Data in Campus is stored by school year and calendar. Before scheduling of students can begin, the upcoming school year and school calendars need to be created.
Calendar Overview Whiteboard Videos
These whiteboard videos provide an overview of how calendars, years, calendar structures and grade levels are used in Campus.
Calendars And Years
This whiteboard video provides an overview of calendars and school years in Infinite Campus.
Calendar Structure
This whiteboard video provides an overview of how Calendars in Campus provide the structure for setting up grade levels, terms, periods and days.
Grade Levels
Grade levels distinguish groups of learners from each other. Different grade levels can have different setups and allow for students to automatically progress from one grade to the next. This whiteboard overview explains how grade levels can be used in Campus.
Terms, Period Schedules and Days
This whiteboard video describes what terms are and how they can be set up in Campus to accommodate grading and scheduling needs.
In this video, learn about the flexibility provided with period schedules in Infinite Campus.
In this overview lesson, learn about how days on a calendar define all the events that take place throughout the year, including which days are breaks, staff development, and regular school days.
Create Next School Year And Calendar(s)
Define The Next School Year
The School Years tab lists all years for which data is stored in Campus. Before calendars can be created, the school year to which they are to be attached must exist.
Tool Search: School Year Setup
The School Years tool lists all years for which data is stored in Campus. One school year is marked as the active year at any given time. A school year must be created before the calendar for that school year can be created and before students can be enrolled into a grade level for that school year.
 School Year Setup
See the School Year Setup Tool Rights article for information about rights needed to use this tool.
School Years Editor
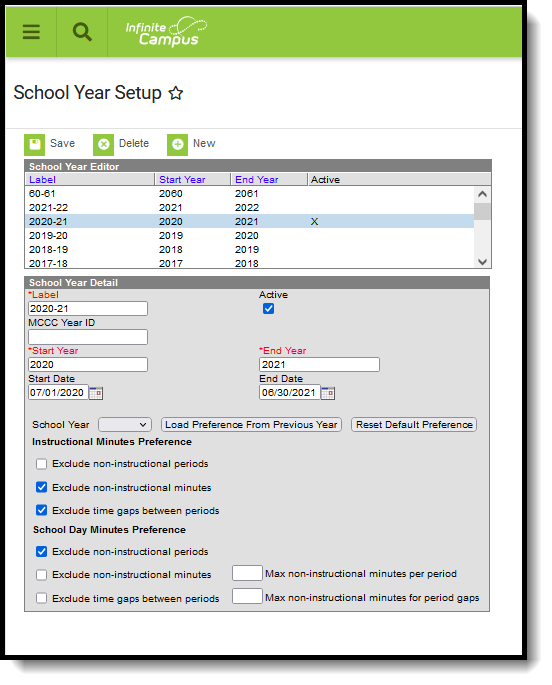
The School Years editor contains two sections - the School Year Editor and the School Year Detail.
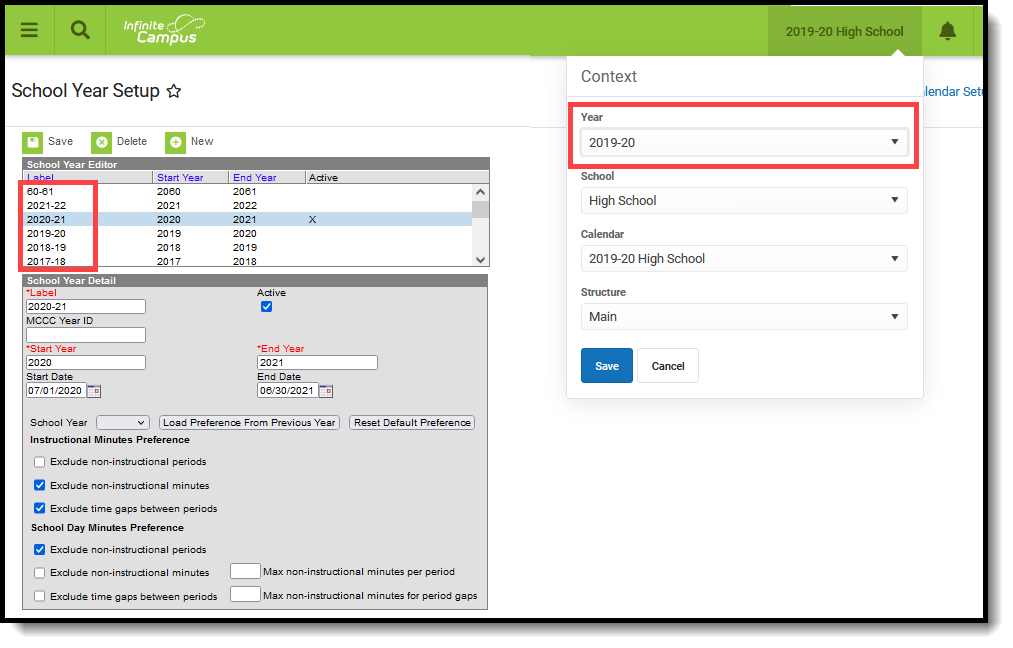
The School Year Editor is a list of school years for which student data and course information should exist in Campus. Depending on user rights, these years are available to select from the Campus toolbar.
The Label, Start Year, End Year and Active information is entered on the School Year Detail editor. All of these fields, minus the Active checkbox, are required entry when creating a new school year.
The following table defines the data elements listed on the School Year Detail.
Data Elements | Description |
|---|---|
Label | Displays the name of the school year (i.e., 2019-20 or 2019-2020). This label displays in the Year dropdown list in the Campus toolbar. For consistency, all school year labels should be the same. |
Active | When marked, indicates that the selected school year is the current school year and data for that school year (calendars, student enrollment, etc.) is the default selection for users. |
Start Year | The year in which the school year begins. Years must have four digits (e.g., 2010, not 10). See the Validations section for more information. |
End Year | The year in which the school year ends. Years must have four digits (e.g., 2010, not 10). See the Validations section for more information. |
Start Date | The first day of the new school year. This is often set to a week or even a month prior to the first day of school for students and includes time spent on-site for staff training, etc. This is not the first day of instruction (that is determined by Calendar Days). Dates are entered in mmddyy format, or use the calendar icon to select a date. |
End Date | The last day of the school year. This is often set to a week or even a month after the last day of school for students and includes time spent on-site for entering grades, etc. This is not the last day of instruction (that is determined by Calendar Days). Dates are entered in mmddyy format, or use the calendar icon to select a date. |
School Year - Load Preference from Previous Year | This field populates the school years editor with settings used in a past school year for the Instructional Minutes Preference and the School Day Minutes Preference, chosen from the dropdown list. |
School Year - Reset Default Preference | This field resets the school years editor with settings used in a past school year for the Instructional Minutes Preference and the School Day Minutes Preference, chosen from the dropdown list. |
Instruction Minutes Preference | Selections determine how instructional minutes are calculated and affect how attendance is reported. More than one option may be chosen. Options are:
If the options for Exclude non-instructional minutes or Exclude time gaps between periods are not chosen , a maximum number of minutes per period or minutes for period gaps can be entered in the appropriate field. See the Validations for more information. |
School Day Minutes Preference | Selections determine how school day minutes are calculated and affect how attendance is reported. More than one option may be chosen. Options are:
If the options for Exclude non-instructional minutes or Exclude time gaps between periods are not chosen , a maximum number of minutes per period or minutes for period gaps can be entered in the appropriate field. See the Validations for more information. |
Validations
The following information defines the validations included on the School Year Editor. Preferences chosen on the School Years Setup tool display at the bottom of the Periods tool.
Data entered into the Instructional Minute Preferences and School Day Minute Preferences affect attendance calculations. See the Configure Attendance Parameters article for detailed information.
| Validation | Description |
|---|---|
| Start and End Year Validation | A validation exists that prevents start or end years from having less than four digits. If a user enters a year that is less than four digits and attempts to save the entry, a warning message appears indicating that field must have four digits. |
| Future School Years | It is possible to create school years for future years, if desired. This may be done to account for planning, for organizing a new course catalog or for the enrollment of students attending a new school that is being built. The School Years Editor warns a user if the entered start and end years are 15 years or more in the future. For example, a warning display if a school year is created with the start date of 2035 (15 years from 2020). The school year can still be created by clicking the OK button on the pop-up warning. |
| Start/End Date is Earlier than the Start/End Date | A validation occurs when an end year is entered that is prior to the start year that is entered, and vice versa. This validation occurs on both the Start and End Year fields and on the Start and End Date fields. |
| Instructional Minute Preference | |
Exclude Non-Instructional Periods | If checked, time for periods marked as non-instructional are not included. |
If checked, period gaps are ignored before and after the period. | |
If unchecked, periods marked as non-instructional are included. | |
| Exclude Non-Instructional Minutes | If checked, all minutes entered are deducted from the Non-Instructional column. |
| If unchecked, entered minutes are not deducted from the Non-Instructional column. | |
Exclude Time Gaps Between Periods | If checked, gaps between periods are not included in any instructional time. If a period ends at 9:30 and the next period begins at 9:35, five minutes would be deducted from the instructional time. This five minute value needs to be entered in the Max non-instructional minutes for period gaps field. |
| School Day Minutes Preference | |
Exclude Non-Instructional Periods
| If checked, time for periods marked as non-instructional are not included. |
If checked, period gaps are ignored before and after the period. | |
If unchecked, periods marked as non-instructional are included. | |
Exclude Non-Instructional Minutes | If checked, all minutes entered are deducted from the Non-Instructional column. |
If unchecked, entered minutes are not deducted from the Non-Instructional column. | |
Exclude Time Gaps Between Periods | If checked, gaps between periods are not included in any instructional time. If a period ends at 9:30 and the next period begins at 9:35, five minutes would be deduced from the instructional time. |
Active School Years
A school year marked as Active indicates it is the school year that is currently in progress or soon to be in progress. Active school years are often the default year selection in the Campus toolbar.
Since new school years are created throughout the year, it is advised that the Active school year not be changed until the completion of the current school year, including summer school calendars and until scheduling and course registration is complete for the next school year. Closing the parent portal, which displays information based on the active year, is also recommended. This should be done after final report cards and transcript information has been available for some time after the end of the current school year.
Course registration can only be done for an upcoming school year. If a new calendar’s school year is marked as the active school year, the registration tools do not function.
Add School Year Information
- Select the New icon. A School Year Detail box displays below the School Year Editor.
- Enter the Label of the new school year. This is the years of which the school calendar spans (19-20, 20-21, etc.).
- Enter the Start Year and End Year in four-digit format (yyyy).
- Mark the Active box to indicate the new calendar is for the current school year. This should be done after the existing school year is complete. If a school has a summer school calendar, change the active year AFTER the end of the summer school session.
- Click the Save icon when finished. The new school year is listed in the School Year Editor.
When deleting school years, a warning message displays if a calendar is associated with the selected year. Only those school years where no calendars are tied to it can be deleted.
Calendar Wizard Overview
The Calendar Wizard provides several options for use in creating school calendars. The document below provides an overview of these options.
Tool Search: Calendar Wizard
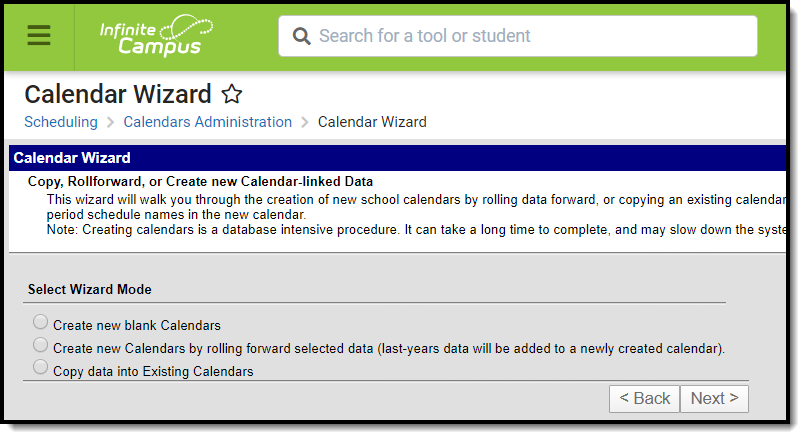
The Calendar Wizard provides the ability to quickly create new calendars from scratch (blank calendars), to create new calendars from previous calendars (rolling forward) and to copy information into existing calendars.
The creation of calendars is time-consuming and often requires additional server resources. It is recommended that calendars be created in off-peak hours.
 Calendar Wizard
See the Calendar Wizard Tool Rights article for information about rights needed to use this tool.
Once the calendar has been rolled, additional modifications will need to be made to Term dates, Period dates and Days. All calendar information should be reviewed for accuracy.
Calendar names must be unique.
Calendar Mode
The selected Wizard Mode should be chosen carefully. The following table lists scenarios for selecting the Calendar Wizard mode:
Mode | Description |
|---|---|
This option should be used if there is a new school in the district. It will only create a calendar frame (start and end dates). Courses, grading tasks, standards, calendar terms and schedule structures will not be rolled forward and will need to be created manually. | |
This option rolls all related data in the existing calendar into the new calendar. | |
| Copy Data into Existing Calendars | This option is used when a district has multiple calendars in the same year or if the district has already set up one calendar and wants to copy that data to other calendars. This is often used for days and day events. |
Determining What Calendar Option to Choose
The following table provides a high level workflow when creating calendars using the New Calendars by Rolling Forward Selected Data Mode.
Step | Question | Answer | Roll Forward |
|---|---|---|---|
1. | Does last year's schedule of terms and periods reflect what will happen in the next school year? | Yes | Roll the Schedule Structure, Term Schedules and Period Schedules. Proceed to Step 2. |
No | Create a New Calendar using the Blank Calendar mode, then use the Copy/Append options to add additional pieces of Data. | ||
2. | Will the curriculum and courses essentially stay the same as last year? | Yes | Roll courses, grading tasks, composite grading and course rules. Proceed to Step 3. |
No | New courses will need to be added manually or using a Course Catalog. In addition, sections cannot be rolled without the courses. Proceed to Step 4. | ||
| 3. | Should last year's master schedule be used as a starting point for this year? | Yes | Roll sections and section placement. Teacher and Room Assignments may also be rolled forward. Proceed to Step 4. |
No | A new Master Schedule for the next school year will need to be built. Proceed to Step 4. | ||
4. | Will the same set of attendance codes be used for the next year? | Yes | Roll attendance codes. Proceed to Step 5. |
No | New codes will need to be created. Proceed to Step 5. | ||
5. | If using teams, will the teams be the same for the next school year? | Yes | Roll teams. Proceed to Step 6. |
No | New teams will need to be created. | ||
6. | If using teams AND sections were rolled, will each team's master schedule be used as a starting point for the next year? | Yes | Roll section team assignment. |
No | Sections will need to be assigned to a particular team for the Scheduling Board to load students by team. |
Create New Blank Calendars
The Create new blank calendars option should be used if there is a new school in the district, or if a district wants to create calendars from scratch. It will only create a calendar frame (start and end dates). Courses, grading tasks, standards, calendar terms and schedule structures will not be rolled forward and will need to be created manually.
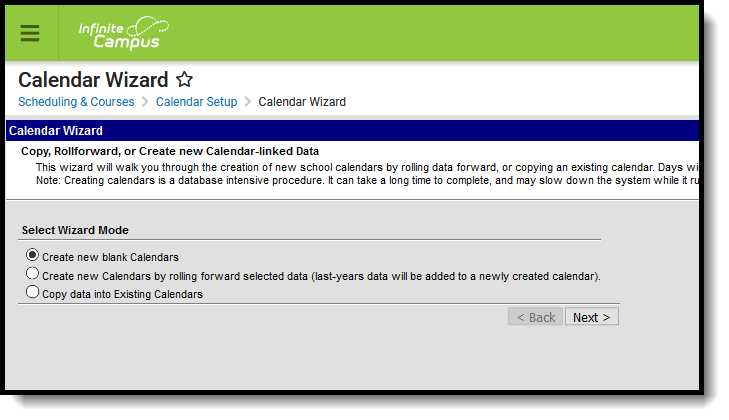 Create New Blank Calendars
Select Wizard Mode
- Select the Create New Blank Calendar option.
- Click the Next button.
Edit Calendar Attributes for New Calendars
- Select the Year for this new calendar from the dropdown list. This selection should match the new school year that was previously created. Years are created in the School Year tool.
- Select how the calendar is named in the Name Template dropdown. The field to the left of the dropdown may be used to add additional information (such as a school number) at the start of the calendar name.
- Enter a Number for the calendar. This field is used internally for state reporting purposes and is a three-digit field (001 – 999).
- Enter the Start Date and the End Date of the calendar. These dates should be before and after the dates for the actual school year to accommodate for staff development, weather make-up days, etc.
- Select the Schools for which to build the new empty calendars. Listed will be all of the existing schools in the district.
- Click the Run Wizard button.
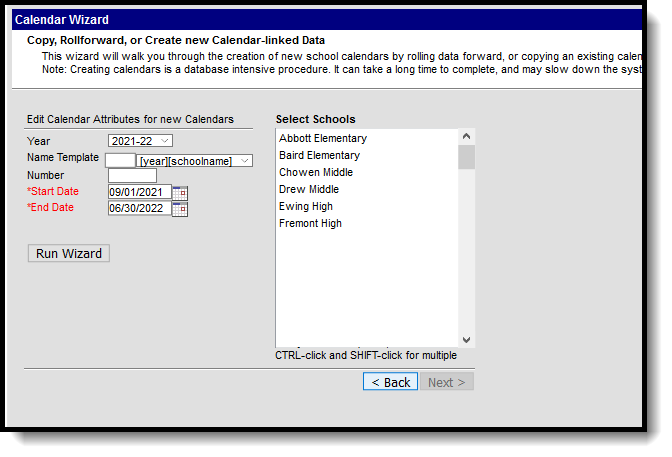 Calendar Attribute Selection
Progress and Completion
The Progress screen displays, indicating the status of the new calendar. When the wizard is finished, the new calendar will be available to select in the dropdown list (after refreshing the screen). When it is not, users needs to be given rights to that calendar. Since this was a blank calendar that was created, everything in the calendar structure needs to be established – term dates, period times, etc.
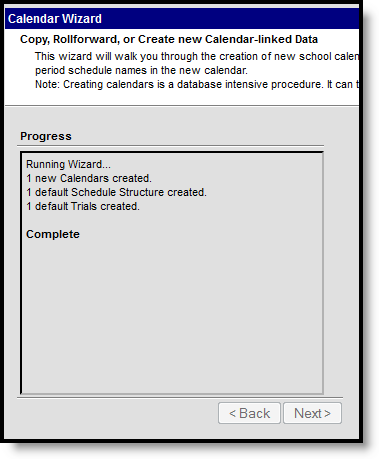 Calendar Creation Progress
Create New Calendars by Rolling Forward Selected Data
The Create New Calendars by rolling forward selected data option rolls all selected information from the source calendar into the new calendar.
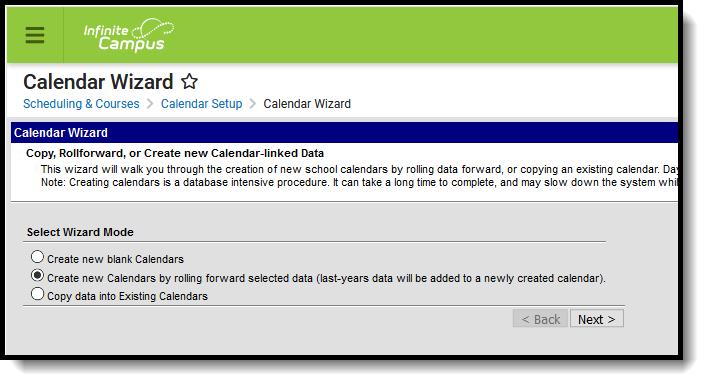 Calendar Wizard - Roll Forward Existing Calendars
Select Wizard Mode
- Select the Create New Calendars by rolling forward selected data.
- Click the Next button.
Edit Calendar Attributes for New Calendars
- Select the Year for this new calendar from the dropdown list. This selection should match the new school year that was previously created. Years are created in the School Year tool within the Calendar folder.
- Enter a name for the new calendar in the first Name Template field.
- In the second name template field, select the appropriate naming convention for the calendar from the dropdown list – either [year][schoolname] or [schoolname][year]. This can be renamed after calendars are rolled.
- Enter a Number for the calendar. This field is used internally for state reporting purposes and is a three-digit field (001 – 999).
- Enter the Start Date and the End Date of the calendar. These dates should start before and end after the actual school year to accommodate for staff development, weather make-up days, etc.
- Select the Calendars to use for building the new calendar (elementary, middle, high schools) and click the Next button.
 Calendar Attributes
Pick the Data to Copy
- Select the Data to Copy from the list provided in the wizard. To reduce the need for re-entering of data, select as many options as necessary. Descriptions of the available options are at the end of this article.
- When finished selecting options to roll forward, click the Run Wizard button.
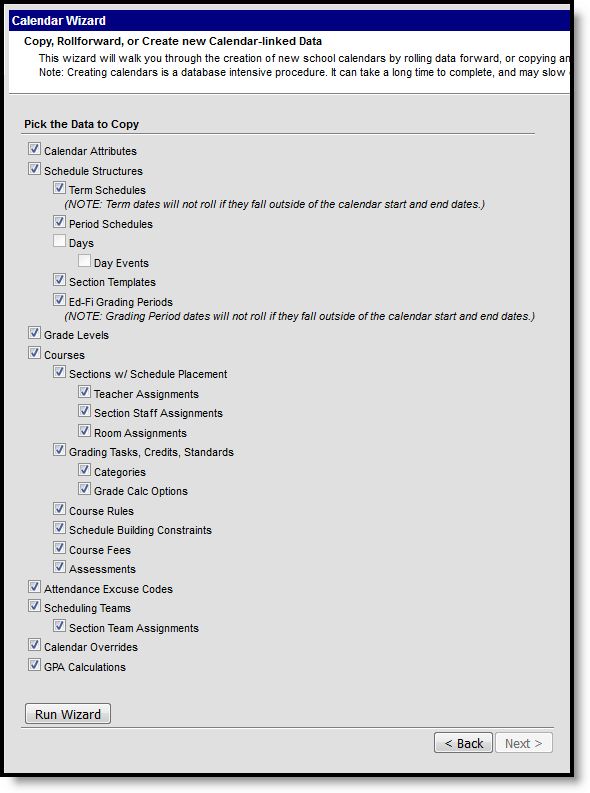 Data to Copy Options
Progress
A Progress Window displays after selecting the Run Wizard button. This indicates how close the process is to completion.
The calendar does not appear for selection in the toolbar until users have performed a hard refresh. This means the refresh button in the browser toolbar needs to be selected, or a shortcut of CTRL-F5 can be done. If this still does not allow the new calendar to be selected, log out completely by using the Log Off option in the Index and then log in again.
Term start and end dates do not roll.
Roll Forward Options
The following are definitions of the options available for rolling forward.
Option | Definition | Location |
|---|---|---|
Calendar Attributes | This includes the name of the calendar, calendar ID, school name, student minutes, etc. When marked, this rolls all of information entered on the Calendar Information tab except the Calendar Name into the new calendar. This option should be marked if using the School choice with Student Assignment process. | Calendar Information |
Schedule Structures | Schedule structures allow building administrators to have multiple calendar layouts in one calendar, for course layout or for state reporting purposes. | Schedule Structure Setup |
Term Schedules | This divides the school year into blocks of days for the purpose of scheduling or grading (i.e., quarters, semesters, etc.). | Term Setup |
Period Schedules | This displays the period name and the start and end times of each period. A school must have at least one period schedule defined, but may have multiple if using the day rotation. | Period Setup |
| Days | Days are used to determine attendance, non-school days and non-instructional days. | Day Setup |
| Day Events | Day events are notes within the calendar day, perhaps indicating an early release day or the dates of school plays. | Day Setup |
| Section Templates | Section Templates are used when placing sections for districts that use a more complex schedule (waterfall, rotating days, etc.). The copy process works as follows:
| Section Template Information |
| Portal Calendar and Term Settings | Calendars & Schedule Structures are assigned to Display Options templates to determine what data for that calendar displays in Campus Student and Campus Parent. The template selected for a calendar/schedule structure is chosen by default when the calendar is rolled. Within Display Options, the Calendar Settings determine whether data for a calendar is enabled and the Term Settings determine whether data for specific terms are enabled. Note: rolling Term Settings forward only copies the configuration to automatically enable terms and does not copy which terms are actually enabled. | Portal Display Options |
| Ed-Fi Grading Periods | The Ed-Fi Grading Periods aligns the calendar periods to grading terms (for Michigan, Nebraska and Wyoming districts). NOTE: Grading Period dates do not roll if they fall outside of the calendar start and end dates. | Ed-Fi Grading Periods |
Grade Levels | Grade levels define the available grade levels of student enrollments. | Grade Level Setup |
Courses | This option creates an index of courses with course names. Rolling courses saves manual entry time of course names and section names. Courses marked as Inactive in the source calendar roll forward to the new calendar as inactive courses. | Course Information |
Sections with Schedule Placement | This option builds the same course sections in the new calendar as exist in the current calendar. Schools may select not to roll course sections, depending on the size of the student body, and may opt to create sections separately. | Section Information > Schedule Placement |
Teacher Assignments | This option allows teacher assignments in the current calendar to be assigned to the same course section in the new calendar. This requires that teachers have a district assignment in the current and new calendars. | Scheduling > Courses > Sections > Teacher Name |
Section Staff Assignments | This option allows staff assignments to be copied between calendars. This requires that staff have a district assignment in the current and new calendars. | Section Information > Staff Name |
Room Assignments | This option schedules the section in the same meeting place in the new calendar as it was in the original calendar. | Section Information > Room |
Grading Tasks, Credits, Standards | This selection copies the items that are used for scoring students on term grades and the appropriate credits into the new calendar. | Course Grading Tasks |
| Grade Calc Options | This selection copies any grade calculation options associated with courses into the new calendar. | Course Grade Calc Options Course Grade Calc Options |
| Categories | This selection copies any categories associated with courses into the new calendar. | Course Categories Course Categories |
Course Rules | Course rules are assigned to courses and are used in the Scheduling Board and in Academic Planning. This option applies the rules assigned to the courses in the original calendar to the same courses in the new calendar. | Course Rules |
| Schedule Building Constraints | This option copies information related to the course's structure —the number of sections, teacher information, etc. | Requests & Rosters |
Course Fees | This option copies all active course fees in the current calendar into the new calendar. | Course Fees |
| Assessments | Assessments created in the Test Setup tool can be assigned to courses and course masters. When marked, those assessments from the current calendar are copied into the new calendar. | Course Assessments Assessments |
| Cross-Site Course/Section Settings | This option copies current courses and sections marked for Cross-Site Enrollment participation into the next calendar. | Cross-Site Enrollment |
Attendance Excuse Codes | Attendance codes are used in the process of attendance entry management. | Attendance Excuse Codes |
Scheduling Teams | Teams or groups are used often in middle schools for keeping a subset of a grade level together in core or home room classes. | Team (Scheduling Group) Setup |
Section Team Assignments | Team assignments are chosen on course sections and mark that section for enrollment by that team only. This option keeps the current Team selection from the Section editor in the new calendar. | Sections > Team |
Calendar Overrides | Calendar overrides applies to the types of overrides that are used at the school to determine enrollment for next year. A student may be accepted to the school based on a specific curriculum program, administrative decision or economic status. Mark this option if using the School choice with Student Assignment process. | Calendar Override Setup |
| GPA Calculations | Any custom GPA calculations associated with the original calendar are copied into the new calendar, unless the GPA calculation is marked as Inactive. | GPA Calculation Setup Calendar GPA Calculation Setup |
Calendar Wizard: New Blank Calendars
"Create new blank Calendars" is typically used when there is a new school in the district. After the calendar is created, named, and given start/end dates additional configuration (e.g. courses, terms, schedule structures) will need to be completed.
Districts can use the Calendar Wizard to create new blank calendars.
Calendar Wizard: Roll Forward Existing Calendar(s)
Districts can create calendars for the upcoming school year by rolling data elements forward from a source calendar. These can include existing calendar structures, courses, scheduling elements and grading setups.
Districts can use the Calendar Wizard to copy, roll forward and create new calendars. This video demonstrates how to roll elements of one calendar forward to create a new calendar for the upcoming school year.
Calendar Wizard: Copy Data Into Existing Calendar(s)
The "Copy data into existing Calendars" feature gives districts expanded options for copying items that are already set up in one calendar to another calendar. These can include existing calendar structures, courses, scheduling elements and grading setups.
This video shows how to copy calendar-linked data from one existing calendar to another.
Set Up Calendar Details
Calendar
Calendar tool is used to enter basic information about the calendar. Some of these settings impact state reporting and other calculations.
Grade Levels
Students enrolled in district schools are assigned to a grade level. Sequences assigned to grade levels impact how students move from one level to another throughout the entire district when rolling students forward to an upcoming calendar.
Tool Search: Grade Level Setup
The Grade Level Setup tool lists the grades that attend the selected school. Only students in the listed grades can be enrolled into that calendar.
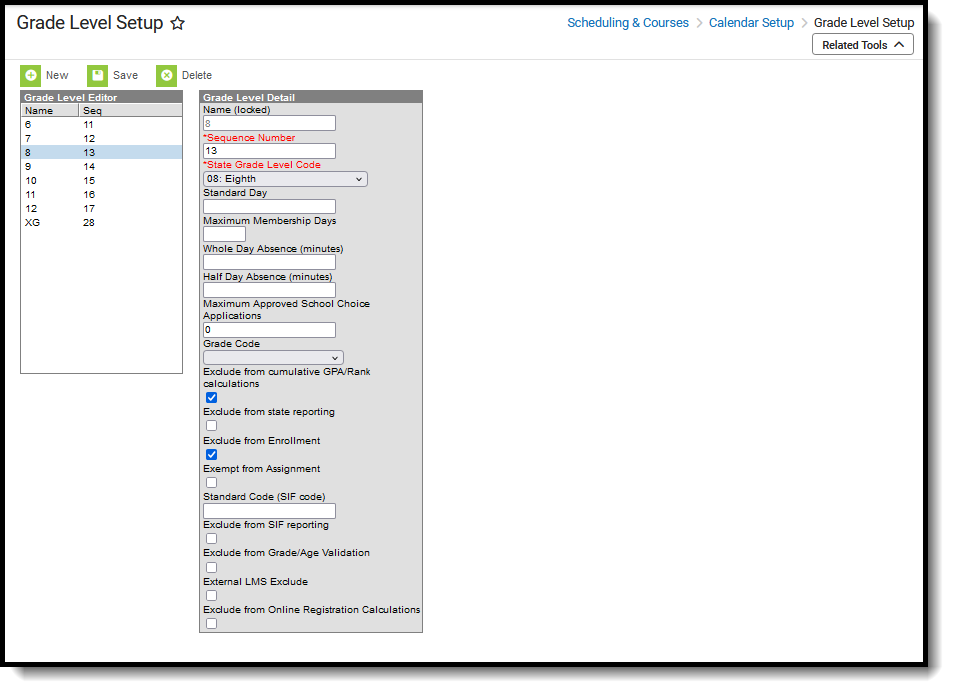 Grade Level Setup
See the Grade Level Setup Tool Rights article for information about rights needed to use this tool.
The Grade Levels listed here reflect students who attend the selected school. Only students in the listed grades can be enrolled into that calendar.
Grade Levels Editor
Field | Description |
|---|---|
Name | Name given to the grade level. This name appears on student enrollment records, in reports and as part of the search results for students, for recording attendance, in the Teacher Grade Book, etc. This grade level should be entered as two (2) digits or as two (2) characters (e.g., KG, 09, etc.). Special characters can also be added (_ % $ # ^ & * ! @ ( ) " + = < >). |
Sequence Number | Order of the grade level used throughout the district. Sequence numbers should be in numeric order and should not start with zero (0). This value is used in the Enrollment Roll Forward logic. If a school uses Academic Planning and Grade Level sequence is changed, existing values in any relevant Programs' Credit Requirements must be re-saved in the active calendar. |
State Grade Level Code | State-defined grade level. Each grade level in the district should be mapped to a State Grade Level Code. This code is referenced in state reporting extracts. Multiple grade levels can be assigned to the same State Grade Level Code. When this happens AND the Grade Level Age is not met for one of the grade levels, the warning message still displays. |
| BIE Grade Level Code | BIE-defined grade level. Each grade level in a BIE district should be mapped to a BIE Grade Level Code. This code is referenced in BIE state reporting extracts. This field is only applicable and available in BIE versions of Campus. |
Standard Day | Total length of the school day in minutes, including non-instructional time. This entry is used in membership and attendance calculations and will override the data that is entered in the Student Day field on the Calendar tool. If the Student Day minutes are equal to the Standard Day minutes, no information needs to be entered. If the standard day is 360 minutes, but this grade level only meets for half of the day, 180 minutes should be entered and considered as a full day of attendance. This is used in exact attendance calculations and state reporting. Wisconsin Districts A value of 0.5, 1.0 or blank is required. |
Maximum Membership Days | Enter the value of membership days for this grade level. This accounts for different grade levels within one calendar having a different number of total membership days. This value is used as the denominator when calculating average daily membership in reporting extracts. If no value is entered, the count of instructional days within the calendar will be used. This would be used if one grade level begins instruction before others, or ends instruction before other grade levels. |
Whole Day Absence | Value in minutes that is considered a whole day of absence for the student. If left blank, calculation is based on the value entered on the Calendar tool. Entries in these fields will override the whole day and half day entries on the calendar tool. Information should only be entered here if it is different from the main calendar minutes. |
Half Day Absence | Value in minutes that is considered a half day of absence for the student. If left blank, calculation is based on the value entered on the Calendar tool. Entries in these fields will override the whole day and half day entries on the calendar tool. Information should only be entered here if it is different from the main calendar minutes. |
Maximum Approved School Choice Applications | Total number of School Choice applications the school will consider. Leave blank if not using Campus School Choice functionality. When the entered number of school choice applications is reached, no additional applications will be approved for that grade level in the selected school calendar. |
Kindergarten Code | Selection indicates the type of Kindergarten grade level in the selected school. Only make a selection if the grade level is a kindergarten grade level. Available options vary from state to state. |
Exclude from Cumulative GPA/Rank Calculation | When marked, students enrolled in this grade level will NOT be included in Class Rank calculations or Cumulative GPA calculations. This applies to ALL students enrolled in the grade level. This can be used for high schools that enroll eighth graders who attend 9th grade courses for credit purposes, yet want to exclude those courses from GPA calculations. This is only an indication that scores received from courses taken during that grade level are NOT factored into GPA calculations; the transcript and eTranscript still display those courses (depending on other course setup scenarios). |
Exclude from State Reporting | When marked, students enrolled in this grade level will NOT be included in state reporting extracts. This applies to ALL students enrolled in this grade level. |
| Exclude from Enrollment | When marked, the grade level can be assigned to the calendars for reporting purposes (e.g., recording 8th grade transcript records for high school credit), but students cannot be enrolled into this grade level. When marked, the following occurs:
The grade level does not display for the following reports:
|
Exempt from Assignment | When marked, students enrolled in this grade level will NOT be included in the School Choice Assignment process. This applies to ALL students enrolled in this grade level. Students must be rolled into this grade level, regardless of school assignment validations, with the exception of the requirement that only one primary household address for each student may exist. |
Standard Code (SIF Code) | Entered value is used in the SIF process. The Standard Code field is used in SIF (Schools Interoperability Framework) to map an irregularly named grade level to a standard grade level. It is best to leave this field blank, unless the school is using integration capabilities that require a SIF or NCES code as directed by Infinite Campus. |
| Exclude from SIF reporting | If marked, the grade level is excluded from SIF events. |
| Exclude from Grade/Age Validation | When marked, enrollments for the selected grade level ignore any age restriction entered for that grade, as defined on the Grade Level Age tool. |
| External LMS Exclude | If a district is sharing Campus data with an external learning management system, this checkbox can be used to exclude specific records from being shared. This designation also applies to all students with Enrollments in this Grade Level. If the Exclude checkbox is marked for the School associated with this Grade Level, that designation also applies to this Grade Level. |
| Exclude from Online Registration Calculations | When marked, the boundary school and school list options for that grade level are excluded from Online Registration Calculations. This applies to Online Registration users (Custom Development product) using OLR version 5.1 or greater. |
Add Grade Levels
- Select the New icon. A Grade Level Detail table will appear to the right of the Grade Level Editor.
- Enter a Name for the grade level.
- Enter a Sequence Number for the grade level.
- Enter a Standard Day length in minutes.
- Enter the Maximum Membership Days.
- Enter the Whole Day and Half Day Absence for this grade level.
- Enter the Maximum Approved School Choice Applications.
- Select the Kindergarten Code from the dropdown list.
- If the entire grade level should be excluded from cumulative GPA calculations, mark the Exclude from Cumulative GPA/Class Rank Calculation checkbox.
- If the entire grade level should be excluded from state reporting, mark the Exclude from State Reporting checkbox.
- If the students enrolled in the grade level should not be included in the School Choice with Assignment process, mark the Exempt from Assignment checkbox.
- Enter the Standard Code (SIF Code) value, if desired.
- Mark the Exclude form Grade/Age Validation checkbox, if desired.
- Mark the External LMS Exclude checkbox, if desired.
- Mark the Exclude from Online Registration Calculations, if applicable.
- Click the Save icon when finished. The new grade level will be listed in the Grade Level Editor table.
Delete Grade Levels
Grade levels associated with a calendar can only be deleted if there are no enrollment records assigned to that grade level.
If there are enrollments assigned to a grade level that need to be deleted, change the grade level on each enrollment to a different grade level. Then verify there are no more enrollments assigned to that grade level and delete the grade level.
Schedule Structures
By default, a Schedule Structure is created when a calendar is created. The content below explains what schedule structures are and how they are used. While it is possible to create additional schedule structures within the same calendar, for example a schedule for grades 1-5 and a separate kindergarten schedule, it is recommended to consult with Infinite Campus prior to creating additional schedule structures as there may be other ways to meet district scheduling needs.
Tool Search: Schedule Structure
Schedule Structures provide a means of allowing different groups of students (by grade level, by different terms, by different day layout) to have a unique layout for their learning day. They allow the school calendars to have multiple schedules in one calendar, instead of having one calendar with each type of schedule.
Consult with Infinite Campus prior to creating Schedule Structures. There may be other ways to accomplish the needs of the district without using this tool, and there may be limitations with your state reporting.
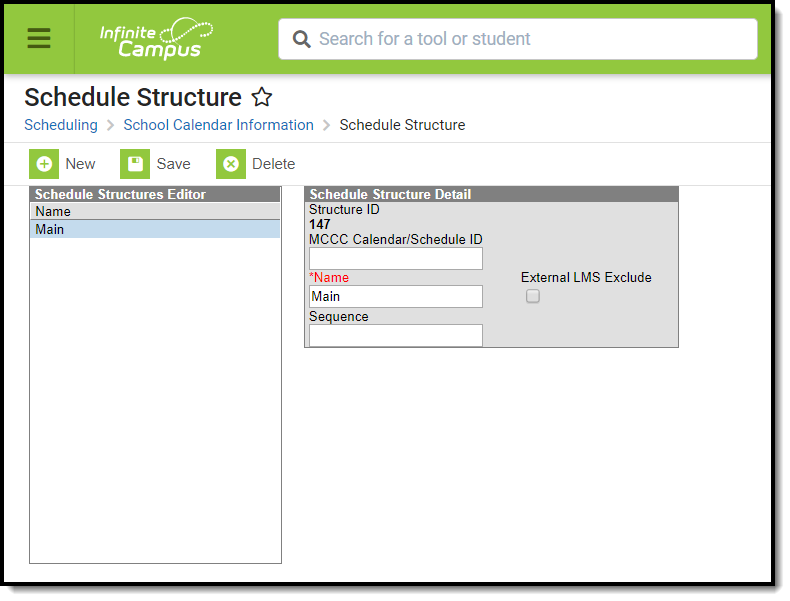 Schedule Structure Setup
See the Schedule Structure Setup Tool Rights article for information about rights needed to use this tool.
Schedule Structures
Multiple schedule structures can be used when different groups of students meet at different times during the day. For example, when a schedule structure is created for kindergarten students who meet three days a week for four hours, a term structure and a period schedule is created for that schedule structure. The same is true for the first through fifth grade students, and the sixth through eighth grade students.
If different term structures are needed (quarters and trimesters), a separate schedule structure is needed for each one and will be tied to a term structure and period schedule. Multiple term structures should not be used with a single schedule structure.
Schedule structures are not the same as period structures.
- Period structures are used for rotating days where the structure of the day is the same.
- Schedule structures can provide a school with more ways to achieve their education goals because they have more fluidity.
The concept of schedule structures is a calendar within a calendar that permits variations in grade levels, terms, period and day structures.
After creating schedule structures, the user may need to log out of the application and log back in to select a structure from the dropdown list, so that term structures and period schedules can be created.
Be aware that schedule structures affect everything, including enrollments, attendance recording and course layout. It is best to use schedule structures only where appropriate.
Students can only be enrolled in one schedule structure at any given time in a selected calendar. There could be situations where a student is enrolled in a schedule structure in one calendar, and a different schedule structure in another calendar.
Every calendar automatically has one schedule structure that is called Main. This can be renamed at any time. When two or more schedule structures are created, an additional dropdown list will become available from the Campus toolbar. The tabs for grade levels, terms, periods and days are all dependent on the schedule structure selected from the dropdown list.
Add Schedule Structures
- Select the New icon.
- Enter a Name for the schedule structure. This name can be reflective of the grade levels served.
- Enter a numeric value (1-1000) in the Sequence field. This allows a structure to be sorted in order of preference. Structures with a sequence of 1 display first in the list. Structures without a sequence are sorted alphabetically.
- Mark the External LMS Exclude checkbox to exclude this record from being shared with an external learning management system, such as through OneRoster or a custom district configuration. Marking this checkbox for a Schedule Structure also applies to all Grade Levels, Sections, and Enrollments within it.
- Click the Save icon when finished. The new structure will be listed in the Schedule Structure Editor list.
Once the schedule structures have been added for this calendar, the Grade Levels can be entered.
Save
Save
Save
Save
Terms
Terms describe how a school year is divided, for example quarters, trimesters or semesters. Each term must have a name, sequence number, start date and end date.
Tool Search: Term Setup
Calendar Terms list the type of calendar structure the school has - trimesters, quarters, etc. Also available on this tab are the start and end dates of the terms.
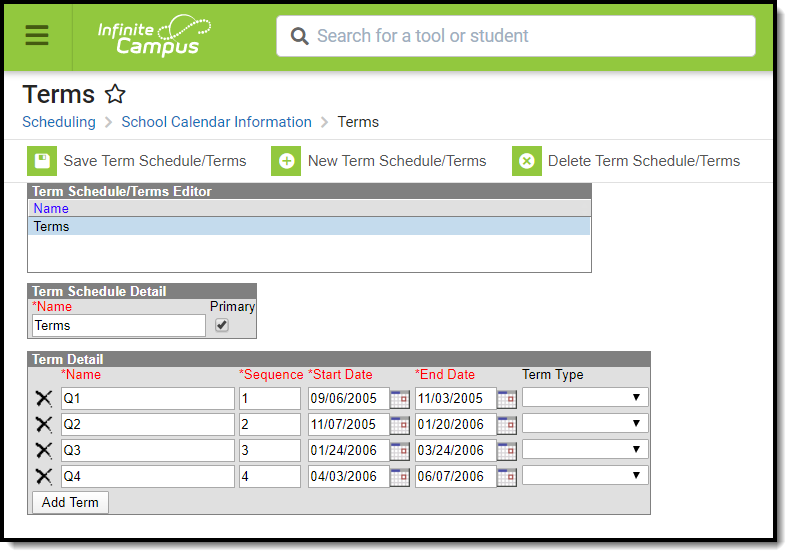 Calendar Terms
See the Term Setup Tool Rights article for information about rights needed to use this tool.
Terms Editor
The Calendar Terms editor displays three different editors - the Term Schedule/Terms Editor, the Term Schedule Detail and the Term Detail.
The Term Schedule/Terms Editor lists the names of the Term Schedule(s) associated with the selected calendar. Most calendars will only have one term schedule, but there are instances where multiple term schedules could exist within one calendar (this setup is not recommended and should only be done under the guidance of Campus Support).
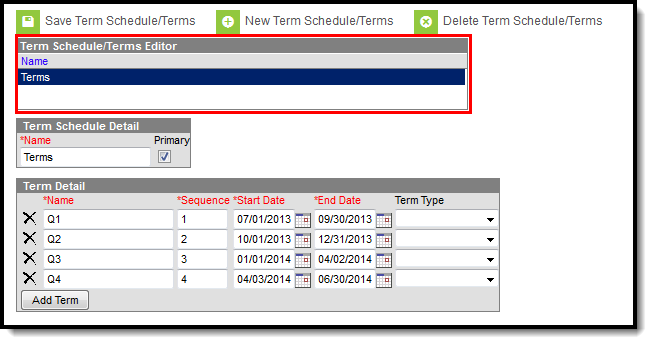 Calendar Terms - Multiple Term Schedule Editor
The Term Schedule Detail displays the name of the selected Term Schedule and an indication of the term schedule being the primary schedule.
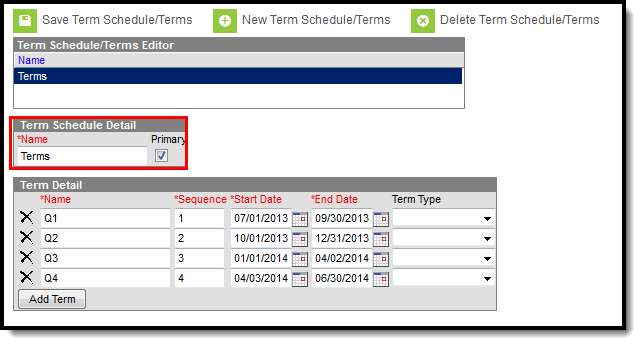 Calendar Terms - Multiple Term Schedule Detail
The Term Detail lists the sequence of the individual terms and each term's start and end dates.
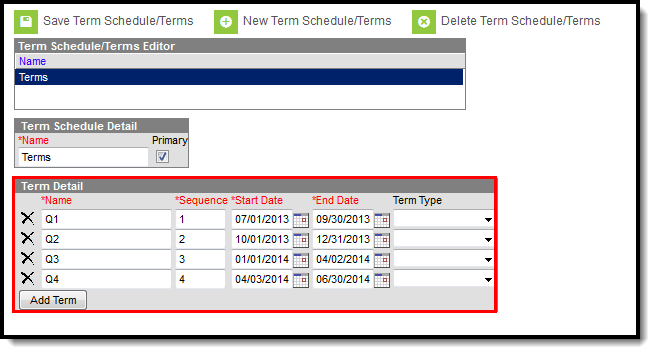 Calendar Terms - Multiple Term Detail
When creating new terms to add to a calendar, select the New Term Schedule/Terms icon. This will open a wizard-type view where the user can select the appropriate term structure for the calendar.
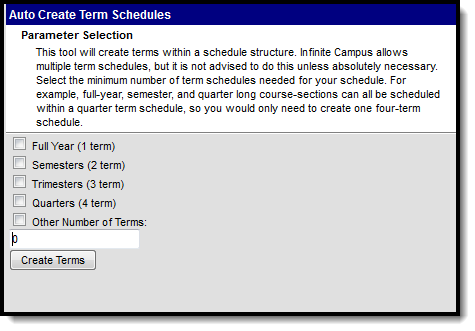 Calendar Terms - New Term Schedule
A selection of the term structure is needed, using the following options. For the definition of these options, this table is based on a 36-week school year.
Term Option | Number of Terms | Definition |
|---|---|---|
Full Year | One Term | Term runs the length of the school year (Week 1 - Week 36). |
Semester | Two Terms | Each term is 18 weeks in length:
|
Trimester | Three Terms | Each term is 12 weeks in length:
|
Quarters | Four Terms | Each term is 9 weeks in length:
|
Other Number of Terms | Term breakdown is up to the school's discretion. The total number of terms and corresponding term sequences that may be added to any calendar is 31. |
Add Terms to a Calendar
- Click the New Terms/Schedules/Terms icon.
- Select the Parameter option from the list of choices.
- Click the Create Terms button. This will generate the appropriate term structure for the calendar. When it is complete, the screen will return to the Terms tab. Once again, select the Schedule Structure from the dropdown list and click the Name of the term in the Terms Editor list.
- Verify the Primary term schedule checkbox is marked.
- In the Term Detail grid, verify that the Name and Sequence are correct. If not, make the appropriate changes.
- Enter the Start and End dates for the terms in mmddyy format or by clicking the calendar icon to select a date. These dates reflect when the majority of students begin attending classes and when the students stop taking classes for each term. These dates also correspond to when appropriate course sections display for teachers to record attendance.
- To add additional terms, click the Add Term button.
- When finished, click the Save Term Schedule/Terms icon. Terms have now been created for the calendar; periods can now be created for the terms.
Please note that calendars can have up to 31 terms. The sequences associated with those terms can also be up to 31. Larger values in those fields cause error messages when viewing course grading tasks and when accessing Campus Instruction.
Date Validations
The following relates to the validation of term dates:
- Dates for terms must fall within the calendar date range. For example, if a calendar has a start date of 08/15/2010, the term cannot start before that date.
- Dates for terms cannot overlap. For example, if Term 1 ends on 10/15/2010, the next term cannot start until 10/16/2010.
- If term dates are changed such that the changes will cause attendance data to fall outside of the term dates, a warning message will be returned.
- Start and End dates are required for all terms.
In Campus, the blocks of date ranges into which a school year is divided are called Terms. Terms must exist before course sections can be placed and students scheduled into them. This video shows how to create and edit a term schedule.
Periods
Each calendar needs at least one period schedule that designates the names and times of periods meeting during the school day. Situations where multiple period schedules may be needed include schools with rotating days, schools that use responsive scheduling, or special circumstances such as late start or testing days.
Tool Search: Period Setup
Calendar Periods list the names and the times of the periods meeting throughout a school day. The editor displays the period information based on the school selected in the Campus toolbar.
At least one period schedule needs to exist in a calendar. Once a period schedule exists, periods can be assigned to that schedule. Then, Calendar Days can be established and assigned a period schedule (day rotation).
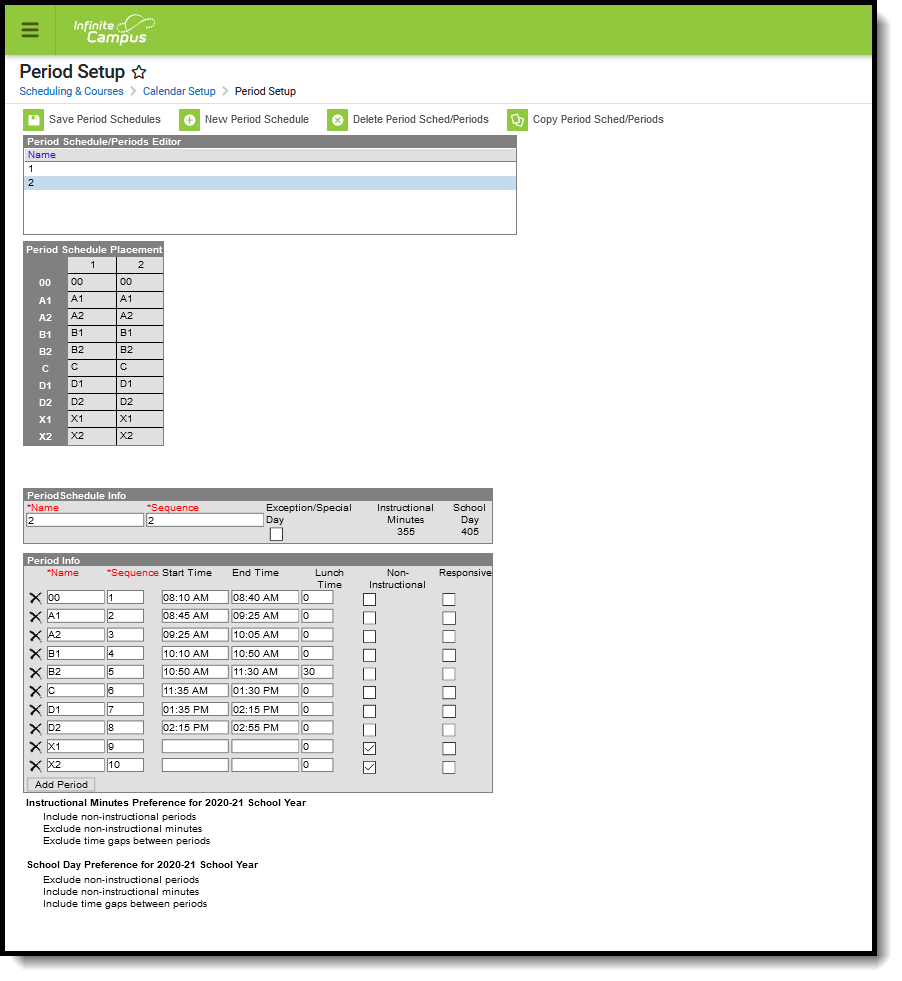 Calendar Periods
See the Period Setup Tool Rights article for information about rights needed to use this tool.
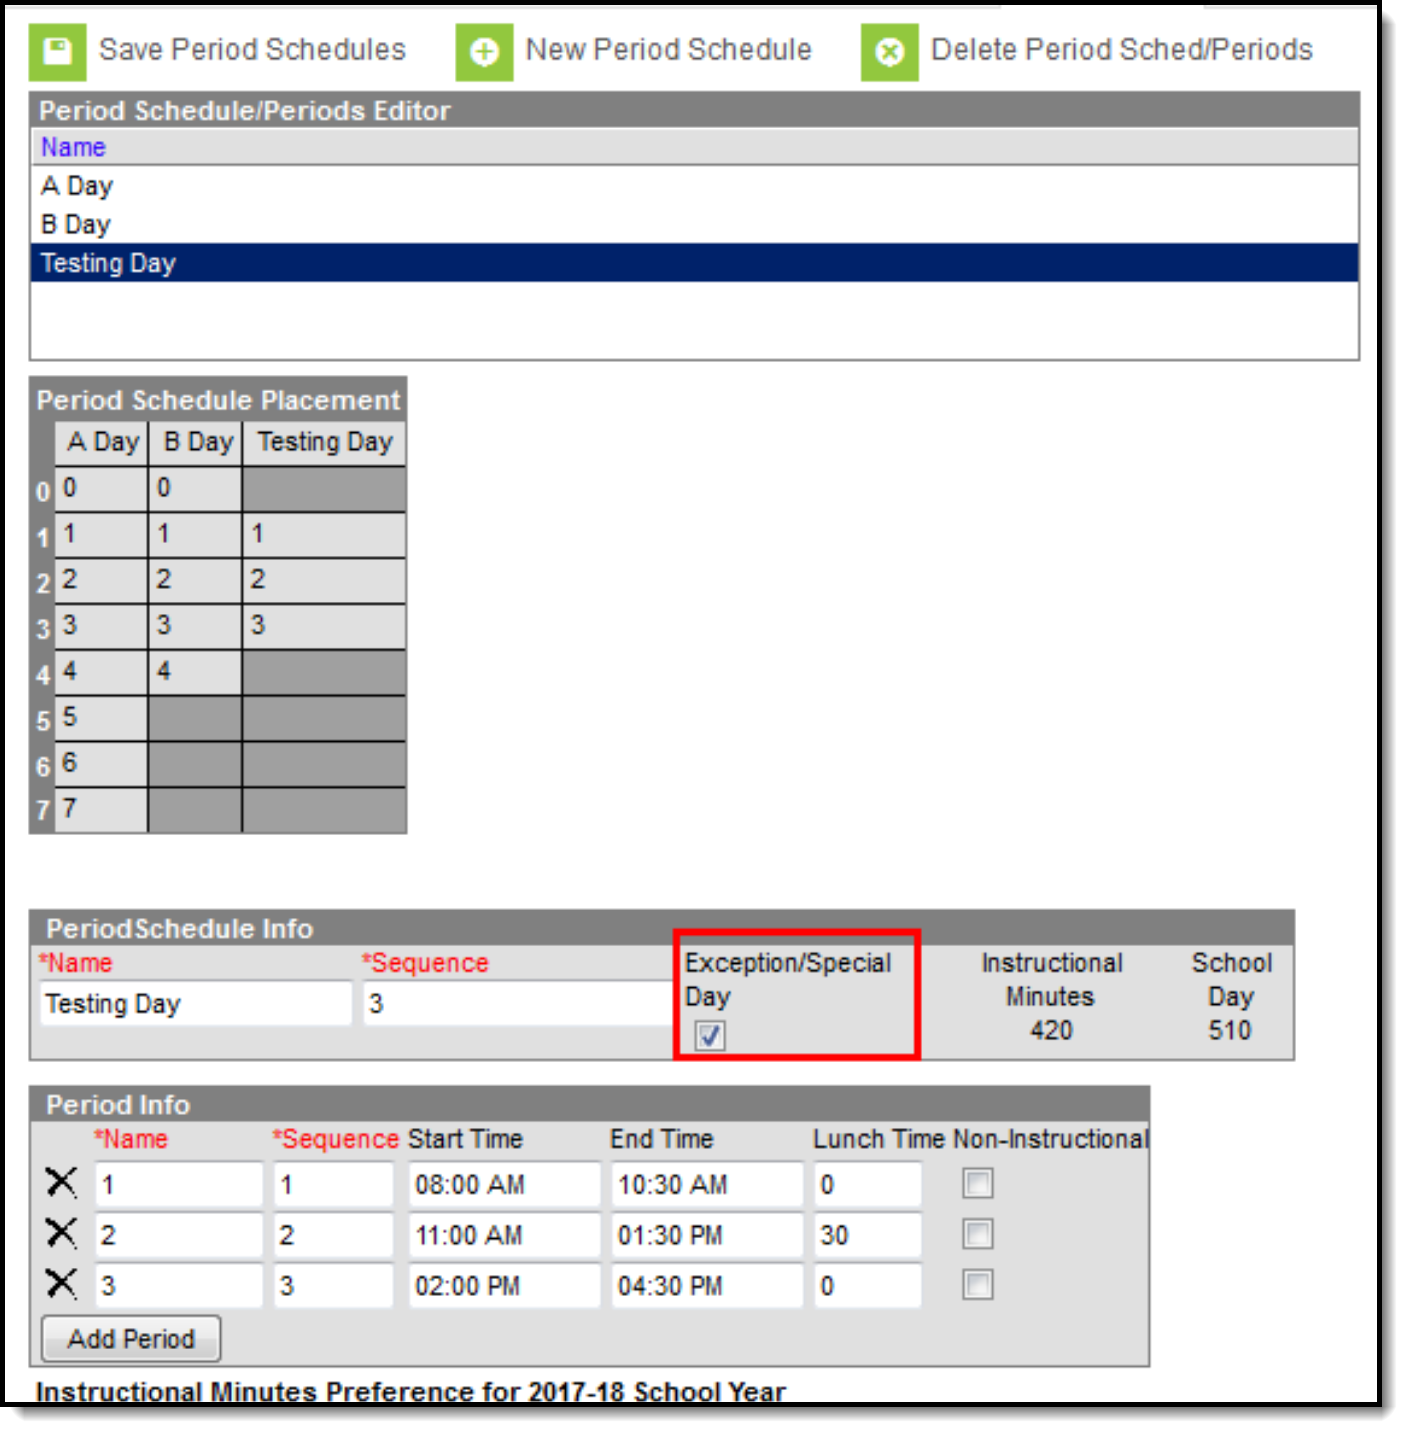
The Periods tool contains four sections:
- Period Schedules/Periods Editor lists the existing period schedules in alphabetical order.
- Period Schedule Placement provides a visual layout of all period schedules and their assigned periods.
- Period Schedule Info lists the name of the period schedule (displayed in the Period Schedules/Periods Editor). whether it's considered a special schedule, and the total instruction and school day minutes associated with that schedule.
- Period Info lists the period names, start and end times, lunch time and instructional/non-instructional selection for each period within that period schedule. This is then displayed in the Period Schedule Placement grid.
Modifications can be made to any of these sections BEFORE THE START OF THE SCHOOL YEAR. When changes are made to period schedules after school has started for the school year, attendance and courses and grade book information is also modified.
- To add more period schedules, use the New Period Schedule icon.
- To delete period schedules, use the Delete Period Sched/Periods icon. These can only be deleted when other information isn't associated with that schedule (course sections, etc.).
- To copy period schedules, click the Copy Period Sched/Periods icon.
- To add periods to a period schedule, use the Add Period button at the end of the Period Info section.
- To remove periods, click the X next to the period name on the left hand side of the Period Info section.
Period Schedules
Period Schedules determine the period layout for a particular day. Districts are able to create any number of period schedules to meet their needs, and add periods to that schedule as desired. Note that the amount of period schedules and periods may affect other areas within Campus, like report display, grade book display, course section layout, scheduling board functionality, etc.
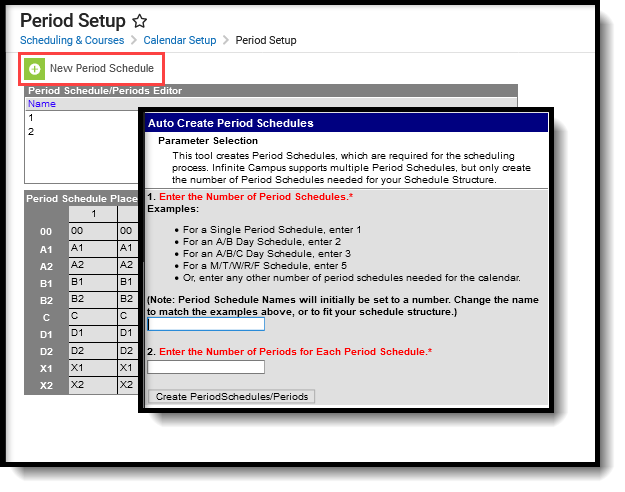 New Period Schedule
Some examples of period schedules are noted in the following table. Use this as reference; it is not meant to cover all possibilities.
| Number of Periods | Description | Comments |
|---|---|---|
| Simple Period Schedule | ||
6 instructional periods 2 non-instructional (before and after school) | Only one structure is created. Students attend all periods every day of the school year.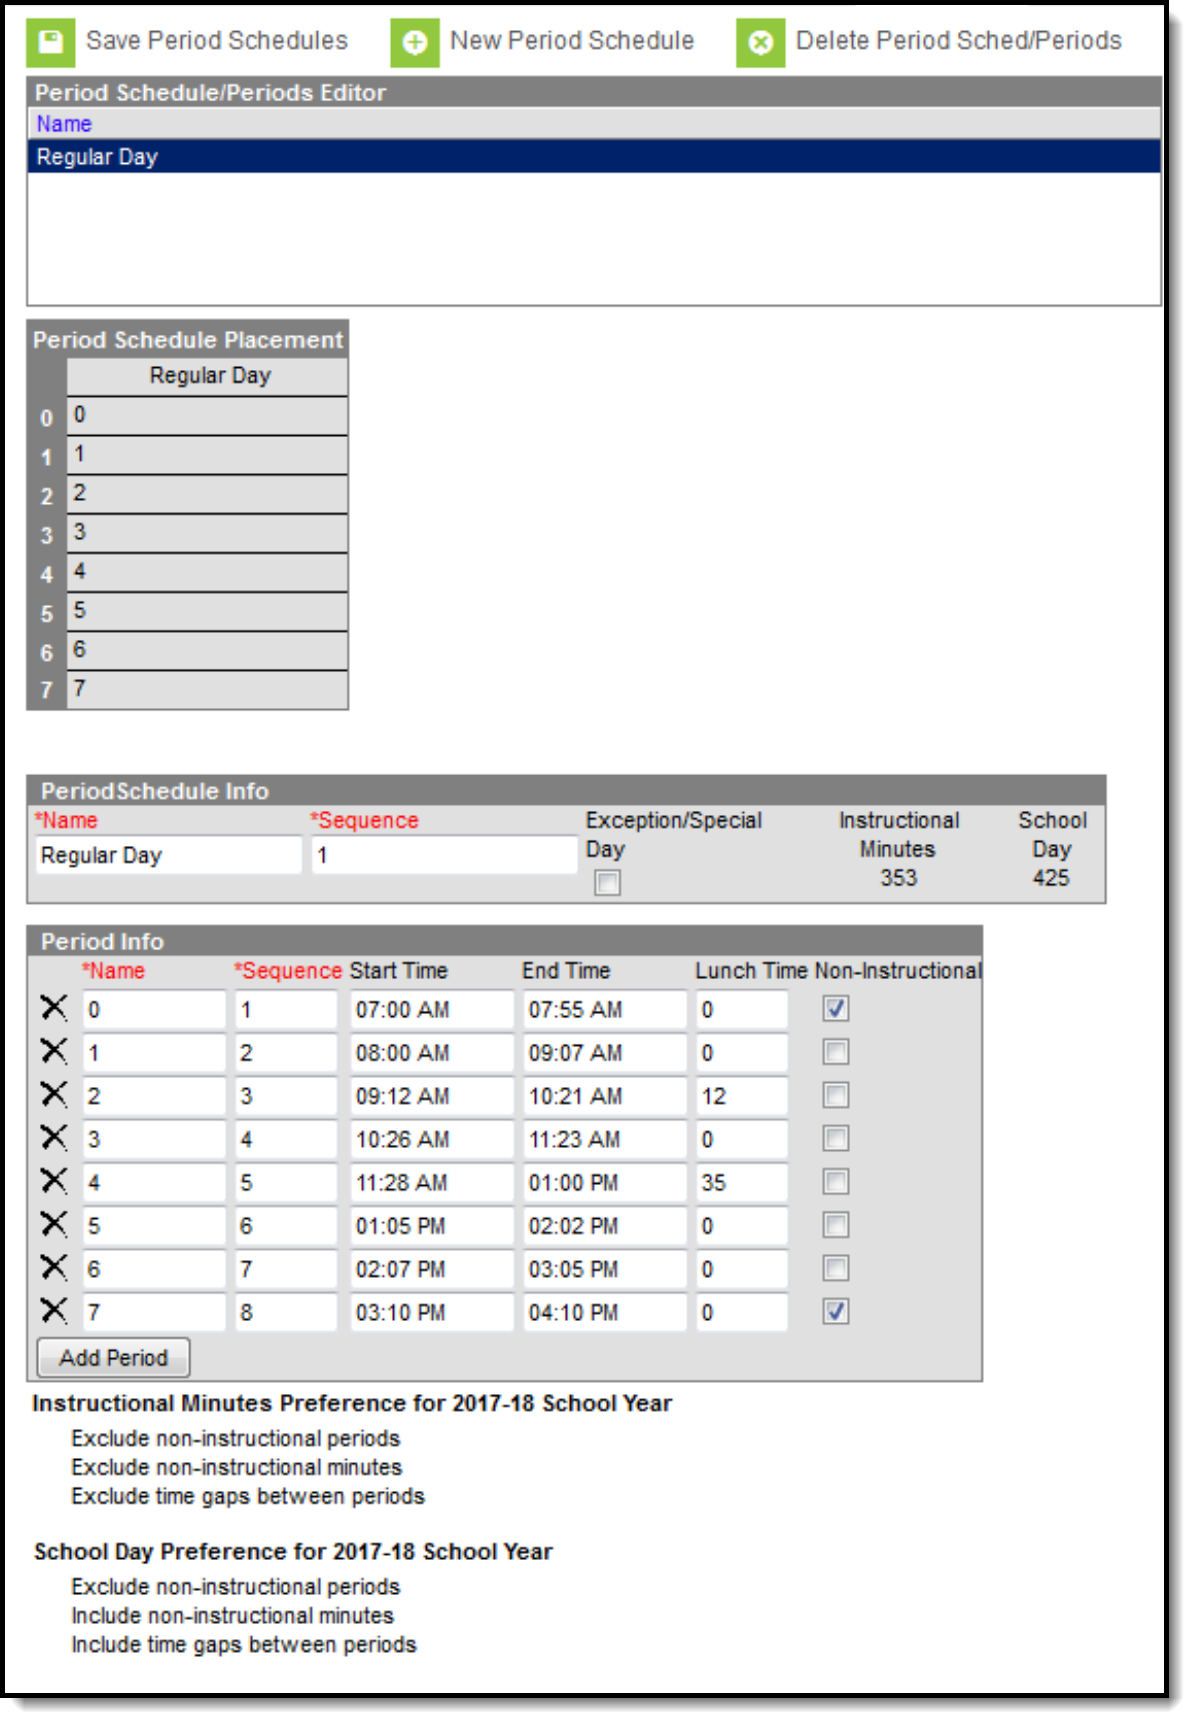 | Variations in this schedule may be addressed on the Calendar Days (early release, late start, etc.). This example includes two break times during the day - at the end of period 2 for 12 minutes and at the end of period four for 35 minutes. Both are marked as Lunch time, and the length is entered into the Lunch Time field. These breaks could also be created as separate periods and marked as non-instructional. |
| Two-day rotating schedule (A/B Day) | ||
8 instructional periods Periods 1-4 meet on Day A, periods 5-8 meet on Day B | Students attend periods in A Day (Blue Day) on Monday, and periods in B Day (White Day) on Tuesday. This alternates throughout the school year.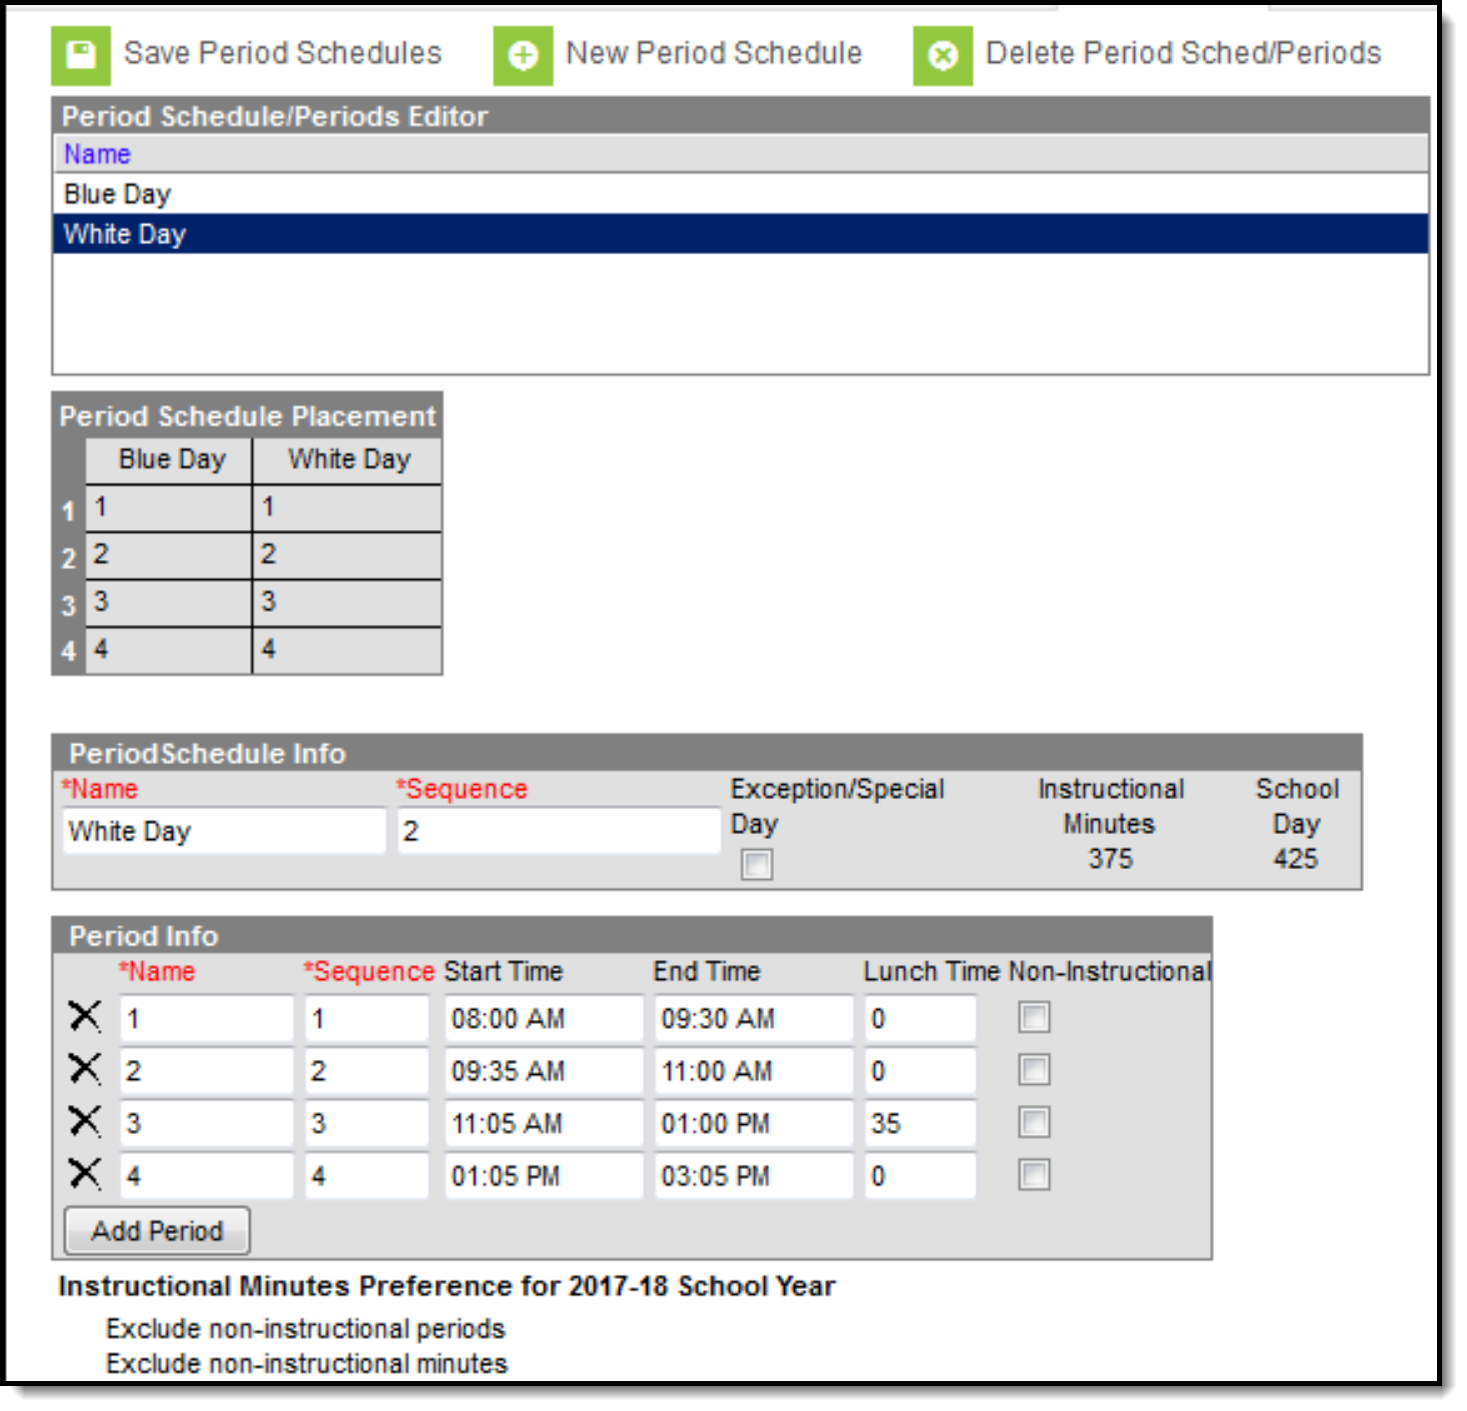 | This is referred to as a block schedule. The length of periods are often longer, and students are scheduled into eight different courses (usually), so all requirements are met for the school year. |
| Three-day rotating schedule (A/B/C Day) | ||
8 instructional periods 4 periods on A day; 4 periods on B day; 8 periods on C day. | Students attend periods in A Day (Red Day) on Monday, and periods in B Day (White Day) on Tuesday, and all periods on C Day (Blue Day). This alternates throughout the school year.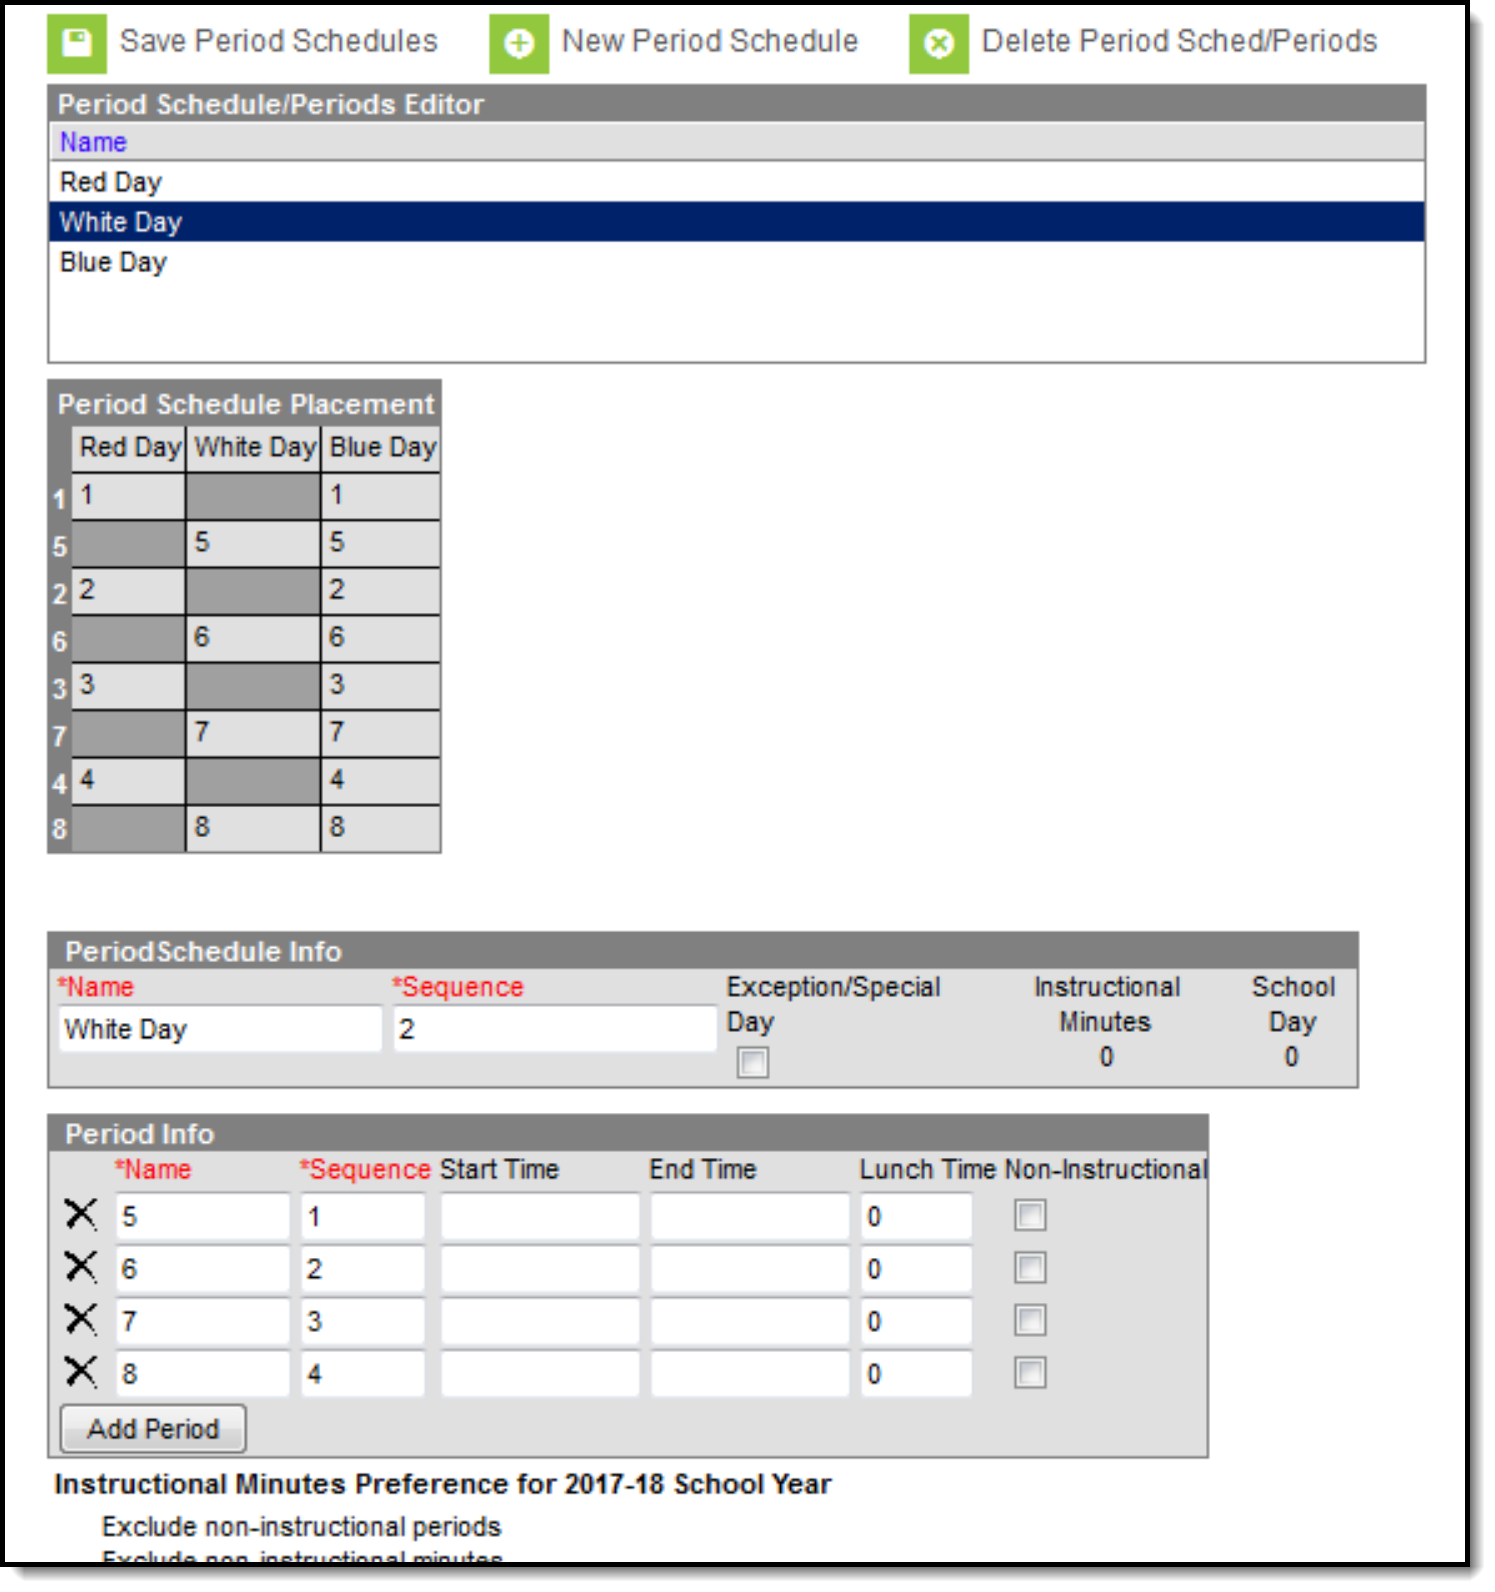 | This is referred to as a modified block schedule. Like a block schedule, the periods that meet on A and B Days are often longer, and periods meeting on C Day are of normal length. In this image, periods on Red Day and White Day are named differently but are assigned the same sequence value. This is why period 5 displays after period 1 in the Period Schedule Placement grid. This is also how periods display on the student's schedule and on the course section placement grid. |
| Five-day rotating schedule (M/T/W/R/F Day) | ||
6 instructional periods All periods meet on all days of the week | Students attend all periods on all days of the week. but the course setup is such that several different classes meet throughout the week.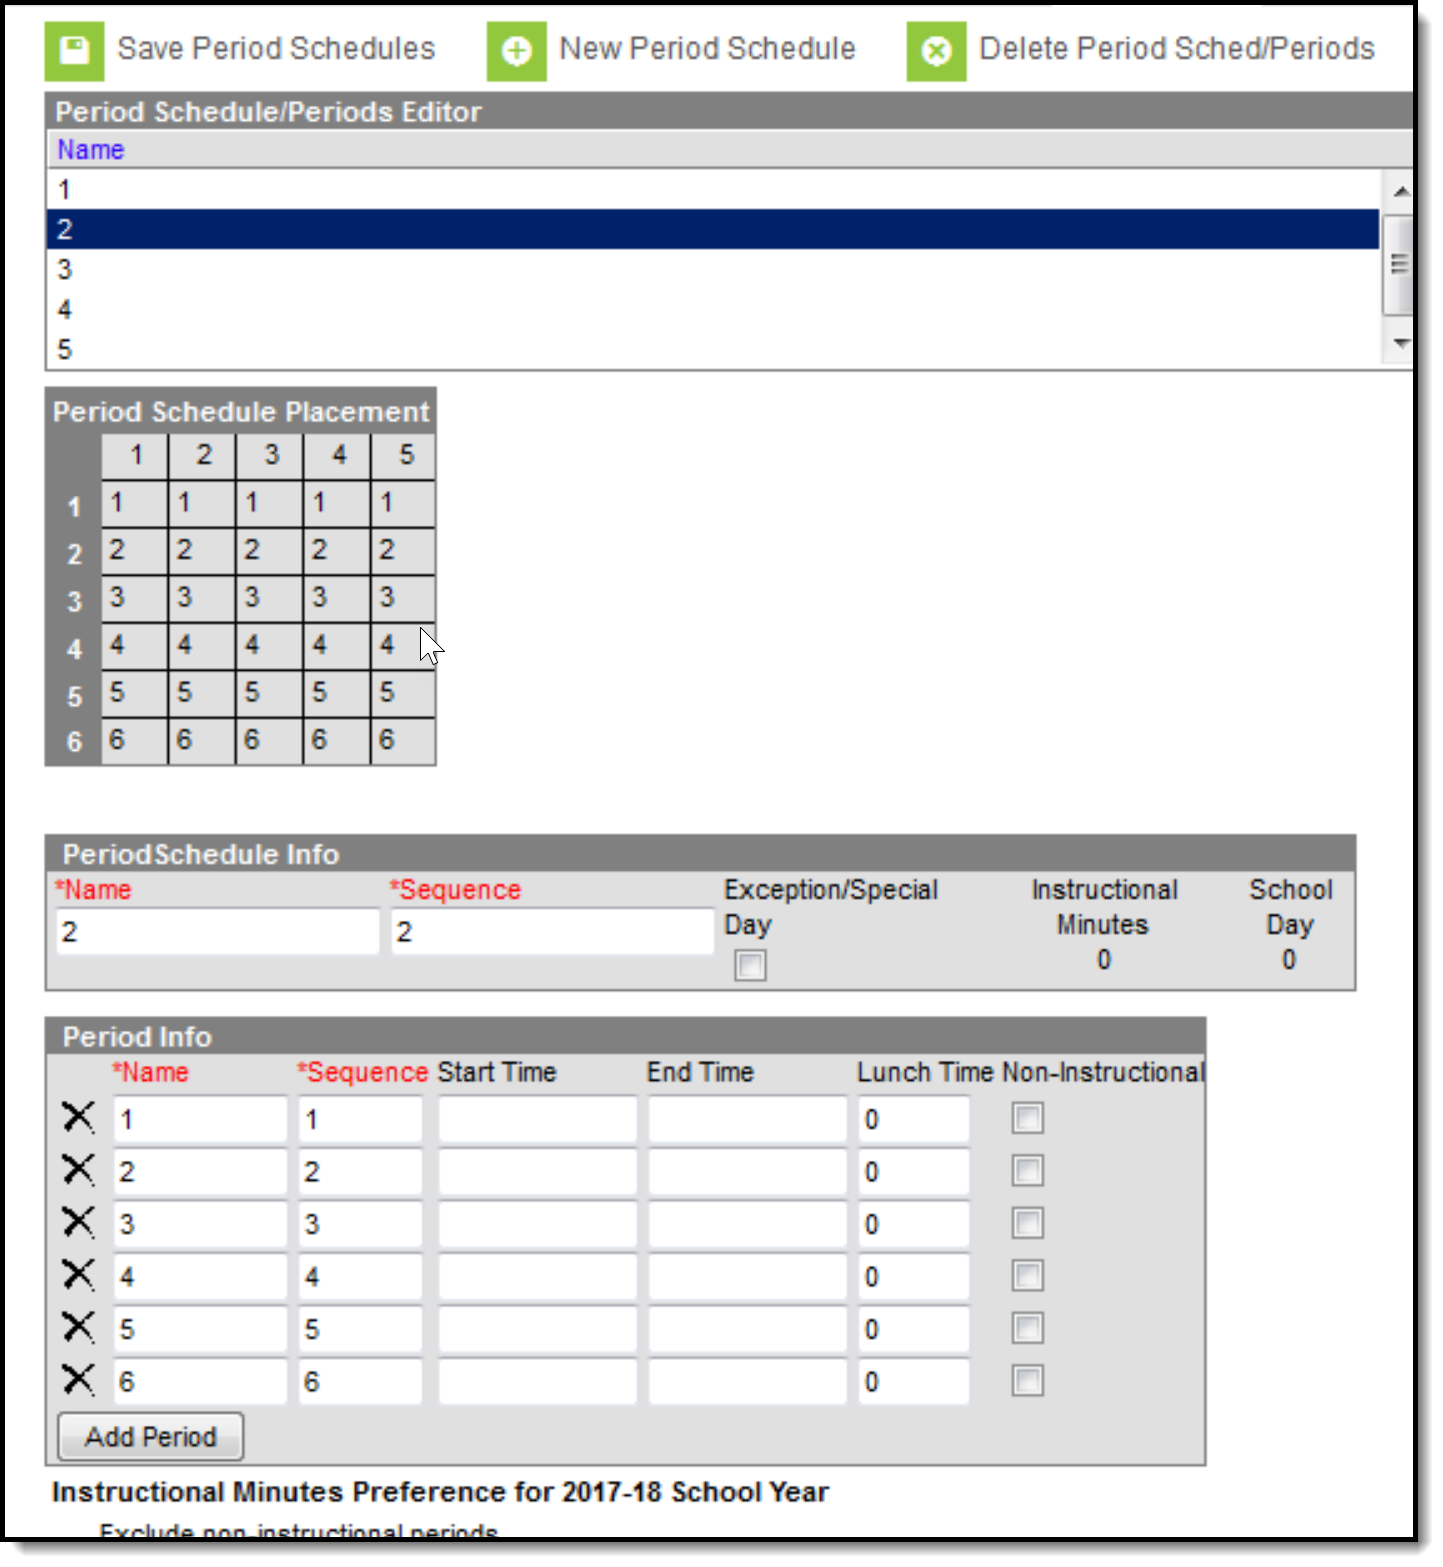 | Period length is of normal length. While there is no limit to the number of period schedules that can be associated with a calendar, when more than five period schedules is needed, please contact Campus Support, as there may be an easier way to address your specific period schedule needs. |
| Exception/ Special Day Schedule | ||
| 3 instructional periods | This structure is used for end of semester finals testing or for flex days (where students receive special instruction on a designated topic). A Day and B Day rotate throughout the year on alternating days. The Testing Day schedule is only assigned when students are being tested (end of term, special state assessments, etc.)
| This structure requires the Exception/Special Day checkbox to be marked, and a manual assignment on the calendar day to which it applies. Structures marked as Exception/Special Day are not included in the mass Day Rotation assignment, but should be assigned manually when necessary. An Exception/Special Day structure can be added to a calendar for a variety of reasons - monthly staff meeting schedules, flexible/responsive day schedules, assembly schedules, etc. As long as the Exception/Special Day checkbox is marked, these schedules are only assigned when needed. |
Add Period Schedules
Verify the correct school year, school and calendar are chosen in the Campus toolbar.
- Select the New Period Schedule icon. An Auto-Create Period Schedules wizard appears.
- Enter the Number of Period Schedules needed for this calendar.
- Enter the Number of Periods for each of the period schedules being created. Enter the largest number of periods needed for a school. For example, in a school that has three rotating schedules, only one day has 8 periods, and the other days only have 4 periods, enter 8. The periods not used on the other rotations can be deleted.
- Click the Create Period Schedules/Periods button. The periods and schedules are created.
After the period schedules and periods are created, the Periods tool looks like this:
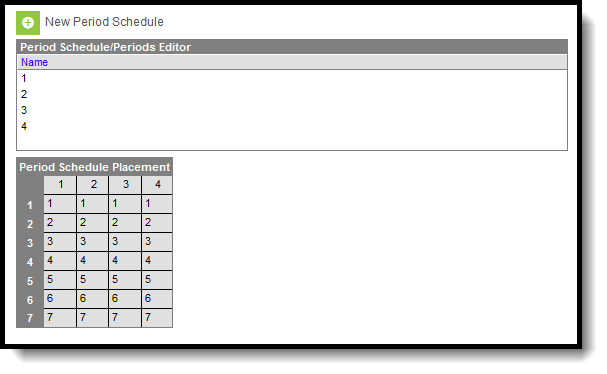 Newly Created Period Schedules
Next, select a period schedule to modify. This includes:
- Changing the name of the period schedule from the default name of a number to a day of the week, a school color, etc.
- Marking a schedule as an exception.
- Modifying the meeting times for each period.
- Marking periods as non-instructional
- Changing the names and sequences of the periods.
- Deleting the periods that aren't necessary in the period schedule.
Period Schedule Info and Period Info Editors
Selecting a period schedule displays the Period Schedule Info editor and the Period Info editor. The table below describes the fields available in both of these editors.
| Field | Description |
|---|---|
| Period Schedule Info Editor | |
| Name | Lists the entered name of the period schedule. This can be a day of the week, a school color, a mascot's name, etc. The name is listed on the Calendar Days tool, on the student's Schedule, on Schedule reports, on Course Sections, on Attendance tools and reports, and other places throughout the product that reference schedules and period layouts. The number symbol (#) cannot be part of the name. |
| Sequence | Entered value determines the sort order of the period schedule. When schedules are created, each period schedule is assigned a sequence in numeric order. For example, when a 5-day rotation is built, the period schedules are created and assigned a sequence of 1-5. The sequence value can be changed as needed. When rotating days are named Blue Day with a sequence of 1, and White Day with a sequence of 2, but White Day should be first, modify the entered value for White Day. The White Day then displays first, and everywhere else period schedules display. The value of the Sequence fields must not be zero (0) and must be unique. Entering a zero or a duplicate sequence number in these fields results in an error message, as does entering a sequence that is the same as another sequence. Validation messages display after selecting Save Period Schedules in the Action Bar. |
| Exception/Special Day | When marked, the period schedule is for use with special days only (testing days, flex days, etc.). It is not assigned or updated as part of the Day Rotation process or Day Reset process on Calendar Days, which means these days must be assigned manually and modified manually when necessary. |
| Instructional Minutes | Indicates the total amount of time students are receiving instruction during the day. This is a calculated field based on the entered period times in the Period Info editor. Periods marked as Non-instructional are not included in this total. Instruction minutes are also entered on the Calendar tool. The value entered into the Student Day field and this total should be the same. |
| School Day | Indicates the total length of a school day, including non-instructional time and any entered lunch/break time. This is a calculated field based on the entered period times in the Period Info editor. |
| Period Info | |
| Name | Indicates the name of the period. This name can be numbers (typical) in ascending order, or days of the week, etc. Period names, like other fields mentioned previously, display everywhere schedules are referenced - attendance, scheduling tools, on the portal, etc. |
| Sequence | Indicates the placement of the period during the day. Periods could be named numerically 1-8; the sequence could also be entered numerically 1-8 (this is a typical setup). But for rotating schedules where periods 1-4 meet on one day and periods 5-8 meet on another day, period 5 might also have a sequence of 1. This would cause period 5 to display after period 1. The value of the Sequence fields must not be zero (0). Entering a zero in these fields results in an error message. Validation messages display after selecting the Save Period Schedules icon in the Action Bar. |
| Start Time | Lists the start of the period. Times can be entered in either military time (HHMM) or standard time (HH:MM) with a morning (am/AM) or afternoon (pm/PM) indication. While it is not a required entry, it is advised that all periods for a school day have a Start Time and End Time entered. |
| End Time | Lists the end of the period. Times can be entered in either military time (HHMM) or standard time (HH:MM). While it is not a required entry, it is advised that all periods for a school day have a Start Time and End Time entered. |
| Lunch | Indicates any time during the period that is set aside for lunch or mid-morning break. This should not be used to enter passing minutes between periods, but rather a chunk of time that is not counted as instructional minutes. |
| Non-Instructional | Indicates the period does not provide instruction to students. This could be a before-school sports training or marching band practice, or time scheduled for students who participate in activities like newspaper or student government, or after-school sports practice times or drivers education sessions. Any period marked as non-instructional is not counted in the Instruction Minutes. It is counted in the overall School Day minutes. |
| Responsive | When marked, indicates the period can be used for Responsive instruction. See the following for more information: |
Additional preferences also display after the period grid, indicating the Instructional Minutes Preference and the School Day Preference for the school year. This information is selected on the School Years editor.
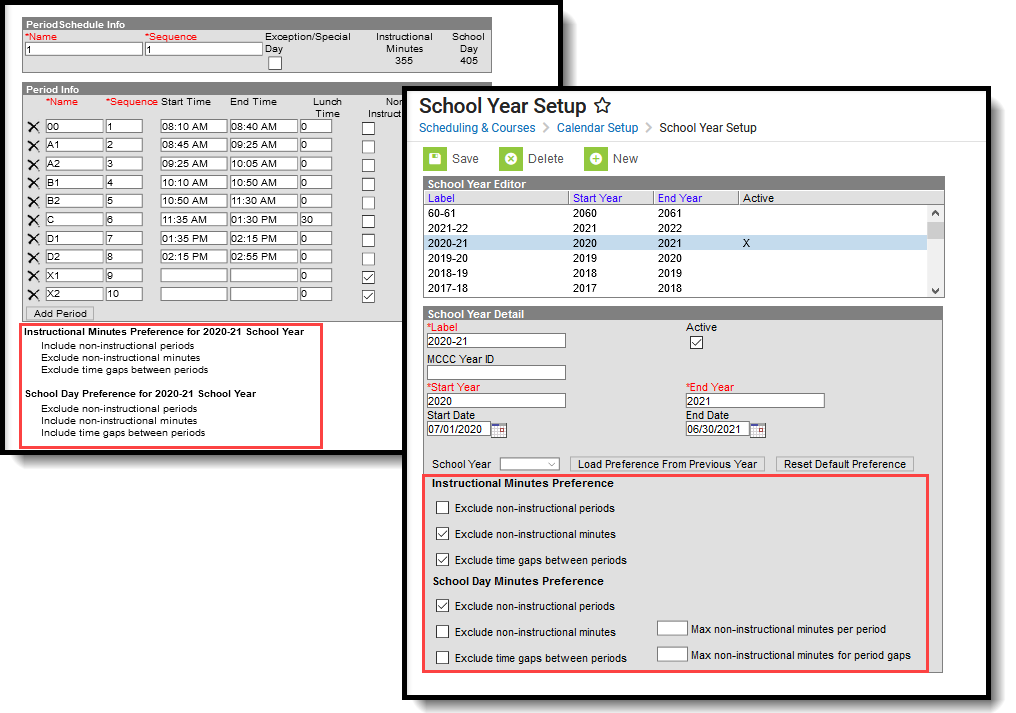 Calendar Minutes Preferences
Add Period Schedule Information
- Select the Period Schedule for which to create Period Information. A Period Schedule Info editor and a Period Info editor appears.
- In the Period Schedule Info editor, modify the Name of the Period Schedule if desired. Special characters cannot be part of the name.
- Verify the Sequence number is correct. The Sequence must not be zero (0).
- When the Period Schedule is only to be used for a special day or exception to the regular schedule of periods, mark the Exception/Special Day checkbox.
- Click the Save Period Schedule icon when finished, or continue to the Period Info editor to manage the start/end times and placement of periods for the period schedule.
Add Period Information
Up to 31 periods can be added. When more than 31 periods is needed in any period schedule, please contact Campus Support. There may be an easier way to build your calendar structure.
- Select the Period Schedule for which to create Period Information. A Period Schedule Info editor and a Period Info editor appears.
- In the Period Info editor, modify the Name of the period to match that of the school.
- Enter the Sequence of the Period. Sequence must not be zero (0).
- Enter the Start Time and End Time of the Period. These times cannot overlap with another period start time.
- Enter the minutes set aside for lunch in the appropriate period in the Lunch Time column.
- Indicate if the period is a Non-Instructional period (does not add the minutes to the Instructional Minutes total) by marking the checkbox.
- Indicate if the period is used for Responsive courses.
- Click the Save Period Schedule when finished.
Once the school year has started, changes to the Period Schedule may adversely affect student attendance data and student schedules. Limit the ability to modify Period information by setting appropriate Tool Rights.
When more periods are needed than what was originally created when building the period schedules, use the Add Period button. This adds a row to the Period Info Editor to add additional periods.
When some periods need to be removed, click the X button on the left hand side of the grid. This can only be done when existing data (course sections, for example) are not assigned to that period.
When an entire period schedule needs to be removed, click the Delete Period Schedules icon. This can only be done when existing data is not assigned to that period schedule, and the process may take a while to complete.
Copy Period Sched/Periods
Use the Copy Period Sched/Periods option to create an exact copy of the selected period schedule. The copied period schedule is added to the Periods Schedule/Periods Editor at the bottom of the list.
The user must have Read, Write and Add tool rights to the calendar.
- Select the Period Schedule to copy from the Period Schedule/Periods Editor.
- Click the Copy Period Sched/Periods icon.
- Enter a Name for the copied period schedule, and click the Copy button. This makes an exact copy of the period schedule.
- Locate the copied period schedule in the Period Schedule/Periods Editor (usually at the bottom of the list) and make any necessary changes to the periods, and then click the Save Period Schedules.
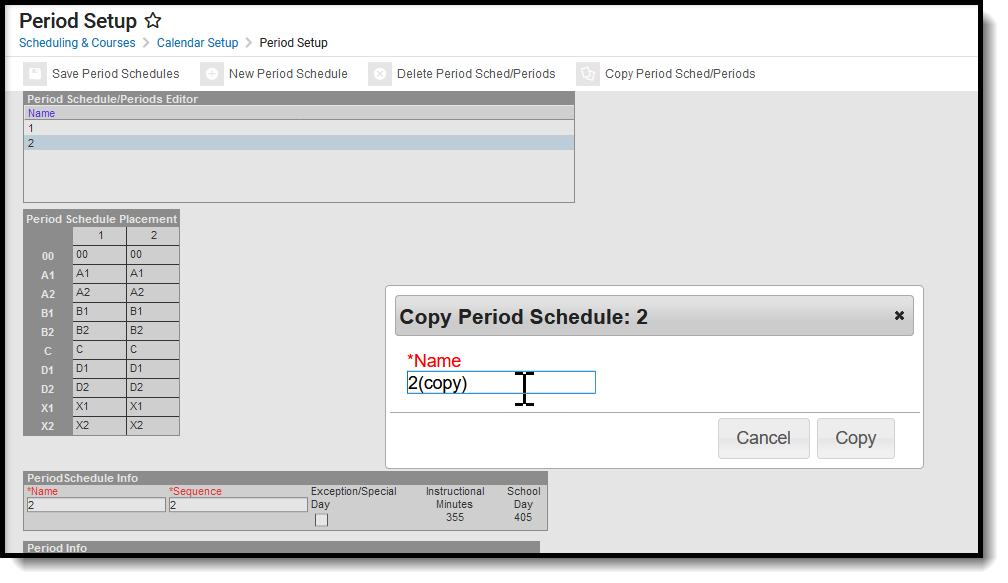 Copy Period Schedules
Responsive Scheduling and Calendar Periods
This section covers steps 2 and 3 in the Responsive Scheduling Workflow.
Before implementing Responsive Scheduling as a part of the school's offerings, review your business processes and discuss this opportunity with the appropriate individuals. This affects all areas of a school, including administrators, attendance clerks, teachers, counselors, curriculum directors, etc. Consider the benefits and consequences involved with the following:
- Calendar changes (new periods, different schedule structures, period length, instruction minutes, etc.)
- New programs/courses to offer
- Course placement
- Attendance tracking
When providing responsive scheduling options for students, it is recommended that a separate period schedule be created. This allows you to be more flexible with your responsive day with regards to actual class periods and when establishing the calendar days that use the responsive schedule.
Responsive courses should not be included in state reports. For this reason, it is recommended that responsive courses be scheduled into non-instructional periods.
In the following example, a separate period schedule has been created, called Responsive Thursday, where every Thursday that is a school day has responsive courses. This structure isn't considered an Exception/Special Day because it routinely (in this case, weekly) occurs throughout the school year.
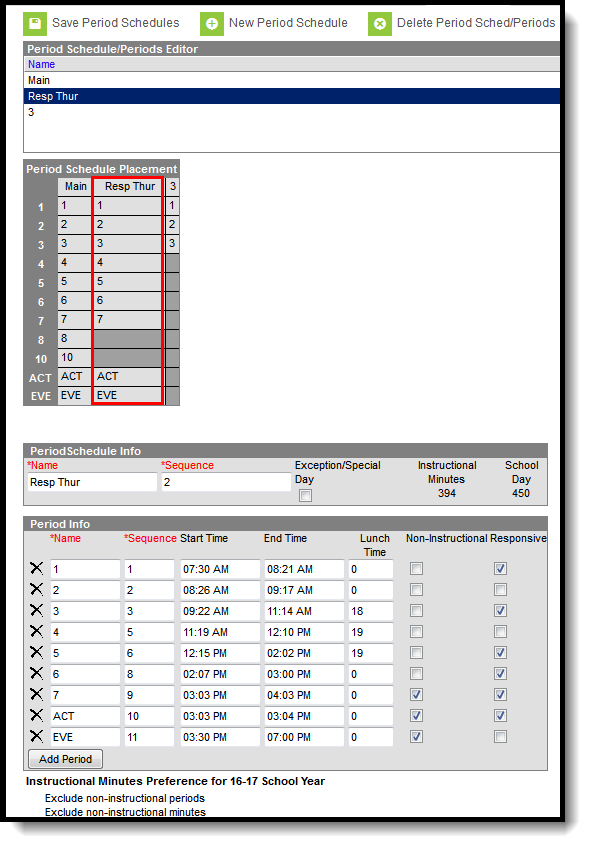 Responsive Period Schedules
This Responsive Schedule is very similar to the the Main schedule. Period names are the same, most of the same periods are included (this responsive schedule does not include Periods 8 and 10), and the length of the periods are the same.
The Responsive checkbox is marked on all periods except three of them. This could be because of teacher prep periods or just to give students a longer break during the day. Only periods marked as Responsive can have responsive courses scheduled into them. Course sections set to meet during periods 2, 4 and EVE cannot be scheduled since the Responsive checkbox is not marked.
School Calendar Days
The Days tool is is used to define details regarding days that fall within the school calendar. Before using any Days tools, verify that calendar and term dates are correct and that periods and period schedules have been created.
Tool Search: Day Setup
The Days tool provides a calendar type of view for all of the days in the school calendar, determined by the year, school and calendar selected in the Campus toolbar. The Days tool also displays which Period Schedules are assigned to a particular day, whether any special events are assigned to a day, or whether a particular day is not recording attendance, is not an instruction day, or is not a school day.
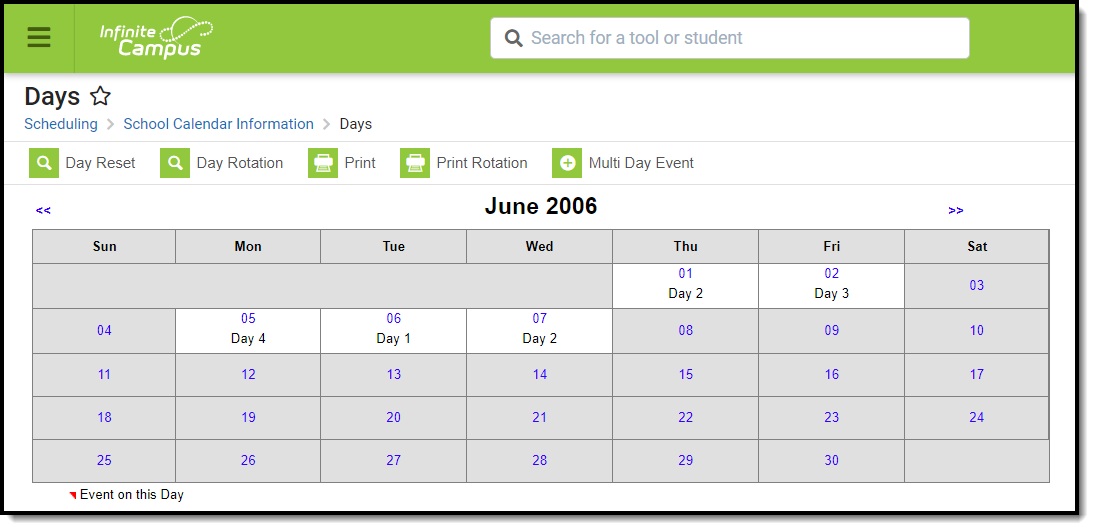 Calendar Days
See the Day Setup Tool Rights article for information about rights needed to use this tool.
Calendar View and Day Detail
The main view of the Days tool displays the start month and days of the calendar (again, determined by the selections in the Campus toolbar). When days have not been set (using the Day Reset or Day Rotation option), every day displays in gray. When days have been set, days that are outside of the calendar or are marked as a non-school day display in gray.
In the following image, days have been set using the Day Reset option, and period schedules have been assigned. The period schedule displays below the date of the day in the grid. This calendar begins on August 15. The red arrow above the date indicates an event is associated with this day, which can be viewed by selecting the day to view the Day Detail. Period schedules have also been assigned to days. These schedules display on the calendar days without having to select a day to view the day detail.
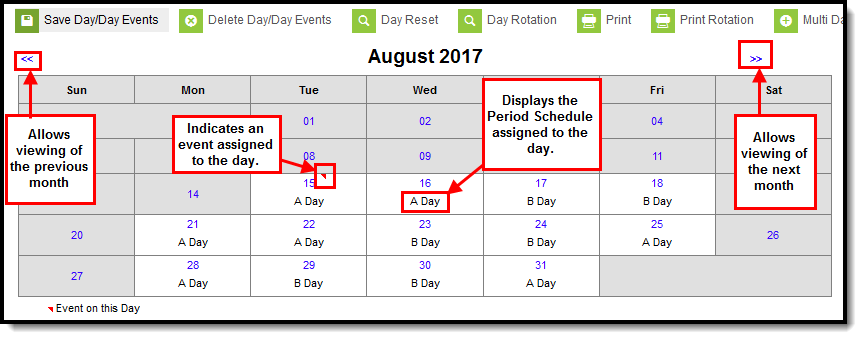 Calendar View
Select any day to view any special events, schedules, comments, etc. for that day. The events, period schedules and selected day types display in the Day Detail editor.
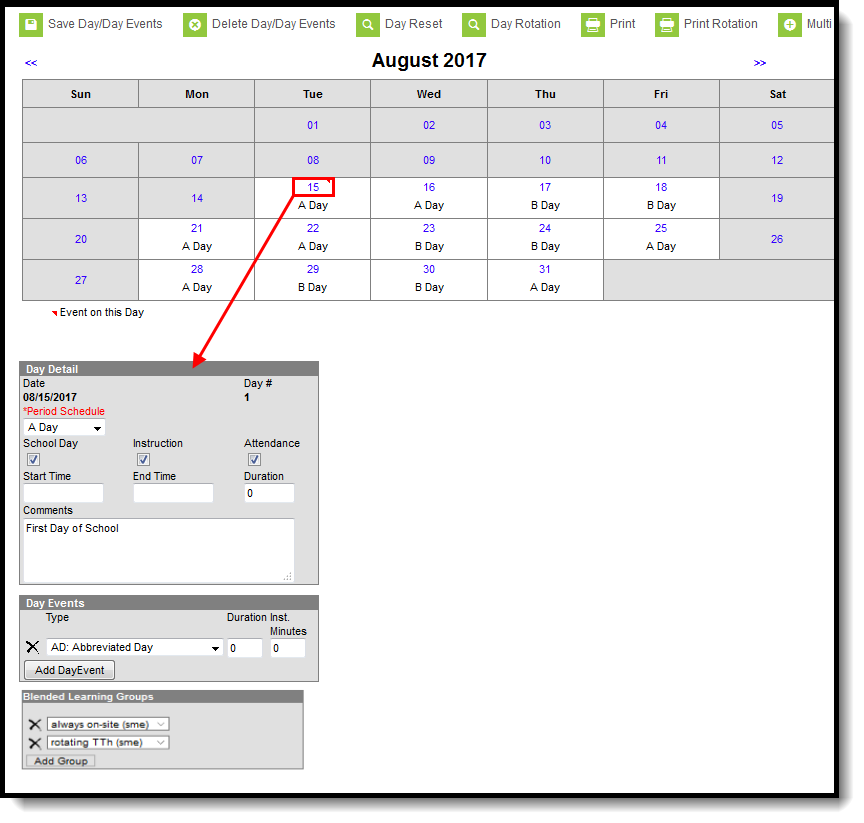 Calendar Day Detail
The following table provides descriptions for the fields on the Day Detail editor.
| Field | Description |
|---|---|
| Date | Displays the date of the selected day. |
| Day # |
Displays the number of instructional days that selected day is. For example, the first day of school has a day number of 1, the second day of school has a day number of 2.
Only days marked as Instruction are assigned a number. When a non-instructional day is selected, the words Not an instructional day display instead. |
| Period Schedule |
Indicates which period schedule is assigned to that day. Period schedules are assigned using the Day Rotation option; these can be assigned or changed manually as well by choosing a different period schedule from the dropdown list. This assignment displays below the date in the calendar grid.
Additional logic determines when a period schedule is assigned. See the Day Rotation section for more information, and see the Periods article for more information on creating period schedules. |
| School Day |
Indicates when the school is open and staff, students, administrators, etc. are on school grounds. This would be marked for a teacher in-service day, or for prep days before or after a term ends.
See the Day Types section for more information. |
| Instruction |
Indicates teachers are providing instruction to students, and causes the Day # field to calculate.
See the Day Types section for more information. |
| Attendance |
Indicates attendance entries for students are recorded.
There are times when teachers are not able to take attendance when they should be taking attendance. One of the causes may be that this checkbox isn't marked.
See the Day Types section for more information. |
| Start Time |
Indicates the time the day begins.
This is an optional field and only needs to be populated when the start time of the selected day varies from the standard start time of a school day.
When a school starts late for the teacher's monthly staff meeting, enter the time the students were in the first period of the day, and add applicable comments for the change in start time. The entered time must be after or equal to the earliest start time entered for any period in the assigned period schedule.
Values entered for this field print on the Calendar Days Report and are considered shortened days. |
| End Time |
Indicates the time the day ends.
This is an optional field and only needs to be populated when the selected day's end time varies from the school day's standard end time.
When a school ends early because of weather or another event, enter the time the last class of the day is released and add applicable comments for the change in end time. The entered time must be before or equal to the latest end time entered for any period in the assigned period schedule.
Values entered for this field print on the Calendar Days Report and are considered shortened days. |
| Duration |
Indicates the total length of the school day based on the entered start and end times.
This is an optional field and only needs to be populated when the Start Time or End Time fields are also populated due to a change for that particular day (it does not automatically calculate). This is left blank for most days, as the instructional minutes, teacher day minutes, etc. are entered on the Calendar tool. |
| Comments | Provides more information on the reason for altered days or the change in start and end times. |
| Day Events | |
| Type |
Indicates the reason for the event and causes the red arrow to display in the calendar grid. Types of days are created in the Attribute/Dictionary.
Multiple events can be associated with a single day. It is recommended that whenever an event is added to a day, a Comment explaining the reason for the event be added as well.
Day events are filtered to appear under the appropriate calendar period structure. This means that day events only appear for the structure under which they were created. They also appear on the printed version of the Day Events report. |
| Duration | Indicates the length of the event. This value does not print on the Calendar Report and is used for state reporting purposes. |
| Instructional Minutes |
Indicates how many total minutes students receive instruction during the event.
In the case of inclement weather, a corresponding Event Type is selected, and the total instructional minutes for the weather day are added here. When the school closes at lunchtime (no instruction in the afternoon), this field is populated with a value that totals the start of the day to the lunch period (240 minutes, for example).
The sum of Instructional Minutes entered on Day Events is counted as non-instructional minutes and is subtracted from the overall instructional day. The remaining time (calculated by subtracting the instructional minutes on the day event from the Student Day minutes on the calendar) is counted as non-instructional minutes. |
|
Grade Level (Nebraska Only) |
For Nebraska Only: Identifies the grade level in which the calendar is associated. Grade levels send to Ed-Fi as their own calendar and Day Events are added per grade to update the data in the ODS for the grade level calendar only. |
| Blended Learning Groups | |
| Blended Learning Groups allow districts to create student groups to manage classes and attendance for students in a setting for students who are on-site in a building for learning, for students who are virtually attending classes or a combination of both.
Once Blended Learning Groups are created, those groups can be assigned to Calendar Days and are included on the Calendar Day Rotation Report. See the Blended Learning Groups section below for more information. | |
Day Types
Each day of the school year needs to be marked for School, Instruction and Attendance, or some combination of each. After using the Day Reset option, all of these options are marked for each day, which means users need to modify the ones that should not be marked this way.
Also noted in the table above, here are the definitions for these fields.
- School Day - this option is marked when teachers, students, administrators, etc. are on school grounds.
- Instruction - this option is marked when students are on school grounds and attending classes.
- Attendance - this option is marked when attendance entries are recorded.
Below are some examples of when these fields should be marked.
The examples shown below vary by district. Please refer to your district's policies and procedures for the proper Day Types used for your district.
| Example | School Day | Instruction | Attendance | Comments |
|---|---|---|---|---|
| Regular School Day | X | X | X | On a regular school day that is scheduled for the normal amount of time, the school is open, teachers are providing instruction and attendance is being recorded. |
| Responsive School Day | X | X | X |
When providing responsive course options (flex scheduling, intervention sessions, etc.), this is treated as a regular day, just the available course offerings would be altered.
See the Responsive Scheduling article for more information. |
| In Service Day | X |
|
|
Teachers and other administrative staff are on campus, completing grades and entering scores, or prepping for upcoming terms. Students are not being taught and attendance is not being recorded. |
| Total Weather Day |
|
|
|
When weather causes a total day off, no options are marked. |
| Late Start | X | X | X | This is treated as a regular school day. A Day Event should be added and the start/end time fields need to be populated to indicate a shortened day happened. |
| Early Release | X | X | X | This is treated as a regular school day. A Day Event should be added and the start/end time fields need to be populated to indicate a shortened day happened. |
| Holiday |
|
|
|
During extended times off for break (winter, spring, etc.), no options are marked. |
| Professional Development - All Day | X |
|
|
When teachers and staff are attending special conferences or meetings for the entire day, only mark the School Day checkbox. |
| Professional Development - Partial Day | X | X | X | When teachers and staff are attending special conferences or meetings for part of the day, all options are marked. A Day Event, Comments and Start/End Times need to be entered. |
| Non-Attendance Days | X | X |
|
There may be reasons determined by the state department of education or the district office that attendance doesn't need to be recorded for certain days, even though students are being instructed. In this instance, only mark the School and Instruction checkboxes. |
Day Reset
A Day Reset is required at the start of the school year, and creates the calendar days. This action updates the days in the calendar to allow attendance to be recorded, for enrollment tallies to count, for membership and attendance reports to calculate properly, etc. On a newly created calendar, before the Day Reset is done, the calendar displays all days in gray; after the Day Reset is done, days within the date range of the calendar in white, unless it has been modified to not be a school day.
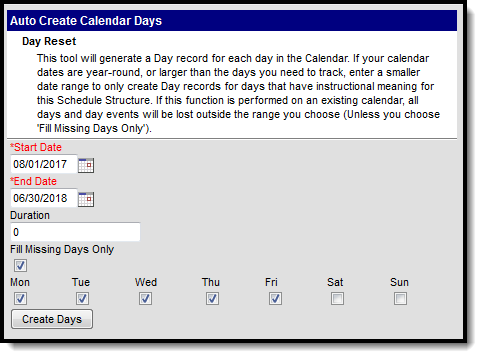 Day Reset
Set Calendar Days for a New School Year
Follow these steps to create calendar days before the school year begins.
This process marks all days within the date range for Instructional, School and Attendance. Manually mark the exceptions for holidays and other events at a later time.
- Select the Day Reset icon. An Auto-Create Calendar Days editor appears.
- Enter the dates of the calendar to build a record for each day in this schedule structure. The Start Date is the first day of instruction (when students are attending classes). The End Date is the last day of instruction.
- Enter a Duration amount. This is considered an override value and should only be populated when the minutes for a regular school day are different than the value of minutes entered on the Calendar Info tool.
- Remove the selection for Fill Missing Days Only.
- Mark the days of the week for which to create days.
- Click the Create Days button. This process may take a few moments. When it is finished, calendar days are created.
Set Calendar Days to Address a Weather Day
Follow these steps to change the current calendar days due to a weather day that requires adding additional days at the end of the school year.
- Select the Day Reset icon. An Auto-Create Calendar Days editor appears.
- Enter the calendar dates to build a record for each day in this schedule structure. For example, three days were added to the end of the calendar, moving the last day of school from June 6 to June 9. The Start Date is entered as June 7, and the end date is entered as June 9.
- Enter a Duration amount. This is considered an override value and should only be populated when the minutes for a regular school day are different than the value of minutes entered on the Calendar Info tool.
- Mark the Fill Missing Days Only option. This option preserves existing days and day events from the previous school year.
- Mark the days of the week for which to create days.
- Click the Create Days button. This process may take a few moments. When it is finished, calendar days are created.
Day Rotations
When the calendar has multiple rotations (A/B days. etc.), use the Day Rotation option to assign a period schedule to school days. This icon only appears when multiple Period Structures are created.
Modifying day rotation for a calendar after the entered start date of the calendar or for past calendars can cause permanent data loss of attendance information and responsive scheduling offerings. Day Rotations should only be performed prior to the beginning of the calendar or when a day needs to be changed from a school day to a non-school day, or a school day with one period schedule to a school day of another period schedule.
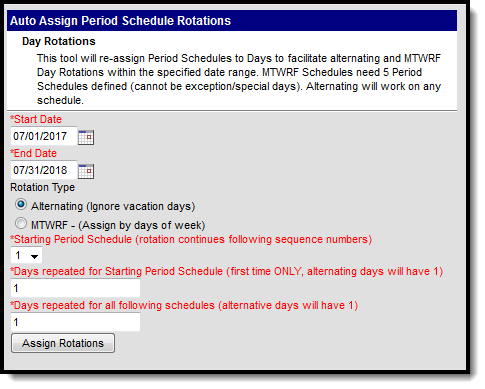 Day Rotation
Period schedules marked as Exception/Special Day (see the Periods article for more information) are not included when using the Day Rotation option. This period structure needs to be assigned manually. Additionally, any day that is currently assigned to a period schedule marked as an Exception/Special Day is excluded from the Day Rotation process and needs to be updated manually.
Days must be created (using the Day Reset option) before period schedules can be assigned and a rotation established.
Set Rotation Days
- Select the Day Rotation icon.
- Enter the Start Date and End Date of the rotation schedule. This is usually the length of the school year. The date range of the calendar populates these days already; when day rotation only needs to be set for a month or some date range less than the total calendar, enter those dates accordingly.
- Select the Rotation Type. Options are Alternating or MTWRF.
- When using the Alternating option, days are marked as Monday - A Day, Tuesday B Day, etc. Non-instruction days are ignored.
- When using the MTWRF option, days are assigned by the day of the week. Five period schedules need to be created for this option to be available.
- Enter the Starting Period Schedule. This is the schedule that is used on the first day.
- Enter how many days the rotation is used in the Days Repeated for Starting Period Schedule field. For example, there are three (3) different rotation days, and two (2) days of each rotation occur before the rotation moves to the next schedule (Monday - A day, Tuesday - A day, Wednesday - B day, Thursday - B day, etc.).
- Enter how many days the rotation repeats for all following schedules in the Days Repeated for all following schedules field. This follows the same logic as step 5. In the same example above, this field would be populated with a value of 2.
- Click the Assign Rotation button. Rotations of the period schedules are now available in the calendar. The assigned period schedule displays when viewing the Days tool (see first image on this article).
A warning message displays when Day Rotations are modified for the current or past calendars, as attendance data, responsive scheduling days and blended learning assignments may be deleted and cannot be recovered.
 Day Rotation Warning
Weather Days
When a school day needs to be changed to a non-school day in the middle of the year, the days must be updated to reflect the now non-school, non-instructional day.
- When the skipped day affects the day rotation, use the Day Rotation option. When the weather day was Monday, an A day, Tuesday becomes the A day. This also changes the following days in the calendar to a new rotation.
- When additional days need to be added to the end of the calendar, use the Day Reset option to modify the days not marked as a school/instruction day.
- When days do not need to be added at the end of the calendar and the calendar does not have a day rotation, but the day still needs to be changed to a non-school/non-instruction day, use the Day Reset option.
Change the Day Rotation
When the Day Rotation needs to be reset due to a rescheduling or an unexpected day off, use the Day Rotation option. This does not overwrite day events or adjust previous days. It only affects the date range that is entered. For example, for a weather day that occurs in January, the administrator would modify that day as a non-instruction day, and then use the Day Reset option for the remainder of the year to reset the days to the appropriate schedule.
To change the assigned period schedule on just one day, manually modify that selection in the Day Detail editor.
Permissions to reset calendar days can only be given to an individual's user account. They cannot be inherited from an administrator's user group that has every tool right assigned.
Multi-Day Events
The Multi-Day Events option allows schools to mass-assign an event or type of school day to a consecutive range of dates. This allows a school to input the same event in a date range (consecutive days) at one time instead of entering the event several times.
Use this option to enter dates for Winter Break or Testing Days.
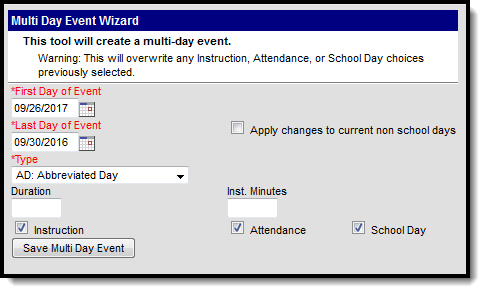 Multi-Day Event
Use the Multi-Day Event Wizard
- Enter the date of the First Day of the Event in mmddyy format or click the calendar icon to select a date.
- Enter the date of the Last Day of the Event in mmddyy format or click the calendar icon to select a date.
- Select the Type of day from the dropdown list.
- Enter the Duration of the school day, and the length of Instruction in minute format.
- Mark the days for Instruction, Attendance and/or School Day.
- Click the Save Multi-Day Event button. The screen refreshes to show the calendar grid with the newly entered events.
Manually Modify a Specific Day
To modify a single day in the calendar, for start time or for a special event (like testing days, etc.),
- Select that date from the calendar. A Day Detail editor displays.
- Verify the Period Schedule (when multiple period schedule exists) is correct. Modify as needed.
- Verify the correct School Day, Instruction and Attendance checkboxes are marked. Modify as needed.
- Enter a Start Time and End Time when the event for this day modifies the regular school day start and end times.
- Enter the Duration of the day in minutes. This value, along with the entered start and end times, acts as an override to the minutes entered on the Calendar Info tool (minutes for a standard day).
- Enter any Comments necessary.
- Select a Day Event Type from the dropdown list, if necessary. Enter the Duration and Instructional Minutes here as well.
- Click the Save Day/Day Events icon when finished.
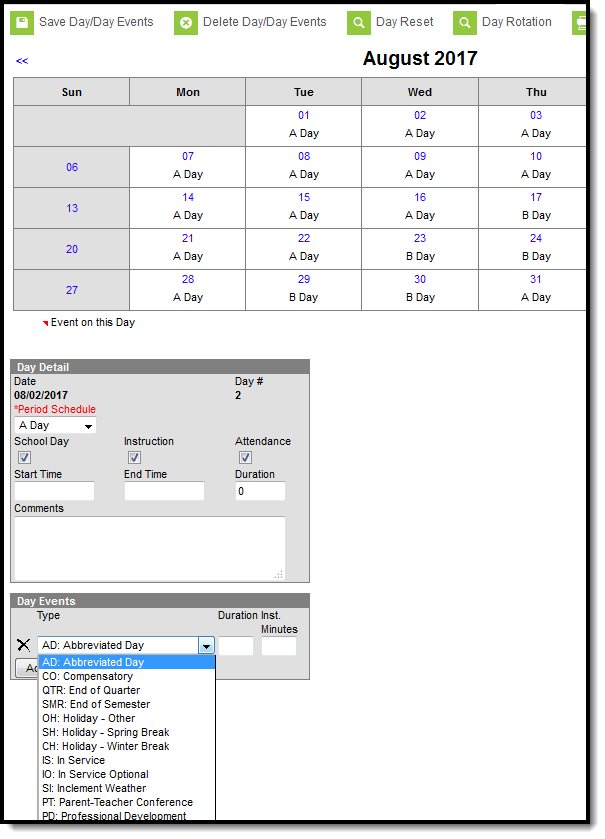 Day Detail Editor
Blended Learning Groups
Blended Learning Groups are created to manage the number of students in a school building at any given time, in an effort to provide on-site learning, virtual learning, or a combination of on-site and virtual learning.
See the Blended Learning Groups article for an overview of the entire Blended Learning Group process.
Multiple learning groups can be assigned to a single day. Students who are expected to be Virtual show an indication of this status when they are assigned to a group that is associated to this calendar day. Groups that are attending physically should not be linked to the calendar days.
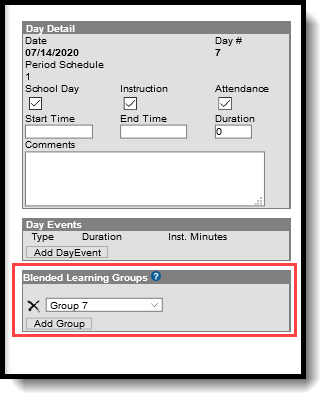 Blended Learning Groups Editor
Manually Assign Blended Learning Groups to Calendar Days
- Select the desired Day from the selected Calendar month.
- In the Blended Learning Groups editor, click the Add Group button.
- Select the desired groups from the dropdown list.
- Repeat this process until all days have a group assigned.
Blended Learning Groups can be assigned for current and future days, as well as days in the past. When assigning groups to days in the past, participation records are created for all students assigned to the selected group, which cannot be undone.
Print Calendar Days
Calendar days can be printed using either the Print icon or the Print Rotation icon. These reports print in either PDF or DOCX format.
- The Print icon generates the selected calendar's days, noting non-instructional and non-school days and any specific key dates that have been entered (as noted as events on the specific days).
- The Print Rotation generates the selected calendar's days, noting the different period schedules that have been assigned to the days. Blended Learning Groups are included on this report.
The Total Instructional, Total Non-Instructional, Total Non-School values are calculated using the value entered in the Student Day field on the Calendar tool, instead of the Instructional minutes in the Period tool.
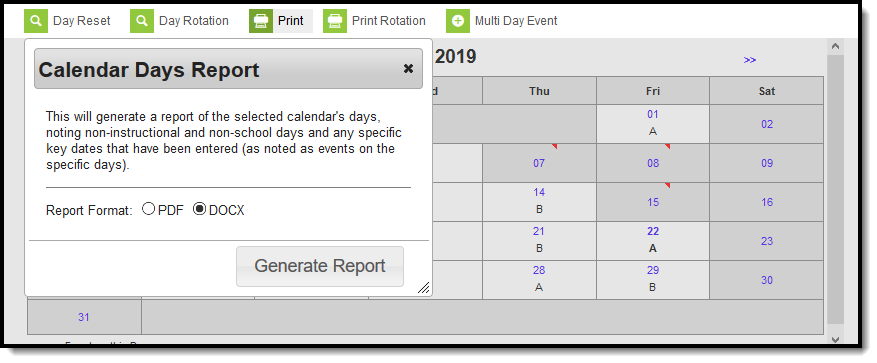 Calendar Print Options
Calendar Days Report
The Calendar Report generated from the Print icon lists non-instructional days and non-school days, and a list of day events that were added to specific days.
When no Instructional Minutes are set on the Days editor, Minutes reported result in the subtraction of Student Day minutes (System Administration > Calendar > Calendar > Student Day (instructional minutes) from Instructional Minute calculations. Non-instructional minute calculations are impacted.
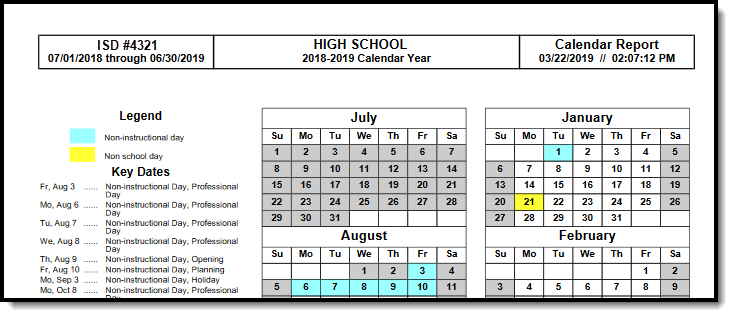 Calendar Days Report - PDF Format
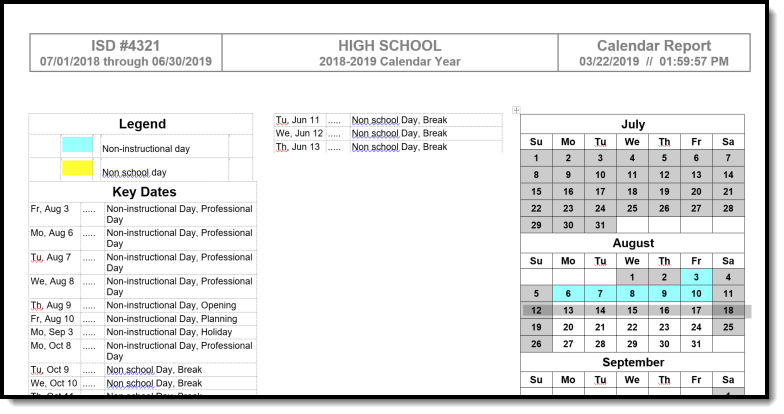 Calendar Days Report - DOCX Format
Calculation of Total Minutes
At the bottom of the Calendar Days Report, there is a total number of Days and Minutes sorted by Total Instructional, Total Non-Instructional and Total Non-School. The calculation for each begins with the entered School Day minutes on the Calendar and uses the School Day, Instruction and Attendance checkboxes on the Day Event editor to determine how many minutes of instruction time, non-instructional time and non-school days (includes weekends) are included in the calendar.
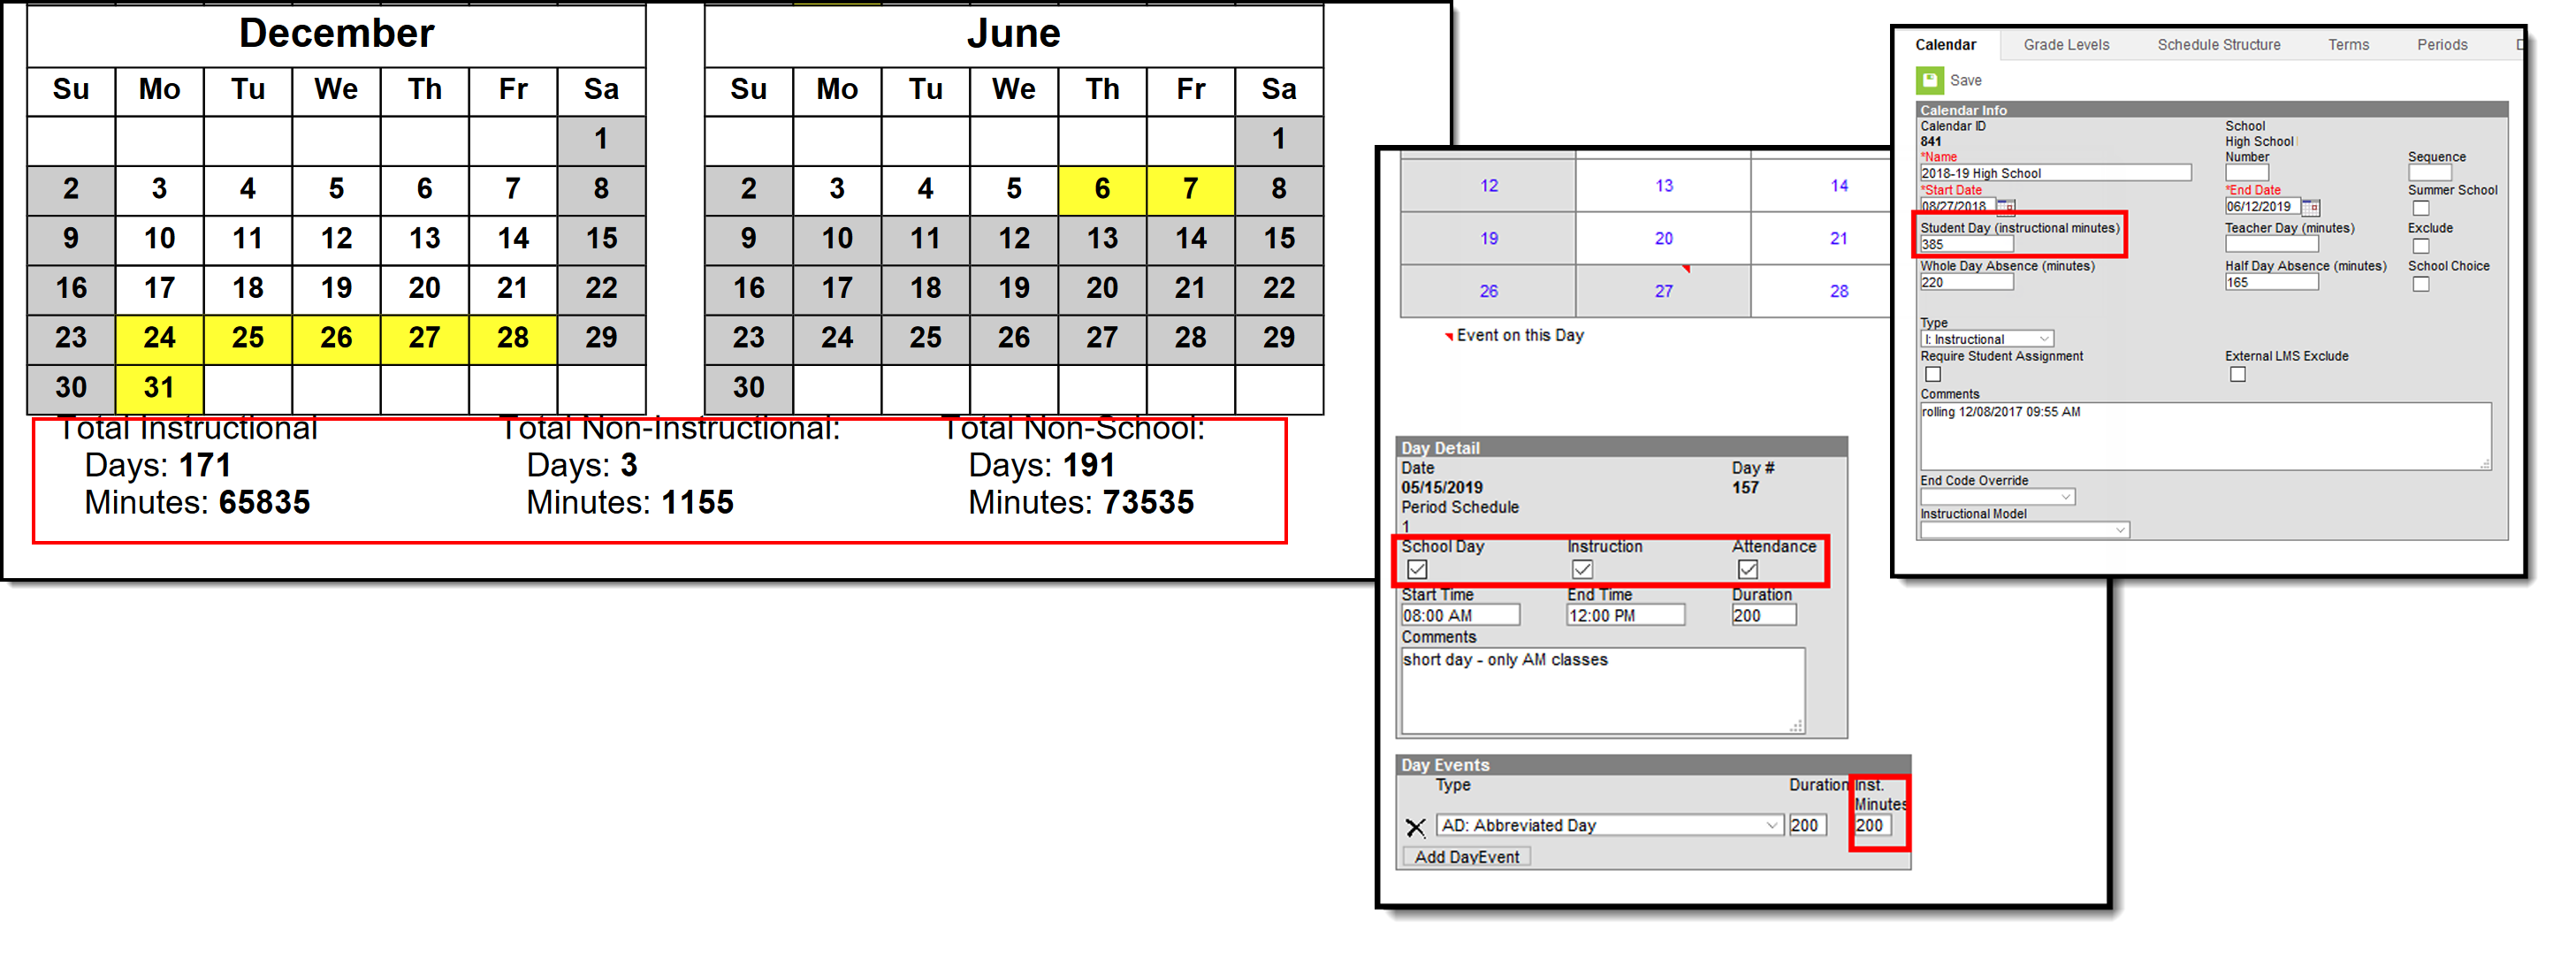 Calendar Days Print - Total Minutes
| Item | Calculation |
|---|---|
| Total Instruction Minutes |
The sum of all days from the start of the calendar to the end of the calendar that are marked as School Day and Instruction Day, multiplied by the School Day value entered on the Calendar tool.
In the image above:
When there are 171 school days and the School Day value is 385, the total minutes is 65,835 (171 x 385). |
| Total Non-Instruction Minutes |
The sum of all days in the calendar that are not marked as Instruction, but is still a School Day, multiplied by the School Day value entered on the Calendar tool.
In the image above:
When there are 3 days not marked as Instruction and the School Day value is 385, the total Non-Instructional minutes is 1,155 (3 x 385).
Non-Instruction minutes are also tallied when a Day Event has an Instruction Minutes value entered. For a Day Event (Shortened Day, for example) that is 185 minutes, that number is subtracted from the Student Day minutes (385), giving a value of 185 non-instructional minutes and 200 instruction minutes. |
| Total Non-School Minutes |
The sum of all days, including weekends, where the School Day checkbox is not marked, multiplied by the School Day value entered on the Calendar tool.
In the image above:
When there are 191 non-school days and the School Day value is 385, the total Non-School minutes is 73,535 (191 x 385). |
Using the same list of Day Events, this table provides additional information on how the Total Minutes values are calculated
| Example | School Day | Instruction | Attendance | Total Minutes |
|---|---|---|---|---|
| Regular School Day | X | X | X | Counts as a full day of instruction. |
| Responsive School Day | X | X | X | Counts as a full day of instruction. |
| Inservice Day | X |
|
|
Counts as a full day of non-instruction time. |
| Total Weather Day |
|
|
|
Counts as a full non-school day. |
| Late Start | X | X | X | Counts as a day of instruction, but requires the time fields and the Instruction Minutes field to be populated for accurate calculations. |
| Early Release | X | X | X | Counts as a day of instruction, but requires the time fields and the Instruction Minutes field to be populated for accurate calculations. |
| Holiday |
|
|
|
Counts as a non-school day. |
| Professional Development - All Day | X |
|
|
Counts as a full day of non-instruction time. |
| Professional Development - Partial Day | X | X | X | Counts as a day of instruction, but requires the time fields and the Instruction Minutes field to be populated for accurate calculations. |
| Non-Attendance Days | X | X |
|
Counts as a full day of instruction. |
Calendar Rotation Days Report
The Calendar Report generated from the Print Rotation icon lists non-instructional days and non-school days, and the period schedules assigned to each school day, as well as assigned Blended Learning Groups when they have been assigned.
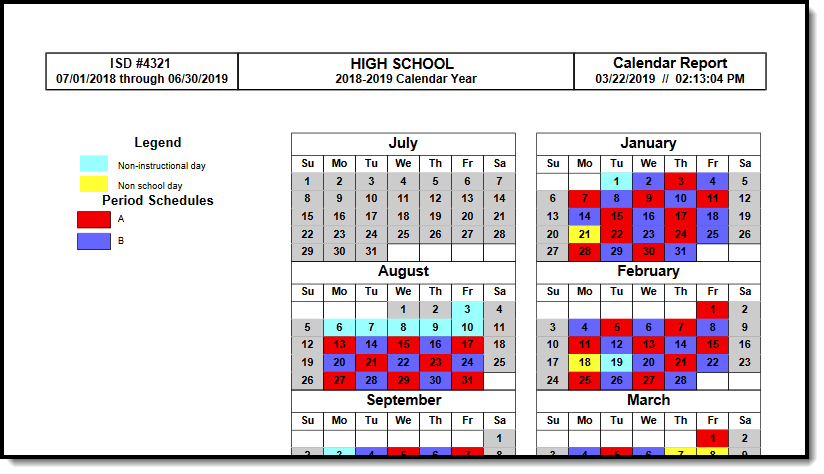 Calendar Days Rotation Report - PDF Format
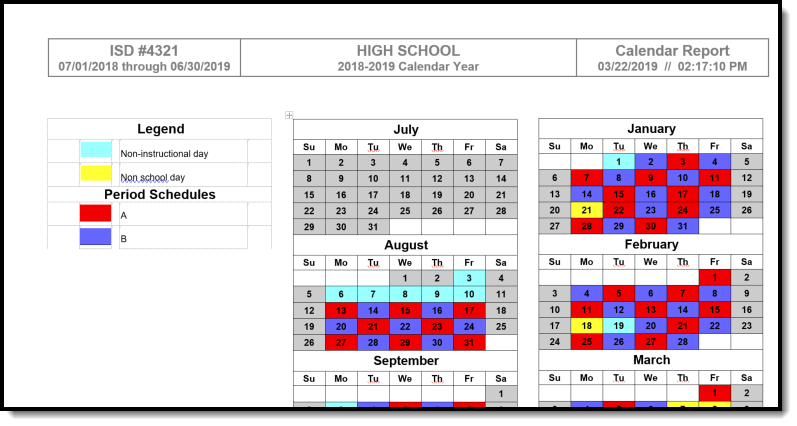 Calendar Days Rotation Report - DOCX Format
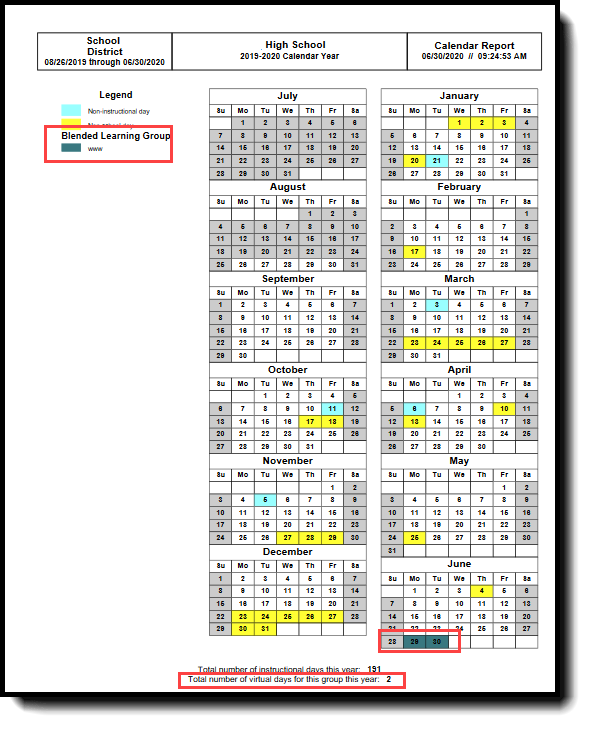 Blended Learning Groups on Print Rotation Report
Date Validations
The following logic is used to ensure proper dates are entered.
- Day Reset does not run when the entered dates fall outside of the calendar start and end dates.
- The Days tool displays error messages when there are no term schedules defined or when any term schedules are missing dates. It also displays an error message when there are no period schedules defined.
- Term dates are required in order to run the Day Reset wizard.
Deleting any school day in which a student has an attendance record causes a record of the attendance data deleted to be recorded in the Audit Attendance table.
When no Instructional Minutes are set on the Days editor, Minutes reported results in the subtraction of Student Day minutes (System Administration > Calendar > Calendar > Student Day (instructional minutes) from Instructional Minute calculations. Non-instructional minute calculations are also impacted.
Responsive Scheduling and Calendar Days
This section covers step 4 in the Responsive Scheduling Workflow.
Following the best practice of creating a separate period schedule for Responsive Scheduling, that period schedule is assigned to a day the same way as any other period schedule. Use the procedures detailed above for assigning a particular schedule to a calendar day.
Responsive sessions can only be assigned for days marked as Instruction.
When an assigned period schedule needs to be modified (due to snow day or other issue), any offerings that have been created for a responsive day are deleted, and any students who have been scheduled for those offerings are unscheduled.
The Days tab contains tools used to view, define and manage days that fall within a selected school calendar. This includes assigning period schedules, setting day events such as holidays or school closings, and defining whether a day counts as a school, instructional or attendance day.
