The Immunization Import tool allows districts to import student immunization information from an external file into Campus.
This is a three step process:
- Create an Ad hoc report using the Filter Designer of students to import MIIC IDs and immunization data.
- Import student MIIC IDs using the file provided by the state. Do NOT modify the file from the state.
- Run the same file a second time to import immunization data.
MIIC IDs
Tool Search: Demographics
Immunization records for the state of Minnesota use Minnesota Immunization Information Connection (MIIC) identification numbers to match health records to students. The MIIC ID is located on the Demographics tool.
A separate import is needed from the state to assign students' MIIC IDs before immunization data can be imported.
 Student MIIC ID Field
Student MIIC IDs
Tool Search: Filter Designer
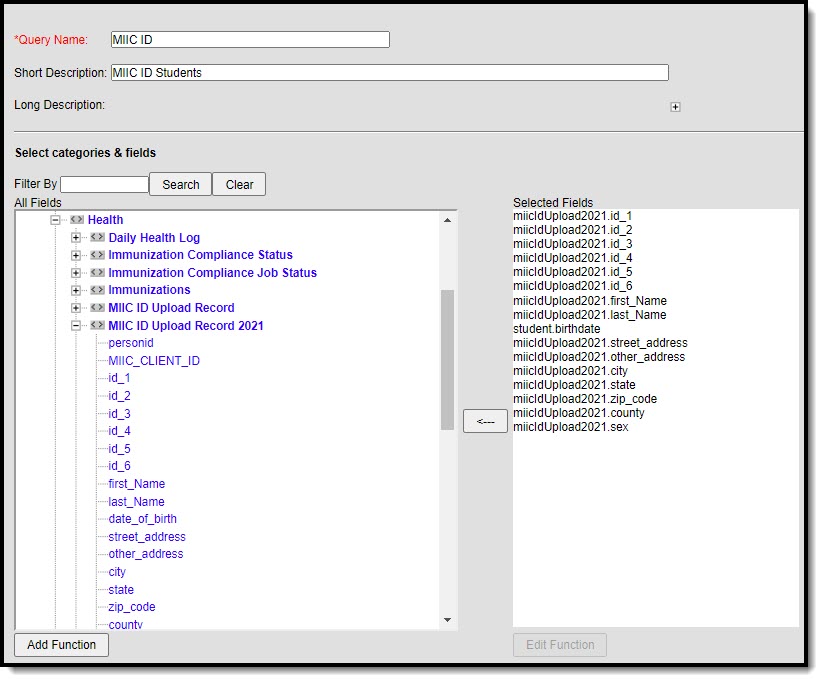
The first step in the immunization import process is to create an Ad hoc filter to compile a file of students to send to the state. The MIIC ID Upload Record 2021 area is the most up-to-date ad hoc fields used to create the report. Fields to include under Student > Health > MIIC ID Upload Record 2021:
- miicIDUpload.2021.id_1
- miicIDUpload.2021.id_2
- miicIDUpload.2021.id_3
- miicIDUpload.2021.id_4
- miicIDUpload.2021.id_5
- miicIDUpload.2021.id_6
- miicIDUpload.2021.firstName
- miicIDUpload.2021.lastName
- miicIDUpload.2021.street_address
- miicIDUpload.2021.other_address
- miicIDUpload.2021.city
- miicIDUpload.2021.state
- miicIDUpload.2021.zip_code
- miicIDUpload.2021.county
- miicIDUpload.2021.sex
Also under Student > Demographics, include student.birthdate. See the screenshot below:
 MIIC ID Ad hoc Fields
Feel free to rename the Column Header output names for readability (see the screenshot below). Set the Formatting for the student's birthdate to MM/DD/YYYY.
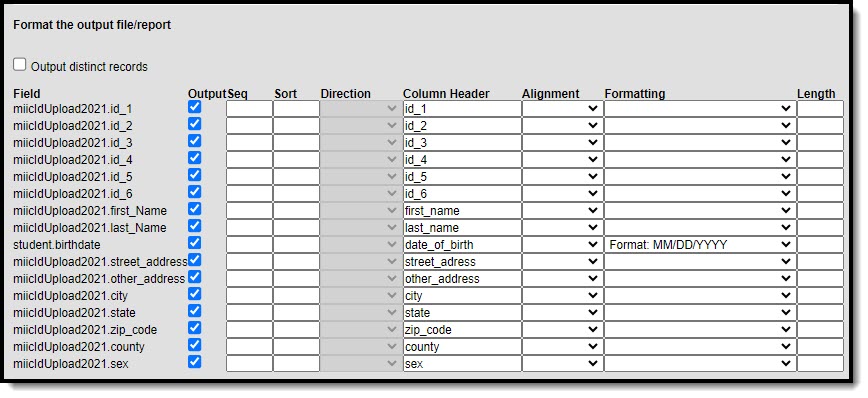 Ad hoc Output Options
Run the query and export the results and an Excel file (.xlsx). Once the file is created, import the file to the state. The state then returns a file called "Full Vaccinations." Save the file from the state as a text file (.txt). Do not rename the file.
This .txt file is then run twice using the Immunization Import tool to map the MIIC IDs and then map the immunization data to the students.
MIIC ID Import Process
Tool Search: Immunization Import
 MIIC Import Options
- Enter the Name of the import mapping. A unique name must be given to each mapping.
- Select the MIIC ID Import (2021 Update) type for the What is the file type?
- Select the MIIC ID option from the What Vaccine codes are you mapping the file to?
- The only options available for the Which identifier(s) in the import file will be used to match students? field are the State ID or Last Name/First Name/Birth Date. The example below matches the identifier with Last Name/First Name/Birth Date.
- When the import file contains a header, mark the Source File Includes Header option.
- The new mapping displays in the Saved Import Mappings window and is highlighted.
- Click Choose File and select the appropriate file which contains the records for the import. This should be the Full Vaccination file provided by the state (the .txt file).
- Click Next to proceed to mapping student identifiers and Campus fields.
Map MIIC Identifiers
The Map Import Data when the Last Name/First Name/Birth Date option is selected is read-only. The file the state returns will automatically sequence the import file correctly.
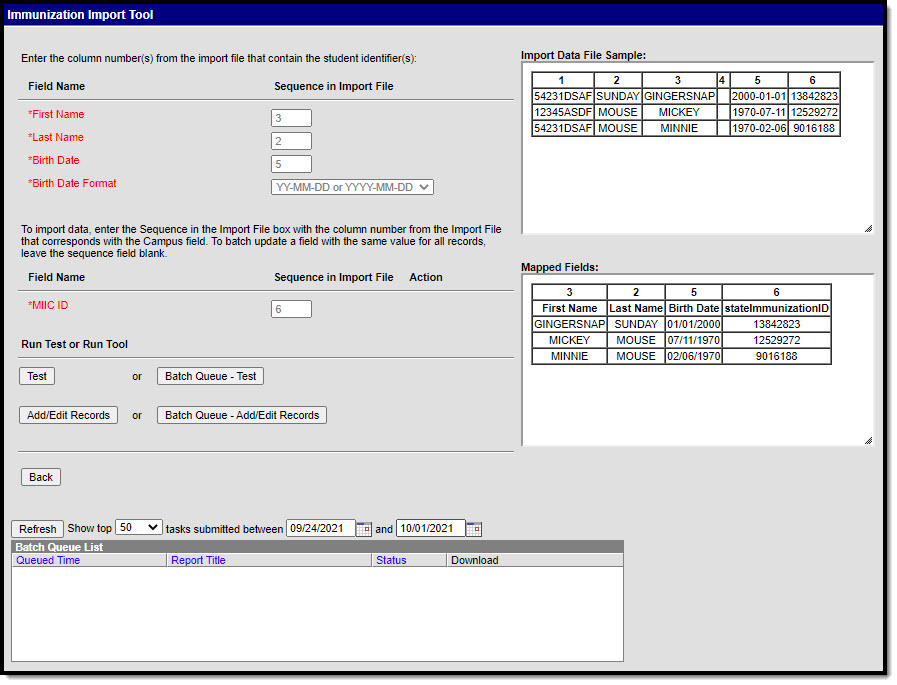 Last Name/First Name/Birth Date MIIC ID identifiers Mapping
Follow the Run Test or Run Tool process detailed in this article above to batch update the student records.
Once the MIIC ID Import has been run, the MIIC Immunization Record Import can be run.
MIIC Immunization Record Import Process
Tool Search: Immunization Import
Run the same file a second time to import the immunization data.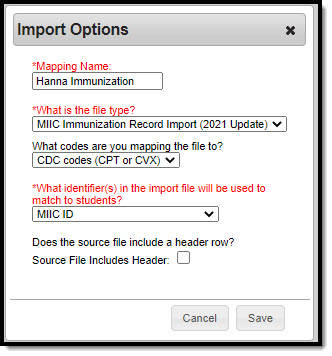 MIIC Import Options
- Enter the Name of the import mapping. A unique name must be given to each mapping.
- Select the MIIC Immunization Record Import (2021 Update) type for the What is the file type?
- Select the CDC codes (CPT or CVX) option from the What Vaccine codes are you mapping the file to?
- The only option available for the Which identifier(s) in the import file will be used to match students? field is the MIIC ID.
- When the import file contains a header, mark the Source File Includes Header option.
- The new mapping displays in the Saved Import Mappings window and is highlighted.
- Click Choose File and select the appropriate file which contains the records for the import.
- Click Next to proceed to mapping student identifiers and Campus fields.
 Immunization Import Follow the Run Test or Run Tool process detailed in this article above to batch update the student records.
Run Test or Run Tool
When the data has been mapped to the selected data fields, the information is ready to be imported.
- It is recommended to perform a Test on the import prior to the actual importing of data. No data is written to the database when a test is performed. When testing, a report displays listing the records being imported and any potential issues. See Report Results below for more details. If a large amount of data is being imported, it is recommended to perform a Batch Queue - Test. When the process is complete, a message appears in the user's Process Alerts.
- To perform the import, click Add/Edit Records or Batch Queue - Add/Edit Records. The Batch Queue - Add/Edit Records option is recommended when importing a large amount of data. When the process is complete, a message appears in the user's Process Alerts.
- A results report generates displaying all records that failed and all records that imported. See Report Results below for more details.
Report Results
After running the Immunization Import tool, a report generates in .csv format and lists any records created along with any errors that occurred. Details of the student identifiers are also listed. The report indicates when it was generated on a Test or Run of the tool. When an error occurred, the line number and reason is indicated under the Error/Warning section.
| Data Element Label | Description |
|---|---|
| Generated On | The date the import tool was tested/run. |
| Error Count | The total number of errors from the import. |
| Warning Count | The total number warnings from the import. |
| Ignored records already in the database | The number of ignored records because vaccine doses and dates already exist for the student. |
| Inserted Records | The number of records inserted. |
| MIIC ID Updated for these Students | This includes the student's State ID, First Name, Last Name, Birth Date, and their MIIC ID. |
| Error/Warning | The reason for the error or warning. Errors may occur due to:
|
