Tool Search: Scheduling Board
The Scheduling Board provides a visual representation of a school's overall schedule, much like a spreadsheet or a magnetic whiteboard, to visualize and build the school's schedule. This visualization has been digitized in the Scheduling Board.
Users can easily see the schedule being built in real time, along with any teacher and room conflicts. Course sections can be dragged and dropped onto the schedule grid, and moved around to other terms and periods, or removed completely. Quickly load and unload course sections, build and unbuild all the courses, lock and unlock section rosters, all within one tool.
See the Scheduling Board - Getting Started article for the following:
- A Scheduling Timeline to stay on track for the entire scheduling season.
- A comparison of what was done where in the Schedule Wizard and where that same task is done in the Scheduling Board.
 Scheduling Board
See the Scheduling Board Tool Rights article for information about rights needed to use this tool.
This article provides information on how to use the Scheduling Board to place courses and course sections, how to assign teachers and rooms to course sections, how to load student course requests and provide guidance in creating the primary schedule for the next school year.
It does not cover every possible schedule design or calendar structure, nor does it attempt to provide answers to optimizing student productivity.
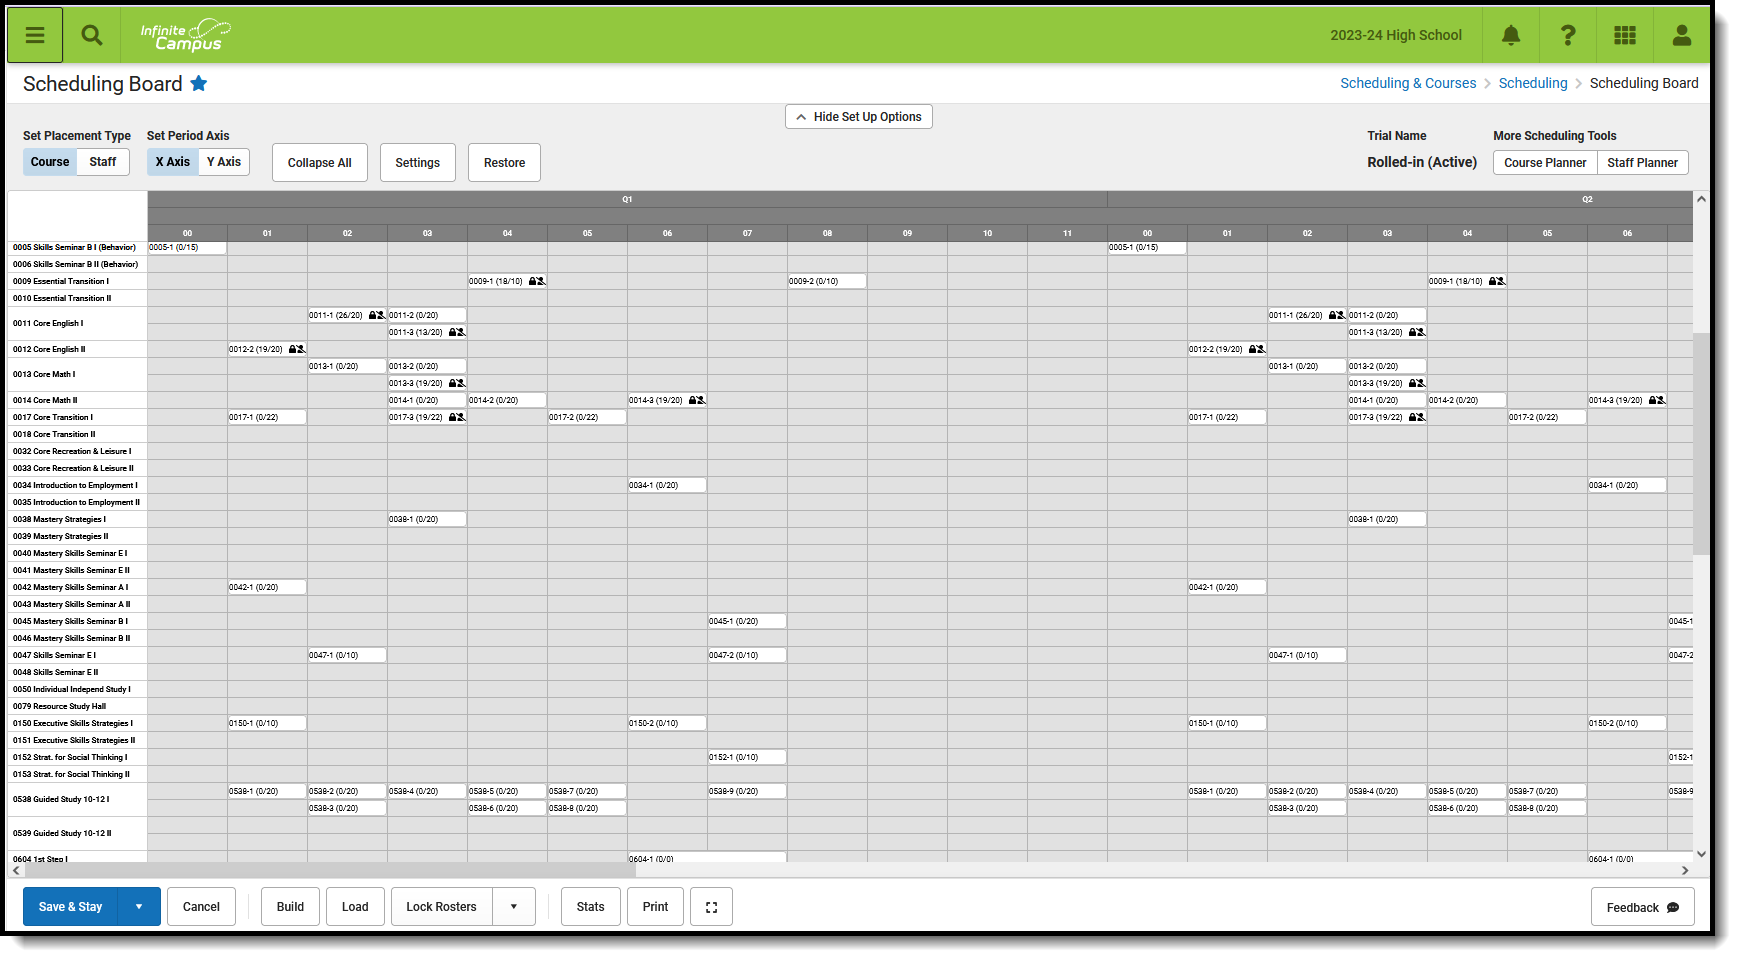
Scheduling Board Navigation
At the top of the Scheduling Board are Settings, where changes to the schedule grid can be done, updates to highlight options (conflicts, missing data, etc.) are managed, and access to other scheduling tools are available. Settings determine how courses display in the grid.
 Scheduling Board Settings
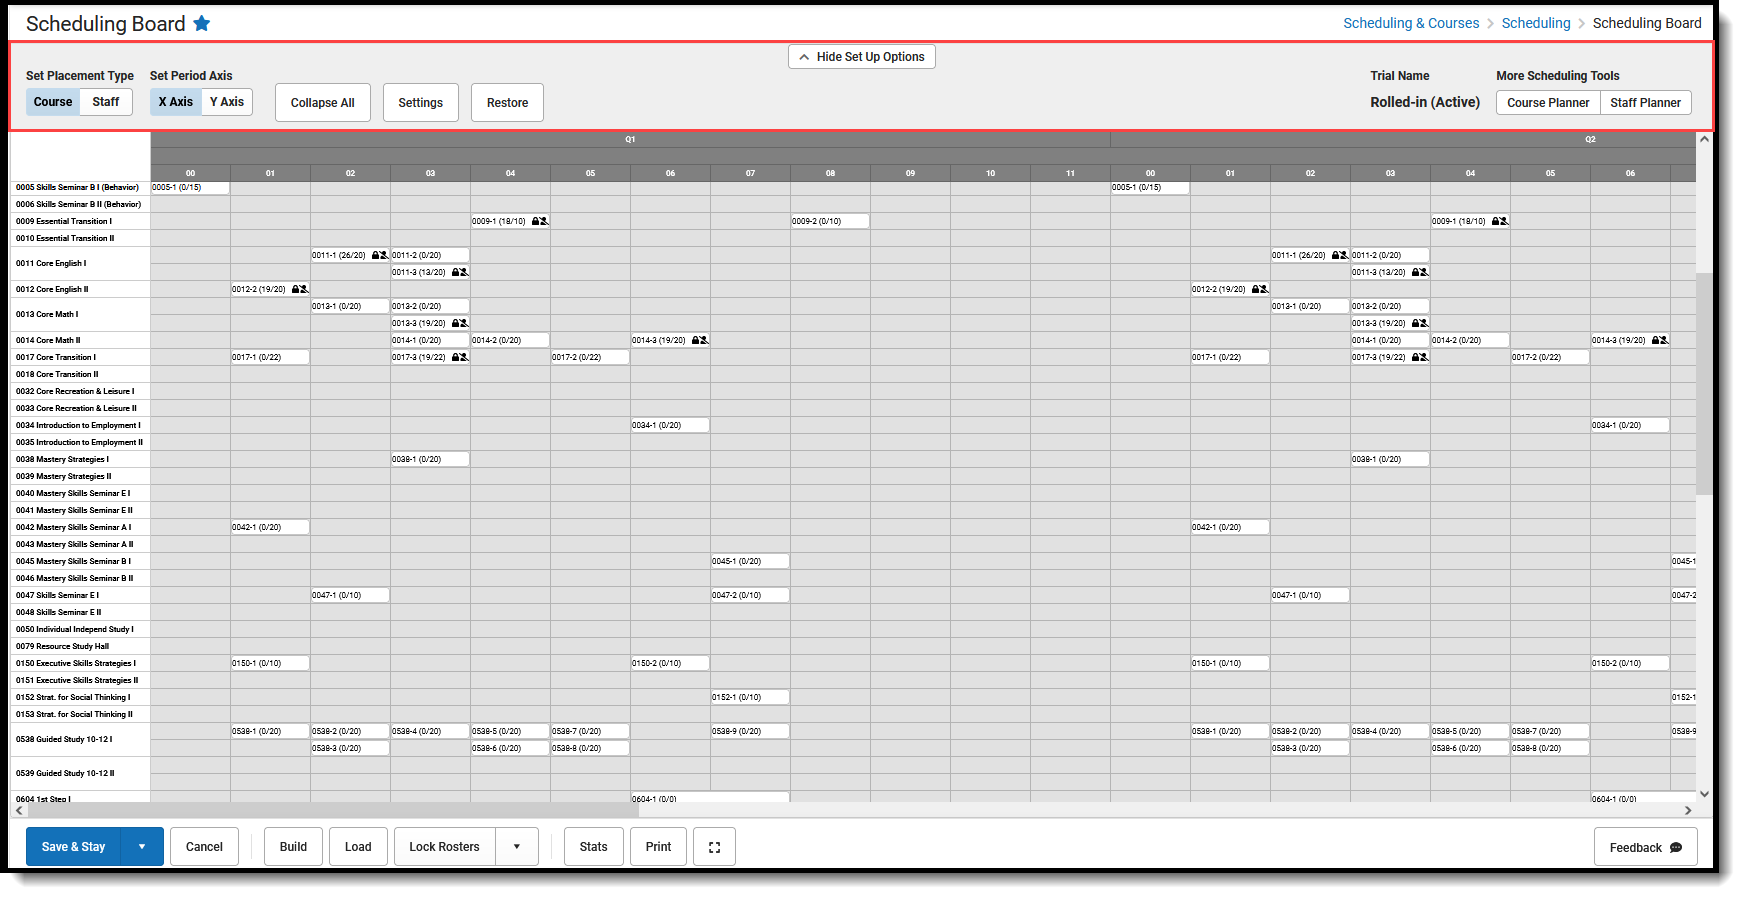
Across the bottom of the Scheduling Board are Actions that can be done. Build and unbuild courses, load and unload courses, lock and unlock rosters, and save changes made or cancel any changes that have been made. Actions determine what happens to the courses on the grid.
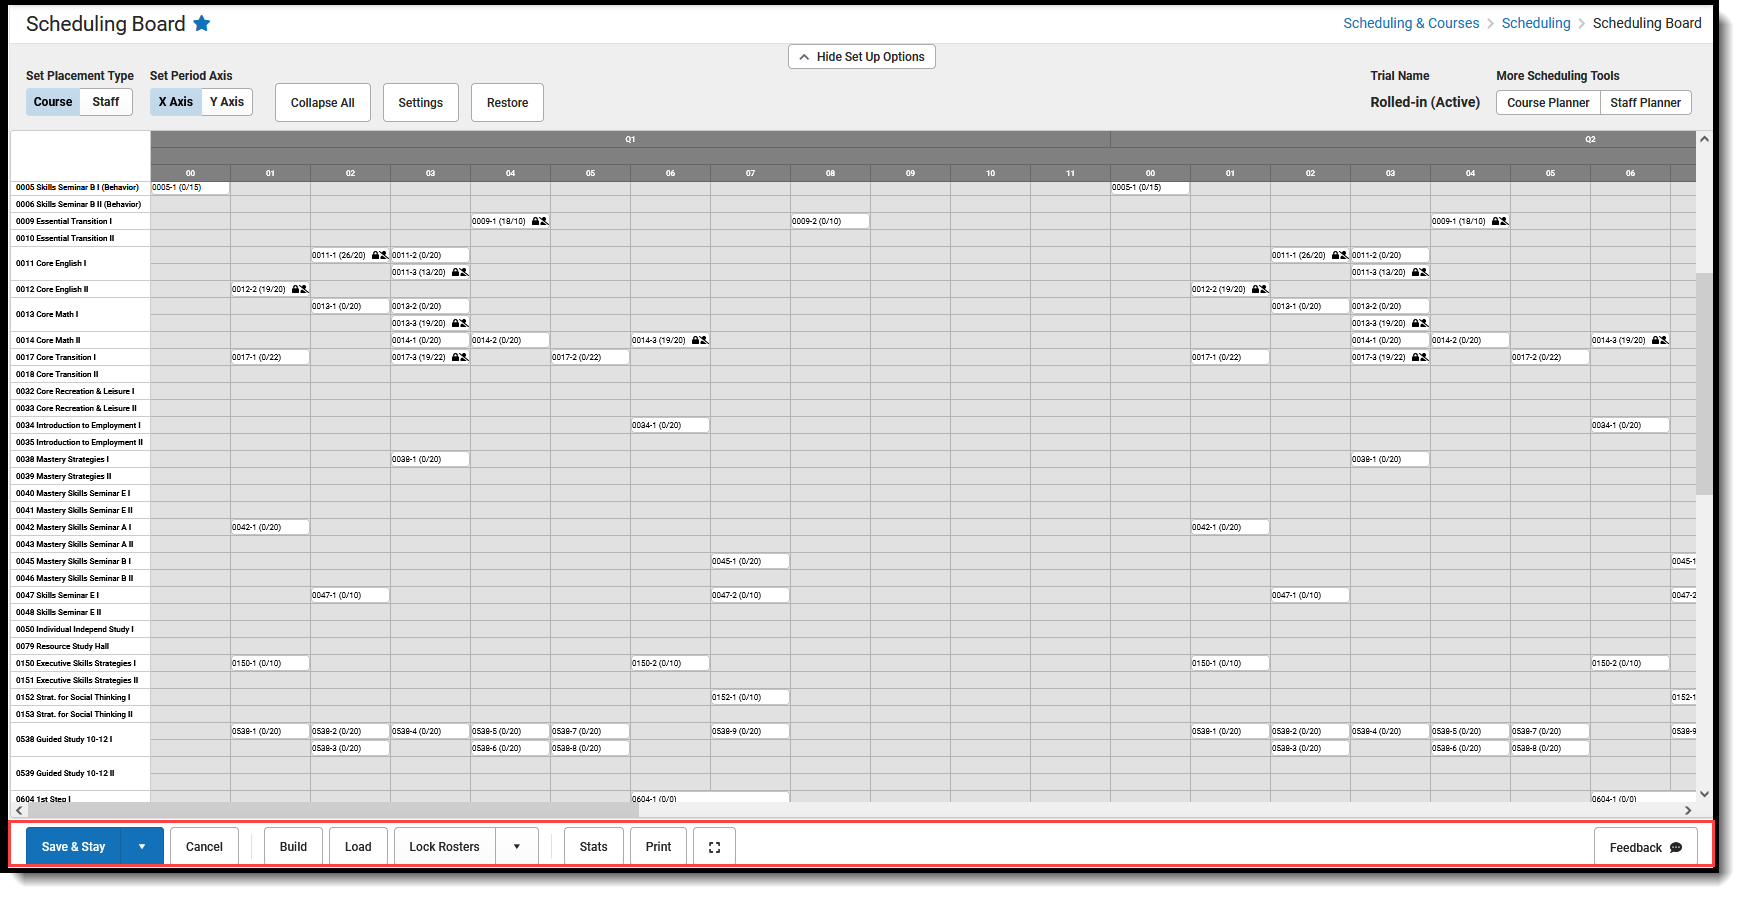 Scheduling Board Actions
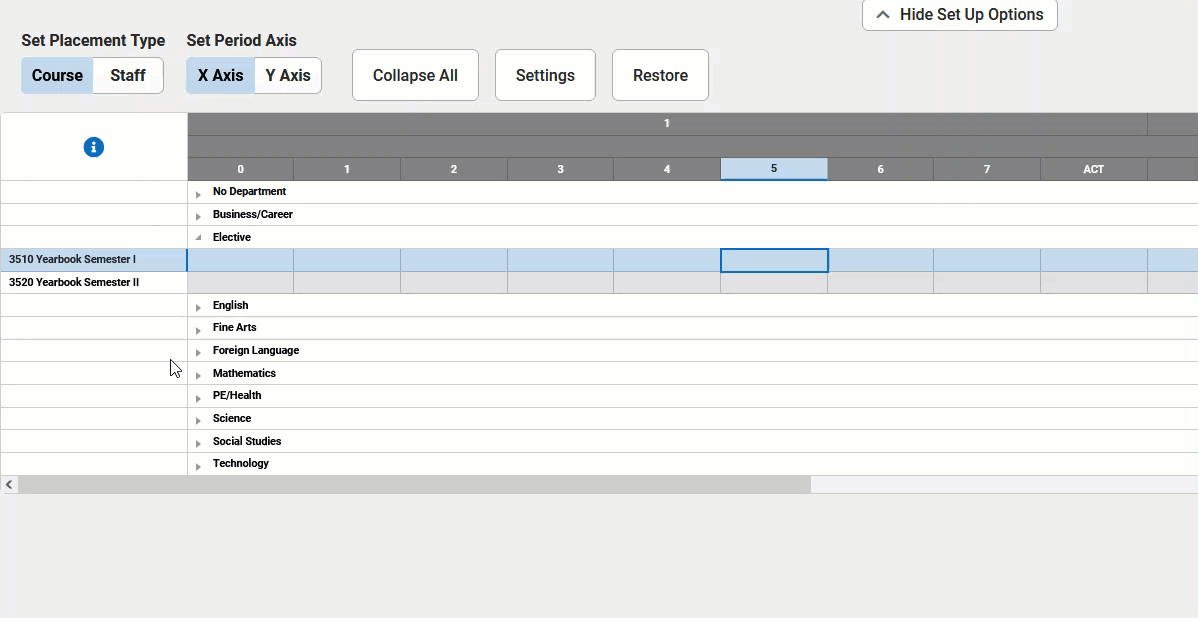
Settings
| Option | Description | ||
|---|---|---|---|
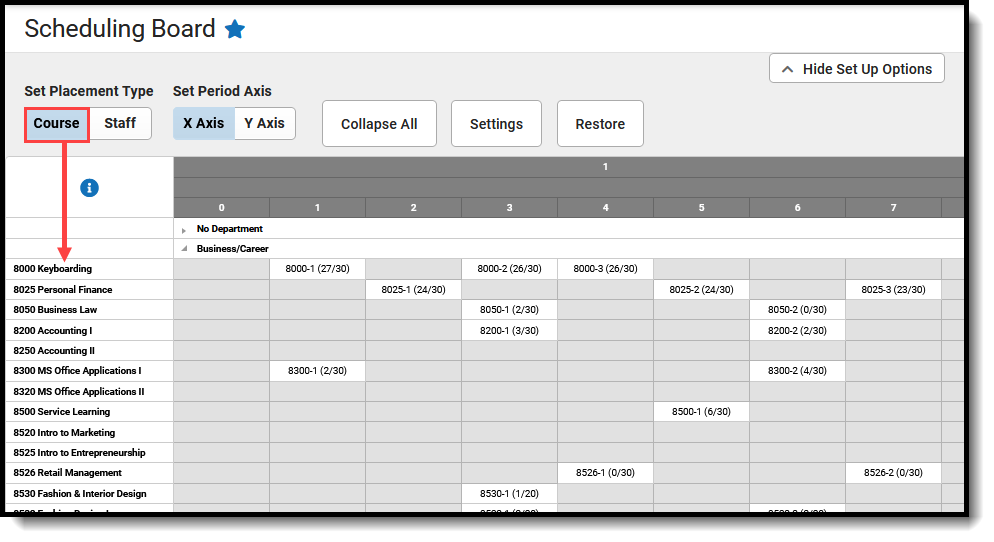
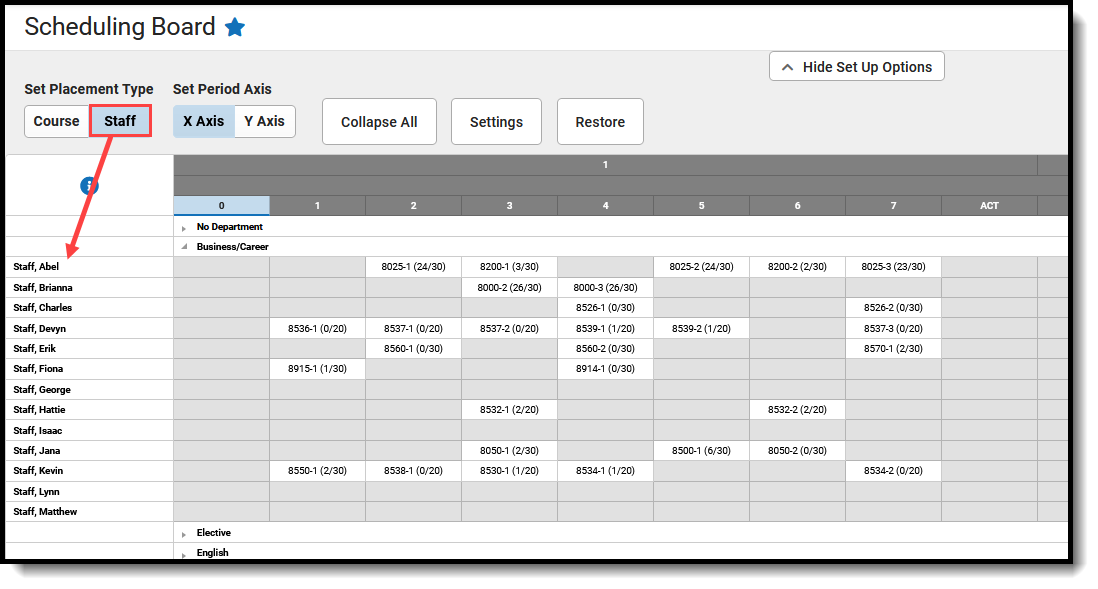
| Set Placement Type | Lists either the Course Number by department or the Staff Name by department on the left hand side.
| ||
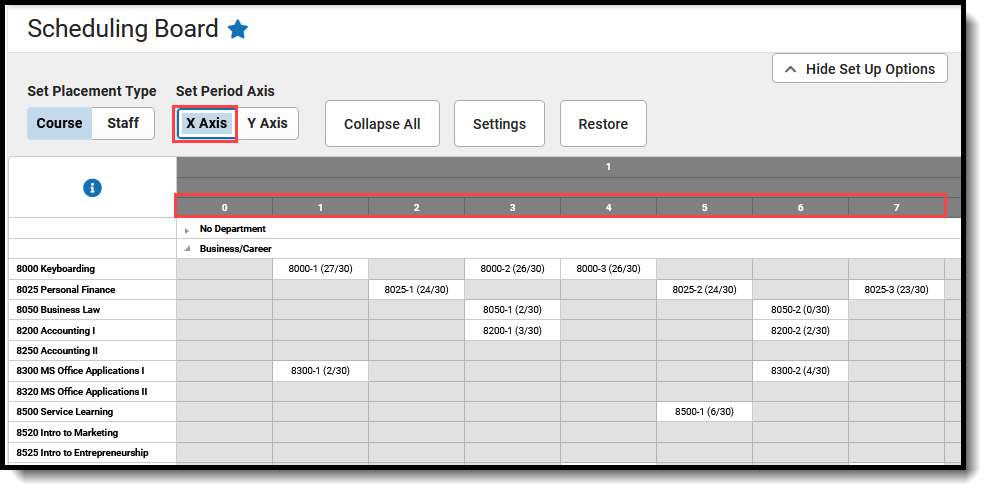
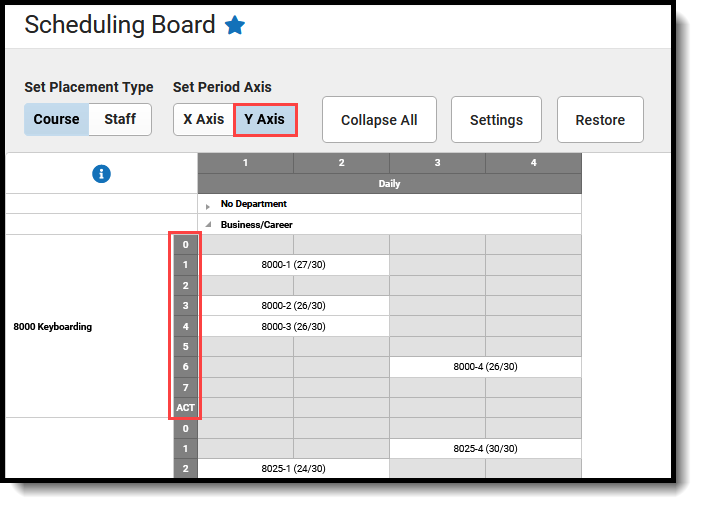
| Set Period Axis | Determines where the Periods display - across the top with Terms and Schedule Structure (X-axis), or down the side with the Course Names and Staff Names (Y-axis).
| ||
| Collapse All, Expand All | Collapses or expands all departments. This makes it easier to work with just one or two departments at a time. | ||
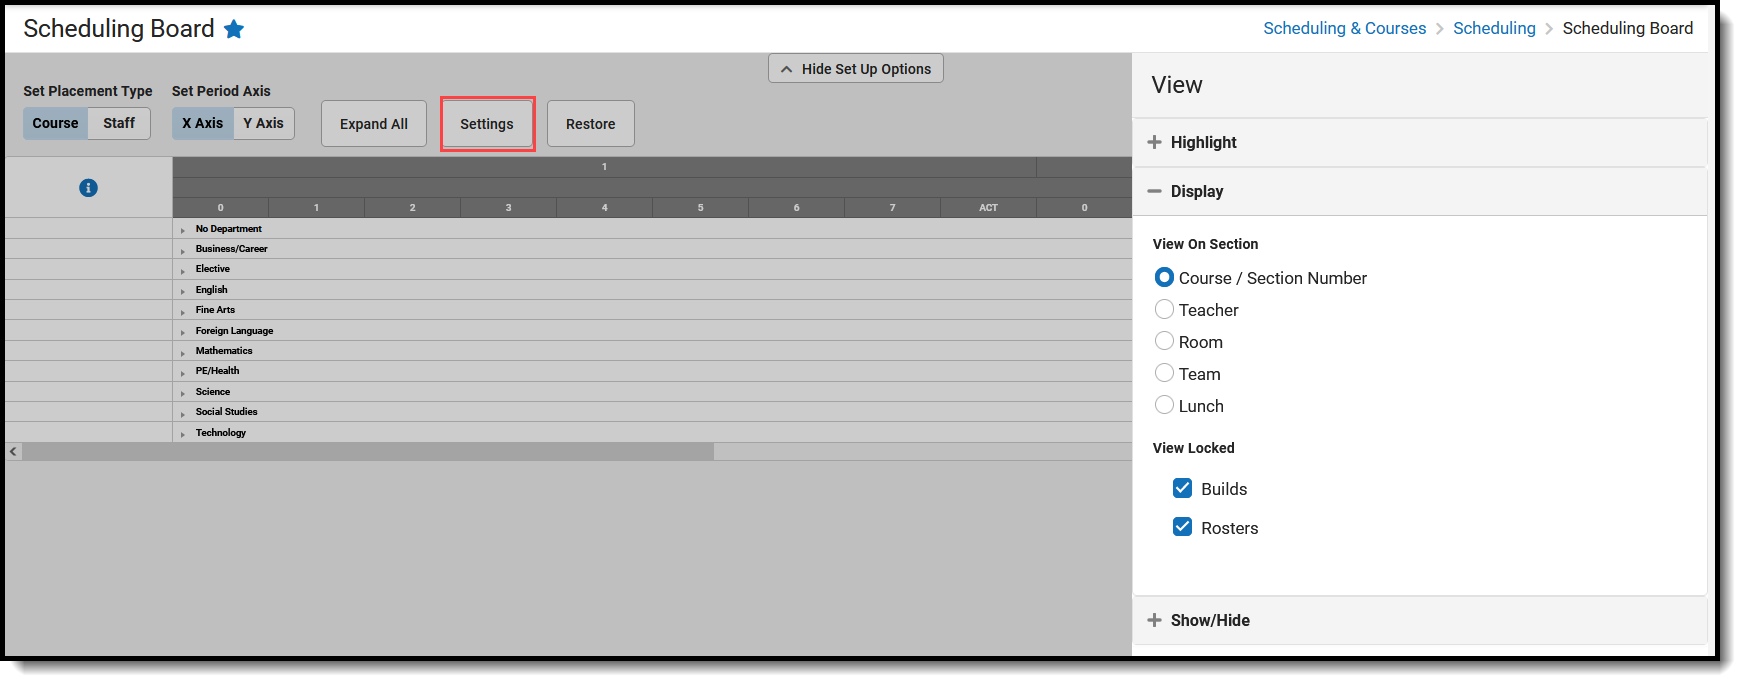
| Settings | Opens a side panel to set what displays as highlighted (conflicts, missing data, etc.); what displays on a course section (teacher name, room, team, etc.); what can be toggled on or off to show locked rosters and locked course builds; and what can be set to be show or hide (terms/period schedules, departments, singletons, etc.). See the Settings Side Panel section below for details.
 | ||
| Restore | Resets all settings to the original options. | ||
| Trial Name | Lists which trial is displayed.
To choose a new trial, click Cancel or Save & Close in the Action Bar. This closes the Scheduling Board and returns the user to the Scheduling Board Trials to choose another trial or create a new trial. | ||
| More Scheduling Tools | Lists additional tools that may help with the scheduling of courses for the next year, like Staff Planner and Course Planner. | ||
| Hide/Display Setup Options | Hides or displays all Scheduling Board Settings. Changes made to courses that may be in a term or schedule or period that is marked as hidden are still made, even when they aren't displayed on the grid. |
Settings Side Panel
The Settings Side Panel determines what information is called out, highlighted or hidden in the grid. These items may need additional work done on them. For example, a course is displaying in red indicating there is a student to student conflict after loading student requests; or there are some empty sections that could alleviate the extra students in some of the overloaded sections.
Settings Side Panel
| Option | Description |
|---|---|
| Highlight | |
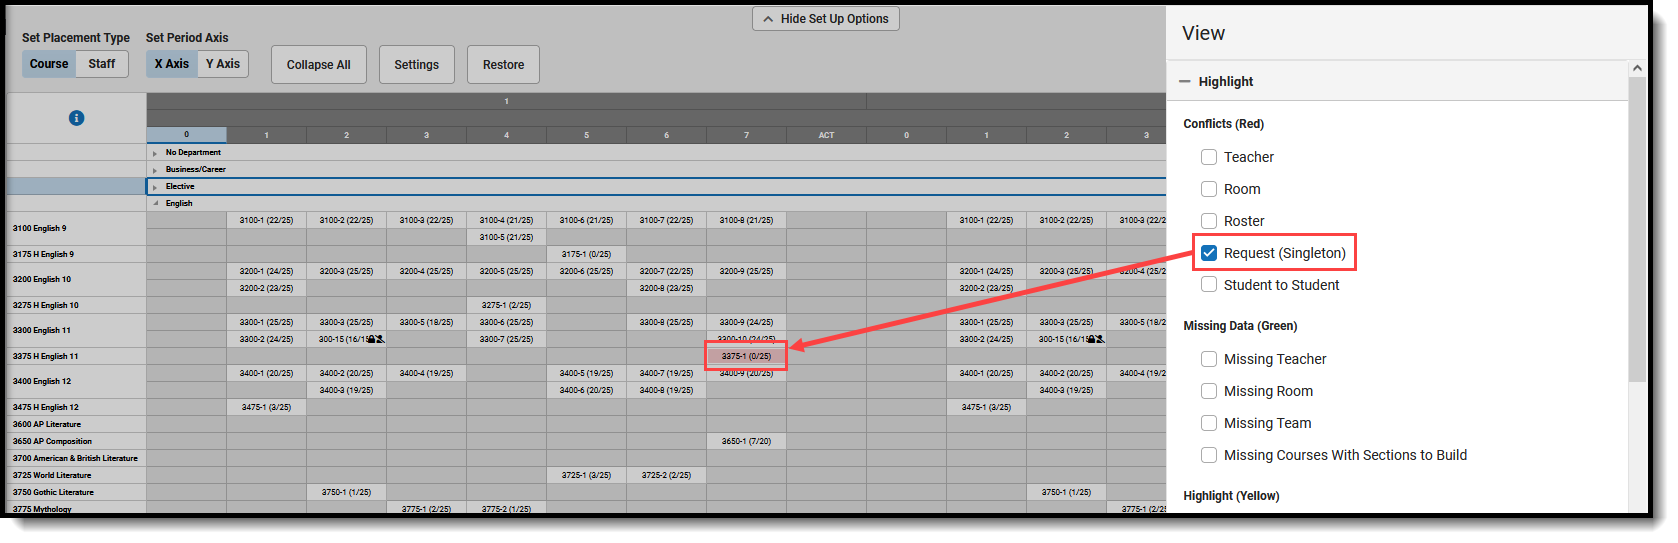
| Conflicts (Red) | Displays one or all of the following in red to show there is an issue (conflict) with the placement of the course section:
While all of these options can be selected to display at once, it works best when one checkbox is marked at a time.
The example below is highlighting a singleton course, where only one instance of that course is placed on the board.
|
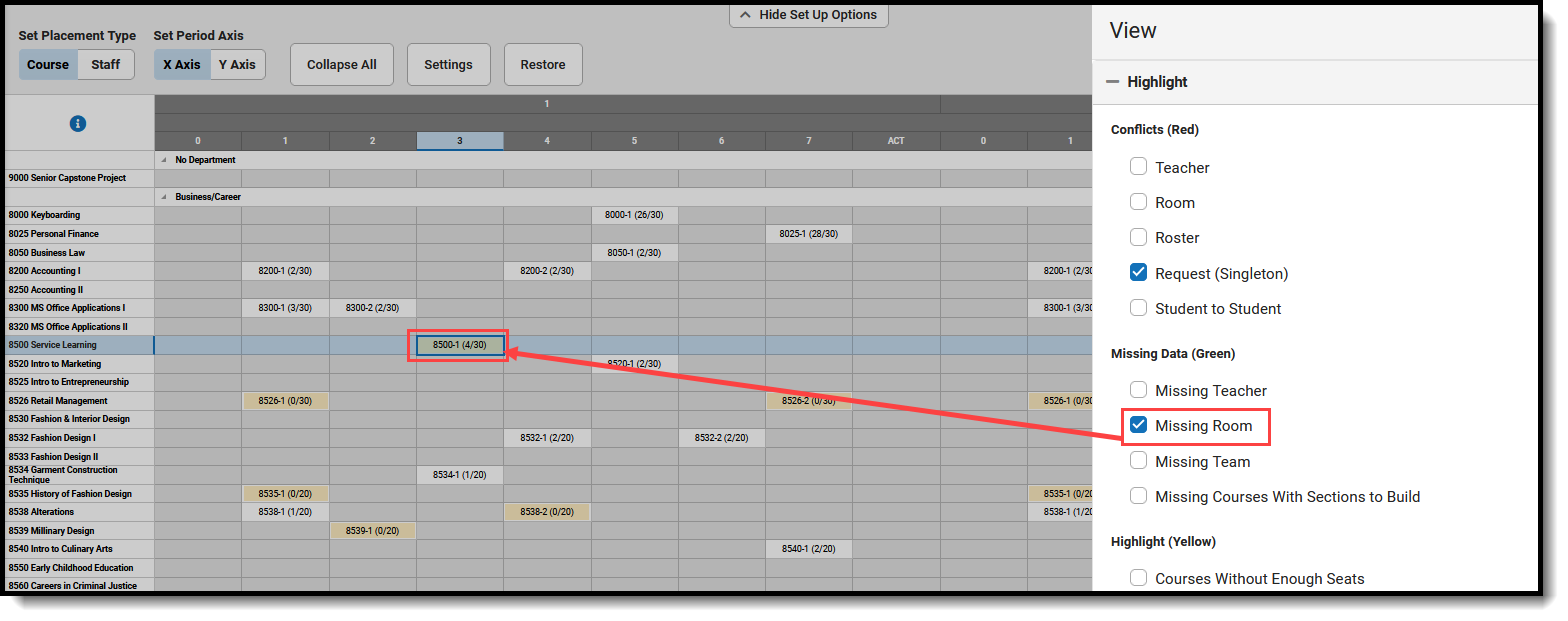
| Missing Data (Green) | Displays one or all of the following in greento show there is information missing with the placed course section.
While all of these options can be selected to display at once, it works best when one checkbox is marked at a time.
The example below is highlighting a course that does not have a room assigned.
|
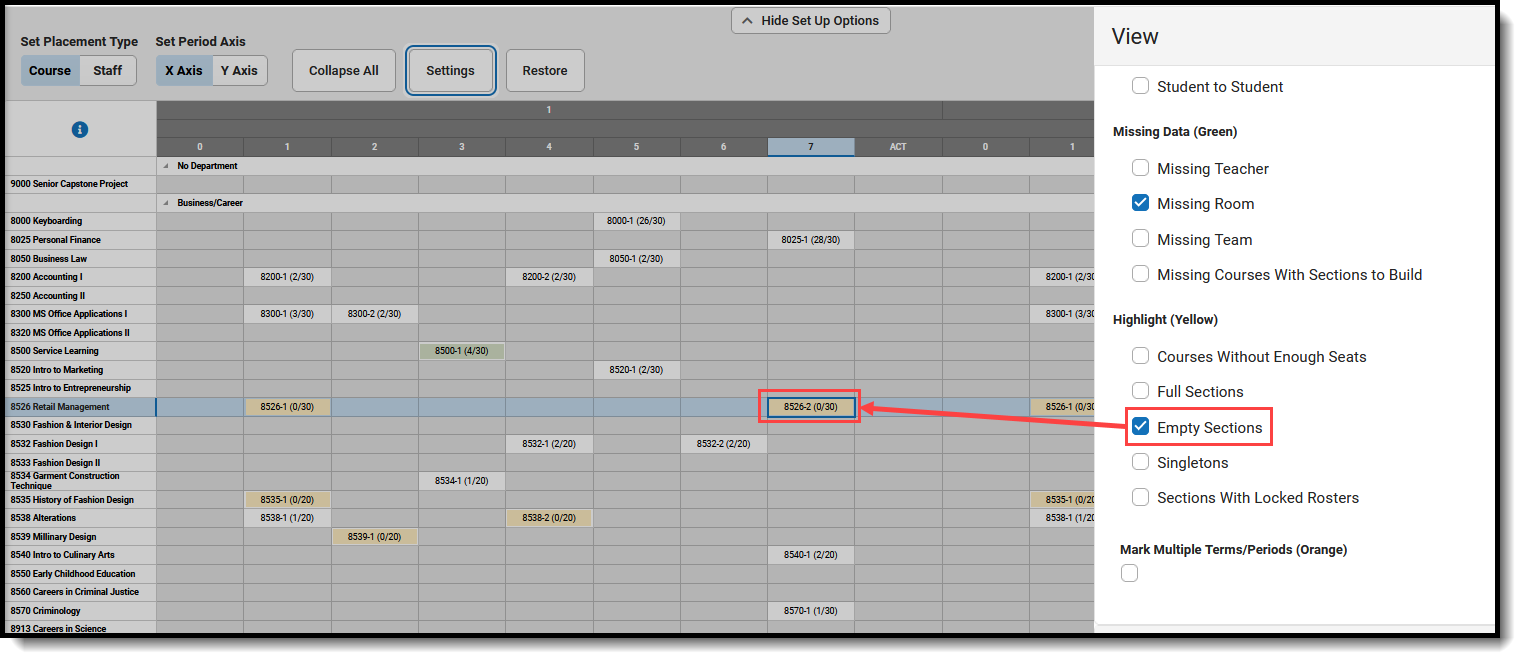
| Highlight (Yellow) | Displays one or all of the following in yellow to highlight their placement on the board:
While all of these options can be selected to display at once, it works best when one checkbox is marked at a time.
The example below shows a course with an empty section.
|
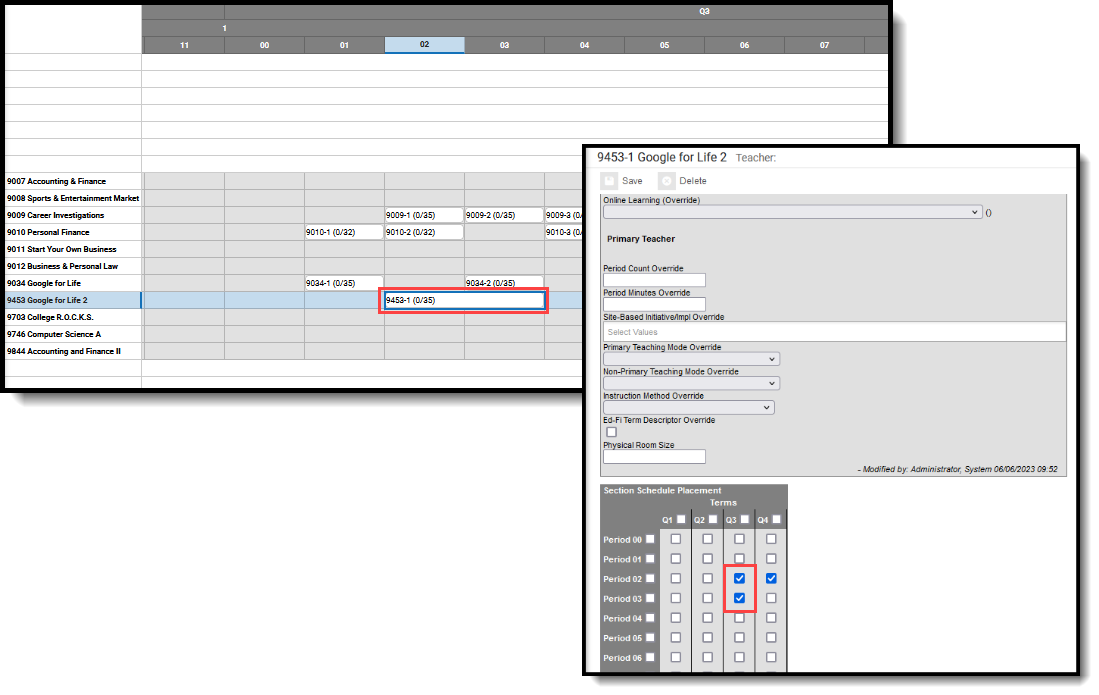
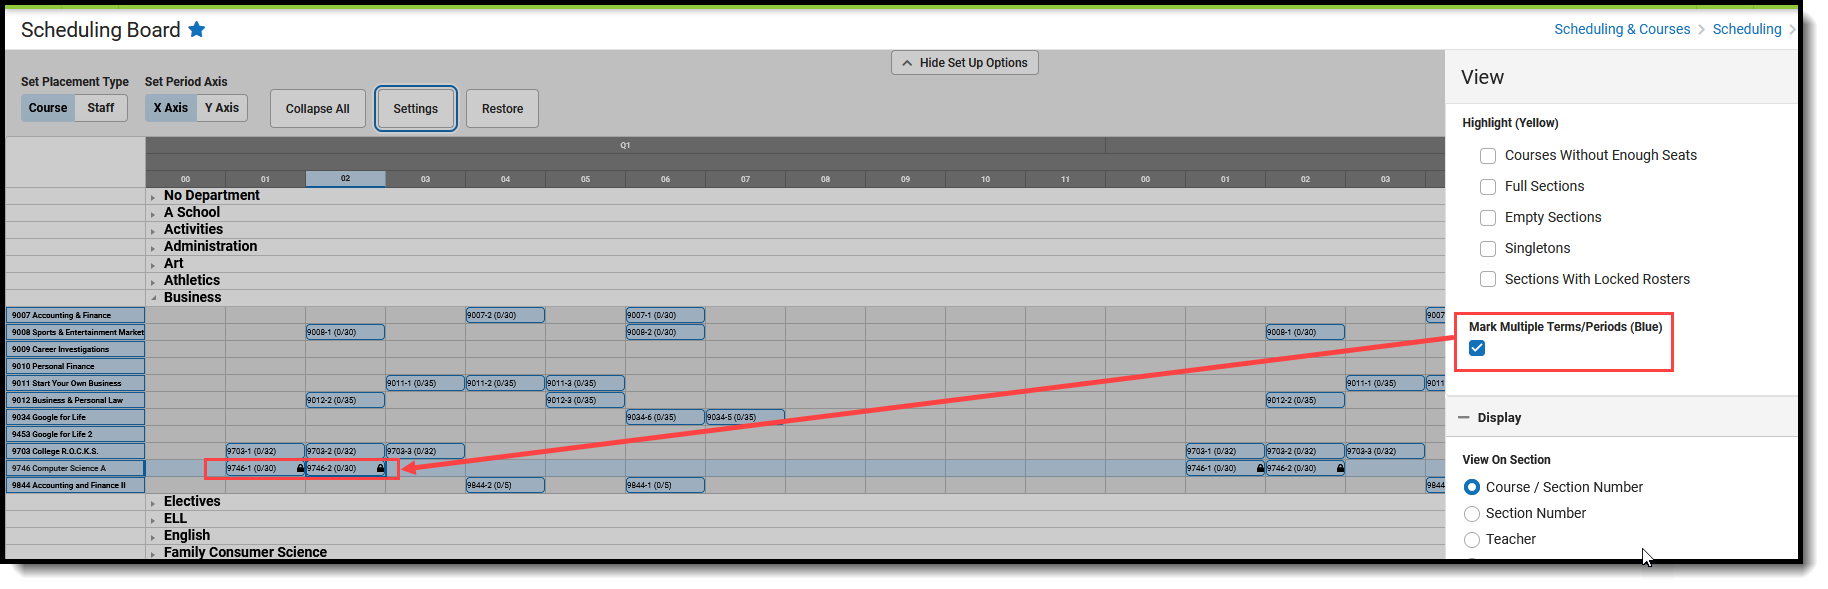
| Mark Multiple Terms/Periods (Blue) |
Displays which courses have sections that meet in multiple terms and multiple periods in blue. There may be instances where this section placement is correct, but verify those courses to be sure.
The example below shows a course that meets in Quarter 1 during periods 1 and 2.
|
| Display | |
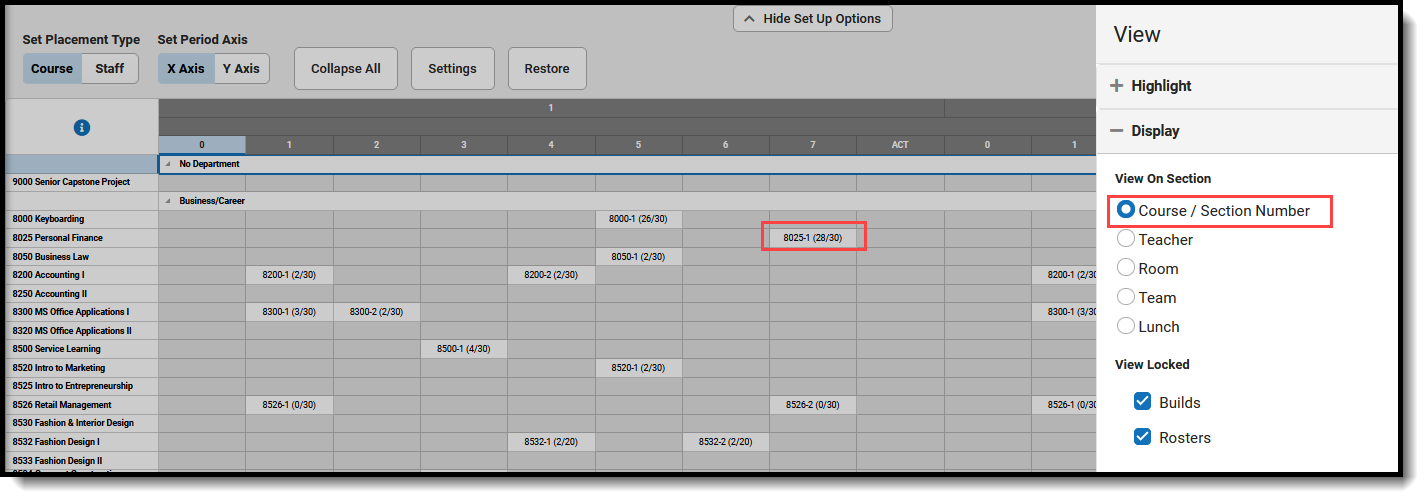
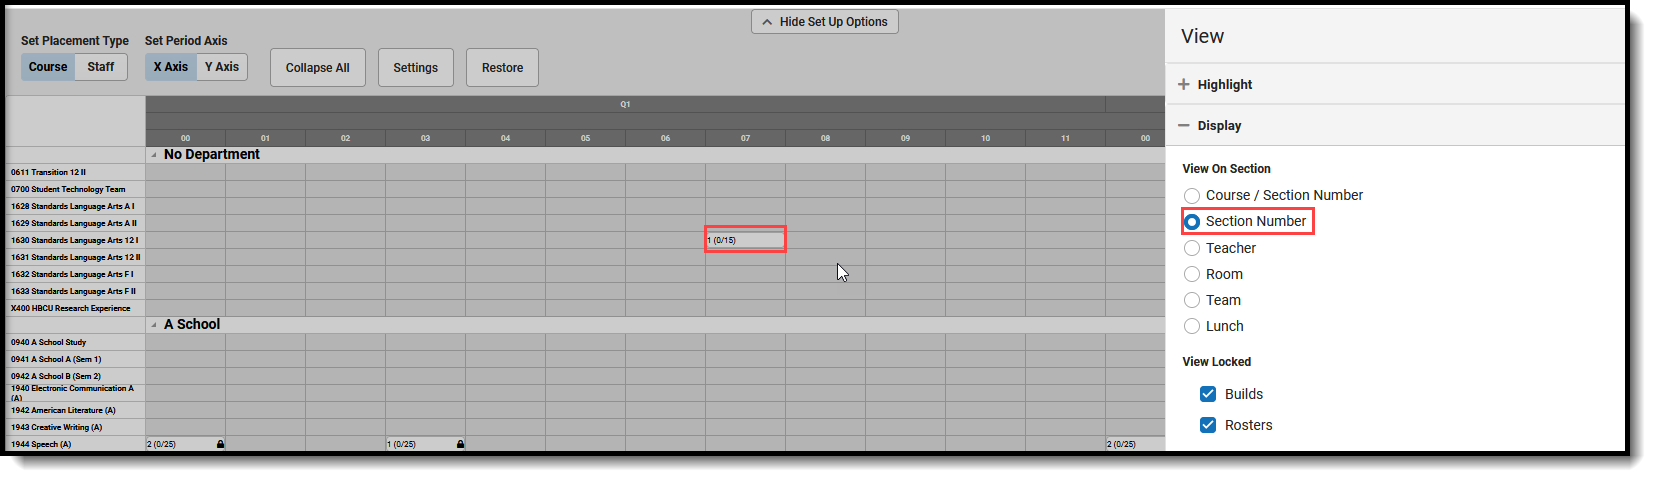
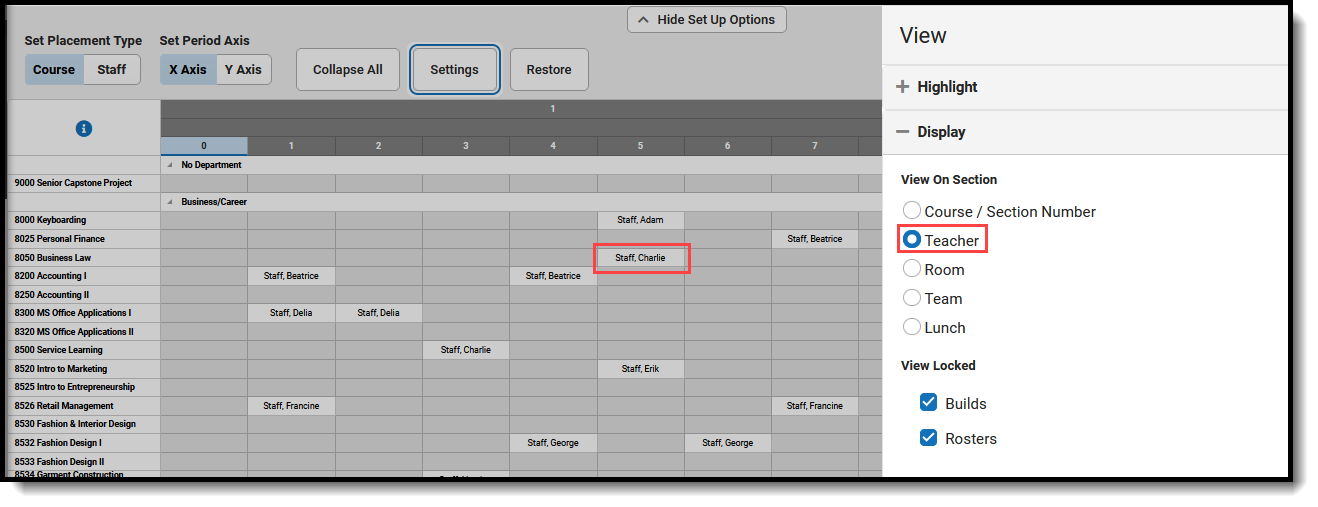
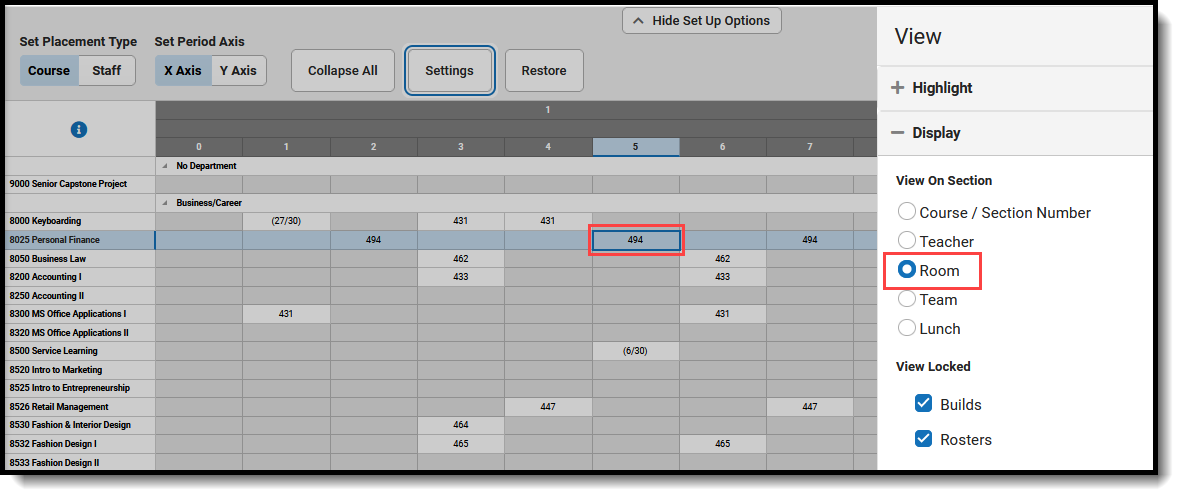
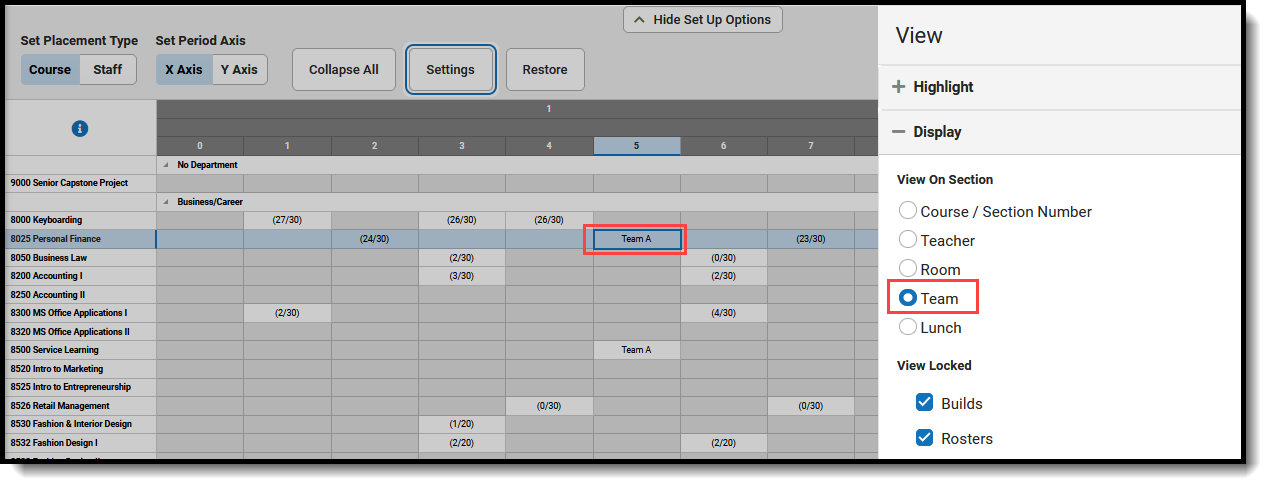
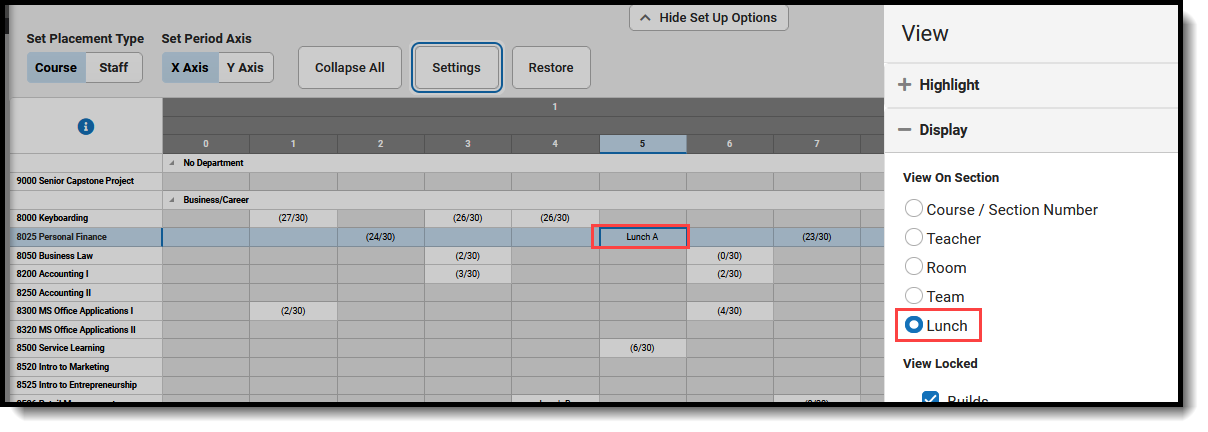
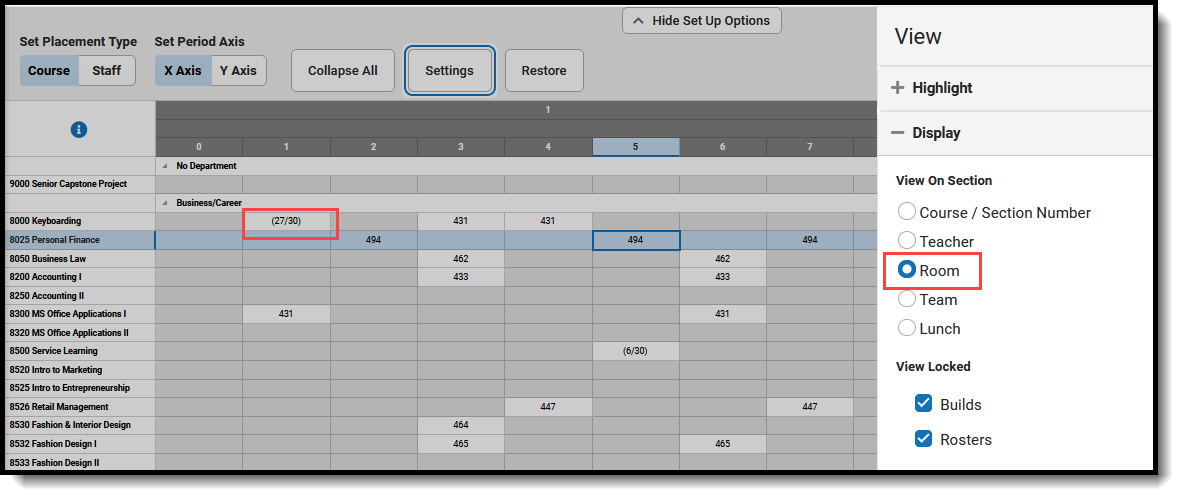
| View On Section | Displays the selected option on the section placed on the grid. One of the following can be selected:
When a section does not have the selected option populated, the number of seats places vs. seats available displays instead. |
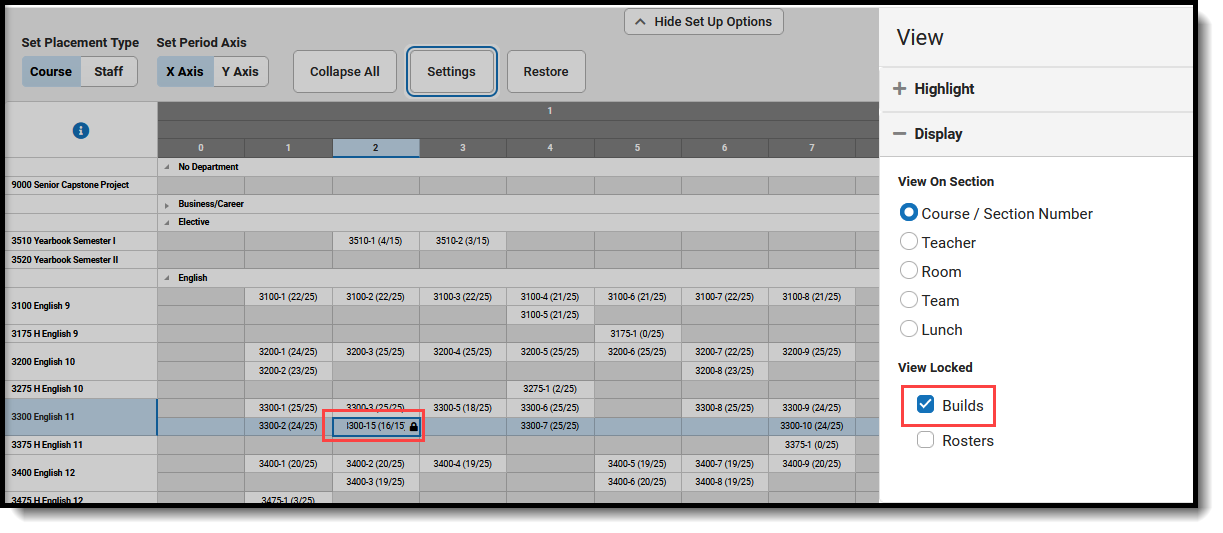
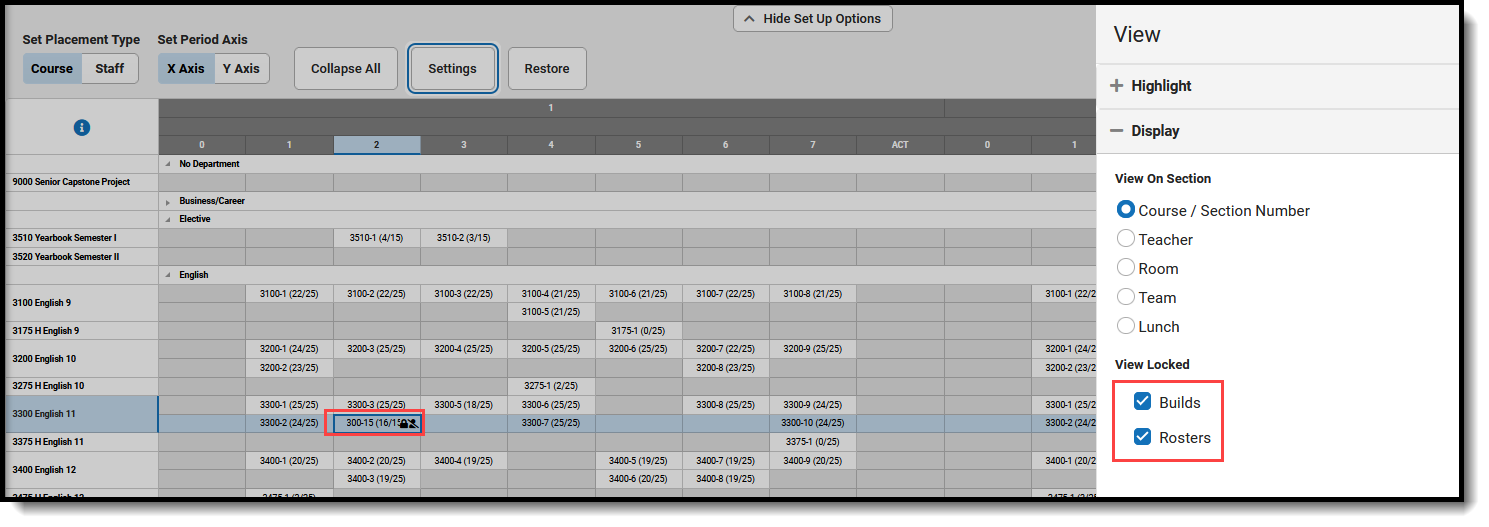
| View Locked | Displays icons that indicate the section build has been locked and the roster of that section has been locked.
When the build has been locked, the section displays with a padlock after the seats filled/seats available totals. When the Rosters have been locked, the section displays with a crossed out student image after the seats filled/seats available totals. Both of these options can be marked at one time, which displays both the padlock and the student image to display.
|
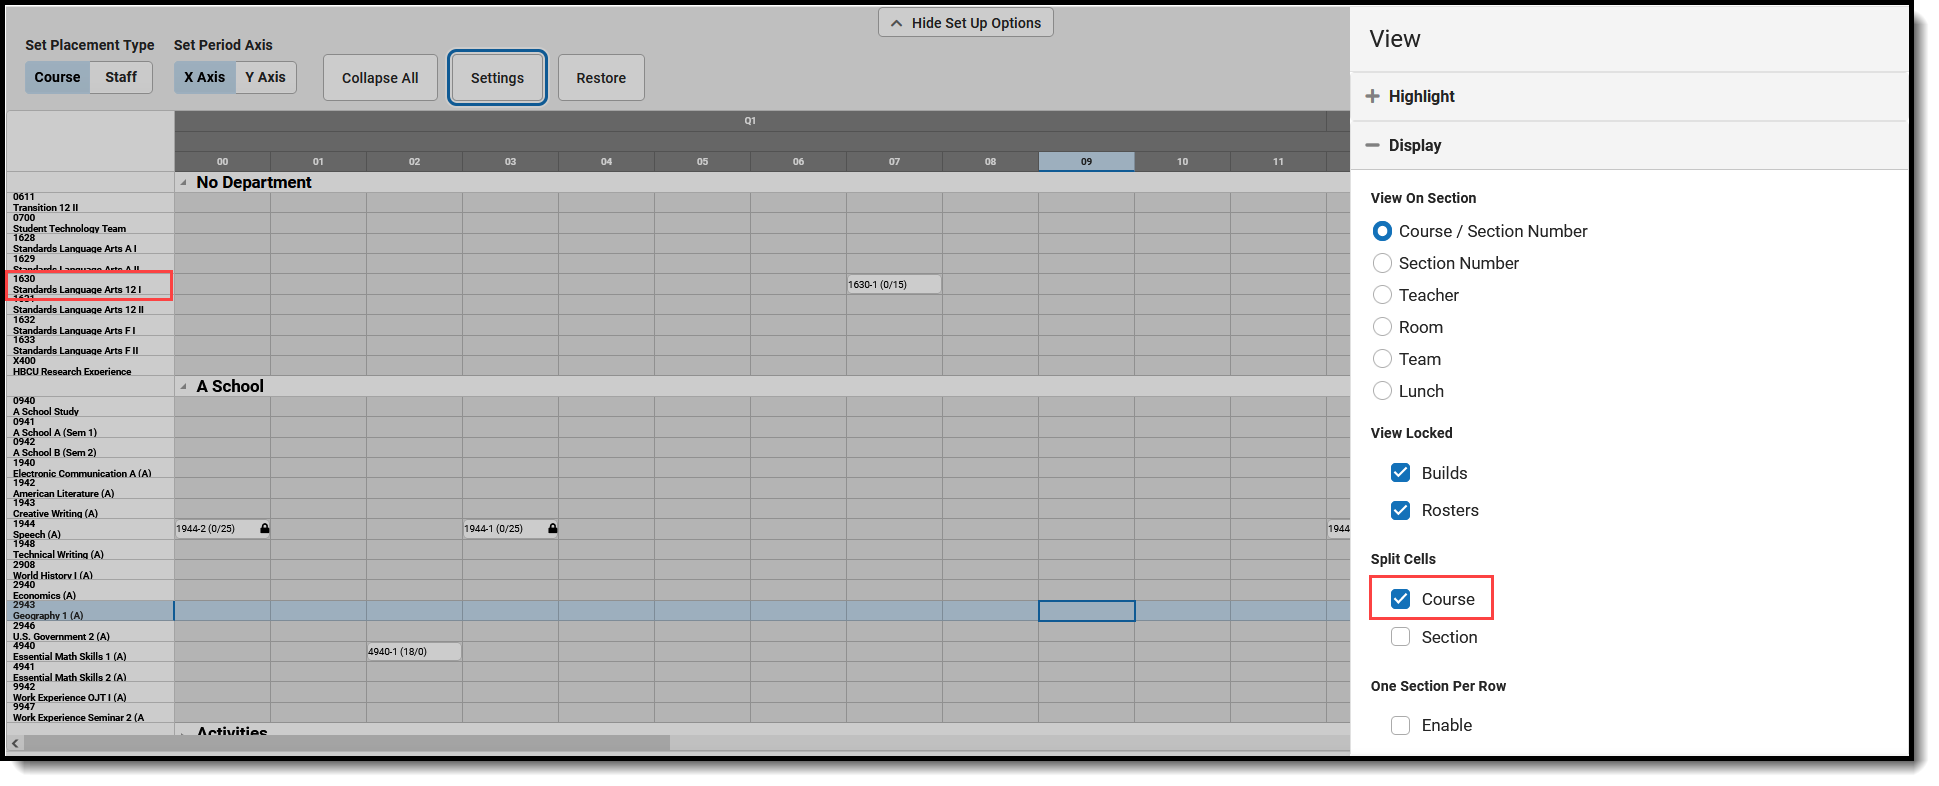
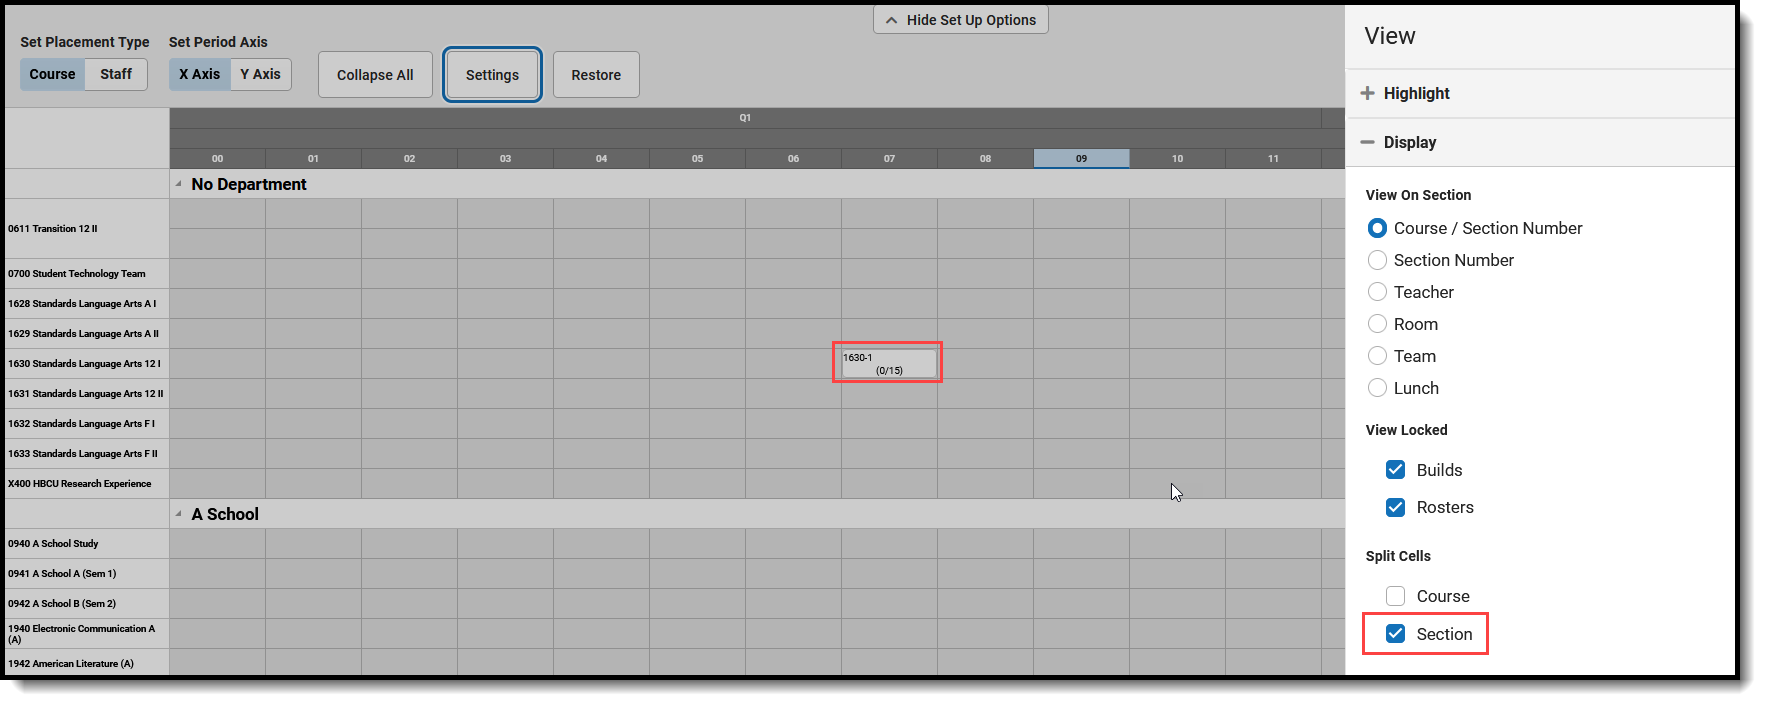
| Split Cells | Changes the display of courses listed on the X- or Y-axis (depending on preferences set in Set Placement Type) and the display of placed sections on the grid. When no options are marked, the courses in the axis display with the Course Number, Course Name format in one row, and the placed sections display on the grid with the Course Number-Section Number and available seat information in one row. 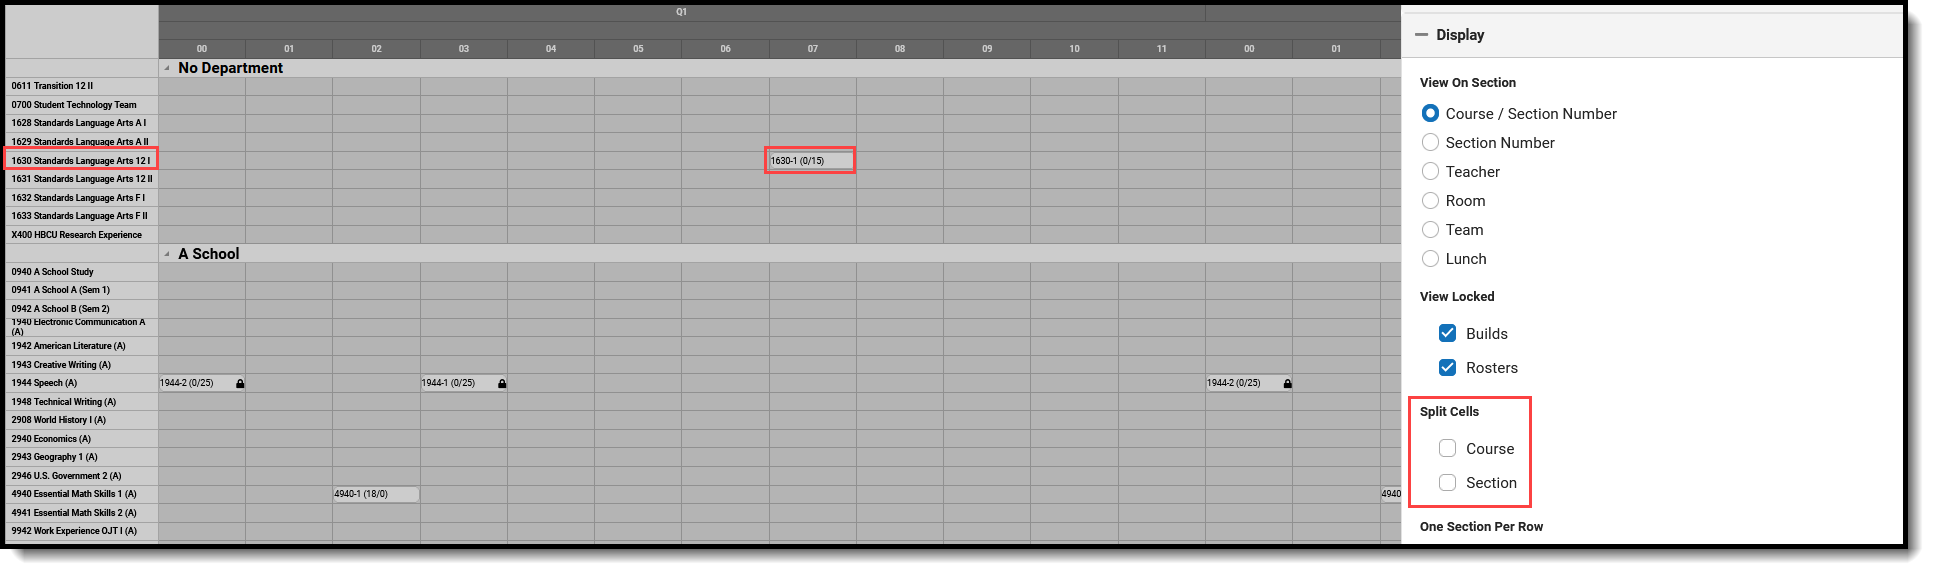 Selecting Course displays the Course Number on one line, and the Course Name on the second line. Selecting Section displays the Course Number-Section Number in one line and seat information on the second line. |
| One Section Per Row | Displays sections that span multiple period schedules (Y-axis) or multiple periods (X-axis) on one line.
 |
| Show/Hide | |
| Terms, Period Schedules and Periods | Hides the terms, period schedules and periods that are marked from the grid. All other terms, period schedules and periods display.
This is helpful when scheduling for just one term that has limited course offerings (maybe a January Term, for example) or scheduling for just the Activity or Homeroom period. In the example below, the terms are named as Term 1, 2, etc., with a single Period Schedule named Daily, and seven periods in the day, plus an activity period. Terms 1, 2 and 4 are hidden, so the focus is on Term 3. 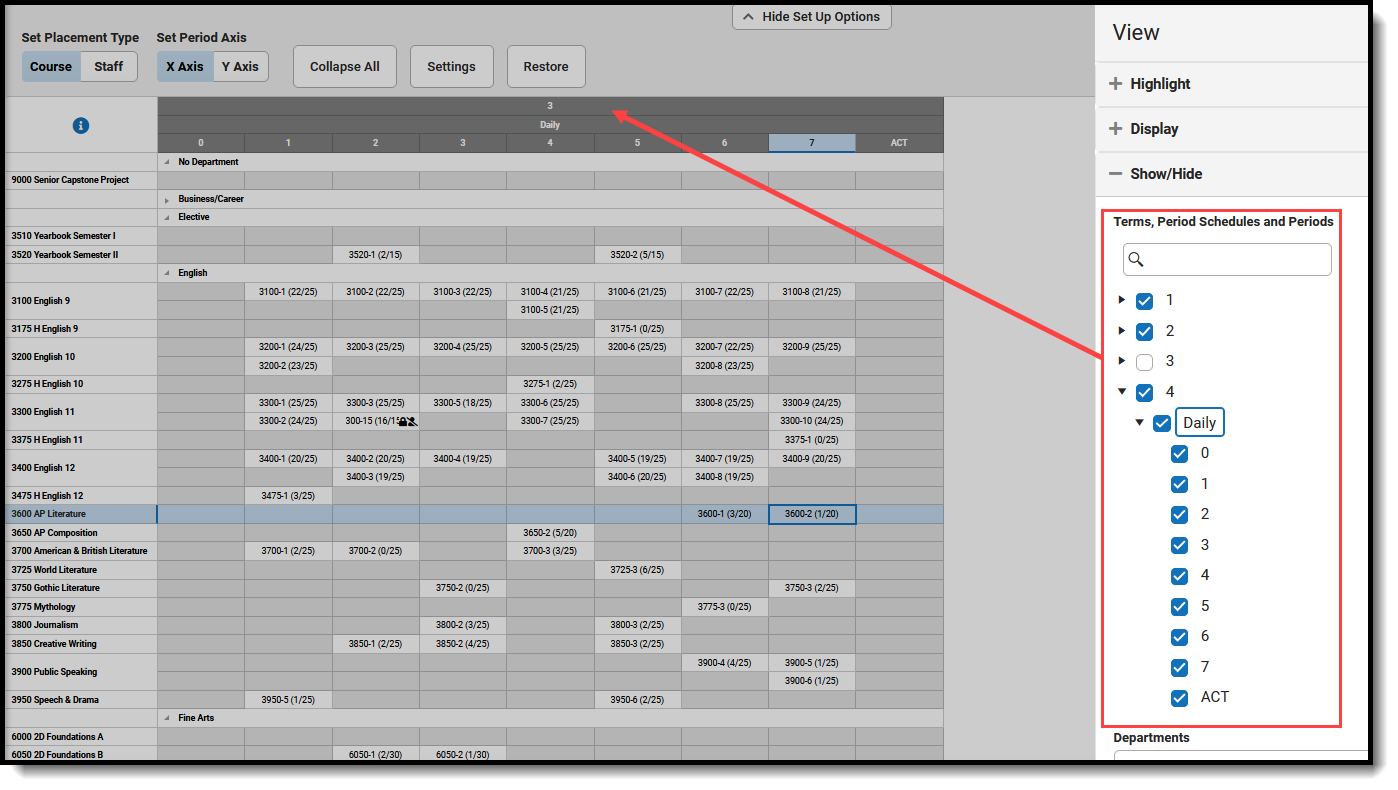 A more complex calendar structure might include less terms but more period schedules and shorter days. A more complex calendar structure might include less terms but more period schedules and shorter days.
In the example below, the calendar has three terms - T1, T2, and T3. Each term has 5 schedules - one for each day of the week - and seven periods each day. Hiding all terms and schedules for Terms 2 and 3, and hiding the schedules for the T, W, TH, F schedules and the HR period for Mondays provides a smaller view of the calendar. 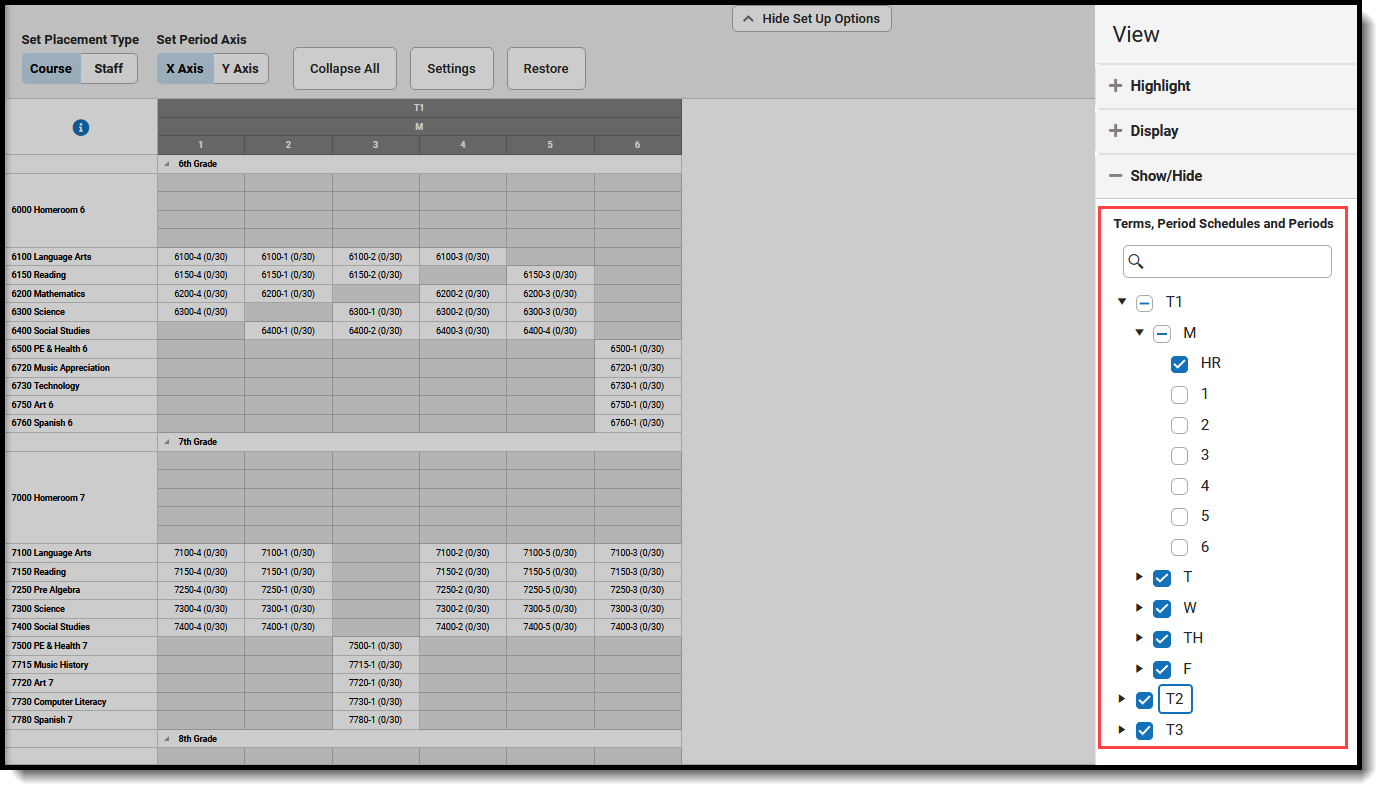 |
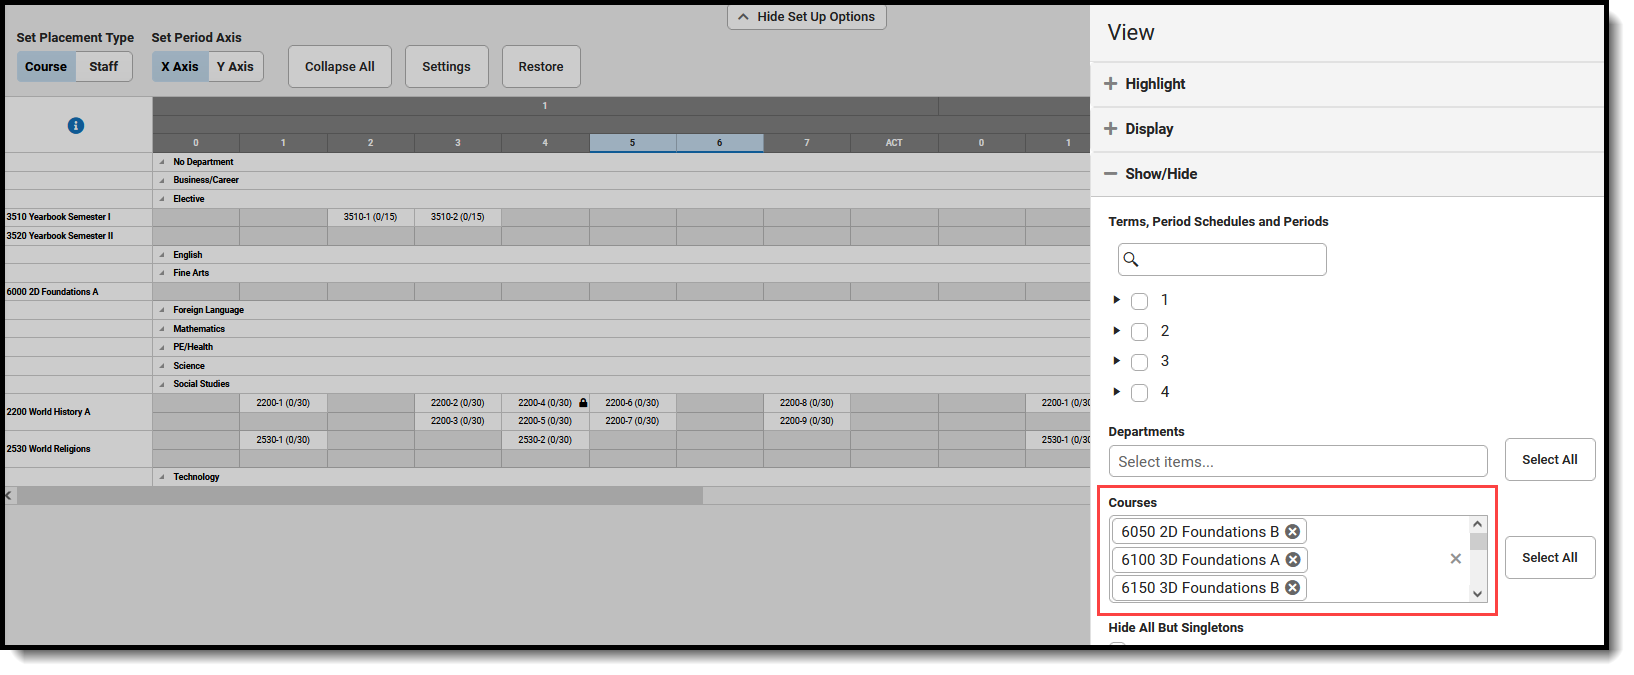
| Departments | Allows certain departments to be hidden from the grid to focus on other departments. Use the Select All button to add all departments in the calendar to the field, then remove the ones you want to work with. Or type in the field to select specific departments to hide.
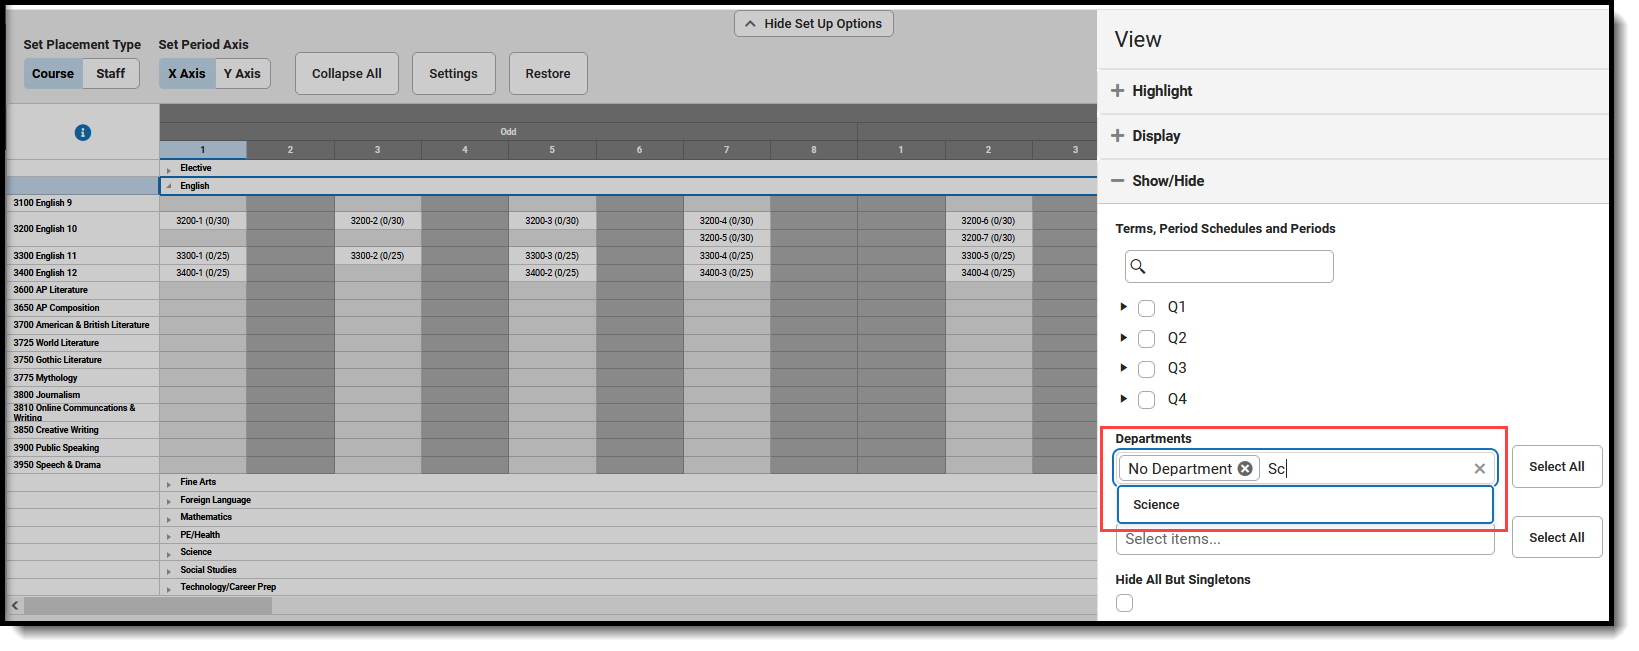 |
| Courses | Allows certain courses to be hidden from the grid to focus on other courses. Use the Select All button to add all courses in the calendar to the field, then remove the ones you want to work with. Or type in the field to select specific courses to hide.
 |
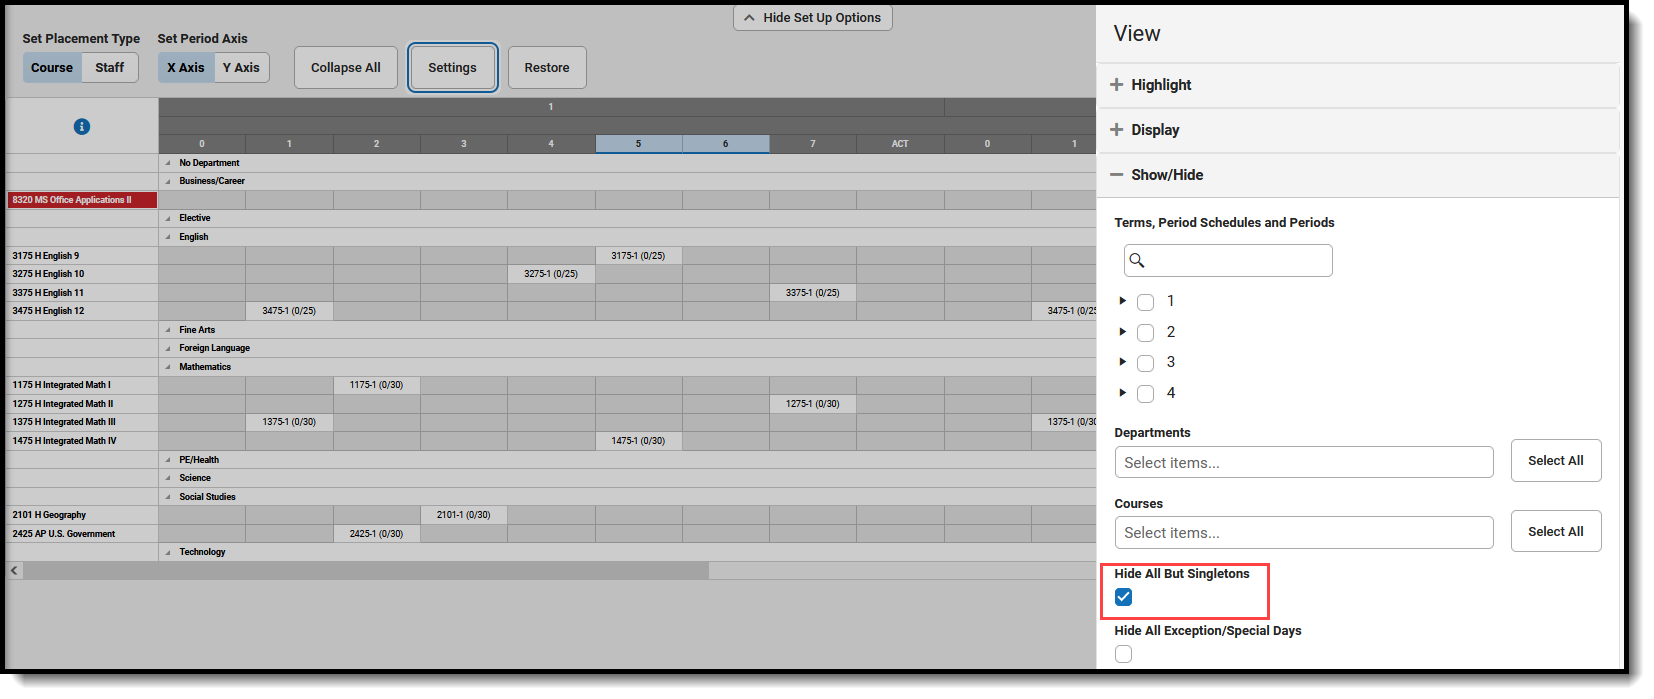
| Hide All But Singletons | When marked, only courses that meet once during a term display on the grid. Due to the limited availability of these courses, it is advised that requests for these courses be loaded first.
 |
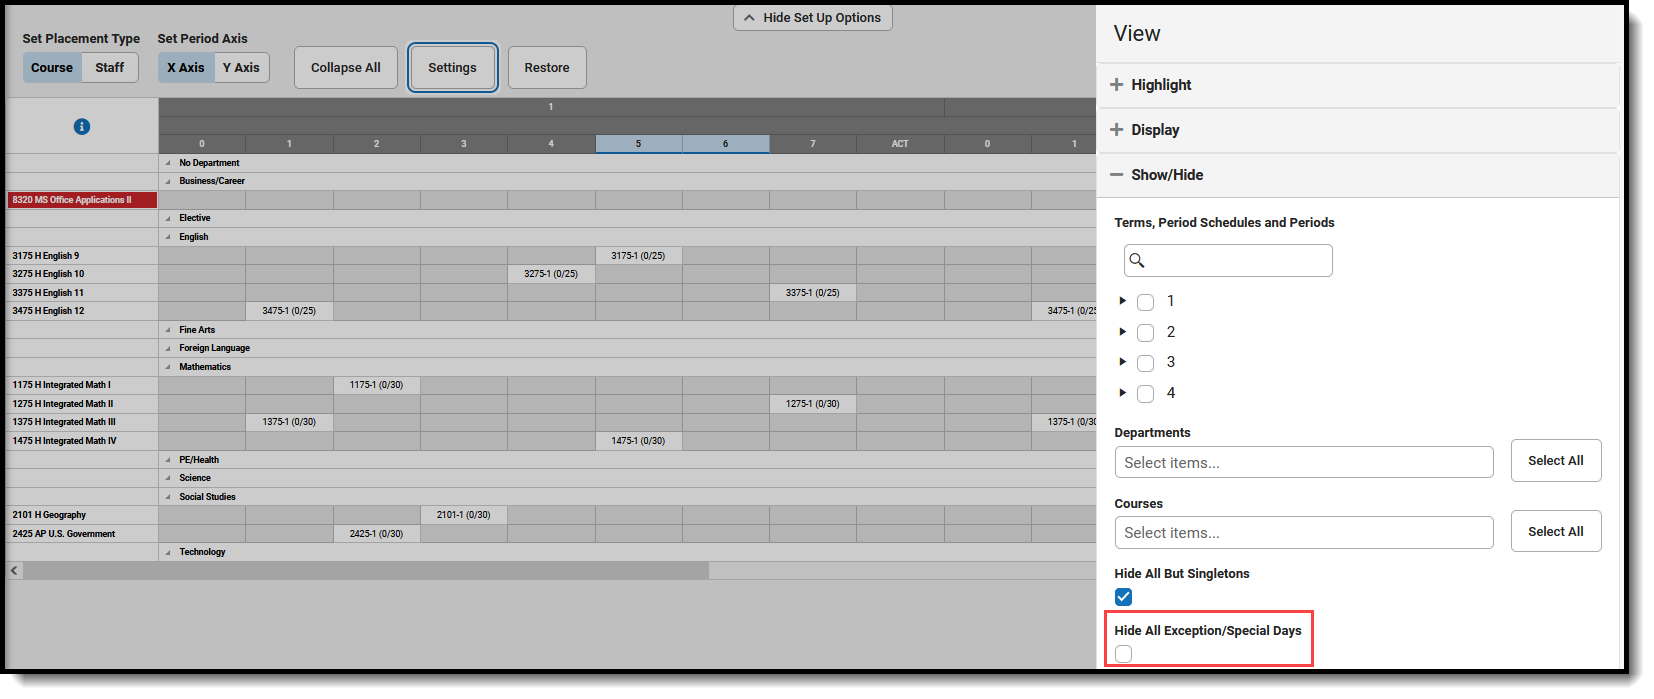
| Hide All Exception/Special Days | For schools that use Responsive Scheduling (e.g., Enrichment Days, Flex Time, etc.), marking this checkbox removes those days from the grid. Those days are scheduled a week or so in advance, so hiding them from the schedule when in the building/loading phase isn't necessary.
 |

Actions
| Option | Description |
|---|---|
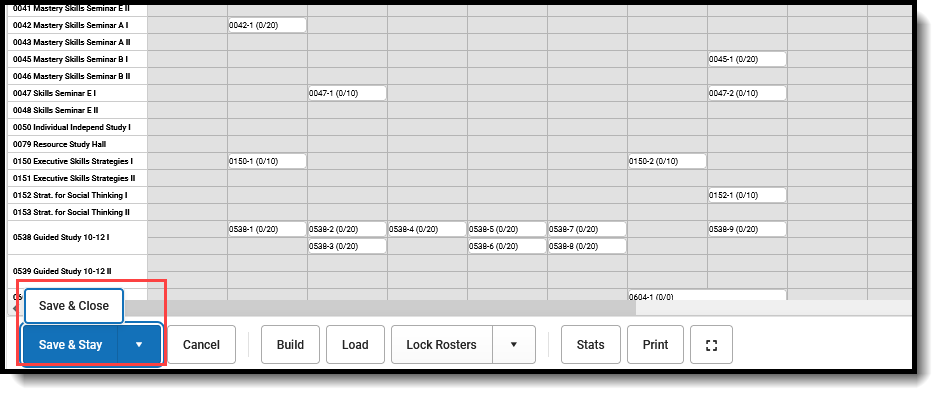
| Save | Saves any changes made to the placement and loading/building of courses since the last save. Two options are available:
In order to avoid a trial being locked after you have exited the Scheduling Board and to avoid losing any changes that were made to the course grid, use one of these options.
Save logic works in the background as follows:
The trial remains locked until the save is complete. The page will need to be refreshed to see that the trial is fully saved and no longer locked.
|
| Cancel | Closes the selected trial. When changes have been made but NOT saved, an Unsaved Changes message displays asking whether those changes should be saves. Choose Stay to remain on the board and continue working, or choose Leave to close the board without saving the changes. |
| Build | Places course and section information on the board. It uses information from the Course Planner and Staff Planner, and from any existing course information data that has been rolled over from the previous calendar.
Logic looks at ALL courses assigned to a staff member, regardless of whether the course section is placed in an instructional or non-instructional period.
A build does NOT add student requests. A build places the course sections on the grid in a period that best fits the requirements of the course and the Builder Configuration settings.
|
| Load | Places student requests into the sections placed on the grid.
|
| Lock Rosters | Locks or unlocks rosters for every course section placed on the grid for the students in the selected Grade Levels (selected in the Lock/Unlock All Rosters by Grade Side Panel). Only course sections with placed requests/students are locked/unlocked.
This means sections without any students assigned to them are not locked/unlocked, allowing them to be manually loaded and locked/unlocked. 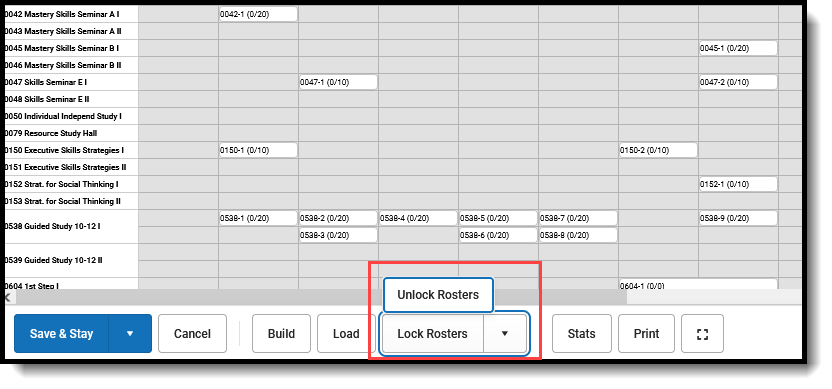 |
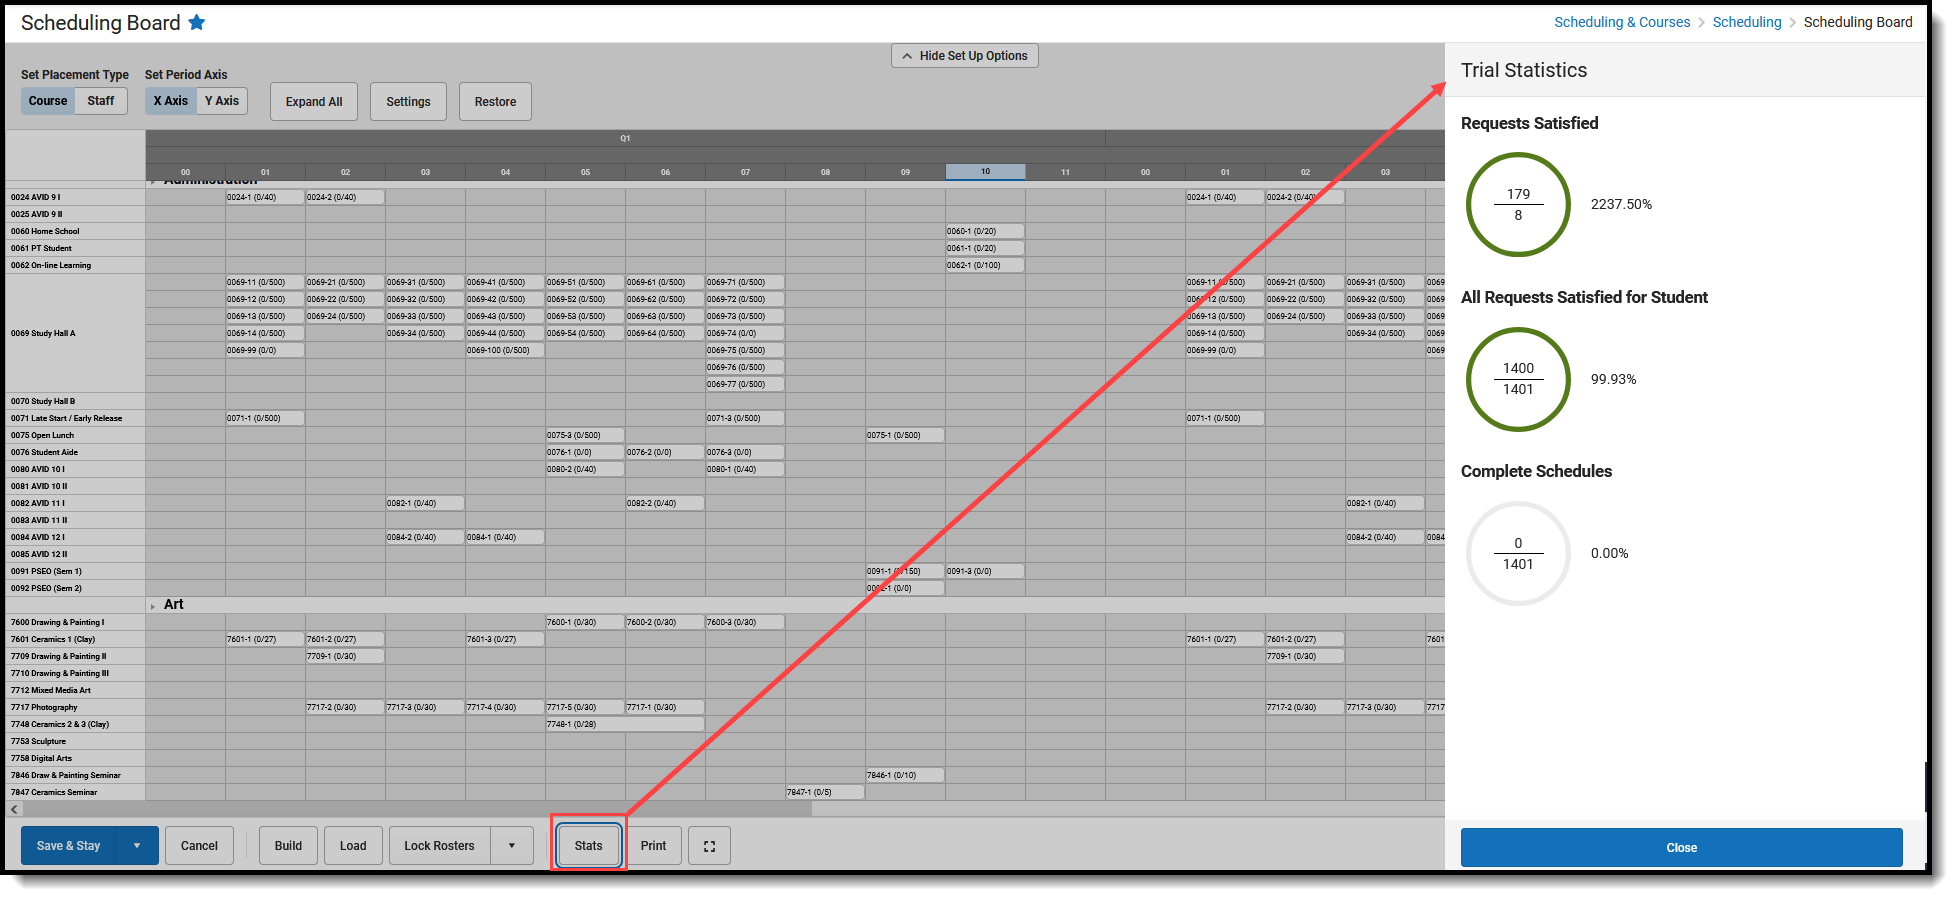
| Stats | Displays a Trial Statistics Side Panel that shows counts and percentages for Requests Satisfied, All Requests Satisfied for Student and Complete Schedules.
Alternate requests are NOT included in these values.
 |
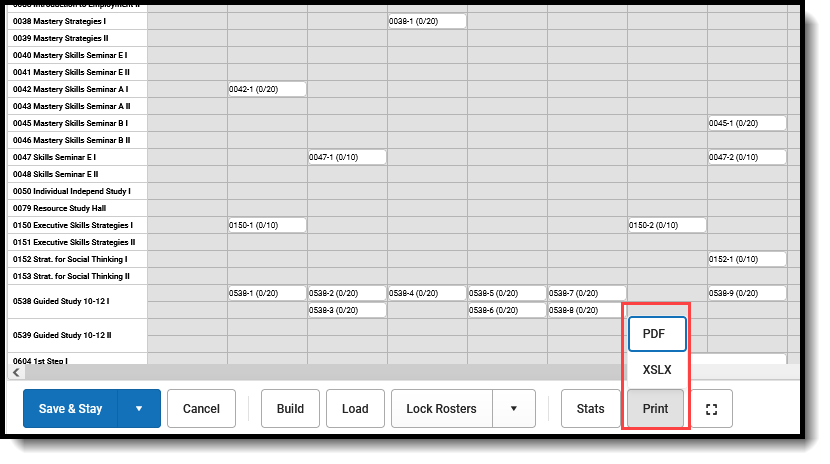
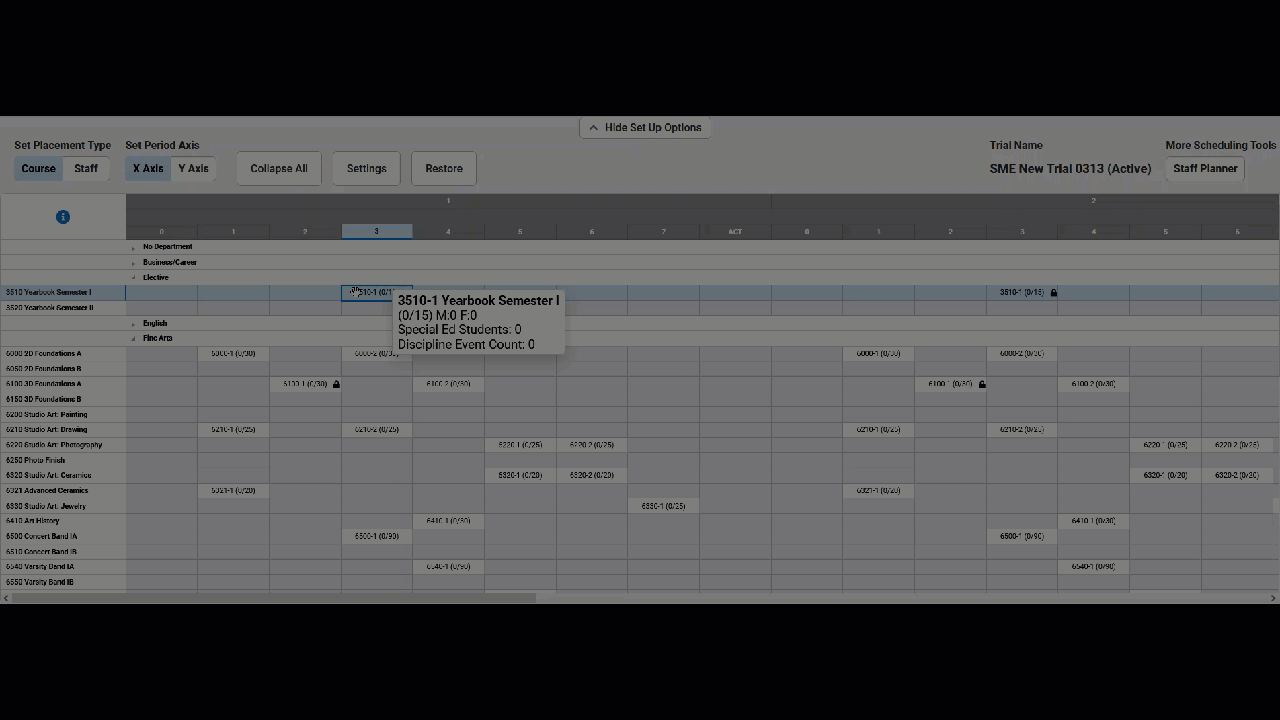
Displays the Scheduling Board in a printable view, in either PDF or XLSX format.
 | |
| Full Screen | Displays the Scheduling Board in a full screen view, removing boarders and navigation tips. This increases the working space. Click the ESC key to return to the previous view.
This first image shows the standard view of the Scheduling Board. 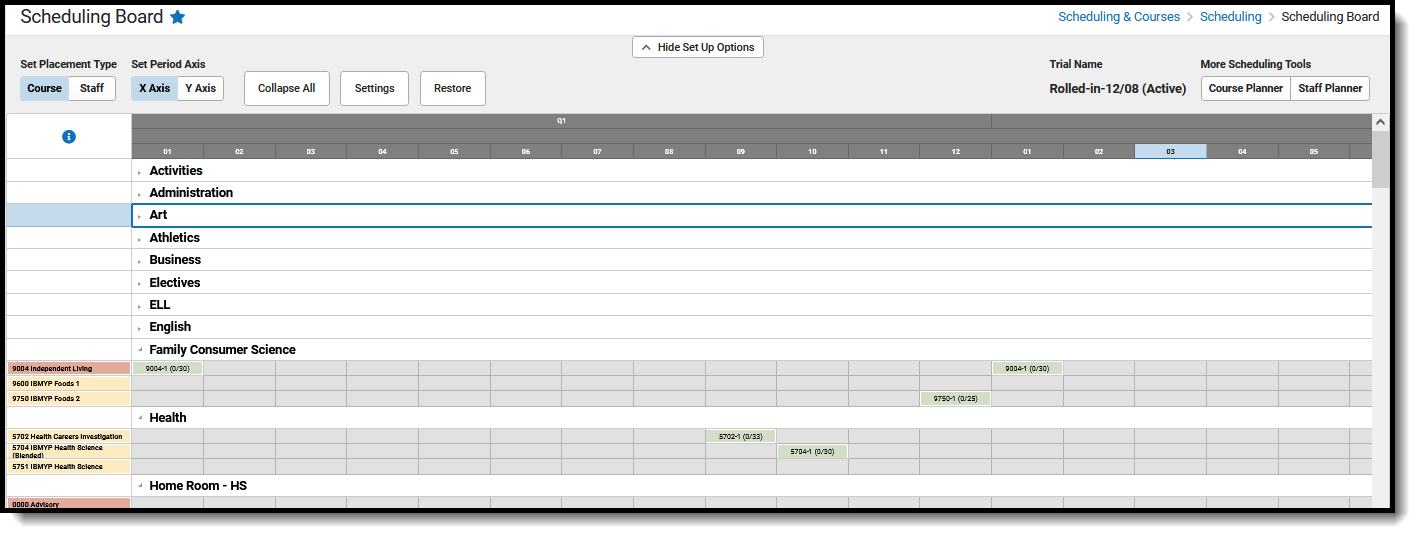 This second image shows the full screen view of the Scheduling Board. This second image shows the full screen view of the Scheduling Board.
 |


Build Settings Side Panel
The following table defines the available Build Configuration options.
 Build Settings Configuration
Option |
Description |
Comments |
|---|---|---|
Builder Search Depth |
Selected numeric value determines how far the builder looks in the planning tools to build the section the selected number of times to meet requests. |
The default value for this option is 3, which means the Builder attempts three different placements to build the course sections on the grid.
Start with this default value, and increase or decrease as needed. Recommended search depth is between 3 and 5. The higher the value, the longer the wizard may run to place sections. |
Automatically fix builder conflicts |
When marked, the builder automatically fixes the conflicts in section placement before completing. |
The Builder attempts to find another teacher (when possible) when the first teacher has a conflict.
For example, Teacher A is scheduled to teach Band during Period 3, but a new section for that teacher for a different course is dragged onto the grid. The Builder finds another teacher to teach the new section.
In another example, a user builds the course sections for the Math Department using the building menu available when right-clicking on the department name on the left-hand side of the builder. Then, a new section is manually placed onto the grid. This hand-built section is assigned a teacher, but the teacher has a conflict due to an assignment from the auto-built sections. When this option is turned on, the builder finds a new teacher to teach the manually placed section; when this option is turned off, the user needs to manually fix the teacher assignment or rebuild the department. Course Planner settings provide the building with logic to fix the build. |
Drag and Drop: Engage the Builder to Automatically Assign Teachers/Rooms |
When marked, the builder automatically assigns teachers and rooms when possible. The manual building of sections also does this. |
When the Staff Planner and/or Course Planner (takes priority) has data assigned for each teacher and rooms are created and set for available sections, the builder assigns an available teacher and an available room.
When there are not that many constraints entered for teachers or for courses, turning this on may cause more wrong assignments than necessary. The section would stay empty and flagged, alerting you to make an assignment. When there are a lot of constraints, using this option would reduce the amount of manual assignments needed. Options set in the Staff Planner override this selection.
When selecting a room for a placed Section, the logic in the build process of the Scheduling Board follows this order:
|
| Drag and Drop: Enable Preferred Section Placement | When marked, the builder uses a Conflict Matrix or "heat map" to determine the best placement for the section. | The three best placements for that new section are displayed, and includes the teacher and room assignments. The first placement is the same location the Auto-Build logic would choose when a single section was placed. |
Periods taught for 100% FTE Required |
Entered numeric value is considered the teacher's full time employment value per term.
This value is represented by a zero (0) in the Staff Planner. |
A teacher may have a prep period in a seven period day, which means 100% capacity is when the teacher is assigned to six course sections during the term.
When a course section spans multiple periods, each period associated with that section is included in this value. Options set in the Staff Planner override this selection. |
| Max Different Courses Taught per Day Required |
Maximum number of courses a teacher can be assigned during the term. | This reflects a negotiated or preferred number of periods the teacher is allowed to teach. Options set in the Staff Planner override this selection. |
| Max Consecutive Periods Taught per Day Required |
Maximum number of consecutive periods the teacher can teacher during the day. | This reflects a negotiated or preferred number of courses a teacher is allowed to teach in a row without a prep period. Options set in the Staff Planner override this selection. |
Min % Used in Sections Needed Calculation Required |
Minimum percentage of seats filled to consider the creation of another section. |
This value, when met, does not recommend another section for the same course until the current section(s) is at least at the entered capacity for student requests. The default value is 60%. It is an average of all sections.
For a course that has 100 requests, and there are three sections of 30 students each, the builder adds a fourth section to fit the remaining 10 requests, and then reshuffles the requests so all four sections have a more even distribution of students (in this case, 4 sections of about 25 students).
When hovering over the course name in the list of courses built, a total number of sections built and sections needed displays. This is a three-step calculation:
|
Limit Course Build by Sections to Build |
Selection limits the courses that are loaded to only those that meet the section limits. Options are:
|
For courses with limited sections and high student requests (i.e, Journalism or Yearbook), building these courses first may satisfy more requests and ensure students are scheduled into these sections.
|
Load Settings Side Panel
The following table defines the available Load Configuration options.
 Load Settings
Option |
Description |
Comments |
|---|---|---|
Full Load Search Depth |
The selected numeric value (1-15) determines how many times the Scheduling Board attempts to satisfy each course request. |
This field MUST have a value other than zero (0) assigned. When it is set to zero, a full load does not occur.
Change the setting to a value between 1 and 15, depending on your school's needs. |
Default Course Priority |
Course priority allows courses without a load priority to be mass-assigned one. This allows for prioritizing or de-prioritizing other courses by using numbers greater or smaller than those entered for those courses. |
When set to 1, all courses marked with a Schedule Load Priority of 1 are loaded first. Other courses are loaded after that in the least number of sections.
Schedule Load Priority is entered on the Course Information editor or Course Masters Information editor. |
| Configure Auto Loading | ||
Autoload Search Depth |
Selected value (1-15) indicates that the Scheduling Board logic works to that level to meet the entered requests and is used in conjunction with the Autoload checkboxes.
The wizard only attempts to place the request being moved; it does not reshuffle the entire schedule. |
When set to 3, the wizard reworks student requests three times to place the student in a matching course section. |
| Autoload When Section Is Created or Deleted | When marked, students are placed in other sections based on their other requested courses and section placements when an existing section is created or deleted. | N/A |
Autoload When Section Is Moved |
When marked, students are placed in other sections based on their other requested courses and section placements when a section is moved to a different period. |
N/A
|
| Load Filters | ||
| Grades | Only those grade levels in the selected school are displayed. When the grade level is not marked, students enrolled in that grade for the next school year do not have requests loaded. |
One grade level can be loaded at a time, and those requests worked as needed. Some prefer to complete senior schedules first before the other grades.
|
| Limit Course Load by Sections to Build | Selection determines the order in which course sections are loaded. Options are:
|
For courses with limited sections and high student demand (i.e., Journalism or Yearbook), loading these courses first may fulfill more requests and ensure that students are scheduled into these sections.
|
| Filter by Ad hoc | Select a previously built filter to load course requests. Use this option to load specific groups of students - a filter with a list of 12th graders, or a group of Special Education students. All Filter Types can be selected - Query Wizard, Selection Editor, and Pass-through SQL Query. | When a filter is selected, the total number of students included in the filter is displayed below the filter field. The changes being made by the load only affect the students in that filter who have course requests. |
| Load Alternates | ||
| Maximum Number of Alternate Sections | The entered value indicates the number of alternate courses a student can be scheduled into based on their course requests. This field allows a value greater than zero up to 99. Once this is assigned, users can:
| When the field is set to three, a student will not be scheduled into more than three alternate sections. Students are assigned to sections based on the Alternate Request Priority Order, which overrides any load priority set for the course. |
Section Balance Configuration Side Panel
Users can define weights on six factors that determine how hard the algorithm needs to work to achieve a balance between sections of a course. The degree to which the Scheduling Board seeks balance in each area is governed by a percentage slider from 0 (does not factor) to 100 (factors the most). In addition to the slider, a text box to the right of the slider allows for a total percentage entry - 50 for 50%, 75 for 75%, etc.

The following table defines the Section Balance logic.
When attempting to place a student, course sections where the student could be placed are retrieved, but before the student is placed, the sections are sorted using an algorithm that takes into account the following:
- Discouraged Peers (student constraints). The section with the fewest number of discouraged peers is given preference, and no further evaluation takes place. There is no slider for this.
- Evaluation of Gender/Minority/Special Education/Discipline. A composite score is calculated using the entered percentage/placement of the sliders. The values for each are summed and used as a target weighting or balance for each section.
- Lowest Sum Score Placement. Based on the composite score above, a student who is a minority, is a special education student, is in the gender minority for the type of class, or has discipline issues, the section that has the lowest sum score based on students already placed in the section is ranked first for placement, the second lowest scoring section is ranked second, and so on.
These categories are not evaluated separately; rather, the composite of students in the section across all categories is used to create balance.
Below is a breakdown of how the Section Balance options work together to load students into courses. Included is a Normalization Constant, which gives equal weight to each variable, so no single variable steers the model's performance in any direction just because it may involve larger numbers. These constants are used when sorting the sections to determine which section best fits the student.
When the slider is closer to the left, fewer sections are considered for placement; when the slider is closer to the right, more sections are considered for placement.
| Section Balance Factor | Description | Normalization Constant |
|---|---|---|
| Student Balance | Favors putting students into the section with the lowest number of students.
This value is always considered when loading students into sections. |
1 |
| Gender Balance | Favors putting students into the section with the lowest number of students of their gender.
This value is ignored when the student's gender noted on their Identity record is NOT M: Male or F: Female. |
.5 |
| Minority Balance | Favors putting students into the section with the lowest number of minority students. Minority status is determined by whichever race/ethnicity code is set as the default value of the Campus application.
This value is ignored when the student's Race/Ethnicity is White. |
The total number of minority students enrolled in the current calendar divided by the total number of enrolled students. |
| Discipline Balance | Favors putting students into the section with the lowest number of total behavior events.
This value is ignored when the student has fewer discipline events than the average number of discipline events per student enrolled in the current calendar, when the slider is set to zero (0), or when there are no discipline events for any enrolled students. |
The total number of discipline events for students enrolled in the current calendar divided by the total number of enrolled students. |
| Special Ed Balance | Favors putting students into the section with the lowest number of IEPs. This number is based on the following:
This value is ignored when the student is NOT considered Special Education, when the slider is set to zero (0), or when there are no Special Education students enrolled in the current calendar. |
The total number of special education students enrolled in the current calendar divided by the total number of enrolled students. |
| Program Participation Balance | Favors assigning students to the section with the fewest students assigned to the selected program. Only one option can be selected at a time. Program records must be active as of the current date. The following programs are available:
Gifted & Talented and Section 504 programs MUST be tracked through the tools available within Student Information > Program Participation. If a district tracks participation in these programs on the enrollment record, on a custom tool, or some other way, that information is not included in the section balancing. | The total number of students active in the selected program and enrolled in the current calendar year divided by the total number of enrolled students. |
Other Side Panels
For each Term, Period, Course, and Section, additional settings can be selected in the side panel. To open these side panels, right-click on the term/period/course/section. The options are the same for each item.
| Terms | |
|---|---|
 |
|
| Periods | |
 |
|
| Departments | |
 |
|
| Courses | |
  |
|
| Sections | |
  |
|
Role Assignments
The Role assigned to a Primary Teacher or a Teacher on the Section Staff History tool also displays in the Staff Planner and the Scheduling Board.
Role names/titles are entered in the Attribute/Dictionary.

Scheduling Board Role Assignment
On the Scheduling Board, the Section side panel includes an Assign Teacher(s) and Roles area that can be collapsed, if needed. To assign a role to the primary teacher, a primary teacher must be selected.
- Assigning a Role in the Scheduling Board populates the Section Staff History Role field with the same selection. The Staff Planner Role field is not populated.
- Updating the existing Role for Primary Teachers overrides the Role on the Section Staff History.
 Scheduling Board - Assign Primary Teacher and Teacher Roles
Staff Planner Role Assignment
On the Staff Planner, the Role can be assigned on the Staff side panel, where Courses & Rooms and Placement Restrictions are assigned, AND in the Batch Edit Staff Information side panel.
 Staff Planner - Role Assignment
 Staff Planner - Batch Edit Staff Information
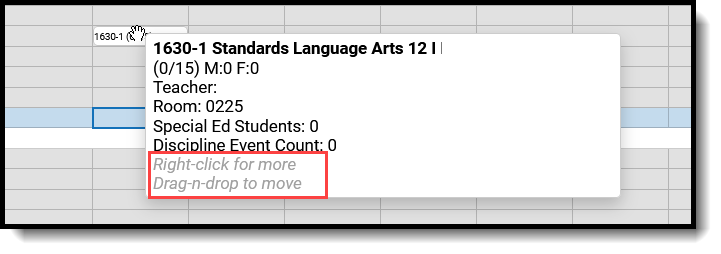
Hover Boxes
There are several places in the Scheduling Board where hovering over (placing the cursor over an entry on the board and leaving it there to display an information box) a section, a course or other area displays a window where key information may be found to aid the scheduler in placing sections, detecting issues and determining how successful the current trial meets the needs of students.
For each hover option, text for what to do next displays, like right-clicking to display the side panels for Courses, Sections, etc., and for dragging and dropping courses onto the grid or moving sections on the grid.
 Hover Box Guidance
| Hover Selection | What Displays | Image |
|---|---|---|
| Terms |
|
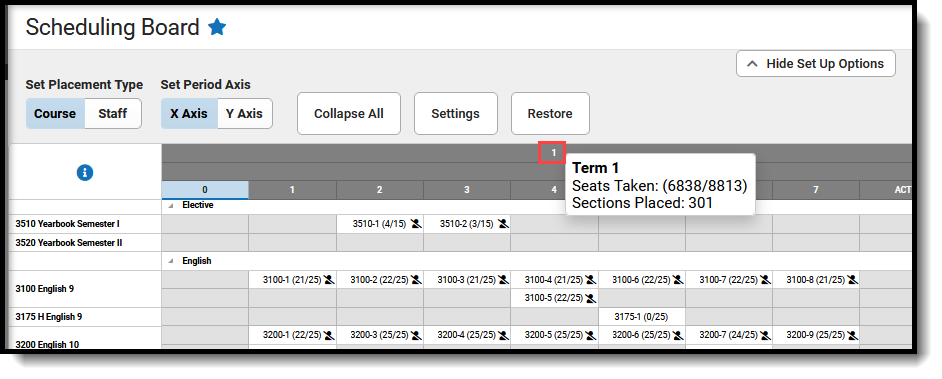 |
| Periods |
The image to the right shows the information for Term 1, Period 1. Term 2, Period 2 could have different results depending on whether sections have been loaded or the same amount of sections have been placed in that period. |
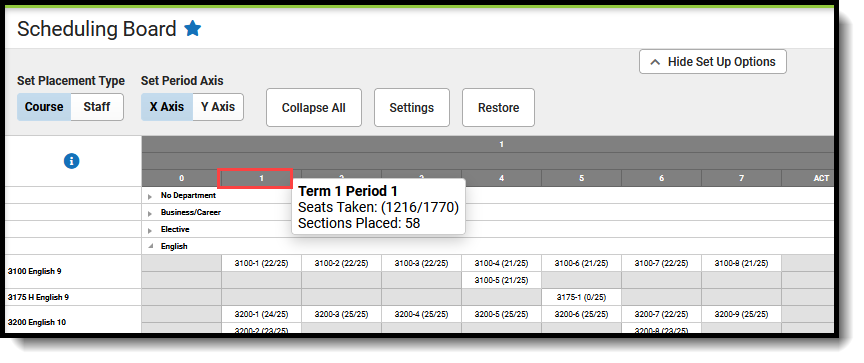 |
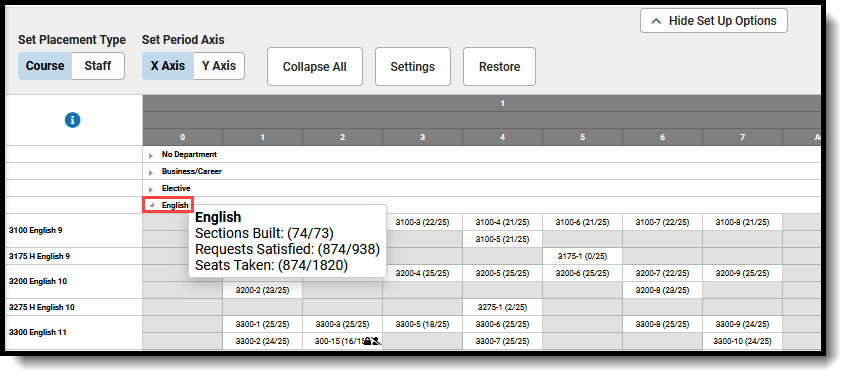
| Departments |
The first number for any of these can be greater than the second number because sections, requests, and seats can be manually created. |
 |
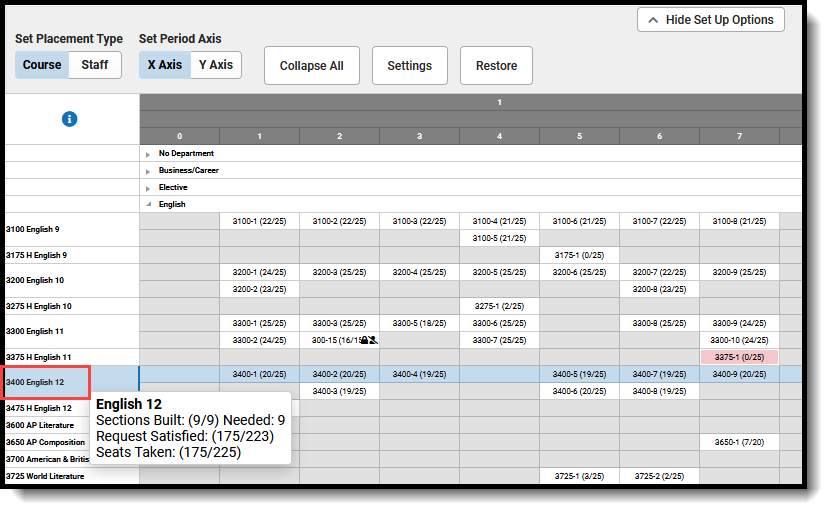
| Courses |
|
 |
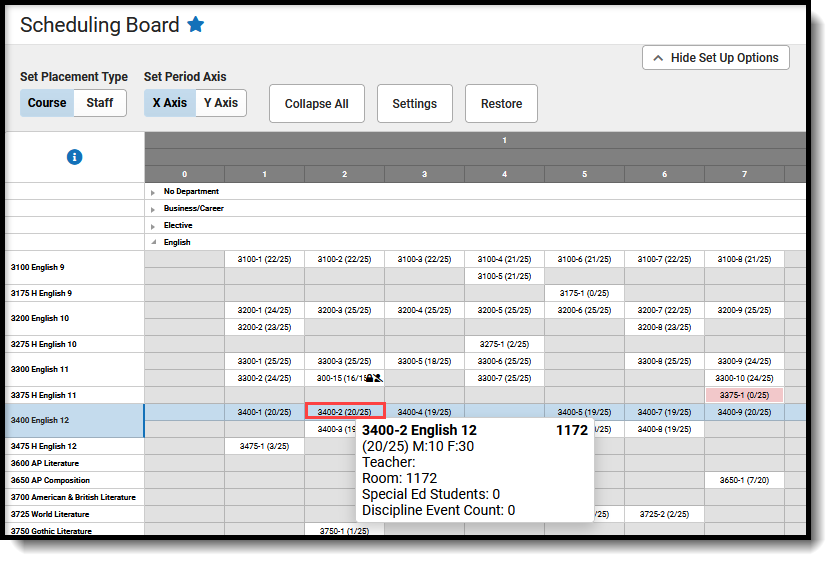
| Sections |
|
 |
Create the Schedule
The Calendar has been created, students have entered course requests, and there are about 10 weeks until the end of the school year. It's time to start creating your course schedule.
Here are a few tips as you get started:
- Refer to the Scheduling Checklist and the Scheduling Center to stay on top of all tasks needed for a successful scheduling season.
- Schedule subsets of students first.
- It's easiest to build the schedule for smaller sets of students, like Special Education students or those with a less than full-time FTE at the school.
- When scheduling for the high school, start with the Seniors, as they have a limited time to meet their graduation requirements. Then work backwards through the grade levels (11, 10, etc.).
- Load singleton courses first. Students who request those courses have one chance to be scheduled into them.
- At least one trial is always active for a calendar. That means you can make and save changes in the board, mark that trial active, and navigate to the student's schedule to see how things look as many times as you need to.
- Work in the Scheduling Board to get as close to 100% requests complete as possible, knowing that at least some student schedules need to have gaps filled or be hand-scheduled throughout the summer. A percentage of 75-85% complete is great!
- Course sections can be moved or rebuilt many times, and sections can be loaded and unloaded many times. Keep working! You'll know when it's time to stop.
- When there are sections for a course that are not scheduled, a message displays indicating there are unplaced sections that are hidden from view. To view them, click Copy to Clipboard and paste them into a text document or a spreadsheet.
- Unplaced sections may affect your build results. Review the sections listed to determine if those unplaced sections should be deleted (unplaced sections will be permanently removed) or retained (unplaced sections will be kept).
Let's get started!
NOTE: When saving changes takes minutes to complete AND your state uses Ed-Fi for collecting student and school data, verify Ed-Fi Configurations for past school years have been deleted.
The current school year and the last school year can remain. For example, a district that has configurations for the 2019-20, 2020-21, 2021-22 and 2022-23 school years can safely delete the 2019-20 and 2020-21 configurations.
Choose Settings for the Scheduling Board
See the Settings section for more information.
- Select the Set Placement Type and the Set Period Axis preference.
- Select the Settings button and mark the desired options in the View Side Panel opens. This includes:
- Selecting which items to highlight in Red as a Conflict, in Green as Missing Data, and in Yellow as a Highlight.
- Selecting which items to View on Section and to View Locked.
- Selecting which Terms, Period Schedules, and Periods to Show or Hide.
- Selecting which Departments to display as Show or Hide.
- Selecting which Courses to display as Show or Hide.
- Selecting whether to Hide All But Singletons.
- Selecting whether to Hide All Exception/Special Days.
- Click the Save button when finished. All selected options are now set and courses can now be built.
These settings can be changed at any time, or completely reset to return to the default settings.
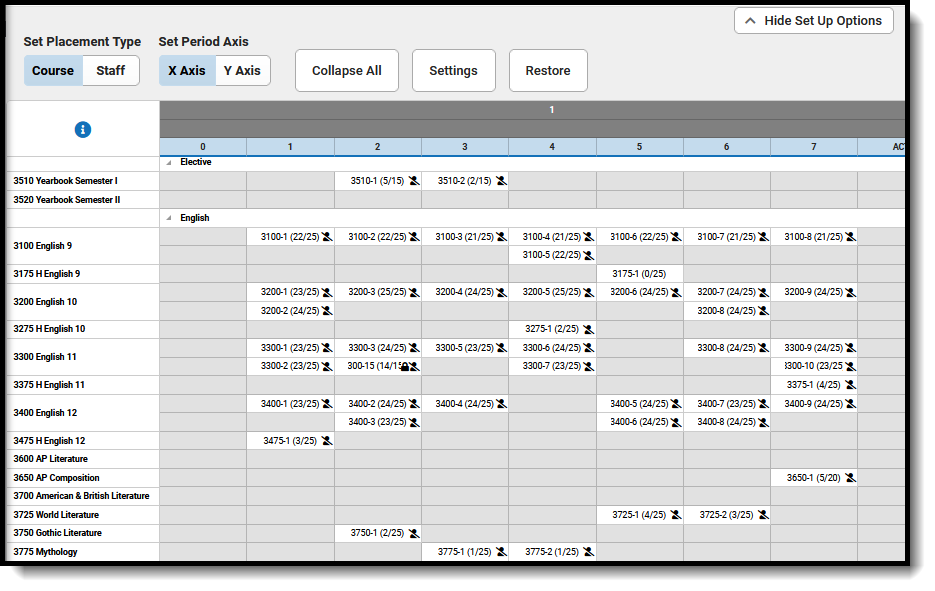
The image below shows what the Board may look like when Settings have been marked to show conflicts, missing data and highlight courses and courses have been built and loaded.
 Settings Marked for Course Build
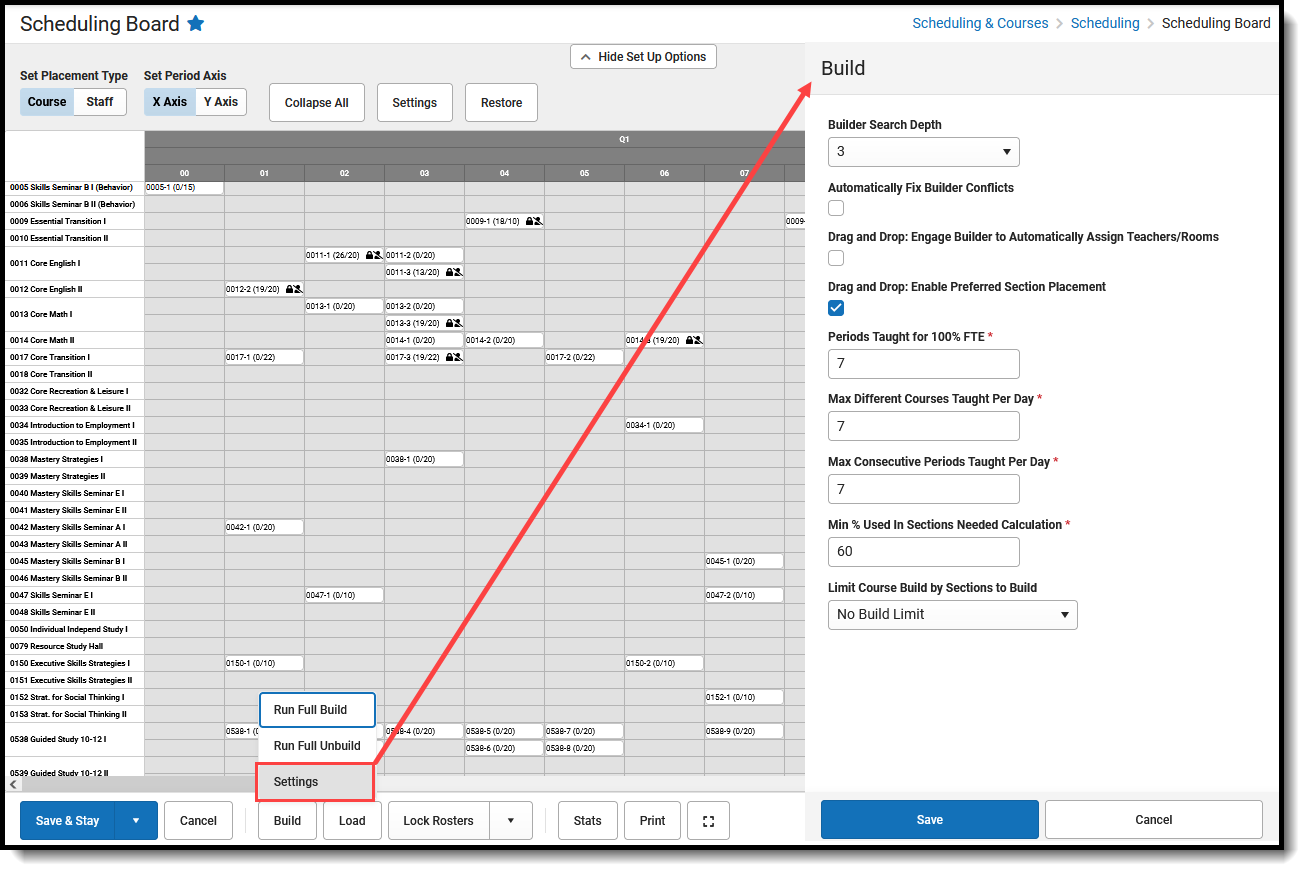
Build
First, verify your Build Settings are marked appropriately.
- Click the Build button in the Action Bar across the bottom, and choose Settings.
- In the Build side panel, review the options listed and make any changes necessary.
- Click Save when finished.
Build Settings
Next, build the courses.
Build All Courses
- Click the Build button in the Action Bar across the bottom.
- Choose Run Full Build. A Building progress bar displays indicating how far along the build is. This process is fairly quick. For larger schools and schools with several terms, period schedules and periods, it may take longer to build.
- When the Build is finished, course sections are visible in the board based on the selected Build Settings.
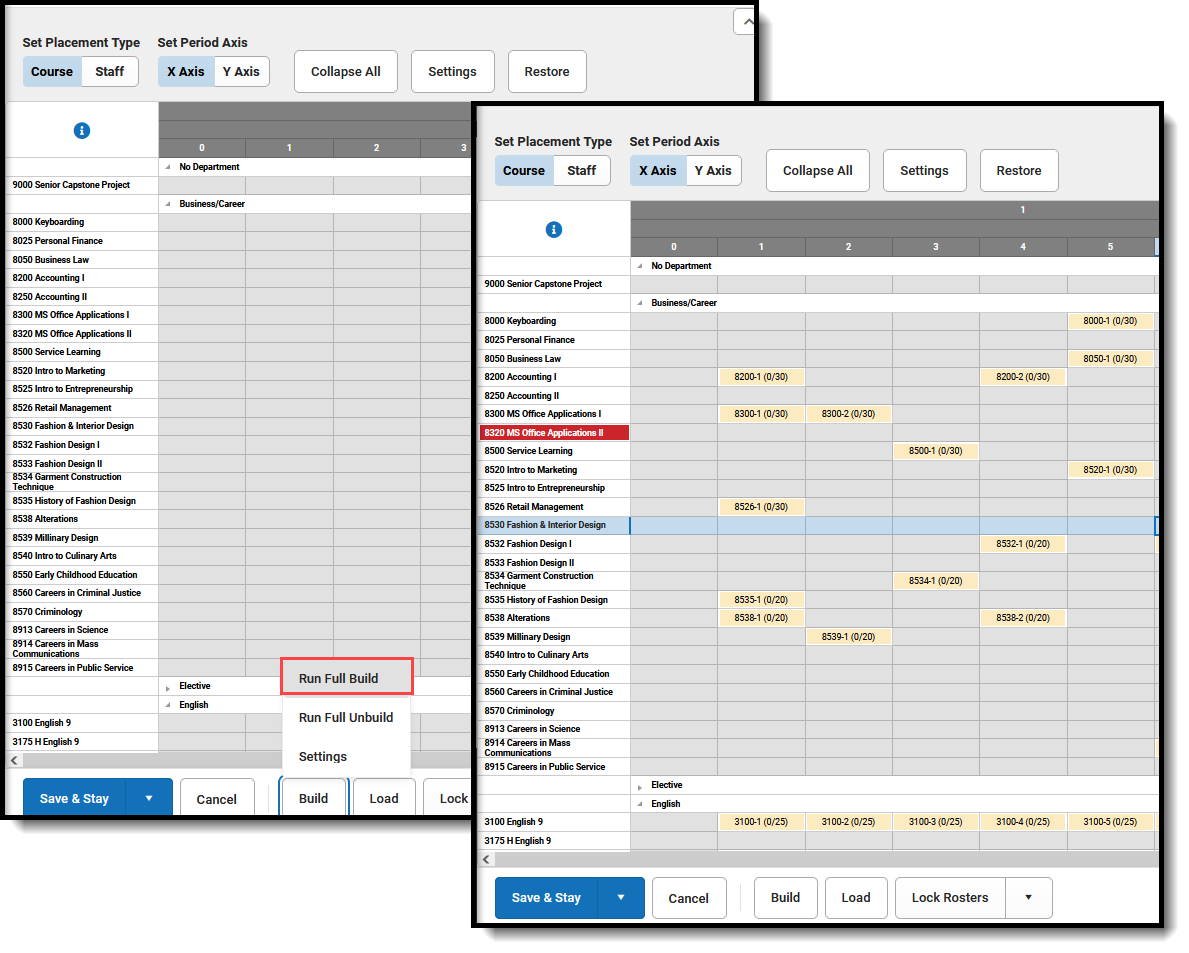 Run Full Build on Blank Grid Builds Courses Based on Build Settings
At this point, you can:
- Work with an individual course to load sections for it manually.
- Load the course sections for a specific Department.
- Move placed courses around to different periods to see what that does to the other courses.
- Load the course sections to see how the course sections populate.
Unbuild All Courses
It's possible the building of the courses was done prematurely, or you want to load only certain courses first. Removing the placed courses can be done at anytime and as often as needed.
- Click the Build button in the Action Bar across the bottom.
- Choose Run Full Unbuild. This removes any course that has been placed on the board that is not locked. A Building progress bar displays indicating how far along the unbuild is.
- When finished, the board is empty, unless that section was locked.
Load
Loading is done AFTER Building. It loads the student requests into the course sections that were built. Like the Build option, loading can be done for a specific course, a particular department or a particular section. Or, load all courses all at once to see how many student requests are met.
First, verify your Load Settings are marked appropriately.
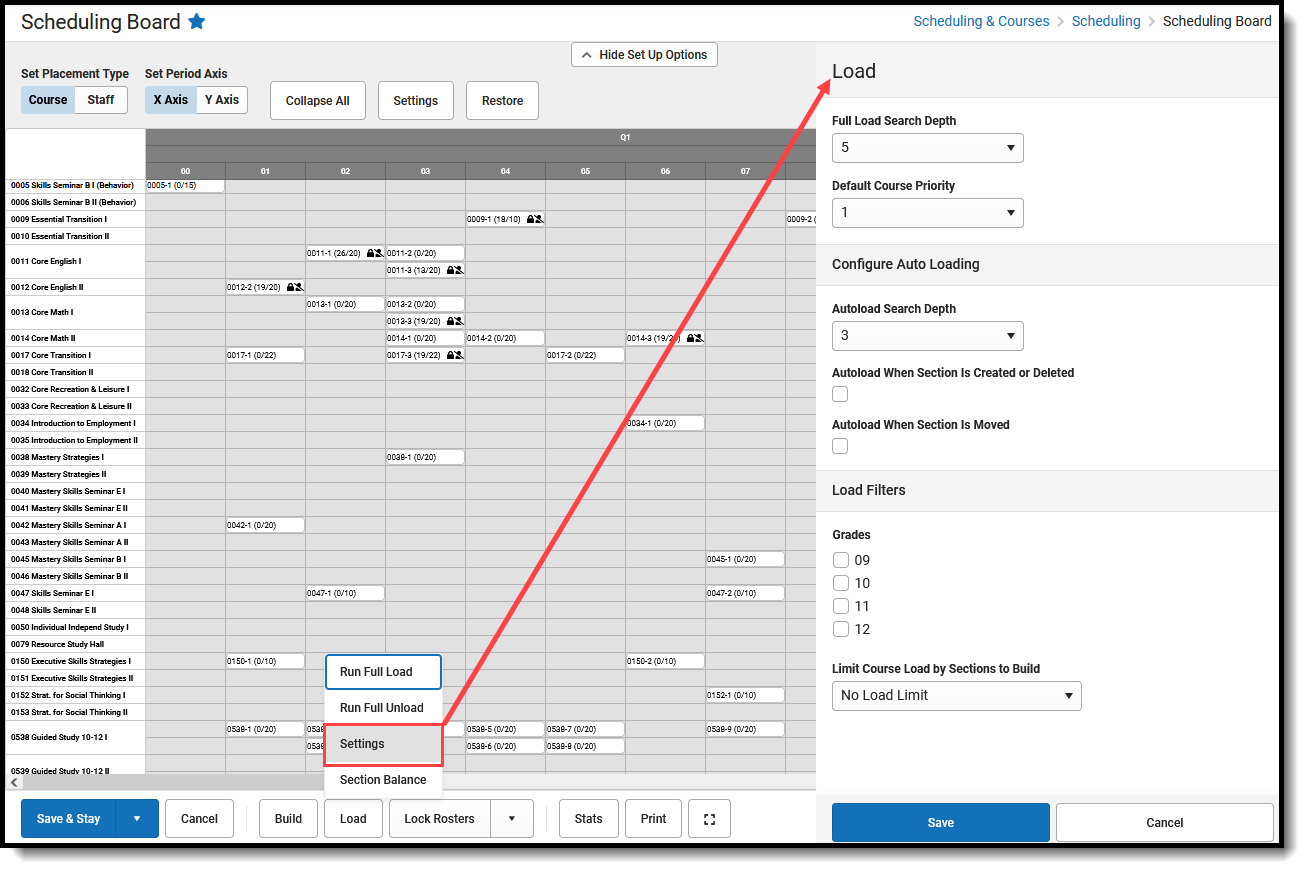 Load Settings
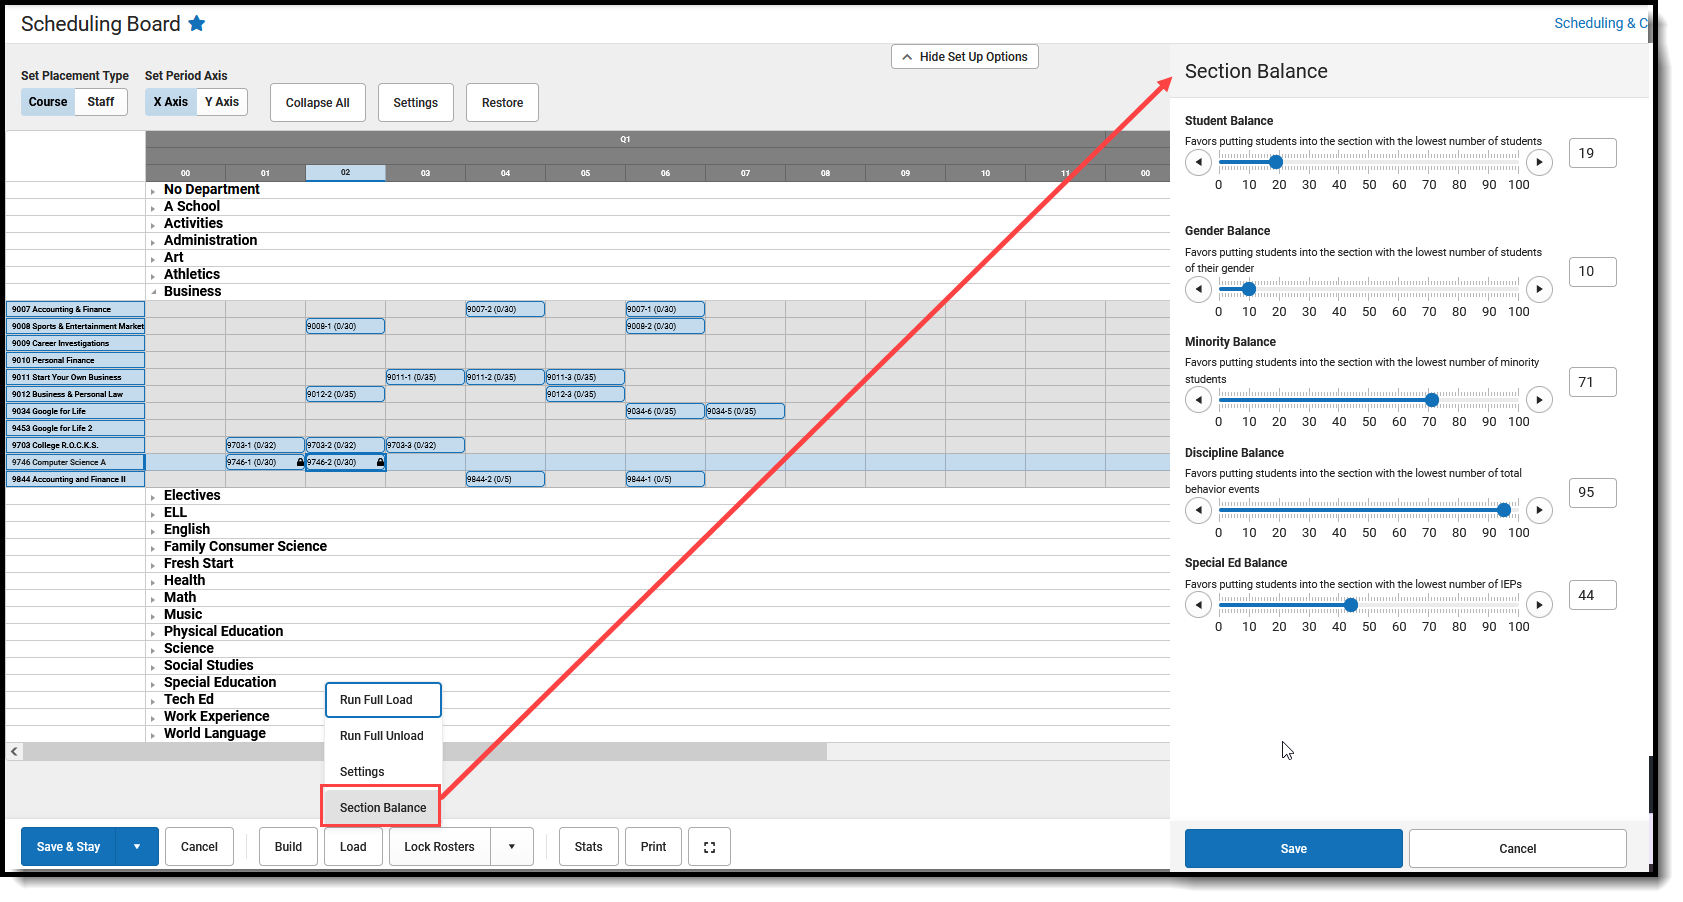
Second, set your Section Balance Settings.
- Click the Load button in the Action Bar across the bottom, and choose Section Balance.
- In the Section Balanceside panel, set the preferences for the listed factors in one of three ways:
- Click the left pointing arrows (changes the value to be closer to zero) or right pointing arrows (changes the value to be closer to 100).
- Click and drag the blue ball on the slider to the desired value.
- Enter the desired value in text box to the right.
- Click Save when finished.
 Section Balance Settings
Next, load the courses.
Load All Courses
Running a full load only adds Required (R) and Elected (E) course requests. Alternate (A) course requests are not included; they can be added using the Run Load Alternates option.
- Click the Load button in the Action Bar across the bottom.
- Choose Run Full Load. A Building progress bar displays, indicating how far along the build is. This process is fairly quick. For larger schools and schools with several terms, period schedules, and periods, it may take longer to build.
When the Load is finished, course sections now display on the grid, and most sections have a count total.
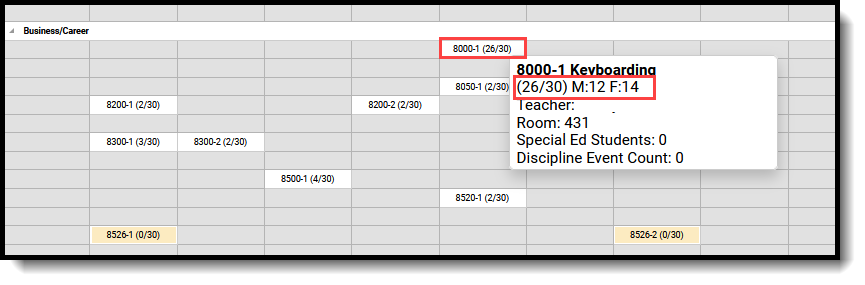 Run Full Load
In the image above, the Keyboarding class had 26 requests fulfilled, and there are 30 possible seats for that section.
At this point, you can:
- Unload the sections and change Settings to see how that changes the build.
- Work with an individual course section to alter how it is loaded by changing the maximum students allowed in the section or load by grade level and gender.
- Unload the section or all sections, and start over.
Unload All Courses
It's possible the loading of the course sections was done prematurely, or you want to load only certain courses first. Removing the placed course sections can be done at any time and as often as needed.
- Click the Load button in the Action Bar across the bottom.
- Choose Run Full Unload. This removes a student from that section, as long as the rosters were not locked.
- When the unload is finished, the courses no longer have requests placed.
Load Alternates
Course Requests marked as A (Alternate) are added AFTER Required (R) and Elected (E) course requests. These requests are NOT added when running a full load.
- Enter the Maximum Number of Alternate Sections that can be added for any student in the Load Settings panel. This determines how many alternate course requests are allowed to be added to each student's schedule.
- Click the Load button in the Action Bar across the bottom.
- Choose Run Load Alternates option. If there is availability on the student's schedule and in the section, the student is placed in their requested alternate course.
Alternate course request placement is determined first by looking at the Academic and Graduation Plan Details assigned to the student to verify that the Allow Planning of Alternates checkbox is marked, AND the student has alternates added to their Course Plan.
When the graduation or academic plan is not marked to allow planning for alternates, or the student does not have a course plan, priority is determined by the order in which the alternate request was added to the Walk-In Scheduler.
In the image below, the student has four alternate course requests. When the Maximum Number of Alternate Sections is set to 2, logic attempts to place the student into the first two alternate requests (other factors come into play, like other placements the student has already or full sections). If the first alternate request is placed, but the second one cannot be placed, the third one is attempted.
 Walk-In Scheduler - Alternate Request Priority
Alternates can also be added by Department, Term, Course, or Section.
| Load by | Description |
|---|---|
| Department | Loads all alternate course requests for all courses assigned to the selected department.  Load alternate course requests by department Load alternate course requests by department
|
| Term | Loads alternate course requests for the selected term.  Load alternate course requests by term Load alternate course requests by term
|
| Course | Loads all alternate course requests for the selected course.  Load alternate course requests by course
|
| Section | Loads all alternate course requests for the selected course.  Load alternate course requests by Section Load alternate course requests by Section
|
Lock Rosters
In a school that has a small student population, limited course offerings and a standard schedule, this first build of the courses and the first load of the requests may have met your completed schedules threshold. You can lock the rosters now!
Lock All Rosters
- Click the Lock Rosters button. A Lock All Rosters by Grade side panel opens.
- All grade levels are selected automatically. When all rosters for all grade levels should be locked, click the Lock button at the bottom of the panel; when rosters for a certain grade level should be locked, remove the checkbox from the other grade levels and click the Lock button.
- The board processes for a short time. When it's finished, a green message displays indicating rosters have been locked. When the Display Settings for View Locked are marked for Rosters, the course sections display with a crossed out student image, indicating the roster has been locked.
 Lock Rosters
Unlock All Rosters
It's possible the locking of rosters was done prematurely and you want to unlock all course sections. Or, you meant to only lock the seniors scheduled into those sections. Unlocking the sections can be done at anytime and as often as needed.
- Click the arrow next to the Lock Rosters button in the Action Bar across the bottom.
- Choose Unlock Rosters. The Unlock All Rosters by Grade side panel displays.
- Remove the checkbox from the desired grade levels to leave some rosters locked and some unlocked. Or leave all grade levels marked for unlocking.
- Click Unlock. When the process finishes, the course section rosters are no longer locked.
Build, Move, and Delete Course Sections using Drag and Drop
The Scheduling Board is designed to build all course sections for the entire school as quickly and easily as possible. There are situations where certain courses are best built manually, such as when a course is a singleton or meets only once in a specific term and period.
When a course spans multiple terms, and the terms have not been locked, users can modify that course.
Build New Course Sections
The Scheduling Board allows courses and sections to be dragged onto the grid and placed where they best meet the needs of the course and students who requested the course. This requires the Build Setting of Drag and Drop: Enable preferred section placement to be marked. A Conflict Matrix or "heat map" locates the best placements for that section. The three best placements for that new section are displayed, and includes the teacher and room assignments. The first placement is the same location the Auto-Build logic would choose when a single section were placed.
- Locate the course to build.
- Click on it and drag it into the period grid.
- Drop it in the desired period. The section is placed and the build for the section is locked.
- At this point, requests can be loaded, teachers and rooms can be assigned, plus other options listed in the section side panel.
 Drag and Drop Course Section

When a Course has placement restrictions (entered from the Course Planner), attempting to manually place a section in that restricted period shows an icon indicating it cannot be placed there (🚫).
Move Course Sections
Moving course sections also uses a Conflict Matrix to determine the best placement for a section. The three best placements for that new section are displayed, and includes the teacher and room assignments. The first placement is the same location the Auto-Build logic would choose when a single section were placed.
When a course is built, sometimes just one section of the course needs to be moved to a different period. Use the same process of selecting that section and dragging it to a new period and dropping it.
- Locate the section on the grid that needs to be moved.
- Click on it and drag it into the desired period.
- Drop it in the desired period. The section is placed in the new period and the build for the section is locked.
- At this point, requests can be loaded, teachers and rooms can be assigned, plus other options listed in the section side panel.
 Drag and Drop Assigned Period
Delete Course Sections
Delete a section by dragging the section completely to the left on the course grid.
 Delete a Drag and Drop Section
Click the Print button to display the scheduling board in a printable view. Departments that are collapsed display as collapsed in the printed view, meaning no courses or sections are visible for those collapsed departments. The printed report displays the course and section information in the assigned periods, as well as the seat count for that section.
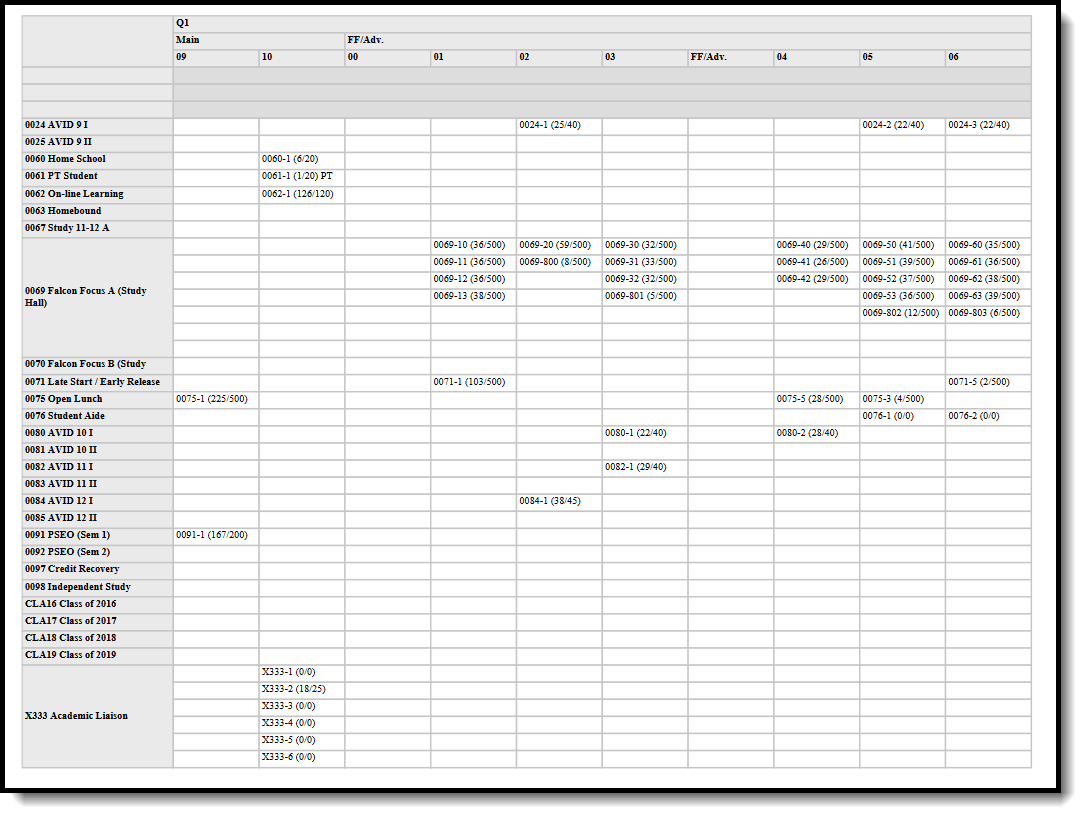 Scheduling Board Print - PDF Format
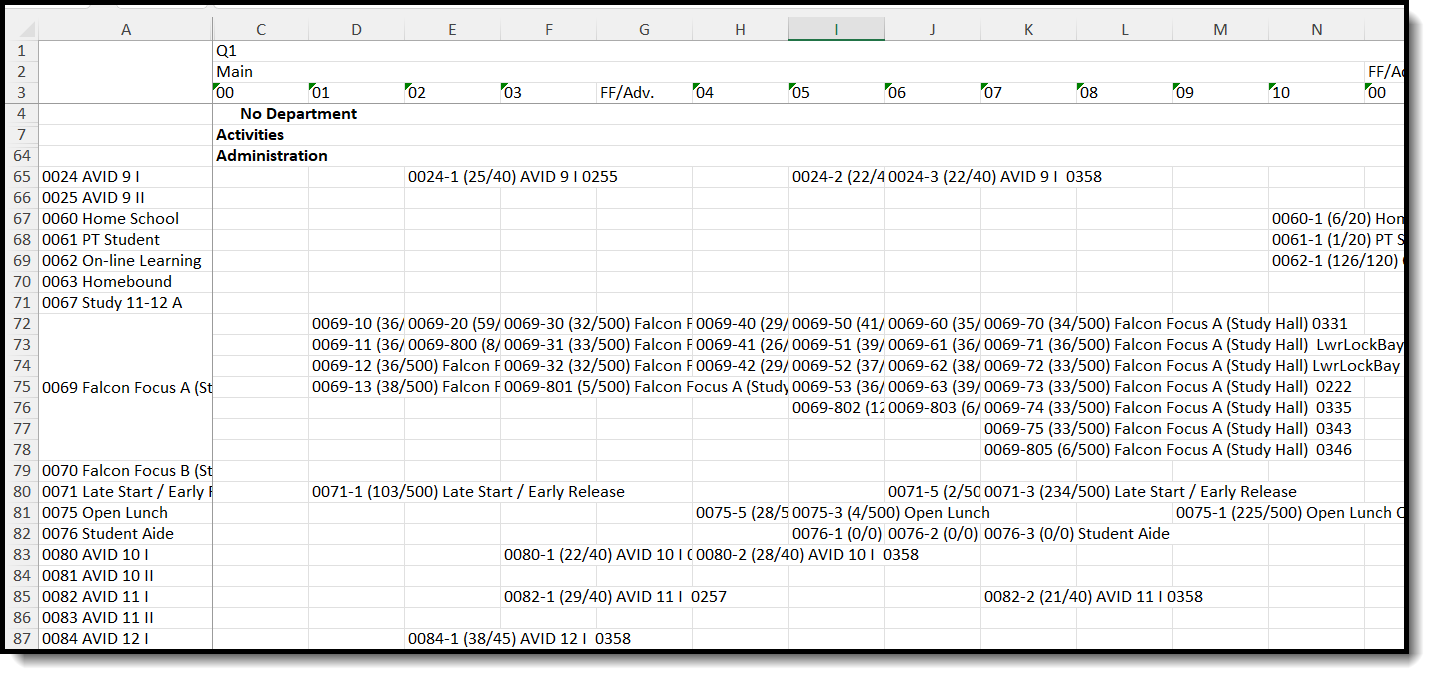 Scheduling Board Print - XSLX Format
Next Steps
- Continue loading and unloading courses, and moving course sections on the grid to get to your desired percentage of requests satisfied. When you reach that point, mark the Scheduling Board Trial as active and congratulate yourself!
- Access the Staff Planner and Course Planner to aid in the scheduling of the course sections.
- Refer to the Scheduling Center to see what other actions need to be taken for scheduling.
- Refer to the Beginning of Year checklist to see what other tasks can be considered complete for the beginning of the school year.
