Tool Search: Assessment Center
This guide walks you through the process of creating the History/Government Assessments reported in the KIDS EOYA Extract, aligning those assessments with courses, and scoring them.
See the core Assessment Center article for additional information.
Before you start
Not all fields are included in these examples; additional fields may be needed depending on the assessment and reporting needs. Review the Assessment Center Test Detail for information on any fields not mentioned in this guidance.
To accurately collect the data used in the KIDS EOYA Extract for History/Government Assessments, the assessments need to be added. Follow the steps below to create the following:
- History/Government assessment (parent test)
- 01: Claim/Thesis assessment (child test)
- 02: Evidence assessment (child test)
- 03: Reasoning assessment (child test)
Step 1 - Create the assessments
Create the Parent Test
- Click New. The Test Detail editor displays.
- In the Test Information section, enter History/Gov Assessment in the Name field. Then choose the Subject of Hist/Gov from the dropdown list.
- In the Test Type section, select District Test for the Test Type.
 Create a new test in the Assessment Center
 - In the Score Fields section, choose Raw and Result from the Score Fields list and move to the Display on Assessment Page list.
- In the Result/Proficiency Statuses section, add Minimum Value, Result Codes, and Result Labels for the scores.
 Step 4-5, Score Fields and Result Status Entry
 -
Click Save.


Create new Child Tests
Child tests are nested within the parent test and can be scored independently. Each child test uses the same Result Statuses that are added to the Parent test.
- Each code has a Raw Score that corresponds to a given performance level. For example, if a score of 1-49 is a performance level of 1, enter 1 as the value for Result Code’01 and 50 as the value for Result Code 02.
- The Label for each code identifies which performance level for the result.
Note that the test name does not matter, as reports look at the Code assigned to the test. As long as each test is easily identified as the appropriate score.
Code 01: Claim/Thesis
- In the Child Tests section, click Add New.
- Enter a Name for the test that identifies it as the Claim/Thesis test, e.g., Claim/Thesis or 01: Claim/Thesis.
- Verify the Parent test displays as History/Gov Assessment (or the name of the parent test).
- Enter 01 in the Code field.
- Choose the Subject of Hist/Gov from the dropdown list.
- In the Test Type section, select District Test for the Test Type, then mark the Teacher-scored checkbox.
 Steps 1-6 - Child Test Setup for Code 01: Claim/Thesis
 - In the Display Settings section, determine the following (this step is optional):
- Mark Display in Portal to show the test results in the Parent and Student Portals.
- Mark Display In Transcripts, along with the appropriate score fields, to have the assessment print on the student's transcript.
- If this test is submitted through eTranscript, choose the applicable PESC Test and PESC Sub-Test.
- Limit which user groups have read-only and read/write access to the test.
- Click Save when finished to add the first child test to the parent test.
- Click Cancel to refresh the parent test detail. Scroll to the Child Tests section and see that the 01: Claim/Thesis test displays.
 Child Test nested within Parent Assessment


Code 02: Evidence
- Click Add New below the 01: Claim/Thesis child test.
- Enter a Name for the test that identifies it as the Evidence test - like Evidence or 02: Evidence, or 02.
- Verify the Parent test displays as History/Gov Assessment (or the name of the parent test).
- Enter 02 in the Code field.
- Choose the Subject of Hist/Gov from the dropdown list.
- In the Test Type section, select District Test for the Test Type, then mark the Teacher-scored checkbox.
- In the Display Settings section, determine the following (this step is optional):
- Mark Display in Portal to show the test results in the Parent and Student Portals.
- Mark Display In Transcripts, along with the appropriate score fields, to have the assessment print on the student's transcript.
- If this test is submitted through eTranscript, choose the applicable PESC Test and PESC Sub-Test.
- Limit which user groups have read-only and read/write access to the test.
- Click Save when finished to add the second child test to the parent test.
- Click Cancel to refresh the parent test detail. Scroll to the Child Tests section and see that the 02: Evidence test displays.
 Second child test nested within parent test
Code 03: Reasoning
- Click Add New below the 02: Evidence child test.
- Enter a Name for the test that identifies it as the Reasoning test - like Reasoning or 03: Reasoning, or 03.
- Verify the Parent test displays as History/Gov Assessment (or the name of the parent test).
- Enter 03 in the Code field.
- Choose the Subject of Hist/Gov from the dropdown list.
- In the Test Type section, select District Test for the Test Type, then mark the Teacher-scored checkbox.
- In the Display Settings section, determine the following (this step is optional):
- Mark Display in Portal to show the test results in the Parent and Student Portals.
- Mark Display In Transcripts, along with the appropriate score fields, to have the assessment print on the student's transcript.
- If this test is submitted through eTranscript, choose the applicable PESC Test and PESC Sub-Test.
- Limit which user groups have read-only and read/write access to the test.
- Click Save when finished to add the second child test to the parent test.
- Click Cancel to refresh the parent test detail. Scroll to the Child Tests section and see that the 03: Reasoning test displays.
 Third child test displayed with Parent test
When finished creating the child tests, the History/Government Parent Test folder should look similar to this:
 History/Government Assessment plus child tests display
Step 2 - Align Assessments to Courses
Now that the History/Government Assessment and the child tests have been created, they need to be aligned with the courses.
- Navigate to the Course Assessments tool.
- Click New.
- In the Test field, enter the name of the parent test - History/Gove Assessment - to narrow the available tests. The child tests created in step 1 display..
- Select one of the child tests to align with the course.
- Enter a Start Date and End Date. These dates could be the Term Dates for when the course meets or the dates when the assessment is administered.
- Click Save.
- Repeat this alignment process three times, once for each child test, for each course in which history/government information is taught.
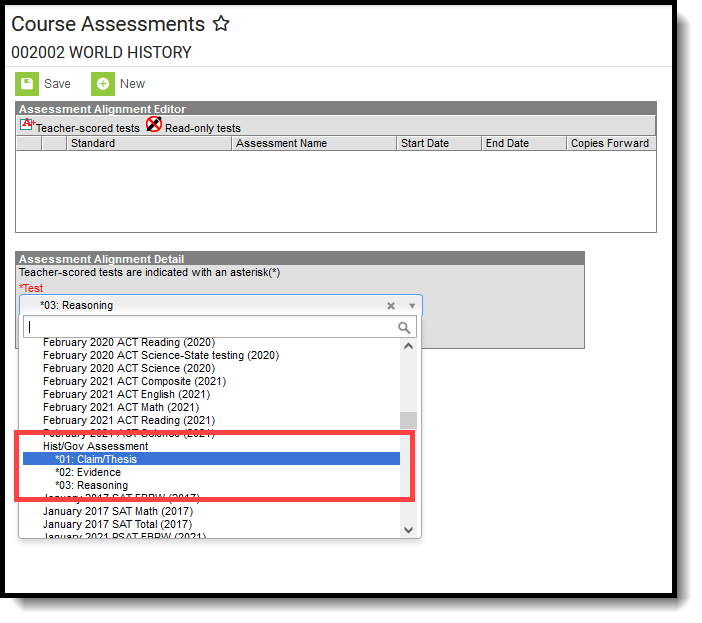 Course Assessment Alignment of Child Tests
The Course Assessment list should look similar to this when finished:
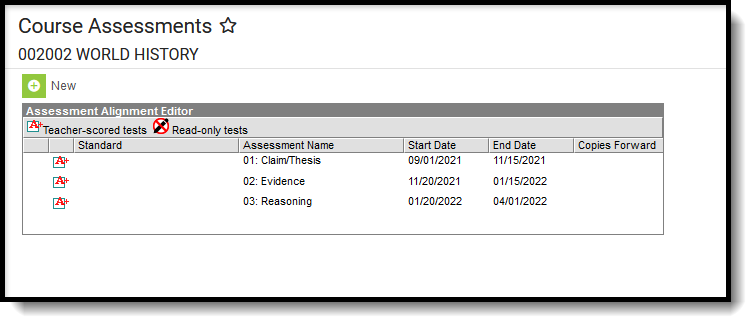 Course Assessment Alignment for History/Government
Step 3 - Teachers Score Assessments
After aligning the test to the course, teachers can now enter scores for those assessments.
- Navigate to the Standardized Test tool.
- Review the Term and Section selected in the Campus toolbar to ensure the selection is correct.
- Select the appropriate Assessment to score from the Assessment field in the Campus toolbar. Look for the assessments marked as Teacher Scored.
- Enter the Scores for the students. The Result populates automatically upon saving.
- Click the Save button when finished.
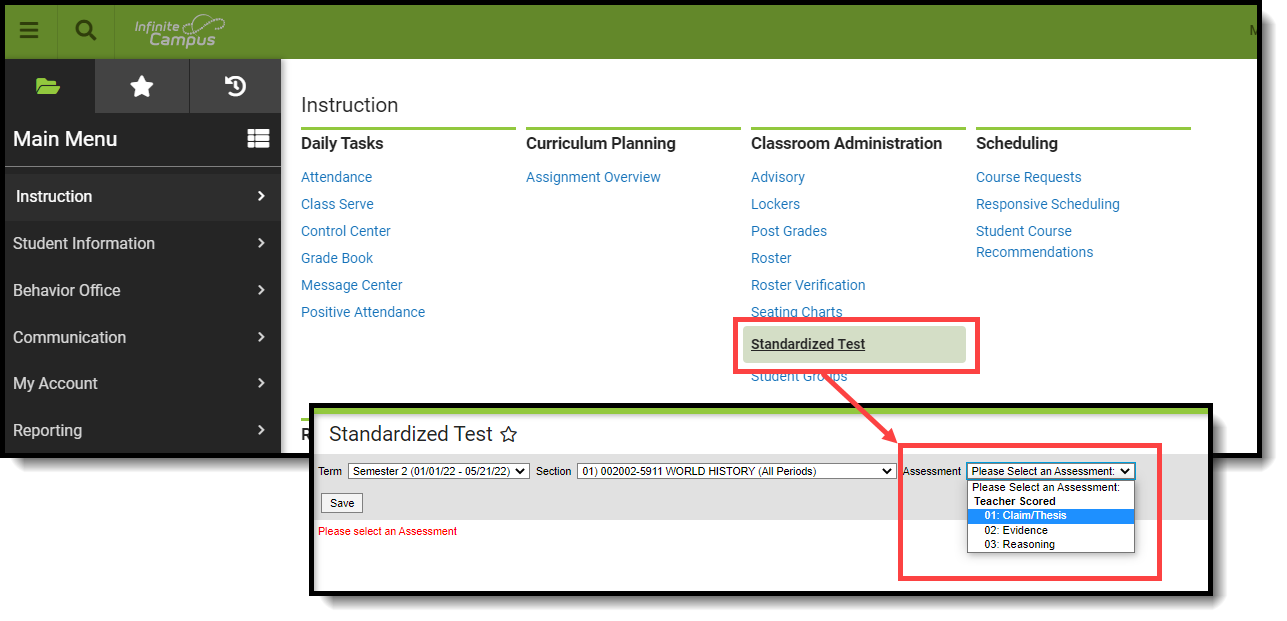 Teachers Scoring Assessments
Administrative staff can also score these assessments from the Section Grading by Student or Section Grading by Task tools.
Step 4 - Review Scores for Students
Assessment scores can be viewed on the student's Assessment tool. Scores can be modified here if necessary.
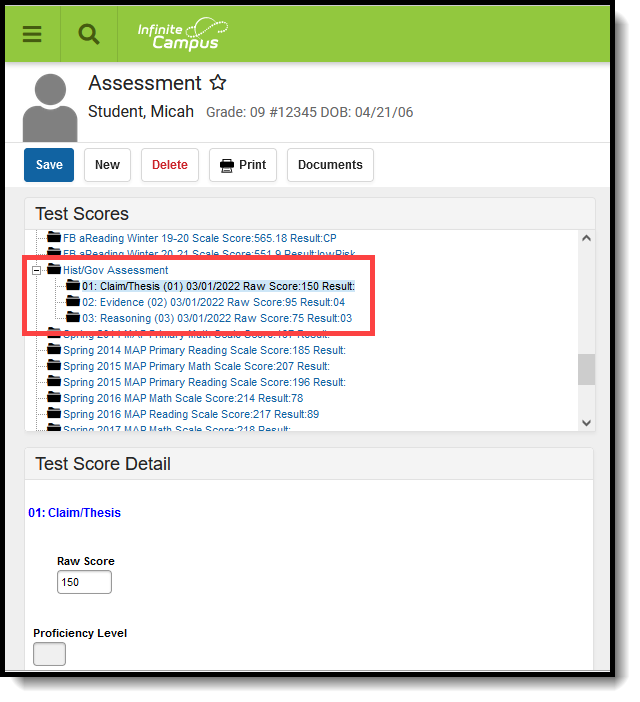 Student Assessment Scores
Impact
The History/Government assessments are required by the State Department of Education. The results are included in several reports, including the KIDS Collection and the Student Assessment Resource.
What's next
Once the History/Government assessment and its child assessments are created and teachers have scored them, the student's scores for those assessments are reported in the EOYA Extract.
