Tool Search: Survey Designer
The Daily Health survey allows districts to send a survey to parents to record Daily Health Log information. Once a survey has been completed, its results will be imported into the student's Daily Health Log record.
This article is specifically for using the Daily Health survey. Infinite Campus will not enhance the survey template or the stored procedure for the Daily Health Survey. The core Survey Designer allows districts enough flexibility to create a basic question for any core field, if needed. Currently, the template is not editable because Write rights are exclusively user-based, therefore making a copy of the survey is recommended. If districts have licensed Events & Actions, the stored procedure can be updated in order to import custom fields.
Generate the Daily Health Survey
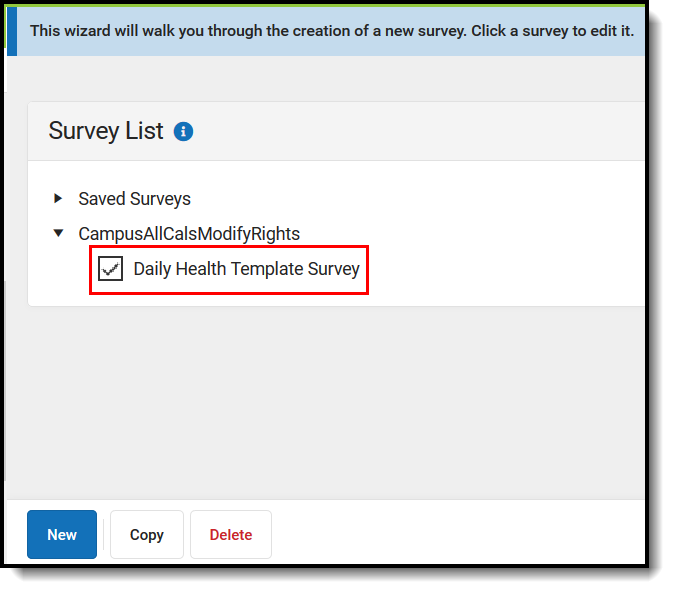
Step 1. Copy the Daily Health Template Survey
Mark the checkbox next to the Daily Health Template Survey in the CampusAllCalsModifyRights group and click Copy.
Step 2. Set the details of the Daily Health Survey
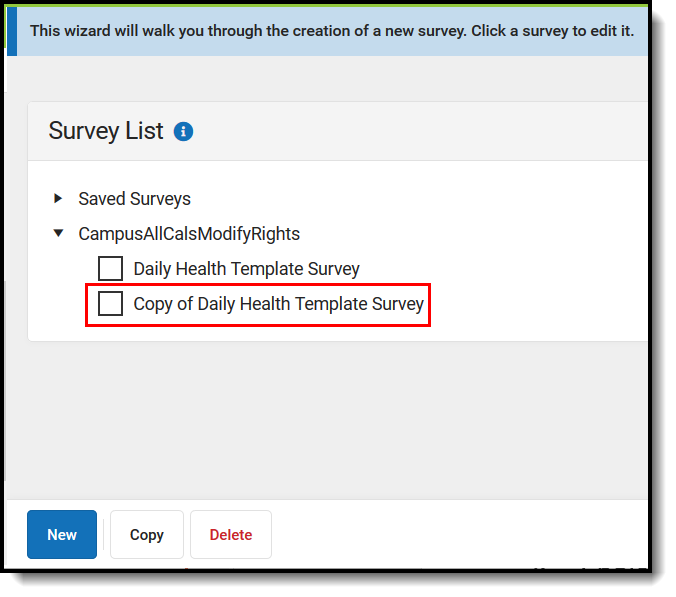
Select the copy of the Daily Health Template Survey.
A Survey Detail editor displays.
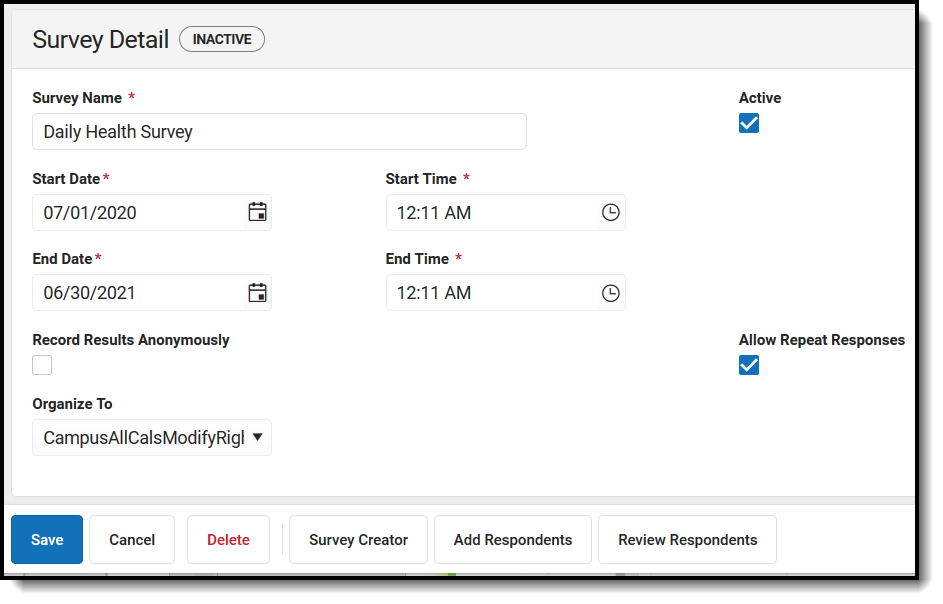
See the table below for information on these fields.
- The Survey Name must be 'Daily Health Survey'.
- Determine if the Survey is Active.
- Enter the Start Date/Time.
- Enter the End Date/Time.
- Mark Record Results Anonymously, if desired.
- Mark Allow Repeat Responses.
- In the Organize To dropdown field, select which user group has access to this survey template.
- Click the Save icon when finished. The Survey Detail will be saved.
Survey Detail Field Descriptions
Field | Description |
|---|---|
Survey Name | The name of the survey. This name is visible to survey participants and included in survey reports. For the Daily Health Survey, the name must be 'Daily Health Survey'. |
Active | When marked, the survey is active. Respondents may access, complete and return the survey. |
Start Date/Time | The day and time the survey is available for respondents. Dates are entered in mmddyy format or can be entered using the calendar icon to select a date. Time is entered in HH:MM AM/PM format or in HH:MM Military format. |
End Date/Time | The day and time the survey is no longer available for respondents. Dates are entered in mmddyy format or can be entered using the calendar icon to select a date. Time is entered in HH:MM AM/PM format or in HH:MM Military format. |
Record Results Anonymously | When marked, surveys will be submitted anonymously, without any identifying respondent information (personID). Respondents are alerted when surveys are recording anonymous results. When using this checkbox, the Allow Repeat Responses checkbox is marked automatically. It is not possible to use Record Results Anonymously without allowing repeat responses to protect the anonymity of the result set. |
Allow Repeat Responses | When marked, the survey allows respondents to submit multiple responses if they decide to repeat the survey. Reports and extracts will display only the most recent submission. This option must be marked for the Daily Health Survey, This option can be marked independently of Record Results Anonymously, but if Record Results Anonymously is marked, unmarking the Allow Repeat Responses checkbox will automatically unmark the Record Results Anonymously checkbox. |
Organize To | The user account/user group(s) to which the survey is assigned. If a survey should only be accessible to the main survey staff member(s) and the district administration, this field should be set to User Account. |
Step 3. Review/Edit Survey Details
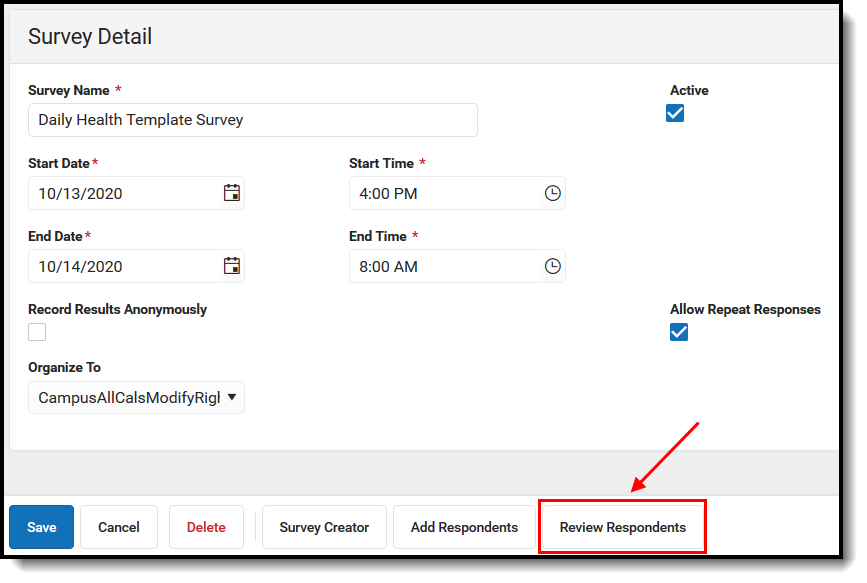
Once Survey Details have been entered, survey questions can be viewed/edited by clicking the Survey Creator button.

The Survey Designer editor will appear. The Daily Health survey questions are displayed. Campus provides most core fields but leaves off undefined droplists.
Note: The Day Health Status, Status Date, Status Time, and Comments are calculated by the Events & Actions stored procedure and, therefore, are not mappable using the Survey Creator.
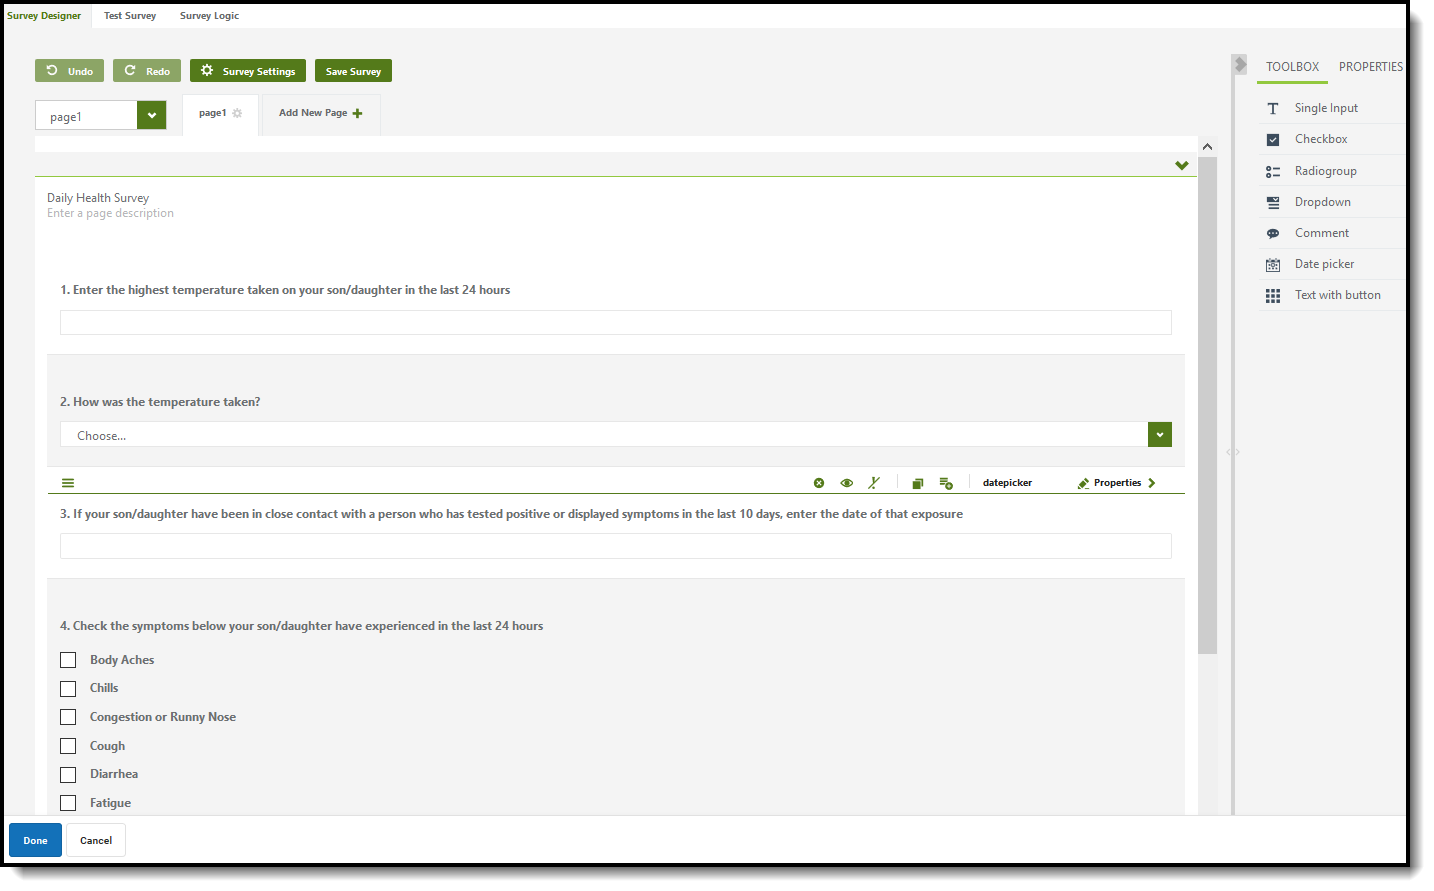
The Events & Actions stored procedure allows Test, Test Date, and Test Results to be configured with the core Survey Creator functionality.
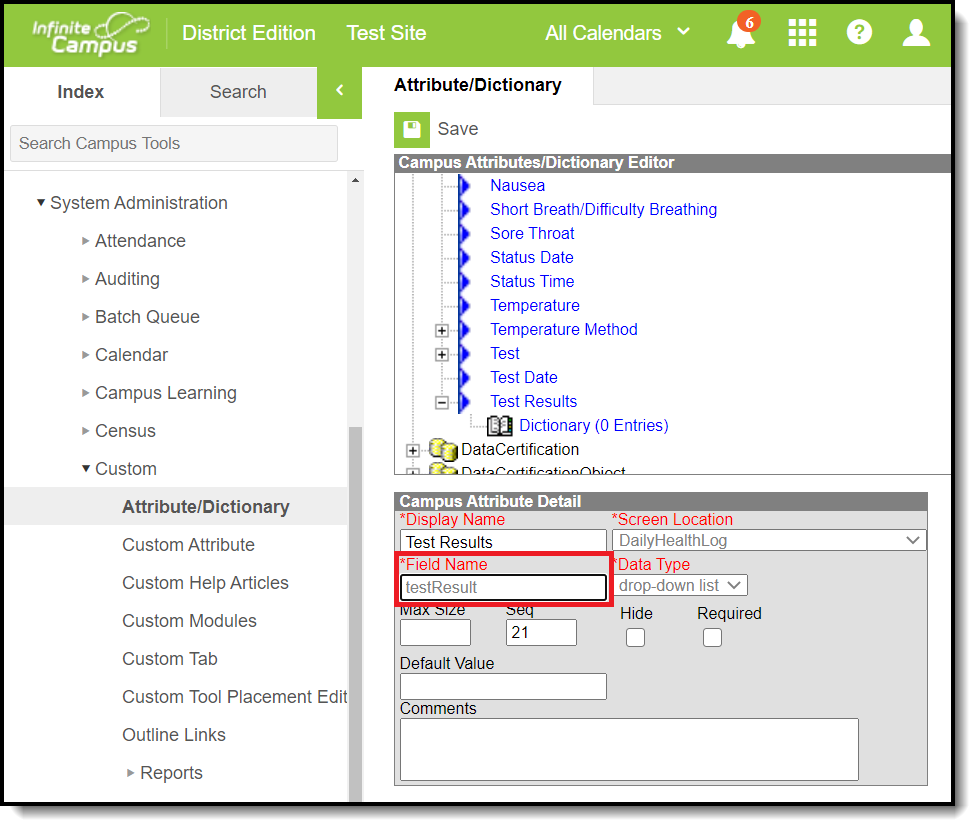
Fields are mapped by entering the Attribute Field Name in the Value name field under Data in the Survey Creator.
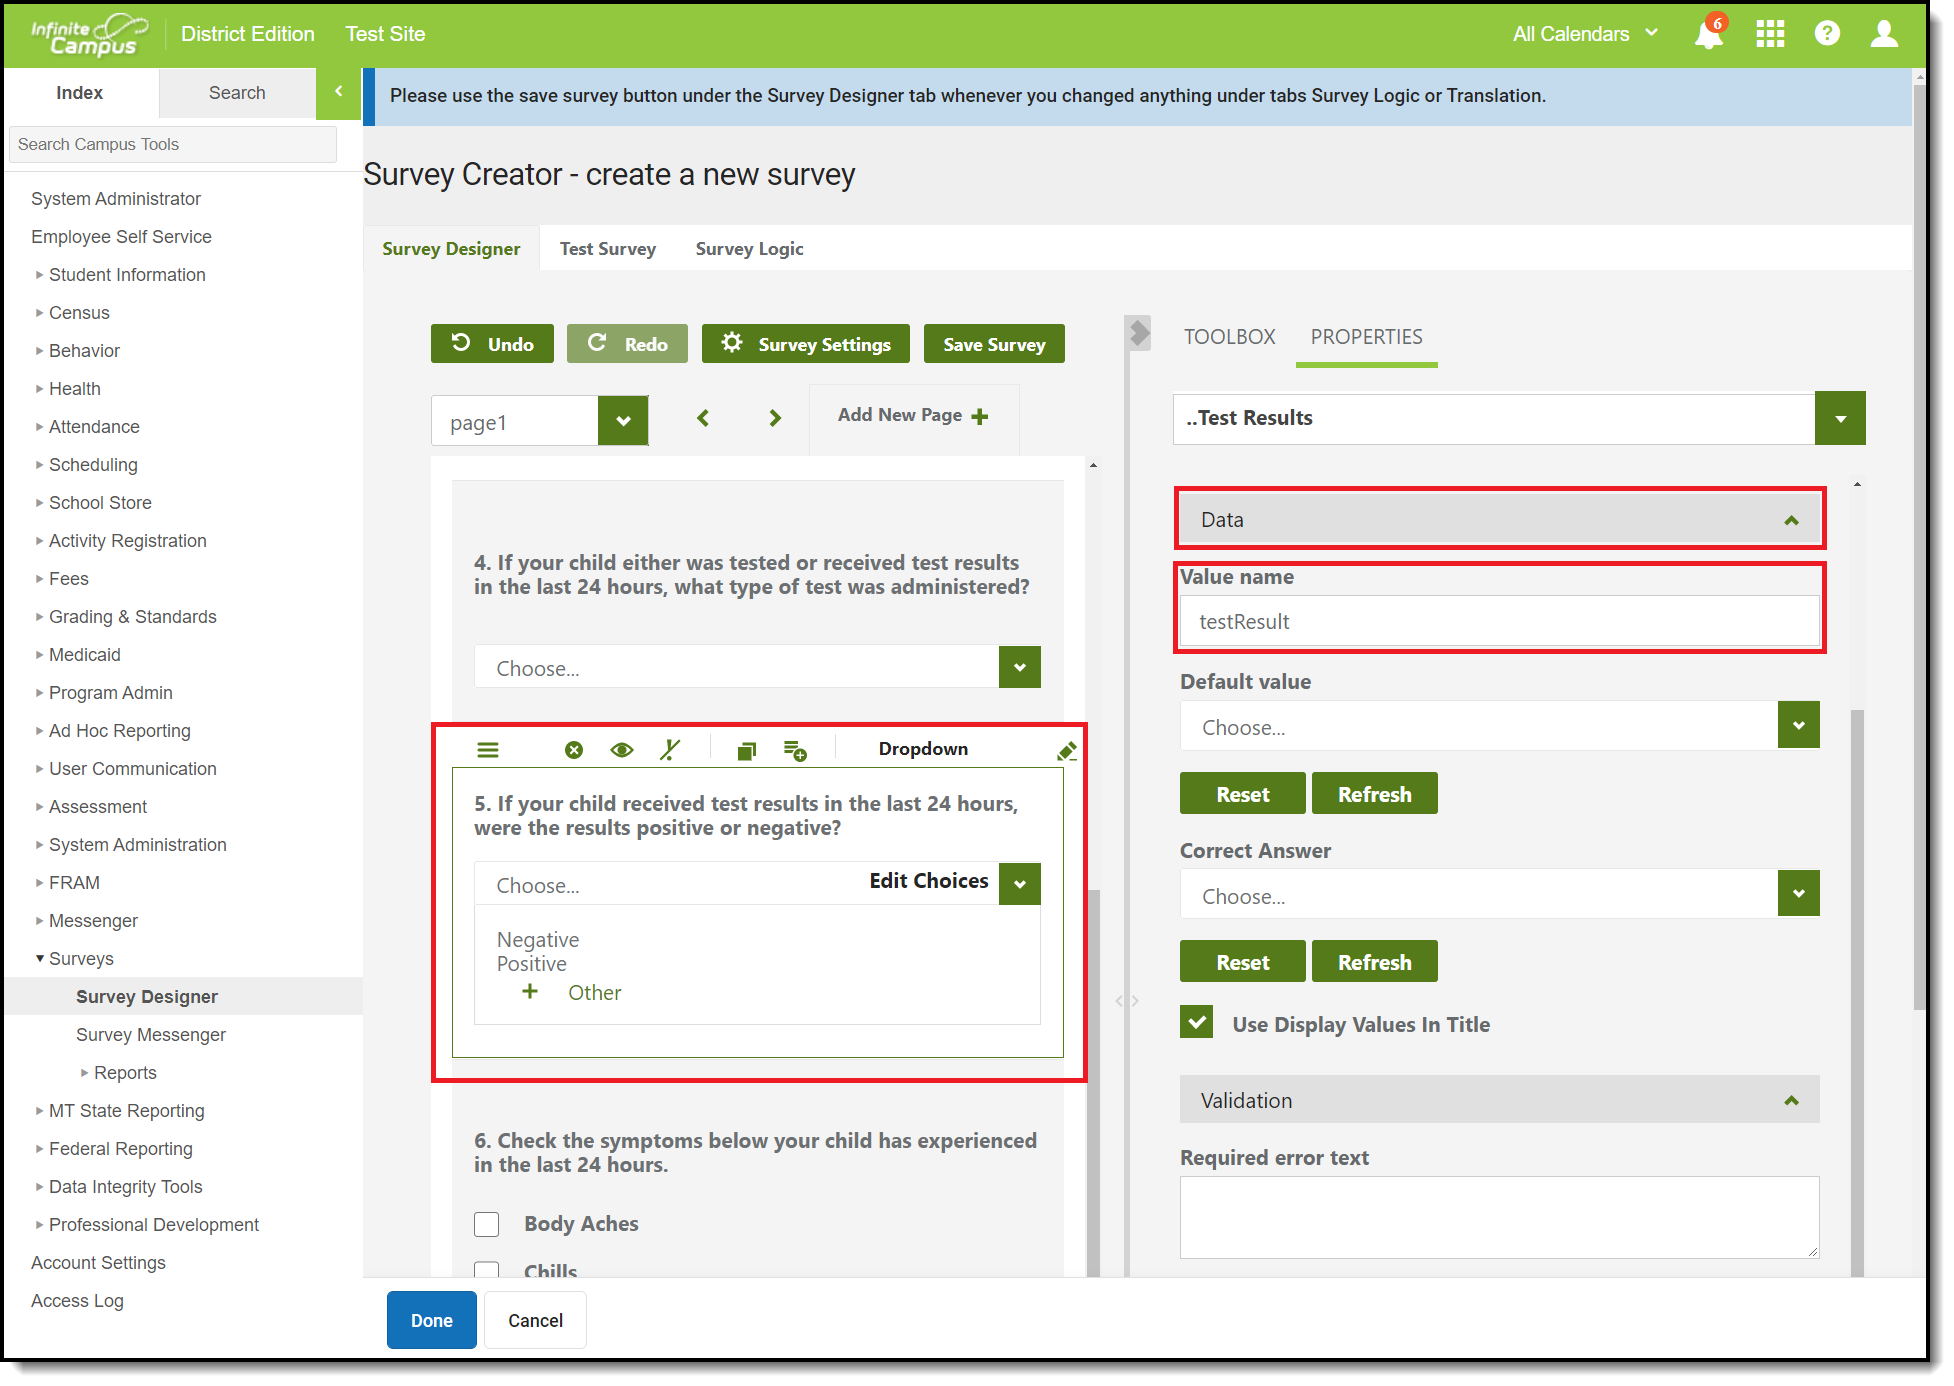
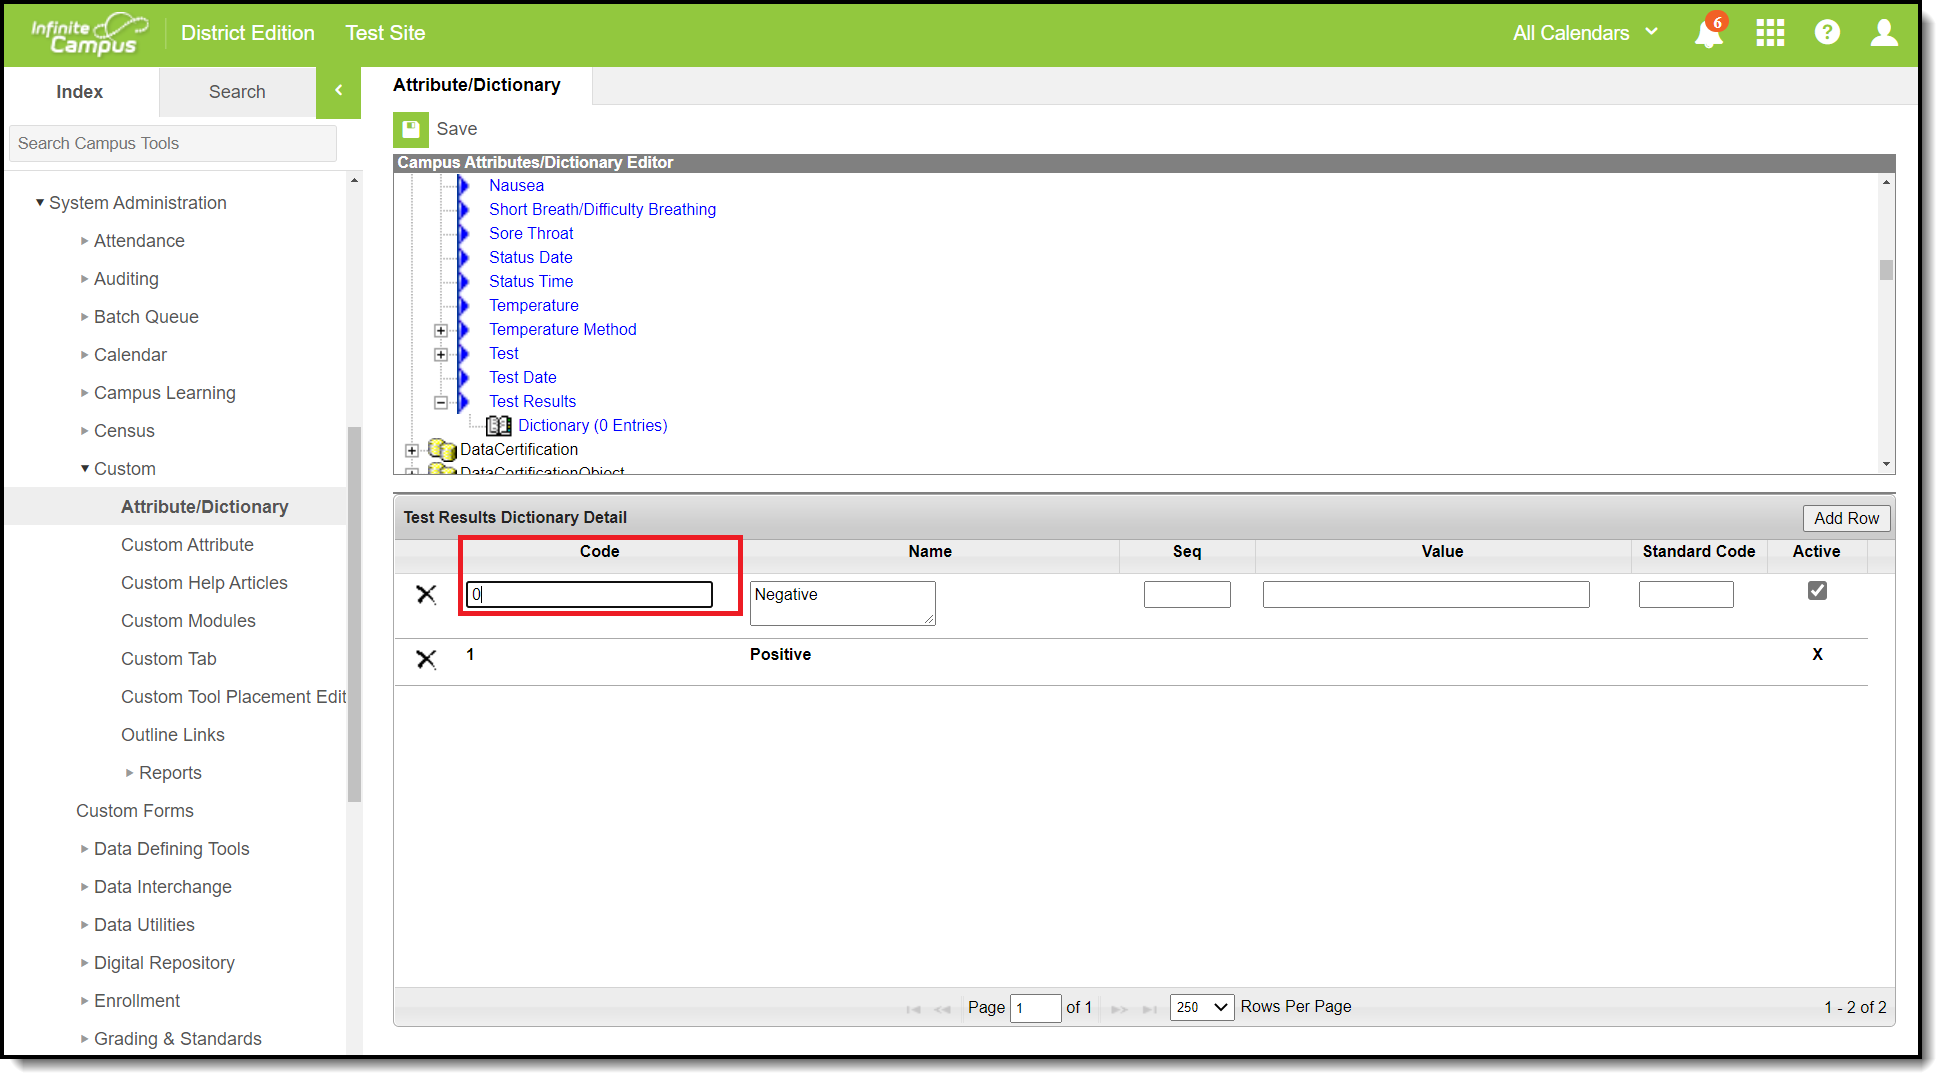
Droplist items are mapped by entering the Dictionary Code in the Value field under Choices in the Survey Creator.
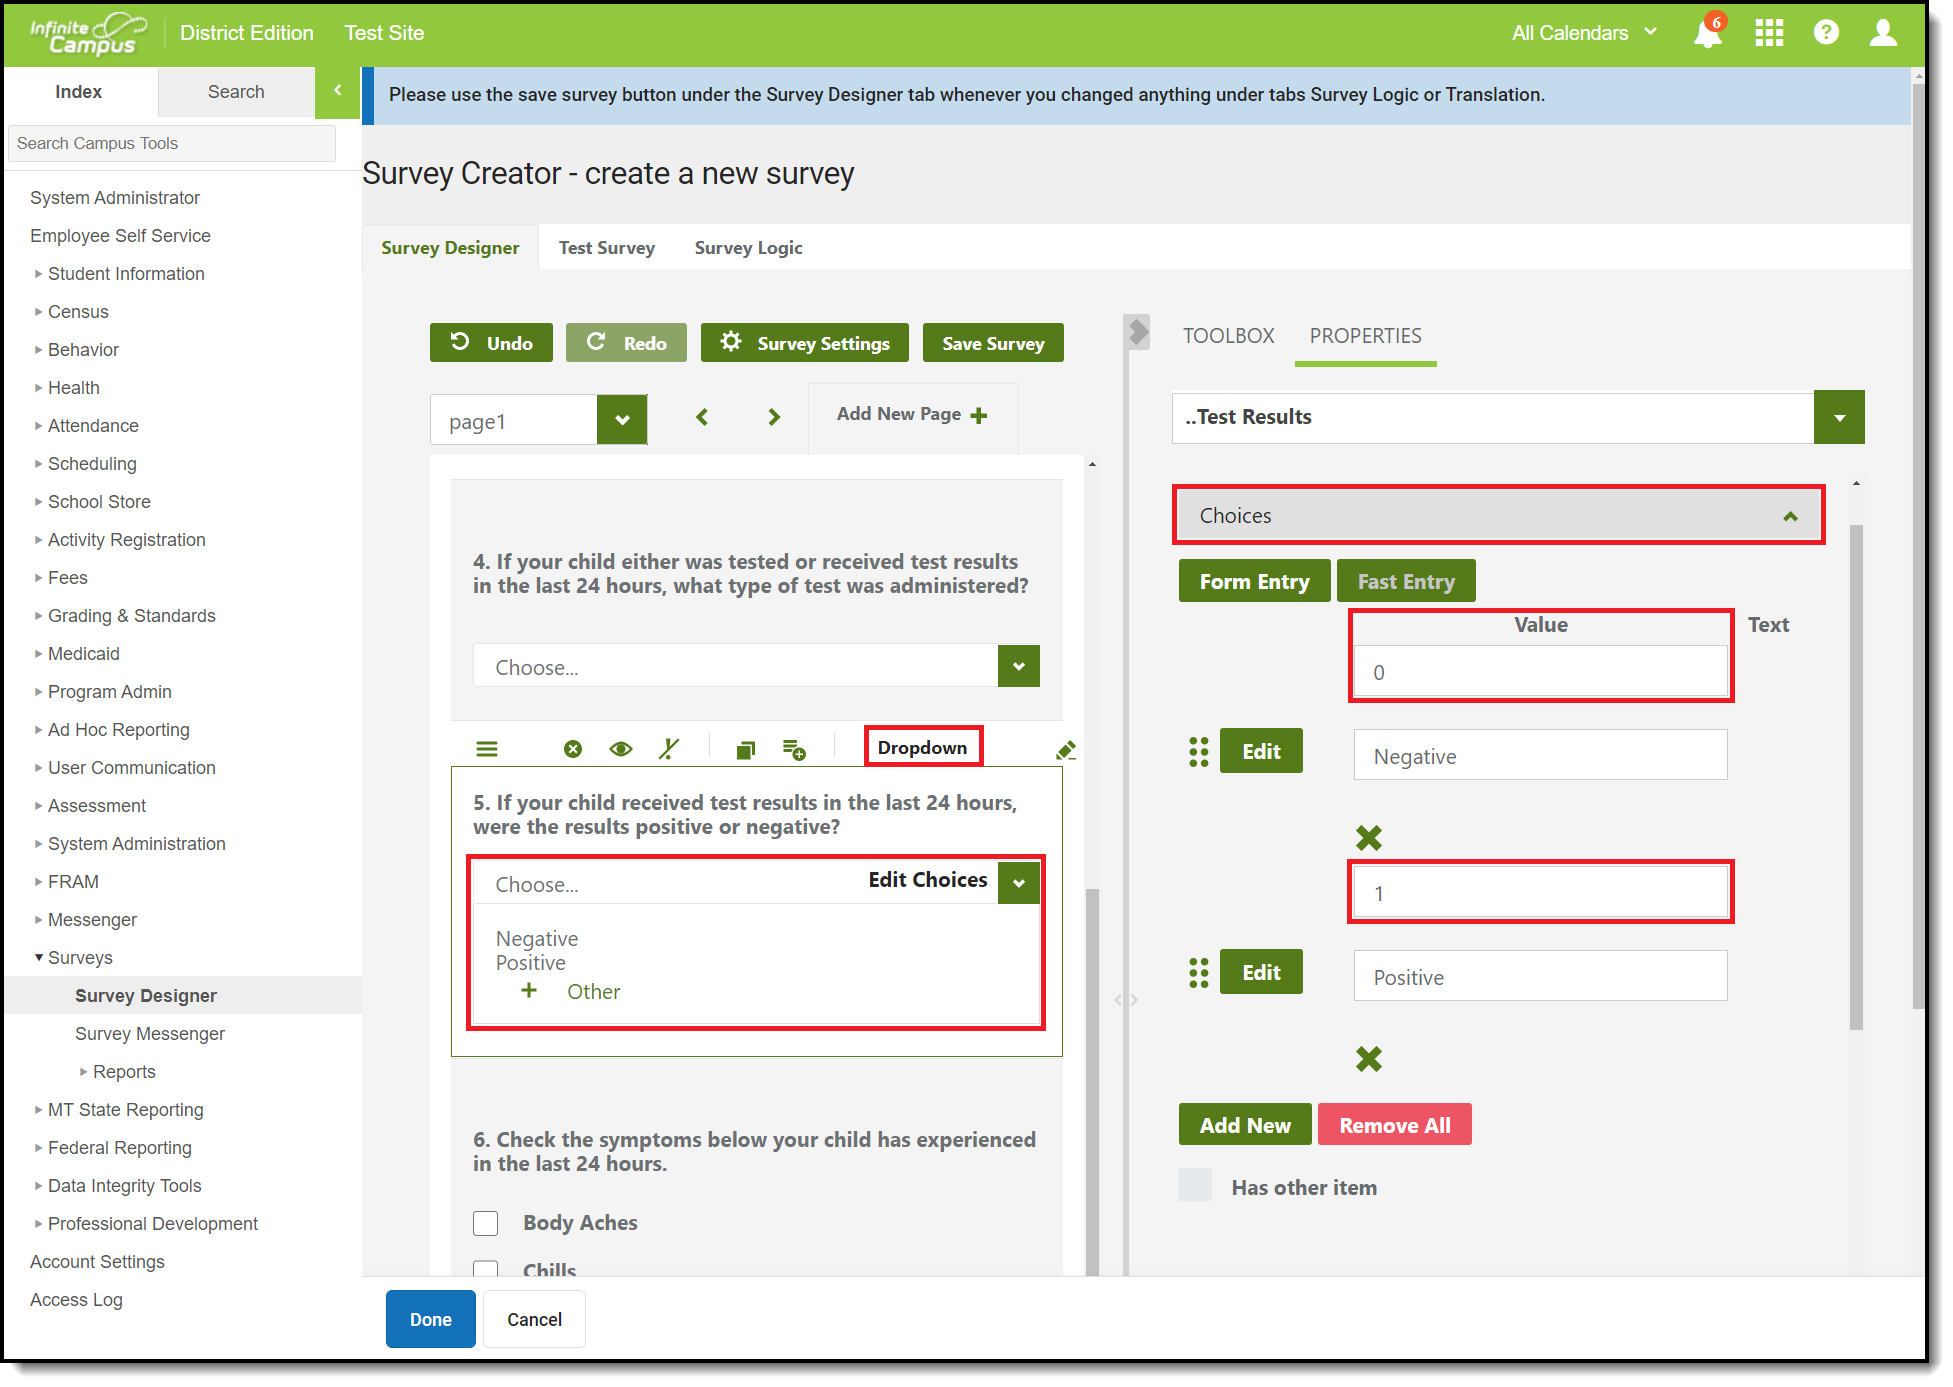
Click Done when finished reviewing/editing the details of the survey.
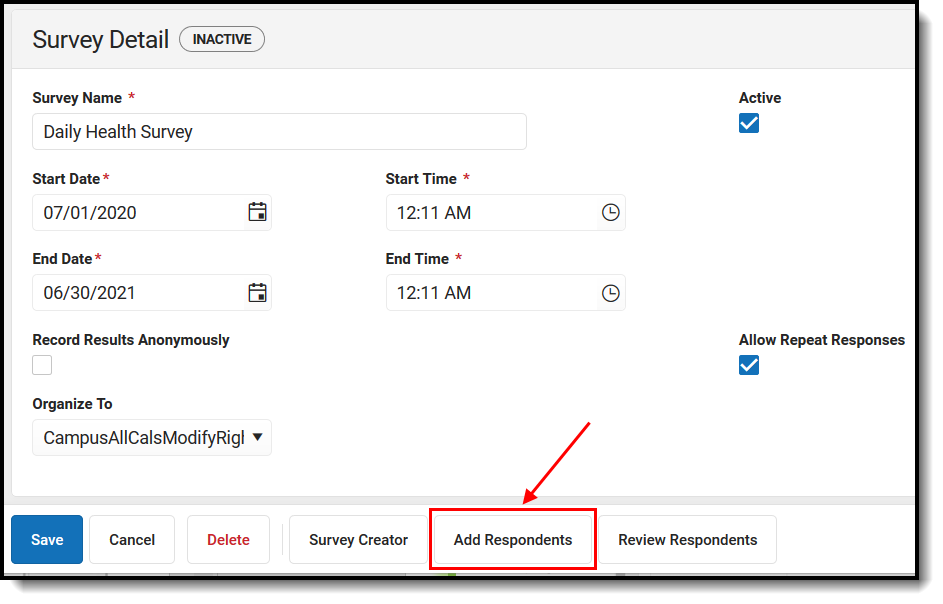
Step 4. Add Respondents
Now that the survey is ready, it is time to send it out. To add survey respondents, click the Add Respondents button (see image below).
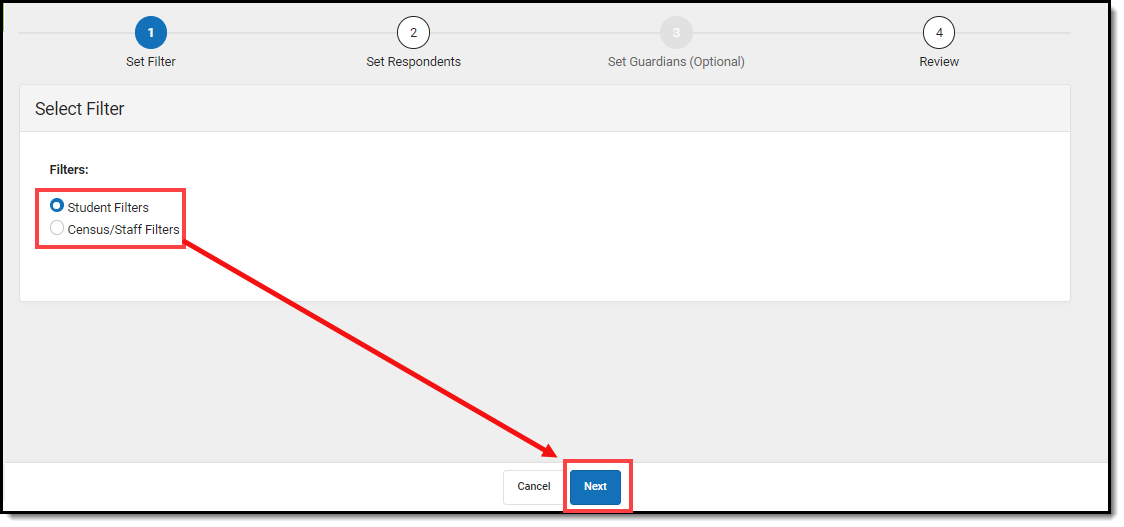
The Select Filter editor appears, asking if the respondent list will be comprised from a student or census/staff Ad Hoc filter.
Ad hoc filters are created within the Filter Designer tool. For a guide on how to create filters, see the Filter Designer article.
Select the Student Filters radio button.
The Add Respondents editor will appear, displaying a list of existing Ad Hoc filters in the Saved Filters window.
- Select which group of people will be invited to take the survey.
- Select which filter(s) should be used to determine the respondent list by selecting the filter in the Saved Filters window and clicking the
 button. The filter will now appear in the Selected Filters window.
 - Select the Operation:
- Union - All respondents in all filters selected (depending on the invite value) will receive the survey.
- Intersection - Only people who appear on all selected filters will receive the survey.
- To limit respondents to only those who have a user account within Infinite Campus, mark the Only add respondents with user accounts checkbox. Since surveys are accessed via the Portal and in order to have Portal access you must have a user account,
- For the Daily Health survey, the Let guardians take the survey on behalf of the students checkbox must be marked if parents and students are taking the survey.
- Click Next.
 button. The filter will now appear in the Selected Filters window.
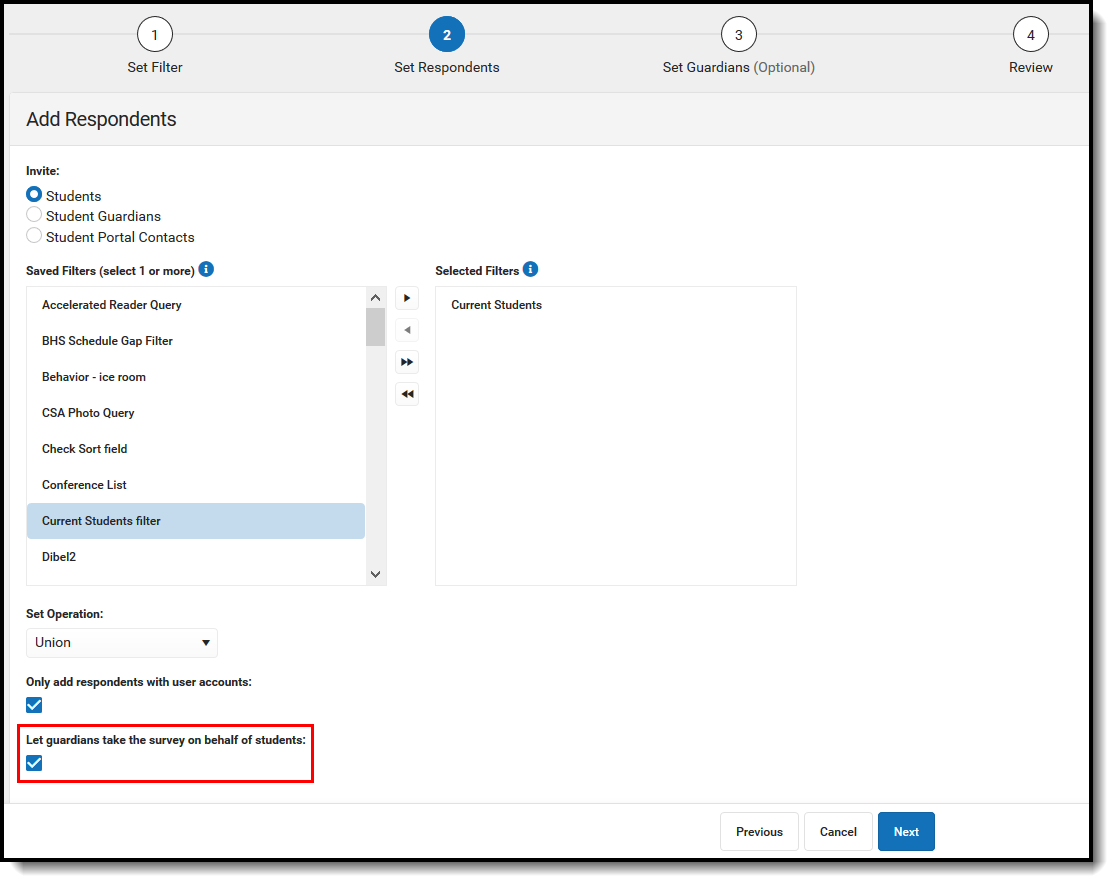
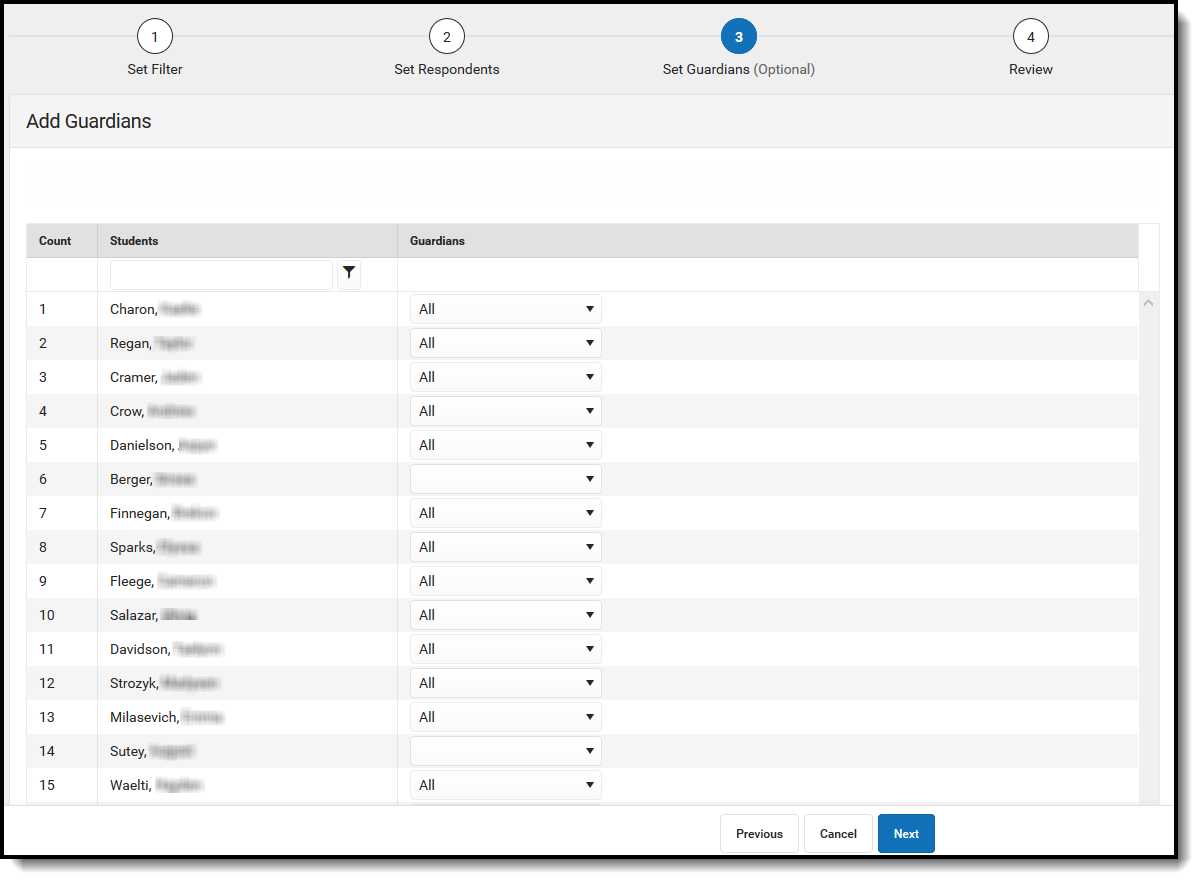
Since the Let guardians take the survey on behalf of students checkbox is marked, the Add Guardians editor will appear (see image below). Here, you can designate student by student which legal guardian is allowed to take the survey on behalf of the student.
Once guardians are selected, click Next.
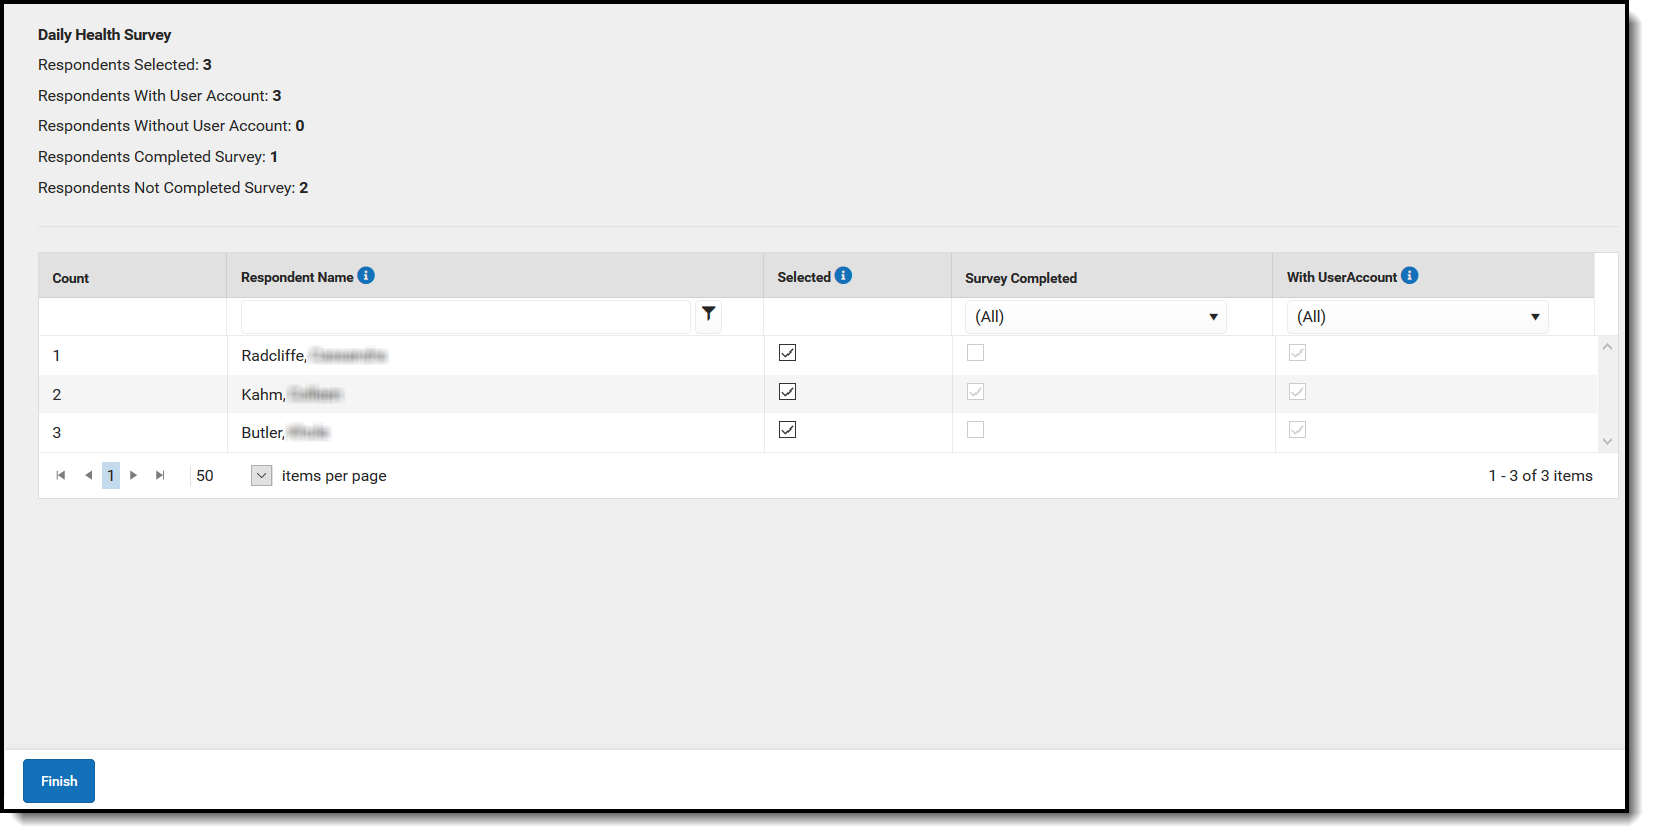
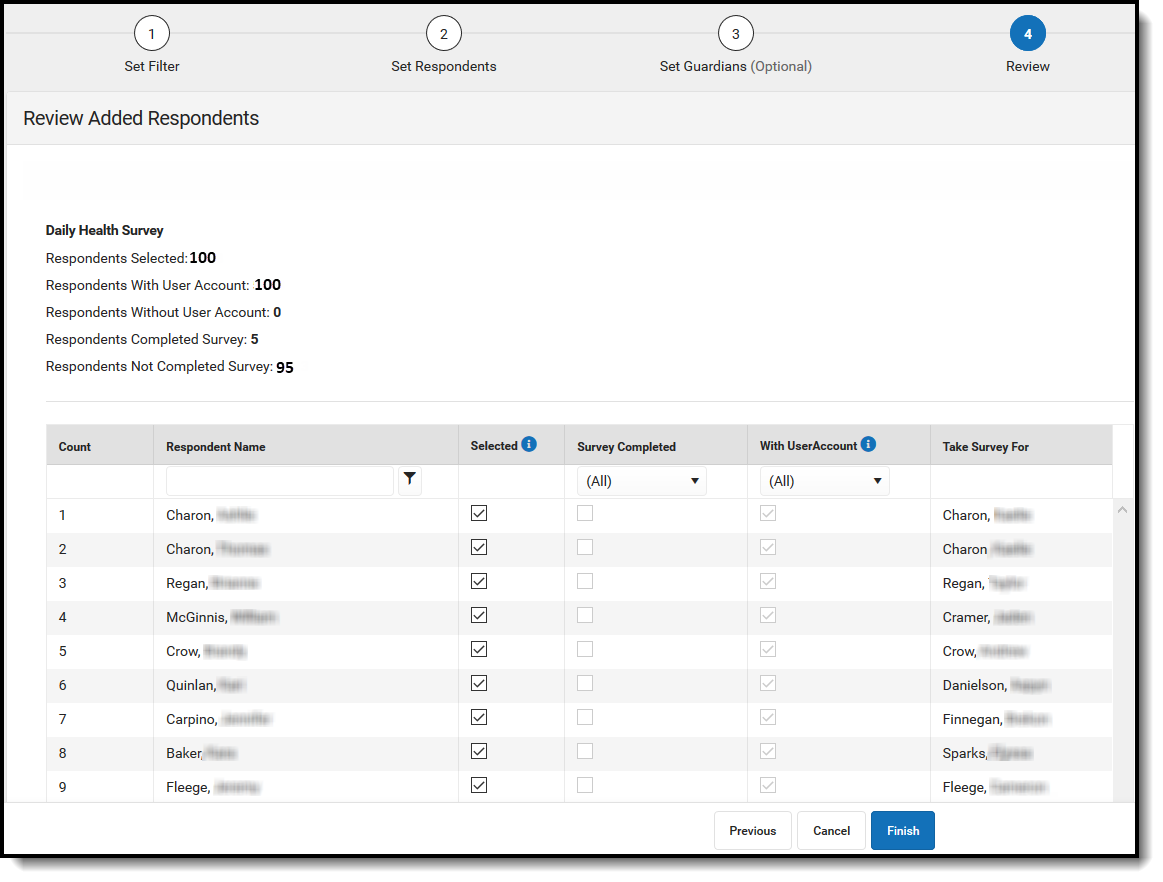
The Review Added Respondents editor appears, detailing now many respondents were selected, how many of them had a user account, how many did not have a user account, how many have already completed the survey, how many have yet to complete the survey, and a detailed breakdown of all people who received the survey.
If you have reviewed this information and feel the survey is ready to be sent out, click Finish. The survey has now been sent out to all respondents with a user account.
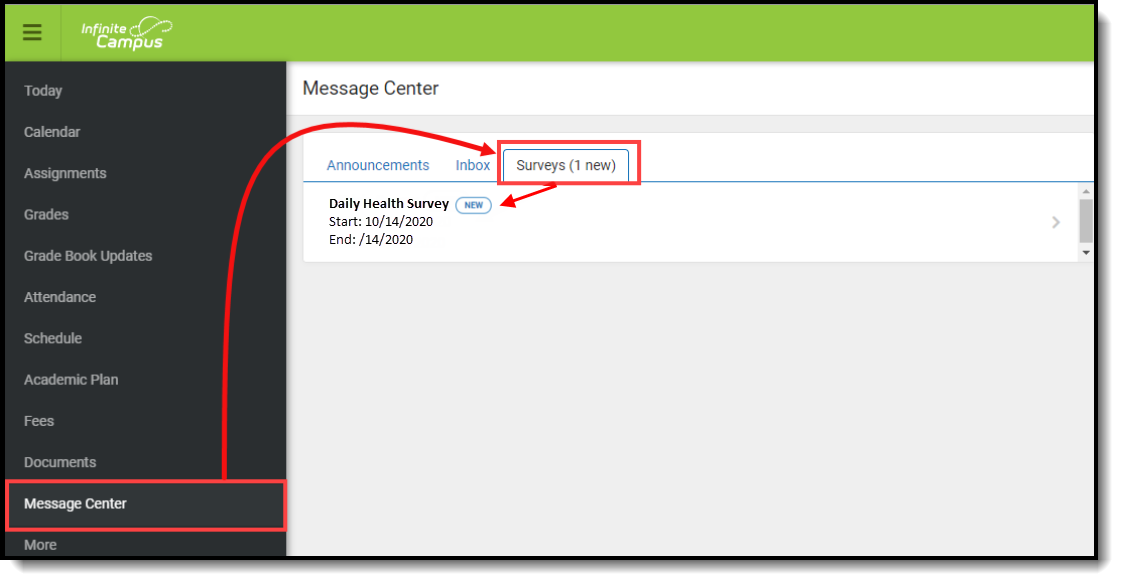
Respondents will receive a survey message in the Message Center under the Survey tab. Only one survey will be sent per student. From here, they can click on the survey and begin filling it out.
Review Respondents
Once a survey has been sent out, you can review who received the survey and how many have completed the survey by selecting the survey in the Survey List and clicking the Review Respondents button.
An editor will appear, detailing information about survey recipients and whether or not they have completed the survey. Once a survey has been completed, the data from the survey will be imported to the student's Daily Health Log record (Student Information > Health > General > Daily Health Log). Students and guardians can view imported records on the read-only Daily Health Log tab in the Campus Portal.