The Attach Content options display if your district has Campus Learning and has given you the Enhanced Curriculum tool right. Specific options are dependent on district and school configuration.
Location: Open an assignment via tools throughout Instruction, including Grade Book, Planner > My Planner, Assignment Overview, and Progress Monitor
The Attach Content options on assignments and resources allow teachers to add additional content.
Click a button below to jump to the related section
Attaching content is just one part of creating an assignment or resource. See the Assignments and Resources article for more information about the tools, options, and features available.
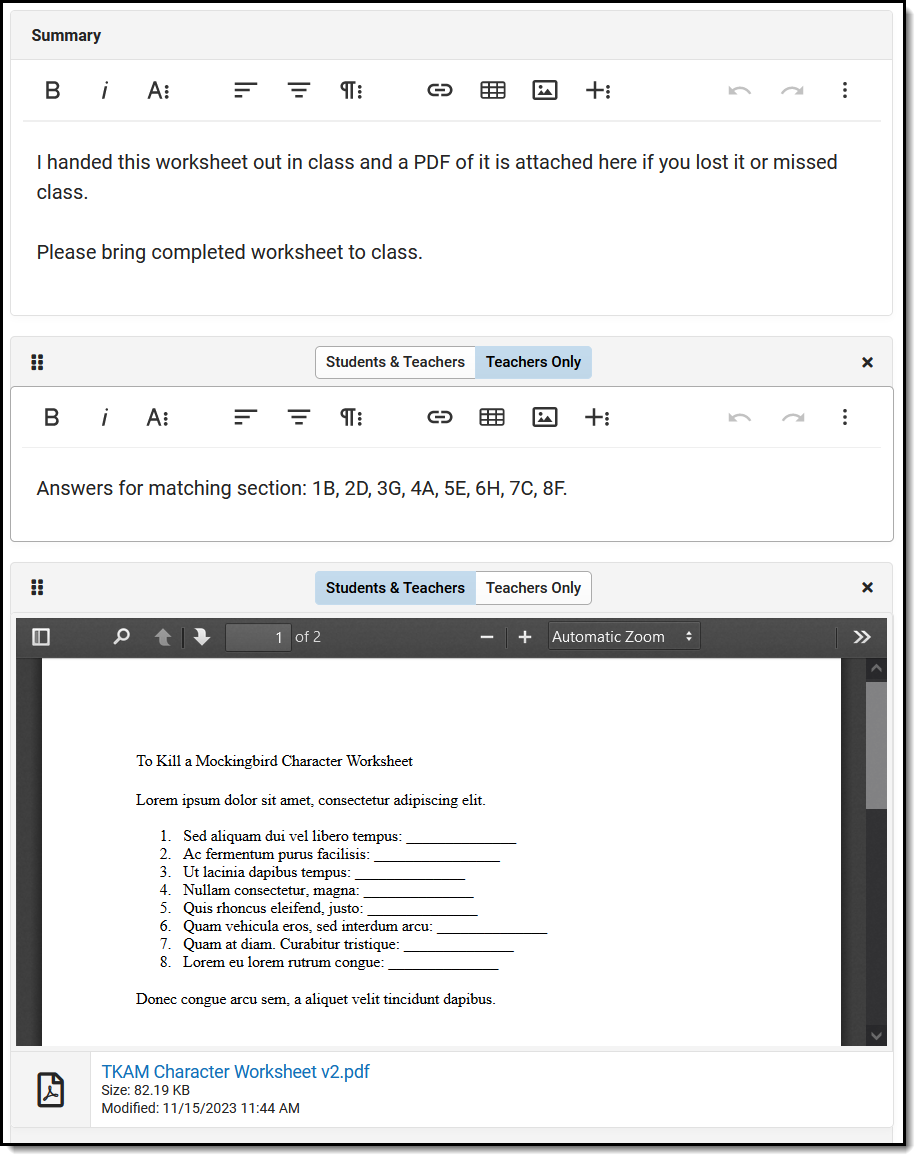 An example of attached content, including a worksheet attached as a file and teacher notes.
The Enhanced Curriculum tool right in Additional Access Rights > Instruction Tools grants access to this option. See the Instruction Tool Rights article for more information.
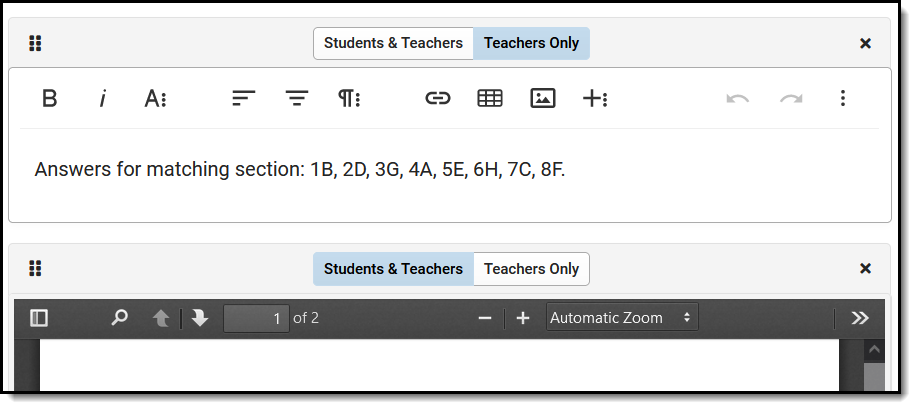
If there are multiple attachments or notes on an assignment, they can be rearranged by clicking the dots icon in the top left corner and dragging the segment into the desired order. Attached content and notes can be visible to Student & Teacher or to Teachers Only, which may be a helpful option for content such as an answer key.
Click the Preview button at the bottom of the editor to see how the assignment will appear for students.
The following types of attached content may be available, depending on district configuration:
The Notes option is available to all teachers. All other options must be configured by your school or district.
Link Directly to Content
Below the Attach Content options is a checkbox called Link Directly to Content.
| When you mark this option and a student clicks the assignment in Campus Student, the attached content opens directly, bypassing the assignment details such as dates and grading. This option is helpful when sharing a resource such as a syllabus or linking directly to a class website or materials. |  |
Keep in mind that students cannot view any additional assignment information, including the description and grading. Assignments with this option marked should not have other tasks linked, such as quizzes or discussions, since students won't be able to access them.
Record Notes
Notes are additional text fields. Format the text as desired, including bold/italics, text colors, or bullets and numbering in the menu. You can also add links, tables, images, or videos. This content displays for others just as you see it here in the editor.
Ideas for Notes:
|
Add a Web Link
Add a Web Link to call out a specific site with more emphasis that linking it in a Notes or Summary editor. Web links open in a new tab.
For each web link, enter a Title for the link and the URL.
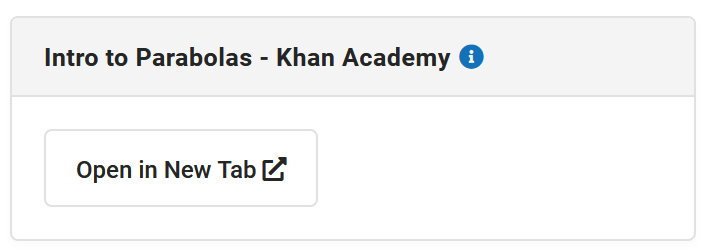 The Title displays at the top of the card.
Attach a File
To use this option, your district must enable the Campus Digital Repository and set the appropriate Digital Repository Preferences, which determines the allowed number of files and file size limits.
To attach a file, click the File button and then click and drag a file or click Select File to browse your local drive. Once you select a file the file name and size displays. Leave the Consent checkbox marked to indicate that you are aware of the Acceptable Use Policies of your district and Campus.
| You cannot upload files that contain any of the following special characters: | . , [ ] { } ( ) ! ; " * ? < > : / \ Tab, LF, CR . |
Click Upload to add the file to the assignment.
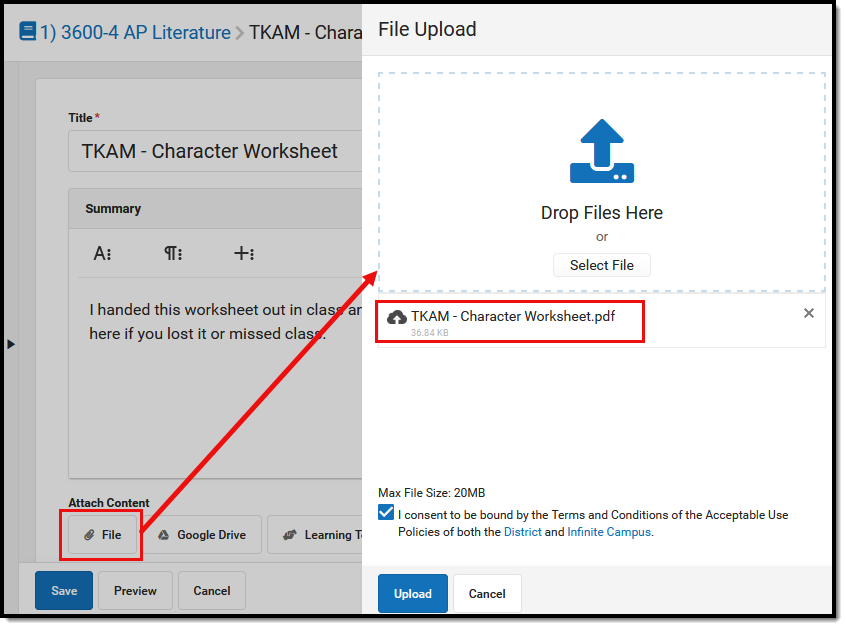 Attach a file to an assignment by uploading it to the digital repository.
Once uploaded, indicate if the file should be visible to Student & Teachers or to Teachers Only:
Campus acts as only a carrier for attached files - files are downloaded and opened in the program in which they are saved. For example, if a teacher attaches an Excel file, students will need Excel in order to download and view the file. Keep in mind the software programs your students are likely to have when attaching files.
File Types
The following file types cannot be uploaded to an assignment:
Attach Google Drive Files
To use this option, your district must configure Campus to connect to a Google Apps for Education account through the Google Drive tool.
If configured by your district, attach Google Drive files to an assignment and resources. Attaching a Google Drive file to an assignment allows students to access it through Campus Student. Teachers can also enable Student Submission of Google Drive files by students.
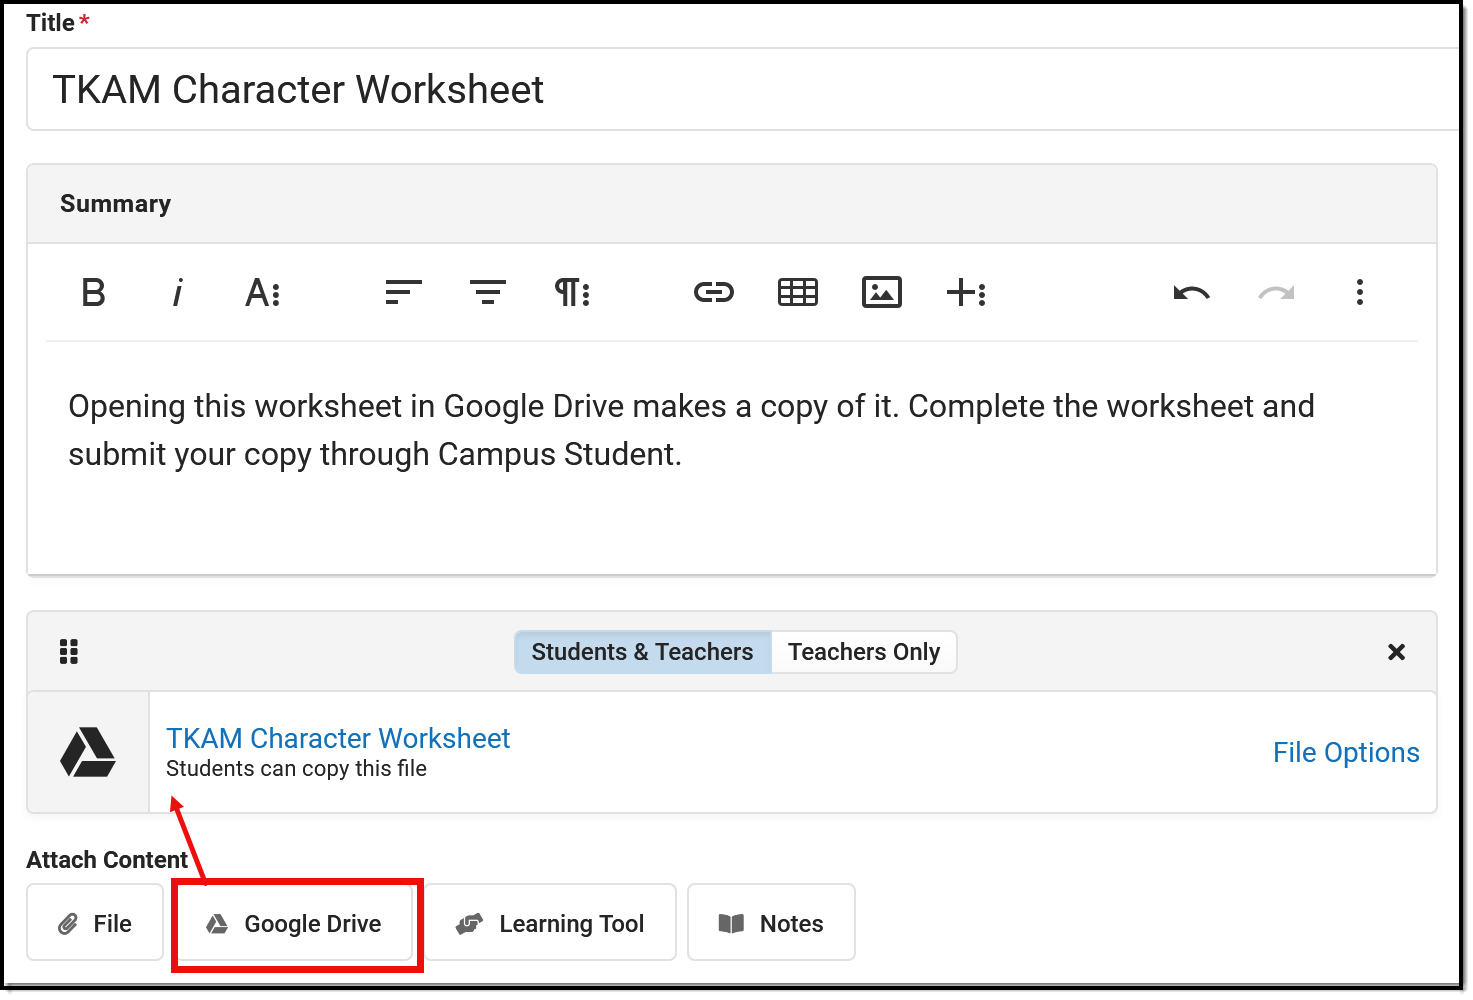 An example of a Drive file attached to an assignment.
For example, teachers could attach an essay prompt that students respond to in a separate file, or a worksheet that students can complete and return. Campus uses information about the assignment to control who has access to edit a file during assigning, completing, and scoring the assignment.
Connecting to Your Google Account
Before you can use any of the Drive options in Campus, you must connect your Google account.
- Click the Google Drive button.
- Make sure your Google Apps for Education email address is selected in the top right of the window that displays. If that email address is not an option, click Add Account and log into your Google Apps for Education account.
- Click Allow to connect this Google account with Campus.
Your Campus account and Google Drive account are now connected. At this point, you can select a file to include.
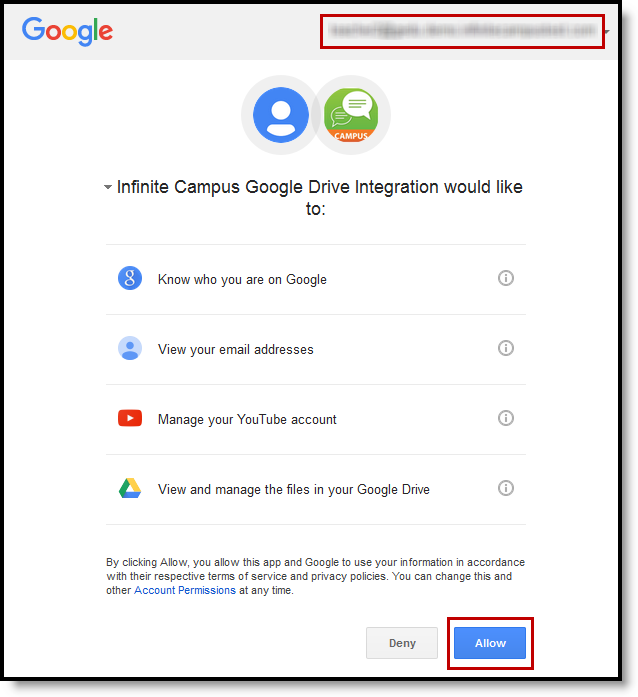 Allow Campus to access your Google Drive account.
Attaching Google Drive Files
Attach a file to an assignment or resource by selecting Google Drive in the Attach Content section. Your Google Drive account displays, where you can select a file, including a document, sheet, or slide presentation. Each file has unique viewing and sharing preferences.
Attachment Options and Sharing Preferences
When you attach a file, you determine how students will interact with the file and how the file can be shared.
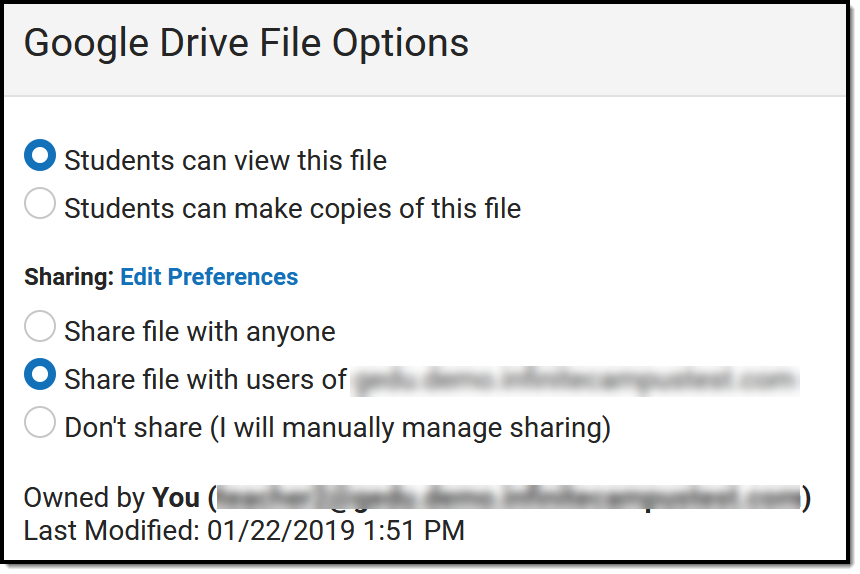 Sharing preferences for Google Drive files.
| Option | Description |
|---|---|
| Attachment Options: Determines if students all view a read-only version of the file or if copies are made for each student. | |
| Students view this file | Students have read-only access to the attached file. For example, use this option for an essay prompt that students should read and then respond to in a separate file. |
| Students make copies of file | When a student clicks the file to open it from the Portal, a copy of the file is made for that student. The name of the copied file is the original file name plus the student's first and last name in parenthesis. Campus creates a file structure and saves the file to the student's Drive account. The file structure is as follows: Infinite Campus Assignments > Calendar Name > Course-Section Number & Course Name > Assignment Name. For example, use this option to distribute a worksheet that students should fill out and return to you. |
| Sharing Preferences: Determines how the file can be shared. These options correspond to and update sharing preferences in Google Drive. Default Sharing Preferences apply. | |
| Share file with anyone | Anyone who has a direct link to the file can view it. |
Share file with users of [your domain] |
All users in the same domain (in this case, your district's Google Apps for Education domain) can open the file from a link. Campus recommends selecting this option. |
| Don't share (I will manually manage sharing) | The owner must manually set up sharing settings for the file. Choosing this option requires you to manually share the file with each individual who needs it by adding their email address to the Share list. |
Once these preferences are set for an uploaded file, modify them by clicking the File Options link:
 Click File Options to modify the attachment and sharing preferences for the file.
Edit Preferences
Access your Google Drive preferences by clicking Submission in Add a Task and then Edit Preferences. Your Preferences include the following:
| Option | Description |
|---|---|
| Your Teacher Google Account | Shows the Google account you currently have connected to Campus. This is the account that owns turned in files. |
| Assignments Google Drive Folder | Where files are stored. Campus creates a file structure as follows for files submitted by students in your Drive: Calendar Name > Course-Section Number & Course Name > Assignment Name > Student Name. |
| Default sharing settings for Google Drive files attached assignments | The default sharing preference selected for attached assignments. |
Assignment Workflow Example - Who Can Edit?
All of the passing back and forth editing rights for Drive files can be a little confusing. Expand below to view a walk through of who can edit a file when.
Note: You can fully manage editing and sharing rights in Campus. However, updating these rights directly from Google Drive overwrites Campus settings.
The following workflow describes the process of assigning, completing, turning in, and scoring an assignment.
- Teacher creates assignment, attaches a Google Drive file, and enables Add a Task > Submission > Google Drive.
- Student accesses the assignment in the Campus Student through the Calendar, Schedule, or Grades.
- Student clicks link to the Drive file.
- If you selected "Students view this file" for the attachment, the student can only access the file in view only mode.
- If you selected "Students make copies of file" for the attachment, a copy of the file is saved to the student's Drive with the student's first and last name added to the title of the assignment.
- Student creates a separate Drive file in response or modifies the copy.
- Student clicks Attach a Google Drive File and attaches the response file.
As soon as the student clicks Save on the assignment, Campus transfers ownership of the file from the student to the teacher. The teacher is now the owner of the file and the student can only view it in view only mode.
Until the student clicks Turn In on the assignment, they can reassign ownership of the file to themselves by deleting the file attachment, as long as the teacher has not marked the assignment as "Turned In."
- Teacher opens Grade Book, expands the Assignment Detail, and clicks Evaluate Work. (See the Submissions and Scoring Submissions articles for more information.)
- Teacher views the file in the scoring screen or clicks the name of the file in the submission list.
Campus creates a file structure for the assignment as follows: Calendar Name > Course-Section Number & Course Name > Assignment Name > Student Name.
- Teacher scores the assignment.
- Teachers can suggest edits to the file by selecting Suggesting instead of Editing in the top right corner of the Drive file. Feedback can be entered in the Google file or in the Teacher Feedback area of the Submissions list.
- Return edit rights to the student so that they can modify a turned in file. From the
 list in the Submission Scoring screen, mark Edit to return edit rights, or View to revoke those rights. See the Scoring Submissions article for more information.
Attach Learning Tools
Learning Tool connections allow teachers to connect content in a partner program with their assignments. Students open the assignment in Campus Student, launch into the other program from there, and complete their work in the other program (if applicable). Teachers can access the linked assignment in the partner program from the assignment in Campus, where they can review student work and enter scores (if applicable). The partner programs available range from assessment providers, learning management systems, and curriculum tools, and are dependent on district setup.
Before you start
- To use this option, your district must configure a connection to a specific learning tool partner program through the Digital Learning Applications tool.
- The configuration for many learning tools relies the email addresses entered in Campus matching those associated with accounts in the partner program, for both the teacher and students.
Create a Learning Tool Link
- In an assignment or resource, click Learning Tool. A list of available partner programs displays, based on the connections configured by your district.
- Select a program. Depending on the program and configuration, it may open in a side panel or in a separate browser tab.
- Indicate which type of link you're adding. There are two types of Learning Tool links:
- Link to Specific Content: This type of link opens a specific piece of content, such as an assignment, video, or quiz in the partner program.
- Link to the Tool in General: This type of link opens the linked program in general. This type of link simplifies access to the program. For example, you might link to the general tool from a resource at the top of their curriculum list to make it easier for students to access course content.
- Click Continue.
- If you're adding a link to specific content, the other program opens so you can select the content to link. You may need to log in to the program if you have not done so before.
- If you're adding a link to the tool in general, the side panel closes.
- Save the assignment to finish adding the link.
Attached learning tools display differently based on the program. For example, a Youtube video displays as embedded in the editor, so that students can view the video without leaving Campus Student. In the example below, a Turnitin assignment displays as a launch link.
 Linked learning tools display differently based on the partner.
Accept Scores
For some programs, you have the option to Accept Scores. This checkbox is marked by default for programs that support score passback. If this checkbox is marked, any scores entered in the partner program for the linked assignment will be populated in the grade book.
Note: The Accept Scores checkbox must be marked prior to scoring assignments in the partner program for those scores to display in the Campus Grade Book.
There is some variation between different learning tool programs. Expand a section below to learn more about a few specific providers.
Naiku
Naiku is an assessment provider. Expand for more information:
Turnitin
TurnItIn helps teacher detect plagiarism and provides tools for analyzing and providing feedback on student work. Expand for more information:
