Tool Search: Events & Actions Configuration
Events & Actions is a means to cue/prompt staff when a change occurs that needs staff attention, like a schedule change, a new student enrolls in the district, or a student leaves the district. These changes are determined and configured by the district, improving communications among all involved parties.
Users can create an event that will monitor database tables, columns, and column values. Stored procedures can be used to enhance the functionality of this tool, which requires database access.
Watch this Events & Actions video for more information.
This tool requires knowledge of SQL, database structures, and the Campus database. If you or your district do not have this sort of knowledge, please contact Infinite Campus to inquire about training, stored procedure creation, or process consulting.
Events and Actions Workflow
Below is the standard workflow that Events and Actions follows.
- An Event is created, along with an associated actions of the event.
- When the Event is made active, a trigger is applied to the database corresponding to the table and column specified in the Event.
- A change occurs in Infinite Campus that is being monitored by an Event and its trigger is captured.
- A Quartz job runs on the database every minute and processes the captured events.
- The Quartz job processes all Actions for the captured Event in the order defined by the Action sequence.
To avoid performance disruptions, Campus recommends saving the first active event for a table during off-peak hours when database activity is low.
Example: No events have been created on the Enrollment table. Consider creating the first event for the table during a time when user activity is low.
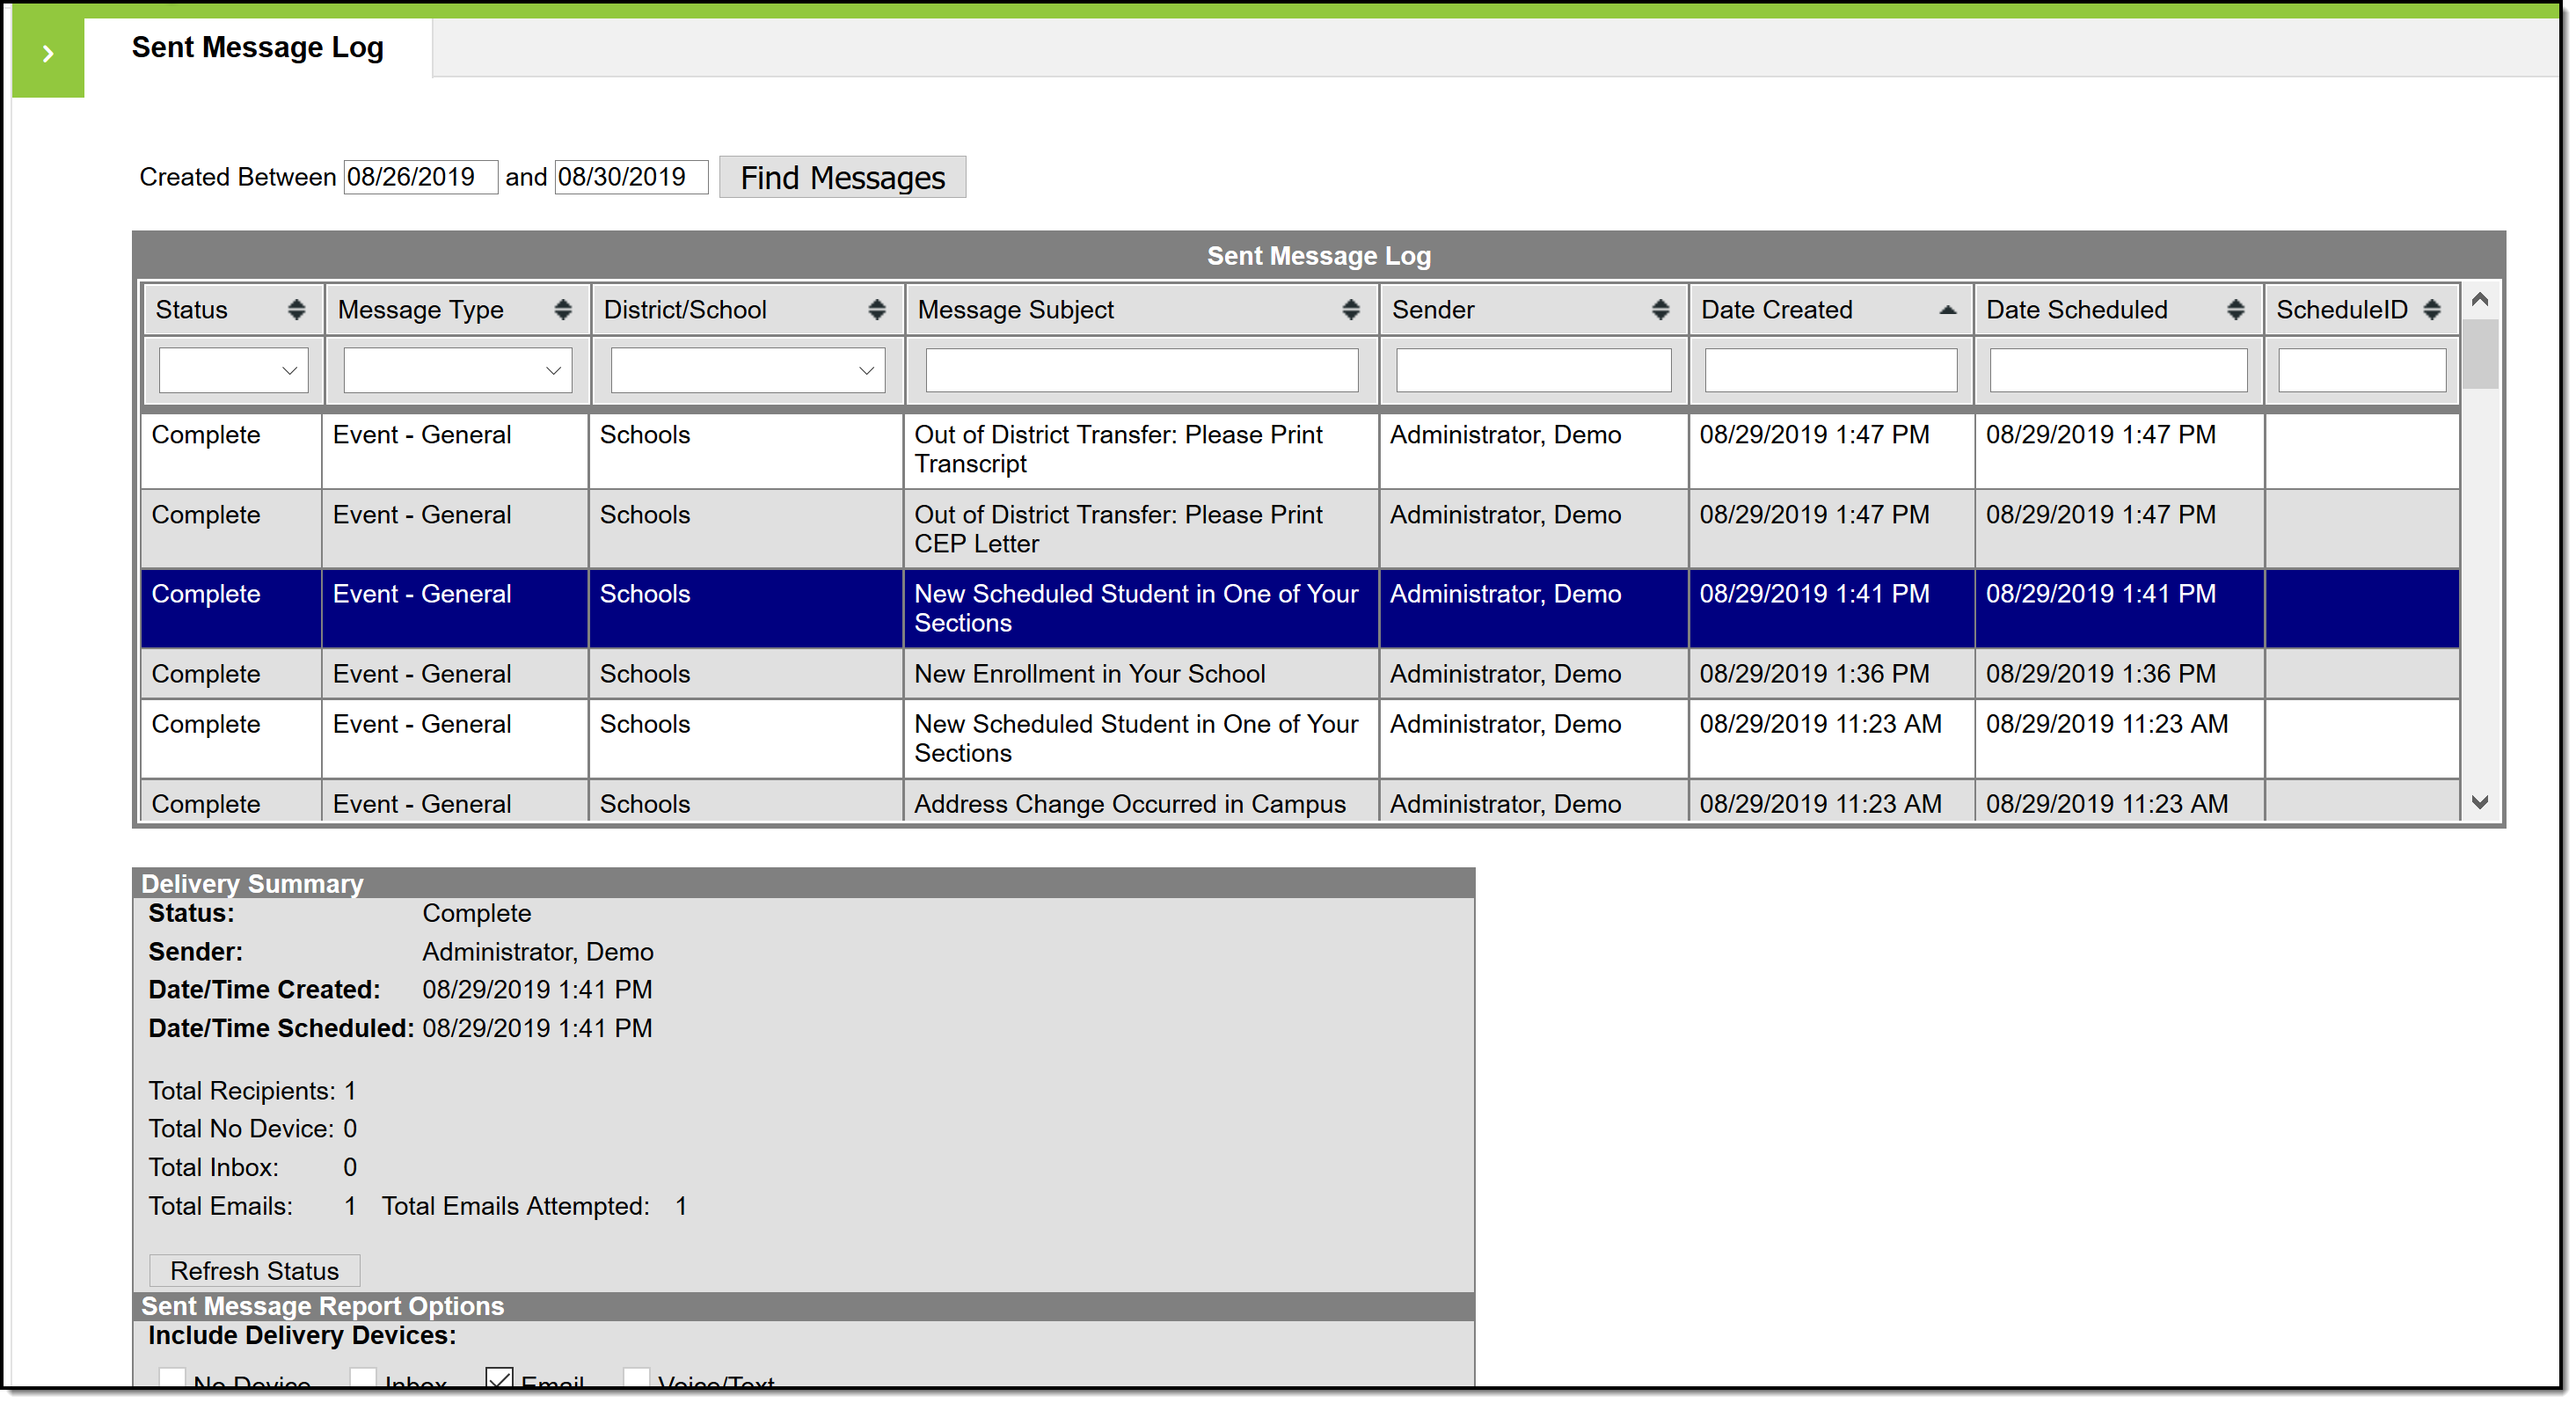
As Actions complete, Campus logs a record in the database if the Debug Logging option is marked on the Event editor. If the action is an Email, Campus records an entry in the Sent Message Log and the Recipient Log.
Tool Rights for Events & Actions
This is a powerful tool requiring technical knowledge of the Campus database. Campus Administrators should assign tool rights to a very limited set of users and only when completely necessary.
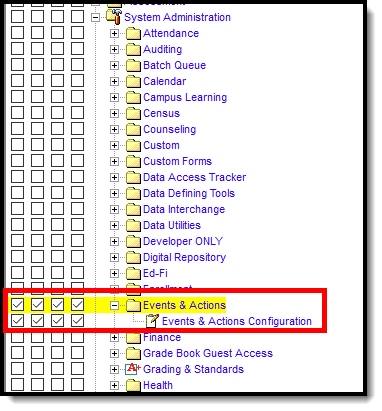
Full access to Events & Actions requires RWAD rights to the following:
- System Administration > Events & Actions
- System Administration > Events & Actions > Events & Actions Configurations
Assign R rights for users to view existing Events & Actions, but new Events & Actions cannot be created and changes cannot be made.
Assign RW rights for users to view existing Events & Actions, and modify existing Events & Actions. New Events & Actions cannot be created.
Assign RWA rights for users to view existing Events & Actions, modify existing Events & Actions, and add new Events & Actions, and copy the action associated with the event (but not the event itself).
Assign RWAD rights for users to view existing Events & Actions, modify existing Events & Actions, add new Events & Actions, copy Events & Actions, and delete Events & Actions.
When given rights to Events & Actions, users also have the ability to see the list of User Groups available in their district even if they do not have rights to user groups. However, they cannot see the individual members of the user groups.
Navigation of Events & Actions
Events & Actions is divided into two editors:
- First, an Event is created. An Event sets the criteria for monitoring an occurrence in the database - a record has been added to a table, a status on an existing record has changed, a record has been deleted.
- Second, an Action (or Actions) is associated with the Event, which is what happens in response to the event. For example, a student ends their enrollment or the building secretary enters an End Date on the enrollment record. That event - the ending of an enrollment - requires certain actions to occur, like the end dating of the student's locker, alerting/informing the counselor to print a transcript, etc.
Actions can be either Email, which sends information to a user group or a custom list using Campus Messenger functionality, or a Stored Procedure that is created by the district. See the Stored Procedures section for more information on this process.
Events Editor
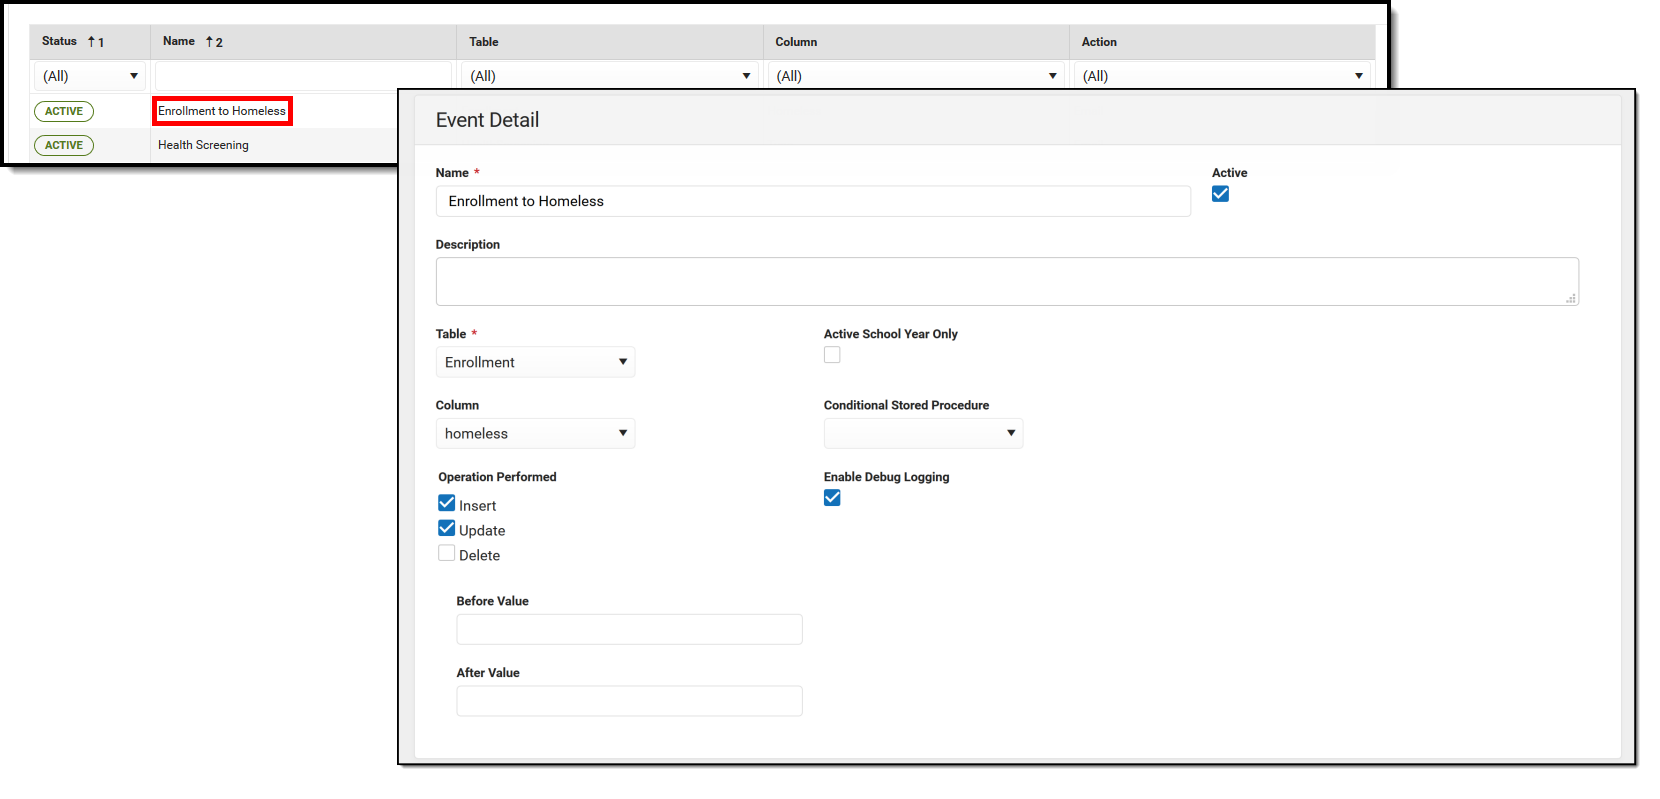
The Events Editor lists all configured events in various states of completion (active, pending, inactive), and includes the selected database table and column used in the event, and the action taken in response to the Event (email, stored procedure, etc.).
The Events editor is a summary screen to aid users in seeing what has been configured already.
These columns can be resorted as desired, by clicking on the header itself (Status, Name, etc.), or by choosing a value from the dropdown for that column.
| Element | Description |
|---|---|
| Status |
Indicates where that event is in the process. Events can be sorted by any of these. Events sort in Pending, Active, Inactive order.
|
| Name |
Provides a short summary of the Event, so it can be easily located when modifications need to be made. If the action is an email to building staff that a student's Homeless status changed, the name of the Event might be Homeless Status Changed. On the Detail editor, a Description field is provided so users can add more information to what occurs with the event. |
| Table | Lists the database table that is defined in the event. |
| Column | Lists the database column of the selected table that is monitored in the event. |
| Action | Indicates a summary of the action(s) that occurs when the event is triggered, such as an email is sent to a selected user group. |
Select an item to view the Events Detail or click New to create a new event.
Events Detail Editor
The Events Detail editor displays all of the fields necessary to create a new event and establish an action for that event. Provided below are descriptions of the fields on the Events Detail editor.
| Field | Description |
|---|---|
| Name | Provides a short summary of the Event (up to 128 characters. This name displays on the Events Editor (defined above). |
| Active |
Indicates whether the event is active (triggers associated with the event cause the action to occur). If this field is not marked, the event is inactive (triggers associated with the event do not cause the action). The default setting for this field to not marked (inactive). This checkbox needs to be manually marked. |
| Description | Provides a larger text field (up to 1000 characters) to detail what the event is for and the subsequent actions that are done. |
| Table | Selection indicates the table the Event is monitoring for change and where the database trigger is placed. Any table in the database can be chosen. |
| Active School Year Only | Displays only when the selected table includes a CalendarID column. When marked, only events that occur in the active School Year initiate Action(s). |
| Column |
Selection indicates the specific column within a table that defines the exact column from the database that is being monitored by the Event. A column must be selected to enable the Before Value/After Value fields. |
| Conditional Stored Procedure |
Adds an additional condition to the event. When the per minute Quartz Job runs and detects an Event has been triggered, it also checks if a Conditional Stored Procedure has been entered. If the criteria in the Conditional Stored Procedure has been met (is true), then the Actions process for the Event. If the Conditional Stored Procedure is not met (False), then no Actions are processed.
This could be used to associate a second table to an event. |
| Operation Performed |
When the marked option occurs for the selected table, the action (email sent, for example) is processed. If user wants to know when a new enrollment is created for a student, Insert would be selected. If user wants to know when an enrollment field has changed, Update would be selected. |
| Enable Debug Logging | When marked, event information is recorded to an internal table for troubleshooting purposes. See the Debug Logging table for more information. |
| Before Value | When a Column is selected, the event conditions are only met when the initial value in the Column is equal to the Before Value. For example, for an event that reports an update to an enrollment field, the before value might be blank; the after value might be Y or 1. |
| After Value | When a Column is selected, the event conditions are only met when the saved value is equal to the After Value. For example, for an event that reports an update to an enrollment field, the before value might be blank; the after value might be Y or 1. |
Event Actions Editor
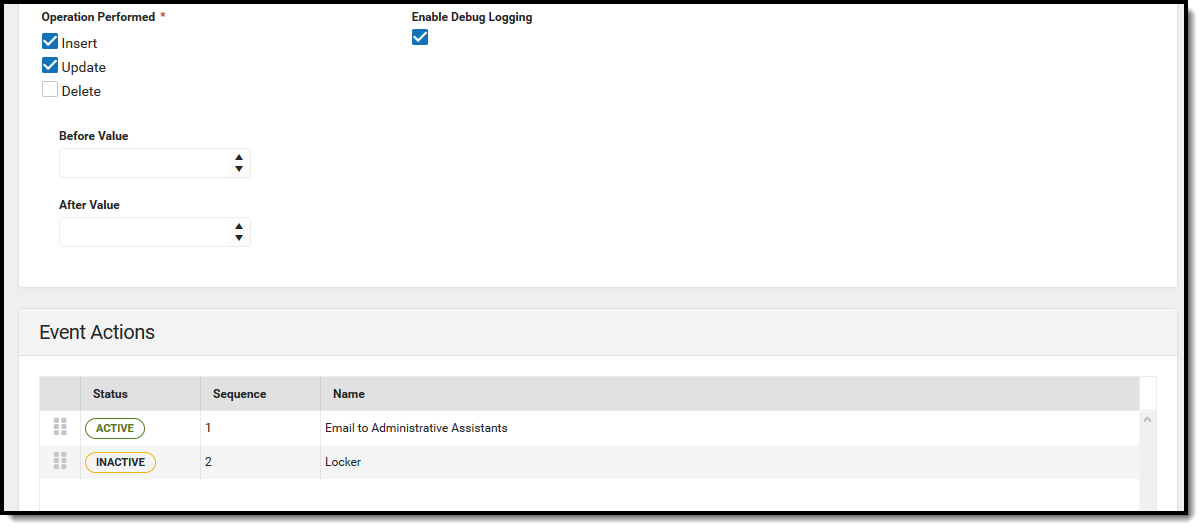
Following the Events Detail Editor is an Event Actions editor, which lists the actions associated with the selected Event. This displays the Status of the action, the Sequence (because an event can have more than one action) and the name of the action. For example, a change to an enrollment record might have an action of sending an email to building secretaries, and another action to send an email to change the combination on a locker.
When an Action is selected, an Action Detail editor and Action Type editor display.
Action Detail
| Field | Description |
|---|---|
| Name | Provides a short summary of the Action (up to 128 characters). |
| Active |
Indicates whether the action is active. When conditions of an event are met, only Actions marked Active will be processed. When this field is not marked, the action is inactive and does not process when the Event conditions are marked. The default setting for this field to not marked (inactive). This checkbox needs to be manually marked. |
| Type |
Indicates whether the action is in the form of an email or a stored procedure. See the following Action Type table for available options. Emails are sent to Campus Messenger for processing. The address used to send emails is entered in the Default Email Sender Address in Email Messenger Settings. |
| Sequence | Determines the order in which the actions occur. An event could have more than one action. If it does, then sequence numbers the actions in numeric order. If this order needs to be changed after more than one are saved, this value can be modified, or the user can drag and drop the actions into the proper order. |
Action Type
This editor varies based on the selected Type in the Detail editor.
| Field | Description |
|---|---|
| Email Type Fields | |
| Recipient |
Determines which staff receive the email. A User Group can be chosen, which are created in User Security, or a Recipient Stored Procedure can be selected. See the Stored Procedures section for more information.
Only one User Group can be selected per action. If multiple user groups should receive an email, use the Copy option to make a copy of the Action and select another User Group. This creates multiple actions for the event that are sequenced and are executed in sequence order.
If a user has rights to this tool, they are able to see the list of User Groups, even if they don't have access to user groups in System Administration. |
| Message Type | Further defines the email recipients. Persons in Campus are assigned Messenger Preferences Contact Reasons. This selection dictates which email address is used for recipients of the email action. |
| Limit Users with Calendar Rights |
This checkbox only appears if the Event table contains a calendarID column. When checked and a record is manipulated in a table with a calendarID, Email actions only send to recipients who have rights to the calendar of the changed record. |
| Subject | Emails are sent with the entered text. |
| Field Stored Procedure | Users select the stored procedure that was created to pull specific columns from the Campus database to be displayed in the email body. |
| Body | Allows creation of an email message using a WYSIWYG editor. Events & Actions uses a new WYSIWYG editor and provides some additional formatting options not available in older WYSIWYG editors. Use the Insert Field option to select the field names to populate specific information for the email. The Insert Field button is only enabled when a Field Stored Procedure has been selected. If the studentName field is selected, the email includes the name of student that requires action. |
Stored Procedure Type Fields | |
| Stored Procedure | Indicates which Stored Procedure that is executed when this event action is processed. |
Create a New Event
- Click the New button at the bottom of the Events editor. An Events Details Editor opens.
- Enter the Name and Description for the Event.
- Select the Active checkbox if the event should be available to run immediately. Otherwise, leave this checkbox not marked.
- Select the Table and Column for the Event.
- Indicate the desired Operation Performed.
- Enter the Before Value and After Value, if applicable.
- Mark the Active School Year Only checkbox if applicable.
- Select a Conditional Stored Procedure, if desired.
- Mark the Enable Debug Logging to track database messages logged as this event executes.
- Click the Save icon when finished. This saves the event, closes the Event Detail editor and displays the Events editor.
- Or, click the arrow next to the Save icon to select Save & Stay. This saves the event and leaves the Event Detail editor visible so Event Actions can be added.
Create a New Action for the Event
An event must be saved before an action can be created for that event.
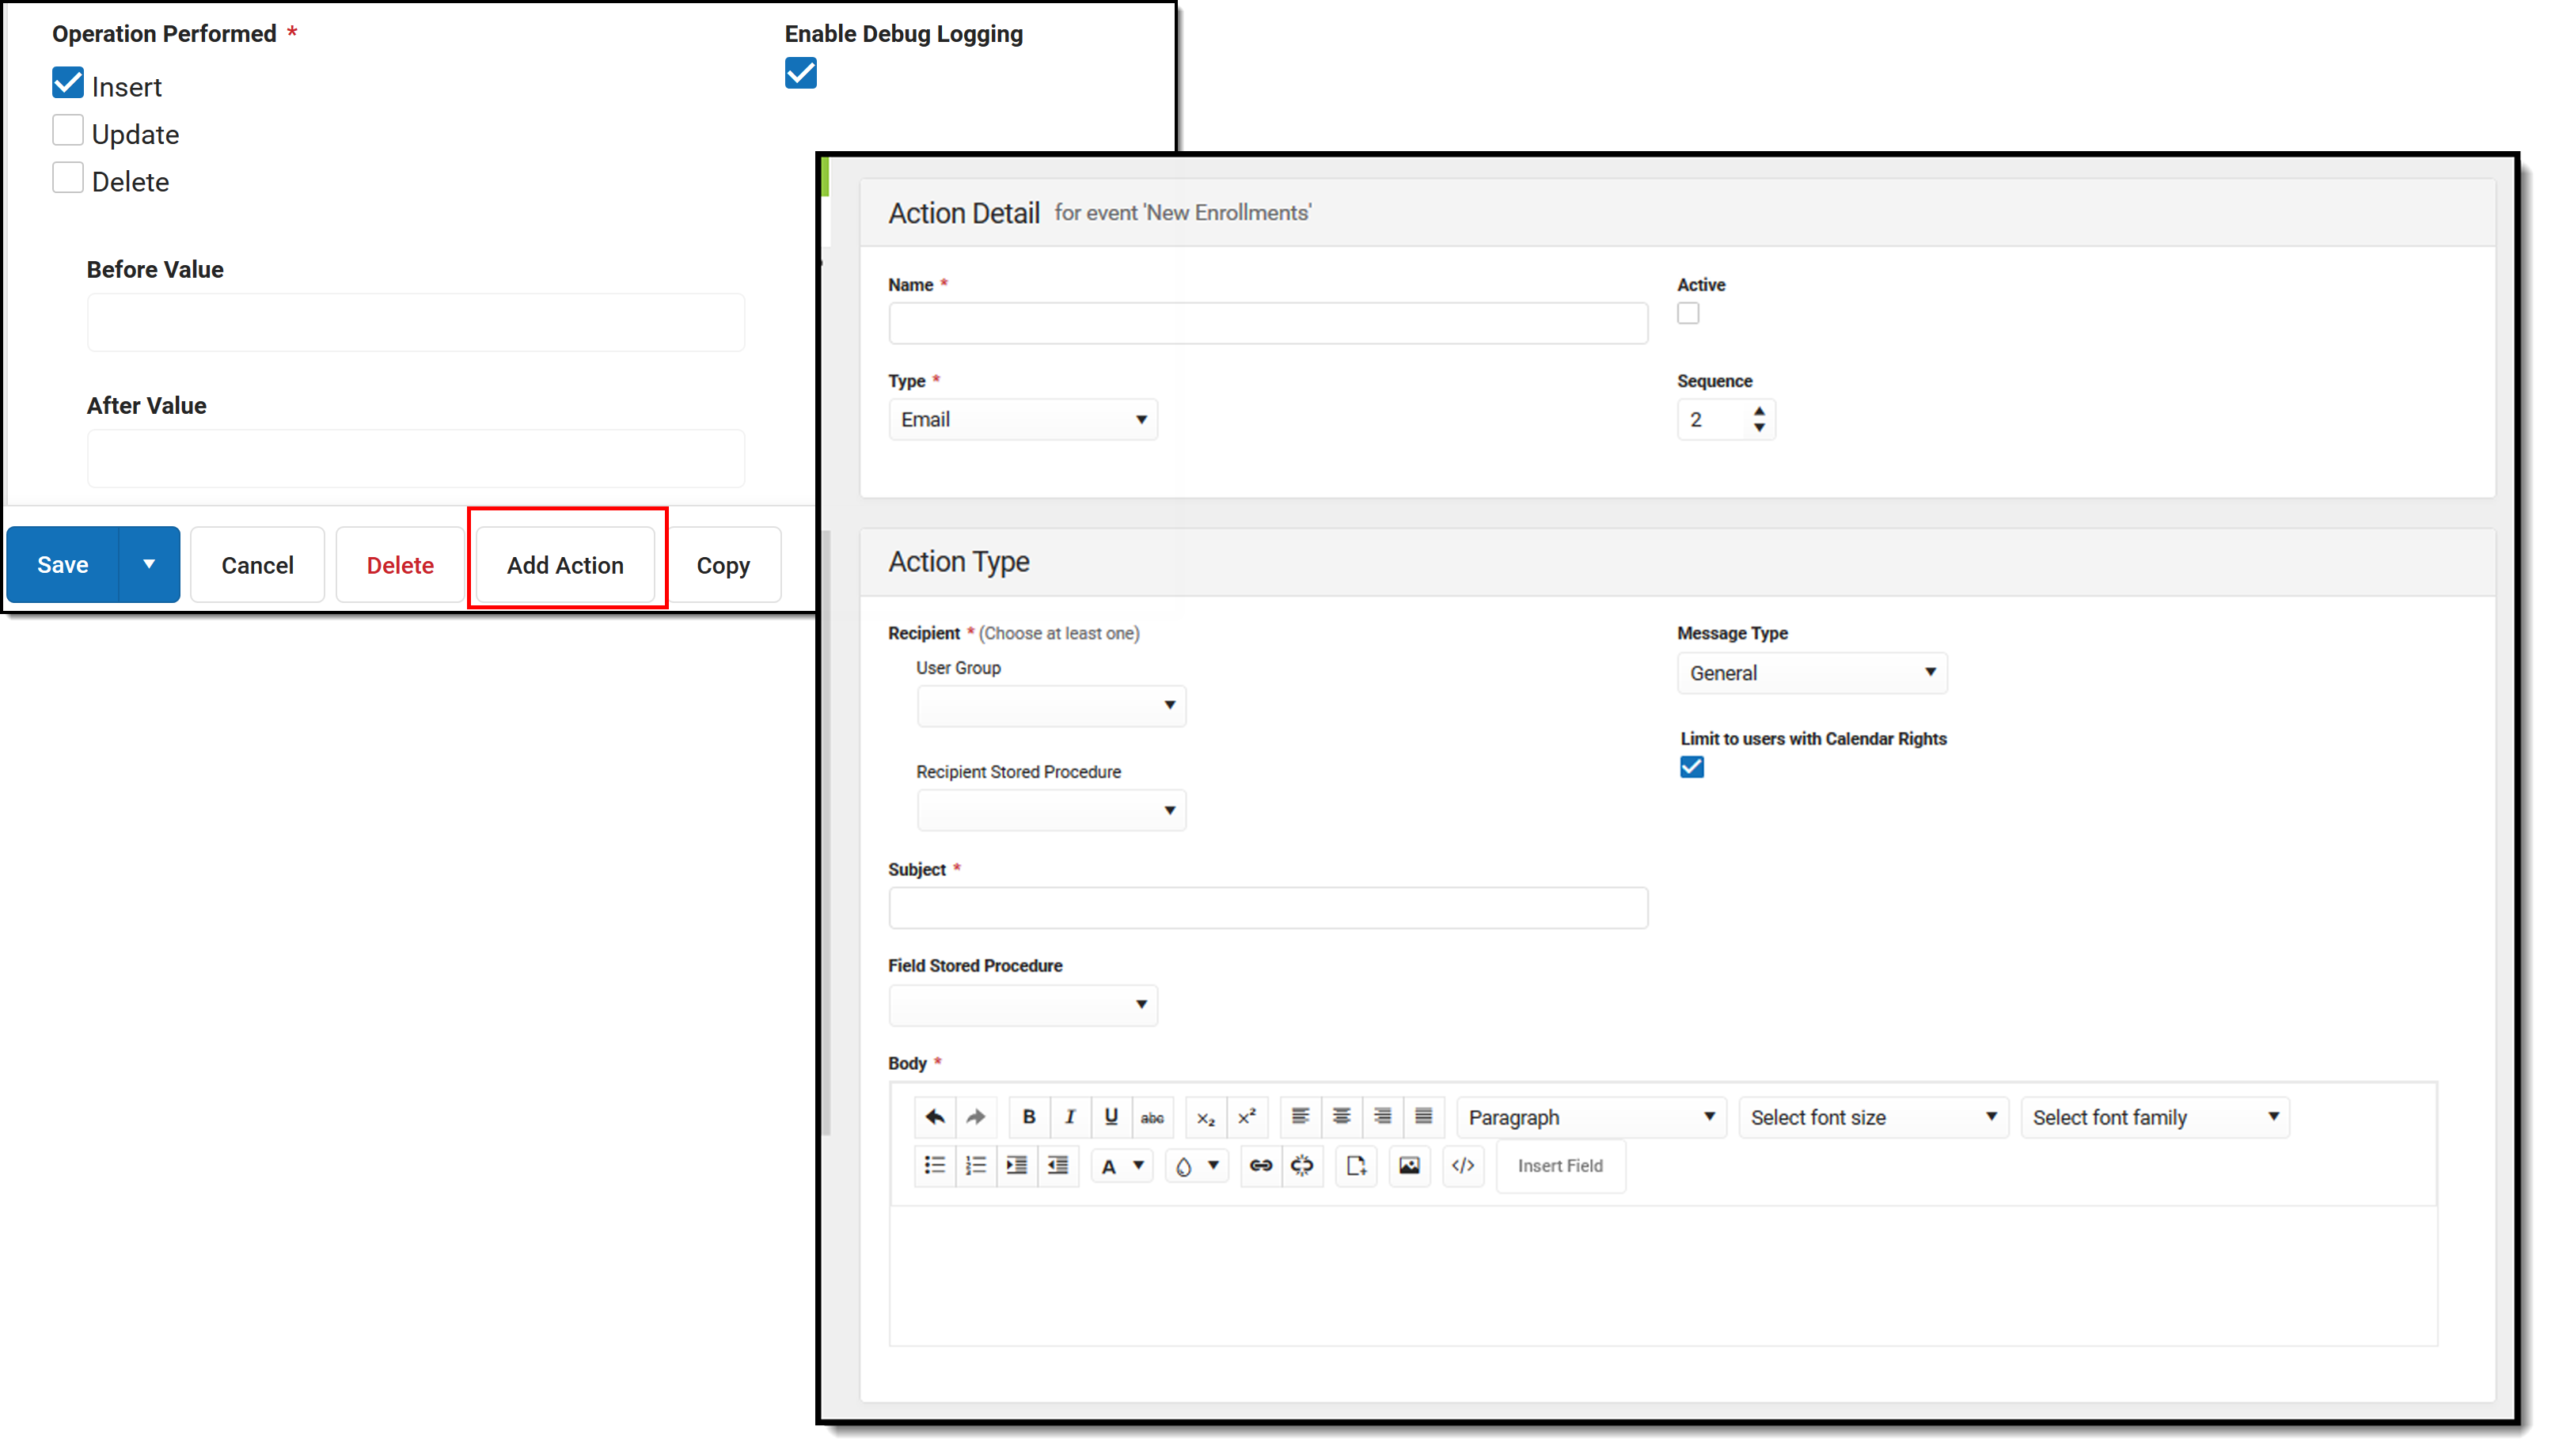
- From the Events Detail editor, click the AddAction button. An Action Detail editor and Action Type editor displays.
- In the Action Detail editor:
- Enter the Name of the Action.
- Select the Active checkbox if the action should be available to run immediately. Otherwise, leave this checkbox not marked.
- Select the Type of action - Email or Stored Procedure.
- Assign a Sequence to the action, or verify the correct Sequence is entered.
- For an Email Action Type, in the Action Type editor:
- Select the desired Recipients to receive a message by choosing a User Group or choosing a Recipient Stored Procedure.
- Select the desired Message Type.
- Select the Limit to Users with Calendar Rights checkbox if the recipients should be limited to users whose calendar rights match the calendarID of the database record that was changed.
- Enter the Subject of the Email.
- Select the Field Stored Procedure that provides the fields available to the Insert Field button in the WYSIWYG editor.
- Enter the Body of the email in the WYSIWYG editor.
- Use the Insert Fieldbutton to customize the email with specific fields provided by the Field Stored Procedure.
- For a Stored Procedure Action Type, in the New Action Type editor:
- Select the desired Stored Procedure from the dropdown. See the Stored Procedures section for more information.
- Select the desired Stored Procedure from the dropdown. See the Stored Procedures section for more information.
- Click the Save or Save & Stay button. Save returns the user to the Event Detail editor; Save & Stay keeps the user on the Action editors, where an action can be copied or modified.
Copy an Event or Action
To copy an event, select an Event from the main Events screen and click the Copy button. The Event Detail editor displays. Follow the procedures above for creating an event. The fields are already populated from the event from which the copy was made. Changes can be made to any field.
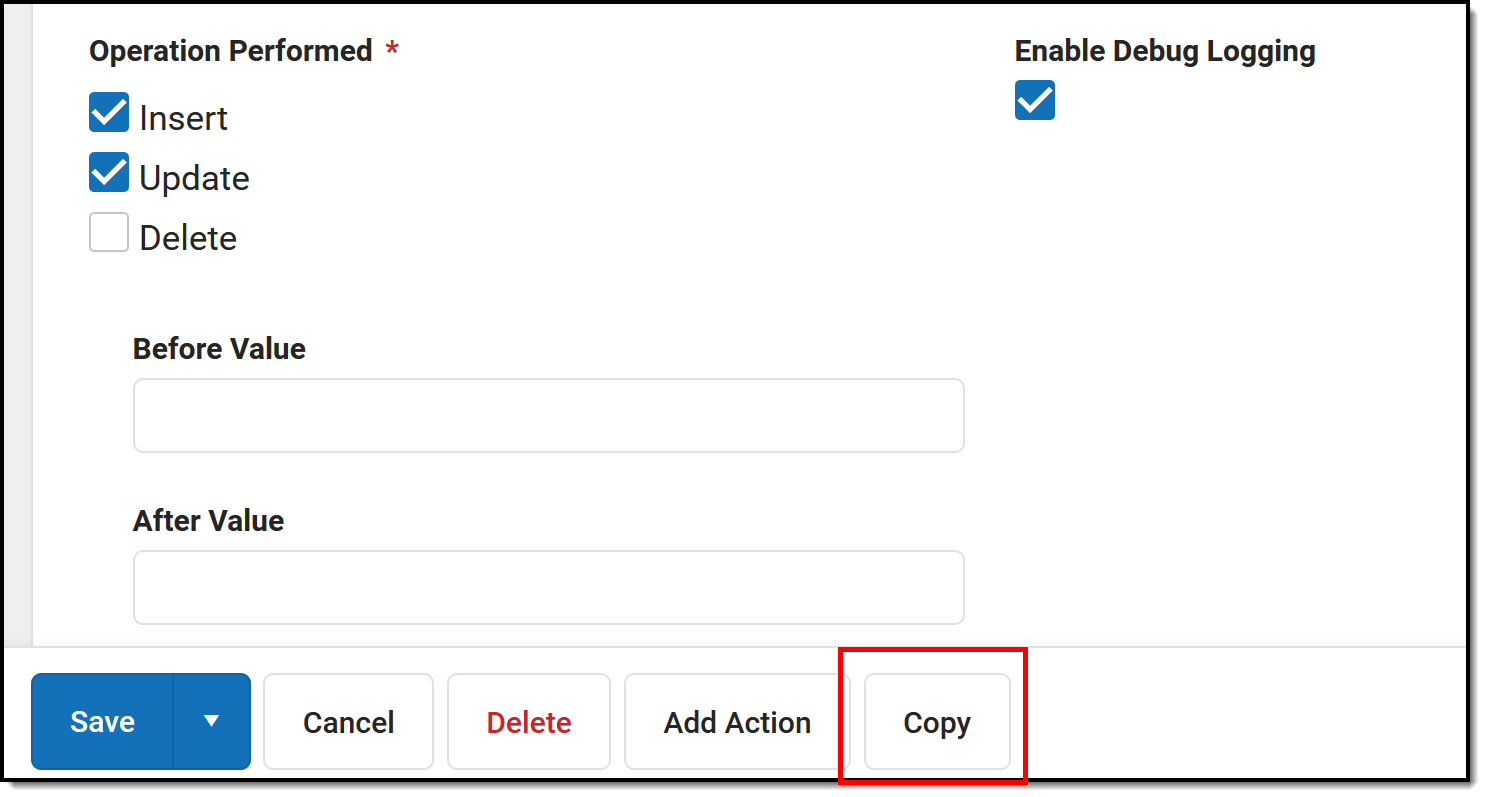
To copy an action, select the Action from the event and click the Copy button. The Action Detail editor displays. Follow the procedures above for creating an action. The fields are already populated from the event from which the copy was made. Changes can be made to any field.
Upon creation, events and actions are inactive. Users must mark the Active checkbox in order to active them.
Since only one table and one column can be associated with any event or action, and one user group can be associated for any action, copying events and actions allows different tables to be selected for the same event.
State Edition Events & Actions
States that have purchased the Campus Workflow Suite for the entire state will have access to the Push To Districts tool. When this tool is used, it moves the Events and Actions down to all districts within the state or updates the existing Events and Actions if changes have been made. The Owner column within the Events table lists the State as the owner of that event.
When the state creates a new Event and Action and pushes it down to districts, it is not active by default. Districts must enable the new Events and Actions. After using Push To Districts, there will be a delay before districts see the new Events and Actions.

Events and Actions that have been saved will appear as 'Unpublished' in the Publish Status and the Sync Status before using Push to Districts. The status will change to 'Published' once Push To Districts has been used. When changes are made to an Event or Action, it will again appear as 'Unpublished.' The status will become 'Published' once Push To Districts is used again.

This is only available for state editions that have purchased the Campus Workflow Suite for the entire state.
If a district makes a copy of a state Event and the state makes changes to the original event, the copy will not be updated.
Debug Logging
When the Enable Debug Logging checkbox is marked on the Event editor, records are stored in the database that provide details on why an error occurred.
The following tables provide a list of the possible messages that might occur and some troubleshooting tips to correct it.
Event Errors
Action Errors
Email Actions
SQL Actions
Event with Multiple Actions
Events and Actions Scenarios
This section provides a few examples of events and actions that can be created.
Scenario 1: Enrollment Change
This example is an Event that sends an email to a specific user group when a new enrollment has been added for a student in the current school year.
Step 1. Verify the staff to whom the message is being sent have email addresses entered
- Navigate to Census > People > Demographics and search for the individuals who are to receive this email.
- In the Messenger Preferences Contact Reasons section, verify the email has been entered and the appropriate Contact Reasons are selected. The Action editor contains a Message Type field; individuals who have a matching Messenger Preferences Contact Reasons checkbox marked receive a message.
For this example, the Counselor has his school email address entered and is marked for Staff and General Message Types.
Staff Email and Contact Reasons
Step 2. Verify the staff person has an active District Assignment record
This step won't affect the delivery of the message, but it's a good idea to review assignment records for accuracy.
- Navigate to Census > People > District Assignments and view the individual's list of assignment and start dates.
Step 3. Verify the correct individuals are included in the User Group that is used in the Event Action
- Navigate to System Administration > User Security > User Group
- Enter the name of the User Group in the Search field and select the desired group.
- Select Membership Summary.
Three counselors are included in the group, and all three of them should receive the email about a new enrollment being added.
Step 4. Create the Event
- Navigate to System Administration > Events & Actions > Events & Actions Configuration.
- Click the New button.
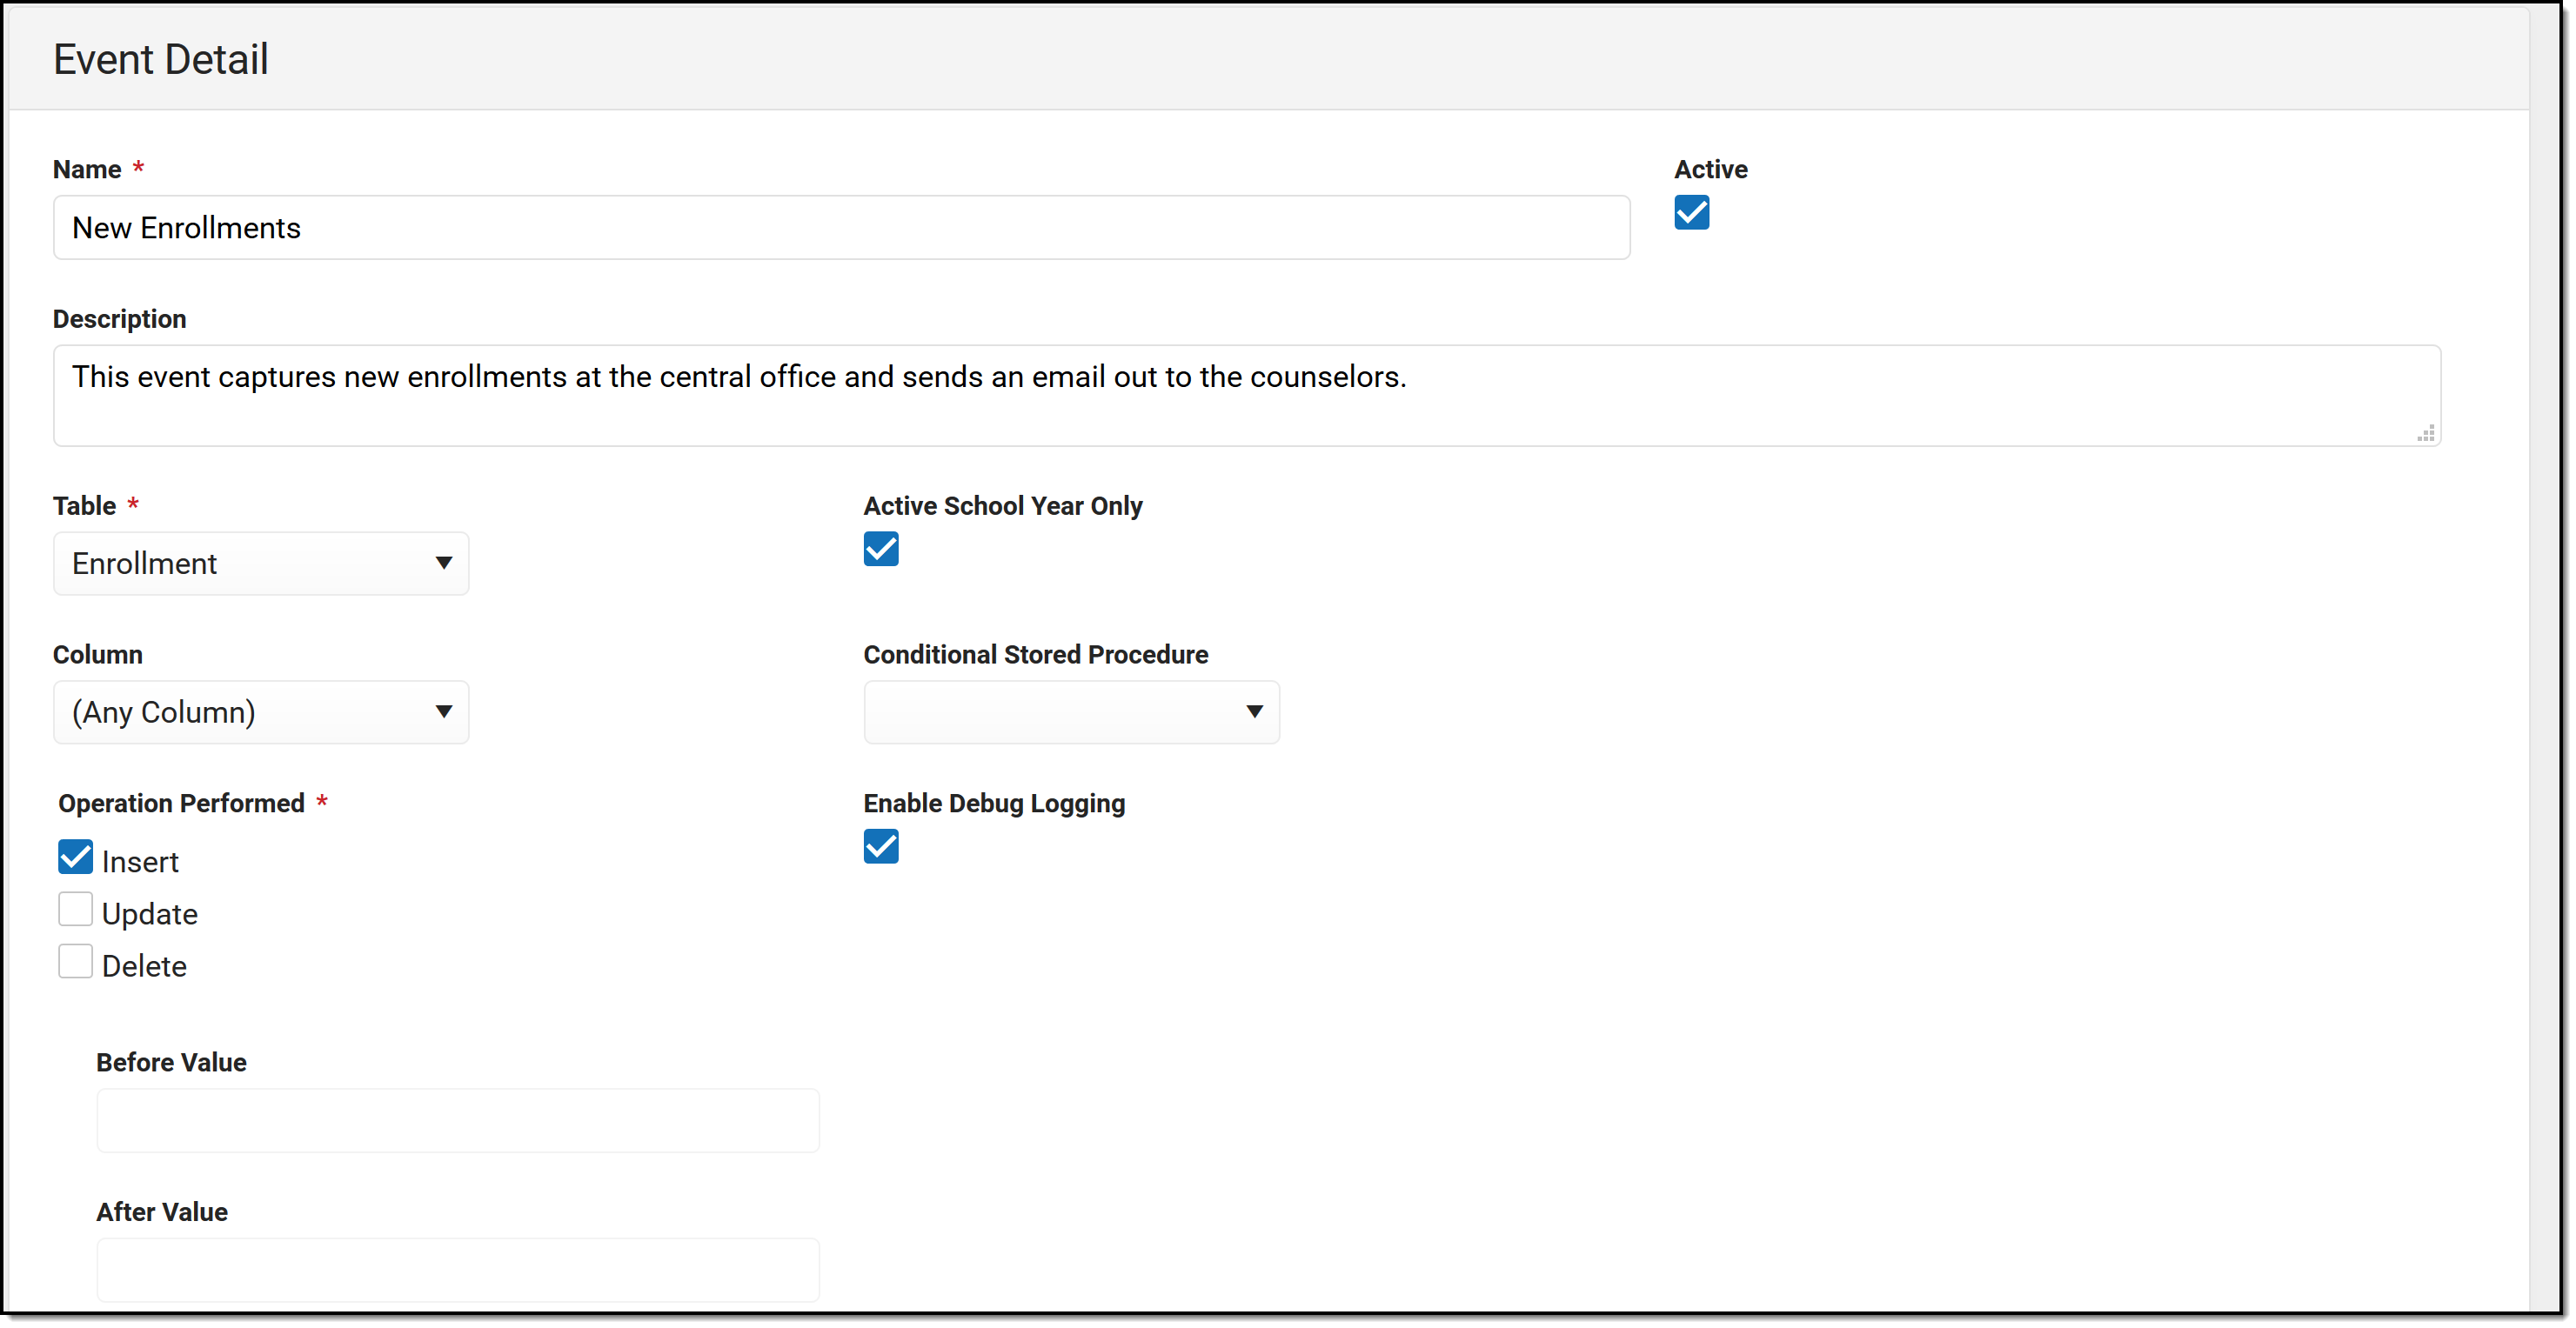
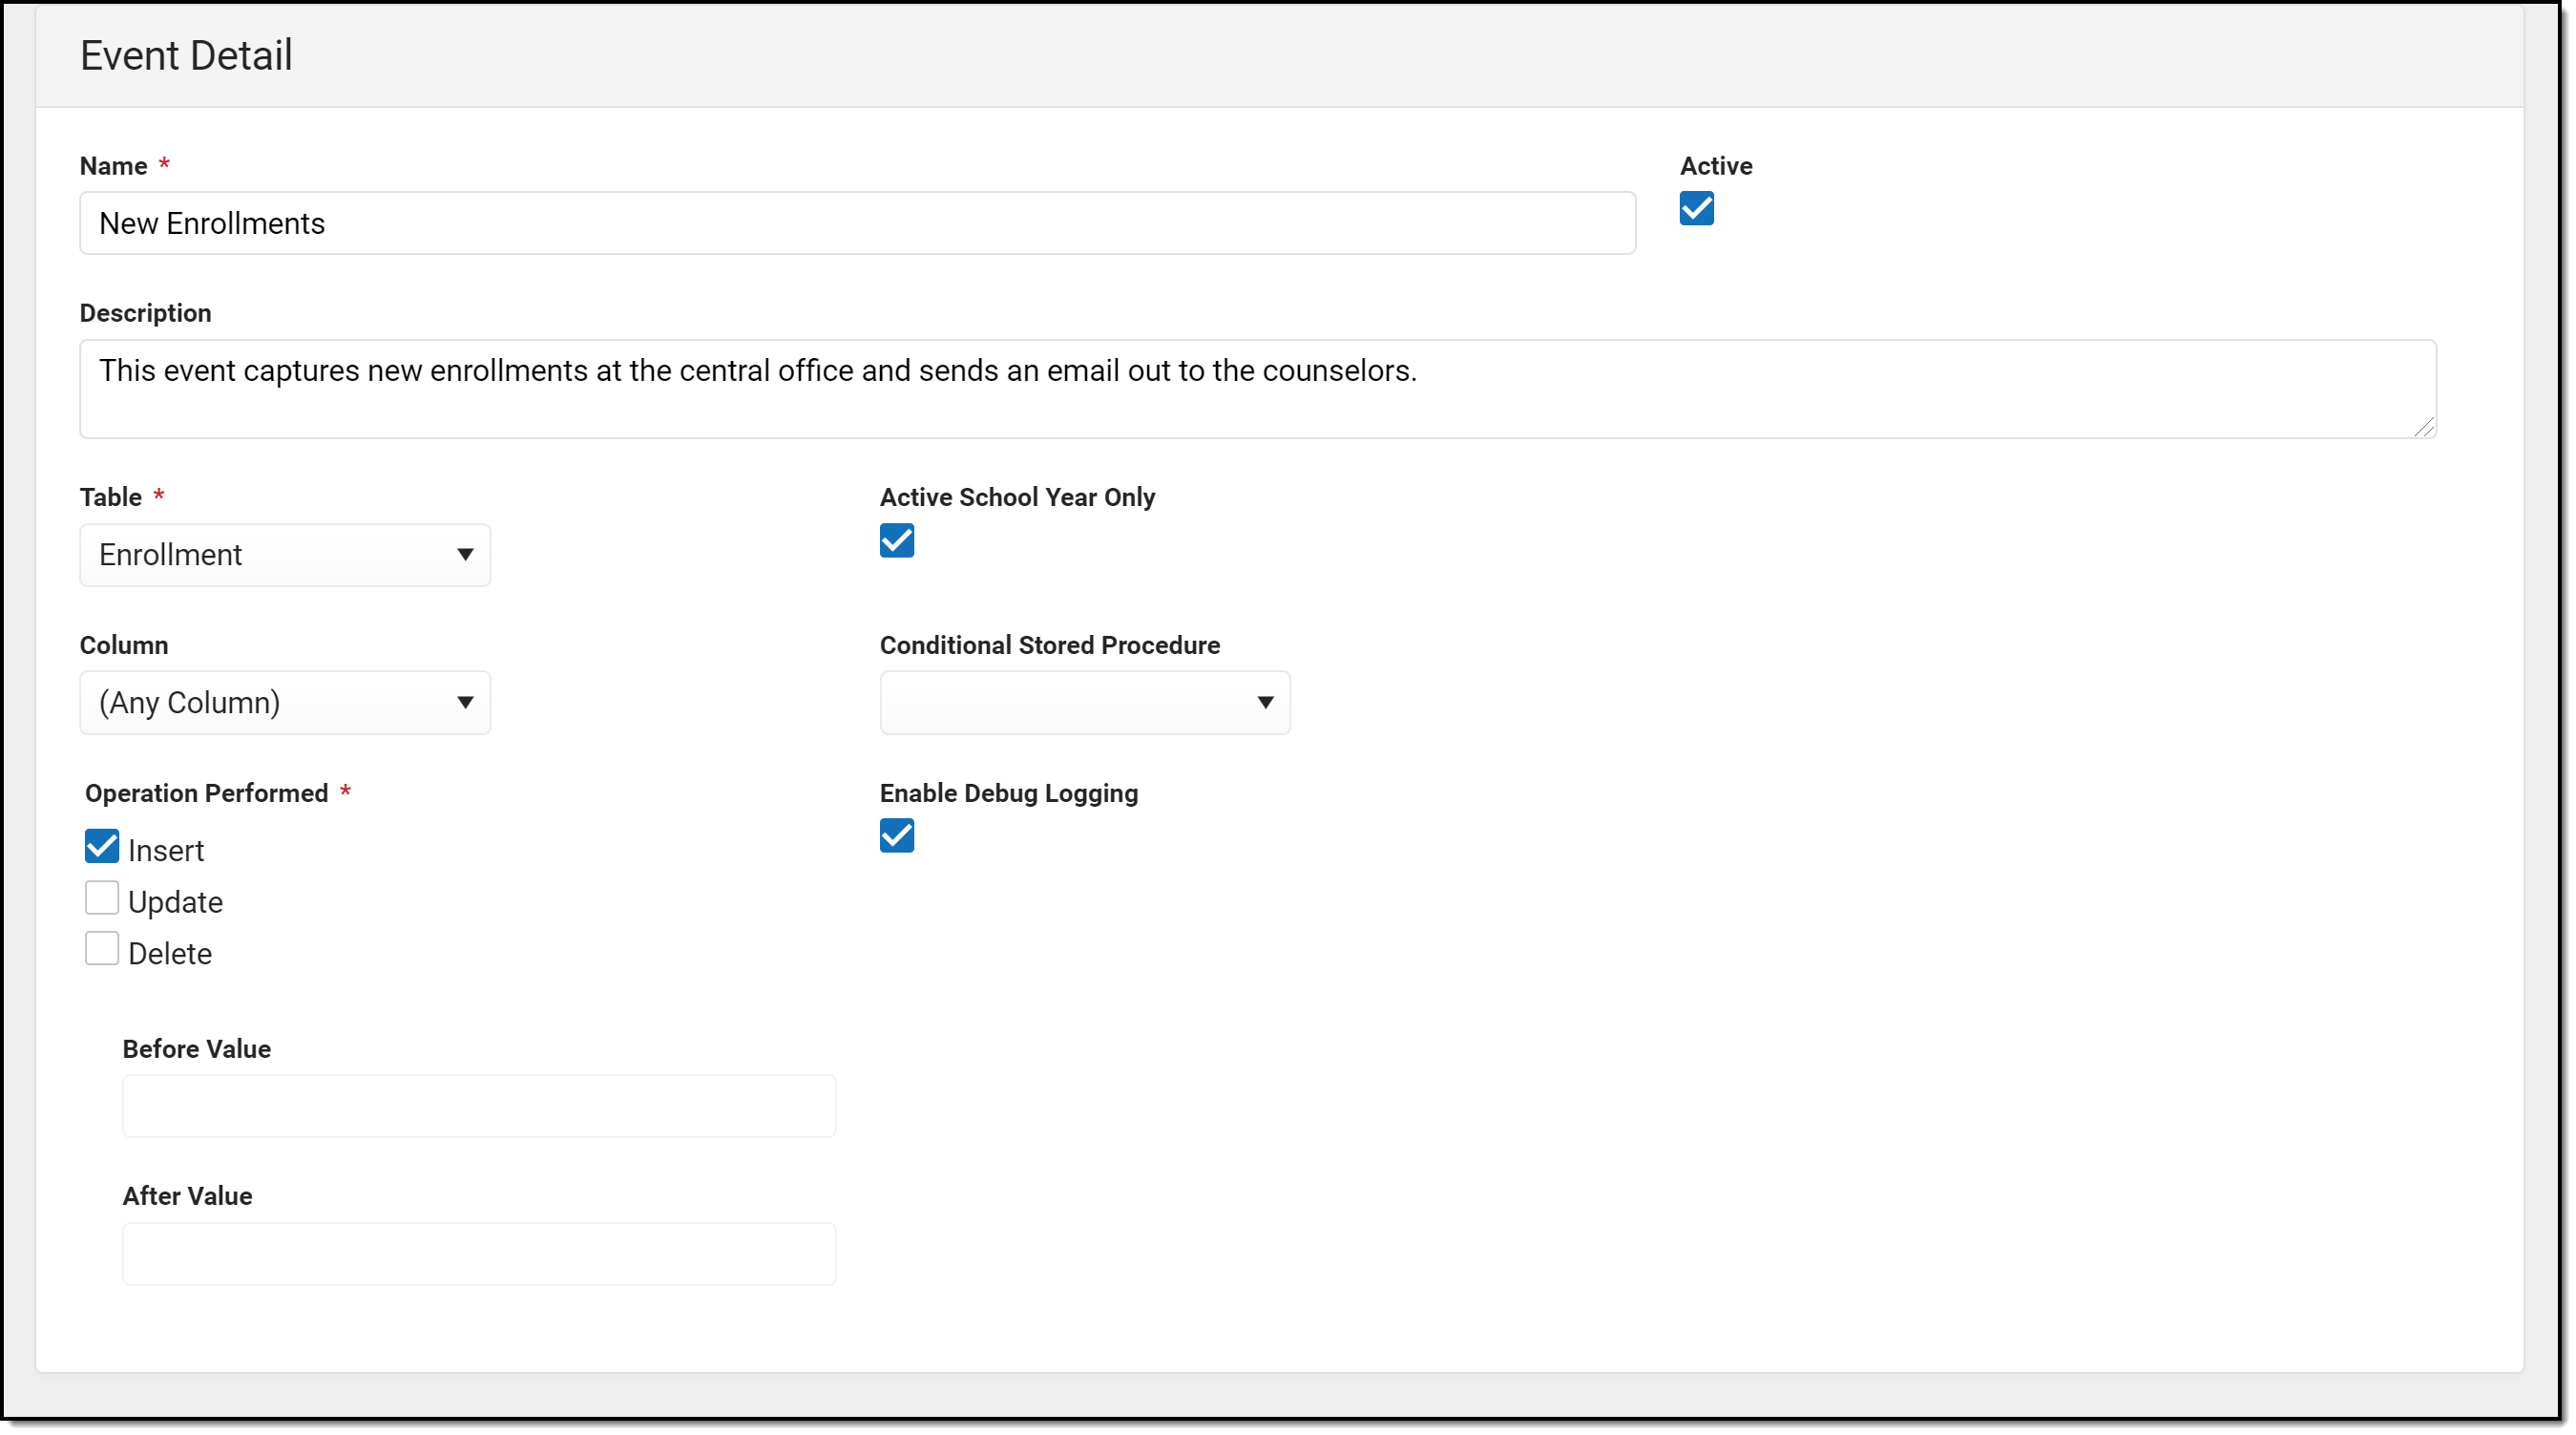
- On the Event Detail editor, enter the Name of the Event. Since this example is to alert counselors of a new enrollment, the Event Name could be New Enrollments.
- Enter a more detailed Description of the event, perhaps including who receives it.
- Mark the Active checkbox.
- Since this is an event related to enrollments, select Enrollment from the Table dropdown.
- Mark the Active School Year Only checkbox. This only sends an email when the new enrollment is for the active year.
- The Column field can be left to the default selection of (Any Column), or insert a specific column. This event isn't looking for a change to an existing column so this isn't necessary.
- For Operation Performed, mark Insert. This event is looking for a new record in the table.
- Mark the Enable Debug Logging for troubleshooting (if access to the database is available).
- The Before Value and After Value fields are not activated since there is no column selection.
- Click the Save & Stay button.
Step 5. Add an Action to the Event
- Click the Add Action button.
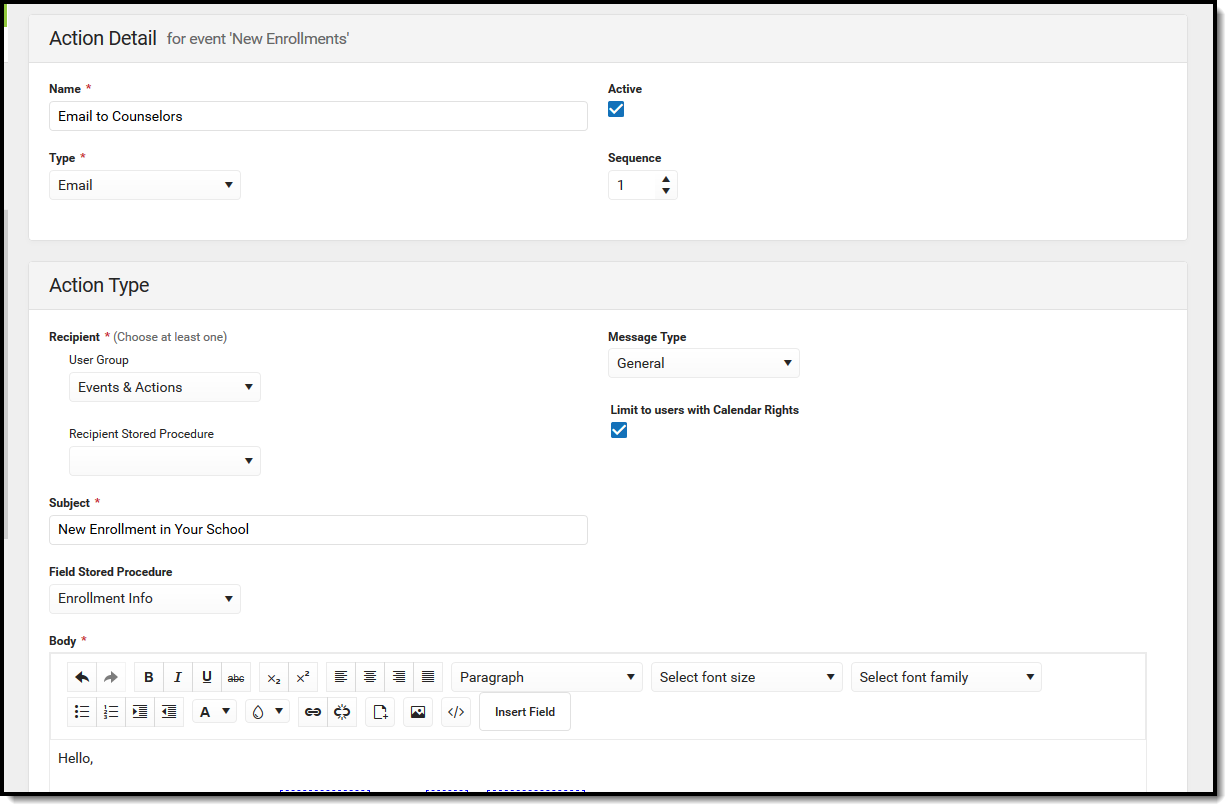
- On the Action Detail editor, enter the Name of the Action. Since this example is to alert counselors of a new enrollment, the Name could be Email to Counselors.
- Mark the Active checkbox.
- Select the Type of Email.
- This event has one action, so the Sequence can be left at 1.
Step 6. Create the Email
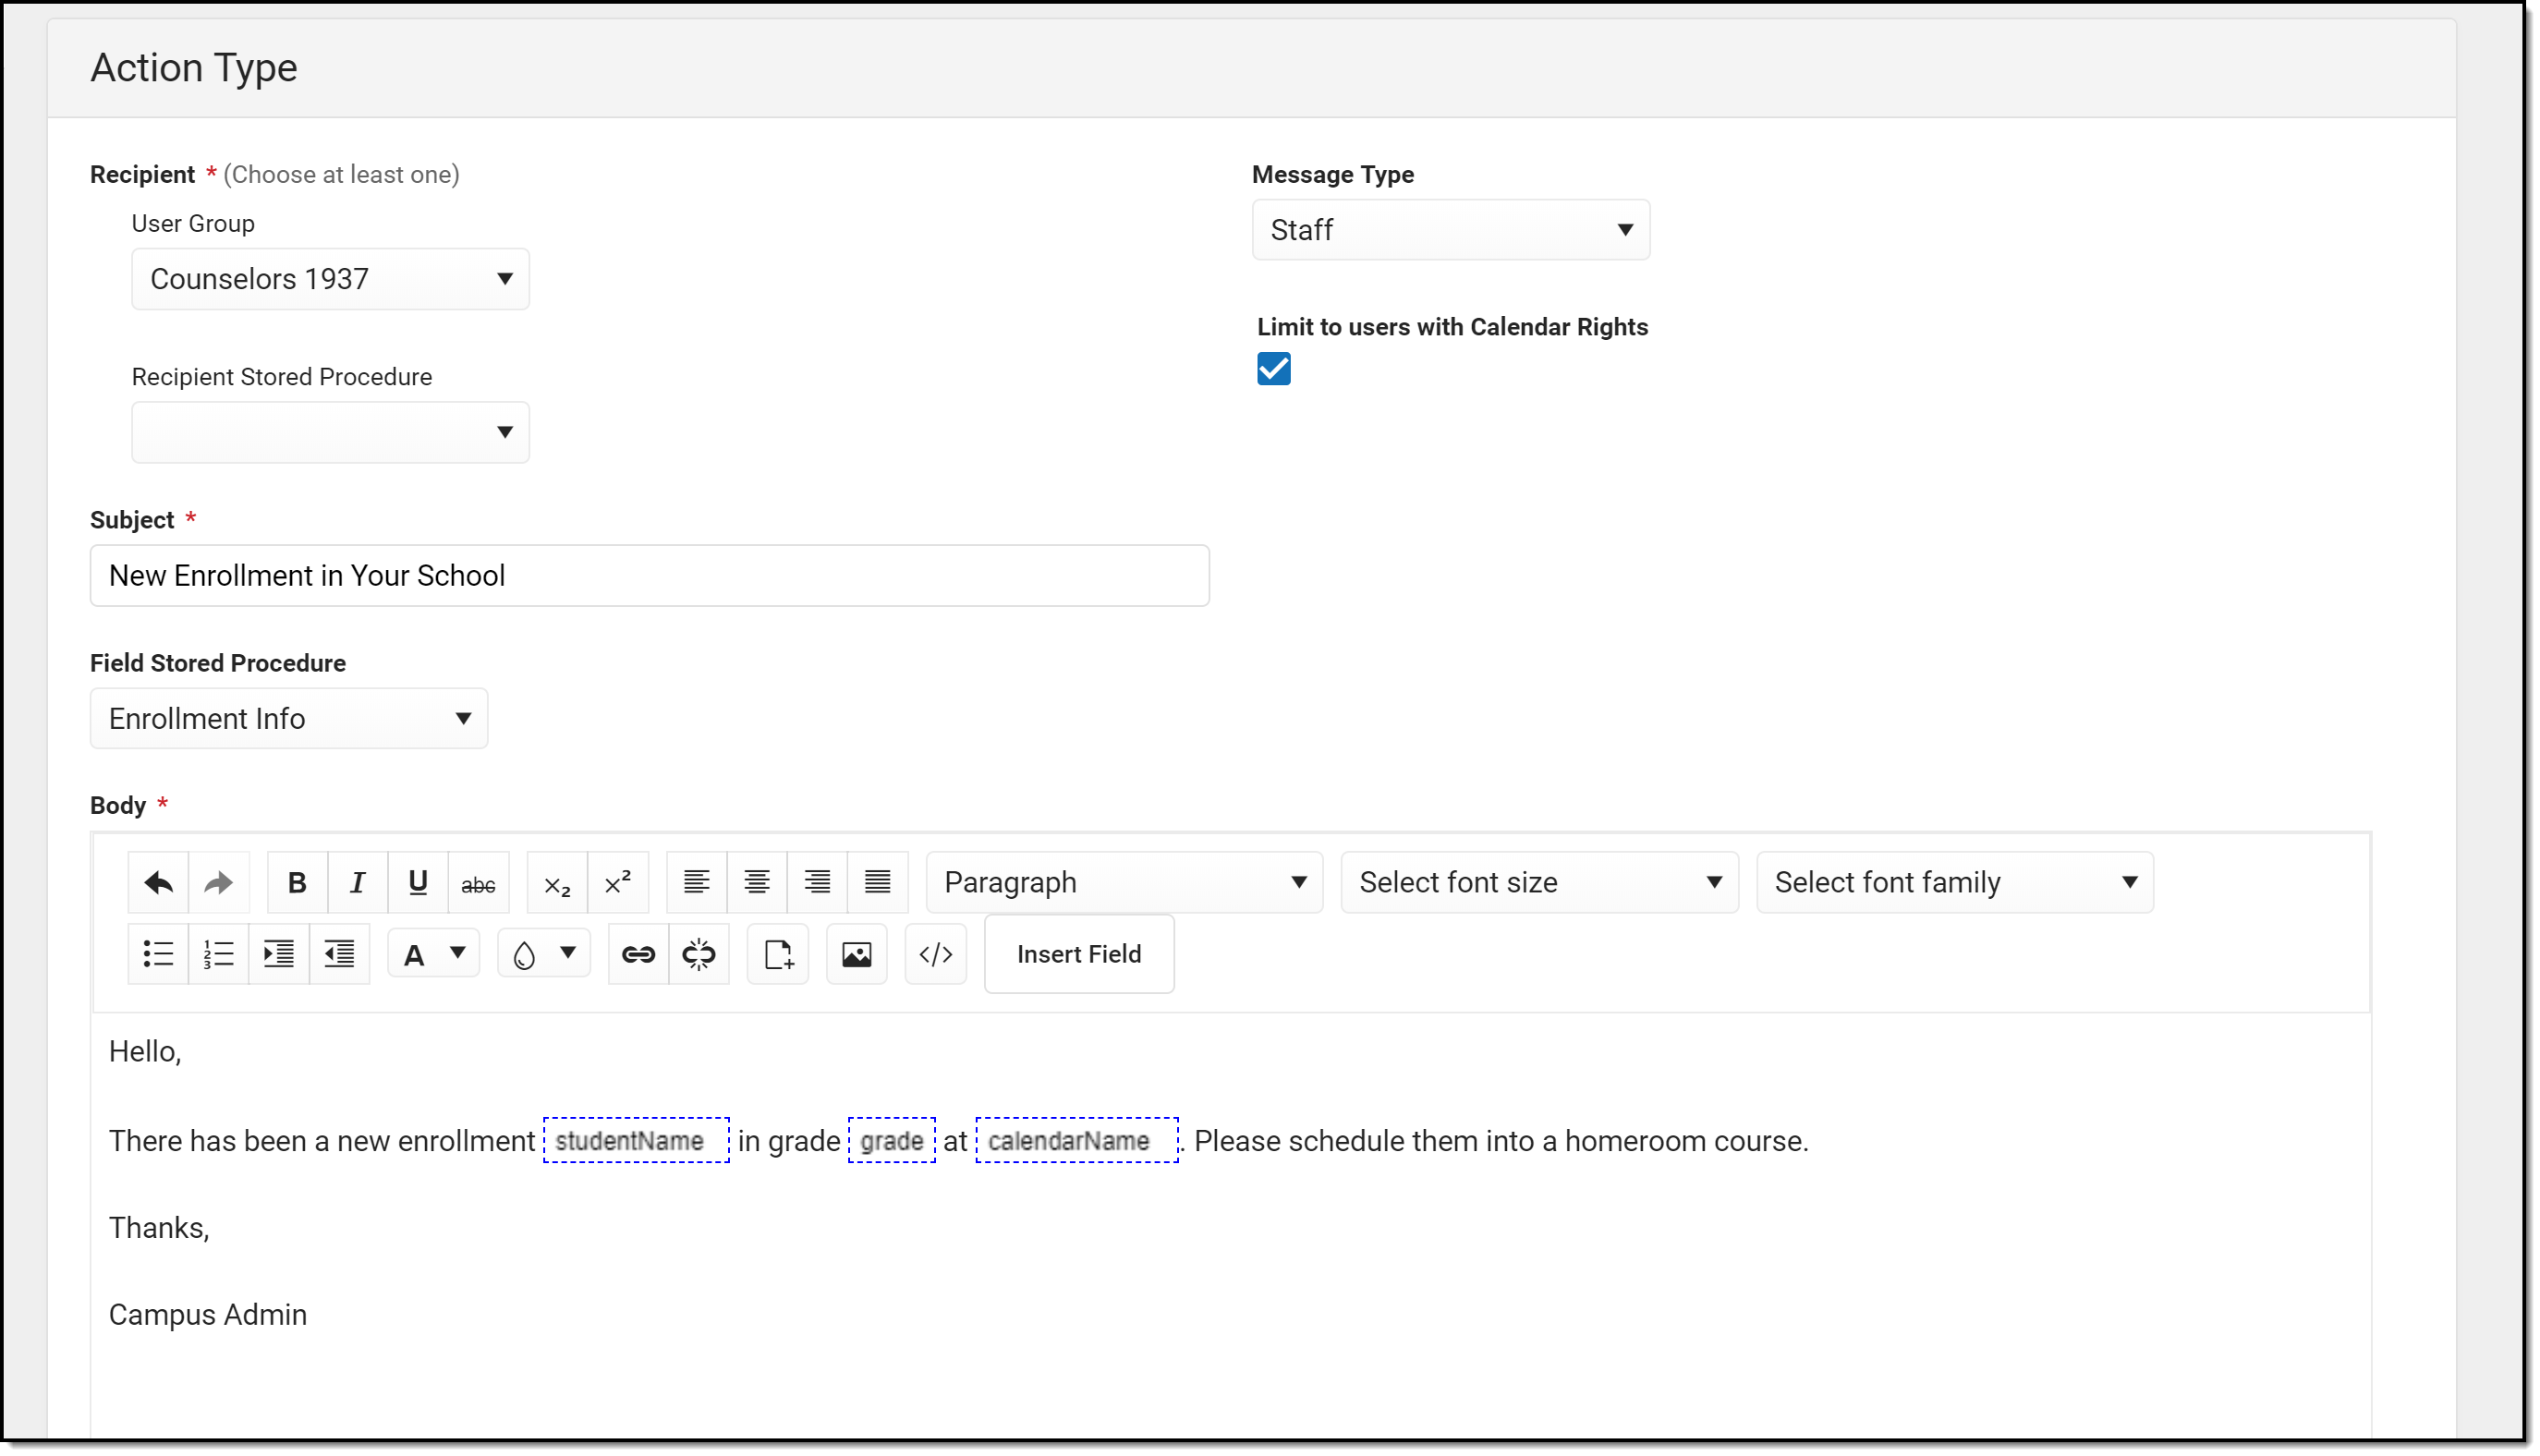
- On the Action Type editor, select the User Group to receive the email.
- Select the desired Message Type. The counselors in this group have the Staff checkbox marked for their staff emails (marked in Step 1).
- Mark the Limit to users with Calendar Rightsso only the counselors with calendar rights in the calendar in which the enrollment was created receive an email.
- Enter a Subject for the email.
- From the Field Stored Procedure dropdown, select the Enrollment Info button. This is a stored procedure that has been added to the database and includes three fields that are used in the body of the email. An email can be sent without these fields, but it won't be customized with the student's name, grade level and calendar name.
- Type the email message in Body field, using the available formatting options of the WYSIWYG editor.
- To customize the message, click the Insert Field button and select the field names.
- Click the Save button.
Step 7. New Enrollment Added
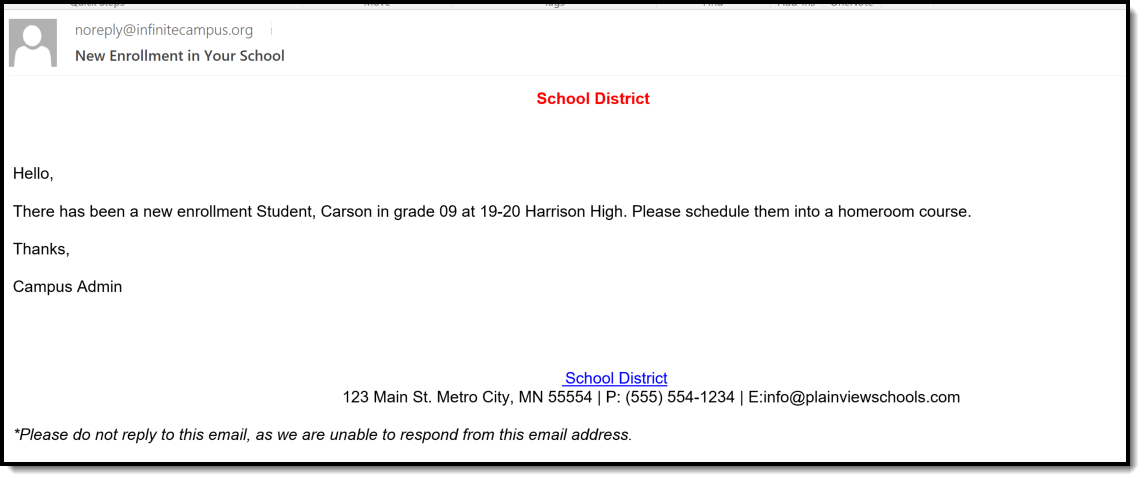
The Central Office has added a new enrollment for a student who has transferred to the district from out of state. A database trigger is watching the Enrollment table and captures this insert. The Events & Actions logic records this change in a file and waits for a quartz job to begin processing (runs every minute). The quartz job begins processing the actions for this captured event and the Recipients receive their email.
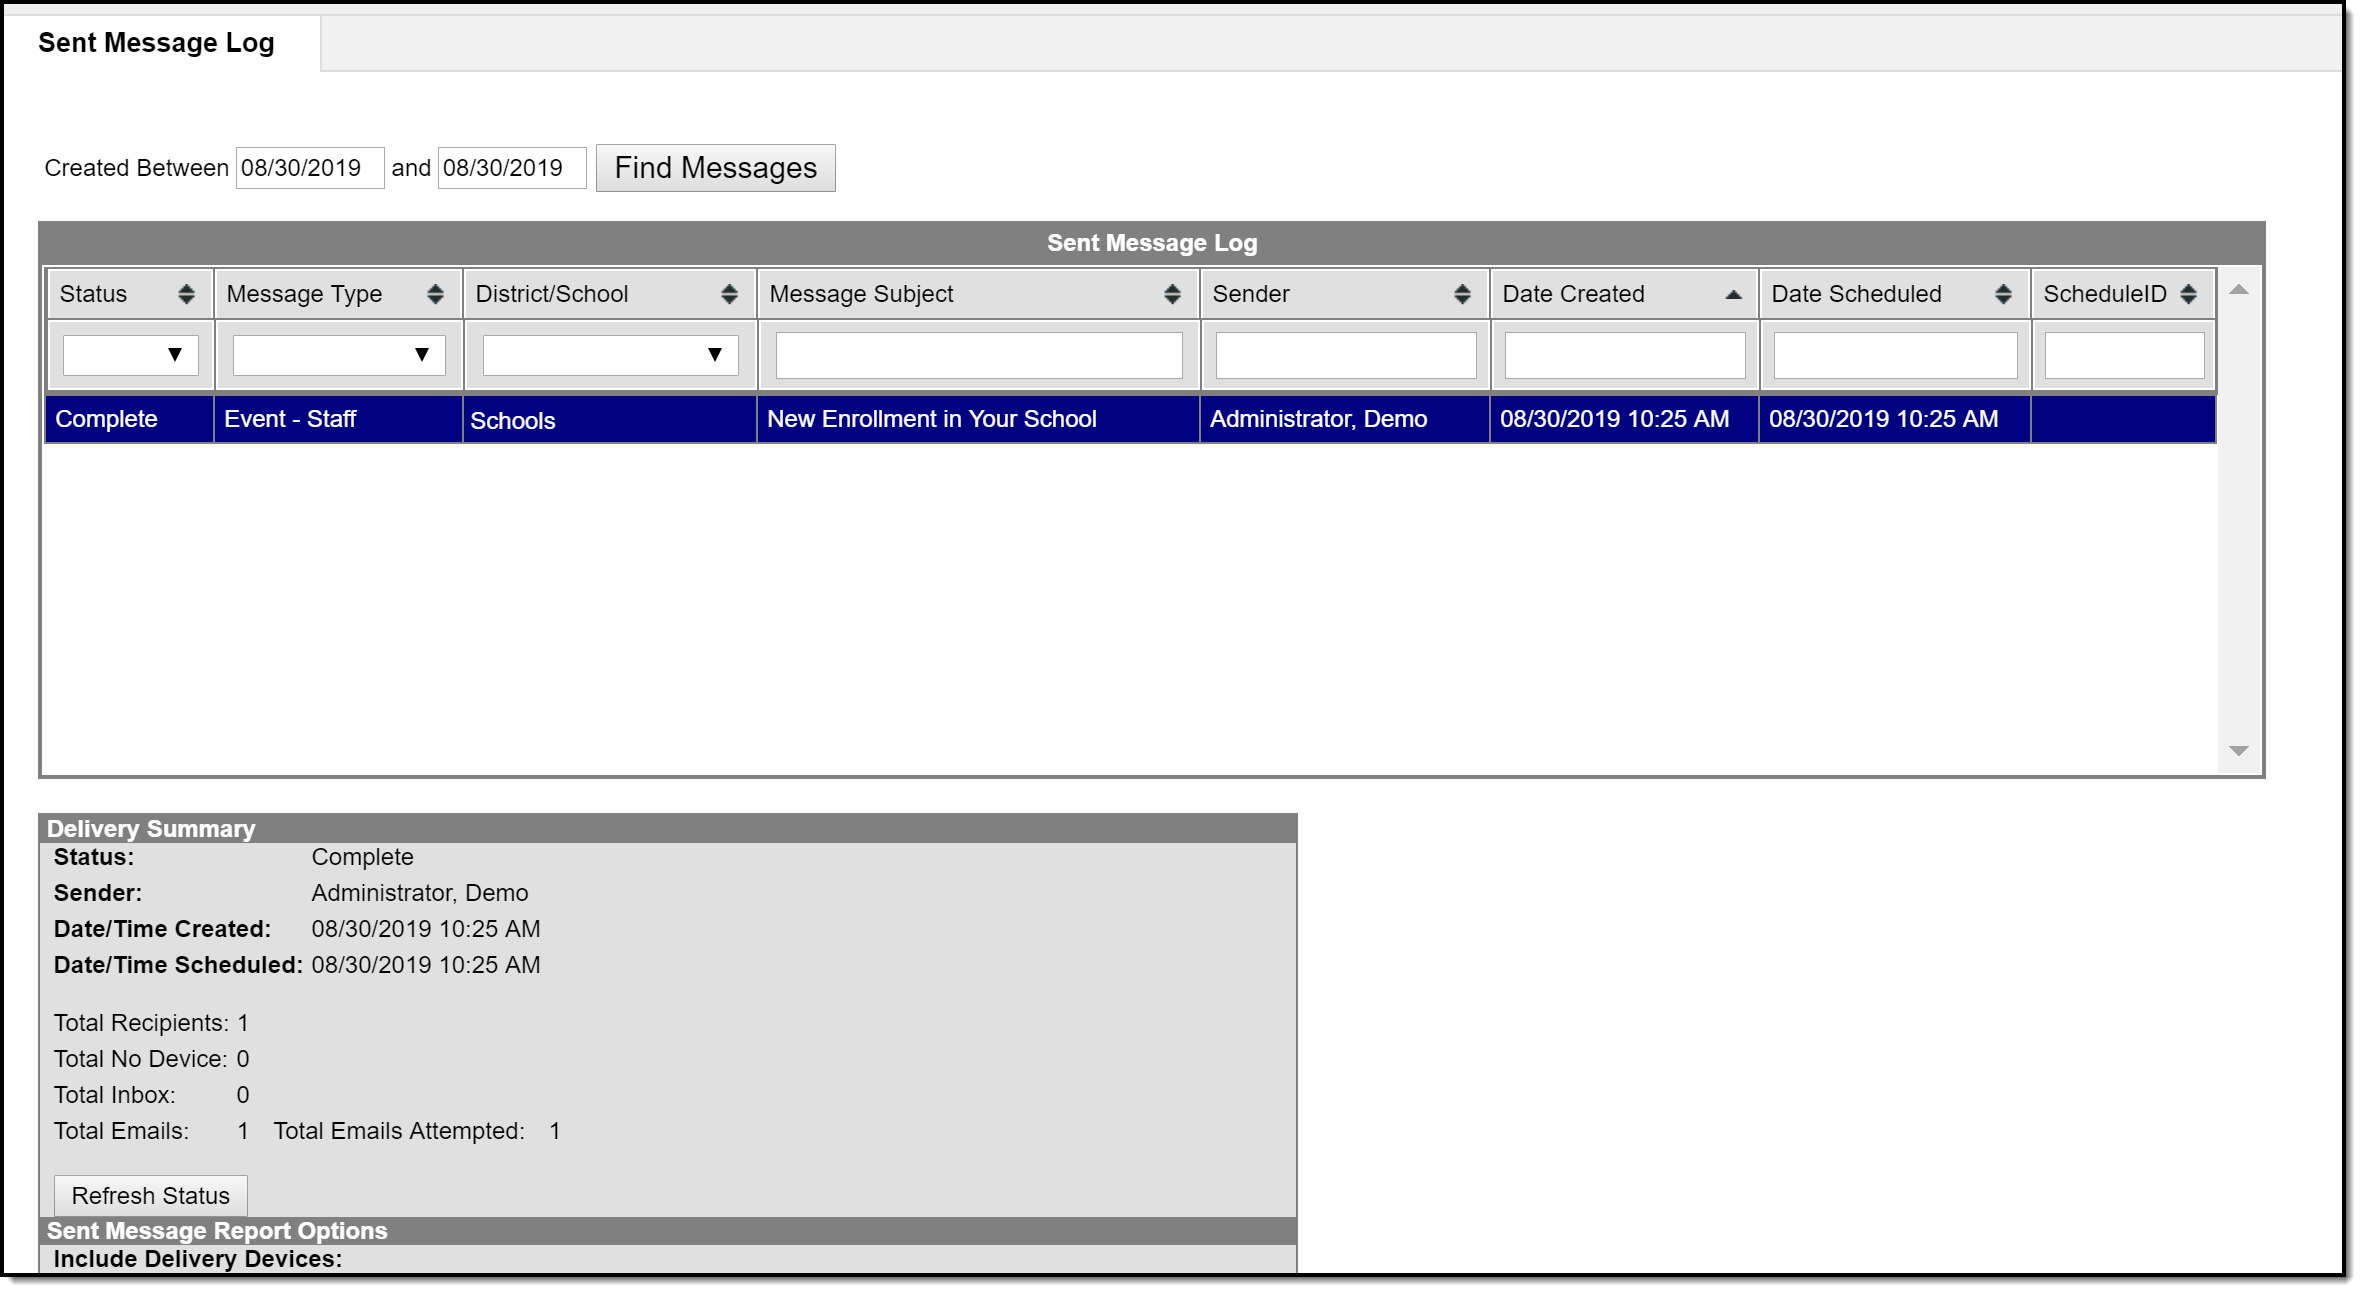
Step 8. Review the Sent Message Log
In the Sent Message Log, the Central Office or the Administrator can verify that the email was sent and the event was completed.
Scenario 2: End Date a Locker
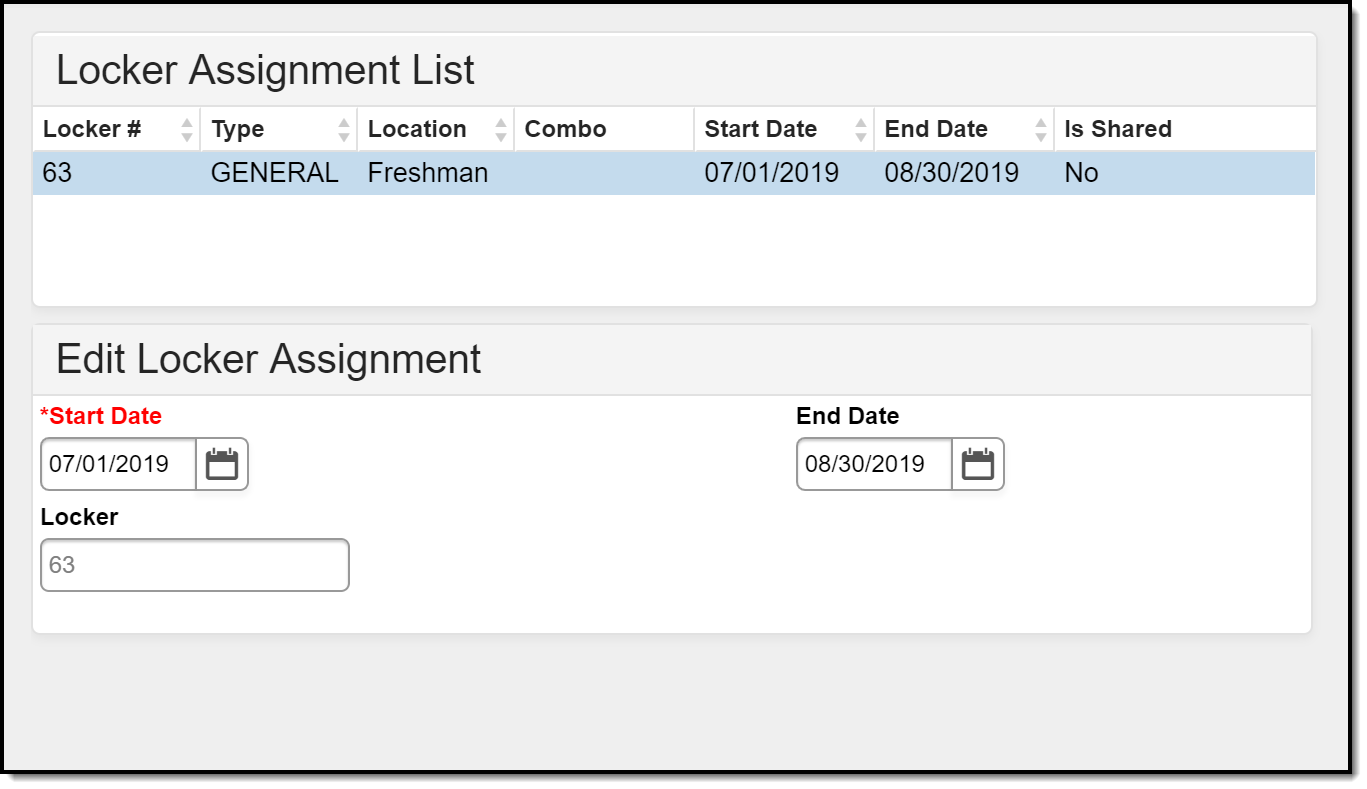
This example is an Event that notifies individuals that a student has transferred out of the district. It uses a stored procedure that has been created by the district to auto-end a student's locker when the enrollment ends.
Assumptions have been made for this example that User Groups are established already and staff emails have been added to Messenger Preferences Contact Reasons and the selections are correct (see Steps 1-3 in the previous example if necessary).
Step 1. Create the Event
- Navigate to System Administration > Events & Actions > Events & Actions Configuration.
- Click the New button.
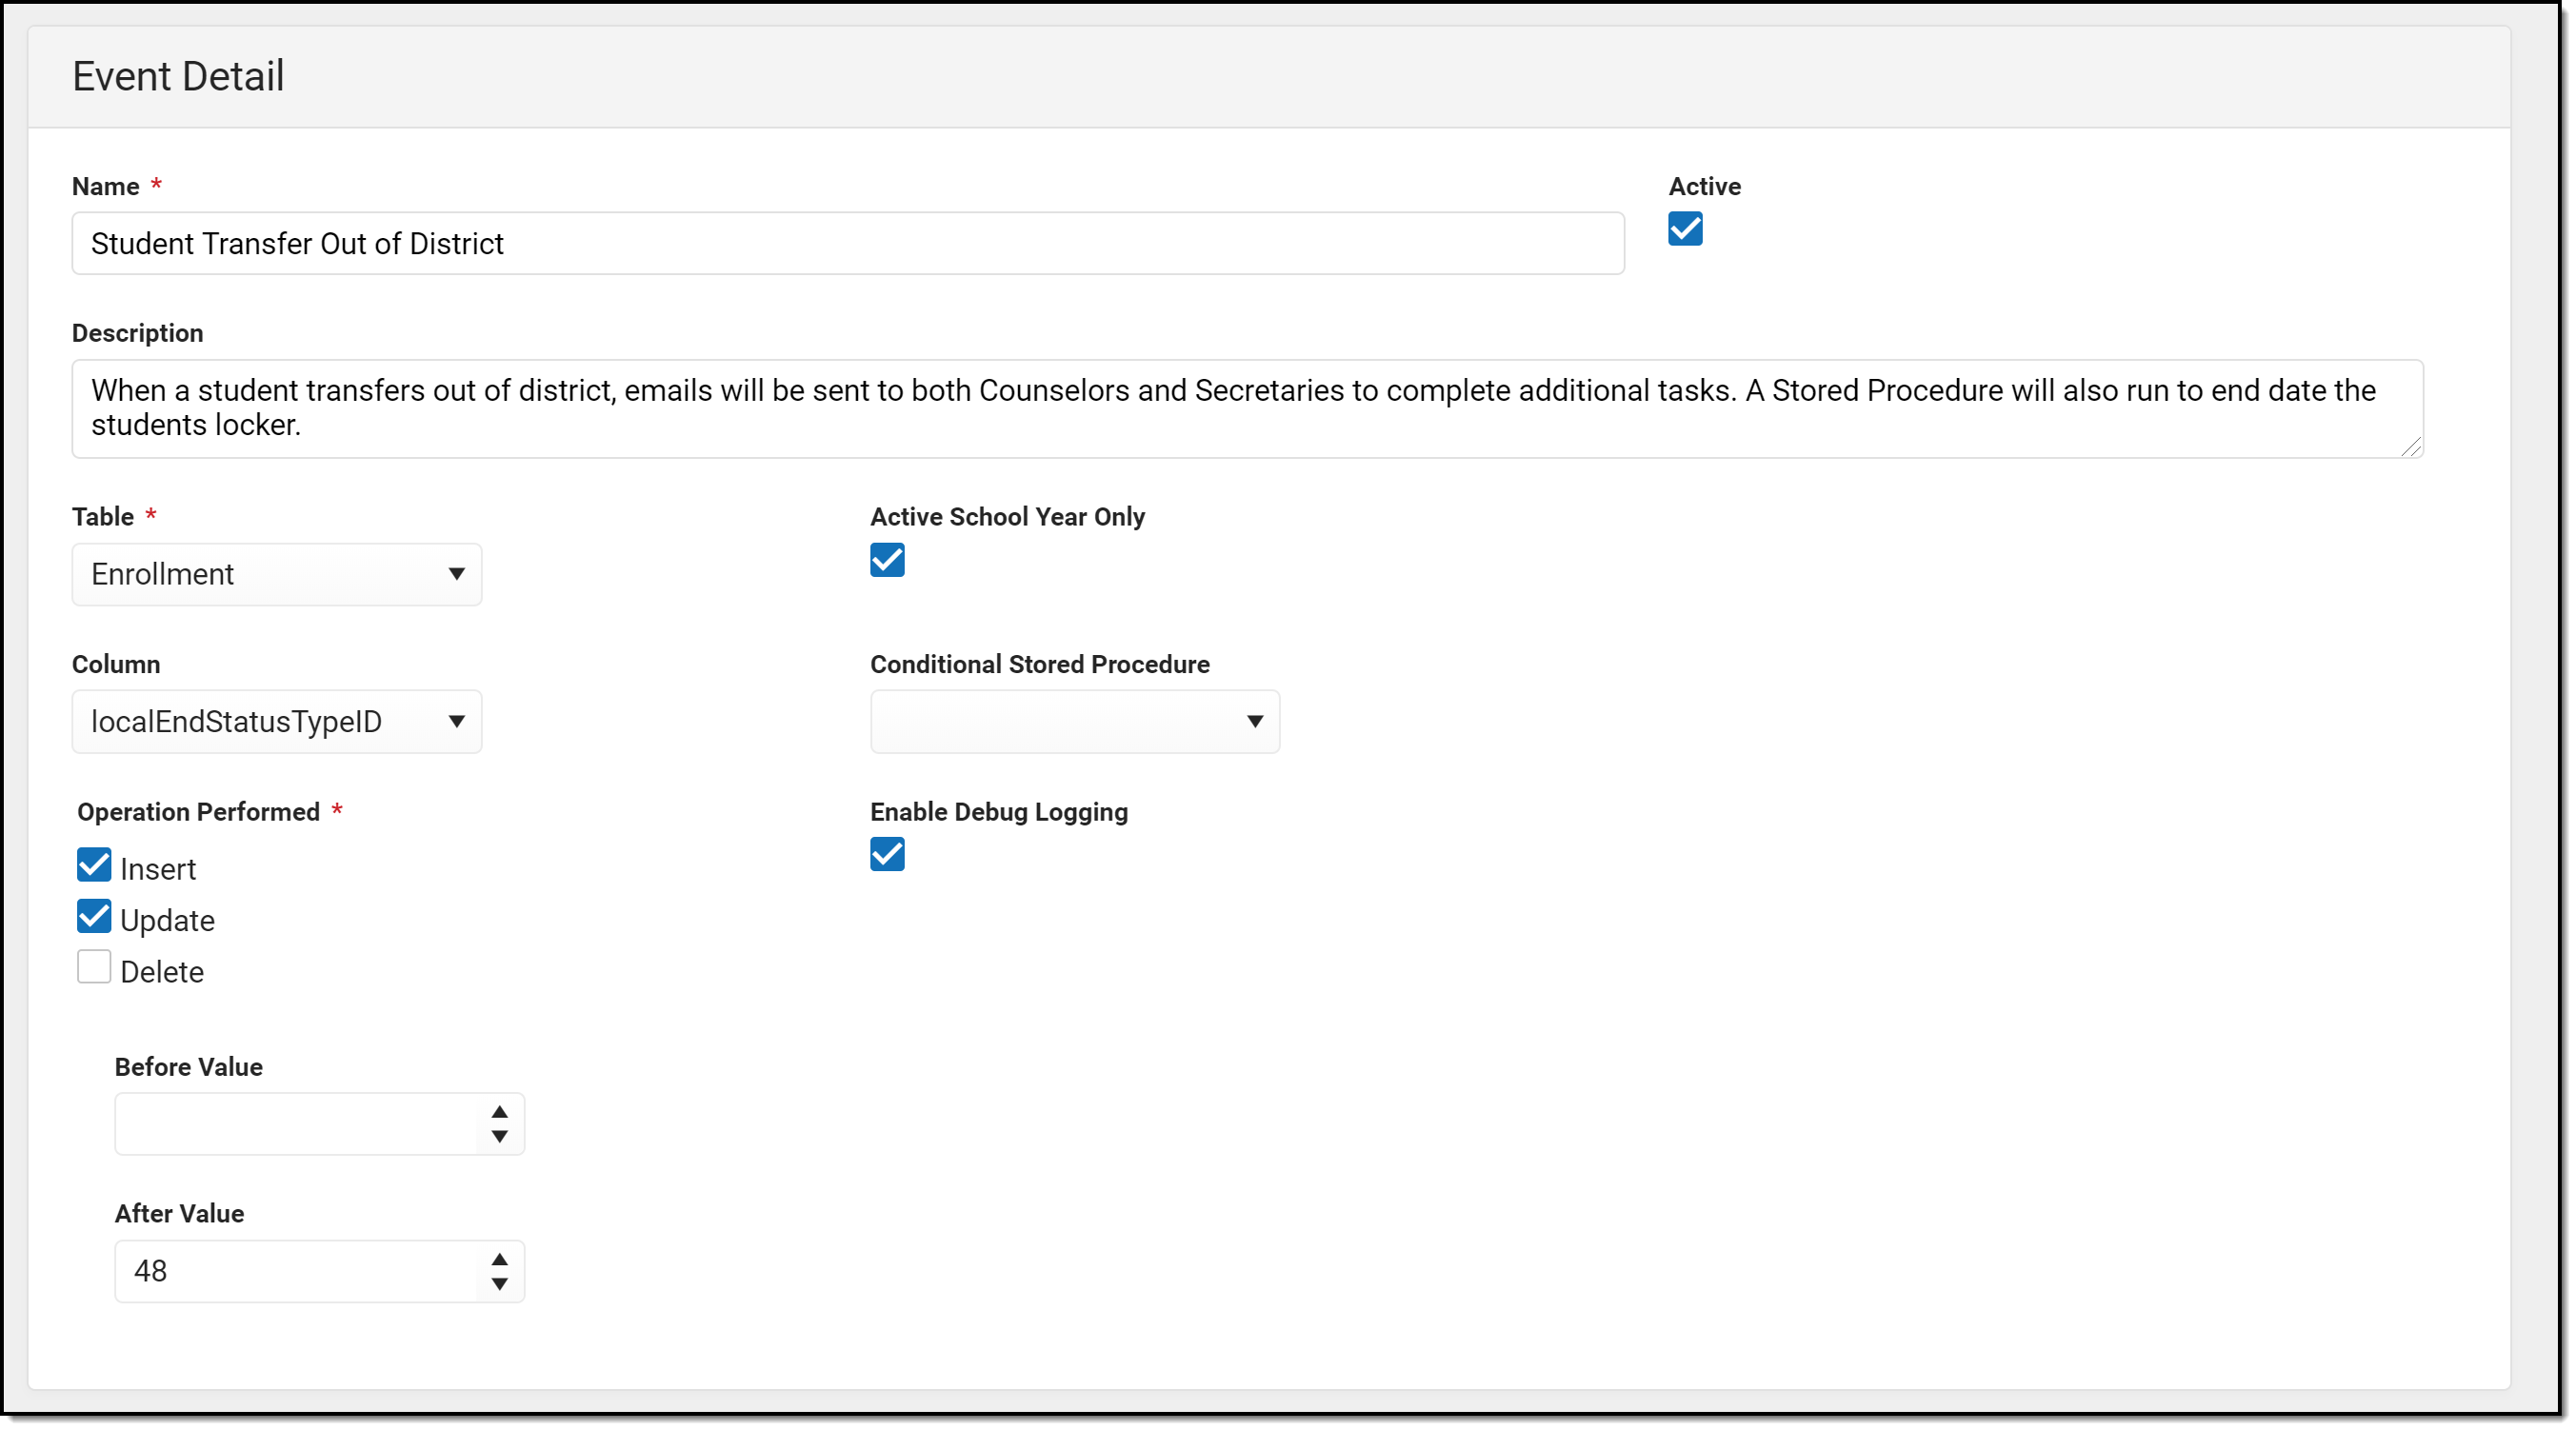
- On the Event Detail editor, enter the Name of the Event. Since this example is to alert counselors of a student transferring out of the district, the Event Name could be Student Transfer Out of District.
- Enter a more detailed Description of the event to include information about the automatic ending of a student's locker.
- Mark the Active checkbox.
- Since this is an event related to enrollments, select Enrollment from the Table dropdown.
- Mark the Active School Year Only checkbox. This means the enrollment must be ended in the active School Year to initiate an Action.
- For this event, the trigger is related to either an insert or a change for a specific column that is looking for an enrollment end status of a particular type. The Column field needs to know which specific table column to look for, so a selection of localEndStatusTypeID is selected.
- For Operation Performed, mark Insert and Update. This event is looking for a new record in the table or an update to an existing record in the table.
- Mark the Enable Debug Logging for easier troubleshooting.
- The Before Value field can be left blank, but the After Value field needs an entry that reflects the End Status that is being monitored. In this example, the Transfer Out of District End Status has a column value of 48.
- Click the Save & Stay button.
Step 2. Add the Action
This event has two other actions already created - one is an email to Counselors to print the student's transcript, and one is an email to the administrator to print a letter. This new action is to auto-end date the student's locker so it can reassigned to other students as needed.
- Click the Add Action button.
- On the Action Detail editor, enter the Name of the Action. Since this example is to end locker assignments, the Name could be End Lockers.
- Mark the Active checkbox.
- Select the Type of Stored Procedure.
- This event has three actions, so the Sequence is three. Actions are performed in the sequence order.
- On the Action Type editor, select the appropriate Stored Procedure. This has already been tested on the district's staging site, added to the database, and made available in the Action Detail editor. See the Stored Procedures section for more information.
- Click the Save button.
When the quartz job runs the actions associated with the Event and are processed in sequence order. The first two actions deliver emails via the Messenger system. The third action runs the stored procedure which end dates the student's locker.
Stored Procedures
Events & Actions allows customers to perform custom tasks when specified changes have occurred in the Campus database. Common options or tasks are available directly in the configuration tool, but to achieve maximum flexibility, some parts of the system can be configured by user-provided stored procedures.
Events & Actions do not require the use of stored procedures; different types of notifications can still be sent as an email. But, the personalized details of that communication (staff name, student name, etc.) would not be included. Without the stored procedure, it would be a generic message.
There are advantages to using Stored Procedures in events:
- Stored procedures can be used in Events to fine tune the exact database change being monitored by the event.
- Stored procedures can be used in Actions with the type of Email to define the recipient list or to provide fields from the database to the email body.
- Stored procedures can be used in Actions with type of Stored Procedure to process a user defined change.
The following information provides guidance on stored procedures. As noted above, if you do not have access to your database to add stored procedures or are unfamiliar with databases, contact Infinite Campus for options.
