When a student transfers from one district to another district within the same state, the receiving district may request existing information from the exiting district. This is done using the Student Locator. Special Education information is an option the receiving district may request.
When a student no longer qualifies for special education services, certain steps must be completed.
The following information details the process the transferring district should do for proper special education records transfer and the process when student exits services within a district.
Special Education Student Transfers to Another District
Enrollment Records
Tool Search: Enrollments
Modify the General Enrollment Information editor by entering an End Date and the End Status.
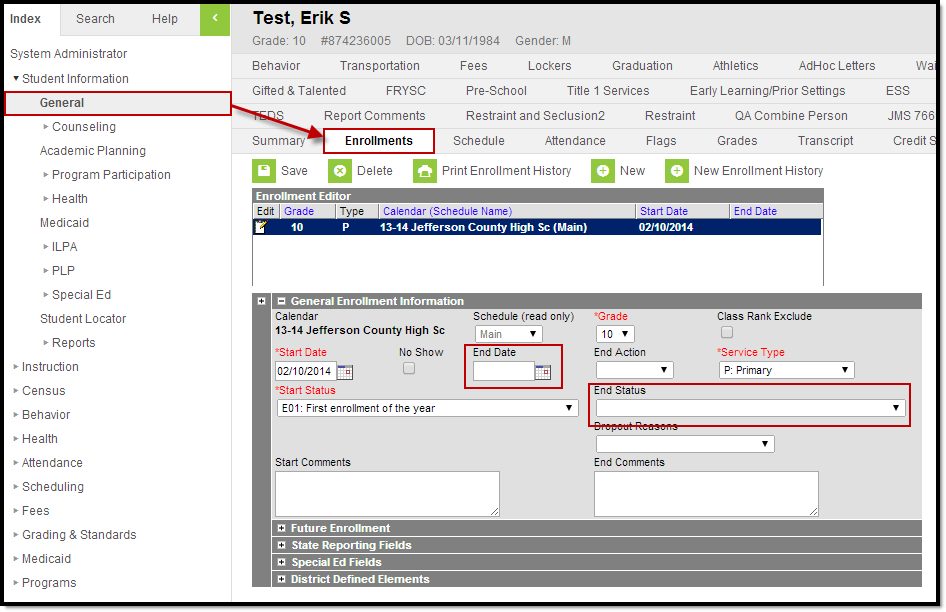
Image 1: General Enrollment Editor - End Date and End Status
Special Ed Enrollment Record
Tool Search: Enrollments
Special Education enrollment information needs to be modified by entering the Special Education Exit Status, Special Education Exit Date and the Special Education Status.
- The Special Education Status needs to be changed from an active status (i.e., A: Active, AR: Active/Referred, etc.) to an inactive status (i.e., I: Inactive).
- The Special Education Exit Status should be changed to 06: Moved, Known to Continue.
- The Special Education Exit Date should be entered as of the last day of enrollment in the district.
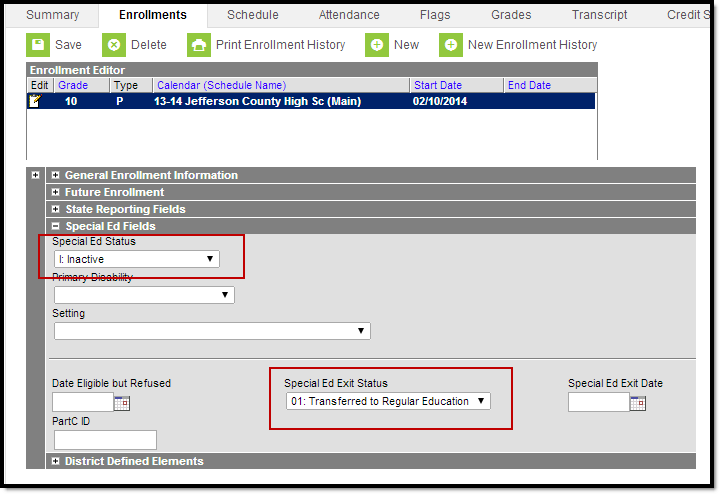
Image 2: Special Education Enrollment Editor - Special Education Status, Special Education Exit Status and Special Education Exit Date

Transportation Tab
Tool Search: Transportation
If the student has a Transportation code of T5: Special Transported, enter an End Date for this record.

Image 3: Transportation Tab - Transportation Code and End Date
Team Members Tab
Tool Search: Special Ed Team Members
Team members are not automatically ended when a student ends enrollment. A user must manually end all team members when a student transfers to another district. Select the Team Member and enter the End Date as the last day the student was enrolled in the district.
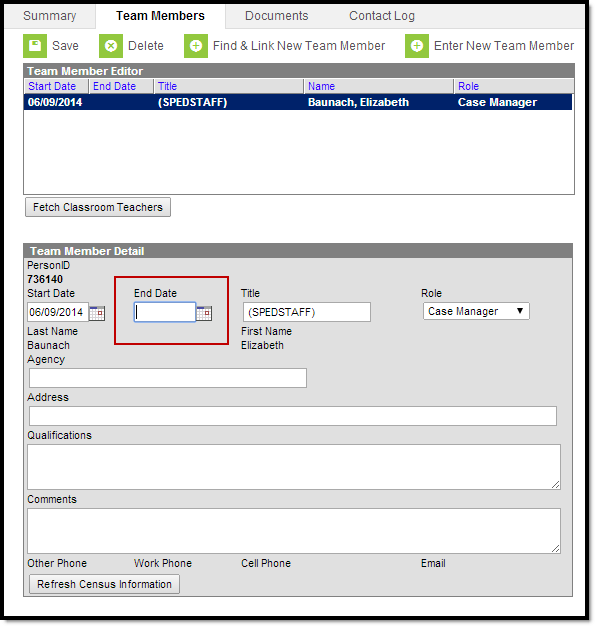
Image 4: Special Education Team Member Tab - End Date
When these changes are complete, the plan will need to be locked again, as only locked plans will be included in the records transfer process.
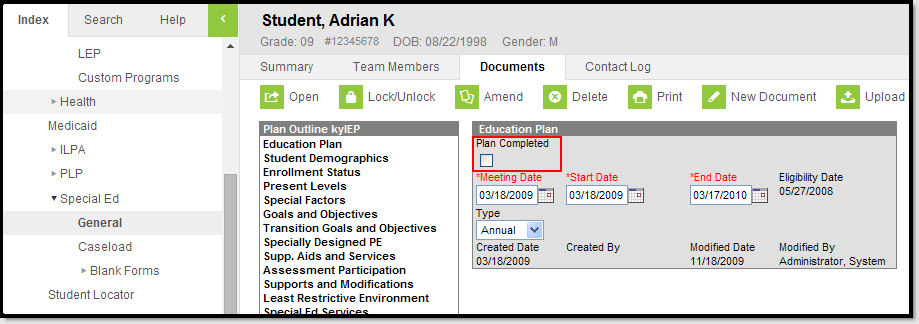
Image 5: Special Education Plan Completed
Open the modified plan from the student’s Documents tab. On the Education Plan editor, mark the Plan Completed checkbox and select OK on the warning that appears. Click the Save icon in the action bar. The plan is now locked.
Special Educaton Student No Longer Qualifies for Services and is Released from Special Education
Enrollment Records
Tool Search: Enrollments
Modify the General Enrollment Information editor by entering an End Date and the End Status.

Image 1: General Enrollment Editor - End Date and End Status
Special Education Enrollment Record
Tool Search: Enrollments
Special Education enrollment information needs to be modified by entering the Special Education Exit Status, Special Education Exit Date and the Special Education Status.
- The Special Education Status needs to be changed from an active status (i.e., A: Active, AR: Active/Referred, etc.) to an inactive status (i.e., I: Inactive).
- The Special Education Exit Status should be changed to 01: Transferred to Regular Education.
- The Special Education Exit Date should be entered as of the last day of enrollment in special education programming.
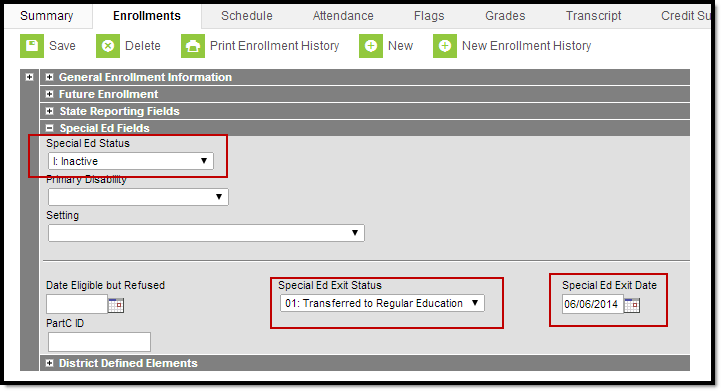
Image 2: Special Education Enrollment Editor - Special Education Status, Special Education Exit Status and Special Education Exit Date
Transportation Tab
Tool Search: Transportation
If the student has a Transportation code of T5: Special Transported, enter an End Date for this record. A new transportation record will need to be added to indicate the student's new transportation code.
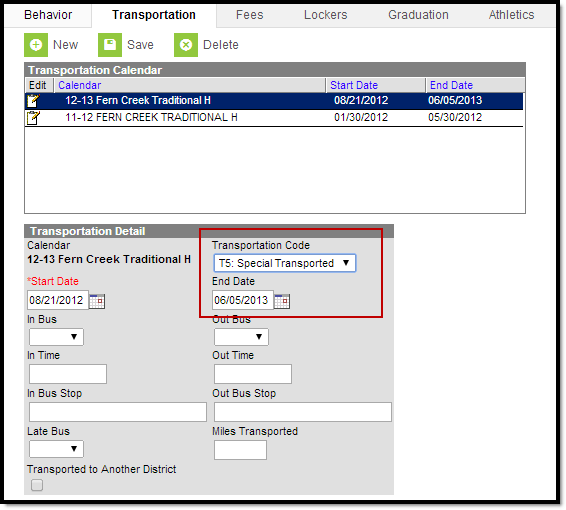
Image 3: Transportation Tab - Transportation Code and End Date
Team Members Tab
Tool Search: Special Ed Team Members
Team members are not automatically ended when a student ends enrollment. A user must manually end all team members when a student transfers to another district. Select the Team Member and enter the End Date as the last day the student was enrolled in the district.
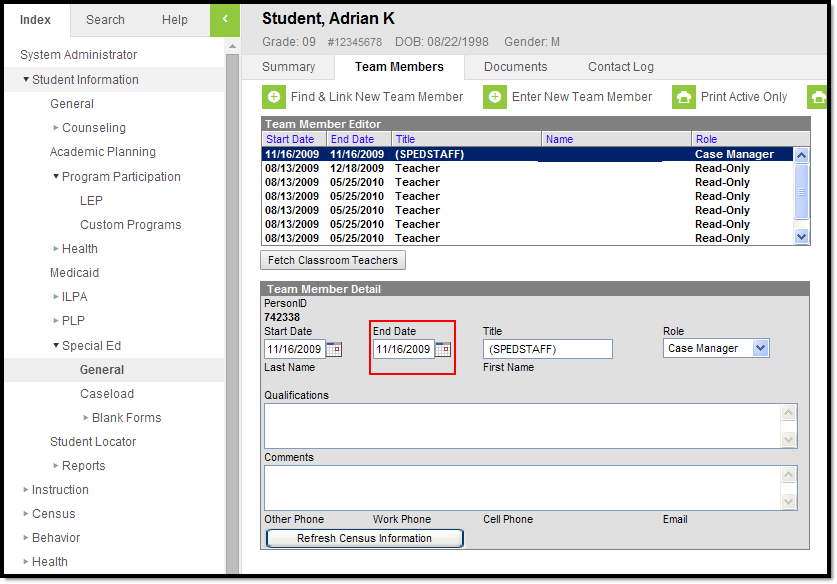
Image 4: Special Education Team Member Tab - End Date
Special Education Documents
When these changes are complete, the plan will need to be locked again, as only locked plans will be included in the records transfer process. This process does not need to be done for students transferring out of the district.
Only the most recent Locked IEP and Evaluation plans will be sent through records transfer as editable plan types. The rest of the students' locked special ed documents will come over as read-only PDF documents. Those read-only PDF documents will all be imported into the calendar year based on the date they were imported, and the Locked IEP and Evaluation plans will be imported based on the dates of those plans.
Image 5: Special Education Plan Completed
Open the modified plan from the student’s Documents tab. On the Education Plan editor, mark the Plan Completed checkbox and select OK on the warning that appears. Click the Save icon in the action bar. The plan is now locked.
