Tool Search: Dependent Care
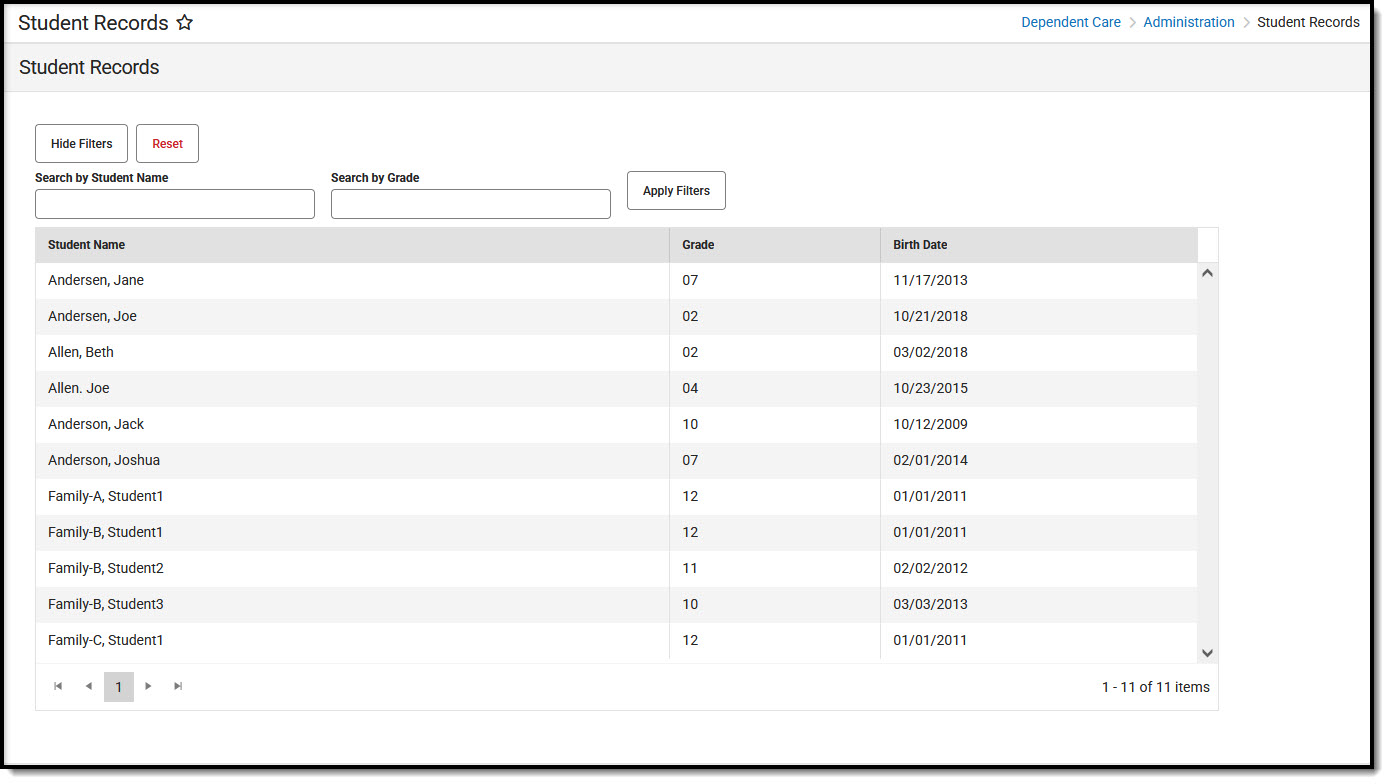
Administration Student Records allows users to view and edit student records for students enrolled in Dependent Care, both past and present. Users can view/edit/adjust a student's: schedule, emergency contacts and persons authorized for pick up, charges, discounts, credits, and any forms and their completion status.

Using Filters
Users may search for a specific student, or subset of students, using the filter options.
- To filter student records, press the Show Filters button. Available filters for student records display.
- To Search by Student Name, type in the name you'd like to search by. Users can search by a single letter or multiple letters.
- To Search by Grade, type in the grade level by which to search.
- Once the desired search filters are entered, press Apply Filters. Student records meeting the search criteria display.
- To remove any filters, press Reset. The full list of student records displays.
- To hide the filter search fields from view, press Hide Filters. The search filters are hidden from view. It is important to note that hiding filters does not remove filters. Any set filters remain and the Student Records list reflects those filters.
Student Records
Users can view student records by selecting the student whose record they'd like to view. Users are able to view and edit sessions for which the student is registered, their session schedule, any charges applied to the account, emergency contacts and persons authorized for pickup, and any forms needed for the session.
Viewing a Student Record
To view a specific record, find the student record you want to view and click on the record.

- A student record screen displays listing all currently enrolled sessions for the student. To view a list of previously enrolled sessions for the student, toggle the Display Previous Sessions option to ON. To view only currently enrolled sessions for the student, toggle OFF the Display Previous Sessions option.
- To view a session in more detail, choose the session you wish to view and press View. A screen displays with session details for the student.
- From this screen, users can both view and edit: Schedule, Emergency Contacts/Authorized Persons, Charges, Credits, Discounts, and Forms.
Editing a Student's Session Schedule
Users are able to both view and edit a student's session schedule.
- To edit the student's session schedule, press Edit. The Student's Current Schedule displays.
- Use the First Attendance Date and Last Attendance Date fields to enter the date range to which the schedule change applies.
- Use the Weekday check boxes to determine the days on which the student will attend the session. The student is scheduled to attend on all of the checked days.
- When finished, press Save to save any changes made to the student's schedule or Cancel to exit without saving the changes.
Student Session Emergency Contacts and Authorized Pickup Person(s)
Users may not remove Emergency Contacts from a student record. They may, however, change their Authorized Pick Up Person status or add new emergency contacts and authorized pick up persons.
- To view/edit the list of Emergency Contacts and Authorized Pick Up Persons for a student, press the Edit button. The Emergency Contacts/Authorized Pick Up People list displays.
- To change a person's Authorized Pick Up status, either mark or unmark the checkbox. If the Authorized Pick Up Person checkbox is marked, the person is authorized to pick up the student. If the checkbox is unmarked, the person is not authorized to pick up the student.
- To add a new emergency contact/authorized pick up person, press Add.
- Enter a Name and Phone number for the new contact.
- If this person is authorized to pick up the student from care, mark the Authorized Pick Up Person checkbox.
- To remove a newly added contact, press Remove. It is important to note that existing contacts may not be removed from the list nor can a newly added contact be removed once the addition is saved.
- When finished, press Save to save any changes made to the student's schedule or Cancel to exit without saving the changes.
Student Session Charges
Users are able to adjust charges applied to the student's session or to add additional charges.
Adjusting Existing Charges
- Find the charge you'd like to adjust and press Adjust. The Adjust a Charge screen displays.
- The Charge Name is read-only cannot be changed.
- In the Effective Date field, enter the date on which this charge adjustment takes effect.
- Use the Adjustment Amount to enter the amount the charge will be adjusted. This amount must be equal to, or less than, the current charge.
- Enter a Comment explaining the adjustment. This is a required field.
- When finished, press Save to save any changes made to the charges or Cancel to exit without saving the changes.
- Once the adjustment is applied, users are able to edit the adjustment by pressing the Edit button. From the Edit screen, users may change the Effective Date and the Adjustment Amount. Users must also enter a Comment explaining the reason for the edit.
Adding Additional Charges
- To add an additional charge to the student session charges, press Add. The Add a Charge screen displays.
- Use the Charge Name drop-list to select a charge the apply to the student's charges.
- In the Effective Date field, enter the date on which the charge should be applied.
- Enter a Comment as to why the charge is being applied. This is a required field.
- When finished, press Save to save any changes made to the charges or Cancel to exit without saving the changes.
Student Session Discounts
Users are able to edit existing discounts applied to the student's session or to add additional discounts.
Editing Existing Discounts
- Find the discount you'd like to change and press Edit. The Edit a Discount screen displays.
- Use the Discount Name field to determine the appropriate applied discount. If the appropriate discount is selected, leave this field as-is.
- In the Start Date and End Date fields, enter the date range for which to apply this discount. If the discount should be indefinitely applied, leave the End Date blank.
- Mark the Apply Discount to Drop Ins if the discount should be applied to any drop-in care for the student. Leave the checkbox unmarked if the discount should not be applied to drop-in care.
- When finished, press Save to save any changes made to the discounts or Cancel to exit without saving the changes.
Adding Additional Discounts
- To add an additional discount to the student session discounts, press Add. The Add a Discount screen displays.
- Use the Discount Name drop-list to select a charge the apply to the student's charges.
- In the Start Date and End Date fields, enter the date range for which to apply this discount. If the discount should be indefinitely applied, leave the End Date blank.
- Mark the Apply Discount to Drop Ins if the discount should be applied to any drop-in care for the student. Leave the checkbox unmarked if the discount should not be applied to drop-in care.
- When finished, press Save to save any changes made to the discounts or Cancel to exit without saving the changes.
Student Session Credits
Under session Credits, users may edit existing credits or can add additional credits to the account.
Editing Existing Credits
- Find the credit you'd like to change and press Edit. The Edit a Credit screen displays.
- Use the Credit Name field to enter the name of the credit. Leave this field as-is if the name of the credit still works.
- In the Effective Date field, enter the date on which to apply this credit. Leave this field as-is if it does not need changing.
- Next, enter the amount to credit the account in the Credit Amount field. Leave this field as-is if the credit amount is still correct.
- Use the Edit Comment field to explain the reason for the credit. This is a required field.
- When finished, press Save to save any changes made to the discounts or Cancel to exit without saving the changes.
Adding Additional Credits
- To add an additional credit to the student session credits, press Add. The Add a Credit screen displays.
- Use the Credit Name field to enter the name of the credit.
- In the Effective Date field, enter the date on which to apply this credit.
- Next, enter the amount to credit the account in the Credit Amount field.
- Use the Comment field to explain the reason for the credit. This is a required field.
- When finished, press Save to save any changes made to the discounts or Cancel to exit without saving the changes.
Student Forms
The Forms section can be used to view any student forms and their completion status. Forms cannot be edited or added form this screen.