This article describes the steps required to transition Ed-Fi to the 2024-2025 school year properly and contains general recommendations for processes to complete at the end of one school year and the start of another.
Step 1. Enable Ed-Fi Functionality
Tool Search: System Preferences
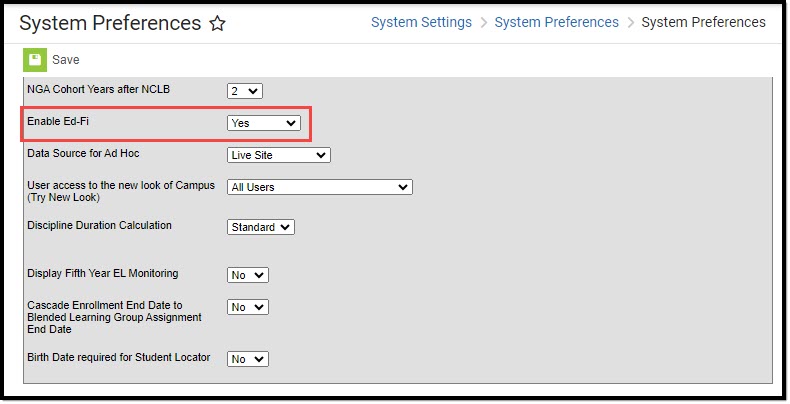
Enable Ed-Fi functionality in System Preferences.
- Yes enables Ed-Fi functionality, and Ed-Fi data syncs from Campus to the Ed-Fi system (when properly configured).
- Tools Only allows users to fill out Ed-Fi fields, like Ed-Fi IDs, but this data does not sync to the Ed-Fi system until the setting is set to Yes. This can be useful when setting up Ed-Fi IDs for students within a school or district to ensure data syncs properly before enabling it.
- No disables Ed-Fi functionality, and all Ed-Fi tools are turned off.
 Enable Ed-Fi System Preference
Step 2. Connection Configuration
Tool Search: Ed-Fi Configuration
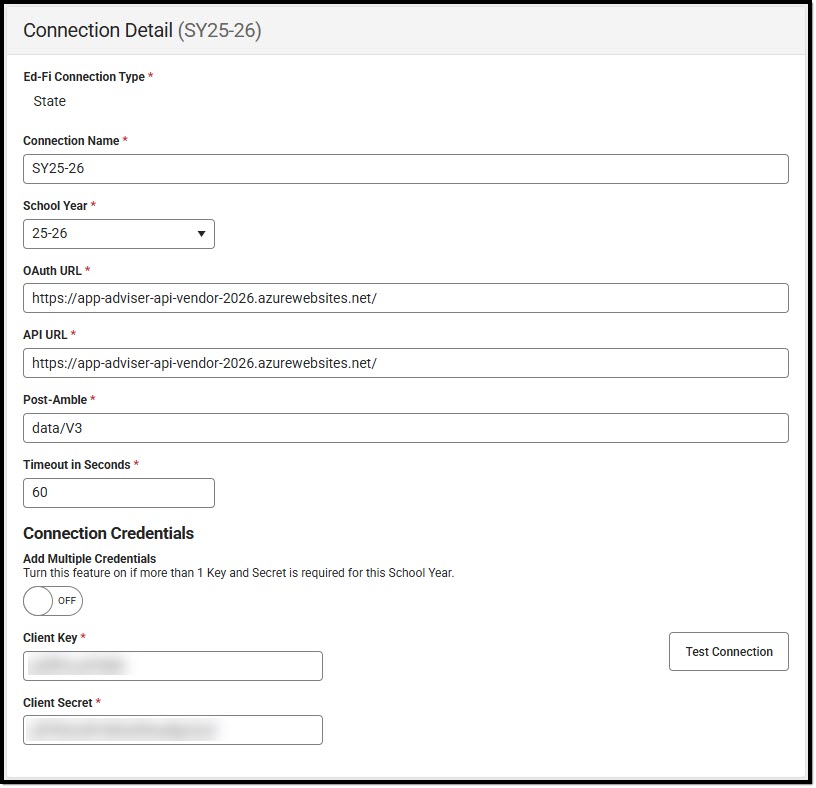
Enter the new connection configuration for the new school year.
 Connection Detail View
Enter New Connection
Districts must be on Campus.2535.
- Click New.
- Select the Connection Type of State.
- Enter a Connection Name.
- Select a School Year. The current year is 25-26.
- Enter the following OAuth URL: https://app-adviser-api-prod-2026.azurewebsites.net/2026/
- Enter the following API URL: https://app-adviser-api-prod-2026.azurewebsites.net/2026/
- Enter the following Post-Amble: data/v3
- Select the Timeout in Seconds. This field defaults to 60 seconds.
- Enter the Client Key. The Client Key is provided by the Nebraska Department of Education.
- Enter the Client Secret. The Client Secret is provided by the Nebraska Department of Education.
- When desired, a certificate can be imported for the Ed-Fi configuration. For more information, see the Import Certificates section of the Ed-Fi Configuration article.
- Click Save.
The new connection is ready for the school year.
Delete Previous Connection
Ensure the existing connection is correct before deleting the previous year's connection.
- Click the Connection button on the previous year's configuration.
- Click the Delete button. A confirmation message displays.
Step 3. Set Tool Rights
See the Ed-Fi Tool Rights article for information on individual user tool rights.
Step 4. Set Ed-Fi Relation Type
Tool Search: Relationship Type Setup, Relationships
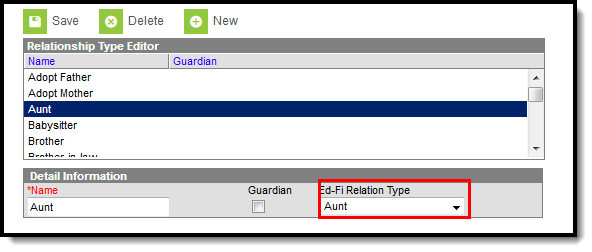
The Ed-Fi Relation Type field displays in states when Ed-Fi is set to Tools Only or On. For Ed-Fi districts, this field reports in the Student Parent Association resource and indicates the nature of an individual's relationship with a student.
 Ed-Fi Relation Type
Step 5. Set Ed-Fi Grade Type
Tool Search: Grading Task Setup
When applicable, mark Grading Tasks as an Ed-Fi Grade Type.
Step 6. Align Grading Tasks
Tool Search: Course Grading Tasks
Add Grading Tasks mapped to the Ed-Fi Grade Type to Courses. For additional information, see the Course Grading Tasks article.
Step 7. Assign Ed-Fi Ids
Tool Search: Demographics
For students and staff, Ed-Fi IDs are generated using a third-party system to locate and generate IDs. Those IDs need to be manually entered into Campus or use the Import Tool.
For parents/guardians, Ed-Fi IDs are auto-generated when the Guardian checkbox is marked for an enrolled student.
See the Enter Ed-Fi IDs for People in Campus article for additional information.
Step 8. Add Teacher Roles
Tool Search: Section Staff History
Add a Teacher Role for teachers who need to report to Ed-Fi. See the Section Staff History article for additional information.
Step 9. Resync Ed-Fi Data
Tool Search: Resync
An ordered resync should be completed as the first resync of the year. This is completed using the Resync tool.
Keeping the Select Dependencies checkbox marked, the resync steps are as follows:
| # | Category |
|---|---|
| 1 | Schedule Information, EXCEPT Student Section Association and Staff Section Association |
| 2 | Staff Information and Staff Section Associations |
| 3 | Student Information and Student Section Associations |
| 4 | Attendance, Discipline, Grade, and Parent Information in any order. Note: Step 4 is not required for Fall reporting. |
Dashboard Access
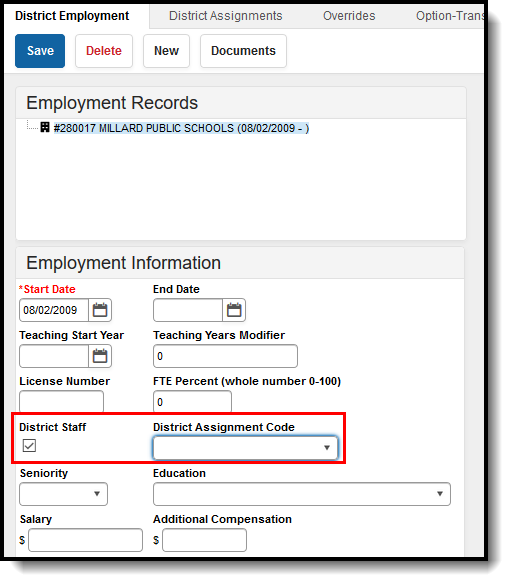
The District Assignment Code field displays when the District Staff checkbox has been marked and gives users access to the Ed-Fi Dashboards based on the Title that is selected for the staff. This field populates the Education Organization Reference, Staff Classification Descriptor, and Position Title fields in the Staff Education Organization Assignment resource. This field has its own sub-right, and users must have a combination of RWAD tool rights to see and populate it. When staff members do not have district-level access to the dashboards, they also need at least one District Assignment record. The staff receives dashboard access to only the schools for which they have an active District Assignment record.

