Tool Search: Custom Tool Placement
The Custom Tool Placement Editor allows you to customize where in the New Look and Feel of Campus navigation UI your custom tools will live. You can either place custom tools within existing menu items and categories or customize and create your own menu items and categories.
Districts and Channel Partners: Please use this tool to ensure your custom tools are organized and located in their proper places.

See the Custom Data and Links Tool Rights article for information about tool rights for this and related tools.
New Tool Mapping
You can determine where in the new navigation UI a custom tool/tab will live by selecting the New Tool Mapping button.
Custom tabs are created within Custom Tool Setup.
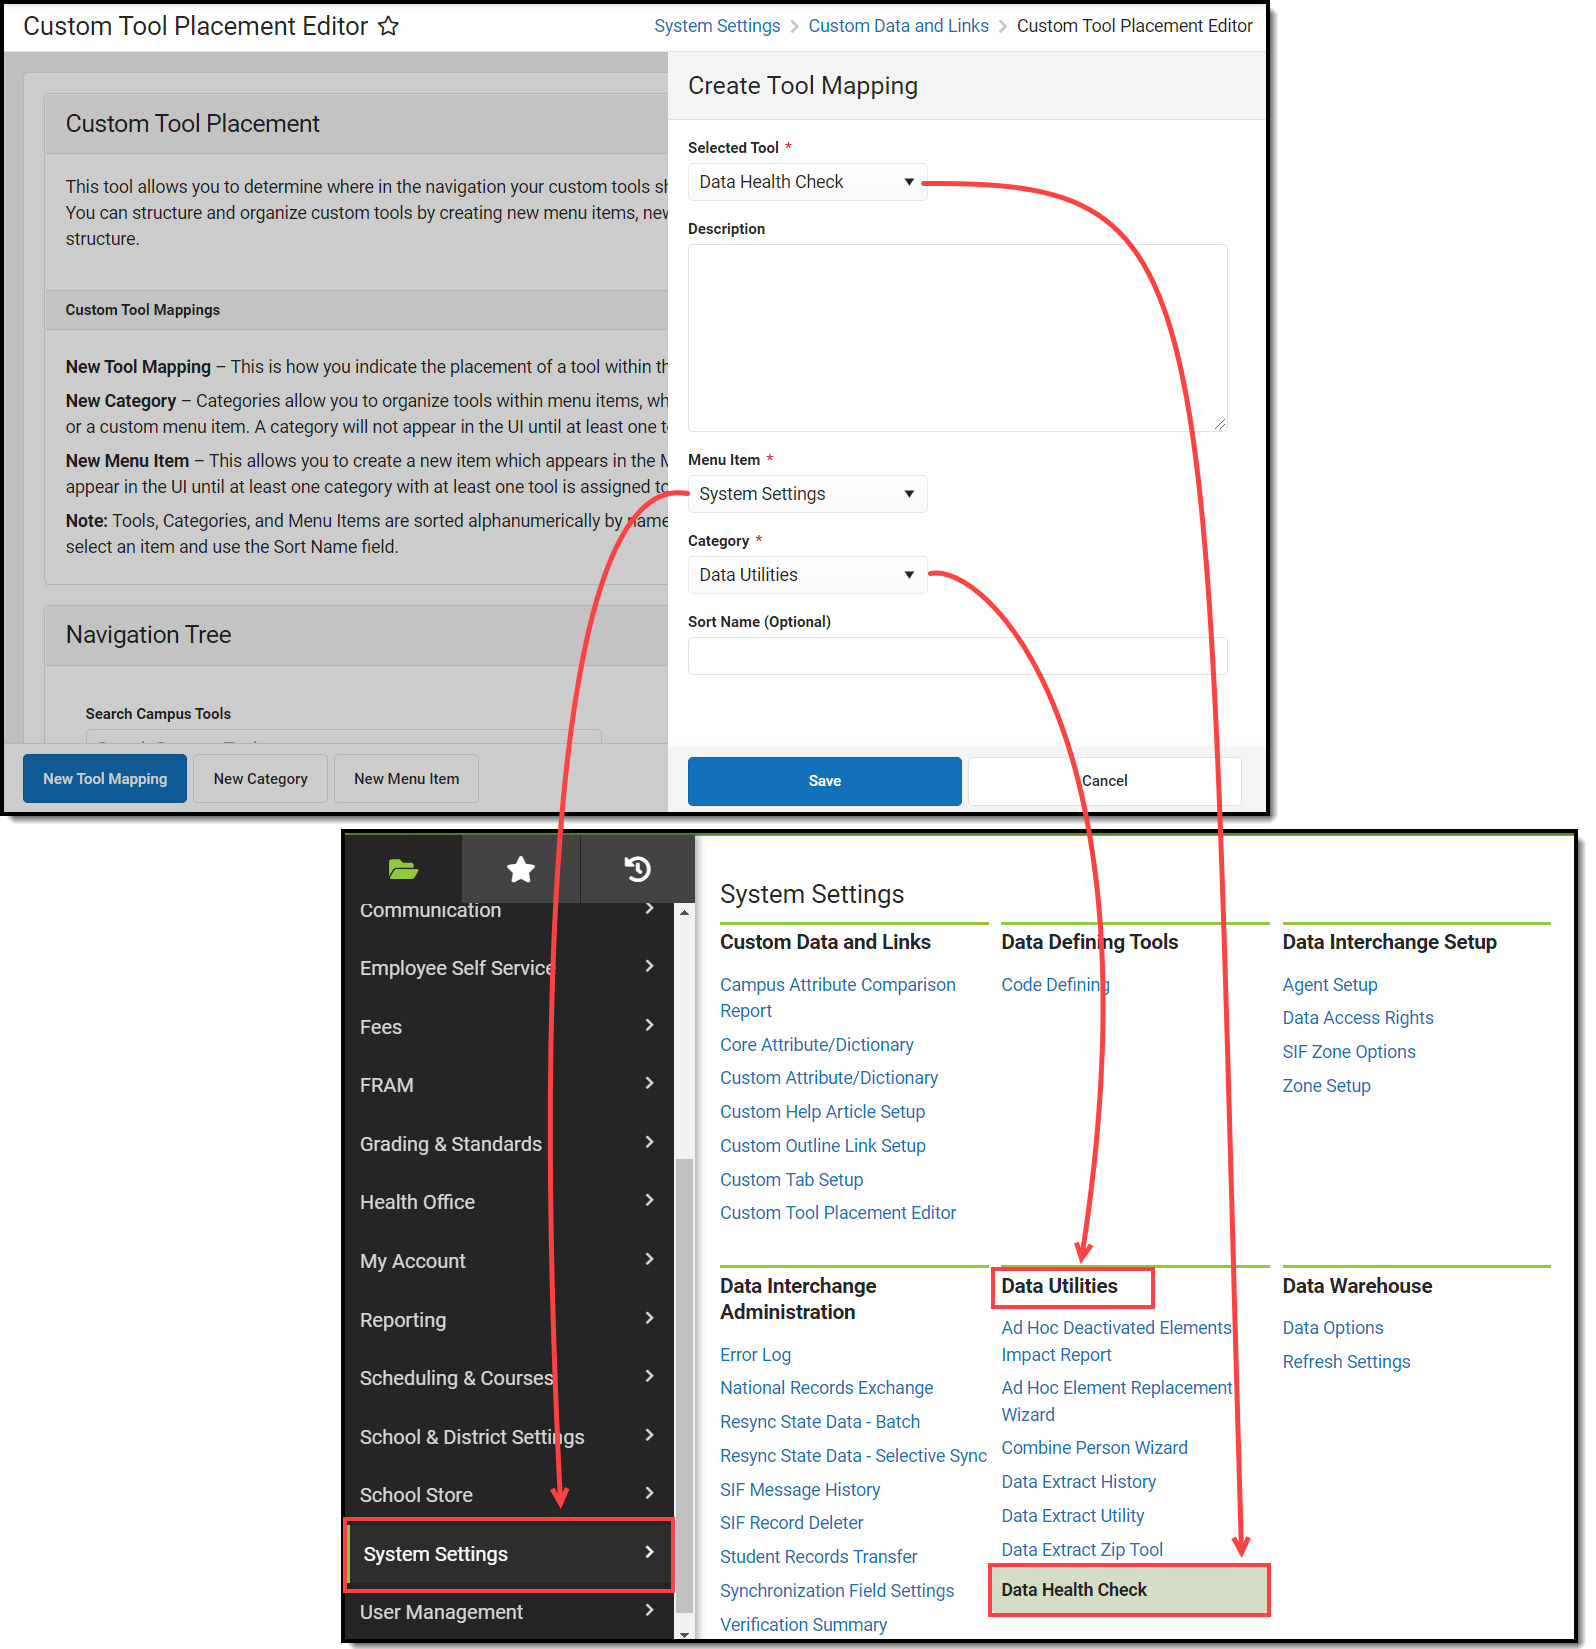
- Select the custom tool/link from the list. This list includes all custom tools and links and their current placement within Classic Campus and New Look.
- Write a Description of the tool (optional).
- Select the Menu Item. This is highest level (parent level) of where your tool will live
- For example in the image below, selecting a Menu Item of 'System Settings' means users can find the tool by first selecting System Settings in the Main Menu.
- Select the Category. This is the category within the Menu Item where the tool will live under.
- For example in the image below, selecting a Category of 'Data Utilities" means the user would first navigate to System Setting (Menu Item) and then look for the Data Utilities category where the tool will reside within.
- To determine the sequence of the tool mapping (sorted alphanumerically) within the New Look of Infinite Campus, enter a Sort Name (optional). Sequenced tool mappings will display the sort name in the Navigation Tree within parenthesis.
- Click Save. The custom tool will now reside within the Menu Item and Category selected.
You may need to log out and back into Infinite Campus for this change to appear.
 Custom Tool Placement - Mapping
New Menu Item
To create an entirely new menu item for your custom tools, select the New Menu Item button. Menu Items are the highest-level parent which contain categories and tools and populate the Main Menu on the left-hand side of the screen.
- Enter the Name of the item.
- Names cannot include the following characters: ; / ? : @ = & * + " < > # % { } | [ ] ` \
- Enter a Description of the item (optional).
- To determine the sequence of the menu item (sorted alphanumerically) within the New Look of Infinite Campus, enter a Sort Name (optional). Sequenced menu items will display the sort name in the Navigation Tree within parenthesis.
- Click Save.
Once a new menu item has been created, at least one category and one tool must be assigned to the menu item in order for it to appear in the UI.
 Custom Tool Placement - New Menu Item
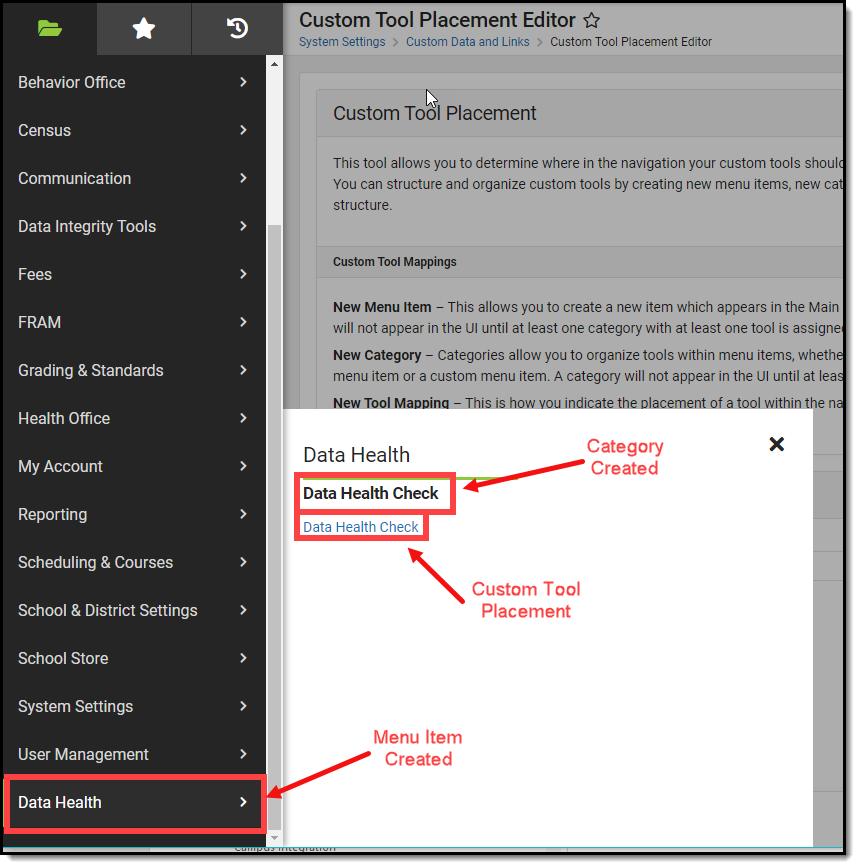
See the New Category section below for an example of how the menu item created in the image above can be used and appear in the UI.
New Category
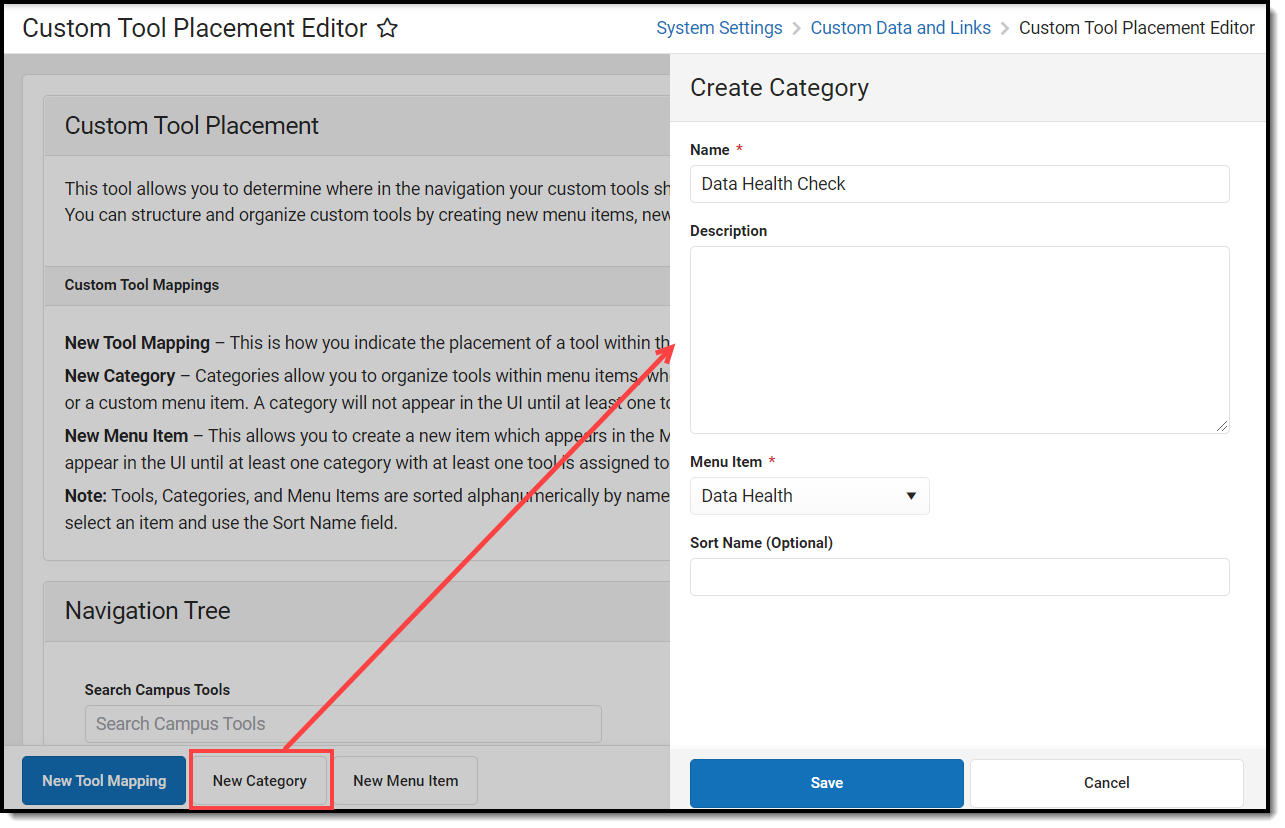
You can create and add new categories to any existing menu item (including custom-made menu items) by selecting the New Category button.
- Enter the Name of the category.
- Names cannot include the following characters: ; / ? : @ = & * + " < > # % { } | [ ] ` \
- Enter a Description for the category (optional).
- Select which Menu Item will house this new category. For example in the image below, a category of Data Health Check is being added to the 'Data Health' menu item created in the image above.
- To determine the sequence of the category (sorted alphanumerically) within the New Look of Infinite Campus, enter a Sort Name (optional). Sequenced categories will display the sort name in the Navigation Tree within parenthesis.
- Click Save. The category now exists in Campus.
At least one tool must be mapped to this category before it will appear in the Campus UI.
 Custom Tool Placement - New Category
Once your category has been created, begin mapping tools to it. You can do this by selecting the New Tool Mapping button and selecting the Menu Item and the Category you just created.
Using the examples found in the New Menu Item and New Category sections above, the 'Data Health' menu item was created, a 'Data Health Check' category was created and added to the Data Health menu item, and the Data Health Check tool was mapped to this menu item and category.
By utilizing the New Menu Item, New Category, and New Tool Mapping features, you can completely customize how and where custom tools appear in the new Infinite Campus navigation.
Note: You can map a custom tool to two different locations using this tool. No matter where you access the duplicated custom tool, it will always show its original location in the breadcrumbs.
 Custom Tool Placement Example
Using the Navigation Tree
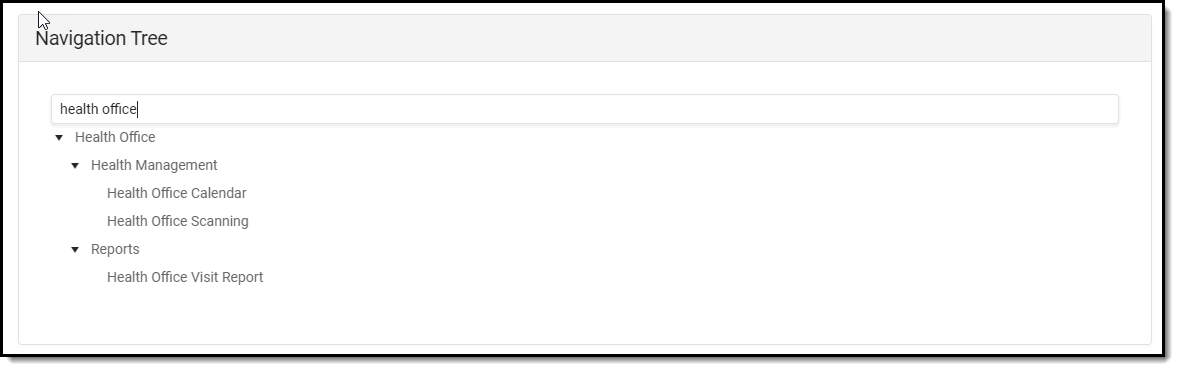
The Navigation Tree allows you to quickly search the navigation hierarchy. This is useful in finding where tools already live before deciding where a custom tool should be located. Search results will continue to refine the navigation tree as more characters are entered.
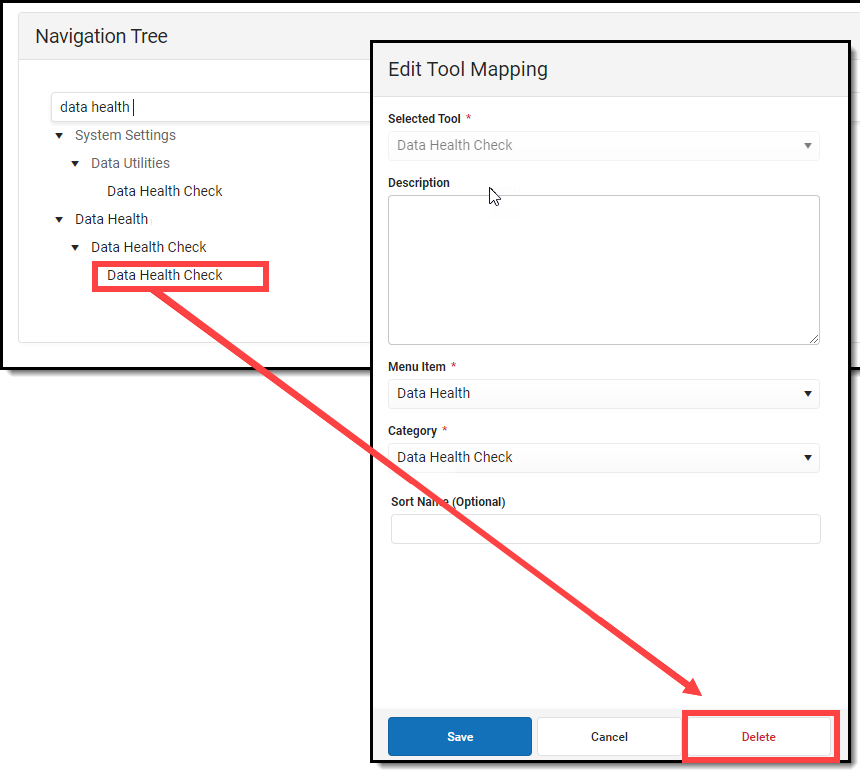
 Navigation Tree
Delete a Custom Menu Item, Category, or Tool Mapping
To delete a custom menu item, category, or tool mapping:
- Locate the category, menu item, or tool in the navigation tree.
- Select the item.
- Click the Delete button. The menu item, category, or tool will no longer appear in the UI in this location.
Menu items require at least one category and tool in order to appear in the UI. Categories require at least 1 tool in order to appear within the UI. Because of this, deleting items may result in the menu item or category disappearing from the UI.
 Edit/Delete Tool Mapping