Tool Search: SSO Service Provider Configuration
The SAML SSO Service Provider Configuration tool allows you to configure and enable SSO authentication(s) for Campus accounts in your district.
Campus accounts can be converted from using the Campus login authentication to SSO authentication by using the User Account Type Wizard.

Only users assigned a Product Security Role of Student Information System (SIS) are allowed to use this tool.
Additional Things to Consider
Please consider the following when enabling and using SAML SSO authentication within Campus:
Once SSO is enabled, the authentication type for user accounts will need to be updated to use this authentication method. This can be done on a user-by-user basis in the User Account tool or updated en masse via the User Account Type Wizard.
- When considering the configuration of user accounts, please note that Cafeteria Serve and Service Layout functionality only authenticates with a non-SSO account (LDAP account or Local Campus Authentication); therefore, please reserve a separate LDAP or Local Campus Authentication account for access to Cafeteria Serve and Service Layout
- In an effort to be as inclusive as possible to the SAML Identity Providers (IDPs) the Infinite Campus user base engages, we have tested the Campus SSO Service Provider against Microsoft Active Directory Federated Services (ADFS), Microsoft Entra Active Directory, Google Apps IDP, Shibboleth IDP, and OmnID. Since the Campus SSO Service Provider is part of the SAML specification, any IDP that is SAML compliant should connect with minimal intervention.
- Users may be asked to provide Campus Support with a test user to assist in troubleshooting any SSO issues they may encounter.
Admins and Authorized Contacts are expected to have a contingency plan for site access in the event your Identity Provider has an issue that makes it impossible to sign in through SSO. Admins should consider setting up a second user account under their own person record that uses an authentication type other than SSO (such as LDAP or Local Campus Authentication). We recommend securing this account with Time-Based Multi-Factor Authentication.
Note that some governing agencies, such as the North Carolina Department of Public Instruction, do not allow the use of Local Campus Authentication. Ensure you comply with your governing agency's security practices.
IDP Certificates vs. Service Provider Certificates
| Certificate Type | Explanation |
|---|---|
| Identity Provider (IDP) Certificates | As a part of the initial setup process, your Identity Provider generates a certificate on their end, and you provide that cert to Infinite Campus when you upload/sync the Service Provider Metadata into Infinite Campus. This is the Identity Provider (IDP) Certificate, which appears under IDP Signature. This is a required part of the SSO setup process. |
| Service Provider Certificates | Infinite Campus (the Service Provider, or SP) can also generate a Service Provider certificate or SP Certificate, which can be provided to your Identity Provider, either by downloading it as a .jks file and uploading it in your Identity Provider system, or, more commonly, by providing your Identity Provider the Service Provider Metadata URL. Only some Identity Providers require this to be generated and provided to them. |
Enable and Configure SAML SSO Functionality
The following steps will guide you in enabling and configuring SAML SSO functionality within Campus:
- Step 1. Enable SAML SSO and Sync IDP Server Data
- Step 2. Generate or Upload the Service Provider Certificate
Step 1. Enable SAML SSO and Sync IDP Server Data
The first step in configuring SAML SSO is to enable SAML SSO functionality, define the Login button and sync IDP server metadata.
Please see the table below for detailed information about each of these fields.
- Click the New button. The Service Provider Configuration editor will appear below.
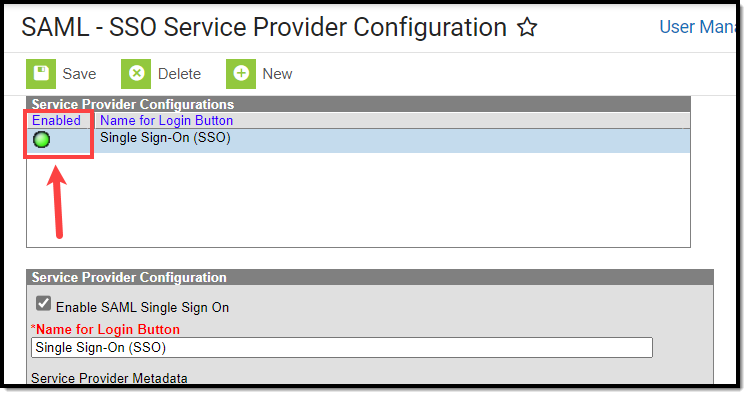
- Mark the Enable SAML Single Sign On checkbox. This will enable this SAML Single Sign-On configuration within Campus.
- Enter a Name for the Login Button. This will be the text that appears on the button for users to select when signing into Campus via SSO or if multiple IDPs are configured, enabled, and made visible, what appears in the dropdown list for selecting which SSO Login to use on the Campus login screen.
One Enabled/Visible SSO Configuration Two or More Enabled/Visible SSO Configurations 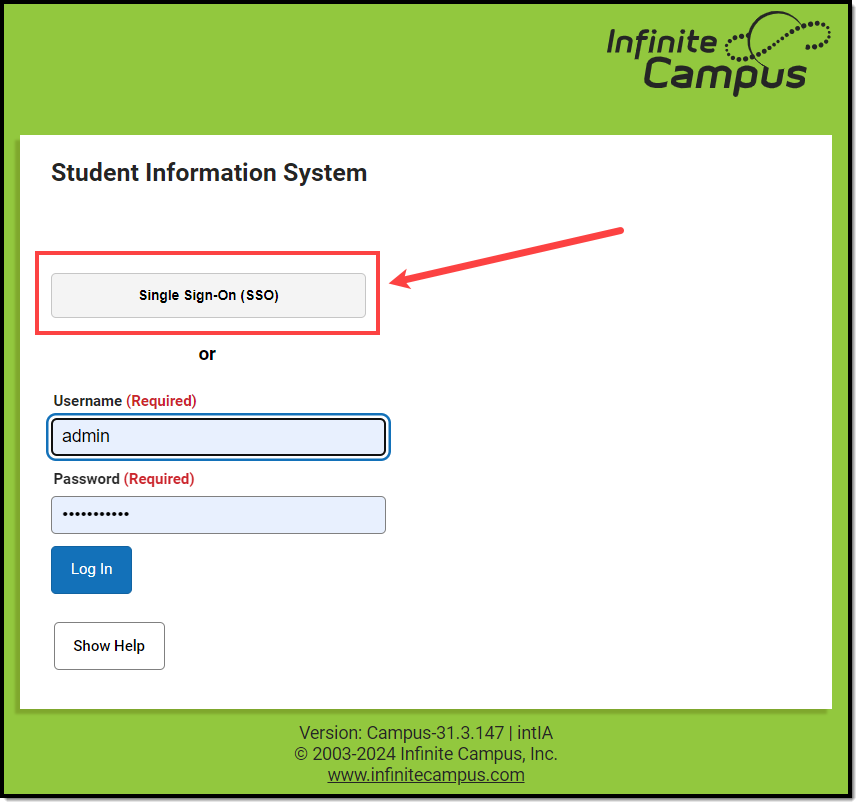
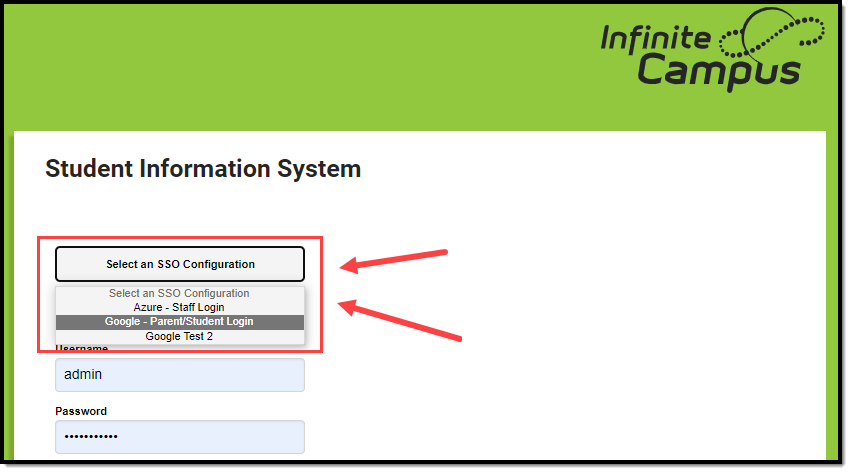
NOTE: Users are highly encouraged to give the button a name recognizable to staff and students/parents, ESPECIALLY if configuring more than one IDP. For example, one configuration is labeled as Staff Login, and another configuration is labeled as Student and Parent Login
- Retrieve the IDP server metadata by either entering the Metadata URL or by uploading the Metadata XML File.
Campus SSO logic will first use an IDPs HTTP-POST binding if one is present and then only look for an HTTP-Redirect binding if the HTTP-POST binding is not found.
- If the Metadata URL was entered, hit the Sync button. This will populate Identity Provider fields below.
- If connecting Campus to Microsoft Entra (formerly Azure), leave the Optional Attribute Name field as nameID. This is the attribute Campus will look for as a response from Entra in order to match the username in Campus to Entra.
For more information about a unique Entra configuration, please see the Configuring a Unique Entra Active Directory section below.
- In the Campus SSO Preferences area, set the Request Timeout. This field indicates the number of minutes that can pass before a request between Infinite Campus and the IDP produces a timeout error.
- Determine the Domain Suffix Handling:
- No Change - This option indicates the domain name does not contain a suffix.
- Remove a Domain Suffix - This option allows you to remove the domain name from an IDP attribute value (such as an email address) to compare only the prefix of the value to the Campus username.
- Append a Domain Suffix - This option allows you to append a suffix to the domain name.
- Check the Logoff IDP when logging off Campus if logoff url exists checkbox if you want the Logoff button in Campus to also log users out of the IDP.
-
This option only works if the Identity Provider Single Logoff URL field is populated and correct. This field is defaulted as marked.
This checkbox will automatically be unmarked and grayed out if the Identity Provider Single Logoff URL references Google.
-
- Designate which Campus Login screen(s) the SSO login button will not appear on:
- Turn off this SSO configuration for the Main Login page - Marking this checkbox means this SSO configuration will not appear as a button or option on the login screen for accessing the Infinite Campus application.
- Turn off this SSO configuration for the Parent Portal - Marking this checkbox means this SSO configuration will not appear as a button or option on the login screen for the Parent Portal.
- Turn off this SSO configuration for the Student Portal - Marking this checkbox means this SSO configuration will not appear as a button or option on the login screen for the Student Portal.
NOTE: If 2 or more IDPs are configured and enabled, to lessen confusion, users are highly encouraged to use these options to hide configurations from users who would not use them (i.e., hide the Staff-specific login from the Parent and Student Portals).
- Move on to Step 2.


Step 2. Generate or Upload the Service Provider Certificate
You must now generate or upload the Service Provider Certificate. To do this, click the Manage SP Certificate button.

Service Provider Certificates can either be automatically generated by Campus using the Generate the SP Certificate feature or manually uploaded via the Upload a Java Keystore (.jks) feature.
To have Campus generate the Service Provider certificate:

- Click the Generate the SP Certificate radio button.
- Enter an Expiration Date. This is the date in which the certificate will expire and will no longer be valid. This field defaults to one year from the current date.
- Click the Generate button. Fields within the Service Provider SP (Signature) section of the SSO Service Provider Configuration editor will automatically populate with data generated from this certificate.
If a Service Provider certificate already exists within Campus, generating a new Service Provider certificate will automatically overwrite any existing certificate and associated data.
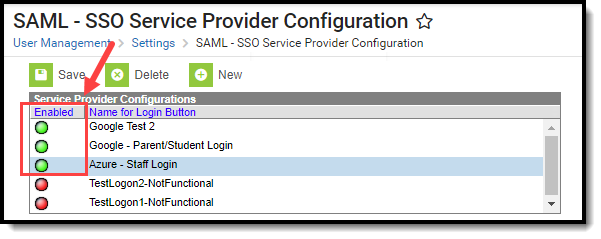
- Click Save at the top of the editor. If the IDP was configured correctly, a green circle in the Enabled column will appear next to the IDP name in the Service Provider Configurations window. Users can now log into Infinite Campus via an SSO button on the login screen (see the Logging into Campus and Campus Portal Using SAML SSO section).

To upload the Service Provider certificate:

- Click the Upload a Java Keystore (.jks) radio button.
- Click the Choose File button and locate the .jks file from your local hard drive or network.
- Once the file is selected, click the Upload button. Fields within the Service Provider SP (Signature) section of the SSO Service Provider Configuration editor will automatically populate with data uploaded from this certificate.
More than one certificate can be uploaded. For example, Microsoft Entra requires two certificates.
If a Service Provider certificate already exists within Campus, uploading a new Service Provider certificate will automatically overwrite any existing certificate and associated data.
- Click Save at the top of the editor. If the IDP was configured correctly, a green circle in the Enabled column will appear next to the IDP name in the Service Provider Configurations window. Users can now log into Infinite Campus via an SSO button on the login screen (see the Logging into Campus and Campus Portal Using SAML SSO section).

Export the Service Provider Certificate
To export the Service Provider certificate stored within Campus, select the Export the SP Certificate radio button and click the Export button. A .cer file of the certificate will appear, which you can save locally to your hard drive or network.

Delete the Service Provider Certificate
To delete the Service Provider certificate stored within Campus, select the Delete the SP Certificate radio button and click the Delete button.
Deleting the certificate will wipe all service provider certificate data from Campus and will remove the ability for Campus users to properly use Single Sign On functionality within Campus.
Once you have deleted the certificate, you MUST generate or upload a new certificate and resync with your IDP.

Certificate Expiration Warnings
Email and in-app notification functionality are built into this tool. Users who have access to this tool will receive an email and an in-app notification every 3 days when a certificate is set to expire within 30 days.
When a certificate will expire in 10 or fewer days, this notification will increase to every day until the certificate is replaced. Users will continue to receive daily notifications until the expired certificate is replaced or removed.
The email warning you receive will pertain to either the required Identity Provider certificate or, if your district has one, the often-optional Service Provider certificate.
Identity Provider Certificate Expiration Warning
If your email contains details corresponding to the IDP Signature on your SSO Service Provider Configuration screen, this warning is about the Identity Provider certificate.
This email means your Identity Provider certificate is about to expire. This needs to be addressed right away in the Identity Provider system. Take action on this to ensure your users can continue to use SSO.
If your Identity Provider is sending Infinite Campus details for more than one certificate (multiple entries under IDP Signature), it could also mean a certificate that is no longer actively in use by your Identity Provider's Infinite Campus integration will expire or has expired. To stop these notifications, delete any expired certs within your Identity Provider, then reupload/resync the IDP metadata to Infinite Campus.
Service Provider Certificate Expiration Warning
If your email says "CN=infinitecampus.com" or otherwise contains details corresponding to the SP Signature on your SSO Service Provider Configuration screen, this warning is about the Infinite Campus-generated Service Provider certificate.
This email means your district previously generated a Service Provider certificate (SP Certificate). This is something you can address in Infinite Campus.
Many vendors do not require an SP certificate. It's typically optional, or not supported at all. It is not uncommon for an Infinite Campus admin to generate an SP certificate unnecessarily during initial setup or troubleshooting, never actually use it or provide it to the district's Identity Provider, and forget to remove it again. If your vendor does not make use of the SP certificate, it can be deleted to stop unnecessary email warnings. Currently, Google SSO and Microsoft Entra SSO (formerly Azure) do not require the SP certificate.
You must have proper Messenger Email Settings configured to receive email notifications.
You can upload a new certificate without removing the expiring or expired certificate, and Infinite Campus will know to use the new valid certificate. However, until you remove the expired certificate from this tool, you will continue to receive in-app and email notifications about it.
Replacing Expired Certificates
This section will explain how to replace an expired Service Provider, Identity Provider, Google SSO, or Microsoft Entra SSO certificate.
- Replacing an Expired Service Provider Certificate
- Replacing an Expired Identity Provider Certificate
- Google SSO Certificate Renewal Process
- Microsoft Entra SSO Renewal Process
Replacing an Expired Service Provider Certificate
If you have received a notice from Infinite Campus that your Service Provider certificate is set to expire or has expired, follow the steps below
- Select the SSO configuration needing an updated certificate.
- Click the Manage SP Certificate button. The Service Provider Certificate Management editor will appear.
- If you have an updated cert key from your IDP server, select the Upload a Java Keystore (.jks) radio button.
- Click Choose File, locate the Java Keystore file, and click Ok.
- Click the Upload button. The Alias, Alias Password, and Keystore Password will populate automatically from the uploaded file.
- Click Save at the top of the SSO Service Provider Configuration tool. Your new certificate has been uploaded, and you should no longer receive expiration warnings until this new certificate approaches its expiration date.

Replacing an Expired Identity Provider Certificate
If you have received a notice from Infinite Campus that your Service Provider certificate is set to expire or has expired, use one of the methods below to replace it, depending on how your Identity Provider provides their IDP metadata.
The individual at your district who administers your Identity Provider system should follow your Identity Provider's processes for generating a fresh certificate in their system.
Method 1 - Resync Metadata via URL
Use this method if your Identity Provider makes an IDP Metadata URL available and you have already pasted it into the URL field in Campus.
- Select the SSO configuration needing an updated certificate.
- Select the Metadata URL radio button.
- If the Metadata URL for your IDP server has changed, enter the URL in this field and click Sync.
- If the Metadata URL for your IDP server has not changed, click Sync.
- Once Sync is selected, the updated metadata should insert an updated certificate. Click Save. Your certificate has been updated.

Method 2 - Resync Metadata via XML File
Use this method if your Identity Provider provides their IDP metadata as an XML file download.
- Select the SSO configuration needing an updated certificate.
- Select the Metadata XML File radio button.
- Click Choose File, locate your metadata XML file, and click OK. The SSO Service Provider Configuration tool will automatically attempt to sync with the IDP, and if successful, you should get a pop-up message stating "IDP Synchronization successful".
- Click Save. Your certificate has been updated.

Google SSO Certificate Renewal Process
Follow the steps below to renew your Google SSO certificate.
- Sign in to admin.google.com as an administrator
- Select Apps > Web and mobile apps.
- Select the Infinite Campus app you previously set up. If your district has followed all documented setup recommendations, it will have set up an app here for Infinite Campus Production, Infinite Campus Sandbox, etc. Take care to select the right one. (If your district has never set up an app for Sandbox, etc., these are the steps to follow.)
- Optional, but recommended: Back up your certs before you make any changes: select Download Metadata. (If you were to have any issues with this process, you could revert things to your current setup by uploading this XML file to Infinite Campus via SSO Service Provider Configuration > your Google config > Metadata XML File.)
- Select Service Provider Details.
- In the Certificate field, ensure a non-expired certificate is selected.
- If the selected certificate is expired or expiring soon, select Manage Certificates and Add another certificate.
- Return to the previous screen (Service Provider Details). Ensure that the new certificate is the one selected in the Certificate field. Save.
- Select Manage Certificates again. Consider deleting the old certificate (via the trash icon). If the old certificate is used by any other apps, update those apps to use the new certificate first, then return here to remove the old certificate.
- Select Download Metadata. Save his file as it needs to be uploaded into your Infinite Campus environment.
- Sign in to Infinite Campus environment corresponding to the Infinite Campus Google app you were working out of.
- Navigate to User Management > Settings > SSO - SAML Service Provider Configuration
- Select your SSO configuration. If you have multiple, ensure you select the Google configuration.
- Select Metadata XML and upload the latest XML file downloaded from admin.google.com
- Select Sync. When it says "IDP Synchronization successful", hit OK.
- Select Save. This is important as this process does not finalize until you hit Save.
If you leave your old certificate in Google, even if it's not the one selected for your Infinite Campus app, you'll continue to get expiration warning emails from Infinite Campus. This is why we recommend removing the old certificate from Google, then hitting Sync in Infinite Campus.
Microsoft Entra SSO Renewal Process
For guidance on renewing your Microsoft Entra SSO certificate, see this page: https://learn.microsoft.com/en-us/entra/identity/saas-apps/infinitecampus-tutorial#replacing-an-expiring-saml-certificate
If you continue to leave your old Entra certificate in Campus, you will continue to receive expiration warning emails from Infinite Campus. We recommend removing the old certificate from Entra, then hitting Sync in Campus to resolve this issue.
Logging into Campus and Campus Portal Using SAML SSO
The following displays how users will log into Campus using SAML SSO functionality:
| Campus District/State Edition | |
| Users will click the SSO button (named whatever was determined in Step 1 of this document). |  |
|
Campus Student/Parent Portal
| |
| Users will click the SSO button (named whatever was determined in Step 1 of this document). |  |
|
Campus Login Page (two or more Enabled SSO Configurations)
| |
| Districts with two or more configured and enabled IDPs will see a button that requires the user to select which SSO Configuration to use when logging in.
This is why it is important to have clear and recognizable Name of Button values for each IDP configuration so users do not have to guess which one they are supposed to use.
|
 |
|
To lessen confusion, you can set each SSO configuration to be hidden for specific login screens.
If hiding this configuration limits the number of SSO options to 1 for these users, the button will change from a dropdown list to a button labeled their single SSO configuration option. | |
Understanding Service Provider Configuration Fields
Use the following table to understand each available field.
| Field | Description |
|---|---|
| Enable SAML Single Sign-On |
Mark this box to enable SAML SSO functionality for your district. SAML SSO functionality will not function properly until all other fields in this editor are correctly populated and saved. |
| Name for Login Button |
This field indicates the name of the SSO login button on the Campus login page.
For example, a value of Staff Login' is entered.
This becomes even more important when two or more IDPs are configured and enabled for a site. Clear login button names ensure users can clearly identify and use the correct SSO login choice.
For example, one IDP is labeled 'Azure - Staff Login' and another is labeled 'Google - Parent/Student Login'. This way, each user knows which one to select.
|
| Service Provider Metadata | This URL is automatically generated by Campus for the SSO Identity Provider (IDP). The link can either be copied and sent electronically to the local IDP administrator or opened and saved in XML format and sent to the IDP administrator. |
| Single Sign-On URL |
This URL is automatically generated by Campus for use in District customized HTML links or icons. This URL will bypass the standard login page and make calls directly to the SSO Identity Provider (IDP) for user identification and authentication. If the user is logging in for the first time of the day or session, the IDP will require the user's username and password credentials and display its login page. If the user has already logged into the SSO Identity Provider (IDP), identification and authentication of the user will be processed without credentials, and once authenticated, the user will be redirected to the applicable Campus homepage. Assertion Consumer Service (ACS) URL is the equivalent of the Single Sign-On URL |
| Single Sign-On Logout URL | This URL is automatically generated by Campus for use with any IDP that requires a URL for redirect to the local application logoff screen upon logout. Microsoft Entra AD is one known IDP that requires the local Campus logout URL in order to properly redirect to the Campus logoff page. |
| Campus (Service Provider) Entity ID |
This value is automatically generated by Campus for the SSO Identity Provider (IDP). It can be edited by selecting the lock icon. This value is used to identify the Infinite Campus Service Provider to the SSO Identity Provider.
Changing this value is NOT recommended for non-Entra users. If the decision is made to change the value, the SSO Identity Provider must re-sync the Service Provider Metadata URL or reload the Service Provider metadata using the Service Provider Metadata URL. For Entra users, this value MUST equal the Entra Client ID. For Non-Production Sites: The site refresh process will revert this Campus Service Provider Entity ID value to your Production site's Campus Service Provider Entity ID value, followed by _[siteType].
|
| Optional Attribute Name |
This is the attribute Campus will look for in the IDP response from an IDP in order to match the username within Campus to the value attached to the specified attribute. If this field is left blank, the default attribute Campus will use for comparison is the Name ID.
This field is required for use with Microsoft Entra AD (formerly Azure) as the Name ID attribute is reserved by Entra and cannot be used for comparisons. For Entra, leave this field value as nameID.
To change this value, click the Lock icon.
An incorrect Optional Attribute Name value will break the connection between Campus and the IDP. |
| Select an option to retrieve Identity Provider (IDP) server data |
Indicates how this tool will receive and insert IDP server data.
Once a URL or XML file has been entered, click the Sync button to load the XML values into Campus. |
| Identity Provider Entity ID |
The Identity Provider Entity ID as indicated in the IDP server data XML file. |
| Identity Provider URL | The Identity Provider URL as indicated in the IDP server data XML file. |
| Identity Provider Single Logoff URL | The Identity Provider Single Logoff URL as indicated in the IDP server data XML file. This URL is required if users wish to use the Logoff IDP if Logoff URL Exists feature. |
| Campus SSO Preferences | |
| Request Timeout | Indicates the number of minutes that can pass before a request between Campus and the IDP produces a timeout error. |
| No Change | This option indicates the domain name does not contain a suffix. |
| Remove a Domain Suffix |
This option allows you to remove the domain name from an IDP attribute value (such as an email address) to compare only the prefix of the value to the Campus username.
This option eliminates the need to store fully qualified domain addresses in the Campus User Account username value.
Users can remove the domain suffix for up to 4 IDP attribute values. A Domain Suffix value is required.
|
| Append a Domain Suffix |
This option allows you to append a suffix to the domain name. A Domain Suffix value is required. |
| Domain Suffix | Indicates the domain suffix that will be removed or appended based on the value set in the Append a Domain Suffix or Remove a Domain Suffix radio buttons. If this text box is left blank, the SAML response will not be checked for a domain suffix. |
| Logoff IDP if Logoff URL Exists |
Marking this checkbox means if the Logoff button is selected in Campus, you are also logged off the IDP. This option only works if the Identity Provider Single Logoff URL field is populated and correct. This field is defaulted as marked. This checkbox will automatically be unmarked and grayed out if the Identity Provider Single Logoff URL references Google. |
| Turn off this SSO configuration for the Main Login page | Marking this checkbox means this SSO configuration will not appear as a button or option on the login screen for accessing the Infinite Campus application. |
| Turn off this SSO configuration for the Parent Portal | Marking this checkbox means this SSO configuration will not appear as a button or option on the login screen for the Parent Portal. |
| Turn off this SSO configuration for the Student Portal | Marking this checkbox means this SSO configuration will not appear as a button or option on the login screen for the Student Portal. |
|
Identity Provider Signature | |
|
Campus allows for more than one IDP certificate | |
| Signature Algorithm | The Identity Provider Signature Algorithm as indicated in the IDP certificate. This value is supplied by the SSO Identity Provider's (IDP) metadata. |
| Issuer | The Issuer as indicated in the IDP certificate. This value is supplied by the SSO Identity Provider's (IDP) metadata. |
| Certificate Valid From | The first date and time for which the certificate is considered valid. This value is supplied by the SSO Identity Provider's (IDP) metadata. |
| Certificate Valid To | The final date and time for which the certificate is considered valid. All time after this value is considered invalid and the certificate will no longer work. This value is supplied by the SSO Identity Provider's (IDP) metadata. |
| Service Signature | |
| Manage SP Certificate | See the Enable and Configure SAML SSO Functionality, Export the Service Provider Certificate, and Delete the Service Provider Certificate sections for more information about functionality. |
| Signature Algorithm | The Signature Algorithm as indicated in the Campus certificate. |
| Issuer | The Issuer, as indicated in the Campus certificate. |
| Certificate Valid From | The first date and time for which the certificate is considered valid. |
| Certificate Valid To | The final date and time for which the certificate is considered valid. All time after this value is considered invalid and the certificate will no longer work. |


Deleting an Existing SSO Configuration
You can delete an existing SSO configuration; however, when you do so, you will receive a pop-up notice indicating the number of users who will be affected (those currently using this SSO configuration). If you proceed with deleting the SSO configuration, impacted users will automatically be set to Local Campus Authentication to ensure their accounts remain accessible, and you will need to manually convert them back to SSO authentication if another configuration is created.
Configuring a Unique Entra Active Directory
The following section will describe how to configure a unique Entra (formerly Azure) Active Directory.
This section is only relevant for Microsoft Entra customers.
Infinite Campus is now available in the Microsoft Azure Marketplace.
- Infinite Campus in the Marketplace: https://azuremarketplace.microsoft.com/en-us/marketplace/apps/aad.infinitecampus?tab=overview
- Entra Active Directory Integration with Campus Tutorial: https://learn.microsoft.com/en-us/entra/identity/saas-apps/infinitecampus-tutorial
Two main actions need to be taken to ensure Entra has an active connection between Campus and your Entra AD environment.
- Utilize the Infinite Campus Azure Marketplace workflow within your Microsoft Entra environment for initial configuration.
- Update the logout URL in the Entra AD manifest with the Campus logout URL.
The following sections will walk you through this process:
- Infinite Campus Azure Marketplace Workflow
- Add the Infinite Campus Logout URL to the Microsoft Entra SAML SSO Configuration
- Complete a Single Sign-On Login
Infinite Campus Azure Marketplace Workflow
Step 1.
In your Entra AD environment, navigate to Enterprise applications > + New application registration.
Enter "Infinite Campus" in the search box in the Add from the gallery section of the page and click on the Infinite Campus icon that appears.

Step 2.
Click the Add button in the lower right-hand corner of the screen.

Step 3.
Once the Infinite Campus application has been added to the Entra environment, you will need to configure SAML SSO. Click on the Single sign-on button of the Enterprise Application index and select the SAML box:

Step 4.
The Microsoft Azure Marketplace workflow will display. Follow the sequence of events on the screen, and if you have any questions, click the "View step-by-step instructions" hyperlink for more information.
To edit data, click the edit icons in the upper-right corner of each section. Once the data on this page has been reviewed and corrected accordingly, move on to the Add the Infinite Campus Logout URL to the Microsoft Entra SAML SSO Configuration section of this article.

Step 1.
This step requires the SAML configuration in Campus to be enabled (check the "Enable SAML Single Sign On" checkbox), along with a metadata upload or synchronization and a subsequent Save, for the Service Provider Configuration screen to publish the applicable URLs. The Single Sign-on Logout URL will be needed for Step 2 below.
In the SSO Service Provider Configuration tool, locate the Single Sign-on Logout URL and copy this value.

Step 2.
Next, the Entra AD app registration properties Logout URL needs to be updated so that the proper redirect upon Campus logout can occur.
- Click on the Settings button (gear icon)
- Click on Properties in the Settings list that has appeared to the right.
- In the Logout URL field, paste the Single Sign-out URL value copied from the SSO Service Provider Configuration tool.
- Select the Save icon.

Step 3. Complete a Single Sign-On Login
The final step is to log out of the administrative account, log into Infinite Campus, and attempt a Single Sign-On user login. Please ensure you have followed the configuration steps outlined throughout this article.
To log in, navigate to the Campus login page and click the SSO button created during the configuration process (covered in steps within this article).
This button may be named something other than Single Sign-On (SSO).
Proper first-time login behavior will be a redirect to the Microsoft Entra AD credentials page. A successful logon to Entra AD results in a successful re-direct to the Infinite Campus application.

To log out of Campus, click the Log Off button in the upper right corner of the page.
Proper logout behavior will be a brief re-direct to the Microsoft Entra AD homepage, then another instant re-direct to the Infinite Campus logoff page. In a later version of Microsoft Entra AD, the redirect may be simultaneous.

Please ensure to contact the Infinite Campus Support team or your CE or other internal contact(s) with any questions or concerns.
Configuring a Google IDP
The following section will describe how to configure the Google IDP to utilize Campus SSO functionality.
Prerequisites
- You need a Google Admin account.
Step 1.
Log in to your Google Administrator account (https://admin.google.com) and select Apps.

Step 2.
Select Web and mobile apps.

Step 3.
Click the Add app button and select Add custom SAML app.

Step 4.
Enter an App name, attach an app icon (we highly suggest an Infinite Campus logo for easier identification), and click Continue.
An example of a logo you can use:
![]()

Step 5.
Click Download Metadata and save the XML file somewhere you can easily locate it for an upcoming step.

Step 6.
Open Infinite Campus in a different tab and navigate to the SSO Service Provider Configuration tool (System Administration > User Security > SAML Management > SSO Service Provider Configuration).
Using the Google IDP metadata file downloaded in Step 5:
- Select the Metadata XML File radio button
- Click Choose File.
- Select the Google IDP metadata file from Step 5 and click Open.
The Identity Provider Entity ID, Identity Provider URL, and Identity Provider Single Logoff URL will populate.
Campus does not support the use of the Logoff IDP if Logoff URL Exists preference when using a Google IDP setup. This checkbox will automatically be unmarked and grayed out if the Identity Provider Single Logoff URL references Google.

Step 7.
Now it's time to save and enable the Campus SSO. Mark the Enable SAML Single-Sign On checkbox and click Save.

Step 8.
Go back to your open Google Admin session. Click Continue.

Step 9.
On the Service Provider Details screen:
- Enter the ACS URL as the same value found in the Single Sign-On URL field.
- Enter the Entity ID as the same value found in the Campus (Service Provider) Entity ID (It must be a unique value for the IDP) field.
- Click Continue.

Step 10.
Now we need to turn on the service within Google.
- Navigate to Apps > Web and mobile apps and locate your Infinite Campus app.
- Click on the app and then select View details.
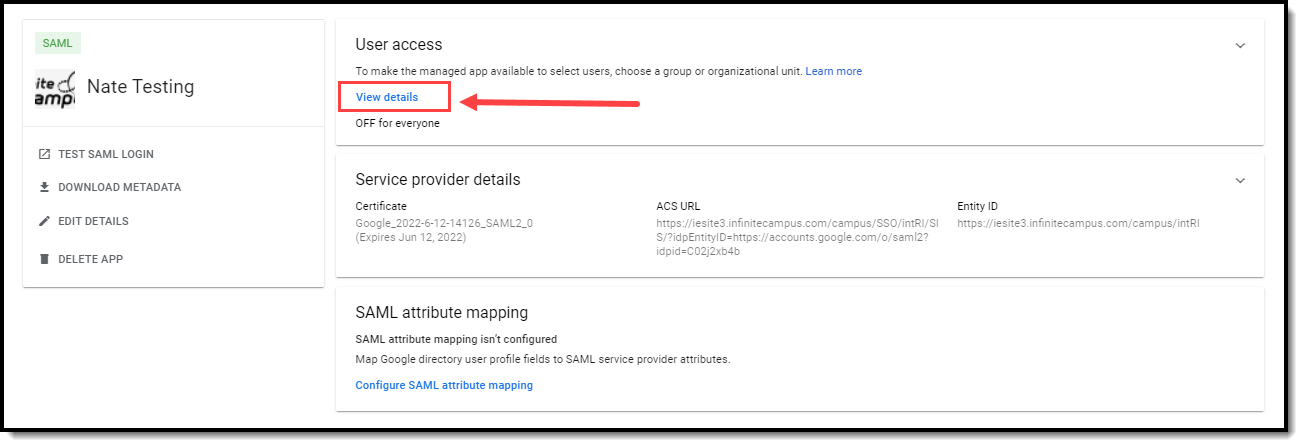
- Click the ON for everyone radio button and select Save. SSO is now configured. The last thing to do is test the connection to ensure everything is working correctly.

By default, Google SSO matches based on username.
Step 11.
Test the connection by selecting a user account, modifying their Authentication Type to SAML: Single Sign-On (SSO), and selecting Save.
Note you will need to know the user's Username and Password in order to complete the login process so using a test account is advised.

Now, log out of Infinite Campus and log back in as this user via the SSO Login button, which is now available on the Campus Login Screen.

If you can log in without a problem, you are all set!
If you would like to convert all existing accounts from using local Campus login authentication to SAML SSO, please use the User Account Type Wizard.
Configuring a Classlink IDP
The following section describes how to configure the Classlink IDP to use Campus SSO functionality.
NOTE: You must have a Classlink Administrator account.
- Log in to your Classlink Administrator account (https://launchpad.classlink.com) and select Management Console.

- Expand Single Sign-On and select SAML Console.

- Select Copy Existing.

- Select Copy for A New SAML App (template).

- Copy the IDP Metadata URL.

- In Campus, navigate to User Management > Settings > SAML - SSO Service Provider Configuration and click New.

- Paste the IDP Metadata URL into the Metadata URL field in the Identity Provider Details section, click Sync, and then Save.

- Copy the Service Provider Metadata URL that is generated.

- In Classlink, click Edit on the newly created SSO connection.

- Select metadata url.

- Paste the Service Provider Metadata URL into the Metadata URL field and rename the connection to something that is easily identifiable with the other system (i.e., ‘Infinite Campus SSO Production Site Connection’).

- Add a Metadata Override of NameID Value. This determines the value sent back from Classlink to Infinite Campus to authenticate the user. This must match the user’s username in Campus. Many districts that use SSO use email as the nameID/SSO username in Infinite Campus. Click Update to make sure your changes take effect.

- The last step is to log back into Infinite Campus and ensure the connection is enabled.


You can also optionally add this connection to your Classlink LaunchPad dashboard. See Classlink's documentation, Add and Assign SAML Apps
Helper Configuration
As of Campus Release Pack.2547 (November 2025), everyone will see a Single Sign-On - Helper configuration enabled for their site. This connection allows Campus Support to log in and access your site, enabling them to assist with troubleshooting any issues you may be experiencing.
You can disable this connection; however, doing so will limit Campus Support's ability to actively resolve reported issues.

State Configuration - Kentucky and Nevada Only
District users will see a State Single Sign-On (SSO) configuration enabled for their site. This connection enables the State to District Login tool to allow state edition users with proper user group rights to seamlessly log into a district edition site.
Districts can disable this connection; however, doing so prevents state edition users from logging in to their site.
Note: Only State Edition users assigned to a pre-determined user group can access a district site using this tool. Assigning tool rights to an individual user will not suffice.
Districts can modify the tool rights assigned to these user groups to control what state edition users can or cannot access.

Sandbox/Staging/Non-Production Environments
This section indicates the process for setting up SSO in a non-production environment for the first time.
- 1. Ensure a Non-SSO User Account Exists for Administrators
- 2. Have the Non-Production Infinite Campus Environment Refreshed
- 3. In Your SSO IDP's System, Repeat Their Setup Process
1. Ensure a Non-SSO User Account Exists for Administrators
In your production environment, ensure a user account exists for yourself and is set to an Authentication Type of LDAP or Local Campus Authentication before proceeding.
Note that some governing agencies, such as the North Carolina Department of Public Instruction, do not allow use of Local Campus Authentication. Ensure you comply with your governing agency's security practices.
THIS IS AN IMPORTANT STEP THAT MUST BE FOLLOWED. If this step is not followed, you will not be able to access your non-production environment until you complete this step and have your non-production environment refreshed again.
For the rest of the process, if your district has more than one non-production environment (ex. sandbox and staging), these steps will need to be followed for each environment.

2. Have the Non-Production Infinite Campus Environment Refreshed
Next, follow the steps below:
- Follow your district’s typical processes to have your non-production Infinite Campus environment refreshed to match your production Infinite Campus site.
- Use your non-SSO user account to log into the non-production Infinite Campus environment.
- Navigate to the SSO Service Provider Configuration screen and select your configuration. You will need to reference this screen and its values for the next steps.
3. In Your SSO IDP's System, Repeat Their Setup Process
Most Identity Providers (ex. Google, Microsoft Entra, etc.) require you set up a fresh app that is specific to the non-production Infinite Campus environment and distinct from the app that you set up for the production Infinite Campus environment.
Refer to whichever sections of this documentation you referred to originally to configure your production app, repeating this process, but for a fresh app specific to your non-production Infinite Campus site:
- General instructions
- IDP-specific instructions
These two items are especially important as you complete the setup in the IDP system for your non-production Infinite Campus app:
| Campus (Service Provider) Entity ID |
In your non-production environment, you’ll notice the Campus (Service Provider) Entity ID starts the same as it does in production, but ends with an underscore and site type (for example _sandbox or _staging). This is an important distinction to be aware so that when you set up a non-production Infinite Campus app in your SSO IDP’s system, you use the non-production Campus (Service Provider) Entity ID.
Your non-production site’s Campus (Service Provider) Entity ID value may not correlate to a valid URL. This is not a concern. What is important is that it is not the same value as your production Campus (Service Provider) Entity ID. |
| Metadata URL/Metadata XML file | During the process of setting up your non-production Infinite Campus app in your SSO IDP’s system, you will either be provided a metadata URL or metadata XML file by your IDP’s system. Do not reuse the metadata originally provided for your production Infinite Campus setup. Use the metadata your SSO IDP provides for the non-production app in your non-production site.
Note: You will need to repeat this step—re-uploading this file or pasting in and resyncing this URL—after each refresh of your non-production site.
|
Matching Campus Fields to IDP Fields
This section will assist you in understanding how fields within your IDP correlate to fields within Campus.
- SSO Setup Process
- Google (admin.google.com)
- Microsoft Entra Active Directory (entra.microsoft.com)
- Microsoft Active Directory Federated Services (AD FS)
- Classlink (SAML Console)
- Clever (SAML Connector)
- Duo SAML SSO
- Okta (SAML App Integration)
- OneLogin (SAML Custom Connector Advanced)
- OmnID
- RapidIdentity (SAML Integration)
SSO Setup Process
Accessed in the Identity Provider system
Find the metadata within your Identity Provider system as a URL or an XML file download. Then paste/upload it to the Campus SSO Service Provider Configuration screen.
| Terms used in Identity Provider systems | Corresponding field in Infinite Campus |
|---|---|
|
"Federation Metadata URL Path" "IDP Metadata URL" "Live Metadata URL" "Metadata URL" |
Select an option to retrieve Identity Provider (IDP) server data... Metadata URL |
|
OR | |
|
"Download Metadata" "Federation Metadata XML" "Metadata (download)" "View IDP Metadata > Save as" |
Select an option to retrieve Identity Provider (IDP) server data... Metadata XML |
Accessed in Infinite Campus > Provided to the Identity Provider system
Within Infinite Campus, do one of these:
- Copy out the Service Provider Metadata URL and provide it to your Identity Provider. Their system can use this URL to pull in the other values it needs (Single Sign-On URL, Campus (Service Provider) Entity ID, Single Sign-Out URL). For Identity Providers that support intaking the Service Provider Metadata URL, it's a convenient way to get them all the URLs their system needs at once.
- Provide the Single Sign-On URL and Campus (Service Provider) Entity ID, and Single Sign-Out URL manually. (Not all systems support the Single Sign-Out URL, so some will have nowhere to put it on their end.)
| Field in Infinite Campus | Terms used for the corresponding field in Identity Provider systems |
|---|---|
| Service Provider Metadata |
"Metadata" "Metadata URL" "Federation metadata address" "Load XML from file or http address" |
|
OR | |
| Single Sign-On URL |
"ACS URL"
"Destination URL" "Recipient URL" "Relying party SAML 2.0 SSO Service URL"
|
| Campus (Service Provider) Entity ID |
"Audience Restriction" "Audience URI (SP Entity ID)" "Entity ID"
"Relying party trust identifier" "Remote Entity Name" |
|
Single Sign-Out URL (Optional) |
"SAML Logout Trusted URL" "Single Logout URL" |
Terms Used in Specific Identity Provider Systems
Google (admin.google.com)
See this section for detailed steps on configuring a Google IDP.
| Get from Google | Provide to Corresponding Field in Campus |
|---|---|
|
Download Metadata |
Select an option to retrieve Identity Provider (IDP) server data... Metadata XML |
Infinite Campus
| Get from Campus | Provide to Corresponding Field in admin.google.com |
|---|---|
| Service Provider Metadata | N/A - Google does not support intaking Infinite Campus Service Provider Metadata via a Metadata URL |
| Single Sign-On URL | ACS URL |
| Campus (Service Provider) Entity ID | Entity ID |
| Single Sign-Out URL | N/A - Google does not support Single Sign Out |
| NameID: The default nameID value from Google is the full Google account email | |
Microsoft Entra Active Directory (entra.microsoft.com)
See this section for detailed steps on configuring a unique Entra (formerly Azure) Active Directory.
Not to be confused with AD FS (Microsoft Active Directory Federated Service), which is a different Identity Provider service from Microsoft.
Entra
| Get from Entra | Provide to the Corresponding Field in Campus |
|---|---|
|
IDP Metadata URL |
Select an option to retrieve Identity Provider (IDP) server data... Metadata URL |
|
OR | |
|
Federation Metadata XML |
Select an option to retrieve Identity Provider (IDP) server data... Metadata XML |
| There is a "Relay State" field on Entra Active Directory's SAML Configuration screen that you will not fill in | |
Infinite Campus
| Get from Campus | Provide to the Corresponding Field in Entra |
|---|---|
| Service Provider Metadata | N/A - Entra Active Directory does not seem to support intaking Infinite Campus Service Provider Metadata via a Metadata URL |
| Single Sign-On URL |
and
|
| Campus (Service Provider) Entity ID | |
| Single Sign-Out URL |
|
| NameID: The default nameID value from Entra Active Directory is the full Microsoft account email | |
Microsoft Active Directory Federated Services (AD FS)
This is not to be confused with Microsoft Entra Active Directory, which is a different Identity Provider service from Microsoft.
AD FS
| Get from AD FS | Provide the Corresponding field in Campus |
|---|---|
|
AD FS > Service > Endpoints
URL Path (the one with a type of Federation Metadata, which should end in .xml) |
Select an option to retrieve Identity Provider (IDP) server data...
Metadata URL |
|
OR | |
|
AD FS > Service > Endpoints
URL Path (the one with a type of Federation Metadata, which should end in .xml)
Navigate to the path in a browser to download the file. |
Select an option to retrieve Identity Provider (IDP) server data...
Metadata XML |
Infinite Campus
| Get from Campus | Provide to Corresponding Field in AD FS |
|---|---|
| Service Provider Metadata |
Select Data Source > Import data about the relying party published online or on a local network...
Federation metadata address (host name or URL) |
|
It is not necessary to enter this info manually if you provide ASFS the Infinite Campus Service Provider Metadata, but if you choose manual setup: | |
| Single Sign-On URL |
Select Data Source > Enter data about the relying party manually > Choose Profile: AD FS Profile > Configure URL...
Relying party SAML 2.0 SSO Service URL |
| Campus (Service Provider) Entity ID |
Select Data Source > Enter data about the relying party manually > Choose Profile: AD FS Profile > Configure Identifiers...
Relying party trust identifier |
| Single Sign-Out URL |
Relying Party Trusts > Properties > Add/Edit > Endpoint Type: SAML Logout > Binding: POST...
Trusted URL |
Classlink (SAML Console)
Classlink
| Get from Classlink | Provide to Corresponding Field in Campus |
|---|---|
|
IDP Metadata URL |
Select an option to retrieve Identity Provider (IDP) server data... Metadata URL |
Infinite Campus
| Get from Campus | Provide to Corresponding Field in Classlink SSO |
|---|---|
| Service Provider Metadata | Metadata URL |
| Single Sign-On URL | N/A - It seems like ClassLink obtains this directly from Infinite Campus' Service Provider Metadata URL |
| Campus (Service Provider) Entity ID | N/A - It seems like ClassLink obtains this directly from Infinite Campus' Service Provider Metadata URL |
| Single Sign-Out URL | N/A - It seems like ClassLink obtains this directly from Infinite Campus' Service Provider Metadata URL |
Clever (SAML Connector)
Clever
| Get from Clever | Provide to Corresponding Field in Campus |
|---|---|
|
Metadata URL |
Select an option to retrieve Identity Provider (IDP) server data...
Metadata URL |
Infinite Campus
| Get from Campus | Provide to Corresponding Field in Clever |
|---|---|
| Service Provider Metadata | N/A - It doesn't seem like Clever supports intaking Infinite Campus Service Provider Metadata via a Metadata URL |
| Single Sign-On URL | Assertion Consumer Service URL |
| Campus (Service Provider) Entity ID | Entity ID |
| Single Sign-Out URL |
N/A - It doesn't seem like Clever supports Single Sign Out |
Duo SAML SSO
Duo
| Get from Duo | Provide to Corresponding Field in Campus |
|---|---|
|
Metadata URL |
Select an option to retrieve Identity Provider (IDP) server data...
Metadata URL |
|
OR | |
|
SAML Metadata |
Select an option to retrieve Identity Provider (IDP) server data...
Metadata XML |
Infinite Campus
| Get from Campus | Provide to Corresponding Field in Duo |
|---|---|
| Service Provider Metadata | Metadata XML URL |
| It is not necessary to enter this info manually if you provide OmnID the Service Provider Metadata, but if you decide to enter it manually: | |
| Single Sign-On URL | Assertion Consumer Service (ACS) URL |
| Campus (Service Provider) Entity ID | Entity ID |
| Single Sign-Out URL | Single Logout URL |
| NameID: Default nameID value from Duo is full email | |
Okta (SAML App Integration)
Okta
| Get from Okta | Provide to Corresponding Field in Campus |
|---|---|
|
View IDP Metadata > Save as |
Select an option to retrieve Identity Provider (IDP) server data...
Metadata XML |
| Additional details: Default RelayState can be left blank. To be able to enter a Single Logout URL, you must upload a Signature Certificate (see Generate the Service Provider Certificate) and mark Enable Single Logout within Okta. | |
Infinite Campus
| Get from Campus | Provide to Corresponding Field in Okta |
|---|---|
| Service Provider Metadata | N/A - Okta does not support intaking Infinite Campus Service Provider Metadata via a Metadata URL |
| Single Sign-On URL |
Single Sign On URL (Recipient URL and Destination URL are the same as the Single Sign On URL) |
| Campus (Service Provider) Entity ID |
Audience URI (SP Entity ID) Audience Restriction |
| Single Sign-Out URL |
Single Logout URL |
| NameID: Default nameID value from Okta is full email | |
OneLogin (SAML Custom Connector Advanced)
OneLogin
| Get from OneLogin | Provide to Corresponding Field in Campus |
|---|---|
|
SSO > Issuer URL |
Select an option to retrieve Identity Provider (IDP) server data...
Metadata URL |
Infinite Campus
| Get from Campus | Provide to Corresponding Field in OneLogin |
|---|---|
| Service Provider Metadata | N/A - OneLogin does not seem to support intaking Infinite Campus Service Provider Metadata via a Metadata URL |
| Single Sign-On URL |
Login URL and ACS (Consumer) URL
|
| Campus (Service Provider) Entity ID |
Audience (EntityID) |
| Single Sign-Out URL |
Single Logout URL |
| NameID: Default nameID value from OneLogin is full email | |
OmnID
OmnID
| Get from OmnID | Provide to Corresponding Field in Campus |
|---|---|
|
OmnID Console > Configure > User Managed SAML Settings...
IDP Metadata URL |
Select an option to retrieve Identity Provider (IDP) server data...
Metadata URL |
| Additional details: Infinite Campus does not support encrypted assertions. Within OmnID (OmnID Console > SP Provided Metadata Settings), Encrypt Assertion must not be marked. | |
Infinite Campus
| Get from Campus | Provide to Corresponding Field in OmnID |
|---|---|
| Service Provider Metadata | Load XML from file or http address |
| It is not necessary to enter this info manually if you provide OmnID the Service Provider Metadata, but if you decide to enter it manually: | |
| Single Sign-On URL | ACS URL |
| Campus (Service Provider) Entity ID | Remote Entity Name |
| Single Sign-Out URL | Single Logout URL |
RapidIdentity (SAML Integration)
RapidIdentity
| Get from RapidIdentity | Provide to Corresponding Field in Campus |
|---|---|
|
Live Metadata URL |
Select an option to retrieve Identity Provider (IDP) server data... Metadata URL |
|
OR | |
|
Metadata (download) |
Select an option to retrieve Identity Provider (IDP) server data... Metadata XML |
Infinite Campus
| Get from Campus | Provide to Corresponding Field in RapidIdentity |
|---|---|
|
Service Provider Metadata
Navigate to the Service Provider Metadata URL in a browser to view and copy its contents |
Metadata > Paste contents of Service Provider Metadata URL into this textbox |
| Single Sign-On URL | N/A - RapidIdentity obtains this directly from the contents of Infinite Campus' Service Provider Metadata URL |
| Campus (Service Provider) Entity ID | N/A - RapidIdentity obtains this directly from the contents of Infinite Campus' Service Provider Metadata URL |
| Single Sign-Out URL | N/A - RapidIdentity obtains this directly from the contents of Infinite Campus' Service Provider Metadata URL |
Troubleshooting existing SSO config in a non-production environment
If you are encountering issues after a refresh or cutover in an environment that has already been set up and is functional, ensure the following is correct:
Ensure Your Metadata Has Been Re-Uploaded/Resynced:
After each site refresh, your non-production environment must be provided with your Identity Provider’s metadata.
If you do not have the metadata for your non-production site:
- Log in to your SSO IDP system,
- Navigate to the non-production Infinite Campus app you’ve set up
- Copy the Metadata URL or re-download the Metadata XML file
Once you have obtained the metadata, navigate to your non-production Infinite Campus environment:
- Log in to Infinite Campus using your non-SSO (LDAP or Local Campus Authentication) credentials.
- Navigate to the SSO Service Provider Configuration tool (System Administration > User Security > SAML Management > SSO Service Provider Configuration)
- Select the SSO configuration.
- Resync the metadata by either:
- Selecting the Metadata URL radio button, pasting in the metadata URL, and clicking Sync
OR - Selecting the Metadata XML file radio button, uploading the metadata XML file, and clicking Sync

- Selecting the Metadata URL radio button, pasting in the metadata URL, and clicking Sync
- Once the metadata has been entered and synced, click Save. Single Sign-On for your non-production Infinite Campus site should now function properly.

Campus (Service Provider) Entity ID:
In your Campus non-production environment, on the SSO Service Provider Configuration screen, verify that your Campus (Service Provider) Entity ID matches your production Campus (Service Provider) Entity ID with the important addition of an underscore and your site type at the end (ex. _sandbox or _staging).
In your SSO IDP system’s non-production app, navigate to where you originally provided this value. Ensure that what is listed in your SSO IDP’s system exactly matches the Campus (Service Provider) Entity ID listed in your Infinite Campus non-production environment. If it does not, update your SSO IDP system to match Infinite Campus.
Troubleshooting SSO Login Issues
See this article for assistance in troubleshooting SSO login issues.
