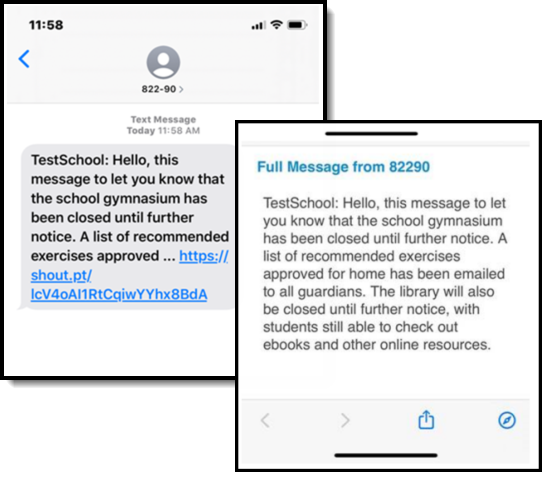
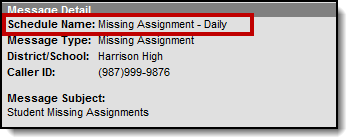
Messenger allows emails to be sent to parents, students, and staff members. If your district purchased Messenger with Voice or Text Messenger, voice and text messages can be sent as well.
Messenger is used to send general messages, but there are other tools for sending specific messages for attendance, behavior, emergencies and staff.
Messenger 2.0
Messenger 2.0 is currently in Open Beta. These tools are subject to change as new features are released.
Overview/Getting Started
Tool Search: Messenger 2.0
| What can I do? | What Do I need to know? |
|---|---|
Messenger 2.0 Feature Comparison
| Feature | Messenger 1.0 | Messenger 2.0 |
|---|---|---|
|
Send messages to students and their messenger contacts (Parents, guardians, etc.) |
X |
X |
|
Enforce a messaging limit (regulates how many messages a parent with multiple students in the school receives) |
X |
X |
|
Include Ad hoc filter options |
X |
X |
|
Option to review before sending |
X |
X |
|
Create and schedule a message to send at a later date and time |
X |
X |
|
Navigation buttons to move back and forth through the process |
|
X |
|
Total recipient count tracking |
|
X |
|
Option to view recipients before completing the entire message |
|
X |
|
Option to send message to student AND parents AND staff from one place |
|
X |
|
Create and send messages from a mobile device |
|
X |
|
Option to provide suggestions and feedback to our developers during the development process |
|
X |
| One-time scheduled messages generate recipient lists at time of delivery |
|
X |
| Recurring messages can be scheduled to send to multiple calendars in a single campaign |
|
X |
| Edit a one-time scheduled message |
|
X |
| Conveniently view and manage scheduled messages |
|
X |
Access Messenger 2.0
Messenger 2.0 is available in the Communications area of Campus and is mobile device friendly.
All Messenger 1.0 functionality remains available and DOES NOT include any added functionality. Messenger 2.0 and its features function separately from Messenger 1.0.
Email Settings
Be sure to check the Email Settings tool to configure general settings for email messages.
Recipient Requirements
The following requirements must be established for recipients to receive a message.
| Recipient | Requirements |
|---|---|
| Students |
|
| Parents/Other |
|
| Staff |
|
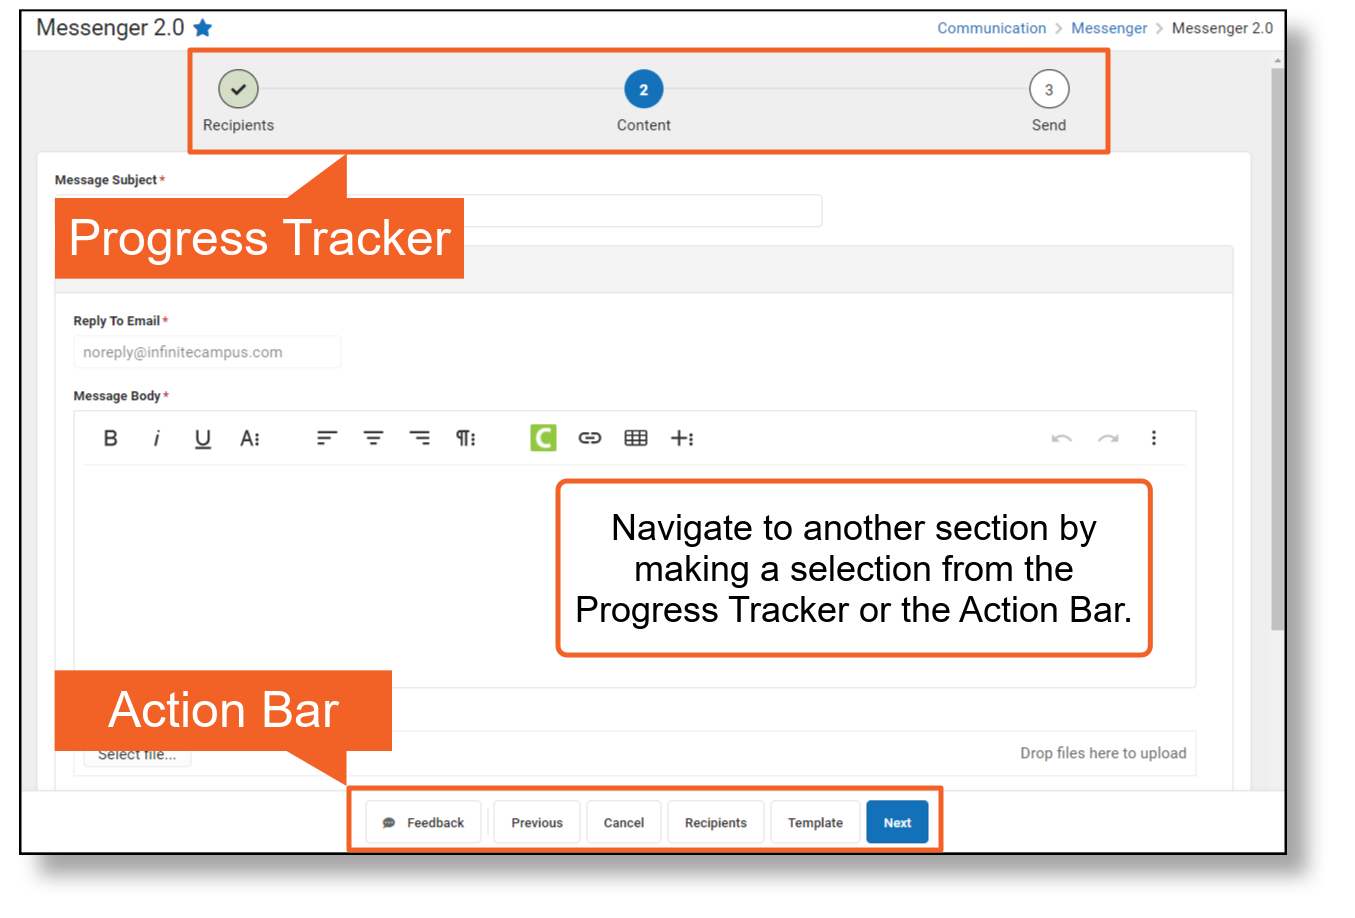
Navigate Messenger 2.0
|
Progress Tracker
| |
|---|---|
 |
An alert indicates there is missing information for required fields. |
 |
The green checkmark indicates all required fields are complete. |
 |
A white circle indicates the screen has not been viewed and no entries have been made. |
Submit Feedback
As we continue to enhance the Messenger 2.0 tools your feedback is critical to help us provide the best user experience possible.
The Feedback button is available on each step of the messenger workflow.
- Press the Feedback button on any step of the workflow and a side panel will open.
- Choose an Overall response (No Response, Dissatisfied, Neutral, Satisfied).
- Enter any comments you have regarding the tool. For example, features you like, features you dislike, questions you may have, enhancements you would like to see in the future, etc.

Create and Send a General or Priority Message
General messages in 2.0 may be sent to students, Messenger Contacts, and/or Staff.
Tool Search: Messenger
The procedures on this page describe how to send a general or priority message via inbox, email, voice or text to students, Messenger contacts, and/or staff.
General messages and Priority messages have identical workflows. They differ in that General messages will only contact email addresses and phone numbers that have been marked 'General' under Census > People > Demographics > Messenger Preferences Contact Reasons, and Priority messages will only contact email addresses and phone numbers that have been marked 'Priority' under Census > People > Demographics > Messenger Preferences Contact Reasons.
For detailed descriptions of each field in the message builder, see the Messenger Field Descriptions article.
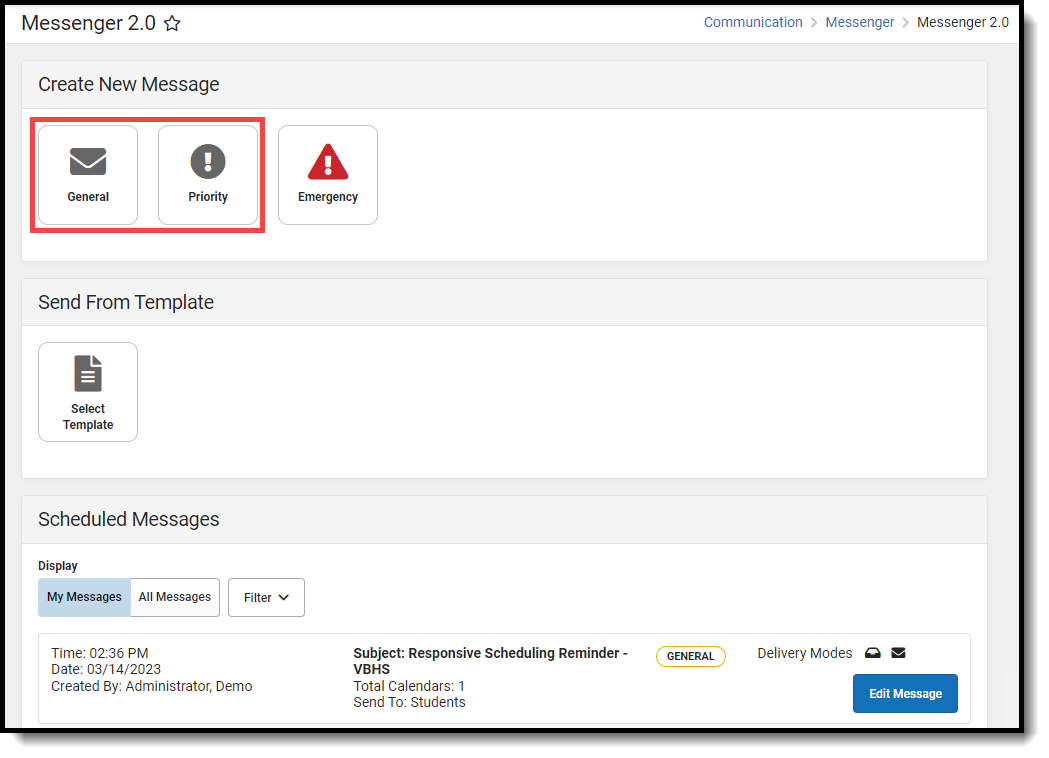
Send a General or Priority Message
Step 1. Recipients
- Select General or Priority.
Result: Step 1 Recipients displays. - Select the Delivery Mode: Inbox, Email, Voice, and/or Text.
- Select a School Year.
Tip: The default selection is the current school year. - Select Select Calendars.
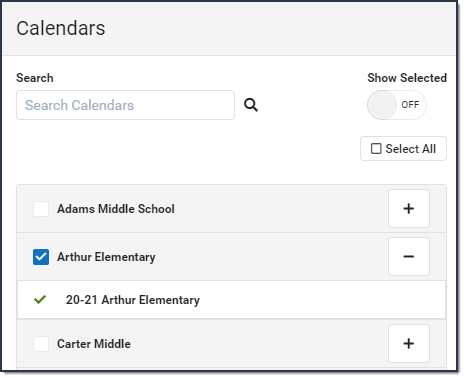
Result: The Calendars panel displays. Use the + (plus) and - (minus) buttons to view or hide additional calendars.
- Select a Preferred Language preference. (Optional)
- Select at least one recipient group from Add Recipients:
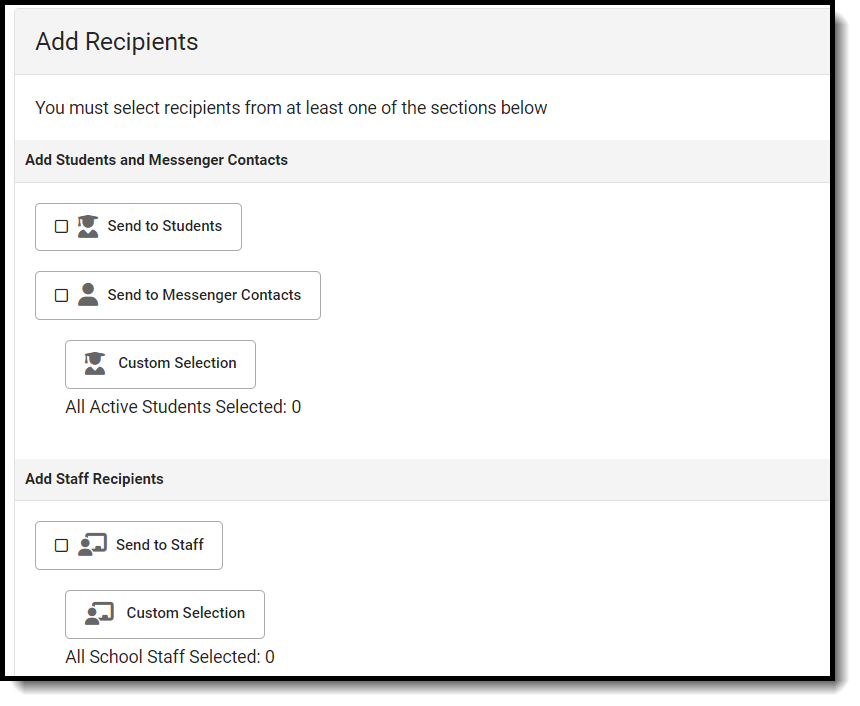
Messenger Contacts are filtered by the student list.
|
Option |
Description |
|
Send to Students |
Includes students in the selected calendar(s). Student Custom Selection: Includes all active students by default with the ability to filter the student list with the following options: Grade Level, Ad Hoc, and Transportation Filter. The Transportation Filter allows for sending messages directly to students on buses and Messenger Contacts based on which bus the student rides. Click Update when you are done. Grade Level Filter will only show grade levels that exist in Calendars within the School Year selected.
|
|
Send to Messenger Contacts |
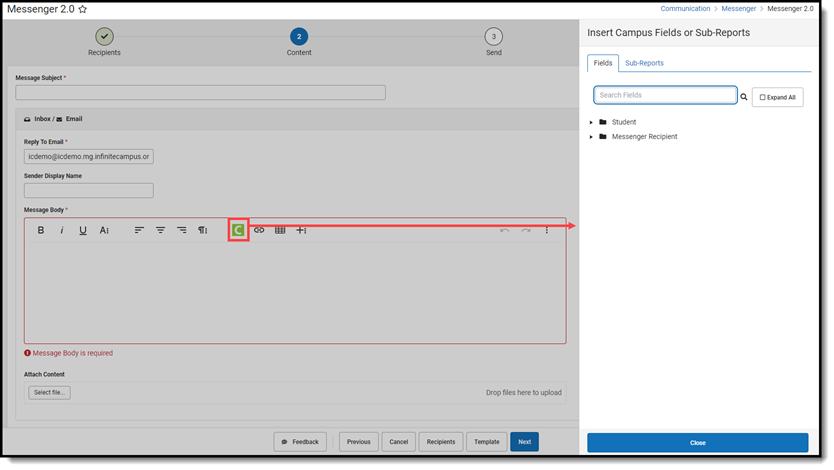
Messenger Contacts are filtered by the student list. If a Student Field and/or Student Sub-Report is added into any Message Body on Step 2, the Messenger Contact will receive one message per student with whom they have a Messenger relationship. If no Student Fields/Sub-Reports are present, the Messenger Contact will receive one message from this one message per delivery mode regardless of how many students with whom they have a Messenger relationship.
 |
|
Send to Staff |
Includes staff in the selected calendar(s).
Staff Custom Selection: Includes all current school staff, including those with a future start date, at schools of the selected calendar(s). From here you can select specific Staff Roles, mark the checkbox to Include District Staff, and/or select predefined Ad Hoc filters. Click Update when you are done. 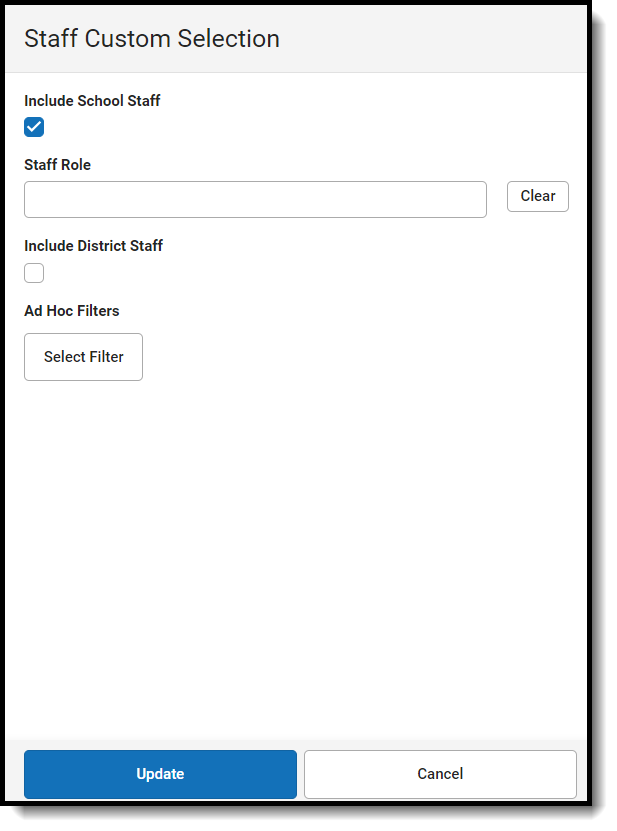 |
| Add Individual Recipients |
To add individuals who are not filtered by Calendars, School Year, or Preferred Language, click Add Individual Recipients. Choose from the available filters or enter a name. Select the desired recipients and click Add Recipients. Fields and/or Sub-Reports cannot to be added to the message bodies on Step 2 when using Add Individual Recipients.
|
| Add Non-Campus Recipients | Click the Add Non-Campus Recipients and enter one or more email addresses/phone numbers of non-Campus recipients. Click Add Recipients after they have been entered.
These email addresses and phone numbers will be contacted via the delivery mode selected between Email, Voice, and Text. Email addresses and phone numbers will be saved to Messenger Templates and Scheduled Messages, as well as recorded in the Sent Message Log. Fields and/or Sub-Reports cannot to be added to the message bodies on Step 2 when using Add Non-Campus Recipients. 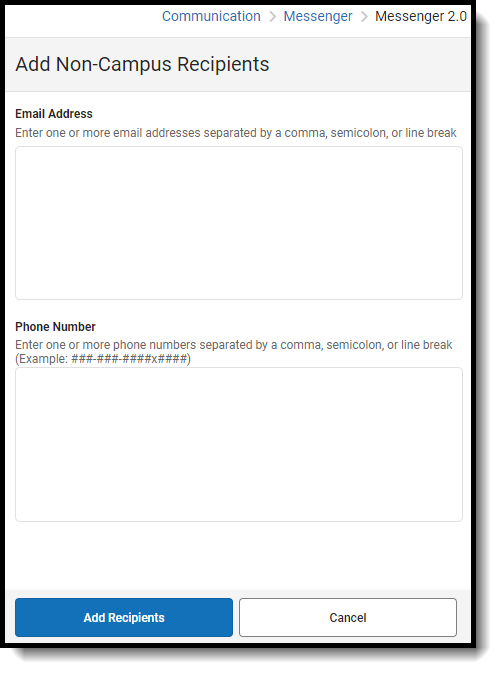 To remove non-Campus recipients: To remove non-Campus recipients:
|
- Click the Recipients button to display a side panel to review the recipient list. If necessary, exclude recipients and click the Update button on the panel when you are done. You may also click the down arrow next to Update to select Update and Generate CSV. This will create a CSV report that contains data related to the message and each of the recipients. For more information, review Recipient Report. (Optional)
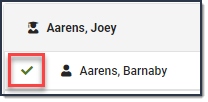
By default, all recipients are automatically selected to receive the message. Click the person's name to exclude them as a message recipient. A checkmark next to the person's name means they will receive the message. No checkmark next to the person's name means they will not receive the message. In the following example, the person will receive the message.
- Select Next.
Result: Step 2 Content displays.
Step 2. Content
- Enter the subject of the message in Message Subject.
- Complete the following Inbox, Email, Voice, and/or Text options.
Option Description Inbox Compose the body of the message in the Message Body.
Attachments are not sent with Inbox messages.
Email - Enter or confirm the correct email is showing in the Reply to Email field.
Tip: This Field is only editable if the Allow Custom Sender’s Email Address checkbox is marked in the Email Settings tab of Messenger Admin. - Enter a Sender Display Name. (Optional)
- Compose the body of the message in the Message Body.
- Click the Select File button to attach a file to the email. (Optional)
Voice Select one of the following options: - Upload - Use this option to attach a pre-recorded .WAV file.
- Text-to-Speech - Use this option to have Campus convert text from the Voice Message Body field on this screen to a voice message. If you are also sending an Email message the Voice Message Body field is not available and the Message Body from the Email card will be converted instead.
When using voice messaging, this call chain determines the order in which each recipient’s phone numbers are contacted:
- Household Phone
- Cell Phone
- Work Phone
- Other Phone
Text Compose the body of the message in Text Message Body. Hyperlinks for text messages must be written as full URLs (e.g., https://www.infinitecampus.com). - Enter or confirm the correct email is showing in the Reply to Email field.
- Optionally, follow one of two workflows within Preview/Test to view a message before sending it to recipients. Test messages will be sent in context of the recipient.
Option Description Preview 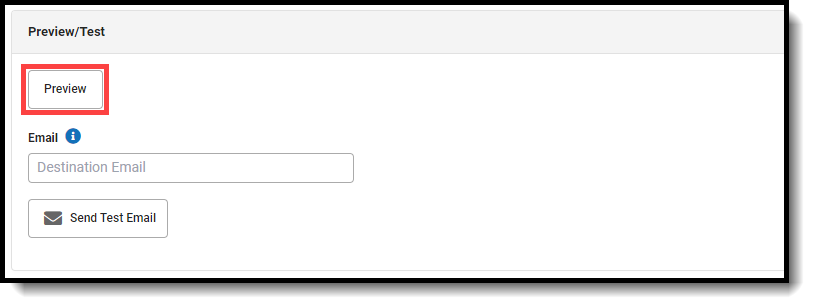
-
Click Preview after entering all the required fields.
-
Select a recipient you'd like to preview the message for from the Preview side panel. All selected message types will now appear the way it would to the individual who will receive it.
-
To send a test message in the context of the selected recipient, enter an email address and/or phone number in the appropriate field in the test area of the Preview side panel and click Send. The test message will send with populated fields and/or sub-reports, if they were included in the message.
-
Click Close when you have finished previewing the message.
Test 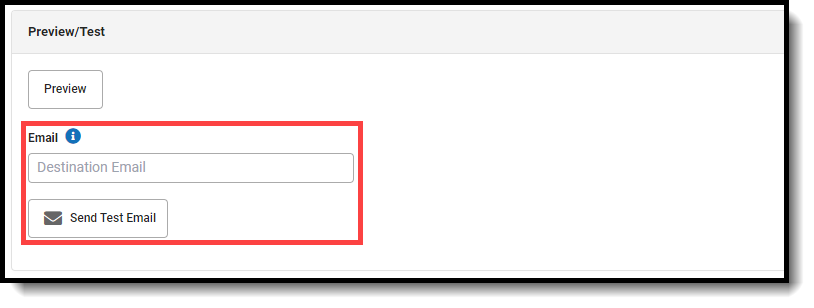
-
Enter a valid email address in the Email field.
-
Click Send Test Email. Up to five email addresses can be entered and email addresses must be separated by a comma.
Infinite Campus strongly recommends previewing or testing messages before delivering them. -
- Select Next.
Result: Step 3. Send displays.
Step 3. Send
- Select Send Now, Schedule One-Time, or Schedule Recurring.
Option Description Send Now Deliver the message as soon as the Send step is completed. The Send Now option is not available if you are trying to send a text/voice message outside of the district-wide dialing window.Schedule One-Time Schedule a message to be sent a single time in the future. The recipient list for this message will be generated at the time of delivery.
- Enter the Date the message will be sent.
- Enter the Inbox/Email Time the message will be sent.
- Enter the Voice/Text Message Time the message will be sent.
Schedule Recurring Schedule a message to be sent on a recurring basis. The recipient lists for these messages will be generated at the time of delivery.
- Enter the Inbox/Email Time the message will be sent.
- Enter the Voice/Text Message Time the message will be sent.
- Setup the Recurrence Pattern based on Day(s) of the Week or Custom Dates:
- Day(s) of the Week
- Click the Day(s) of the Week radio button.
- Select the days of the week the message will be sent.
- Select the Frequency the message will be sent.
- Select a Start and End Date for the message.
- Custom Dates
- Click the Custom Dates radio button.
- Click the day the message will be sent in the Select Dates calendar.
- Day(s) of the Week
- Confirm you would like to receive a confirmation email that the message was successfully sent by marking the Confirmation Email checkbox. Clear the checkbox if you do not want to receive a message sent successfully email.
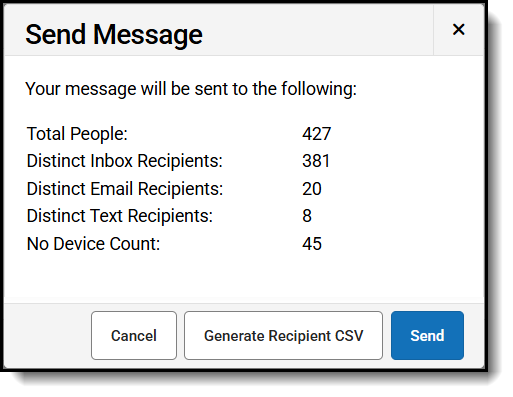
- Click Send. An alert will display the number of message recipients for each selected Delivery Mode. Use the 'Generate Recipient CSV' to download the Recipient Report before sending the message.
-
Click Send. After you initiate the send message process, you'll be taken back to the main Messenger 2.0 screen. The message then starts processing and shows up in the 'In Progress' tab of Upcoming Messages. A loading graphic of three dots appears while the list refreshes with your latest sent messages.
While the message is processing, you can leave the screen and return later to check your message details. A status label below the 'Created By' field shows the progress of the message in the sending process. After the message is fully processed, it leaves the 'In Progress' tab and moves to the Sent Message Log 2.0. For more information about In Progress messages and their statuses, read the Upcoming Messages documentation.
A warning displays if you are scheduling a voice/text message to go out within 30 minutes of the dial window closing. If the dial window closes while this message campaign is in progress, all calls/texts are stopped at the dial window end time.
Recipient Report
After Students, Messenger Contacts, or Staff have been selected under Send To, a report can be generated to preview:
- Total and Distinct recipient counts.
- Full recipient list and the delivery modes they are eligible to be contacted at.
- A list of recipients who do not have an eligible delivery mode to be contacted at.
- A list of excluded recipients.
Generating Recipient Report
- Click the Recipients button.
- Click the down arrow next to Update.
- Click Update and Generate CSV. The report will then download to your computer.

Recipient Report Definitions
| Term | Definition |
| Total People |
Total number of distinct people pulled into the recipient list. |
| Total Eligible Recipients | Total number of distinct people eligible to receive a message. Excludes: missing devices, contact preferences, excluded people. |
| Distinct Inbox | Total number of people eligible to receive a process inbox message. |
| Distinct Email | Total number of people eligible to receive email messages. |
| Distinct Voice | Total number of people eligible to receive a voice call. |
| Distinct Text | Total number of people eligible to receive a text message.
Note: If a recipient confirms the voice call they will not receive a text message |
| Excluded Recipients | Number of recipients that were excluded.
Note: Messenger contacts must be excluded from receiving a message from all students to be counted.
|
| No Device | Number of people who do not have an eligible device to receive a message. |
General or priority messages may be sent to students, student messenger contacts or staff at multiple schools using Messenger 2.0.
Create and Send an Emergency Message
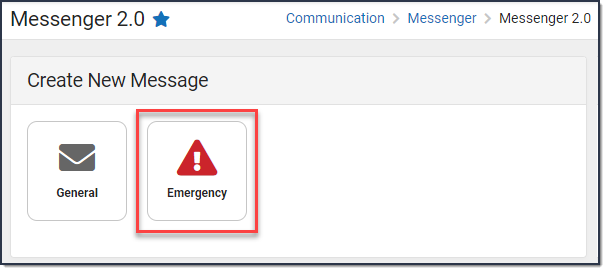
Emergency messages are designed to be sent immediately to Students, Messenger Contacts, and/or Staff.
You can send an emergency message if you need to quickly create and immediately deliver a message to students, messenger contacts, and/or staff.
| What can I do? | What do I need to know? |
|---|---|
Important Information about Emergency Messages
- Unlike other Campus messages, an emergency message does not have a scheduled delivery window. All messages are delivered immediately or as quickly as possible.
- Emergency messages are NOT limited to the dialing window established by the District Start Time and District End Time fields of the Voice Settings tool (System Administration > Messenger > Messenger Preferences > Voice Settings).
- The Emergency Messenger sends messages to contacts based on the contact phone numbers and email addresses marked to receive emergency messages on the Demographics tool. The Emergency checkbox on the Demographics tab must be marked by the phone number or email address. Phone numbers and email addresses that do not have the Emergency checkbox marked do not receive an emergency message.
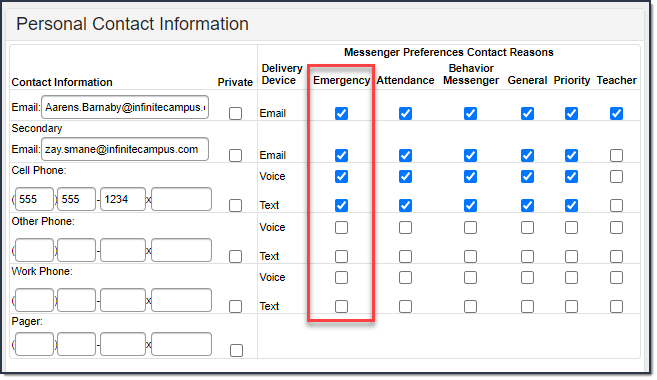
- Emergency Messenger also relies on proper designation of a person as a Messenger contact on the Relationships tool.
-
Sending out MASS Emails using Freeware like Google as Your Email Server
- Emails exceeding the amount set by the email service provider may fail due to controls set by the provider to prevent SPAM.
- Free email service providers also typically set maximum allowed emails sent per day. After that limit is reached, usually in a 24 hour rolling period, additional emails won't be sent until the time passes.
- For more information about Google's sending limits, see the following articles:
Phone Recipient Confirmation
When voice messages are delivered, Shoutpoint may attempt to reach a recipient at multiple phone numbers. Shoutpoint continues to call recipient phone numbers until the recipient confirms message receipt or until the maximum number of redials is met as allowed by the district (configured in System Administration > Messenger > Messenger Preferences > Voice Settings).
For districts that have migrated to Voxology, Voxology performs redials but does not utilize the redial settings for a specific status. Instead, it will run through a person's phone numbers until they have confirmed contact or all devices have had a successful contact attempt (answering machine or picked up). Additional contact attempts will stop if confirmed.
To confirm delivery of a message, a recipient must press 0 at the end of a voice message. This cancels all additional delivery and/or redial attempts for recipients with non-shared numbers or non-extension numbers.
Confirming and cancelling calls to other phone numbers works in the following way:
- Recipients can confirm calls on any phone number, even those shared with any other recipient in Campus.
- If a phone number contains an extension, recipients are not be able to confirm the call.
- Confirming calls to phone numbers for the same recipient does not cancel calls to any phone numbers which contain extensions.
- If a multiple recipients share a phone number but have different Delivery Devices selected for the same Messenger tool (Voice/Text), Voice call confirmation cancels the Text message from going out for the other recipient.
To stop additional calls, a recipient should always press 0 to confirm receipt of messages. If a recipient listens to a message but does not confirm its receipt by pressing 0, they may continue to receive call and redial attempts.
Send an Emergency Message
The procedures in this section describe how to send an emergency message via inbox, email, voice or text to students, messenger contacts, and/or staff. For detailed descriptions of each field in the message builder, see the Messenger Field Descriptions article.
To begin, choose one of the following options.
| Option | Description |
|---|---|
| Create a new message | 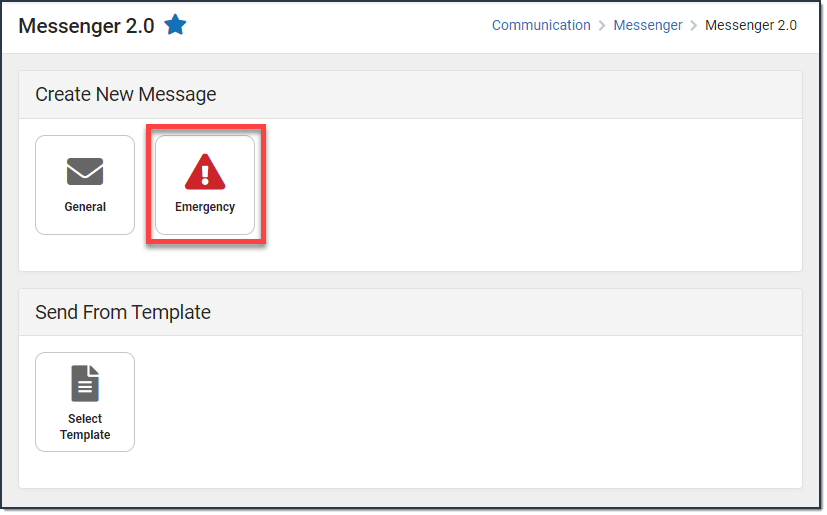 |
| Use an existing template | Click Select Template > Emergency then select the template you want to use.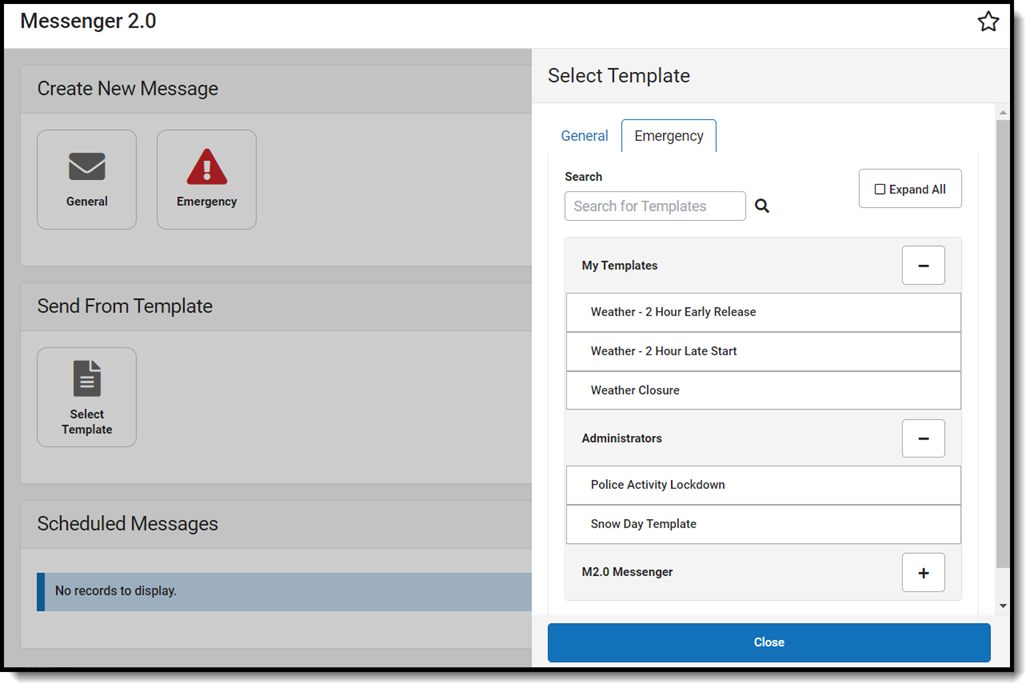 |
Step 1. Recipients
- Select General or Priority.
Result: Step 1 Recipients displays. - Select the Delivery Mode: Inbox, Email, Voice, and/or Text.
- Select a School Year.
Tip: The default selection is the current school year. - Select Select Calendars. By default, all Calendars a user has tool rights to are selected when an Emergency Message is created.
Result: The Calendars panel displays. Use the + (plus) and - (minus) buttons to view or hide additional calendars.

- Select a Preferred Language preference. (Optional)
- Select at least one recipient group from Add Recipients:

Messenger Contacts are filtered by the student list.
Option |
Description |
Send to Students |
Includes students in the selected calendar(s). Student Custom Selection: Includes all active students by default with the ability to filter the student list with the following options: Grade Level, Ad Hoc, and Transportation Filter. The Transportation Filter allows for sending messages directly to students on buses and Messenger Contacts based on which bus the student rides. Click Update when you are done.
|
Send to Messenger Contacts |
Messenger Contacts are filtered by the student list. |
Send to Staff |
Includes staff in the selected calendar(s).
Staff Custom Selection: Includes all current school staff, including those with a future start date, at schools of the selected calendar(s). From here you can select specific Staff Roles, mark the checkbox to Include District Staff, and/or select predefined Ad Hoc filters. Click Update when you are done.  |
| Add Individual Recipients | To add individuals who are not filtered by Calendars, School Year, or Preferred Language, click Add Individual Recipients. Choose from the available filters or enter a name. Select the desired recipients and click Add Recipients. Fields and/or Sub-Reports cannot to be added to the message bodies on Step 2 when using Add Individual Recipients.
|
| Add Non-Campus Recipients | Click the Add Non-Campus Recipients and enter one or more email addresses/phone numbers of non-Campus recipients. Click Add Recipients after they have been entered.
These email addresses and phone numbers will be contacted via the delivery mode selected between Email, Voice, and Text. Email addresses and phone numbers will be saved to Messenger Templates and Scheduled Messages, as well as recorded in the Sent Message Log. Fields and/or Sub-Reports cannot to be added to the message bodies on Step 2 when using Add Non-Campus Recipients.  To remove non-Campus recipients: To remove non-Campus recipients:
|
- Click the Recipients button to display a side panel to review the recipient list. If necessary, exclude recipients and click the Update button on the panel when you are done. You may also click the down arrow next to Update to select Update and Generate CSV. This will create a CSV report that contains data related to the message and each of the recipients. For more information, review Recipient Report. (Optional)
By default, all recipients are automatically selected to receive the message. Click the person's name to exclude them as a message recipient. A checkmark next to the person's name means they will receive the message. No checkmark next to the person's name means they will not receive the message. In the following example, the person will receive the message.

- Select Next.
Result: Step 2 Content displays.
Step 2. Content
- Enter the subject of the message in Message Subject.
- Complete the following Inbox, Email, Voice, and/or Text options.
Option Description Inbox Compose the body of the message in the Message Body.
Attachments are not sent with Inbox messages.
Email - Enter or confirm the correct email is showing in the Reply to Email field.
Tip: This Field is only editable if the Allow Custom Sender’s Email Address checkbox is marked in the Email Settings tab of Messenger Admin. - Enter a Sender Display Name.(Optional)
- Compose the body of the message in the Message Body.
- Click the Select File button to attach a file to the email. (Optional)
Voice Select one of the following options: - Upload - Use this option to attach a pre-recorded .WAV file.
- Text-to-Speech - Use this option to have Campus convert text from the Voice Message Body field on this screen to a voice message. If you are also sending an Email message the Voice Message Body field is not available and the Message Body from the Email card will be converted instead.
When using voice messaging, this call chain determines the order in which each recipient’s phone numbers are contacted:
- Call/Text all eligible devices marked for Emergency.
- Calls and texts are sent at the same time to all devices, reaching everyone simultaneously.
- After the first round, if redials are initiated, we automatically revert to this call chain:
- Household Phone
- Cell Phone
- Work Phone
- Other Phone
Text Compose the body of the message in Text Message Body. Hyperlinks for text messages must be written as full URLs (e.g. https://www.infinitecampus.com). - Enter or confirm the correct email is showing in the Reply to Email field.
- Optional: To view a message in the manner it will be delivered to recipients, enter a valid email address in the Email field and click Send Test Email. Up to five email addresses can be entered and email addresses must be separated by a comma.
Infinite Campus strongly recommends testing messages before delivering them.
- Select Next.
Result: Step 3. Send displays.
Step 3. Send
- Select Send Now or Schedule One-Time.
Option Description Send Now Deliver the message as soon as the Send step is completed. Schedule One-Time Schedule a message to be sent in the future. Once created, these messages can be edited/viewed within Scheduled Messages in Messenger 2.0.
- Enter the Date the message will be sent.
- Enter the Send Time the message will be sent.
- Confirm you would like to receive a confirmation email that the message was successfully sent by marking the Confirmation Email checkbox. Clear the checkbox if you do not want to receive a message sent successfully email.
- Click Send. An alert will display the number of message recipients for each selected Delivery Mode. Use the 'Generate Recipient CSV' to download the Recipient Report before sending the message.

-
Click Send. After you initiate the send message process, you'll be taken back to the main Messenger 2.0 screen. The message then starts processing and shows up in the 'In Progress' tab of Upcoming Messages. A loading graphic of three dots appears while the list refreshes with your latest sent messages.
While the message is processing, you can leave the screen and return later to check your message details. A status label below the 'Created By' field shows the progress of the message in the sending process. After the message is fully processed, it leaves the 'In Progress' tab and moves to the Sent Message Log 2.0. For more information about In Progress messages and their statuses, read the Upcoming Messages documentation.
Recipient Report
After Students, Messenger Contacts, or Staff have been selected under Send To, a report can be generated to preview:
- Total and Distinct recipient counts.
- Full recipient list and the delivery modes they are eligible to be contacted at.
- A list of recipients who do not have an eligible delivery mode to be contacted at.
- A list of excluded recipients.
Generating Recipient Report
- Click the Recipients button.
- Click the down arrow next to Update.
- Click Update and Generate CSV. The report will then download to your computer.

Recipient Report Definitions
| Term | Definition |
| Total People | Total number of distinct people pulled into the recipient list. |
| Total Eligible Recipients | Total number of distinct people eligible to receive a message. Excludes: missing devices, contact preferences, excluded people. |
| Distinct Inbox | Total number of people eligible to receive a process inbox message. |
| Distinct Email | Total number of people eligible to receive email message. |
| Distinct Voice | Total number of people eligible to receive a voice call. |
| Distinct Text | Total number of people eligible to receive a text message.
Note: If a recipient confirms the voice call they will not receive a text message |
| Excluded Recipients | Number of recipients that were excluded.
Note: Messenger contacts must be excluded from receiving a message from all students to be counted. |
| No Device | Number of people who do not have an eligible device to receive a message. |
Emergency messages can be sent to select recipients using Messenger 2.0.
Messenger 1.0
General Message
Learn how to create a template for sending general messages. Use the template to send a message manually or automatically.
Create a Template for a General Message
The Message Builder tool allows users to build a template for general messages, and the template is then used to send emails, voice or text messages to students and/or guardians.
The Message Builder tool allows a user to build and send messages to students and/or guardians. Depending on the messaging options used by the district/school, this tool may be used to create inbox, email, voice and/or text messages. The Message Builder tool uses saved ad hoc filters and messages templates as a basis for building messages.
If an enrolled student who is an emancipated minor has a non-Household Messenger relationship box selected for themselves on the Relationships tab, the Message Builder sends messages to the student when Student Messenger Contacts is selected in Message Builder and the student meets the other filter criteria selected for the message.
 Message Builder
See the Message Builder Tool Rights article for information on available tool rights.
Field Descriptions
| Field | Description | ||||||
|---|---|---|---|---|---|---|---|
| User/Group | This dropdown list allows you to save message templates to your user account or a user group to which you belong.
You must have Read Tool Rights to User Group Formats under this tool in order to share templates among the groups to which you belong. | ||||||
| Template | This dropdown list displays a list of available templates. To create a new template, select <new> from this list. Templates save to either the User (default), or User Group where they are accessible to other members in the group.
Minimize future message setup time by creating and saving templates.
Templates save:
| ||||||
| Filter Criteria | |||||||
| Message Type | This field determines the type of message that is sent. The following options are available:
| ||||||
| Deliver To: |
See the topic About Call Chaining in the Messenger with Voice - Setup and Details article for more information about how Voice Messenger and Shoutpoint distribute voice messages. | ||||||
| Enrollment Filter: Message Only Active Students | When this checkbox is marked, Messenger sends the message to students who meet the following criteria:
If this checkbox IS NOT marked, the message will deliver to all individuals who pull based on the Saved Filter, regardless of enrollment. | ||||||
| Limit delivery to contacts that speak: | This field allows messages to be filtered to any household language based on the value selected in the Preferred Language field in Census > People > Demographics > Personal Contact Information (section).
The default selection for this field is 'No Language Preference'. This option allows messages to be sent out to all recipients regardless of their Preferred Language type. If a language is selected, only recipients whose Preferred Language in Demographics matches the language selection here will receive the message. | ||||||
| Saved Filters | This is a list of saved student type Ad hoc filters. | ||||||
| Set Filter Operation | This field determines what the tool should do with the filters. The default value Union is used most often. Union indicates that all members of all selected filters are included. Intersection indicates that only the members who exist within each of the selected filters are included. | ||||||
| Delivery Devices | |||||||
| Inbox | The Inbox option is automatically selected. This option places a note in the parent's inbox that a new message is available. Infinite Campus strongly recommends leaving this option marked to ensure delivery to a Portal Account when no other delivery devices are marked for messages. | ||||||
| The Email option sends an email to the guardian's email address on record (entered in Census > People > Demographics). | |||||||
| Voice | The Voice option calls the guardian's phone number on record (entered in Census > People > Demographics). Sub-reports cannot be added to Voice messages. | ||||||
| Text | The Text option sends a text message to the guardian's mobile device. Recipients who have indicated a desire to receive text messages must have the Text (SMS) checkbox marked in the Personal Contact Information editor of the Demographics tab to receive text messages.
Sub-reports cannot be added to Text messages. | ||||||
| Message Details | |||||||
| Reply To Email | This field displays the email address that is automatically included in the message body for message recipients to reference.
This field can be changed if the Allow Custom Sender's Email Address checkbox is marked on the Email Settings tab.
Existing templates may display a different address if the the Allow Custom Sender's Email Address checkbox is marked and a user modified the Sender’s Email field. | ||||||
| Caller ID | This field displays the phone number that is automatically included in the message body for message recipients to reference.
This field can only be changed if the Allow Custom Caller ID checkbox is marked on the Voice Settings tab. Existing templates may display a different Caller ID if the Allow Custom Caller ID checkbox is marked and a user modified the Caller ID field. | ||||||
| Sender Display Name | Entries to this field will display in the recipient's email inbox for easier sender identification.
 This field is only available if the Allow Custom Sender Display Name checkbox is marked on the Email Settings tab AND Email is selected from the Delivery Devices options in the message template. | ||||||
| Message Subject | This field determines the text that displays in the Subject field of the email message. | ||||||
| Message Body | This field contains the text contained in the message. See the Campus Insert Fields for Message Builder section for important information about inserting Campus fields in the Message Body and the Text Message body. The Message Body uses a WYSIWYG editor. Do NOT copy attribute fields from another Messenger tool in Campus. The attribute fields are not the same. For more information about using the options available with the editor, see the WYSIWYG Editors article.
Message Body supports the use of Chinese characters for email messages only. | ||||||
This option allows you to send a voice message. See the article Messenger with Voice - Setup and Details for more information about this feature.
You must click the Upload button after browsing for the attachment. When an attachment is properly uploaded, the Attach File message displays on the screen. | |||||||
| Browse and upload an email attachment | This option allows you to add an attachment to the email. See the article File Types (Digital Repository) for information about supported file types.
You must click the Upload button after browsing for the attachment. When an attachment is properly uploaded, the Attach File message displays on the screen.
If you need to send multiple files, attach a zip file.
This option is controlled by an email preference set by the District Administrator and may not display in all districts. File attachments are not sent to Messenger Inbox or Portal Inbox. File attachments are only received in email. | ||||||
| Text Message | The text message to be sent to the guardian's mobile device and are limited to 400 characters. The maximum length of a text message is set to 400 characters. A warning message displays when a message has reached the character limit and will prevent the message from being saved if the limit is exceeded. Campus recommends districts stay within a 140 single text character limit. Messages that exceed 140 characters, but remain within the 400 character maximum, should note the following:
Existing text message templates still display in their entirety, but need to be modified to be within this limit before sending. If users wish to stop receiving text messages, they can text STOP to the short code. This results in the user receiving no further text messages from Campus, even if the user has the Text option marked on their Contact Preferences. Users need to go through the opt in process again to start receiving texts at a later date. | ||||||
| Delivery Date: | The day on which the message should be sent. | ||||||
| Send Inbox/Emails at: | The time inbox and/or email messages begin delivery. The time saves with the templates. If messages should always go out immediately after Send is selected, this field should be left blank. | ||||||
| Dial Window | These fields create a dialing window during which a general voice message may be sent. The default values for these fields are set up on the Voice Settings tab (System Administration > Messenger > Messenger Preferences > Voice Settings).
Dial Window times must be entered and saved with templates. If the start time entered on the message is earlier than the start time on the template (and the start time on the template is after the start time entered on the Voice Settings tab), Messenger uses the start time on the template and does not send the message until that time is reached.
If the end time on the Dial Window is earlier than the end time entered on the Voice Settings tab, calls do not stop. Instead, they continue until the end time on the Voice Settings tab is reached. In addition, if a voice message is still delivering when the District end time is reached, message delivery stops and is not completed. | ||||||
Campus Fields and Sub-Reports for Message Builder
Campus Fields and Sub-Reports includes specific Message Builder fields for use in the Message Body WYSIWYG. Once a message is sent with a specific event (for behavior or attendance), the message is only sent once. If a student receives a message about an event that occurred on Monday, the message about that event is not be sent again.
Any ad hoc fields that have been deactivated display in red. Use the Element Replacement tool to locate deactivated elements and replace them with the new field.
Messages containing a sub-report, where a large recipient count exists, may take longer to send. Users should not navigate away from the page while the system is attempting to send the message.
Information in the letter sub-reports uses data stored in the AttendanceDayAggregation table. This means that attendance data for the current date is accurate as of the previous night's attendance calculation, or the last time the Attendance Aggregation Refresh was run. If needed, the Attendance Aggregation Refresh tool can be run to force an attendance recalculation to pull in the current day's data.
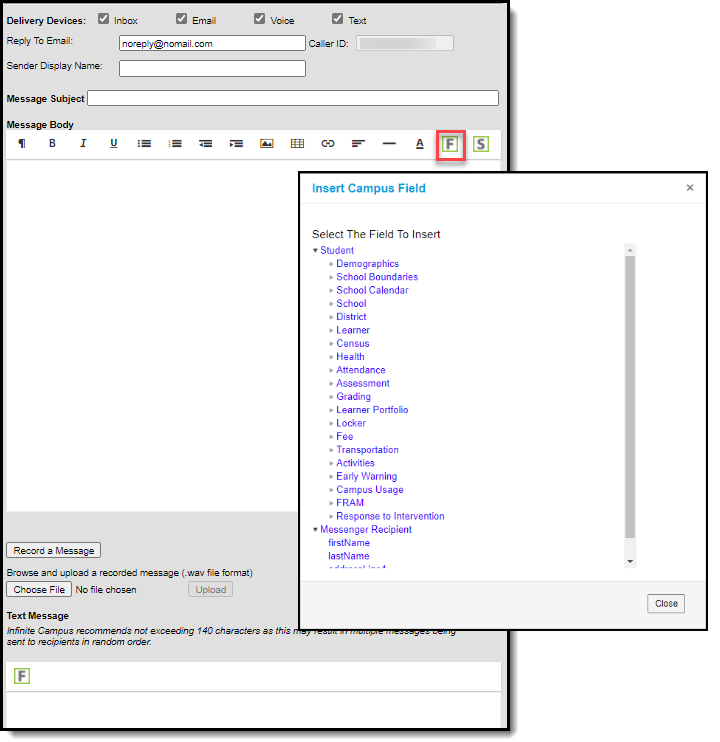
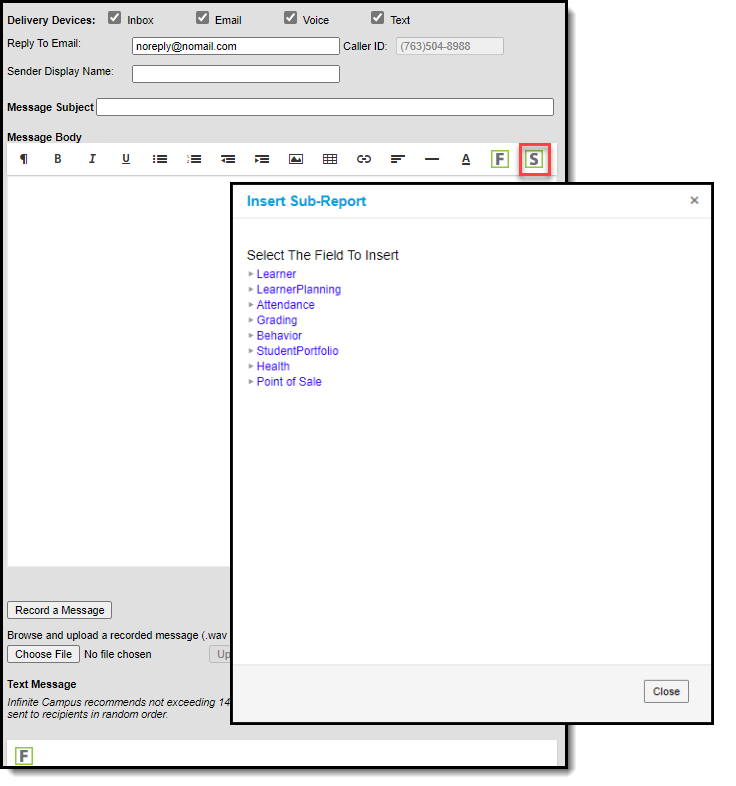 Sub-Report Options
The following table lists the sub-report options for each area.
| Area | Sub-Reports |
|---|---|
| Learner | Student Schedule Active and Dropped Student Schedule |
| Learner Planning | Course Requests Course Plan |
| Attendance | Period Mark Summary Course Mark Summary Whole/Half Day Summary Exact Day Summary Single Day Count Summary |
| Grading | Grade Detail Term GPA Summary |
| Behavior | Discipline Summary Behavior Summary |
| Student Portfolio | Cumulative GPA and Class Rank |
| Health | Immunization Health Screening Concussion Health Screening Dental Health Screening Hearing Health Screening Scoliosis Health Screening Vision |
| Point of Sale | POS Account Balance |
When using sub-reports in letters, please note the following:
- All behavior data is included when adding either of the sub-reports.
- A field only displays if there is data for that field. If a field is chosen from the sub-report but there is no saved data for that student, information for that field does not display.
- A sub-report option only displays if the district/school records that data.
Create a New Template
Templates allow you to create reusable messages that save time and standardize content.
- Select the <New> option from the Template dropdown list.
- Select User (default) or a User Group that the template should be saved to from the User/User Group dropdown field. Templates saved under a User Group are available to other members in the group.
- Use the Field Descriptions to complete the Message Builder editor.
The Message Body uses a WYSIWYG editor.
Do NOT copy attribute fields from another Messenger tool in Campus. The attribute fields are not the same.
For more information about using the options available with the editor, see the WYSIWYG Editors article.
- Click the Save button at the top message editor.
- Enter a name for the template in the pop-up box. The template appears in the Template dropdown list.
Delete a Template
- Select the template you want to delete from the Template dropdown list.
- Click the Delete button. A confirmation message displays.
- Click the OK button. Campus removes the template and it does not display in the Template dropdown list.
Create Messages
- Select an existing Template from the Template dropdown list.
- Use the Field Descriptions to complete Message Builder editor.
The Message Body uses a WYSIWYG editor. For more information about using the options available with the editor, see the WYSIWYG Editors article.
Browse and upload an email attachment. (optional)
You must click the Upload button after browsing for the attachment. When an email attachment is properly uploaded, the Attach File message displays on the screen.

Click the Test button.
Infinite Campus strongly recommends testing messages before delivering them. A message is sent in the exact manner it is delivered to recipients. The Test Message screen prompts you for a destination phone and/or email address then confirm that the test message was sent.
- Click the Preview/Send Message button. The Preview Message screen displays.
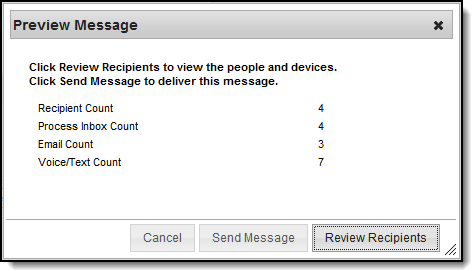
- Click the Review Recipients button. The Review Recipients screen displays.
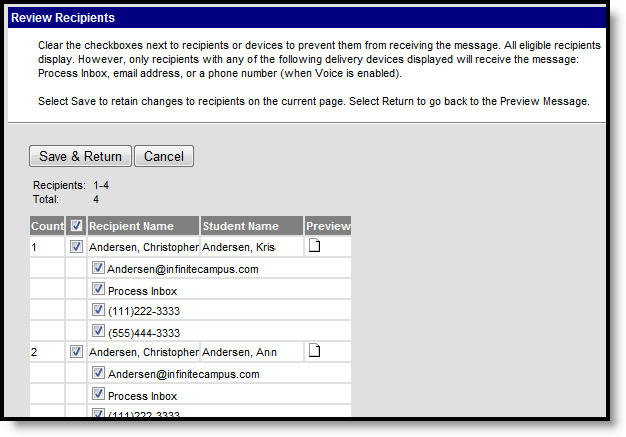
Complete the following tasks on the Review Recipients screen. (Optional)
Task Description To exclude recipients/phone numbers Clear the checkbox next to a name or phone number. Preview the message Click the page icon in the Preview column. To exit and return to the Message Preview screen Click the Save & Return button if changes have been made to the recipient list. Otherwise, if no changes have been made, click the Cancel button. - Click the Send Message button on the PreviewMessage screen. The Preview Message screen displays. This screen confirms that the message tasks has been completely set up for delivery at the times entered in the Send Emails At and/or Dial Window fields of the main Message Builder screen. This screen does not indicate that the message is currently being sent.
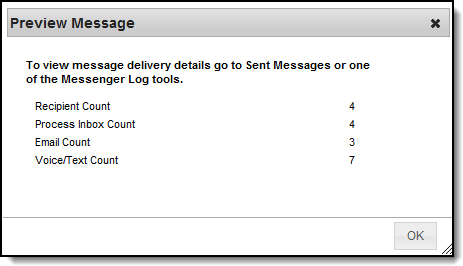
- Click OK.
Send a Message (Manually)
Once a template is created, Message Builder allows you to create and send a message using that template.
The Message Builder tool allows a user to build and send messages to students and/or guardians. Depending on the messaging options used by the district/school, this tool may be used to create inbox, email, voice and/or text messages. The Message Builder tool uses saved ad hoc filters and messages templates as a basis for building messages.
If an enrolled student who is an emancipated minor has a non-Household Messenger relationship box selected for themselves on the Relationships tab, the Message Builder sends messages to the student when Student Messenger Contacts is selected in Message Builder and the student meets the other filter criteria selected for the message.
 Message Builder
See the Message Builder Tool Rights article for information on available tool rights.
Field Descriptions
| Field | Description | ||||||
|---|---|---|---|---|---|---|---|
| User/Group | This dropdown list allows you to save message templates to your user account or a user group to which you belong.
You must have Read Tool Rights to User Group Formats under this tool in order to share templates among the groups to which you belong. | ||||||
| Template | This dropdown list displays a list of available templates. To create a new template, select <new> from this list. Templates save to either the User (default), or User Group where they are accessible to other members in the group.
Minimize future message setup time by creating and saving templates.
Templates save:
| ||||||
| Filter Criteria | |||||||
| Message Type | This field determines the type of message that is sent. The following options are available:
| ||||||
| Deliver To: |
See the topic About Call Chaining in the Messenger with Voice - Setup and Details article for more information about how Voice Messenger and Shoutpoint distribute voice messages. | ||||||
| Enrollment Filter: Message Only Active Students | When this checkbox is marked, Messenger sends the message to students who meet the following criteria:
If this checkbox IS NOT marked, the message will deliver to all individuals who pull based on the Saved Filter, regardless of enrollment. | ||||||
| Limit delivery to contacts that speak: | This field allows messages to be filtered to any household language based on the value selected in the Preferred Language field in Census > People > Demographics > Personal Contact Information (section).
The default selection for this field is 'No Language Preference'. This option allows messages to be sent out to all recipients regardless of their Preferred Language type. If a language is selected, only recipients whose Preferred Language in Demographics matches the language selection here will receive the message. | ||||||
| Saved Filters | This is a list of saved student type Ad hoc filters. | ||||||
| Set Filter Operation | This field determines what the tool should do with the filters. The default value Union is used most often. Union indicates that all members of all selected filters are included. Intersection indicates that only the members who exist within each of the selected filters are included. | ||||||
| Delivery Devices | |||||||
| Inbox | The Inbox option is automatically selected. This option places a note in the parent's inbox that a new message is available. Infinite Campus strongly recommends leaving this option marked to ensure delivery to a Portal Account when no other delivery devices are marked for messages. | ||||||
| The Email option sends an email to the guardian's email address on record (entered in Census > People > Demographics). | |||||||
| Voice | The Voice option calls the guardian's phone number on record (entered in Census > People > Demographics). Sub-reports cannot be added to Voice messages. | ||||||
| Text | The Text option sends a text message to the guardian's mobile device. Recipients who have indicated a desire to receive text messages must have the Text (SMS) checkbox marked in the Personal Contact Information editor of the Demographics tab to receive text messages.
Sub-reports cannot be added to Text messages. | ||||||
| Message Details | |||||||
| Reply To Email | This field displays the email address that is automatically included in the message body for message recipients to reference.
This field can be changed if the Allow Custom Sender's Email Address checkbox is marked on the Email Settings tab.
Existing templates may display a different address if the the Allow Custom Sender's Email Address checkbox is marked and a user modified the Sender’s Email field. | ||||||
| Caller ID | This field displays the phone number that is automatically included in the message body for message recipients to reference.
This field can only be changed if the Allow Custom Caller ID checkbox is marked on the Voice Settings tab. Existing templates may display a different Caller ID if the Allow Custom Caller ID checkbox is marked and a user modified the Caller ID field. | ||||||
| Sender Display Name | Entries to this field will display in the recipient's email inbox for easier sender identification.
 This field is only available if the Allow Custom Sender Display Name checkbox is marked on the Email Settings tab AND Email is selected from the Delivery Devices options in the message template. | ||||||
| Message Subject | This field determines the text that displays in the Subject field of the email message. | ||||||
| Message Body | This field contains the text contained in the message. See the Campus Insert Fields for Message Builder section for important information about inserting Campus fields in the Message Body and the Text Message body. The Message Body uses a WYSIWYG editor. Do NOT copy attribute fields from another Messenger tool in Campus. The attribute fields are not the same. For more information about using the options available with the editor, see the WYSIWYG Editors article.
Message Body supports the use of Chinese characters for email messages only. | ||||||
This option allows you to send a voice message. See the article Messenger with Voice - Setup and Details for more information about this feature.
You must click the Upload button after browsing for the attachment. When an attachment is properly uploaded, the Attach File message displays on the screen. | |||||||
| Browse and upload an email attachment | This option allows you to add an attachment to the email. See the article File Types (Digital Repository) for information about supported file types.
You must click the Upload button after browsing for the attachment. When an attachment is properly uploaded, the Attach File message displays on the screen.
If you need to send multiple files, attach a zip file.
This option is controlled by an email preference set by the District Administrator and may not display in all districts. File attachments are not sent to Messenger Inbox or Portal Inbox. File attachments are only received in email. | ||||||
| Text Message | The text message to be sent to the guardian's mobile device and are limited to 400 characters. The maximum length of a text message is set to 400 characters. A warning message displays when a message has reached the character limit and will prevent the message from being saved if the limit is exceeded. Campus recommends districts stay within a 140 single text character limit. Messages that exceed 140 characters, but remain within the 400 character maximum, should note the following:
Existing text message templates still display in their entirety, but need to be modified to be within this limit before sending. If users wish to stop receiving text messages, they can text STOP to the short code. This results in the user receiving no further text messages from Campus, even if the user has the Text option marked on their Contact Preferences. Users need to go through the opt in process again to start receiving texts at a later date. | ||||||
| Delivery Date: | The day on which the message should be sent. | ||||||
| Send Inbox/Emails at: | The time inbox and/or email messages begin delivery. The time saves with the templates. If messages should always go out immediately after Send is selected, this field should be left blank. | ||||||
| Dial Window | These fields create a dialing window during which a general voice message may be sent. The default values for these fields are set up on the Voice Settings tab (System Administration > Messenger > Messenger Preferences > Voice Settings).
Dial Window times must be entered and saved with templates. If the start time entered on the message is earlier than the start time on the template (and the start time on the template is after the start time entered on the Voice Settings tab), Messenger uses the start time on the template and does not send the message until that time is reached.
If the end time on the Dial Window is earlier than the end time entered on the Voice Settings tab, calls do not stop. Instead, they continue until the end time on the Voice Settings tab is reached. In addition, if a voice message is still delivering when the District end time is reached, message delivery stops and is not completed. | ||||||
Campus Fields and Sub-Reports for Message Builder
Campus Fields and Sub-Reports includes specific Message Builder fields for use in the Message Body WYSIWYG. Once a message is sent with a specific event (for behavior or attendance), the message is only sent once. If a student receives a message about an event that occurred on Monday, the message about that event is not be sent again.
Any ad hoc fields that have been deactivated display in red. Use the Element Replacement tool to locate deactivated elements and replace them with the new field.
Messages containing a sub-report, where a large recipient count exists, may take longer to send. Users should not navigate away from the page while the system is attempting to send the message.
Information in the letter sub-reports uses data stored in the AttendanceDayAggregation table. This means that attendance data for the current date is accurate as of the previous night's attendance calculation, or the last time the Attendance Aggregation Refresh was run. If needed, the Attendance Aggregation Refresh tool can be run to force an attendance recalculation to pull in the current day's data.

 Sub-Report Options
The following table lists the sub-report options for each area.
| Area | Sub-Reports |
|---|---|
| Learner | Student Schedule Active and Dropped Student Schedule |
| Learner Planning | Course Requests Course Plan |
| Attendance | Period Mark Summary Course Mark Summary Whole/Half Day Summary Exact Day Summary Single Day Count Summary |
| Grading | Grade Detail Term GPA Summary |
| Behavior | Discipline Summary Behavior Summary |
| Student Portfolio | Cumulative GPA and Class Rank |
| Health | Immunization Health Screening Concussion Health Screening Dental Health Screening Hearing Health Screening Scoliosis Health Screening Vision |
| Point of Sale | POS Account Balance |
When using sub-reports in letters, please note the following:
- All behavior data is included when adding either of the sub-reports.
- A field only displays if there is data for that field. If a field is chosen from the sub-report but there is no saved data for that student, information for that field does not display.
- A sub-report option only displays if the district/school records that data.
Create a New Template
Templates allow you to create reusable messages that save time and standardize content.
- Select the <New> option from the Template dropdown list.
- Select User (default) or a User Group that the template should be saved to from the User/User Group dropdown field. Templates saved under a User Group are available to other members in the group.
- Use the Field Descriptions to complete the Message Builder editor.
The Message Body uses a WYSIWYG editor.
Do NOT copy attribute fields from another Messenger tool in Campus. The attribute fields are not the same.
For more information about using the options available with the editor, see the WYSIWYG Editors article.
- Click the Save button at the top message editor.
- Enter a name for the template in the pop-up box. The template appears in the Template dropdown list.
Delete a Template
- Select the template you want to delete from the Template dropdown list.
- Click the Delete button. A confirmation message displays.
- Click the OK button. Campus removes the template and it does not display in the Template dropdown list.
Create Messages
- Select an existing Template from the Template dropdown list.
- Use the Field Descriptions to complete Message Builder editor.
The Message Body uses a WYSIWYG editor. For more information about using the options available with the editor, see the WYSIWYG Editors article.
Browse and upload an email attachment. (optional)
You must click the Upload button after browsing for the attachment. When an email attachment is properly uploaded, the Attach File message displays on the screen.

Click the Test button.
Infinite Campus strongly recommends testing messages before delivering them. A message is sent in the exact manner it is delivered to recipients. The Test Message screen prompts you for a destination phone and/or email address then confirm that the test message was sent.
- Click the Preview/Send Message button. The Preview Message screen displays.

- Click the Review Recipients button. The Review Recipients screen displays.

Complete the following tasks on the Review Recipients screen. (Optional)
Task Description To exclude recipients/phone numbers Clear the checkbox next to a name or phone number. Preview the message Click the page icon in the Preview column. To exit and return to the Message Preview screen Click the Save & Return button if changes have been made to the recipient list. Otherwise, if no changes have been made, click the Cancel button. - Click the Send Message button on the PreviewMessage screen. The Preview Message screen displays. This screen confirms that the message tasks has been completely set up for delivery at the times entered in the Send Emails At and/or Dial Window fields of the main Message Builder screen. This screen does not indicate that the message is currently being sent.

- Click OK.
Messages to students or their messenger contacts can be sent using the Message Builder.
Send a Message (Automatically)
The Message Builder Scheduler allows users to select a day and time for Campus to send routine messages. This tool uses the message templates created with the Message Builder tool.
You must create a message template in Message Builder prior to creating delivery schedules.
Tool Search: Message Builder Scheduler
The Message Builder Scheduler allows users to select a day and time for Campus to send routine messages. This tool uses the message templates created with the Message Builder tool.
The Message Builder Scheduler will automatically generate messages based on the data available at that time. A confirmation email will be sent to the person that created the messenger schedule telling them that it has run and how many phones/email devices received the message if the Send confirmation email checkbox is marked. The person must have an email address entered on their Census > Demographics tab.
- Message Builder templates that include email attachments will send the same attachment each time the message is sent. Keep this in mind if the email attachment was not meant to be sent repeatedly.
- Always review and compare Ad hoc results to recipient lists. If you are scheduling the same message but using different Message Builder templates for different audiences or setting up a recurring schedule, this step will help you avoid unintentionally sending the message multiple times to the same recipients because of crossover created by the ad hoc lists. You can use the Message Builder tool to review the recipient list.
The Message Builder Filter Criteria Detail and Message Delivery Detail areas do not allow users to change any of the fields within. These are updated by changing the template or creating a new template with the Message Builder tool.
See the Message Builder Scheduler Tool Rights article for information on available tool rights.
Scheduling a Message Builder Message
- Select a template from the Message Builder Schedules table.
- Enter the Schedule Name.
- Select a Calendar. This option defaults to the calendar selected in the toolbar.
- Enter the Start Date in mmddyy format or click the calendar icon to select a date.
Enter the Start Date/Time of the message.
If the time entered on the Scheduler is... Then the message will be sent... the same or later than the time entered in the Dial Window or Send Email field on the template
at the time entered on the Scheduler. earlier than the time entered in the Dial Window or Send Email field on the template at the time set on the template. - Choose how often to send the message by selecting an option from the Recurring Frequency dropdown list.
- Mark the Send Confirmation Email checkbox to receive an email when the message has been sent. A confirmation email will be sent to the person who set up the Message Builder Schedule.
- Select the Save icon when finished. The new schedule will appear below its respective template in the Attendance Messenger Schedules table.
Add more schedules by selecting the newly added schedule in the Message Builder Schedules list and select the Add Scheduled Message Builder.
Message Builder Scheduler allows staff to select a date and time to send a general or priority message to students and or guardians.
Staff Messenger
The Staff Messenger tool allows a district to send messages to its staff members. Before a message can be sent, a template must be created.
Create a Staff Message Template
The Staff Messenger tool allows a district to send messages to its staff members. Before a message can be sent, a template must be created.
Tool Search: Staff Messenger
The Staff Messenger tool allows a district to send messages to its staff members. Phone messages can be delivered to staff if a district has purchased Campus Messenger with Voice. To receive email and/or phone messages, the recipients must have the corresponding Messenger Preference of General Notification and Priority Notification set on their Demographics tab to receive messages.
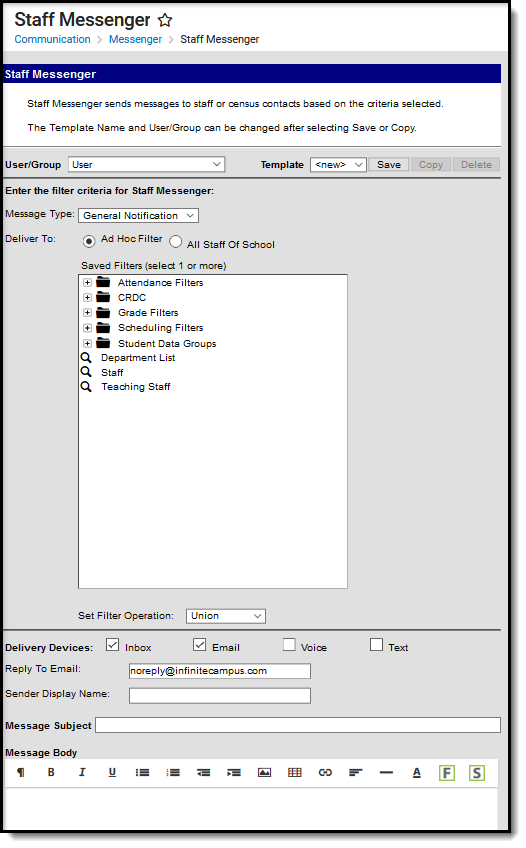 Staff Messenger Editor
See the Staff Messenger Tool Rights article for information available tool rights.
Field Descriptions
| Field | Description | ||||||
|---|---|---|---|---|---|---|---|
| User/Group | This dropdown list allows you to save message templates to your user account or a user group to which you belong. Users need Tool Rights to User Group Formats under Staff Messenger to share and save templates to Groups. | ||||||
| Template | This dropdown list displays a list of available templates. To create a new template, select <new>from this list. Templates save to either the User (default), or User Group where they are accessible to other members in the group. Minimize future message setup time by creating and saving templates. Templates save:
| ||||||
| Filter Criteria | |||||||
| Message Type | This field determines the type of message that is sent. The following options are available:
| ||||||
| Deliver To: | This selection determines which staff receive the message. Select the radio button for an Ad hoc filter or for All Staff of School. In order to be included in the delivery of message sent when using the All Staff of School option, a staff person needs both a District Employment record AND a District Assignment record. | ||||||
| Set Filter Operation | This field determines what the tool should do with the filters. The default value Union is used most often. Union indicates that all members of all selected filters are included. Intersection indicates that only the members who exist within each of the selected filters are included. | ||||||
| Delivery Devices | |||||||
| Inbox | The Inbox option is automatically selected. This option places a note in the user's inbox that a new message is available. Infinite Campus strongly recommends leaving this option marked to ensure delivery to a staff account when no other delivery device is marked for messages. | ||||||
| The Email option sends an email to the email address on record (entered in Census > People > Demographics). | |||||||
| Voice | The Voice option calls the phone number on record (entered in Census > People > Demographics). | ||||||
| Text | The Text option sends a text message to a mobile device. Recipients who have indicated a desire to receive text messages must have the Text (SMS) checkbox marked in the Personal Contact Information editor of the Demographics tab to receive text messages. | ||||||
| Message Details | |||||||
| Reply ToEmail | This field displays the email address that is automatically included in the message body for message recipients to reference.
This field can be changed if the Allow Custom Sender's Email Address checkbox is marked on the Email Settings tab. Existing templates may display a different address if the Allow Custom Sender's Email Address checkbox is marked and a user modified the Sender’s Email field. | ||||||
| Caller ID | This field displays the phone number that is automatically included in the message body for message recipients to reference.
This field can only be changed if the Allow Custom Caller ID checkbox is marked on the Voice Settings tab. Existing templates may display a different Caller ID if the Allow Custom Caller ID checkbox is marked and a user modified the Caller ID field. | ||||||
| Sender Display Name | Entries to this field will display in the recipient's email inbox for easier sender identification. Sender Display Name This field is only available if the Allow Custom Sender Display Name checkbox is marked on the Email Settings tab AND Email is selected from the Delivery Devices options in the message template. | ||||||
| Message Subject | This field determines the text that displays in the Subject field of the email message. | ||||||
| Message Body | You can enter comments in the Message Body using the WYSIWYG editor. Do NOT copy attribute fields from another Messenger tool in Campus. The attribute fields are not the same. For more information about using the options available with the editor, see the WYSIWYG Editors article. Message Body supports the use of Chinese characters for email messages only. | ||||||
This option allows you to send a voice message. See the article Messenger with Voice - Setup and Details for more information about this feature. You must click the Upload button after browsing for the attachment. When an attachment is properly uploaded, the Attach File message displays on the screen. The ability to send voice messages is controlled by a preference set by the District Administrator. | |||||||
| Browse and upload an email attachment | This option allows you to add an attachment to the email. See the article the Digital Repository Preferences for information about supported file types and sizes. You must click the Upload button after browsing for the attachment. When an attachment is properly uploaded, the Attach File message displays on the screen. This option is controlled by an email preference set by the District Administrator and may not display in all districts. | ||||||
| Text Message | The text message to be sent to the mobile device. The ability to send text messages is controlled by a preference set by the District Administrator. There is a character limit of 400 characters for text messages. Infinite Campus recommends not exceeding 140 characters as this may result in multiple messages being sent to recipients in random order. The maximum length of a text message is set to 400 characters. When a text message reaches this length, a warning message displays indicating such. The message cannot be saved until the character limit is met. Existing text message templates still display in their entirety, but need to be modified to be within this limit before sending. If users wish to stop receiving text messages, they can text STOP to the short code. This results in the user receiving no further text messages from Campus, even if the user has the Text option marked on their Contact Preferences. Users need to go through the opt in process again to start receiving texts at a later date. | ||||||
| Delivery Date: | The day on which the message should be sent. | ||||||
| Send Inbox/Emails at: | The time inbox and/or email messages begin delivery. The time saves with the templates. If messages should always go out immediately after Send is selected, this field should be left blank. | ||||||
| Dial Window | These fields create a dialing window during which a general voice message may be sent. The default values for these fields are set up on the Voice Settings tab System Administration > Messenger > Messenger Preferences > Voice Settings). Dial Window times must be entered and saved with templates. If the start time entered on the message is earlier than the start time on the template (and the start time on the template is after the start time entered on the Voice Settings tab), Messenger uses the start time on the template and does not send the message until that time is reached. If the end time on the Dial Window is earlier than the end time entered on the Voice Settings tab, calls do not stop. Instead, they continue until the end time on the Voice Settings is reached. In addition, if a voice message is still delivering when the District end time is reached, message delivery stops and is not completed. | ||||||
Campus Fields and Sub-Reports for Staff Messenger
Campus Fields and Sub-Reports includes specific fields for use in the Message Body WYSIWYG. These fields are designed to pull the latest qualifying event, based on filter criteria. Other fields are available but they use ad hoc logic and may not return the most recent event data if there are multiple events in a year.
Any ad hoc fields that have been deactivated display in red. Use the Element Replacement tool to locate deactivated elements and replace them with the new field.
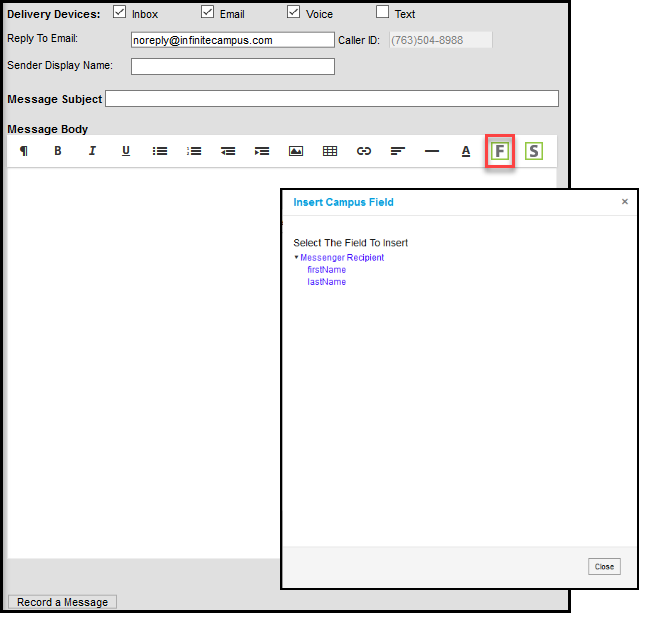 Staff Messenger Campus Fields Selections
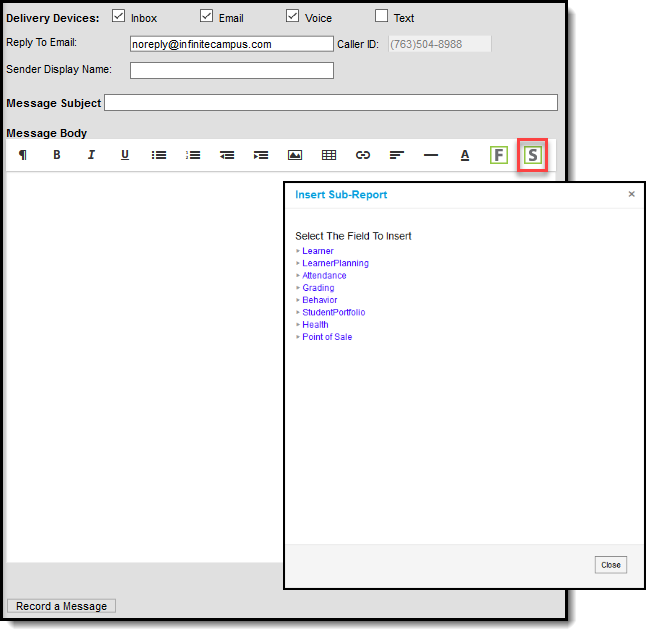 Staff Messenger Sub-Reports Selection
Sub-Report Options
The following table lists the sub-report options for each area.
| Area | Sub-Reports |
|---|---|
| Learner | Student Schedule Active and Dropped Student Schedule |
| Learner Planning | Course Requests Course Plan |
| Attendance | Period Mark Summary Course Mark Summary Whole/Half Day Summary Exact Day Summary Single Day Count Summary |
| Grading | Grade Detail Term GPA Summary |
| Behavior | Discipline Summary Behavior Summary |
| Student Portfolio | Cumulative GPA and Class Rank |
| Health | Immunization Health Screening Concussion Health Screening Dental Health Screening Hearing Health Screening Scoliosis Health Screening Vision |
| Point of Sale | POS Account Balance |
When using sub-reports in letters, please note the following:
- All behavior data is included when adding either of the sub-reports.
- A field only displays if there is data for that field. If a field is chosen from the sub-report but there is no saved data for that student, information for that field does not display.
- A sub-report option only displays if the district/school records that data.
Create a New Template
Templates allow you to create messages that can be sent at a later date. Templates also allow you to create reusable messages that save time and standardize content. The following information is saved with the template: Filter criteria, Delivery Devices, Sender Display Name (if enabled), Message Subject, Message Body, wav file (if uploaded), email attachment (if enabled and uploaded) and Text Message Body (if enabled).
- Select the <New> option from the Template dropdown list.
- Select User (default) or a User Group that the template should be saved to from the User/User Group dropdown field. Templates saved under a User Group are available to other members in the group.
- Use the Field Descriptions to complete the Staff Messenger editor.
The Message Body uses a WYSIWYG editor.
Do NOT copy attribute fields from another Messenger tool in Campus. The attribute fields are not the same.
For more information about using the options available with the editor, see the WYSIWYG Editors article. - Click the Save button at the top message editor.
- Enter a name for the template in the pop-up box. The template appears in the Template dropdown list.
Delete a Template
- Select the template you want to delete from the Template dropdown list.
- Click the Delete button. A confirmation message displays.
- Click the OK button. Campus removes the template and it does not display in the Template dropdown list.
Create Messages
- Select an existing Template from the Template dropdown list.
- Use the Field Descriptions to complete Message Builder editor.
The Message Body uses a WYSIWYG editor. For more information about using the options available with the editor, see the WYSIWYG Editors article.
Browse and upload an email/voice attachment. (optional)
You must click the Upload button after browsing for the attachment. When an attachment is properly uploaded, the Attach File message displays on the screen.

Click the Test button to review the message and its recipients.
Infinite Campus strongly recommends testing messages before delivering them. A message is sent in the exact manner it is delivered to recipients. The Test Message screen confirms that the test message was sent.
- Click the Preview/Send Message button. The Preview Message screen displays.

Click the Review Recipients button. The Review Recipients screen displays.
Complete the following tasks on the Review Recipients screen. (Optional)
Task Description To exclude recipients/phone numbers Clear the checkbox next to a name or phone number. Preview the message Click the page icon in the Preview column. To exit and return to the Message Preview screen Click the Save & Return button if changes have been made to the recipient list. Otherwise, if no changes have been made, click the Cancel button. - Click the Send Message button on the PreviewMessage screen. The Preview Message screen displays. This screen confirms that the message tasks has been completely set up for delivery at the times entered in the Send Emails At and/or Dial Window fields of the main Message Builder screen. This screen does not indicate that the message is currently being sent.

- Click OK.
Send a Staff Message
Now that a template has been created, it can be used to send messages to staff.
Tool Search: Staff Messenger
The Staff Messenger tool allows a district to send messages to its staff members. Phone messages can be delivered to staff if a district has purchased Campus Messenger with Voice. To receive email and/or phone messages, the recipients must have the corresponding Messenger Preference of General Notification and Priority Notification set on their Demographics tab to receive messages.
 Staff Messenger Editor
See the Staff Messenger Tool Rights article for information available tool rights.
Field Descriptions
| Field | Description | ||||||
|---|---|---|---|---|---|---|---|
| User/Group | This dropdown list allows you to save message templates to your user account or a user group to which you belong. Users need Tool Rights to User Group Formats under Staff Messenger to share and save templates to Groups. | ||||||
| Template | This dropdown list displays a list of available templates. To create a new template, select <new>from this list. Templates save to either the User (default), or User Group where they are accessible to other members in the group. Minimize future message setup time by creating and saving templates. Templates save:
| ||||||
| Filter Criteria | |||||||
| Message Type | This field determines the type of message that is sent. The following options are available:
| ||||||
| Deliver To: | This selection determines which staff receive the message. Select the radio button for an Ad hoc filter or for All Staff of School. In order to be included in the delivery of message sent when using the All Staff of School option, a staff person needs both a District Employment record AND a District Assignment record. | ||||||
| Set Filter Operation | This field determines what the tool should do with the filters. The default value Union is used most often. Union indicates that all members of all selected filters are included. Intersection indicates that only the members who exist within each of the selected filters are included. | ||||||
| Delivery Devices | |||||||
| Inbox | The Inbox option is automatically selected. This option places a note in the user's inbox that a new message is available. Infinite Campus strongly recommends leaving this option marked to ensure delivery to a staff account when no other delivery device is marked for messages. | ||||||
| The Email option sends an email to the email address on record (entered in Census > People > Demographics). | |||||||
| Voice | The Voice option calls the phone number on record (entered in Census > People > Demographics). | ||||||
| Text | The Text option sends a text message to a mobile device. Recipients who have indicated a desire to receive text messages must have the Text (SMS) checkbox marked in the Personal Contact Information editor of the Demographics tab to receive text messages. | ||||||
| Message Details | |||||||
| Reply ToEmail | This field displays the email address that is automatically included in the message body for message recipients to reference.
This field can be changed if the Allow Custom Sender's Email Address checkbox is marked on the Email Settings tab. Existing templates may display a different address if the Allow Custom Sender's Email Address checkbox is marked and a user modified the Sender’s Email field. | ||||||
| Caller ID | This field displays the phone number that is automatically included in the message body for message recipients to reference.
This field can only be changed if the Allow Custom Caller ID checkbox is marked on the Voice Settings tab. Existing templates may display a different Caller ID if the Allow Custom Caller ID checkbox is marked and a user modified the Caller ID field. | ||||||
| Sender Display Name | Entries to this field will display in the recipient's email inbox for easier sender identification. Sender Display Name This field is only available if the Allow Custom Sender Display Name checkbox is marked on the Email Settings tab AND Email is selected from the Delivery Devices options in the message template. | ||||||
| Message Subject | This field determines the text that displays in the Subject field of the email message. | ||||||
| Message Body | You can enter comments in the Message Body using the WYSIWYG editor. Do NOT copy attribute fields from another Messenger tool in Campus. The attribute fields are not the same. For more information about using the options available with the editor, see the WYSIWYG Editors article. Message Body supports the use of Chinese characters for email messages only. | ||||||
This option allows you to send a voice message. See the article Messenger with Voice - Setup and Details for more information about this feature. You must click the Upload button after browsing for the attachment. When an attachment is properly uploaded, the Attach File message displays on the screen. The ability to send voice messages is controlled by a preference set by the District Administrator. | |||||||
| Browse and upload an email attachment | This option allows you to add an attachment to the email. See the article the Digital Repository Preferences for information about supported file types and sizes. You must click the Upload button after browsing for the attachment. When an attachment is properly uploaded, the Attach File message displays on the screen. This option is controlled by an email preference set by the District Administrator and may not display in all districts. | ||||||
| Text Message | The text message to be sent to the mobile device. The ability to send text messages is controlled by a preference set by the District Administrator. There is a character limit of 400 characters for text messages. Infinite Campus recommends not exceeding 140 characters as this may result in multiple messages being sent to recipients in random order. The maximum length of a text message is set to 400 characters. When a text message reaches this length, a warning message displays indicating such. The message cannot be saved until the character limit is met. Existing text message templates still display in their entirety, but need to be modified to be within this limit before sending. If users wish to stop receiving text messages, they can text STOP to the short code. This results in the user receiving no further text messages from Campus, even if the user has the Text option marked on their Contact Preferences. Users need to go through the opt in process again to start receiving texts at a later date. | ||||||
| Delivery Date: | The day on which the message should be sent. | ||||||
| Send Inbox/Emails at: | The time inbox and/or email messages begin delivery. The time saves with the templates. If messages should always go out immediately after Send is selected, this field should be left blank. | ||||||
| Dial Window | These fields create a dialing window during which a general voice message may be sent. The default values for these fields are set up on the Voice Settings tab System Administration > Messenger > Messenger Preferences > Voice Settings). Dial Window times must be entered and saved with templates. If the start time entered on the message is earlier than the start time on the template (and the start time on the template is after the start time entered on the Voice Settings tab), Messenger uses the start time on the template and does not send the message until that time is reached. If the end time on the Dial Window is earlier than the end time entered on the Voice Settings tab, calls do not stop. Instead, they continue until the end time on the Voice Settings is reached. In addition, if a voice message is still delivering when the District end time is reached, message delivery stops and is not completed. | ||||||
Campus Fields and Sub-Reports for Staff Messenger
Campus Fields and Sub-Reports includes specific fields for use in the Message Body WYSIWYG. These fields are designed to pull the latest qualifying event, based on filter criteria. Other fields are available but they use ad hoc logic and may not return the most recent event data if there are multiple events in a year.
Any ad hoc fields that have been deactivated display in red. Use the Element Replacement tool to locate deactivated elements and replace them with the new field.
 Staff Messenger Campus Fields Selections
 Staff Messenger Sub-Reports Selection
Sub-Report Options
The following table lists the sub-report options for each area.
| Area | Sub-Reports |
|---|---|
| Learner | Student Schedule Active and Dropped Student Schedule |
| Learner Planning | Course Requests Course Plan |
| Attendance | Period Mark Summary Course Mark Summary Whole/Half Day Summary Exact Day Summary Single Day Count Summary |
| Grading | Grade Detail Term GPA Summary |
| Behavior | Discipline Summary Behavior Summary |
| Student Portfolio | Cumulative GPA and Class Rank |
| Health | Immunization Health Screening Concussion Health Screening Dental Health Screening Hearing Health Screening Scoliosis Health Screening Vision |
| Point of Sale | POS Account Balance |
When using sub-reports in letters, please note the following:
- All behavior data is included when adding either of the sub-reports.
- A field only displays if there is data for that field. If a field is chosen from the sub-report but there is no saved data for that student, information for that field does not display.
- A sub-report option only displays if the district/school records that data.
Create a New Template
Templates allow you to create messages that can be sent at a later date. Templates also allow you to create reusable messages that save time and standardize content. The following information is saved with the template: Filter criteria, Delivery Devices, Sender Display Name (if enabled), Message Subject, Message Body, wav file (if uploaded), email attachment (if enabled and uploaded) and Text Message Body (if enabled).
- Select the <New> option from the Template dropdown list.
- Select User (default) or a User Group that the template should be saved to from the User/User Group dropdown field. Templates saved under a User Group are available to other members in the group.
- Use the Field Descriptions to complete the Staff Messenger editor.
The Message Body uses a WYSIWYG editor.
Do NOT copy attribute fields from another Messenger tool in Campus. The attribute fields are not the same.
For more information about using the options available with the editor, see the WYSIWYG Editors article. - Click the Save button at the top message editor.
- Enter a name for the template in the pop-up box. The template appears in the Template dropdown list.
Delete a Template
- Select the template you want to delete from the Template dropdown list.
- Click the Delete button. A confirmation message displays.
- Click the OK button. Campus removes the template and it does not display in the Template dropdown list.
Create Messages
- Select an existing Template from the Template dropdown list.
- Use the Field Descriptions to complete Message Builder editor.
The Message Body uses a WYSIWYG editor. For more information about using the options available with the editor, see the WYSIWYG Editors article.
Browse and upload an email/voice attachment. (optional)
You must click the Upload button after browsing for the attachment. When an attachment is properly uploaded, the Attach File message displays on the screen.

Click the Test button to review the message and its recipients.
Infinite Campus strongly recommends testing messages before delivering them. A message is sent in the exact manner it is delivered to recipients. The Test Message screen confirms that the test message was sent.
- Click the Preview/Send Message button. The Preview Message screen displays.

Click the Review Recipients button. The Review Recipients screen displays.
Complete the following tasks on the Review Recipients screen. (Optional)
Task Description To exclude recipients/phone numbers Clear the checkbox next to a name or phone number. Preview the message Click the page icon in the Preview column. To exit and return to the Message Preview screen Click the Save & Return button if changes have been made to the recipient list. Otherwise, if no changes have been made, click the Cancel button. - Click the Send Message button on the PreviewMessage screen. The Preview Message screen displays. This screen confirms that the message tasks has been completely set up for delivery at the times entered in the Send Emails At and/or Dial Window fields of the main Message Builder screen. This screen does not indicate that the message is currently being sent.

- Click OK.
Emergency Messenger
The Emergency Messenger allows you to quickly create and deliver emergency messages to staff or guardians.
Create an Emergency Template
The Emergency Messenger allows you to quickly create and deliver emergency messages to staff or guardians. Unlike other Campus messages, an emergency message does not have a scheduled delivery window. All messages are delivered immediately or as quickly as possible.
Before a message can be sent, a template must be created.
Tool Search: Emergency Messenger
The Emergency Messenger allows you to quickly create and deliver emergency messages to staff or guardians. Unlike other Campus messages, an emergency message has no scheduled delivery window. All messages are delivered immediately or as quickly as possible. Emergency notifications are NOT limited to the allowed dialing window established by the Voice Settings tool.
Emergency message recipients must be specified each time a new message is sent--even when using a saved template.
Emergency Messenger can be used after you set up Messenger Settings.
Emergency Messenger respects the Active Year, Calendar Start/End Dates, Term Start/End Dates, and student enrollment status.
- Emails exceeding the amount set by the email service provider may fail due to controls set by the provider to prevent SPAM.
- Free email service providers also typically set the maximum number of emails that can be sent per day. After that limit is reached, usually in a 24-hour rolling period, additional emails will not be sent until the time passes.
- For more information about Google's sending limits, see the following articles:
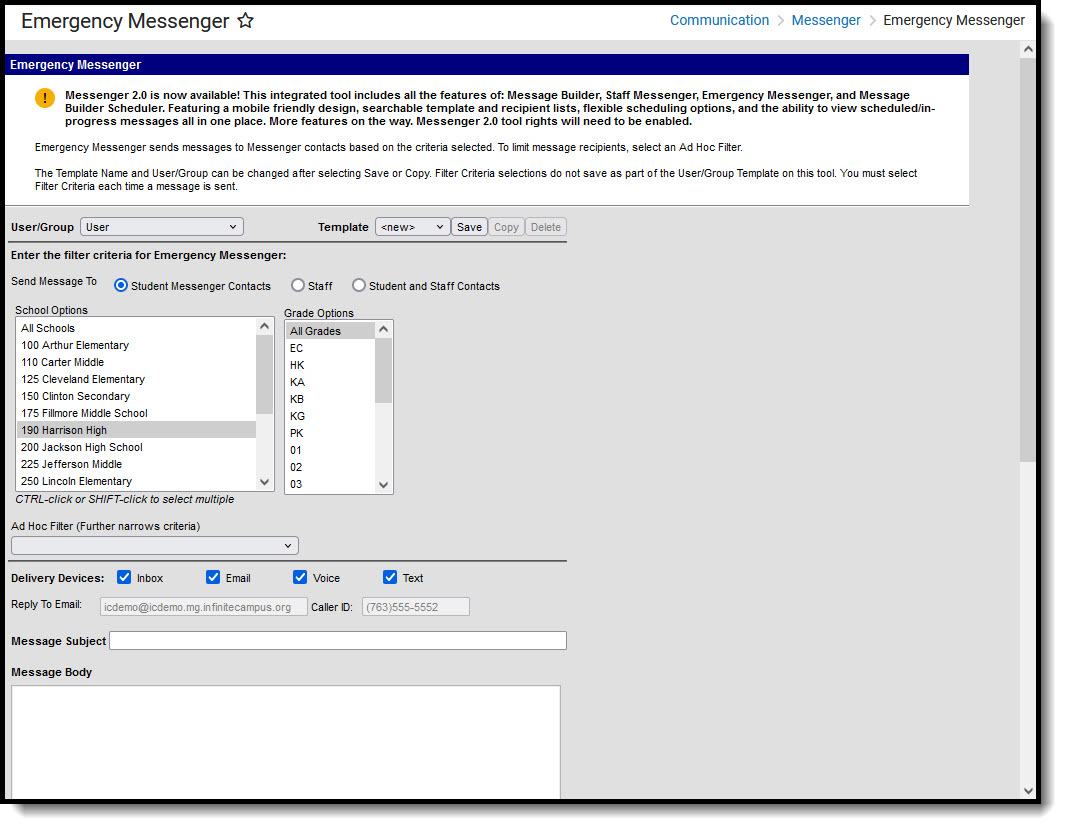 Emergency Messenger
 See the Emergency Messenger Tool Rights articles for information on available tool rights.
Emergency Message Logic
The Emergency Messenger sends messages to contacts based on the phone numbers and email addresses marked to receive emergency messages on the Demographics tool. For a person to receive an emergency message, the Emergency checkbox must be marked for a phone number or email address in the Personal Contact Information section. Phone numbers and email addresses that do not have the Emergency checkbox marked do not receive an emergency message.
For more information, please refer to the following articles:
Settings applied for general voice messaging in the Prompt Preferences also apply to emergency messaging. Any text or .wav files specified for voice messages are also appended to emergency messages, as are redial settings (configured on the Voice Settings tool).
Phone Recipient Confirmation
When voice messages are delivered, Shoutpoint may attempt to reach a recipient at multiple phone numbers. Shoutpoint continues to call recipient phone numbers until the recipient confirms the message receipt or until the maximum number of redials is met as allowed by the district (configured on the Voice Settings tool).
To confirm message delivery, a recipient must press "0" at the end of a voice message. This cancels all additional delivery and/or redial attempts for recipients with non-shared or non-extension numbers.
Confirming and canceling calls to other phone numbers works in the following way:
- Recipients can confirm calls on any phone number, even those shared with any other recipient in Campus.
- If a phone number contains an extension, recipients are not be able to confirm the call.
- Confirming calls to phone numbers for the same recipient does not cancel calls to any phone numbers which contain extensions.
- If multiple recipients share a phone number but have different Delivery Devices selected for the same Messenger tool (Voice/Text), Voice call confirmation does not prevent the Text message from going out to the other recipient.
Field Descriptions
| Field | Description |
|---|---|
| User/Group | This dropdown list allows you to save message templates to your user account or a user group to which you belong. |
| Template | This dropdown list displays a list of available templates. To create a new template, select <new> from this list. Templates save to either the User (default), or User Group where they are accessible to other members in the group.
Minimize future message setup time by creating and saving templates. Templates save:
|
| Filter Criteria | |
| Send Messages To | Emergency messages may be sent to the following recipients:
|
| School Options | This field determines which schools receive the message. The schools that display are a comprehensive list of schools to which you currently or previously had calendar rights. When the All Schools option is selected, only the schools where you are current year calendar rights are sent a message. |
| Grade | This field determines which grade(s) receive the message. |
| Staff Types |
This field determines the type of staff member who receives the message. |
| Ad hoc Filter | The Ad hoc Filter field allows you to limit the message recipients. The dropdown selector includes all Filters and Data Types available to you, but only one can be selected. If you choose to send messages to Student and Staff Contacts DO NOT use an Ad hoc filter based on a Student Data Type, or staff are NOT sent a message (with the exception of any staff who are also currently students). |
| Delivery Devices | |
| Inbox | The Inbox option is automatically selected. This option places a note in the parent's portal inbox that a new message is available. Infinite Campus strongly recommends leaving this option marked to ensure delivery to guardians with a Portal Account, but no other delivery device is marked for messages. |
| The Email option sends an email to the guardian's email address on record (entered in Census > Demographics). | |
| Voice | The Voice option calls the guardian's phone number on record (entered in Census > Demographics). |
| Text | The Text option sends a text message to the guardian's mobile device. Recipients who have indicated a desire to receive text messages must have the Emergency checkbox marked for Text (SMS) on the Personal Contact Information editor of the Demographics tool to receive text messages. |
| Message Details | |
Create and save templates with your name and contact information (email/phone) in the message body for guardians to reference. | |
| Reply to Email | This field displays the email address entered in Messenger Settings > Email Settings > Sender Email Address. This field cannot be changed. |
| Caller ID | This field displays the phone number entered in Messenger Settings > Caller ID Preferences. This field cannot be changed. |
| Sender Display Name | Entries to this field will be displayed in the recipient's email inbox for easier sender identification.
 This field is only available if the Allow Custom Sender Display Name checkbox is marked on the Email Settings tool AND Email is selected as a delivery device in the message template. |
| Message Subject | This field determines the text displayed in the email message's subject field. |
| Message Body | The message sent to the Portal Inbox, via email, and by TTS for Voice (if no .wav file) is uploaded.
Message Body supports the use of Chinese characters for email messages only. |
This option allows you to send a voice message. For more information about this feature, see the Messenger with Voice—Setup and Details article.
After browsing for the attachment, you must click the Upload button. The Attach File message displays on the screen when an attachment is properly uploaded.
Uploaded .wav files are played immediately after the Hello Message specified in the Prompt Preferences. | |
| Browse and upload an email attachment | This option allows you to add an attachment to the email. See the Digital Repository Preferences article for information about supported file types and sizes.
After browsing for the attachment, you must click the Upload button. The Attach File message displays on the screen when an attachment is properly uploaded.
This option is controlled by an email preference set by the District Administrator and may not be displayed in all districts. |
| Text Message | This field is used to enter the text message sent to mobile devices. The maximum length of a text message is set to 400 characters. When a text message reaches this length, a warning message displays indicating such. The message cannot be saved until the character limit is met. Campus recommends districts stay within a 140 single-text character limit. Messages that exceed this limit but still remain within the 400-character maximum threshold should note the following:
Existing text message templates still display in their entirety but must be modified to be within this limit before sending.
Users wishing to stop receiving text messages can text STOP to the shortcode. This results in the user receiving no further text messages from Campus, even if the user has the Text option marked on their Contact Preferences. Users need to go through the opt-in process again to start receiving texts at a later date. |
Create Templates
You can create and use templates or create emergency messages as needed.
A district may want to create message templates to use in emergency situations. For example, the district might create templates for emergency situations such as school closures. It is recommended that districts prepare for potential emergencies by creating templates beforehand; however, templates are not required. Templates can be saved only as text; .wav files cannot be saved because they cannot be customized for a date or time.
- Verify that the <New> value is displayed in the Template field.
- Select User (default) or a User Group to which the template should be saved from the User/User Group dropdown field. Templates saved under a User Group are available to other members of the group.
- Mark the checkbox next to the Delivery Devices to which you want to send the message.
- Enter a Sender Display Name (if enabled and Delivery Device *Email* is selected).
- Enter a Message Subject to summarize the content of the message.
- Enter the details of the message in the Message Body text box.
- Complete one of the following options:
- Click the Copy from Message Body option to send the same message as a text message (limited to 140 characters).
If not sending the same message, enter the text in the Text Message area.
Emergency text messages are only delivered to a recipient as a final attempt at contact. They are ONLY sent when all initial emergency phone calls and the scheduled number of redials have been attempted for the number without receipt confirmation from the recipient. Should the recipient confirm receipt of the message (by pressing "0" after listening), all text messages scheduled for delivery to that recipient's phone numbers are canceled. Additional phone calls and/or redials are also canceled.
- Click the Save button to the right of the Template field. A pop-up window will appear asking for the template's name.
- Enter the template name and click OK. The template is saved and available for selection within the Template field.
Send Emergency Messages
Messages should be sent through the Emergency Messenger tool only when the need for contact is immediate. Unlike other message types, emergency messages cannot be scheduled for a future date or time and are sent immediately after creation.
It is the district's discretion as to what is and is not an emergency message.
When a specific School is selected in the campus toolbar, that school is highlighted as the School Option. If the Campus toolbar has All Schools selected, specify a School Option before sending the message. Emergency message recipients must be specified each time a new message is sent—even when using a saved template. A message may be sent to student messenger contacts/guardians, staff members, or student and staff contacts.
Complete one of the following options.
Option
Description
Use an existing template
Select an existing template from the Template dropdown field. If the template was saved under a User Group, select the Group from the User/User Group dropdown field. The Message Subject, Message Body, and Text Message fields populate with the information from the selected template.
Create a new message
- Verify that the <New> value is displayed in the Template field.
- Enter a Message Subject to summarize the content of the message.
- Enter the details of the message in the Message Body text box.
Use the Field Descriptions to complete the Emergency Messenger editor.
The Ad hoc Filter includes all Filters and Data Types available to you, but only one can be selected. If you choose to send messages to Student and Staff Contacts, DO NOT use an Ad hoc filter based on a Student Data Type, or staff are NOT sent a message (except any staff who are also students).Browse and upload an email/voice attachment. (optional)
You must click the Upload button after browsing for the attachment. The Attach File message displays on the screen when an attachment is properly uploaded.
Test the Emergency Message.
The Test button allows the user to type in a single phone number and email address to which the voice or email message is sent for previewing. This feature should be used to test the text-to-speech pronunciation.- Click the Test button. The test pop-up window displays.
- Enter a Destination Phone # in 10-digit format (Enter your number for testing purposes).
- Select Send Test to prompt the call.
- Click OK on the verification.
- Wait several seconds.
- Answer the call and review the message for pronunciation, accuracy, and inclusion of .wav files, if uploaded.
Preview the Emergency Message recipients.
The Preview/Send button allows the user to preview and modify the recipients and numbers to which the emergency message is sent. The Preview button does not allow the user to listen to the message (which should be done through the Test button).Click the Preview/Send button. The following window displays.
The Recipient Count displays all eligible recipients; however, not all eligible recipients receive a message if they do not have any delivery devices available.The Process Inbox Count displays the number of recipients with Portal accounts.
The Email Count displays the number of recipients with email addresses marked to get Emergency messages.
The Voice/Text Count displays the number of recipients with phone numbers marked for Emergency messages for either Voice and/or Text (Text is available if purchased by the district).
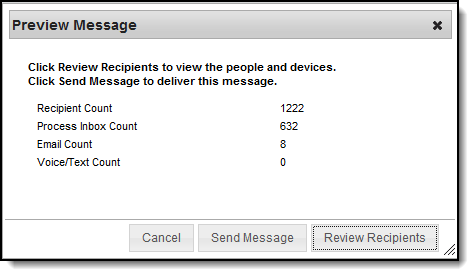
Click the Review Recipients button to display a list of individuals who will receive the message. All recipients and phone numbers to which the message is sent are displayed for verification. To exclude particular recipients and/or their phone numbers, remove the flag of the appropriate checkboxes.
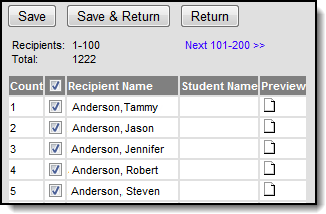
- Click Save & Return or Cancel.
Click the Send Message button. The message is immediately sent to the selected recipients.
Infinite Campus recommends testing and previewing the message BEFORE sending.
Send an Emergency Message
Now that a template has been created, it can be used to send emergency messages.
Tool Search: Emergency Messenger
The Emergency Messenger allows you to quickly create and deliver emergency messages to staff or guardians. Unlike other Campus messages, an emergency message has no scheduled delivery window. All messages are delivered immediately or as quickly as possible. Emergency notifications are NOT limited to the allowed dialing window established by the Voice Settings tool.
Emergency message recipients must be specified each time a new message is sent--even when using a saved template.
Emergency Messenger can be used after you set up Messenger Settings.
Emergency Messenger respects the Active Year, Calendar Start/End Dates, Term Start/End Dates, and student enrollment status.
- Emails exceeding the amount set by the email service provider may fail due to controls set by the provider to prevent SPAM.
- Free email service providers also typically set the maximum number of emails that can be sent per day. After that limit is reached, usually in a 24-hour rolling period, additional emails will not be sent until the time passes.
- For more information about Google's sending limits, see the following articles:
 Emergency Messenger
 See the Emergency Messenger Tool Rights articles for information on available tool rights.
Emergency Message Logic
The Emergency Messenger sends messages to contacts based on the phone numbers and email addresses marked to receive emergency messages on the Demographics tool. For a person to receive an emergency message, the Emergency checkbox must be marked for a phone number or email address in the Personal Contact Information section. Phone numbers and email addresses that do not have the Emergency checkbox marked do not receive an emergency message.
For more information, please refer to the following articles:
Settings applied for general voice messaging in the Prompt Preferences also apply to emergency messaging. Any text or .wav files specified for voice messages are also appended to emergency messages, as are redial settings (configured on the Voice Settings tool).
Phone Recipient Confirmation
When voice messages are delivered, Shoutpoint may attempt to reach a recipient at multiple phone numbers. Shoutpoint continues to call recipient phone numbers until the recipient confirms the message receipt or until the maximum number of redials is met as allowed by the district (configured on the Voice Settings tool).
To confirm message delivery, a recipient must press "0" at the end of a voice message. This cancels all additional delivery and/or redial attempts for recipients with non-shared or non-extension numbers.
Confirming and canceling calls to other phone numbers works in the following way:
- Recipients can confirm calls on any phone number, even those shared with any other recipient in Campus.
- If a phone number contains an extension, recipients are not be able to confirm the call.
- Confirming calls to phone numbers for the same recipient does not cancel calls to any phone numbers which contain extensions.
- If multiple recipients share a phone number but have different Delivery Devices selected for the same Messenger tool (Voice/Text), Voice call confirmation does not prevent the Text message from going out to the other recipient.
Field Descriptions
| Field | Description |
|---|---|
| User/Group | This dropdown list allows you to save message templates to your user account or a user group to which you belong. |
| Template | This dropdown list displays a list of available templates. To create a new template, select <new> from this list. Templates save to either the User (default), or User Group where they are accessible to other members in the group.
Minimize future message setup time by creating and saving templates. Templates save:
|
| Filter Criteria | |
| Send Messages To | Emergency messages may be sent to the following recipients:
|
| School Options | This field determines which schools receive the message. The schools that display are a comprehensive list of schools to which you currently or previously had calendar rights. When the All Schools option is selected, only the schools where you are current year calendar rights are sent a message. |
| Grade | This field determines which grade(s) receive the message. |
| Staff Types |
This field determines the type of staff member who receives the message. |
| Ad hoc Filter | The Ad hoc Filter field allows you to limit the message recipients. The dropdown selector includes all Filters and Data Types available to you, but only one can be selected. If you choose to send messages to Student and Staff Contacts DO NOT use an Ad hoc filter based on a Student Data Type, or staff are NOT sent a message (with the exception of any staff who are also currently students). |
| Delivery Devices | |
| Inbox | The Inbox option is automatically selected. This option places a note in the parent's portal inbox that a new message is available. Infinite Campus strongly recommends leaving this option marked to ensure delivery to guardians with a Portal Account, but no other delivery device is marked for messages. |
| The Email option sends an email to the guardian's email address on record (entered in Census > Demographics). | |
| Voice | The Voice option calls the guardian's phone number on record (entered in Census > Demographics). |
| Text | The Text option sends a text message to the guardian's mobile device. Recipients who have indicated a desire to receive text messages must have the Emergency checkbox marked for Text (SMS) on the Personal Contact Information editor of the Demographics tool to receive text messages. |
| Message Details | |
Create and save templates with your name and contact information (email/phone) in the message body for guardians to reference. | |
| Reply to Email | This field displays the email address entered in Messenger Settings > Email Settings > Sender Email Address. This field cannot be changed. |
| Caller ID | This field displays the phone number entered in Messenger Settings > Caller ID Preferences. This field cannot be changed. |
| Sender Display Name | Entries to this field will be displayed in the recipient's email inbox for easier sender identification.
 This field is only available if the Allow Custom Sender Display Name checkbox is marked on the Email Settings tool AND Email is selected as a delivery device in the message template. |
| Message Subject | This field determines the text displayed in the email message's subject field. |
| Message Body | The message sent to the Portal Inbox, via email, and by TTS for Voice (if no .wav file) is uploaded.
Message Body supports the use of Chinese characters for email messages only. |
This option allows you to send a voice message. For more information about this feature, see the Messenger with Voice—Setup and Details article.
After browsing for the attachment, you must click the Upload button. The Attach File message displays on the screen when an attachment is properly uploaded.
Uploaded .wav files are played immediately after the Hello Message specified in the Prompt Preferences. | |
| Browse and upload an email attachment | This option allows you to add an attachment to the email. See the Digital Repository Preferences article for information about supported file types and sizes.
After browsing for the attachment, you must click the Upload button. The Attach File message displays on the screen when an attachment is properly uploaded.
This option is controlled by an email preference set by the District Administrator and may not be displayed in all districts. |
| Text Message | This field is used to enter the text message sent to mobile devices. The maximum length of a text message is set to 400 characters. When a text message reaches this length, a warning message displays indicating such. The message cannot be saved until the character limit is met. Campus recommends districts stay within a 140 single-text character limit. Messages that exceed this limit but still remain within the 400-character maximum threshold should note the following:
Existing text message templates still display in their entirety but must be modified to be within this limit before sending.
Users wishing to stop receiving text messages can text STOP to the shortcode. This results in the user receiving no further text messages from Campus, even if the user has the Text option marked on their Contact Preferences. Users need to go through the opt-in process again to start receiving texts at a later date. |
Create Templates
You can create and use templates or create emergency messages as needed.
A district may want to create message templates to use in emergency situations. For example, the district might create templates for emergency situations such as school closures. It is recommended that districts prepare for potential emergencies by creating templates beforehand; however, templates are not required. Templates can be saved only as text; .wav files cannot be saved because they cannot be customized for a date or time.
- Verify that the <New> value is displayed in the Template field.
- Select User (default) or a User Group to which the template should be saved from the User/User Group dropdown field. Templates saved under a User Group are available to other members of the group.
- Mark the checkbox next to the Delivery Devices to which you want to send the message.
- Enter a Sender Display Name (if enabled and Delivery Device *Email* is selected).
- Enter a Message Subject to summarize the content of the message.
- Enter the details of the message in the Message Body text box.
- Complete one of the following options:
- Click the Copy from Message Body option to send the same message as a text message (limited to 140 characters).
If not sending the same message, enter the text in the Text Message area.
Emergency text messages are only delivered to a recipient as a final attempt at contact. They are ONLY sent when all initial emergency phone calls and the scheduled number of redials have been attempted for the number without receipt confirmation from the recipient. Should the recipient confirm receipt of the message (by pressing "0" after listening), all text messages scheduled for delivery to that recipient's phone numbers are canceled. Additional phone calls and/or redials are also canceled.
- Click the Save button to the right of the Template field. A pop-up window will appear asking for the template's name.
- Enter the template name and click OK. The template is saved and available for selection within the Template field.
Send Emergency Messages
Messages should be sent through the Emergency Messenger tool only when the need for contact is immediate. Unlike other message types, emergency messages cannot be scheduled for a future date or time and are sent immediately after creation.
It is the district's discretion as to what is and is not an emergency message.
When a specific School is selected in the campus toolbar, that school is highlighted as the School Option. If the Campus toolbar has All Schools selected, specify a School Option before sending the message. Emergency message recipients must be specified each time a new message is sent—even when using a saved template. A message may be sent to student messenger contacts/guardians, staff members, or student and staff contacts.
Complete one of the following options.
Option
Description
Use an existing template
Select an existing template from the Template dropdown field. If the template was saved under a User Group, select the Group from the User/User Group dropdown field. The Message Subject, Message Body, and Text Message fields populate with the information from the selected template.
Create a new message
- Verify that the <New> value is displayed in the Template field.
- Enter a Message Subject to summarize the content of the message.
- Enter the details of the message in the Message Body text box.
Use the Field Descriptions to complete the Emergency Messenger editor.
The Ad hoc Filter includes all Filters and Data Types available to you, but only one can be selected. If you choose to send messages to Student and Staff Contacts, DO NOT use an Ad hoc filter based on a Student Data Type, or staff are NOT sent a message (except any staff who are also students).Browse and upload an email/voice attachment. (optional)
You must click the Upload button after browsing for the attachment. The Attach File message displays on the screen when an attachment is properly uploaded.
Test the Emergency Message.
The Test button allows the user to type in a single phone number and email address to which the voice or email message is sent for previewing. This feature should be used to test the text-to-speech pronunciation.- Click the Test button. The test pop-up window displays.
- Enter a Destination Phone # in 10-digit format (Enter your number for testing purposes).
- Select Send Test to prompt the call.
- Click OK on the verification.
- Wait several seconds.
- Answer the call and review the message for pronunciation, accuracy, and inclusion of .wav files, if uploaded.
Preview the Emergency Message recipients.
The Preview/Send button allows the user to preview and modify the recipients and numbers to which the emergency message is sent. The Preview button does not allow the user to listen to the message (which should be done through the Test button).Click the Preview/Send button. The following window displays.
The Recipient Count displays all eligible recipients; however, not all eligible recipients receive a message if they do not have any delivery devices available.The Process Inbox Count displays the number of recipients with Portal accounts.
The Email Count displays the number of recipients with email addresses marked to get Emergency messages.
The Voice/Text Count displays the number of recipients with phone numbers marked for Emergency messages for either Voice and/or Text (Text is available if purchased by the district).

Click the Review Recipients button to display a list of individuals who will receive the message. All recipients and phone numbers to which the message is sent are displayed for verification. To exclude particular recipients and/or their phone numbers, remove the flag of the appropriate checkboxes.

- Click Save & Return or Cancel.
Click the Send Message button. The message is immediately sent to the selected recipients.
Infinite Campus recommends testing and previewing the message BEFORE sending.
Attendance Messenger
This section shows how to create a template for sending messages regarding a student's attendance. Use the template to send a message manually or schedule it to be sent automatically.
Create an Attendance Messenger Template
The Attendance Messenger tool is used to send email messages to parents and guardians regarding their child's absences and tardies. If a district purchased Messenger with Voice, voice messages can be sent as well.
Before messages can be sent, a template must be created.
Voice and text message features described in this article only apply to schools/districts that use Campus Messenger with Voice add-on functionality
The Attendance Messenger creates attendance message templates that specify delivery criteria. Messages may be sent to student messenger contacts immediately through this tool or set for automated delivery with the Attendance Messenger Scheduler tool.
This tool only works in the active school year.
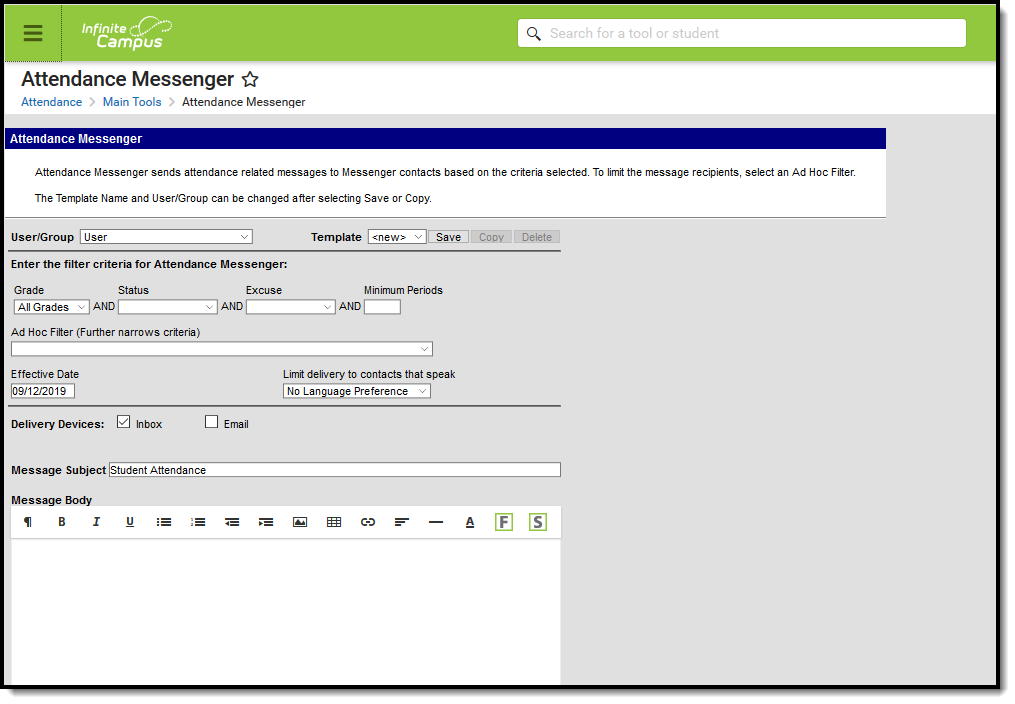
Attendance Messenger Editor
See the Attendance Messenger Tool Rights article for information about rights needed to use this tool.
Attendance Messenger Field Descriptions
| Field | Description | ||||||
|---|---|---|---|---|---|---|---|
| User/Group | This dropdown list allows you to save message templates to your user account or a user group to which you belong. | ||||||
| Template | This dropdown list displays a list of available templates. To create a new template, select <new> from this list. | ||||||
| Filter Criteria | |||||||
| Grade | This field determines which grade(s) report in the message. | ||||||
| Status | This field determines which attendance records are include in the message, based on the assigned attendance status. One attendance status can be selected: Absent, Tardy or Early Release. | ||||||
| Excuse | This field determines which attendance records to include in the message, based on the assigned attendance excuse. One attendance excuse can be selected: Excused, Unexcused or Unknown. | ||||||
| Minimum Periods | This field determines which attendance records to include in the message. Enter the minimum number of periods for which the status and excuse combination must occur. Only Instructional periods are considered when sending attendance messages. Attendance recorded for non-instructional periods is NOT included. | ||||||
| Ad hoc Filter | This is a list of saved student-type Ad hoc filters. | ||||||
| Effective Date | The day on which the attendance event occurred. | ||||||
| Limit Delivery to contacts that speak | Use this field to limit message delivery to the language set in the Preferred Language Field on the person's Demographics tool. To send messages to student messenger contacts whose Preferred Language is English AND student messenger contacts whose Preferred Language is Spanish, two separate templates must be created. | ||||||
Delivery Devices | |||||||
| Inbox | The Inbox option is automatically selected. This option places a note in the student messenger contact's inbox that a new message is available. Infinite Campus strongly recommends leaving this option marked to ensure delivery to the student messenger contact with a Portal Account but no other delivery device marked for messages from teachers. | ||||||
| The Email option sends an email to the student messenger contact's email address on record (entered in Census > People > Demographics). | |||||||
| Voice | The Voice option calls the student messenger contact's phone number on record (entered in Census > People > Demographics). | ||||||
| Text | The Text option sends a text message to the student messenger contact's mobile device. Recipients who have indicated a desire to receive text messages must have the Text (SMS) checkbox marked in the Personal Contact Information editor of the Demographics tool to receive text messages. Sub-reports cannot be used for Text messages. | ||||||
| Message Details | |||||||
| Sender's Email | This field displays the email address that is automatically included in the message body for message recipients to reference. This field can be changed if the Allow Custom Sender's Email Address checkbox is marked on the Email Settings tool. Existing templates may display a different address if the Allow Custom Sender's Email Address checkbox is marked and a user modified the Sender’s Email field.
| ||||||
| Caller ID | This field displays the phone number that is automatically included in the message body for message recipients to reference.
This field can only be changed if the Allow Custom Caller ID checkbox is marked on the Voice Settings tool. Existing templates may display a different Caller ID if the Allow Custom Caller ID checkbox is marked and a user modified the Caller ID field. | ||||||
| Message Subject | This field determines the text that displays in the Subject field of the email message. The default subject is Student Attendance but can be changed to something else. | ||||||
| Message Body | This field contains the text contained in the message. See the Campus Insert Fields for Message Builder section for important information about inserting Campus fields in the Message Body and the Text Message body. The Message Body uses a WYSIWYG editor. For more information about using the options available with the editor, see the WYSIWYG Editors article. Do NOT copy attribute fields from another Messenger tool in Campus. The attribute fields are not the same. Message Body supports the use of Chinese characters for email messages only. | ||||||
This option allows you to send a voice message. See the article Messenger with Voice - Setup and Details for more information about this feature. You must click the Upload button after browsing for the attachment. When an attachment is properly uploaded, the Attach File message displays on the screen. | |||||||
| Browse and upload an email attachment | This option allows you to add an attachment to the email. See the article the Digital Repository Preferences or information about supported file types and sizes. You must click the Upload button after browsing for the attachment. When an attachment is properly uploaded, the Attach File message displays on the screen. | ||||||
| Text Message | The text message to be sent to the student messenger contact's mobile device. The ability to send text messages is controlled by a preference set by the District Administrator. There is a character limit of 400 characters for text messages. Infinite Campus recommends not exceeding 140 characters as this may result in multiple messages being sent to recipients in random order. The maximum length of a text message is set to 400 characters. When a text message reaches this length, a warning message displays indicating such. The message cannot be saved until the character limit is met.Existing text message templates still display in their entirety, but need to be modified to be within this limit before sending. If users wish to stop receiving text messages, they can text STOP to the short code. This results in the user receiving no further text messages from Campus, even if the user has the Text option marked on their Contact Preferences. Users need to go through the opt in process again to start receiving texts at a later date. | ||||||
| Delivery Date: | The day on which the message should be sent. | ||||||
| Send Inbox/Emails at: | The time inbox and/or email messages begin to be delivered. The time saves with the templates. If messages should always go out immediately after Send is selected, this field should be left blank. | ||||||
| Dial Window: | These fields create a dialing window during which a general voice message may be sent. The default values for these fields are set up on the Voice Settings tool. (System Administration > Messenger > Messenger Preferences > Voice Settings). Dial Window times must be entered and saved with templates. If the start time entered on the message is earlier than the start time on the template (and the start time on the template is after the start time entered on the Voice Settings tool), Messenger uses the start time on the template and does not send the message until that time is reached. If the end time on the Dial Window is earlier than the end time entered on the Voice Settings tool, calls do not stop. Instead, they continue until the end time on the Voice Settings tool is reached. In addition, if a voice message is still delivering when the District end time is reached, message delivery stops and is not completed. | ||||||
Campus Fields and Sub-Reports for Attendance Messenger
Campus Fields and Sub-Reports includes specific fields for use in the Message Body WYSIWYG. These fields are designed to pull the latest qualifying event, based on filter criteria. Other fields are available but they use ad hoc logic and may not return the most recent event data if there are multiple events in a year.
Any ad hoc fields that have been deactivated display in red. Use the Element Replacement tool to locate deactivated elements and replace them with the new field.
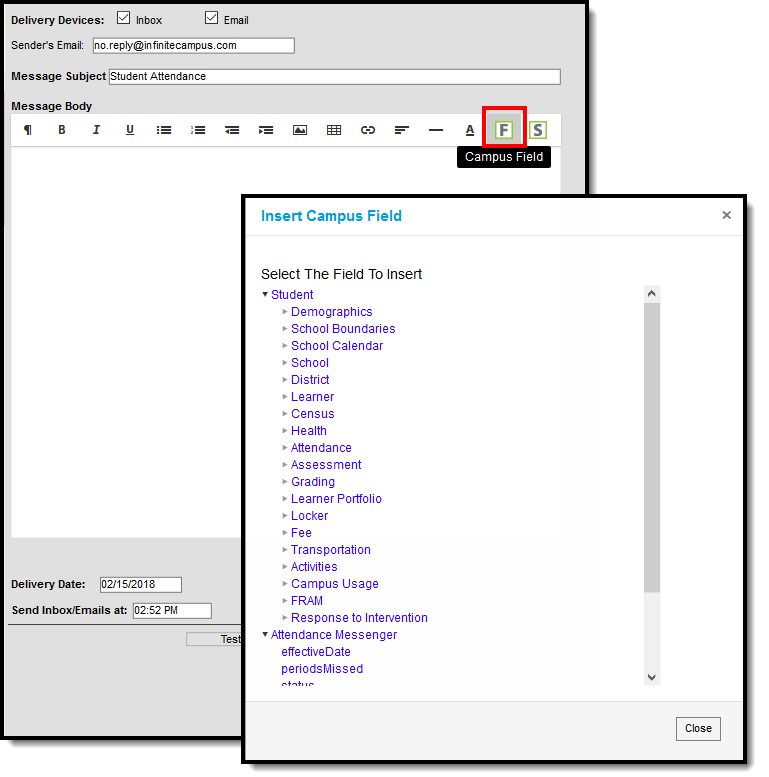
Attendance Messenger Campus Fields Selection
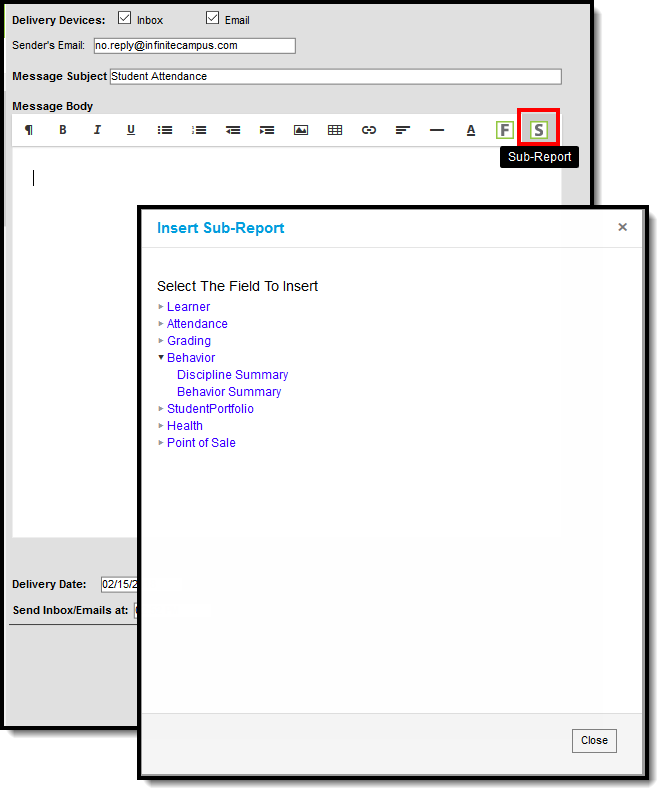
Attendance Messenger Sub-Reports Selection
Sub-Report Options
The following table lists the sub-report options for each area.
| Area | Sub-Reports |
|---|---|
| Learner | Student Schedule Active and Dropped Student Sch |
| Learner Planning | Course Requests Course Plan |
| Attendance | Period Mark Summary Course Mark Summary Whole/Half Day Summary Exact Day Summary Single Day Count Summary |
| Grading | Grade Detail Term GPA Summary |
| Behavior | Discipline Summary Behavior Summary |
| Student Portfolio | Cumulative GPA and Class Rank |
| Health | Immunization Health Screening Concussion Health Screening Dental Health Screening Hearing Health Screening Scoliosis Health Screening Vision |
| Point of Sale | POS Account Balance |
When using sub-reports in letters, please note the following:
- All behavior data is included when adding either of the sub-reports.
- A field only displays if there is data for that field. If a field is chosen from the sub-report but there is no saved data for that student, information for that field does not display.
- A sub-report option only displays if the district/school records that data.
Create a New Template
Templates allow you to create reusable messages that save time and standardize content.
- Select the <New> option from the Template dropdown list.
- Use the Field Descriptions to complete the Attendance Messenger editor.
The Message Body uses a WYSIWYG editor.
Do NOT copy attribute fields from another Messenger tool in Campus. The attribute fields are not the same.
For more information about using the options available with the editor, see the WYSIWYG Editors article.
- Click the Save button at the top message editor.
- Enter a name for the template in the pop-up box. The template appears in the Template dropdown list.
Delete a Template
- Select the template you want to delete from the Template dropdown list.
- Click the Delete button. A confirmation message displays.
- Click the OK button. Campus removes the template and it does not display in the Template dropdown list.
Create Attendance Messenger Notifications
- Select an existing Template from the Template dropdown list.
- Use the Field Descriptions to complete the Attendance Messenger editor.
The Message Body uses a WYSIWYG editor.
Do NOT copy attribute fields from another Messenger tool in Campus. The attribute fields are not the same.
For more information about using the options available with the editor, see the WYSIWYG Editors article.
Browse and upload an email/voice attachment. (optional)
You must click the Upload button after browsing for the attachment. When an attachment is properly uploaded, the Attach File message displays on the screen.

Test the Attendance Message by clicking the Test button. (optional)
The Test button allows the user to type in a single phone number or email address to which the voice or email message is sent for previewing. This feature should be used to test the text-to-speech pronunciation. Infinite Campus recommends testing messages before delivering them. A message is sent in the exact manner in which it is delivered to recipients. The Test Message screen confirms that the test message was sent.- Click the Test button. The test pop-up window displays.
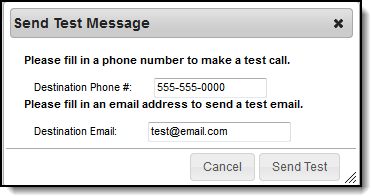
- Enter a Destination Phone # in 10-digit format (Enter your own number for testing purposes).
- Enter a Destination Email.
- Select Send Test.
- Click OK on the verification.
- Wait several seconds.
- Answer the call and review the message for pronunciation, accuracy and inclusion of .wav files, if uploaded.
- Click the Test button. The test pop-up window displays.
- Click the Preview/Send button to review the message and its recipients.
- Click the Send Message button. The message is sent to the appropriate student messenger contacts.
The Attendance Messenger tool allows users to create message templates for parents/guardians of students who meet specific attendance criteria. This video demonstrates how to create an attendance message template.
Send an Attendance Message (Manually)
Now that the template has been created, an attendance message can be sent manually or it can be scheduled to be sent later in the day.
This article shows the manual way of sending an attendance message.
Voice and text message features described in this article only apply to schools/districts that use Campus Messenger with Voice add-on functionality
The Attendance Messenger creates attendance message templates that specify delivery criteria. Messages may be sent to student messenger contacts immediately through this tool or set for automated delivery with the Attendance Messenger Scheduler tool.
This tool only works in the active school year.

Attendance Messenger Editor
See the Attendance Messenger Tool Rights article for information about rights needed to use this tool.
Attendance Messenger Field Descriptions
| Field | Description | ||||||
|---|---|---|---|---|---|---|---|
| User/Group | This dropdown list allows you to save message templates to your user account or a user group to which you belong. | ||||||
| Template | This dropdown list displays a list of available templates. To create a new template, select <new> from this list. | ||||||
| Filter Criteria | |||||||
| Grade | This field determines which grade(s) report in the message. | ||||||
| Status | This field determines which attendance records are include in the message, based on the assigned attendance status. One attendance status can be selected: Absent, Tardy or Early Release. | ||||||
| Excuse | This field determines which attendance records to include in the message, based on the assigned attendance excuse. One attendance excuse can be selected: Excused, Unexcused or Unknown. | ||||||
| Minimum Periods | This field determines which attendance records to include in the message. Enter the minimum number of periods for which the status and excuse combination must occur. Only Instructional periods are considered when sending attendance messages. Attendance recorded for non-instructional periods is NOT included. | ||||||
| Ad hoc Filter | This is a list of saved student-type Ad hoc filters. | ||||||
| Effective Date | The day on which the attendance event occurred. | ||||||
| Limit Delivery to contacts that speak | Use this field to limit message delivery to the language set in the Preferred Language Field on the person's Demographics tool. To send messages to student messenger contacts whose Preferred Language is English AND student messenger contacts whose Preferred Language is Spanish, two separate templates must be created. | ||||||
Delivery Devices | |||||||
| Inbox | The Inbox option is automatically selected. This option places a note in the student messenger contact's inbox that a new message is available. Infinite Campus strongly recommends leaving this option marked to ensure delivery to the student messenger contact with a Portal Account but no other delivery device marked for messages from teachers. | ||||||
| The Email option sends an email to the student messenger contact's email address on record (entered in Census > People > Demographics). | |||||||
| Voice | The Voice option calls the student messenger contact's phone number on record (entered in Census > People > Demographics). | ||||||
| Text | The Text option sends a text message to the student messenger contact's mobile device. Recipients who have indicated a desire to receive text messages must have the Text (SMS) checkbox marked in the Personal Contact Information editor of the Demographics tool to receive text messages. Sub-reports cannot be used for Text messages. | ||||||
| Message Details | |||||||
| Sender's Email | This field displays the email address that is automatically included in the message body for message recipients to reference. This field can be changed if the Allow Custom Sender's Email Address checkbox is marked on the Email Settings tool. Existing templates may display a different address if the Allow Custom Sender's Email Address checkbox is marked and a user modified the Sender’s Email field.
| ||||||
| Caller ID | This field displays the phone number that is automatically included in the message body for message recipients to reference.
This field can only be changed if the Allow Custom Caller ID checkbox is marked on the Voice Settings tool. Existing templates may display a different Caller ID if the Allow Custom Caller ID checkbox is marked and a user modified the Caller ID field. | ||||||
| Message Subject | This field determines the text that displays in the Subject field of the email message. The default subject is Student Attendance but can be changed to something else. | ||||||
| Message Body | This field contains the text contained in the message. See the Campus Insert Fields for Message Builder section for important information about inserting Campus fields in the Message Body and the Text Message body. The Message Body uses a WYSIWYG editor. For more information about using the options available with the editor, see the WYSIWYG Editors article. Do NOT copy attribute fields from another Messenger tool in Campus. The attribute fields are not the same. Message Body supports the use of Chinese characters for email messages only. | ||||||
This option allows you to send a voice message. See the article Messenger with Voice - Setup and Details for more information about this feature. You must click the Upload button after browsing for the attachment. When an attachment is properly uploaded, the Attach File message displays on the screen. | |||||||
| Browse and upload an email attachment | This option allows you to add an attachment to the email. See the article the Digital Repository Preferences or information about supported file types and sizes. You must click the Upload button after browsing for the attachment. When an attachment is properly uploaded, the Attach File message displays on the screen. | ||||||
| Text Message | The text message to be sent to the student messenger contact's mobile device. The ability to send text messages is controlled by a preference set by the District Administrator. There is a character limit of 400 characters for text messages. Infinite Campus recommends not exceeding 140 characters as this may result in multiple messages being sent to recipients in random order. The maximum length of a text message is set to 400 characters. When a text message reaches this length, a warning message displays indicating such. The message cannot be saved until the character limit is met.Existing text message templates still display in their entirety, but need to be modified to be within this limit before sending. If users wish to stop receiving text messages, they can text STOP to the short code. This results in the user receiving no further text messages from Campus, even if the user has the Text option marked on their Contact Preferences. Users need to go through the opt in process again to start receiving texts at a later date. | ||||||
| Delivery Date: | The day on which the message should be sent. | ||||||
| Send Inbox/Emails at: | The time inbox and/or email messages begin to be delivered. The time saves with the templates. If messages should always go out immediately after Send is selected, this field should be left blank. | ||||||
| Dial Window: | These fields create a dialing window during which a general voice message may be sent. The default values for these fields are set up on the Voice Settings tool. (System Administration > Messenger > Messenger Preferences > Voice Settings). Dial Window times must be entered and saved with templates. If the start time entered on the message is earlier than the start time on the template (and the start time on the template is after the start time entered on the Voice Settings tool), Messenger uses the start time on the template and does not send the message until that time is reached. If the end time on the Dial Window is earlier than the end time entered on the Voice Settings tool, calls do not stop. Instead, they continue until the end time on the Voice Settings tool is reached. In addition, if a voice message is still delivering when the District end time is reached, message delivery stops and is not completed. | ||||||
Campus Fields and Sub-Reports for Attendance Messenger
Campus Fields and Sub-Reports includes specific fields for use in the Message Body WYSIWYG. These fields are designed to pull the latest qualifying event, based on filter criteria. Other fields are available but they use ad hoc logic and may not return the most recent event data if there are multiple events in a year.
Any ad hoc fields that have been deactivated display in red. Use the Element Replacement tool to locate deactivated elements and replace them with the new field.

Attendance Messenger Campus Fields Selection

Attendance Messenger Sub-Reports Selection
Sub-Report Options
The following table lists the sub-report options for each area.
| Area | Sub-Reports |
|---|---|
| Learner | Student Schedule Active and Dropped Student Sch |
| Learner Planning | Course Requests Course Plan |
| Attendance | Period Mark Summary Course Mark Summary Whole/Half Day Summary Exact Day Summary Single Day Count Summary |
| Grading | Grade Detail Term GPA Summary |
| Behavior | Discipline Summary Behavior Summary |
| Student Portfolio | Cumulative GPA and Class Rank |
| Health | Immunization Health Screening Concussion Health Screening Dental Health Screening Hearing Health Screening Scoliosis Health Screening Vision |
| Point of Sale | POS Account Balance |
When using sub-reports in letters, please note the following:
- All behavior data is included when adding either of the sub-reports.
- A field only displays if there is data for that field. If a field is chosen from the sub-report but there is no saved data for that student, information for that field does not display.
- A sub-report option only displays if the district/school records that data.
Create a New Template
Templates allow you to create reusable messages that save time and standardize content.
- Select the <New> option from the Template dropdown list.
- Use the Field Descriptions to complete the Attendance Messenger editor.
The Message Body uses a WYSIWYG editor.
Do NOT copy attribute fields from another Messenger tool in Campus. The attribute fields are not the same.
For more information about using the options available with the editor, see the WYSIWYG Editors article.
- Click the Save button at the top message editor.
- Enter a name for the template in the pop-up box. The template appears in the Template dropdown list.
Delete a Template
- Select the template you want to delete from the Template dropdown list.
- Click the Delete button. A confirmation message displays.
- Click the OK button. Campus removes the template and it does not display in the Template dropdown list.
Create Attendance Messenger Notifications
- Select an existing Template from the Template dropdown list.
- Use the Field Descriptions to complete the Attendance Messenger editor.
The Message Body uses a WYSIWYG editor.
Do NOT copy attribute fields from another Messenger tool in Campus. The attribute fields are not the same.
For more information about using the options available with the editor, see the WYSIWYG Editors article.
Browse and upload an email/voice attachment. (optional)
You must click the Upload button after browsing for the attachment. When an attachment is properly uploaded, the Attach File message displays on the screen.

Test the Attendance Message by clicking the Test button. (optional)
The Test button allows the user to type in a single phone number or email address to which the voice or email message is sent for previewing. This feature should be used to test the text-to-speech pronunciation. Infinite Campus recommends testing messages before delivering them. A message is sent in the exact manner in which it is delivered to recipients. The Test Message screen confirms that the test message was sent.- Click the Test button. The test pop-up window displays.

- Enter a Destination Phone # in 10-digit format (Enter your own number for testing purposes).
- Enter a Destination Email.
- Select Send Test.
- Click OK on the verification.
- Wait several seconds.
- Answer the call and review the message for pronunciation, accuracy and inclusion of .wav files, if uploaded.
- Click the Test button. The test pop-up window displays.
- Click the Preview/Send button to review the message and its recipients.
- Click the Send Message button. The message is sent to the appropriate student messenger contacts.
Send an Attendance Message (Automatically)
The Attendance Messenger Scheduler tool sets the dates and times for automatic delivery of attendance messages, according to a template first created in the Attendance Messenger tool.
Tool Search: Attendance Messenger Scheduler
Voice and text message features described in this article only apply to schools/districts that use Campus Messenger with Voice add-on functionality
The Attendance Messenger Scheduler tool sets the dates and times for automatic delivery of attendance messages, according to a template first created in the Attendance Messenger tool.
The Attendance Messenger Scheduler will automatically generate messages based on the data available at that time. A confirmation email will be sent to the person that created the messenger schedule telling them that it has run and how many phones/email devices received the message. The person must have an email address entered on their Demographics tab.
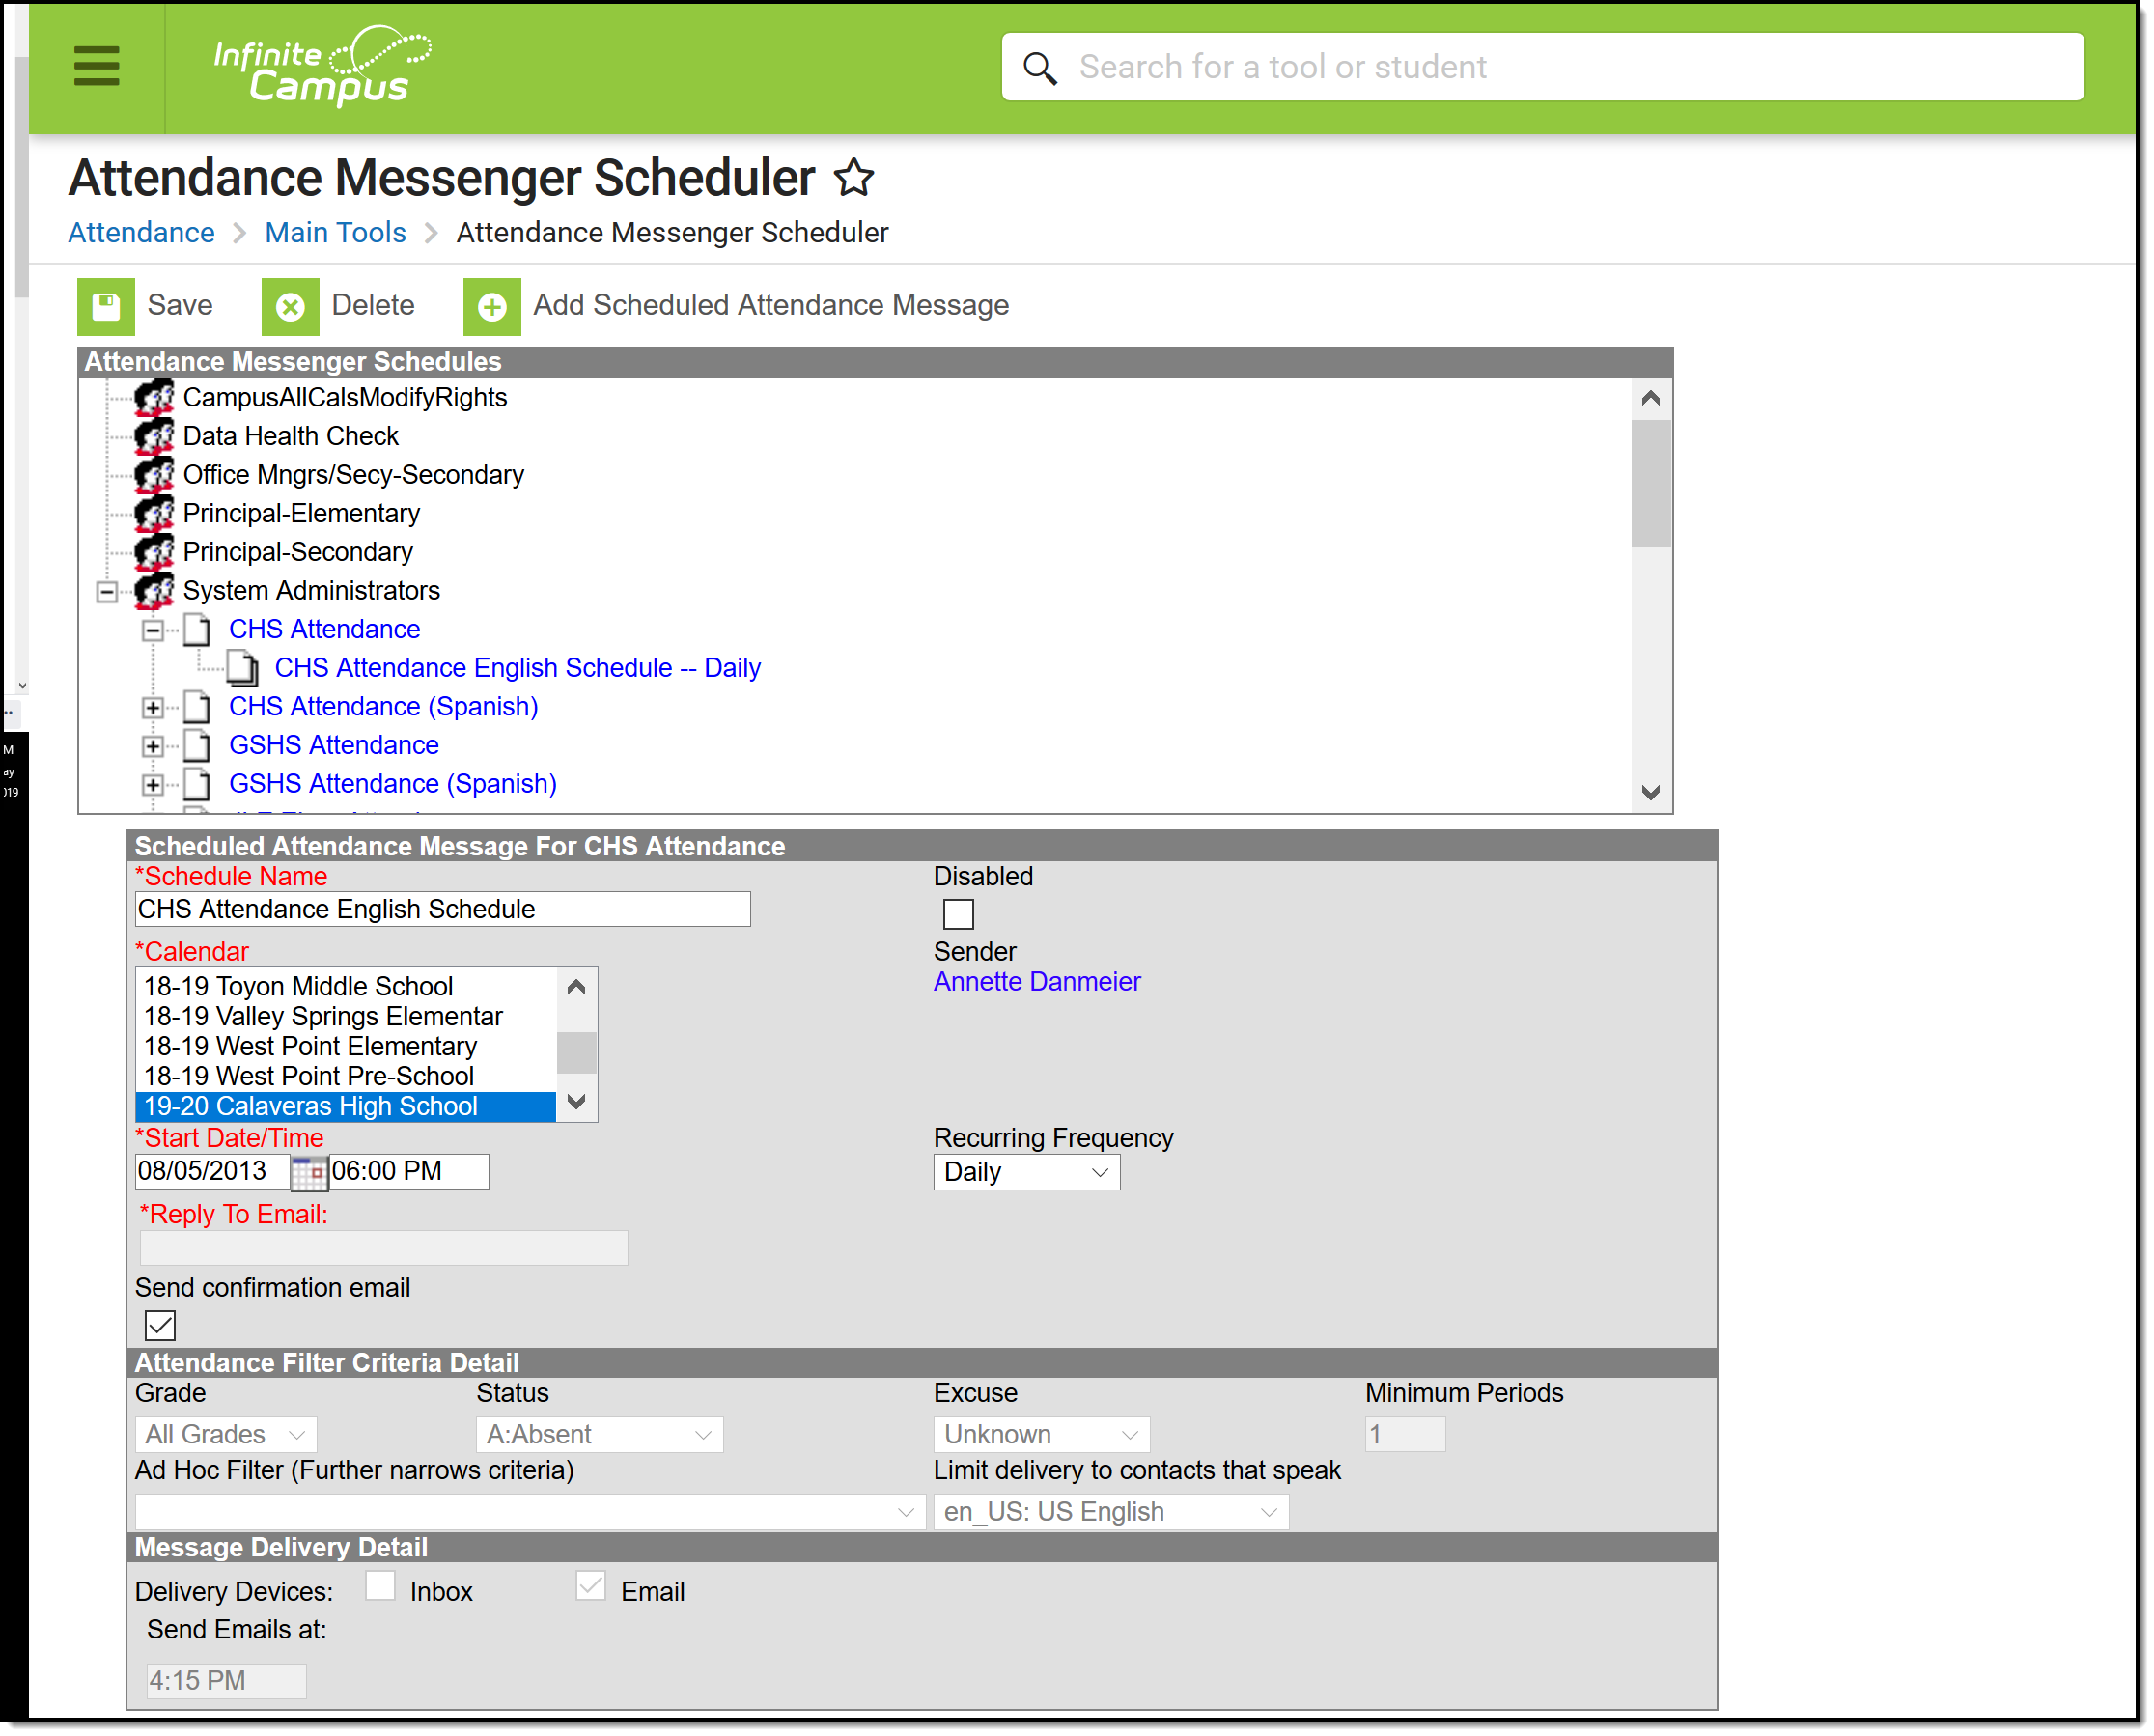
Attendance Messenger Scheduler Tool
See the Attendance Messenger Scheduler Tool Rights article for information about rights needed to use this tool.
Schedule an Attendance Message
- Select a template from the Attendance Messenger Schedules table.
- Enter the Schedule Name.
- Select a Calendar. This option defaults to the calendar selected in the toolbar.
- Enter the Start Date in mmddyy format or click the calendar icon to select a date.
- Enter the Start Date/Time of the message.
If the time entered on the Scheduler is... Then the message will be sent... the same or later than the time entered on the Dial Window or Send Email field on the template at the time entered on the Scheduler. earlier than the time entered in the Dial Window or Send Email field on the template at the time set on the template. - Choose how often to send the message by selecting an option from the Recurring Frequency dropdown list.
- Enter the Schedule Time Window of the message.
The Schedule Time Window begins after the Start Date/Time entered on the Scheduler.
Example
If the Start Date/Time is.... And the Schedule Time Window begins as... Then the message is sent at... 9:00 AM 11:00 AM 11:00 AM 9:00 AM 8:00 AM 9:00 AM - Mark the Send Confirmation Email checkbox to receive an email when the message has been sent. A confirmation email will be sent to the person who set up the schedule.
- Select the Save icon when finished. The new schedule will appear below its respective template in the Attendance Messenger Schedules table.
Add more schedules by selecting the newly added schedule in the Attendance Messenger list and select the Add Scheduled Dial.
Troubleshooting
Ensure all settings in the message template created in Attendance Messenger are correct.
If a dial window has been set on the message template, messages will no longer be sent once that window is closed, even if they have not all been delivered. Also, ensure correct start and end times if a window has been added if messages are not delivered when expected.
Ensure recipients have the information needed in order for a message to be received set in Census > People > Demographics > Personal Contact Information.
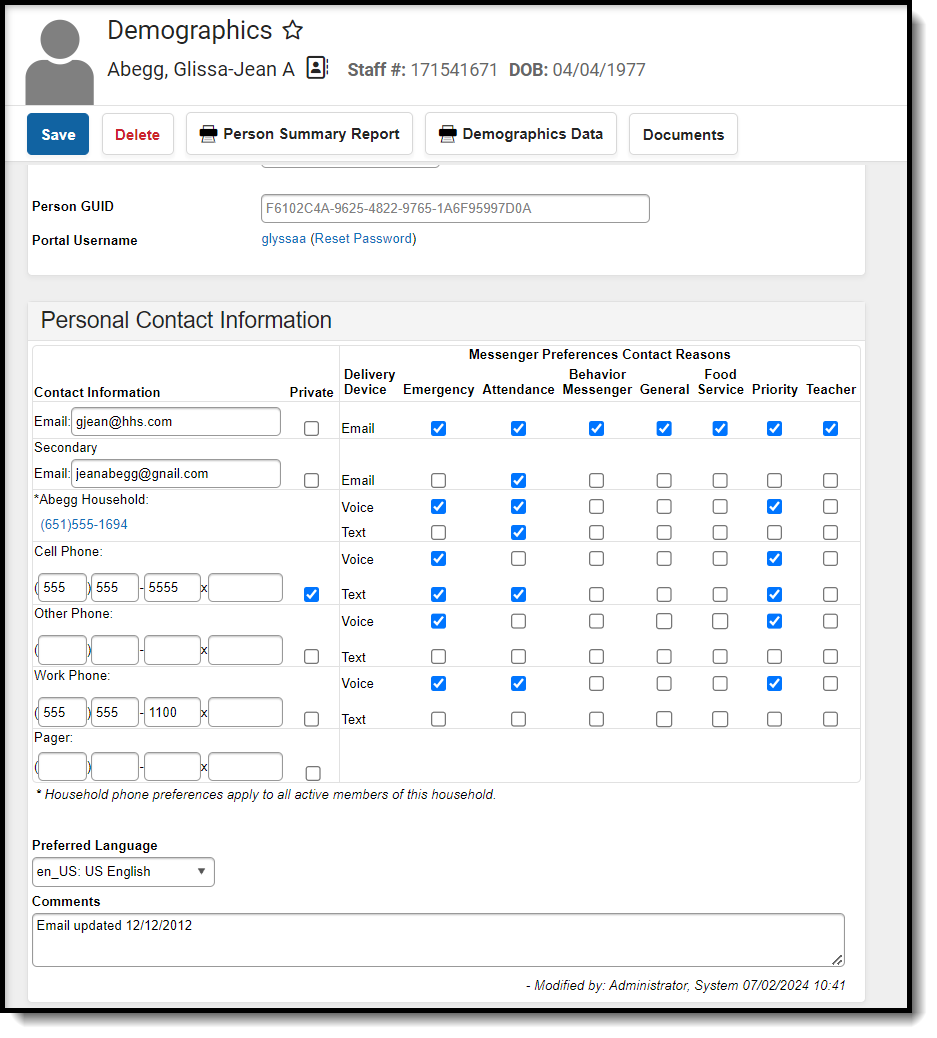 Demographics > Personal Contact Information
The Attendance Message Scheduler tool allows users to determine when the attendance dialer delivers messages. This video demonstrates how to schedule an attendance message for automatic delivery.
Behavior Messenger
This section shows how to create a template for sending messages regarding a student's behavior. Use the template to send a message manually or schedule it to be sent automatically.
Create a Behavior Messenger Template
The Behavior Messenger allows you to create messages that are sent to guardians when students are part of a behavior event.
Before messages can be sent, you need to create a template that specifies the criteria on which to filter events.
Tool Search: Behavior Messenger
The Behavior Messenger allows you to create messages that are sent to guardians when students are part of a behavior event.
The Behavior Messenger templates specify the criteria on which to filter events. You can set up a Behavior Messenger template to be dialed on a schedule using the Behavior Messenger Scheduler tool.
Behavior Messenger sends a message regardless of the Event's status; e.g., Submitted, In Progress, and Complete.
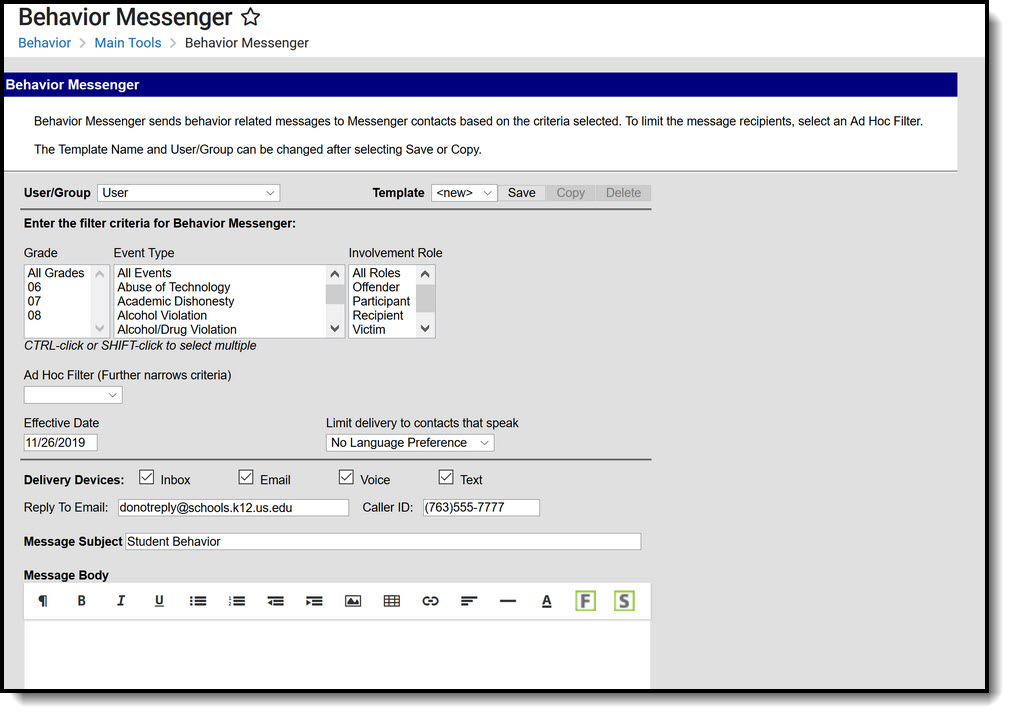 Behavior Messenger Editor
See the Behavior Messenger Tool RIghts article for information on available tool rights.
Behavior Messenger Field Descriptions
| Field | Description | ||||||
|---|---|---|---|---|---|---|---|
| User/Group | This dropdown list allows you to save message templates to your user account or a user group to which you belong. | ||||||
| Template | This dropdown list displays a list of available templates. To create a new template, select <new> from this list. | ||||||
| Filter Criteria | |||||||
| Grade |
This field determines which grade levels report in the message. | ||||||
| Event Type | This field determines which behavior events report in the message. | ||||||
| Involvement Role | This field determines which roles report in the message. | ||||||
| Ad hoc Filter | This is a list of saved student type ad hoc filters. | ||||||
| Effective Date | The day on which the behavior event occurred. | ||||||
| Limit Delivery to contacts that speak |
Use this field to limit message delivery to the language set in the Preferred Language Field on the person's Demographics tab. To send messages to guardians whose Preferred Language is English AND guardians whose Preferred Languages is Spanish, two separate templates must be created. | ||||||
| Delivery Devices | |||||||
| Inbox | The Inbox option is automatically selected. This option places a note in the parent's portal inbox that a new message is available. Infinite Campus strongly recommends leaving this option marked to ensure delivery to the guardian's with a Portal Account but no other delivery device marked for messages. | ||||||
| The Email option sends an email to the guardian's email address on record (entered in Census > Demographics). | |||||||
| Voice |
The Voice option calls the guardian's phone number on record (entered in Census > Demographics). Sub-reports cannot be used for Voice messages. | ||||||
| Text |
The Text option sends a text message to the guardian's mobile device. Recipients who have indicated a desire to receive text messages must have the Text (SMS) checkbox marked in the Personal Contact Information editor of the Demographics tab to receive text messages. Sub-reports cannot be used for Text messages. | ||||||
| Message Details | |||||||
| Sender's Email |
This field displays the email address that is automatically included in the message body for message recipients to reference.
This field can be changed if the Allow Custom Sender's Email Address checkbox is marked on the Email Settings tab. Existing templates may display a different address if the the Allow Custom Sender's Email Address checkbox is marked and a user modified the Sender’s Email field. | ||||||
| Caller ID |
This field displays the phone number that is automatically included in the message body for message recipients to reference.
This field can only be changed if the Allow Custom Caller ID checkbox is marked on the Voice Settings tab. Existing templates may display a different Caller ID if the Allow Custom Caller ID checkbox is marked and a user modified the Caller ID field. | ||||||
| Message Subject | This field determines the text that displays in the Subject field of the email message. The default subject is Student Behavior but can be changed to something else. | ||||||
| Message Body |
This field contains the text contained in the message. See the Campus Insert Fields for Message Builder section for important information about inserting Campus fields in the Message Body and the Text Message body. The Message Body uses a WYSIWYG editor. Do NOT copy attribute fields from another Messenger tool in Campus. The attribute fields are not the same. For more information about using the options available with the editor, see the WYSIWYG Editors article. Message Body supports the use of Chinese characters for email messages only. | ||||||
|
This option allows you to send a voice message. See the article Messenger with Voice - Setup and Details for more information about this feature. You must click the Upload button after browsing for the attachment. When an attachment is properly uploaded, the Attach File message displays on the screen. | |||||||
| Browse and upload an email attachment |
This option allows you to add an attachment to the email. See the article the Digital Repository Preferences for information about supported file types and sizes. You must click the Upload button after browsing for the attachment. When an attachment is properly uploaded, the Attach File message displays on the screen. This option is controlled by an email preference set by the District Administrator and may not display in all districts. | ||||||
| Text Message |
The text message to be sent to the guardian's mobile device. There is a character limit of 400 characters for text messages. There is a character limit of 400 characters for text messages.
Infinite Campus recommends not exceeding 140 characters as this may result in multiple messages being sent to recipients in random order. The maximum length of a text message is set to 400 characters. When a text message reaches this length, a warning message displays indicating such. The message cannot be saved until the character limit is met.
Existing text message templates still display in their entirety, but need to be modified to be within this limit before sending.
If users wish to stop receiving text messages, they can text STOP to the short code. This results in the user receiving no further text messages from Campus, even if the user has the Text option marked on their Contact Preferences. Users need to go through the opt in process again to start receiving texts at a later date. | ||||||
| Delivery Date: | The day on which the message should be sent. | ||||||
| Send Inbox/Emails at: |
The time inbox and/or email messages begin delivery. The time saves with the templates. If messages should always go out immediately after Send is selected, this field should be left blank. | ||||||
| Dial Window: |
These fields create a dialing window during which a general voice message may be sent. The default values for these fields are set up on the Voice Settings tab (System Administration > Messenger > Messenger Preferences > Voice Settings). Dial Window times must be entered and saved with templates. If the start time entered on the message is earlier than the start time on the template (and the start time on the template is after the start time entered on the Voice Settings tab), Messenger uses the start time on the template and does not send the message until that time is reached. If the end time on the Dial Window is earlier than the end time entered on the Voice Settings tab, calls do not stop. Instead, they continue until the end time on the Voice Settings tab is reached. In addition, if a voice message is still delivering when the District end time is reached, message delivery stops and is not completed. | ||||||
Campus Fields and Sub-Reports for Behavior Messenger
Campus Fields and Sub-Reports includes specific Behavior Messenger fields for use in the Message Body WYSIWYG. These fields are designed to pull the latest qualifying event, based on filter criteria. Other fields are available in Student > Behavior but they use ad hoc logic and may not return the most recent event data if there are multiple events in a year.
Any ad hoc fields that have been deactivated display in red. Use the Element Replacement tool to locate deactivated elements and replace them with the new field.
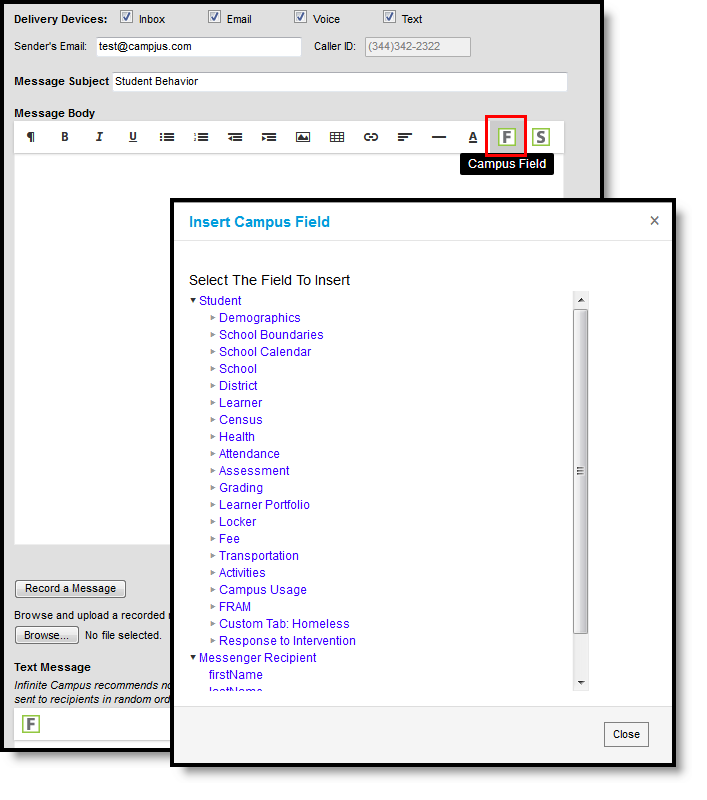 Behavior Messenger Campus Fields Selection
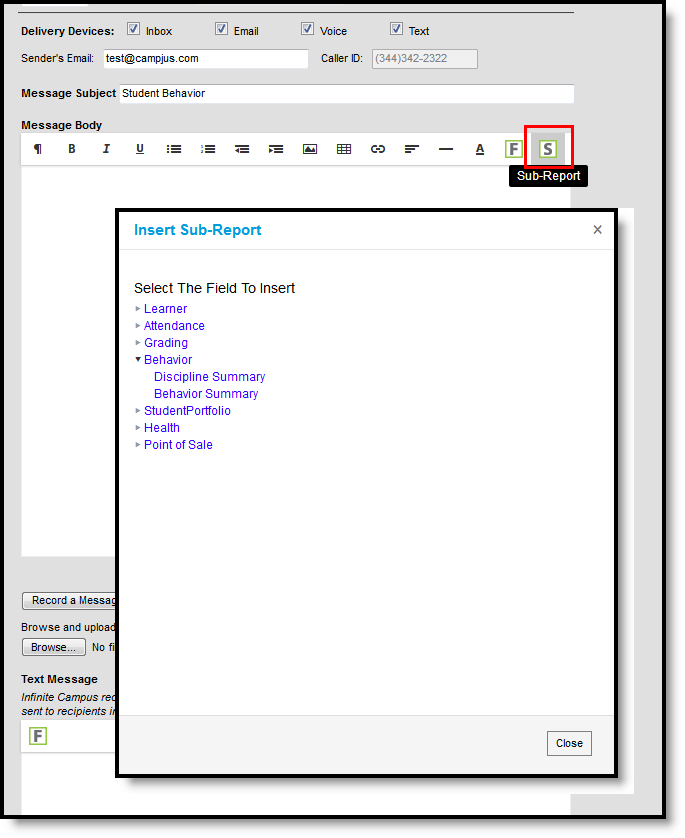 Campus Sub-Reports Selection
Sub-Report Options
The following table lists the sub-report options for each area.
| Area | Sub-Reports |
|---|---|
| Learner |
Student Schedule Active and Dropped Student Sch |
| Learner Planning |
Course Requests Course Plan |
| Attendance |
Period Mark Summary Course Mark Summary Whole/Half Day Summary Exact Day Summary Single Day Count Summary |
| Grading |
Grade Detail Term GPA Summary |
| Behavior |
Discipline Summary Behavior Summary |
| Student Portfolio | Cumulative GPA and Class Rank |
| Health |
Immunization Health Screening Concussion Health Screening Dental Health Screening Hearing Health Screening Scoliosis Health Screening Vision |
| Point of Sale | POS Account Balance |
When using sub-reports in letters, please note the following:
- All behavior data is included when adding either of the sub-reports.
- A field only displays if there is data for that field. If a field is chosen from the sub-report but there is no saved data for that student, information for that field does not display.
- A sub-report option only displays if the district/school records that data.
Information in the letter sub-reports uses data stored in the AttendanceDayAggregation table. This means that attendance data for the current date is accurate as of the previous night's attendance calculation, or the last time the Attendance Aggregation Refresh was run. If needed, the Attendance Aggregation Refresh tool can be run to force an attendance recalculation to pull in the current day's data.
Create a New Template
Templates allow you to create reusable messages that save time and standardize content.
- Select the <New> option from the Template dropdown list.
- Use the Field Descriptions to complete the Behavior Messenger editor.
The Message Body uses a WYSIWYG editor.
Do NOT copy attribute fields from another Messenger tool in Campus. The attribute fields are not the same.
For more information about using the options available with the editor, see the WYSIWYG Editors article.
- Click the Save button at the top message editor.
- Enter a name for the template in the pop-up box. The template appears in the Template dropdown list.
Delete a Template
- Select the template you want to delete from the Template dropdown list.
- Click the Delete button. A confirmation message displays
- Click the OK button. Campus removes the template and it does not display in the Template dropdown list.
Create Behavior Messenger Notifications
- Select an existing Template from the Template dropdown list.
- Use the Field Descriptions to complete the Behavior Messenger editor.
The Message Body uses a WYSIWYG editor. For more information about using the options available with the editor, see the WYSIWYG Editors article.
-
Browse and upload an email/voice attachment. (optional)
You must click the Upload button after browsing for the attachment. When an attachment is properly uploaded, the Attach File message displays on the screen.

- Click the Preview/Send button to review the message and its recipients.
- Click the Send Message button. The message is sent to the appropriate guardians.
Send a Behavior Message (Manually)
Behavior messages can be sent manually, or they can be scheduled so they are delivered at a certain time.
Tool Search: Behavior Messenger
The Behavior Messenger allows you to create messages that are sent to guardians when students are part of a behavior event.
The Behavior Messenger templates specify the criteria on which to filter events. You can set up a Behavior Messenger template to be dialed on a schedule using the Behavior Messenger Scheduler tool.
Behavior Messenger sends a message regardless of the Event's status; e.g., Submitted, In Progress, and Complete.
 Behavior Messenger Editor
See the Behavior Messenger Tool RIghts article for information on available tool rights.
Behavior Messenger Field Descriptions
| Field | Description | ||||||
|---|---|---|---|---|---|---|---|
| User/Group | This dropdown list allows you to save message templates to your user account or a user group to which you belong. | ||||||
| Template | This dropdown list displays a list of available templates. To create a new template, select <new> from this list. | ||||||
| Filter Criteria | |||||||
| Grade |
This field determines which grade levels report in the message. | ||||||
| Event Type | This field determines which behavior events report in the message. | ||||||
| Involvement Role | This field determines which roles report in the message. | ||||||
| Ad hoc Filter | This is a list of saved student type ad hoc filters. | ||||||
| Effective Date | The day on which the behavior event occurred. | ||||||
| Limit Delivery to contacts that speak |
Use this field to limit message delivery to the language set in the Preferred Language Field on the person's Demographics tab. To send messages to guardians whose Preferred Language is English AND guardians whose Preferred Languages is Spanish, two separate templates must be created. | ||||||
| Delivery Devices | |||||||
| Inbox | The Inbox option is automatically selected. This option places a note in the parent's portal inbox that a new message is available. Infinite Campus strongly recommends leaving this option marked to ensure delivery to the guardian's with a Portal Account but no other delivery device marked for messages. | ||||||
| The Email option sends an email to the guardian's email address on record (entered in Census > Demographics). | |||||||
| Voice |
The Voice option calls the guardian's phone number on record (entered in Census > Demographics). Sub-reports cannot be used for Voice messages. | ||||||
| Text |
The Text option sends a text message to the guardian's mobile device. Recipients who have indicated a desire to receive text messages must have the Text (SMS) checkbox marked in the Personal Contact Information editor of the Demographics tab to receive text messages. Sub-reports cannot be used for Text messages. | ||||||
| Message Details | |||||||
| Sender's Email |
This field displays the email address that is automatically included in the message body for message recipients to reference.
This field can be changed if the Allow Custom Sender's Email Address checkbox is marked on the Email Settings tab. Existing templates may display a different address if the the Allow Custom Sender's Email Address checkbox is marked and a user modified the Sender’s Email field. | ||||||
| Caller ID |
This field displays the phone number that is automatically included in the message body for message recipients to reference.
This field can only be changed if the Allow Custom Caller ID checkbox is marked on the Voice Settings tab. Existing templates may display a different Caller ID if the Allow Custom Caller ID checkbox is marked and a user modified the Caller ID field. | ||||||
| Message Subject | This field determines the text that displays in the Subject field of the email message. The default subject is Student Behavior but can be changed to something else. | ||||||
| Message Body |
This field contains the text contained in the message. See the Campus Insert Fields for Message Builder section for important information about inserting Campus fields in the Message Body and the Text Message body. The Message Body uses a WYSIWYG editor. Do NOT copy attribute fields from another Messenger tool in Campus. The attribute fields are not the same. For more information about using the options available with the editor, see the WYSIWYG Editors article. Message Body supports the use of Chinese characters for email messages only. | ||||||
|
This option allows you to send a voice message. See the article Messenger with Voice - Setup and Details for more information about this feature. You must click the Upload button after browsing for the attachment. When an attachment is properly uploaded, the Attach File message displays on the screen. | |||||||
| Browse and upload an email attachment |
This option allows you to add an attachment to the email. See the article the Digital Repository Preferences for information about supported file types and sizes. You must click the Upload button after browsing for the attachment. When an attachment is properly uploaded, the Attach File message displays on the screen. This option is controlled by an email preference set by the District Administrator and may not display in all districts. | ||||||
| Text Message |
The text message to be sent to the guardian's mobile device. There is a character limit of 400 characters for text messages. There is a character limit of 400 characters for text messages.
Infinite Campus recommends not exceeding 140 characters as this may result in multiple messages being sent to recipients in random order. The maximum length of a text message is set to 400 characters. When a text message reaches this length, a warning message displays indicating such. The message cannot be saved until the character limit is met.
Existing text message templates still display in their entirety, but need to be modified to be within this limit before sending.
If users wish to stop receiving text messages, they can text STOP to the short code. This results in the user receiving no further text messages from Campus, even if the user has the Text option marked on their Contact Preferences. Users need to go through the opt in process again to start receiving texts at a later date. | ||||||
| Delivery Date: | The day on which the message should be sent. | ||||||
| Send Inbox/Emails at: |
The time inbox and/or email messages begin delivery. The time saves with the templates. If messages should always go out immediately after Send is selected, this field should be left blank. | ||||||
| Dial Window: |
These fields create a dialing window during which a general voice message may be sent. The default values for these fields are set up on the Voice Settings tab (System Administration > Messenger > Messenger Preferences > Voice Settings). Dial Window times must be entered and saved with templates. If the start time entered on the message is earlier than the start time on the template (and the start time on the template is after the start time entered on the Voice Settings tab), Messenger uses the start time on the template and does not send the message until that time is reached. If the end time on the Dial Window is earlier than the end time entered on the Voice Settings tab, calls do not stop. Instead, they continue until the end time on the Voice Settings tab is reached. In addition, if a voice message is still delivering when the District end time is reached, message delivery stops and is not completed. | ||||||
Campus Fields and Sub-Reports for Behavior Messenger
Campus Fields and Sub-Reports includes specific Behavior Messenger fields for use in the Message Body WYSIWYG. These fields are designed to pull the latest qualifying event, based on filter criteria. Other fields are available in Student > Behavior but they use ad hoc logic and may not return the most recent event data if there are multiple events in a year.
Any ad hoc fields that have been deactivated display in red. Use the Element Replacement tool to locate deactivated elements and replace them with the new field.
 Behavior Messenger Campus Fields Selection
 Campus Sub-Reports Selection
Sub-Report Options
The following table lists the sub-report options for each area.
| Area | Sub-Reports |
|---|---|
| Learner |
Student Schedule Active and Dropped Student Sch |
| Learner Planning |
Course Requests Course Plan |
| Attendance |
Period Mark Summary Course Mark Summary Whole/Half Day Summary Exact Day Summary Single Day Count Summary |
| Grading |
Grade Detail Term GPA Summary |
| Behavior |
Discipline Summary Behavior Summary |
| Student Portfolio | Cumulative GPA and Class Rank |
| Health |
Immunization Health Screening Concussion Health Screening Dental Health Screening Hearing Health Screening Scoliosis Health Screening Vision |
| Point of Sale | POS Account Balance |
When using sub-reports in letters, please note the following:
- All behavior data is included when adding either of the sub-reports.
- A field only displays if there is data for that field. If a field is chosen from the sub-report but there is no saved data for that student, information for that field does not display.
- A sub-report option only displays if the district/school records that data.
Information in the letter sub-reports uses data stored in the AttendanceDayAggregation table. This means that attendance data for the current date is accurate as of the previous night's attendance calculation, or the last time the Attendance Aggregation Refresh was run. If needed, the Attendance Aggregation Refresh tool can be run to force an attendance recalculation to pull in the current day's data.
Create a New Template
Templates allow you to create reusable messages that save time and standardize content.
- Select the <New> option from the Template dropdown list.
- Use the Field Descriptions to complete the Behavior Messenger editor.
The Message Body uses a WYSIWYG editor.
Do NOT copy attribute fields from another Messenger tool in Campus. The attribute fields are not the same.
For more information about using the options available with the editor, see the WYSIWYG Editors article.
- Click the Save button at the top message editor.
- Enter a name for the template in the pop-up box. The template appears in the Template dropdown list.
Delete a Template
- Select the template you want to delete from the Template dropdown list.
- Click the Delete button. A confirmation message displays
- Click the OK button. Campus removes the template and it does not display in the Template dropdown list.
Create Behavior Messenger Notifications
- Select an existing Template from the Template dropdown list.
- Use the Field Descriptions to complete the Behavior Messenger editor.
The Message Body uses a WYSIWYG editor. For more information about using the options available with the editor, see the WYSIWYG Editors article.
-
Browse and upload an email/voice attachment. (optional)
You must click the Upload button after browsing for the attachment. When an attachment is properly uploaded, the Attach File message displays on the screen.

- Click the Preview/Send button to review the message and its recipients.
- Click the Send Message button. The message is sent to the appropriate guardians.
Send a Behavior Message (Automatically)
The Behavior Messenger Scheduler allows you to set up times to automatically send Behavior messages. Before you can use this tool, you must create templates using the Behavior Messenger.
Tool Search: Behavior Messenger Scheduler
The Behavior Messenger Scheduler allows you to set up times to automatically send Behavior messages. Before you can use this tool, you must create templates using the Behavior Messenger. All behavior templates appear in the Behavior Messenger Scheduling list.
When the scheduled time arrives, the Behavior Messenger automatically sends messages based on the data available at that time. A confirmation email is sent to the person who set up the schedule. The confirmation email informs the sender that a message was sent and how many devices received the message.Campus sends the confirmation email to the Email Address field on the person's Demographics Tab and will NOT send to the Secondary Email Address.
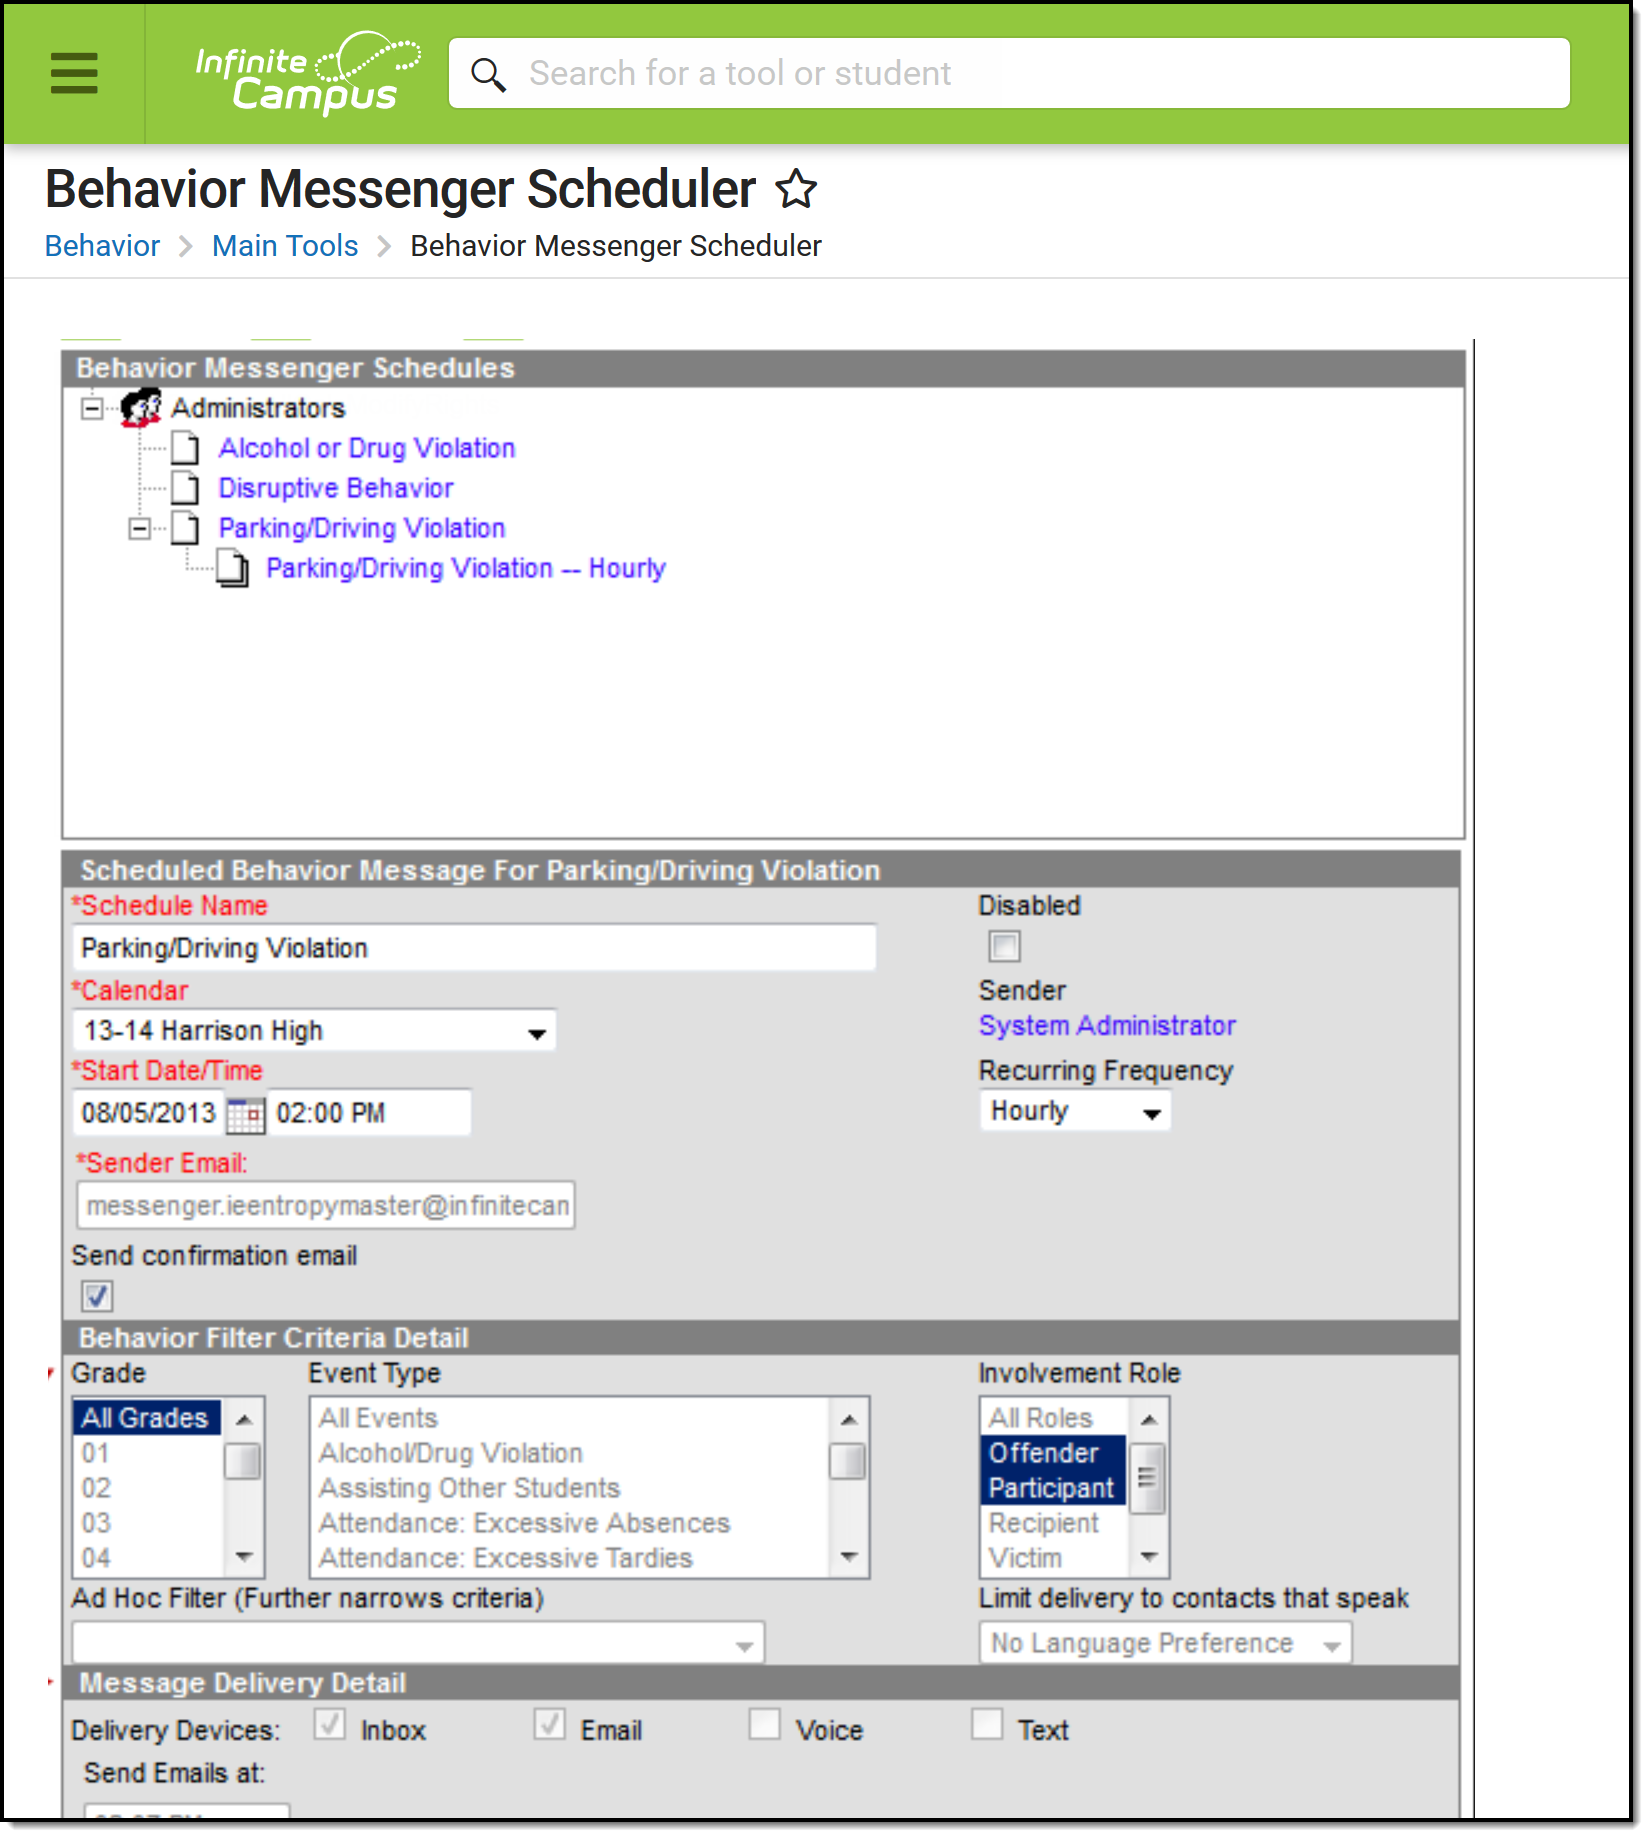 Behavior Messenger Scheduler
See the Behavior Messenger Scheduler Tool Rights for information on available tool rights.
Schedule a Behavior Message
- Select a template from the Behavior Messenger Schedules table.
- Enter the Schedule Name.
- Select a Calendar. This option defaults to the calendar selected in the toolbar.
- Enter the Start Date in mmddyy format or click the calendar icon to select a date.
Enter the Start Date/Time of the message.
If the time entered on the Scheduler is... Then the message will be sent... the same or later than the time entered in the Dial Window or Send Email field on the template
at the time entered on the Scheduler. earlier than the time entered in the Dial Window or Send Email field on the template at the time set on the template. - Choose how often to send the message by selecting an option from the Recurring Frequency dropdown list.
- Mark the Send Confirmation Email checkbox to receive an email when the message has been sent. A confirmation email will be sent to the person who set up the schedule.
- Select the Save icon when finished. The new schedule will appear below its respective template in the Behavior Messenger Schedules table.
Add more schedules by selecting the newly added schedule in the Behavior Messenger list and select the Add Scheduled Behavior Message.
If the Behavior Messenger should be disabled, mark the Disabled checkbox. If disabled, no future messages will be sent for the schedule.
Additional Messenger Tools
Additional Messenger tools include the Message Center, the Missing Assignment Scheduler, and the Failing Assignment Scheduler.
Message Center
The Message Center lets teachers view messages they received via the Messenger tools.
Tool Search: Classroom Messenger
The Classroom Messenger collects all your messages, including process alerts and notices.
- Process Alerts are sent automatically based on processes in Campus, such as records transfer or responses to behavior referrals.
- State, District and School notices are messages sent to all users through User Communication.
- Messages are sent to specific users, such as reminders and updates, through Messenger.
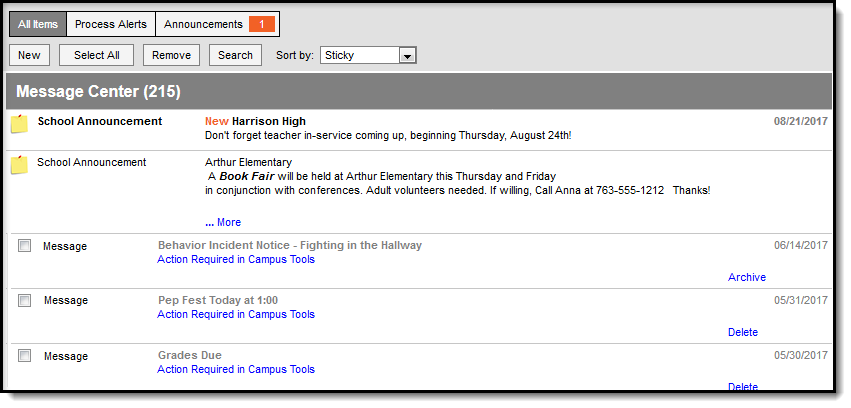 The Message Center in Classroom Messenger includes announcements and messages.
Sort your messages using the Sort by dropdown list. Options are:
- Sticky - sticky messages are at the top, followed by other messages sorted by date.
- Date (newest) - messages sorted with most recent at the top.
- Date (oldest) - messages sorted with earliest at the top.
Filter the messages in your inbox by clicking the All Items, Process Alerts or Notices buttons at the top.
New Messages
New messages have an orange New indicator that disappears when you read the message.
The orange number icon indicates how many messages you have. In the example above, the teacher has 1 new Announcement.
Messages with the yellow post-it icon are designated as "sticky," which means they appear at the top of you inbox and you can't delete them. These messages are given an end date when they're created, at which point they disappear from your inbox.
To view a message, click on the blue link. The message opens in the Campus Tools.
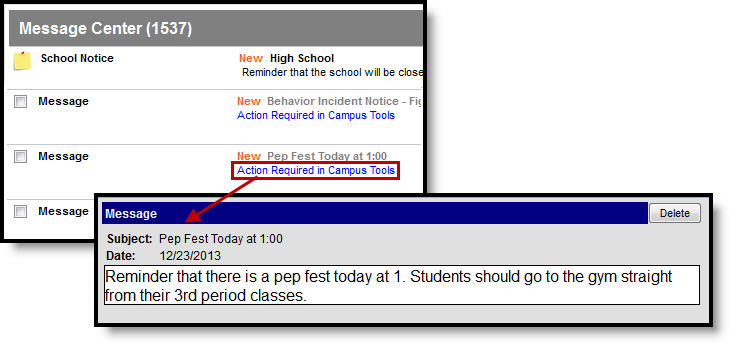 Open a message by clicking the blue link.
Use the app switcher to return to Campus Instruction.
 \
\
Searching for Messages
To search for specific messages by date and type, click Search in the task bar.
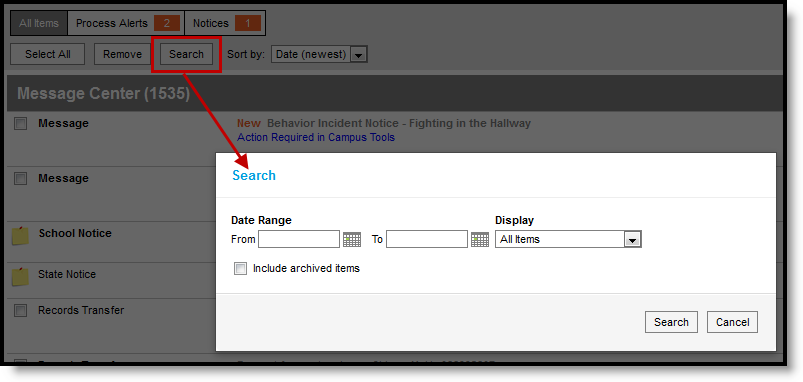 Search for a message by date.
- Enter a Date Range to view messages sent to you within those dates.
- Select which types of messages you wan to Display. Types in this dropdown list are sorted between Process Alerts, Notices and Archived items.
- To Include archived items, mark that checkbox.
- Click Search. Only messages that meet your criteria appear.
Classroom Messenger displays all process alerts and announcements for teachers. This video demonstrates how to view messages in Classroom Messenger.
Missing Assignment Scheduler
The Missing Assignment Scheduler sends messages to parents and/or students about missing assignment information. The message is delivered to the recipient's Inbox of their portal account or their email address.
Tool Search: Missing Assignment Scheduler
The Missing Assignment Scheduler allows districts to select a day and time for Campus to send missing assignment messages. Missing assignment information is based on the start date and the due dates of assignments and the scores entered in the teacher’s Grade Book.
Messages are only sent for assignments marked as Missing.
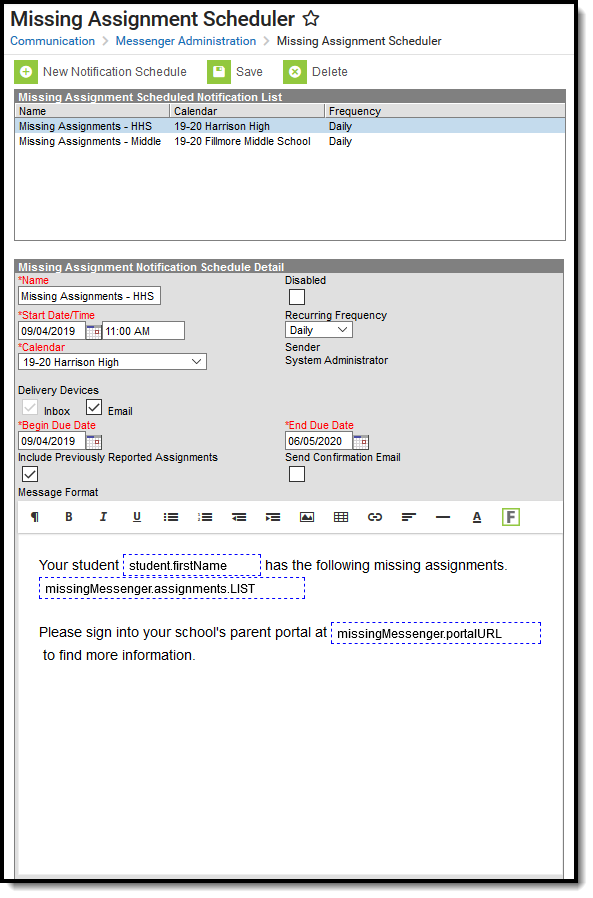 Missing Assignments Scheduler Editor
See the Missing Assignment Scheduler Tool Rights article for information on available tool rights.
Create a New Notification Schedule
- Click New Notification Schedule.
Use the information in the following table to complete the fields.
Field
Description
Required
Name
Enter a unique name to identify this notification schedule.
X
Disabled
Select this checkbox to turn off this notification schedule.
Start Date/Time
Select the day and time by which Campus should start sending messages.
X
Recurring Frequency
Select how often the messages should be send. Valid options include monthly, weekly, daily and hourly.
X
Calendar
Select the calendar for which messages should be sent.
Delivery Devices
Select the devices to which the message should be sent. Valid options include Inbox, Email and Voice. Voice is only an option if the district uses Campus Voice Messenger. Messages are automatically delivered to the inbox on the portal.
Begin Due Date
Missing assignments due on or after the Begin Due Date will prompt a message.
X
End Due Date
Missing assignments with an end due date before or on the End Due Date will prompt a message.
X
Include Previously Reported Assignments
Once a message for a specific failing or missing assignment is sent, that assignment won't trigger another message unless "Include Previously Reported Assignments" is marked.
Send Confirmation Email
This checkbox indicates that a receipt of messages is required.
- Click the Message Format area and add/remove any required text.
- Click the Save button.
Failing Assignment Scheduler
The Failing Assignment Scheduler sends messages to parents and/or students about assignments with a failing grade. The message is delivered to the recipient's Inbox of their portal account or their email address.
Tool Search: Failing Assignment Scheduler
The Failing Assignment Scheduler allows districts to select a time when notifications regarding failing grade assignment messages will be sent to parents, based on the Start Dates and Due Dates of assignments. This eliminates the possibility of sending failing assignment information to those students that may have already received a notice or are no longer in the class.
This feature uses data entered by teachers in the Grade Book to send messages to appropriately marked parents and guardians, so those individuals are aware and can take action to enhance the student's experience with the course.
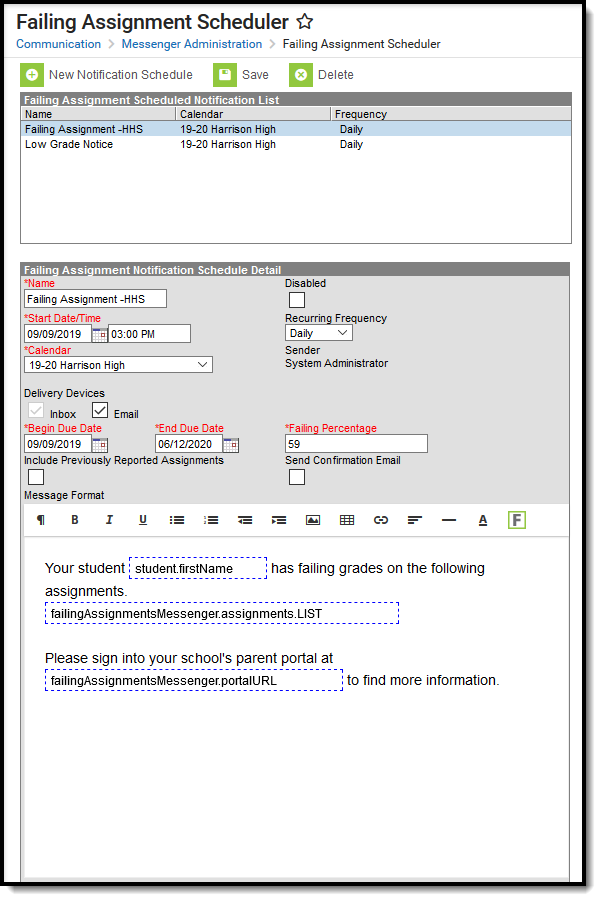 Failing Assignments Scheduler
See the Failing Assignment Tool Rights article for information on available tool rights.
Assignments marked as one of the following will not be included:
- Exempt
- Dropped
- Inactive
- Hidden
Failing Assignment Editor
The Failing Assignment Scheduler tool is in two sections. The first section, the Failing Assignment Schedule Notification List, displays existing and saved failing assignments. The second section, the Failing Assignment Notification Schedule Detail, notes the specific options included in each notification. Edits can be made by selecting a saved notification and updating the details.
The following table provides a definition of the fields included in the scheduler.
Field | Description |
|---|---|
Name | Displays the name of the message notification that will be sent. This is a required field. |
Disabled | Determines if the message is active. If marked, the message is not active and will not be sent at the designated time. |
Start Date/Time | Determines the date and time the messages will be sent. Dates are entered in mmddyy format or use the calendar icon to select a date. Time is entered in standard HH:MM format. This is a required field. |
Recurring Frequency | Determines the interval at which the messages are sent. Options are:
|
Calendar | Indicates the calendar from which data is pulled in the message and defaults to the calendar selected in the toolbar. This is a required field. |
Sender | Notes which user has created the message. |
Delivery Devices | Indicates how the recipients will receive the message.
|
Caller ID | Lists the phone number that will display (if Phone is selected as a Delivery Device) when the message is sent. This field populates with the number entered on the School tool for the calendar selected. This is a required field. |
Begin Due Date | The first date to include due assignments. The message will list assignments with this due date through the end due date. This is a required field. |
End Due Date | The last date to include due assignments. The message will list assignments with the beginning due date through this date. This is a required field. |
Failing Percentage | Lists the percentage that indicates a failing grade (i.e, 50% is F). The message will be sent to students who received this percentage or lower. This is a required field. |
Include Previously Reported Assignments | Once a message for a specific failing or missing assignment is sent, that assignment won't trigger another message unless "Include Previously Reported Assignments" is marked. |
Send Confirmation Email | When selected, a confirmation email will be sent to the sender of the message indicating the message has been sent. |
Message Format | Lists the text of the message. This message can be built using the WYSIWYG editor and Campus Fields that will personalize the message. This displays the body of the message as written in the Grade Messages tool. Do NOT copy attribute fields from another Messenger tool in Campus. The attribute fields are not the same. |
Using the Failing Assignment Scheduler
- Select the New Notification Schedule icon.
- Enter the Name of the Failing Assignment Scheduler.
- Enter the Start Date and Time of this message.
- Select the Recurring Frequency from the dropdown list.
- Select the Calendar with which this message is associated.
- Select the appropriate Delivery Devices.
- Mark the Include Previously Reported Assignments checkbox if previously reported assignments should be listed on this current announcement.
- Enter the Begin Due Date in mmddyy format, or use the calendar icon to select a date.
- Enter the End Due Date in mmddyy format, or use the calendar icon to select a date.
- Mark the Send Confirmation Email checkbox if a message regarding the receipt of messages should be delivered.
- Enter the percentage that qualifies as a failing grade in the Failing Percentage field.
- Review the Message Format.
- Click the Save icon when complete. The Failing Assignment Message is now scheduled to be delivered to the appropriate individuals.
Disabling the Failing Assignment Scheduler
To disable a message, select that message from the list of Failing Assignment Schedules. Mark the Disabled checkbox and click the Save icon. This message will no longer be sent.
Reports
Messenger provides reports that tells who received a message and when it was sent.
Recipient Log
The Recipient Log is used to review messages you sent to a specific recipient. It also provides detailed information about messages sent via email, voice, and text.
Tool Search: Recipient Log
The Recipient Log allows you to review process inbox, email, voice and text messages that were scheduled or sent by you to a specific recipient. Once you find the message for which you are searching, you can review the message details as well as print a Recipient Report for a specific message.
Print the Recipient Report to determine whether delivery devices were available when the message was sent or whether a message was successfully delivered.
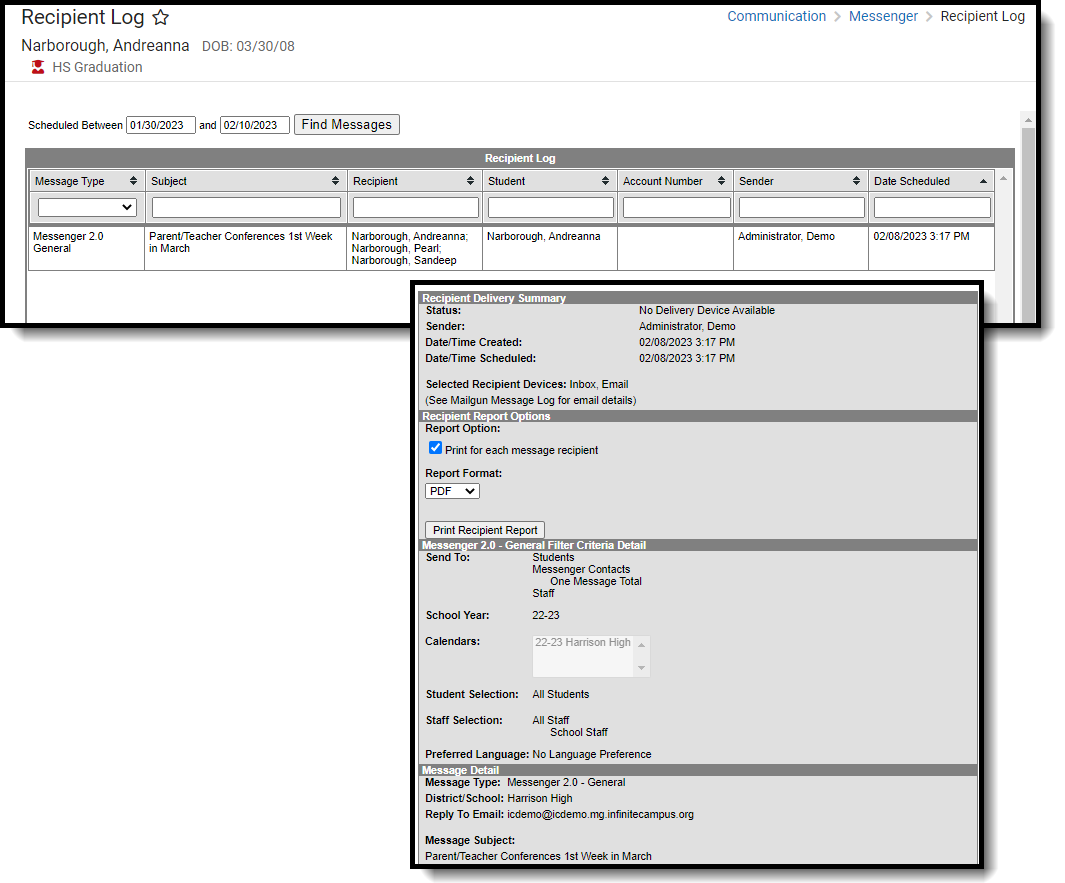
See the Recipient Log Tool Rights article for information on available tool rights.
Search for Messages Sent to a Specific Recipient
- Enter the date range in which the message was created and click the Find Messages button. The Recipient Log displays the messages that fall within the date range you entered.
- Filter the results by selecting an option in the column's dropdown list, entering search criteria, or sorting the search results by clicking the column headers. (Optional)
To filter results using the Date Scheduled field, you must enter the date in the format in which it displays on the screen: MM/DD/YYYY HH:MM AM (or PM). For example, 10/01/2023 8:30 AM. If you do not know the full date or time, you can enter part of the date or time and the search tool will display dates/times that match the numbers you enter.
Select the message you want to view. The Recipient Delivery Summary, Recipient Report Options, Filter Criteria Detail and Message Detail areas display. See the following Screen Examples and Field Descriptions for details about each area.
Print a Recipient Report
The Recipient Report provides additional details about the delivery of a message.
The report includes the following types of information:
- Recipient Delivery Summary.
- Filter Criteria used to send the message.
- Detailed information about the message.
Enter the date range in which the message was created and click the Find Messages button. The Recipient Log displays the messages that fall within the date range you entered.
If you cannot see the message for which you want a report, sort the search results by clicking the column headers or filter the results by selecting an option in a column's dropdown list.
Select the message for which you want a report for message details to display.
Mark the Print for each message recipient checkbox to print a report for each unique recipient/student message combination if the message was sent to multiple recipients about the same student or regarding multiple students to the same recipient. (optional)
- Select the Report Format. Available formats include PDF or DOCX.
Click the Print Recipient Report button.
Recipient Report Example
Tool Rights control whether you see actual data or just Campus field names on the report. For example, student.firstname may display instead of John.
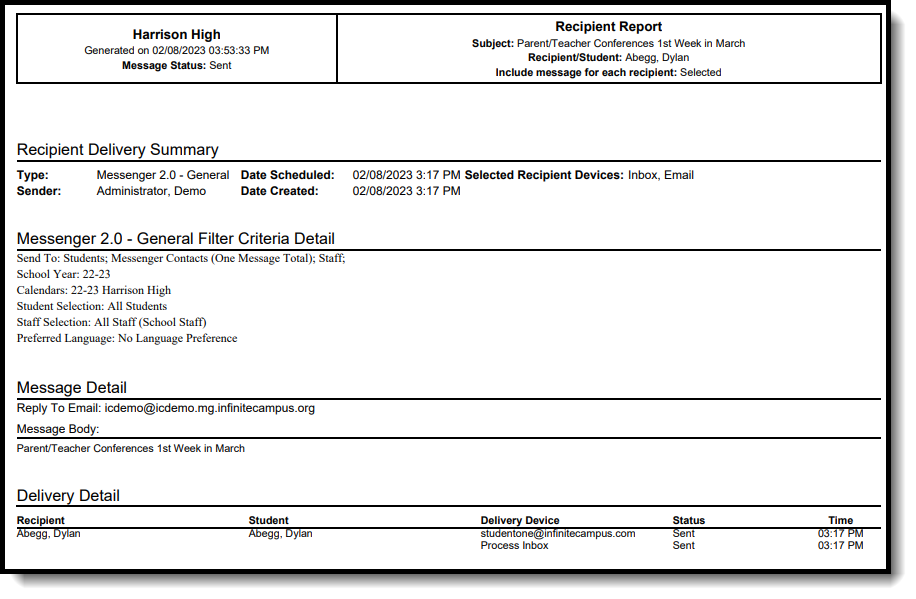
Screen Examples and Field Descriptions
The Recipient Log tab is divided into multiple areas.
Recipient Log Search and Result Table

| Field | Description |
|---|---|
| Scheduled Between | The date range in which the message was scheduled. |
| Message Type | The tool used to create the message. |
| Subject | The subject on the message. |
| Recipient | The recipient(s) of the message. This field contains up to 3 recipient names on 2 rows. |
| Student | The student for whom you are reviewing messages. |
| Account Number | Point of Sale Customers Only The Account Number column displays up to 4 account numbers. If the account is for a Family Account (multiple patrons on a single account), the account number displays once for each patron on the account who received the message. |
| Sender | The user who sent the message. |
| Date Scheduled | The date on which the message is/was scheduled to be sent. To filter results using the Date Scheduled field, you must enter the date in the format in which it displays on the screen: MM/DD/YYYY HH:MM AM (or PM). For example, 10/01/2022 8:30 AM. If you do not know the full date or time, you can enter part of the date or time and the search tool will display dates/times that match the numbers you enter. |
Recipient Report Options

| Field | Description |
|---|---|
| Print for each message recipient |
Prints a report for each unique recipient/student message combination if the message was sent to multiple recipients about the same student or regarding multiple students to the same recipient.
You must select this option if want to view Campus fields instead of just seeing the field name in the message body. For example, student.firstname displays John on the Recipient Report when it's printed. This feature is only available if you have tool rights for the Recipient Campus Fields . |
| Print Recipient Report | Clicking this button prints the Recipient Report. |
Filter Criteria Detail
Each Messenger tool displays unique Filter Criteria. The Filter Criteria was selected on the Messenger Template for the message.
This section does not appear for Messenger tools that use a Recipient Selector like Class Messenger or Scheduling Messenger to send messages or non-Messenger tools such as Behavior Referrals and Special Education Process Alerts.
The following screen is an example of the Message Builder Filter Criteria.
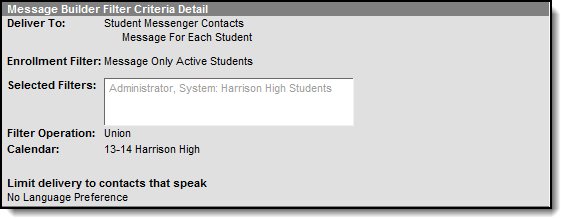
Message Detail
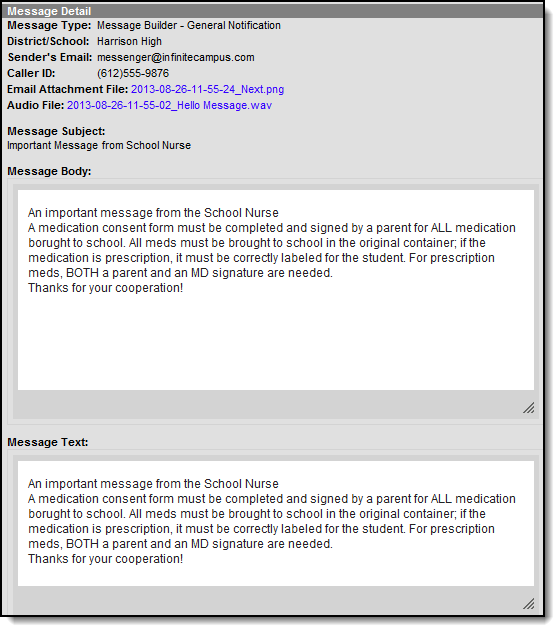
| Field | Description |
|---|---|
| Schedule Name | If a message is sent via a Messenger Scheduler tool, the Schedule Name appears before the Message Type to indicate the message is scheduled.
|
| Message Type | Identifies the specific Messenger Tool or other Campus tool that was used to send the message. |
| District/School | The district or school to which the message was sent. |
| Sender's Email | The email address that appears as the sent from address on sent email messages. |
| Caller ID | The caller ID number shown to recipients of phone messages. |
| Email Attachment File | This link allows you to view the attachment sent on the email message. The file is available as long as your system administrator has not deleted the attachment or moved the attachment to another server. |
| Audio File | This link allows you to listen to the audio file that was used for phone messages. The file is available as long as your system administrator has not deleted the attachment or moved the attachment to another server. |
| Message Subject | The subject entered on email messages. |
| Message Body | The content of the email message. |
| Message Text | The content of the text message. |
Messages you sent to a selected recipient can be viewed in the Recipient Log.
Sent Message Log
The Sent Message log allows you to review messages that have been sent.
Tool Search: Sent Message Log
The Sent Messages Log allows you to view details for email, Process Alerts, voice and text messages you have sent using Campus Messenger. In-progress and Waiting messages can be canceled as well.
Messages created in Infinite Campus are sent to a service provider for delivery (e.g. Mailgun, Shoutpoint, your SMTP mail host). The Status field in the Sent Message Log reflects the status of delivery from Campus to the appropriate service provider.
 Sent Message Log
See the Sent Message Log Tool Rights article for information on available tool rights.
Searching for Messages
- Enter the date range in which the message was created and click the Find Messages button. The Sent Message Log displays the messages that fall within the date range you entered. The first 4000 messages are included.
-
Filter the results by selecting an option in the column's dropdown list or sort the search results by clicking the column headers. (Optional)
To filter results using the Date Created or Date Scheduled fields, you must enter the date in the format in which it displays on the screen: MM/DD/YYYY HH:MM AM (or PM). For example, 05/01/2022 8:30 AM. If you do not know the full date or time, you can enter part of the date or time and the search tool will display dates/times that match the numbers you enter.
-
Select the message to view. The Delivery Summary, Sent Message Report Options, Filter Criteria Detail and Message Detail areas display. See the following Screen Examples and Field Descriptions for details about each area.
Sent Message Log Search Results

| Field | Description |
|---|---|
| Created Between | The date range in which the message was created. |
| Status |
The delivery status of the message. Options include:
|
| Message Type | Identifies the specific Messenger Tool, Messenger Scheduler or other Campus tool which sent the message. |
| District/School | The district or school to which the message was sent. |
| Message Subject | The subject on the message. |
| Sender | The user who sent the message. |
| Date Created |
The date on which the message was created. |
| Date Scheduled |
The date on which the message is/was scheduled to be sent. |
| Schedule ID |
The unique identification number for the message. This field displays for all message types; however, the field is blank if the message did not include Voice and/or Text as part of the message. |
Delivery Summary
Selecting a message from the search results will open details for the message, including a delivery summary. Messages that have not been sent can be canceled from this section.
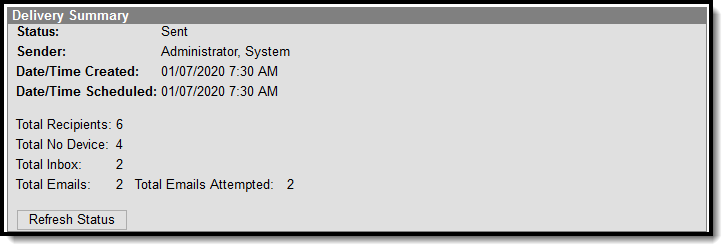
| Field | Description |
|---|---|
| Status |
The delivery status of the message.
|
| Sender | The user who sent the message. |
| Date/Time Created | The date and time on which the message was created. |
| Date/Time Scheduled | The date and time on which the message is/was scheduled to be sent. |
| ScheduleID | The internal database ID for the message sending process if the message included Voice and/or Text delivery options. |
| Total Recipients | The sum of all recipients eligible for receiving the message. This includes recipients who did not receive a message due to not having a delivery device or they did not have a delivery device selected for the message type. |
| Total No Device | The sum of all recipients who did not receive a message since they did not have a delivery device available or they did not have a delivery device selected for the message type. |
| Total Inbox | The total number of messages sent to user's Process Alerts. |
| Total Emails | The total number of messages sent via email. |
|
Total Voice |
The total number of messages sent via phone. The field is called Total Voice/Text if your district uses text messaging in addition to voice messaging. |
| Total Emails Attempted | The total number of email messages that Campus tried to send. |
|
Total Voice Attempted |
The total number of voice/text message that Campus tried to send. The field is called Total Voice/Text Attempted if your district uses text messaging in addition to voice messaging. Total Voice Attempted and Total Voice/Text Attempted amounts may be less than the amount shown in the Total Voice or Total Voice/Text field since the recipient can confirm calls by pressing zero and cancel additional voice calls and text messages. The option to Allow Multiple Messages in a Single Call (found on the Voice Settings tab) reduces the amount reported in the field since the option allows multiple messages to be delivered to a single phone number. |
Canceling In-Progress or Waiting Messages
You can use the Sent Message Log tool to cancel messages that are currently running (In-Progress) or messages that have been scheduled but have not completed (Waiting). Canceled messages are NOT considered a failed delivery.
Messages sent from a template with a future Delivery Date appear immediately in the Sent Message Log. However, messages created using a Messenger Scheduler tool do not appear in the Sent Message Log until the Start Date/Time entered on the Scheduler.
After a message has been cancelled, the status may take several minutes to update. Use the Refresh Status button when checking the cancellation progress.
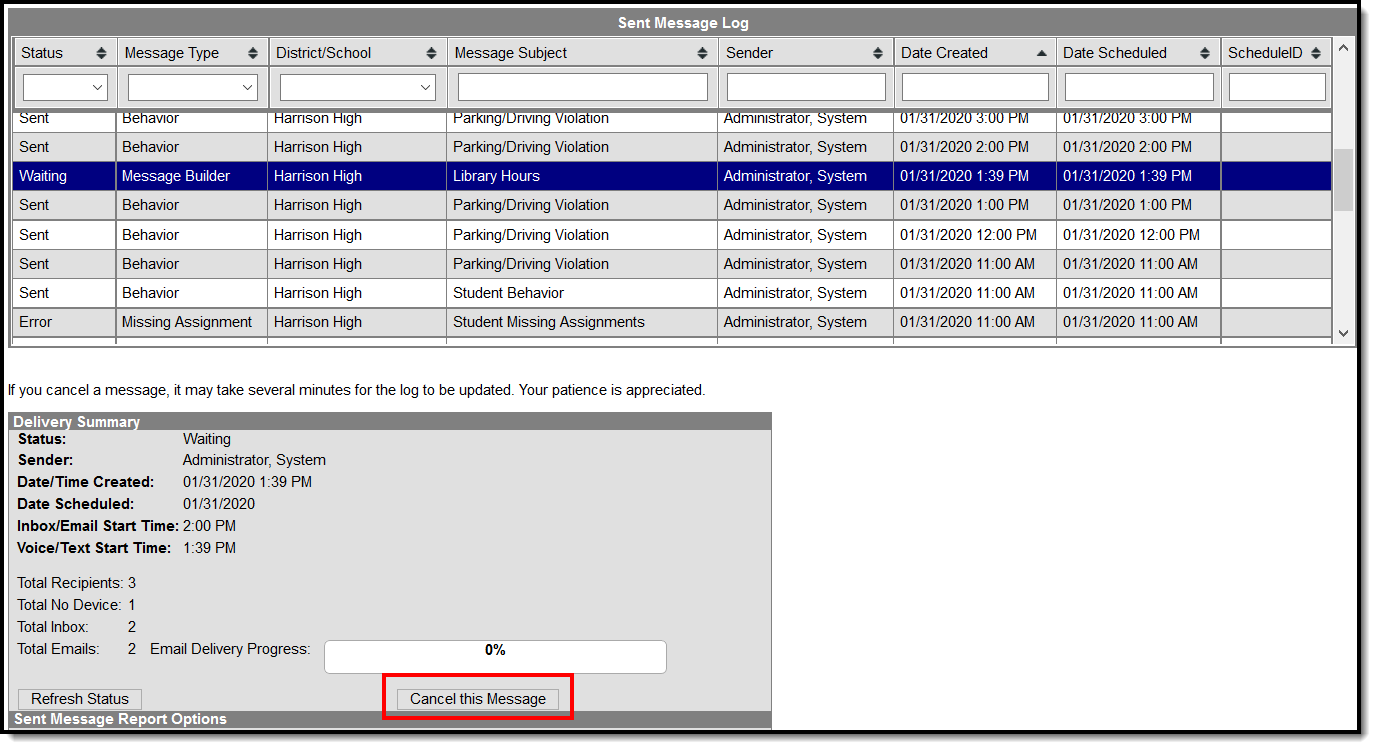
-
Enter the date range in which the message was created and click the Find Messages button. The Sent Message Log displays the messages that fall within the date range you entered.
If you cannot see the message you want to cancel, sort the search results by clicking the column headers or filter the results by selecting an option in a column's dropdown list
-
Select the message you want to cancel. The Delivery Summary displays.
-
Click the Cancel this Message button. A warning message displays.
-
Click OK. Campus stops the delivery of any messages that have not been sent, updates the message status to Canceled and adds the cancel information to the Delivery Summary. This process may take several minutes to complete.
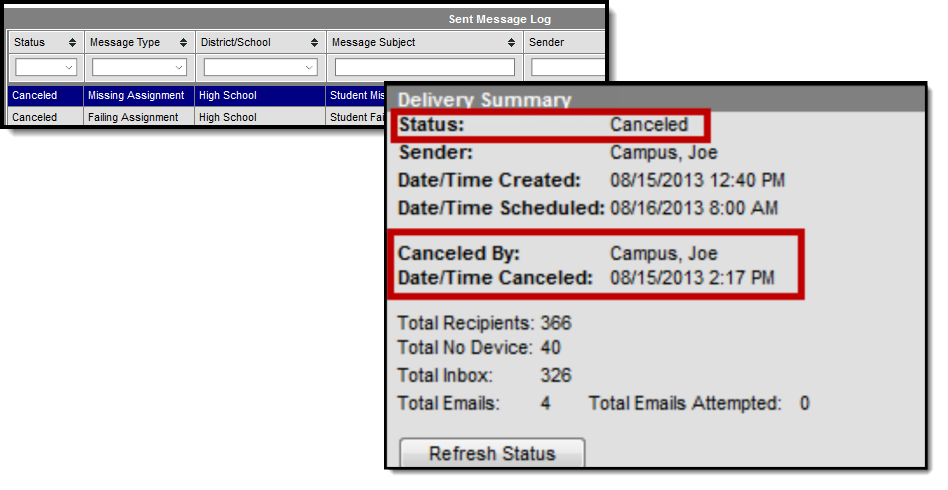
Sent Message Report Options
If desired, a report can be generated with additional details related to a specific message's delivery.
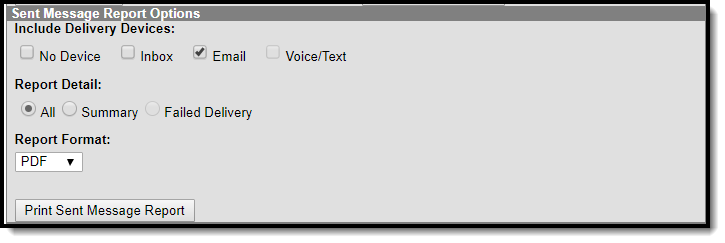
| Field | Description |
|---|---|
| Include Delivery Devices |
The device(s) on which you want to report. Marking No Device includes recipients who did not receive a message since they did not have a delivery device available or they did not have a delivery device selected for the message type. Delivery Devices not included in the sent message are NOT available to select for the report. |
| Report Detail |
This option is not available for waiting or In-progress message campaigns. |
| Format | The report can generate in PDF, CSV or DOCX format. |
| Print Sent Message Report | Clicking this button prints the Sent Message Report. See the Print a Sent Message Report for more information. |
-
Enter the date range in which the message was created and click the Find Messages button. The Sent Message Log displays the messages that fall within the date range you entered.
If you cannot see the message for which you want a report, sort the search results by clicking the column headers or filter the results by selecting an option in a column's dropdown list.
-
Select the message for which you want a report. The message details display.
-
Configure Sent Message Report Options:
-
Click the Print Sent Message Report button.
-
The Sent Message Report displays in the format you selected.
Report Output Details
The Sent Message Report provides additional details about the delivery of a specific message, including:
- Summary statistics on message delivery.
- Filter Criteria used to send the message.
- Delivery status organized by recipients.
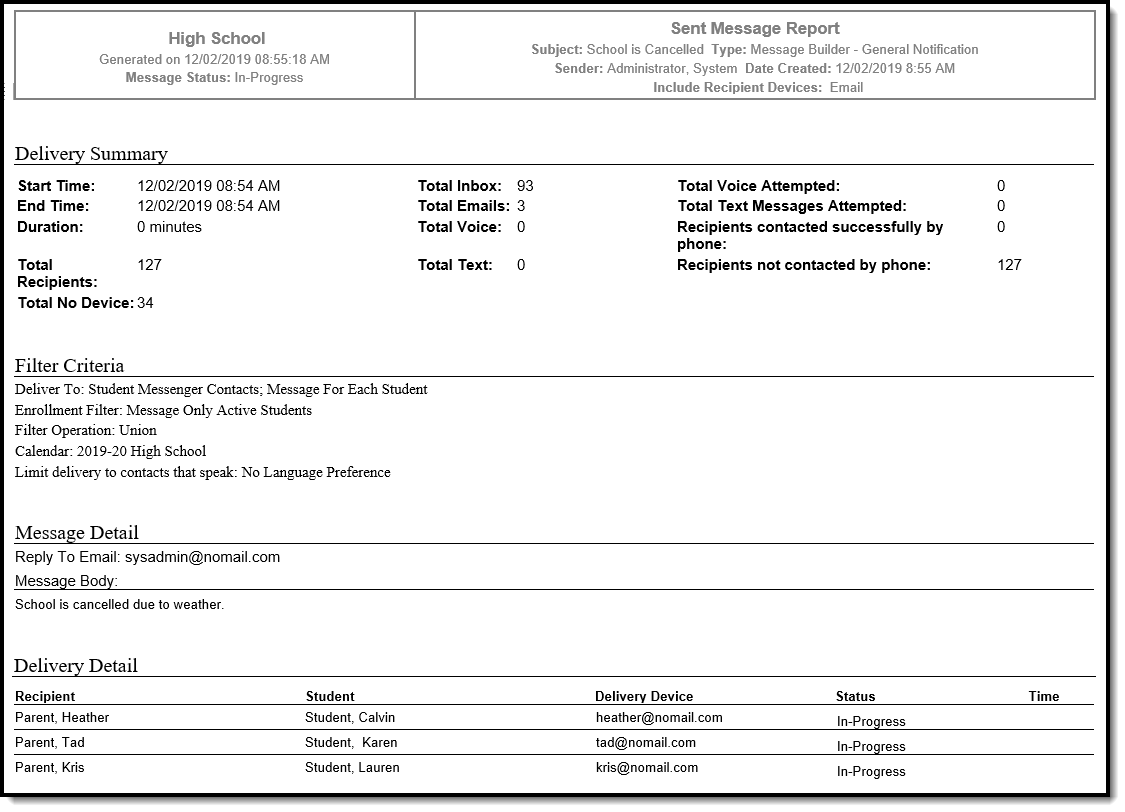
Phone Messages
The following information only applies to districts that use Campus Messenger with Voice.
The Sent Message Report includes summary information regarding the voice and text messages including a total for the number of recipients contacted successfully by phone. Phone messages are categorized by their delivery status as detected by Shoutpoint technology.
A call is considered successful:
- If a live voice is detected.
- If voicemail/answering machine is detected (regardless of whether redials are allowed on the Voice Settings tool)
- If a recipient confirms reception of the message by pressing 0 (zero).
- If a text message is sent.
Even though a text message is successfully sent, Campus can not guarantee the recipient's successful retrieval of the text message. Retrieval depends on many things like the recipient's carrier reception and carrier account settings--all of which Campus can not control.
- If Preconnect for extension dialing is detected.
Recipients not contacted by phone display with an asterisk ( * ).
Duplicate email addresses and phone numbers in the same message are indicated with a cross (†) in the PDF and an ampersand (&) in the CSV file. When Campus calculates the totals for the Delivery Summary section of the report, these email addresses and phone numbers are NOT included in the totals.
In the Delivery Summary section of the report:
- Email addresses without a cross are counted in the Total Email field.
- Voice messages without a cross are counted in the Total Voice field.
- Text messages without a cross are counted in the Total Text field.
Refer to the following tables for a description of the fields used in the report.
| Field Name | Calculation Logic | Notes |
|---|---|---|
| Recipients contacted successfully by phone | Number of unique People who successfully received the text, or voice, calls. |
If two users shared the same phone number, each user would be included in this count
Only includes people who had at least one successfully completed statuses to at least one of their devices (Completed, Live Voice, etc) |
| Total Recipients | Number of unique People included in the recipient list |
If two users shared the same phone number, they would each be included in this count.
This doesn't necessarily mean each of these people were ultimately contacted, just that they were pulled into the recipient list of the message |
| Total No Device |
Number of unique People included in the recipient list who had no device available to be contacted. |
This only reports when No Device is marked in the report options. The field reports recipients who did not receive a message since they did not have a delivery device available or they did not have a delivery device selected for the message type. |
| Total Inbox | Number of unique Inboxes the message was delivered to |
The details of which inboxes were contacted only report if the inbox delivery option is selected prior to printing the sent message log. |
| Total Emails | Number of unique Email Addresses in the recipient list |
If two users shared the same email address, the email address would only be counted once.
This includes all status types (i.e. failed, etc). |
| Total Voice | Number of unique Phone Numbers in the recipient list |
If two users shared the same phone number, the phone number would only be counted once.
This includes all status types (i.e. failed, cancelled, completed, etc.). |
| Total Text | Number of unique Phone Numbers in the recipient list |
If two users shared the same phone number, the phone number would only be counted once.
This includes all status types (i.e. failed, cancelled, completed, opted out, etc). |
| Total Voice Attempted: | Number of unique Phone Numbers the message was attempting to reach. |
If two users shared the same phone number, the phone number would only be counted once.
This does NOT include status types of Cancelled. |
| Total Text Messages Attempted | Number of unique Phone Numbers the message was attempting to reach |
If two users shared the same phone number, the phone number would only be counted once.
This does NOT include status types of Cancelled or opted out (Blank status). |
| Recipients contacted successfully by phone | Number of unique People who successfully received the text, or voice, calls. |
If two users shared the same phone number, each user would be included in this count
This only includes people who had at least one successfully completed statuses to at least one of their devices (Completed, Live Voice, etc). |
| Recipients not contacted by phone | Number of unique People who did not receive a call, or text, to one of their devices |
If two users shared the same phone number, each user would be included in this count
This only includes users who did not have at least one successfully completed status to at least one of their devices. (i.e. non-complete statuses = failed, cancelled, opted out, etc). |
Call Status Codes
|
Code |
Status
|
Notes |
|---|---|---|
|
0 |
No answer |
Dialer detected no answer by called party. |
|
1 |
Busy |
Dialer detected a busy signal. |
|
2 |
Operator |
Automated operator answered - number issue, all circuits busy, etc. |
|
3 |
Not In Service |
Phone number not in service. |
|
4 |
No Ring Back |
Dialer dialed the number but did not hear a ring tone. |
|
5 |
Live Person |
Dialer detected a live person. |
|
6 |
Answering Machine |
Dialer detected an answering machine. |
|
7 |
Fax |
Received a fax carrier signal. |
|
8 |
PBX |
Call connected to destination telephone number. Extension dialing was used. |
|
9 |
Unknown |
Provider could not determine the call status. |
|
10 |
Failed |
Failed for any reason but most likely a failed because of a Messenger error. |
|
13 |
Preconnect Done |
Present when a phone number includes an extension to dial. This status indicates the call was made, connected to the primary number and attempted to dial the extension. |
|
14 |
Fast-Busy |
Received a Fast Busy signal. Usually this status is returned when the local company's phone lines are full (all circuits are busy). |
|
16 |
Operator |
Signaling or audio consistent with an out of service number was received. Privacy flag was set for this call. |
|
17 |
Temporarily Unavailable |
Destination telephone number temporarily unavailable. Will automatically attempt redial through alternate routes. |
|
-1 |
N/S |
An unknown error has occurred. |
|
-2 |
Invalid Phone # |
Destination telephone number is invalid. |
|
-3 |
Do Not Call |
Destination telephone number is on do not call list. |
| -4 | Duplicate |
|
|
-5 |
No Response from Dialer |
Internal communication failure. Call may have been dialed but status is unknown |
|
-7 |
Local Operator |
Destination telephone number is known to not be in service. |
|
-9 |
Local Time Restricted |
Local time if the destination telephone number is outside the allowed times for this campaign. |
|
-10 |
State Restricted |
All attempts to the destination telephone number were unsuccessful. The final route is state restricted. |
|
-11 |
Call Expired |
Call timed out prior to being placed. |
|
-12 |
No Channel |
Internal processing failure. Call was not dialed. |
|
-13 |
Route Unavailable |
All attempts to the destination telephone number were unsuccessful. |
|
-14 |
Call Error |
Call creation produced an error. See Call Log Detail Statistics lookup for more detail. Check the Call Error field. |
|
-15 |
Wireless |
Destination number identified as a wireless number. Scrub wireless has been enabled for this campaign. |
|
-18 |
Origination Tollfree Restricted |
All attempts to the destination telephone number were unsuccessful. The final route restricted toll free ANIs. Consider using an ANI that is not a tollfree number. |
|
-19 |
Destination Tollfree Restricted |
All attempts to the destination telephone number were unsuccessful. The final route restricts Toll Free destinations. |
|
-20 |
Remote Dialer Did Not Set Call Progress |
Internal communication failure. Call status is unknown. |
|
-21 |
Local No Answer |
Destination telephone number is known to not connect. |
|
-22 |
Suppressed Phone # |
Destination telephone number is on a suppression list. |
|
-23 |
Local Fax |
Destination telephone number is known to be a fax number. |
|
-24 |
Low Resources |
All attempts to the destination telephone number were unsuccessful. |
|
-25 |
Sub-System Error |
Internal sub-system failure. See Call Log Detail Statistics lookup for more detail. Check the Call Error field. |
|
-26 |
All Routes Temporarily Unavailable to Destination |
Call temporarily could not connect via any route. |
| -27 | SMS Sent | SMS delivered to destination telephone company |
| -28 | SMS Delivered | SMS successfully left Shoutpoint's gateway and Shoutpoint also received a status of “delivered” back from the destination phone service provider. |
| -29 | Email Sent | Email Sent. |
| -30 | Text Message Failed | Text message was not successfully sent by SMS provider OR there was an error in the SMS settings in Campus. |
| -31 | Origination International Restricted | All attempts to the destination telephone number were unsuccessful. The final route restricted international ANIs. Consider using an ANI that is not an international number. |
| -32 | Web Stream Connected |
|
| -33 | SMS Opt Out | Destination telephone number has opted out of receiving SMS messages via STOP message. |
| -34 | Phone Quota Exceeded |
|
| -35 | Script Ended Before Dialing |
|
| -36 | Origination US Restricted |
|
| -37 | Canada Intra Restricted |
|
| -38 | Max Customer Minute Charge |
|
| -39 | SMS Queued |
|
| -40 | Undelivered |
|
Delivery Detail
The Delivery Detail section is specific to the device (portal account, phone number called, texted, or email contacted) for each recipient.
| Field | Description |
|---|---|
| Recipient | The person who received the message. |
| Student | The student who is enrolled at the school. |
| Delivery Device | The Delivery Mode that was selected when the message was created. |
| Status | The status is specific to the device (portal account, phone number called, texted, or email) contacted.
|
| Time | The time the message was received. |
Filter Criteria Detail
Each Messenger tool displays unique Filter Criteria. The Filter Criteria was selected on the Messenger template for the message.
This section does not appear for Messenger tools that use a Recipient Selector like Class Messages or Scheduling Messenger to send messages or non-Messenger tools including Behavior Referrals and Special Education Process Alerts.
| Tool | Filter Criteria Examples |
|---|---|
| Staff Messenger |
 |
| Failing Assignment Scheduler |
 |
| Behavior Messenger |
 |
Message Detail

| Field | Description |
|---|---|
| Schedule Name |
If a message is sent via a Messenger Scheduler tool, the Schedule Name appears before the Message Type to indicate the message is scheduled.
|
| Message Type | Identifies the specific Messenger Tool or other Campus tool that was used to send the message. |
| District/School | The district or school to which the message was sent. |
| Sender's Email | The email address that appears as the sent from address on sent email messages. |
| Caller ID |
The caller ID number shown to recipients of phone messages. |
| Email Attachment File | This link allows you to view the attachment sent on the email message. The file is available as long as your system administrator has not deleted the attachment or moved the attachment to another server. |
| Audio File | This link allows you to listen to the audio file that was used for phone messages. The file is available as long as your system administrator has not deleted the attachment or moved the attachment to another server. |
| Message Subject | The subject entered on email messages. |
| Message Body | The content of the email message. |
| Message Text | The content of the text message. |
Review Messages Sent via Mailgun
The Mailgun Message Log contains all of the messages sent by the district via the Mailgun API with an indication of each event status, who received the email, the subject of the email, and any potential errors which occurred.
This tool is only available for users who have Mailgun functionality enabled in their district.
Tool Search: Mailgun Message Log
When a message is sent from a Campus tool, the Sent Message Log displays the status of the delivery of the message to the Mailgun API. The Mailgun Message Log found in System Administration contains all of the messages sent by the district via the Mailgun API, including password reset emails, username reminders, and account security email confirmations. The event status, email recipient, subject of the email, and any errors that occurred are listed. The Mailgun Message Log found in the Messenger module contains all of the same information but limits the messages displayed to only those sent by the person accessing the tool within Infinite Campus.
The status that displays in the Sent Message Log is not the same as the Event status found in the Mailgun Message Log. For example: A message can have a status of 'Sent' in the Sent Message Log but an Event status of 'Failed' in the Mailgun Log. In this scenario the message was delivered to the Mailgun API, but failed in its delivery to the recipient.
- This tool is only available for users who have Mailgun functionality enabled in their district.
- Based on Mailgun restrictions and recommendation, the data in this tool is updated hourly.
- For information on setting up Mailgun within Campus, see the Email Settings article.
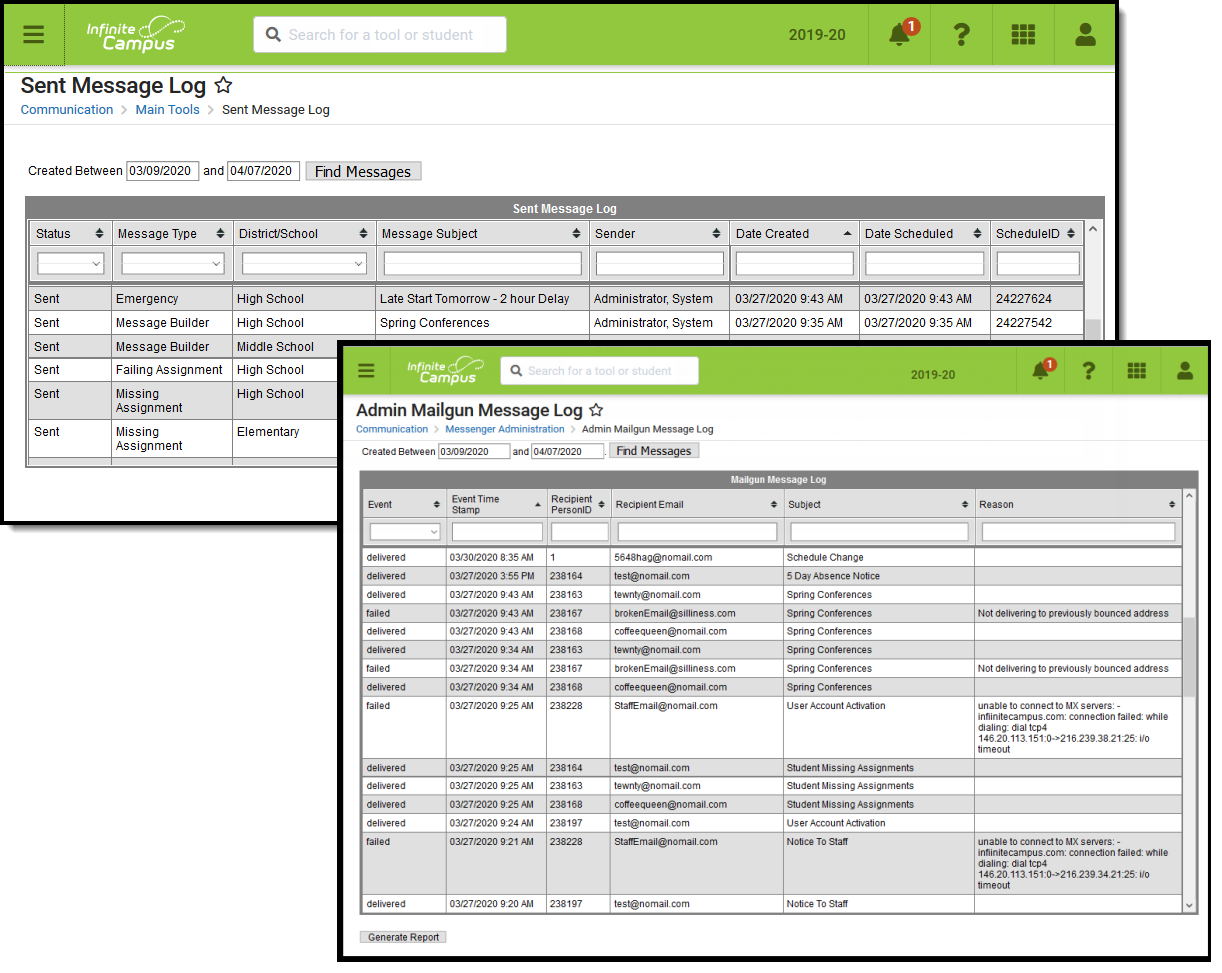 Mailgun Message Log
See the Mailgun Message Log Tool Rights article for information on available tool rights.
IMPORTANT:
Mailgun uses a suppression list as spam prevention, instead of sending limits. If an email message bounces (usually due to an invalid email address), Mailgun places that email address on the suppression list to prevent further attempts. To resolve this issue, users must correct the email address of the recipient and contact Campus Support. Only Campus Support is authorized to remove the email address from the suppression list in order for emails to begin sending to the recipient again.
Tool Rights
PATH: System Administration > User Security > Users > Tool Rights
Users must have at least R(ead) tool rights assigned for the Mailgun Message Log in order to access and view data.
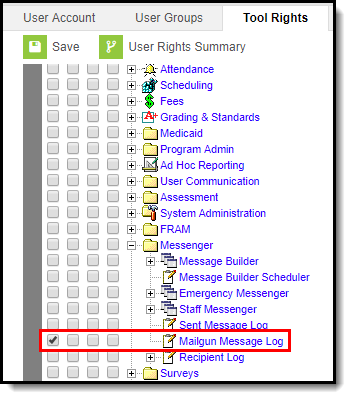
Mailgun Message Log Tool Rights
Reviewing Mailgun Messages
By default, the message log contains all messages sent by the district on the current day (System Administration > Messenger > Mailgun Message Log) or all messages sent by you on the current day (Messenger > Mailgun Message Log). This list can be populated with messages outside of the current date by entering a date range at the top and selecting Find Messages. You can also filter messages by entering criteria in the fields below each column.
The data in this tool updates frequently to include current day messages. Recently sent messages will not display immediately.
 Filtering Messages
For example, entering a Subject of 'Missing' filtered messages to only those with this text included in the email subject.
 Filtering Messages Based on Subject
You can also filter messages based on the Event which occurred, such as a failure to send the message. In the example below, messages are filtered by an Event of 'failed' and the Reason column describes why the message failed to send.
 Reviewing Failed Messages
Invalid emails can be updated by conducting a 'Person ID' search using the All People, Advanced Search tool.
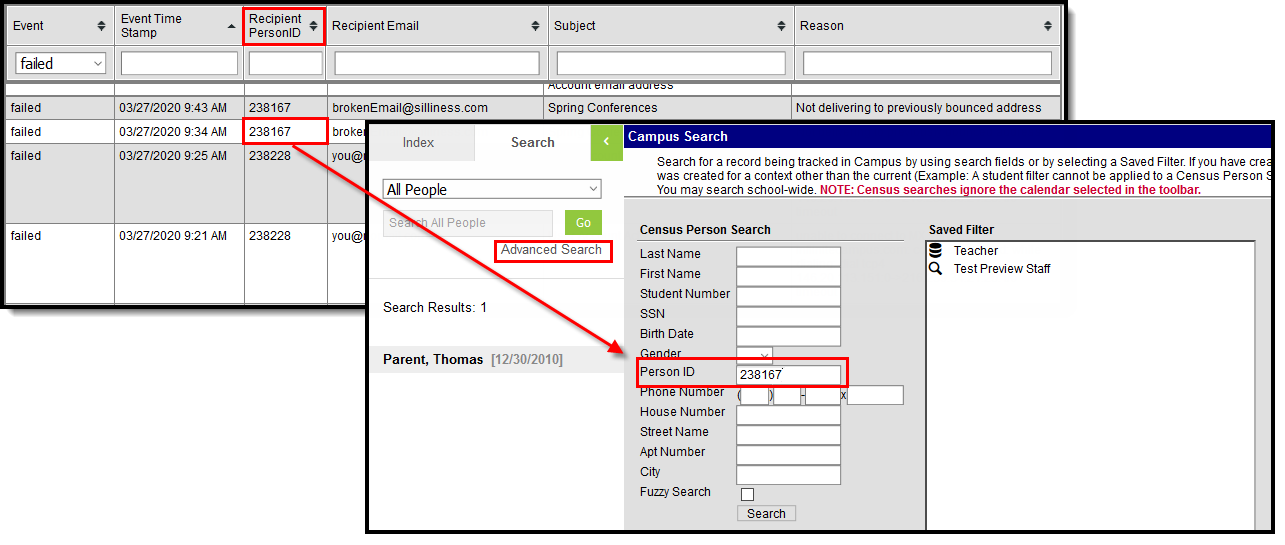 Recipient PersonID Advanced Search
Event status are defined as the following:
- Accepted - Mailgun accepted the request to send/forward the email and the message has been placed in the queue.
- Rejected - Mailgun rejected the request to send/forward the email. Review the Reason column for why this may have occurred.
- Delivered - Mailgun sent the email and it was accepted by the recipient email server.
- Failed - Mailgun could not deliver the email to the recipient email server. Review the Reason column for why this may have occurred.
- Complained - The email recipient clicked on the spam complaint button within their email client. This may impact your ability to reach this person in the future.
Generate the Report
You can generate a report of all messages sent through the Mailgun API during a specific date range by entering this date range in the Created Between date fields and clicking Generate Report at the bottom of the screen (Image 6).
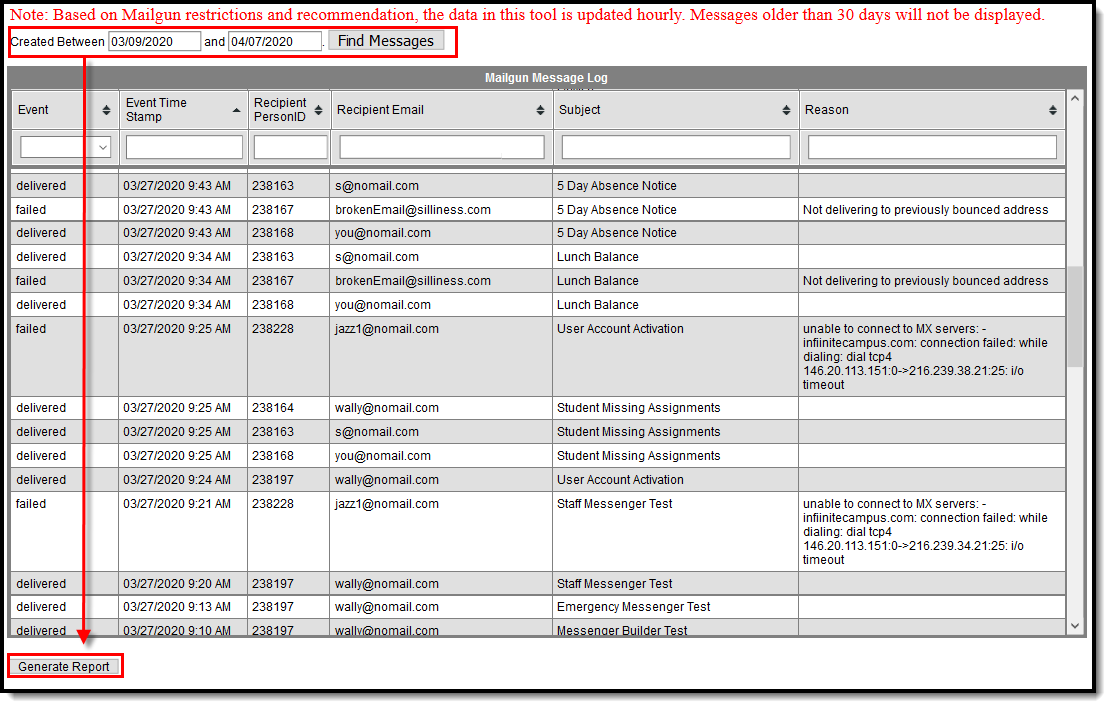 Generating the Mailgun Message Log Report
The report will appear in a separate window in CSV format.
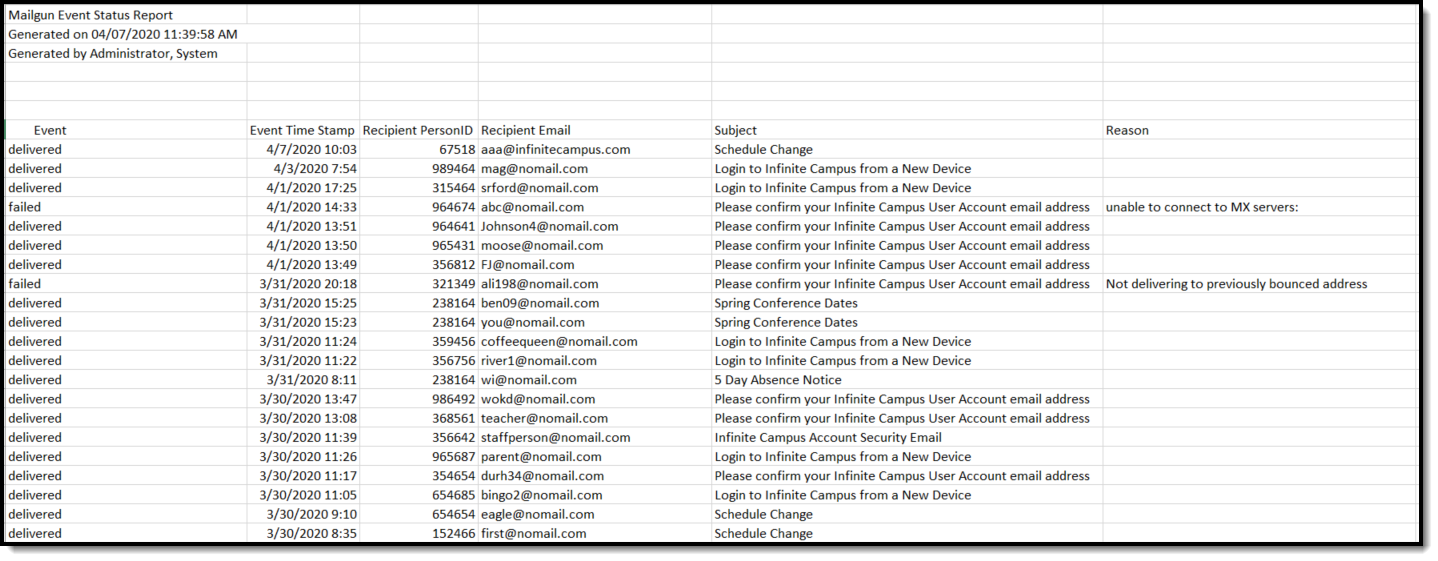 Example of Report


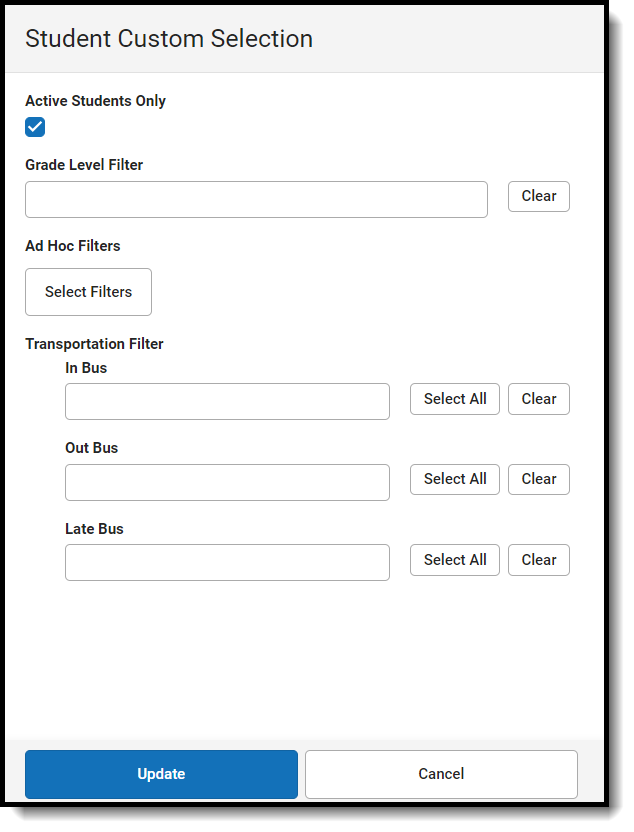
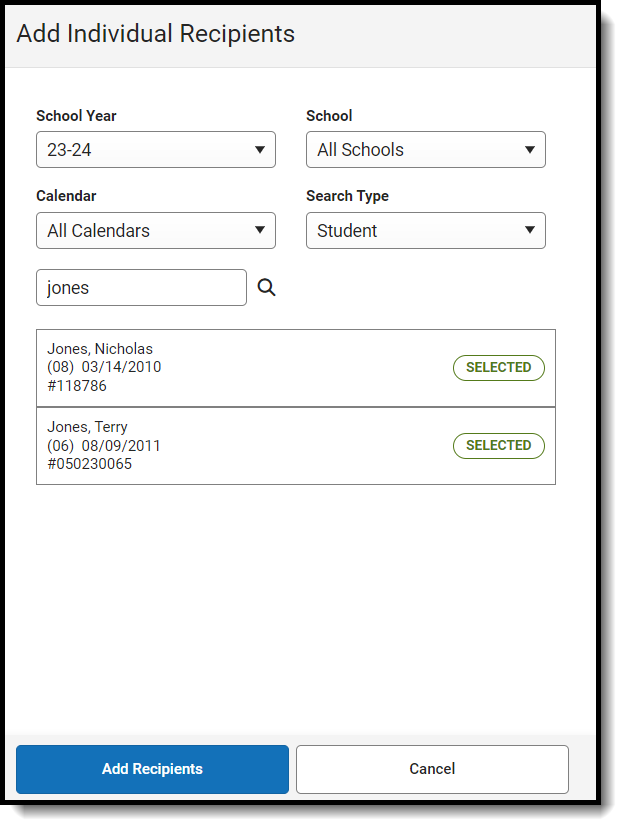


 While the message is processing, you can leave the screen and return later to check your message details. A status label below the 'Created By' field shows the progress of the message in the sending process. After the message is fully processed, it leaves the 'In Progress' tab and moves to the

 While the message is processing, you can leave the screen and return later to check your message details. A status label below the 'Created By' field shows the progress of the message in the sending process. After the message is fully processed, it leaves the 'In Progress' tab and moves to the