Tool Search: Data Change Tracker Setup
Data Change Tracker is available as part of the Campus Data Suite. Campus Data Suite is available for self-hosted and Cloud Choice hosted Districts.
Data Change Tracker functionality must first be enabled via the Data Change Tracker Setup tool for data changes to begin being tracked within Campus and begin populating data for use in the Data Change Tracker Report.
Along with enabling this functionality, this tool also details how many months' worth of data changes will be tracked for reporting and which tables within Campus will be tracked.

Prerequisites
The following must be completed before enabling Data Change Tracker functionality via the Data Change Tracker Setup tool:
- Data Change Tracker functionality must be enabled for your district.
A user must be assigned to the Data Change Tracker security role by your district's Security Administrator or be assigned tool rights for the Data Change Tracker Setup tool. Tool rights for the Data Change Tracker can only be given to individual user accounts. These tool rights cannot be given to a User Group.

Enabling Data Change Tracker Functionality
To enable Data Change Tracking, mark the Enable Data Change Tracker checkbox and click the Save icon. Once enabled, data changes occurring within Campus will begin being tracked and stored for all tables indicated in the List of Tracked Groups and Tables list below.
Once enabled, you may need to wait up to an hour for collected data to be processed for reporting purposes.
The number of months to retain logs of tracked data changes indicates how many months' worth of data changes will be retained within Campus. The expiration date for retained data is based on the date the record was modified (this includes any values contained within the source record or the association with the school).
If you would like more months retained than the number being shown, please contact Infinite Campus.

Understanding Tracked Groups and Tables
If table customization functionality has been enabled, the list of tracked tables will feature the ability to manually add or remove tables being tracked by the Data Change Tracker tool, which Campus did not already predefine.
This functionality can only be turned on by Campus Hosting.
Attendance tables are not a part of the Data Change Tracker as this data is already captured in the core attendance auditing structure. For more information, see the Attendance Change Tracking Report and the Enable Attendance Auditing System Preference.
See the following sections for more information about this functionality:
Removing Tables From Being Tracked
To remove a table from being tracked by the Data Change Tracker tool, unmark the checkbox in the Tracked column for each table you wish to remove. Once all desired tables have been unmarked, select the Save icon.
Some tables are enabled by default and cannot be untracked as they are critical in ensuring other tables throughout the tool can function and track data properly.
![]()
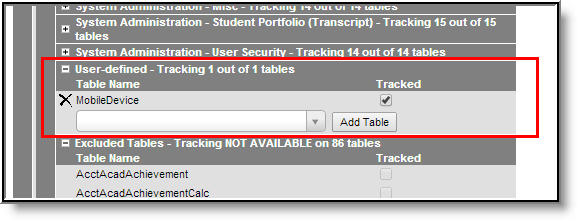
Adding User-Defined Tables
To add tables to a table group and have them tracked by Data Change Tracker functionality, expand a table group and begin typing the name of the table in the blank field at the bottom of the table list. As you type, an auto-completed list will appear after at least 3 letters have been entered.
Campus Hosting must enable this functionality manually. If you do not see the Add Table button and want to use it, have your Authorized Support Contact submit a request to Campus Hosting to enable tracking of user-defined tables.
Users cannot add tables included within the DenyList group: "Excluded Tables - Tracking NOT AVAILABLE".
Tracking is available for most tables however, there are some exceptions. Human Resource and Payroll-related tables cannot be enabled for security reasons, tables that are logged cannot be enabled as it would be capturing redundant information and impact performance, and attendance tables cannot be added as attendance information is already captured in the core attendance auditing structure (see the Attendance Change Tracking Report).
![]()
Once the table has been found, select the table from the list. The table name will populate the field. Select the Add Table button to add the table to the table group.
![]()
Added tables will appear in the table group list with a black X to the left of the table name. To have Data Change Tracker functionality begin tracking change data for this table, mark the checkbox in the Tracked column and select the Save icon.
To remove a table from the table group, click the black X to the left of the table name.
![]()
If you would like to create your own set of tables within a group (instead of within a predefined group), you can add tables to the User-defined table area.
Tracking New Tables
Infinite Campus lists any new tables as they're released via the Technical Information document accompanying every Campus version (for example). When a release contains new tables, you should consider whether or not your district wants to track any of these new tables. Provided table customization functionality has been enabled (this functionality can only be turned on by Campus Hosting), these new tables can be added to tracking on the Data Change Tracker Setup screen, as described in the Adding User-Defined Tables section of this document.
The following is the workflow for tracking a new table within Data Change Tracker:
- Infinite Campus adds a new table via a Release Pack.
- The district notices the new table(s) and decides they want them added for tracking.
- If the district does not have the preference enabled to track custom tables within Data Change Tracker they need to put in a Campus Support case requesting this functionality.
- Once Infinite Campus enables this preference for the district, they need to go into the Data Change Tracker Setup tool and add it as a tracked table via the process described in the Adding User-Defined Tables section of this document.
- The district will need to continue to repeat Step 4 for each new table as they are added to Infinite Campus.
Printing Tracked Tables
To print a list of all tables currently being tracked by the Data Change Tracker tool, select the Print Tracked Tables icon. The Data Change Tracker Configuration Report - Tracked Tables will appear in a separate window in HTML format (see Image 9).
![]()
Printing Untracked Tables
To print a list of all tables not being tracked by the Data Change Tracker tool, select the Print Untracked Tables icon. The Data Change Tracker Configuration Report - Untracked Tables will appear in a separate window in HTML format (see Image 10).
This report is useful in reviewing which tables you may want to add and have tracked by the Data Change Tracker tool.
This is not an exhaustive list of every Campus table that is not being tracked. This report only includes common tables plus user-defined tables that are not being tracked.
![]()
Viewing the Error Log
To view a list of errors that have occurred during the data change tracking process, click the View Error Log button. The Data Change Tracker Error Log will appear (see Image 11).
An error log has been provided to help assure administrators that the Data Change Tracker tool is configured correctly and that tracked changed records are successfully being captured and stored in the tracking database. The Error Log is broken into two parts: Recently Logged Errors and All Logged Errors.
To view the error log, click the View Error Log button. The Data Change Tracker Error Log will appear (see Image 11).
![]()
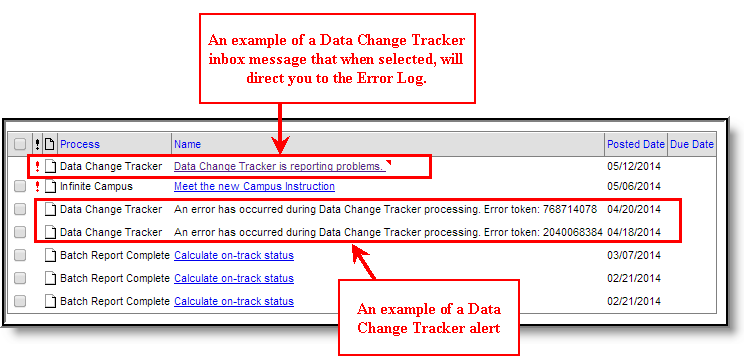
If errors occur, an alert or message will appear within the Process Inbox, directing administrators to the error log (see Image 12). The error log will display details of any issues that have been discovered since the last time a system integrity check was run.
Please share these details when contacting Infinite Campus Support.
The Data Change Tracker Error Log will indicate the time in which the error occurred (TimeStamp), the name of the object that had the error (Object Name), the type of object that had the error (Object Type), the error which occurred (Error Message), the source of the error (Error Source), and the Campus database username (User Source) of who modified data within Campus itself.
Not all errors within the log pertain to data changes. In the example below (Image 13), a misconfiguration of an audit job has generated an error.
![]()
Reviewing Excluded Tables
To review a list of tables that are excluded from Data Change Tracker functionality, scroll to the bottom of the tool and expand the Excluded Tables - Tracking NOT AVAILABLE section.
Tracking is available for most tables however, there are some exceptions. Human Resource and Payroll-related tables cannot be enabled for security reasons, tables that are logged cannot be enabled as it would be capturing redundant information and impact performance, and attendance tables cannot be added as attendance information is already captured in the core attendance auditing structure (see the Attendance Change Tracking Report).
![]()
