Tool Search: Behavior Letter Wizard
The Behavior Letter Wizard allows schools and districts to create disciplinary letters that automatically populate student data based on predefined event-trigger criteria. Users can initially create a behavior letter and generate it each time they want to pull student data for the defined criteria.
Different letter formats can be created for any combination of events and resolutions. Users can create letters for an effective date or a date range. Sort options are provided for desired printing options, either by student name or by mailing address zip code (for bulk mail rates). Created letters are saved and can be used as many times as desired
When entering the Effective Date to generate letters, the entered date is associated with the date on which the behavior incident occurred, not the date of a behavior resolution.

See the Behavior Letter Wizard Tool Rights for information on available tool rights.
Create a new Behavior Letter
Click the New button located below the Saved Letters window. This displays the Trigger Criteria and Report Options page.
Behavior letters look for multiple incidents, multiple events and multiple resolutions associated with a student.
Enter trigger criteria
When modifying existing trigger criteria, inactive Event and Resolution Types are indicated as such, with the Start and End Date of the type in parentheses. Types that apply to a specific school appear with "(Only for XX School use)".
- Enter the Letter Name. This is the name that appears within the Saved Letters window and describes the nature of the report being created.
- Select either Incident or Resolution in the Apply Date Selection To area. This allows users to search for behavior events when only the event or resolution date is known. This appears in the Saved Letters window, indicating the date the letter applies.
Click the Add Criteria button, then select the Event trigger criteria from the dropdown list. This is the behavior event a student may need to be given to potentially populate the letter. Selecting Any Event includes all behavior events which meet the criteria and date range entered. Up to 99 behavior events/resolutions can be added to the letter wizard editor.
The Behavior Letter Wizard accepts Event Types containing the only following special characters: ? < > . : ; ? | * % @ # ! $ ^ ( ) - _ + = “ “. Attempting to generate a behavior letter containing an Event Type with an “&” character produces an error.
- Select the Resolution trigger criteria from the dropdown list. This is the behavior resolution a student needs to be given to potentially populate the letter.
- Selecting Any Resolution includes all behavior resolutions, including unresolved events, which meet the criteria and date range entered.
- Selecting Unresolved Resolution reports the Events that have not been assigned Resolutions.
- Select the Role trigger criteria from the dropdown list. Only students with this role assigned will potentially populate the letter depending on the criteria and date range entered.
- Enter the EventCount. This field only counts events matching the given trigger criteria. This is the number of times a student must have the specified behavior event, resolution and role combination occur from the start of the calendar year to the effective date, or last day of the date range. This field defaults to any count if left blank. Entries in this field should be numeric only. A warning message appears if the entered value is not numeric.
Add additional trigger criteria by selecting the Add Criteria button.
Event, Resolution and Role criteria are JOINED using AND to increment the count. Multiple criteria rows are joined using OR.
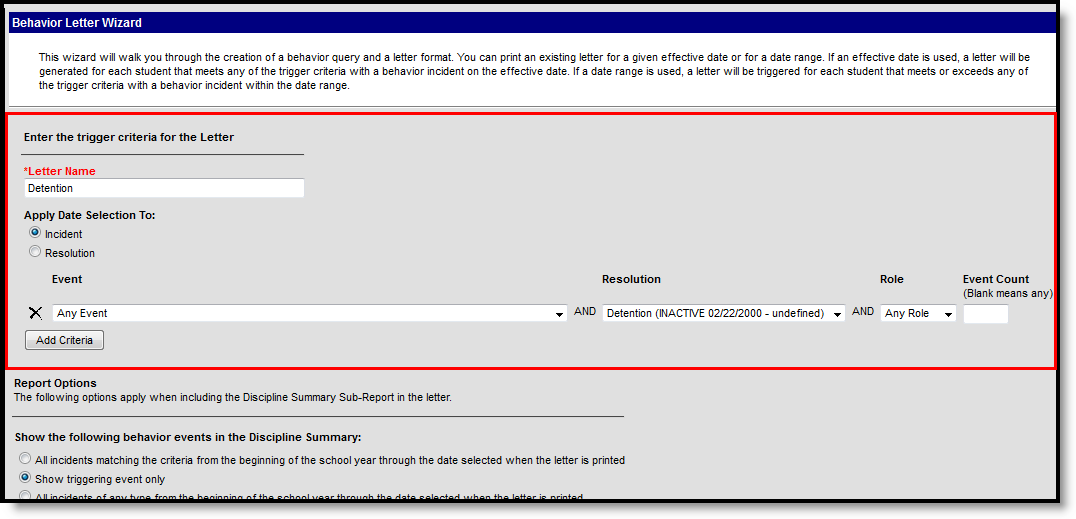 Behavior Letter Wizard Trigger Criteria
See the Trigger Criteria Scenarios for what letters report based on the criteria selected in this editor.
Enter report options
- Select what events are pulled into the Discipline Summary Report. Below is a summary of each option:
- All incidents matching the criteria from the beginning of the school year through the date selected when the letter is printed - This pulls all events of the type selected with the resolution and role specified from the beginning of the calendar year to the last day in the date range entered.
- Show triggering event only - This only displays events which triggered the count date criteria to be met.
- All incidents of any type from the beginning of the school through the date selected when the letter is printed - This displays all behavior events that occurred from the beginning of the calendar year to the effective date entered or last day within the date range entered.
- Select which information to include within the Discipline Summary Report by marking the appropriate checkboxes. Only information marked within this area displays within the Discipline Summary Report.
- Show Role - Shows the role (participation) of the student within the event.
- Show Context - Prints the selected context as entered on the Incident.
- Show Participant Details - Prints details entered for the Participant in an Event.
- Show Demerits - Lists the demerits entered on the behavior event.
- Show Referral Name - Prints the name of the person who submitted the Incident.
- Show Resolution Details - Prints details entered for a Resolution in an Event.
- Show Location - Prints the selection location as entered on the Incident.
- Show Incident Details - Prints details entered on the Incident.
- Show Classification Details - Prints the classification of the behavior event, if one is selected (Harassment, Drugs, Weapons, etc.).
- Select which information to include in the Behavior Summary Report by marking the appropriate checkboxes. Only information marked within this area displays within the Behavior Summary Report.
- Show Behavior Incident - Prints the incidents that triggered the behavior letter.
- Show Behavior Harassment - Indicates if the incident was labeled as harassment.
- Show Behavior Response - Prints the behavior response associated with the event.
- Show Behavior Event - Prints the behavior event.
- Show Behavior Drugs - Prints any record of Drugs associated with the event.
- Show Behavior Resolution - Prints details entered for a Resolution in an Event.
- Show Behavior Role - Shows the role (participation) of the student within the event.
- Show Behavior Weapons - Prints any record of weapons associated with the event.
- Show Behavior Detention - Prints the assigned detention information.
- Show Custom Behavior Fields - Prints any localized behavior event, behavior resolution, or behavior response information.
- When finished, select the Letter Format button. Users are redirected to a new editor where writing of the letter can begin.
 Behavior Letter Report Options
Insert Campus Fields and Sub-Reports
To maximize efficiency and allow for the letter to adapt to reporting the same message uniquely for each student receiving a letter, Using Campus Fields and Campus Sub-Reports in letters allows the reports to dynamically pull and display specific student data for each student within the generated letter.
Users who wanted to have each person’s first name appear within the letter would select the Campus Field icon and insert first name by selecting Demographics > firstName. By inserting firstName, each individual letter will have the person’s name populate where the campus field was placed. This concept can be applied to a variety of Campus data and can greatly improve efficiency when printing letters for a large group of users.
Campus Field Options
To include Campus fields within a letter, select the small icon on the right-hand size of the text format bar.
Once the Campus field options icon is selected, users are presented with the Campus Field Properties editor. Much like other Ad hoc field editors, users are able to select Campus fields related to student data.
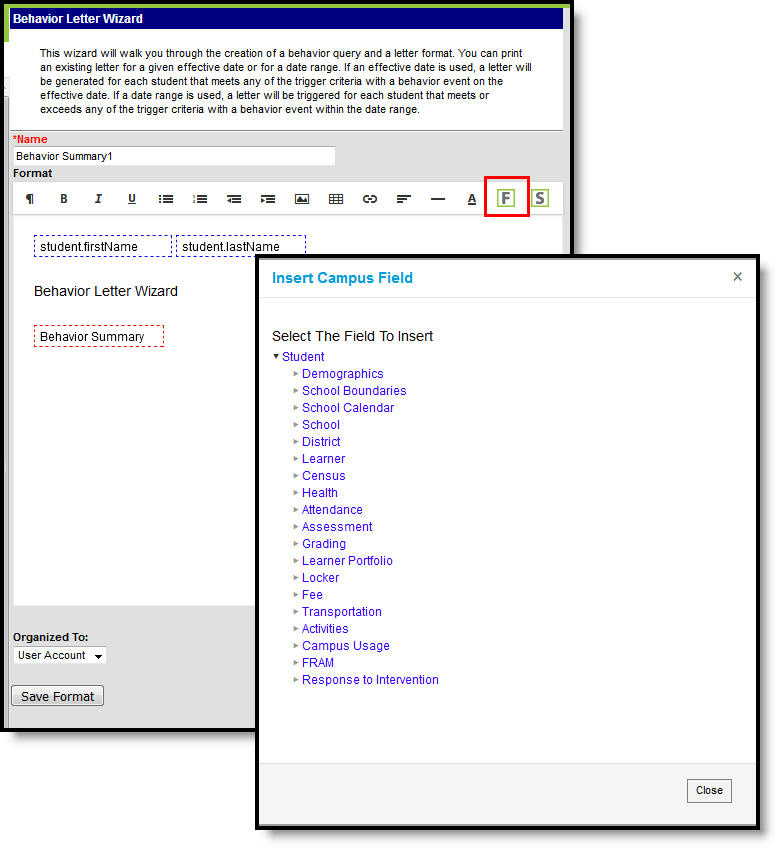 Insert Campus Fields
When adding Custom Attributes to letters, Custom Attributes cannot contain special characters.
To insert Campus fields within the letter, select the field from the Campus Field Properties editor. The selected field appears within a dotted blue-lined box in the text field.
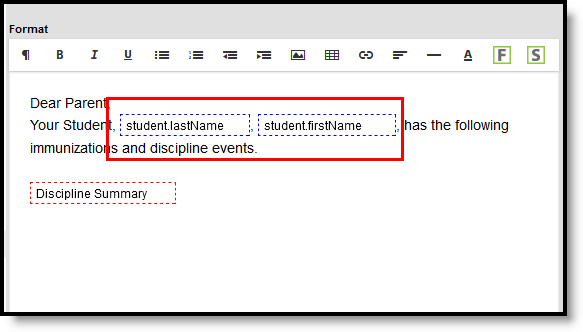 Campus Fields in Behavior Letter Editor
In the example above, a student's first name and last name are pulled into the report. Every time this report is generated, each student being reported pulls their unique data for these fields into the letter.
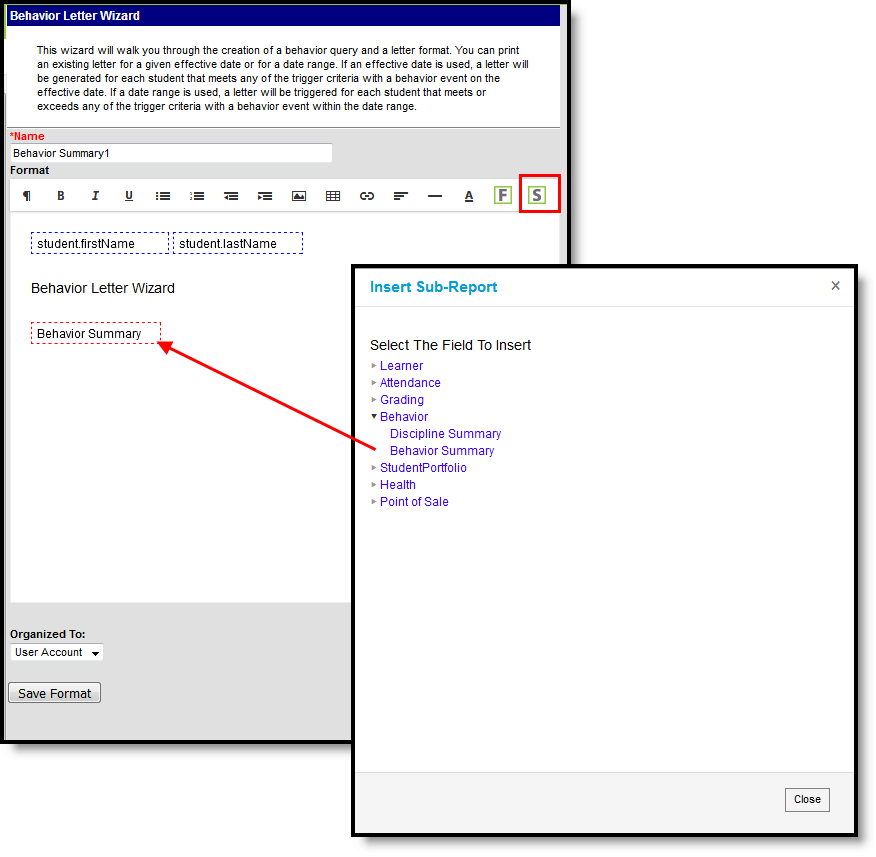
Campus Sub-report options
Campus Sub-reports can also be included within the letter. For the purpose of utilizing previously established Discipline Summary options as well as including the most relevant behavior information, users are encouraged to only include the Discipline Summary Sub-report within the letter. This can be done by clicking the Campus Sub-report icon and selecting Behavior > Discipline Summary.
Fields displaying in red text have been deactivated. Use the Element Replacement tool to update ad hoc filters with new fields.
There are two Behavior Sub-reports available:
- Discipline Summary
- Behavior Summary
In order to report accurate behavior information in the behavior letters, multiple sub-reports should NOT be included in the same letter.
 Behavior Letter Sub-Report Options
Sub-report options
The following table lists the sub-report options for each area.
| Area | Sub-Reports |
|---|---|
| Learner | Student Schedule Active and Dropped Student Sch |
| Learner Planning | Course Requests Course Plan |
| Attendance | Period Mark Summary Course Mark Summary Whole/Half Day Summary Exact Day Summary Single Day Count Summary |
| Grading | Grade Detail Term GPA Summary |
| Behavior | Discipline Summary Behavior Summary |
| Student Portfolio | Cumulative GPA and Class Rank |
| Health | Immunization Health Screening Concussion Health Screening Dental Health Screening Hearing Health Screening Scoliosis Health Screening Vision |
| Point of Sale | POS Account Balance |
When using sub-reports in letters, please note the following:
- All behavior data is included when adding either of the sub-reports.
- A field only displays if there is data for that field. If a field is chosen from the sub-report but there is no saved data for that student, information for that field does not display.
- A sub-report option only displays if the district/school records that data
Enter letter content
- Ensure the letter Name is correct. This field auto-populates with the name entered in the previous editor.
- Begin writing the letter within the text box. Add any desired formatting options using the WYSIWYG editor.
- Select the appropriate Campus Fields to include in the letter.
- Select the appropriate Campus Sub-reports to include in the letter. Users are encouraged to select the Discipline Summary report to include the most relevant behavior information and utilize previously established options. The Event List and Resolution List in the Behavior node lists all events or resolutions that meet the selected criteria.
- Select a user group from the Organized To dropdown list. Only users included within the user group selected will have rights to view and use the letter. If the User Account option is selected, only the user creating the letter will have rights to view and use the letter.
- Once all writing is complete, all Campus fields have been inserted into the letter and the Discipline Summary has been included (if desired), select the Save Format button. The screen flashes telling the user the letter has been saved. The completed letter remains open to make additional modifications if needed. To access and print the newly saved letter, select Behavior Letter Wizard from the Campus Outline.
Inserting an Image into a Letter
Images in any of the approved formats can be added to letters. If you have trouble with a .JPEG image in FOP, try opening it with an image processing program (such as Photoshop or Gimp) and then save it. Specifying 24-bit color output may also help.
For the PDF and PostScript renderers, most .JPEG images can be passed through without decompression. Grayscale, RGB, and CMYK color spaces render properly; however, for other output formats, the .JPEG images have to be decompressed.
Refer to the WYSIWYG Editors article for more information.
Set up preferred language
This format screen allows the entry of the letter's body. Letters can be created in several languages (see the Preferred Language Letter Setup section below). A school can create an Attendance letter in however many languages are needed, but it must first be entered in the selected Default Value.
Infinite Campus does not provide translation services.
Districts must use their own resources when creating communication to parents/guardians, students, staff, etc. in another language.
Letters must exist in the assigned default language (see Step 1). Text can be entered for additional languages, as needed for the district's population. Two things must be done:
- A language must exist in the Attribute/Dictionary and be marked active in the Attribute/Dictionary tool.
- A language must be assigned as the Preferred Language on the Personal Contact Information editor on the Demographics tab.
Existing language codes should not be modified. Access to letters is lost until the original code is recreated. If that language code is assigned to any person, that assignment is lost as well.
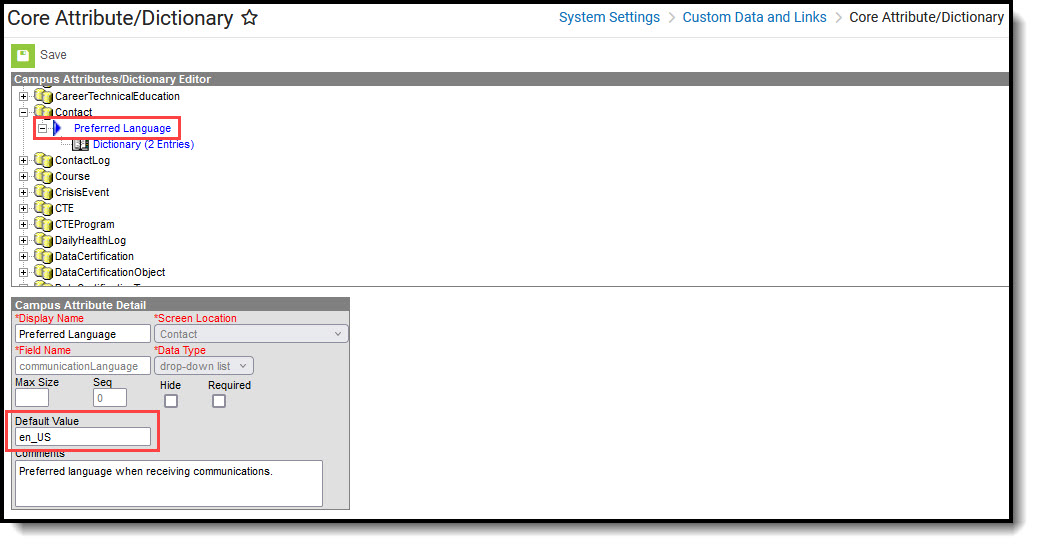
Step 1. Enter the preferred language default value
Tool Search: Core Attribute/Dictionary
Enter the desired Default Value for the Preferred Language. This value is used to show the Default Language Preview when creating letters in other languages, and if no Preferred Language has been assigned to an individual (Step 3), letters generate in this default language.
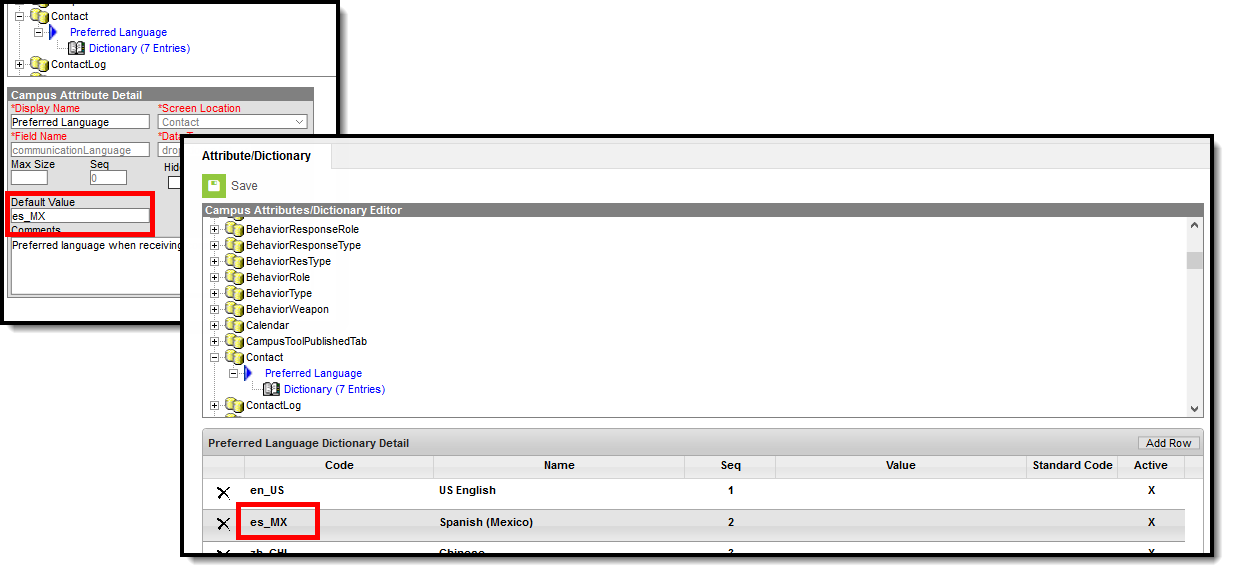
- Expand the Contact object.
- Click on Preferred Language element. A Campus Attribute Detail editor displays.
- Enter the appropriate Default Value. This could be en_US, es_MX, or another abbreviation that matches the Code assigned to the Languages entered in the Dictionary list. The entered value must match the Dictionary Code for that language.
Step 2. Add language to the Attribute/Dictionary
Tool Search: Core Attribute/Dictionary
Languages available here are used in the Preferred Language Selector and control the list of languages.
- Expand the Preferred Language attribute and select Dictionary. A Preferred Language Dictionary Detail editor displays.
- Click the Add Row button in the far right corner of the Detail editor.
- Enter a Code, Name, and Sequence for the language.
- Mark the language as Active.
- To add more languages, click the Add Row in the right-hand corner, and repeat steps 3 and 4.
- Click the Save icon when finished.
The Language Code can be up to 15 characters in length.
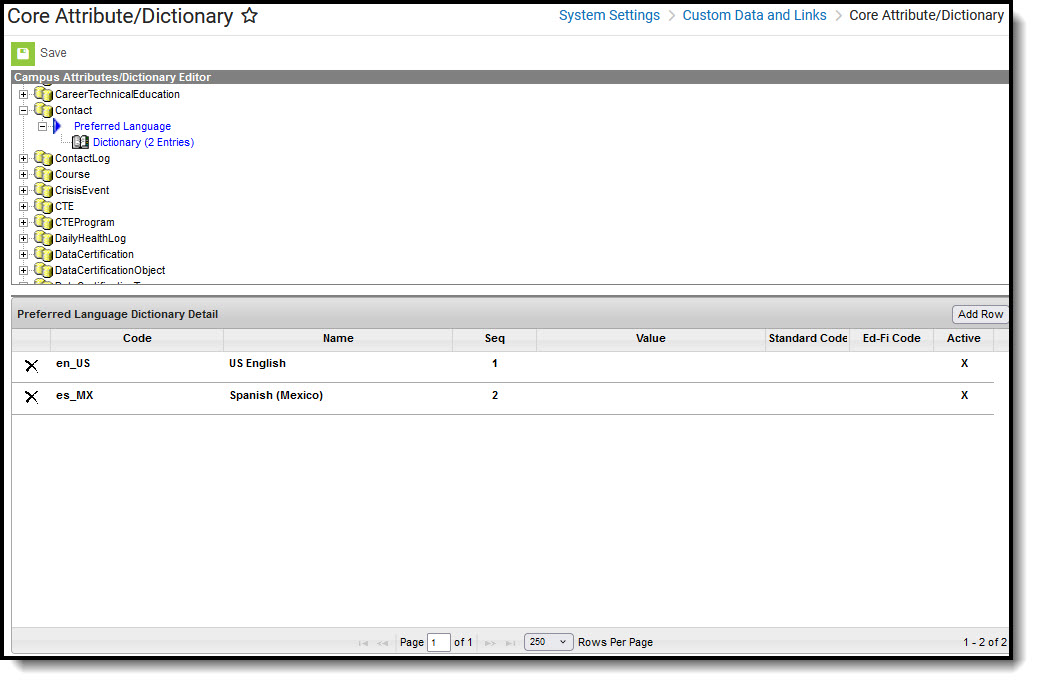
Any language can be added or removed. But the language entered as the Default Value MUST remain. As the default preferred language, it is used when an individual has no Preferred Language assigned. Letters do not generate at all if this language is removed. The Code entered in the Dictionary must match the Default Value.
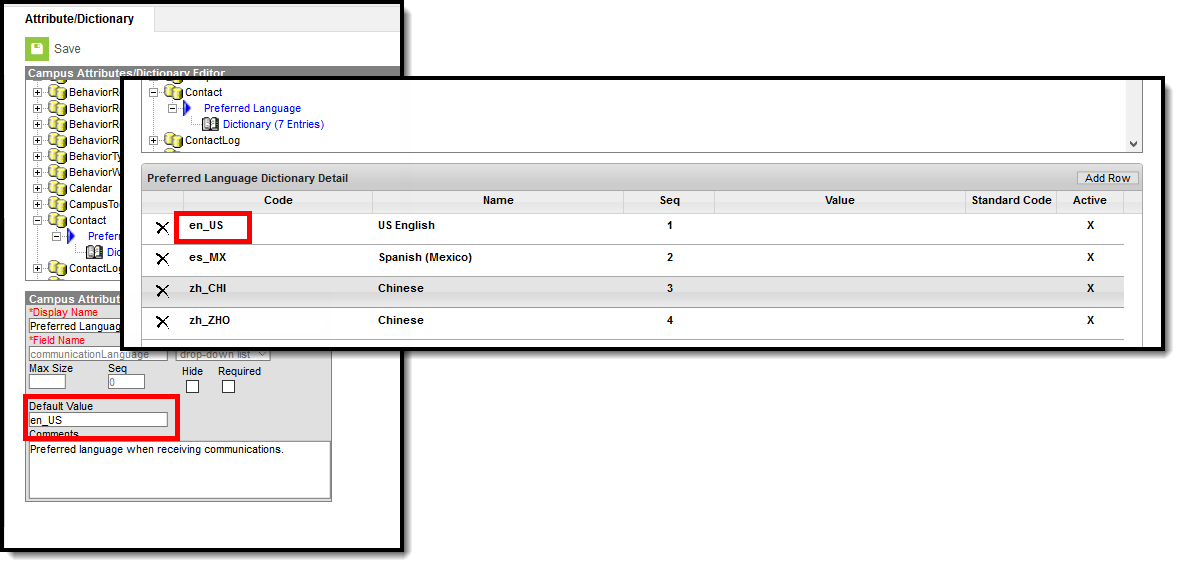 Default Value Matches Dictionary Code
Step 3. Assign preferred language to parent/guardian
Tool Search: Demographics
Assign the Preferred Language to the parent/guardian who receives an attendance letter. This field can be assigned to all persons in Campus, as well. It's used to send other sorts of messages to parents/guardians, staff and students.
Parents/guardians can also select the Preferred Contact Language on the Contact Preferences editor in the Campus Portal.
 Preferred Language Assignment
Step 4. Create the letter in the default language
Create the letter in the Default Language.
 Preferred Language Display
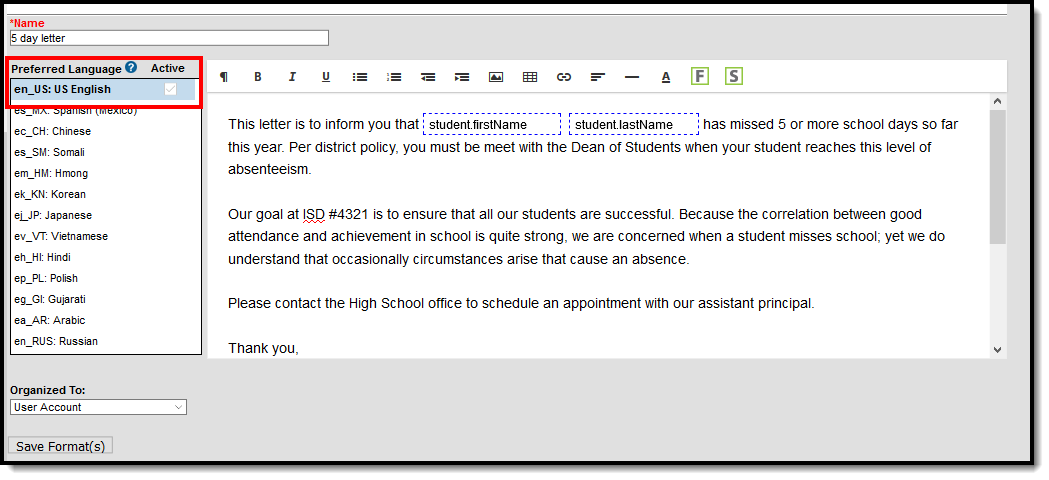
Default Language: English
In the following example, en_US: US English is the Default Language.The Attribute/Dictionary has been entered as follows:
- Preferred Language Default Value: en_US
- Preferred Language Dictionary Value Code: en_US
When the same letter is created in another language, the English version displays as the Preview.
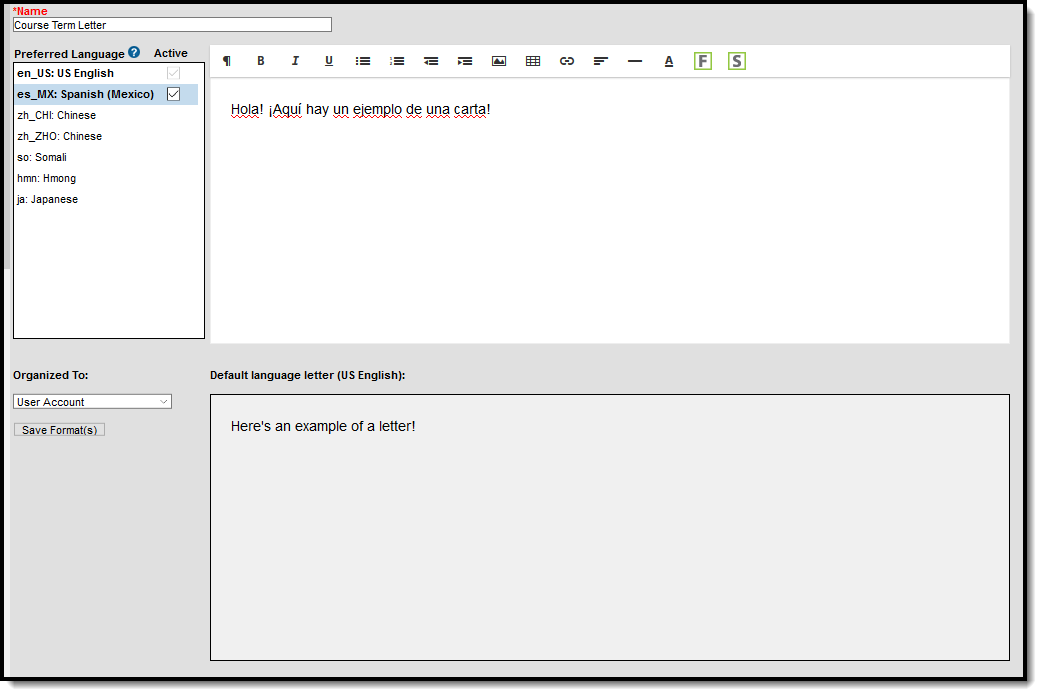
Default Language: es_MX
In the following example, es_MX: Spanish (Mexico) is the Default Language.The Attribute/Dictionary has been entered as follows:
- Preferred Language Default Value: es_MX
- Preferred Language Dictionary Value Code: es:_MX
 Spanish Default Language Setup
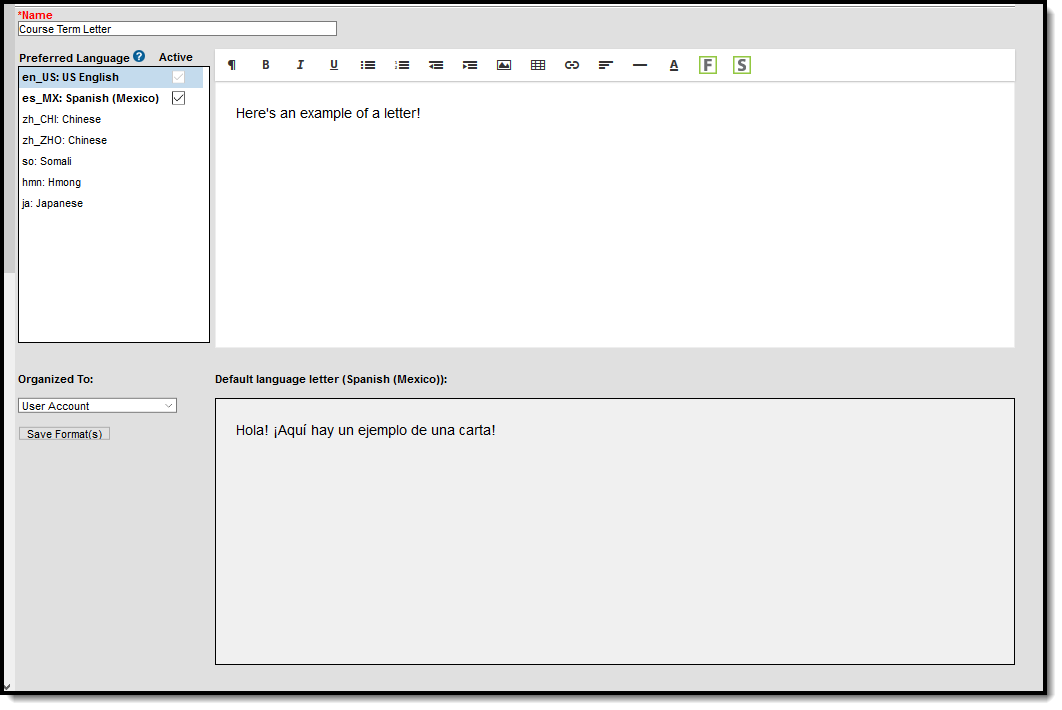
When the same letter is created in another language, the Spanish version displays as the Preview.
 Preferred Language in Spanish Letter Preview
When finished, select the appropriate Organized To: option, then click the Save Format button. Follow your district's standard procedure to print and generate attendance letters. Letters in English and letters in non-English generate in the same collection of letters. When a parent/guardian is assigned a Preferred Contact Language that is not English, the letter prints in that language.
Step 5. Create the letter in additional languages
After creating the letter in the Default Language, enter text for this same letter in a different language by selecting the language in the Preferred Language list and type/paste translated text into the WYSIWYG editor. That language becomes bold, and an Active checkbox becomes available. A language version of the letter is only a draft until the Active checkbox is marked.
When it is determined that the draft letter can be sent, mark the Active checkbox to indicate the letter is now ready to print for those individuals assigned that Preferred Language.
 Letter in Spanish
Repeat these steps for the other languages in which letters need to be available.
Please adhere to any district policy that may exist for what needs to be included in the letters.
Step 6. Send the letters
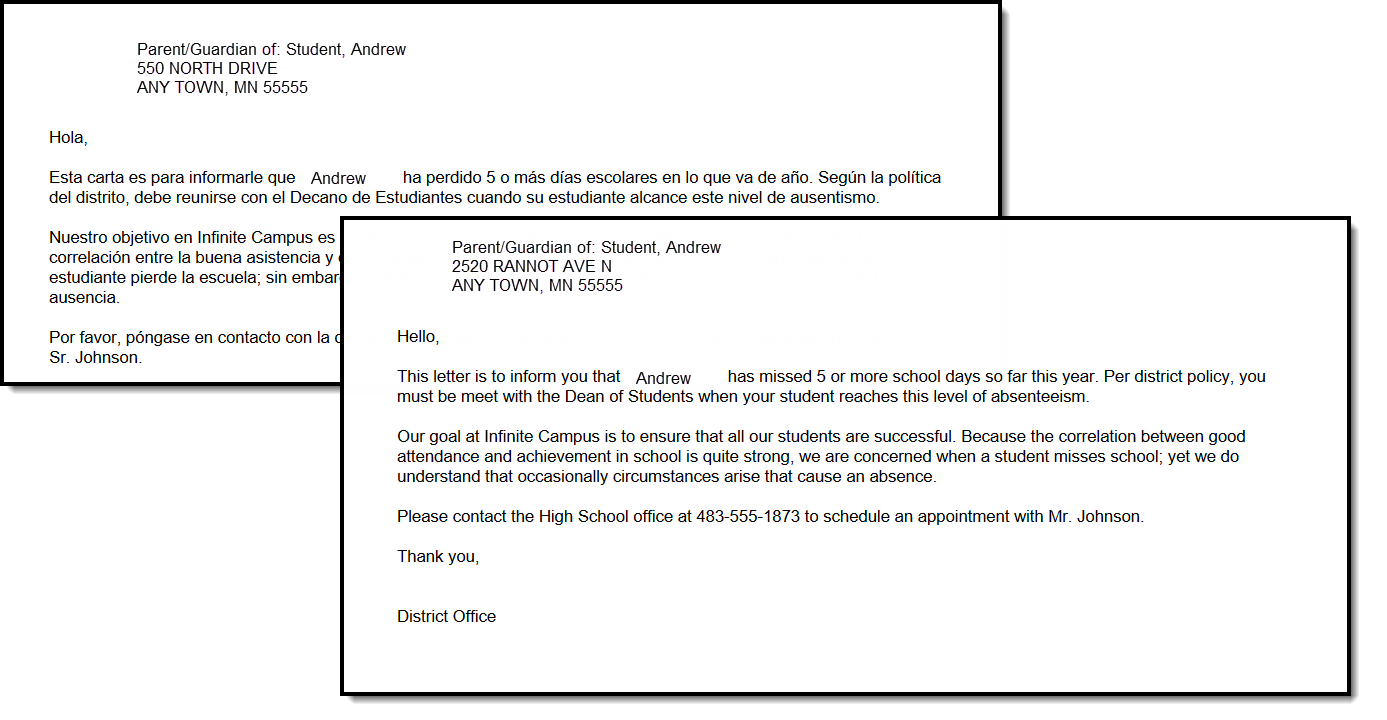
A letter is sent for each distinct Preferred Language associated with the parents/guardians in the household marked to receive mailings. In the example below, one of the student's guardians receives a letter in Spanish because that is the Preferred Contact Language for that guardian, while another guardian at a different mailing address receives the same letter in English. If there are two parent/guardians in the household assigned the same Preferred Language, one letter is generated for the household.
 Letters in Multiple Languages
There may be certain foreign-language characters that don't line up properly with other text when using the Campus Fields or when fonts are mixed (e.g., phone numbers alongside non-English characters). Try adding additional returns between lines.
Trigger criteria scenarios
Scenario | Outcome |
|---|---|
Any Event | Generates a letter for each Event. |
Event (A) | Generates a letter for each Event where the Event Type is (A). |
Any Event | Generates a letter for each Event with a Resolution where the Resolution Type is (B). |
Any Event | Generates a letter for each Event that includes a Role of (C). |
Event (A) | Generates a letter for each Event with a Resolution where the Resolution Type is (B) |
Any Event | Generates a letter for each Event where a participant with Role (C) is assigned a |
Event (A) | Generates a letter for each Event with an Event Type of (A) where a participant has a |
Event (A) | Generates a letter for each Event with an Event Type of (A) where a Participant has |
Any Event | Generates a letter for each Participant who was involved in (X) number of Events. |
Event (A) | Generates a letter for each Event with an Event Type of (A) that includes a Participant |
Any Event | Generates a letter for each Event that is assigned a Resolution with a Resolution |
Any Event | Generates a letter for each Event where a Participant has a Role of (C) and that |
Event (A) | Generates a letter for each Event with an Event Type of (A) assigned a Resolution |
Any Event | Generates a letter for each Event involving a Participant with a Role of (C) who was |
Event (A) | Generates a letter for each Event with an Event Type of (A) involving a Participant |
Event (A) | Generates a letter for each Event with an Event Type of (A) involving a Participant |
Any Event | Generates a letter for each Event that does not have a Resolution assigned. |
Event (A) | Generates a letter for each Event with an Event Type of (A) that does not have a |
Any Event | Generates a letter for each Event involving a Participant with a Role of (C) that |
Event (A) | Generates a letter for each Event with an Event Type of (A) involving a Participant |
Any Event | Generates a letter for each Participant with (X) number of Events that do not have |
Event (A) | Generates a letter for each Event with an Event Type of (A) that includes a |
Any Event | Generates a letter for each Event where a Participant with a Role of (C) was involved |
Event (A) | Generates a letter for each Event with an Event Type of (A) where a Participant with a |
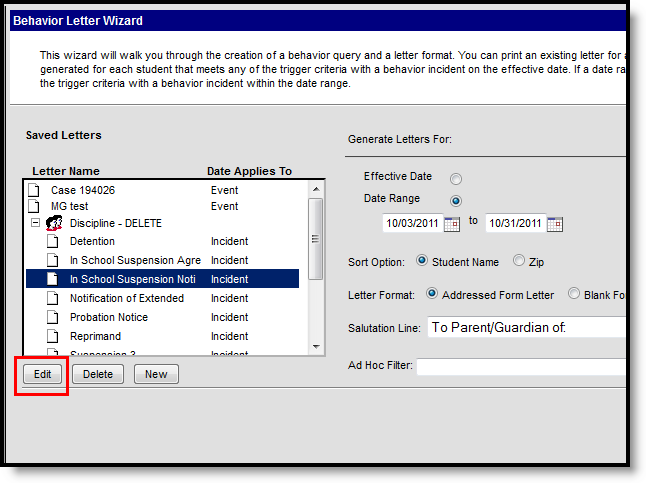
Edit saved letters
Users can edit saved behavior letters. This is a useful option when making slight modifications, updates or additions to existing letters.
- Select the letter from the Saved Letters window. The selected letter is highlighted.
- Select the Edit button. Users are redirected to the trigger criteria and report options editors for modification.
- Once finished making modifications, select the Letter Format button. Users are redirected to the letter editor.
- Make all appropriate modifications to the body of the letter and select the Save Format button when finished. The behavior letter is now saved with all edits made.
 Editing Behavior Letters
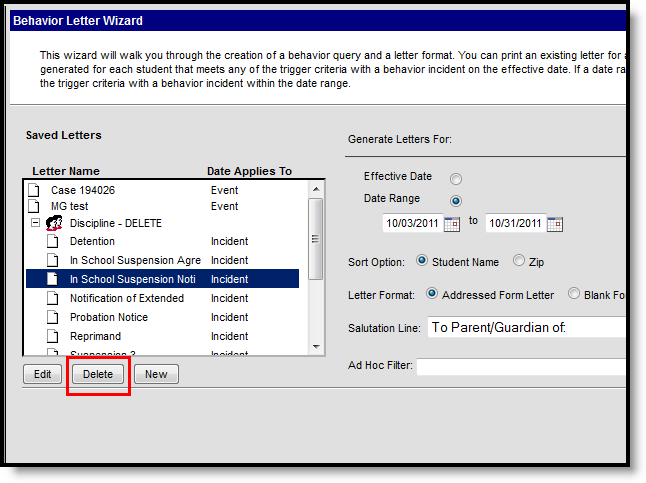
Delete saved letters
Users can delete saved behavior letters. This is useful for deleting unused letters and general maintenance of the saved behavior letter list.
- Select a behavior letter from the Saved Letters window. The selected letter is highlighted.
- Select the Delete button. Users receive a warning message asking whether they wish to delete the report design. Select OK to delete the letter.
- The Save Letters window updates and the deleted behavior letter is removed from the system.
 Deleting Saved Letters
If the Discipline Summary sub-report is included in a selected letter and letters are being generated for a date range, Event criteria is ignored. All events with the selected resolution print.
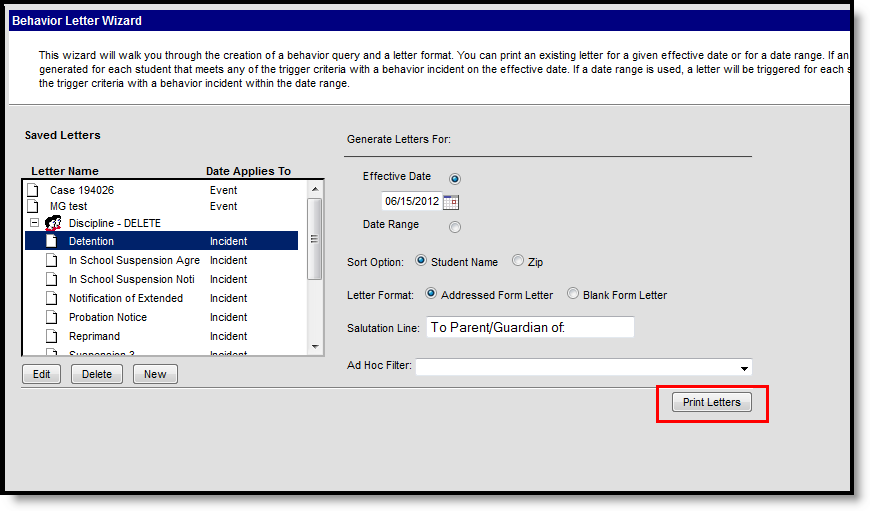
- Select a letter from the Saved Letters window. The selected letter is highlighted in blue.
- Select whether to generate data for the report based on the Effective Date or Date Range. Description for each option is as follows:
- Effective Date - A letter generates for each student who met or exceeded the trigger count for the specified criteria on this day. This date is associated to the date of the behavior incident or the start date of the behavior resolution.
- Date Range - A letter generates for each student who met or exceeded the trigger count during the date range entered. This includes the first and last day of the range.
- Select whether to sort generated letters by Student Name or Zip.
- Select a Letter Format. Selecting the Addressed Form Letter radio button makes the Salutation Line field available. Letters generated with this option selected formats in a mailing letter style, where address information is placed to fit a standard window envelope. Any salutation written within the Salutation Line field is included at the beginning of the address viewable within the envelope window. Letters generated using the Blank Form Letter format appear as a more standard letter, with no formatting used for direct mailing purposes.
- Select an Ad hoc Filter from the dropdown list (if desired). Ad hoc filters can be created by going to Ad hoc Reporting Filter Designer.
- Select the Print Letters button. Generated letters appear in a separate window in PDF format.
 Behavior Letter Wizard - Print Letters
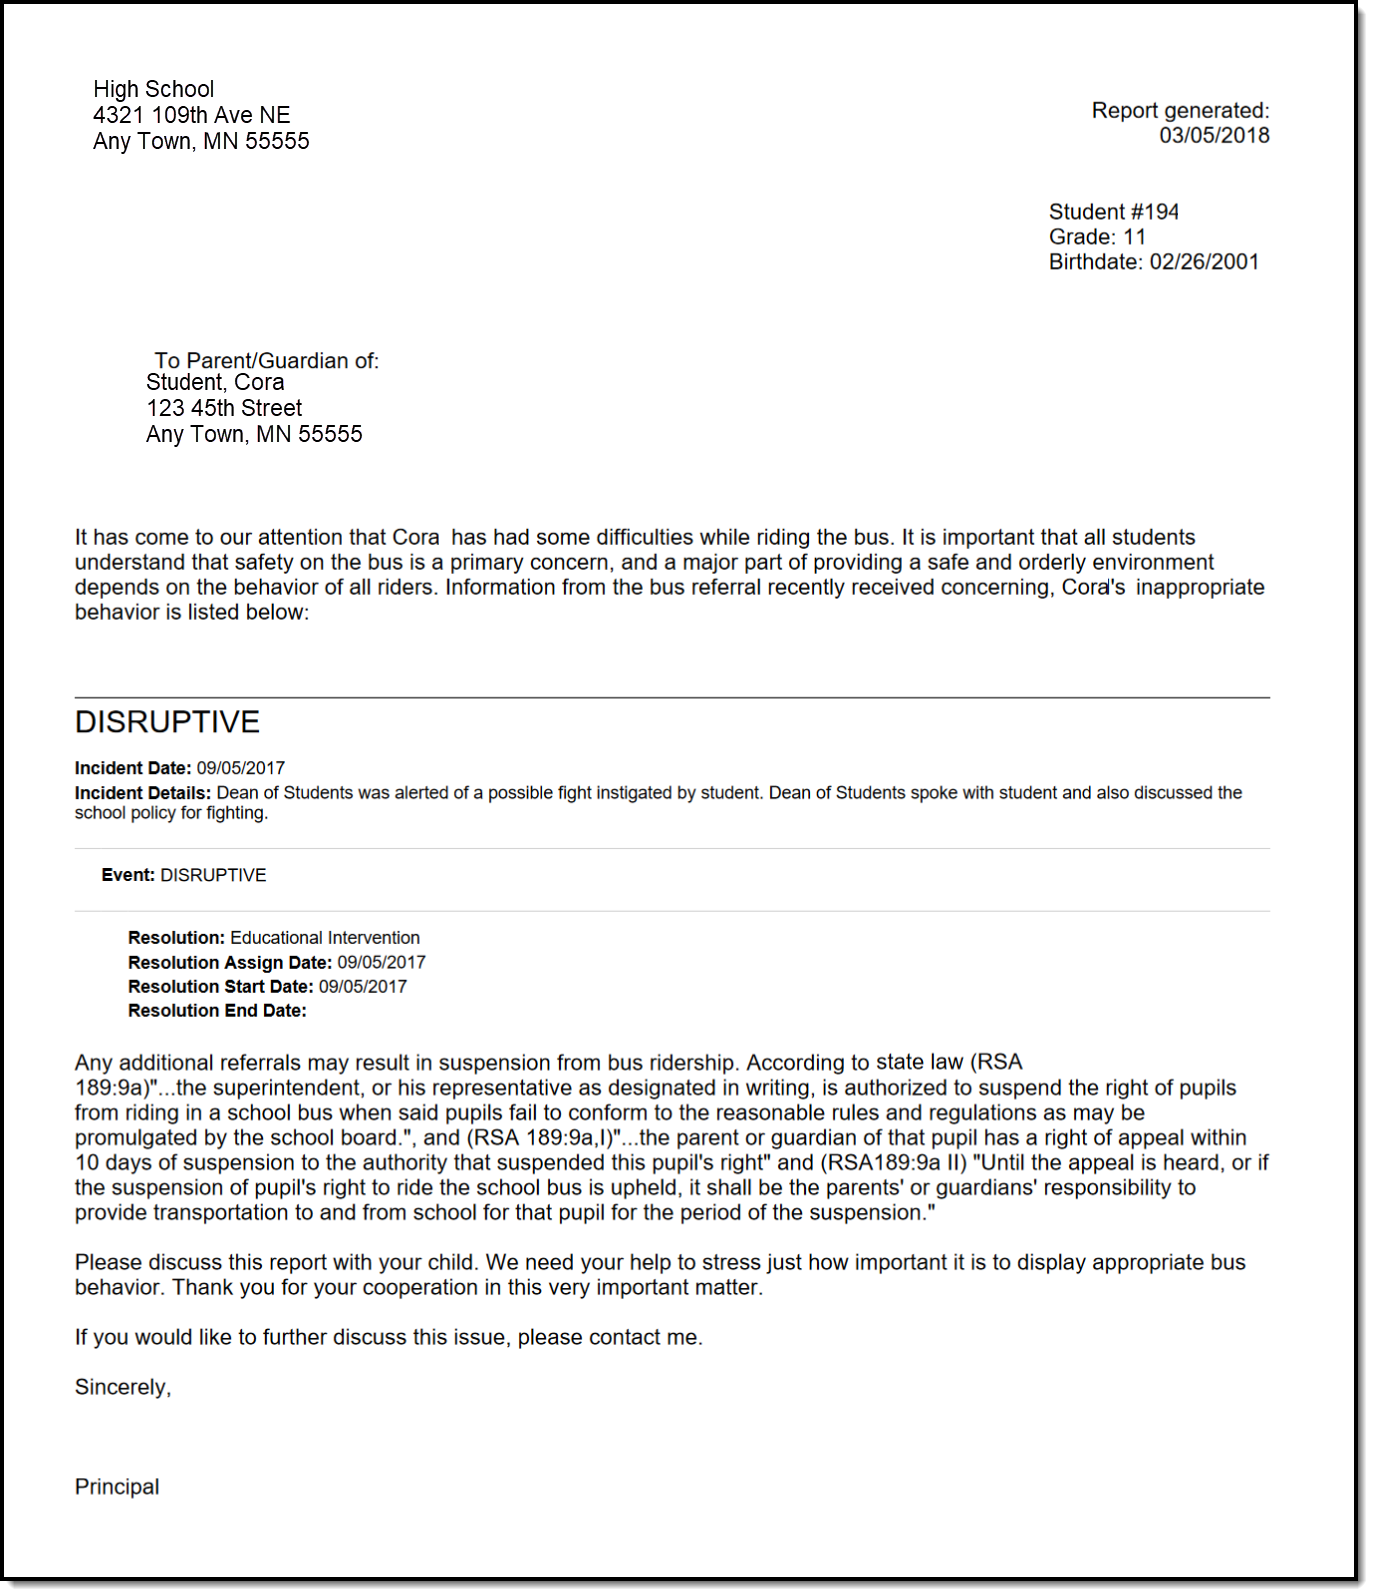 Behavior Letter - Addressed Form Letter Format
The letter example above was generated using the following options:
- Apply Date Selection to Incident
- Any Event, Any Resolution, Any Role
- Show Triggering event only
- Displays the following in the Discipline Summary: Show Resolution Details, Show Incident Details
- No options chosen for Display the following information in the Behavior Summary.
For students who do not have a mailing address, a letter still generates for them. Like in the Preview of the attendance letters, the student's name is listed on the summary of who receives a letter, but instead of an address, the words NO MAILING ADDRESS displays where the address would otherwise display. Letters print for the student with the same NO MAILING ADDRESS indication.
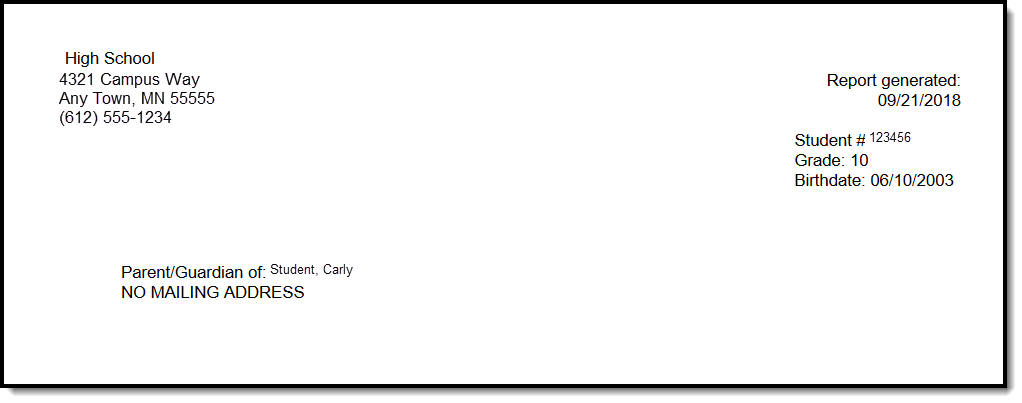 No Mailing Address Display on Letter Print
No Mailing Address is determined by the Mailing checkbox marked on the Household associated with the Address.
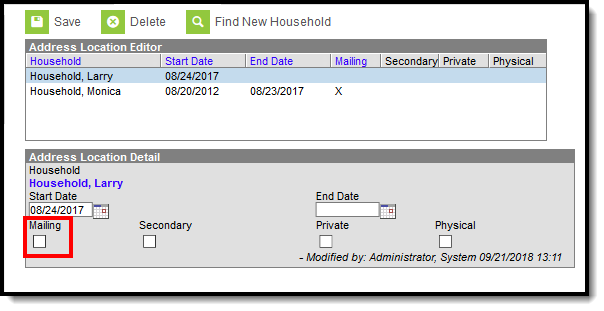 Address Location Detail - Mailing Checkbox
