The Campus Mobile Payments app, available for Android and iOS devices, allows districts who use the School Store to enter credit/debit card purchases in real-time at school or district events.
A Mobile Payments option has been added to the Categories and General Product tools (School Store > Administration > Categories and School Store > Product Inventory > General Product). This option allows Categories, Products, and Product Items to be assigned to an event. The Product Items can then be purchased at the event.
The Events tool in School Store > Administration is used to create an event, assign a Cashier PIN to a Category, and arrange the Product Items in a layout that will be displayed on a mobile device.
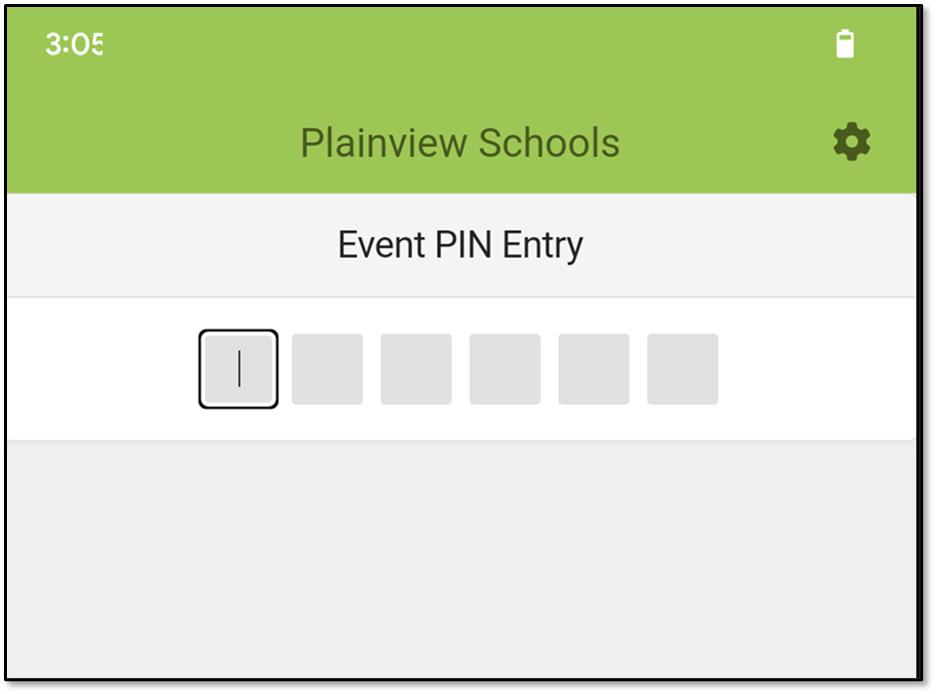
The Device Management tool allows users to set up a device to be used at an event. A QR code is used to connect the device with Campus information. Once connected, the Cashier PIN is entered to access the event.
A Bluetooth card reader is available from Campus and is required for the Campus Mobile Payments app. Contact your sales representative or Client Relationship Manager for more information.
Overview
This video gives an overview of Campus Mobile Payments.
Campus Mobile Payments allows districts to take credit/debit card payments using a card reader and a phone or tablet running the Campus mobile payments app.
Categories
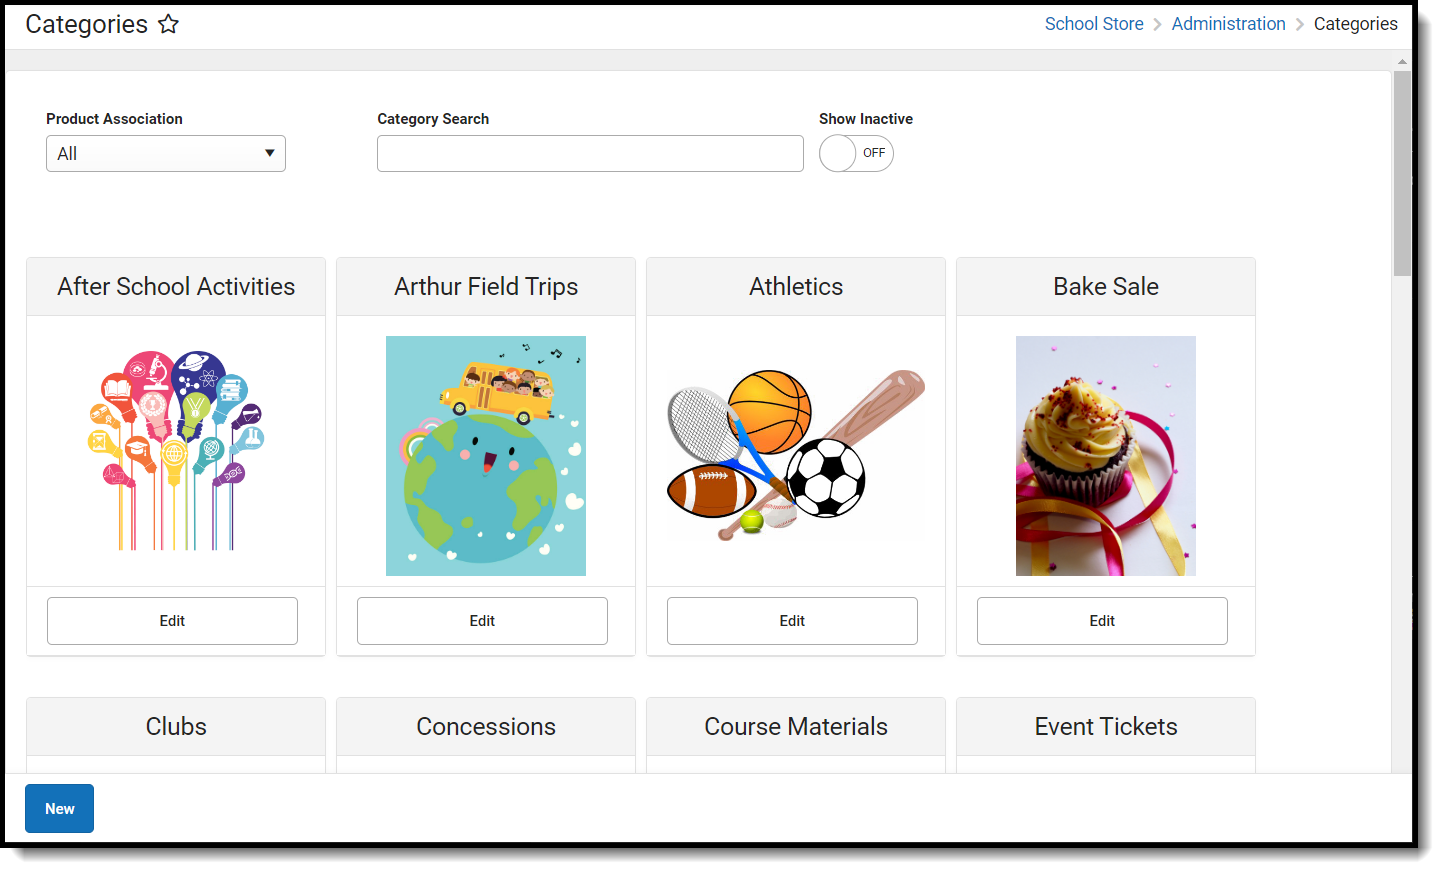
Categories are how similar products are grouped together in the School Store. When a portal user selects a category, only the products assigned to that category display.
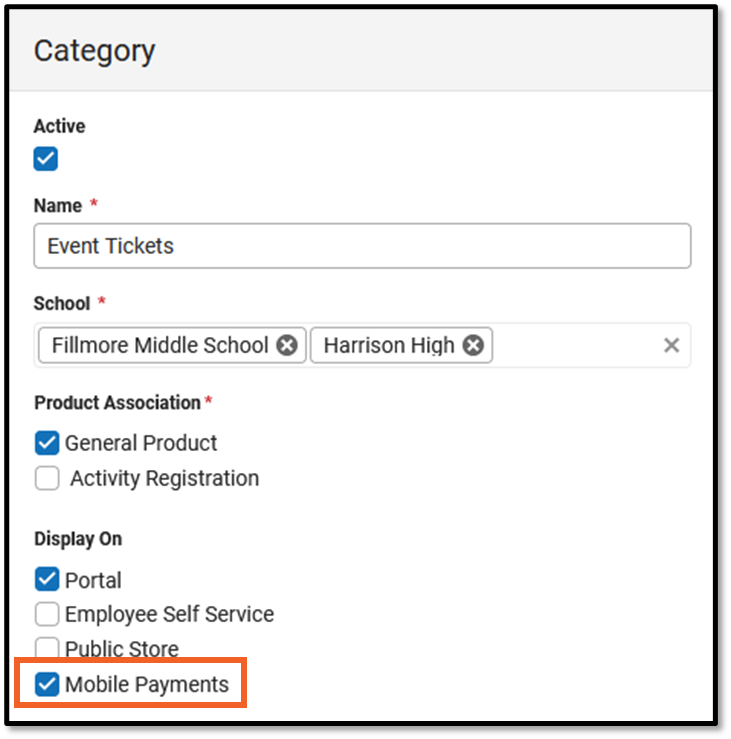
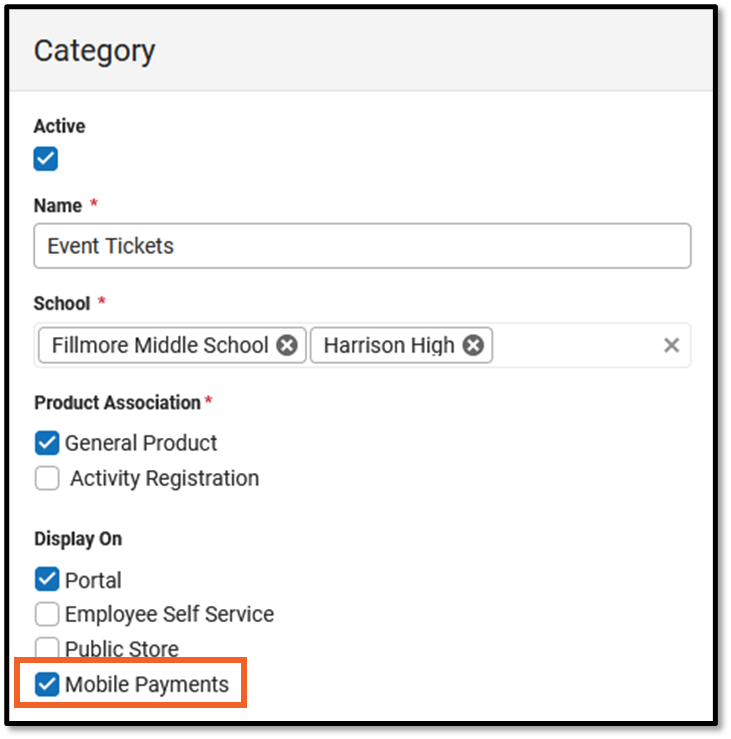
If you want a category to be used with the Campus Mobile Payments app, the Mobile Payments checkbox must be marked.
Tool Search: Categories
Categories are how similar products are grouped in the store. When a portal user selects a category, only the products assigned to that category display. Inactive categories and active categories with NO active products do not appear in the School Store.
- If you select All Schools in the Campus toolbar, the Categories for every school can be seen.
- If you set the Show Inactive toggle to ON, inactive Categories also display. Otherwise, when the toggle is set to OFF, only active Categories display. Inactive Categories can be deleted if there are no Products assigned.
Create a New Category
- Select School Store > Administration > Categories.
Result
The Categories page displays.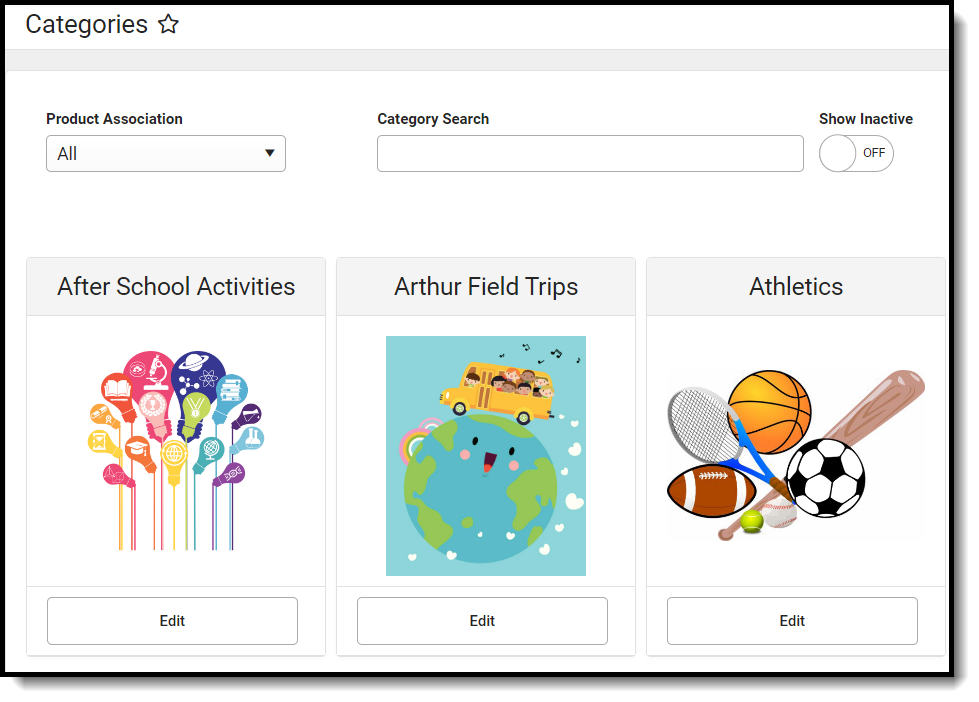
- Click New in the action bar.
Result
The Category panel displays. The Active checkbox and the Display OnPortal checkbox are automatically selected.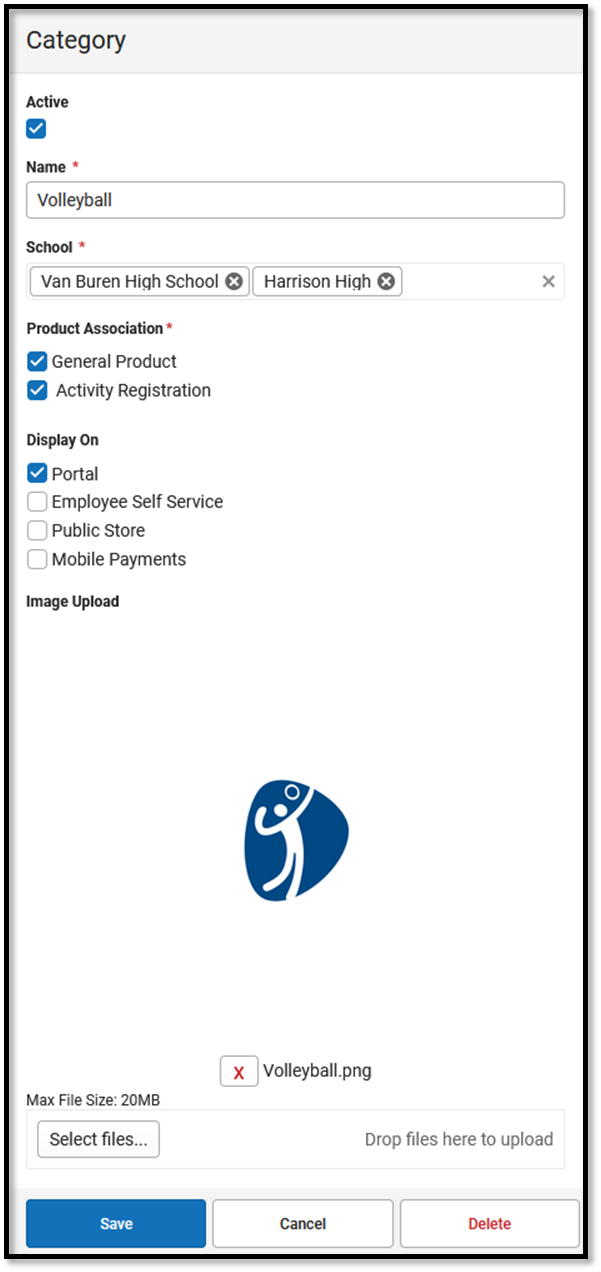
- Enter a Name for the category.
Select the Schools where the category will be available.
This field only displays schools you have tool rights to.Mark the appropriate Product Association checkboxes:
General Product - Mark this checkbox if the category will include products for purchase in the School Store.
Activity Registration - Mark this checkbox if the category will include activities for which students can register. When this checkbox is marked, Campus makes the category available for selection in the Activity Builder. If this checkbox is not marked, the category will not be available in the Activity Builder.
Mark the appropriate Display On checkboxes:
Portal
Tip: This checkbox is automatically selected on new Categories. Clear this checkbox if you do not want this Category to display in Campus Parent or Campus Student.Employee Self Service
Public Store
Mobile Payments
The options Employee Self Service, Public Store, and Mobile Payments must have General Product selected (under Product Association).
Use the Select Files option to upload an image for the category.
The image must use one of the following extensions: .jpg, .jpeg, .png, or .gif.
- Click Save.
Result
The Category is ready for you to add Products.
- if someone else wants to edit the School field on the Category, they must have tool rights to all of the assigned schools. Otherwise, they cannot make changes to the School field.
if you decide to inactivate a Category and active products are tied to the Category, Campus also inactivates the products and the products will not display in the School Store until they are manually made active again.
the Product Category is a required field on the Orders Report. If you remove a school from a Category, you will not be able to use the Orders Report for purchases made for that combination of Category and School.
Categories group products, services, and activities in the school store and activity registration.
General Product
After Categories are set up, products can be created using the General Product progress tracker, which consists of three steps.
- 1 - Product
- 2 - Product Items
- 3 - Availability
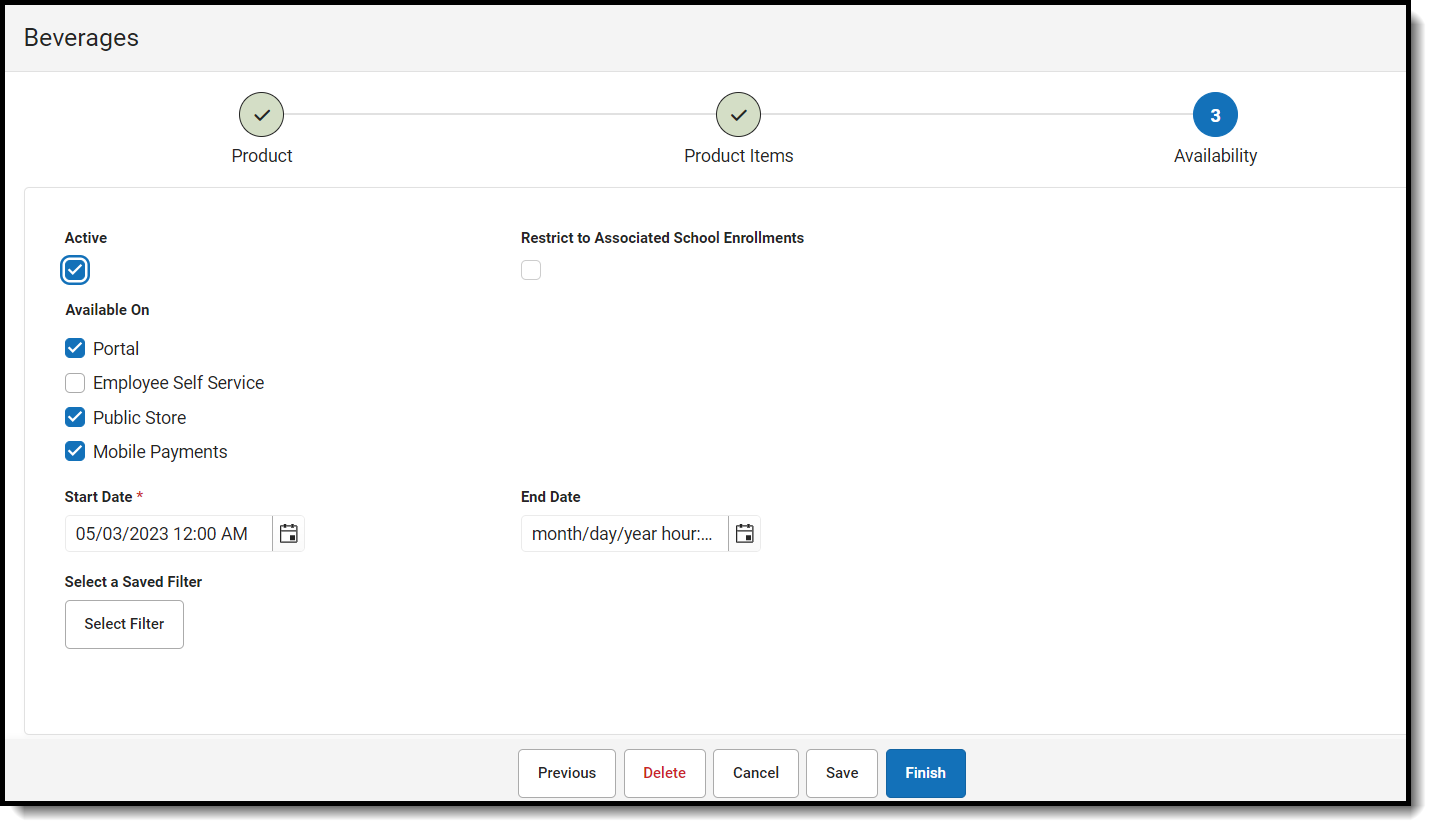
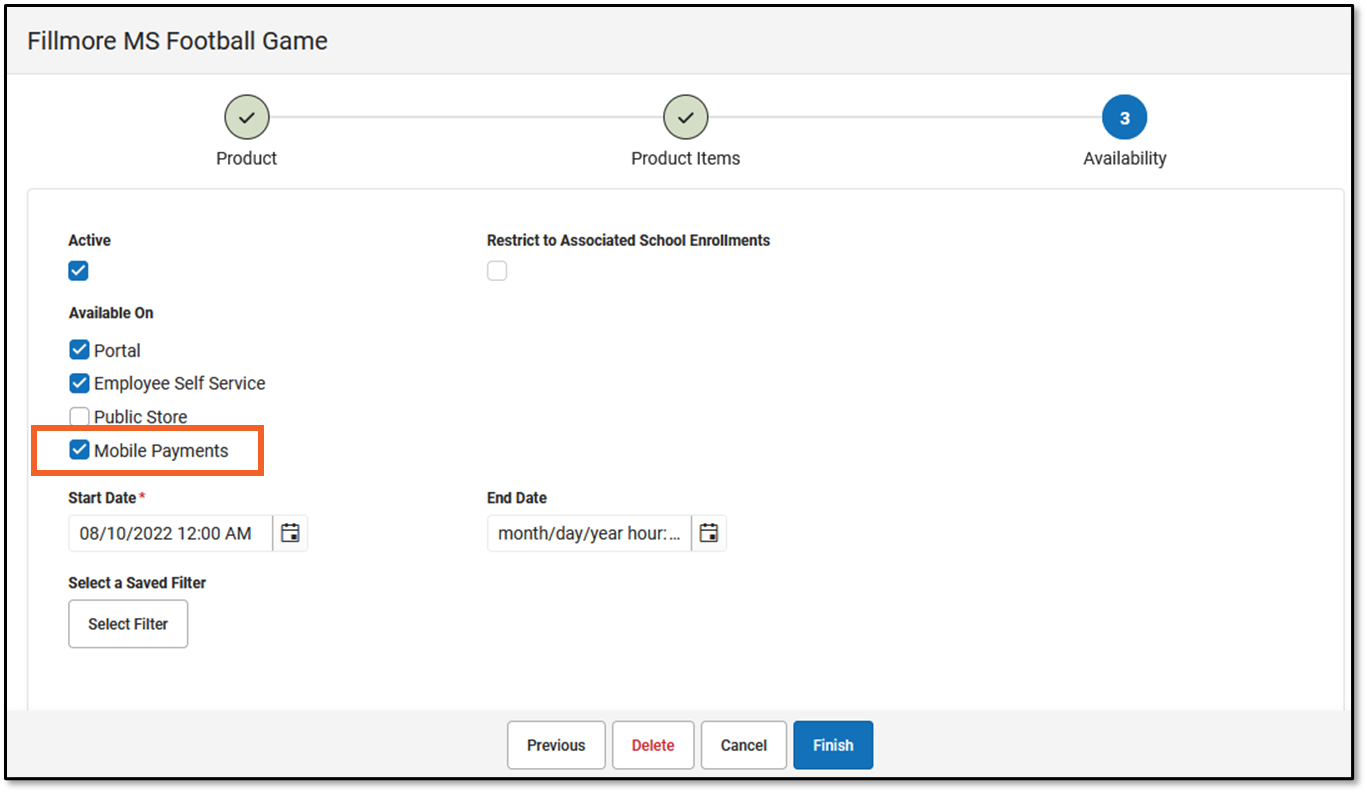
If Products and Product Items are going to be used in the Campus Mobile Payments app, the Mobile Payments checkbox must be marked in Step 3 of the General Product progress tracker.
Tool Search: General Product
After Categories are set up, Products can be created using the Product progress tracker. The Product progress tracker includes the following three parts:
- 1 - Product
- 2 - Product Items
- 3 - Availability
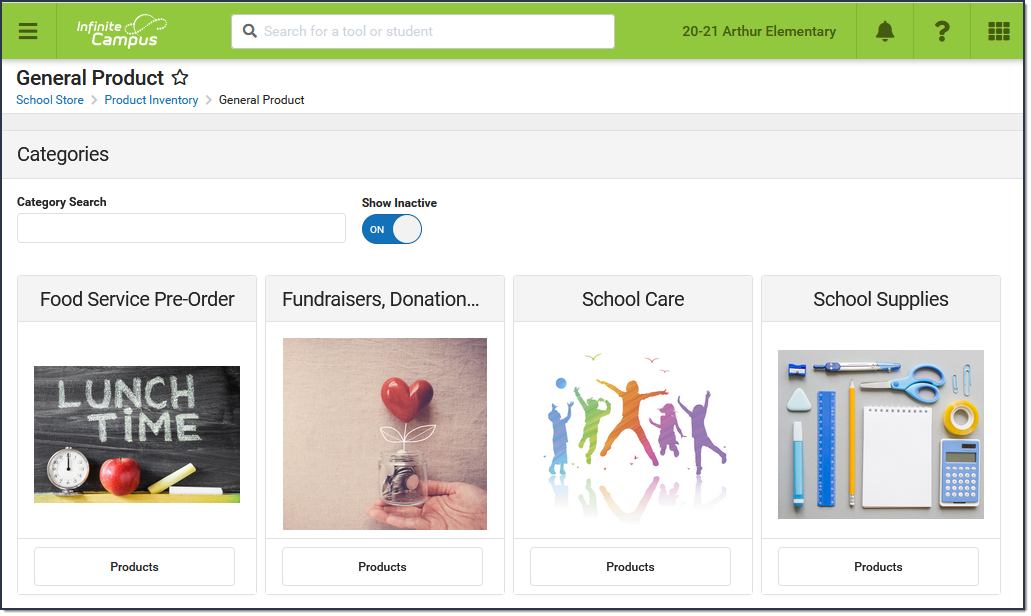
To get started, select All Schools or a specific school in the Campus toolbar, then click the Products button on a Category. If you set the Show Inactive toggle to ON, inactive Categories also display. Otherwise, when the toggle is set to OFF, only active Categories display.
If you create a Product and decide you do not want it, you can delete the Product if it has never been purchased.
1 - Product
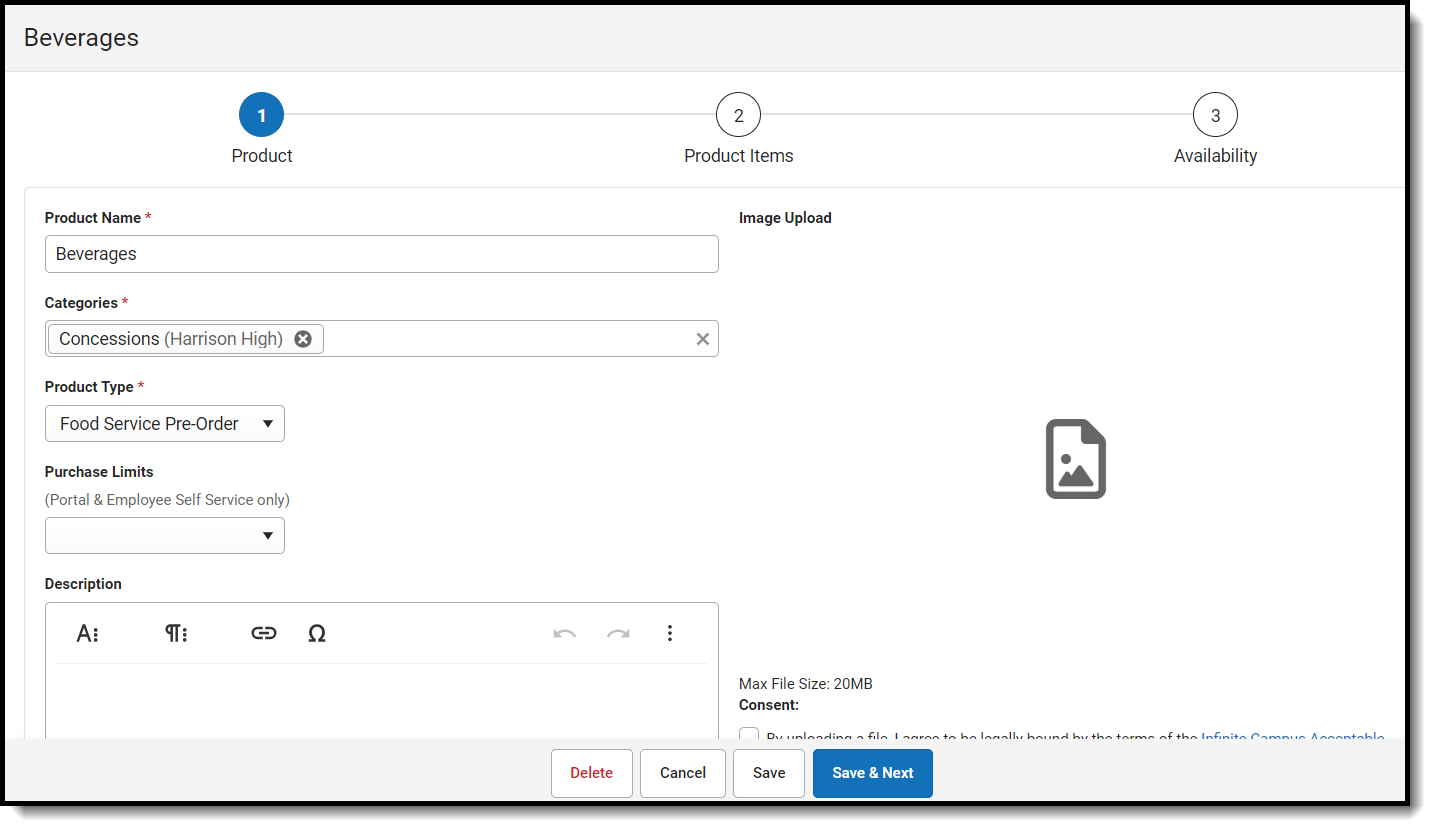
| Field | Description |
|---|---|
| Product Name | The name that displays in the School Store, Public Store, Employee Self Service, and/or Campus Mobile Payments. |
| Categories |
The Categories under which you want the Product to appear. You can select multiple Categories.
When you select a Category in School Store, Public Store, Employee Self Service, and/or Campus Mobile Payments, the assigned Products display.
The Products and Items associated with the Category are available for selection when setting up the Event Layout in School Store > Administration > Events.
The Product Category is a required field on the Orders Report. If you remove a school from a Category, you will not be able to use the Orders Report for purchases made for that combination of Category and School. |
| Product Type |
The Product Type to which you want to assign the Product. When this product is purchased, funds are deposited into the bank associated with the Product Type's Fund Account. |
| Purchase Limits |
Purchase Limits restrict the number of products or product items that can be bought for an individual recipient.
Purchase Limits can only be used in Parent Portal, Student Portal, and Employee Self Service. |
| Description | Detailed information about the product. This Description appears below the picture of the product. |
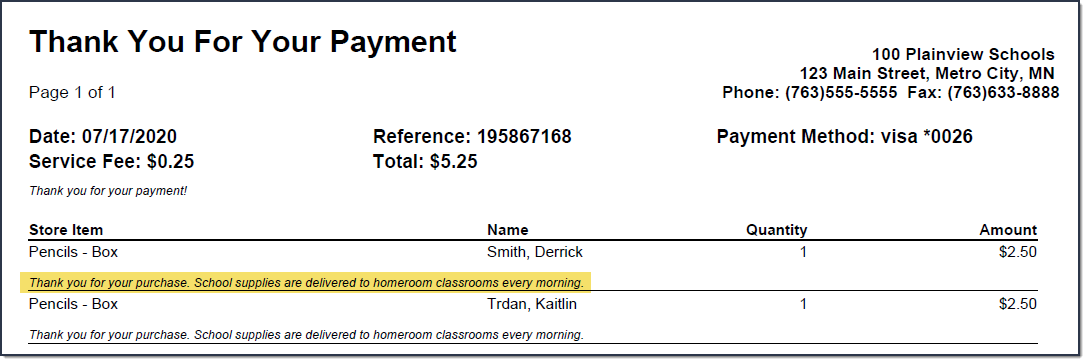
| Receipt Comments | This field allows for comments or special instructions to be added to a customer's receipt when the product is purchased. Comments appear below the purchased item.
 |
| Variable Rate | Mark this checkbox if you do not want to set a specific price for the item. When this checkbox is marked, the customer can enter any amount they want when they check out. This option is useful for things like donations. |
| Partial Refund | Mark this checkbox if you want to allow partial refunds for this item. |
| Inventory Tracking |
When this checkbox is marked, Campus calculates the amount of inventory you have available after a purchase is made. An additional column called Inventory on Hand displays on the Step 2 Attributes screen and allows you to manage the items in your store. If the number in this column is zero, Campus displays the message Out of Stock when the users try to add the item to their cart. Do NOT mark this option if
When this checkbox is marked, the product is included in the Inventory on Hand report. If you use the Payments Reporter to issue refunds for products purchased in the School Store and this checkbox is marked, Campus allows you to choose whether you want to return the item to Inventory on Hand. |
| Customer Comments |
When this checkbox is marked, customers can add information to their purchase before they check out. Comments appear on the Pick List report. You may enter text in the customer comment field to automatically display a message.
Customer Comments are not available in the Campus Mobile Payments app. |
| Description | Detailed information about the product. This Description appears below the picture of the product. |
| Image Upload | This option allows you to add a picture of the product.
The image must use one of the following extensions: .jpg, .jpeg, .png, or .gif. As a best practice, the file should not exceed 3MB. The image that displays in the store is a square, so a 1:1 aspect ratio is also recommended.
The uploaded images do not display in the Campus Mobile Payments app. |
| Image Description | After you select an image, an Image Description field appears. Use this field to enter a short text description of the image to be read aloud by screen readers, helping users with visual impairments understand what the image shows. |
| File Upload |
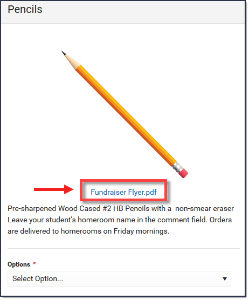
This option allows you to add a PDF file to the product. For example, pencils are going to be sold at a fundraiser, so a flyer about the fundraiser can be uploaded to the Pencils product.
A link to the PDF file displays between the image and the description.
The uploaded files do not display in the Campus Mobile Payments app. |
2 - Product Items
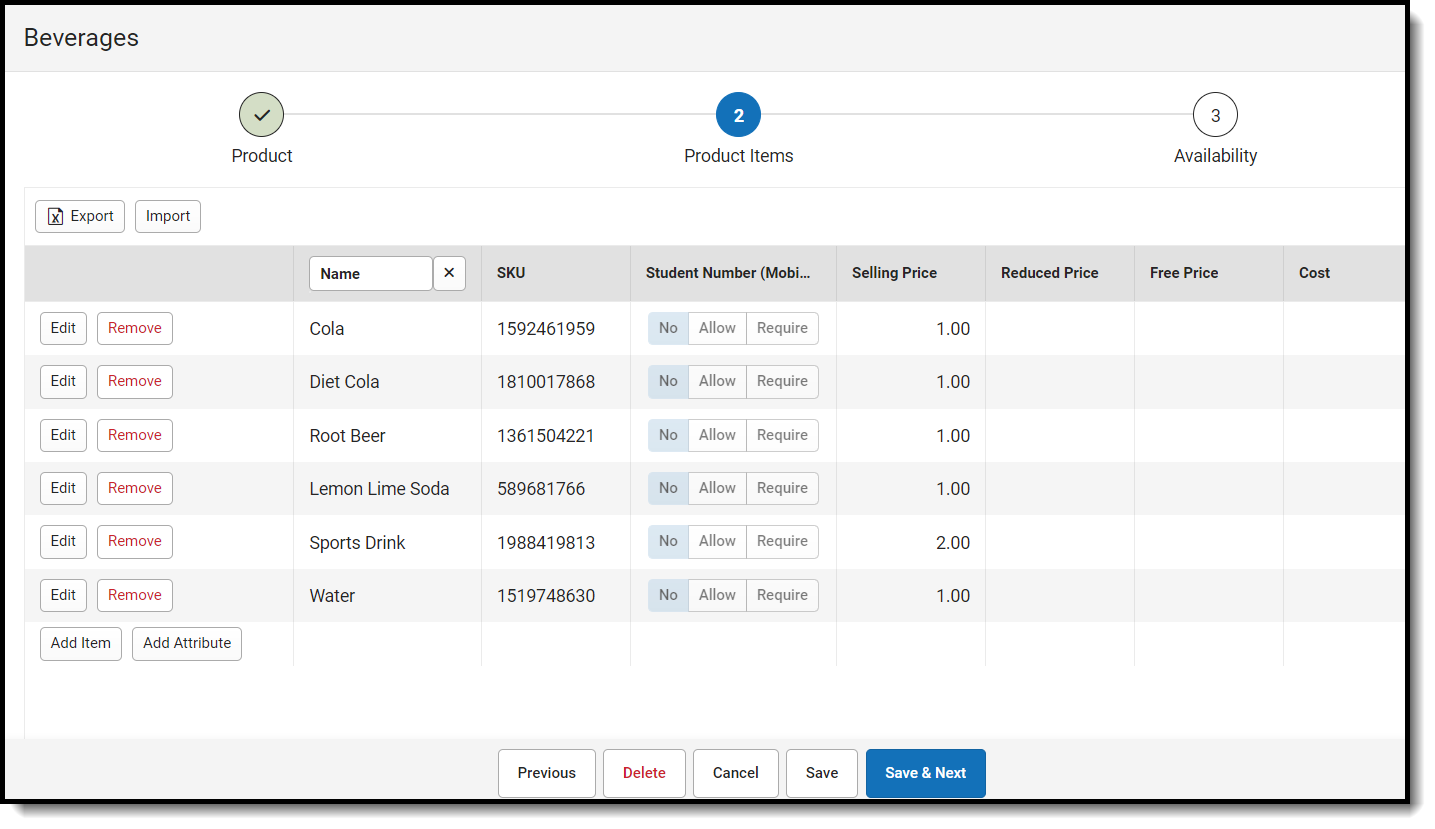
You can drag and drop rows to easily reorder lines in the table. To add multiple attributes (lines and rows) to the table, you must first click the Add Attribute button.
| Field | Description |
|---|---|
| Export | The Export button allows you to download an Excel version of the Product Items table. |
| Import |
The Import button allows you to upload an Excel or CSV file to populate the Product Items table.
To begin, use the Export button to download a template of the Product Items table.
|
| Add Item |
The Add Item button allows you to add another row to the table if you are using custom attributes. |
| Add Attribute | The Add Attribute button allows you to add custom attributes to the table. You can add up to three custom attribute columns for tracking additional product information. |
| Student Number (Mobile) | This column displays if Mobile Payments is marked within the Category under Display On.
 The Student Number (Mobile) field is used to track information about purchases for students. For example, if selling prom tickets, you may want to enter the student number at the time of purchase to track the students who are attending. The Student Number (Mobile) field is used to track information about purchases for students. For example, if selling prom tickets, you may want to enter the student number at the time of purchase to track the students who are attending.
When a row is added in Step 2 Product Items, the Student Number (Mobile) column displays three options:
The Student Number (Mobile) column appears in the Campus Mobile Payments app only. |
| SKU |
You can enter your own SKU or one from a vendor. If you leave this field blank, Campus assigns a unique, system generated number. Infinite Campus recommends using unique SKUs for each product. |
| Inventory on Hand |
This column only displays if Inventory Tracking is selected in Step 1 Product. This is the total amount of inventory on hand. You can manually update this number at any time. If the number in this column is zero, Campus displays the message Out of Stock when the user tries to add the item to their cart. |
| Selling Price | The price customers pay and see in the store. The price can be $0.00.
Items that cost $0 cannot be purchased through the Public Store. |
| Reduced Price |
The price students with a Reduced eligibility status whose guardians have given permission to share it with the School Store and Activity Registration pay and see in the School Store. The price can be $0.00. |
| Free Price | The price students with a Free eligibility status whose guardians have given permission to share it with the School Store and Activity Registration pay and see in the School Store. The price can be $0.00. |
| Cost | The price the district paid to purchase the product from the vendor. This field is optional. |
| Purchase Limit | This column only displays if you chose Purchase Item in the Product Limits dropdown list (Part 1 of the Product Progress Tracker). Enter the maximum number of this particular item the user is allowed to purchase for a recipient. |
3 - Availability
| Field | Description |
|---|---|
| Active | When this checkbox is marked, the product is available on the Start Date in the store(s) marked in the Available On section. |
| Restrict to Associated School Enrollments | When this checkbox is marked, the Recipient dropdown list in the School Store will only display students who have an enrollment in the active school year at the school to which the product is attached. This includes primary, secondary, and enrollments with a future end date.
Example If you have a Product attached to the High School only and this checkbox is marked, parents will only be able to select their student(s) with primary and secondary High School enrollments in the active school year as well as enrollments with a future end date. Please note that if the same Product is associated with multiple schools; e.g., a middle school and a high school, parents can select both middle and high school students in both stores. This option is only available when the product is only available on the Portal. If the Employee Self Service, Public Store, or Mobile Payments checkboxes are also selected, this field is disabled. |
| Include Future Enrollment | When Restrict to Associated School Enrollments has been selected, allows future enrolled students to purchase the item. If selected, the Days Before Enrollment field will appear. This allows users to set the number of days before the enrollment start date the product will be available for purchase. The maximum number of days is 365. |
| Available On |
|
| Start Date |
The first day and time on which the product may be purchased. This field is required. Campus verifies the Product Type and Category are active on the same day or prior. |
| End Date | The last day and time on which the product may be purchased. After this date and time, the product is inactive and is not available in the store. |
| Purchase Limit | This field only displays if you chose Product in the Product Limits dropdown list (Part 1 of the Product Progress Tracker). Enter the maximum number the user is allowed to purchase for a recipient from that product group. For example, if the Product Limit is set to 3 for School Supplies, this means you can purchase any3 items from the School Supplies product group.
Purchase Limits can only be used in Parent Portal, Student Portal, and Employee Self Service.
|
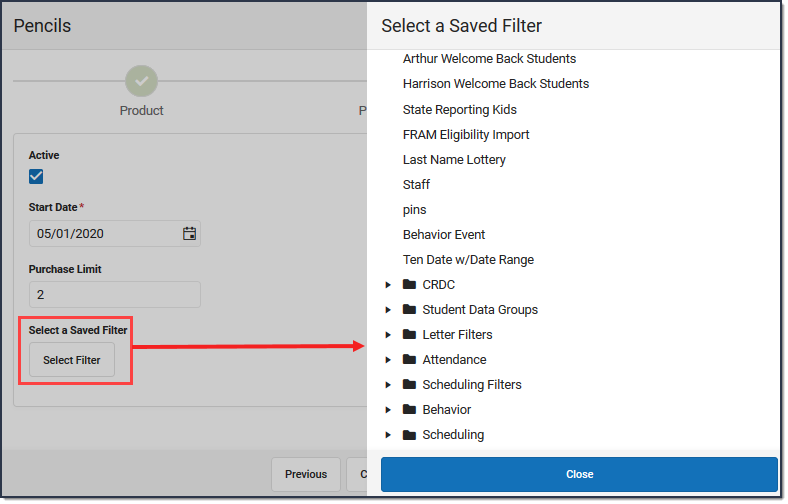
| Select a Saved Filter |
This option allows you to select an Ad Hoc filter to limit purchasing to the people included in the filter. Only people who are included in the Ad Hoc filter and have an active enrollment in the active calendar year can be selected as a Recipient.
See the Ad Hoc Filter Examples for more information.
Select a Saved Filter is only available when Portal is selected from the Available On section. If the Employee Self Service, Public Store, or Mobile Payments checkboxes are also selected, Ad Hoc filters cannot be applied. |
The General Product tool allows you to set up products and services for the School Store and associate them to categories.
Events
The Campus Mobile Payments app can be used at an event hosted by a school or the district. For example, a mother purchases basketball tickets with her credit card or a father uses a debit card to purchase cookies at a bake sale.
These events are created using the Events tool. Before you can create an event, make sure the Mobile Payments checkbox is marked in Categories and General Product.
It takes two steps to create an event.
- Create Event - name the event, provide the dates the event will be held, assign schools and categories to it, and create a Cashier PIN.
- Event Layout - choose which items will be sold and build the layout in which the items are to be displayed in the Campus Mobile. Payments app.
Tool Search: Events
The Campus Mobile Payments app is used to pay for purchases using a credit or debit card. The purchase and payment can be recorded on a mobile device such as a smartphone or tablet. A BBPOS card reader is used to swipe the credit/debit card.
The app can be used at an event hosted by a school or the district. For example, a mother purchases basketball tickets with her credit card or a father uses a debit card to purchase cookies at a bake sale.
These events are created using the Events tool. Before you can create an event, make sure the Mobile Payments checkbox is marked in Categories and General Product.
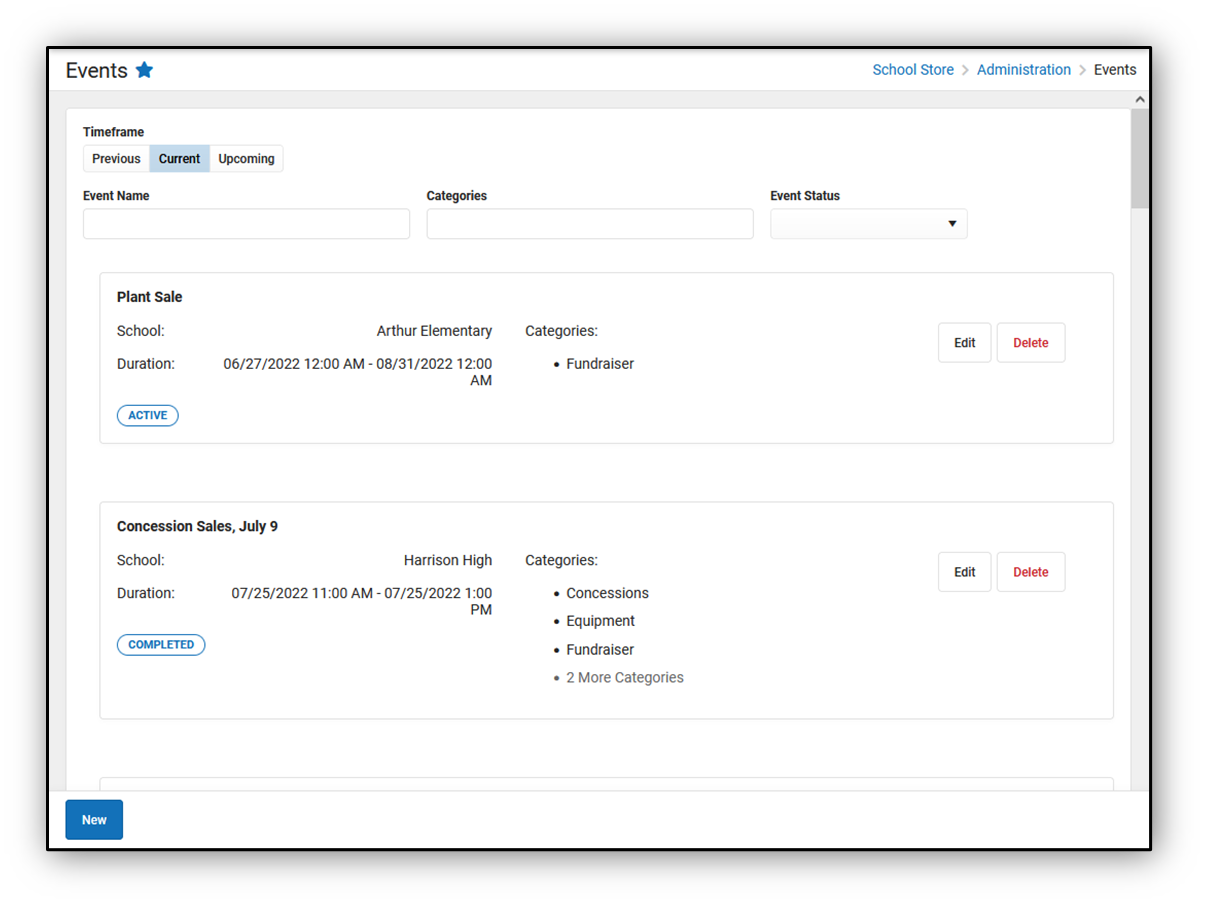
Write - View and modify existing events.
Viewing Events
The initial view of the Events tool is a summary list of all events. This summary list provides a preview of the event's information and its status.
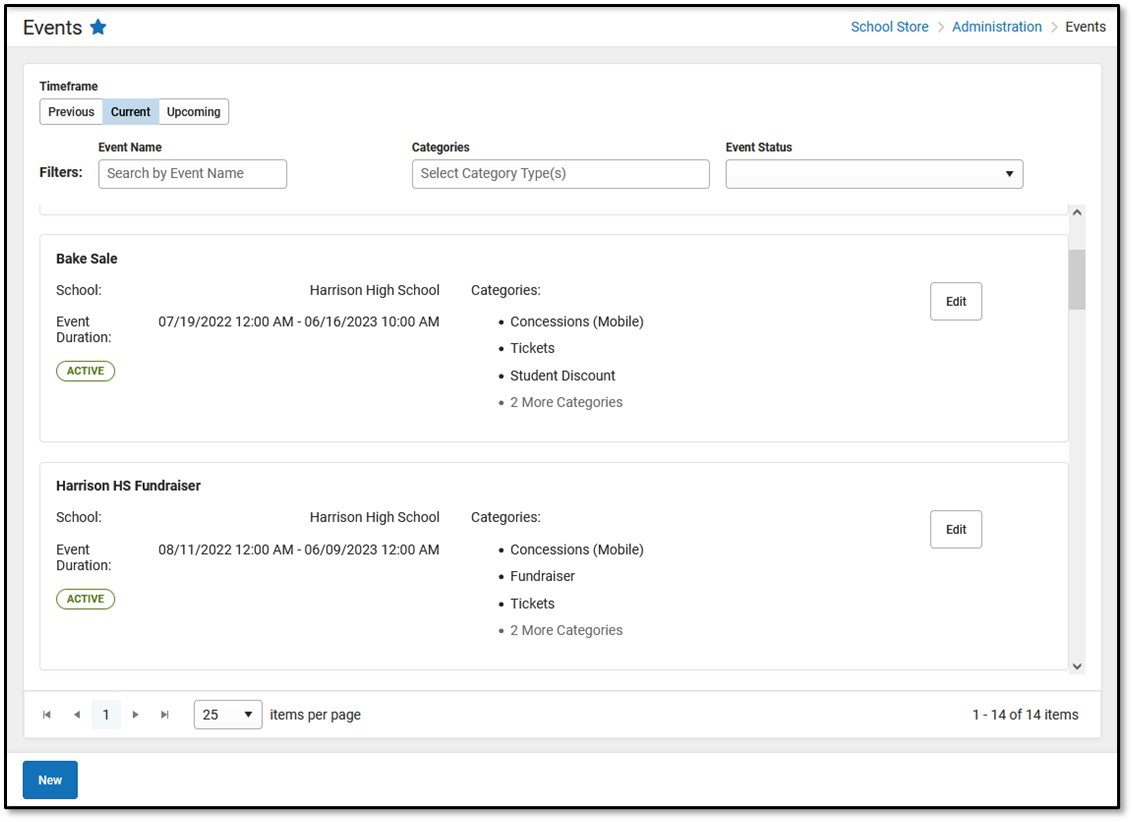
The Timeframe and Filters fields are used to display certain events.
| Option | Description |
|---|---|
| Timeframe | Events can be viewed based on the time they occur.
|
| Filters | You can further narrow the number of events that display by using the following filters:
|
Step 1 Create an Event
Events, such as a basketball game or a bake sale, must be set up using the Events tool. If a staff member has access to all schools, they can set up and view events for any school within the district. If they have access to certain schools only, they can set up and view events for just those schools.
The first step to creating an Event is to define the parameters. To add an event, click the New button.
Result
The New Event window displays.
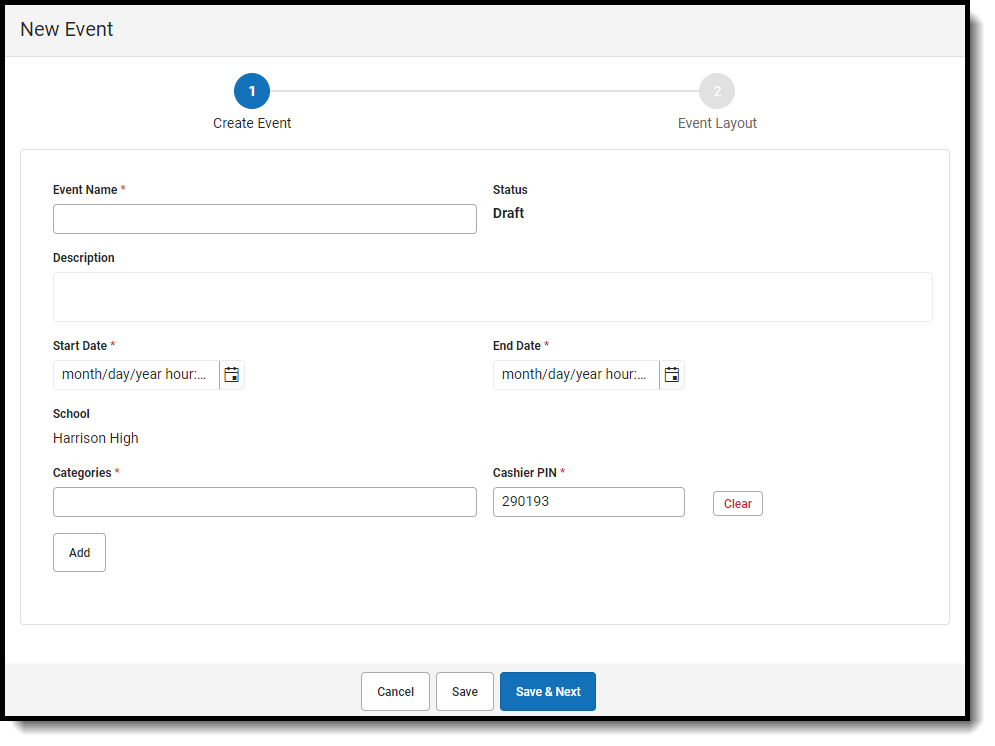
Field Descriptions
| Field | Description |
| Event Name | Required. The name of the event with a maximum of 50 characters. |
| Status | The Status of an event will vary depending on the current date and whether Step 1 Create an Event and Step 2 Event Layout have been completed. Events with a Timeframe of Previous, Current, or Upcoming may have one of the statuses listed below:
|
| Description | A description of the event with a maximum of 500 characters. The Description displays in the Mobile Payments app after the Event PIN is entered. |
| Start Date | Required. The date the event begins. If the Start Date is in the future, it will appear in the Upcoming timeframe. |
| End Date | Required. The date the event ends. If the current date is after the End Date, the event will appear on the Previous timeframe. |
| School | Required. If the Context Switcher is set to a specific school, that school will display in the School field and it cannot be changed. If All Schools is selected in the Context Switcher, the school must be selected from the School dropdown list. |
| Categories | Required. Categories are how similar products are grouped in the School Store. Categories assigned to the School selected appear on the dropdown list. Multiple Categories can be selected. |
| Cashier PIN | Required. The Cashier PIN is a six-digit number attached to the Categories previously selected. When a person enters the Cashier PIN on the Mobile Payments app, that person accesses the event and can enter purchases on the device they're using.
|
| Clear/Remove | Click Clear or Remove to delete a Category and its Cashier PIN.
|
| Add | Click Add to assign different categories to different cashier PINs. Categories selected in a previous row can be used again IF a different Cashier PIN will be assigned. |
Step 2 - Event Layout
The second step to creating an Event is entering the items to be sold and building the layout in which the items are to be displayed in the Campus Mobile Payments app.
The Item Selection & Layout section lists the Category. Below the selected Category are the related Products/Items that can be sold. If an item will be sold, the checkbox is marked and a Sequence number is assigned. This number determines the way the item is displayed in the Preview section. The Preview shows how the items will appear on the device used during the event.
Categories, Products, and Product Items must be set up first before completing this step.
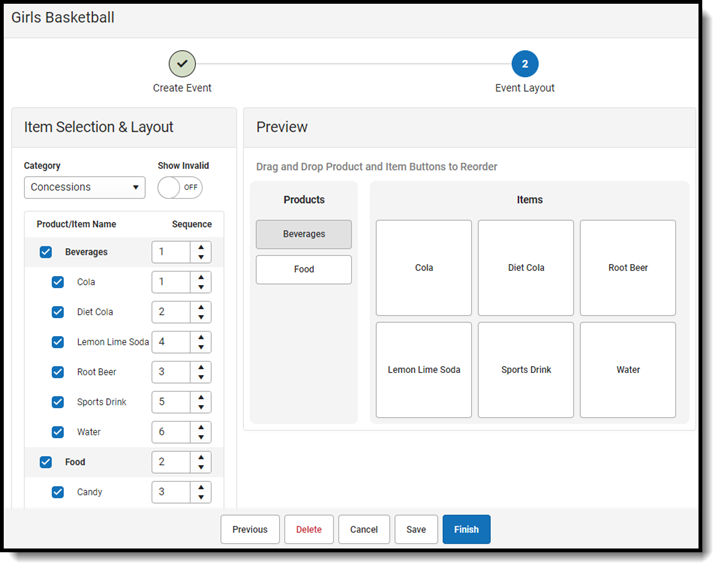
Field Descriptions
| Item Selection & Layout Fields | Description |
| Category | The options appearing on the Category dropdown list are based on the Categories selected in Step 1: Create Event. |
| Show Invalid | If you set the Show Invalid toggle to ON, inactive Products and Items that were active/valid at the time the event was set up also display. Otherwise, when the toggle is set to OFF, only active Products and Items display. Categories with invalid or inactive Products or Items will appear with a  . .If a Category with invalid or inactive Products or Items is selected, they will not display in the Campus Mobile app. Users will need to go to General Product to reactivate the product(s) in order for them to display. |
| Product/Item Name | The bold-faced name under Product/Item Name is the Product. The Product Items appear below the Product. They are indented and in alphabetical order. The Product and Product Items displayed are based on the Category selected. |
| Sequence | Products and Product Items are listed in alphabetical order. A Sequence number can be entered to change the order in which the Products and Product Items will be displayed in the Campus Mobile Payments app. |
| Preview Fields | Description |
| Products | The Products buttons that are previewed are based on the selections made on the left-hand side under Item Selection & Layout. The Sequence numbers determine the order of the Products buttons. The Products buttons can be moved by dragging them to their new location. The Sequence numbers get updated accordingly. |
| Items | The Sequence numbers also determine the order of item buttons within Campus Mobile Payments. The Items buttons can be moved by dragging them to their new location. The Sequence numbers get updated accordingly. If an Item is tracking inventory and there are 5 or less items remaining, or it is out of stock, a LOW INVENTORY or OUT OF STOCK will label appear. |
| Alerts | Description |
Inactive | A Category, Product, or Item will display as Inactive if the Active checkbox is unchecked within its respective setup. |
Invalid | A Category, Product, or Item will display as Invalid if the Mobile Payments checkbox has been unchecked within its respective setup men. |
| Labels | Description |
Low Inventory | This alert will appear next to an item if there are 5 or fewer items still available for purchase. |
Out of Stock | This alert will appear next to an item if there are none left for purchase. |
Editing Events
If users have the rights, Events on the Previous, Current, or Upcoming timeframes can be edited regardless of the status.
- Select School Store > Administration > Events.
Result
The Events screen displays. - Select a Timeframe: Previous, Current, or Upcoming.
Result
Events with a status of Draft or Completed display when the Previous button is clicked.
Events with a status of Draft or Active display when Current is clicked.
Events with a status of Draft or Ready display when Upcoming is clicked. - Click the Edit button.
Result
The screen for Step 1 - Create Event displays. - Make changes to any of the fields on the screen or add more Categories.
If All Schools appears in the Context Switcher, the School field can be modified.Changing the Start Date and End Date to current or future dates overrides the original event upon saving. Purchases made during the original event are retained to ensure historical data is accurate. - Click the Save & Next button.
- Make any changes to Step 2 - Event Layout.
- Click the Finish button.Depending on the Start Date and End Date, the edited event will appear when the Current or Upcoming buttons are selected in the Timeframe.
Deleting Events
If users have the rights, Events on the Previous or Upcoming timeframes can be deleted regardless of the status. Events with a Current timeframe can be deleted with a status of Draft.
Previous and Upcoming Events
- Select School Store > Administration > Events.
Result
The Events screen displays. - Select a Timeframe: Previous or Upcoming.
Result
Events with a status of Draft or Completed display when the Previous button is clicked.
Events with a status of Draft or Ready display when Upcoming is clicked. - Click the Delete button.
Result
The Confirm Deletion message displays.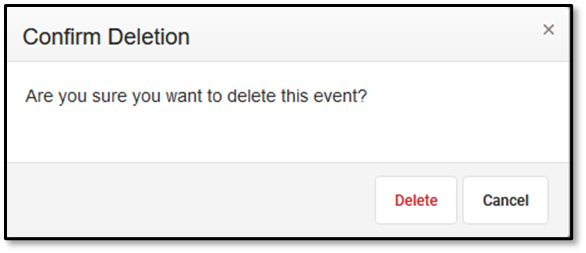
- Click the Delete button to continue to permanently remove the event.
Click the Cancel button to cancel the operation and keep the event.
Current Events
Events on the Current timeframe can be deleted if the status is Draft. If the status is Active, it can be deleted, but it requires an extra step.
Events with a Draft Status
Events with a timeframe of Current AND a status of Draft can be deleted.
- Select School Store > Administration > Events.
Result
The Events screen displays. - Click the Current button in the Timeframe button group.
Result
Events with a status of Draft or Active display. - Locate the event to be removed and click the Delete button.
Result
The Confirm Deletion message displays.
- Click the Delete button to continue to permanently remove the event.
Click the Cancel button to cancel the operation and keep the event.
Events with an Active Status
Events with a timeframe of Current AND a status of Active cannot be deleted, but they can be moved to the Upcoming timeframe by modifying the Start Date and End Date to a future date. It can then be deleted after it has been moved.
- Select School Store > Administration > Events.
Result
The Events screen displays. - Click the Current button in the Timeframe button group.
Result
Events with a status of Draft or Active display. - Click the Edit button for the event to be modified.
Result
The side panel for the event displays. - Change the Start Date and End Date to a future date.
- Click the Save & Next button.
Result
The Event Layout screen displays. - Click the Delete button.
Result
The Confirm Deletion window displays.
- Click the Delete button to remove the event or Cancel to keep it.
The Campus Mobile Payments app is used to pay for purchases on a mobile device at events held by the district or a school. Before using Mobile Payments, the events need to be set up using the Events tool.
Device Management
The Campus Mobile Payments app is used to pay for purchases using a credit or debit card. The purchase and payment can be recorded on a mobile device such as a smart phone or tablet. A BBPOS card reader is used to swipe the credit/debit card.
These devices need to be set up in Infinite Campus using the Device Management tool and the Campus Mobile Payments app must be installed on the devices.
Tool Search: Device Management
The Campus Mobile Payments app is used to pay for purchases using a credit or debit card. The purchase and payment can be recorded on a mobile device such as a smartphone or tablet. An M2 card reader is used to process the credit/debit card.
The app can be used at an event hosted by a school or the district. For example, a mother purchases basketball tickets with her credit card or a father uses a debit card to purchase cookies at a bake sale.
The devices used to record the purchases may include those owned by the school, staff, or parents/volunteers working at the event. These devices need to be set up in Infinite Campus using the Device Management tool and the Campus Mobile Payments app must be installed on the devices.
When the device is ready to be used at an event, the Campus Mobile Payments app is launched on the device and scans a QR code. This gives the device access to events at the schools it has been specifically assigned to. After entering a pre-assigned Cashier PIN, the device is connected to a specific event.
If a card is chip-enabled, it must use the chip (insert or tap) first. Only after three failures to read the chip is the swipe enabled for that card. If a card does not have a chip installed, you can swipe it.
Hardware
| Hardware | Its Function |
| Android 12 (or greater) Device
or Apple iOS 14 (or greater) Device |
The Campus Mobile Payments app needs to be installed on the device. The device will be used to record purchases made a card reader. |
Stripe Reader M2
 |
A Bluetooth device that works with the Campus Mobile Payments app to record credit/debit card purchases. For more information, read the Stripe Reader M2 instructions. |
Tool Rights
Users can only view devices assigned to schools to which they have rights. If a device is assigned to multiple schools, users can modify the device for the schools to which they have rights.
- R = users can view the devices on the Device Management tool.
- W = users can view and modify existing devices.
- A = Users can view, modify, and add new devices.
- D = Users can view, modify, add, and delete existing devices. A device can still be deleted even if purchases and payments were recorded on it. These transactions are retained for the Sales report.
Viewing Devices

The initial view of the Device Management tool is a summary list of all devices. This summary list can be searched based on the following options:
| Option | Description |
| Status | Status consists of three buttons:
|
| Filters |
|
Setting Up a New Device

- Click New. The New Device panel displays.
- Enter the Device Name. This is a required field. The name must be unique across the district.
TIP: Developing a naming convention such as School Name-Department-DeviceType can be helpful for users with access to All Schools.
Example names: Harrison HS iPad, Arthur Elem Samsung Tablet, District Communication's iPad. - The school appearing in the Context Switcher is the default in the School(s) dropdown list.
- Multiple schools can be selected.
- Only schools to which you have tool rights display on the School(s) dropdown list.
- Remove schools by clicking the
 next to the school's name.
- Select the Mobile App Modes for Device. These selections determine whether the device can be used to process payments for events and/or in office.
- Click the Generate QR Code & Save button.
The QR code must be generated before the device can be saved.The QR code displays, and it will expire in 30 minutes. If the QR code expires, a new one can be generated by clicking the Refresh QR Code button.A device can scan the QR code at this point if the Campus Mobile Payments app is installed on it. If the scanning does not take place now, it can be scanned later with a new QR code by clicking the Refresh QR Code button.
- Click Save. The Device Management screen displays, and the new device appears when the Pending button is clicked from the Status button group.
Scanning the QR Code on a New Device
New devices need to scan a QR code before they can be used at an event.
Before You Start
- Make sure the device is set up in Infinite Campus. If not, read Setting Up a New Device in this article.
- Download the Campus Mobile Payments app from your app store to the device.
- Launch Infinite Campus, navigate to School Store > Administration > Device Management and click the Pending button from the Status group.
- Select the device. When the side panel displays, click the Refresh QR Code button.
- Launch the Campus Mobile Payments app on the device. The Scan District QR Code screen appears.
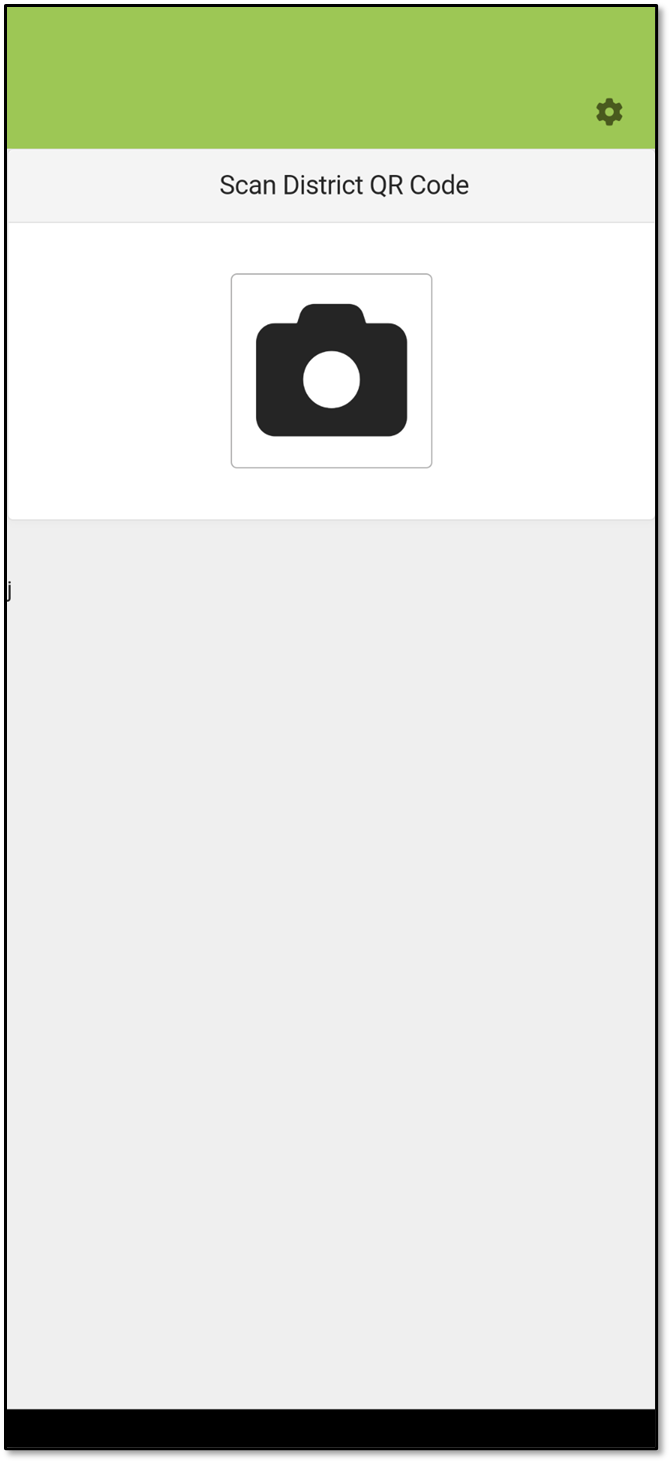
- Tap the camera icon.

- Scan the QR code in Infinite Campus with the device. The device is connected to Infinite Campus, and the user will be able to access an active event or the In Office/Pending Transactions for the school that is assigned to the device.
- In Infinite Campus, the following fields under Device Information get updated in the side panel:
Device Type, Operating System, and Last Updated, and the Active checkbox is marked.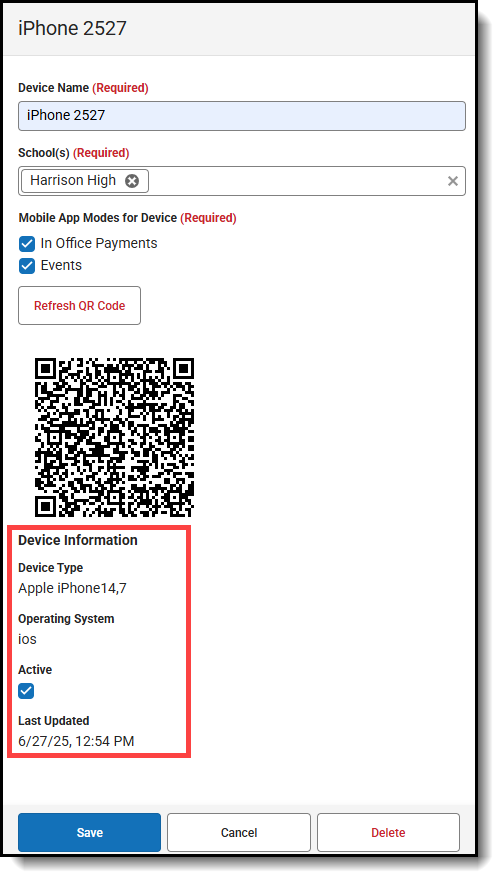
- Infinite Campus recognizes this device. If a user attempts to add the same device again within the same school, the Existing Device message displays on the device after scanning the QR code.
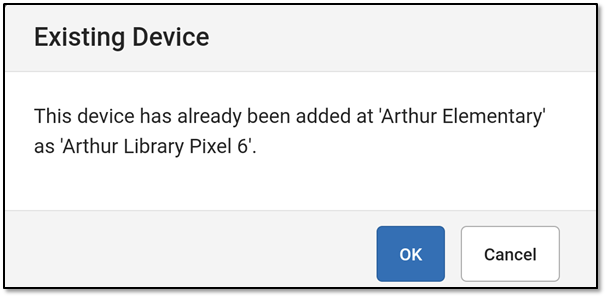 Example of Existing Device Message
 - If a user attempts to add a pre-existing device for a different school, the device does NOT get created for that school. Instead, the new school is added to the School(s) field of the existing device after the QR code is scanned.
- In Infinite Campus, the following fields under Device Information get updated in the side panel:
- Click the Save button. The side panel closes and clicking the Active button in the Status button group displays this device.
- Turn on the card reader and place it next to the device, and then tap Scan. Location and Bluetooth pairing must be allowed in order to use the app.
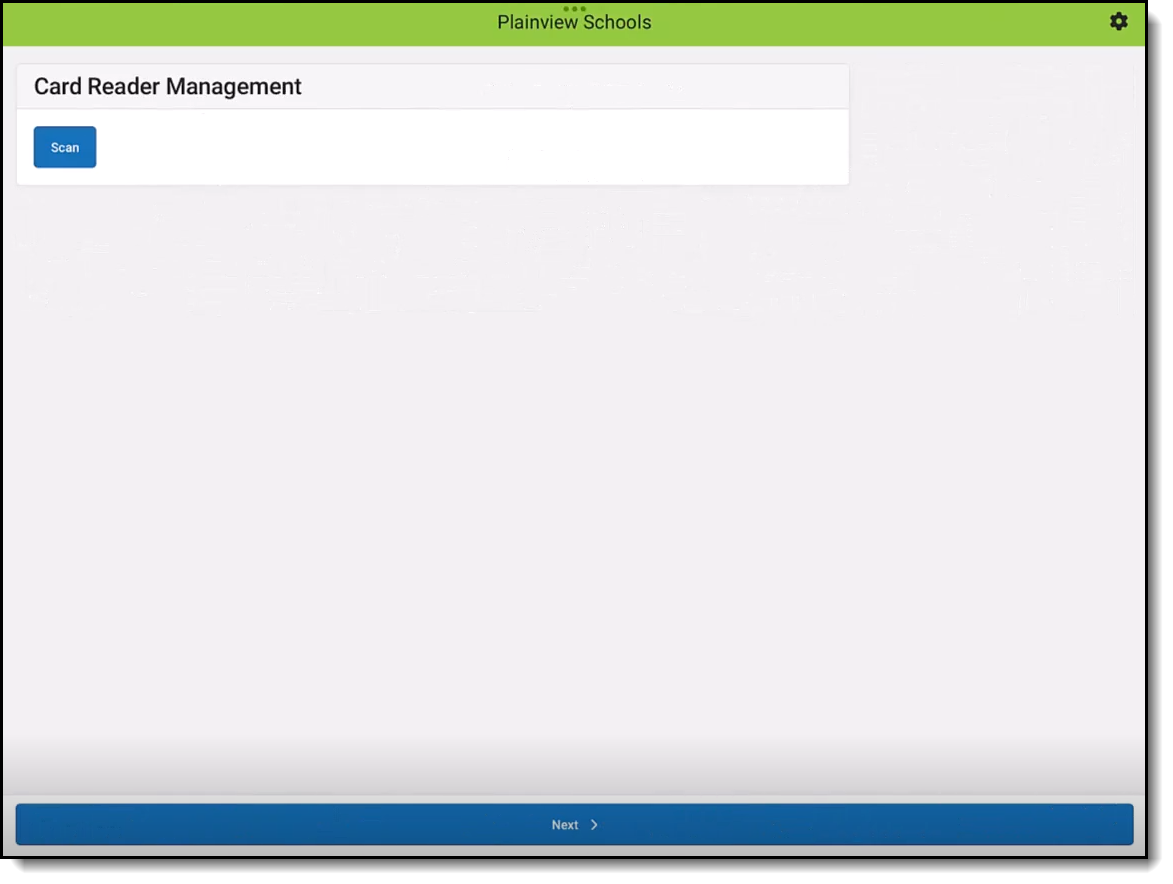
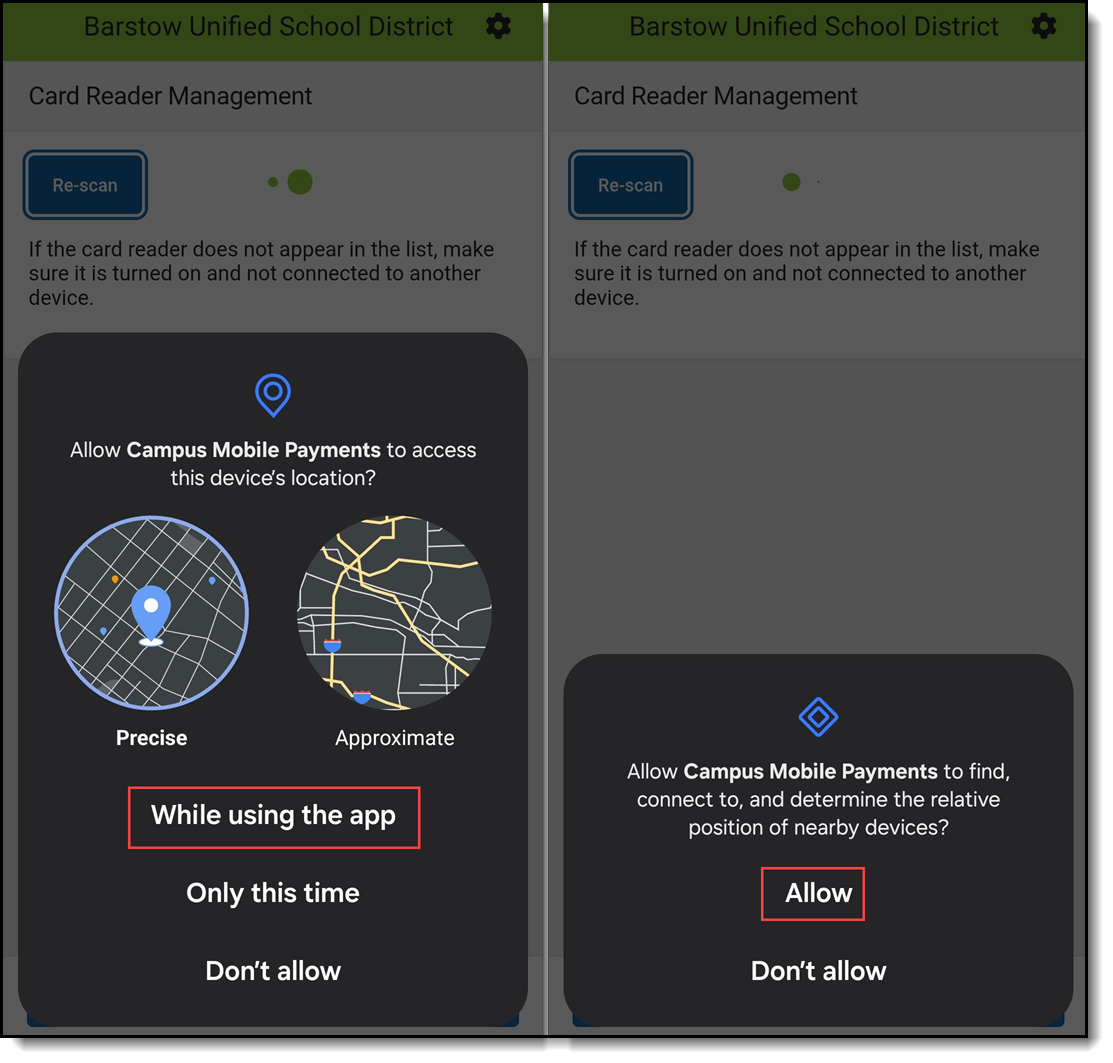
- Depending on your device, you may see one or both messages below. Select the response(s) in the orange box(es). Location and Bluetooth pairing must be enabled to use the app.
- A list displaying one or more serial numbers for card readers appears. Compare the serial number on the back of the card reader with the list.
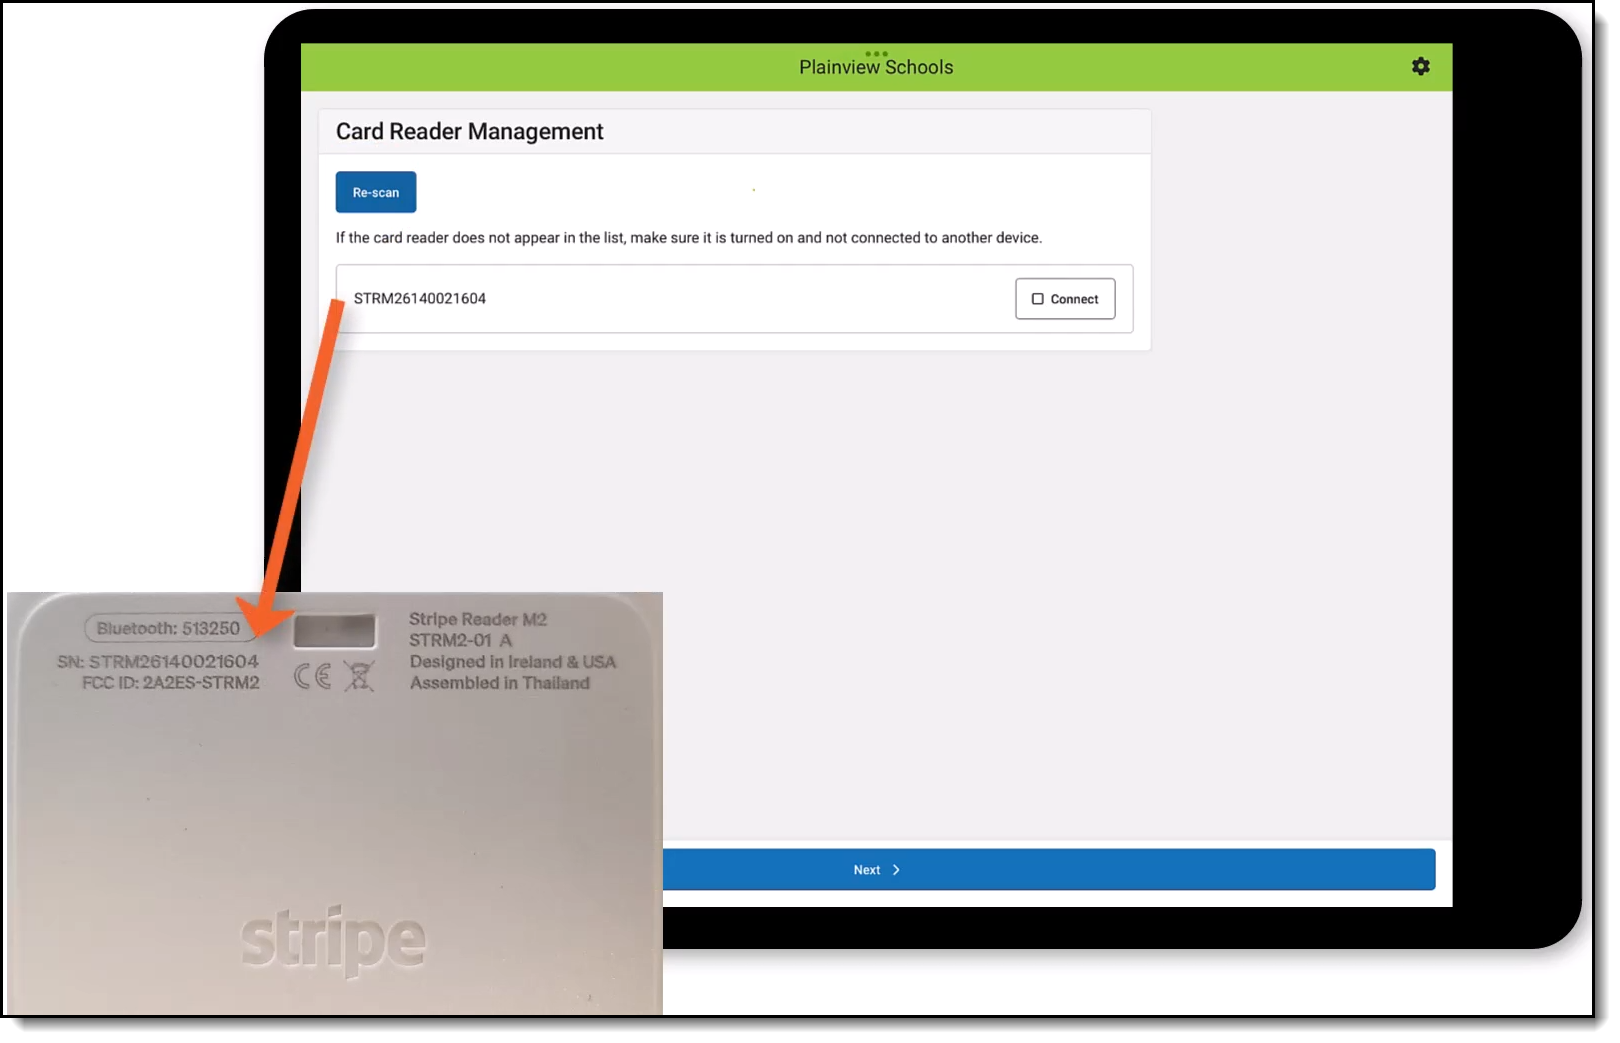 Serial Number and Passkey
 - Tap the Connect button for the serial number that matches your card reader.
- When the green dots stop displaying and you see the Connected message next to the serial number, tap Next.
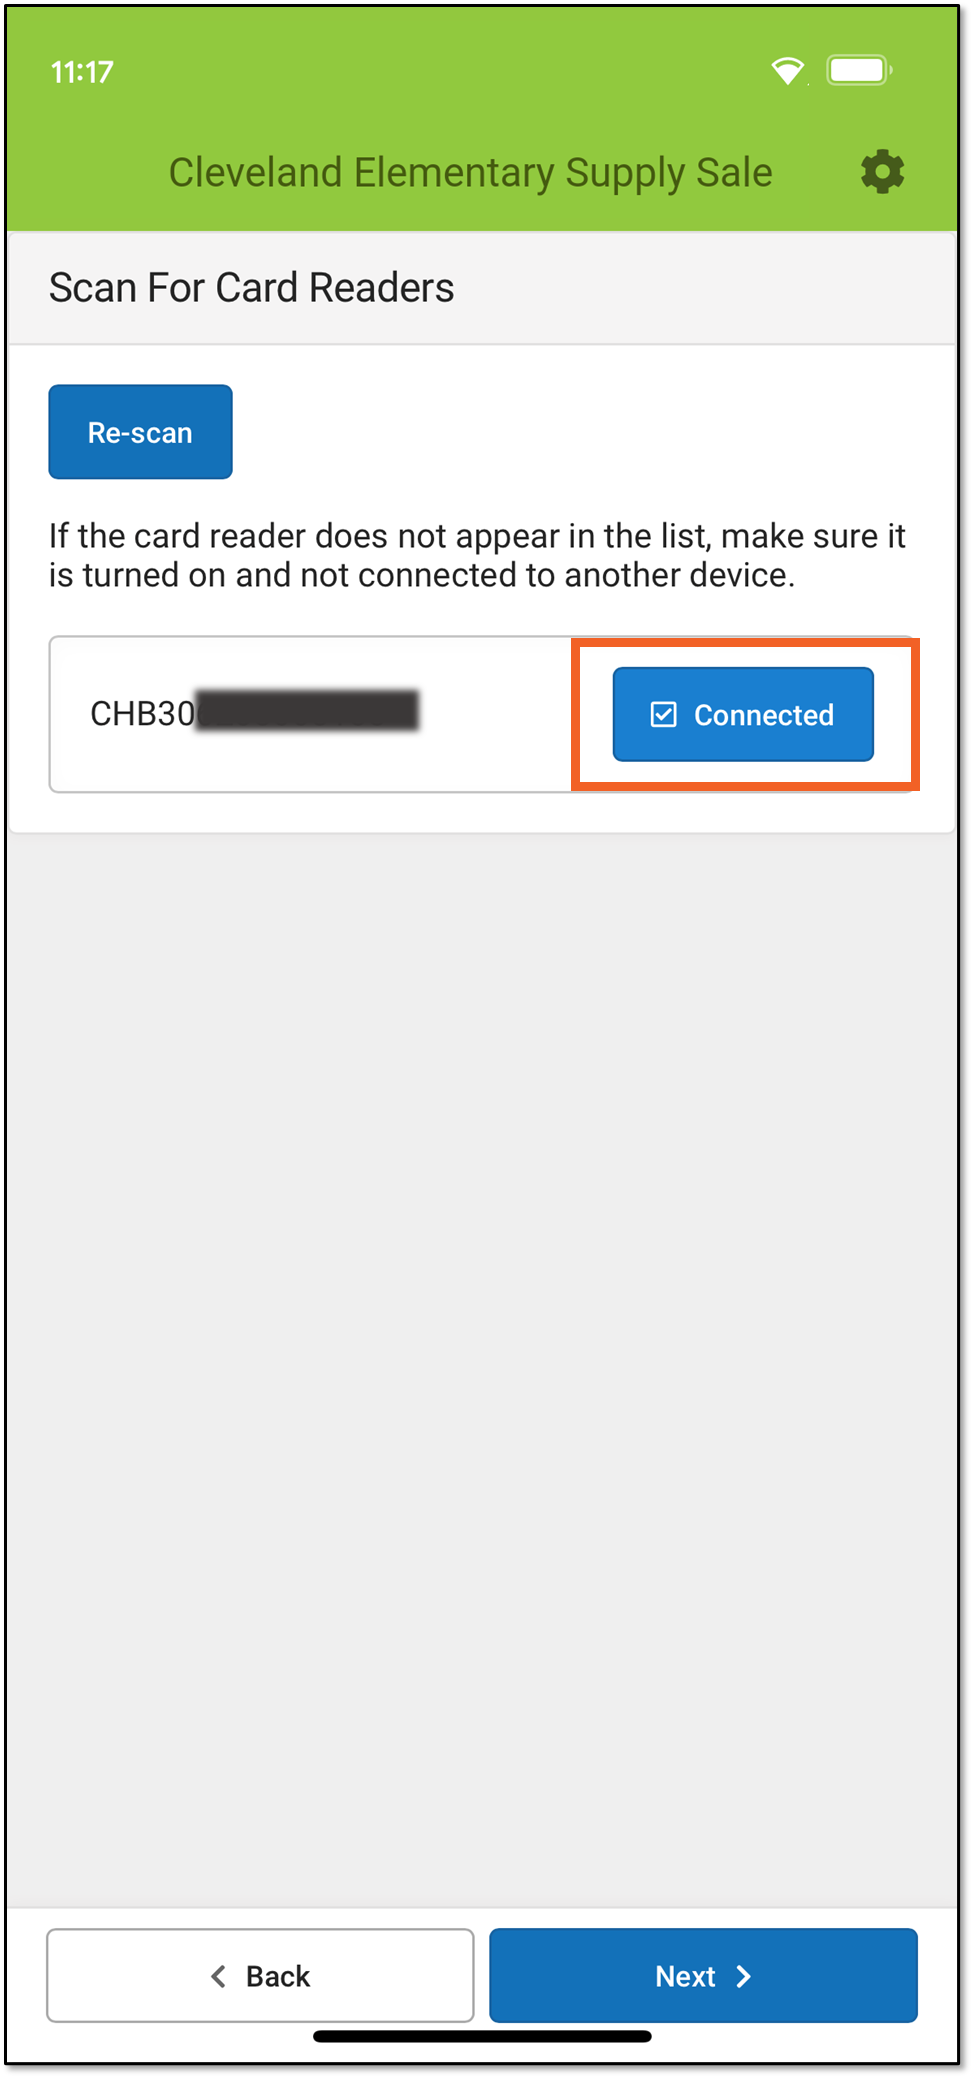
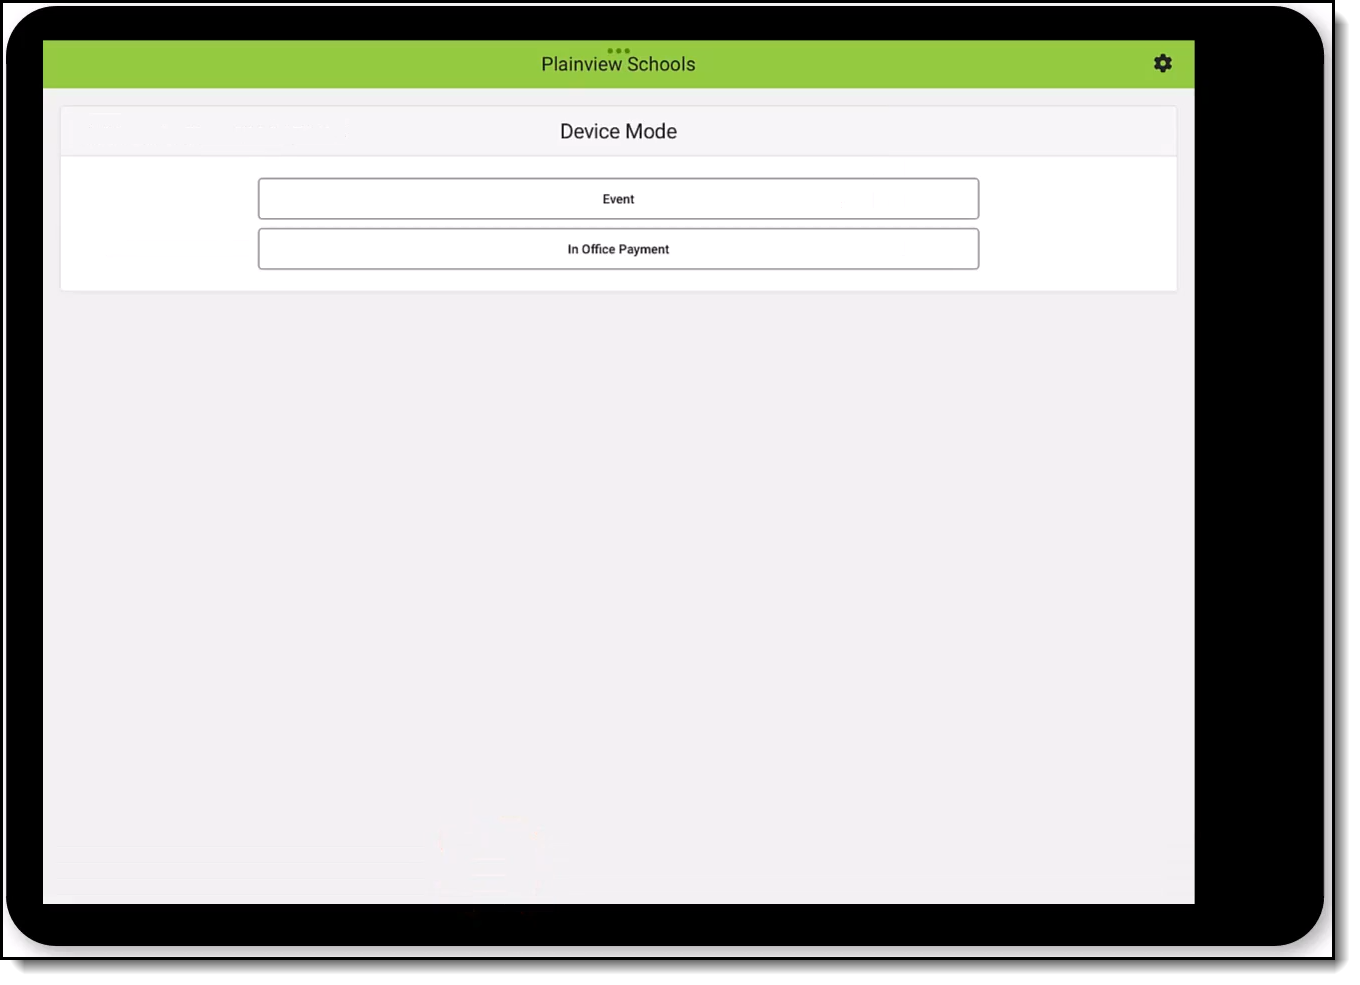
- If the device is set up exclusively for Events, you'll see the Event PIN Entry screen. If it's registered solely for In Office payments, you'll be directed to the In Office/Pending Transactions screen. If both options are enabled on the device, the Device Mode screen will appear.
Editing a Device
Devices with a status of Inactive, Active, or Pending can be edited.
- Find the device by clicking one of the Status buttons: Inactive, Active, or Pending.
- Select the device. The side panel for that device displays.
- If you have the rights, make the changes to the Device Name.
Schools can be added or removed from the School(s) field if you have rights to those schools.
The device can be deactivated or reactivated by unmarking or marking the Active checkbox. - Click the Save button.
Deleting a Device
Devices with a status of Inactive, Active, or Pending can be deleted. Users can delete a device IF they have rights to all of the schools listed in the School(s) field.
 This device can be used at all of the schools listed in the School(s) field. This user can NOT delete this device because they have rights to three of the schools only; they do NOT have rights to the other schools (in gray). This device can be used at all of the schools listed in the School(s) field. This user can NOT delete this device because they have rights to three of the schools only; they do NOT have rights to the other schools (in gray). |
 This user can delete this device because they have rights to all of the schools listed in the School(s) field. This user can delete this device because they have rights to all of the schools listed in the School(s) field. |
- Find the device by clicking one of the Status buttons: Inactive, Active, or Pending.
- Select the device. The side panel for that device displays.
- Click the Delete button. The
Confirm Delete message displays.
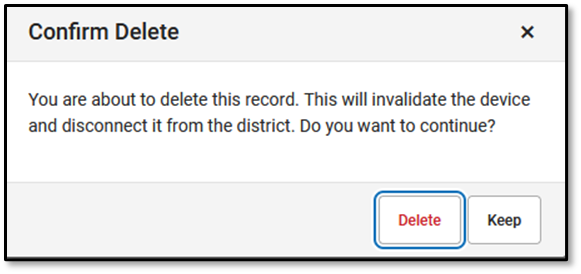
- Click the Delete button to remove the device. Click the Keep button if the device should not be removed.
Deactivating a Device
Devices with a status of Active can be deactivated. Devices with a status of Inactive can be reactivated.
- Find the device by clicking the Active button from the Status group.
- Select the device. The side panel for that device displays.
- Unmark the Active checkbox.
- Click the Save button. The device has a status of Inactive.
Reactivating a Device
- Find the device by clicking the Inactive button from the Status group.
- Select the device. The side panel for that device displays.
- Mark the Active checkbox.
- Click the Save button. The device has a status of Active.
Uninstalling Campus Mobile Payments from
a Device
Campus Mobile Payments can be removed and reinstalled on a mobile device. Below are the steps that need to be done after reinstalling the app.
Android Devices
- Locate the device by clicking any of the buttons in the Status button group: Inactive, Active, or Pending.
- Select the device. The side panel displays.
- Click the Refresh QR Code button.
- Scan the QR code with the Android device.
- Click the Save button in the side panel. The record for that device in the Device Management tool has been updated.
iOS Devices
After reinstalling Campus Mobile Payments app on an iOS device, the record for that device will no longer be usable in the Device Management tool; Infinite Campus no longer recognizes the device due to the way the device's information is updated for iOS devices. The current device record in Device Management needs to be deleted and recreated by following the steps below.
- Locate the device by clicking any of the buttons in the Status button group: Inactive, Active, or Pending.
- Select the device. The side panel displays.
- Click the Delete button. The Confirm Delete message displays. Click the Delete button.
- Re-create a new record for the iOS device by following the steps in Setting Up a New Device.
Campus Mobile Payments processes transactions at events, such as ticket sales, and is used for credit or debit card transactions in the school office. This video demonstrates how to manage devices.
Using the Campus Mobile Payments App
Learn how to use the Campus Mobile Payments app to process credit/debit card payments on a device such as a tablet or smart phone.
This article shows how to use the Campus Mobile Payments app to process credit/debit card payments on a device such as a tablet or smartphone.
If a card is chip-enabled, it must use the chip (insert or tap) first. Only after three failures to read the chip is the swipe enabled for that card. If a card does not have a chip installed, you can swipe it as expected.
- Launch the Campus Mobile Payments app on the device.
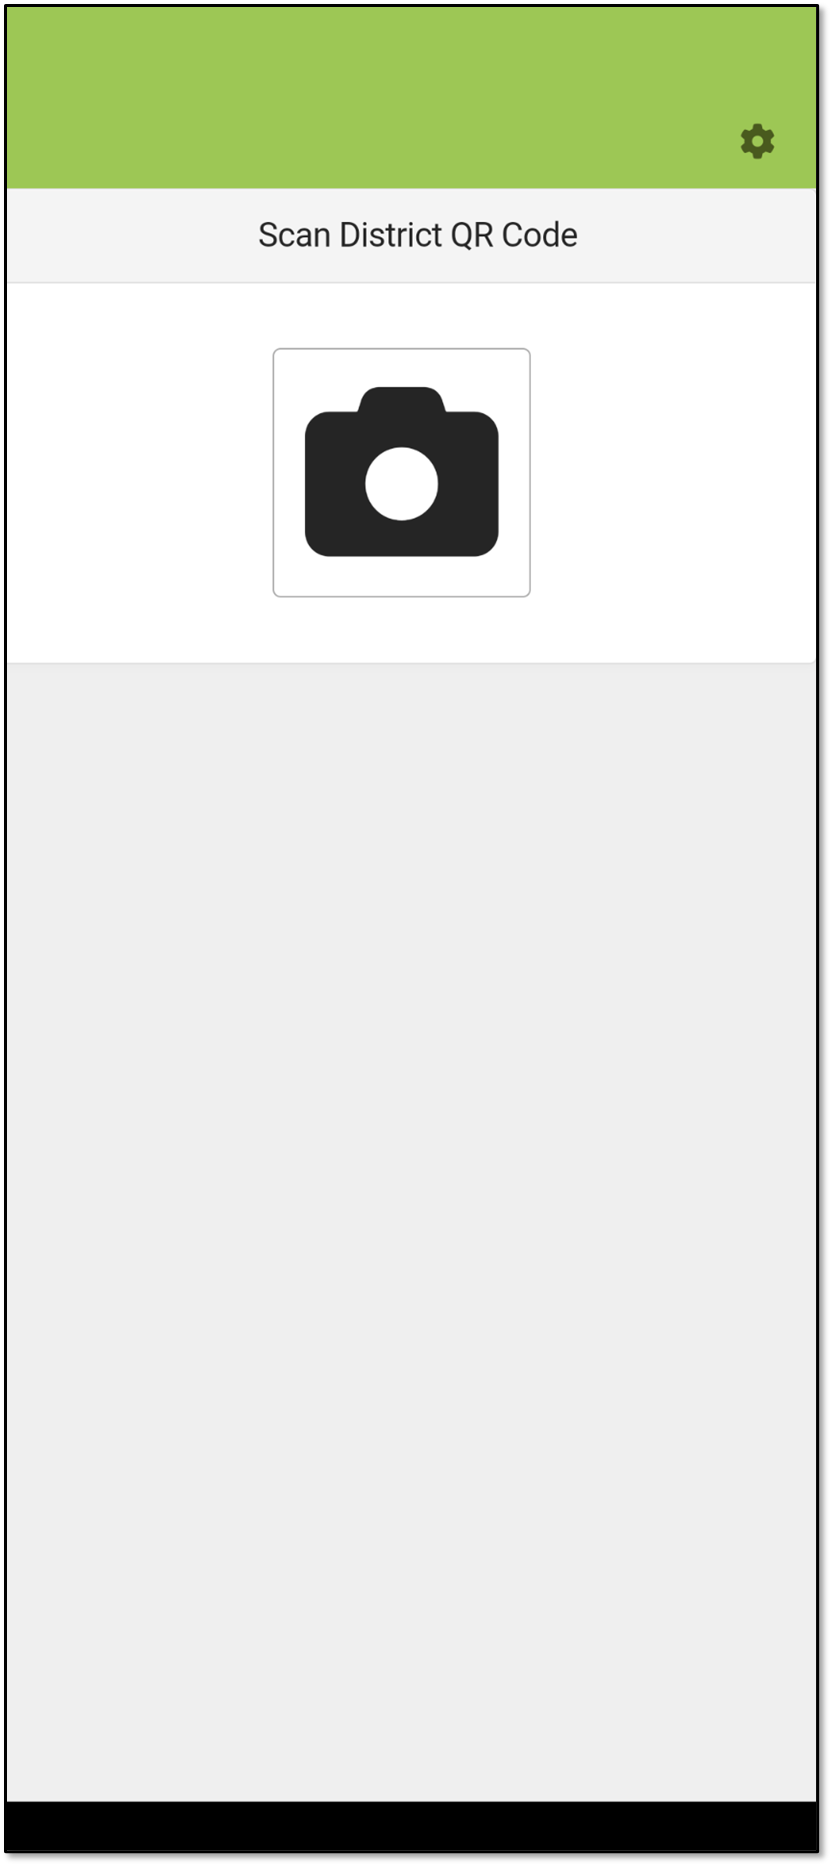
- Depending on your device, you may be asked to access Bluetooth. Tap the OK button. You will see the Scan District QR Code screen or the Card Reader Management screen.
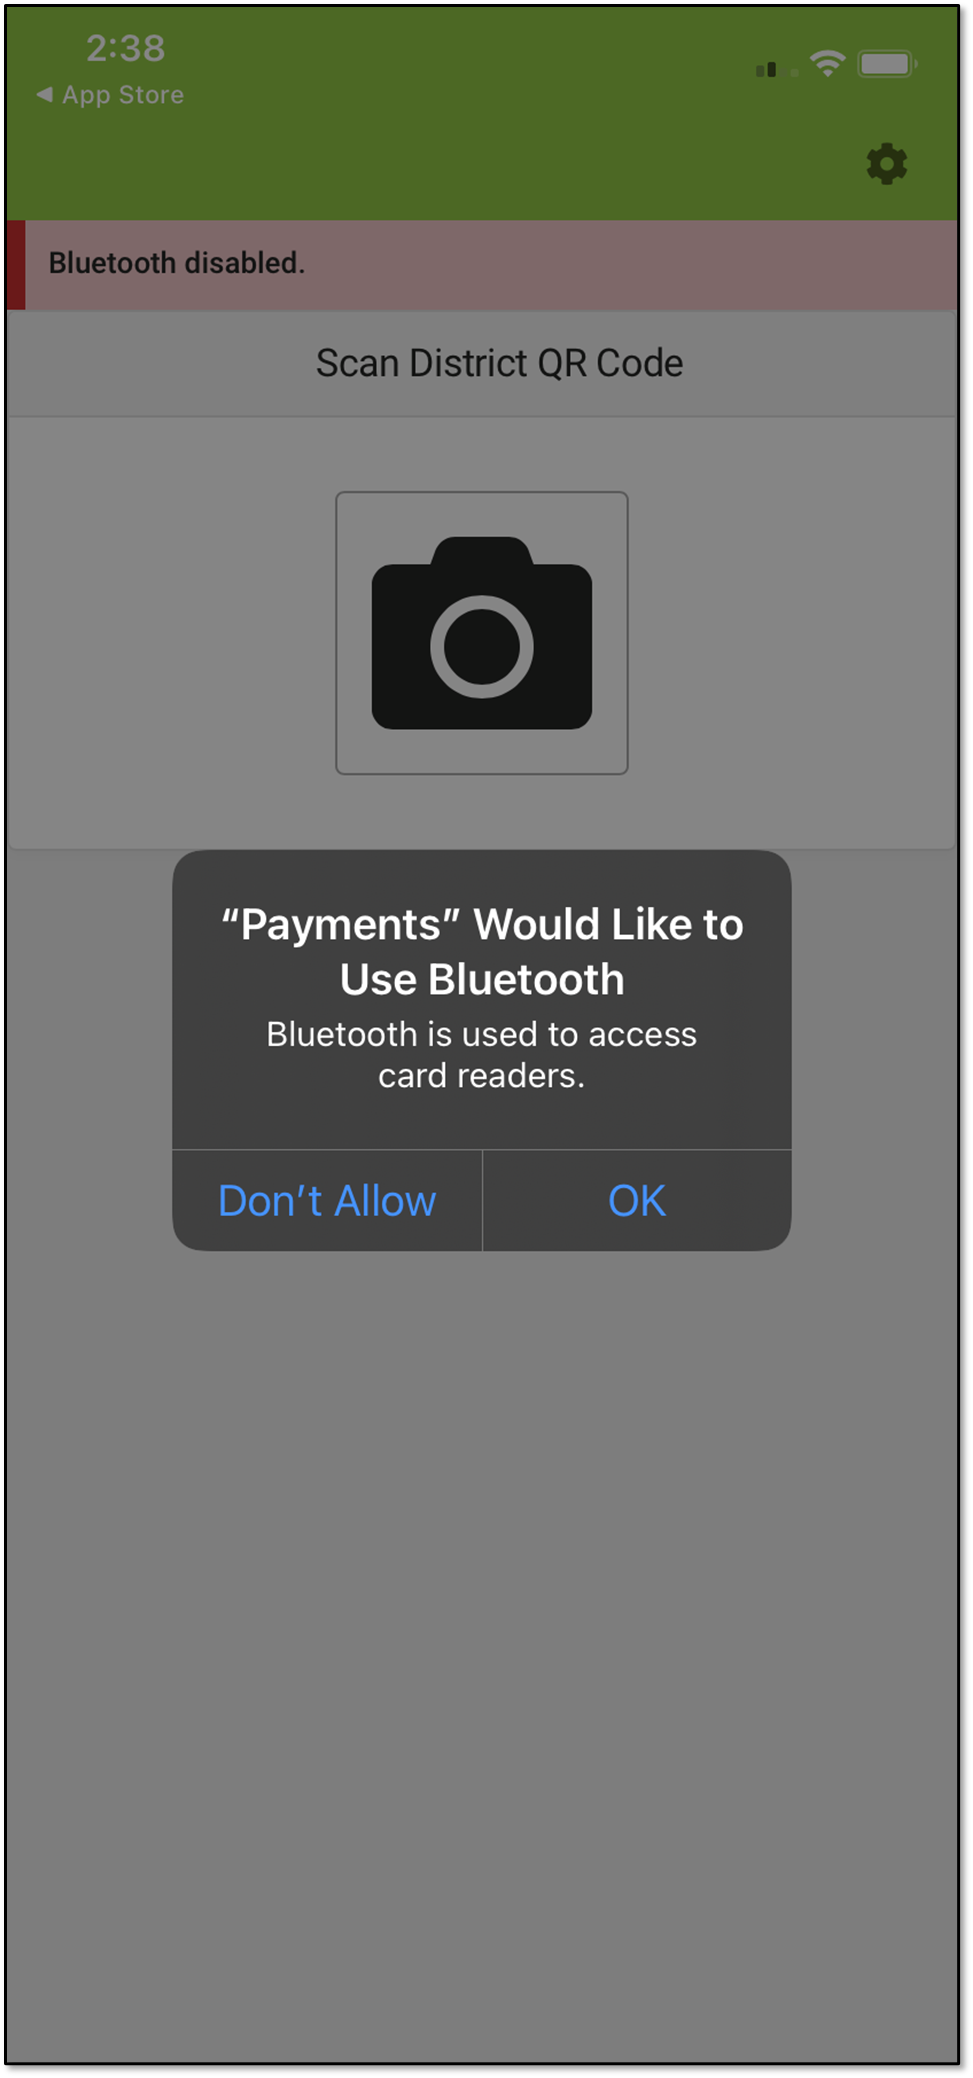
- If you see "Scan District QR Code," contact the school's technical person to register the device.
- Turn on the card reader and place it next to the device, and then tap Scan.

- Depending on your device, you may see one or both messages below. Select the response(s) in the orange box(es). Location and Bluetooth pairing must be enabled to use the app.

- A list displaying one or more serial numbers for card readers appears. Compare the serial number on the back of the card reader with the list.
 Serial Number and Passkey
 - Tap the Connect button for the serial number that matches your card reader.
- When the green dots stop displaying and you see the Connected message next to the serial number, tap Next.

- Depending on device settings, Campus Mobile Payments can be used at Events, or for in office payments.

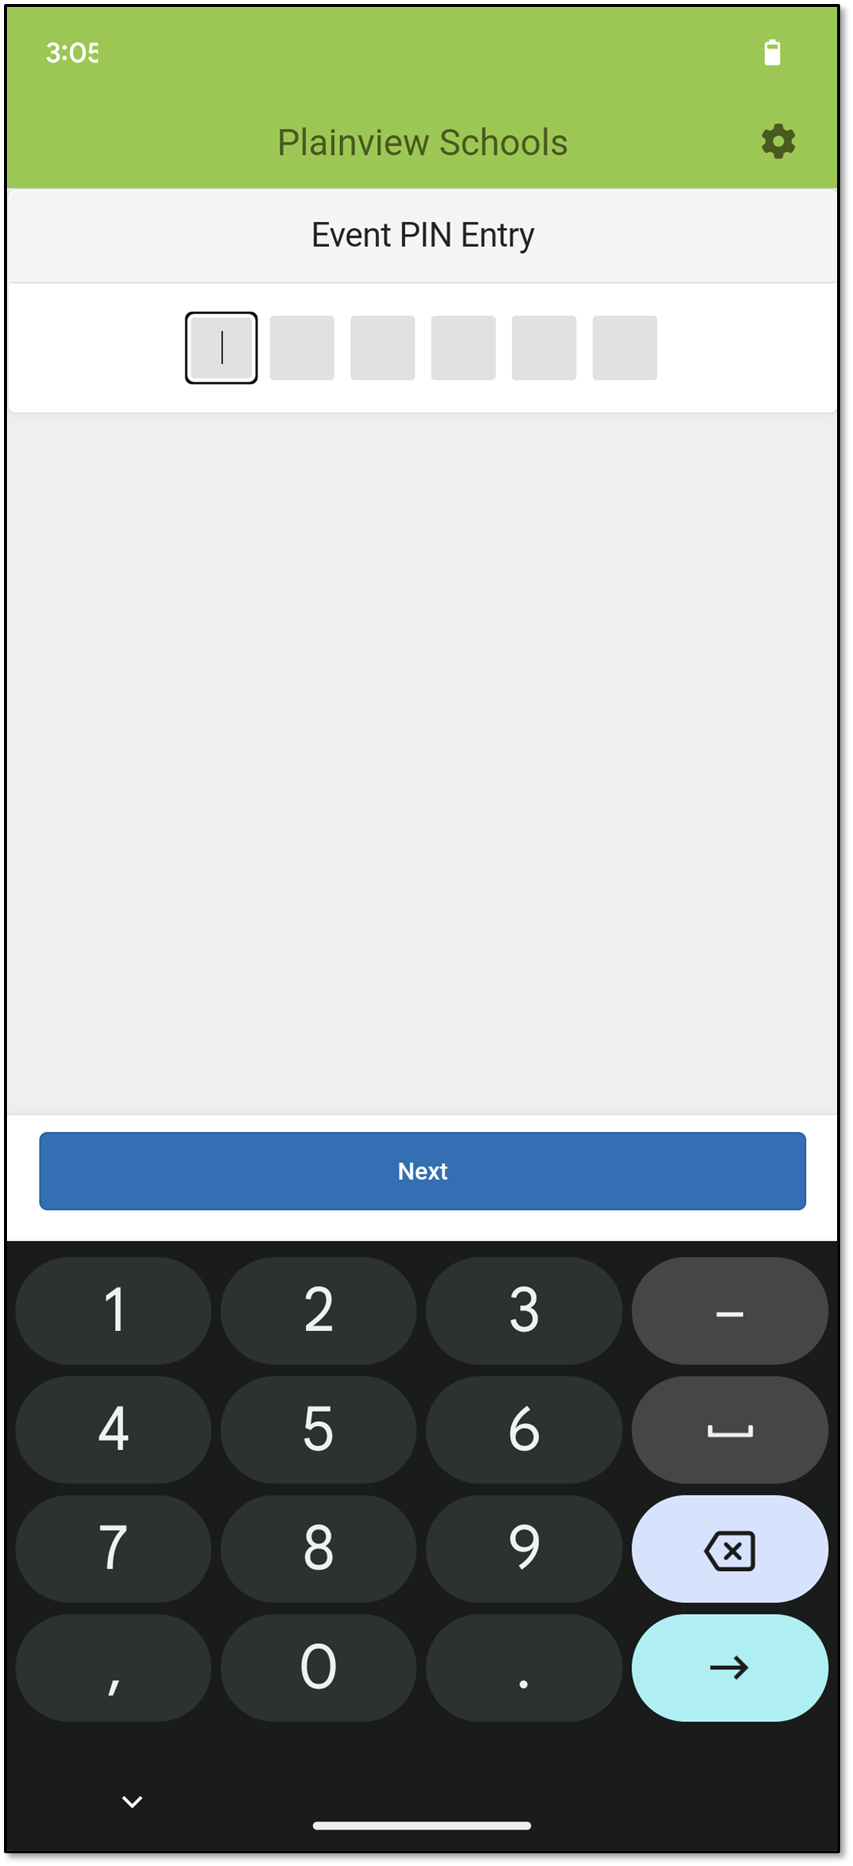
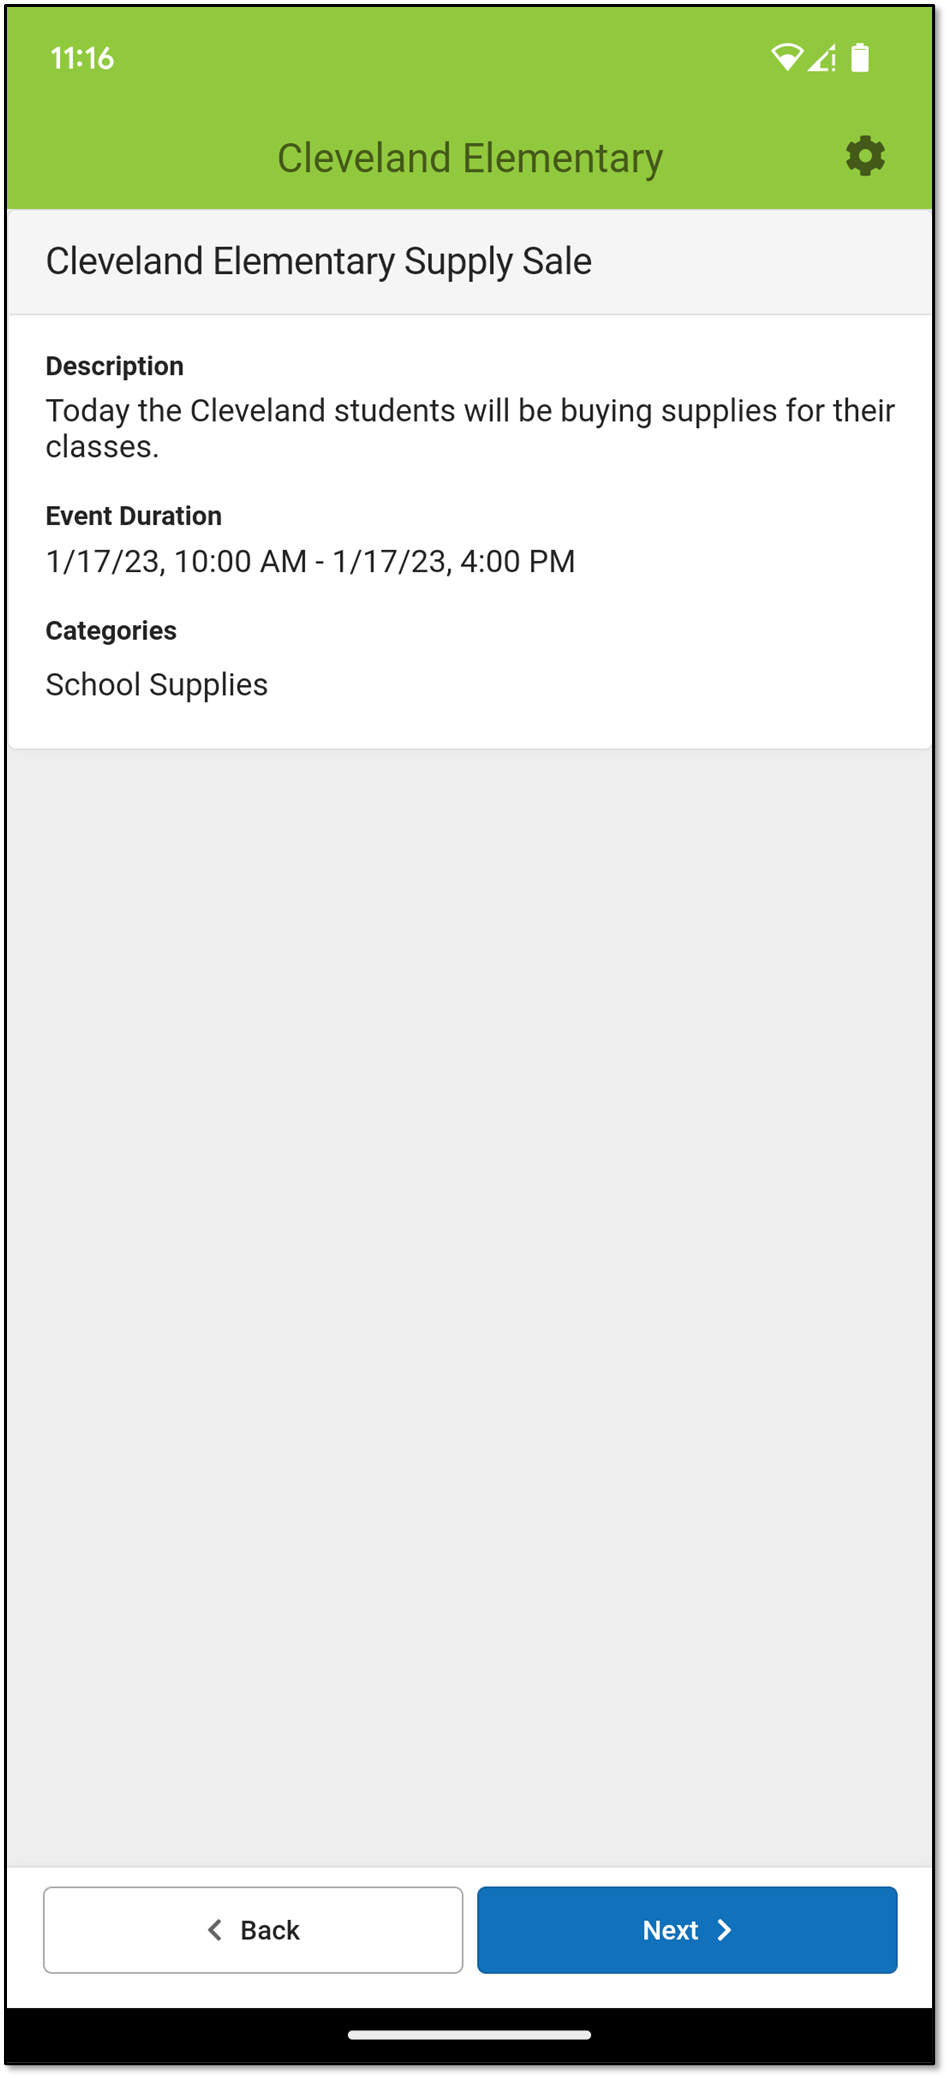
- When Events is selected, enter the cashier PIN (provided by your event coordinator) in the Event PIN Entry boxes and tap Next. Information about the event displays.
- Verify this is the correct event and then tap the Next button. The Scan for Card Readers screen displays.
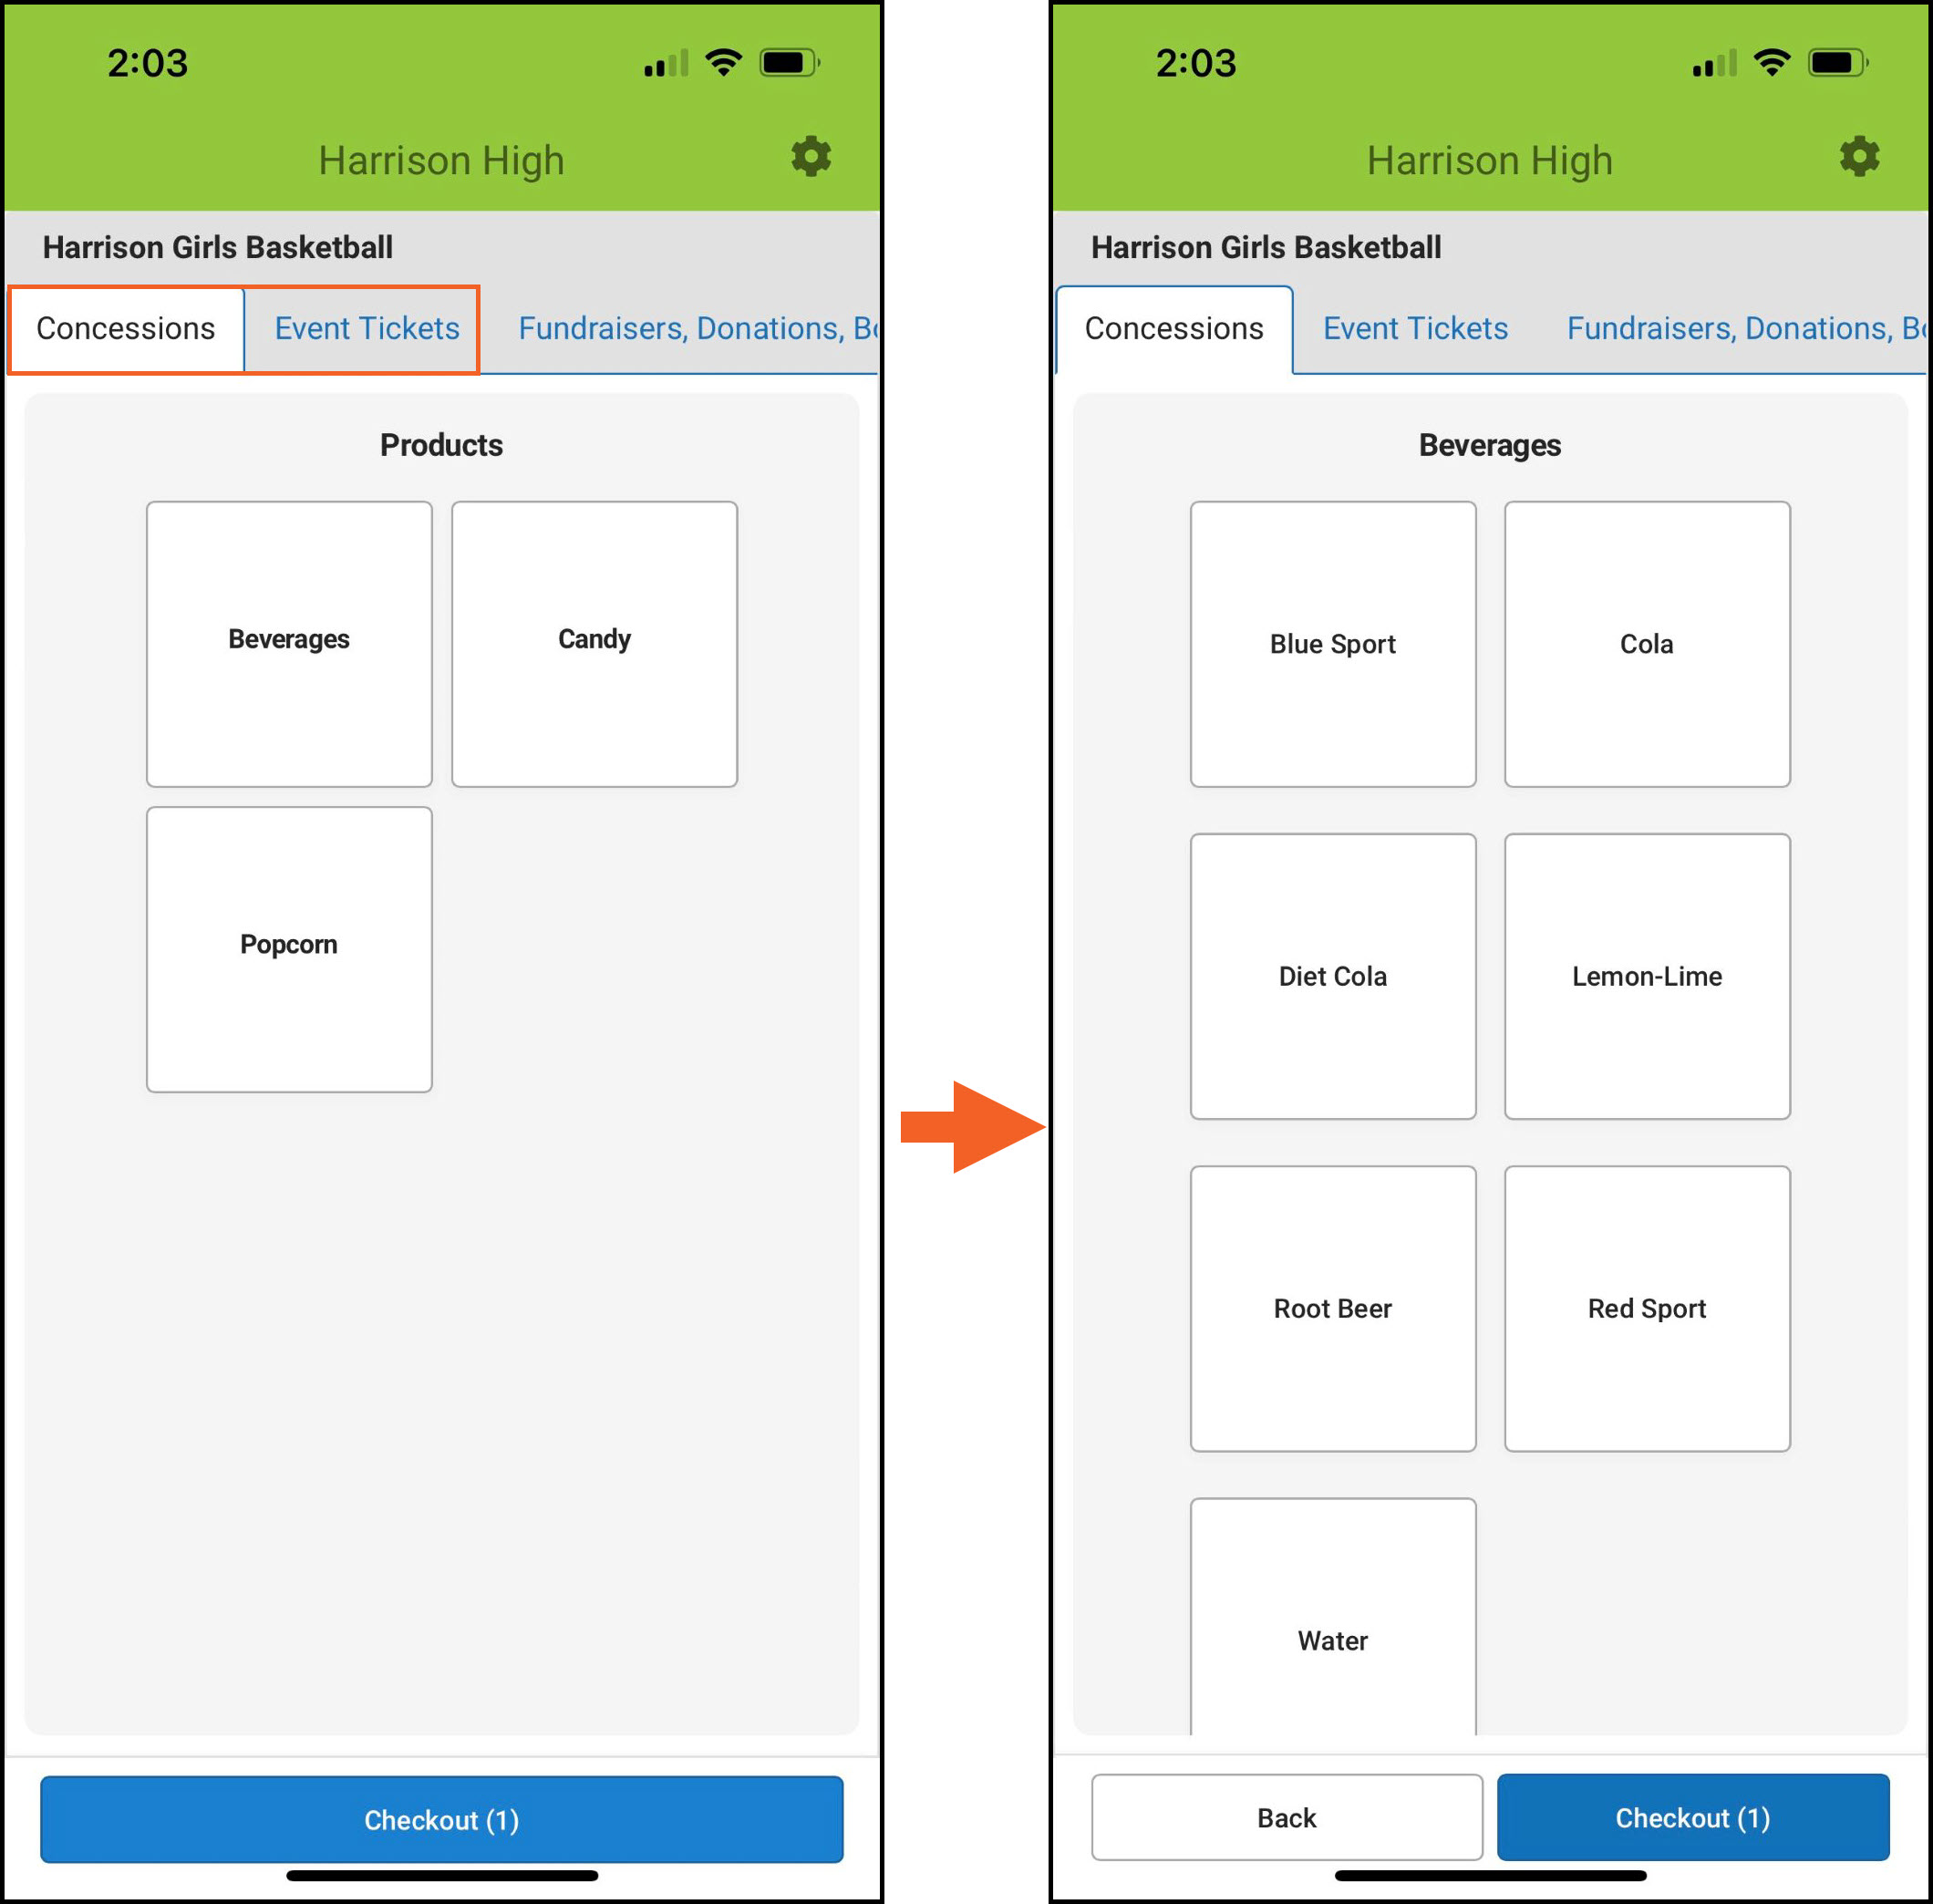
- The categories (in the orange box) appear, and its products appear below. Tap the category you need. When you see the products, tap the one that has the purchasable items. After selecting the product, the items that can be purchased are displayed.
Select a Category and Product Purchasable Items Display After Selecting a Product
- Select the item being purchased.
- A student number may be required for this purchase, or it can be optional.
- In Figure 1, the Student Number is required, as indicated with the red asterisk.
- In Figure 2, the Student Number is optional, and it can be omitted by tapping the Skip button.
After entering the Student Number, tap Confirm.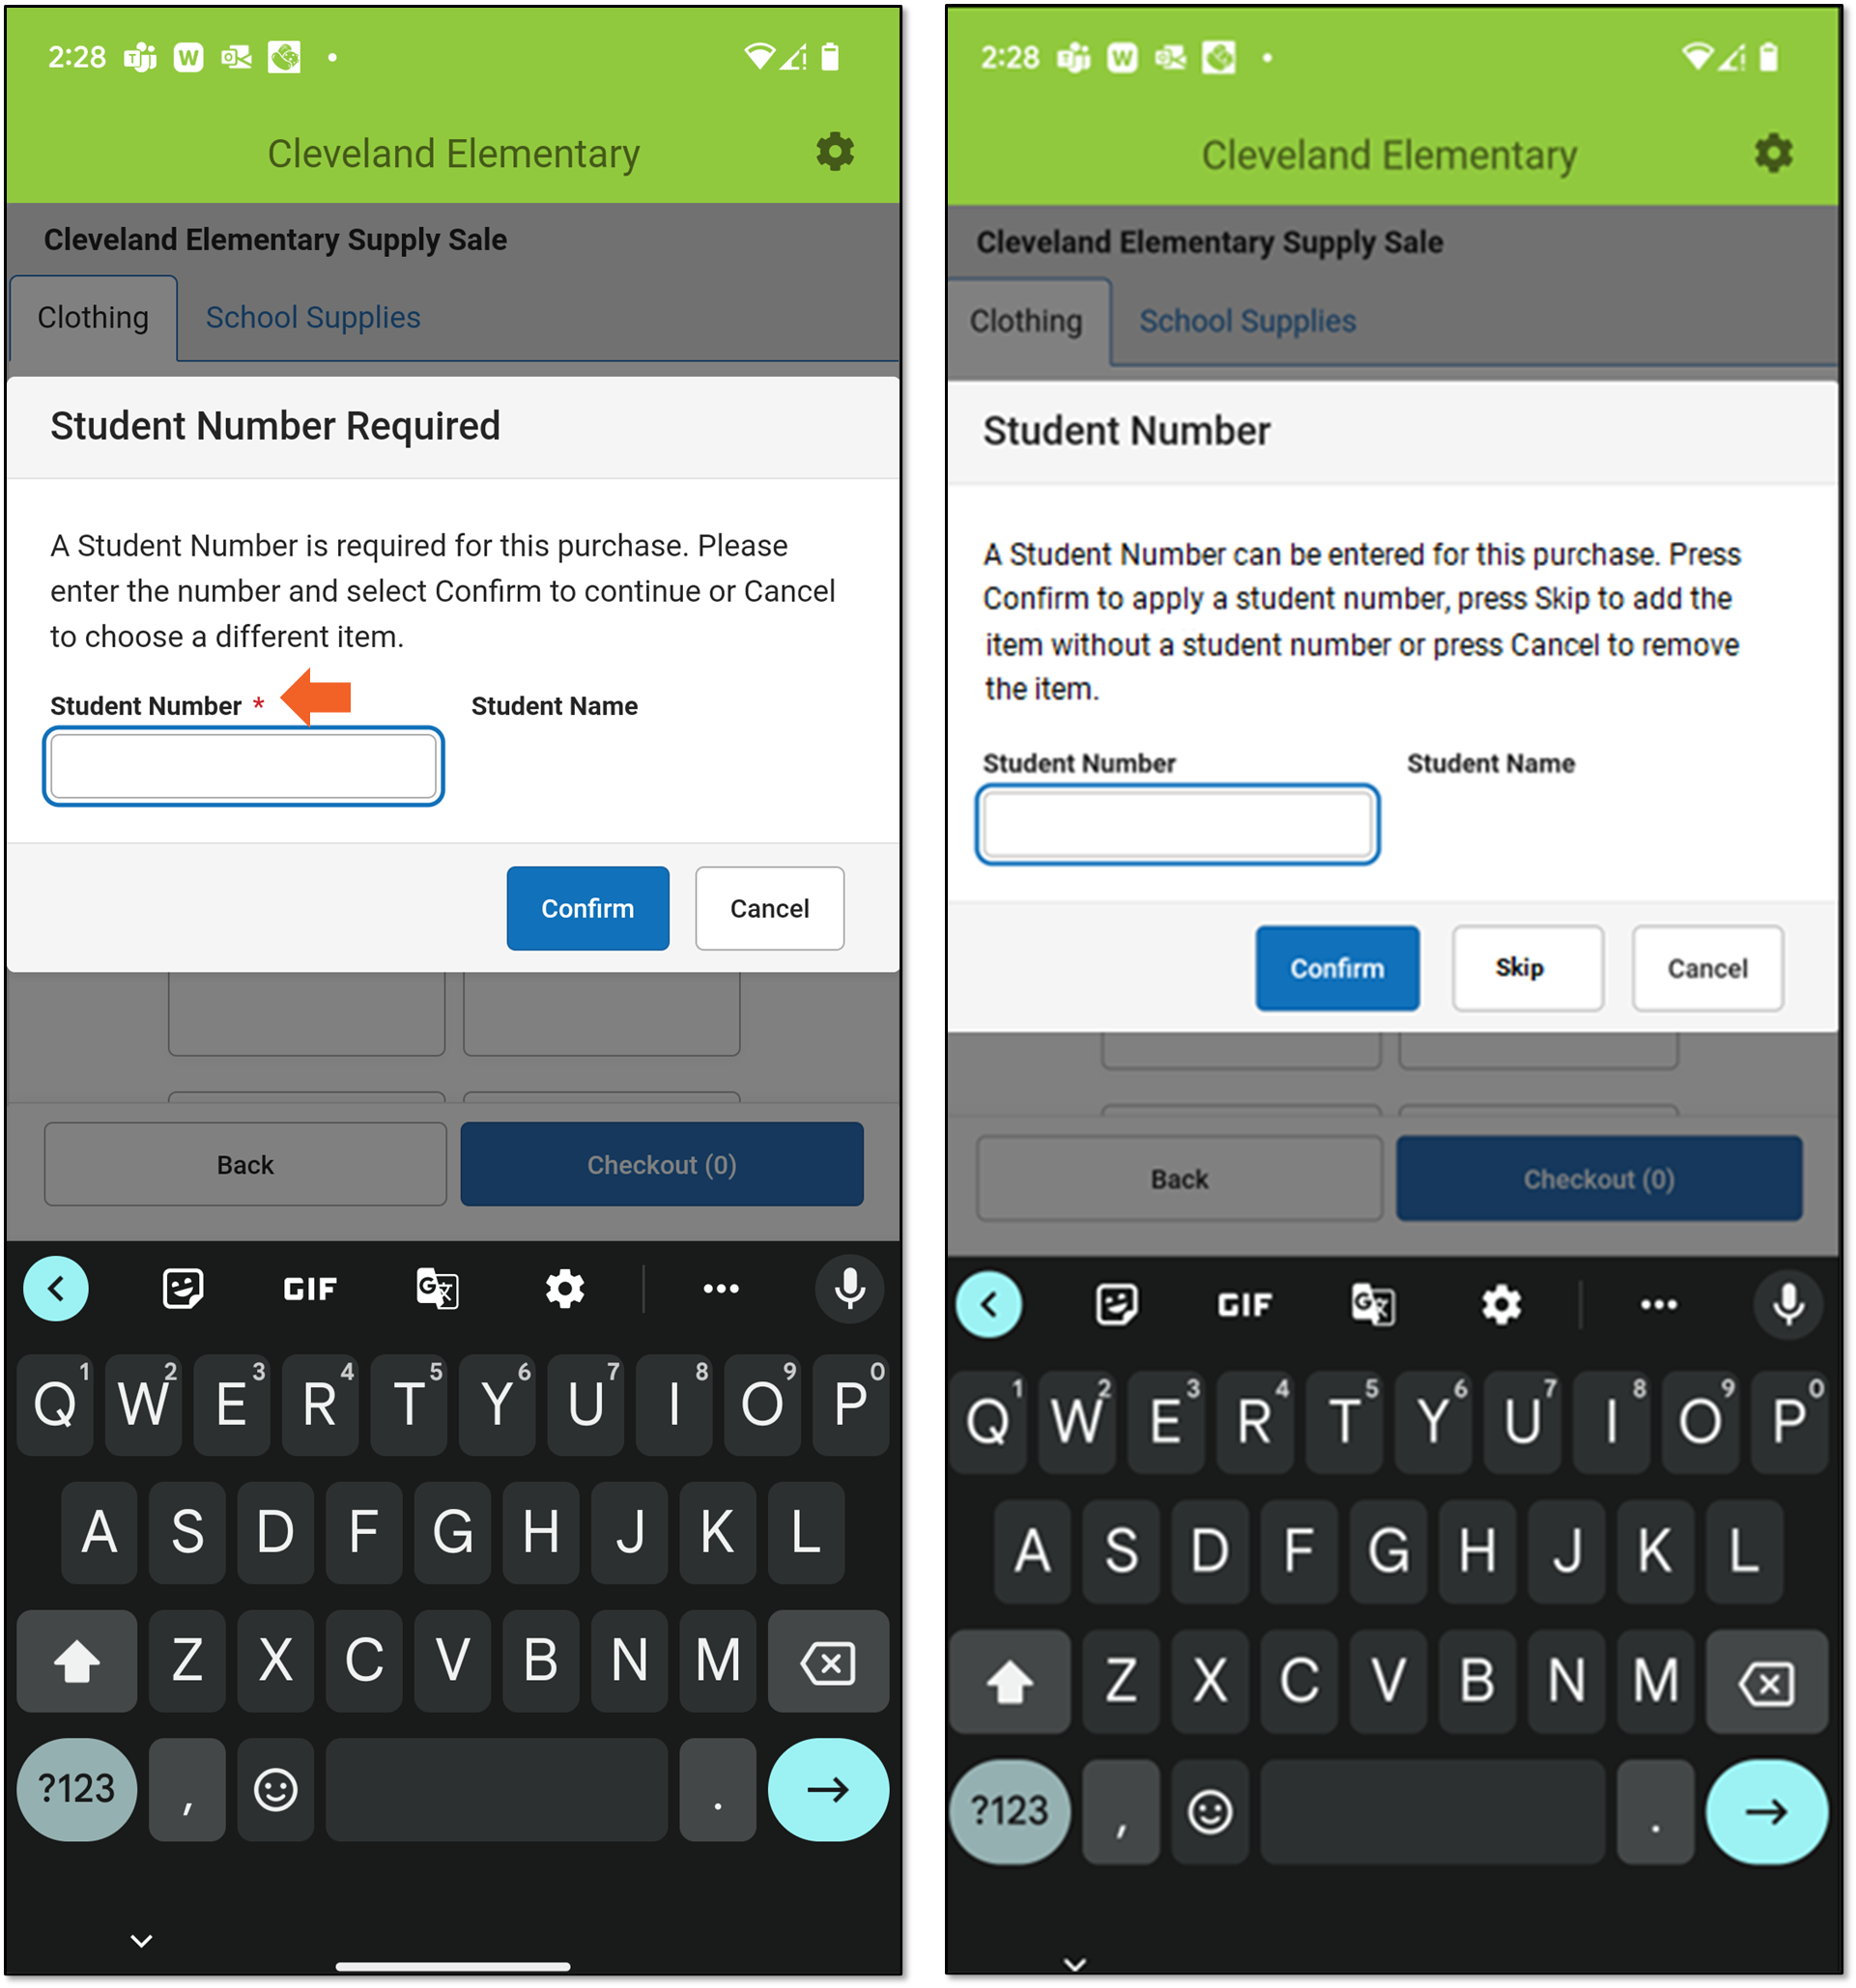 Figure 1 Figure 2
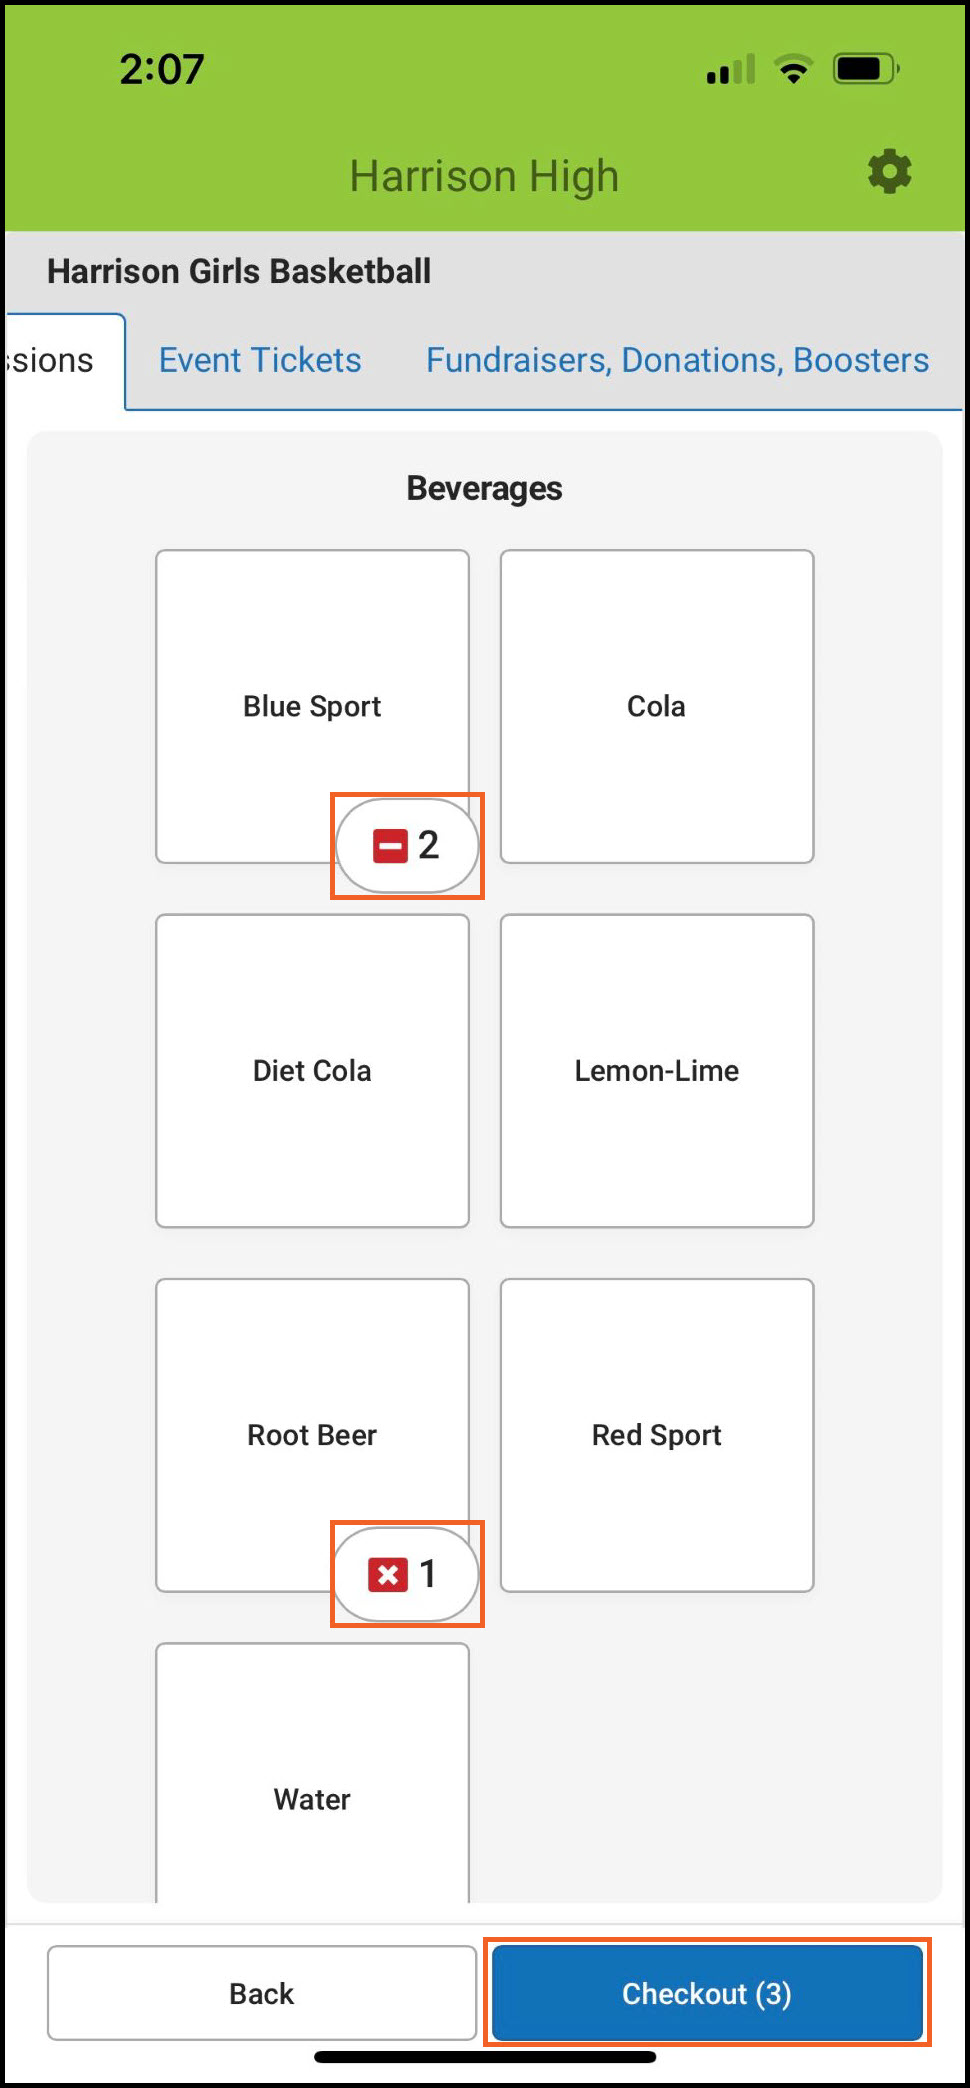
- As items are being selected, a number next to it indicates the quantity being purchased.
- Tap the item again to increase the quantity or tap the to remove it.
- Tap the red minus sign ( ) to decrease the quantity.
- The number on the Checkout button is the total number of all items purchased.
-
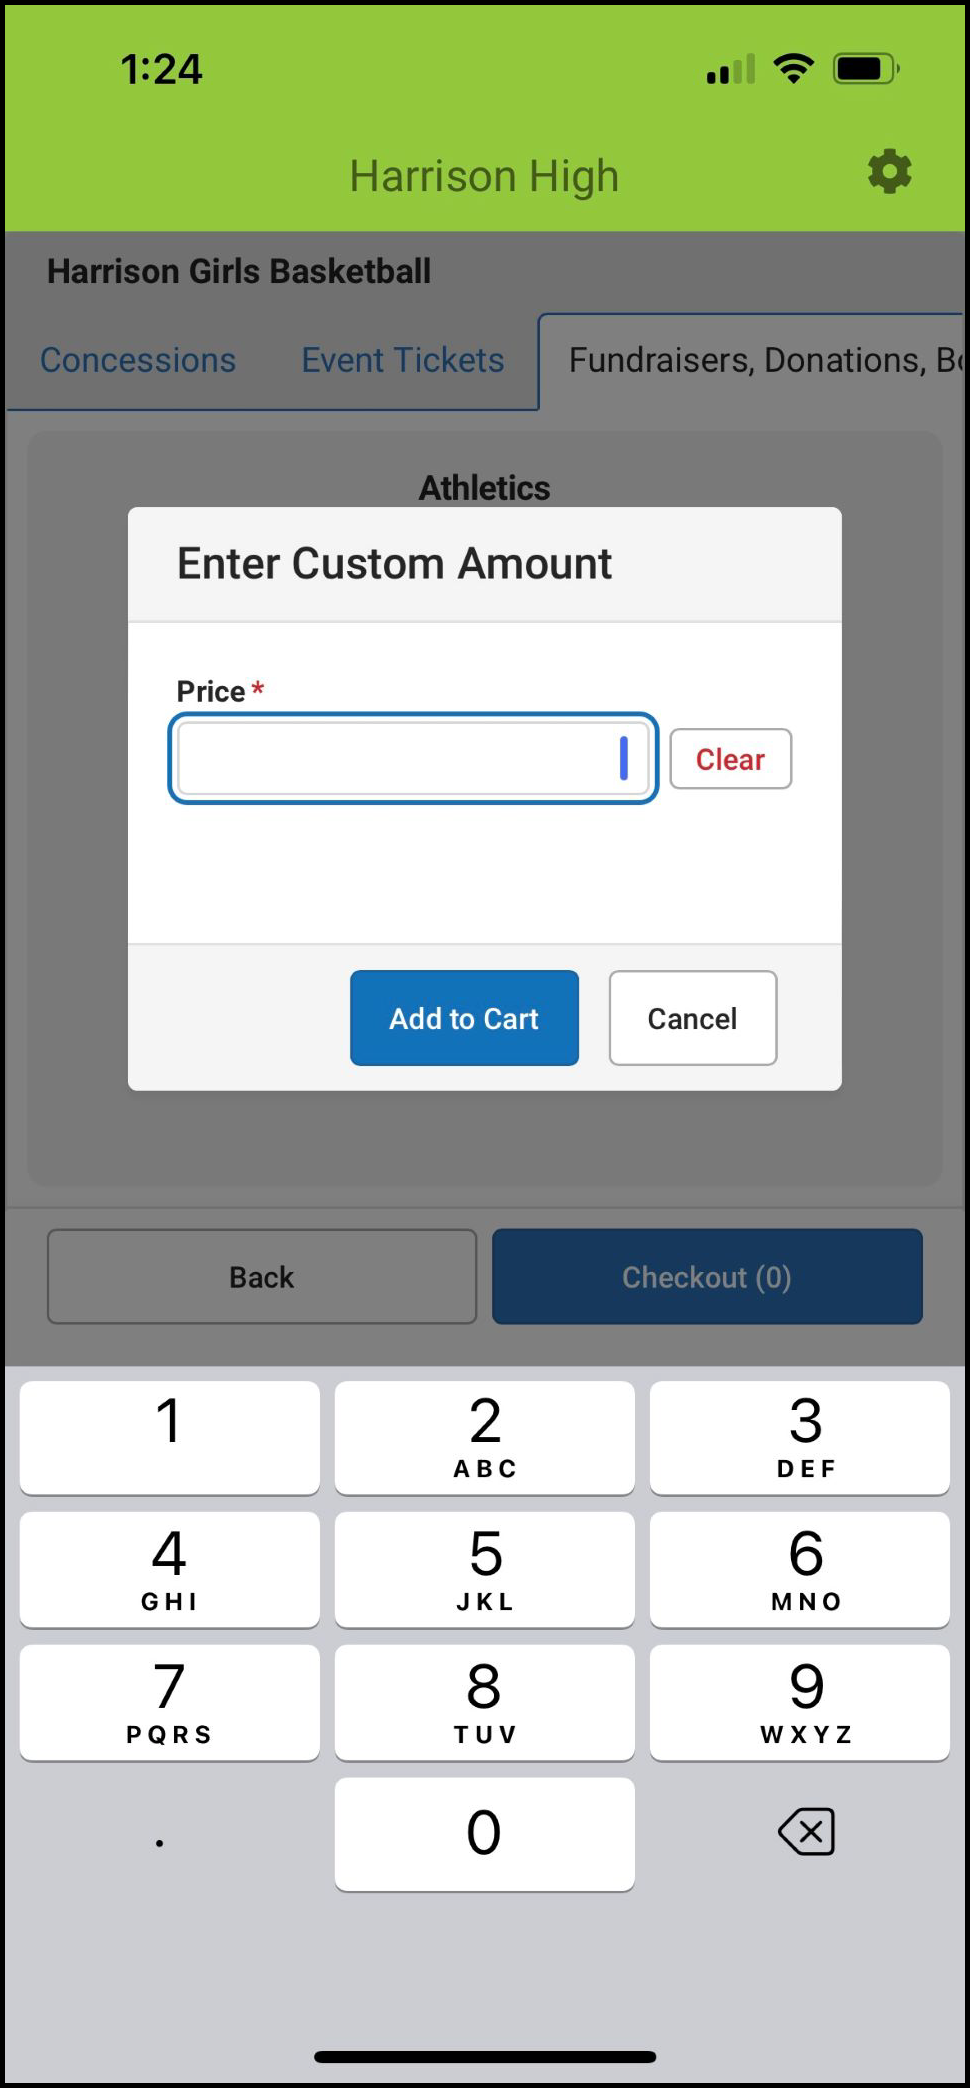
If the item selected has a custom price, enter an amount in the Price field and tap Add to Cart.
- When you are ready to accept payment, tap Checkout. The items in the cart display.
- Verify the items are correct.
a. The quantity can be increased or decreased.
b. An item can be removed.
c. The receipt can be emailed by providing an email address.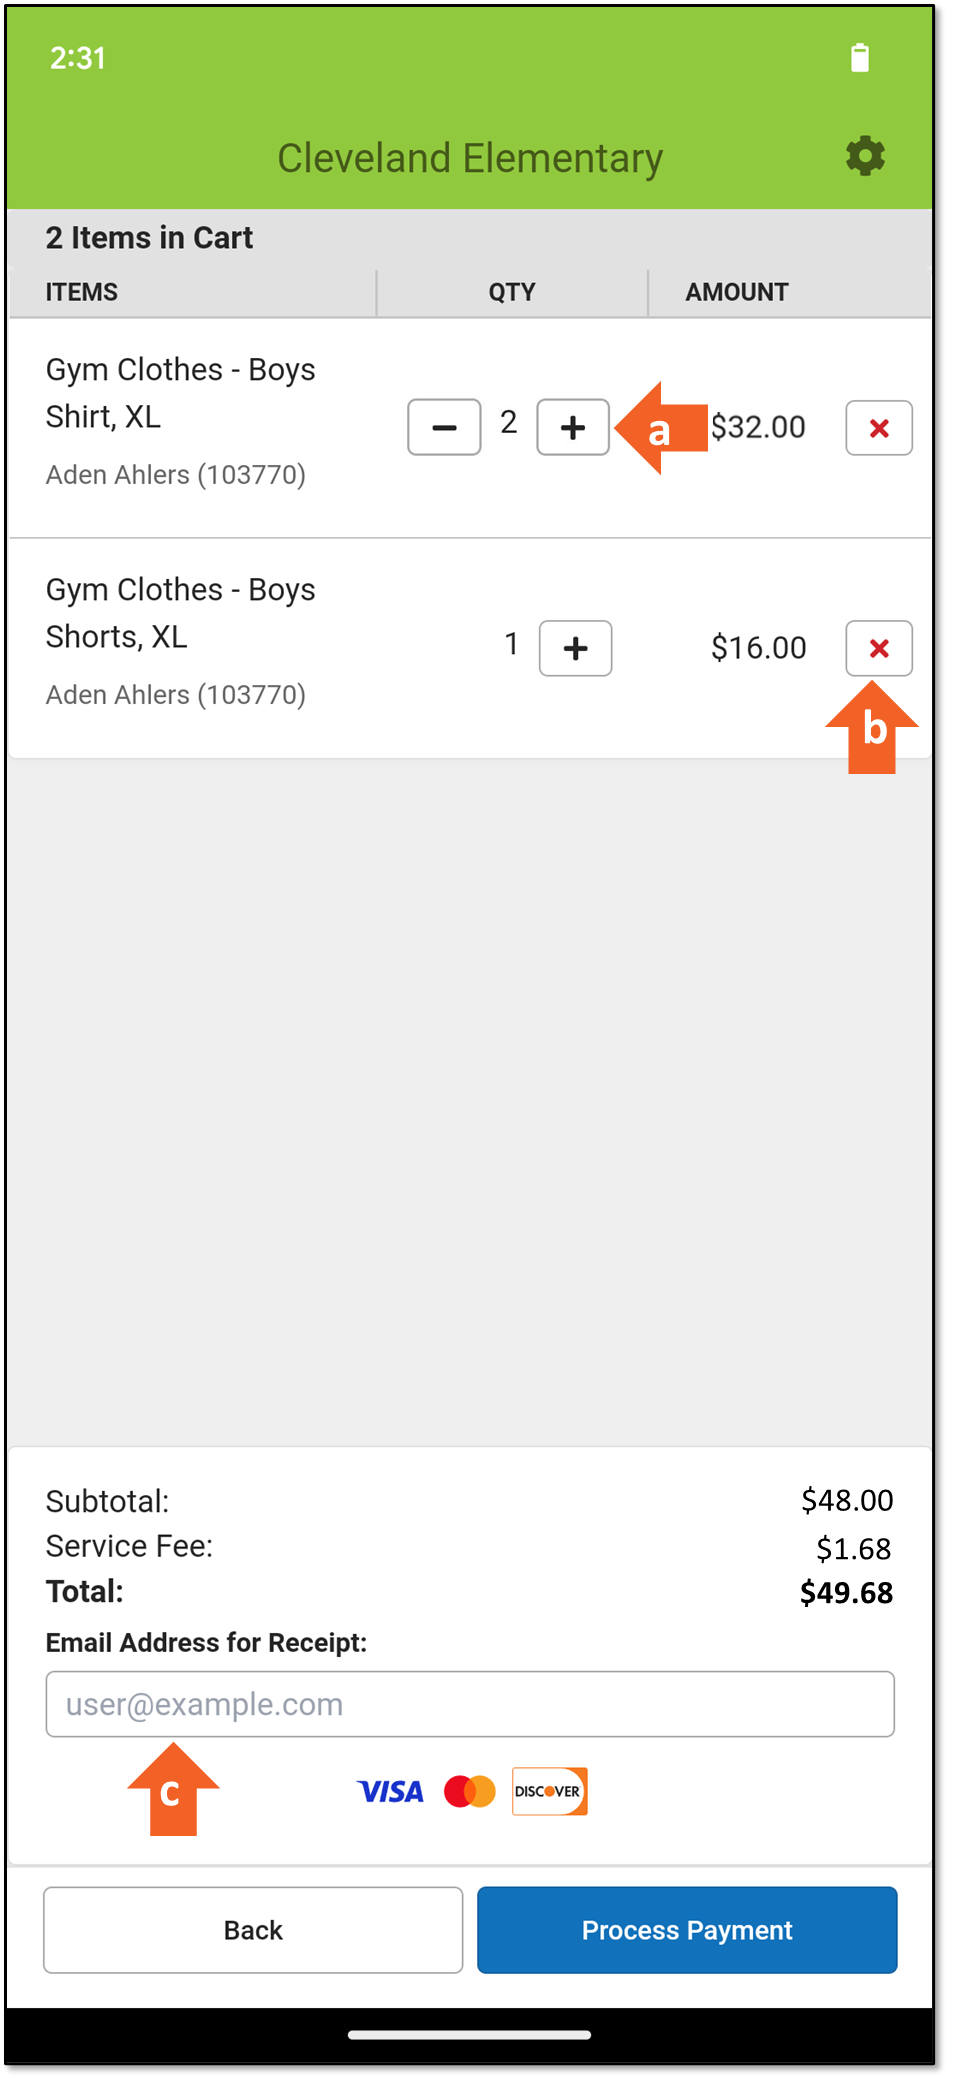
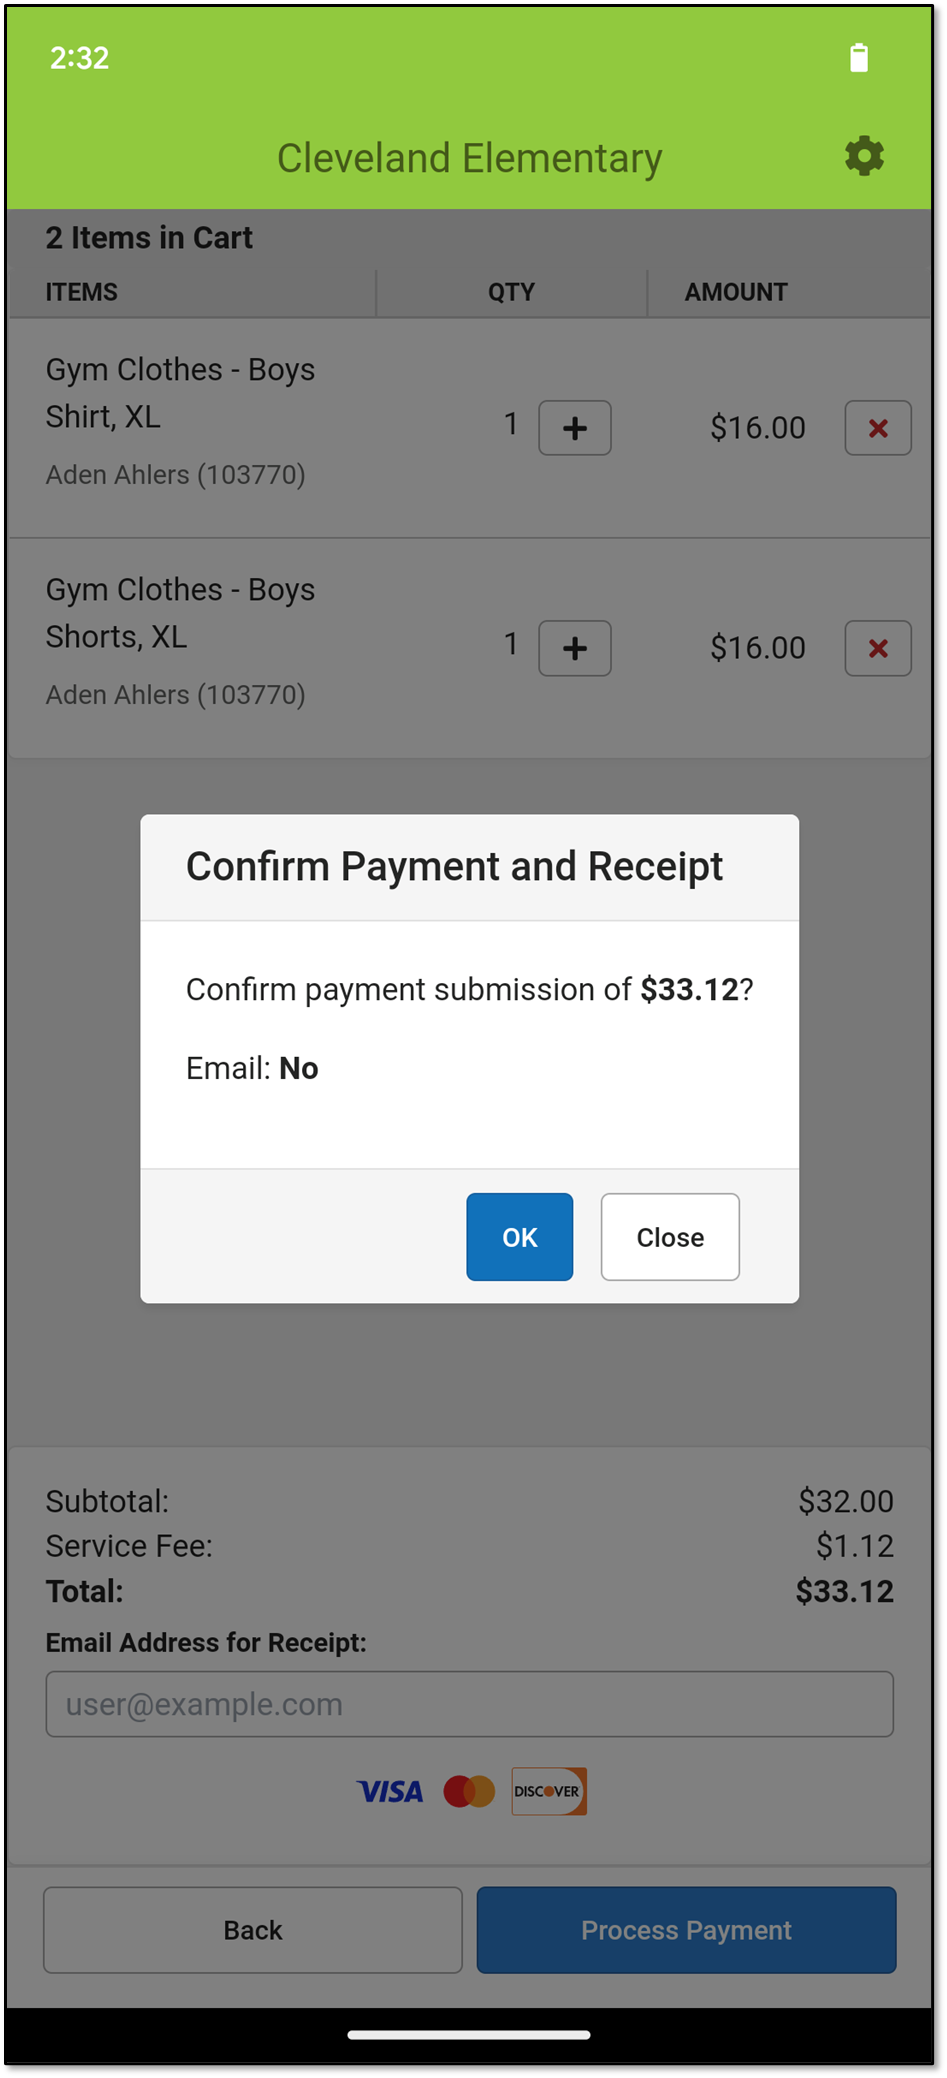
- If everything looks correct, choose Process Payment or Manual Credit Card Entry. The Confirm Payment and Receipt (Process Payment) or the Credit/Bank Card Processing (Manual Credit Card Entry) screen displays.
- If Manual Credit Card Entry was chosen, enter all of the required credit card information, then tap Submit Payment
- Tap the OK button to continue. The Insert, Tap, or Swipe Card message displays.
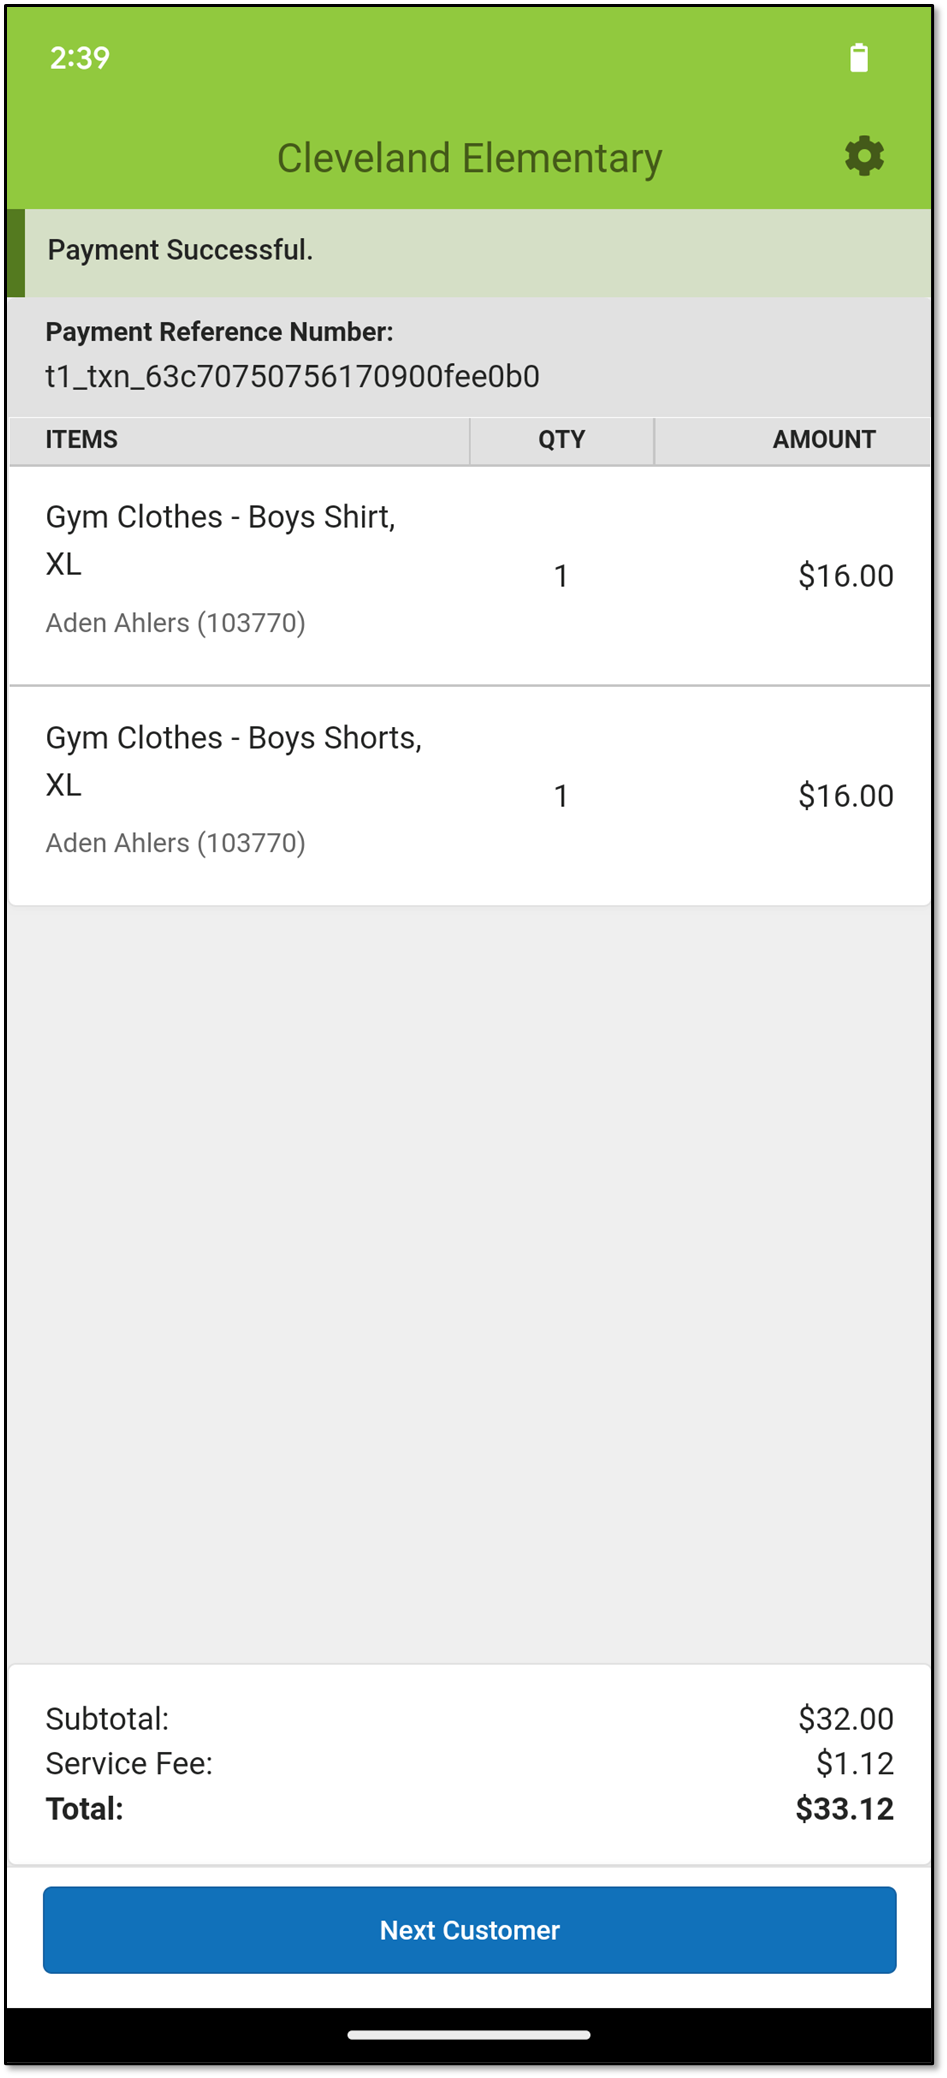
- Insert, tap, or swipe the credit/debit card in the card reader. The Payment Successful screen displays.
Note: Insert or tap must be used if the card is chip-enabled.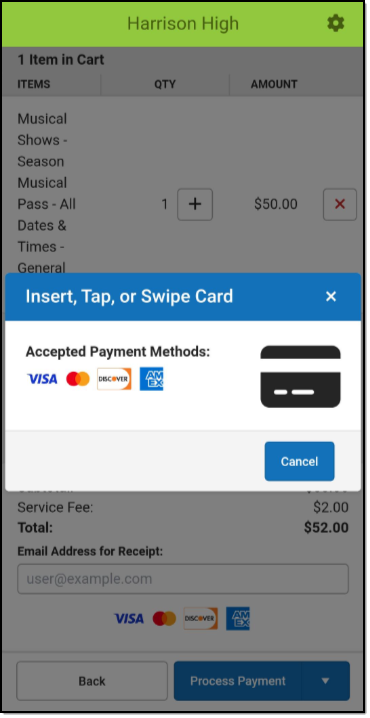
- Tap the Next Customer button to start a new transaction.
-
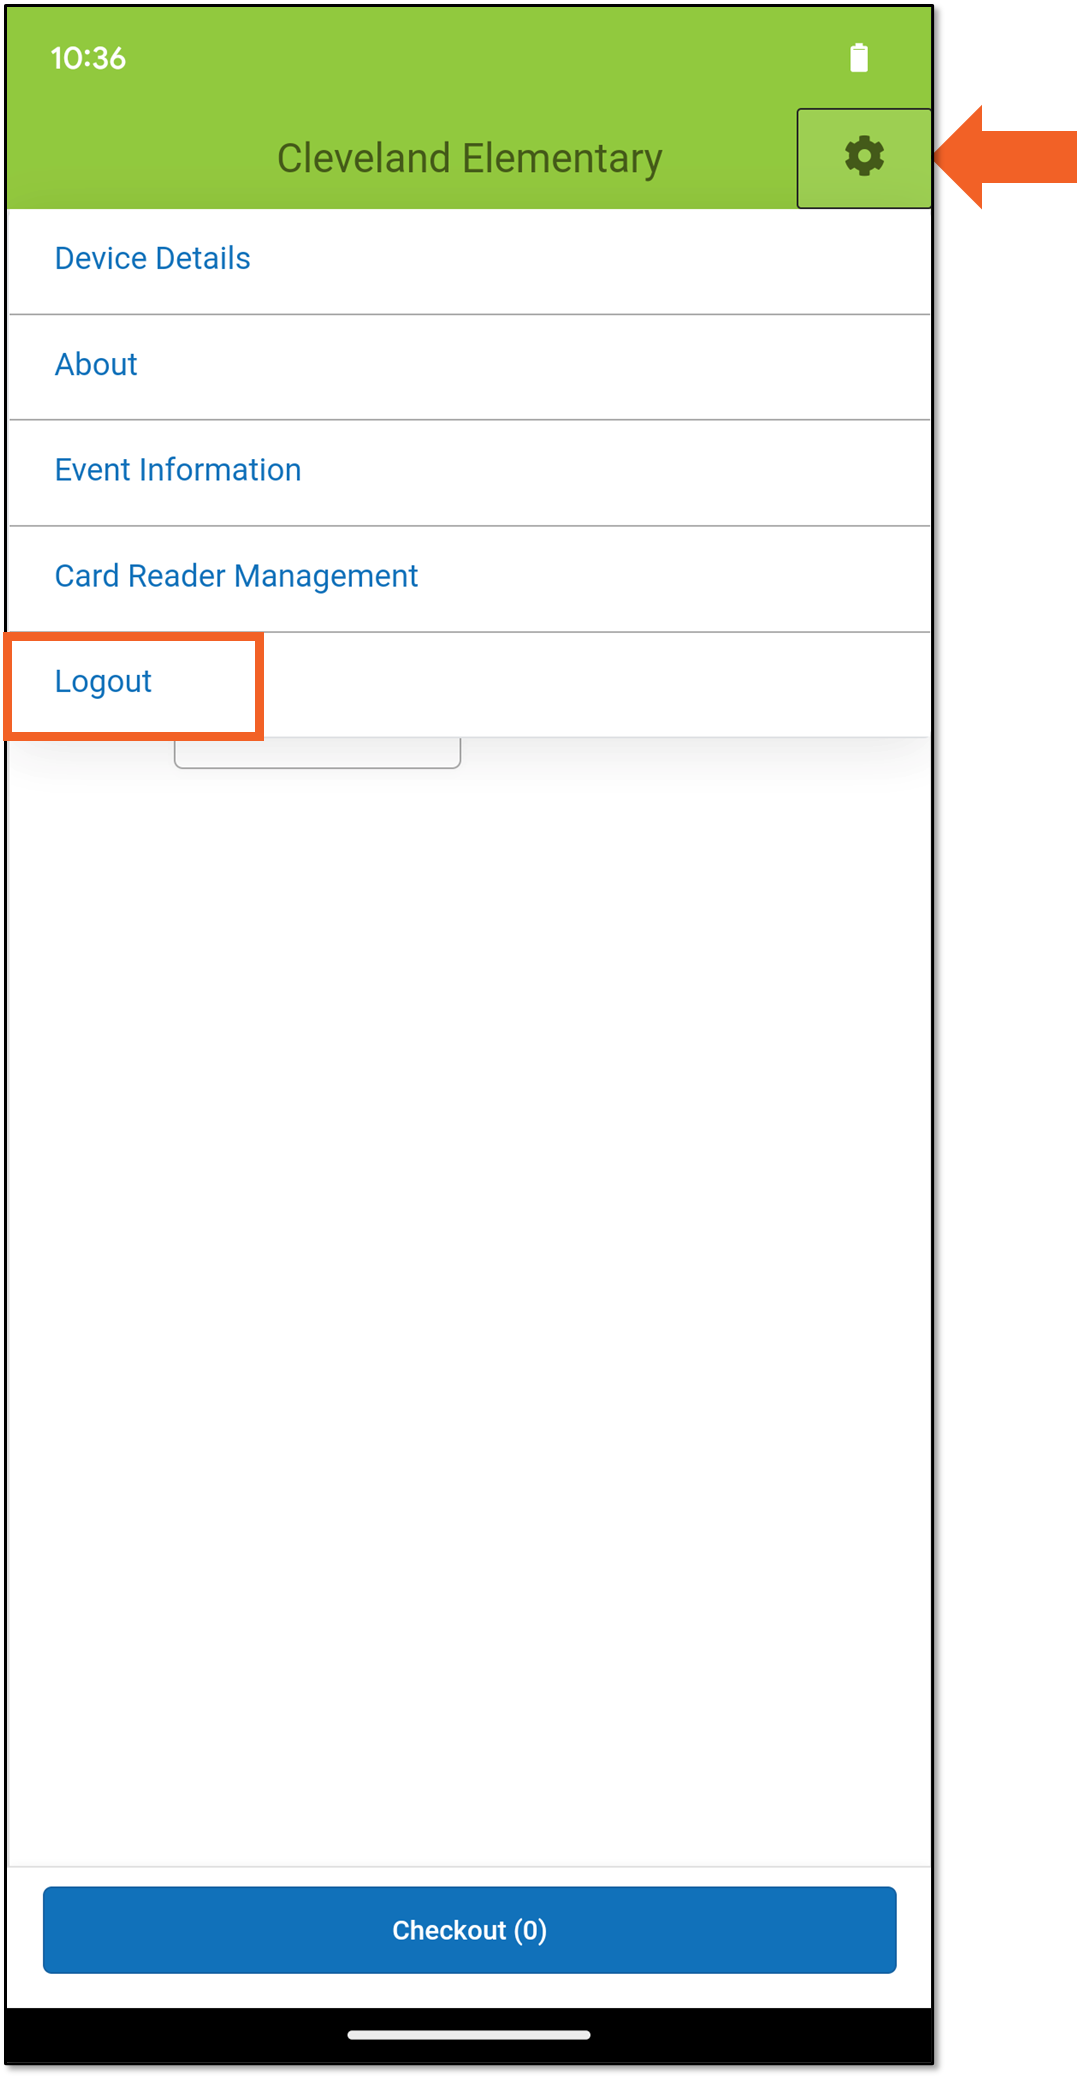
Continue to process transactions. When the event is over, tap the Gear icon and choose Logout.
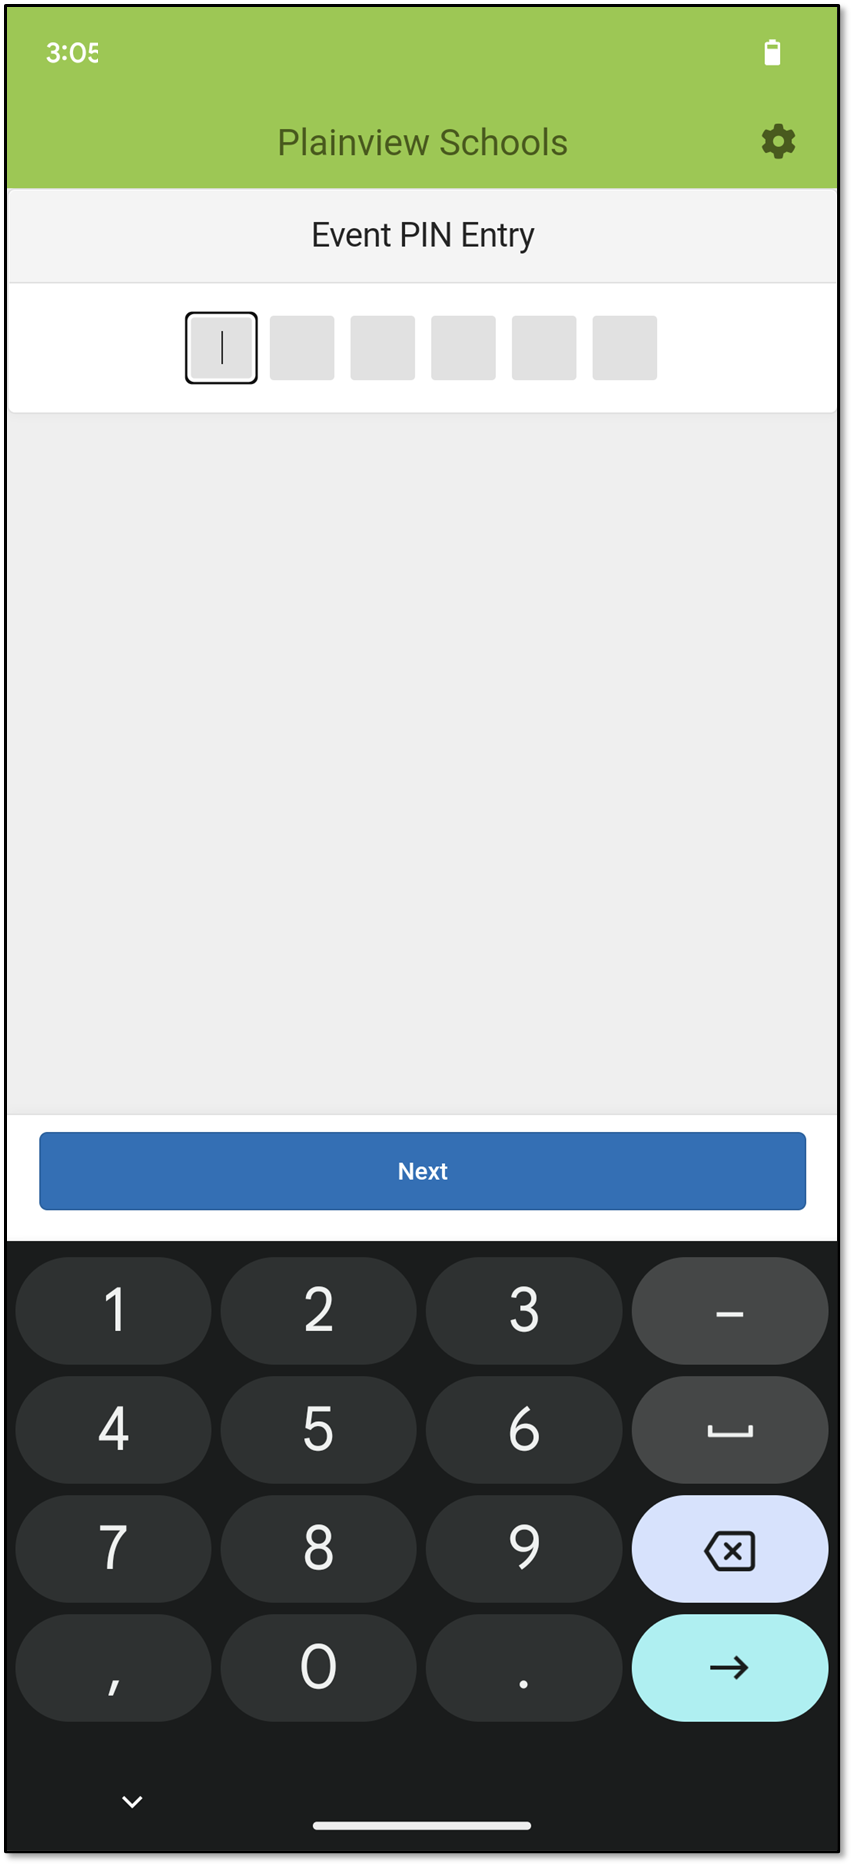
 You will be returned to the Event PIN Entry screen.
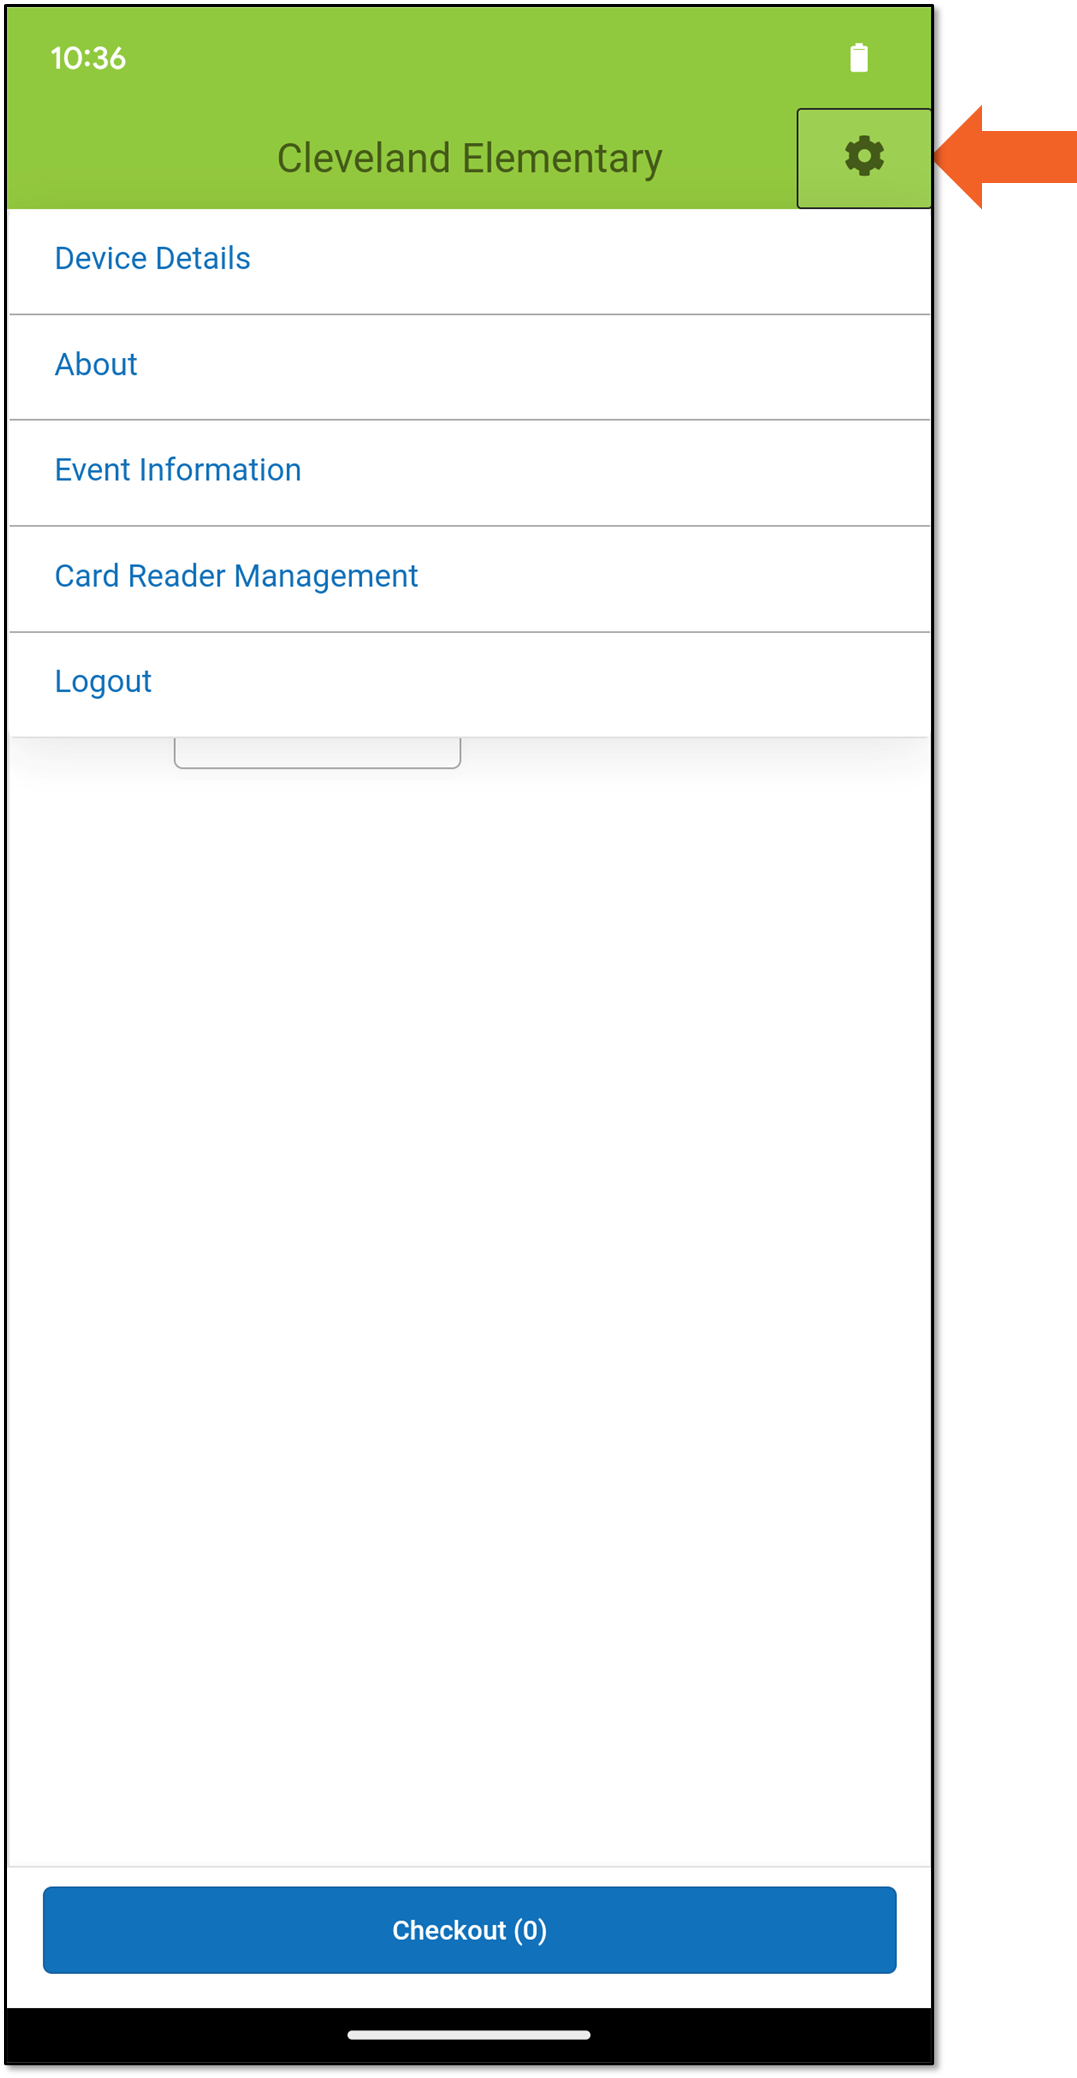
The Gear Icon
The menu for the Gear icon changes depending on where you are within the app. Below are the descriptions for all of the menu options.
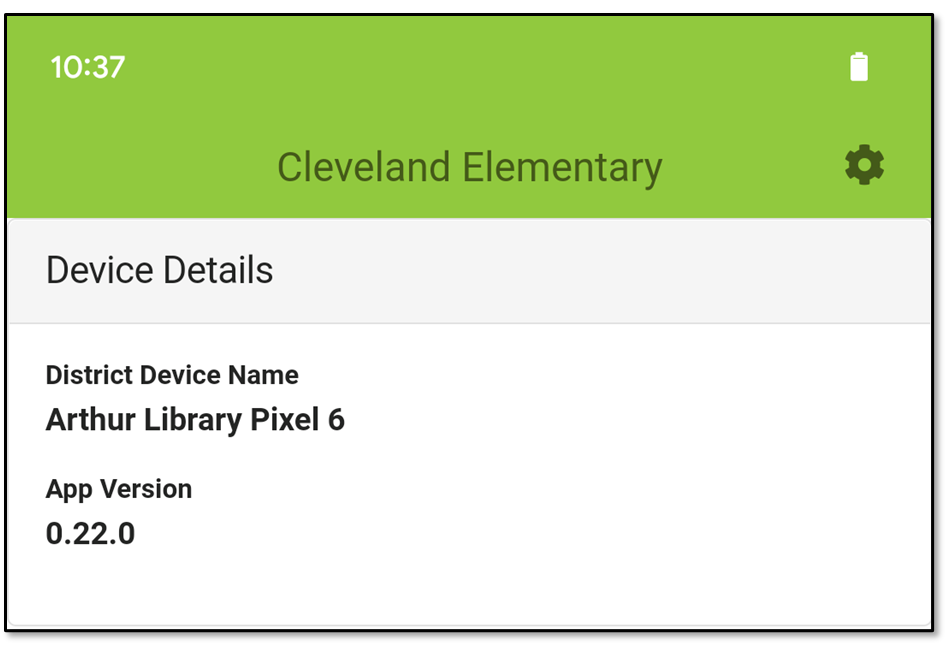
Device Details
Device Details gives the app version and the name of the device being used. The name is the one given in the Device Management tool.
About
The About screen displays the rights and trademarks for the Campus Mobile Payments app.
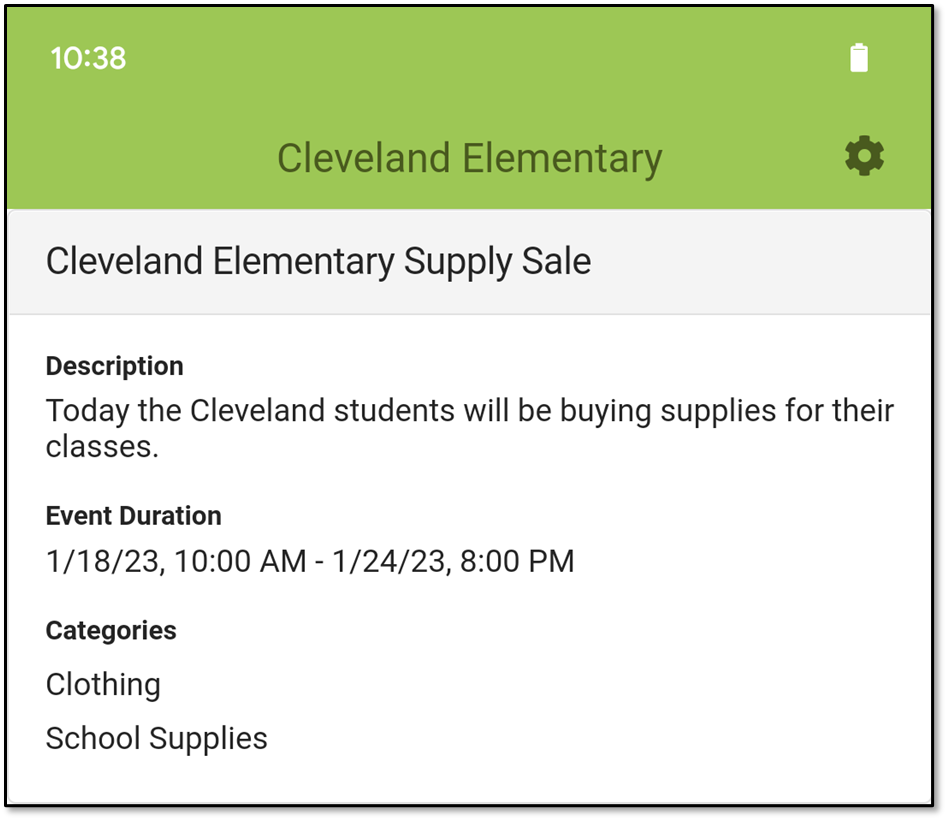
Event Information
Choose Event Information to get the details about the event taking place.
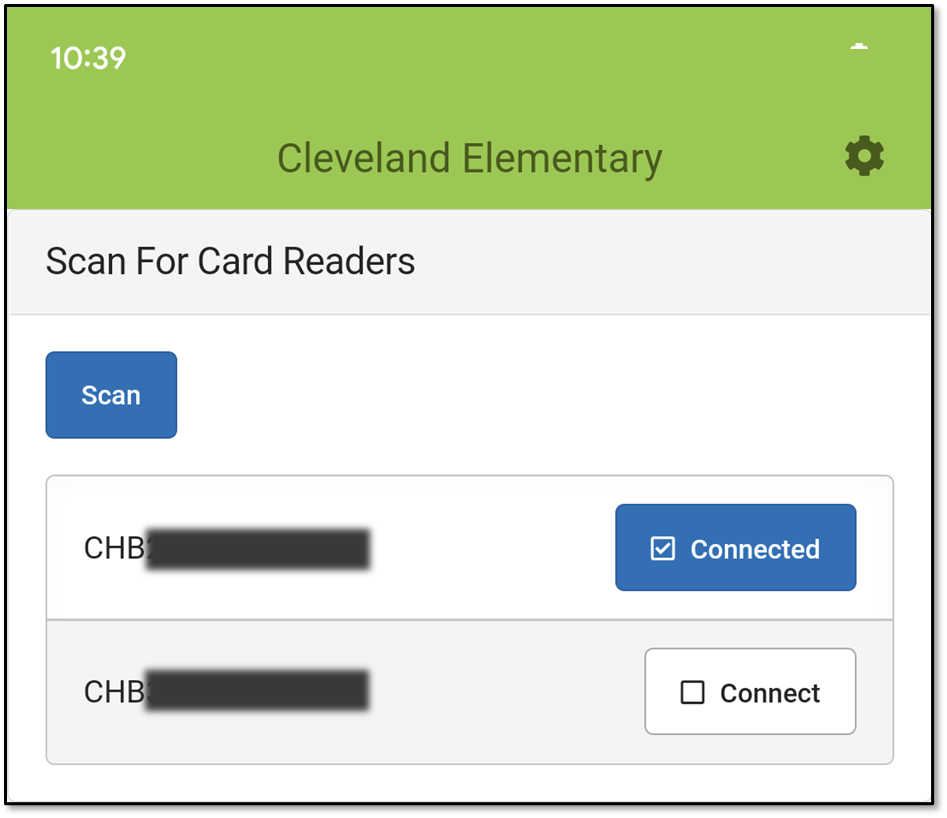
Card Reader Management
Choose Card Reader Management to see which devices are being used at this event. The card reader you are using should say Connected.
Logout
When an event is over, choose Logout to get logged out of Campus Mobile Payments. You will be returned to the Event PIN Entry screen.
The Mobile Payments app lets you process card transactions at events, such as selling tickets or concessions, and process in-office card transactions from the Campus application.




 next to the school's name.



 to remove it.
 ) to decrease the quantity.


 You will be returned to the Event PIN Entry screen.

