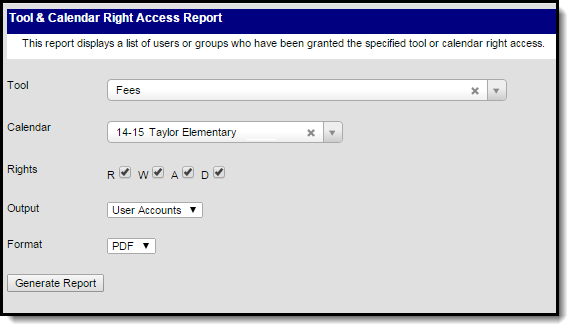
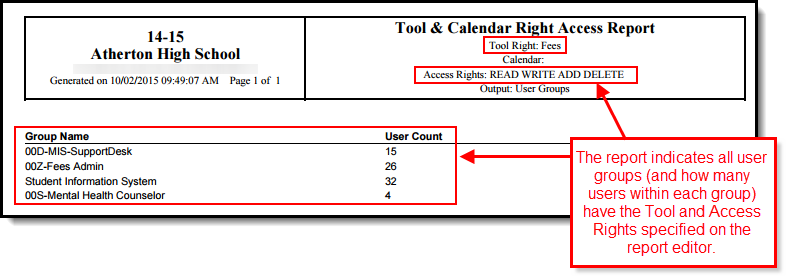
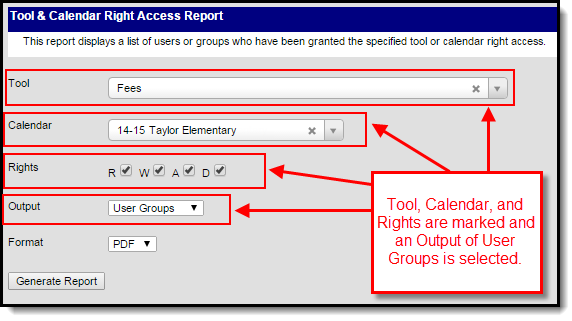
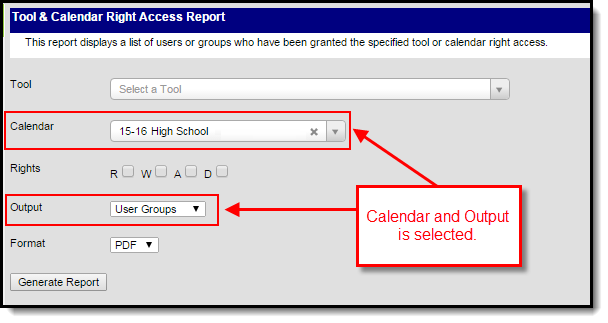
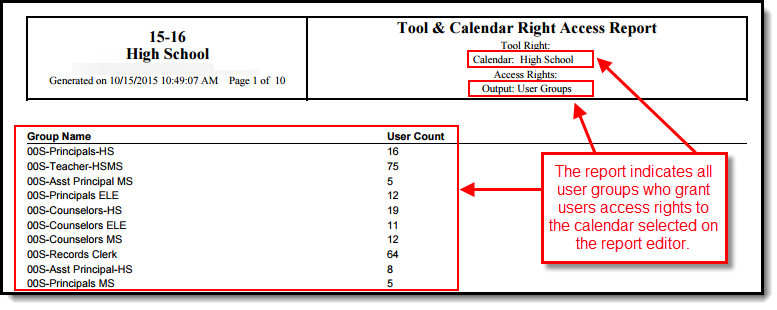
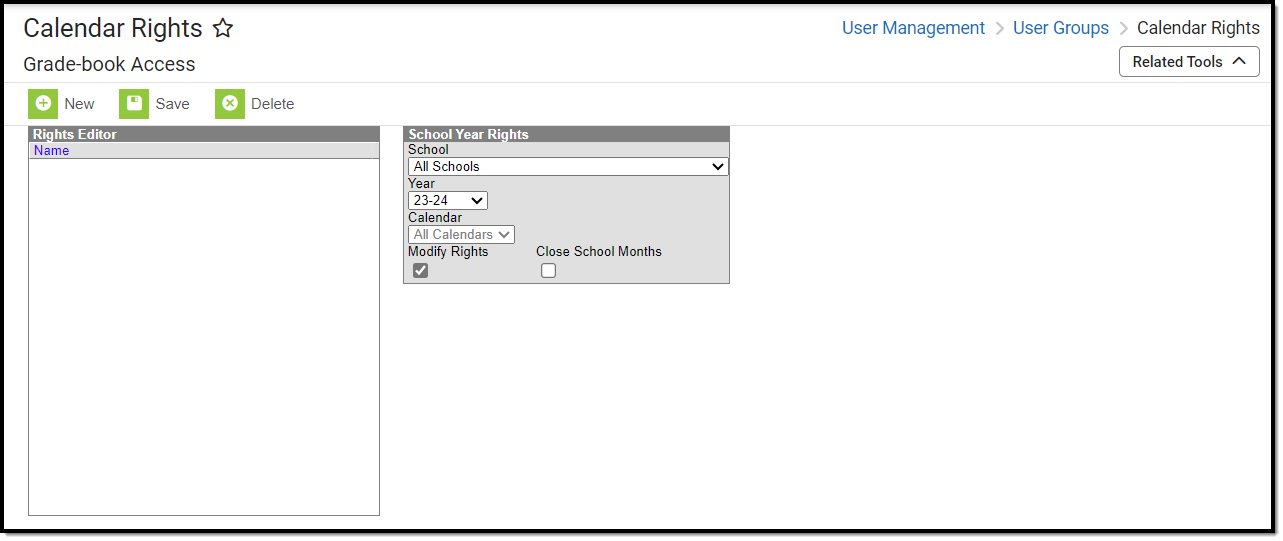
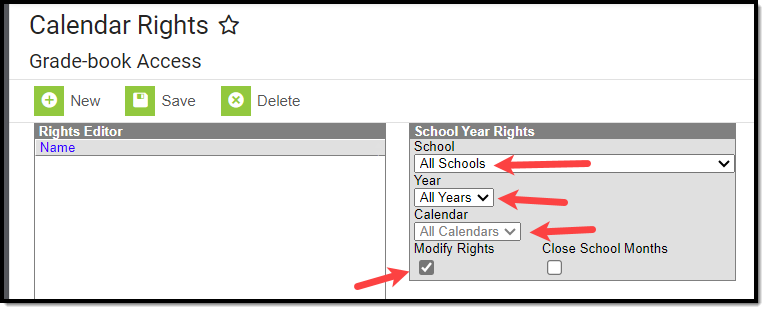
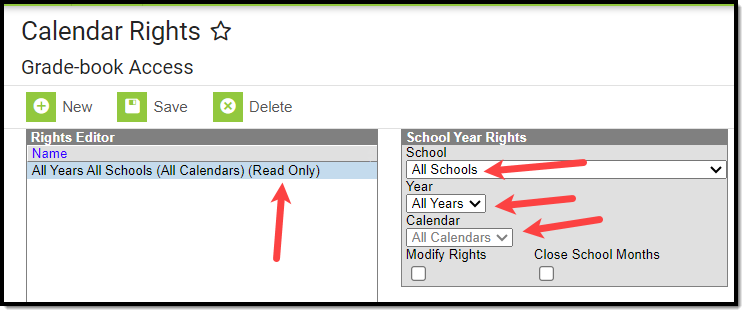
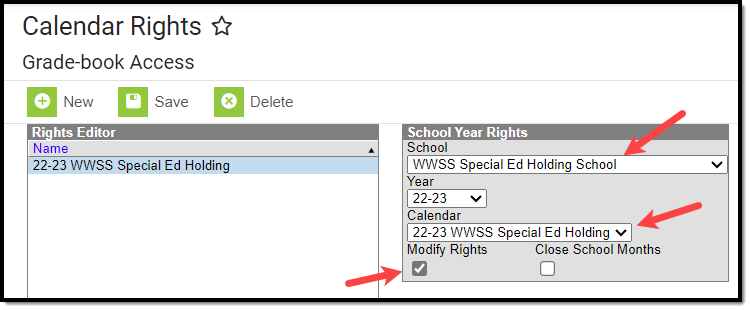
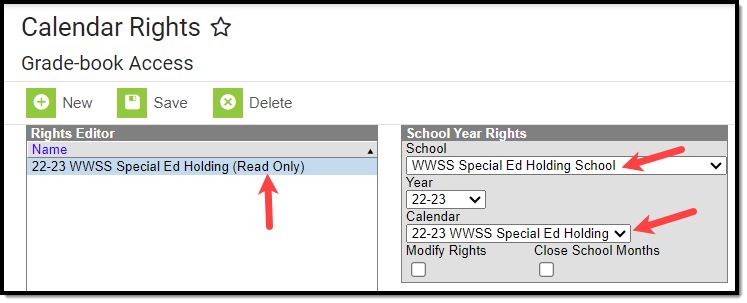
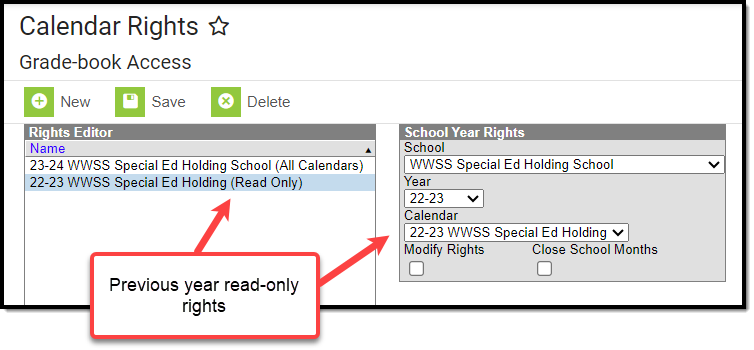
Calendar Rights determine what school, year and calendar access is provided to all users within a user group.
Calendar rights work in tandem with Tool Rights, where Tool Rights determine which tools user group members can access and Calendar Rights determine which calendars user group members are allowed to view and modify via Campus tools.
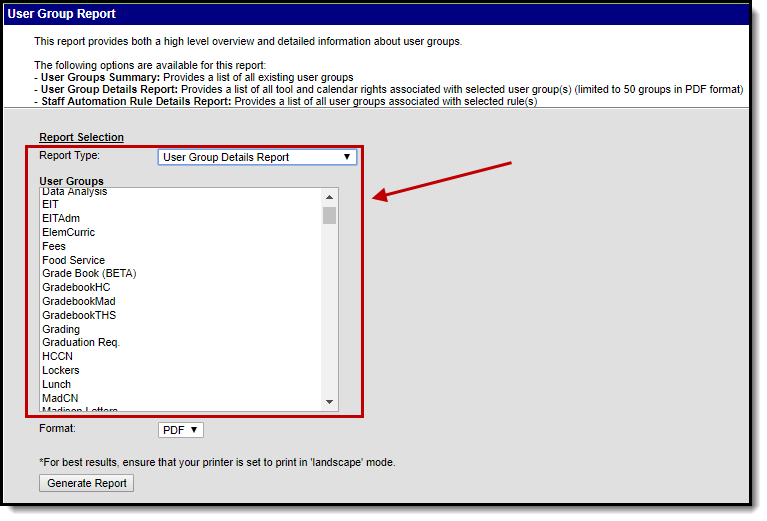
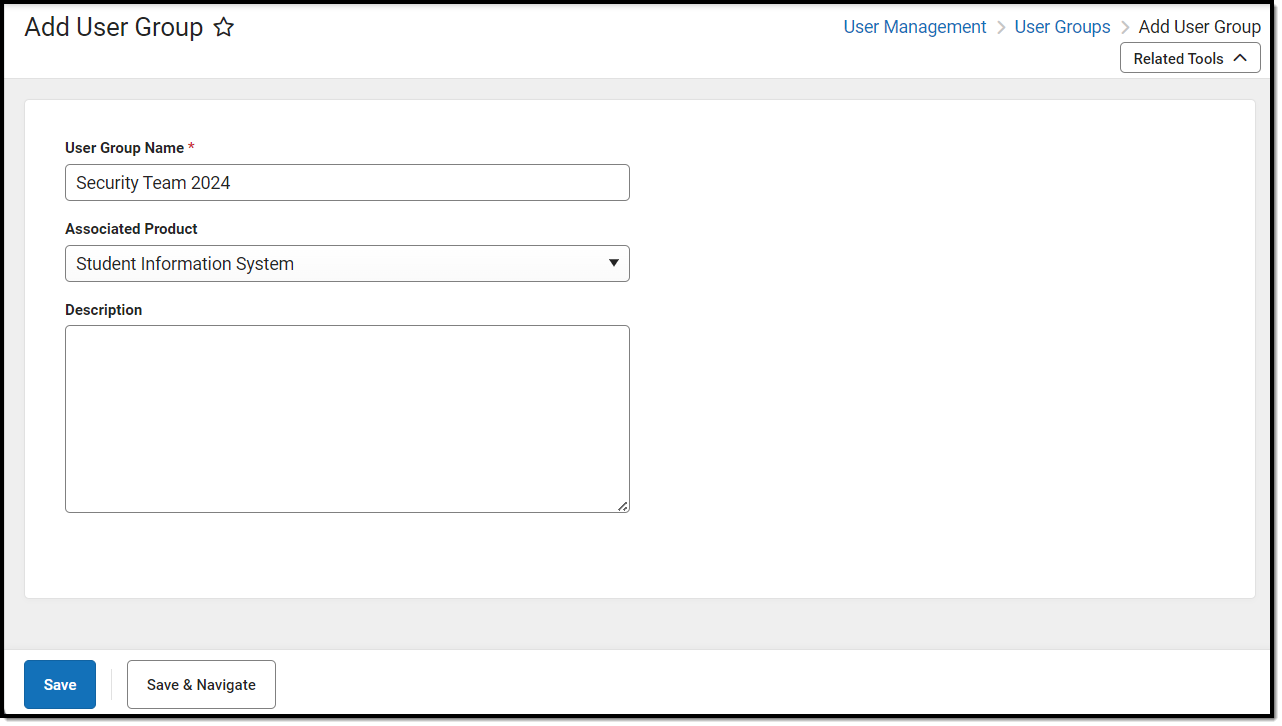
User Groups
Create Calendar Rights User Groups
The first step in assigning calendar rights for staff members is to create a user group(s). A user group is a way to define a specific set of tool and/or calendar rights and apply these rights to all users assigned to the group.
Assign Calendar Rights to a User Group
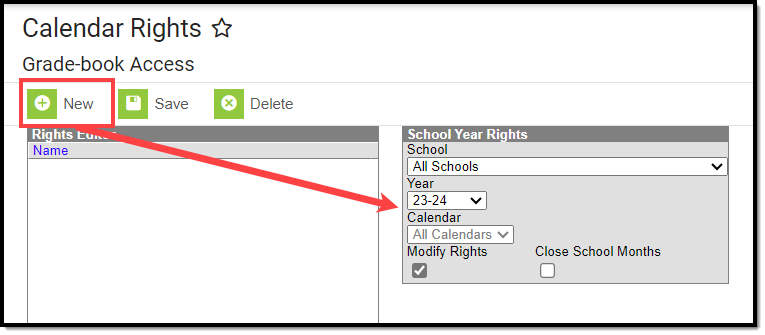
Once user groups are established, calendar rights can be assigned. Calendar Rights determine what school, year and calendar access is provided to all users within the user group.
Assign User Groups to Individual Staff Members
Once calendar user groups have been created, individual staff members can then be assigned to the user group(s).
Assign Calendar User groups to All Staff Members
You can also assign calendar user groups to staff members en masse using the User Account Batch Wizard.
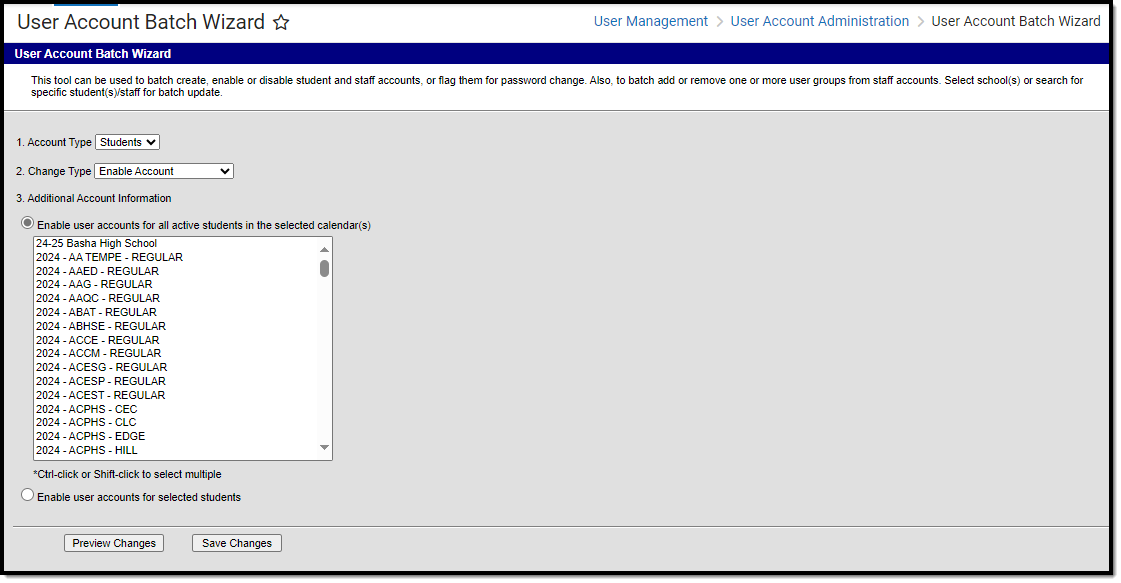


Create User Accounts for All Staff in a School or Select Staff Members
Once the User Group, Username, Password, and Homepage criteria are set, you must determine which staff members will have user accounts created. User accounts can be created for all staff within a selected school(s) or for a specific set of staff members. See the following sections below for more information about these two options.
All accounts created require a password change upon first login.
For more information about creating letters and emails to inform users of their new user account, see the Informing Users of Newly Created User Accounts section below.
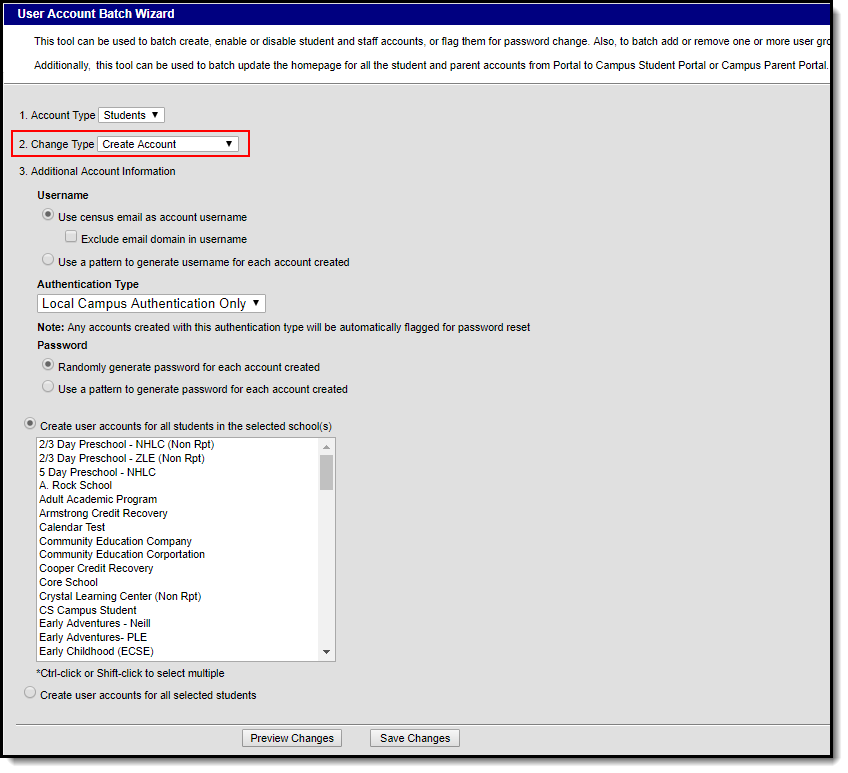
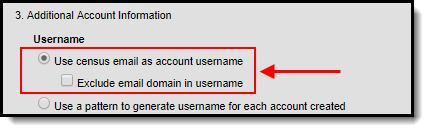
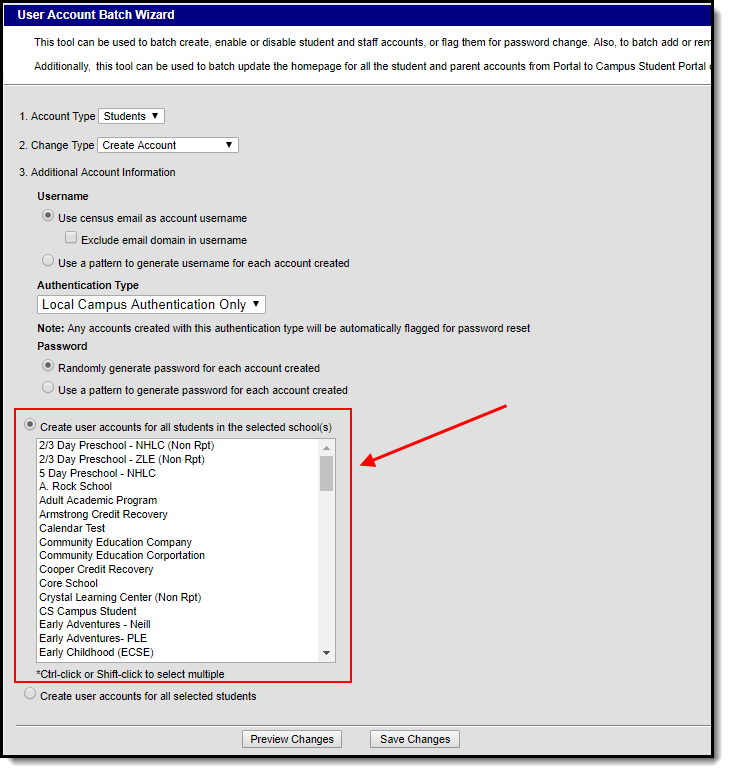
To create user accounts for all staff within a selected school(s):
- Select an Account Type of 'Staff'.
- Select a Change Type of 'Create Account'.
- Set User Group, Username, Authentication Type, Password, and Homepage criteria (as described in the sections above).
- Select the Create user accounts for all staff in the selected school(s) radio button.
- Select which school(s) will have all staff user accounts created. To select multiple schools, hold the CTRL button while selecting each school.
- To preview a list of all user accounts that will be created, click the Preview Changes button. A report will appear in CSV format.
- To initiate the creation of staff user accounts, click the Save Changes button. A report will appear in CSV format, detailing all user accounts created.
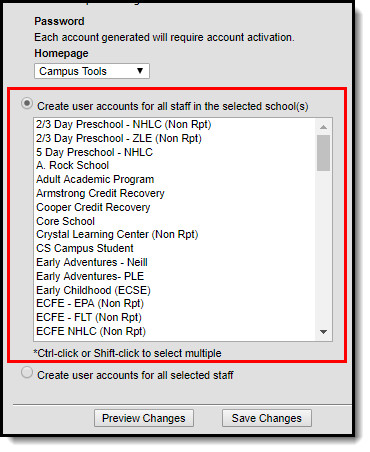
Image 16: Creating Accounts for All Staff Members in a School
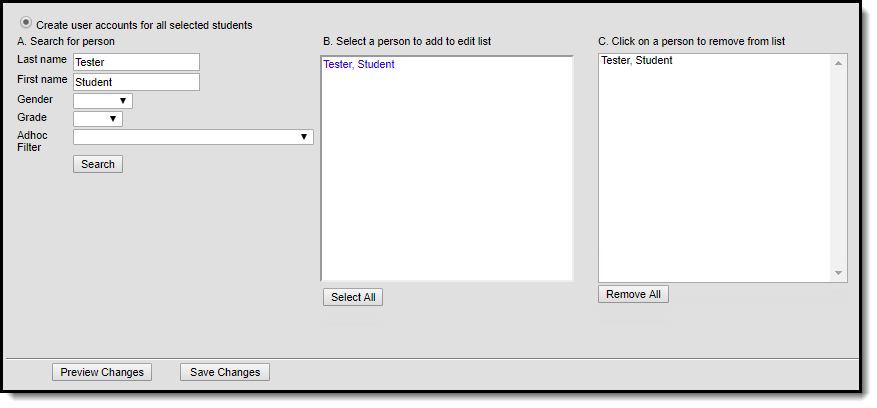
To create user accounts for a specific staff members:
- Select an Account Type of 'Staff'.
- Select a Change Type of 'Create Account'.
- Set User Group, Username, Password, and Homepage criteria (as described in the sections above).
- Select the Create user accounts for all selected staff radio button.
Enter search criteria for the staff member (e.g., Last Name, First Name, Gender, Title, etc) and click the Search button. Staff members matching the search criteria will appear in the window on the right.
Search results are district-wide.
- In the Select a person to add to edit list window, select the name of each staff member whose user account will be created. When a staff member is selected, their name will appear in the Click on a person to remove from list window.
- To preview a list of all user accounts that will be created, click the Preview Changes button. A report will appear in CSV format.
- To create staff user accounts, click the Save Changes button. A report will appear in CSV format, detailing all user accounts created.

Image 17: Creating Accounts for Specific Staff
Below is an example of the CSV report that will be generated when the Save Changes button is selected (Image 18).
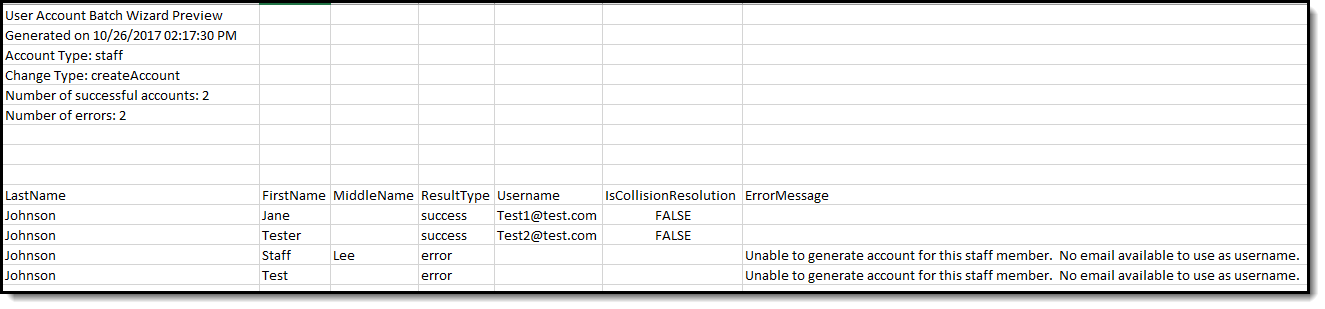
Image 18: Example of the CSV Report Detailing Created Accounts
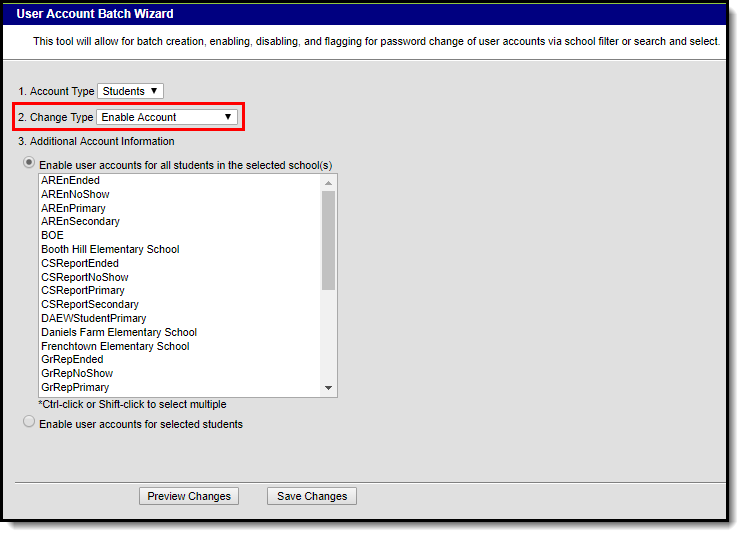
Disabling Student and Staff Accounts
The Disable Account option allows you to disable user accounts for all students or staff within a calendar(s) or for a specific set of users. See the following sections below for more information.
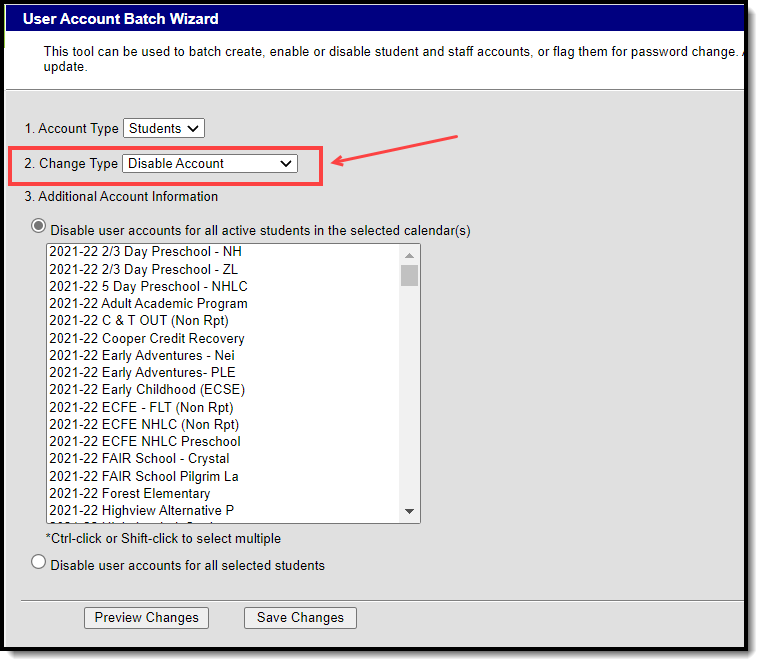
Image 19: Disable Account Option
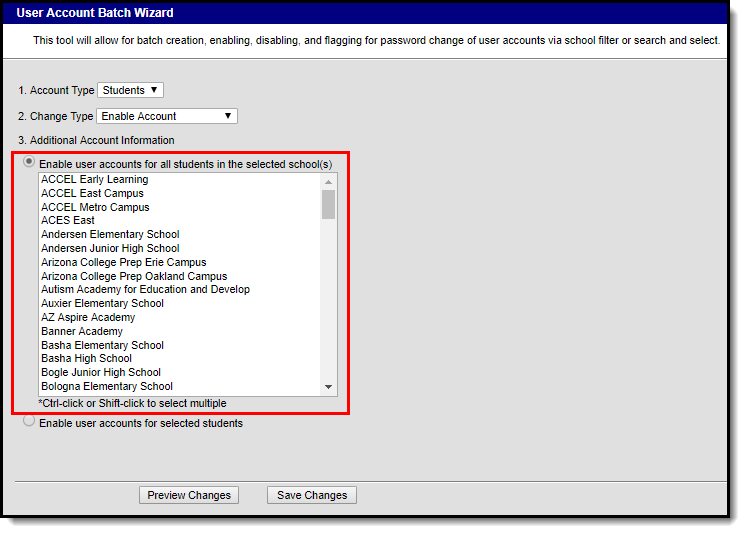
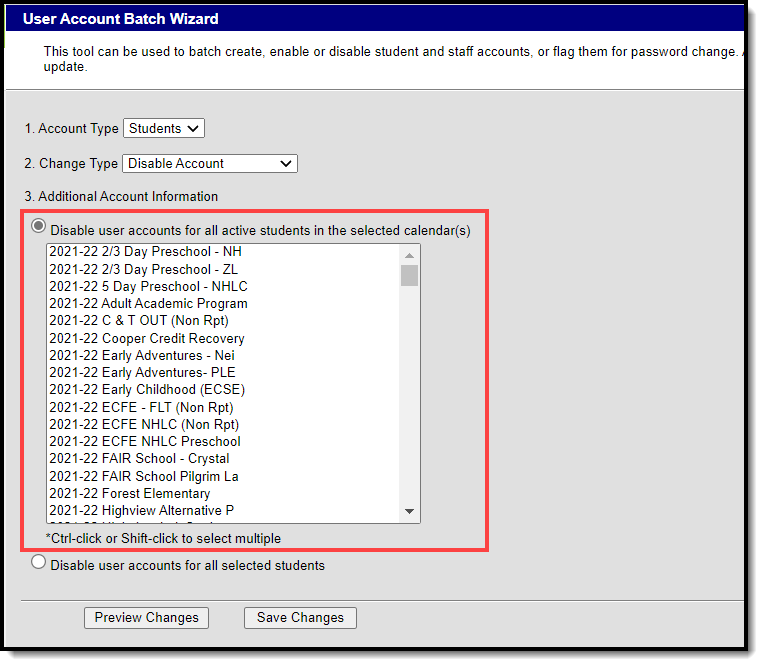
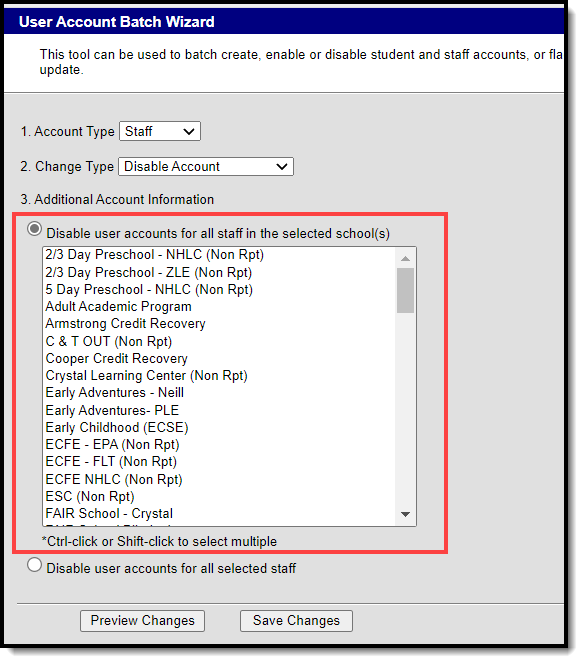
Disable User Accounts for All Students or Staff in a Selected Calendar(s)
To disable all user accounts for all students or staff within a selected calendar(s):
- Select an Account Type
- Students - Select this option to disable all students within a selected calendar(s).
- Staff - Select this option to disable all staff within a selected calendar(s).
- Select a Change Type of 'Disable Account'.
- Mark the Disable user accounts for all students in the selected calendar(s) OR Disable user accounts for all staff in the selected calendar(s) radio button.
- Select which calendar(s) will have user accounts disabled. To select multiple calendars, hold the CTRL button while selecting each calendar.
- To preview a list of all user accounts that will be disabled, click the Preview Changes button. A report will appear in CSV format.
- To initiate disabling a student or staff user account, click the Save Changes button. A report will appear in CSV format, listing all disabled user accounts.
| Student Accounts | Staff Accounts |
|---|---|
|
|
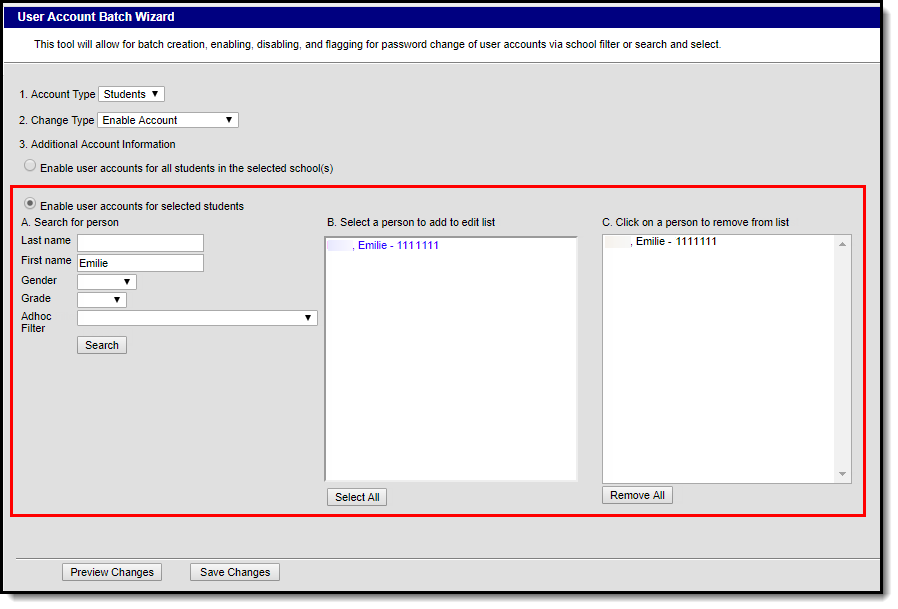
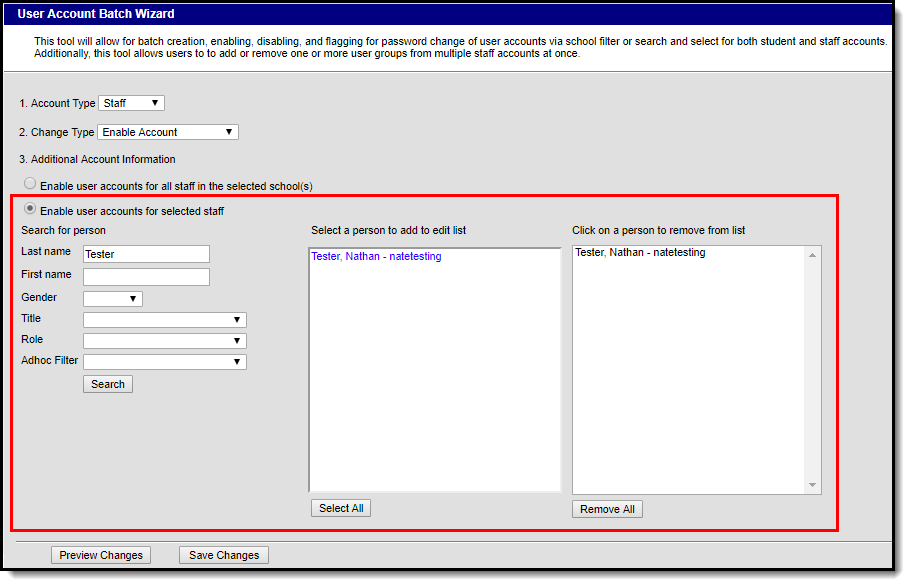
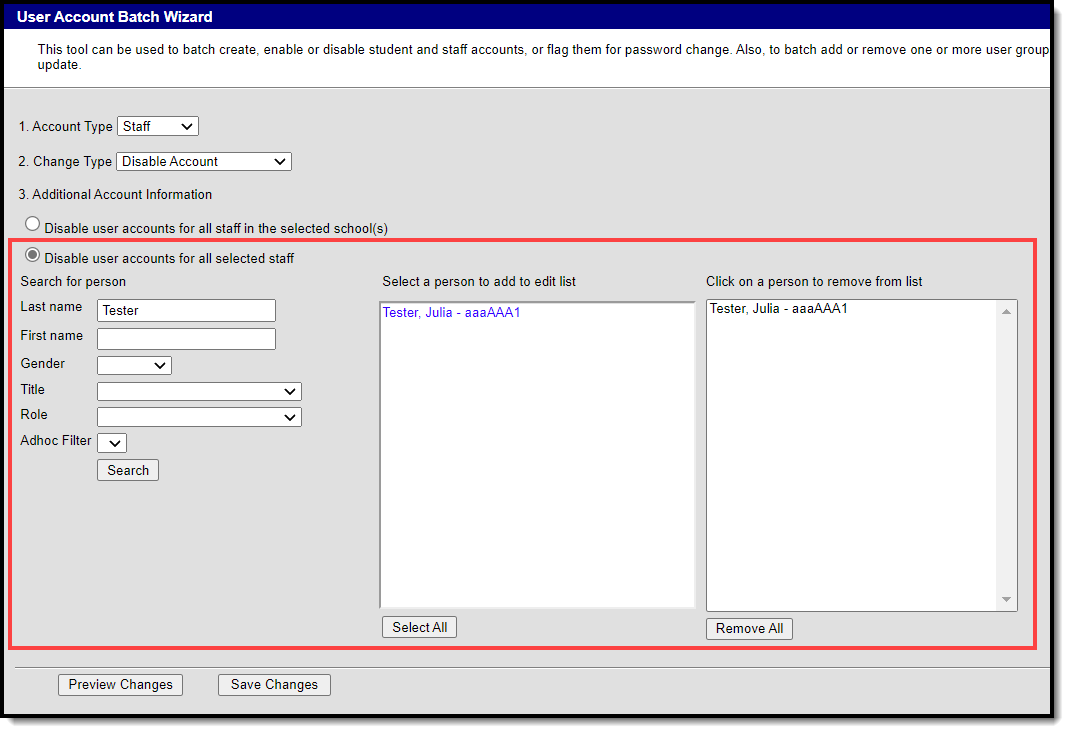
Disable User Accounts for All Selected Students or Staff
To disable user accounts for a specific student or set of students:
- Select an Account Type
- Students - Select this option to disable specific students within a selected calendar(s).
- Staff - Select this option to disable specific staff within a selected calendar(s).
- Select a Change Type of 'Disable Account'.
- Mark the Disable user accounts for selected students OR Disable user accounts for all selected staff radio button.
- Enter search criteria for the student (e.g., Last Name, First Name, Gender, Grade) or staff (e.g., Last Name, First Name, Title, Role) and click the Search button. Users matching the search criteria will appear in the window on the right.
Search results are district-wide.
- In the B. Select a person to add to the edit list window, select the name of each person whose user account will be disabled. When a person is selected, their name will appear in the C. Click on a person to remove from list window.
- To preview a list of all user accounts that will be disabled, click the Preview Changes button. A report will appear in CSV format.
- To initiate disabling a student or staff user account, click the Save Changes button. A report will appear in CSV format, listing all disabled user accounts.
| Student Accounts | Staff Accounts |
|---|---|
|
|

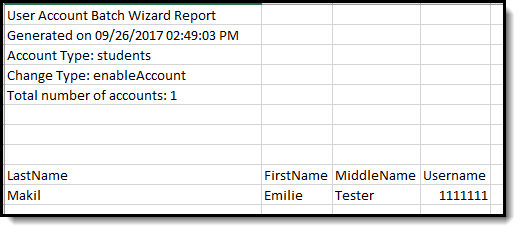
Below is an example of the CSV report that will be generated when the Save Changes button is selected (Image 20).
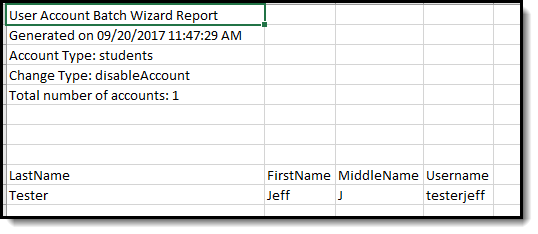
Image 20: Example of the CSV Report Detailing Disabled Accounts
Forcing a Password Change
The Force Password Change option allows you to force a password change for all student or staff user accounts in a school(s) or for a specific set students or staff.
Only students with a student user account that is enabled and does not already have the Force Password Change field selected will be forced to change their password.
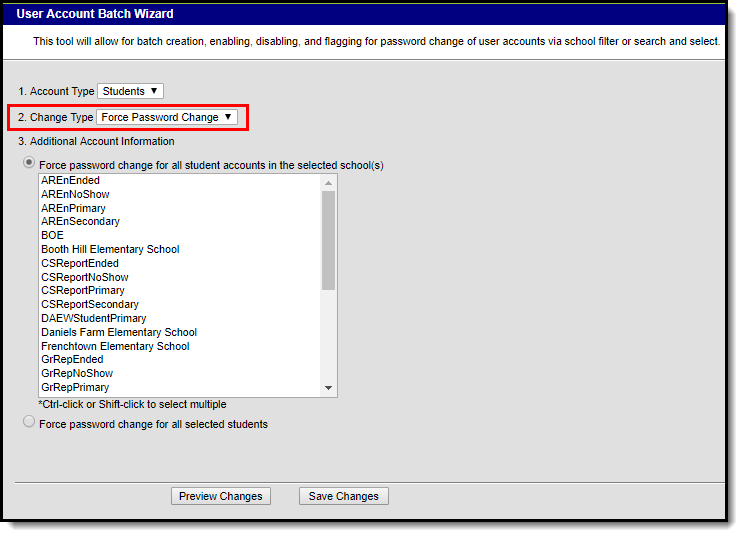
Image 21: Force Password Change Option
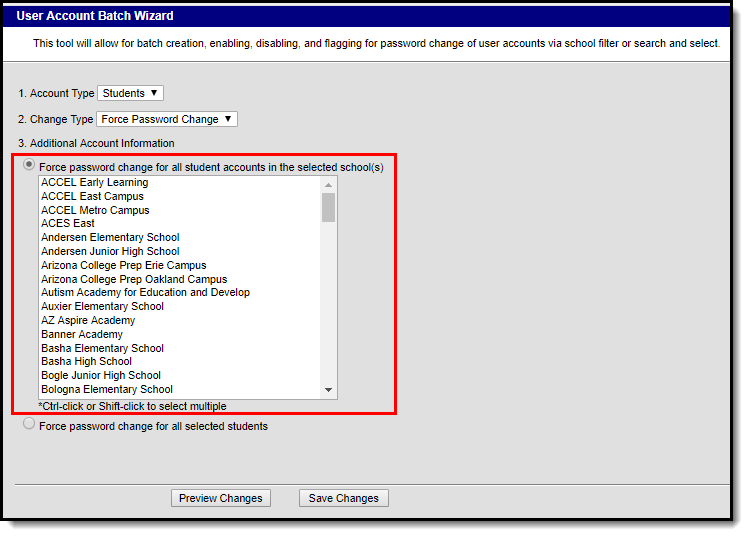
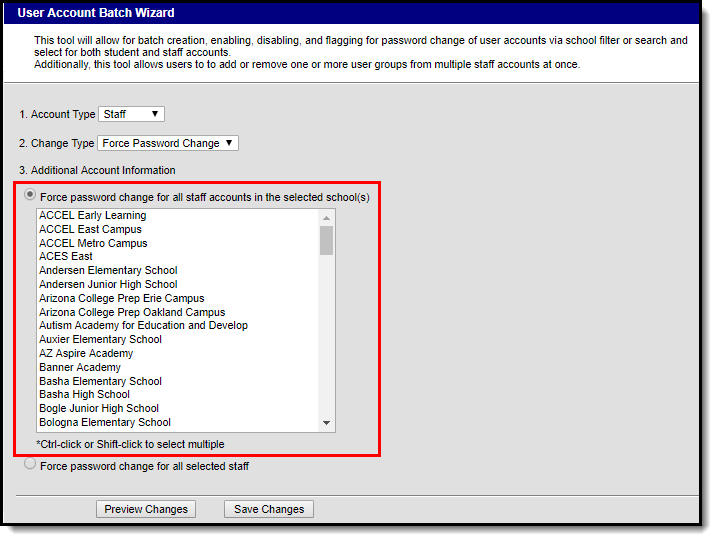
Force a Password Change for All Students or Staff in a Selected School(s)
To force a password change for all student or staff accounts in a selected school(s):
- Select an Account Type
- Student - Selecting this option means that all students in the selected school(s) will be forced to change their passwords.
Staff - Selecting this option forces all staff within the selected school(s) to change their passwords. Staff are identified based on the presence of a District Assignment record.
When forcing a password change for staff, the tool omits staff members with the following Product Security Roles: Application Security, Finance, Human Resources, Open Market Food Service, Payroll, Student Information System, Campus Learning.
- Select a Change Type of 'Force Password Change'.
- Mark the Force password change for all student accounts in the selected school(s) OR Force password change for all staff accounts in the selected school(s) radio button.
- Select which schools will have all student or staff accounts forced to change their password.
- To preview a list of all user accounts that will be impacted, click the Preview Changes button. A report will appear in CSV format.
- To initiate a password change for student or staff user accounts in the selected school(s), click the Save Changes button. A report will appear in CSV format, detailing all user accounts impacted.
Only students with an active user account, an active or future enrollment record in the selected school(s), and who do not already have the Force Password Change field selected will be required to change their user account password.
| Student Accounts | Staff Accounts |
|---|---|
|
|
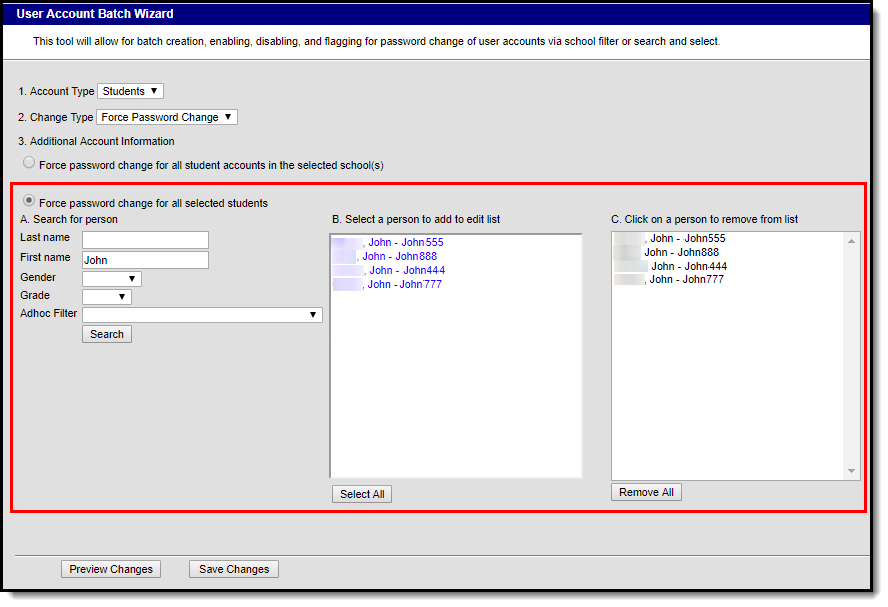
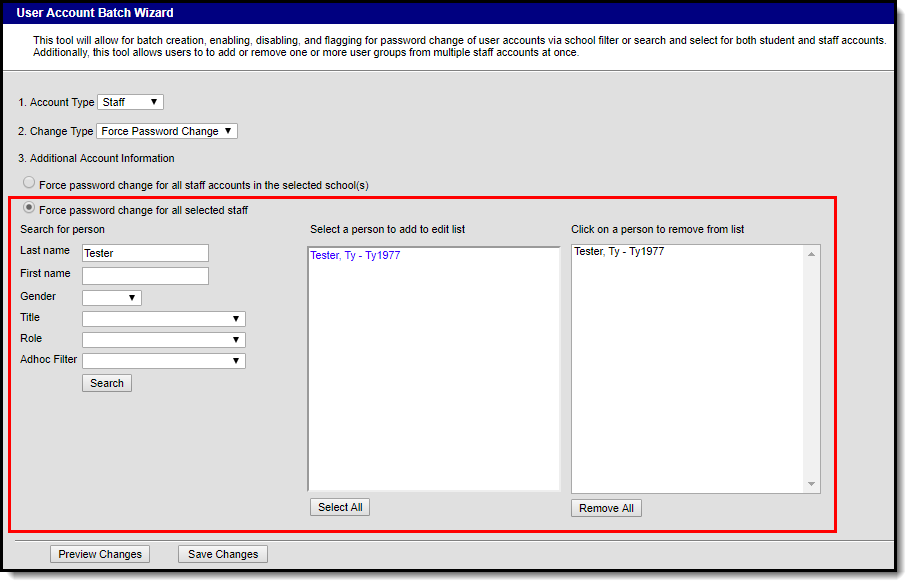
Force a Password Change for All Selected Students or Staff
To force a password change for specific students or staff:
- Select an Account Type.
- Student - Select this option to force a password change for specific students.
Staff - Select this option to force a password change for a specific staff member. Logic identifies staff members by looking for user accounts set with a Homepage of 'Campus Application' and then excluding some users based on their user group/product security roles.
When forcing a password change for staff, the tool omits staff members with the following Product Security Roles: Application Security, Finance, Human Resources, Open Market Food Service, Payroll, Student Information System, Campus Learning.
- Select a Change Type of 'Force Password Change'.
- Mark the Force password change for all selected students or Force password change for all selected staff radio button.
Enter search criteria for the student (e.g., Last Name, First Name, Gender, Grade) or staff (e.g., Last Name, First Name, Title, Role) and click the Search button. Users matching the search criteria will appear in the window on the right.
Search results are district-wide.
- In the B. Select a person to add to edit list window, select the name of each person who will be forced to change their password. When a person is selected, their name will appear in the C. Click on a person to remove from list window.
- To preview a list of all user accounts that will be impacted, click the Preview Changes button. A report will appear in CSV format.
- To initiate a password change for all selected students or staff, click the Save Changes button. A report will appear in CSV format, detailing all user accounts impacted.
Only selected students with an active user account, an active or future enrollment record in the selected school(s), and does not already have the Force Password Change field selected will be required to change their user account password.
| Student Accounts | Staff Accounts |
|---|---|
|
|
Below is an example of the CSV report that will generate once the Save Changes button is selected (Image 20).

Image 22: Example of the CSV Report Detailing User Accounts Forced to Change Their Password
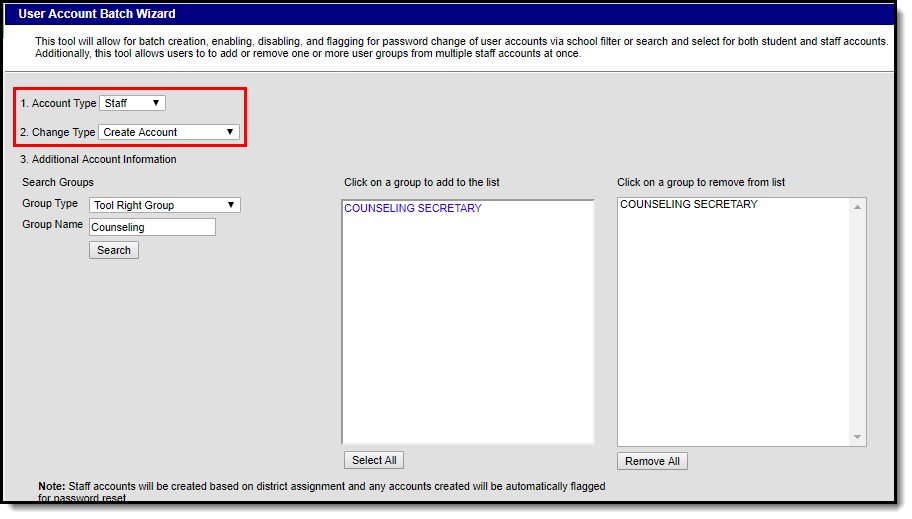
Adding User Groups to Staff Accounts
User Groups can be assigned to all staff user accounts within a school or for a specific set of staff members. This functionality is useful in mass applying calendar rights and tool rights for all staff members in a school or for a specific set of staff members (e.g., all teachers, specific counselors, etc).
User Groups are broken into the following three categories:
- Tool Rights Groups - These groups only contain tool rights and do not assign calendar rights.
- Calendar Group - These groups only contain calendar rights and do not assign tool rights.
- Mixed or Empty Group - These groups assign a combination of tool and calendar rights or they are blank and contain no calendar or tool rights at the moment.
By separating user groups into these categories, users have more control over which rights are assigned and can easily identify and sort through different user groups when assigning.
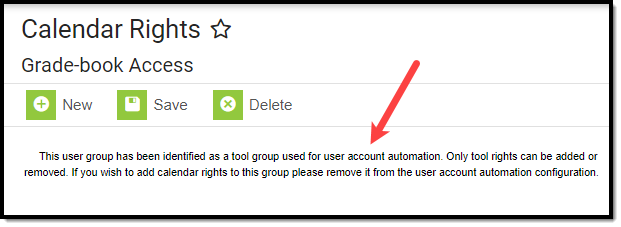
User groups containing all schools and all calendars cannot be added to staff accounts via the User Account Batch Wizard. User accounts requiring all schools/all calendars must be handled manually.
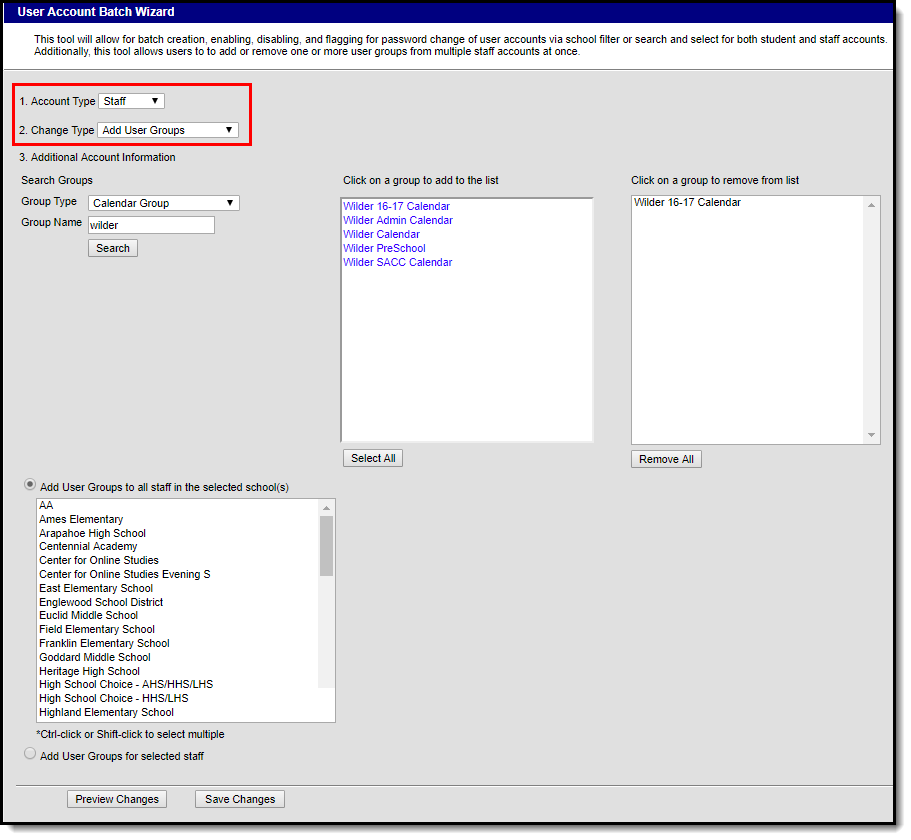
Image 23: Add User Groups Option
Add User Groups for All Staff in a Selected School(s)
To add user groups for all staff within a selected school(s):
- Select an Account Type of 'Staff'
- Select a Change Type of 'Add User Groups'.
- Search for a User Group by first selecting the Group Type. Only user groups of this type will appear in search results.
- Enter the Group Name being searched. Only user groups of the selected type that match the group name entered will appear in search results.
- Click the Search button. Search results will appear in the Click on a group to add to the list window on the right.
- Select which groups will be assigned to these user accounts. Selected groups will appear in the Click on a group to remove from list window.
- Repeat steps 1-6 If additional tool rights groups, calendar groups, or mix user groups should be added.
- Select the Add User Groups to all staff in the selected school(s) radio button.
- Select which school(s) will have selected user groups assigned to all staff members. To select multiple schools, hold the CTRL button while selecting each school.
- To preview a list of all user accounts and what user groups will be added, click the Preview Changes button. A report will appear in CSV format.
- Select the Save Changes button. Specified User Groups have now been added to all staff members in the selected schools.
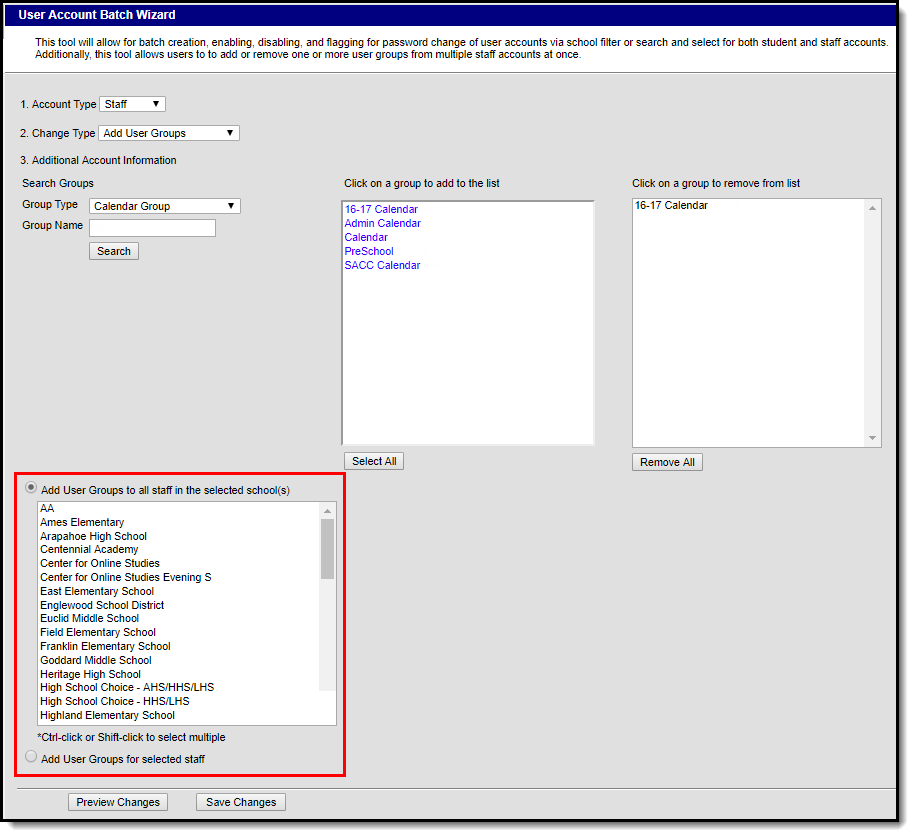
Image 24: Adding User Groups for All Staff in a School(s)
Add User Groups for Specific Staff Members
To add user groups for specific staff members:
- Select an Account Type of 'Staff'
- Select a Change Type of 'Add User Groups'.
- Search for a User Group by first selecting the Group Type. Only user groups of this type will appear in search results.
- Enter the Group Name being searched. Only user groups of the selected type that match the group name entered will appear in search results.
- Click the Search button. Search results will appear in the Click on a group to add to the list window on the right.
- Select which groups will be assigned to these user accounts. Selected groups will appear in the Click on a group to remove from list window.
- Repeat steps 1-6 If additional tool rights groups, calendar groups, or mix user groups should be added.
- Select the Add User Groups for selected staff radio button.
Search for a person by entering identifying criteria (e.g., Last Name, First Name, Gender, Title, etc) and click the Search button. Search results will appear in the window to the right.
Search results are district-wide.
- Select which users will have user groups added by clicking on their name in the Select a person to add to edit list window. Once a person is selected, they will appear in the Click on a person to remove from list window.
- To preview a list of what user groups will be added for which people, click the Preview Changes button. A report will appear in CSV format.
- Once read,y initiate the addition of the user groups, select the Save Changes button. Specified User Groups have now been added to the selected users.
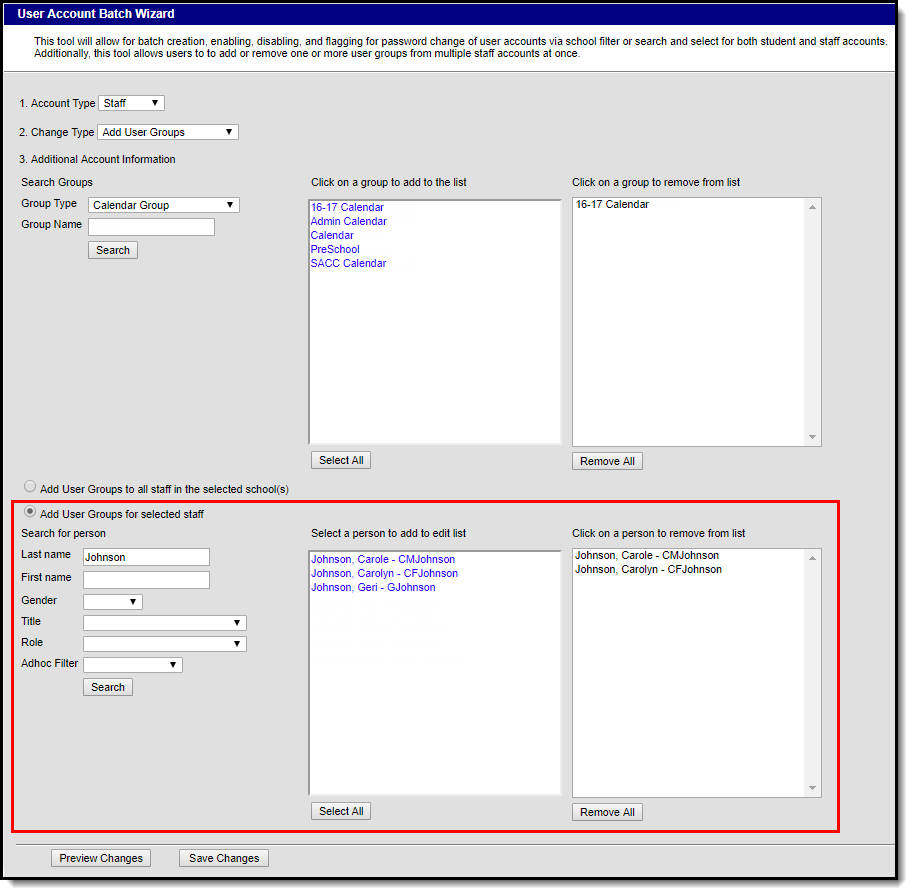
Image 25: Adding User Groups for Specific Staff Members
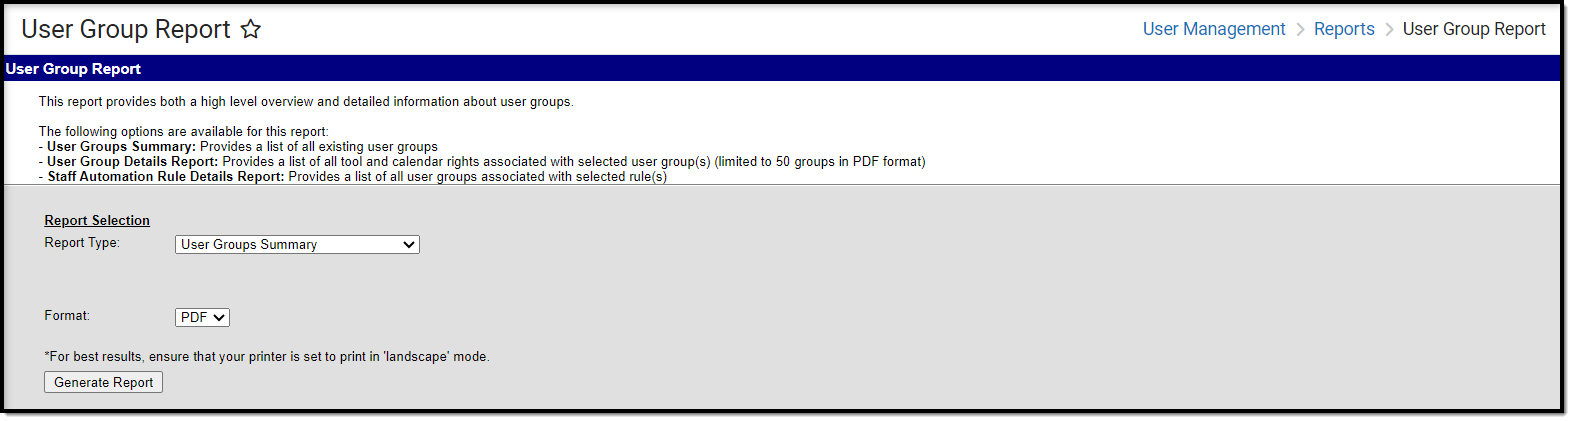
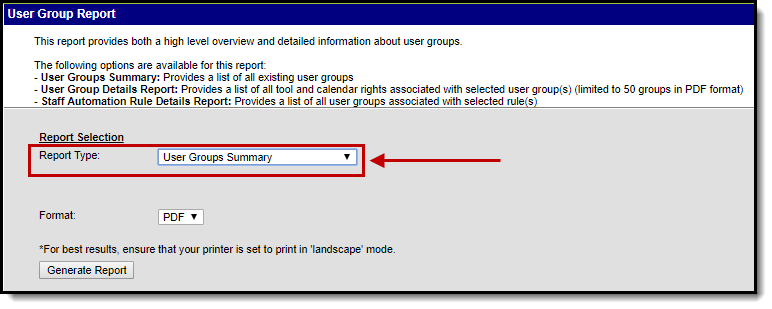
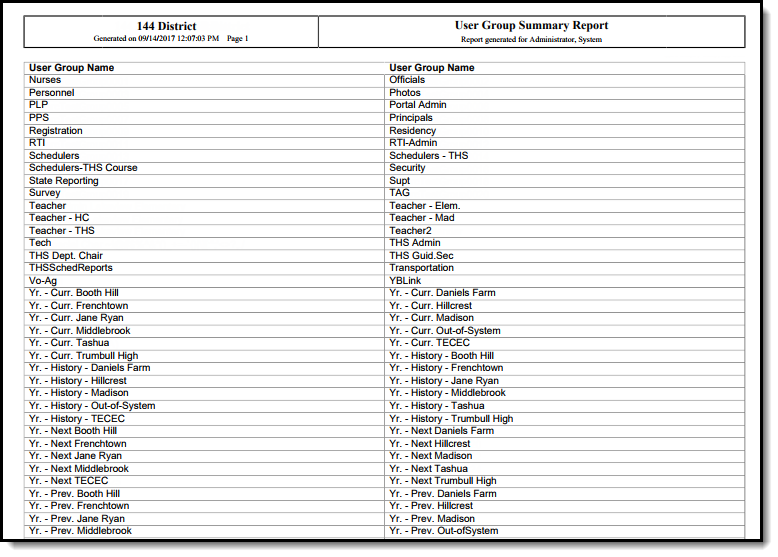
Below is an example of the report generated after user groups are added.
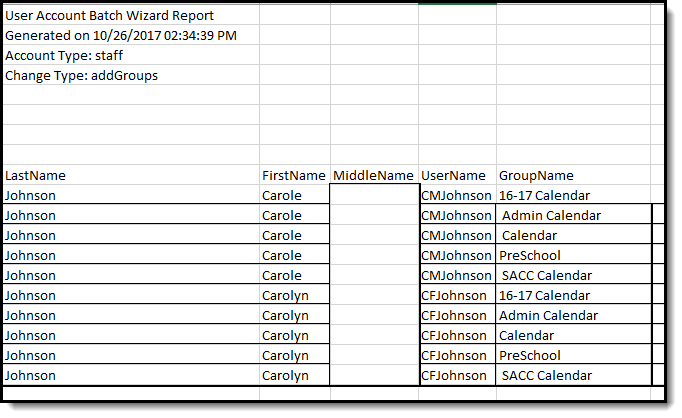
Image 26: Example of the User Group Report
Removing User Groups from Staff Accounts
User Groups can also be removed from all staff user accounts within a school or for a specific set of staff members. This functionality is useful for mass-removing calendar and tool rights for all staff members in a school, or for a specific set of staff members (e.g., all teachers, specific counselors, etc.).
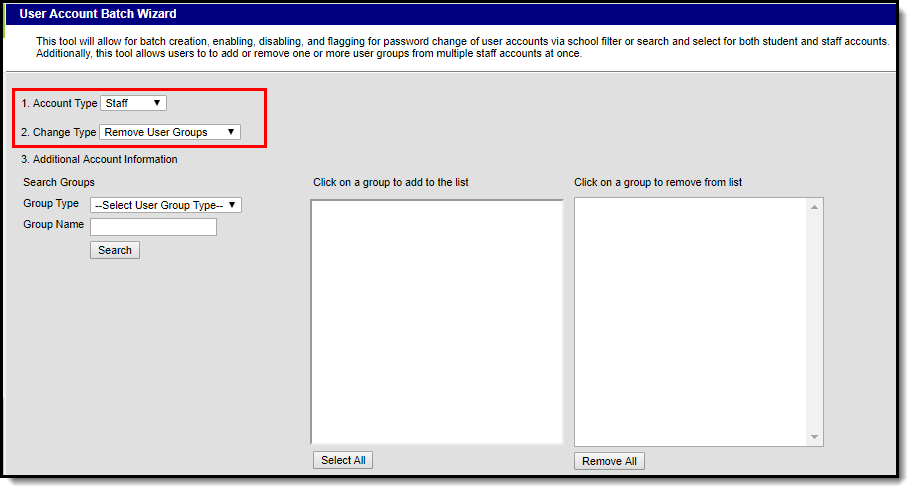
Image 27: Remove User Groups Option
Remove User Groups for All Staff in a Selected School(s)
To remove user groups for all staff within a selected school(s):
- Select an Account Type of 'Staff'
- Select a Change Type of 'Remove User Groups'.
- Search for a User Group by first selecting the Group Type. Only user groups of this type will appear in search results.
- Enter the Group Name being searched. Only user groups of the selected type which matches the group name entered will appear in search results.
- Click the Search button. Search results will appear in the Click on a group to add to the list window on the right.
- Select which groups will be removed from these user accounts. Selected groups will appear in the Click on a group to remove from list window.
- Repeat steps 1-6 If additional tool rights groups, calendar groups, or mix user groups should be added for removal.
- Select the Remove User Groups to all staff in the selected school(s) radio button.
- Select which school(s) will have selected user groups removed for all staff members. To select multiple schools, hold the CTRL button while selecting each school.
- To preview a list of all user accounts that will have user groups removed, click the Preview Changes button. A report will appear in CSV format.
- Select the Save Changes button. Specified User Groups have now been removed to all staff members in the selected schools.
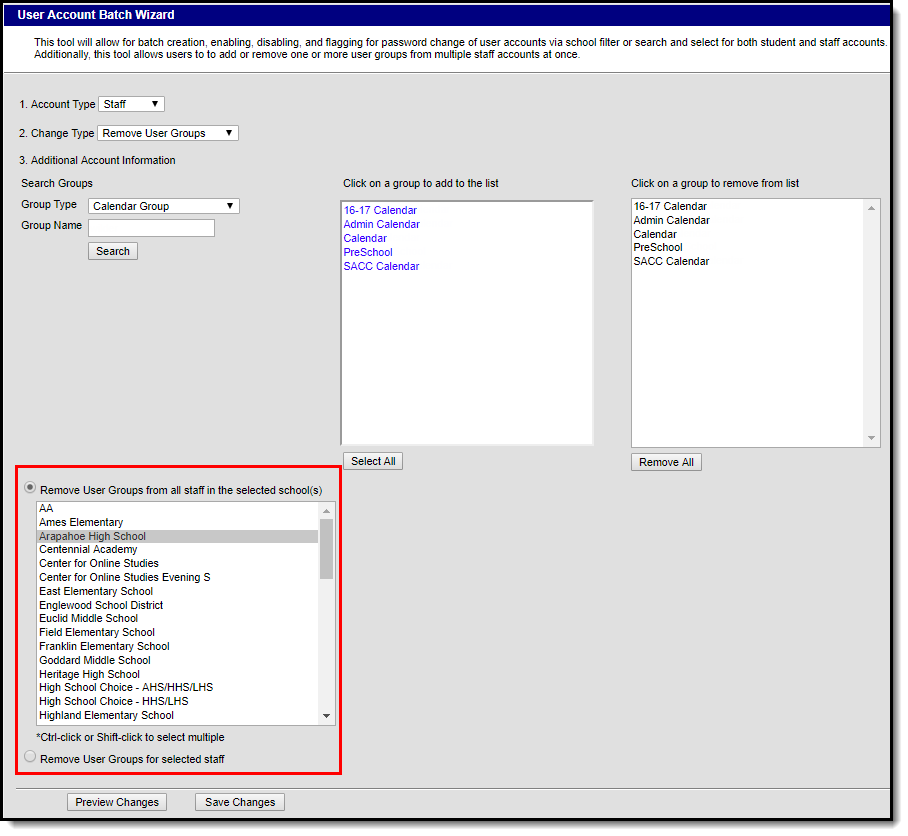
Image 28: Removing User Groups for All Staff in a School(s)
Remove User Groups for Specific Staff Members
To remove user groups for specific staff members:
- Select an Account Type of 'Staff'
- Select a Change Type of 'Remove User Groups'.
- Search for a User Group by first selecting the Group Type. Only user groups of this type will appear in search results.
- Enter the Group Name being searched. Only user groups of the selected type that match the group name entered will appear in search results.
- Click the Search button. Search results will appear in the Click on a group to add to the list window on the right.
- Select which groups will be removed from these user accounts. Selected groups will appear in the Click on a group to remove from list window.
- Repeat steps 1-6 If additional tool rights groups, calendar groups, or mix user groups should be added for removal.
- Select the Remove User Groups for selected staff radio button.
Search for a person by entering identifying criteria (e.g., Last Name, First Name, Gender, Title, etc) and click the Search button. Search results will appear in the window to the right.
Search results are district-wide.
- Select which users will have user groups removed by clicking on their name in the Select a person to add to edit list window. Once a person is selected, they will appear in the Click on a person to remove from list window.
- To preview a list of what user groups will be removed for which people, click the Preview Changes button. A report will appear in CSV format.
- Once read,y initiate the removal of the user groups, select the Save Changes button. Specified User Groups have now been removed for the selected users.
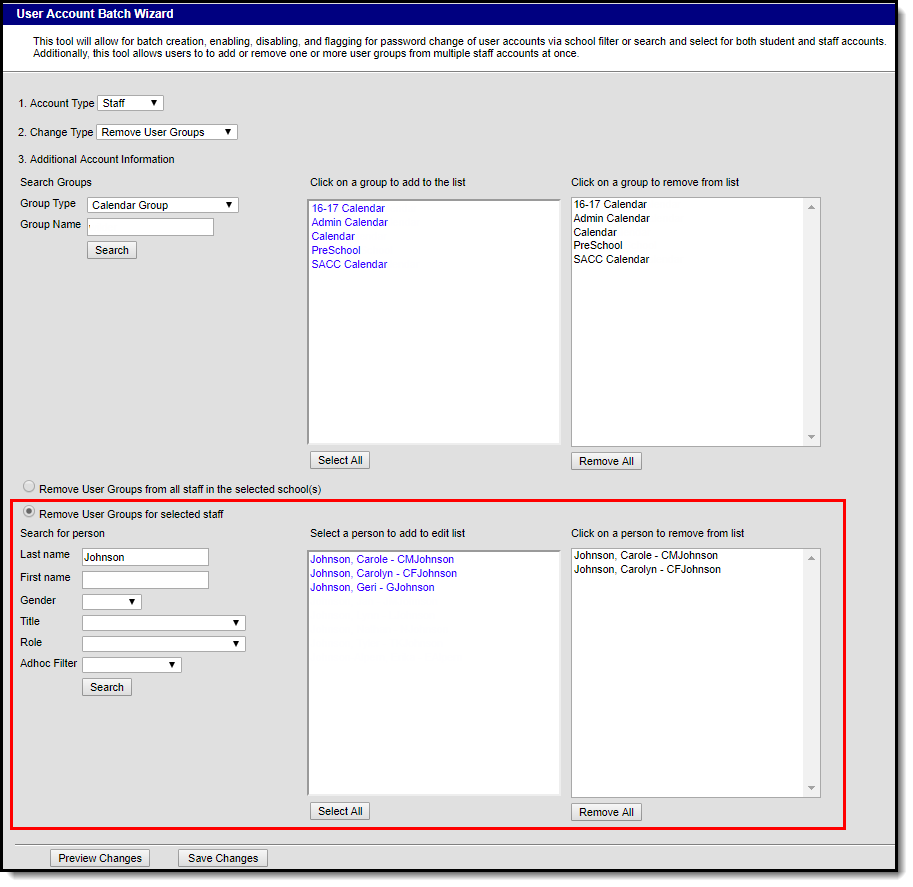
Image 29: Removing User Groups for Specific Staff Members
Below is an example of the report that appears when the Save Changes button is selected.
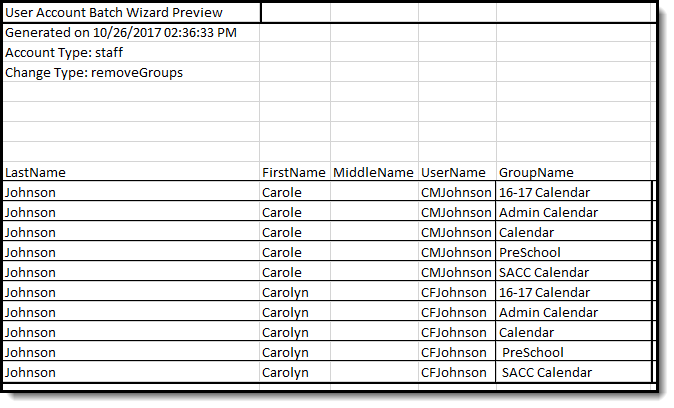
Image 30: Example of the Remove User Groups Report
Informing Users of Newly Created User Accounts
You can inform all users who have a newly created user account or who have never logged into their user account to log in to their account and update their account password by using the User Account Messenger, User Account Messenger Scheduler, and Account Letter Builder tools.
See the following sections below for more information:
- Creating an Email Message to Inform Users of Their New User Account
- Establishing a Recurring User Account Activation Message
- Creating Letters to Inform Users of Newly Created User Accounts
Creating an Email Message to Inform Users of Their New User Account
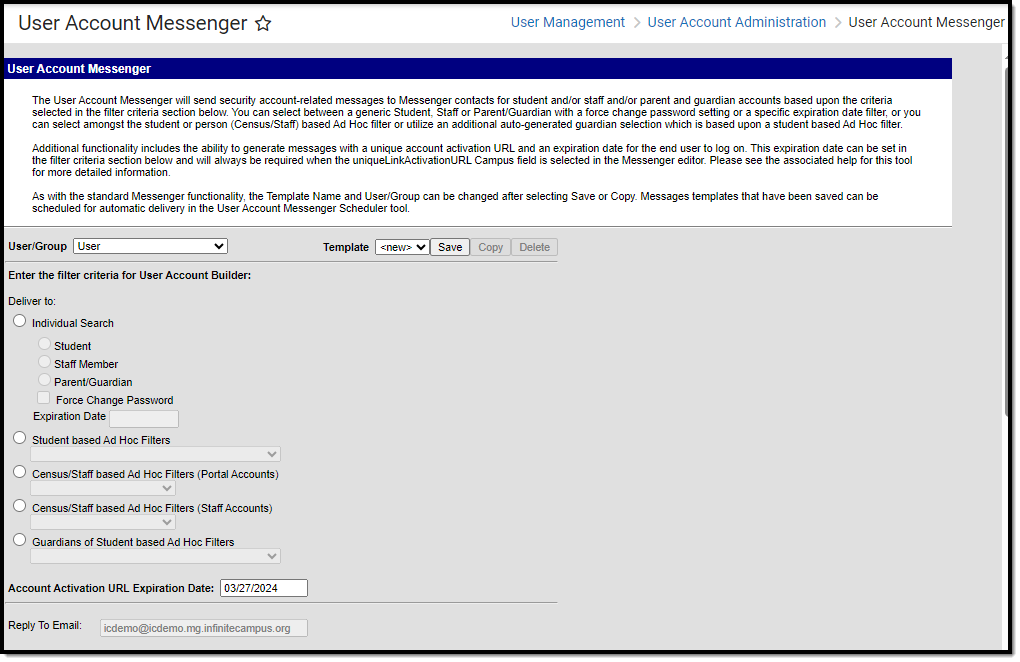
Tool Search: User Account Messenger
You can use the User Account Messenger to send an email for users to follow and access their new user account.
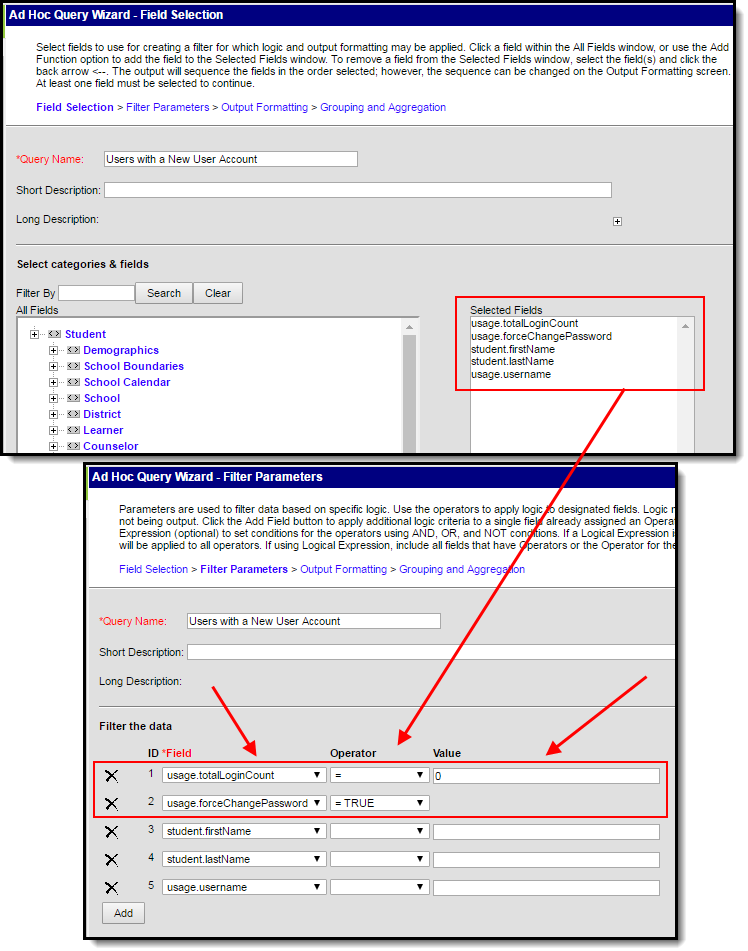
In the example below, an Ad hoc filter was created that includes the total login count (usage.totalLoginCount) and if the account is flagged to require a password change (usage.forceChangePassword). These fields are important as they can be combined with Filter Parameters to identify only those users who have a Campus user account who have never logged into their account and need to change their password (which will be the case for any accounts auto-generated via Account Security Preferences).
Use the following values to ensure a proper list is generated (see Image 32):
- usage.totalLoginCount
- Operator: =
- Value: 0
- usage.forceChangePassword
- Operator: =TRUE
Once this filter is created, use the User Account Messenger to send a message to each user.
This message should include the following Campus fields:
- The accountManagement.username field.
- The accountManagement.uniqueLinkActivationURL field.
- The accountManagmeent.uniqueLinkExpirationDate field.
You should also enter an Account Activation URL Expiration Date (see Image 33). This is the date the unique activation URL contained in the message will expire. Users will need to select this URL prior to this date.
Filter criteria is important when sending this message. Only users who match the filter criteria selected (e.g., Student based Ad Hoc Filters, Census/Staff based Ad hoc Filters (Staff Accounts, etc) will receive the message and be able to activate their accounts.
For notifying Staff, please consider the following:
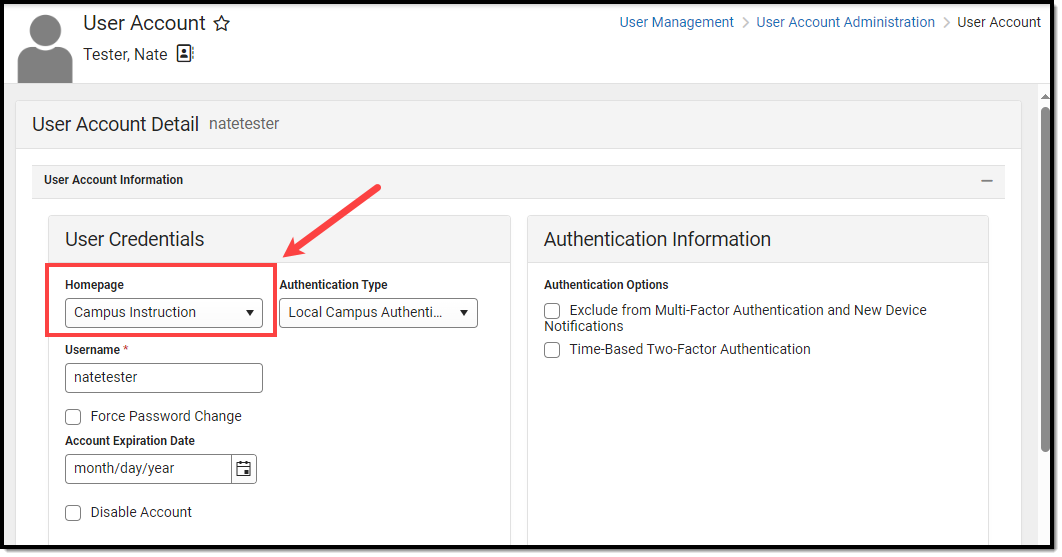
- If notifying staff of their newly created Campus Application accounts (System Administration > User Security > Users > User Account > Homepage = Campus Instruction OR Campus Application), use the Census/Staff based Ad Hoc Filters (Staff Accounts) filter option.

Establishing a Recurring User Account Activation Message
Tool Search: User Account Messenger Scheduler
Once you have created and saved a user account activation message in the User Account Messenger tool (see the steps mentioned in the section above), you can establish a daily, weekly, or monthly recurring message event using the User Account Messenger Scheduler.
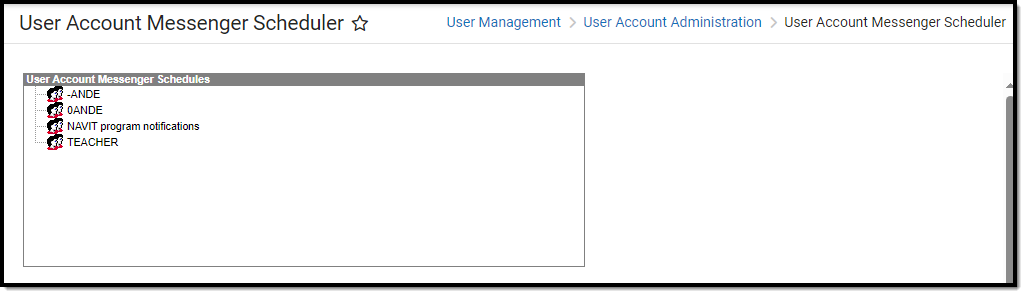
For example, using a user account activation message template and setting to a frequency of daily, you can set the User Account Messenger Scheduler to email the user account activation email to any user accounts created in the last 24 hours and repeat this process every day within a certain timeframe.
See the User Account Messenger Scheduler article for more information about this process.
Creating Letters to Inform Users of Newly Created User Accounts
Tool Search: User Account Letter Builder
You can use the User Account Letter Builder to all users who have a newly created user account or who have never logged into their user account to log into their account and update their account password.
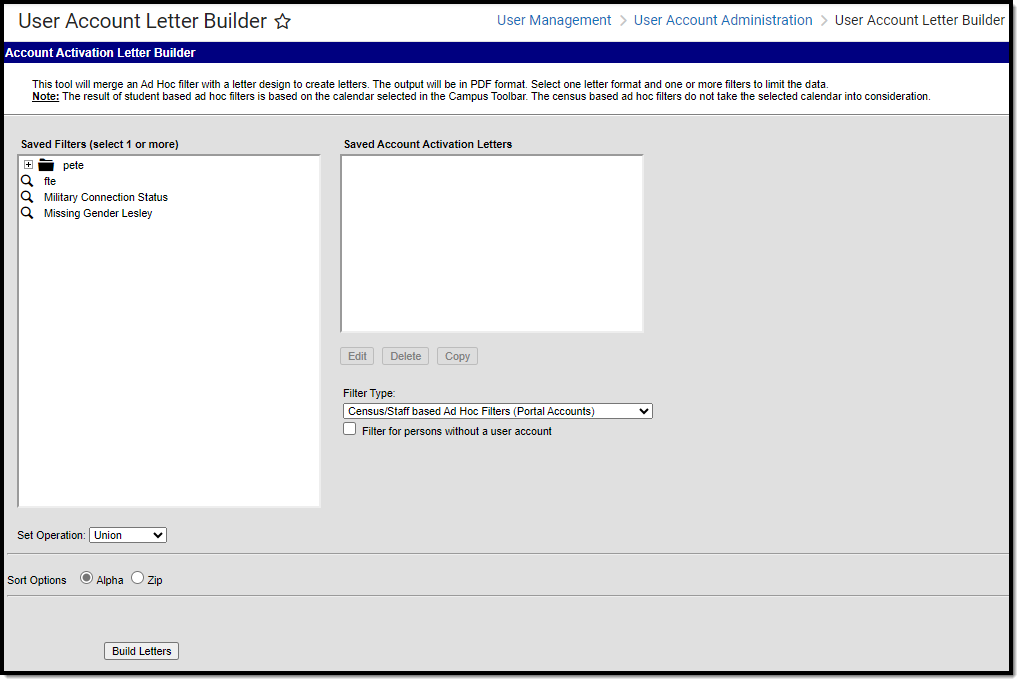
In the example below, an Ad hoc filter was created that includes the total login count (usage.totalLoginCount) and if the account is flagged to require a password change (usage.forceChangePassword). These fields are important as they can be combined with Filter Parameters to identify only those users who have a Campus user account who have never logged into their account and need to change their password (which will be the case for any accounts auto-generated via Account Security Preferences).
Use the following values to ensure a proper list is generated (see Image 35):
- usage.totalLoginCount
- Operator: =
- Value: 0
- usage.forceChangePassword
- Operator: =TRUE
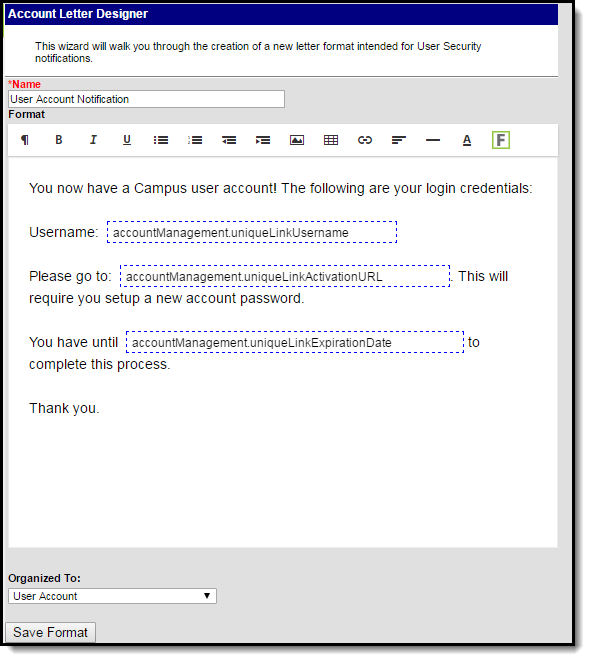
Once this filter is created, use the Account Letter Designer to design a letter that will be generated for each one of these users.
This letter should include the following Campus fields (see Image 36):
- The accountManagement.username field.
- The accountManagement.uniqueLinkActivationURL field.
- The accountManagmeent.uniqueLinkExpirationDate field.
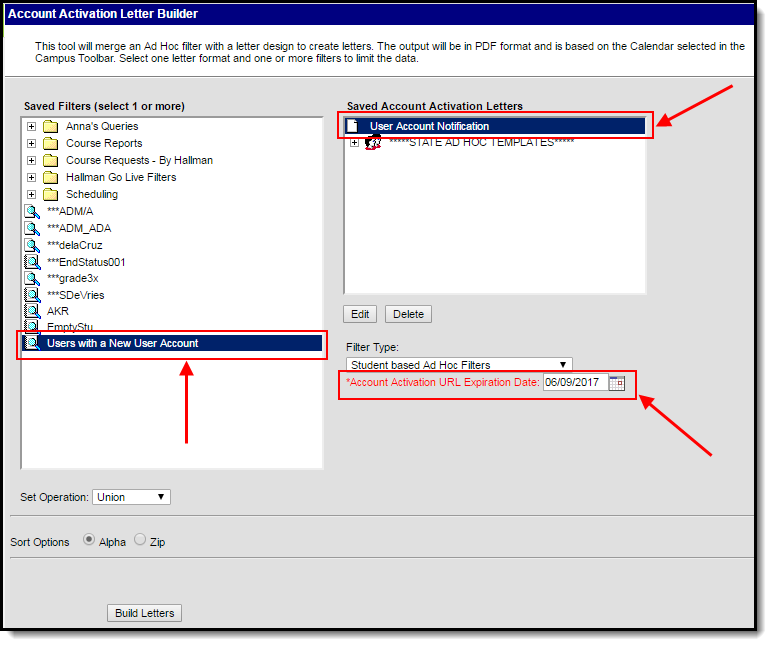
Once the filter has been created and the account activation letter has been built:
Select a Filter Type.
Filter criteria is important when generating this letter. Only users who match the filter criteria selected (e.g., Student based Ad Hoc Filters, Census/Staff based Ad hoc Filters (Portal Accounts), etc) will have a letter generated.
For notifying Staff, please consider the following:
- If notifying staff of their newly created staff Portal accounts (System Administration > User Security > Users > User Account > Homepage = Campus Portal), use the Census/Staff based Ad Hoc Filters (Portal Accounts) filter option.
- If notifying staff of their newly created Campus Application accounts (System Administration > User Security > Users > User Account > Homepage = Campus Instruction OR Campus Application), use the Census/Staff based Ad Hoc Filters (Staff Accounts) filter option.
- Select the filter from the Saved Filters window.
- Select the letter from the Saved Account Activation Letters window.
- Enter an Account Activation URL Expiration Date. This is the date the unique activation URL contained in the message will expire (see Image 37). Users will need to select this URL prior to this date.
- Click the Build Letters button. The letters will appear in a separate window.
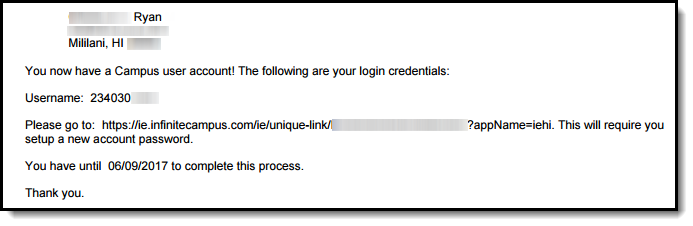
Below is an example of a generated letter using this scenario (Image 38).