The Absence Request toolset is part of the Campus Workflow Suite.
Tool Search: Absence Request Processing
Before using the Absence Request Processing tool, be sure the Scanner Settings have been set up under
Attendance Office > Settings > Scanner Settings. If not, you will see this message:
Use the Absence Request Processing tool to manage Absence Requests submitted by a parent or guardian.
 Absence Request Processing - Current Requests
See the Absence Request Processing Tool Rights article for information about rights needed to use this tool.
Current Requests Filter Options
| Field | Description | ||||||||||
|---|---|---|---|---|---|---|---|---|---|---|---|
| Relation to Student | Use the Relation to Student field to filter the list of requests by the relationship of the requester to the student: Self or Parent/Guardian. Leave the filter option blank to include all relations. | ||||||||||
| Request Date | The Request Date field allows users to filter the results by the date on which the absence request begins. Leave this filter blank to include all dates. | ||||||||||
| Request Time | The Request Time column to filter the list of requests by the parent-indicated time of arrival or departure for Arriving Late or Leave Early absence requests. This column remains blank for Full-Day absence requests. Leave this filter blank to include all request times. | ||||||||||
| Last Name | The Last Name field allows users to filter the results by the student's last name. | ||||||||||
| First Name | The First Name field allows users to filter the results by the student's first name. | ||||||||||
| Excuse | Use the Excuse field to filter the results by the Excuse reason entered for the student's absence. Excuse options can be modified in District-Wide Scanner Settings. All Schools MUST be selected. | ||||||||||
| Processed | The Processed column allows users to filter results by the request's processing status: All, Submitted, or Processed. Leave this filter blank to include all requests.
| ||||||||||
| Status | Use the Status column to filter the results by the status currently assigned to the absence request:
| ||||||||||
| Toggle Mass Process | Use this option to process a large number of requests at once. See Mass Process Absence Requests for more
information. |
Review an Absence Request
- Select the request you want to process from the Current Requests list.
Result: A detailed view of the absence request displays.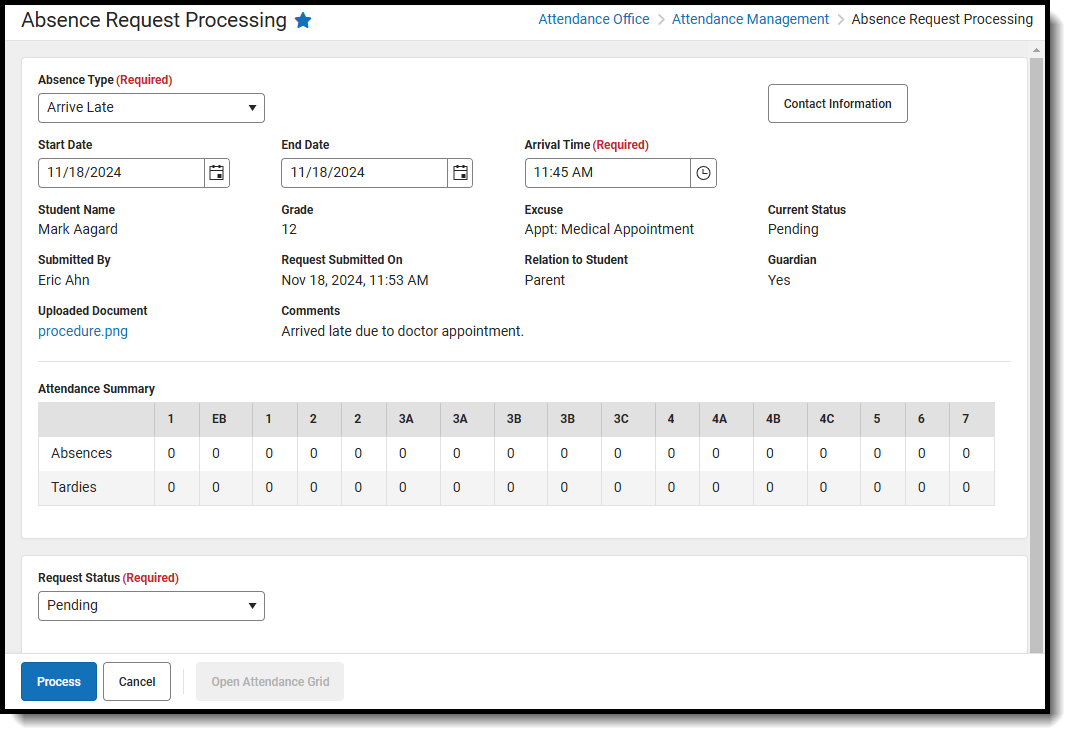
- Review the absence request information and attendance summary for the student.
- The Attendance Summary shows the student's attendance from the current term.
- If the attendance request is a late arrival or early departure for today, it can be processed from the absence request or by clicking the Open Attendance Grid button at the bottom. See the Attendance Grid section for more informationAbsence Requests may encounter issues with period schedules with periods that overlap.
- For information on how Attendance Codes are determined/applied, see New Excuse Field Logic.


Absence Request Processing Field Descriptions
| Field | Description | ||||||||||
|---|---|---|---|---|---|---|---|---|---|---|---|
| Absence Type Required |
The type of absence request. Options include: Full Day Absence, Arrive Late, or Leave Early. This field can be edited. NOTE: If you are processing an application for the second time, due to a document upload being added after initial processing, this field is not editable. | ||||||||||
| Start Date | The first day the student will be absent. This field can be edited. NOTE: If you are processing an application for the second time, due to a document upload being added after initial processing, this field is not editable. | ||||||||||
| End Date | The last day the student will be absent. This field can be edited. NOTE: If you are processing an application for the second time, due to a document upload being added after initial processing, this field is not editable. | ||||||||||
| Arrival/Departure Time Required |
If the absence request is Arriving Late or Leave Early, the time the parent indicated they would be arriving or leaving. NOTE: If you are processing an application for the second time, due to a document upload being added after initial processing, this field is not editable. | ||||||||||
| Student Name | The name of the student. | ||||||||||
| Grade | The student's grade level. | ||||||||||
| Excuse | The reason for the student's absence. Excuse options can be modified in District-Wide Scanner Settings. All Schools MUST be selected. | ||||||||||
| Current Status | The status of the absence request. | ||||||||||
| Submitted By | The student or parent/guardian who entered the absence request. | ||||||||||
| Request Submitted On | The date and time the absence request was submitted. | ||||||||||
| Relation to Student | The parent/guardian's relationship to the student. The relation may also be Self if the student submitted the request (via the Check In/Out Kiosk). | ||||||||||
| Guardian | An indicator that the person submitting the absence request is the student's guardian. | ||||||||||
| Uploaded Document | A document uploaded with the absence request. This can be viewed by clicking the document link. Documents are limited to 2 MB. See Supported File Types for a list of accepted file types. | ||||||||||
| Comments | Any comments relating to the student absence. | ||||||||||
| Contact Information | Clicking this button opens a pop-up listing the student's guardians and their contact information. | ||||||||||
| Attendance Summary | An overview of the student's historical attendance information. | ||||||||||
| Request Status Required |
The status currently assigned to the absence request:
| ||||||||||
| Excuse Code Required |
The attendance code applied to a processed absence request. | ||||||||||
| Attendance Comments | Additional comments related to the absence. |
Absence Request Check In Logic
| Absence Request Check In Logic |
|---|
|
Absence Request Check Out Logic
| Absence Request Check Out Logic |
|---|
|
| Exception Logic |
|---|
|
The Attendance Grid
The Attendance Grid allows users to manually adjust attendance as needed if the automated filling of attendance codes doesn't meet their needs.
 Absence Request Processing - Attendance Grid
Attendance Grid Fields
| Field | Description | ||||||
|---|---|---|---|---|---|---|---|
| Period | The name/number of the Period. | ||||||
| Course(s) | The name of the Course(s) in which the student is rostered for the given period. | ||||||
| Room(s) | The Room in which the Course is scheduled. | ||||||
| Excuse Name | The Excuse Name field lists the existing excuse code and name used for the selected period. | ||||||
| Status | The attendance Status for the period. Statuses are set for excuses in Attendance Code Setup. | ||||||
| Excuse | The existing Excuse code for the period. Excuse codes are created at the school-level in Attendance Code Setup. | ||||||
| New Excuse | The New Excuse code to use for the selected period. Users with R (Read) rights only cannot modify the New Excuse. | ||||||
| Comments | Use the Comments field to enter any additional information about the absence. | ||||||
| Process | Click Process to process the absence requests. | ||||||
| Fill Up/Fill Down |
NOTE: Users may also change a code anywhere in the grid and then use the Fill Up or Fill Down button to fill up/down from that spot, using the code they selected for that period. | ||||||
| Retain Existing Codes | The Retain Existing Codes button is used to revert values entered in the New Excuse column to the existing codes listed in the Excuse column. | ||||||
| Reset | If values in the New Excuse column were cleared in error, press Reset to reset the default New Excuse values. | ||||||
| Clear | Press Clear to remove all selected values in the New Excuse and Comments fields. | ||||||
| Contact Information | Use the Contact Information button to view a list of contacts and contact information for the student. |
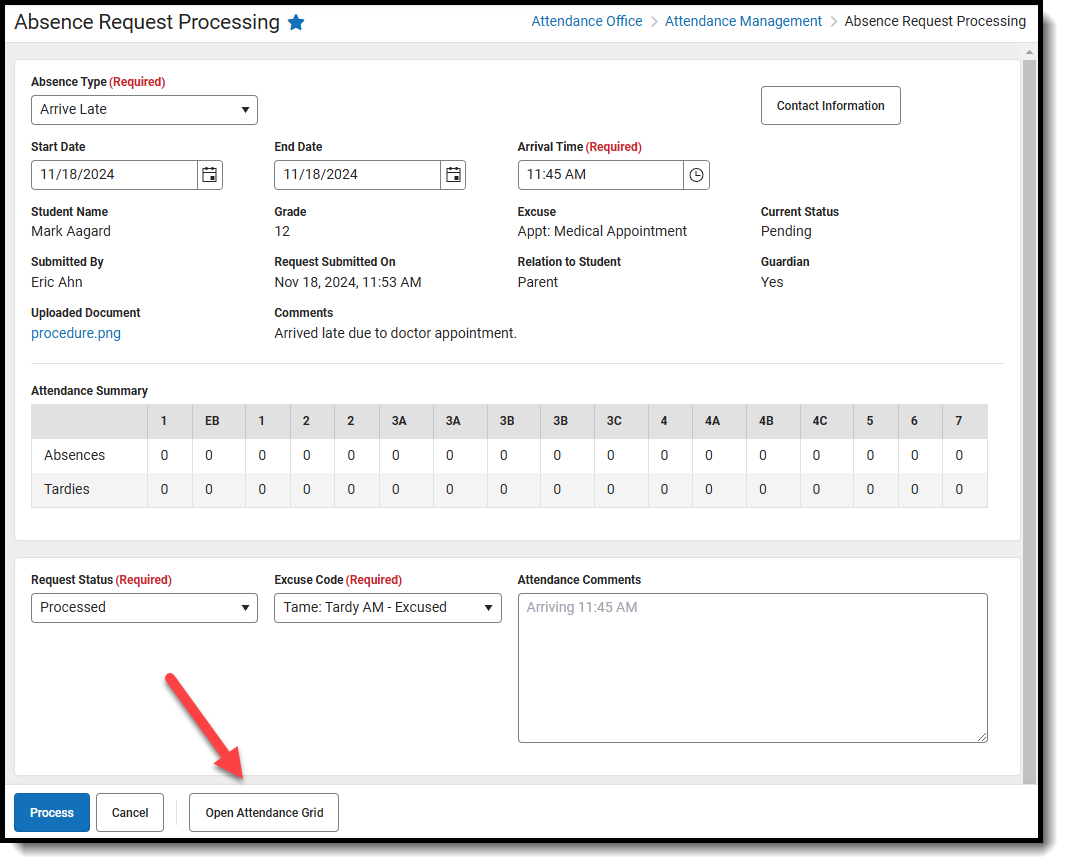
Process the Absence Request
- If processing the request, select the Request Status from the dropdown list.
- Select an Excuse Code from the dropdown list.
- Enter Attendance Comments. (Optional)
- Click Open Attendance Grid to review how your attendance codes and comments will be applied to the student.
- Click Process.
Result: A confirmation message displays and you are returned to the Current Requests screen. The value in the Processed column changes to Processed and the Status changes to the Request Status you selected.
Mass Process Absence Requests
Users can process multiple submitted absence requests at one time using the Toggle Mass Process button.
- Press the Toggle Mass Process button.
- Select the requests to include in the mass process.
- When finished selecting the appropriate requests, press Mass Process.
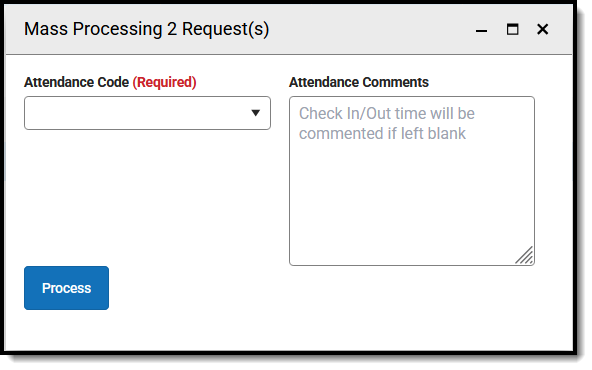 Mass Process Editor
 - Use the Attendance Code drop-list to select the excuse code to apply to all selected absence requests.
- If necessary, enter any Attendance Comments.
- Click Process to process the absence requests.

