Cheat Sheet (Food Service)
Last Modified on 10/13/2025 12:40 pm CDT
The instructions in this cheat sheet apply to the New Look look of Campus.
Deposit (Household)
| Quick Steps |
|---|
- Go to Census > Households > Household Food Service Deposit.
- Click Open Household Search.
- Enter and then select the name of the Household.
- Click the New Deposit button.
- In the Member field, select All to split the payment evenly or select a household member.
-
Enter the Payment Amount, then complete one of the following tasks
- To split the payment evenly between patrons, click Fill.
- If there is a student in the household that is not receiving part of the deposit or the deposit is split unevenly, manually enter the amounts.
Do NOT Click FILL. The amount entered for each patron must equal the amount entered in the Payment Amount field.
- Select the Payment Method and Payment Location.
- Click Save.
|
| Step |
Action |
Example |
|---|
| Detailed Steps |
|---|
| 1 |
Go to Census > Households > Household Food Service Deposit. |
|
| 2 & 3 |
Enter and then select the name of the Household.
|
|
| 3 |
Click the New Deposit button. |
|
| 4 |
Select All to split the payment evenly or select a household member. |
|
| 5 |
Enter the Payment Amount, then complete one of the following tasks
- To split the payment evenly between patrons, click Fill.
- If there is a student in the household that is not receiving part of the deposit or the deposit is split unevenly,
manually enter the amounts. Do NOT Click FILL.
The amount entered for each patron must equal the amount entered in the Payment Amount field.
|

OR
 |
| 6 |
Select the Payment Method and Payment Location. |
|
| 7 |
Click Save. |
|
Deposit (Single Patron)
| Quick Steps |
Example |
|---|
- Go to Census > People > Food Service Deposit.
- Click Open Person Search. If the search has already been used, it will automatically open.
- Enter and then select the name of the student.
- Click New Deposit.
- Enter the Amount.
- Select the Payment Method and Payment Location.
- Click Save.
|
|
View One Patron's Transactions
| Quick Steps |
Example |
|---|
- Go to Food Service > Information > Account Journal.
-
Click Open POS Account Search. If the search has already been used, it will automatically open.
-
Enter and then select the name of the student. If you don’t know the student's last name, enter a comma, space, and then the first name.
- Click the Account. The Account Journal screen will appear with the Transaction List.
|
|
New Transaction
| Quick Steps |
Example |
|---|
- Go to Food Service > Information > Account Journal.
-
Click Open POS Account Search. If the search has already been used, it will automatically open.
-
Enter and then select the name of the student. If you don’t know the student's last name, enter a comma, space, and then the first name.
- Click the Account.
- Click New Transaction.
- Fill in the required fields within Transaction Detail.
- Click Save.
|
|
Void Transactions
| Quick Steps |
Example |
|---|
- Go to Food Service > Information > Account Journal.
-
Click Open POS Account Search. If the search has already been used, it will automatically open.
-
Enter and then select the name of the student. If you don’t know the student's last name, enter a comma, space, and then the first name.
- Click the Account.
-
Click the transaction you want to void. You must select the transaction. After you select the transaction, the Void TX button displays.
- Click Save.
|
|
Adjustments
| Quick Steps |
Example |
|---|
- Go to Food Service > Information > Account Journal.
-
Click Open POS Account Search. If the search has already been used, it will automatically open.
-
Enter and then select the name of the student. If you don’t know the student's last name, enter a comma, space, and then the first name.
- Click the Account.
- Click Adjustment.
- Fill in the required fields within the Adjustment section.
- Click Save.
|
|
Balance Transfers
| Quick Steps |
Example |
|---|
- Go to Food Service > Information > Account Journal.
-
Click Open POS Account Search. If the search has already been used, it will automatically open.
-
Enter and then select the name of the student. If you don’t know the student's last name, enter a comma, space, and then the first name.
- Click the Account.
- Click Transfer.
- Enter the Account # of the person receiving the money and the Amount.
- Click Save.
|
|
Flags
| Quick Steps |
Example |
|---|
- Go to Student Information > General > Flags.
-
Click Open Student Search. If the search has already been used, it will automatically open.
-
Enter and then select the name of the student. If you don’t know the student's last name, enter a comma, space, and then the first name.
- Click the student's name.
- Click New.
- Select Food Service Alert in the Flags dropdown list.
- Enter in a Start Date as 7/1/YYYY or 8/1/YYYY.
- Enter a User Warning. (40 character max)
- Click Save.
|
|
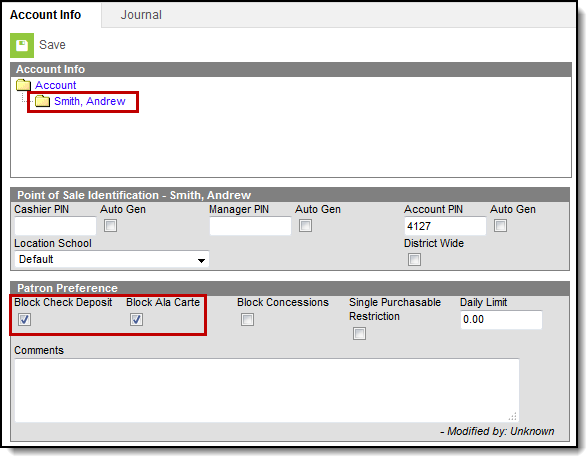
Block Ala Carte Items or Checks on the POS Terminal
| Quick Steps |
Example |
|---|
- Click the Search tab.
-
Select Account, enter the student's last name, and click Go
- Click on Account # (not name).
- Click the Account Info tab.
- Select the patron's name.
- Mark the Block Check Deposit and/or Block Ala Carte checkboxes.
- Click Save.
|
|
PIN Report
| Quick Steps |
Example |
|---|
- Go to Food Service > Reports > PIN Report.
- Select PIN Report.
- Select your School.
- Select one of the following Sort Options.
- Patron Name - Pick this option if you want a master list.
- Homeroom Teacher - Pick this option if you have homerooms in your school to get a list sorted by teacher.
- Click Generate.
|
|
Negative Account Balance Report
| Quick Steps |
Example |
|---|
- Go to Food Service > Reports > Patron Balance Report.
- Select Low Balance Report.
- Select your School.
- Enter -.01 as the Max Balance.
- Click Generate Report.
|
|
Transaction Summary Report (Production Counts)
| Quick Steps |
Example |
|---|
- Go to Food Service > Reports > Transaction Summary Report.
- Select your School.
- Select All Services.
- Mark the Include Purchasable Detail checkbox.
- Click Generate Report.
|
|
Transaction Detail Report (Journal of Transactions)
| Quick Steps |
Example |
|---|
- Go to Food Service > Reports > Transaction Detail Report.
- Choose the Terminal.
- Click Export.
|
|
End of Day Report (Drawer Counts)
| Quick Steps |
Example |
|---|
- Go to Food Service > Reports > End of Day Report.
- Select the Terminal on the right side.
- Mark the Transaction Detail and Cashier Detail checkboxes.
- Click Generate Report.
|
|
Deposit Report (View Entered Checks, etc.)
| Quick Steps |
Example |
|---|
- Go to Food Service > Reports > Deposit Report.
- Select your School.
- Clear the Online Payments checkbox.
- Click Generate Report.
|
|
Audit Report (When Transactions Look Wrong)
| Quick Steps |
Example |
|---|
- Go to Food Service > Reports > Audit Report.
- Select the Item(s) you want to report.
- Click Generate Report.
|
|
View Student Details (Phone Numbers, etc.)
| Quick Steps |
Example |
|---|
- Go to Student Information > General > Summary.
-
Click Open Student Search. If the search has already been used, it will automatically open.
- Enter and then select the name of the student. If you don’t know the student's last name, enter a comma, space, and then the first name.
- Click the student's name.
|
|