Tool Search: Delete Calendar
The Delete Calendar tool allows users with proper tool rights to delete calendars that have been previously marked for deletion, which is done on the Calendar Details tool.
This information syncs to State Edition when a calendar is deleted in District Edition.
 Delete Calendar
See the Delete Calendar Wizard Tool Rights article for information about rights needed to use this tool.
For States Using Ed-Fi
Ed-Fi Version 3.X:
The following is a known issue for Ed-Fi users: All resources within the selected calendar will delete when the Delete Calendar Tool is utilized, with the exception of the Calendar resource. The Delete Tool is currently required to delete the calendar.
Ed-Fi Version 2.X and lower:
The Delete Calendar process requires additional steps to properly remove calendars from Ed-Fi:
- Use the Identity Mapping tool to find the Calendar IDs for the calendars that need to be deleted.
- Use the Ed-Fi Delete Tool.
- Use the Delete Calendar tool.
The process for deleting calendars is two-fold:
Marking a for deletion (Calendar Details). This means a user can select a particular calendar to be deleted and add a comment as to why it's being deleted. The calendar can also be unmarked for deletion.
Removal of calendars that are marked for deletion (Delete Calendar). This involves viewing a list of calendars that have been marked for deletion, validating those calendars, previewing the calendars, deleting those calendars, and printing a report of those deleted calendars.
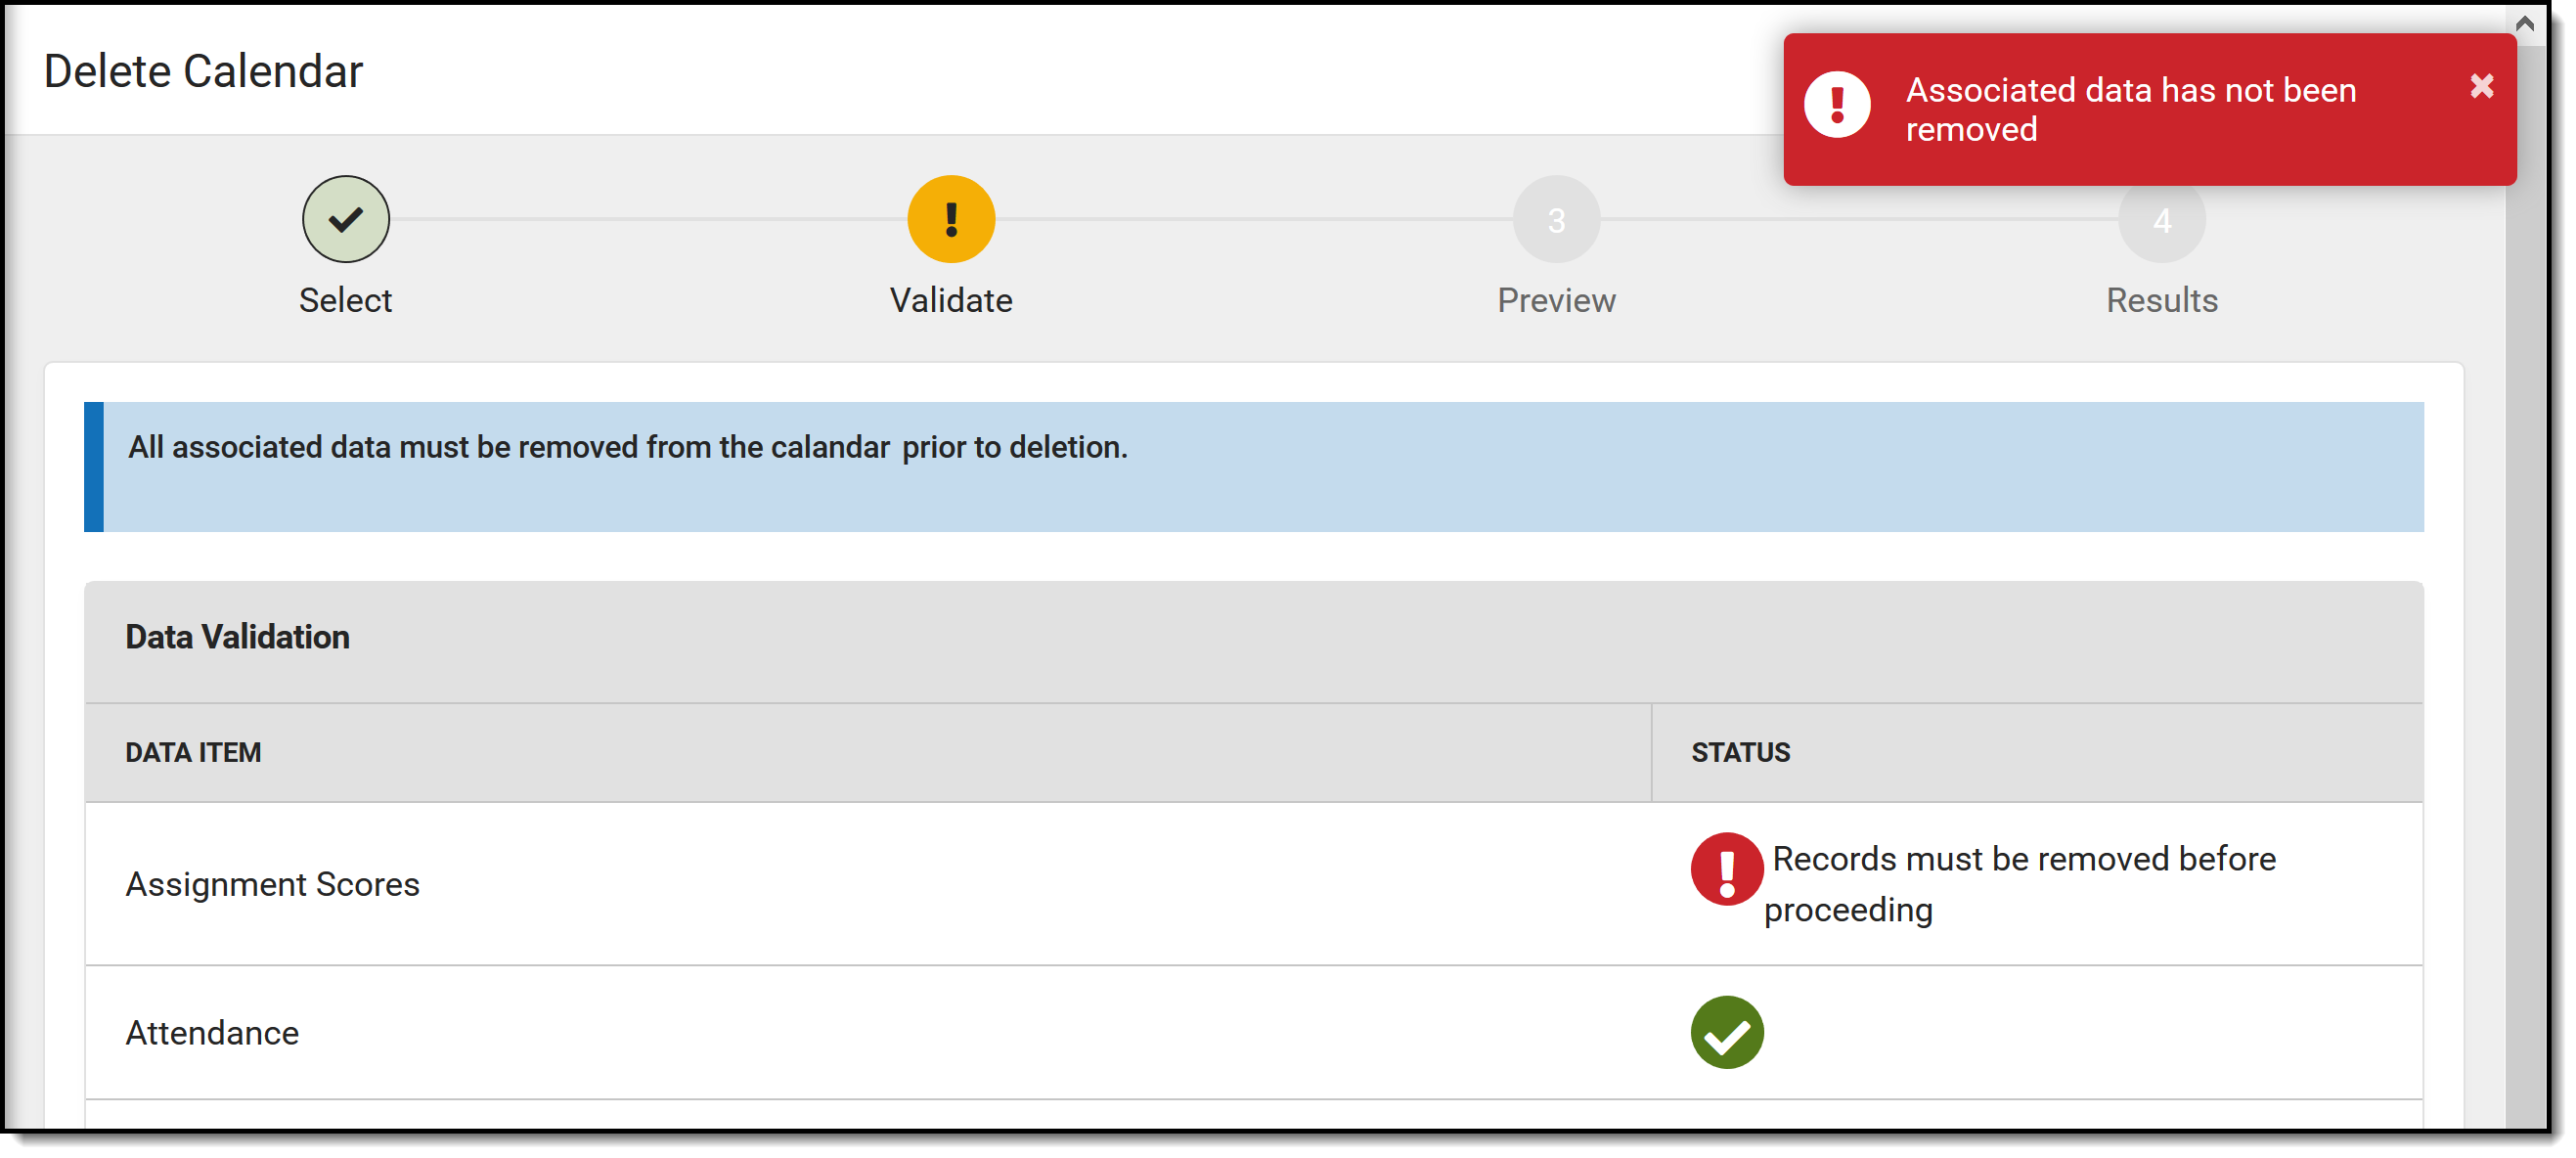
A progress tracker displays on each screen so users can quickly tell where they are in the process. If there is an issue with one of the selections, an exclamation point displays (i.e, when there are no dates selected or when there are no calendars selected or data exists that is preventing the calendar from being deleted). These are indications to revisit that step in the process (click the exclamation point) to verify the entered information is correct.
At any time during the process, click the Previous button at the bottom of the screen to return to the previous step.
![]() Progress Tracker for Delete Calendar
Progress Tracker for Delete Calendar
Delete Calendar Process
This section explains each step in the Delete Calendar process. See the Steps for Deleting Calendars section for instructions related to each section of the process.
Calendar Selection
Since calendars have already been marked for deletion on Calendar Details, the list of available calendars to delete is limited. Only one calendar can be chosen for deletion at one time. Once selected, an information box displays a deletion summary, which was added by the user who marked the calendar for deletion.
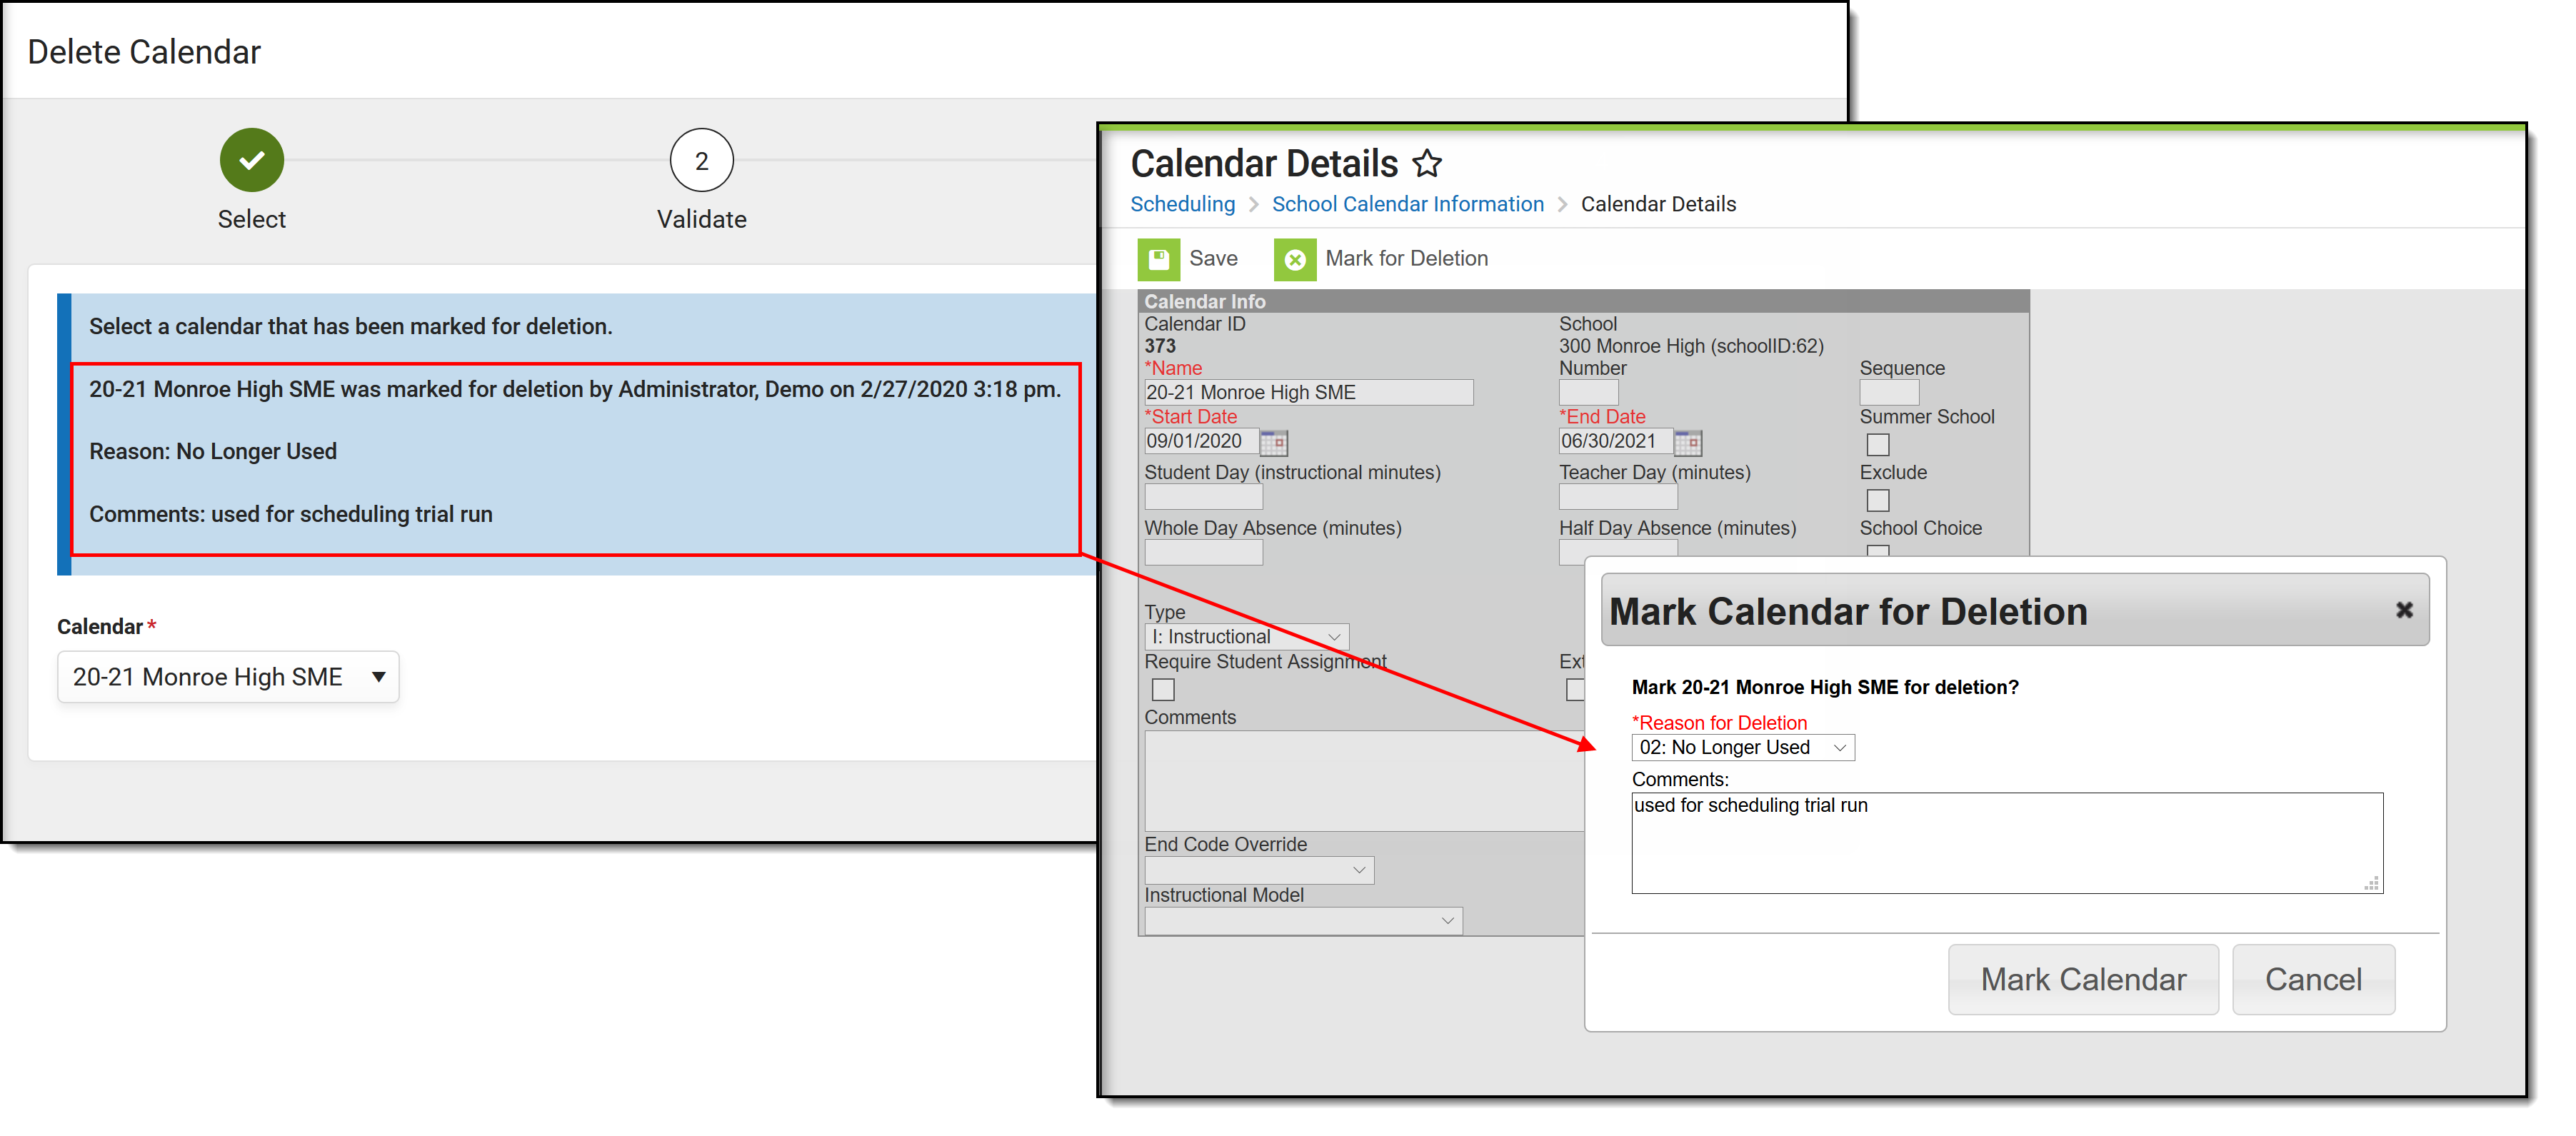 Delete Calendar Summary, Mark Calendar for Deletion Comments
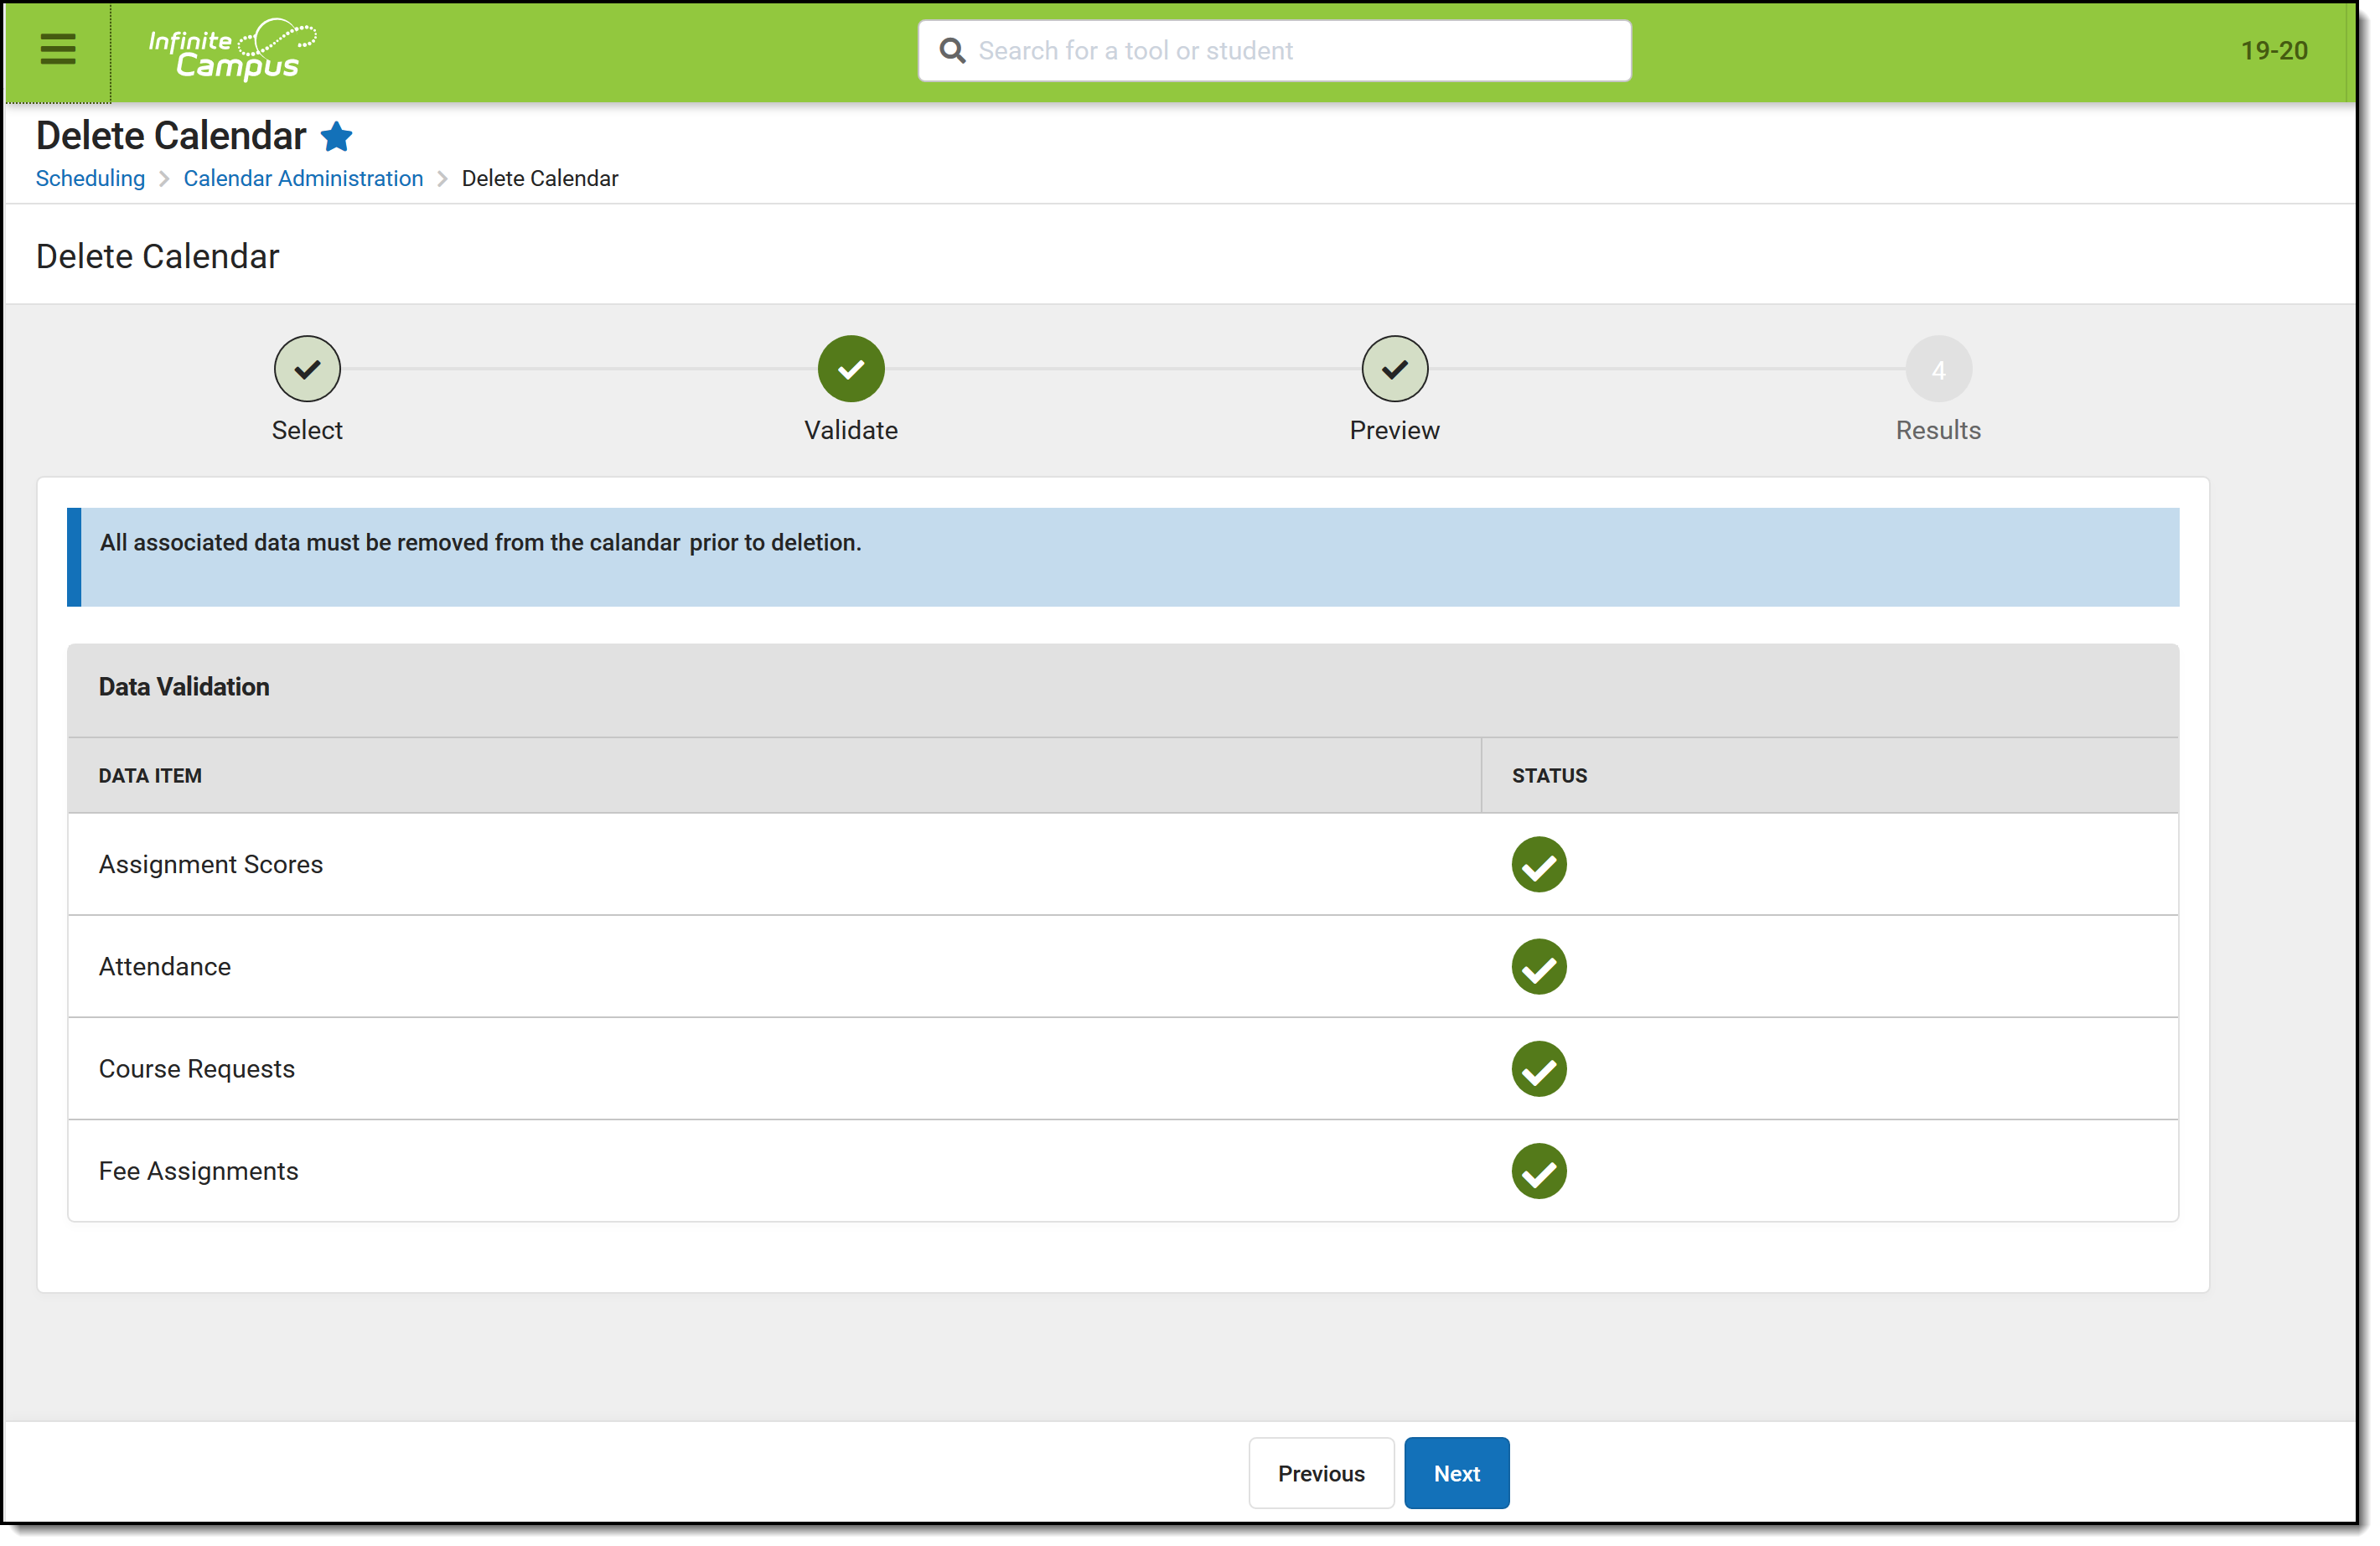
Validate
All data related to assignment scores, attendance data, course requests, and fee assignments must be removed from the calendar in order for the delete process to complete. If data does not exist, the Status column lists a green checkbox; if data does exist, the Status column lists a red exclamation point. Items with an exclamation point need to be addressed before the calendar can be deleted.
 Validate Status
Preview
The Preview screen lists the calendar that is being deleted, the number of schedule structures, term schedules, terms and periods that are also being deleted.
Use the Schedule Calendar Delete option to determine when calendars are deleted - immediately using the Now option, or at a specific date and time using the Schedule option.
This process may significantly impact system performance. For that reason, deleting calendars is best performed in off-peak hours (weekends, after school, etc.).
This information can be printed for record keeping, if desired. The printed document is a simple PDF form that lists the calendar being deleted, who requested the deletion, the date is requested, the reason and any entered comments.
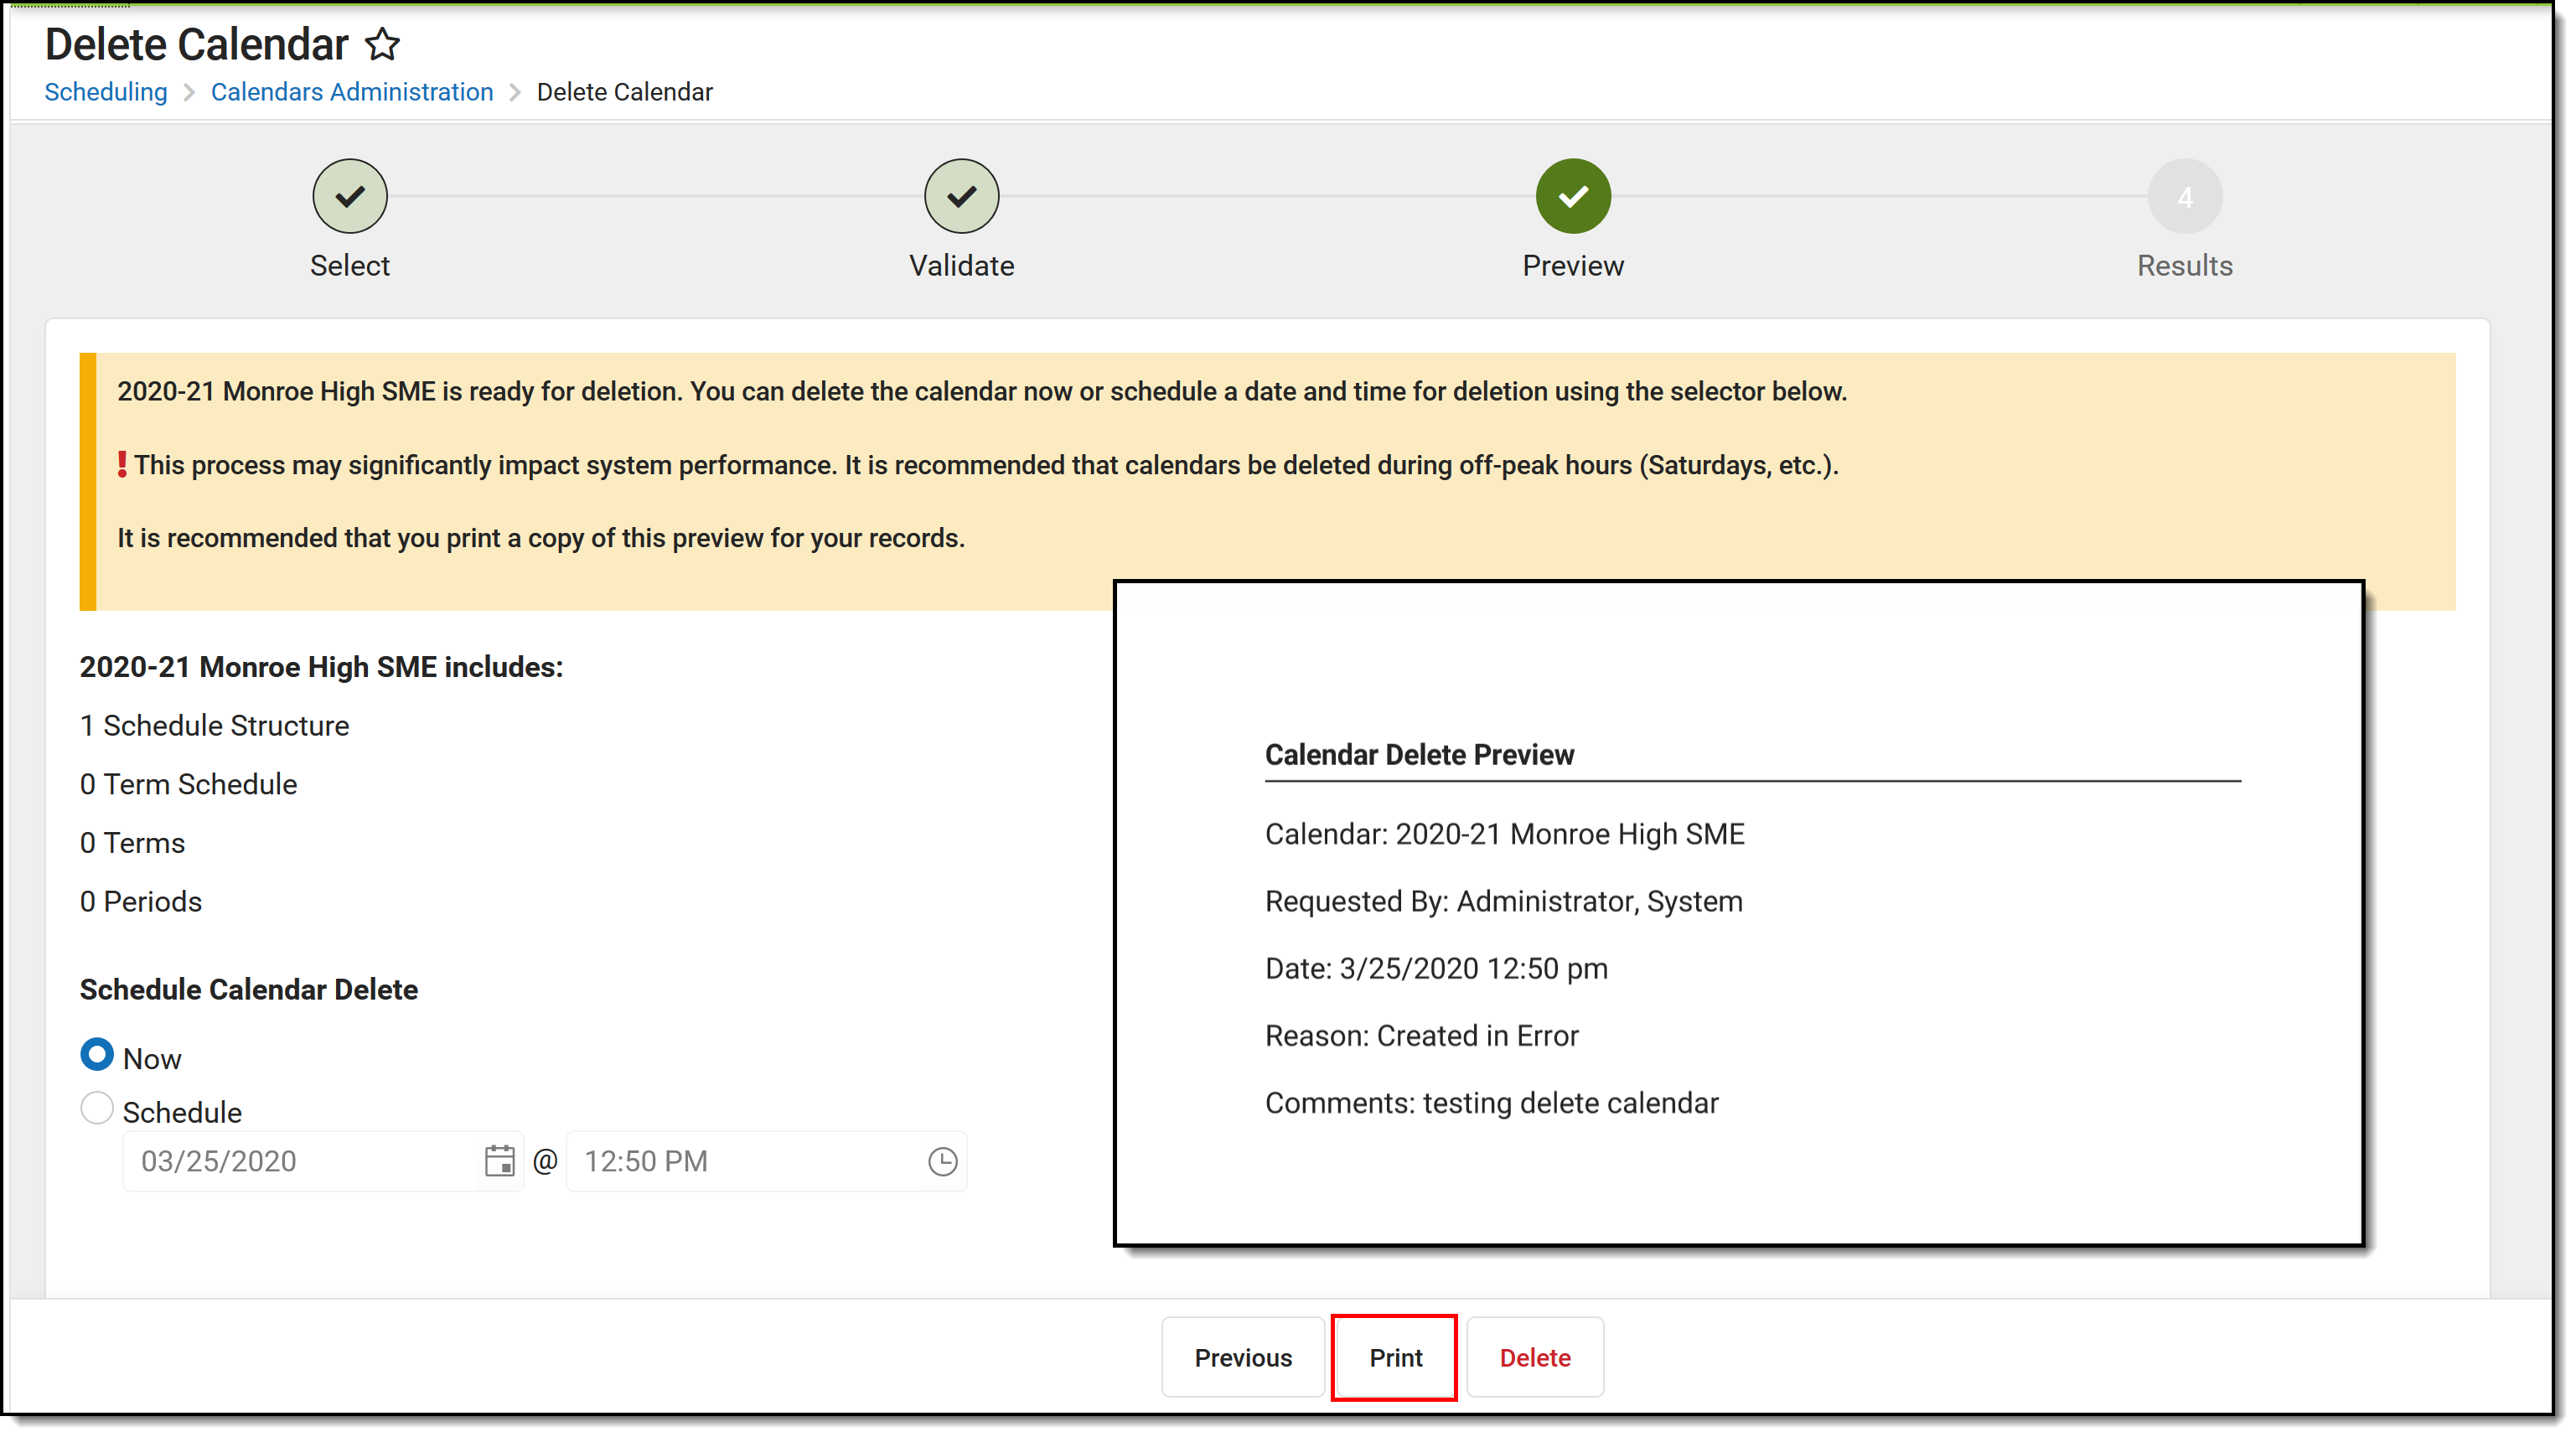 Preview of Delete Calendar and Report
Before moving on the Results status (clicking the Delete button at the bottom), a confirmation message displays asking the user to verify that the calendar can indeed be deleted and that the process cannot be stopped. Click the Delete button to delete the calendar and view the Results.
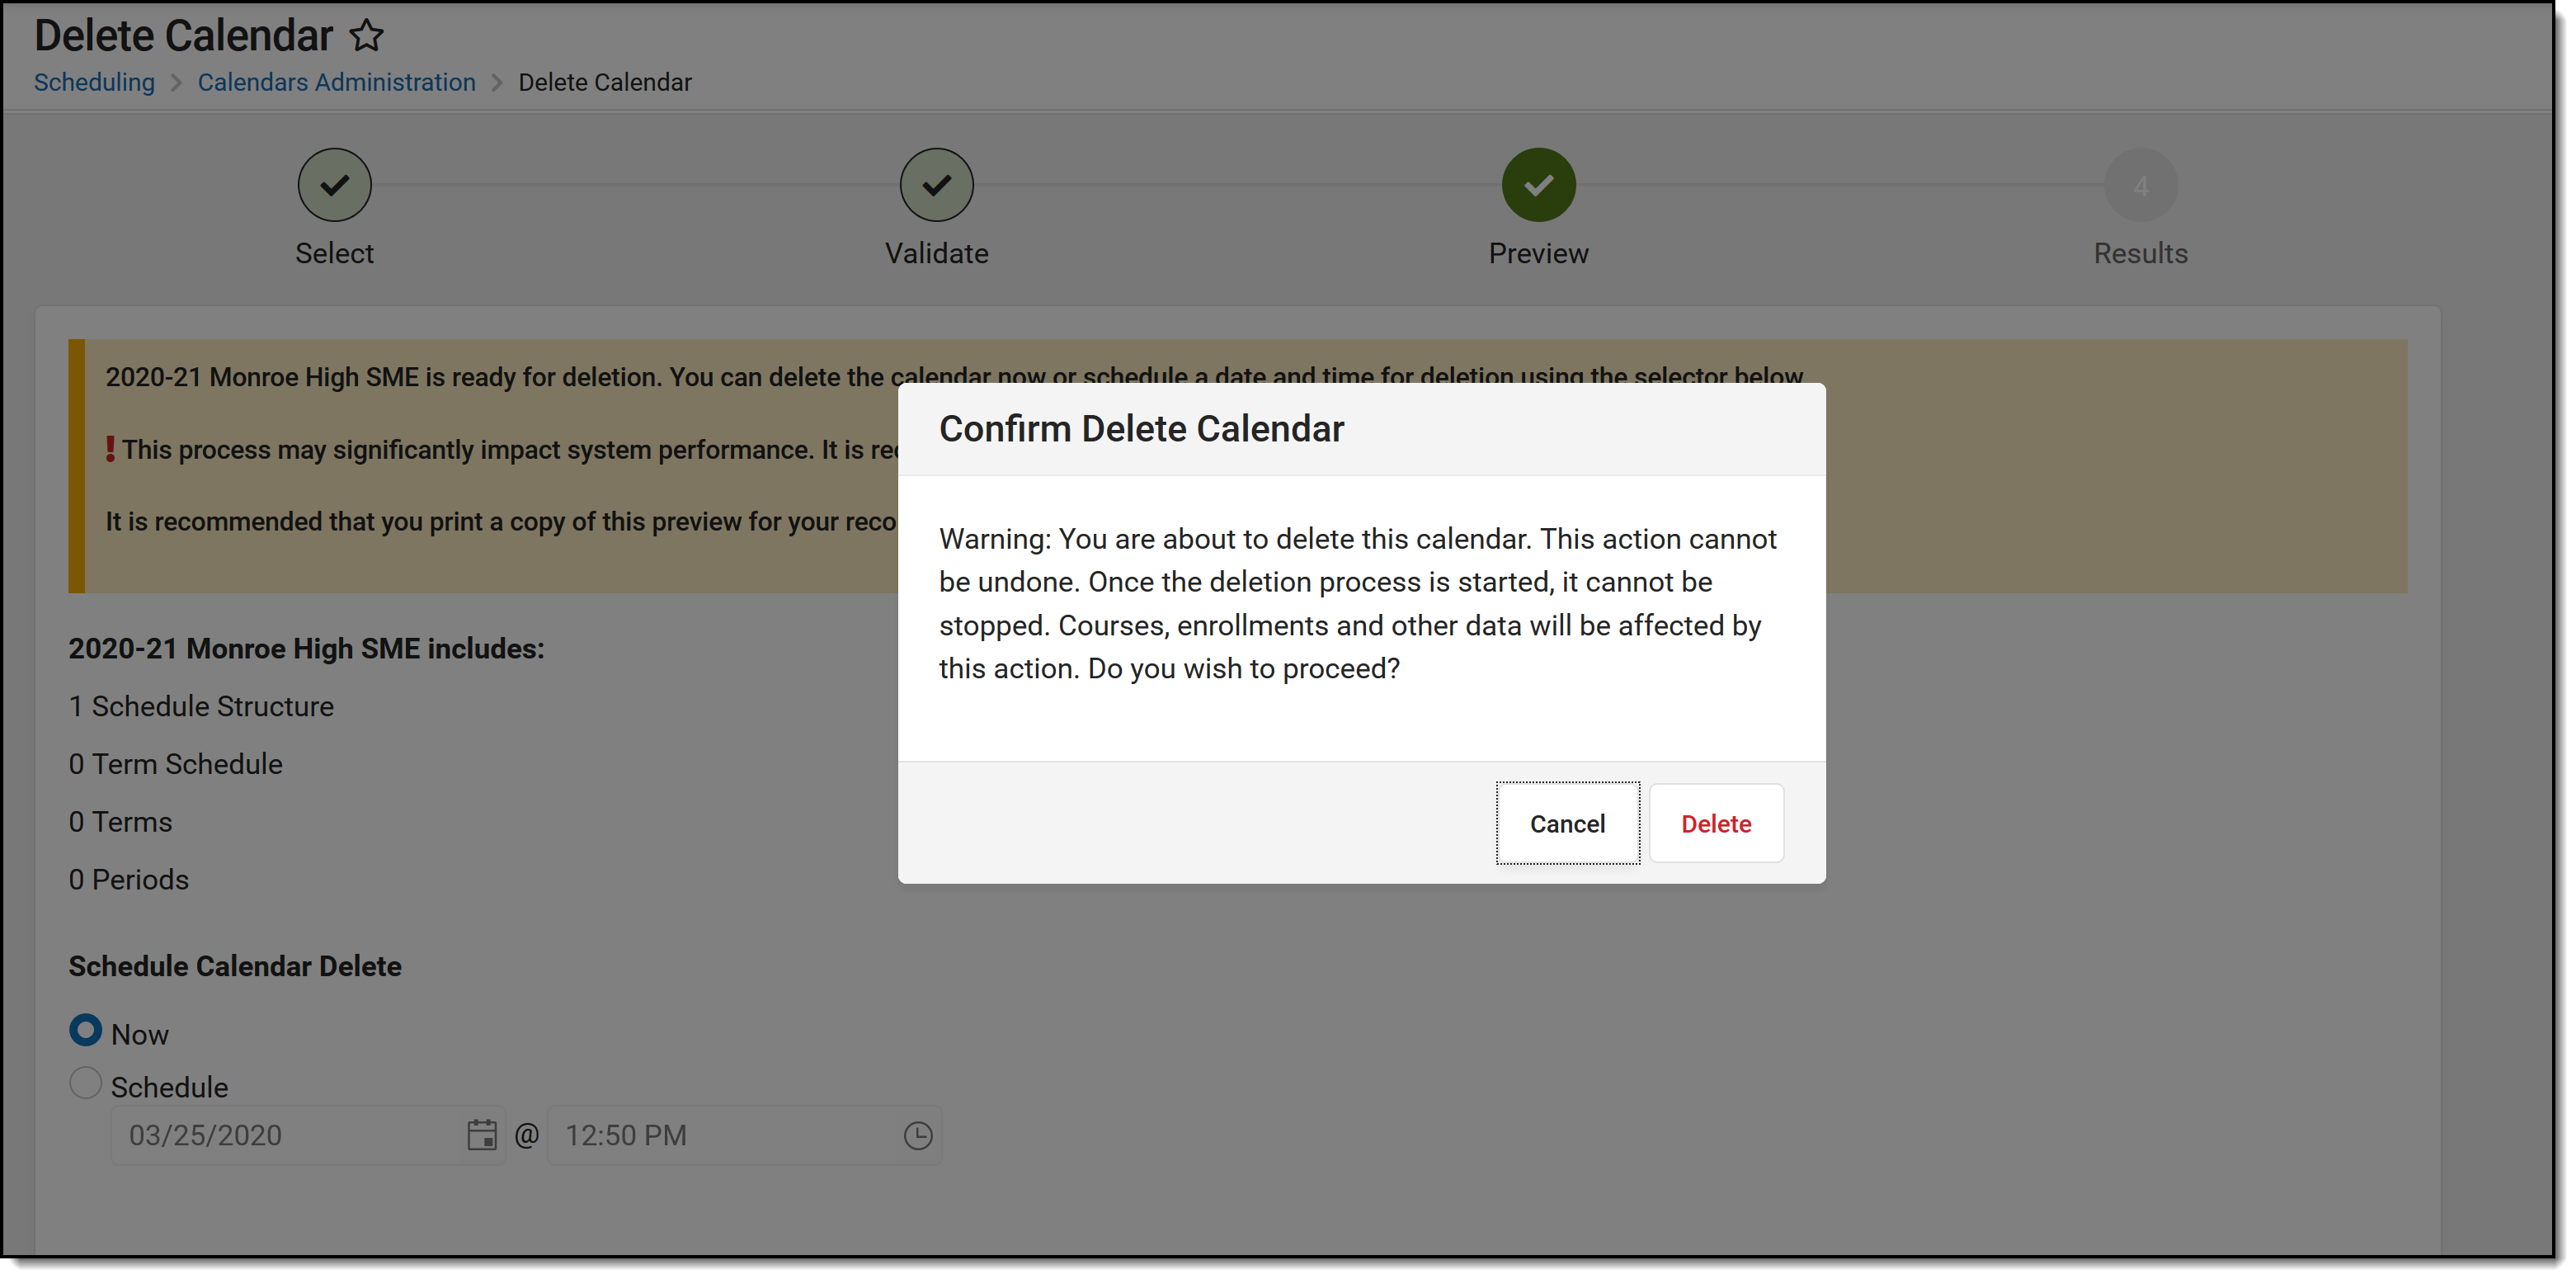 Confirm Deletion
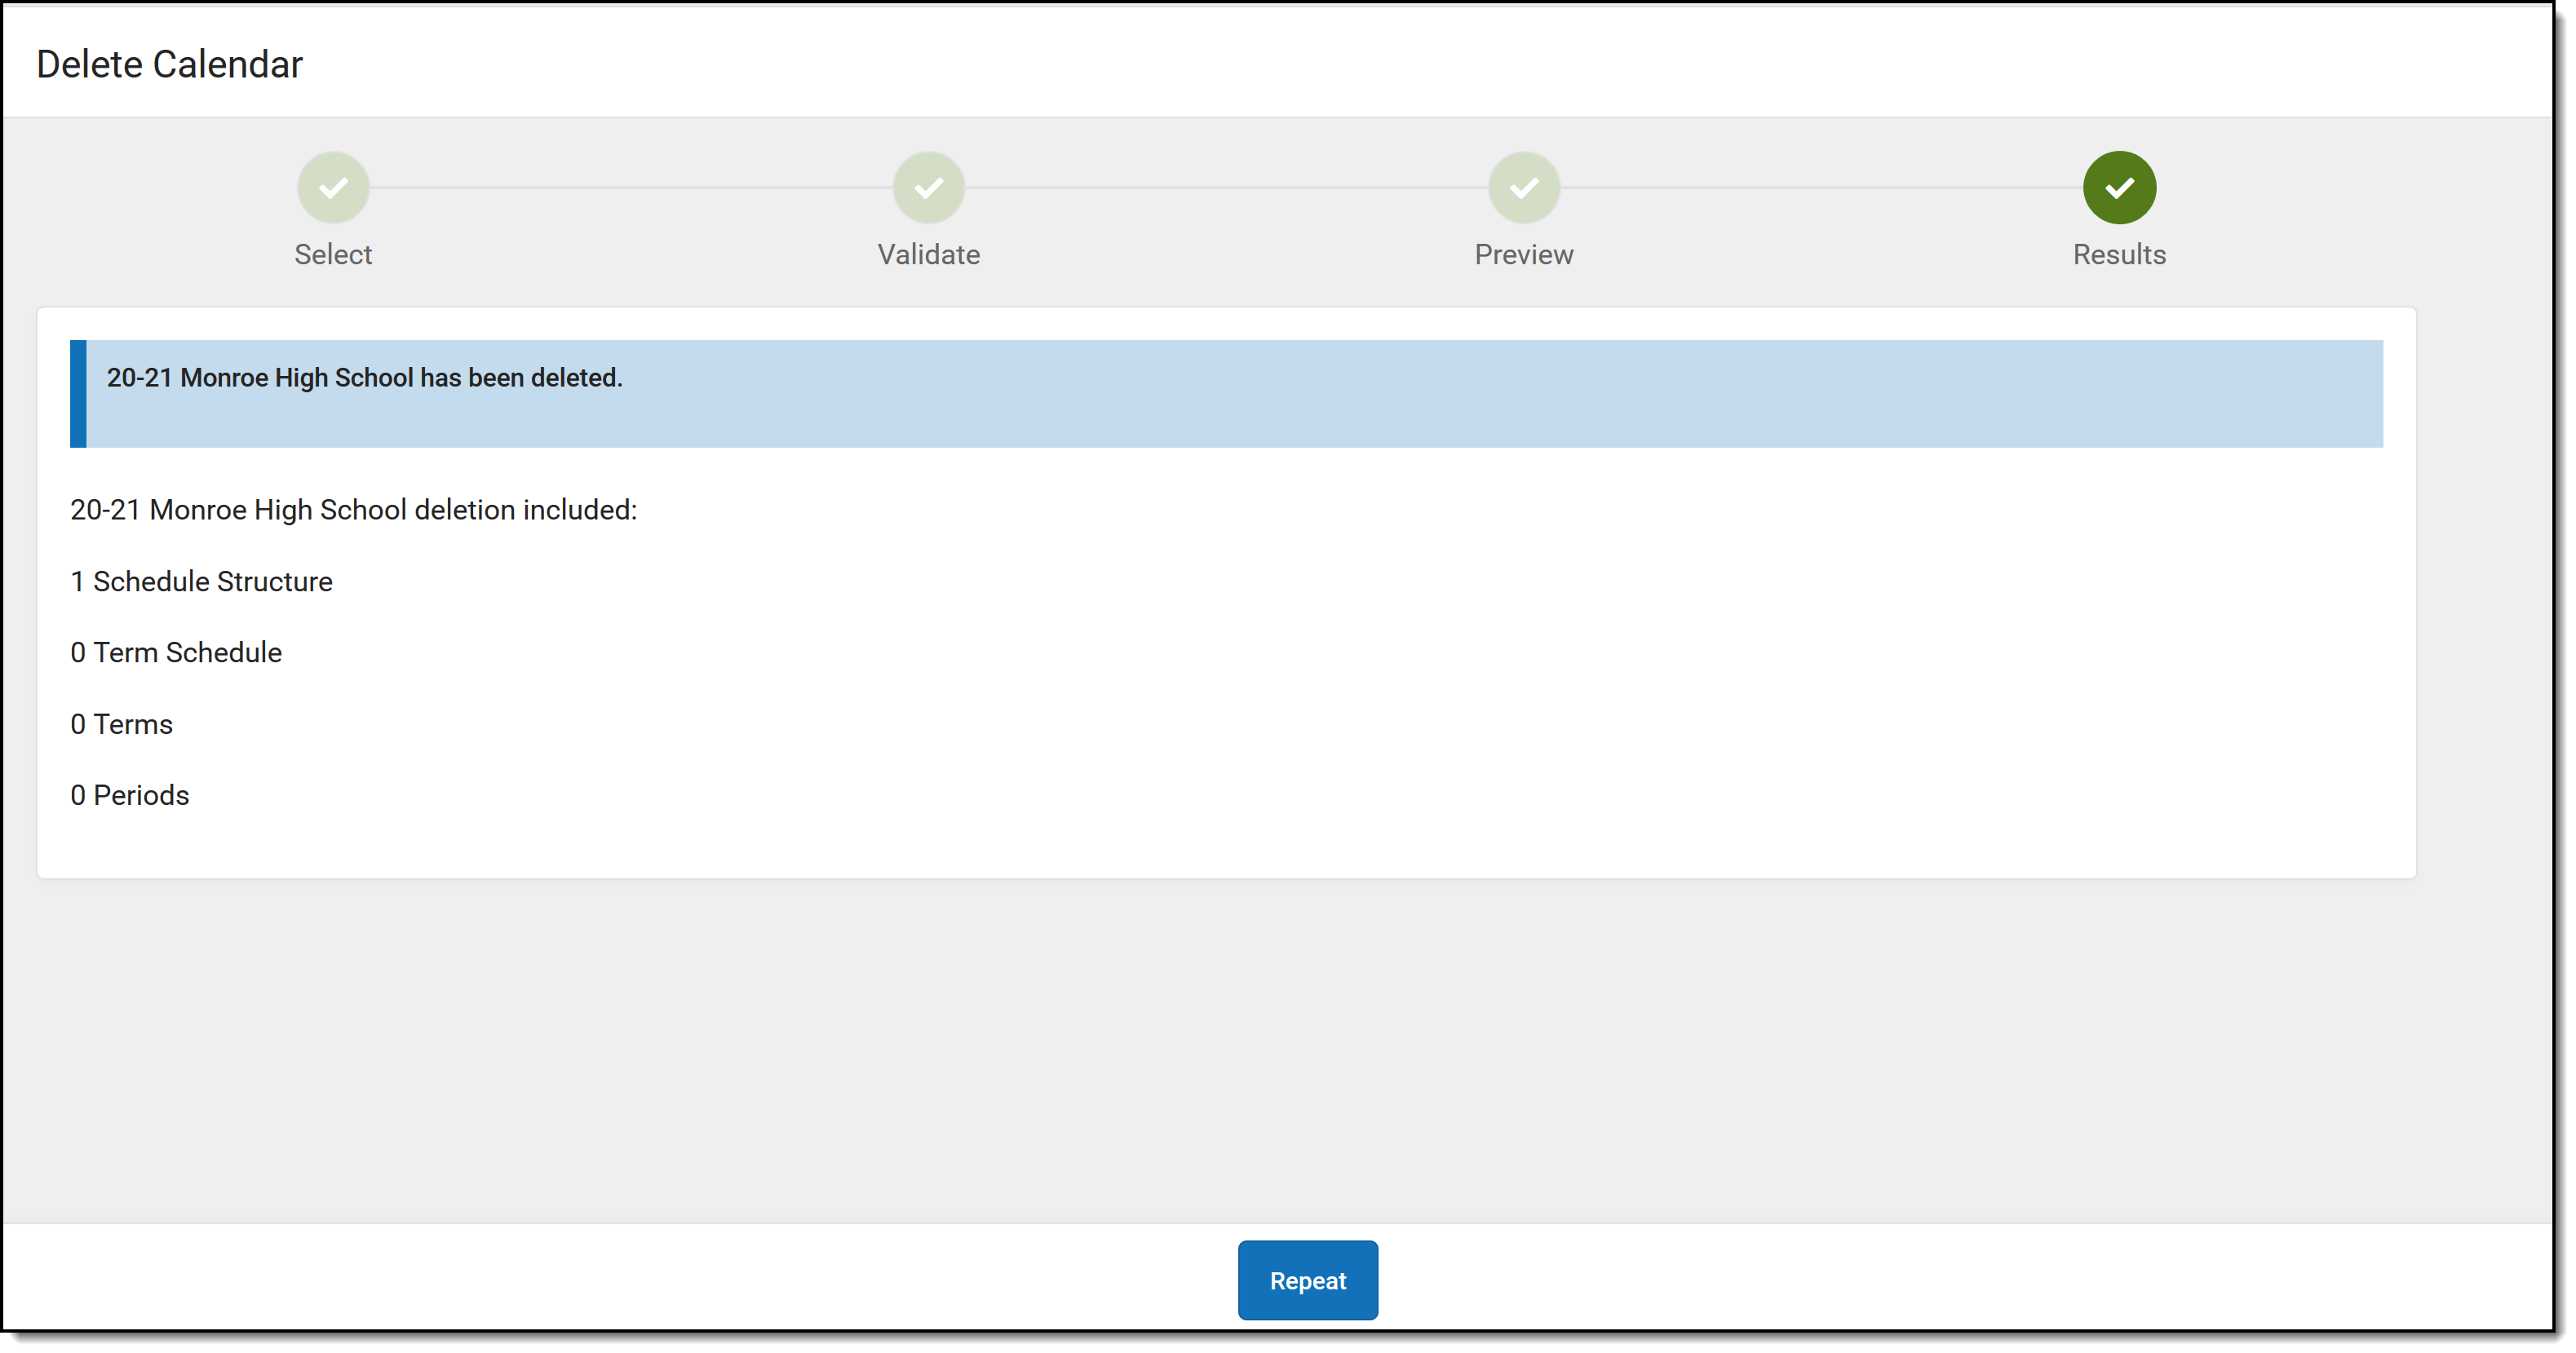
Results
The Results view displays a status countdown to completion. When the calendar is scheduled to delete now, the Status is Queued; when the calendar is scheduled to delete at a specific time, the status remains in the Scheduled status until the time comes to delete. A banner displays indicating when that calendar is scheduled for deletion. When the delete process has finished, the selected calendar is deleted.
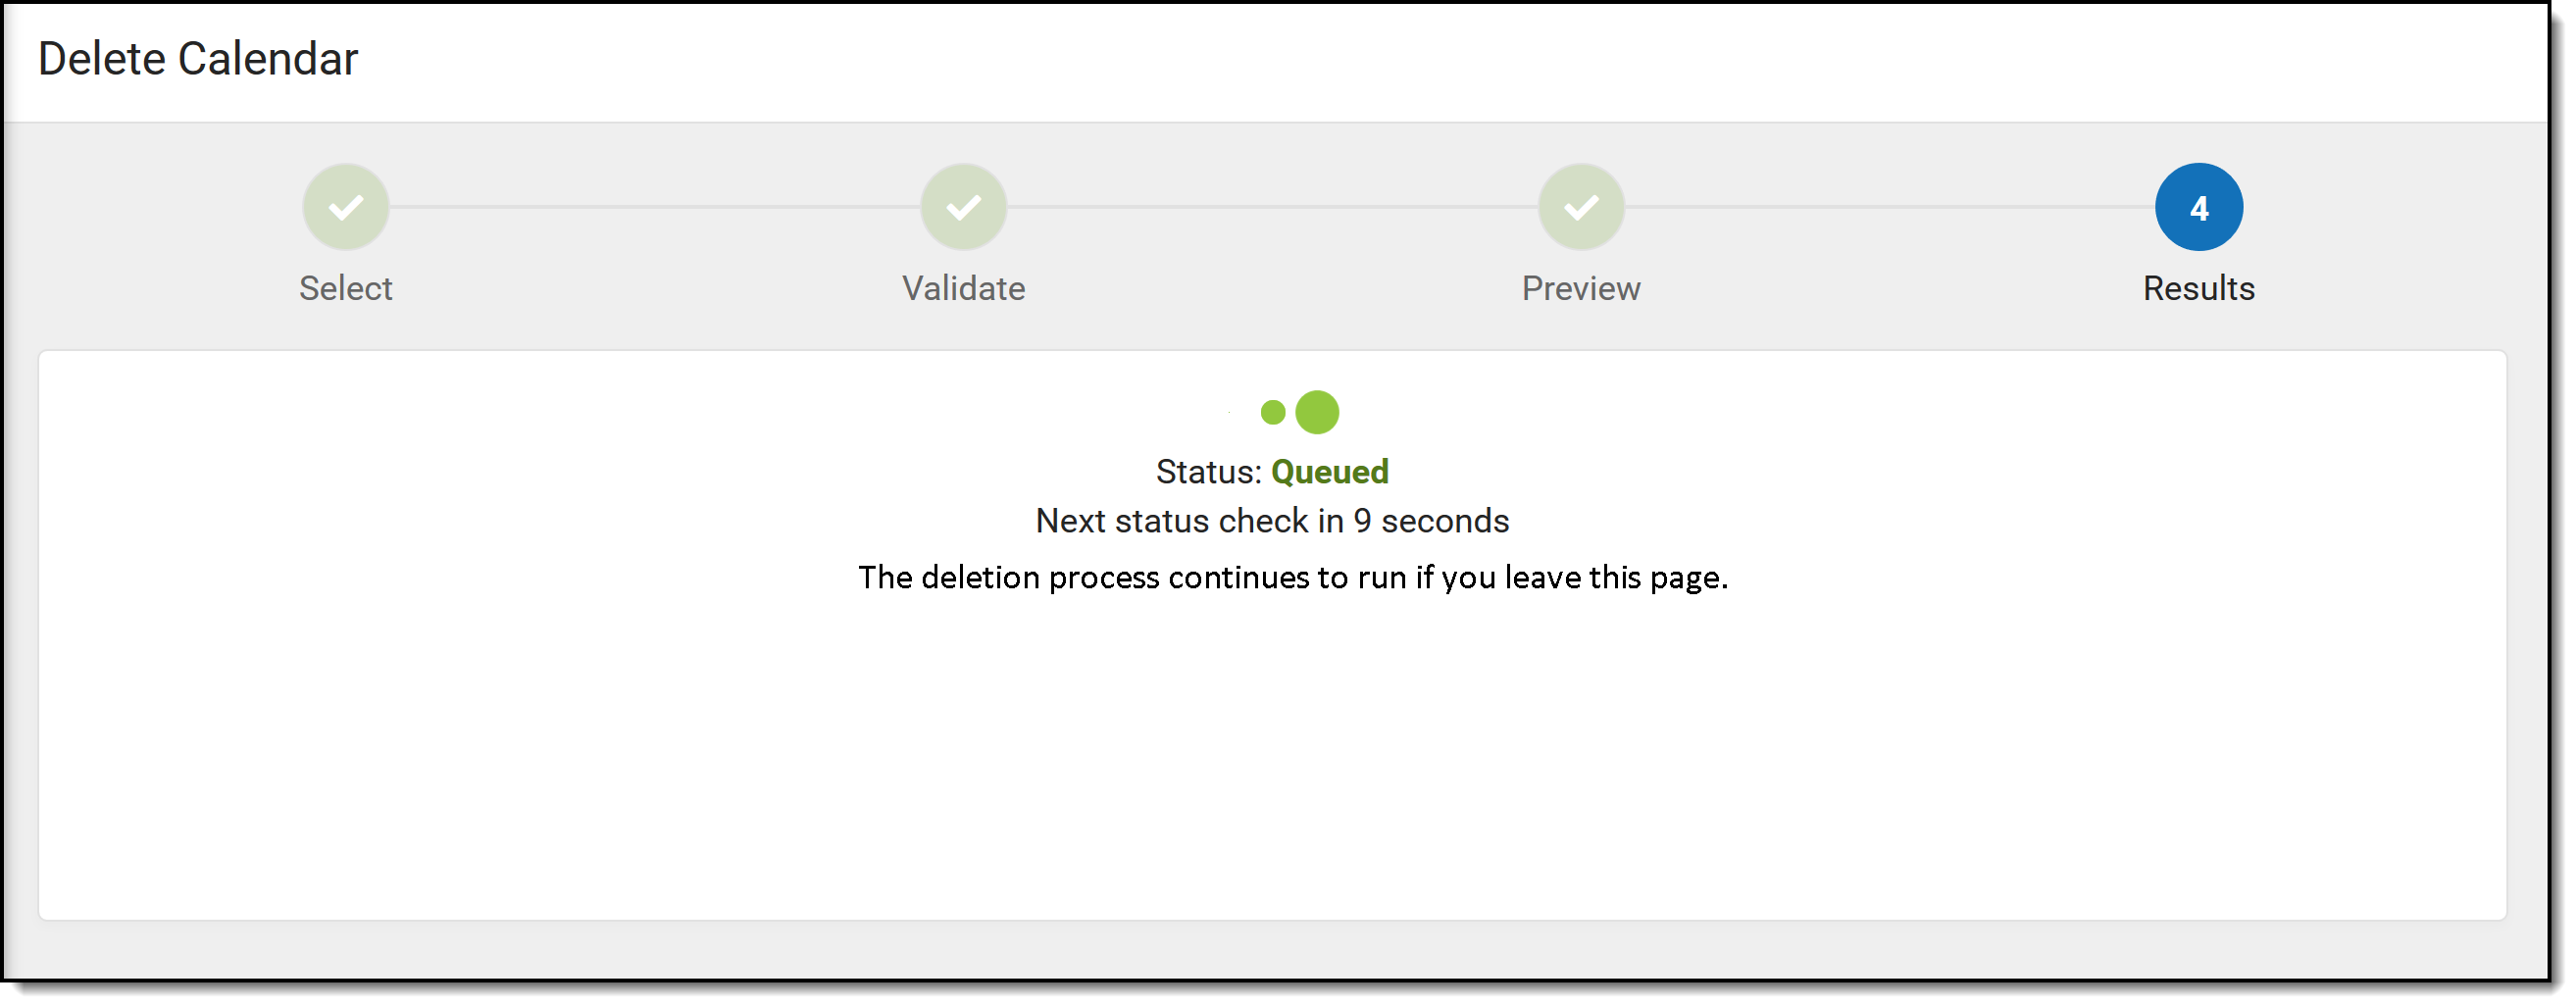 Status of Delete Calendar Scheduled for Now
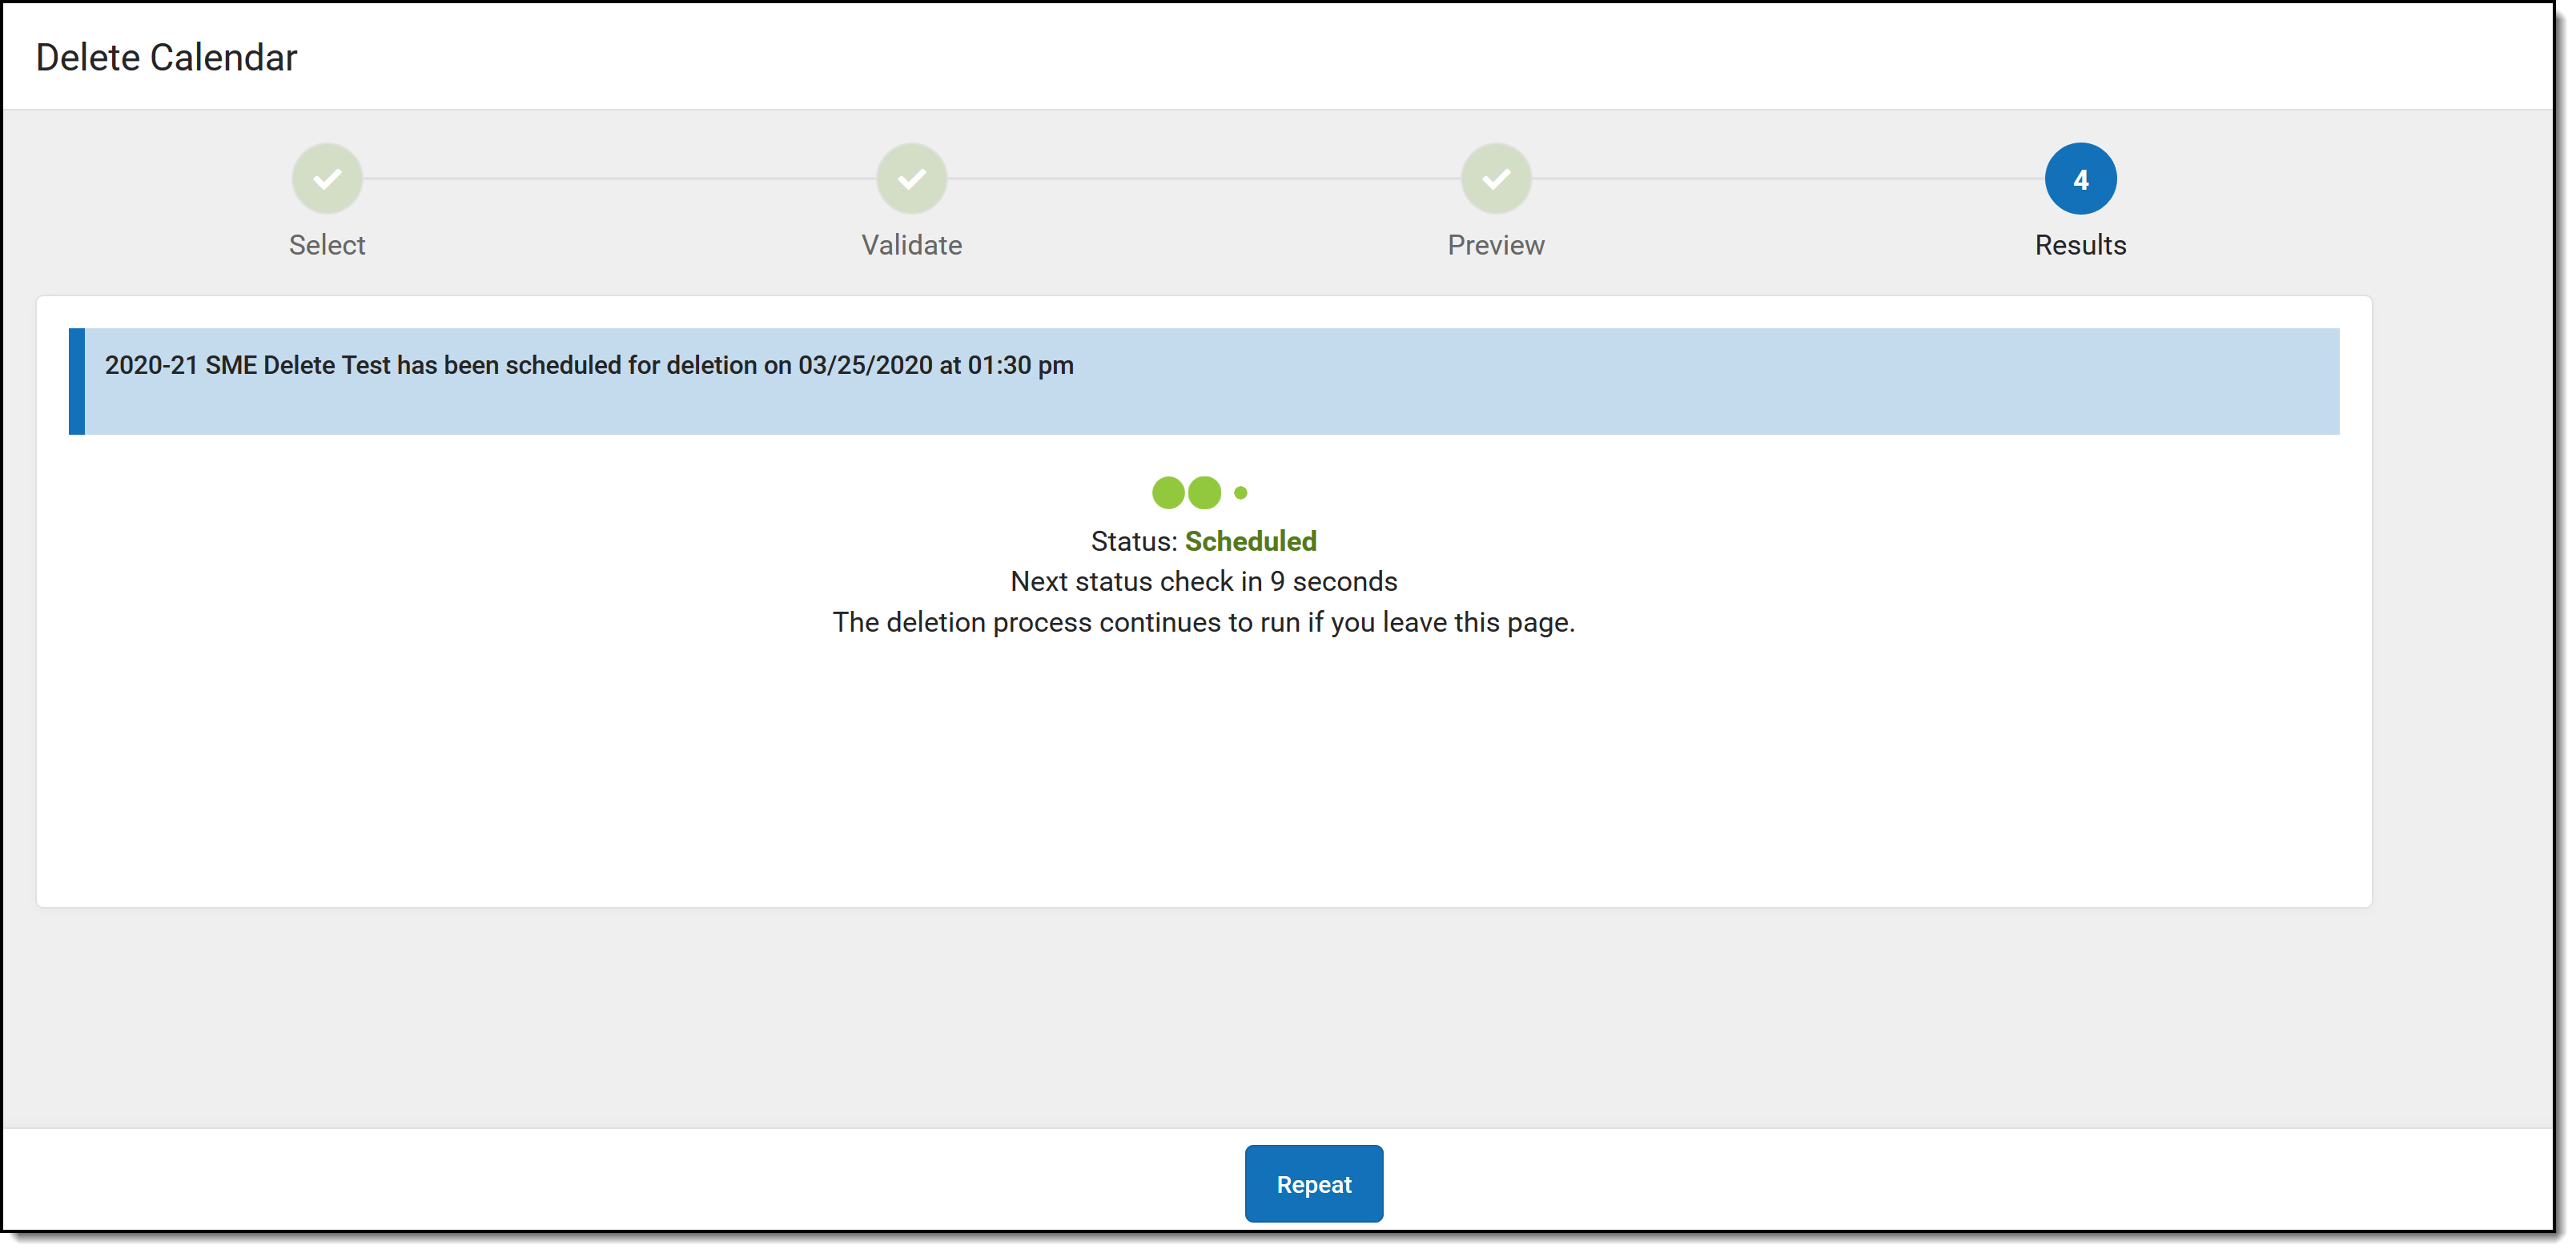 Status of Delete Calendar Schedule for Specific Date and Time
To view the status of a calendar scheduled for deletion, click the Repeat button from the Results step. This returns the user to the Select process. The calendar scheduled for deletion displays with the name of the calendar and (Delete Scheduled). Choose this calendar to view the date and time when the calendar is scheduled to be deleted.
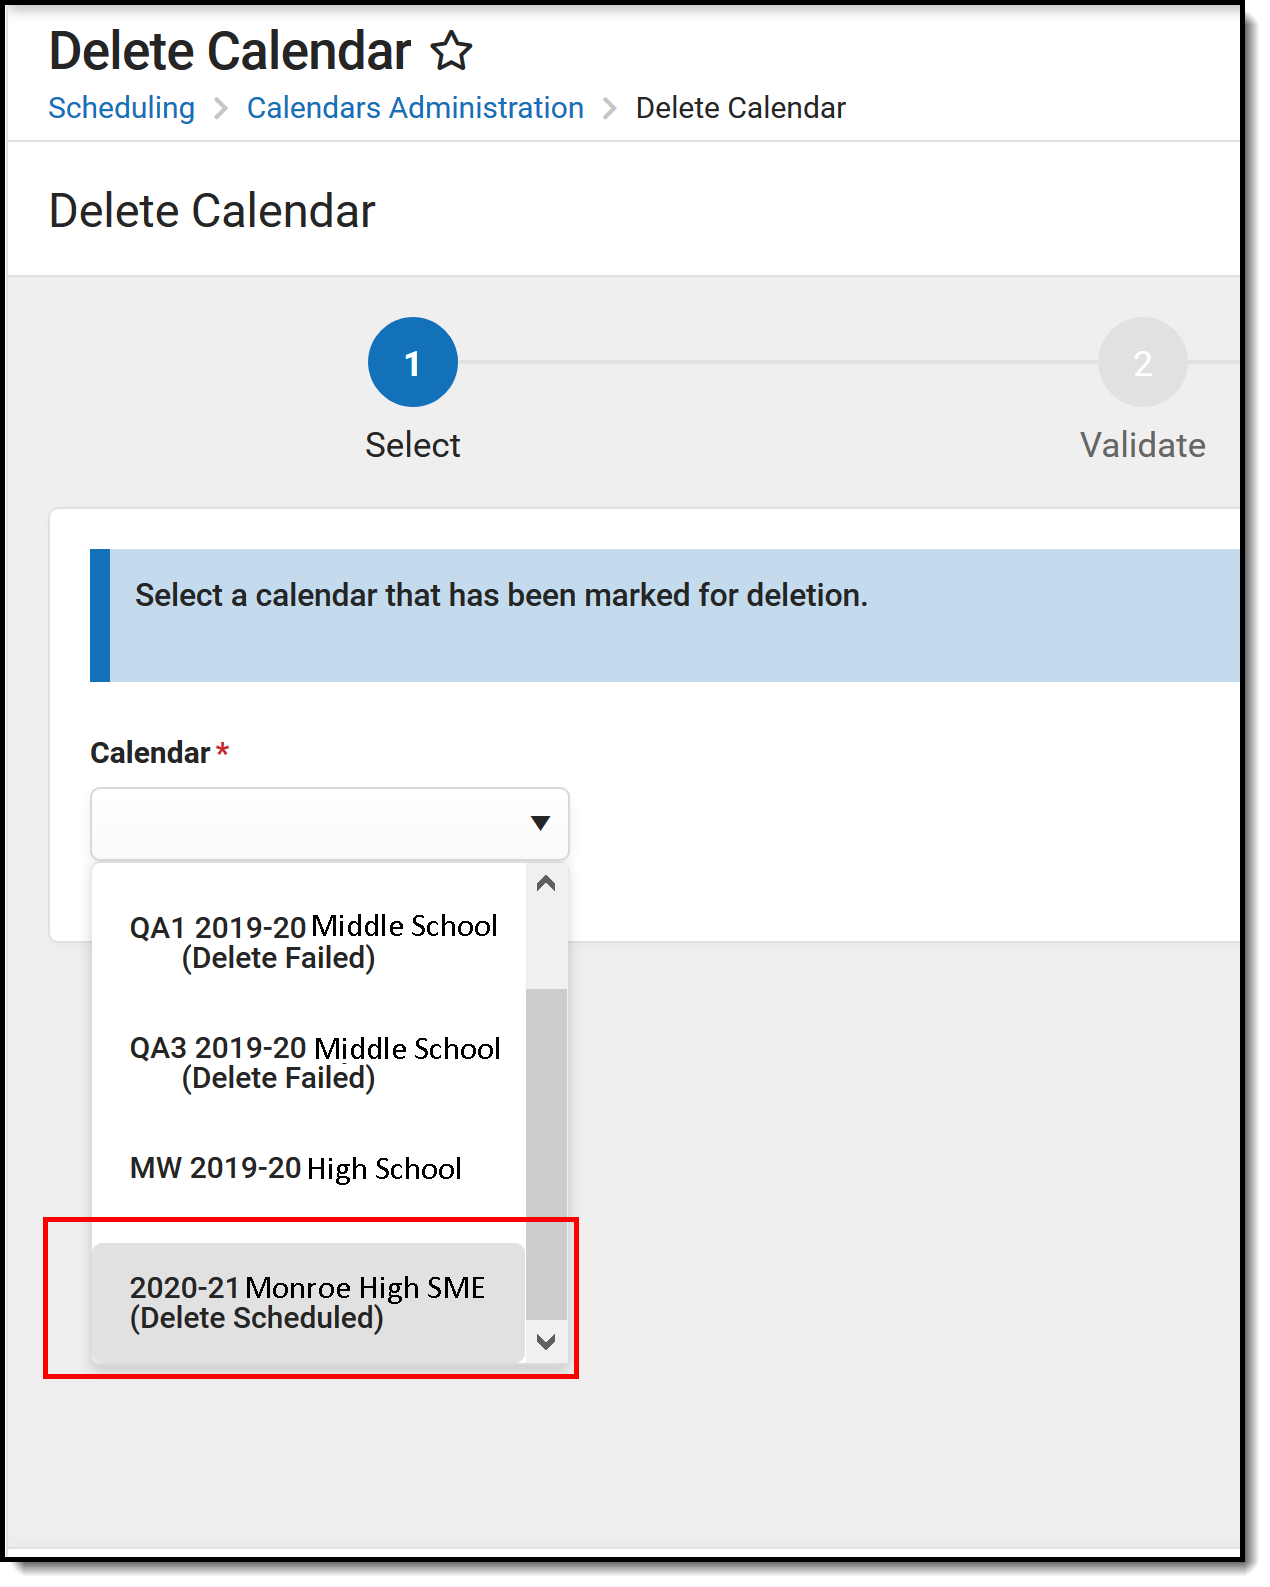 Delete Calendar Status
Steps for Deleting Calendars
- Select the Calendar to be deleted from the dropdown list. Click the Next button.
- Review the list of items for Data Validation. If any information exists, remove that information prior to the calendar being deleted. Click the Next button.
- Preview the calendar information. Click the Print button to generate a summary report of the deleted calendar.
- Determine when the calendar should be deleted by choosing Now or Schedule in the Schedule Calendar Delete section.
- If scheduling the calendar, enter the desired Date and Time for the deletion.
- Click the Delete button to continue.
- Confirm that the selected calendar should be deleted and click the Delete button.
- View the status of the deletion. Upon completion of the deletion, a message displays stating the calendar has been deleted.
- Click the Repeat button to begin the process again for another calendar.
 Delete Calendar Complete, Option to Repeat Process
