Tool Search: School Choice Messenger
The School Choice Messenger walks a user through the process of creating a message than can be sent to inform a guardian of their student's School Choice application.
 School Choice Messenger
School Choice Messenger Logic
School Choice messages are sent to contacts based on contact phone numbers and email addresses marked to receive information on the Demographics tab. The General Messenger Preference needs to be marked in order to receive school choice messages.
Field Descriptions
The following fields appear on the School Choice Messenger for selection.
| Field | Description | ||||||
|---|---|---|---|---|---|---|---|
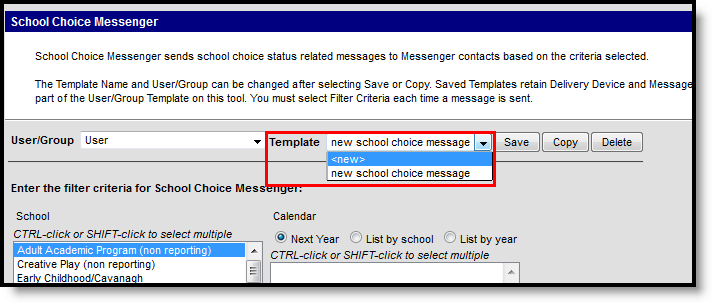
| User/Group | Allows message templates to be saved to a user account or a user group. Assigning the template to a user group lets other members of that group see the template. | ||||||
| Template | Selection indicates the template that will be used when sending School Choice Messages. Create a new template by selecting the <new> option from the list. | ||||||
| School | Selection indicates which students enrolled in which schools receive messages. Additional filtering of students is done by selecting a calendar. | ||||||
| Calendar | Selection indicates which students enrolled in which calendars for which schools receive messages. A school needs to be chosen in order for this calendar list to be populated. | ||||||
| Grade Level | Selection indicates which students enrolled in which grade levels in the selected calendars and schools receive messages. | ||||||
| Application Status | Select which application statuses are included in the message. If no option is selected, applications without an approval status will be returned. | ||||||
| Acceptance Status | Select which acceptance statuses are included in the message. | ||||||
| Delivery Devices | Select where the messages are sent.
| ||||||
| Sender's Email | This field displays the email address that is automatically included in the message body for message recipients to reference.
This field can be changed if the Allow Custom Sender's Email Address checkbox is marked on the Email Settings tool. Existing templates may display a different address if the the Allow Custom Sender's Email Address checkbox is marked and a user modified the Sender’s Email field. | ||||||
| Message Subject | This field determines the text that will display in the Subject Field of the email message. | ||||||
| Message Body | This field is used to enter the message that will be sent. Use the WYSIWYG editor as needed and to add Campus Fields as necessary. Do NOT copy attribute fields from another Messenger tool in Campus. The attribute fields are not the same. Message Body supports the use of Chinese characters for email messages only. | ||||||
| Browse and upload an email attachment | Use this option to add an attachment to the message. Follow the onscreen prompts for locating and uploading an attachment. This option is controlled by an email preference set by the District Administrator and may not display in all districts. | ||||||
| Delivery Date | The day on which the message should be sent. | ||||||
| Send Inbox/Emails at | The time inbox and/or email messages will begin to be delivered. The time will save with the templates. If you want messages to always go out immediately after Send is selected, the template should be saved with this field blank. |
Create Templates
Create and use templates or create a one time use message as needed.
A district may want to create multiple messages for personalization from a school, an application status, etc. Templates can be saved only as text.
- Verify the <new> value is displayed in the Template field.
- Click the Save button next to the New field. A Save/Copy Template window displays.
- Select the User or Group option from the dropdown list.
- Enter the name of the Template. This name should be descriptive enough for all users to understand what sort of message is being sent.
- Click the OK button.
- Select the remaining criteria as desired for the message.
- Repeat this process for each type of school choice message needed.
Templates can also be copied or deleted. Use the Copy and Delete buttons at the top of the wizard.
 Create Message Templates
Send a School Choice Message
- Select the User/Group option from the dropdown list.
- Select which Template to use from the dropdown list. Or, enter message criteria as needed.
- Select which School(s) to include in the report.
- Select the Calendar(s) to include in the report.
- Select the Grade Levels to include in the report.
- Select the Application Status for which to generate notifications.
- Select the Delivery Devices.
- Click the Preview Notices button.
- Click the Review Recipients button to display a list of individuals receiving the message.
- Click the Send Message button to send the message to the recipients.
School Choice messages can also be reviewed using the Sent Message Log in the Messenger module.
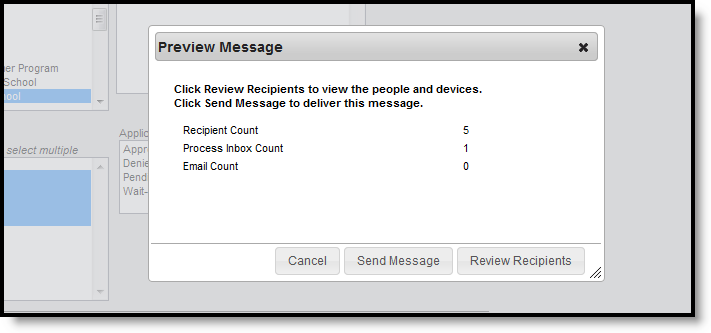 School Choice Message Preview
