Tool Search: Dependent Care
Site Attendance allows users to take session attendance by student at each session site. Users can verify daily attendance, emergency contacts, persons authorized to pickup, and any forms attached to the session. Users may also check students in and out of the session.
 Dependent Care - Site Attendance
Site Attendance Fields
| Field | Description | ||||||
|---|---|---|---|---|---|---|---|
| Timeframe (Current is the default) | Use the Timeframe field to determine the type of sessions you'd like to view.
| ||||||
| Filter by Session Name | This field allows the user to narrow the displayed sessions to a more specific subset of sessions or to one session in particular. | ||||||
| Sessions | All sessions for the currently selected timeframe display in the Sessions section. | ||||||
| Session Sites | Sites attached to a session display next to the session. |
Take Site Attendance
- To begin taking attendance, select the appropriate session and then the Site for which you are taking attendance.
 Site Attendance
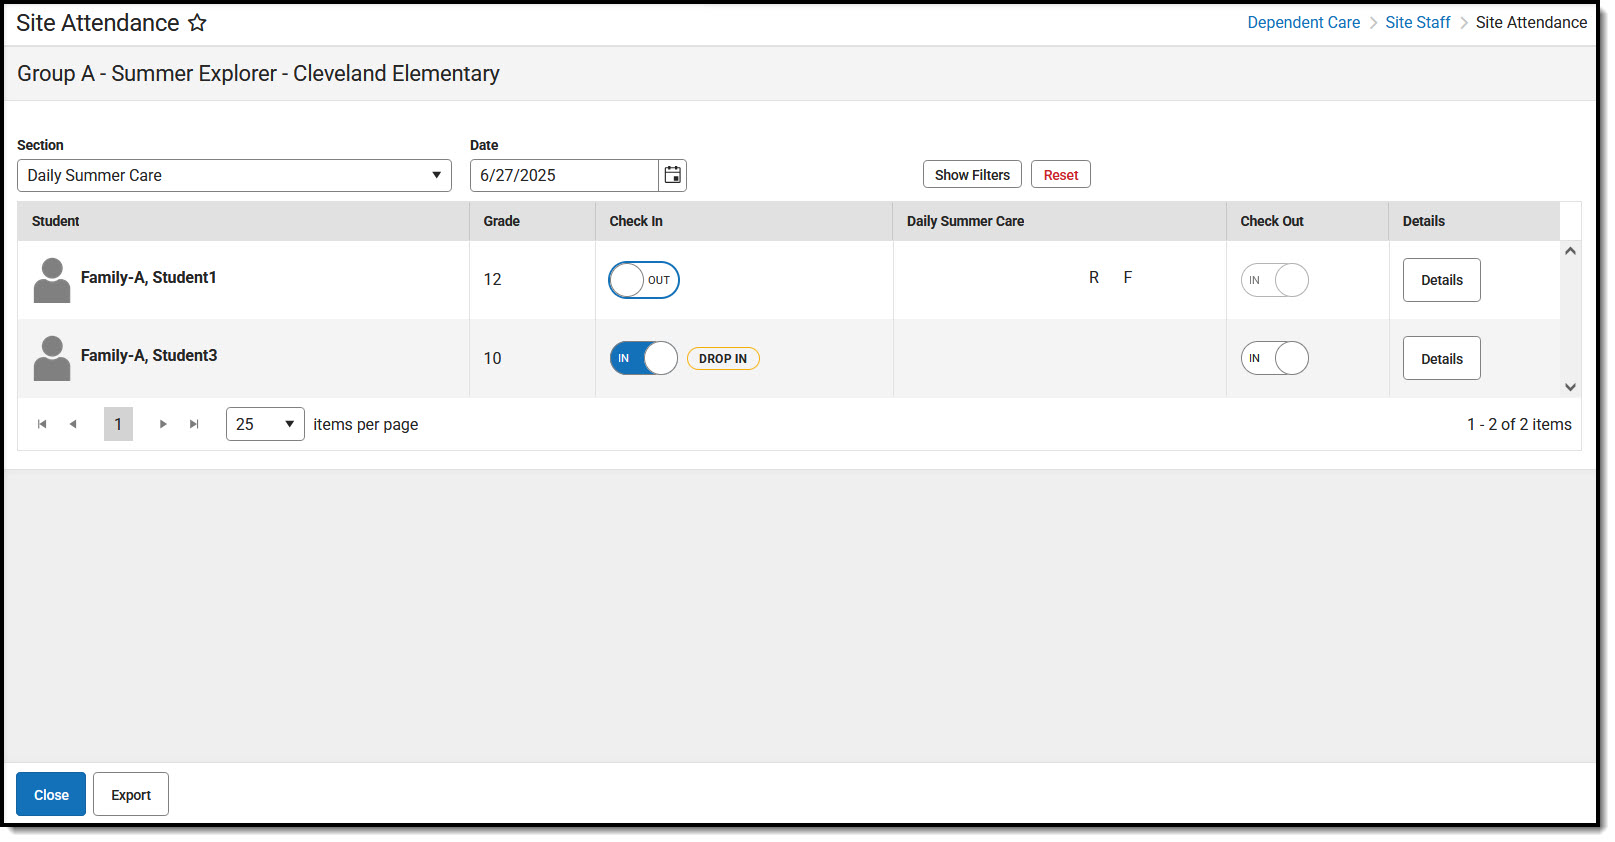
 - Site Attendance for the selected site displays. Use the Section drop-list to select the site section for which you are taking attendance.
- If the selected section does not accept drop-in care, a banner displays at the top of the screen stating the section does not allow drop-in care.

- Use the Date field to select the date for which you are viewing/taking attendance.
- Press Show Filters to narrow the list of students to a specific student or subset of students.
- Use the Search by Student filter to narrow the list to a specific student(s).
- The View by Grade filter allows users to view any students in a specific grade.
- To view a section by specific days, use the weekdays in the View by Day section to select the days for which you want to view students scheduled for attendance.
- Once you have entered all the information by which you want to filter, press Apply Filters. All students meeting the filter criteria for the section display. To clear out the filters and again view all students in the section, press Reset.
- To check in a student for the section, find the student checking in and press the Check In option. The student's check-in status changes to checked In.
- If a student is not registered to attend on the day for which they are being checked in, a Drop In Rate alert displays.
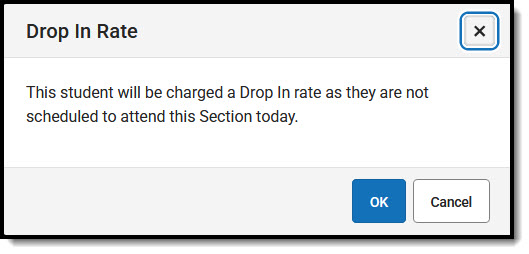
- Press OK to continue checking in the student and having drop-in rates applied. Press Cancel to cancel the student's check in.
- If a student is not registered to attend on the day for which they are being checked in, a Drop In Rate alert displays.
- To check out a student from the section, find the student checking out and press Check Out. The student's checkout status changes to Out.


View Student Details
Users can view the attendance schedule, emergency contact/pickup persons, and form details for each student registered for the section.
Press Details to view a student's attendance schedule for the section, emergency contacts, persons authorized for pickup, and any forms attached to the session. 
NOTE: These are read-only fields; users may not edit the information on this screen.
Export Student Attendance Data
Users can export student attendance data for the selected section, or all sections, to a printable format.
 Export Student Attendance Data Editor
- Press the Export button.
- In the Type field, select the format in which to export the data: Excel or CSV.
- Use the Data field to select Grid as is or All Data.
Data Type Description Grid as is Attendance data for only those students fitting the filtered criteria is exported. All Data All student attendance data is exported regardless of any applied filters. - Press Generate to export the data or Close to exit without exporting any data.
