Student Record Sessions allow users to view the sessions for which the student is currently registered, as well as sessions for which they were previously registered.
 Student Record Student Session(s) View
View Session Details
- To view a list of previously enrolled sessions for the student, toggle the Display Previous Sessions option to ON. To view only currently enrolled sessions, toggle OFF the Display Previous Sessions option.
- To view a session in more detail, select the desired session and press View. A screen displays session details for the student.

- From this screen, users can both view and edit: Schedule, Emergency Contacts/Authorized Persons, Charges, Credits, Discounts, and Forms.

Edit a Student's Session Schedule
Users can view and edit a student's session schedule.
- To edit the student's session schedule, press Edit. The student's Current Schedule displays.
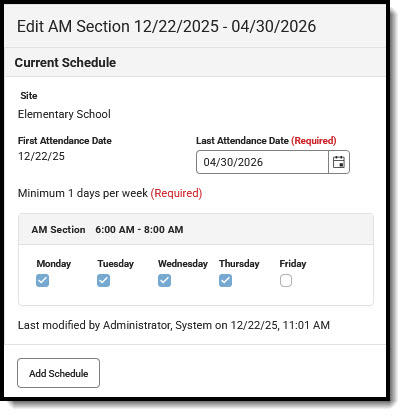 Current Schedule View
 - The First Attendance Date field displays the day on which the student first attended the session.
- Use the Last Attendance Date fields to enter a new date, if necessary.
- The Weekday check boxes display the days on which the student attends the session. The student is scheduled to attend on all of the checked days. Users cannot modify the currently scheduled days. See Add a Student Schedule to make changes to scheduled days for the session.
- When finished, press Save to save any changes made to the student's schedule or Cancel to exit without saving the changes. To make further changes to the student's session schedule, press Add Schedule. See Add a Student Session Schedule for more information.

Add a Student Session Schedule
Users can modify a student's session schedule through the Added Schedule option.
 Added Schedule Editor
- Use the First Attendance Date and Last Attendance Date fields to enter the date range for which the student will be in attendance for the session.
- Use the Weekday check boxes to mark the days for which the student will be in attendance. Checked days indicate the student will attend the session. Leave days the student won't attend blank. Students must attend for at least the minimum number for days required for the session. Users may not save the changes if the student schedule does not meet this requirement.
- When finished, press Remove Schedule to remove the added student schedule for the session. Press Save to exit and save the added schedule for the session. Press Cancel to exit from editing the student's session schedule without saving any changes.
Student Session Emergency Contacts and Authorized Pickup Person(s)
Users may not remove Emergency Contacts from a student record. They may, however, change their Authorized Pick Up Person status or add new emergency contacts and authorized pick up persons.
- To view/edit the list of Emergency Contacts and Authorized Pick Up Persons for a student, press the Edit button. The Emergency Contacts/Authorized Pick Up People list displays.
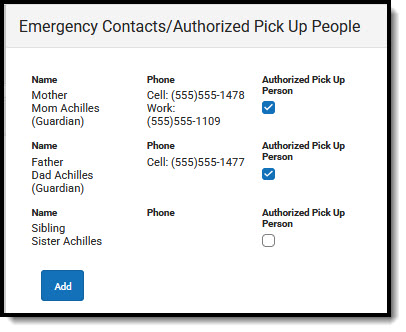
- To change a person's Authorized Pick Up status, either mark or unmark the checkbox. If the Authorized Pick Up Person checkbox is marked, the person is authorized to pick up the student. If the checkbox is unmarked, the person is not authorized to pick up the student.
- To add a new emergency contact/authorized pick up person, press Add.
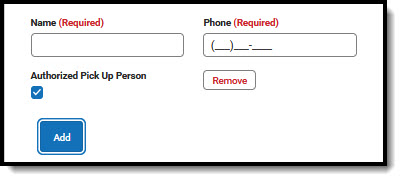
- Enter a Name and Phone number for the new contact.
- If this person is authorized to pick up the student from care, mark the Authorized Pick Up Person checkbox.
- To remove a newly added contact, press Remove. It is important to note that existing contacts may not be removed from the list nor can a newly added contact be removed once the addition is saved.
- When finished, press Save to save any changes made to the student's schedule or Cancel to exit without saving the changes.


Student Session Charges
Users can adjust charges applied to the student's session or add additional charges.
Adjust Existing Charges
NOTE: If a charge has already been invoiced, users may view the charge details but cannot adjust it.
- Find the charge you'd like to adjust and press Adjust. The Adjust a Charge screen displays.
 Adjust a Charge
 - If the charge has already been invoiced, the charge cannot be edited. A note displays saying the charge has already been invoiced.
- The Charge Name is read-only and cannot be changed.
- The Comment field lists comments entered when the charge was made.
- In the Effective Date field, enter the date on which this charge adjustment takes effect.
- Use the Adjustment Amount to enter the amount the charge will be adjusted. This amount must be equal to, or less than, the current charge.
- Enter an Adjustment Comment explaining the adjustment.
- When finished, press Save to save any changes made to the charges or Cancel to exit without saving the changes.
- Once the adjustment is applied, users are able to edit the adjustment by pressing the Edit button. From the Edit screen, users may change the Effective Date and the Adjustment Amount. Users must also enter a Comment explaining the reason for the edit.

Charge Adjustment Fields
| Field | Description |
|---|---|
| Charge Name | Name of the charge selected for Adjustment. This is a read-only field and cannot be edited. |
| Comment | Lists all comments entered when the charge was made. This is a read-only field and cannot be edited. |
| Effective Date Required | Indicates the date on which this charge adjustment takes effect. |
| Adjustment Amount Required | Determines the dollar amount of the charge adjustment. This amount MUST BE equal to, or less than, the current charge. |
| Adjustment Comment Required | Explains the reason for the adjustment. |
Edit a Charge Adjustment
Users can edit charge adjustments before they are invoiced.
- Find the charge you'd like to adjust and press Adjust. The Adjust a Charge screen displays.
 Edit an Adjustment Editor
 - If the charge has already been invoiced, the charge cannot be edited. A note displays saying the charge has already been invoiced.
- The Charge Name is read-only and cannot be changed.
- The Comment field lists comments entered when the charge was made. This field cannot be edited.
- In the Effective Date field, enter/edit the date on which this charge adjustment takes effect.
- Use the Adjustment Amount to enter the amount the charge will be adjusted. This amount must be equal to, or less than, the current charge.
- Enter or edit the Adjustment Comment explaining the adjustment.
- When finished, press Save to save any changes made to the charges or Cancel to exit without saving the changes.
- Once the adjustment is applied, users are able to edit the adjustment by pressing the Edit button. From the Edit screen, users may change the Effective Date and the Adjustment Amount. Users must also enter a Comment explaining the reason for the edit.

Add Additional Charges
- To add an additional charge to the student session charges, press Add. The Add a Charge screen displays.
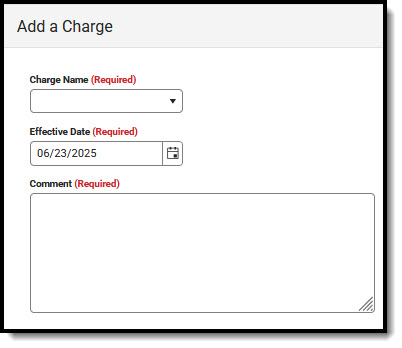
- Use the Charge Name drop-list to select a charge the apply to the student's charges.
- In the Effective Date field, enter the date on which the charge should be applied.
- Enter a Comment as to why the charge is being applied. This is a required field.
- When finished, press Save to save any changes made to the charges or Cancel to exit without saving the changes.

Student Session Discounts
Users are able to edit existing discounts applied to the student's session or to add additional discounts.
Add Additional Discounts
- To add an additional discount to the student session discounts, press Add. The Add a Discount screen displays.
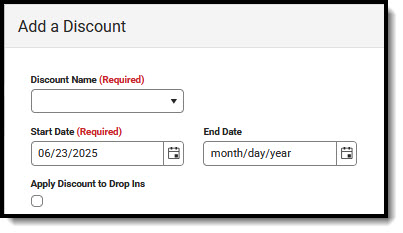
- Use the Discount Name drop-list to select a discount to apply to the student's account.
- In the Start Date and End Date fields, enter the date range for which to apply this discount. If the discount should be indefinitely applied, leave the End Date blank.
- Mark the Apply Discount to Drop Ins if the discount should be applied to any drop-in care for the student. Leave the checkbox unmarked if the discount should not be applied to drop-in care.
- When finished, press Save to save any changes made to the discounts or Cancel to exit without saving the changes.

Discount Fields
| Field | Description |
|---|---|
| Discount Name Required | Indicates the discount being applied to the account. |
| Start Date Required | Determines the date on which the discount is applied to the account. |
| End Date | Determines the date on which the discount ends.
|
| Apply Discount to Drop Ins | Indicates if the discount applies to any drop-in care for the student.
|
Edit Existing Discounts
- Find the discount you'd like to change and press Edit. The Edit a Discount screen displays.
 Edit a Discount Editor
 - Use the Discount Name field to view the name of the applied discount.
- The Start Date field displays the date on which the discount was applied. The End Date field determines the date on which the discount ends. If the discount should be indefinitely applied, leave the End Date blank.
- Mark the Apply Discount to Drop Ins if the discount should be applied to any drop-in care for the student. Leave the checkbox unmarked if the discount should not be applied to drop-in care.
- When finished, press Save to save any changes made to the discounts or Cancel to exit without saving the changes.

Student Session Credits
Under session Credits, users may edit existing credits or can add additional credits to the account.
Edit Existing Credits
- Find the credit you'd like to change and press Edit. The Edit a Credit screen displays.
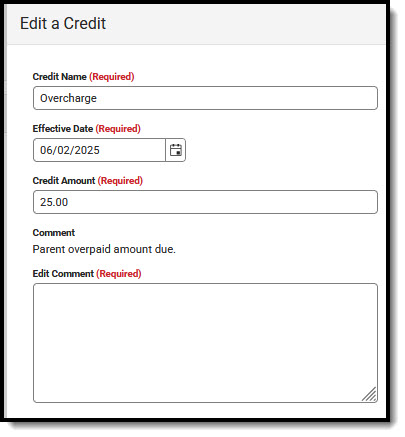
- Use the Credit Name field to enter the name of the credit. Leave this field as-is if the name of the credit still works.
- In the Effective Date field, enter the date on which to apply this credit. Leave this field as-is if it does not need changing.
- Next, enter the amount to credit the account in the Credit Amount field. Leave this field as-is if the credit amount is still correct.
- Use the Edit Comment field to explain the reason for the credit. This is a required field.
- When finished, press Save to save any changes made to the discounts or Cancel to exit without saving the changes.

Add Additional Credits
- To add an additional credit to the student session credits, press Add. The Add a Credit screen displays.
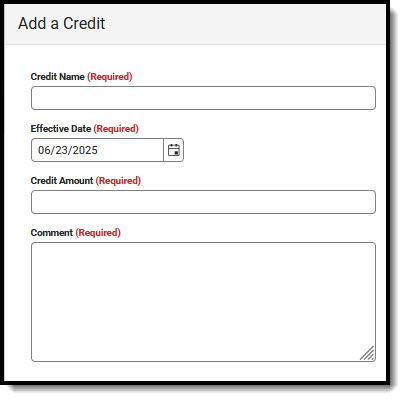
- Use the Credit Name field to enter the name of the credit.
- In the Effective Date field, enter the date on which to apply this credit.
- Next, enter the amount to credit the account in the Credit Amount field.
- Use the Comment field to explain the reason for the credit. This is a required field.
- When finished, press Save to save any changes made to the discounts or Cancel to exit without saving the changes.

Credits Fields
| Field | Description |
|---|---|
| Credit Name Required | The name of the Credit being issued. |
| Effective Date Required | The date on which to apply the credit to the account. |
| Credit Amount Required | The dollar amount being credited to the account. |
| Comment/Edit Comment Required | Comment explaining the reason for the credit or the reason for editing the credit. |
Student Forms
The Forms section can be used to view any student forms and their completion status. Forms cannot be edited or added form this screen.
Outstanding Invoices
In the Outstanding Invoices section of the Student Records screen, users can view any unpaid invoice balances for the student's account. This screen details the current invoice balance and provides itemized invoice details. This is a read-only screen; no changes can be made to the account.
If the account does not have any outstanding (unpaid) invoices, a banner displays saying: This account has no outstanding invoices.
See the Student Record Outstanding Invoices article for more information.
Member Credits
Users can view credits to a student account, add credit to the account, and make credit adjustments to the account. See the Student Record Member Credits article for more information.
Payment History
Use the Payment History section to view history of account payments, add payments or refunds to the account, and manage payment errors.
See the Student Record Payment Error Details (Dependent Care) article for more information.
 Dependent Care Student Record Payment History
- Use the filter fields to narrow the search and find the specific payment for which you're looking. Once you've entered all the appropriate filters, press Apply Filters. All payments meeting the search criteria display.
- To view all account payment history, press Clear Filters.
- To view payment history in Excel, press Export to Excel.
