After the upcoming calendar has been created and courses rolled forward, updates may need to be made to course, section and teaching staff information before moving forward with scheduling of students.
Review Teacher Assignments
District Employment
The District Employment tab is used to record basic information for district employees. Districts may select a preference that requires District Employment information to be entered for staff prior to entering District Assignment information that details where they work and what they do in a district.
Tool Search: District Employment
The District Employment tool provides information on all current and past employees within the district or state.
 District Employment tool
 See the District Employment Tool Rights article for information about rights needed to use this tool.
A staff icon displays next to a person's name if that person has a Staff ID. When searching for staff, use the Quick Search Staff option or the Advanced Search settings. This returns staff members with both a District Employment record and a District Assignment record.
A System Preference is available - Require Employment Record for District Assignment - that determines how District Employment records work in conjunction with District Assignment records. The Employment tool creates a district employment record; the District Assignment tool creates a school or building employment record.
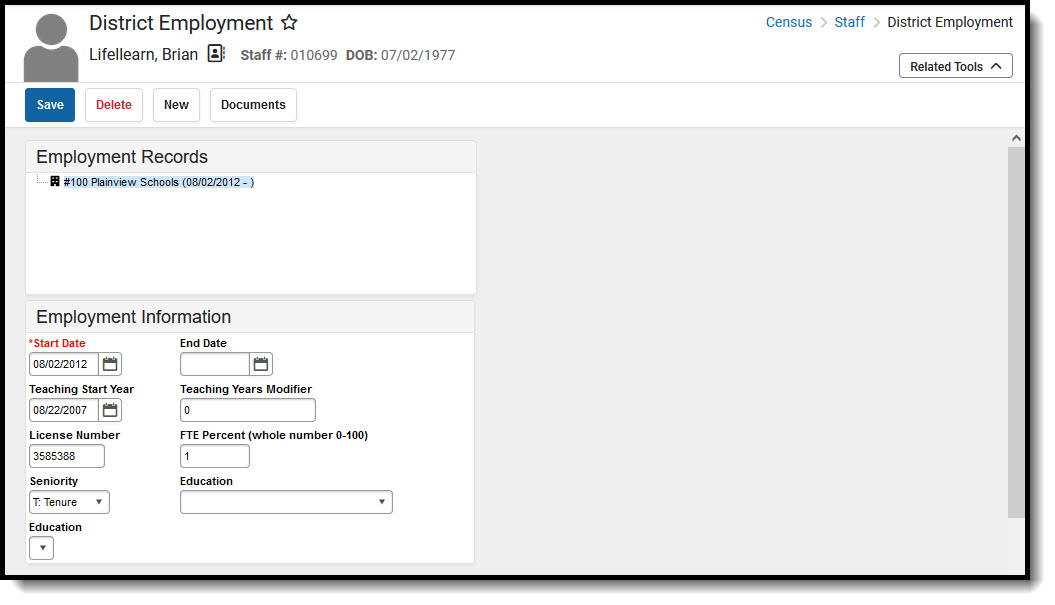
Employment Editor Information
The fields available on this editor may vary by state. Follow your state's policies and procedures to meet reporting requirements.
Data Element | Description |
|---|---|
Start Date | Indicates the date on which the staff member began employment in the district. This is a required field. Dates are entered in mmddyy format, or you can use the calendar icon to select a date. |
End Date | Indicates the date on which employment in the district ended for the staff member. Entering an end date causes the staff person to appear in red text when that person is returned in search results. Dates are entered in mmddyy format or use the calendar icon to select a date. A District Employment record is considered active until midnight on the entered end date. For example, if the district employment record is ended for a staff person as of September 19, it is considered active until midnight on September 19. At 12:01 a.m. on September 20, it is no longer active. |
Teacher Start Year | Indicates the date the staff person began teaching (when the teaching license was received). |
Teaching Years Modifier | Used to add a value to the total number of teaching years in the Years Teaching column of the Staff Report. Calculations may vary from state to state. Review state-specific documentation for details. |
License Number | Staff person's teaching license number. |
FTE Percent (whole number 0-100) | Indicates the percentage of time an employee works during a full-time work week. This field accepts whole numbers between 0 and 100. If a user enters decimal numbers (1.4, .75, etc.), the value is rounded up or down when the record is saved (1.4 rounds to 1, .75 rounds to 1, 2.8 rounds to 3). Not all states use this field. The District Assignments editor also included an FTE of Assignment field. |
| Ed-Fi Org Title Code | This field gives users access to the Ed-Fi Dashboards based on the selected title for the staff. |
Seniority | Indicates the staff person's tenure, if applicable. Options are as follows:
|
Education | Indicates the level of schooling the staff person has. Options are as follows:
|
Additional options for the Education and Seniority fields can be added using the Campus Attribute Dictionary.
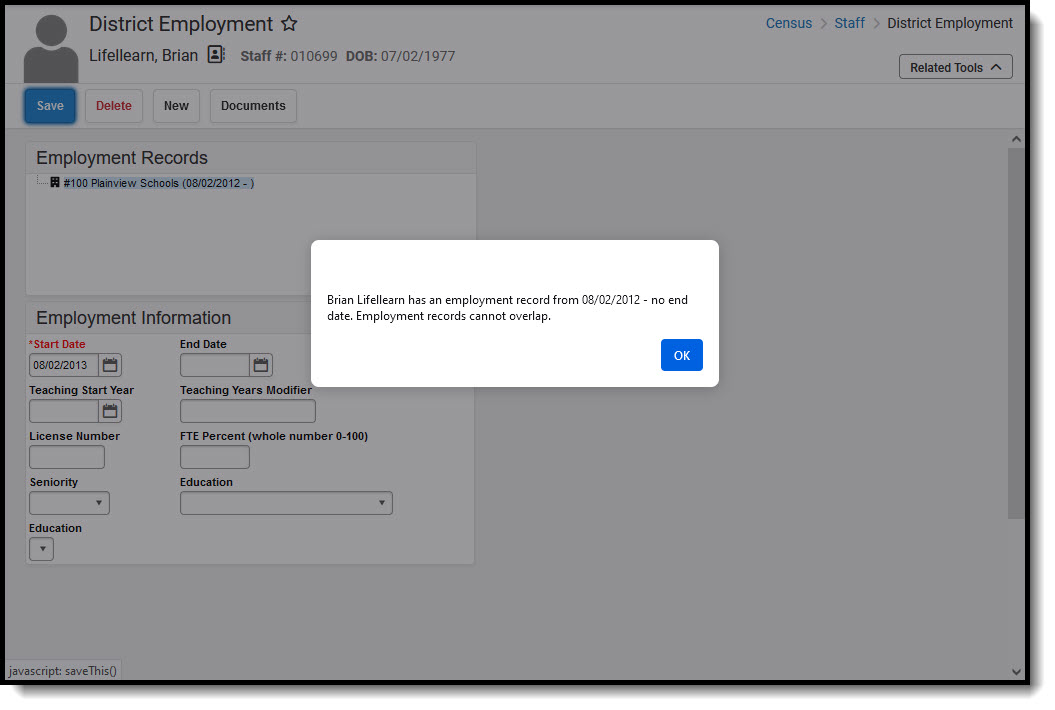
District Employment Validations
A staff member cannot have multiple employment records within the same time period in the same district. For example, if a teacher has a district employment record that begins in September 2010, a second employment record that begins in September 2011 cannot be added.
The first record is not automatically ended; however, a warning message indicates that an existing employment record exists and overlapping records are not allowed.
 Employment record overlap warning
This same message displays when a user attempts to create an employment record that overlaps at any point and time with an existing record, even if the existing record is ended. For example, if an employment record with a start date of September 2001 ended in May 2010, a new one with a start date within those dates of employment cannot be created.
Add Employment Records
- Enter the Start Date of the employment in the district. When the staff member ends employment, enter the date of his/her last day within the district in the End Date field.
- Enter a date in the Teaching Start Year field. This is the year the staff person started teaching, if that person is a teacher.
- In the Teaching Years Modifier field, enter the number of years the staff person has been teaching. This number needs to be a whole number.
- Enter the staff member’s License Number.
- Enter the full-time employment percentage of the staff person in the FTE Percent field.
- Select the type of Seniority of the employee from the dropdown list.
- Select the employee’s Education Level from the dropdown list.
- Click the Save icon when finished.
Edit Employment Records
- Select the Employment Record that needs to be modified.
- Enter an End Date for the record. This keeps the dates of the employment record but indicates the staff person is no longer active.
- Click the Save icon when finished.
When an Employment Record is ended, a District Assignment record may also need to be ended.
Manage District Employment Documents
To view documents, click the Documents button on the action bar. Users with the appropriate tool rights may also complete the following tasks.
- Upload Documents
- Delete Documents
- Replace Documents
- Edit a Document Name or File Description
- Download Documents
State-Specific Information
Follow these links to view District Employment information for your state. Linked articles open in a new browser tab.
District employment records are entered and maintained for staff in Campus.
District Assignment
The District Assignment tab holds information regarding where a staff member is working or has worked in a district and what their role is. Checkboxes are used to determine where a staff member's name appears in various droplists throughout Campus.
District Assignments are used when assigning course sections to teachers. Only teachers in the selected school who are employed during the date range can be assigned to sections as teachers. Any staff member with a district assignment to a school may be added as a new section staff member.
A staff member’s employment record is organized into two areas - the district of employment and the school(s) to which the person is assigned.
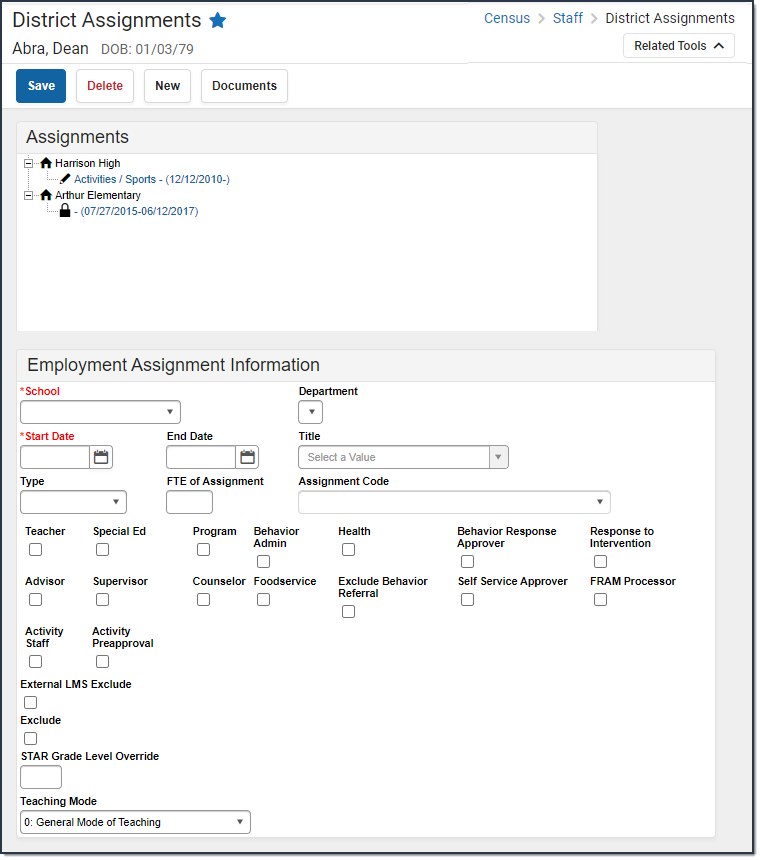 District Assignments Editor
See the District Assignments Tool Rights article for information about rights needed to use this tool.
The available fields and data elements on the District Assignment editor vary from state to state. See the Localizations page for specific state information.
District Assignments Editor
The following fields are available on the District Assignments editor.
| Field | Description |
|---|---|
| School | Indicates at which school building the staff person is employed. |
| Department | Indicates the assigned area within the school where the staff person is assigned. The list is populated from the available Departments at the district. This is used for scheduling purposes. |
Start Date Required | Indicates the date the staff person began employment at the selected school. This is the very first date the staff member was employed at the school. Dates are entered in mmddyyyy format or the calendar icon may be used to select a date. |
| End Date | Indicates the date the staff person ended employment at the selected school. This is the very last date the staff member was employed at the school. Dates are entered in mmddyyyy format or the calendar icon may be used to select a date. A District Assignment record is considered active through midnight on the entered end date. For example, if the district assignment record is ended for a staff person as of September 19, the district assignment record is considered active until midnight on September 19. At 12:01am on September 20, the district assignment record is no longer active. |
| Title | Position name of the staff person. This list of titles is editable within the Attribute/Dictionary. See the Attribute Dictionarydocumentation for additional information. |
| Type | Indicates the position of the staff member. |
| FTE of Assignment | Indicates what portion of the employee’s FTE percent this particular district assignment represents. The field accepts both decimal and whole numbers (e.g., .5 or 50 to represent a half-time assignment). It is important for consistency and accuracy of reporting that the same numbering system is used for all employees (e.g. FTE of Assignment in decimal format for all employees). Not all states use this field. The District Employment editor also includes a FTE Percent field. |
| Assignment Code | The Assignment Code field is an auto-complete field that is dynamically searchable depending upon user-entered text. This information is populated by the values stored in the Attribute Dictionary. If an entered search request does not match any entries in the dictionary, a warning message displays indicating the user should modify the entered search results. |
| District Assignment Checkboxes | These checkboxes determine, in addition to appropriate tool rights, what access a user has to certain areas of the product. See the District Assignment Checkboxes section for more information. |
| Health License | Indicates the title of the health staff member. This value only pertains to staff with the Health checkbox marked. This field defaults to hidden. The display name and values populated in the dropdown can be modified in the Attribute/Dictionary at System Administration > Custom > Attribute/Dictionary > EmploymentAssignment > HealthLicense. See the Attribute Dictionary documentation for additional information. |
| Supervisors | Denotes the staff person as being a supervisor within the department. If a staff member is marked as a Supervisor on the District Assignment record, this field is available. |
| External LMS Exclude | When marked, prevents this record from being shared with external learning management systems, such as through OneRoster or a custom district configuration. |
| Teaching Mode | Indicates an alternative mode of instruction the staff person uses when teaching classes. |
| Exclude | When marked, the district assignments record is not included in state reporting. It's used in Ed-Fi reporting (Michigan, Nebraska, Wisconsin and Wyoming) and for other state reporting needs. |
District Assignments Checkboxes
A series of checkboxes display on the District Assignments tool that determine, in addition to the appropriate tool rights, what access a user has to certain areas of the product. The following defines what tool rights need to be given and when these checkboxes should be selected.
These checkboxes are used by other areas of the product (e.g., My Data, Emergency Messenger, Ad hoc Reporting) to differentiate between types of staff members.
In addition to the selections made on the District Assignments tool, appropriate tool rights need to be assigned.
Checkbox | Description | Affected Area |
|---|---|---|
Teacher | Selecting the Teacher checkbox makes the staff member’s name available in the Teacher dropdown lists on the Staff History tool. This option is available in State Edition. | Scheduling > Courses > Course > Section > Staff History |
Special Education | Selecting the Special Education checkbox makes the staff member’s name appear in the Special Ed Staff dropdown list on the student’s Team Members tool when adding new team members. This option is available in State Edition. | Student Information > Special Ed > Team Members |
Program | The logic tied to this checkbox is specific to Ohio only. If this checkbox is marked for a staff member in Ohio, the staff person will appear as an option in the Program Staff dropdown list from the Programs tool. | Programs > Program Staff for Ohio only |
Behavior Admin | Selecting the Behavior Admin checkbox makes the staff member’s name appear in the Behavior Admin Staff dropdown list on the student’s Behavior tool when adding new behavior events and on the Behavior Management Resolution editor. It is also used to display the staff person's name in the Notify list on the Behavior Referral tool. | Student Information > General > Behavior Behavior > Behavior Management > Incidents > Resolutions Behavior > Behavior Referral > Incident Detail Information > Notify |
Health | Selecting the Health checkbox allows the staff member’s name to appear in the Recorded By dropdown on the student’s Medications and Health Office Visits tool when adding/editing medications and health events. | Student Information > Health > Health Office Visits Student Information > Health > Medications |
| Behavior Response Approver | When marked, the staff person can be selected in the Behavior Response Approver dropdown list on the Response editor. | Behavior > Behavior Management > Incidents > Response Editor |
| Response to Intervention | When marked, the staff member’s name appears in the Response to Intervention dropdown list on the student’s Team Members tool when adding new team members. | Student Information > Response to Intervention > General Team Members |
Advisor | Selecting the Advisor checkbox allows the staff member’s name to appear in the Advisor dropdown list on the student’s Team Members tool when adding team members for PLP purposes. This option is available in State Edition. | Student Information > PLP > Team Members |
Supervisor | Selecting the Supervisor checkbox indicates the person is considered a supervisor at the school or district and will display a Supervisor dropdown on the District Assignments tool. Once this checkbox is chosen for anyone at the school, the Supervisor dropdown will appear on all staff member’s District Assignment tool. | Census > Staff > District Assignment |
Counselor | Selecting the Counselor checkbox places the staff member’s name in the Counselor dropdown list on the Fill Counselor Wizard in Scheduling. | Scheduling > Fill Counselor |
Food Service | There is no logic tied to this checkbox. However, staff members can still be marked accordingly and information can be pulled in Ad hoc Filter Designer if needed. | N/A |
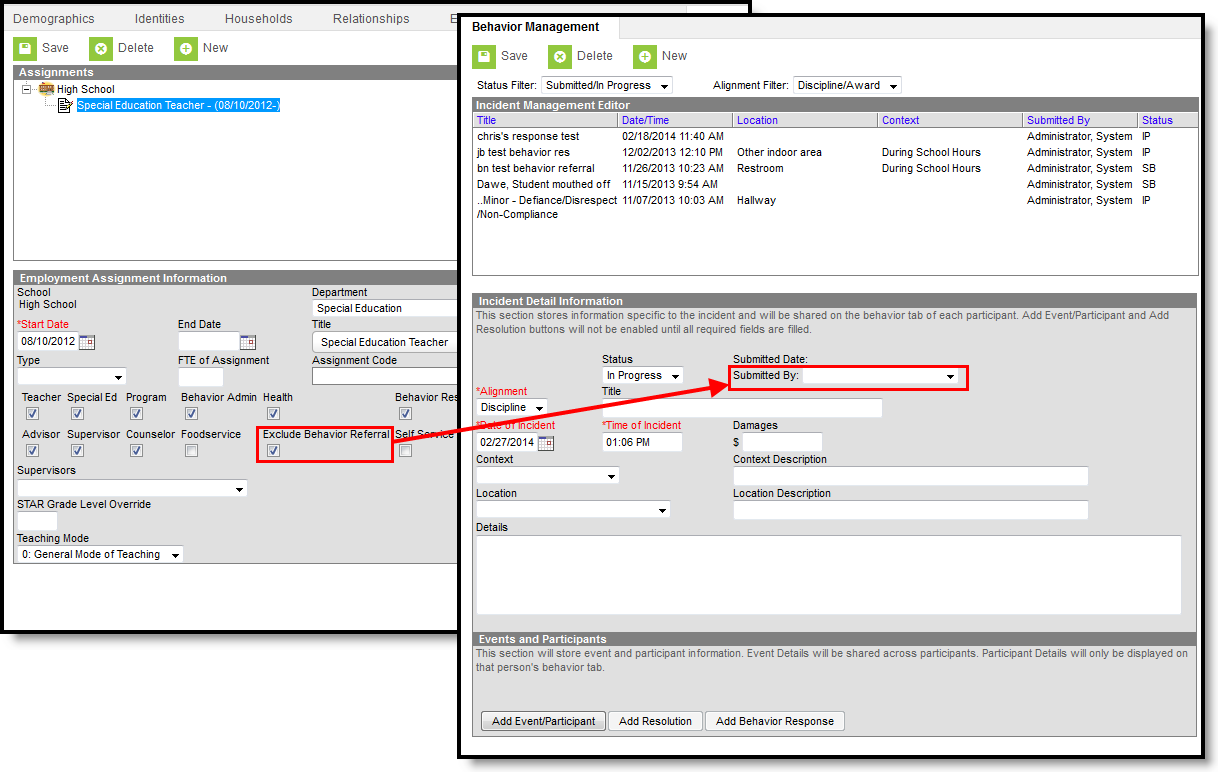
Exclude Behavior Referral | Eliminates that user’s name from the Submitted By dropdown list on the Incident Detail editor.
|
|
Self Service Approver | The Self Service Approver checkbox indicates that staff member has the ability to approve or deny requests entered by co-workers using the My Data feature in Census and should receive notifications of those requests in their Process Inbox. The staff member with this checkbox requires additional tool rights to the Request Processor feature. This selection only turns on/off the notification of requests through the Process Inbox. In addition to this checkbox, those staff members who will be responsible for approving staff member's My Data requests will also need tool rights to the Request Processor. This option is available in State Edition:
| Census > Staff Request Processor |
FRAM Processor | Indicates the staff member is a designated FRAM Processor and has the ability, depending on assigned tool rights, to process Meal Benefits Applications via the Household Applications or Online Applications tools. | FRAM > Household Applications > Online Applications |
| Activity Staff | When this checkbox is marked, the staff member may be assigned as the primary or secondary owner responsible for an activity in the Activity Registration tool. | Activity Registration > Activity Monitor > Activity Builder |
| Activity Preapproval | When this checkbox is marked, the staff member may be assigned as the School Approver, District Approver, or International Approver for an activity preapproval request. | Activity Registration > Preapproval Configuration; Preapproval Requests |
District Assignment/Course Section Logic
The District Assignment Record is linked to the Course Section Editor by the District Assignment field on the Course Section tool. The following defines the logic used.
This field pulls the Title (or, in some locations, the State Title) assigned to the selected staff person on the District Assignment record. Only assignments within the current school will be available for selection. This field is not required.
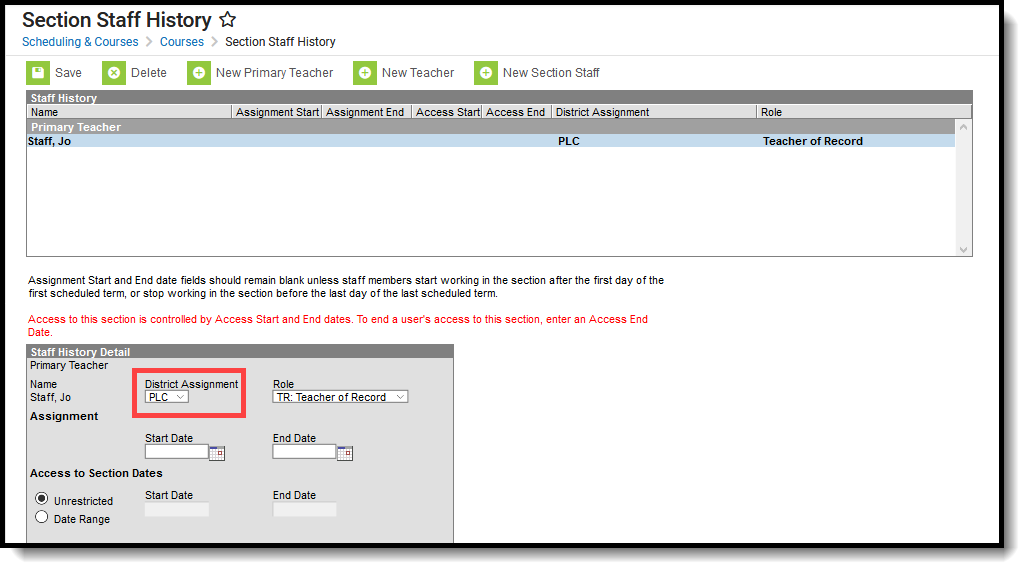 District Assignment Field on Staff History
Once a District Assignment selection has been made on the Staff History Editor, the following logic is applied:
- Users may not remove a District Assignment when that staff person has a section assignment. A warning message will appear indicating that the District Assignment is linked to a Course Section.
- Users may not remove the Title/State Title selection from the District Assignment when the staff person has a section assignment. A warning message will appear indicating that the District Assignment is linked to a Course Section.
- Users may not remove the Teacher checkbox selection when that staff person has a section assignment. A warning message will appear indicating the District Assignment is linked to a Course Section.
When a District Assignment is ended for a teacher, the start and end dates of the District Assignment display in the selected District Assignment option.
Add District Assignments
- Click the Add Assignment icon. An Employment Assignment Information window will appear.
- Select the School at which the person works from the dropdown list. This is a required field.
- Select the Department in which the person works from the dropdown list.
- Enter the Start Date for this person. This is the date the person began working at the selected school. Dates are entered in mmddyy format or by clicking the calendar icon and selecting a date.
- Select a Title from the dropdown list.
- Select a Type of employment. These types vary by state. Please select the appropriate options for the user.
- Enter the person’s Assignment Code and enter the FTE of Assignment.
- Check the boxes to indicate the designations of the person.
- Select a Health License option, if applicable.
- Select the person’s Supervisor from the dropdown list.
- Enter any other fields necessary that are localized for your state and required for reporting purposes.
- Click the Save button when finished.
State Edition users are not required to select all options on this editor.
The Primary Teaching Area field is not used in all states and options can be localized to fit individual state needs. This field becomes available when the staff member is designated as a Teacher.
Edit District Assignments
- Select the assignment record to modify.
- Make the necessary changes to the record.
- Click the Save button when finished.
When an assignment needs to be ended, enter a date in the End Date field. All other information should remain as a historical instance of the staff person's employment and settings during a certain range.
Manage Documents
To view documents, click the Documents button on the action bar. Users with the appropriate tool rights may also complete the following tasks.
- Upload Documents
- Delete Documents
- Replace Documents
- Edit a Document Name or File Description
- Download Documents
State-Specific Information
Fields vary by state. Follow these links to view District Assignment information for your state. Linked articles open in a new browser tab.
Save
The District Assignments tool lists the location where the staff member is working and information about their role. This lesson demonstrates how to manage District Assignments.
Course Preparation
Course Tools (For Schools Not Using Course Catalogs)
Use Course Tools to enter and edit information regarding courses in a selected calendar and school. For schools using Course Masters, some of this information may be locked at the course master level so that it cannot be changed at the school level.
Tool Search: Add Course
The Add Course tool allows users to create new courses and enter the required fields for saving them. It contains the same fields as the Course Information tool but also includes data entry for basic course information.
When the school selected in the Context Switcher is linked to a Course Master, the Add Course Master tool displays.
As of the Campus.2515 Release Pack (April 2025), the Add Course tool has a new look and feel! It now matches the updated Course Information tool.
- See the Course Information Field Descriptions for definitions, database information, and Ad hoc Reporting locations.
- Use your browser's search functionality (CTRL-F, F3, etc.) to locate the new field.
- Your tool rights may need to be modified. Full access to Add Course requires Read and Write rights, plus Read rights to Course Information and Section Information.
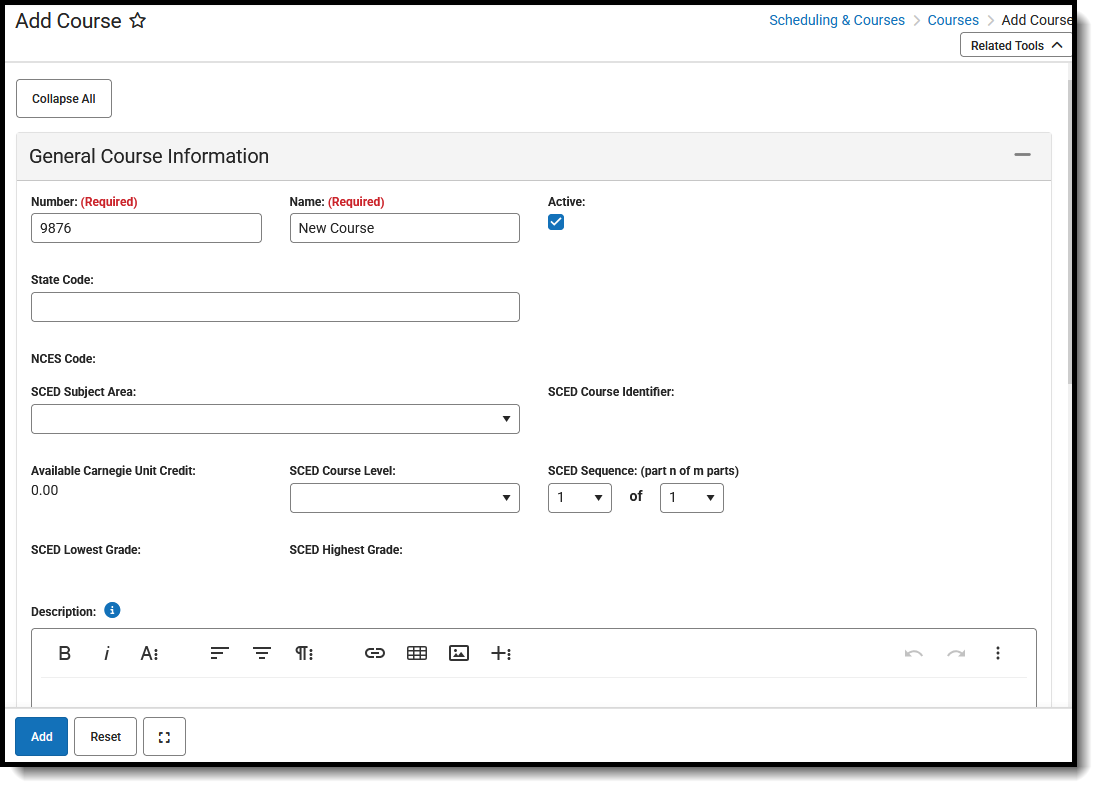 Add Course Tool
To add a new course, users need at least Read rights to Course Information and Section Information.
For more information on necessary tool rights, refer to the Add Course Tool Rights and the Course Information Tool Rights articles.
Navigation of Add Course Tool
The Add Course tool is organized into the following sections:
- General Course Information includes identifying course information, whether it's an active course (students can be scheduled into it), SCED information, and a course description.
- Scheduling includes the length of the course, the number of periods it meets in one day, the number of schedules it meets in, the department name, the maximum student count, etc.
- Course Setup includes fields like the course is an attendance-taking course, uses positive attendance, is standards-based, reports scores on a student's transcript, and much more.
- State Defined lists all of the fields that are used for state reporting in your state and includes fields like Dual Credit and State Report Exclude.
- District Defined lists any field your district has chosen to collect data on. These are added using the Custom Attribute/Dictionary.
- Comments lists any additional information about the course that your school or district wants known. This could be a note when the course was added to the catalog, that it must meet in a certain room, that it's only for seniors, or some other piece of information.
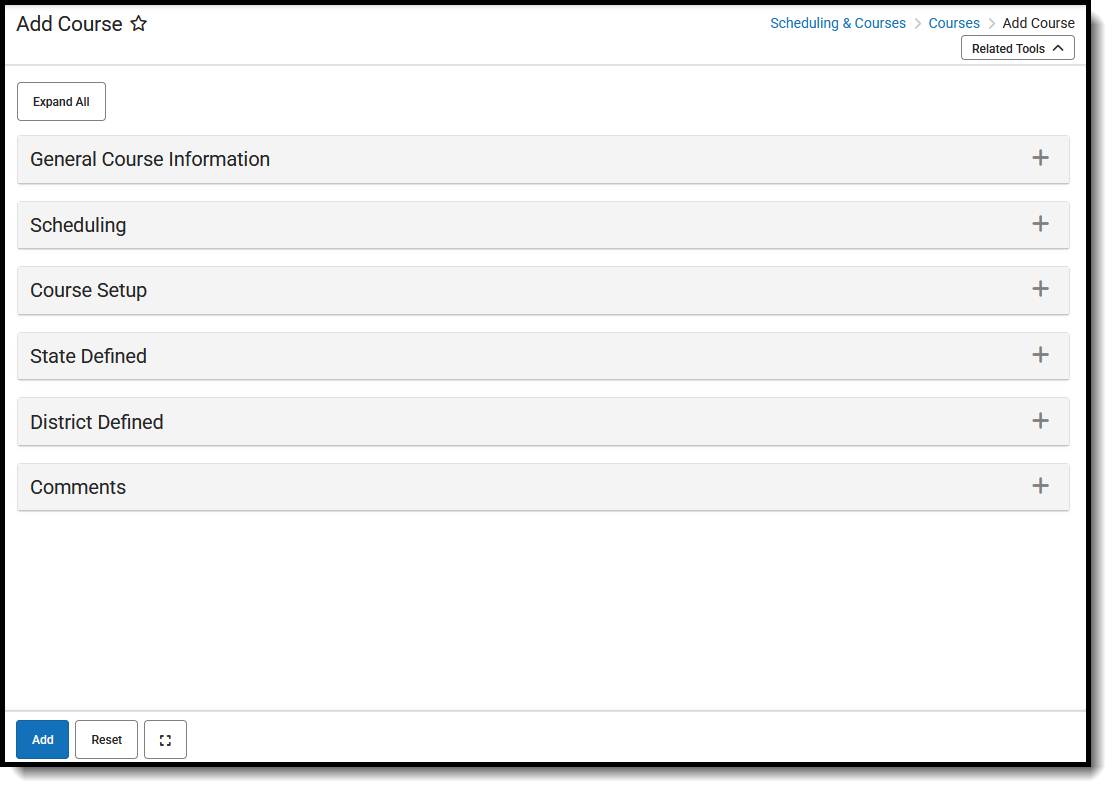 Add Course Tool - All Cards Collapsed
Click on the gray header or use the plus sign on the right side to expand the card. Use the Expand All/Collapse All button at the top of the tool to open or close all of these sections.
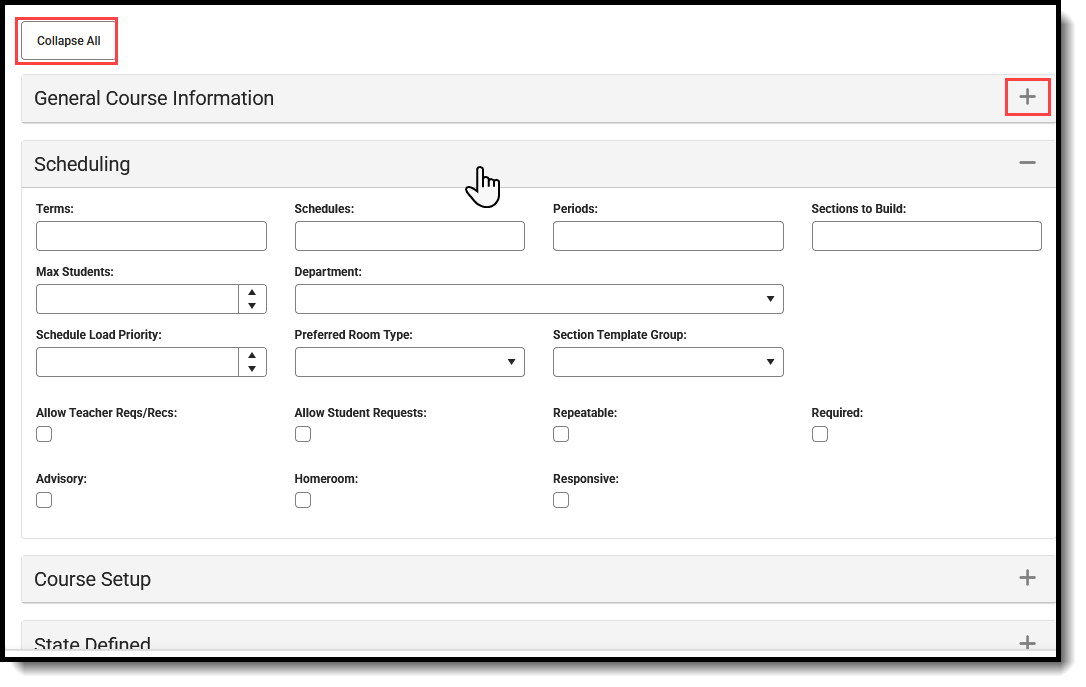 Open or Close Add Course Cards
The Add, Reset, and Full Screen view buttons display across the bottom of the tool.
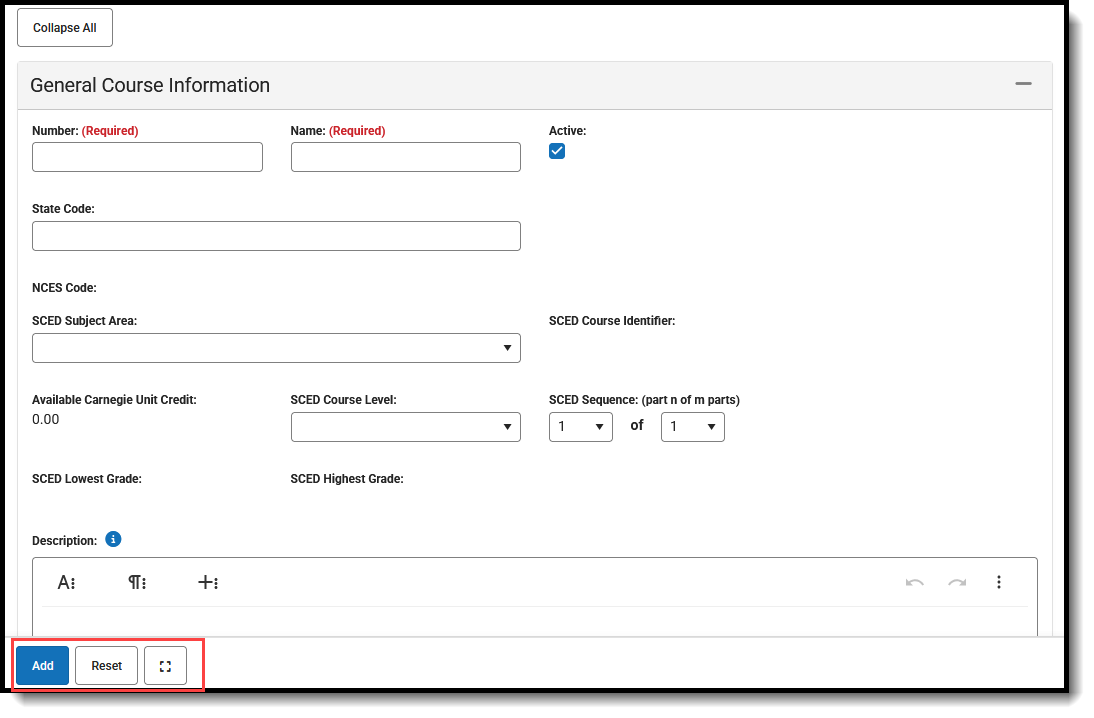 Add Course - Add, Reset, Full Screen
Add a Course Record
- In the General Information card, enter the new course Number and Name. These are the only fields that need to be populated to save the new course.
- Mark the Active checkbox. This is automatically marked. Remove the checkbox if the course is considered not active (not available for course requests or placement on student schedules).
- Populate all other fields as needed, following district and school policy.
- Click the Add button when finished. The new course is added to the list of available courses for the selected calendar.
Once a course is added, the screen reloads as the Course Information tool where additional course management can be done - adding sections, assigning teachers, etc.
 Search for Newly Added Course
Reset the Add Course Cards
Click the Reset button to remove any values entered in any of the fields on the Add Course tool. This clears out all fields in case of a misentry or an error. Re-enter the new course information as needed.
Add Course from Course Master
When the selected calendar is linked to a Course Master, a new course can be added from the Course Master without navigating to Course Master Information or Add Course Master tools. The Add Course tool displays a message across the top of the tool indicating that a district-wide Course Catalog is in use and that new courses need to be created as a Course Master and linked to your schedule. All active Course Masters are listed.
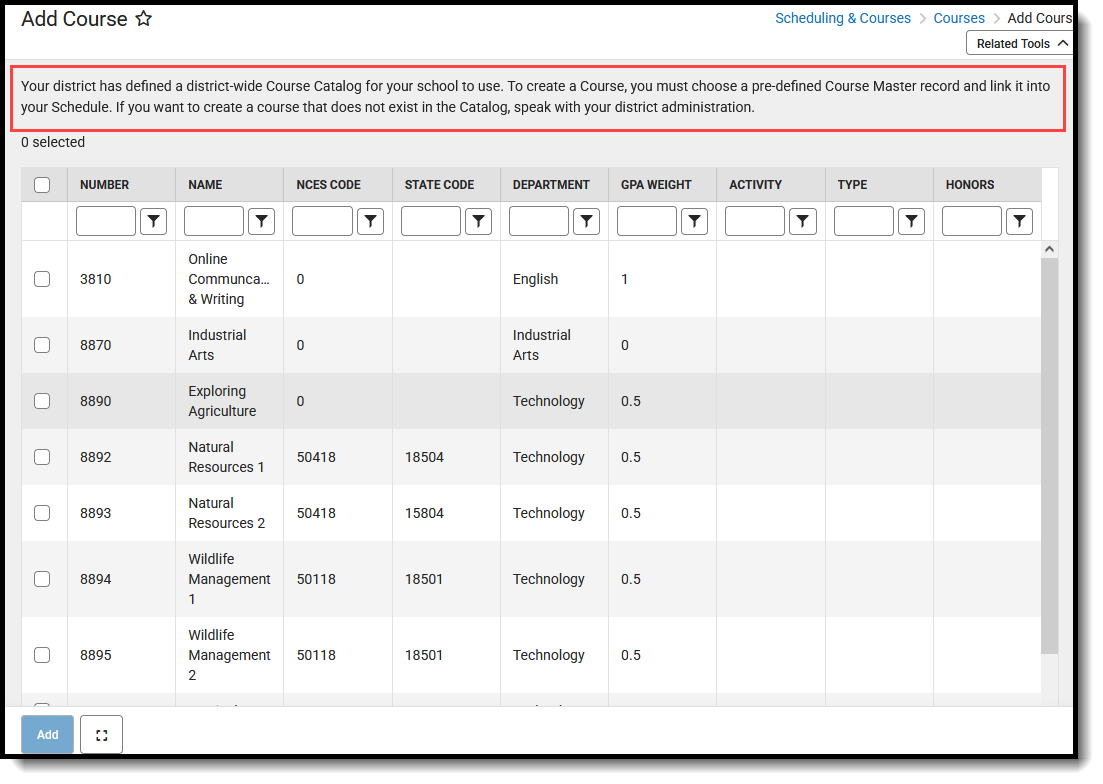 Add Course from Course Master
- Enter matching values for one or more columns to return results.
- Place a checkmark next to the desired Course Master(s).
- Click Add. A confirmation message displays indicating which courses are being added to the current schedule.
- Choose one of the following:
- Continue to add the course.
- Copy to Clipboard to copy the list of courses being added. The list of courses can be pasted into a document for review at a later time.
- Cancel adding the course.
The selected course masters are added to the list of available courses.
This article contains videos associated with the tools used to set up courses in Campus. Videos are organized in the general order in which the tools are typically used. This video series is geared toward schools that DO NOT use Course Catalogs/Course Masters.
Add Course
For schools that HAVE NOT been assigned a Course Catalog, Add Course is used to enter information for courses that will be offered at the selected school. This video covers basic information typically entered when adding a course. Your district or state may have specific practices to follow and customized fields that are used with courses. See related content for more information.
Course Information
This video provides an overview of the data that can be reviewed and managed for a selected course using the Course Information tool.
Course Grading Tasks
Grading Tasks represent grades teachers post (Progress, Quarter, Trimester, Semester, Final, etc.). This video demonstrates how to align Grading Tasks to a selected Course.
Course Standards
Course Standards are generally used to indicate student progress towards reaching a level of proficiency. This video shows how to align Standards to a Course.
Course Categories
Course Categories are used to sort assignments into groups. Districts can create these at the Course level so that all teachers of the course can use the SAME categories in Campus Instruction.
Course Grade Calc Options
The Course Grade Calc Options tool is used to configure how each standard and grading task on a course is calculated. This course uses a course with both grading tasks and standards aligned to it as an example of how grade calc options might be used.
Course Rules
There are two kinds of COURSE RULES that can be added to a course – Scheduling Rules and Planning Rules. This video describes the difference between the two and how they may be used in the Scheduling process and the Academic Planning process.
Course Fees
This video demonstrates how to attach fees to a course so they may be assigned to students taking the course.
Push Course Changes
This video shows how schools that haven't been assigned a course catalog can use the PUSH TO SECTIONS tool to push changes to sections of a SELECTED course, and the PUSH ALL COURSES TOOL to push data to sections of all impacted courses at once.
Course Master Tools (Course Catalog)
Districts can create course catalogs that contain course masters with elements defined at the district level. Changes can be made to courses or new courses added and these changes can be pushed down to schools that use the course catalogs.
Tool Search: Course Masters
A Course Master defines elements of courses from a district level, so all schools in the district for the same grade levels (elementary schools, middle schools, high schools, ALCs, etc.) use the same course numbering and course naming conventions, use the same grading setup Grading Tasks, Standards, Grade Calc Options), and are assigned the same assessments. The grading setup tools can then be pushed to course sections, which eliminates individual course maintenance.
Districts with multiple schools, particularly growing districts, may wish to consider using Course Catalogs and Course Masters. Having a consistent setup of courses throughout the entire districts provides a more efficient Scheduling process.
Course Catalogs need to be created first before creating Course Masters. A Course Catalog is a collection of Course Masters that is associated with the school. Changes made to the Course Master are also applied to the courses at the schools, if fields have been locked.
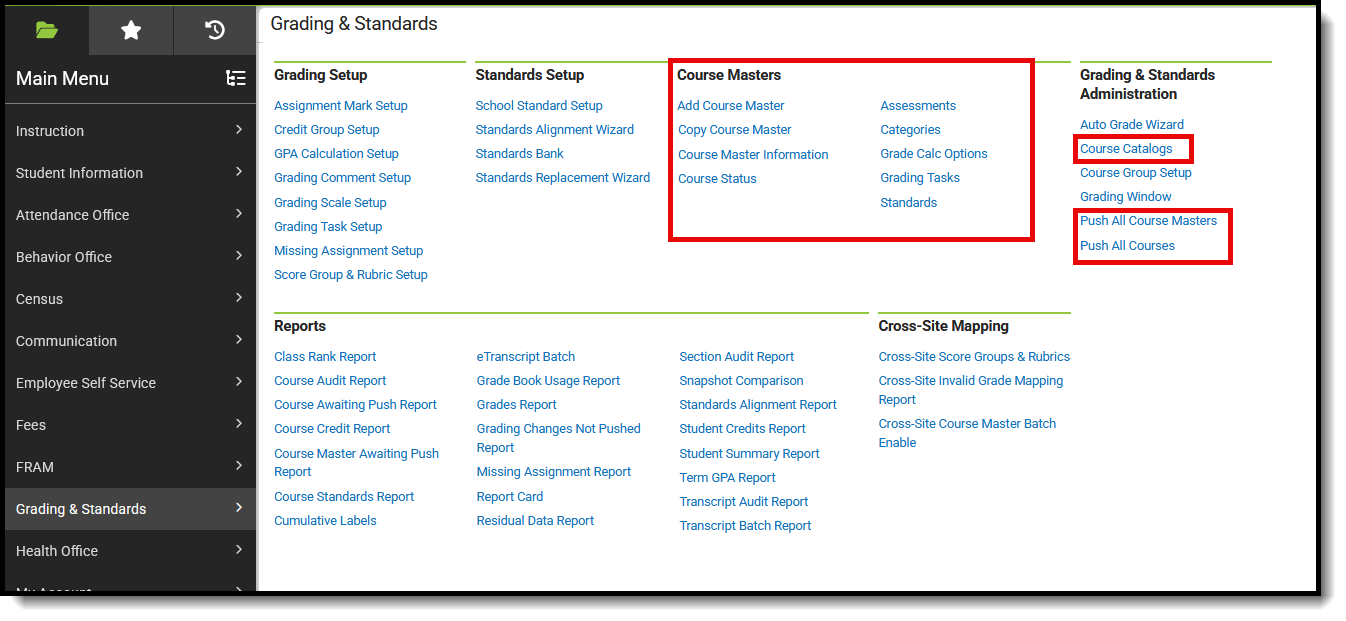 Available Course Master Tools
Best Practices for Course Masters
When using Academic Planning functionality:
- When a calendar is assigned a Course Master, the Credit Overflow Override field must be set on the Grading Task tab of the course in the course master.
- When a calendar is not assigned a Course Master, and courses are maintained at each school, the Credit Overflow Override field must be set on the grading task tab of the course.
For districts that have more than one high school and multi-year academic planning is used, it is recommended that Course Masters be created. This reduces the amount of individual course maintenance that needs to be performed.
Course Master Workflow
| Step | Location | |
|---|---|---|
| 1. | Create a Course Catalogs for the district. | Grading and Standards Administration > Course Catalogs |
| 2. | Assign the Course Catalog to the school. | School and District Settings > Schools > School Information > Course Catalog - Master List |
| 3. | Add new Course Masters for the school. | Grading and Standards > Course Masters > Add Course Master |
| 4. | Add Grading Tasks to the Course Master. | Grading and Standards > Course Masters > Grading Tasks |
| 5. | Add Standards to the Course Master. | Grading and Standards > Course Masters > Standards |
| 6. | Add Categories to the Course Master. | Grading and Standards > Course Masters > Categories |
| 7. | Add Assessments to the Course Master. | Grading and Standards > Course Masters > Assessments |
| 8. | Establish Grade Calc Options for the Course Master. | Grading and Standards > Course Masters > Grade Calc Options |
| 9. | Push the Course Master to the Courses. | Grading and Standards > Course Masters > Course Master Info > Push to Courses |
| 10. | Copy Course Master information to other Course Masters. | Grading and Standards > Course Masters > Copy course Master |
| 11. | Use the Push ALL Course Masters tool to update the Course Catalog with the latest Course Master data. | Grading and Standards Administration > Push All Course Masters |
| 12. | Use the Course Master Awaiting Push Report to review grading setup changes that have not been pushed to courses before using this tool. | Grading & Standards > Repots > Course Master Awaiting Push Report |
| 13. | Use the Push ALL Courses tool to update all courses in the selected calendar with the latest Course data. | Grading and Standards Administration > Push All Courses |
| 14. | Use the Course Status tool to view all courses associated with a course master in the selected school and manage the grading setup of those courses. | Grading and Standards > Course Masters > Course Status |
Save
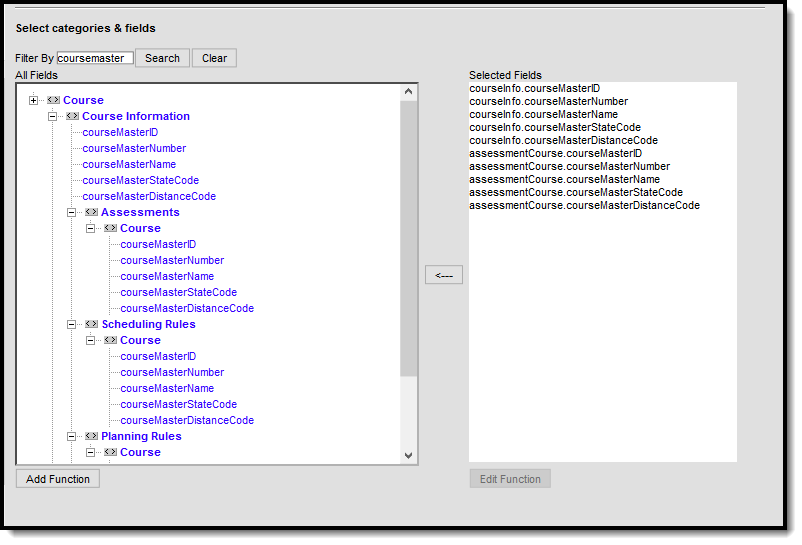
Course Master Information in Ad hoc Query Wizard
Course Course Master information is available in the Query Wizard for Course/Section Data Type filters. Fields can be selected from the following folders:
- Course > Course Information
- Course > Course Information > Assessments > Course
- Course > Course Information > Scheduling Rules > Course
- Course > Course Information > Planning Rules > Course
Fields available on the Course Information tool are noted in the Course Information section below.
 Course Information Fields in Ad hoc
This series of videos explains how to use the tools Campus provides to create Course Catalogs, then add Course Masters to them. This includes information on how to add, manage and copy Course Master elements such as Grading Tasks/Standards, Grade Calc Options, Categories and Assessments.
Course Catalogs are assigned to schools under School & District Settings via the School Information tool.
Course Catalogs
Districts can use Course Catalogs in conjunction with Course Masters to define and manage course configuration elements in a consistent manner. Schools that have been assigned a Course Catalog can't create their own courses. They need to select courses from the catalog.
Add Course Master
Course Masters provide the framework for individual courses within a Course Catalog.
Course Master Information (Course Masters)
Use the Course Master Information tool to update basic course information and push changes to locked elements to schools using the affected Course Master. See related content for the PUSH ALL COURSE MASTERS tool if your catalog has several course masters that have been updated.
Grading Tasks (Course Masters)
Grading tasks describe the types of grades that appear on student report cards, such as mid-term grades, semester grades and trimester grades. Districts using course catalogs can define these tasks on course masters for schools that use them.
Standards (Course Masters)
Standards can be defined for course masters to ensure consistency in how courses are graded across schools. This video demonstrates how to define a standard for a course master.
Grade Calc Options (Course Masters)
Districts can set grade calculation options on course masters to determine how in progress grades calculate in teacher Grade Books. Grade Calculation Options can be set for Grading Tasks and for Standards. This video focuses on Grading Tasks.
Categories (Course Masters)
In Campus Instruction, assignments are sorted into CATEGORIES. Districts can define these categories on a course master so every teacher of that course uses the same categories.
Assessments (Course Masters)
The Assessments tool gives districts a way to allow teachers to enter scores for district-defined tests and to see scores for National and State assessments for students they teach without giving access to other areas of Campus. This video shows how to align assessments to a course master.
Copy Course Master/Copy Course Master Elements
Campus provides COPY tools that can speed up the process of adding Course Masters to catalogs, as well as copying grading setup options from one course master to others.
Push All Course Masters
Using the Push All Course Masters tool, administrators can push locked data to courses that are linked to course masters in a selected catalog. In this video, you will learn how to push grading setup and course master attributes to linked courses.
Course Scheduling And Planning Rules
Use scheduling and planning rules where appropriate to assist with the scheduling of courses, teachers and students. Rules do not need to be applied to every course but can be useful in certain circumstances, for example when students must take and pass Algebra before taking Geometry.
Tool Search: Course Rules
Course rules are added to courses to assist with scheduling and planning across multiple years. When a rule is applied to a course, its complement is applied to the course’s pair. Rules should be used only when absolutely necessary to achieve the district's educational goals and to meet the students' needs.
This tool allows assigning both Scheduling Rules, used to build and load courses on the Scheduling Board and Walk-In Scheduler, and Planning Rules, used to map a student's progress toward graduation or completion of a program.
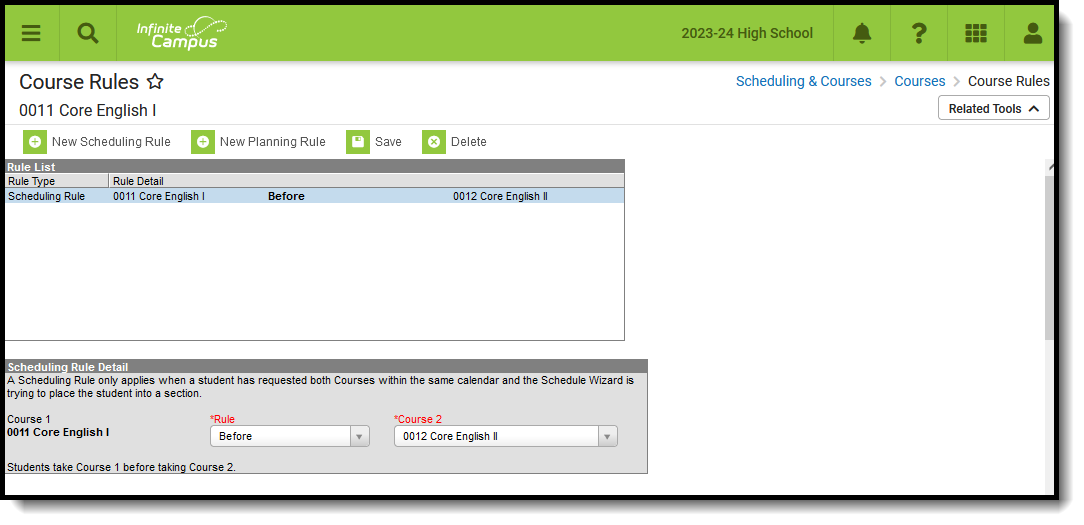 Course Rules
See the Course Rules Tool Rights article for information about rights needed to use this tool.
Scheduling Rules
The Scheduling Board approaches fulfilling student course requests in a very systematic manner. In most situations, the Board needs to understand the relationship between courses as they are created and defined. This is done using the scheduling rules.
Scheduling rules tie courses together in various ways, affecting the Scheduling Board's flexibility. The rule only takes effect when a student has requested both courses during the same scheduling year. When a rule is applied to a course, its complement is applied to the course’s pair. Rules should be used only when absolutely necessary to achieve the district's educational goals.
Scheduling Rules help ensure courses are scheduled appropriately. They are NOT used in the planning process.
 Scheduling Rules
Scheduling problems arise when scheduling rules are applied incorrectly or overused. When student requests are not being fulfilled for a course or a series of courses, analyze the scheduling rules for those courses to ensure they are not preventing the Scheduling Board from working efficiently. Scheduling rules may not operate as expected when a section spans multiple terms.
Things to Know
Build and Load Logic
When the Scheduling Board builds and loads courses, it attempts to place courses and students multiple times based on these rules.
Depending on the complexity of the period schedule, the number of rules associated with courses, the restrictions placed on staff and students, the course may not be placed in the desired manner.
For courses with more restrictive needs (many rules, staff restrictions, etc.), consider manually placing these courses first and locking them. Then use the Build and Load functionality on the Scheduling Board to build and load the remaining courses.
50% Request Requirement
Build only considers rules when:
- One paired course has been built where the number of sections must exactly equal the number of sections to build.
- There are requests for at least 50% of the possible seats for both paired courses.
Scheduling Rule Detail Editor
| Field | Description | Ad hoc Field Name |
|---|---|---|
Course 1 Required | The course that is currently selected. | schedRule.courseID1 |
Rule Required | Selection indicates the scheduling rule that is assigned to the course. See the descriptions and examples for more information. | schedRule.type schedRule.ruleID |
Course 2 Required | The course that is either the Parent course or the Child course, depending on which rule is being assigned. The inverse of the selection displays on the Course Rules detail of the selected course. | schedRule.courseID2 |
Add Scheduling Rules
See the Scheduling Rules Descriptions and Examples for details on the available rules.
- Select the New Scheduling Rule icon from the Action bar. A Scheduling Rule Detail appears below the Rule List.
- Verify the desired course appears as the Course 1.
- Select the correct Rule from the dropdown list.
- Select the correct Course2 option for which to apply the rule.
- Click the Save icon when finished.
Read the rule setting once selected. Additional rules can be added as needed.
Selected courses cannot have a rule tied to itself. The course currently selected DOES NOT display in the Course dropdown for rule selection.
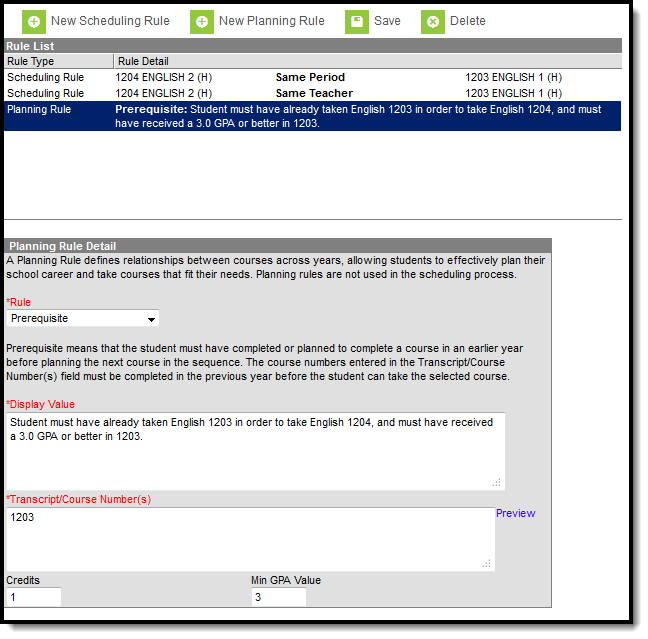
Planning Rules
A Planning Rule defines relationships between courses across years and for a single year, allowing students to choose courses and to effectively plan their Academic Plan. This information is used when students and counselors are determining an Academic Plan for the student.
Create Planning Rules in future calendars.
Planning rules help ensure that students take courses in appropriate years and in the appropriate order. They are NOT used to place courses on a student schedule during the scheduling process.
 Planning Course Rules
Best Practices
When you are using Academic Planning functionality:
- When a year or semester long course is broken down into multiple courses for schedule flexibility, the Parent Of/Child Of rules should be used. Parent and child courses must have the same credit type. Prerequisites for this sort of setup only need to include or be defined on the Parent course.
- Rule alerts prevent a student from requesting a course without meeting the rule requirements from the transcript, in-progress courses or planned courses.
- Courses that require instructor approval need to have the Allow Student Requests checkbox not marked. Instructors use the Student Course Recommendations to recommend these courses.
- Always verify the Calendar/School selection before saving rules.
- Inactivation of courses requires adjustments to Course Planning Rules.
Planning Rules Detail Editor
Different fields display for different planning rules. Review the table below for details.
| Field | Description | Available Rules | Ad hoc Field Name |
|---|---|---|---|
Rule Required | Selection indicates the planning rule that is assigned to the course. See the descriptions and examples for more information. | All | planningRule.type |
Display Value Required | Text entered in this field displays on the Portal and should be descriptive enough for both students and counselors to know why the rule was added and what the student needs to do in order to take the course. For example, when the Prerequisite rule was chosen for a course, text should indicate what the prerequisite is (Course Name and Number, minimum grade/GPA received, etc.) and any other information that may be helpful for the student, parent/guardians and counselor. An entry might be "Must take 2221 Alg 2 before taking 2231 Trigonometry." | Prerequisite Concurrent Prerequisite or Concurrent Equivalent Grade Level Course Rotation | planningRule.displayValue |
Transcript/Course Number(s) Required | Values entered here can be course numbers from middle school courses, transcript courses, and transfer credit courses. Wildcard characters like percentage signs can be entered when the course numbers are similar (as in, all course numbers end in 2). Commas must be entered between courses numbers, as such: "2221,2223,2225" or "2221, 2223, 2225." When students plan courses through the Portal or a counselor adds the course to a student's academic plan, the entered course numbers are reviewed by the application to ensure the student has not previously taken the course and it does not display on the transcript. Clicking the Preview link displays an HTML view of the entered course numbers and is used to verify the correct courses are included from the current calendar and school. | Prerequisite Concurrent Prerequisite or Concurrent Equivalent | planningRule.transcript CourseNumberString |
| Credits | Enter the total amount of credits the student needs to earn for the course(s) entered in the Transcript/Courses field. | Prerequisite Concurrent Prerequisite or Concurrent | planningRule.credits |
| Minimum GPA Value | Enter the lowest GPA value the student can earn for the course(s) entered in the Transcript/Course Number(s) field. | Prerequisite Prerequisite or Concurrent | planningRule.gpaValue |
Course 2 Required | The course that is either the Parent course or the Child course, depending on which rule is being assigned. The inverse of the selection displays on the Course Rules detail of the selected course. Parent and child courses must have the same credit type. | Parent Of Child Of | planningRule.courseID2 |
Grade Level(s) Required | Indicates the grade level of enrollment the course applies. Only students in the assigned grade levels can add the course to their Course Plan for that grade level. | Grade Level | N/A |
Allow Course to be Planned Every __ Years Required | The entered value indicates the interval of years the course is available. The entered value must be greater than 1. | Course Rotation | N/A |
Starting in School Year Required | Select the year in which the rotation of the course begins. When the 2018-19 school year is selected and the entered Every __ Year value is 2, the course is available for planning in the 2018-19 school year and again in the 2020-2021 school year, but not in the 2019-2020 school year. | Course Rotation | N/A |
Add Planning Rules
See the Planning Rules Descriptions and Examples for details on the available rules.
- Select the New Planning Rule from the action bar.
- Select the Rule from the dropdown list.
- Enter the required information in the appropriate fields based on the descriptions above.
- For complete planning rule setup, enter the values for the non-required fields based on the descriptions above.
- Click the Save button when finished. The new planning rule displays on the Rule List.
Course Rules in Ad hoc Query Wizard
Scheduling Rules and Planning Rules assignments are available in the Query Wizard for Course/Section Data Type filters. Fields can be selected from the following folders:
- Course Information > Scheduling Rules
- Course Information > Planning Rules
Identifying course information should also be included in the filter. Choose these fields from the Course > Course Information section (courseInfo.courseNumber, courseInfo.courseName, for example). For clarity, also select identifying course information from the Scheduling Rules > Course section (courseInfo.courseNumber, courseInfo.courseName, for example).
Ad hoc field names are included in the tables below for each rule.
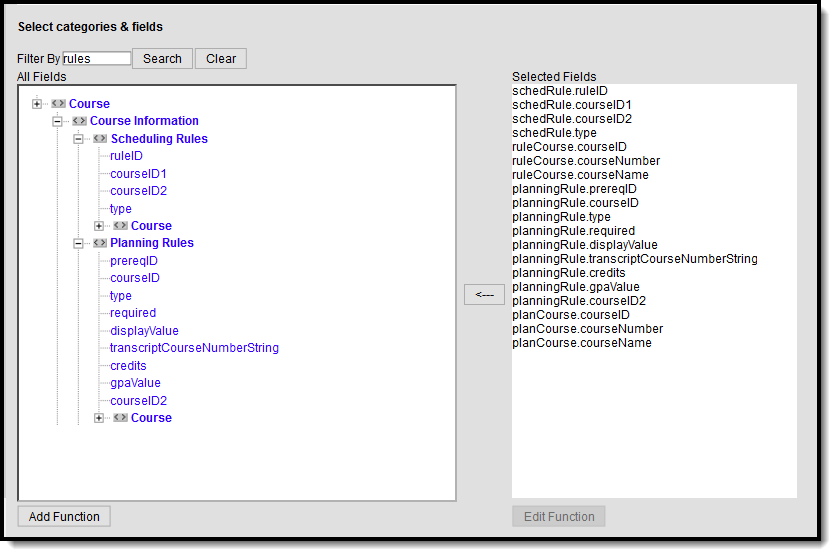 Course Rules Available in Ad hoc Reporting
The Course Build Constraints tool allows users to view Section Builder Constraints that have been applied to the selected course. Users with rights to do so can access the Mass Edit Constraints tool from here to build or remove constraints on selected courses.
The rules and constraints on the course planner allow users to select specific rules, teachers, rooms or to block out periods where course sections should not meet. This video demonstrates how to manage rules and constraints for a selected course.
