Tool Search: POS Account Messenger
Use the POS Account Messenger tool to create POS account message templates, send balance information and send other routine food service messages. Messages may be sent immediately through this tool or set for automated delivery with the POS Account Messenger Scheduler tool.
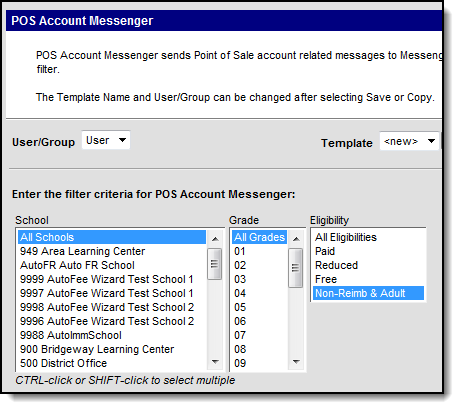
 POS Account Messenger Editor
See the POS Account Messenger Tool Rights article for information about rights needed to use this tool.
Important Information about This Tool
- To receive Point of Sale messages, contacts must have the Food Service checkbox selected, on the appropriate devices, in Census > People > Demographics > Personal Contact Information.
- Emancipated Minors who have a non-household Messenger relationship to themselves on the Census > People > Relationships tool will receive Point of Sale messages.
- Staff must have a District Employment record to receive messages.
- Settings in this tool do NOT affect the Low Lunch Balance Notification on the Campus Parent Portal.
Send Messages to Staff
- Staff must have a District Employment record to receive messages.
- To send messages to staff accounts, you must select Non-Reimb & Adult in the Eligibility column.
- Messages are sent to staff based on their District Assignment record at the school(s) selected in the filter criteria. If a staff member has multiple District Assignment records and the POS Account Messenger templates are set up to send messages to individual schools or groups of schools, the staff member may receive multiple messages especially if messages are sent from the POS Account Messenger instead of the POS Account Messenger Scheduler.
- If a staff member does not have a District Assignment but does have a District Employment record, you must select All Schools in the School column.
 Filter selections for sending messages to staff
To exclude staff from a message, select Paid, Reduced and Free in the Eligibility column.
Send Messages to Generic Accounts
To send messages to generic accounts, you must select Non-Reimb & Adult in the Eligibility column. Generic accounts are defined where no Eligibility is entered, no student enrollment or District Assignment/District Employment records are entered.
Generic accounts must have a Location School designated on Account Details and the School selected. In addition, contact information such as an email and/or phone information must be entered on the Generic Account's Census record on Demographics and the General checkbox must be selected for the appropriate email address and/or phone number.
Create a New POS Account Message Template
Templates allow you to create reusable messages that save time and standardize content.
-
Select the <New> option from the Template dropdown list. Use the Field Descriptions to complete the POS Account Messenger editor.
Do not copy attribute fields from another Messenger tool in Campus. The attribute fields are not the same.
- Click the Save button at the top message editor.
- Enter a name for the template in the pop-up box. The template will appear in the Template dropdown list.
Delete a Template
- Select the template you want to delete from the Template dropdown list.
- Click the Delete button. A confirmation message displays.
- Click the OK button. Campus removes the template and it does not display in the Template dropdown list.
Create and Send POS Account Messenger Messages
- Select an existing Template from the Template dropdown list.
- Use the Field Descriptions to complete editor.
-
Click the Test button to review the message and its recipients.
Infinite Campus strongly recommends testing messages before delivering them. A message will be sent in the exact manner it will be delivered to recipients. The Test Message screen will confirm that the test message was sent.
- Click the Preview/Send Message button. The Preview Message screen displays.
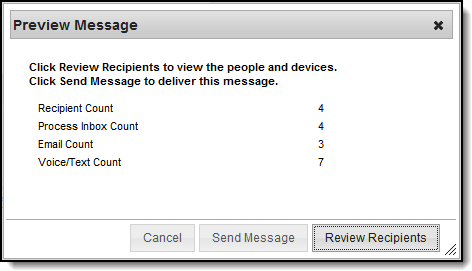
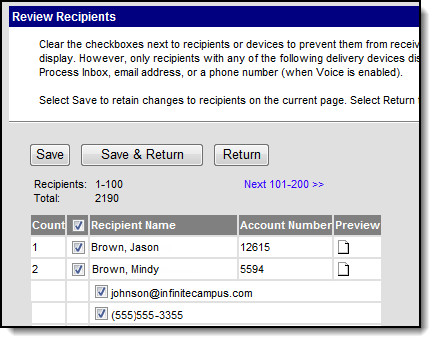
- Click the Review Recipients button. The Review Recipients screen displays.
-
Complete the following tasks on the Review Recipients screen. (Optional)
TaskDescriptionTo exclude recipients Clear the checkbox next to a name. Preview the message Click the page icon in the Preview column. To exit and return to the Message Preview screen Click the Save & Return button if changes have been made to the recipient list. Otherwise, if no changes have been made, click the Cancel button. - Click the Send Message button on the PreviewMessage screen.
Result
The Preview Message screen displays. This screen confirms that the message tasks has been completely set up for delivery at the times entered in the Send Emails At and/or Dial Window fields of the main Message Builder screen. This screen does not indicate that the message is currently being sent. - Click OK.


Field Descriptions
| Field | Description | ||||||
|---|---|---|---|---|---|---|---|
| User/Group | This dropdown list allows you to save message templates to your user account or a user group to which you belong. You must have Tool Rights to User Group Formats under this tool in order to share templates among the groups to which you belong. | ||||||
| Template | This dropdown list displays a list of available templates. To create a new template, select <new> from this list. | ||||||
| School | This field limits message delivery to the selected school(s). The school selected in the Campus toolbar is selected by default. | ||||||
| Grade | This field determines which grade(s) report in the message. | ||||||
| Eligibility | This field limits message delivery to the selected eligibilities. To send messages to generic accounts, you must select Non-Reimb & Adult in the Eligibility column. Generic accounts are defined where no Eligibility is entered, no student enrollment or District Assignment/District Employment records are entered. See the previous topic Sending Messages to Generic Accounts for more information. To exclude staff from a message, select Paid, Reduced and Free in the Eligibility column. | ||||||
| Balance | This field limits message delivery to the following accounts:
| ||||||
| Account | This field limits message delivery to a specific account status. The account status is indicated on Account Details.
| ||||||
| Exclude Zero Balances | This field limits message delivery to accounts with a balance other than $0.00. | ||||||
| Ad Hoc Filter | The Ad Hoc Filter field allows you to limit message delivery to specific recipients. Ad Hoc filters for Student and Census/Staff are available for selection. POS Account Messenger does not look at calendars. When you select an ad hoc filter for a template in POS Account Messenger, the ad hoc filter pulls personIDs for All Years, All Schools and All Calendars. The Ad Hoc filter intersects with the filter criteria on the template and looks for matching personIDs based on School(s) selected in Enrollments, District Assignment/District Employment records or POSIdentifcation (Location School). Then the criteria selected on the template further filters message recipients by Eligibility selection, active or inactive accounts, etc. The Effective Date is ignored if the personID is pulled in the ad hoc filter and the account has a Location School designated. This allows districts to pull and send messages to generic accounts. Former students or staff may be selected for a message if their account contains a Location School that was never cleared after they left the district. | ||||||
| Effective Date | This field limits message delivery to students or staff who are enrolled or employed with the corresponding eligibility selected on the date entered. Staff member accounts must have a District Employment record for the Effective Date selected when All Schools is selected in the School field. District Employment dates must correspond (overlap) with District Assignment dates when individual schools are selected. If districts use family accounts where patrons are all staff and there are no students, then only active staff on the account as of the Effective Date selected will receive messages. Saved templates will not save selections from this field. | ||||||
| Limit Delivery to Contacts that speak | This field limits message delivery to recipients who have the Preferred Language selected on their Census > People > Demographics. | ||||||
| Delivery Devices | Inbox - This option places a note in the parent's inbox on the Campus Parent Portal. Infinite Campus strongly recommends marking this option to ensure delivery to a portal account when no other delivery devices are marked for messages. Email - The Email option sends an email to the email address on record (entered in Census > People > Demographics). Voice - The Voice option calls the guardian's phone number on record (entered in Census > People > Demographics). Text - The Text option sends a text message to the guardian's mobile device. Recipients who have indicated a desire to receive text messages must have the Text (SMS) checkbox marked in the Personal Contact Information editor of the Demographics tool to receive text messages. | ||||||
| Sender's Email | This field displays the email address that is automatically included in the message body for message recipients to reference.
This field can be changed if the Allow Custom Sender's Email Address checkbox is marked on the Email Settings tool. Existing templates may display a different address if the the Allow Custom Sender's Email Address checkbox is marked and a user modified the Sender’s Email field. | ||||||
| Caller ID | This field displays the phone number that is automatically included in the message body for message recipients to reference.
This field can only be changed if the Allow Custom Caller ID checkbox is marked on the Voice Settings tool. Existing templates may display a different Caller ID if the Allow Custom Caller ID checkbox is marked and a user modified the Caller ID field. | ||||||
| Message Subject | This field determines the text that will display in the Subject field of the email message. | ||||||
| Message Body | You can enter comments in the Message Body using the WYSIWYG editor. The WYSIWYG editor allows you to insert Campus attributes. The POS Account Messenger supports the following attributes:
Do NOT copy attribute fields from another Messenger tool in Campus. The attribute fields are not the same. Message Body supports the use of Chinese characters for email messages only. | ||||||
| Browse and upload a recorded message | This option allows you to send a voice message. See the article Messenger with Voice - Setup and Details for more information about this feature. You must click the Upload button after browsing for the attachment. When an attachment is properly uploaded, the Attach File message displays on the screen. | ||||||
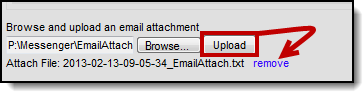
| Browse and upload an email attachment | This option allows you to add an attachment to the email. See the article the Digital Repository Preferences for information about supported file types and sizes. You must click the Upload button after browsing for the attachment. When an email attachment is properly uploaded, the Attach File message displays on the screen.
This option is controlled by an email preference set by the District Administrator and may not display in all districts. | ||||||
| Text Message | The text message to be sent to the student messenger contact's mobile device. The ability to send text messages is controlled by a preference set by the District Administrator. There is a character limit of 400 characters for text messages.
In the Campus.1813 Release Pack (March 2018), a 400 character limit restriction was added to Text Messages. Infinite Campus recommends not exceeding 140 characters as this may result in multiple messages being sent to recipients in random order. The maximum length of a text message is set to 400 characters. When a text message reaches this length, a warning message displays indicating such. The message cannot be saved until the character limit is met.
Existing text message templates still display in their entirety, but need to be modified to be within this limit before sending. If users wish to stop receiving text messages, they can text STOP to the short code. This results in the user receiving no further text messages from Campus, even if the user has the Text option marked on their Contact Preferences. Users need to go through the opt in process again to start receiving texts at a later date. | ||||||
| Delivery Date | The day on which the message should be sent. | ||||||
| Send Inbox/Emails at | The time inbox and/or email messages will begin to be delivered. The time will save with the templates. If you want messages to always go out immediately after Send is selected, the template should be saved with this field blank. | ||||||
| Dial Window | These fields create a dialing window during which a voice message may be sent. The default values for these fields are set up on the Voice Settings tool (System Administration > Messenger > Messenger Preferences > Voice Settings). Dial Window times must be entered and will save with templates. If the start time entered on the message is earlier than the start time on the template (and the start time on the template is after the start time entered on the Voice Settings tool), Messenger uses the start time on the template and will not send the message until that time is reached. If the end time on the Dial Window is earlier than the end time entered on the Voice Settings tool, calls will not stop. Instead, they will continue until the end time on the Voice Settings tool is reached. In addition, if a voice message is still delivering when the District end time is reached, message delivery will be stopped and will not be completed. |
Campus Fields and Sub-Reports for POS Account Messenger
Campus Fields and Sub-Reports include specific fields for use in the Message Body WYSIWYG. These fields are designed to pull the latest qualifying event, based on filter criteria. Other fields are available but they use ad hoc logic and may not return the most recent event data if there are multiple events in a year.
Any ad hoc fields that have been deactivated display in red. Use the Element Replacement tool to locate deactivated elements and replace them with the new field.
Campus Fields can also be added to Text Messages. Sub-Reports cannot be added to Text Messages.
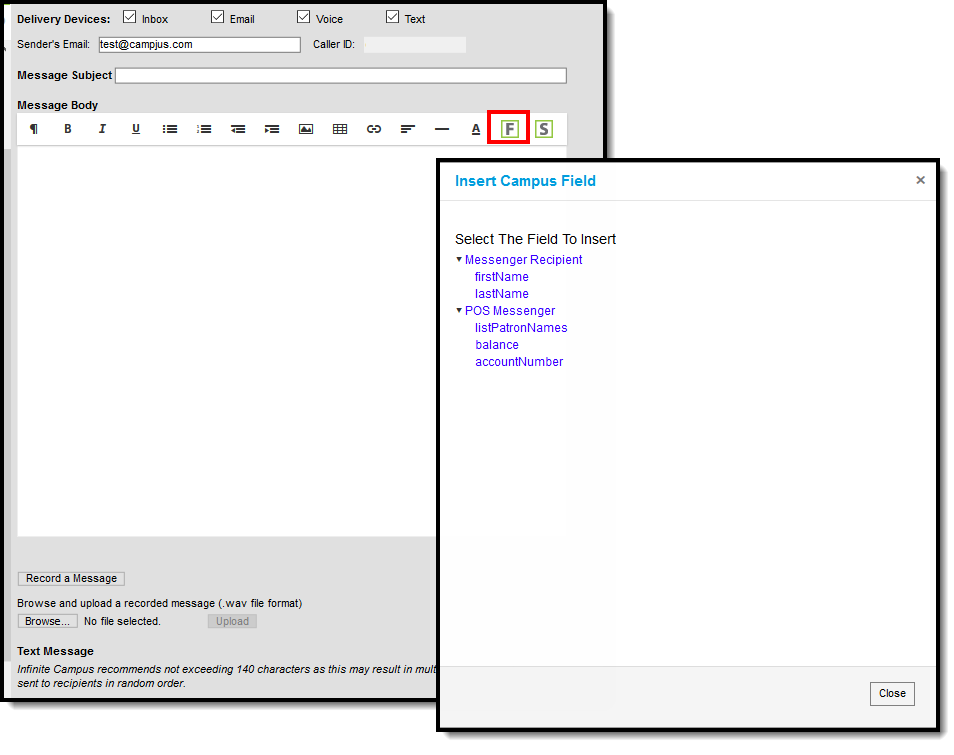 POS Account Messenger Campus Fields Selection
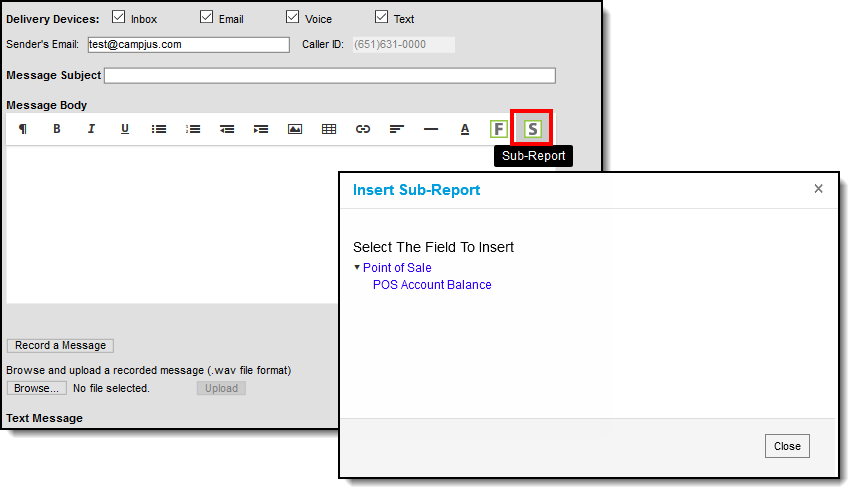 POS Account Messenger Sub-Reports Selection
When using sub-reports in letters, please note the following.
- A field only displays if there is data for that field. If a field is chosen from the sub-report but there is no saved data for that student, information for that field does not display.
- A sub-report option only displays if the district/school records that data.
