My Curriculum is part of the Campus Learning premium offering and requires the Enhanced Curriculum Editor tool right.
Tool Search: My Curriculum
From My Curriculum, you can schedule your curriculum into your sections in three different ways:
- Add one item to one destination section
- Add multiple items to one destination section
- Add one item to multiple destination sections
Both options with one destination section use a version of the curriculum copier, so they are explained together below
The Enhanced Curriculum tool right in Additional Access Rights > Instruction Tools grants access to advanced assignment options. See the Instruction Tool Rights article for more information.
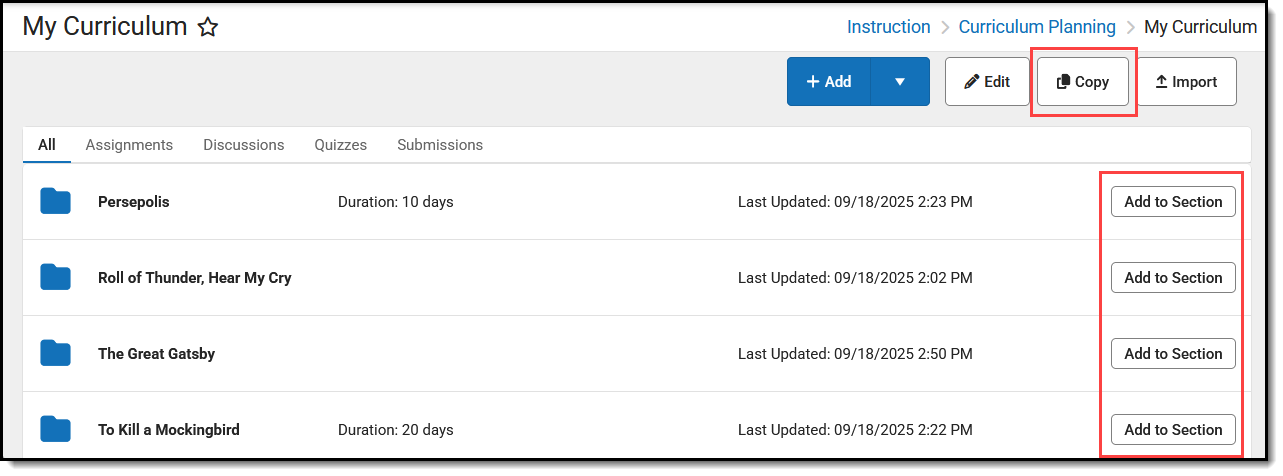
Add One or Multiple Items to One Section
When copying from the My Curriculum list, the options described below open a version of the Curriculum Copier.
- Click Copy to add multiple items to a specific section. All items in your My Curriculum list display in the Source area.
- Click Add to Section next to an assignment, resource, or folder to a specific section. Only the specific item is shown in the Source area.
 Add curriculum to a section using the Copy or Add to Section options.
Step 1: Select Items and Destination
|
When copying from My Curriculum, you don't need to select a Source section.
Select a School Year and Section for the Destination section. The Destination Curriculum list populates with existing curriculum in that section.
Mark the checkbox next to curriculum in the source section to copy to the destination. Click the arrow next to folders to view what's inside them. Items in the Source Curriculum list that are already in the destination section display with an uneditable checkmark. |
 Select a Destination Section and then mark curriculum to add. Click image to enlarge. Select a Destination Section and then mark curriculum to add. Click image to enlarge. |
To add the selected curriculum to a specific folder in the destination section, click Edit under the destination section and select a Folder.
Click Next to proceed.
Step 2: Item Dates & Grading
Next, enter dates and grading setup for the selected items. If desired, you can skip this step and modify this information later.
Click the black arrow next to folders to expand.
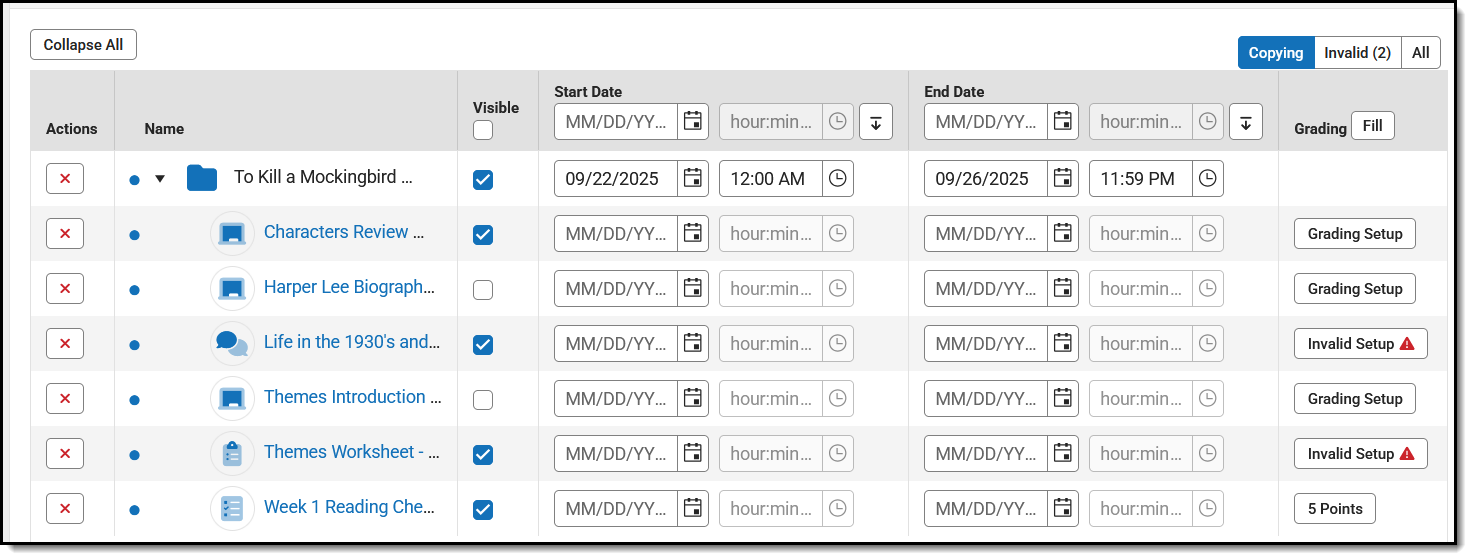 In Step 2, enter Start and End Dates and modify Grading setup.
 Click the red next to an item to remove it from the list. Click the name of an item to view a read-only version of it. To fill information for all items in the list, enter it in the header row of the table and click the fill down button.
- Visible: Indicate if the item should be Visible on Campus Student and Campus Parent using the checkbox.
- Dates: Enter Start and End Dates by clicking the date to type or select another day. Click the clock icons to set times for the assignment.
- Grading: Click the Grading Setup link to view the grading setup for the item.
- If the category entered on the curriculum matches a category in the destination section, it is populated by default.
- If the Task or Standard selected for the curriculum matches an alignment in the destination section, the existing grading setup is populated by default, as with the bottom assignment in the image above. If a valid alignment is not found, an Invalid Setup warning displays. Open the grading setup and select an alignment to continue.
Click Save when finished to add the curriculum to the destination section.
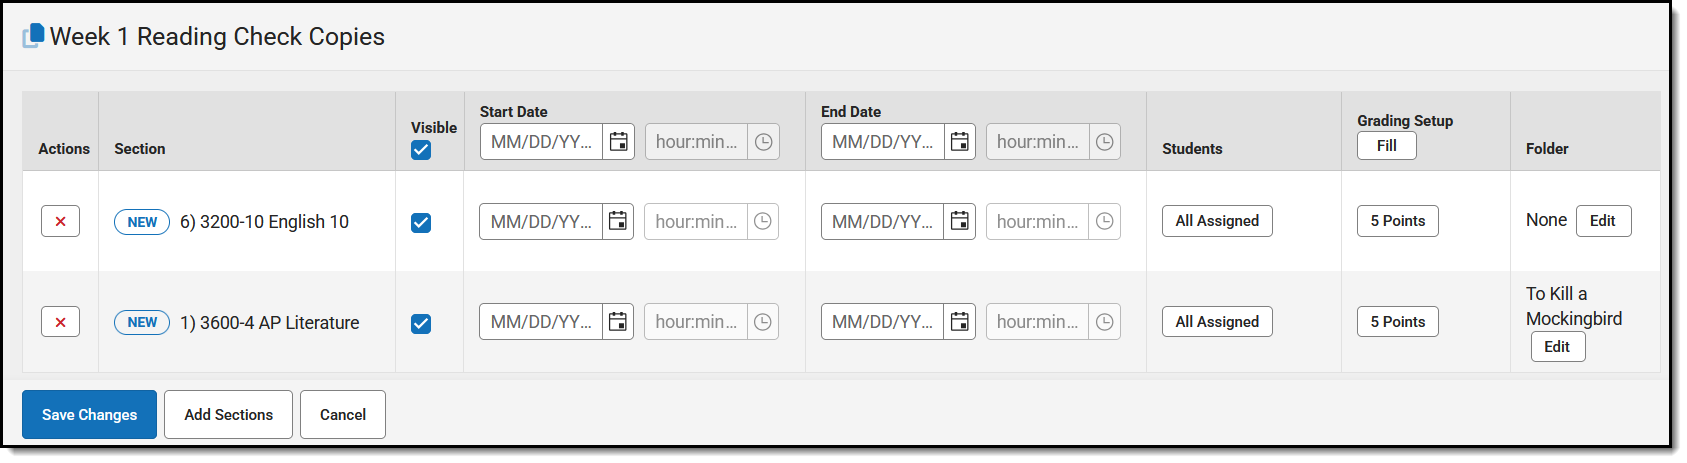
Add One Item to Multiple Sections
This option applies to assignments and resources, but not folders. Open the item and then click Add in the Other Sections/Schedules area.
 Click Add in the assignment to add it to Sections.
 | An Add Sections side panel opens with a list of your sections. Filter the list by Term, Period, and Course/Section Group.
Mark sections to add the assignment to them. Click OK when finished.
|
 |
The Add Sections side panel closes and the list of sections is updated to include those you selected. In this list, edit whether the curriculum is Visible to parents and students, the Start/End Dates, which Students are assigned, the Grading setup, and the Folder. Click the red X next to a section from the list.
Click Save Changes when finished.
 Modify curriculum data such as dates and grading.