Campus Learning, an enhancement to Campus Instruction, is the Infinite Campus learning management system (LMS) that connects teachers to new, powerful tools for digital learning. Teachers are welcome to visit Campus Learning Home for more information.
Welcome to Campus Learning!
What is Campus Learning?
Campus Learning is the Infinite Campus LMS. It is a premium offering that is designed to provide all the powerful tools that teachers and students need for digital learning.
Campus Learning is the Infinite Campus LMS that connects teachers to new, powerful tools for digital learning. Campus Learning is a premium option for Campus Instruction. Licenses to Campus Learning can be purchased at a district level.
Campus Learning includes the following existing and new tools for teachers. We're always working on new features!
Curriculum OptionsUse Folders to arrange curriculum. Create Resources, like assignments that are not scored, to distribute lesson materials, a syllabus, or any other instructional content that doesn't fit an "assignment." Use the Curriculum Library to share curriculum with other teachers in your district and find curriculum they've shared to add to your sections. Use My Curriculum to create and manage curriculum outside of the context of a section. Progress MonitorThe Progress Monitor allows teachers in standards-based classrooms to view students' proficiency at a glance and easily manage assignments across all standards in a section. PlannerView your curriculum and schedule in a calendar format, as well as the curriculum and schedules of other teachers. Connect to Other ProgramsWhen enabled by your district, integrations connect other programs to Campus. Depending on the type of connection, you can:
Engagement Check-InGauge student well-being and engagement with the class and curriculum using Engagement Check-In. |
Advanced Assignment ToolsAdditional assignment features include:
QuizzesCreate quizzes that are customized to your class's needs using a variety of question types and other features. Use Quiz Settings to allow retakes, organize questions into pages to simplify a student's experience, and print quizzes for students who need a paper copy.
When it comes time to score the quiz, icons and sort options help you focus on which answers need your attention and provide feedback as needed. For students using paper quizzes, submit answers on their behalf. Score AnalysisThe Score Analysis tool allows teachers to view a distribution of student scores on assignments and visually break down how each student scored. CommunicationAt the section level, use the Section Feed to communicate between teachers and students. Use Groups tool to communicate with wider groups that can include staff, students, and parents/guardians. Group Owners can create groups for shared clubs, organizations, events, and interests and enable various levels of one-way and two-way communication. |
Visit the Campus Learning Suite page to learn more.
Campus Learning offers the best features of an LMS natively built into the Campus SIS database. Watch this video to learn more about Campus Learning.
Campus Learning Startup Guide
To get started with your new Campus Learning license you will need to enable tool rights for teachers to access their new Campus Learning Tools.
Have a License - Now What?
To get started, enable Tool Rights for teachers to access Campus Learning tools. This Tool Rights document indicates Campus Learning-specific tools with a ![]() icon.
icon.
What's Included in Campus Learning?
Campus Learning Tools for Teachers
Here's a summary of the tools available to teachers as part of a Campus Learning license.
PlannerDisplays teacher's schedule and section curriculum in a date-based view, allowing teachers to view their curriculum plan for a whole week and easily click-and-drag units, lesson plans, and assignments based on a section's progress. Progress MonitorEmpowers standards-based instruction by allowing teachers to view student proficiency at a glance and manage assignments across all standards in a section. Know at a glance how students are doing, who needs attention, and what assignments need to be scored.
Engagement Check-InAllows teachers to check in with students to gauge their well-being and engagement with the class and curriculum. |
Enhanced CurriculumExpands assignments created in Campus far beyond simple dates and scoring alignments:
|
Curriculum LibraryShare curriculum to the library to make it available to other users in the district. Teachers can then add curriculum from the library to their own sections and modify it to fit their needs. With the Curriculum Library District Manager tool right, users in a curriculum director role can add curriculum for teachers to use and help maintain the library.
QuizzesCreates robust quizzes to be administered through assignments. Choose from a variety of question types to meet the needs of different classes and subjects. Included in Enhanced Curriculum tool right. Google DriveConnects to your district's Google Apps for Education account and allows teachers to distribute Google files through curriculum. DiscussionsEnables forum-style discussions within sections through Campus Student. Discussions are administered via resources and assignments and can be scored if desired. Included in Enhanced Curriculum tool right. |
Integrating with Digital Learning Partners
A Campus Learning license makes two additional types of integrations available in Digital Learning Applications Configuration.
- OneRoster Roster-Sync - Allows third-party vendors to request section and roster data from Campus. This type of connection is available without Campus Learning.
- OneRoster Grade Book Sync - Allows third-party vendors to request section and roster data from districts and send assignment, score, and grade data.
- LTI - Allows districts to establish connections with other learning tool providers and integrate those tools with assignments. Students access these tools through Campus Student and scores are received if enabled.
Visit infinitecampus.com for a list of current digital learning partners.
Which type of integration is right for my district?
If your teachers manage grading outside of Campus, use a OneRoster connection with Grade Book Sync. This type of integration prevents the need to double-entry of section and roster data, and receives assignment, score, and grade data from an outside program and makes that data available in other areas of Campus, such as through the Campus Student and Campus Parent Portals and report cards and transcripts. |
If your teachers manage grading using Campus but use a third-party program to provide additional resources, use an LTI connection. This type of integration connects resources in a third-party program with individual assignments, which students can launch from assignments in Campus Student. If supported in the third-party program, teachers can score student work in the other program and automatically populate those scores in their Campus Grade Book. |
If your district manages grading using Campus and has Google Apps for Education, use a Google Drive connection. With this type of integration teachers can add Google Drive files to assignments for students to access, students to submit Google Drive files through Campus Student, and teachers can view and score those files without leaving Campus. |
Teaching Center
Engagement Check-In
Teachers can use the Engagement Check-In tool to gauge students well-being and level of engagement in class and with curriculum.
This tool is available as part of the Campus Learning premium offering.
Location: Teaching Center > click the Smiley Face icon
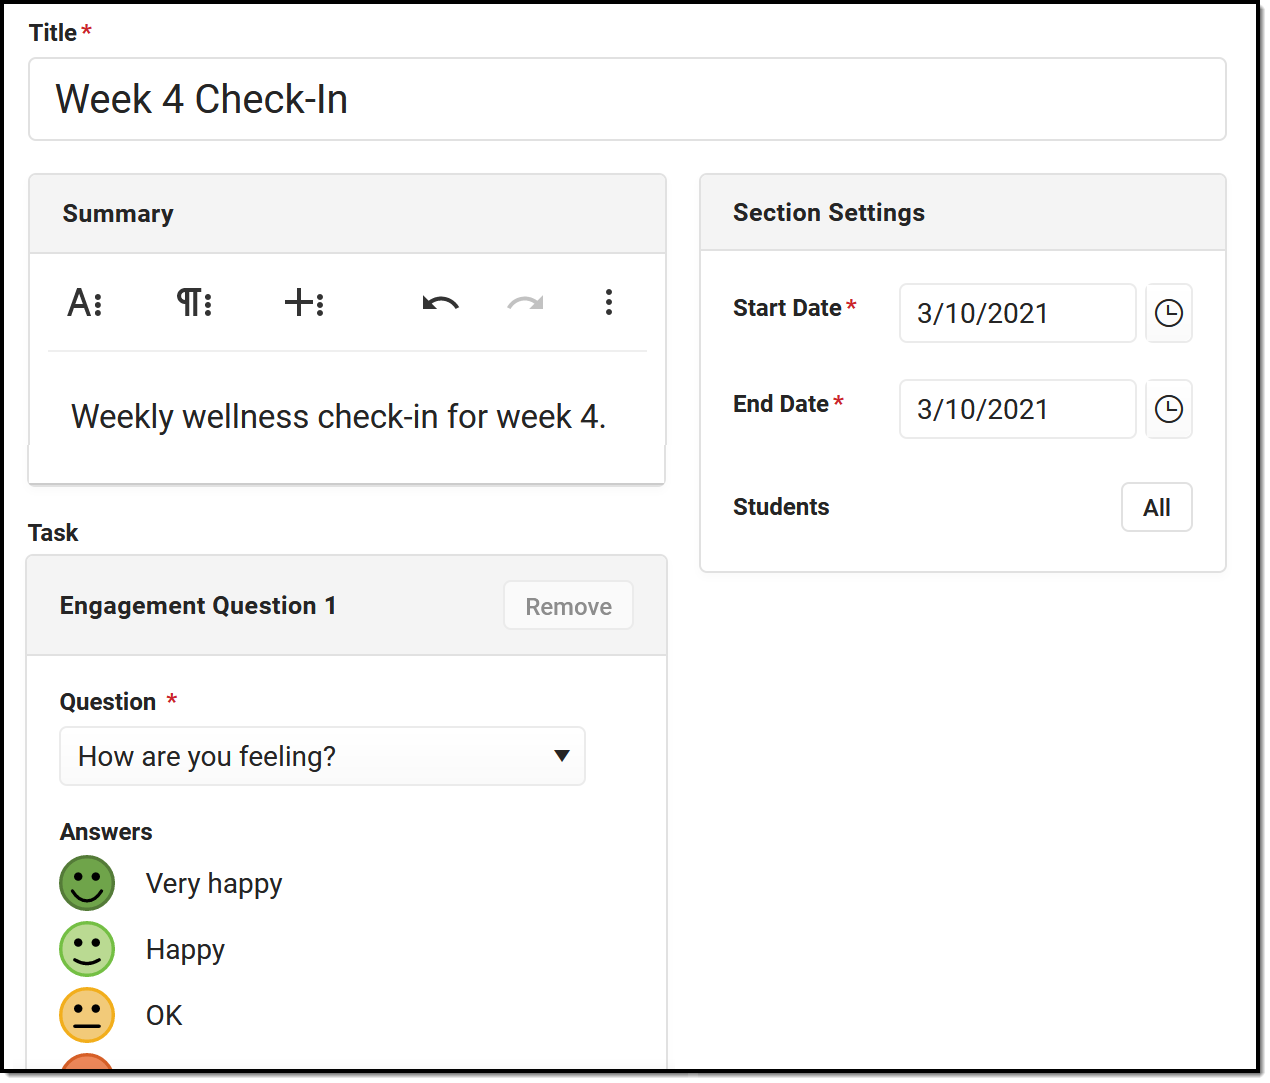
Create an Engagement Check-In to help gauge student well-being and engagement in your class and with curriculum. Questions relate to overall well-being, engagement in class, and feelings about specific assignments and curriculum.
Check-Ins display on the Today screen in Campus Student. Check-Ins are not visible in Campus Parent.
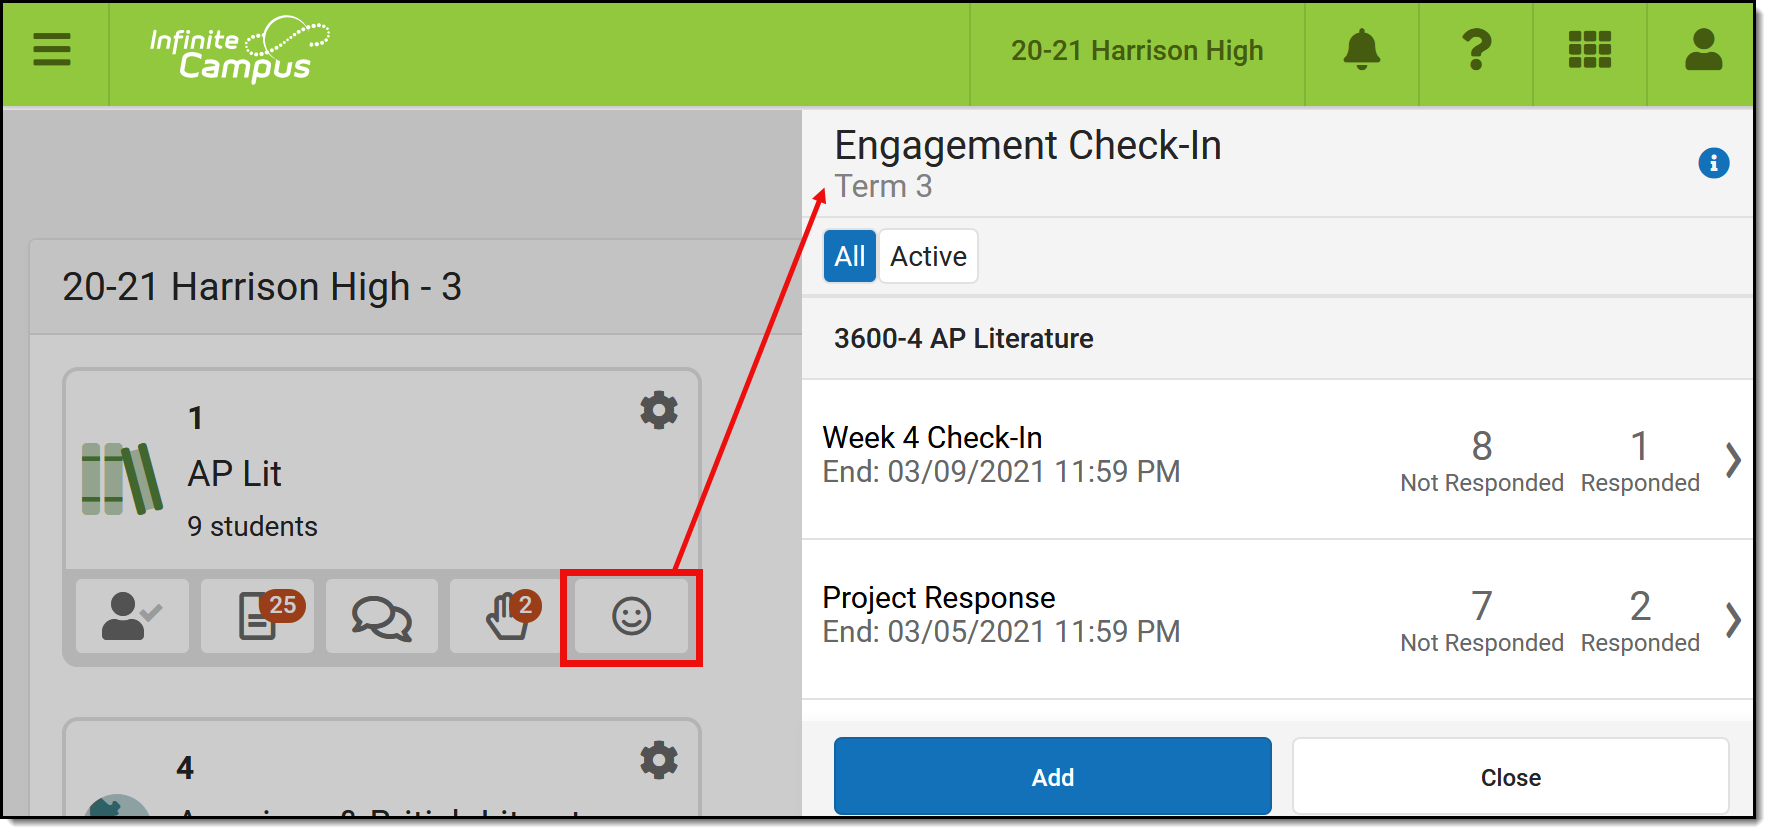 Use an Engagement Check-In to solicit information about student well-being and engagement.
Filter between All and Active Check-Ins using the buttons at the top. A Check-In is Active when today's date falls within the Check-In's date range.
Individualized and Hidden check-ins are indicated with labels.
See the Instruction Tool Rights article for more information.
Create a Check-In
To create a Check-In, click the icon to open the Check-In list and click New.
|
 |
In Campus Student
In Campus Student, students access Check-Ins from the Today screen:
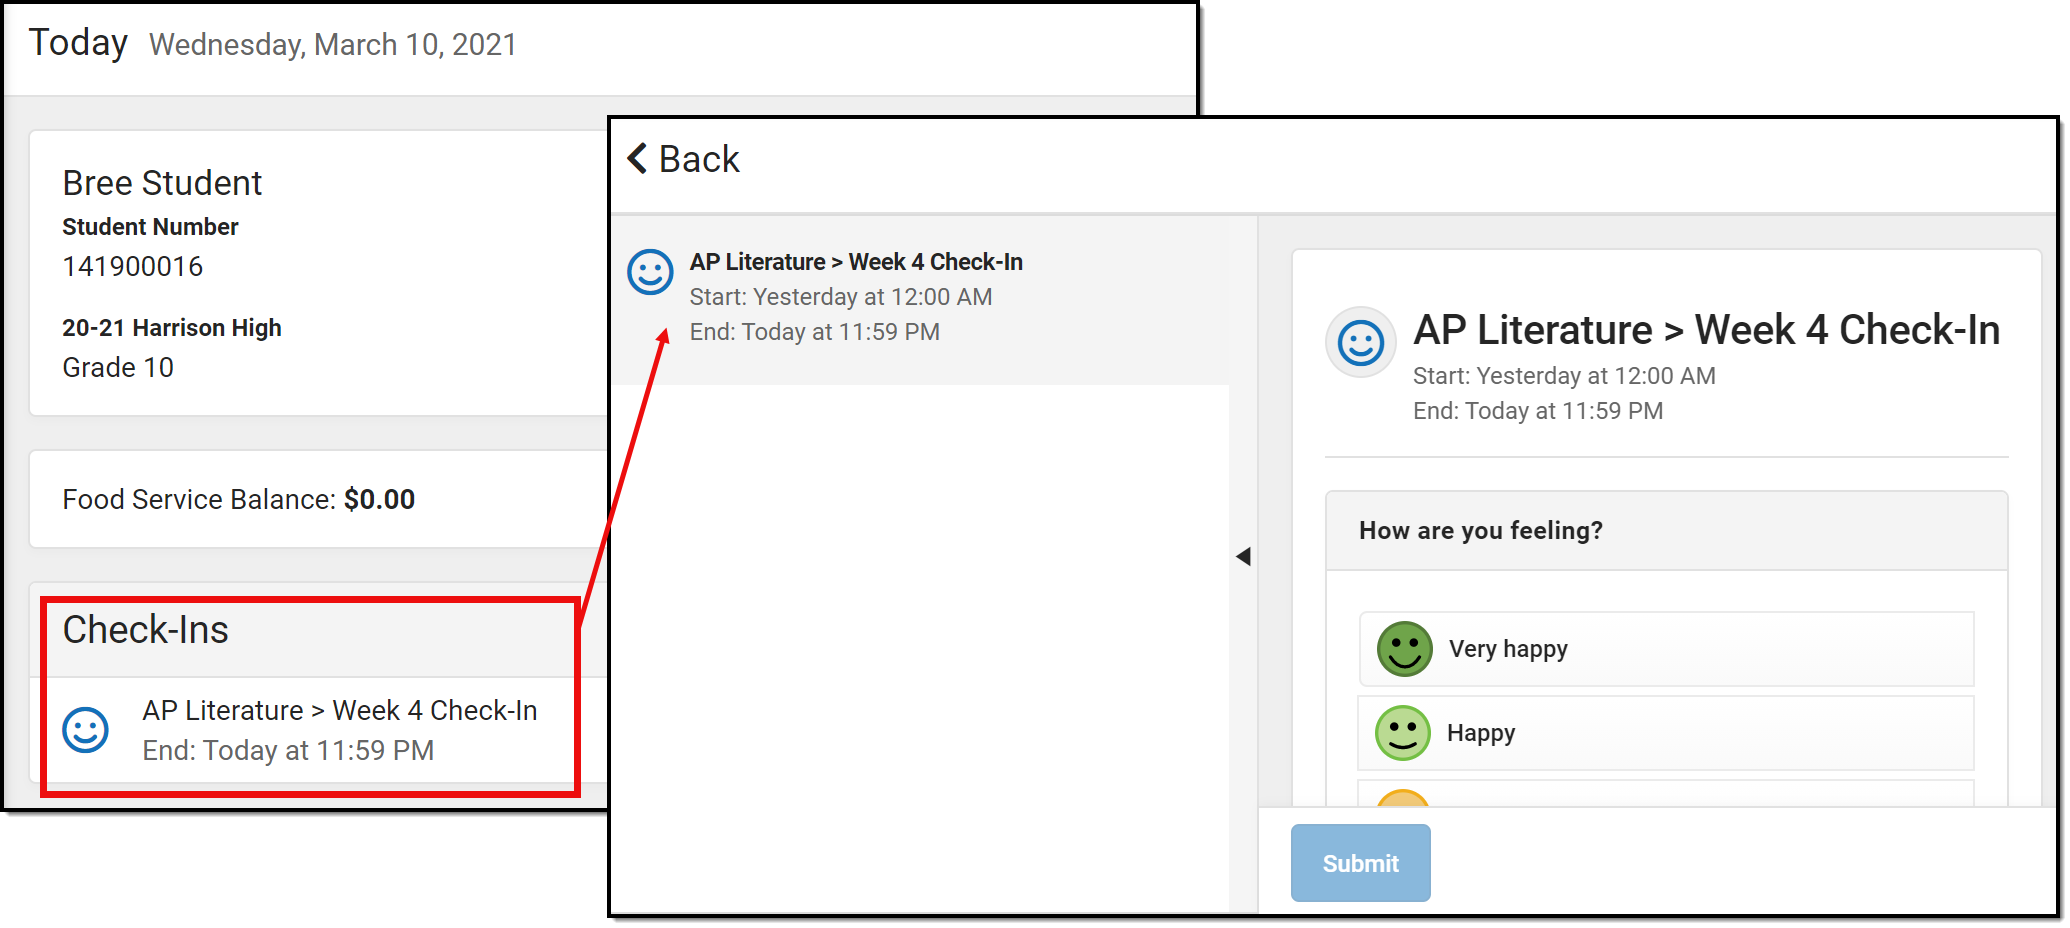 Students access Check-Ins from Campus Student.
View Check-In Results
Open a Check-In and click Edit to make changes. Questions cannot be changed once a student has responded. |
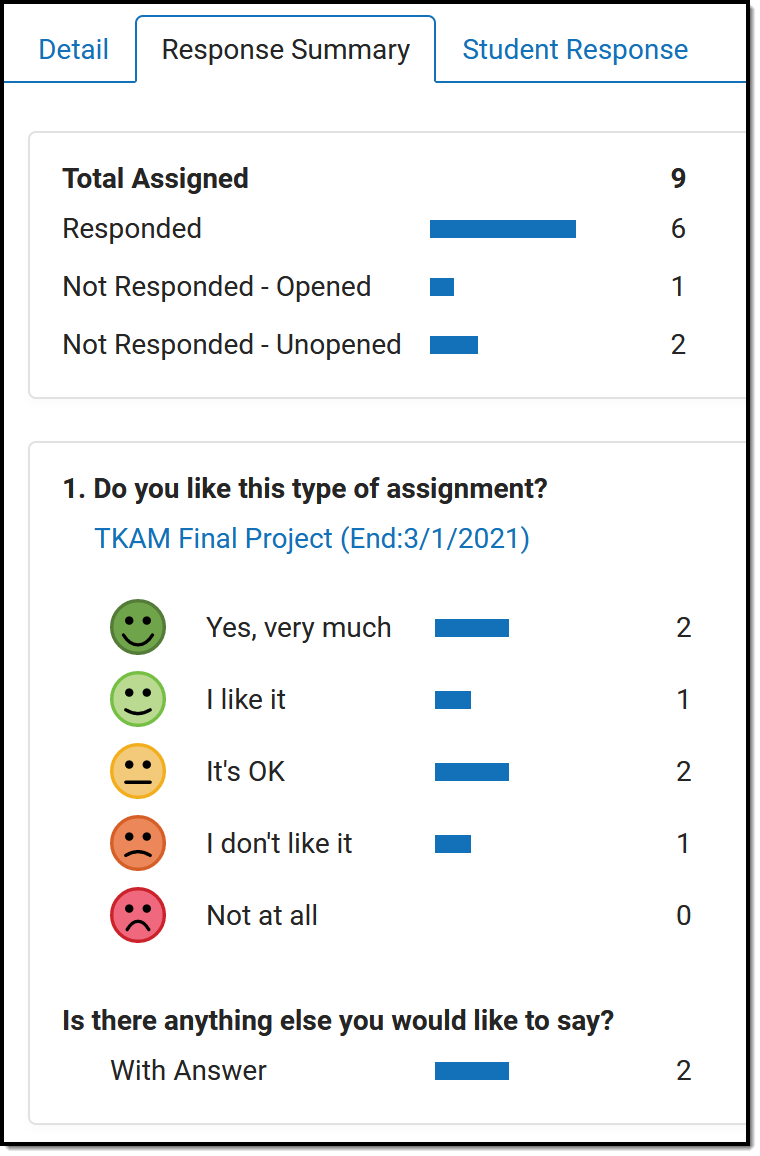
Open an existing Check-In to view results. Three tabs display: Detail, Response Summary, and Student Response.
Detail
The Detail tab shows a read only view of the Check-In.
Response Summary
The Response Summary tab summarizes the number of students who have and have not responded and shows a distribution of answers per question.
The Total Assigned section shows the number of students who received the Check-In. The totals of who have responded, who have not responded but have opened the Check-In, and who have not responded or opened the Check-In also display.
For each question, the total number of students who selected each answer is displayed. Hover over a response and then the eye icon that displays to see a tooltip listing the students who selected that response. If the Check-In included a Follow-Up question, the total is the number of students who responded to that question.
Click on any total or response to view a filtered version of the Student Response tab. |
 |
Student Response
The Student Response tab shows responses by student.
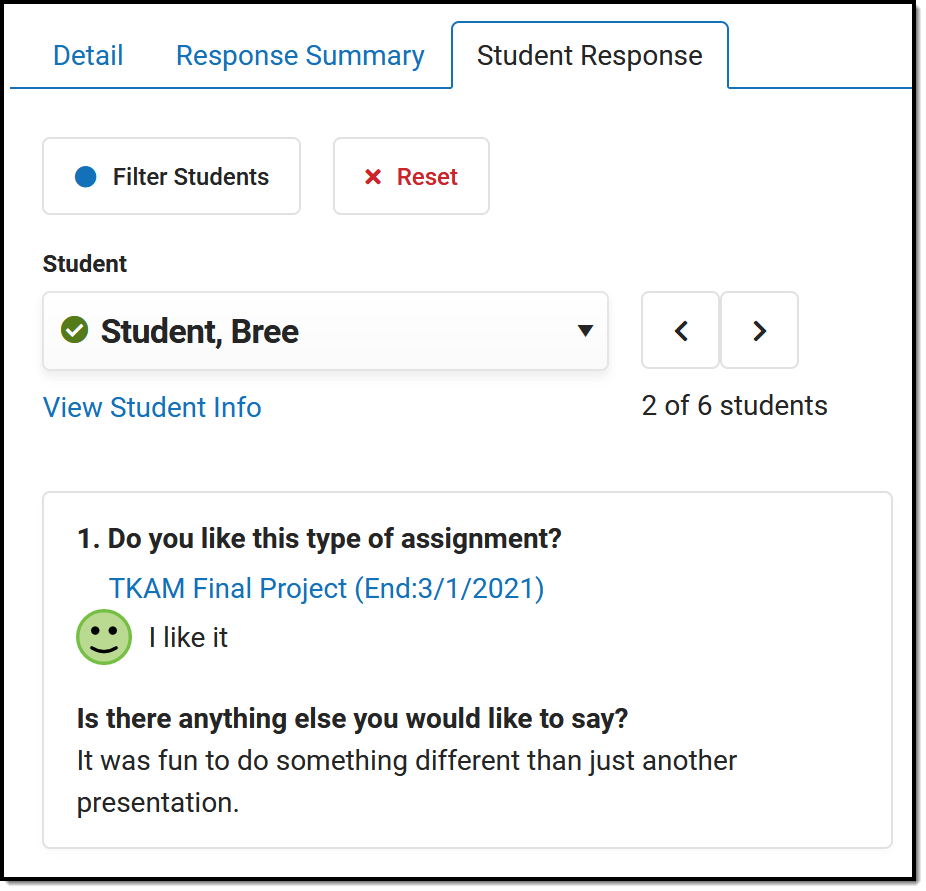 |
Navigate between students using the Student dropdown list or the arrow buttons next to it. The selected student's response displays.
Click View Student Info to view information about the student as shown in the Teaching Center.
Filters Click Filter Students to limit the Student dropdown list to only those who meet the selected criteria. For example, filter the list to only students who had negative responses or those who responded to the Follow-Up question. Click Reset to clear the filter. |
Engagement Check-Ins are included as part of the Campus Learning Suite premium offering. Visit the Campus Learning Suite page to learn more.
Teachers can use the Engagement Check-In tool to gauge students well-being and level of engagement in class. In this video, you will learn how to create an engagement check-in and review student responses.
Planner
Understand Campus Planner
The Campus Planner allows teachers to view their schedule while managing class assignments and daily tasks. In addition, teachers can view and copy another teacher's curriculum, as well as create their own assignments.
This tool is available as part of the Campus Learning premium offering.
Tool Search: Planner
This article describes the Settings that control the appearance of the Planner and the To Do List, with separate articles describing the Schedule view and Curriculum view.
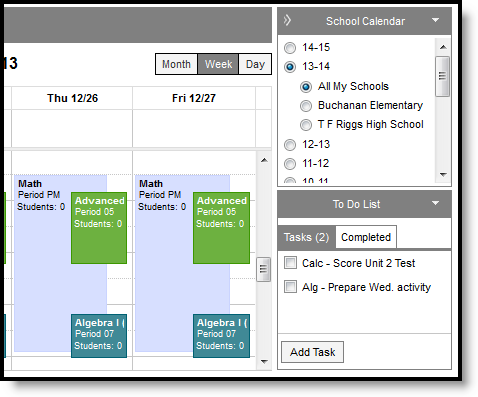
The School Calendar or the To Do List or both can be minimized to increase the space of the schedule.
 Use the available options to determine what displays in your Planner.
See the Instruction Tool Rights article for information on available tool rights.
Any Day Events entered for the school appear in your calendar, such as holidays.
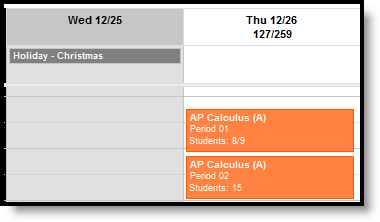
Day Events in the Planner
Calendar Options
The calendar options in the header appear above both views of the planner.
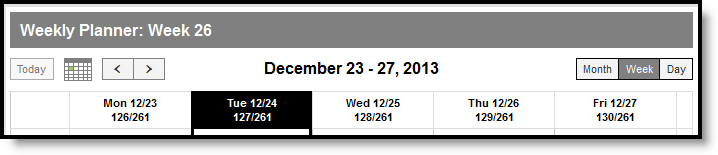
Calendar Header in the Planner
When in week view, the week of the school year displays at the top of the calendar. The day of the school year also displays for each day.
In the top right of the calendar, you can change the view to Month, Week, or a single Day. Use the arrows at the left to advance or go back from your current view.
Click the calendar icon to select a specific day to view. Click Today to return to the current day from wherever you are.
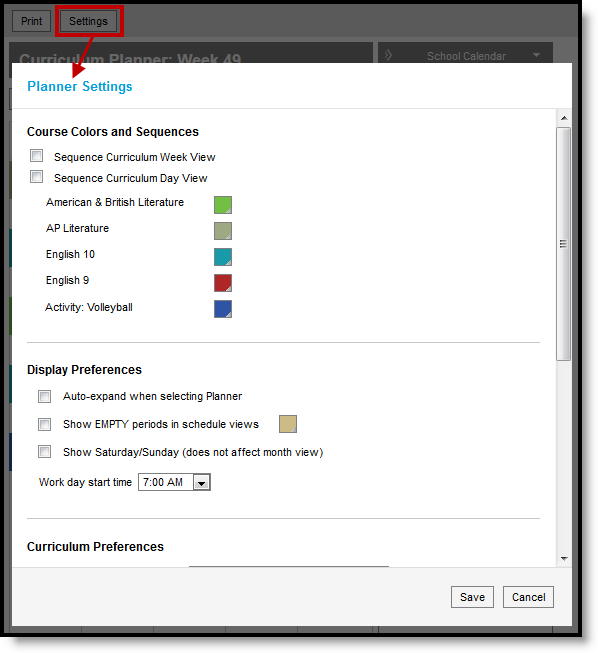
Planner Settings
The planner Settings allow you to choose the color and sequence of each course in your schedule, as well as display preferences for how the schedule appears and curriculum preferences.
 Planner Settings
Sequence selections apply to Week View and/or Day View. Sequence fields for each section display when a setting is marked.

Enter sequence numbers for each section.
Color choices apply to each course, so multiple sections of the same course are the same color.
The Display Preference logic is as follows:
Option |
Logic |
|---|---|
| Show EMPTY periods in schedule view | Marking this preferences displays all periods you don't have a section to the default color. Change color as desired. |
| Show Saturday/Sunday | Marking this preference adds Saturday and Sunday to the week view. |
| Work day start time | Select the default earliest time that should appear in the schedule. |
The Curriculum Preferences logic is as follows:
| Option | Description |
|---|---|
| Allow the selected sections to be visible to other users | Marking a section makes it available for other teachers to add to their Other Curriculum view. |
School Calendar Selection
Each year and calendar that you have rights to display in the School Calendar list. Select which schedule you'd like to view. Select All My Schools to view all of your sections across schools. If you have sections in multiple schools, you may want to choose a different color scheme in Settings for each school (such as light and dark, warm and cold, etc).
Multiple Schools in the Schedule
To Do List
The To Do List allows you to list tasks you'd like to remember and mark them off as you complete them.
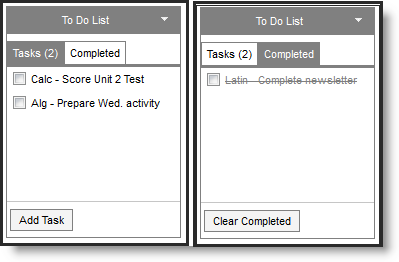
To Do Lists, Current and Completed
To add items, click Add Task, enter the reminder and hit Enter.
Once you've completed a task, mark the checkbox to move the task to the Completed list. To move a task back to the active list, mark the checkbox for the task in the Completed tab. Click Clear Completed to remove all completed items from that list.
Save
View My Schedule
Teachers can view all sections they teach in a monthly, weekly or daily view from the Schedule portion in the Planner. If applicable, district/school events may also be displayed.
This tool is available as part of the Campus Learning premium offering.
Location: Planner > My Schedule
The Schedule view of the Planner shows all of your sections, based on the school and calendar options you've selected.
Hover over a section to see additional information.
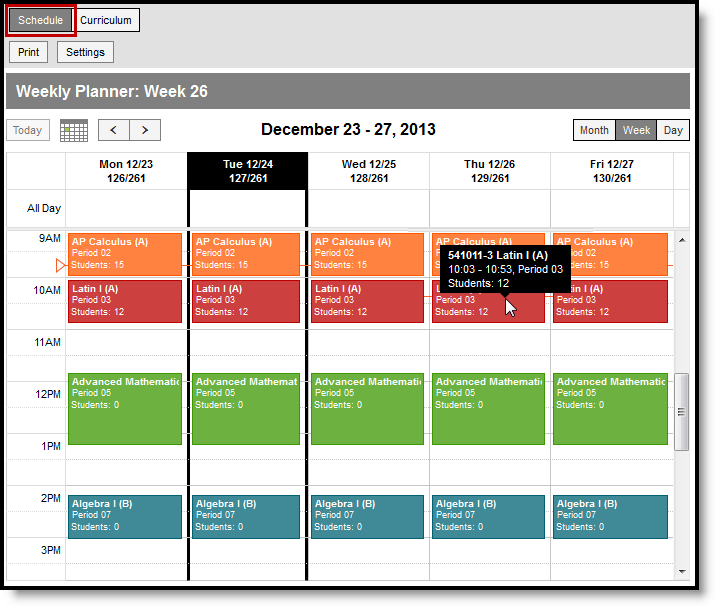
Schedule View
Tool rights to the Planner grant full access to this tool.
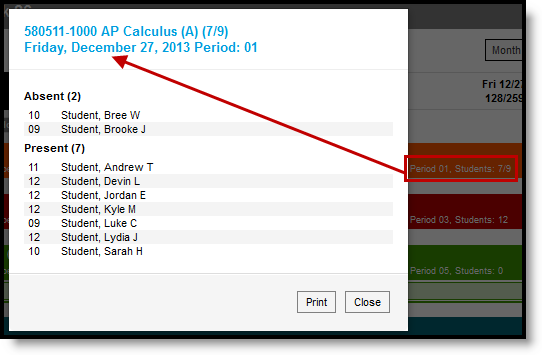
Click on the Students: # line on a day to view a student list, which includes any scheduled absences. Print this list if desired.
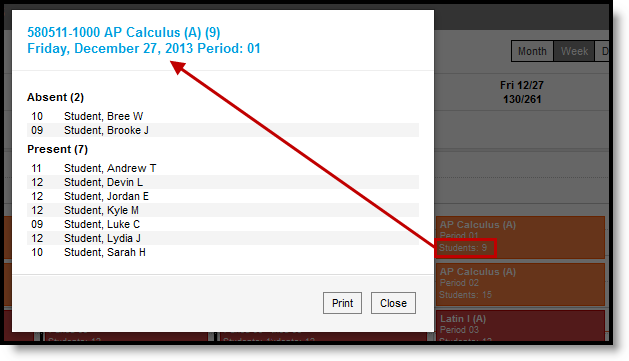
Student Attendance on a Future Day
Meetings scheduled by counselors that you are invited to also display in your schedule. Click the title of the meeting to view a printable version of the meeting basics, including Location, Date and Time, and Agenda.
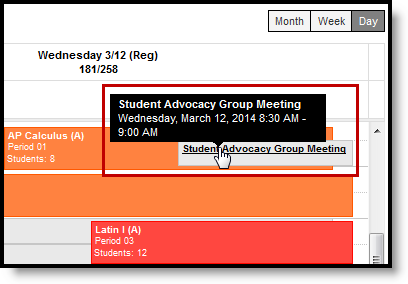
A Meeting in Your Schedule
Save
Save
My Schedule in the Planner shows all sections the user has been assigned to teach as well as when each section meets. This video demonstrates how to view schedule details in the Planner.
View My Curriculum
The My Curriculum view of the Planner allows teachers to view curriculum items for all assigned course sections. From this view, teachers can view assignments for a given month, week or day, and modify them as needed.
This tool is available as part of the Campus Learning premium offering.
Location: Planner > My Planner
The My Planner view shows assignments in each of your sections, based on the school and calendar options you've selected. This view gives you the opportunity to view all assignments for a given week or day and modify them as needed.
An additional option displays on the right where you can select specifically which sections display.
 The My Planner view shows scheduled curriculum.
Tool rights to the Planner grant full access to this tool.
The bar for each assignment runs from the Assigned Date to the Due Date. Click on the assignment name to view and modify the assignment. Click the name of an assignment and then click Score to score an assignment from the planner.
You can also modify an assignment by clicking on it and dragging it to a new day within the same section. Dates automatically update based on your placement.
Options in Section Header
In the section header for each section, click the various options to see more information:
Buttons at the Right
- New: Click to create a new folder, resource, assignment, discussion, quiz, or submission assignment.
- Library: Click Library to view the Curriculum Library where you can add curriculum to your section that other teachers have shared.
- List: Opens the Curriculum List for the section.
- Classroom: Navigates to Classroom in the context of this section.
Period Number, Student Count
Click on the Period #, Students: # line on a day to view a student list, which includes any scheduled absences. Print this list if desired.
Student Attendance in the My PlannerView
Blended Learning
If your school is using Blended Learning, your roster will be divided by students who are physically in class and those who attending virtually. Each student's group is indicated with the icon and name.
Section Number and Name
Click the name of a section to open additional section options:
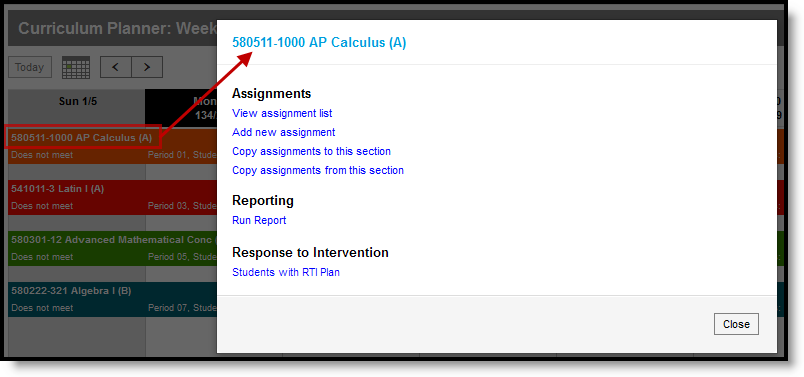
Section Options
RTI (Response to Intervention)
Click the RTI icon to enter an intervention delivery record from the planner (see image below).
A teacher must have at least R(ead) tool rights to Document Sections (Student Information > Response to Intervention > General > Documents > Plan > Document Sections) in order to access the View Plan and Link to Resource links shown on the Intervention Delivery screen (see the image below).

Entering an Intervention Delivery Record through the My Planner View
Previous Versions
My Curriculum (Planner) [.2403 - .2539]
The Planner is only available as part of the Campus Learning Suite premium offering. Visit the Campus Learning Suite page to learn more.
From My Planner, teachers can view their schedule while managing class assignments and daily tasks. In this video, you will learn how to use My Planner from the Planner.
View Other Curriculum
The Other Curriculum tool can be used to view the curriculum schedule of other teachers in your district. This option allows you to compare the pacing of your instruction with other teachers or monitor the progress of teachers you oversee.
This tool is available as part of the Campus Learning premium offering.
Location: Planner > Other Planners
Use the Other Planners view at the top of the Planner to view the curriculum schedule of other teachers in your district. This option allows you to compare the pacing of your instruction with other teachers, or monitor the progress of teachers you oversee.
Access to advanced curriculum tools is governed by the Enhanced Curriculum tool right.
 View other teachers' curriculum in line with your own using the Other Planners view.
Access to Other Planner requires tool rights to the Planner and the Other Planner sub-right.
Add Other Teachers to Your Planner
Add teachers to the Other Planners list by clicking Search and finding teachers to include.
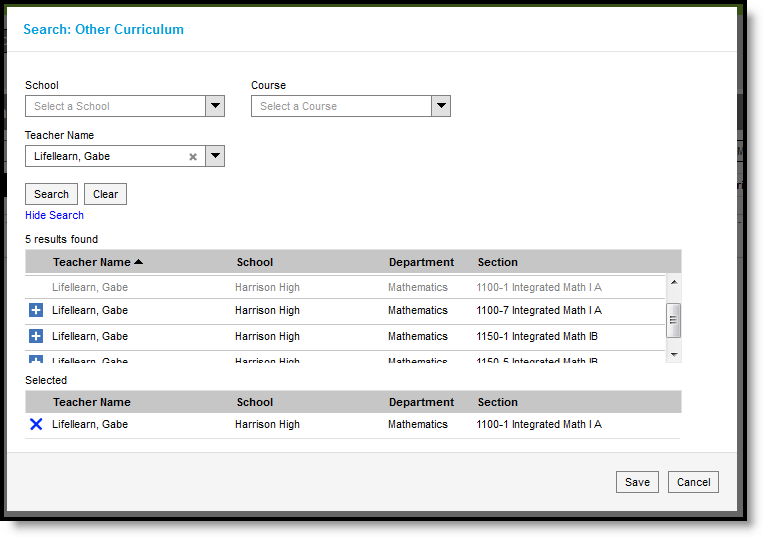
Searching for Other Planners to View
Search for teachers by Name, filtered by School or Course, or any combination of the three. Click the plus next to a teacher's name to add them to your list. Once all the teachers you'd like to add are in the Selected list, click Save to add them to your Other Planner list to the right of the planner.
If a teacher has classes in more than one school, you have the option of indicating which of their schedules you want to view.
To remove a teacher from your list, click the X after their name.
The performance of the Planner may be affected by the number of teachers and curriculum items shown at one time. Campus recommends adding teachers to your list and then toggling a few on at a time to compare curriculum.
Add Curriculum from Another Teacher's Class
With other teachers added to your Planner, you can easily add curriculum from other sections to your class.
- Click on the assignment, resource, or folder to view a read-only version.
- Click the Add to Section button.
- Add sections in the Section Selector side panel that displays and edit dates and grading as needed. See the Other Sections/Schedules section of the Assignments article for more information.
- Click Save when finished.
Previous Versions
Other Curriculum [.2403 - .2539]
Other Planners is only available as part of the Campus Learning Suite premium offering. Visit the Campus Learning Suite page to learn more.
Other Planners in the Planner allow teachers to view and copy other teachers' curriculum. This video demonstrates how to view other teachers' curriculum.
Curriculum
View and Modify Curriculum from the Curriculum List
Teachers can view and modify all curriculum for a section, across terms and alignments using the Curriculum List.
Users must have Campus Learning and the Enhanced Curriculum tool right to access advanced curriculum options such as folders and resources. |
Location: Click the List button in tools through Instruction, including Grade Book, Planner > My Planner, or Progress Monitor; Grade Book > expand Settings menu > Curriculum List; Planner > click section name > Curriculum List
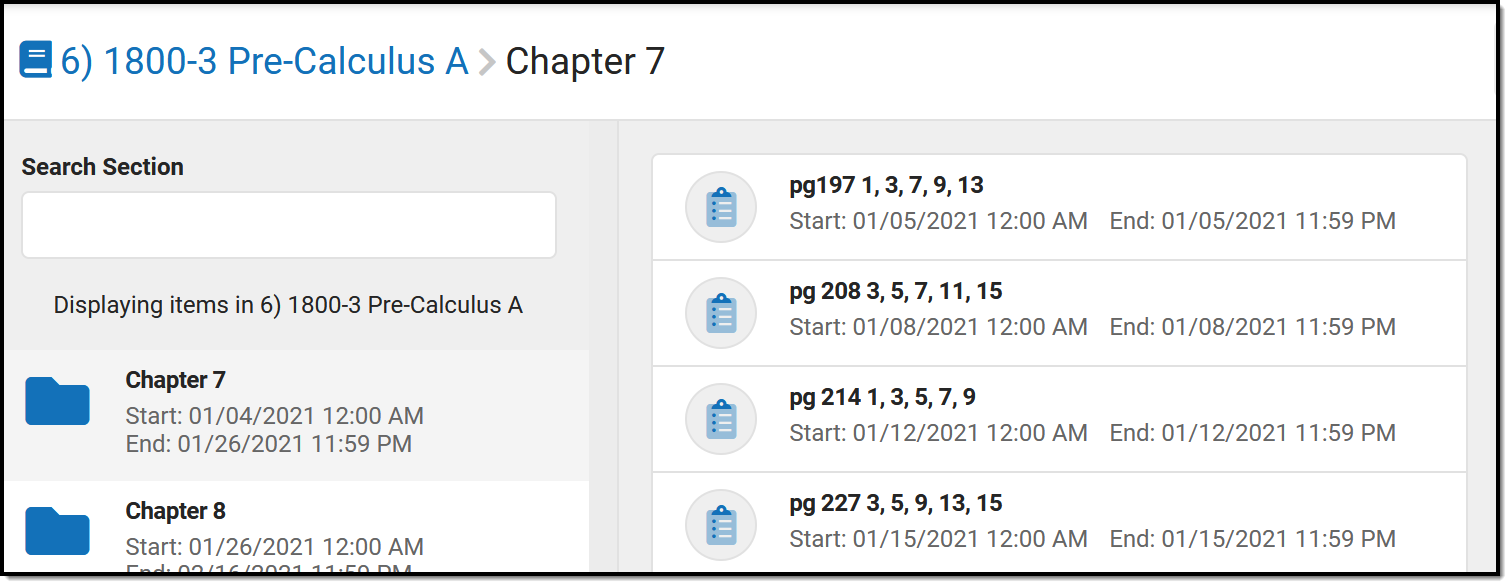
The List displays all curriculum for a section, across terms and alignments.
This list looks different for teachers who do not have Campus Learning and the Enhanced Curriculum tool right. See the Without Enhanced Curriculum section below for more information.
 The List shows all curriculum for the section. Use folders to organize content.
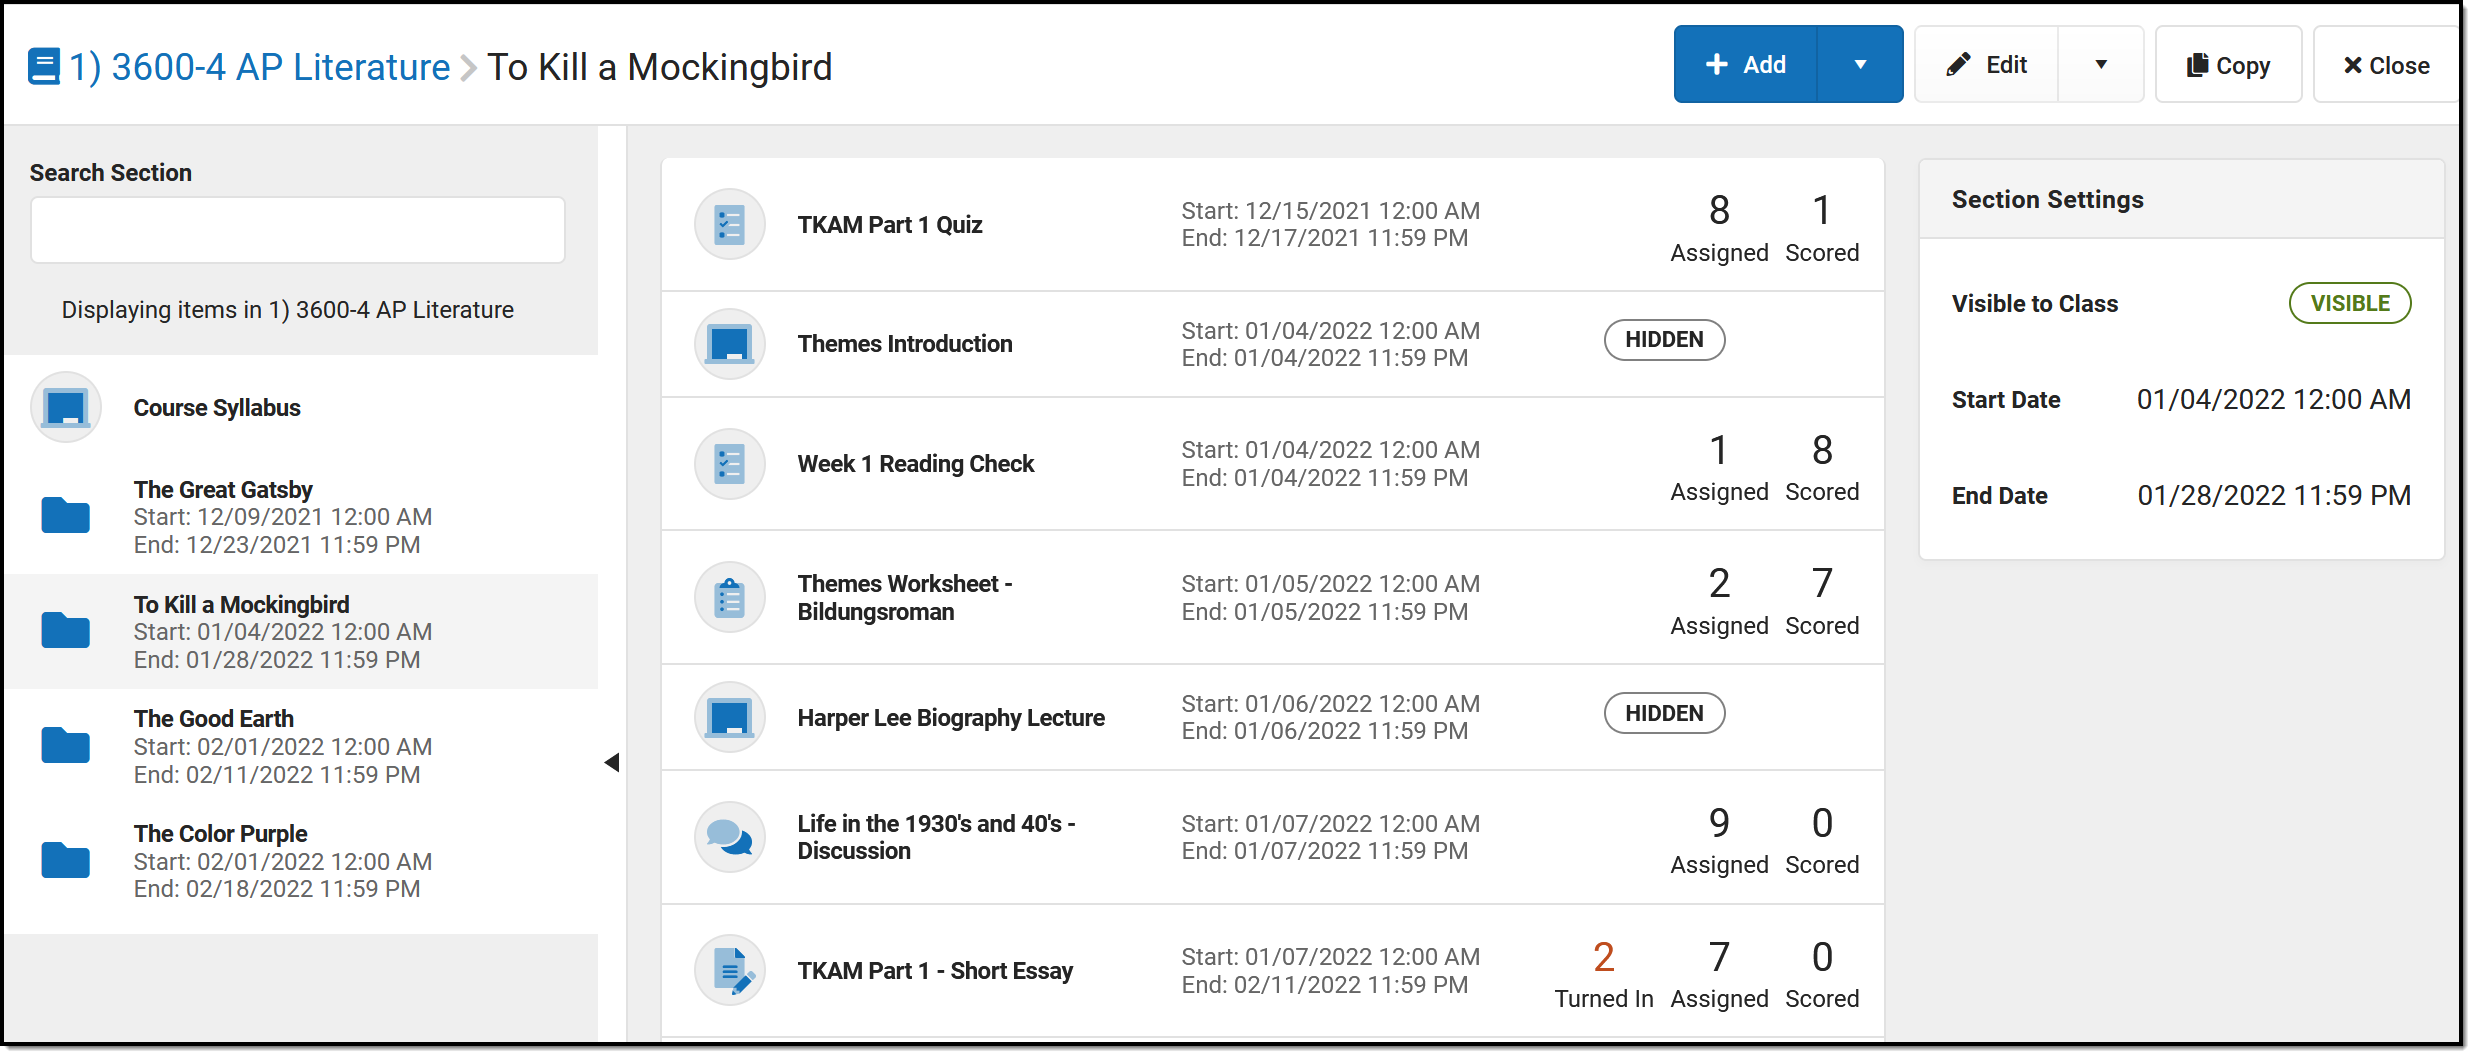
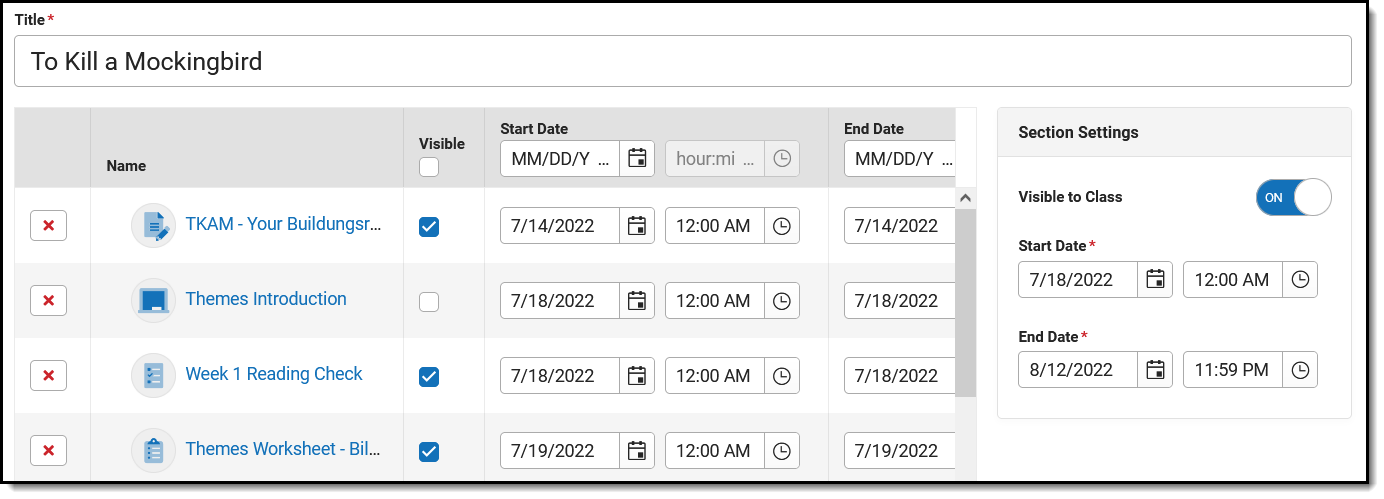
When you open the list, the highest level of your curriculum hierarchy displays. If you don't use folders to organize your content, you'll just see a list of all assignments and resources, ordered by Start Date.
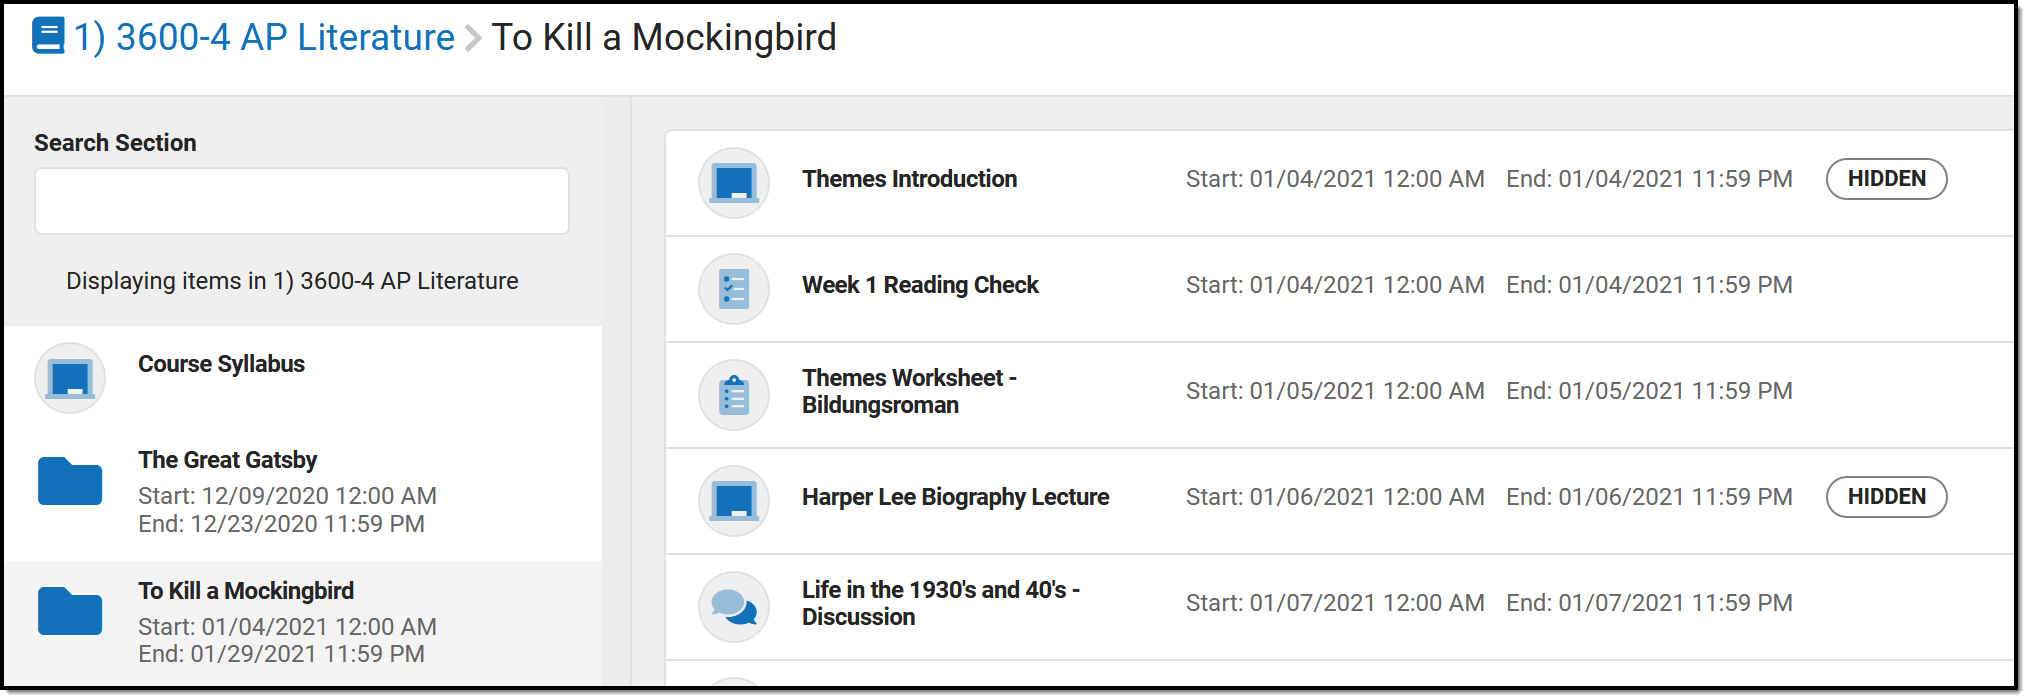
In the example above, I've organized my items into folders for the books my Lit class is reading, with a Course Syllabus resource at the top to keep it visible to students. I then clicked on the "To Kill a Mockingbird" folder to view the assignments, resources, and other items nested within that folder.
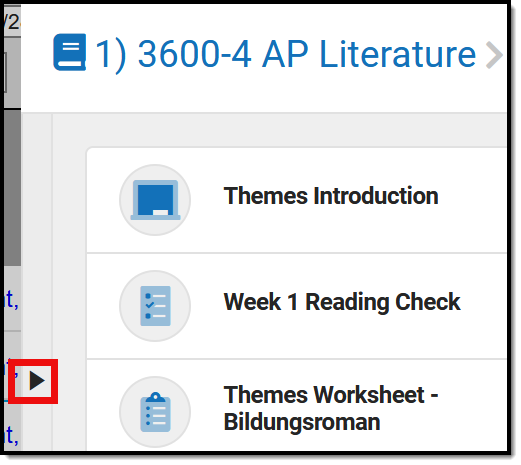 | Within a folder, click the black arrow on the left side of the list to expand or collapse the folder list. In the image above, I've expanded the folder list to display next to my assignments and resources. |
Numbers display next to assignments to provide more information about their status:

| Turned In | Assigned | Scored |
| The first number, in red, indicates if there are unscored submissions for the assignment. Click this number to view and score student work. | The assigned number indicates how many student have been given this assignment and have not turned it in or received a score. Click this number to Individualize the assignment | The scored number indicates how many students have received a score for this assignment. Click this number to open the scoring editor. |
At any point when viewing the list or a piece of curriculum, use the breadcrumbs at the top to navigate up through the hierarchy. In the example below, I've opened an assignment in the To Kill a Mockingbird folder. At the top, I can click the folder name to view it, or the section name to return to the top level curriculum list: |

Curriculum TypesEach type of curriculum has its own identifying icon. Links below provide more information: | |
 | Folders |
 | Assignments |
 | Resources |
 | Discussions |
 | Quizzes |
 | Submissions |
 | Imported Assignments |
Create an assignment by clicking  or click the arrow next to +Add to create any other item.
Click Library to view the Curriculum Library where you can add curriculum to your section that other teachers have shared. Click Copy to open the Curriculum Copier
Filtering the List
At the top level of the list, filtering options display along the top to simplify finding curriculum.
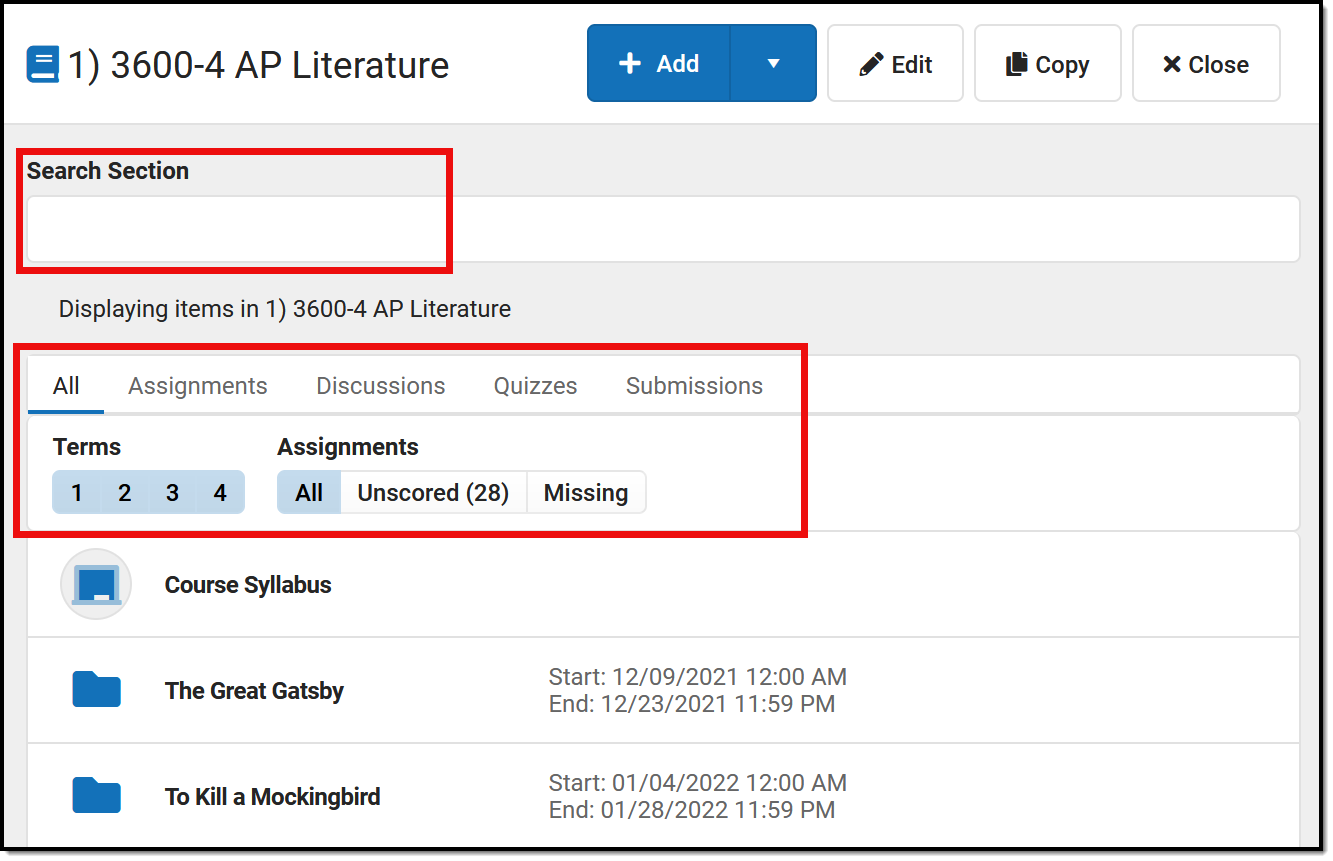 Filter options display at the top of the Curriculum List.
Search within all items in the section using the search bar at the top. This search includes the title and all other content entered for items, including summaries and notes.
Filter the list to show All items, only Assignments (any item with Grading toggled on), or based on the Task aligned to the item: Discussions, Quizzes, and Submissions. Users who receive assignments from a different program also have a filter for Imported items. Use the Term buttons to filter the list to only display items that are in-progress at some point during the selected term(s). Finally, use the Assignment filters to display graded items that are Unscored, are have Unreleased scores, or have any students flagged as Missing.
Filter the list to Unreleased assignments to display the Release All Scores button, which updates all assignments with Release Dates in the future to have a Release Scores setting of On Save. See the Release Scores article for more information.
Edit Mode
Click the Edit button to open edit mode for your current view of the list, whether it be a single assignment, all items in a folder, or everything in your section.
Below is an example of edit mode for all items in a folder:
 Click 'Edit' to modify the folder and items in it.
Edit the Title of the folder at the top. Edit the visibility of the folder and the dates in the Section Settings on the right. If a folder is hidden, all items within it are hidden by default.
Editing Items
All changes made in this view take effect once you click Save. Fill the visibility status or dates of all items using the fields in the table header.
- Click the red
 next to an item to delete it.
 - Click the name of an item to view a read-only version of it.
- Indicate if the item should be Visible on Campus Student and Campus Parent using the checkbox.
- Modify Start and End Dates by clicking the date to type or select another day. To set both dates easily, click the date to open the calendar, then click the Start Date you want and then the End Date, without closing the calendar. Click the clock icons to set times for the assignment
- Click the Grading link to view the grading setup for the item. Resources are not scored; click Grading Setup for a resource to change it to an assignment and set up grading.
 next to an item to delete it.
As you modify items, a dot next to the name indicates which items have unsaved changes. | 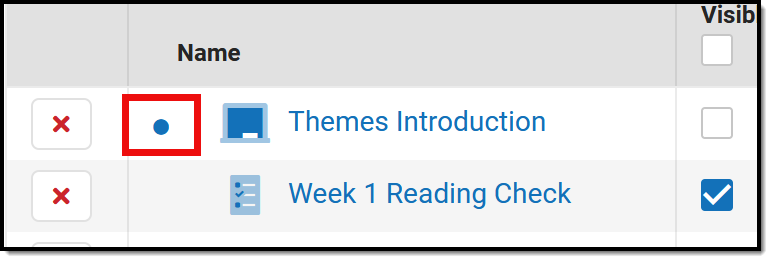 |
Click Save when finished to apply all changes.
Click the arrow next to the Edit button and select Move to change the parent folder of an item.
Without Enhanced Curriculum
Teachers who do not have Campus Learning and the Enhanced Curriculum tool right only see assignments in this list.
Search for assignments in the section using the Search Section bar at the top. Assignments are listed by Start Date. Add an assignment, open edit mode for the section (described below), or copy assignments from this section using the buttons at the top. Click an assignment to view a read-only version. With the assignment, click Edit to make changes. Click Edit to make changes to multiple assignments without opening them individually. See the Editing Items section above for more information. | 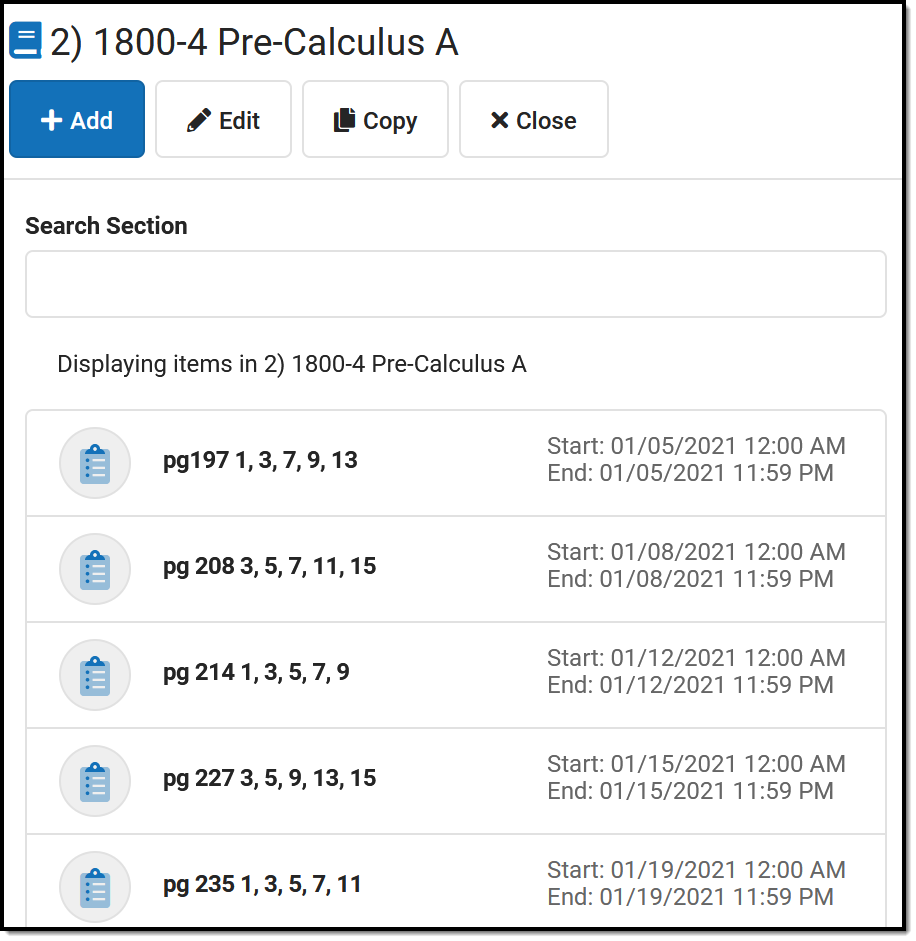 |
Save
Users must have Campus Learning and the Enhanced Curriculum tool right to access advanced curriculum options such as folders and resources. Visit the Campus Learning Suite page to learn more.
Using the Curriculum List, teachers can view all curriculum for a section, across terms and alignments. In this video, you will learn how teachers can use the Curriculum List.
Reflections
Reflections allow teachers to record information about how a piece of curriculum was used in their class and if it worked well.
Reflections are part of the Campus Learning premium offering and require the Enhanced Curriculum tool right.
Location: Tools throughout Instruction, including Grade Book, Planner > My Planner, Assignment Overview and Progress Monitor > Reflections
Reflections allow teachers to record information about how a piece of curriculum was used in their class and if it worked well. Access curriculum via the Curriculum List.
 Reflections are used to record thoughts about a piece of curriculum.
Access to assignments requries tool rights to a grading tool, such as Grade Book, Planner, or Progress Monitor. Additionally, the Enhanced Curriculum tool right in Additional Access Rights > Instruction Tools grants access to advanced assignment options. See the Instruction Tool Rights article for more information.
Reflections can be added to any assignment or resource. See the Assignments & Resources article for more information about creating curriculum, including scheduling, grading, and content.
What is a Reflection?
A reflection is a short survey about a piece of curriculum. It asks 5 questions about how the curriculum was used in your class, how it went, and your impression of the curriculum. Some questions have follow-up questions. The questions vary from reflection to reflection to collect a variety of data about each item without requiring an extensive survey. The first and last questions are included in every reflection.
Video
Add a Reflection
To add a reflection to a piece of curriculum:
- Click the Reflections tab on an assignment.
- Click Add Reflection.
- Answer the questions in the survey that displays.
- Click Complete when finished to save the reflection. Once completed, reflections cannot be deleted.
Teachers can create as many reflections for a piece of curriculum as desired. Navigate between reflections using the arrow keys next to the date of the reflection and click Current to return to the most recent reflection.
Edit a Reflection
To edit a reflection:
- Click Edit.
- Make desired changes.
- Click Complete when finished.
Only the most recent reflection can be edited.
View Reflections
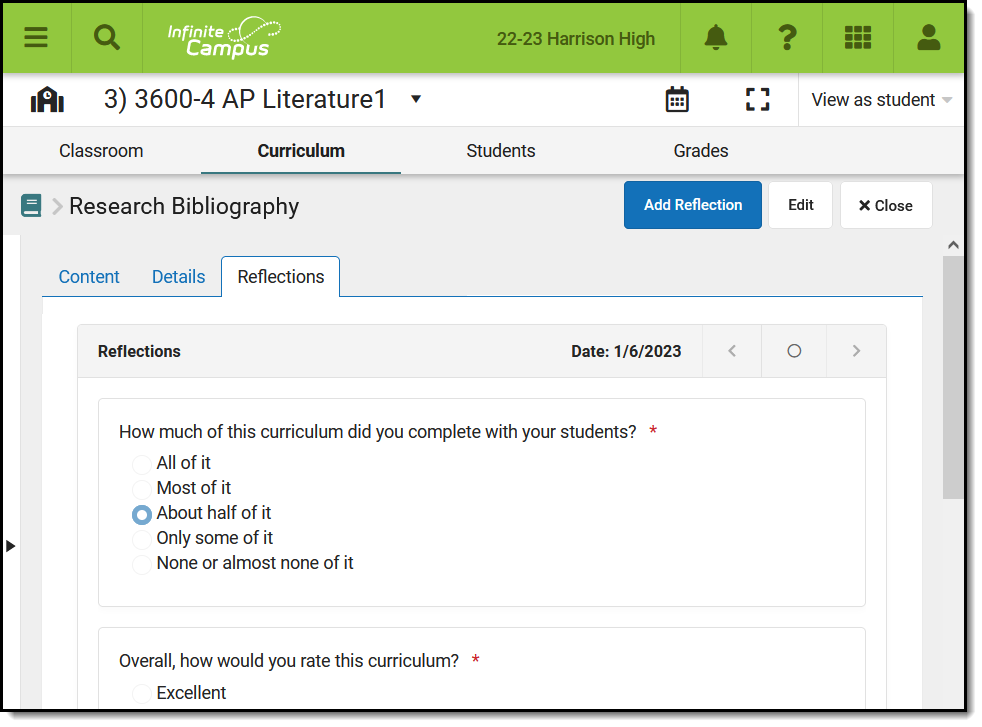
Click the Reflections tab to view the most recent Reflection. If multiple reflections exist, page through them using the Previous and Next buttons.
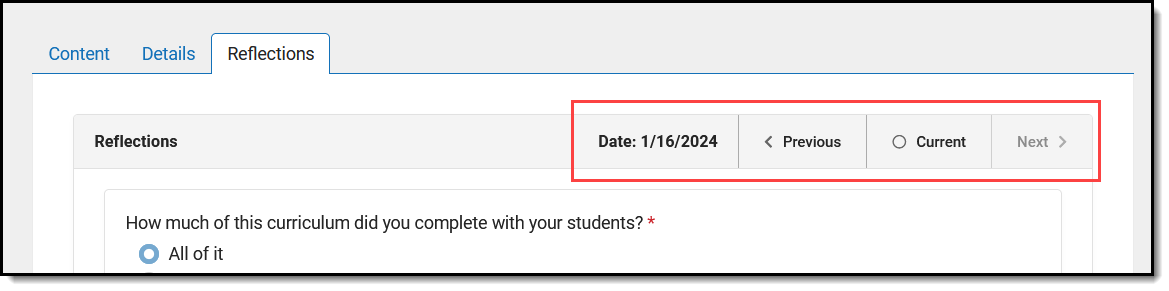 Navigate between Reflections using the options at the right.
The date the Reflection was created displays at the top right.
Do Reflections Copy?
Reflections stay with a piece of curriculum when you copy it from year to year or term to term. Teachers can use reflections to track the the value of curriculum over time.
Reflections are not copied when using Duplicate to create a new instance of a piece of curriculum. Likewise, if another teacher adds curriculum to their section via the Other Curriculum tab or the library, reflections are not copied to the new teacher.
Other Considerations
- If a piece of curriculum is aligned to multiple sections, the same reflections display for all sections.
- While reflections are currently only visible when looking at a specific piece of curriculum, additional tools in the future may make reflections visible to other users.
Users must have Campus Learning and the Enhanced Curriculum tool right to access advanced curriculum options such as adding Reflections. Visit the Campus Learning Suite page to learn more.
Using Reflections, teachers can record information about how curriculum was used and how well it worked in their class. In this video, you will learn to record reflections for curriculum.
Curriculum Library
Share Curriculum to the Library
Teachers can share or remove their curriculum to the district-wide Curriculum Library.
The Curriculum Library is available as part of the Campus Learning premium offering.
Location: Anywhere you access assignments, including Instruction > Grade Book, Progress Monitor, Curriculum List, or Planner
Sharing curriculum to the Curriculum Library makes the curriculum available for other teachers to use in their classes. Curriculum can be shared at the folder level or as individual assignments and resources.
Share curriculum anywhere you can view it, including from the Curriculum List for a section or from My Curriculum.
 Click the Share button to enter details and share a folder of curriculum.
To share curriculum, teachers need the Enhanced Curriculum tool right, the Curriculum Library District Share tool right, and rights to at least one of the following grading tools: Grade Book, Planner, Progress Monitor.
Check out this video for more information.
Share Curriculum
Curriculum can be shared at the folder level or as individual assignments and resources, including those with quizzes aligned. Note: assignments with Engagement Check-Ins or those received via a OneRoster connection cannot be shared.
- Open the curriculum item you want to share.
- In the About section, enter Curriculum Details for the curriculum. If sharing a folder, it is also recommended to enter this metadata for assignments and resources in the folder as well.
- Click Share.
- The metadata entered in the About section for the curriculum is displayed. Edit if needed.
- There is a checkbox below the metadata called Include Grading, which is marked by default. Leave this checkbox marked if the shared curriculum should include grading setup. Scoring Rubrics are included in shared curriculum.
- Click Share to add your curriculum to the library.
Curriculum you share displays with a blue Shared by Me indicator. See the Add Curriculum from the Library article for more information about using the Curriculum Library.
 Curriculum you shared is indicated in the Library.
When you share curriculum, the version in the library is separate from the one you have. Changes you make to your curriculum will not be reflected in the version in the library. Likewise, when teachers use your curriculum from the library, any changes they make do not affect the library version.
Update Shared Curriculum
Currently, the only way to update shared curriculum is to make changes to your version and then share again. Remove the version you shared previously to make sure other teachers are finding the most up-to-date version.
Remove Curriculum
|
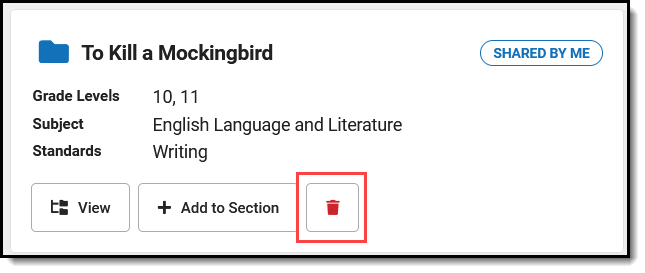 |
Removing content removes it from the library, but teachers who have added it from the library still have access to their own versions. Likewise, you'll still have the original version of the curriculum you shared in your Curriculum List.
Users must have Campus Learning and the Enhanced Curriculum tool right to access advanced curriculum options such as accessing the Curriculum Library. Visit the Campus Learning Suite page to learn more.
Using the Curriculum Library, teachers can share or remove their curriculum to the district-wide Curriculum Library. In this video, you will learn to share your curriculum to the Curriculum Library.
Add Curriculum from the Library
Teachers can search the district-wide Curriculum Library and add selected curriculum to the sections they teach.
The Curriculum Library is available as part of the Campus Learning premium offering.
Tool Search: Library
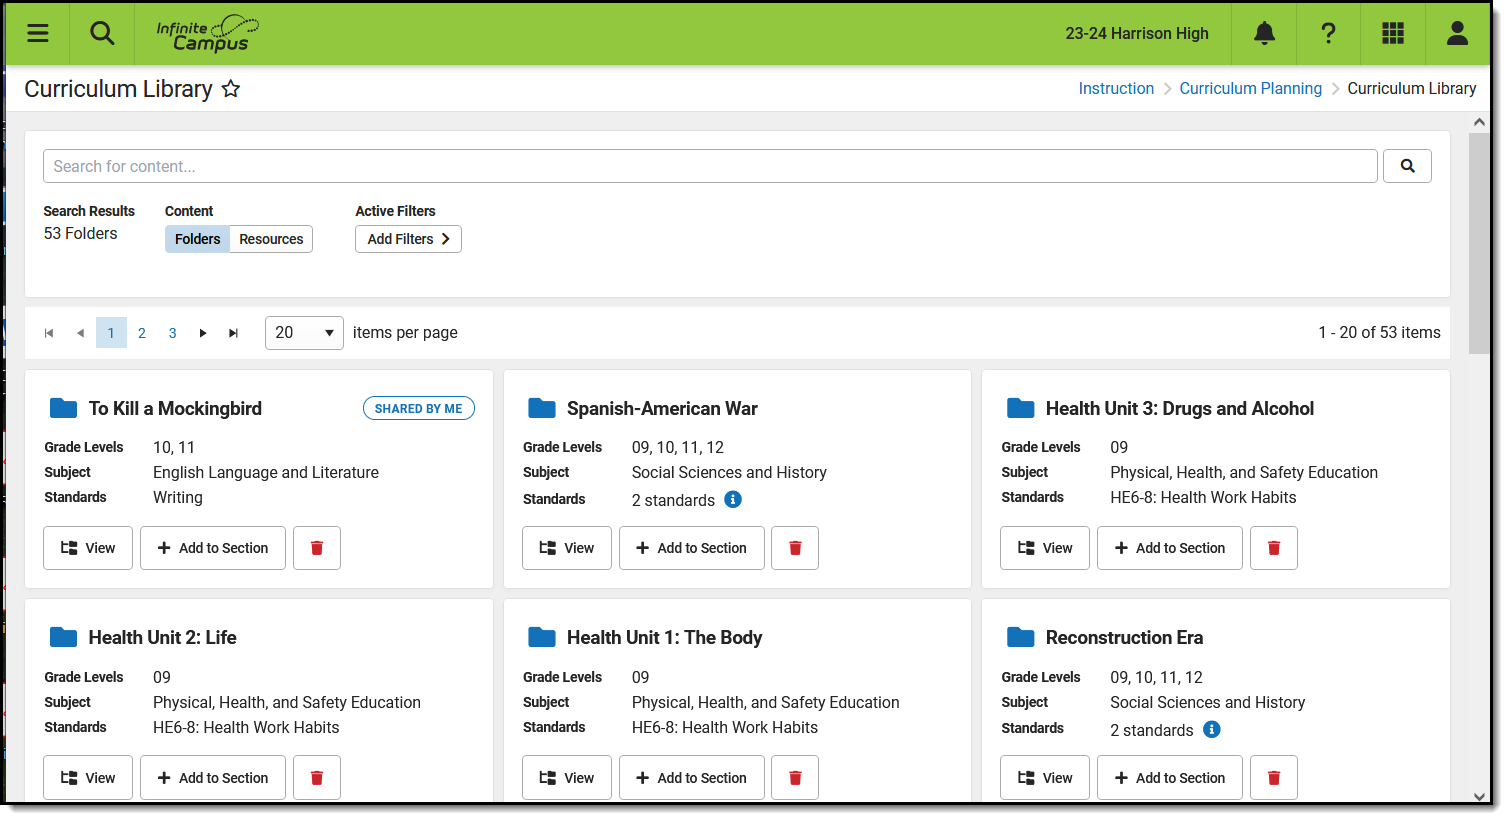
The Curriculum Library allows teachers to collaborate and share curriculum with each other. Curriculum is shared to the library as folders or as individual assignments and resources. Teachers can search the library for curriculum and add copies to their own sections.
The Library includes all curriculum shared by teachers at your district.
Access the library from the Curriculum Library tool, or via the Library button in the Grade Book, Progress Monitor, or Planner.
 The Curriculum Library shows curriculum shared by you and other teachers in your district.
To add curriculum from the library a teacher needs the Enhanced Curriculum tool right, as well as tool rights to at least one of the following grading tools: Grade Book, Planner, Progress Monitor.
Check out this video for more information.
Search for Curriculum
Search and use filters to find curriculum in the library. The search finds curriculum that has any text matching the search term(s), including names, summaries, descriptions, and text within attachments.
Use the Content toggle below the search bar to toggle between displaying folders of curriculum or individual resources, which includes assignments and resources. When viewing Resources, an additional set of filters displays to filter the library by items with specific Included Content, including a Quiz, Submission, Discussion, LTI Link, or Scoring Rubric.
Filter Search Results
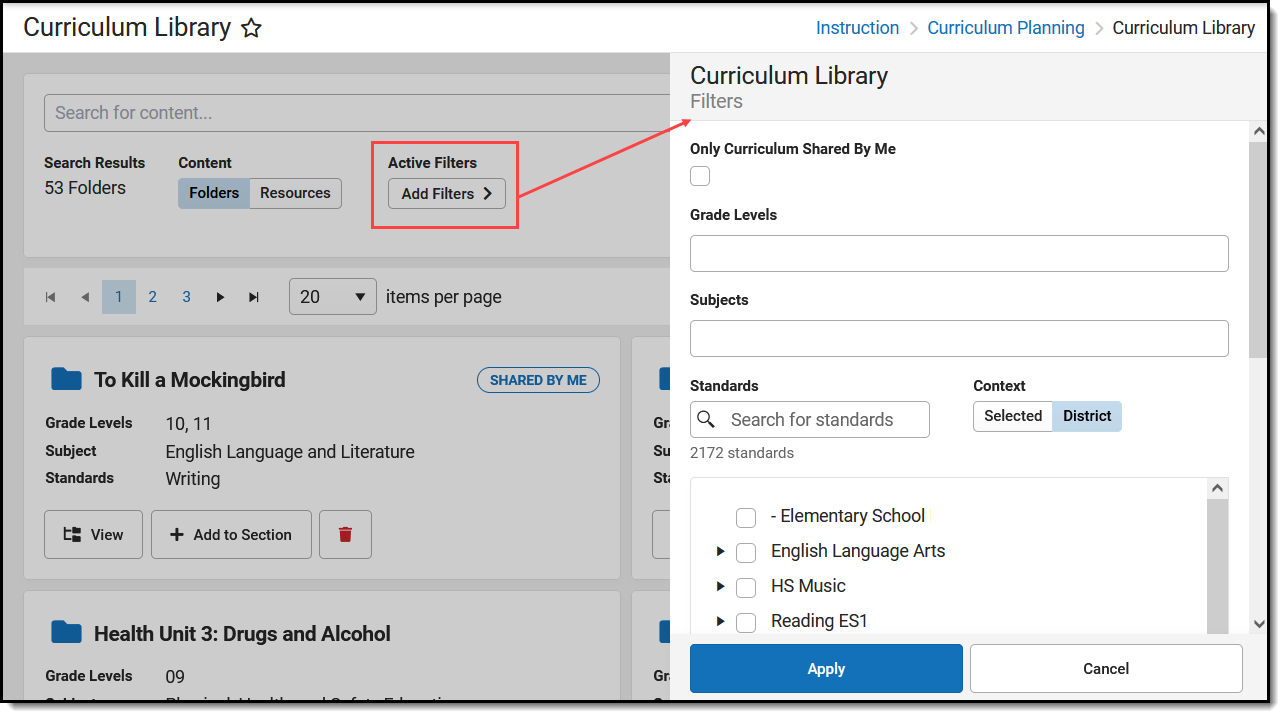
To further filter search results, click Add Filters.

The Only Curriculum Shared by Me option filters the library to show only curriculum that you have shared. See the Share Curriculum to the Library article for more information. This option is helpful for reviewing what you've shared. Tip: Curriculum that has already been shared cannot be modified. To update shared curriculum, modify your version of the curriculum in one of your sections, remove the shared version from the library using the red trash can 'Remove' button, and share a new version.
Other filter options are:
- Grade Levels
- Subjects
- Standards
These filters rely on the curriculum metadata in the About section of the curriculum, which was entered for the curriculum before it was shared.
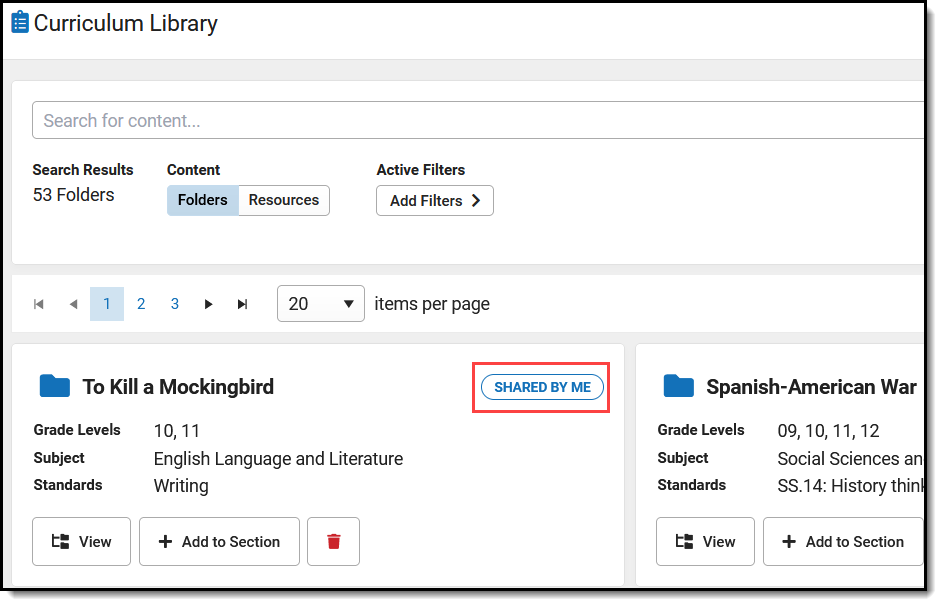
In this example, I'm looking for curriculum for my 10th grade English class. I selected a Grade Level of 10 and a Subject of English Language Arts. The Active Filters area shows that two filters are selected and the library only shows folders that meet those filters.
 Filter search results to find curriculum in the library.
View Curriculum
To view the curriculum in a folder, click the  button. A read-only version of the Curriculum List displays. button. A read-only version of the Curriculum List displays.
Click folders, resources, and assignments to view more information. |
 |
Copy to a Section or My Curriculum
Curriculum is added to your section by copying it from the library.
Step 1: Open the Copier
Copy a whole folder or an individual item by clicking Copy in the library or when viewing the curriculum. Use the arrow button next to Copy to choose whether you're copying to a specific section or to the My Curriculum tool. |
 |
Step 2: Select Curriculum and Destination Section
- In the Source section on the left, leave the checkboxes marked for any curriculum you want to add to your section. Unmark checkboxes for curriculum you don't want. Click the name of an item to view it.
- In the Destination section, indicate if the curriculum should be copied to a specific Section or to your My Curriculum tool.
- If copying to a specific section, select School Year and Section from the list of classes you teach.
- Any existing curriculum in that section or My Curriculum displays for reference.
- If desired, click Edit and select an existing Folder at the Destination to copy the selected curriculum to that folder.
- Click Next when finished.
 Indicate the source curriculum to copy to the selected Destination Section or My Curriculum.
Step 3: Dates and Grading
To quickly add curriculum to your section, skip this step. Add dates and grading setup later by accessing the curriculum through the Curriculum List. By default, curriculum added to a section from the Library is not marked as Visible to students and parents.
The options in this step differ depending on whether you're copying to a specific section or to My Curriculum.
- If copying to a specific section:
- Indicate if any of the curriculum should be Visible in Campus Student and Campus Parent. Note: the folder must be marked as visible for any curriculum in it to be visible.
- Modify Start and End Dates by clicking the date to type or select another day.
- If copying to My Curriculum:
- Enter a Duration in days for how long the curriculum should take.
- Click the Grading Setup link to view the grading setup for the item. Resources are not scored; click Grading Setup for a resource to change it to an assignment and set up grading.
- Click Save when finished to add the curriculum to your section.
 Enter Dates (or Duration) and Grading information for curriculum you're adding.
Fill data for all items by using the corresponding option in the header of the table.

Impact
If copying to a section, the curriculum you added is now visible in the Curriculum List of the section. Curriculum with dates is also visible in the Planner and curriculum with grading setup is visible in the Grade Book, and everywhere else curriculum displays in Instruction.
If copying to My Curriculum, view the copied curriculum in that tool and edit it as desired. You can then add curriculum from Schedule Curriculum from My Curriculum into your sections.
You can edit it or remove items as desired; the version in the Library is not affected by changes you make to your copy.
Users must have Campus Learning and the Enhanced Curriculum tool right to access advanced curriculum options such as accessing the Curriculum Library. Visit the Campus Learning Suite page to learn more.
Using the Curriculum Library, teachers can search the district-wide Curriculum Library and copy the selected curriculum to the sections they teach or to the My Curriculum tool. In this video, you will learn how to copy curriculum from the Curriculum Library to your course sections.
Curriculum Library (Admin)
Administrators can view or remove curriculum from the district-wide Curriculum Library using the Curriculum Library District Manager.
The Curriculum Library is available as part of the Campus Learning premium offering.
Tool Search: Curriculum Library District Manager
The Curriculum Library lets teachers collaborate and share curriculum across a district. The Curriculum Library District Manager can view curriculum in the Library and remove items shared by anyone.
 The Curriculum Library collects all curriculum shared by users in the district.
The Curriculum Library District Manager tool right allows you to view curriculum in the Library and remove curriculum shared by anyone. Enhanced Curriculum and grading tool rights are not required for this level of access.
See the Instruction Tool Rights article for more information.
Check out this video for more information.
Search for Curriculum
Search and use filters to find curriculum in the library. The search looks for the entered text in the Name, Description, and other content in any curriculum in the library, including .pdf and .doc files.
Use the Content toggle below the search bar to toggle between displaying folders of curriculum or individual resources, which includes assignments and resources.
Filter Search Results
|
To further filter search results, click Add Filters.
The Only Curriculum Shared by Me option filters the library to show only curriculum that you have shared.
Other filter options are:
These filters rely on the Curriculum Details entered for the curriculum before it was shared. |
|
View Curriculum
| To view the curriculum in a folder, click the button. A read-only version of the Curriculum List displays.
Click folders, resources, and assignments to view more information. |
|
Remove Curriculum
|
|
 button.
 Removing content removes it from the library. However, teachers who have already added it to their own section still have access to their own version. Likewise, teachers who shared the curriculum originally still have their own version.
Users must have Campus Learning and the Enhanced Curriculum tool right to access advanced curriculum options such as accessing the Curriculum Library. Visit the Campus Learning Suite page to learn more.
Using the Curriculum Library District Manager, administrators can view, copy, or remove curriculum from the district-wide Curriculum Library. In this video, you will learn to manage curriculum from the Curriculum Library.
Folders
Create and Manage Folders
Teachers can use Folders to arrange their assignments and resources to organize the curriculum for their course sections. They are simple and flexible, allowing you to organize your curriculum in a way that makes sense for your course and students.
Folders are available as part of the Campus Learning premium offering and require the Enhanced Curriculum tool right.
Location: Tools throughout Instruction including Grade Book, Planner > My Planner, and Progress Monitor > click the arrow next to the Add button > Folder
Folders are used to structure curriculum. They are simple and flexible, allowing you to organize your curriculum in a way that makes sense for your course and students. This article includes suggestions for ways you could use folders.
 Use folders to organize assignments and resources.
The Enhanced Curriculum tool right in Additional Access Rights > Instruction Tools grants access to this option. See the Instruction Tool Rights article for more information.
See the List article for more information about viewing curriculum.
Additional Options:
|
Add a Folder
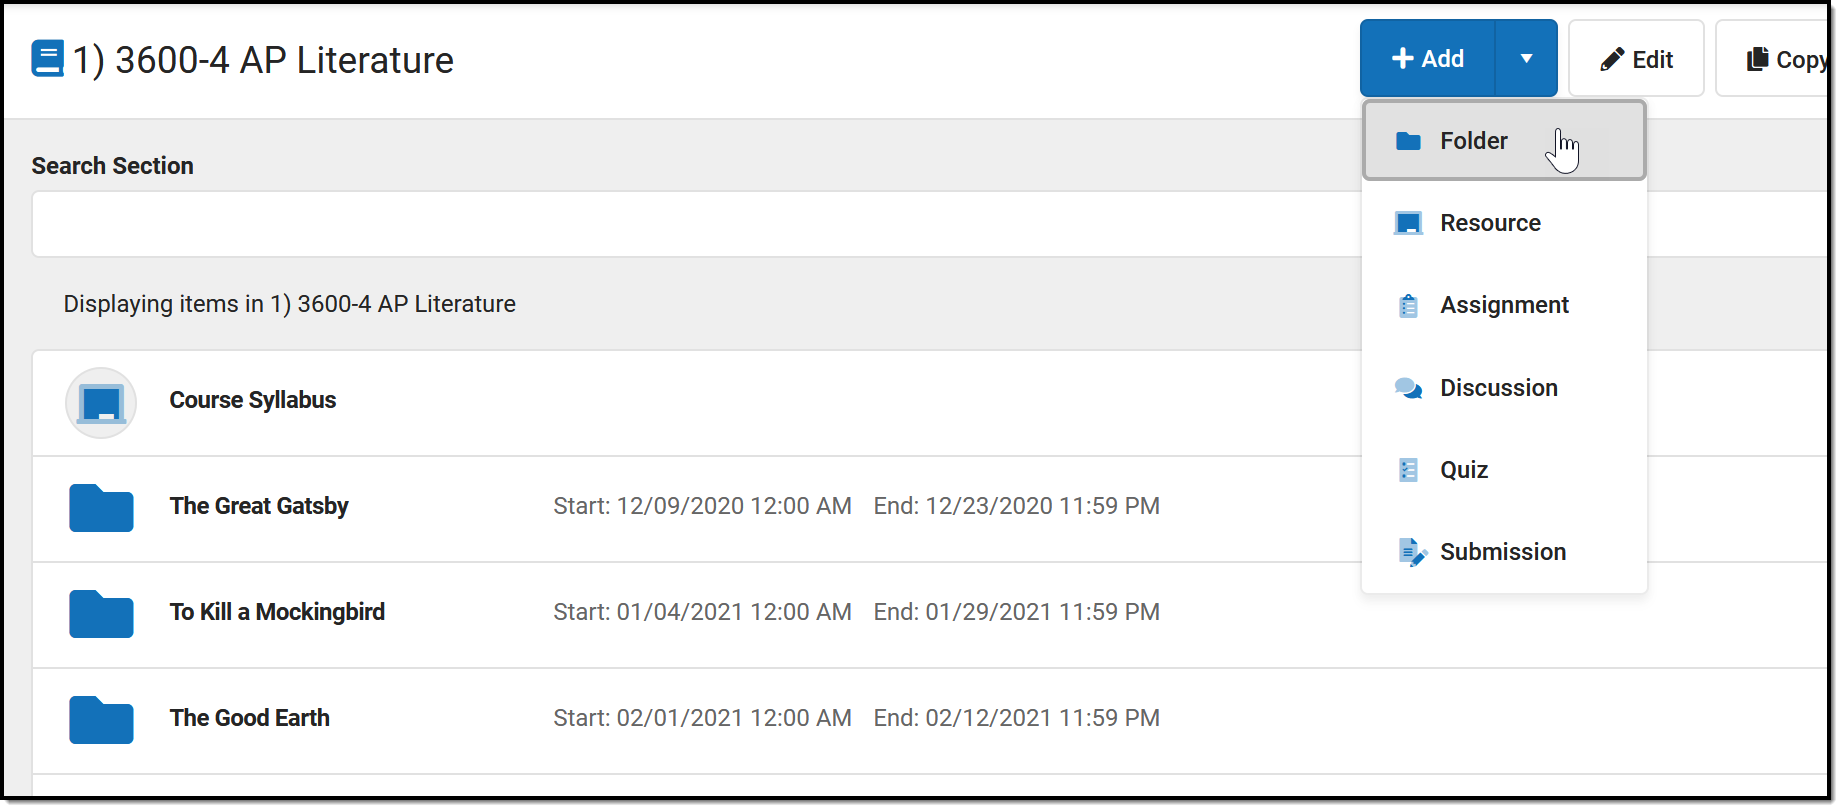
To create a folder, click the arrow next to the +Add button and click Folder. This button displays in the Grade Book, Planner, or Progress Monitor, or while viewing any existing folder, assignment, or resource.
 Add a Folder to organize curriculum.
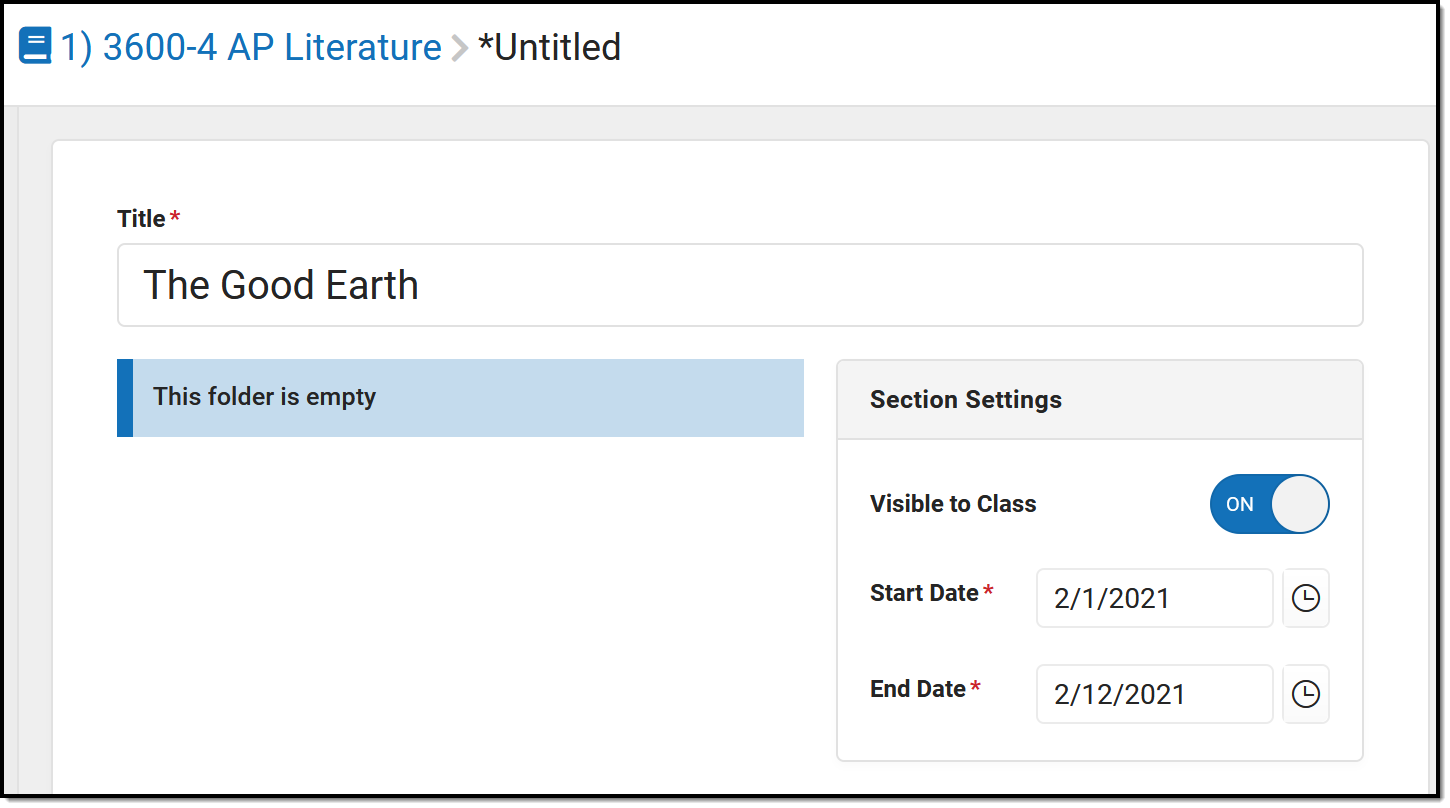
- Enter a Title for the folder. This title must be unique in this section.
- Indicate if the folder should be Visible to Class through Campus Student and Campus Parent.
- Enter Start and End Dates. To set both dates easily, click the date to open the calendar, then click the Start Date you want and then the End Date, without closing the calendar.
Click Save when finished. Use the Preview at the bottom of the editor to view how the folder will look to students or parents, or to other teachers.
Organize Curriculum
Once you've created a folder, add assignments and resources to it. See the Assignments & Resources article for more information about these curriculum items.
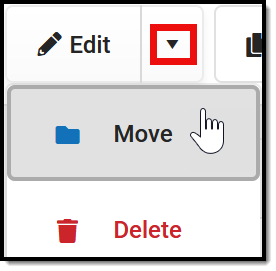 |
You can also Move curriculum into a folder. To do so, open the item you'd like to move, click the arrow next to Edit, and select Move. The choose a folder to add the item to it. |
In the example below, I'm moving an existing resource (with a powerpoint presentation attached) into the folder I just created.
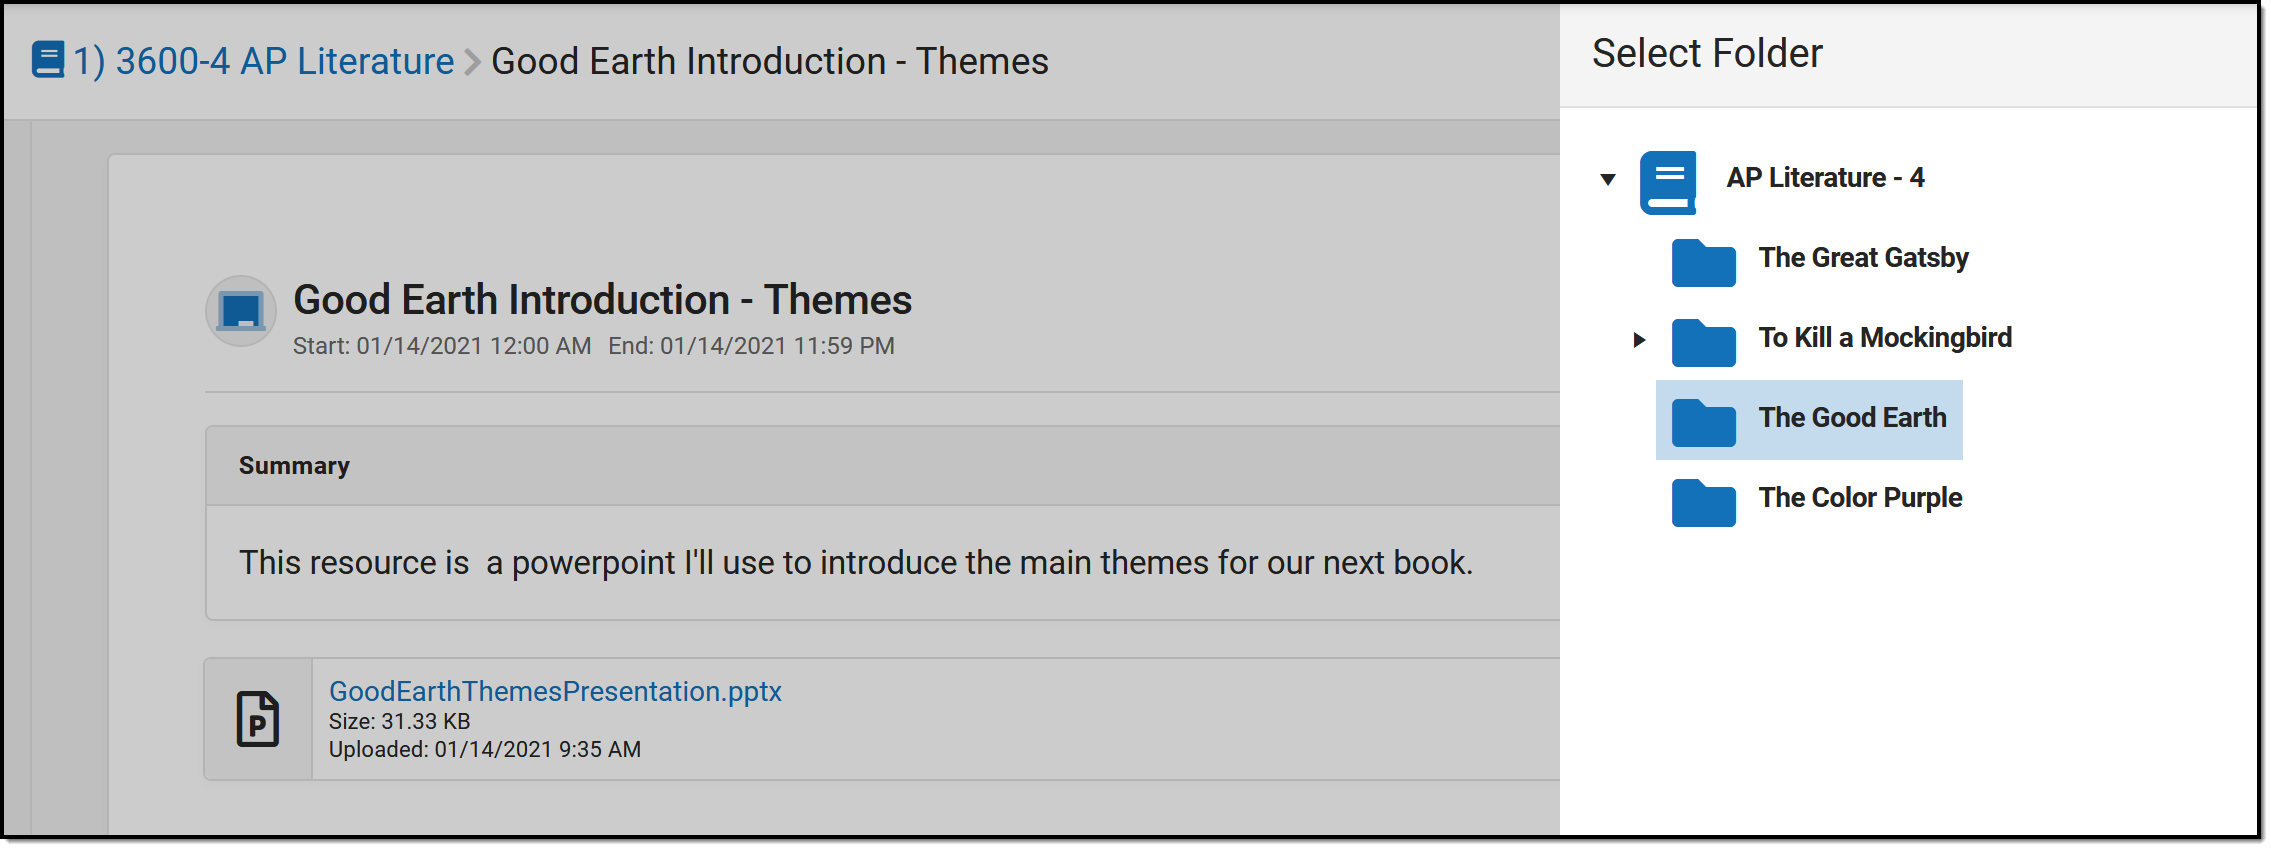 Click 'Move' and then choose a folder.
Suggestions for Folders
Use folders in whatever way makes sense to you and your class. Here are some examples of ways you could structure your curriculum.
Create a folder at the top of your curriculum for "Course Resources" to collect frequently used resources, such as the course syllabus and a PDF of your Scoring Rubric. |
In this example, I created folders for the novels we're reading. I then added hidden resources to store my lecture notes and powerpoints. |
 |
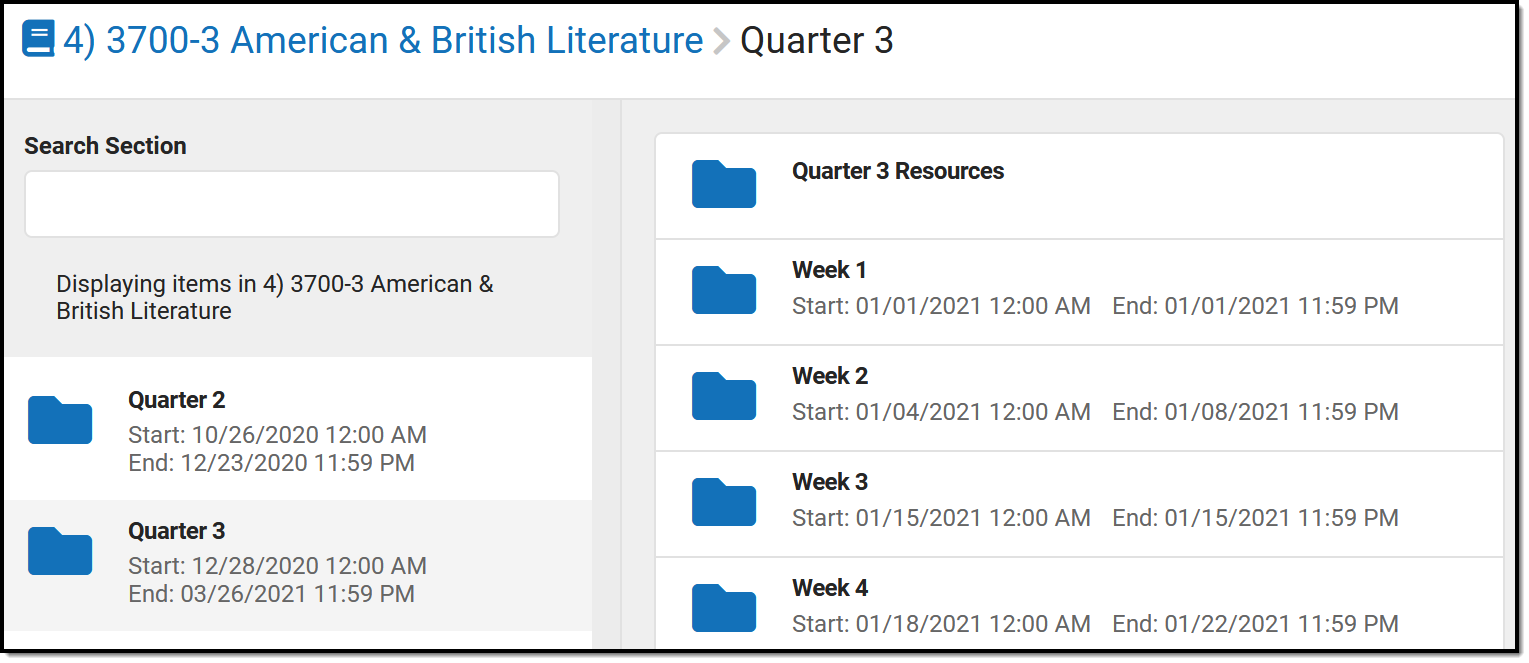 |
Here, the teacher organized curriculum by quarter and then week. |
Another option would be creating folders for units or textbook chapters. |
 |
Folders are only available with the Enhanced Curriculum tool right, which is included as part of the Campus Learning Suite premium offering. Visit the Campus Learning Suite page to learn more.
Using Folders, teachers can arrange their assignments and resources to organize the curriculum for their course sections. In this video, you will learn how to create and manage folders.
Assignments
Add an Assignment
Advanced assignment tools are available as part of the Campus Learning premium offering. Additional options include the For Student and For Teachers areas of the Assignment Detail editor as well as individualizing student assignments.
Advanced assignment tools are available as part of the Campus Learning premium offering and require the Enhanced Curriculum Editor tool right, including the Summary, Attach Content, and Add a Task areas of the Assignment editor.
Location: Click Add or List button in tools throughout Instruction, including Grade Book, Planner > My Planner, Assignment Overview, and Progress Monitor
Access assignments in various places throughout Instruction. Regardless of what tool you're in, the editor looks the same.
Available Actions
CreateCreate an assignment or resource anywhere you see an Add button (in the Planner, it's called New)
Click +Add to add an assignment, or click the arrow on the right of the button to add a Folder or a Resource, or to add an assignment starting with a Discussion, Quiz, or Submission.
Categories must exist before assignments can be created. |
ModifyTo modify an assignment, open it by clicking the name or abbreviation and then click the Edit button
Click Edit to modify the item, or click the arrow on the right of the button to move the assignment to a different folder or delete it.
When editing an item that is in multiple sections, you'll have the option of whether changes should be made to all instances or just the current one. |

Access to assignments requries tool rights to a grading tool, such as Grade Book, Planner, or Progress Monitor. Additionally, the Enhanced Curriculum tool right in Additional Access Rights > Instruction Tools grants access to advanced assignment options.
See the Instruction Tool Rights article for more information.
Other Edit Options
Click the arrow next to the edit button to access other options:
| Duplicate | Move | Delete |
| Creates a duplicate of the current item. | Allows you to select a different parent folder in the curriculum structure. | Removes the current item. Be aware that deleting an assignment cannot be undone, even one with submissions or scores. |
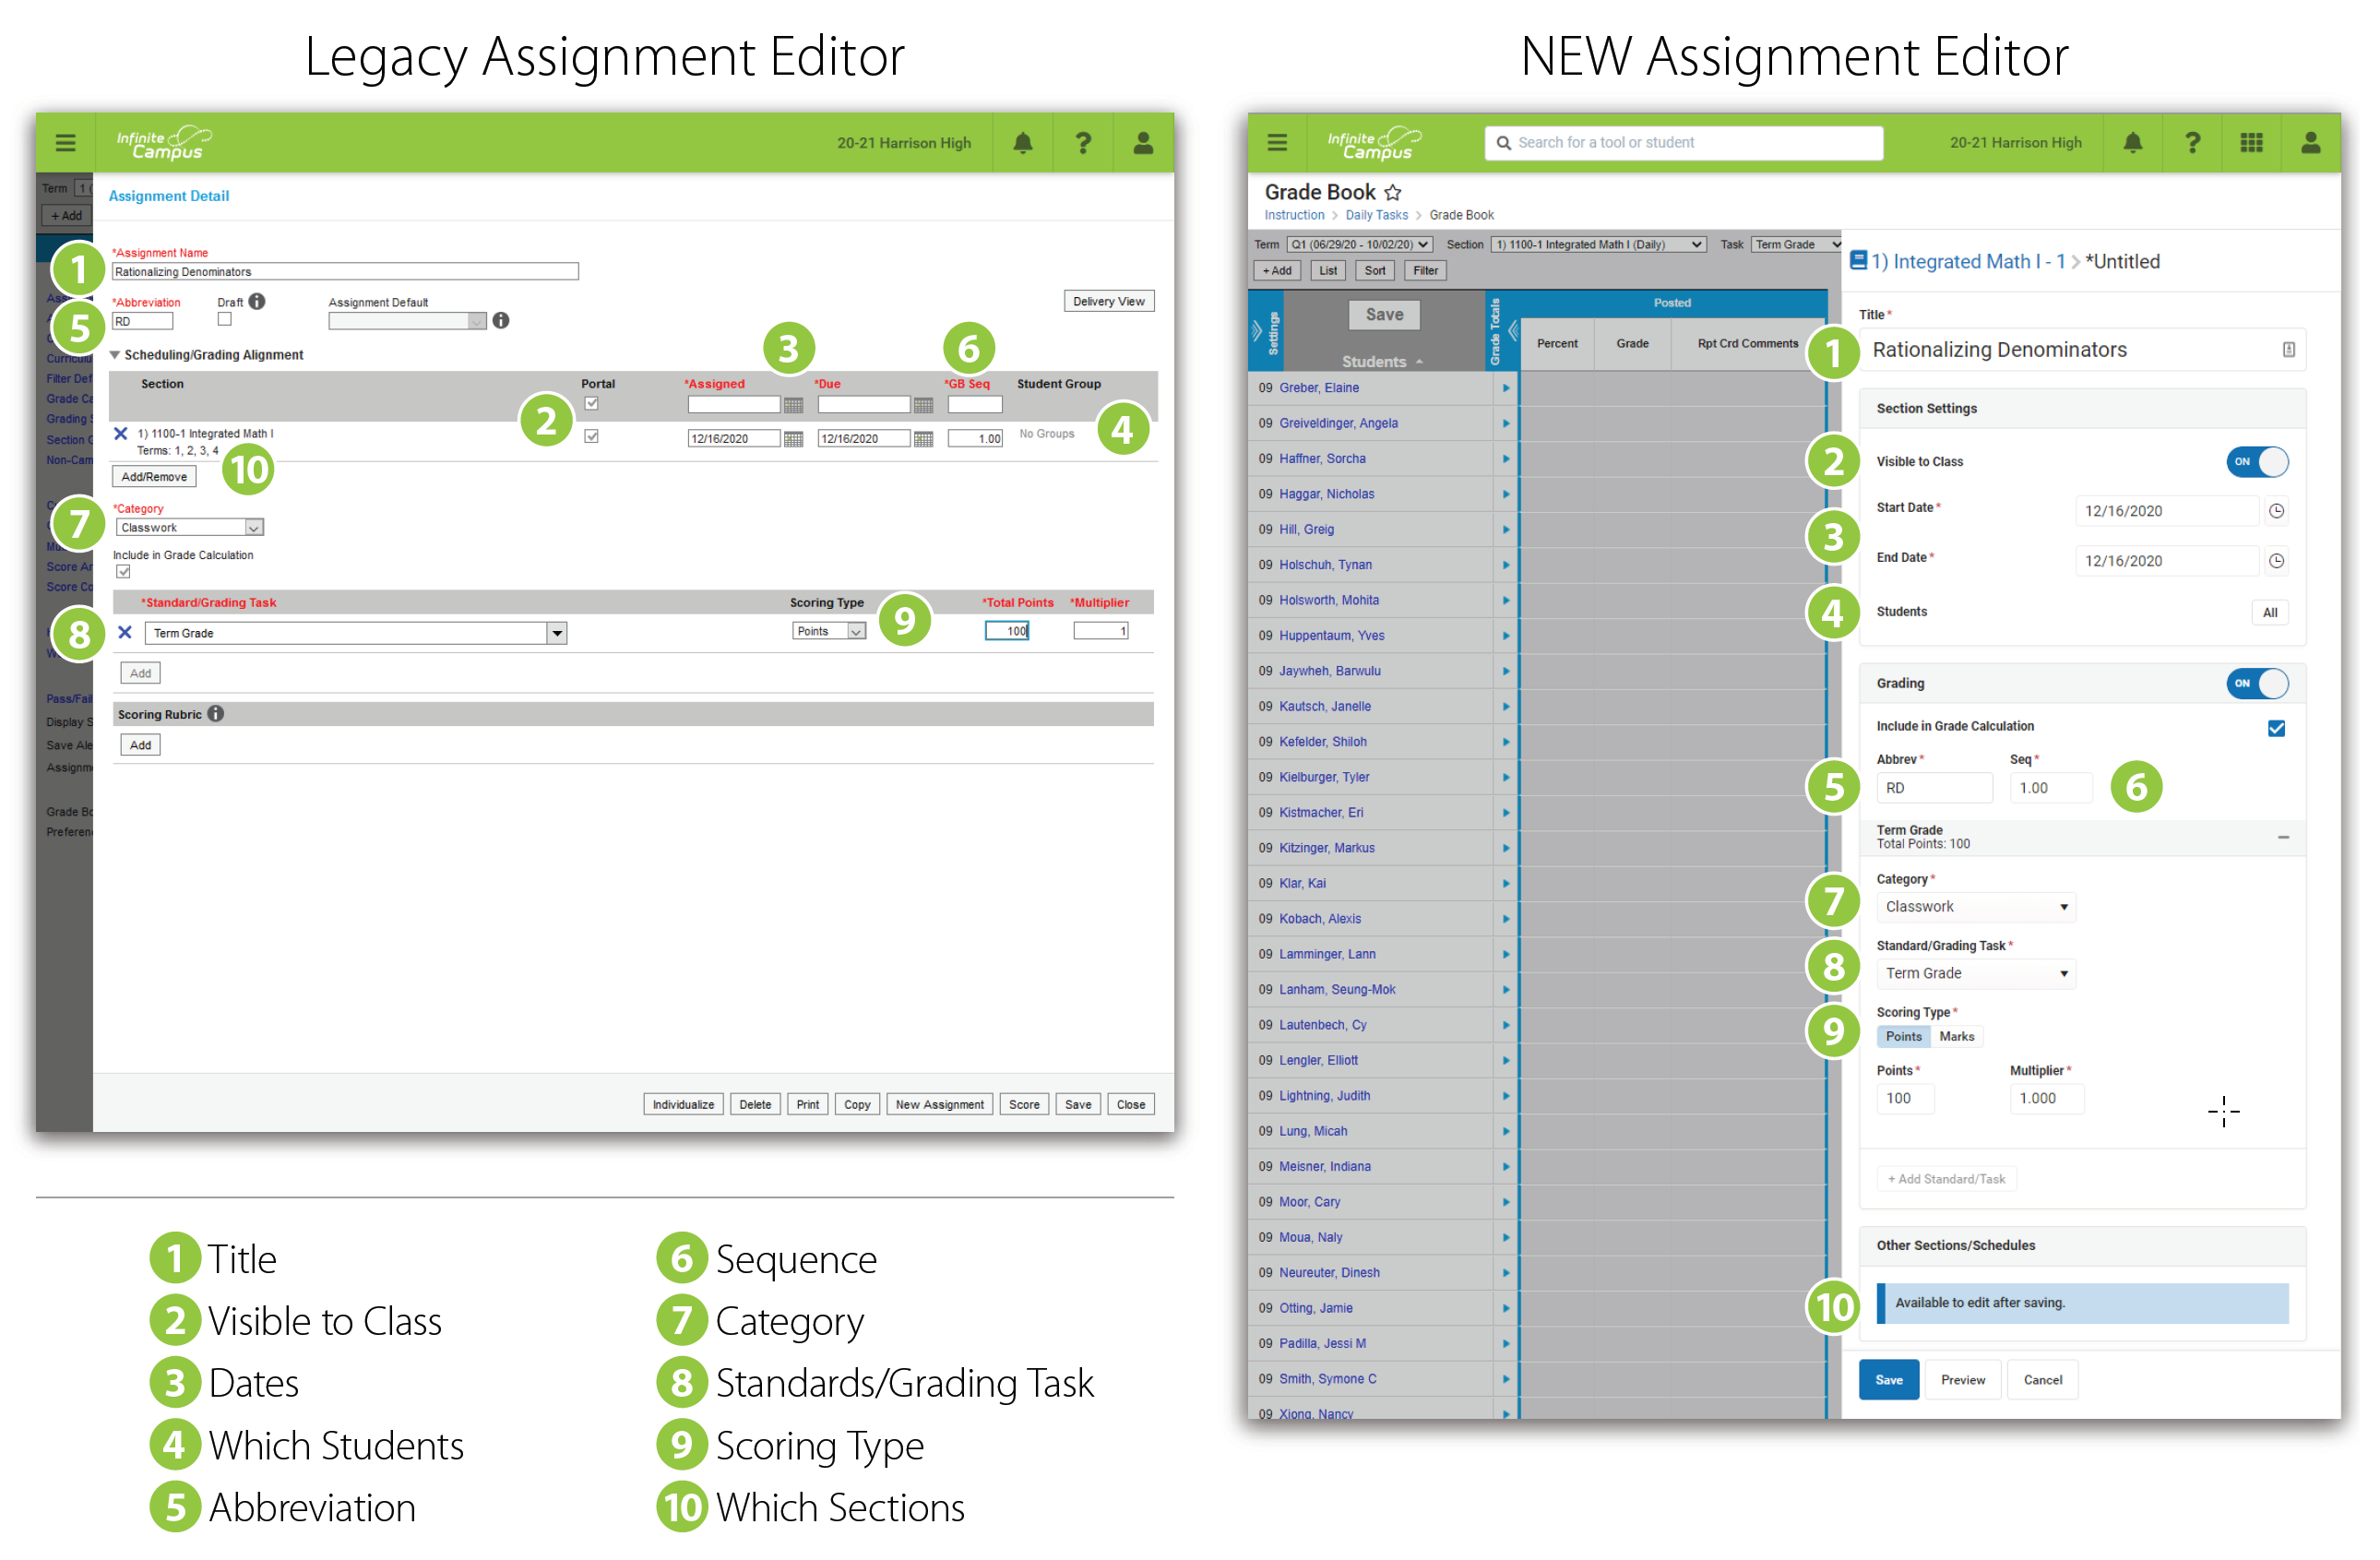
Everything moved, help!
Recent improvements included redesigning the assignment editor. But don't worry, it's the same fields, just in different places. Expand below for a comparison of the old assignment editor and the new one:
What are Resources?
| Resources are, essentially, assignments that will not be scored. They allow teachers to share information with parents and students within the context of section curriculum.
When creating an item, toggle Grading on to make it an assignment, or off to make it a resource. Because resources are not scored, they do not display in the Grade Book.
|
 |
Resources can be grouped within whatever folder structure you use to manage your curriculum. Consider creating a Course Resources folder to collect section-wide or often used materials, such as a syllabus.
Content, Details, and Reflections
Assignments and resources are made up of three tabs:
- Content: Information such as Dates, Grading, and the content of the assignment. This article describes this tab.
- Details: Metadata used when sharing curriculum to the Curriculum Library. See the Curriculum Details article for more information.
- Reflections: Records of how curriculum was used in your class. See the Reflections article for more information.
Areas of the Editor
Every assignment or resource needs a Title. Let's walk through each of the sections in the assignment editor:
In a hurry? Don't have Campus Learning or the Enhanced Curriculum Editor tool right? See The Basics: Assignments. |
Section Settings
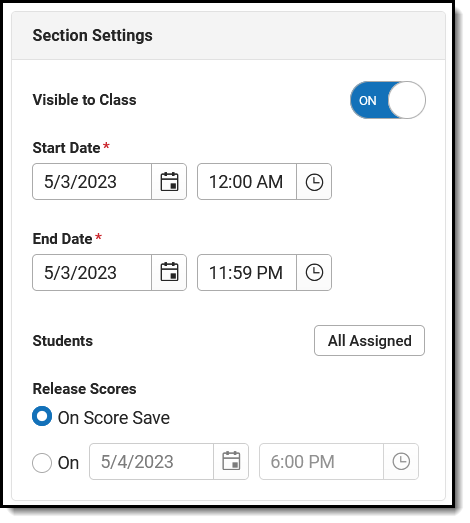 |
Visible to Class indicates if this item is visible on Campus Student and Campus Parent. Click the Preview button at the bottom of the editor to see what the assignment will look like for parents or students.
Start and End Dates default to today. Click the date to type or select another day. To set both dates easily, click the date to open the calendar, then click the Start Date you want and then the End Date, without closing the calendar. Dates are not required if Grading is toggled off. For the most part, dates are informational, but they do control the following:
|
To enter a time, such as for a quiz only available during a class period, click the clock icon. By default, an assignment is available to all students in a section. To change this, click the All Assigned button next to Students. From here, select an existing student group or use the Assigned checkboxes to indicate which students should be assigned. All students not assigned will be marked as Exempt on the assignment. Campus Learning customers can also individualize dates for students. See the Individualized Assignments section for more information. The Release Scores setting determines when an assignment's score will be visible to parents and students. Leave the On Score Save option selected to keep scores visible as soon as they are entered. Or select a date for Release Scores On to schedule when scores will be made available to parents and students. This date must be after the End Date entered for the assignment. See the Release Scores article for more information about this option. | |
Grading
If Grading is toggled on, you're working on an assignment. If Grading is off, it's a resource. Include in Grade Calculation is marked by default - unmark this checkbox if the assignment will be scored but that score should not be included when calculating grades, such as for a practice test. If not marked, the assignment displays with an * in scoring screens like the Grade Book and Progress Monitor.
The Abbreviation for the assignment populates as you enter a title. The Sequence defaults to 1. Modify if desired, up to 7 digits: XXXXX.XX. The abbreviation is used to identify assignments in the Grade Book and the sequence is used to sort.
Grading alignments display in collapsible sections, with basic information in the heading.
Select a Category for the assignment. Categories are groupings of related assignments, such as Homework or Formative. If Default Scoring options are setup for a category, the Scoring Type, Points, and/or Multiplier may auto-populate based on the category selected. These details are still editable. See the Categories article for more information. Standards and Grading Tasks are item to which grades are posted. The Standard/Task of your current context, such as what's selected in the Grade Book, is selected by default. Only alignments available in your current section display.
Select a Scoring Type to indicate how the assignment will be scored. Options are: |
 Select applicable grading information for the assignment.
|
If desired, change the Multiplier if using points or marks, which determines how the assignment affects students' grades. For example, a 50 point assignment with a Multiplier of 2 counts as a 100 point assignment.
Add additional scoring alignments by clicking Add Standard/Task. Multiple alignments are most commonly used in standards-based grading, where a single assignment may demonstrate mastery in multiple standards.
The Add Scoring Rubric button displays for Campus Learning users who have the Enhanced Curriculum tool right. Scoring Rubrics allow teachers to communicate expectations for assignments with students and evaluate how well student work met those expectations. See the Create Scoring Rubrics article for more information. | |
Other Sections/Schedules
Adding an assignment to other sections is only available once the assignment has been saved.

To add the assignment to other sections, click Add/Edit and then the Add Sections button:
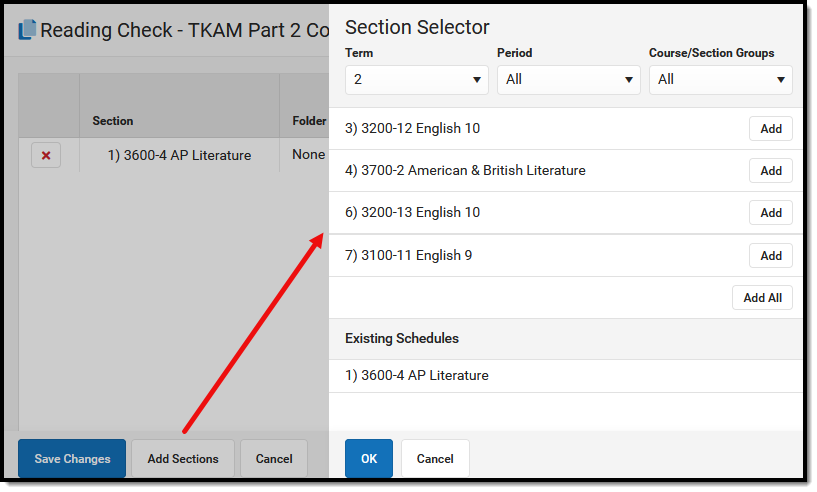 Add the assignment to other sections you teach.
|
Filter this section list by Term, Period, or Course/Section Groups at the top.
Click Add next to any section to add it to the assignment.
Any sections that already include this assignment are listed at the bottom in Existing Schedules.
Click OK when finished.
| |
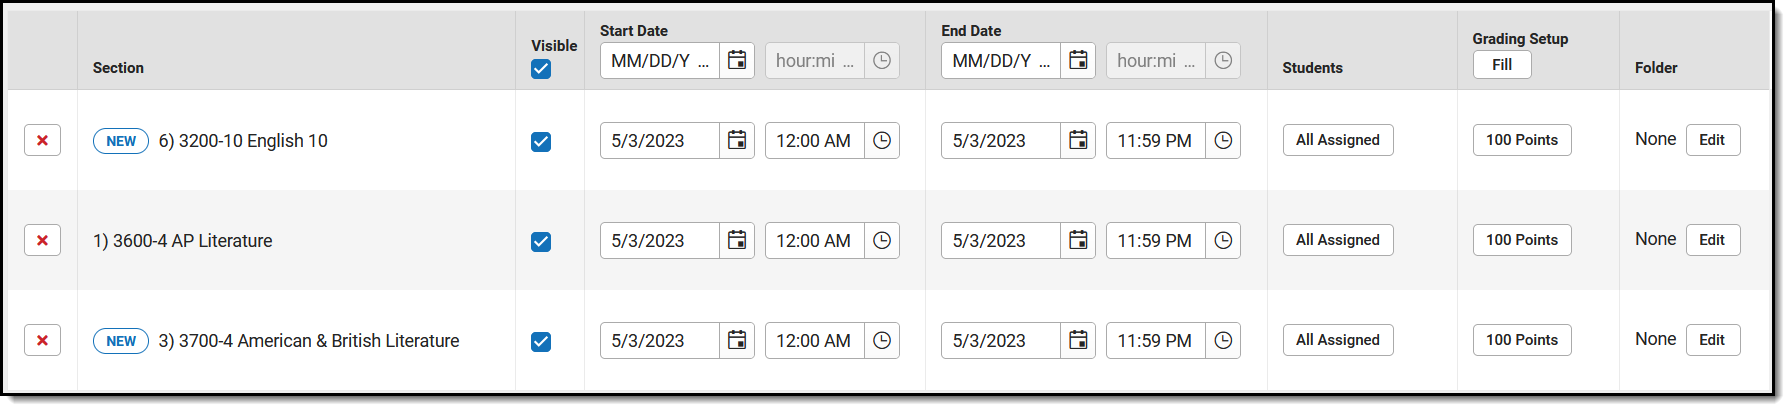
Once added to the list, make any needed updates to each instance of the assignment, including the Folder (Campus Learning only), whether it's Visible on Campus Student & Parent, the Start/End Dates, and the Grading setup. By default, these fields match the original assignment.
Click the red X next to a section to remove the assignment from it. Sections cannot be removed if the assignment has already been scored.
Note: Previously, assignments had to have the same grading setup across sections. In the new assignment editor, grading setup can be different in each instance of the assignment, including the task/standard, the category, and the scoring information.
Click the blue scoring link ("100 points" in the example image above) to view and modify Grading information for that instance.
Click Save Changes when finished. The Other Sections/Schedules area now lists other sections that include this assignment. | ||
Advanced Features
If your district has Campus Learning and has given you the Enhanced Curriculum Editor tool right, additional features display for assignments and resources.
Summary & Notes
The Summary is a text field where you can enter any information about the assignment that would be helpful to students, such as instructions, objectives, and lesson materials.
- Format the text as desired, including bold/italics, text colors, or bullets and numbering in the
 menu.
menu. - You can also add links, tables, images by clicking those icons in the editor.
- Click the equation button to build a math equation using common mathematical operators, characters, and formulas.
- Click the + button to see options for embedding videos, special characters, or any other embeddable content enabled by your district.
Content in the Summary panel displays for students and parents (if the assignment is Visible) just as you see it here in the editor.
Notes are additional text fields, which can be helpful for grouping entered content, slotting text between other attachments and tasks, and adding information that is only visible to other teachers.
| Adding Images To add an image, click the  and select a method for attaching an image: and select a method for attaching an image:
|
 |
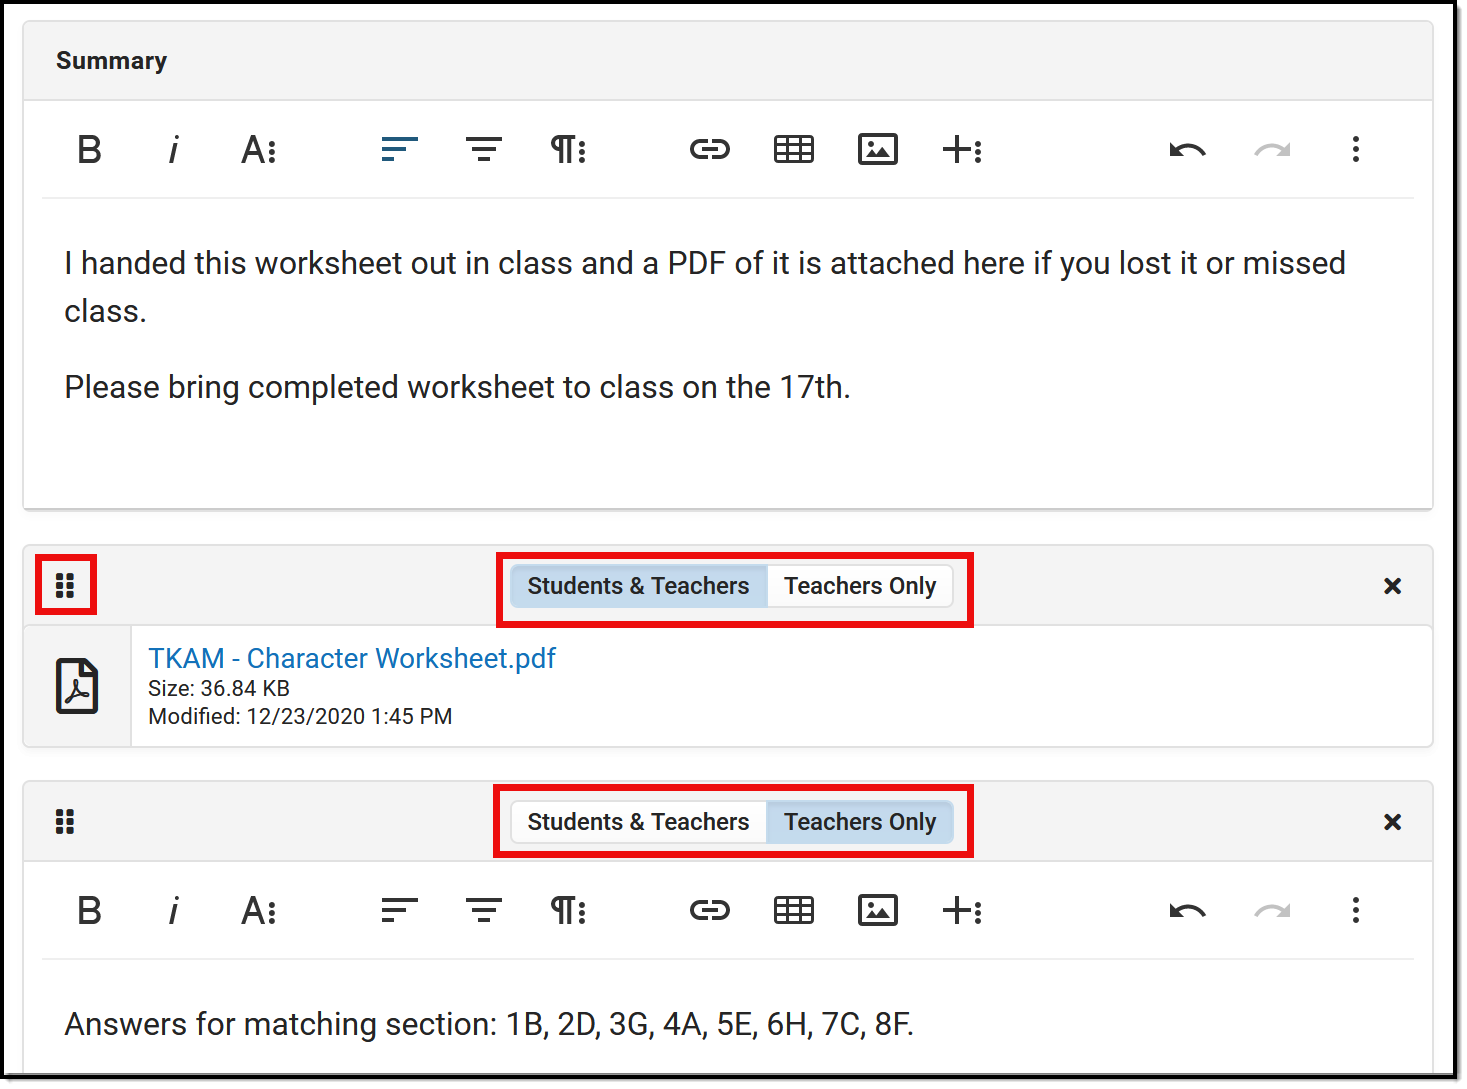 |
The Summary always displays above any additional content added to the assignment, such as files or notes.
If multiple attachments, notes, or tasks are added below the Summary, they can be rearranged by clicking the dots icon in the top left corner and dragging the segment into the desired order.
The Summary is visible to anyone who can see the assignment. Other attached content and notes can be visible to Student & Teacher or to Teachers Only, which may be a helpful option for content such as an answer key.
Click the Preview button at the bottom of the editor to see how the assignment will appear for students. |
Attach Content
Various options may be available in the Attach Content section, based on your district/schools setup. Options include:
Add a Task
Additional tasks can be aligned to an assignment or resource. Check out the following articles for more information:
'About' Section
The About section on an assignment, resource, or folder houses the metadata used to identify curriculum in the Curriculum Library.
This section includes the following fields:
|  |
Individualized Assignments
Individualizing assignments allows teachers to specify which students receive an assignment and each student's Start and End Dates. Assignments can be assigned to select students, as in the case of remedial or advanced work. Start and End Dates can also be individualized to give students the time they need to complete assignments. Quiz timers can also be individualized.
See the Individualized Assignments for more information.
Save
Save
Save
Save
Some advanced assignment features are only available with the Enhanced Curriculum tool right, which is included as part of the Campus Learning Suite premium offering. Visit the Campus Learning Suite page to learn more.
From many places within Campus Instruction, teachers can quickly create new assignments using the assignment editor. The assignment editor is the same in all locations. In this video, a teacher will create a new assignment for one of their course sections.
Release Scores
The Release Scores option allows teachers to schedule when assignment scores are released to students and parents.
Release Scores is part of the Campus Learning premium offering and requires the Enhanced Curriculum tool right.
Location: Tools throughout Instruction, including Grade Book, Planner > My Planner, Assignment Overview and Progress Monitor > Release Scores
The Release Scores process allows teachers to schedule a date at which scores for an assignment will be visible to parents and students. Choosing a date on which scores are released lets teachers score assignments over time without revealing scores until scoring is finished, such as for a test or essay that may take multiple days to score.
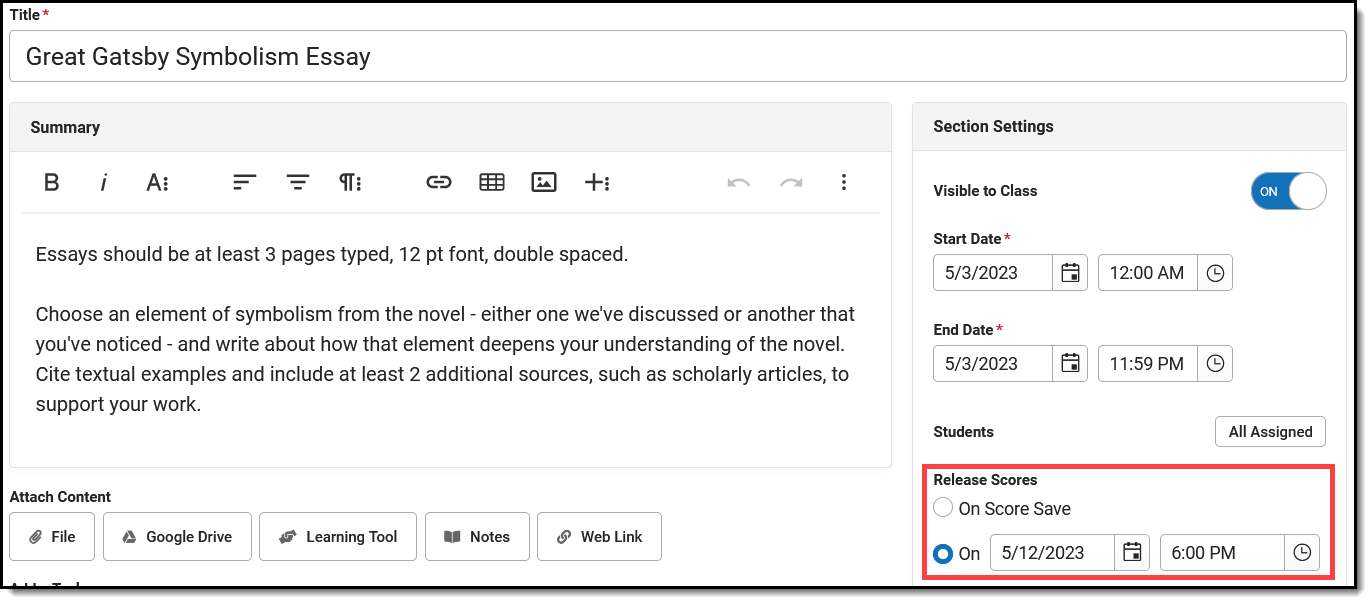 Enter a Release Scores On date to schedule when scores will be visible to parents and students.
The Enhanced Curriculum tool right in Additional Access Rights > Instruction Tools grants access to this option. See the Instruction Tool Rights article for more information.
Even if a release date is set, the Turned In, Missing, and Late flags display for parents and students as soon as the flags are selected and saved so that teachers can still use these flags to communicate information about the assignment even if scores have not been released.
Students and parents receive a notification when the assignment is flagged and a second notification when the score is released. The score date shown is the date the score was released, not the date it was scored.
Set a Release Scores Date
Release Scores settings are found in the Section Settings area of assignments. Leave On Score Save to make scores visible to parents and students as soon as they are saved. To schedule when scores will be made visible to parents and students, enter a Release Scores On date and time. This date must be after the End Date of the assignment.
Once saved, the Release Date entered can be updated if needed. The date and time may be extended to provide more time to score the assignment, or switch to On Score Save if scoring is complete and scores can be released. If the End Date of the assignment is updated to a date after the Release Date, the Release Scores setting will be updated to On Save.
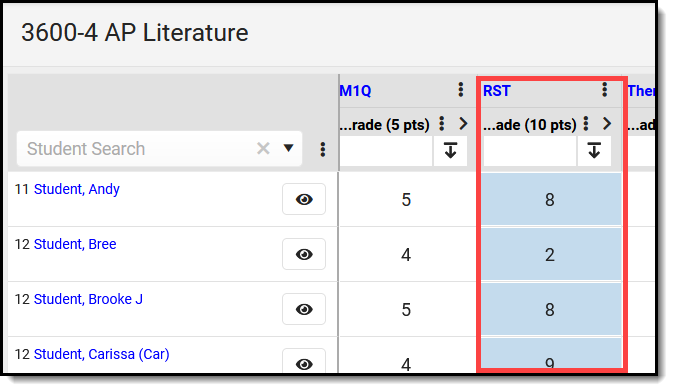
Unreleased assignments display in blue in the Grade Book and Progress Monitor: |
|
In-Progress Grades/Proficiency Estimates
Wherever In-Progress Grades/Proficiency Estimates are visible in Instruction, such as the Grade Book or Progress Monitor, teachers have the option of including all or only released scores in the calculation.
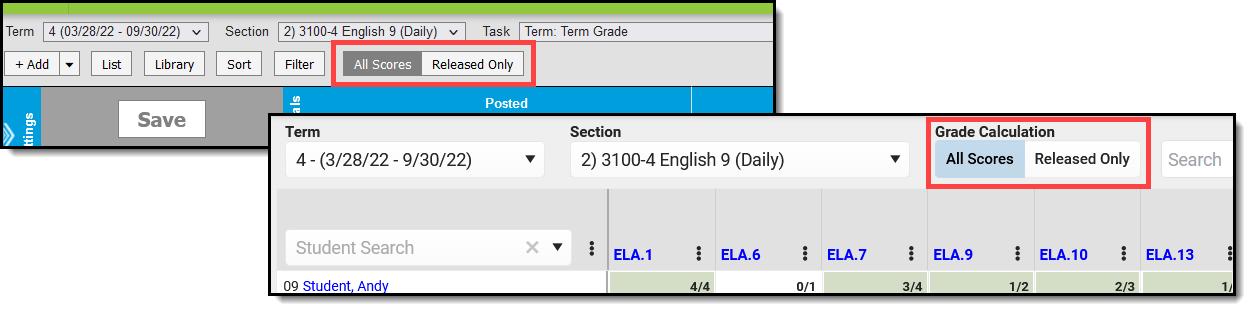 All Scores vs Released Only filters display in the Grade Book and Progress Monitor.
Click All Scores to see In-Progress Grades/Proficiency Estimates that include all scores, both released and unreleased. Filter to Released Only to see In-Progress Grades/Proficiency Estimates as parents and students do, with only released scores included in the calculation.
Note: these settings only apply to your current view of In-Progress Grades/Proficiency Estimates. Parents and students always see a grade calculated using release scores only.
 Switch Grade Calculation to view In-Progress grades with and without released scores.
When posting grades in a section with unreleased scores, a warning displays in the Post Grades screen, but you are not prevented from posting grades. The posted grade includes only released scores. Unreleased scores are not included in the calculation for posted grades. Toggle to Released Only to view the In-Progress Grades/Proficiency Estimates that will be posted.
Release Now
Release Score settings can be updated on assignments at any time. Additionally, there are a couple of places in scoring tools where scores can be released easily.
| In the Grade Book, expand the assignment and click Release Scores to update that assignment to Release Scores On Save | 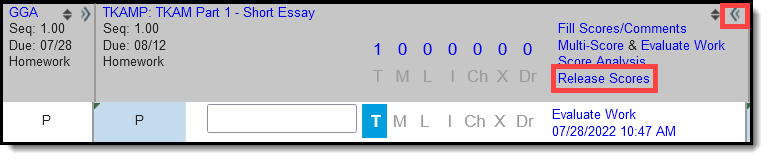 | |
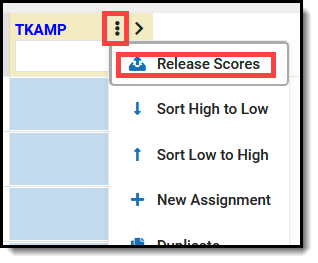 |
In the Progress Monitor, click a column header and then the three dots menu ( ) next to the assignment name and click Release Scores to update that assignment to Release Scores On Save. ) next to the assignment name and click Release Scores to update that assignment to Release Scores On Save. |
|
Release All Scores
Release All Scores to make all scores visible to parents and students. This option may be useful prior to posting grades to make all scores available.
To release all scores, open the Curriculum List and filter the list to show only Unreleased. At that point, a Release All Scores button displays. Click it to set the Release Scores option to all assignments with Release Dates in the future to have a Release Scores setting of On Save, regardless of whether the assignment has scores or not.
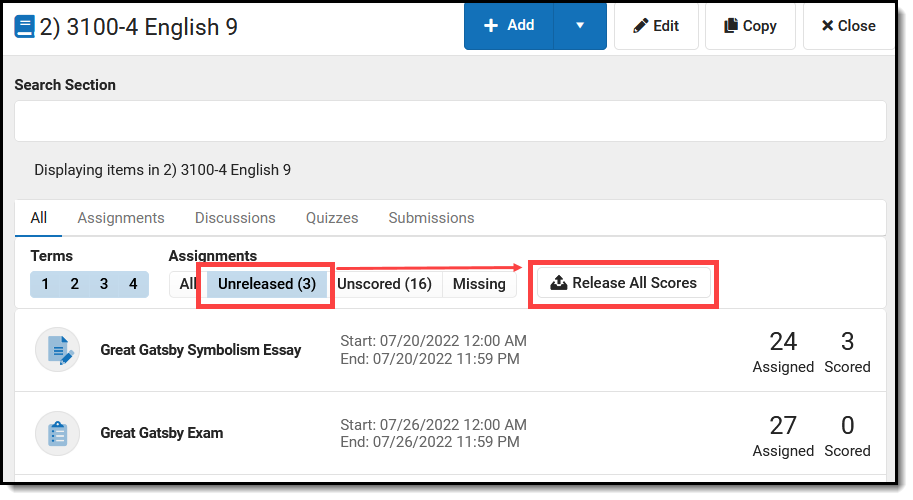 Release all scores by filtering the Curriculum List to show only Unreleased scores and click Release All Scores.
The Release Scores option displays only if your district has Campus Learning and has given you the Enhanced Curriculum tool right. Visit the Campus Learning Suite page to learn more.
The Release Scores option allows teachers to schedule when assignment scores are released to students and parents. In this video, you will learn how teachers can use the Release Scores option.
Enable Student Submission in Assignments
When creating an assignment, teachers have the option of allowing students to submit their work though the Campus Student.
The Submissions option displays if your district has Campus Learning and has given you the Enhanced Curriculum tool right. Specific options are dependent on district and school configuration.
Location: Anywhere you view assignments, such as Grade Book, Planner > My Planner, or Progress Monitor
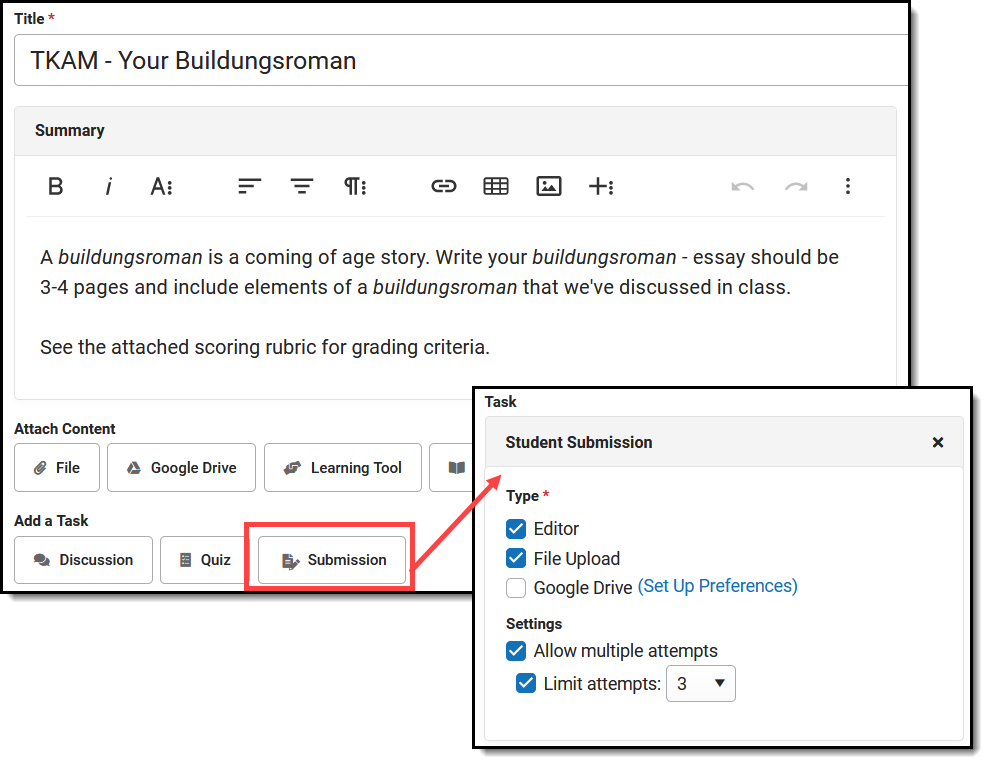
Submissions are one type of task that can be added to assignments and resources. This option allows students to submit work in various forms through Campus Student, work which teachers can then view and score within Campus.
Types of submissions include through a text editor or file attachment.
 Enable submissions to allow students to submit work through Campus Student.
The Enhanced Curriculum tool right in Additional Access Rights > Instruction Tools grants access to this option. See the Instruction Tool Rights article for more information.
From an assignment or resource, click Submission and then select which types of submissions should be allowed. Options available depend on your district's setup.
Include instructions for the submissions in the Summary of the assignment.
Types of Submissions
|
Settings
Mark the Allow multiple attempts checkbox to let students resubmit an assignment that they have already turned in. Leave Limit attempts unmarked to allow unlimited reattempts, or mark the checkbox and select a number of reattempts if desired.
Here's an example of what all three submission options look like from the student view:
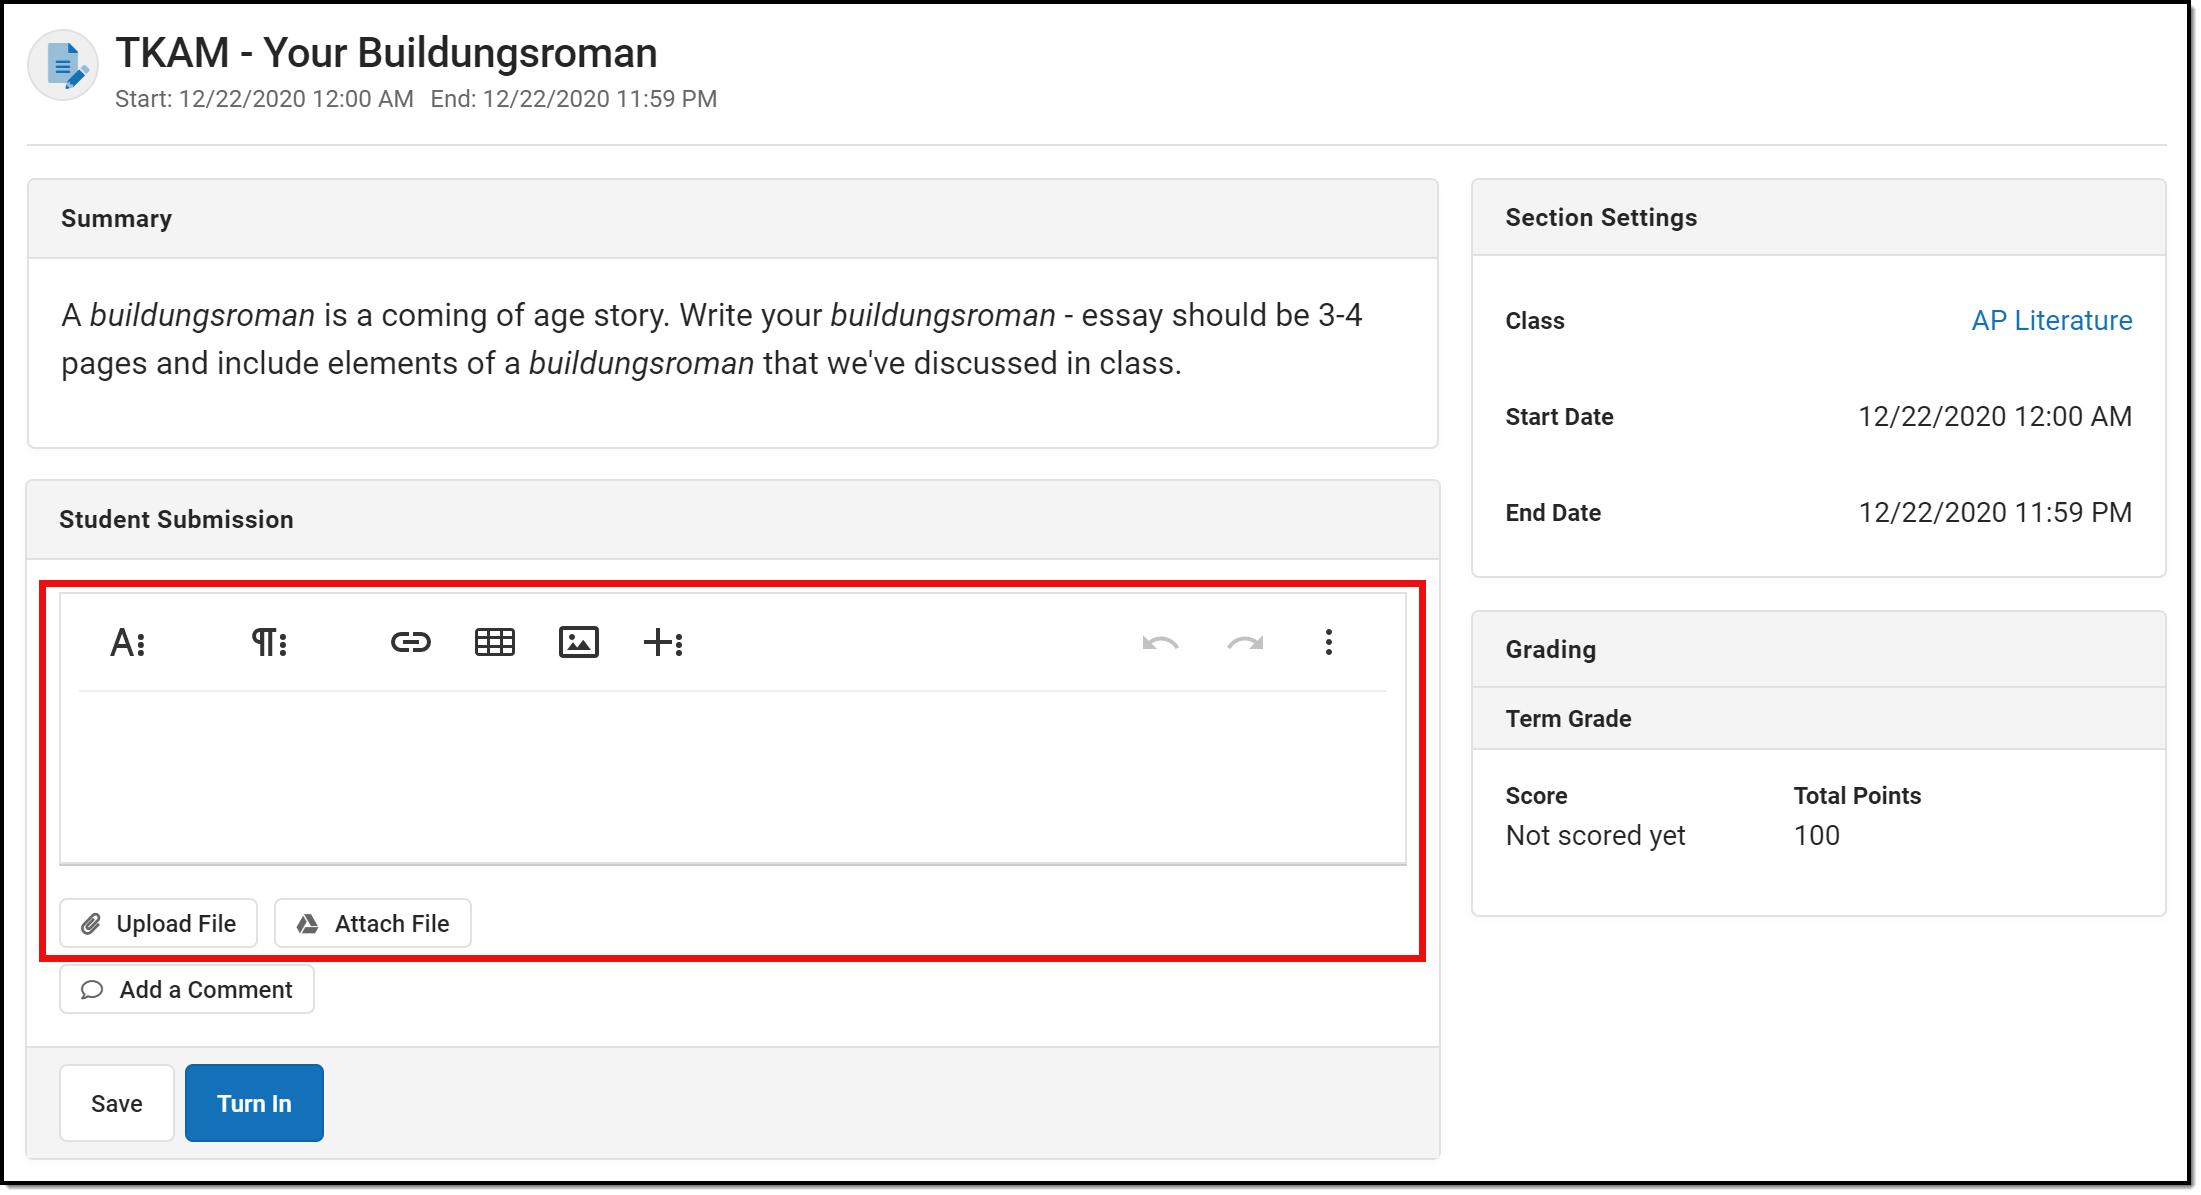 Editor, File Upload, and Google Drive submission options in the student view.
If multiple attempts are allowed, the number of reattempts allowed is shown next to the Turn In button. Once the assignment is turned in, a Reattempt Submission button displays. Students can switch between each of their attempts to see what they submitted each time.
For assignments submitted via Google Drive: when the student initiates a reattempt, they receive Edit rights to the Google Drive file, but the teacher retains ownership of the file.
To learn more, watch the video below.
Receiving Submissions
There are two ways to access student submissions:
- From an assignment (accessed through the Grade Book, the Planner, or the Assignment Overview), click Score. A Student Work column appears at the far right of the Scoring Editor.
- From the Grade Book, expand the assignment and click the Evaluate Work timestamp.
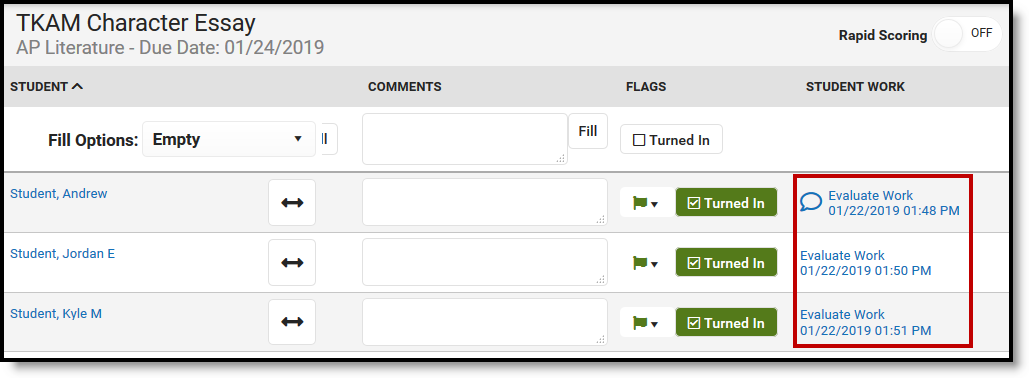
Student Submission Column in the Scoring Editor
Student submissions are indicated by a date stamp in blue, which functions as a link to the submission itself. The date reflects the most recent time the student saved the submission. The blue speech bubble icon, as shown in Image 6, indicates that the student has submitted a comment separate from the response.
Students may enter comments without submitting an assignment. The date stamp and all comment icons function as links to the specific submission.
Submitting on Behalf of a Student
Classroom must be enabled to submit work for a student. The Digital Repository must also be enabled by your district.
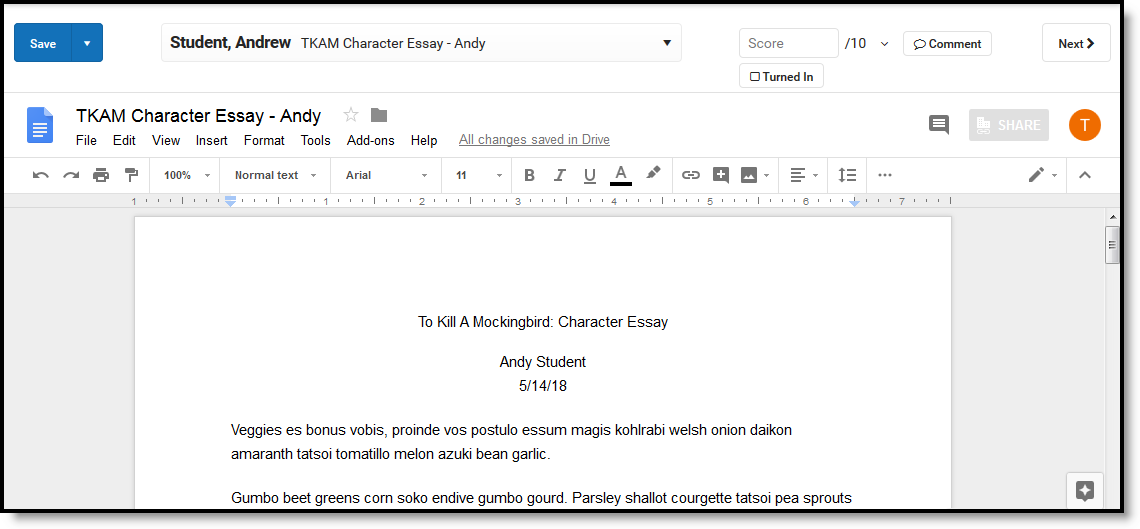
Teachers have the option of submitting an assignment on behalf of a student. To do so, open the assignment and then select a student in the View as Student dropdown list in the top right corner. Any submission options enabled for the assignment then display.
 Use View as Student mode to submit an assignment for a student.
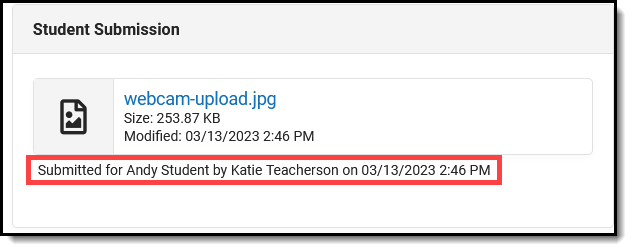
Based on the options enabled, type in the text box, upload a file, and/or attach a Google Drive file and then click Turn In. If uploading files is enabled via the Digital Repository, you also have the option of taking a photo using your webcam or phone camera and attaching the picture to the assignment.
Click Upload File and expand Take photo. Take a picture using your webcam or phone camera of the work, click Add Photo, and then Upload. Students are also able to submit photos via Campus Student
 Take a photo to attach it to an assignment as a submission.
When you submit work for a student, your name is displayed in both teacher and student views. |
 |
Viewing a Student Submission
Clicking the date stamp or the comment icon opens the Submission Scoring Screen.
Scoring Student Submissions
From this screen, teachers can page through student submissions and enter scores, comments, and flags. Navigate between students using ![]() .
.
Click ![]() to view additional submissions for the student, and to view student comments, provide feedback to comments, or give students edit rights to their Google files (if using Google Drive Integration).
to view additional submissions for the student, and to view student comments, provide feedback to comments, or give students edit rights to their Google files (if using Google Drive Integration).
See the Scoring Submissions article for more information about scoring assignments from this screen.
Teacher Feedback
Teachers can enter feedback in response to student comments. From the Submission Scoring Screen, click ![]() to view student comments and respond as needed. This feedback is different from assignment comments; feedback can be used to respond to student comments or student work, whereas comments may apply to the assignment and score as a whole. Feedback is available to students in Campus Student upon
to view student comments and respond as needed. This feedback is different from assignment comments; feedback can be used to respond to student comments or student work, whereas comments may apply to the assignment and score as a whole. Feedback is available to students in Campus Student upon ![]() .
.
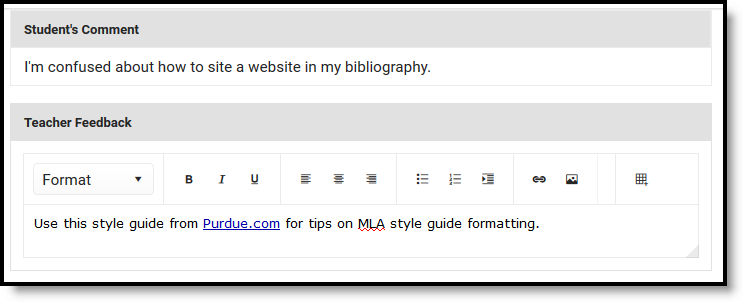 Teacher feedback can be used to respond to student comments.
Previous Version
Submissions (Assignments & Resources) [.2311 - .2323]
Submissions (Assignments & Resources) [.2211-.2307]
Submissions are only available with the Enhanced Curriculum tool right, which is included as part of the Campus Learning Suite premium offering. Specific options are dependent on district and school configuration. Visit the Campus Learning Suite page to learn more.
The Submissions assignment option allows students to submit work through Campus Student. This video demonstrates how to enable student submissions in assignments.
To learn more about Reattempting Submissions, watch the video below:
Creating Resources
Using Resources, teachers can provide students and parents additional content related to their course.
Resources are only available with the Enhanced Curriculum tool right, which is included as part of the Campus Learning Suite premium offering. Visit the Campus Learning Suite page to learn more.
Using Resources, teachers can provide students and parents with additional content related to their course. In this video, you will learn how to share curricular content with students assigned to your course sections.
Curriculum Details
Using the Details tab, teachers can enter metadata for folders, resources, and assignments to help identify curriculum in the Curriculum Library.
Curriculum Details are part of the Campus Learning premium offering and require the Enhanced Curriculum tool right.
Location: Tools throughout Instruction, including Grade Book, Planner > My Planner, Assignment Overview and Progress Monitor > click Details
Curriculum Details are the metadata used to identify curriculum in the Curriculum Library. Details are entered on the Details tab and can be added to Assignments, Resources, and Folders.
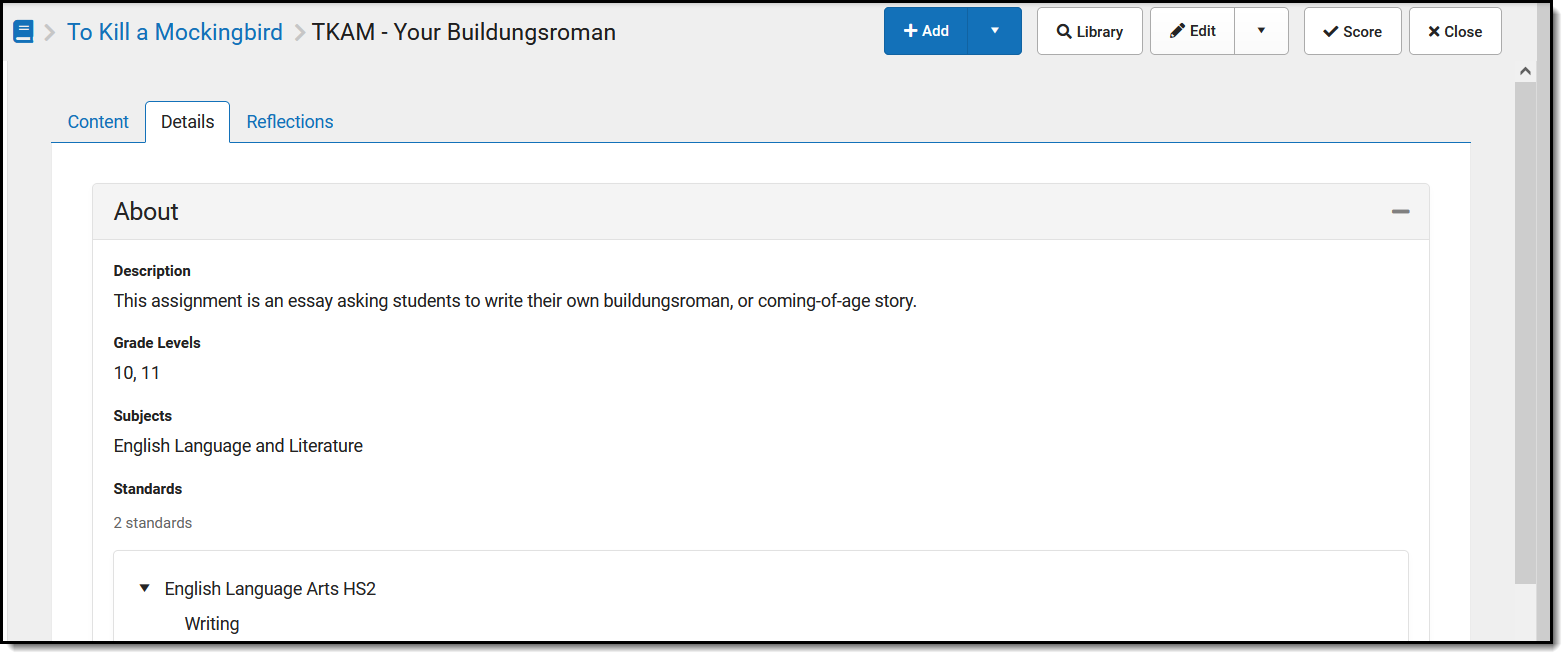 Curriculum Details provide metadata to help find curriculum in the Library.
Access to assignments requries tool rights to a grading tool, such as Grade Book, Planner, or Progress Monitor. Additionally, the Enhanced Curriculum tool right in Additional Access Rights > Instruction Tools grants access to advanced assignment options. See the Instruction Tool Rights article for more information.
Video
Add Details
- Open a piece of curriculum, such as an assignment or folder.
- Click the Details tab.
- Click Edit
- Enter a Description about the content of the curriculum.
- Select the Grade Levels and Subject of the curriculum.
- Select Standards to which the curriculum applies. These may be aligned to the curriculum for grading, or not. Search for standards if desired. The Context options indicate which standards are currently being shown - those aligned to the District, to the Course, or already selected for this curriculum.
- Click Save when finished.
Considerations for Sharing
Details help users of the Curriculum Library to find the curriculum they're looking for. Curriculum is shared by folder; Details should be entered for the folder, and all included curriculum if desired, prior to sharing the folder. After curriculum is shared, Details can only be modified by removing a folder from the library, editing Details, and sharing the folder again.
Some advanced assignment features are only available with the Enhanced Curriculum tool right, which is included as part of the Campus Learning Suite premium offering. Visit the Campus Learning Suite page to learn more.
Using the Details tab, teachers can enter descriptive data about their curriculum folders, resources, and assignments. In this video, you will learn how to enter curriculum details.
Attach Content
The Attach Content options on assignments and resources allow teachers to add additional content.
The Attach Content options display if your district has Campus Learning and has given you the Enhanced Curriculum tool right. Specific options are dependent on district and school configuration.
Location: Open an assignment via tools throughout Instruction, including Grade Book, Planner > My Planner, Assignment Overview, and Progress Monitor
The Attach Content options on assignments and resources allow teachers to add additional content.
Click a button below to jump to the related section
Attaching content is just one part of creating an assignment or resource. See the Assignments and Resources article for more information about the tools, options, and features available.
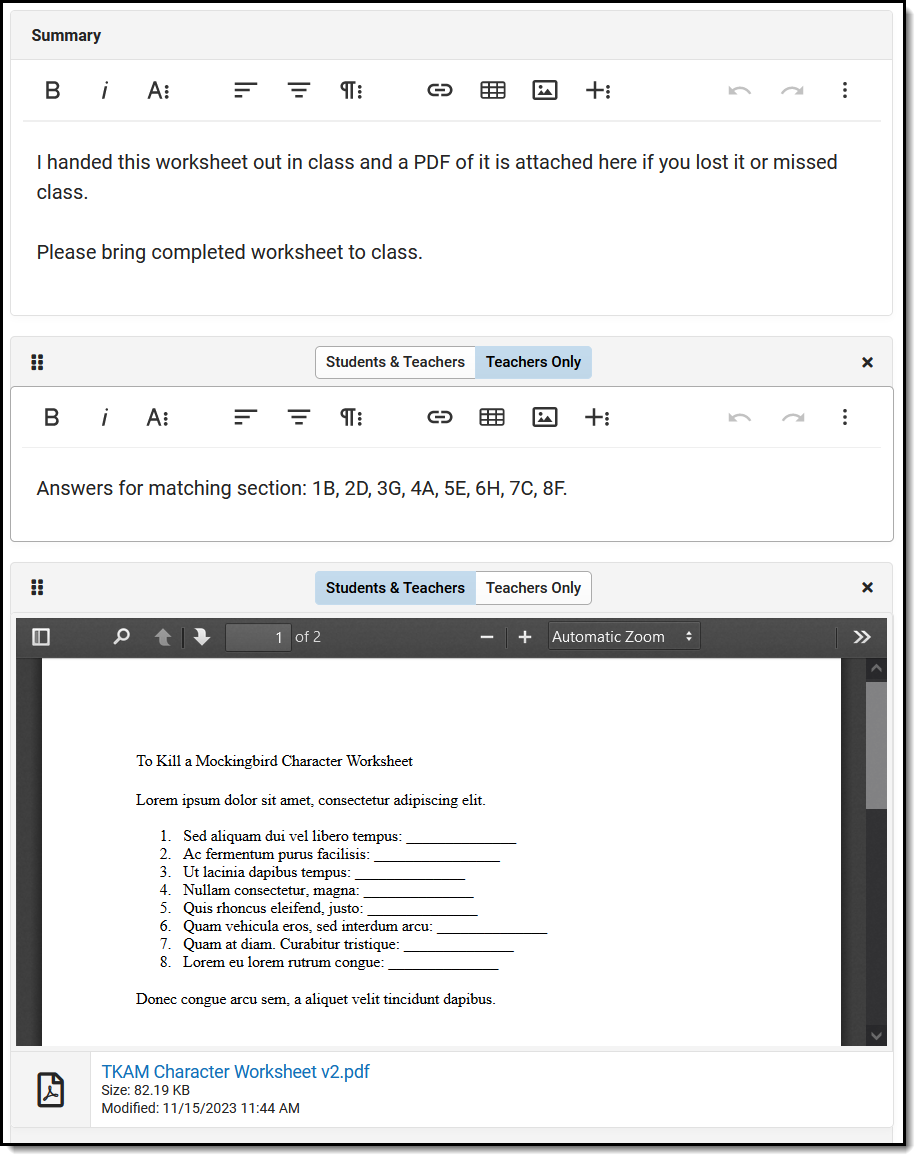 An example of attached content, including a worksheet attached as a file and teacher notes.
The Enhanced Curriculum tool right in Additional Access Rights > Instruction Tools grants access to this option. See the Instruction Tool Rights article for more information.
If there are multiple attachments or notes on an assignment, they can be rearranged by clicking the dots icon in the top left corner and dragging the segment into the desired order. Attached content and notes can be visible to Student & Teacher or to Teachers Only, which may be a helpful option for content such as an answer key.
Click the Preview button at the bottom of the editor to see how the assignment will appear for students.
The following types of attached content may be available, depending on district configuration:
The Notes option is available to all teachers. All other options must be configured by your school or district.
Link Directly to Content
Below the Attach Content options is a checkbox called Link Directly to Content.
| When you mark this option and a student clicks the assignment in Campus Student, the attached content opens directly, bypassing the assignment details such as dates and grading. This option is helpful when sharing a resource such as a syllabus or linking directly to a class website or materials. |  |
Keep in mind that students cannot view any additional assignment information, including the description and grading. Assignments with this option marked should not have other tasks linked, such as quizzes or discussions, since students won't be able to access them.
Record Notes
Notes are additional text fields. Format the text as desired, including bold/italics, text colors, or bullets and numbering in the menu. You can also add links, tables, images, or videos. This content displays for others just as you see it here in the editor.
Ideas for Notes:
|
Add a Web Link
Add a Web Link to call out a specific site with more emphasis that linking it in a Notes or Summary editor. Web links open in a new tab.
For each web link, enter a Title for the link and the URL.
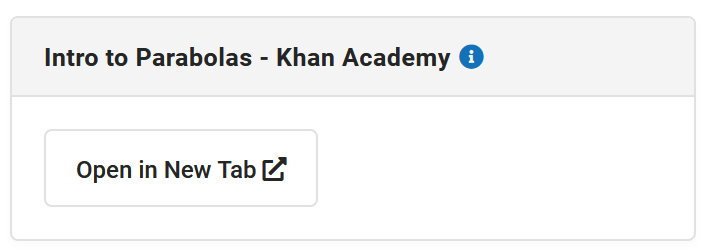 The Title displays at the top of the card.
Attach a File
To use this option, your district must enable the Campus Digital Repository and set the appropriate Digital Repository Preferences, which determines the allowed number of files and file size limits.
To attach a file, click the File button and then click and drag a file or click Select File to browse your local drive. Once you select a file the file name and size displays. Leave the Consent checkbox marked to indicate that you are aware of the Acceptable Use Policies of your district and Campus.
| You cannot upload files that contain any of the following special characters: | . , [ ] { } ( ) ! ; " * ? < > : / \ Tab, LF, CR . |
Click Upload to add the file to the assignment.
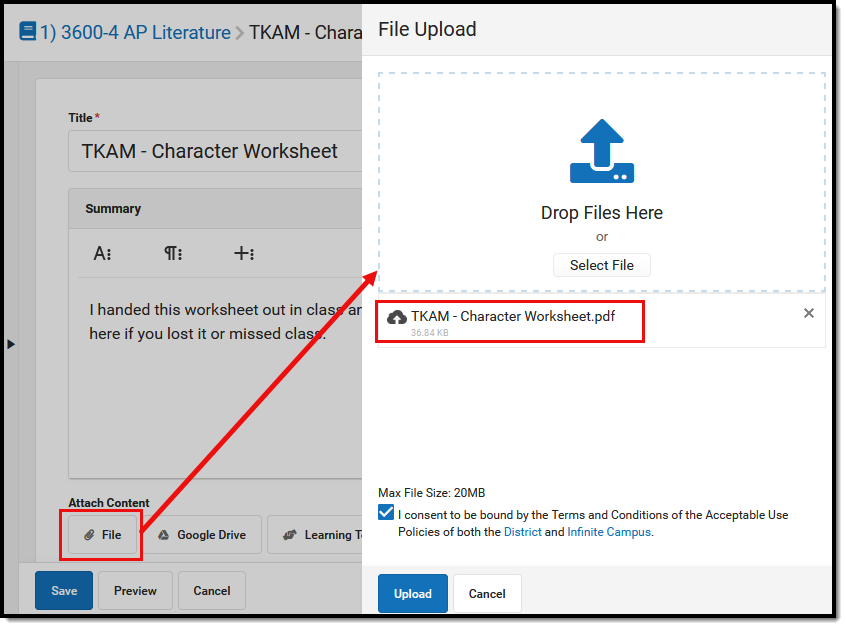 Attach a file to an assignment by uploading it to the digital repository.
Once uploaded, indicate if the file should be visible to Student & Teachers or to Teachers Only:
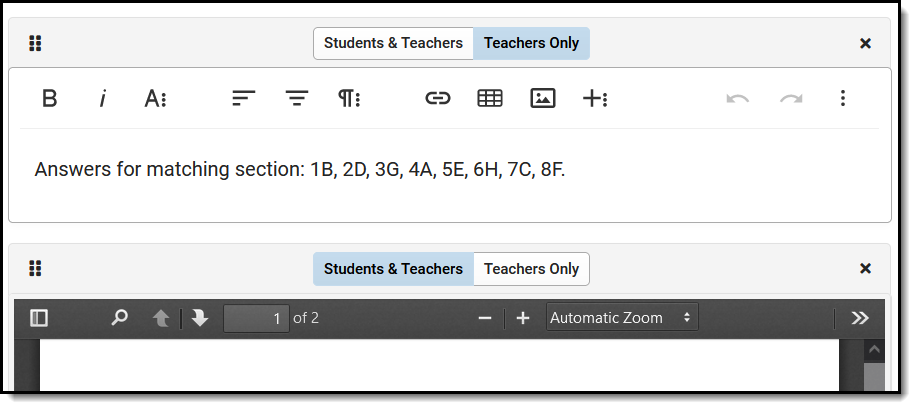
Campus acts as only a carrier for attached files - files are downloaded and opened in the program in which they are saved. For example, if a teacher attaches an Excel file, students will need Excel in order to download and view the file. Keep in mind the software programs your students are likely to have when attaching files.
File Types
The following file types cannot be uploaded to an assignment:
Excluded File Types | ||
|---|---|---|
.application ClickOnce Deployment Manifest file .bat Batch file .class A compiled .java file .cmd Command file .com Simple executable file .cpl Control Panel file .dll Dynamic-link Library .exe Executable file format |
.gadget Small program file .hta HTML executable file .inf Setup Information file .jar Java Archive file .java Java source code file .js Java script file .jsp JavaServer Pages file .lnk Windows executable file .msc Microsoft management console file |
.msi Installer package file format .msp Windows Installer patch file .pif Program Information Files .reg Registration file .scf Windows Explorer command file .scr Screensaver file .vbs Virtual Basic Script .xsl XML style sheet |
Attach Google Drive Files
To use this option, your district must configure Campus to connect to a Google Apps for Education account through the Google Drive tool.
If configured by your district, attach Google Drive files to an assignment and resources. Attaching a Google Drive file to an assignment allows students to access it through Campus Student. Teachers can also enable Student Submission of Google Drive files by students.
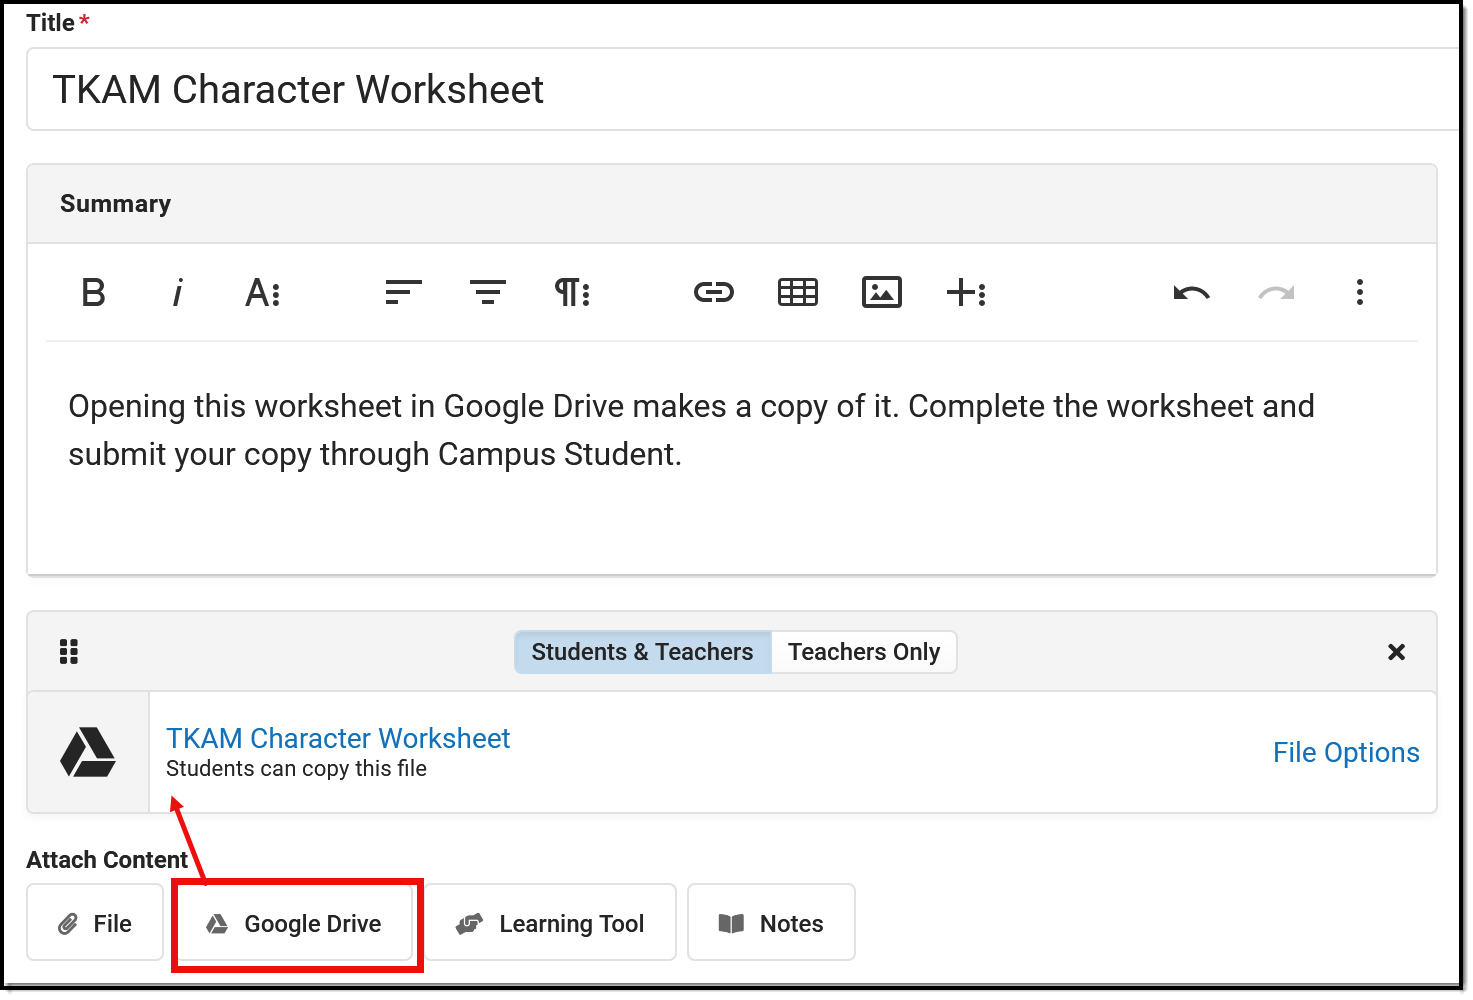 An example of a Drive file attached to an assignment.
For example, teachers could attach an essay prompt that students respond to in a separate file, or a worksheet that students can complete and return. Campus uses information about the assignment to control who has access to edit a file during assigning, completing, and scoring the assignment.
Connecting to Your Google Account
Before you can use any of the Drive options in Campus, you must connect your Google account.
- Click the Google Drive button.
- Make sure your Google Apps for Education email address is selected in the top right of the window that displays. If that email address is not an option, click Add Account and log into your Google Apps for Education account.
- Click Allow to connect this Google account with Campus.
Your Campus account and Google Drive account are now connected. At this point, you can select a file to include.
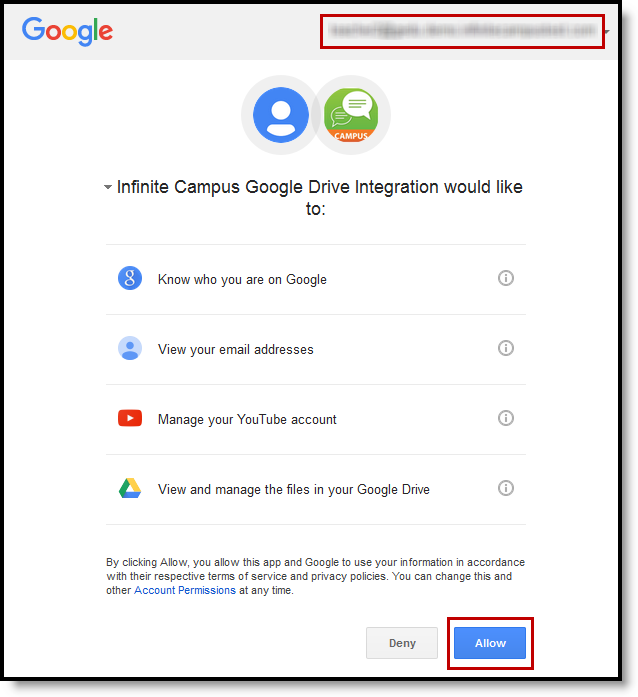 Allow Campus to access your Google Drive account.
Attaching Google Drive Files
Attach a file to an assignment or resource by selecting Google Drive in the Attach Content section. Your Google Drive account displays, where you can select a file, including a document, sheet, or slide presentation. Each file has unique viewing and sharing preferences.
Attachment Options and Sharing Preferences
When you attach a file, you determine how students will interact with the file and how the file can be shared.
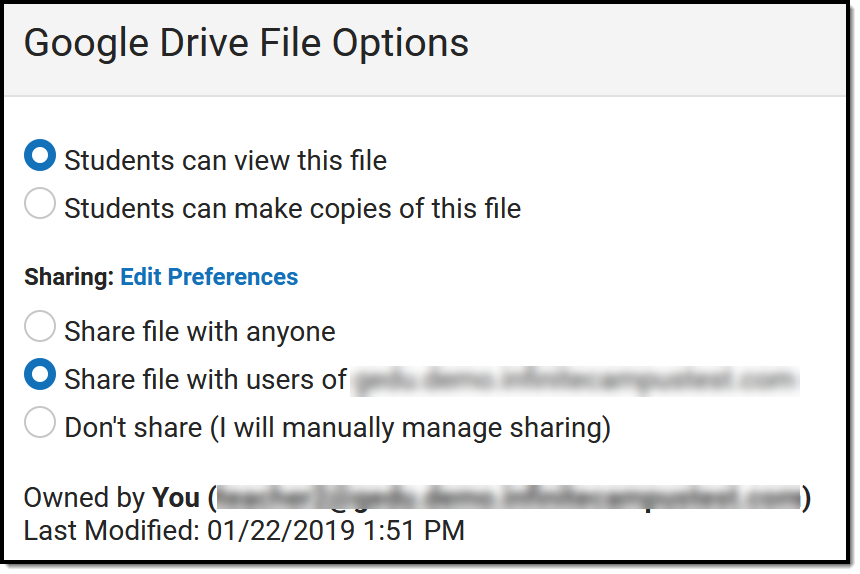 Sharing preferences for Google Drive files.
| Option | Description |
|---|---|
| Attachment Options: Determines if students all view a read-only version of the file or if copies are made for each student. | |
| Students view this file | Students have read-only access to the attached file. For example, use this option for an essay prompt that students should read and then respond to in a separate file. |
| Students make copies of file | When a student clicks the file to open it from the Portal, a copy of the file is made for that student. The name of the copied file is the original file name plus the student's first and last name in parenthesis. Campus creates a file structure and saves the file to the student's Drive account. The file structure is as follows: Infinite Campus Assignments > Calendar Name > Course-Section Number & Course Name > Assignment Name. For example, use this option to distribute a worksheet that students should fill out and return to you. |
| Sharing Preferences: Determines how the file can be shared. These options correspond to and update sharing preferences in Google Drive. Default Sharing Preferences apply. | |
| Share file with anyone | Anyone who has a direct link to the file can view it. |
Share file with users of [your domain] |
All users in the same domain (in this case, your district's Google Apps for Education domain) can open the file from a link. Campus recommends selecting this option. |
| Don't share (I will manually manage sharing) | The owner must manually set up sharing settings for the file. Choosing this option requires you to manually share the file with each individual who needs it by adding their email address to the Share list. |
Once these preferences are set for an uploaded file, modify them by clicking the File Options link:
 Click File Options to modify the attachment and sharing preferences for the file.
Edit Preferences
Access your Google Drive preferences by clicking Submission in Add a Task and then Edit Preferences. Your Preferences include the following:
| Option | Description |
|---|---|
| Your Teacher Google Account | Shows the Google account you currently have connected to Campus. This is the account that owns turned in files. |
| Assignments Google Drive Folder | Where files are stored. Campus creates a file structure as follows for files submitted by students in your Drive: Calendar Name > Course-Section Number & Course Name > Assignment Name > Student Name. |
| Default sharing settings for Google Drive files attached assignments | The default sharing preference selected for attached assignments. |
Assignment Workflow Example - Who Can Edit?
All of the passing back and forth editing rights for Drive files can be a little confusing. Expand below to view a walk through of who can edit a file when.
Note: You can fully manage editing and sharing rights in Campus. However, updating these rights directly from Google Drive overwrites Campus settings.
The following workflow describes the process of assigning, completing, turning in, and scoring an assignment.
- Teacher creates assignment, attaches a Google Drive file, and enables Add a Task > Submission > Google Drive.
- Student accesses the assignment in the Campus Student through the Calendar, Schedule, or Grades.
- Student clicks link to the Drive file.
- If you selected "Students view this file" for the attachment, the student can only access the file in view only mode.
- If you selected "Students make copies of file" for the attachment, a copy of the file is saved to the student's Drive with the student's first and last name added to the title of the assignment.
- Student creates a separate Drive file in response or modifies the copy.
- Student clicks Attach a Google Drive File and attaches the response file.
As soon as the student clicks Save on the assignment, Campus transfers ownership of the file from the student to the teacher. The teacher is now the owner of the file and the student can only view it in view only mode.
Until the student clicks Turn In on the assignment, they can reassign ownership of the file to themselves by deleting the file attachment, as long as the teacher has not marked the assignment as "Turned In."
- Teacher opens Grade Book, expands the Assignment Detail, and clicks Evaluate Work. (See the Submissions and Scoring Submissions articles for more information.)
- Teacher views the file in the scoring screen or clicks the name of the file in the submission list.
Campus creates a file structure for the assignment as follows: Calendar Name > Course-Section Number & Course Name > Assignment Name > Student Name.
- Teacher scores the assignment.
- Teachers can suggest edits to the file by selecting Suggesting instead of Editing in the top right corner of the Drive file. Feedback can be entered in the Google file or in the Teacher Feedback area of the Submissions list.
- Return edit rights to the student so that they can modify a turned in file. From the
 list in the Submission Scoring screen, mark Edit to return edit rights, or View to revoke those rights. See the Scoring Submissions article for more information.
Attach Learning Tools
Learning Tool connections allow teachers to connect content in a partner program with their assignments. Students open the assignment in Campus Student, launch into the other program from there, and complete their work in the other program (if applicable). Teachers can access the linked assignment in the partner program from the assignment in Campus, where they can review student work and enter scores (if applicable). The partner programs available range from assessment providers, learning management systems, and curriculum tools, and are dependent on district setup.
Before you start
- To use this option, your district must configure a connection to a specific learning tool partner program through the Digital Learning Applications tool.
- The configuration for many learning tools relies the email addresses entered in Campus matching those associated with accounts in the partner program, for both the teacher and students.
Create a Learning Tool Link
- In an assignment or resource, click Learning Tool. A list of available partner programs displays, based on the connections configured by your district.
- Select a program. Depending on the program and configuration, it may open in a side panel or in a separate browser tab.
- Indicate which type of link you're adding. There are two types of Learning Tool links:
- Link to Specific Content: This type of link opens a specific piece of content, such as an assignment, video, or quiz in the partner program.
- Link to the Tool in General: This type of link opens the linked program in general. This type of link simplifies access to the program. For example, you might link to the general tool from a resource at the top of their curriculum list to make it easier for students to access course content.
- Click Continue.
- If you're adding a link to specific content, the other program opens so you can select the content to link. You may need to log in to the program if you have not done so before.
- If you're adding a link to the tool in general, the side panel closes.
- Save the assignment to finish adding the link.
Attached learning tools display differently based on the program. For example, a Youtube video displays as embedded in the editor, so that students can view the video without leaving Campus Student. In the example below, a Turnitin assignment displays as a launch link.
 Linked learning tools display differently based on the partner.
Accept Scores
For some programs, you have the option to Accept Scores. This checkbox is marked by default for programs that support score passback. If this checkbox is marked, any scores entered in the partner program for the linked assignment will be populated in the grade book.
Note: The Accept Scores checkbox must be marked prior to scoring assignments in the partner program for those scores to display in the Campus Grade Book.
There is some variation between different learning tool programs. Expand a section below to learn more about a few specific providers.
Naiku
Naiku is an assessment provider. Expand for more information:
After selecting Naiku from the Learning Tool list, select an existing assessment or create a new one. A new assessment is aligned when you save it. To add an existing assessment, click the Name of the assessment and then Use this assessment.
If Accept Scores is marked for the assessment in Campus, each student's score displays in the Grade Book once they've taken the assessment. From the assignment detail, click the assessment name to view results in Naiku. Once all students have completed the assessment, close the assessment in Naiku to prevent students from continuing to access it.
Considerations for Using Naiku Assessments
- The Naiku Support Center provides helpful instructions for creating and managing assessments.
- The district must purchase and configure Naiku before assessments can be aligned to assignments.
- The Grade Book must be set up (including Categories and Grade Calc Options) prior to aligning Naiku assessments.
Turnitin
TurnItIn helps teacher detect plagiarism and provides tools for analyzing and providing feedback on student work. Expand for more information:
After selecting Turnitin from the Learning Tool list, Turnitin opens in a separate window. Edit assignment details if desired and close.
To score the assignment, open the assignment in Campus and click the Turnitin link. View the submission in TurnItIn, use TurnItIn's features to analyze and enter feedback, and score there if desired. If Accept Scores is marked for the assignment, the scores entered in Turnitin populate in the Grade Book.
Considerations for Using Turnitin
- All teachers and students must have email addresses entered in Campus to use TurnItIn. The email addresses must match the address attached to their TurnItIn accounts.
- TurnItIn Support provides helpful instructions.
- The district must purchase and configure TurnItIn before assignments can be aligned to TurnItIn.
- When assignments aligned to TurnItIn are copied, a new assignment does not exist in TurnItIn until a teacher or student clicks the TurnItIn link in the copied assignment.
- The Grade Book must be set up (including Categories and Grade Calc Options) prior to aligning TurnItIn.
- TurnItIn cannot be used in Internet Explorer.
The Attach Content options display if your district has Campus Learning and has given you the Enhanced Curriculum tool right. Specific options are dependent on district and school configuration. Visit the Campus Learning Suite page to learn more.
The Attach Content options allow teachers to attach additional content to assignments and deliver them to students through Campus Student. In this video you will learn how to attach content to assignments and resources.
Quizzes
Quizzes allows teachers to create, administer, and score assessments by attaching them to their assignments.
Quiz Overview
Quizzes are only available with the Enhanced Curriculum tool right, which is included as part of the Campus Learning Suite premium offering. Visit the Campus Learning Suite page to learn more.
Using Quizzes, teachers can create, administer, and score assessments by attaching them to their assignments. In this overview video, you will learn the general process for creating, administering, and scoring quizzes.
Create Quizzes
This tool is available as part of the Campus Learning premium offering and requires the Enhanced Curriculum tool right.
Location: Anywhere you view assignments, such as Grade Book, Planner, or Progress Monitor > click Add split button > Quiz
Quizzes can contain a variety of question types, making them customizable for your class's needs. Students take quizzes through Campus Student. Most question types can be automatically scored.
Quiz questions can be organized into pages to group related questions.
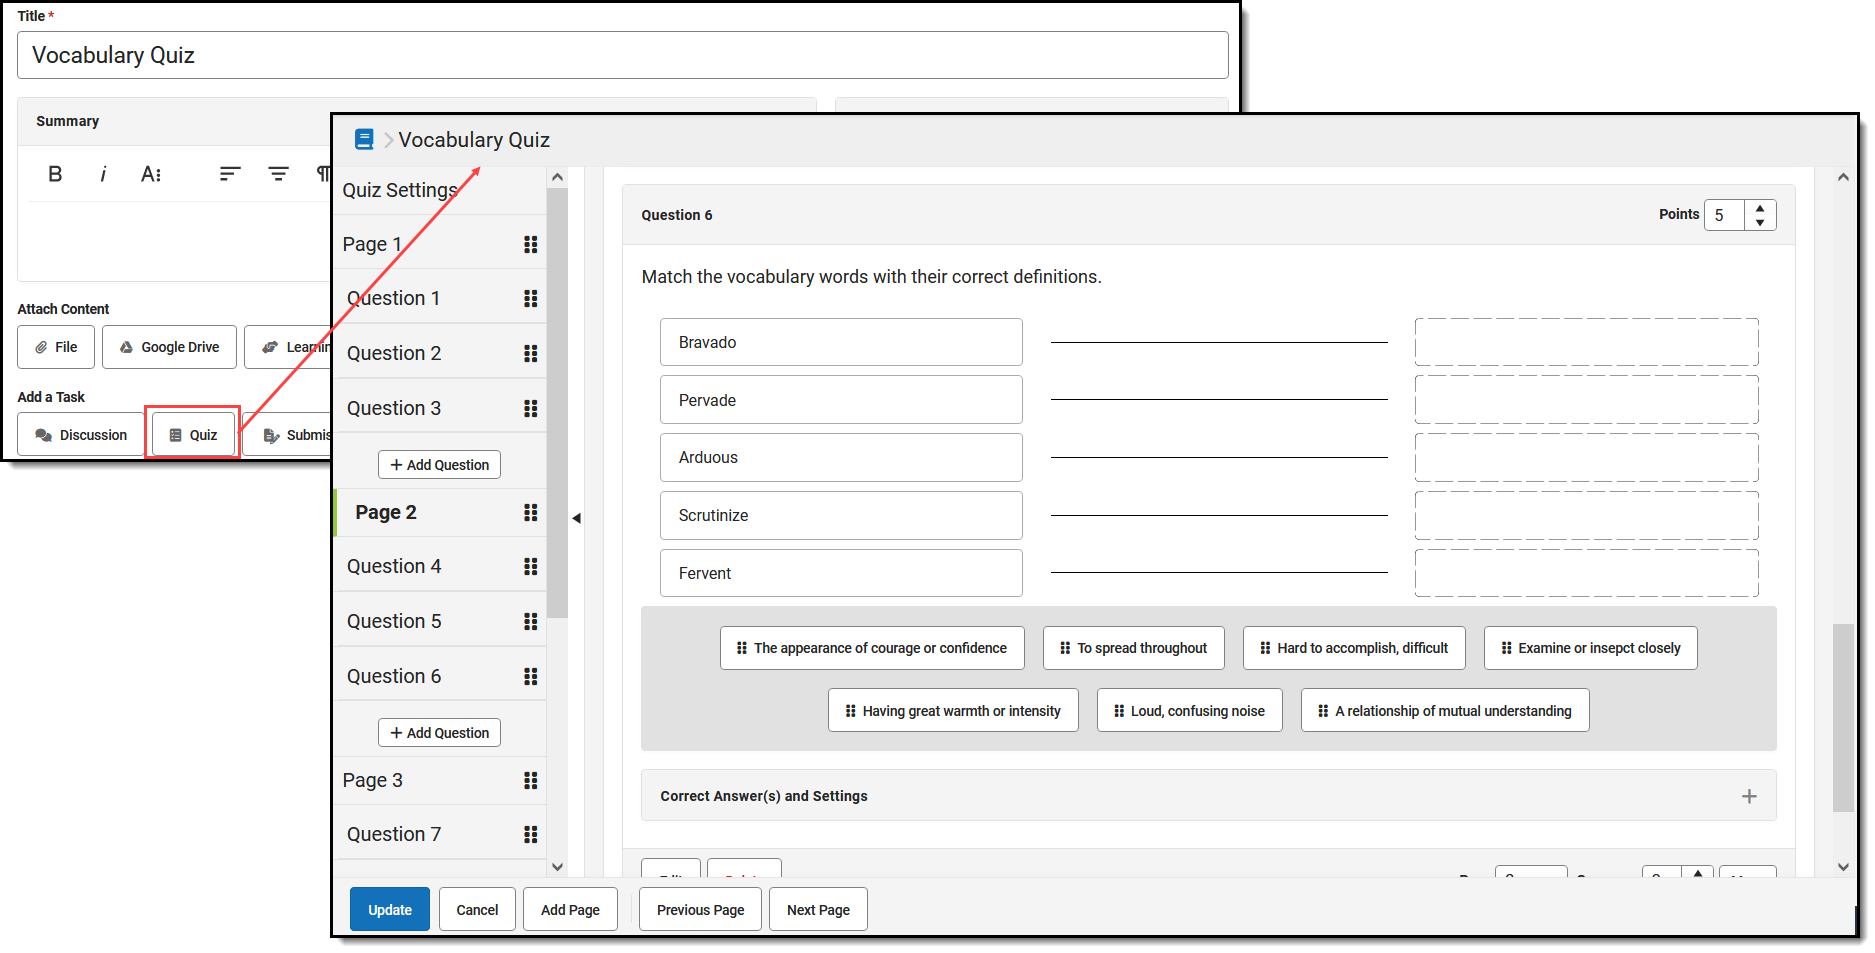 Create a Quiz in the Add a Task section.
The Enhanced Curriculum tool right in Additional Access Rights > Instruction Tools grants access to this option. See the Instruction Tool Rights article for more information.
Create a quiz
- To start creating a quiz, create an assignment and then click Quiz in the Add a Task section OR click the arrow button next to Add and select Quiz. See the Assignments & Resources article for information about the other fields in the assignment editor.
- Enter high-level Instructions for the quiz, if desired.
- Review the Quiz Settings to enable Reattempts and select a Scoring Method and score display preference.
- Add questions to the quiz by clicking Add Question. Click Change Question Type to view a list of available question types. Enter question text, settings, and options. Specific question fields vary based on the question type. See the Quiz Question Types article for more information.
- After creating each question, click Done to enable the Add Question button in the index at the left and below the previous question.
- If desired, change the number of Points that a question is worth. See the Understand Scoring Setup section below for more information about how this Points field calculates.
- Once all questions are created, click Add to Assignment to finish creating the quiz and return to the assignment.
- Set up the Section Settings and Grading for the assignment. Keep the following in mind:
- Use the Time fields next to the Start and End Dates of the assignment to control when students can view the quiz, such as only during the class period.
- If your quiz includes Essay/Short Answer questions, you may want to change the Release Scores setting to release on a specific date. Because this question type cannot be auto-scored, the auto-calculated score does not reflect these questions until the teacher has scored them. As a result, the student's score would appear lower than it actually is.
- To administer a quiz that is scored, but does not contribute to student grades (such as a practice quiz), unmark the Include in Grade Calculation checkbox.
- Quizzes can be added to Resources as well, such as a survey or class poll. Toggle Grading off to make the assignment a resource.
- Click Save when finished. Use the View as Student option at the top right of the assignment editor to preview what the quiz looks like for students.
|
To edit a quiz, click Edit on the assignment and then Edit for the quiz.
When changes are made to a quiz that students have already submitted, you have the option to Update scores or Update scores and reassign to students.
|
|
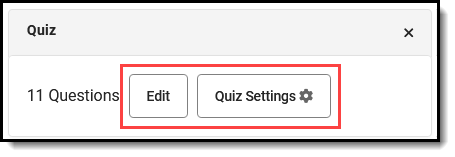
Check out this video for more information.
Quiz Settings
Once a quiz is created, a Quiz Settings button displays. Settings include quiz-level instructions. Click Add Instructions to add information to the beginning of the quiz. This screen also includes the following three options:
Allow Students to Reattempt Quiz
Students must respond to each question
Time Settings
Student Scoring Method
Display Correct and Incorrect Answers
|
 |
Quiz Settings can be modified at any point, including after students complete the quiz. For example, if you are using a quiz in multiple sections, reopen the quiz after all students have taken it and enable answers so students can review how they did.
Note: feedback entered for specific questions when scoring quizzes also follows this quiz setting.
Page-level settings
Additional settings display at the top of a page of questions and only apply to the questions on that page.
 Page-level settings apply to only questions on that page.
- Randomize Question Order: Delivers questions in a random order.
- Randomize Question Selection: Delivers a random selection of questions from that page. Marking this checkbox makes the following settings editable.
- Number of Questions to Deliver: The number of questions delivered from the page.
- Points Per Question: The proportion of the total points possible that each question is worth. When randomizing questions, all questions are worth the same number of points, overwriting the Points field on individual questions. See the scoring setup section below for more information about how scores are calculated based on the Points entered.
For example, if a page of a quiz has 10 questions and a teacher randomizes selection and enters a Number of 5, each student who takes the quiz will see 5 random questions from the 10 available on that page.
If the teacher reassigns the quiz, students will see the same questions, but if the student reattempts the quiz, they receve a new randomized set of questions.
Organize quiz questions
Once created, quiz questions can be rearranged and organized
Pages
| Quiz questions can be organized into pages. This option allows you to group related questions and provide group-specific instructions. Students have the option to pinning these instructions to keep them visible when they scroll.
In this example, the instructions for the page include a poem for students to read and then questions to answer about that poem. Add pages using the Add Page button at the bottom of the screen and reorder pages, with their questions included, using the drag-and-drop icon  in the index at the left. in the index at the left. |
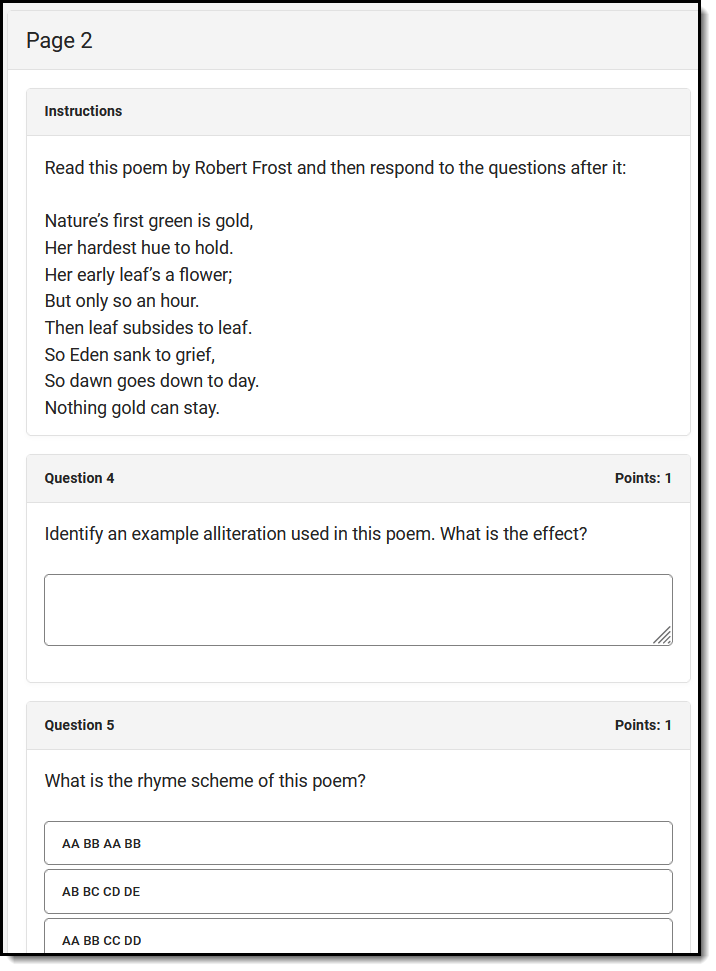 Use pages to group related questions. Use pages to group related questions. | |
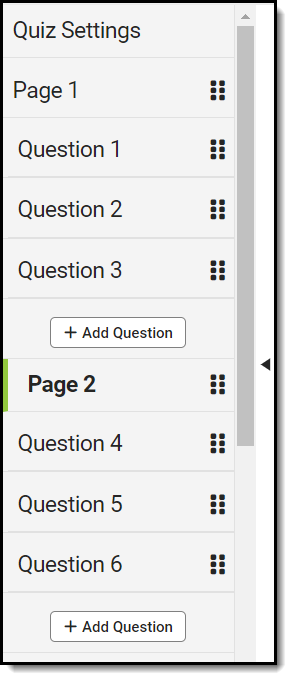 |
Use the index on the left to view the organization of pages and questions, or collapse it to increase the workspace. | |
Reorder questions
Questions can be reordered in two ways:
Option 1: In the index at the left of the quiz, click and hold the drag-and-drop icon  and move the question where you'd like it. and move the question where you'd like it.
When questions and pages are moved, their numbers are updated to reflect their new position. |
Option 2: Below the question, use the Page and Sequence dropdown lists to indicate where the question should be and click Move.
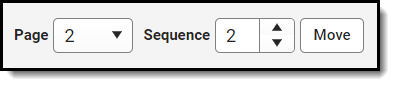 |
Understand scoring setup
| When quizzes are scored using points, the Points entered for each question represent the proportion of points possible for the assignment that each question is worth, not the numerical number of points.
Rather than indicating the raw number of points a question is worth, the Points field on each question indicates the weight of the question, relative to the Points set for all of the other questions. |
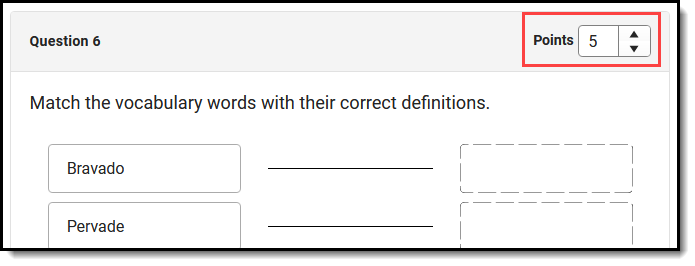 |
| The following examples illustrate the connection between question point values and assignment points possible. | |
| Questions with the Same Point Values | One Question Worth More than Others | Question Point Values Vary |
|---|---|---|
|
|
|
Print a quiz
To print a quiz:
- Open the assignment that includes a quiz.
- Click View Quiz.
- At the bottom of the screen, click Print Quiz or click the arrow next to the Print Quiz button and click With Key.
 An example of a printed quiz question "With Key" An example of a printed quiz question "With Key" |
The standard Print Quiz option generates the quiz in a format appropriate to hand out to students so they can take it without a device.
If the Key is included, the Correct Answers and Settings section is printed below each question, as it appears for each question in edit mode. |
Note: The Number Line question type may not be formatted correctly in a printed quiz.
Previous Version:
SaveSave
Save
Save
Save
Quizzes are only available with the Enhanced Curriculum tool right, which is included as part of the Campus Learning Suite premium offering. Visit the Campus Learning Suite page to learn more.
Quizzes are assessments teachers can add to assignments and administer to students through Campus Student. This video demonstrates how to create a quiz and attach it to an assignment.
Quizzes are only available with the Enhanced Curriculum tool right, which is included as part of the Campus Learning Suite premium offering. Visit the Campus Learning Suite page to learn more.
We value your feedback. Please take a moment to complete this brief survey.
Quizzes are assessments teachers can add to assignments and administer to students through Campus Student. In this tutorial, you will create your first quiz.
*This tutorial is audio-enabled.
Score Quizzes
Quizzes are available as part of the Campus Learning premium offering and requires the Enhanced Curriculum tool right.
Location: Anywhere you score assignments, such as Grade Book, Planner, or Progress Monitor
When students submit their responses to a quiz via Campus Student, most questions can be scored automatically, with the exception of Essay/Short Answer questions. Teachers can modify scores as needed, either for individual questions or for the assignment as a whole.
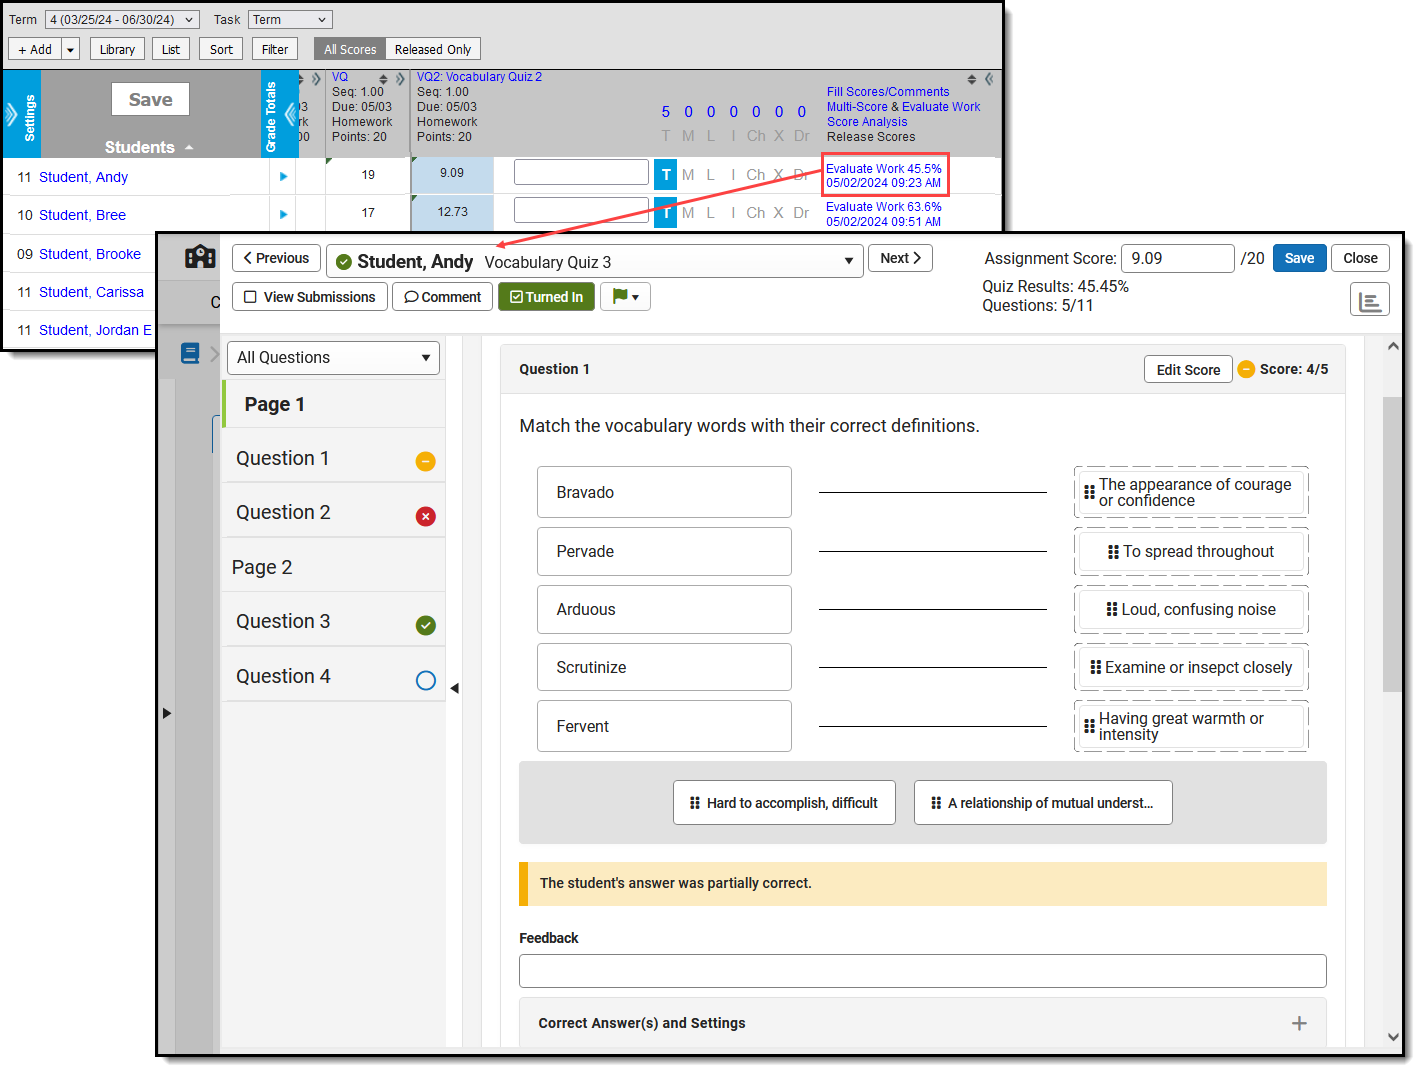 Open the scoring screen to see student responses to each question.
 When students are taking a quiz, an In Progress link displays in the grade book. Click on a link to view a student's current progress through the quiz. Quizzes cannot be edited once a student has started taking it, although teachers can change the Quiz Settings to display feedback.
Once the student submits the quiz, it is flagged as Turned In and the link changes to Evaluate Work with a timestamp. Click the link to open the scoring screen to review can review student responses and scores.
How Scores are Calculated
Questions are scored automatically based on the answer options entered, with the exception of Essay/Short Answer questions.
When quizzes are scored using points, the Points entered for each question represent the proportion of points possible for the assignment that each question is worth, not the numerical number of points. Rather than indicating the raw number of points a question is worth, the Points field on each question indicates the weight of the question, relative to the Points set for all of the other questions.
| For example, in the image above, the quiz included 4 questions, two worth 1 Point each, one worth 4 points and one worth 5 points. This student got one, 1 pt question wrong, partial credit on the 5 pt question, and the 4 points question, a short answer, has not been scored yet. With 5 out of 11 question points correct, the student earned 45.45% on the quiz. 45.45% of the 20 points possible on the quiz is 9.09 points, but the student's score will likely increase once the short answer is scored. | 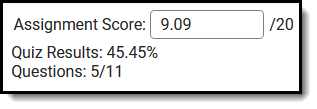 |
For assignments scored using Points, the number of points earned is calculated. For assignments scored using Rubrics or Marks, the student's performance on the quiz is expressed as a % but it's up to the teacher to interpret that percent as the appropriate Rubric or Mark and enter the score. If the assignment has multiple alignments, the Quiz Result is calculated, but teachers must enter a score for each alignment.
Reviewing Student Responses
Use the navigation options at the top of the scoring screen to page between each student's submission.
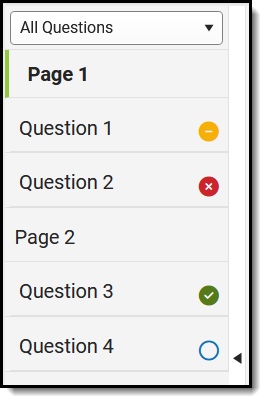 Question status is shown at the right. Question status is shown at the right. |
Use the index along the left side of the quiz to navigate between questions. Question status indicators are as follows:
| |
| The dropdown list at the top filters the index by the status of the question.
|
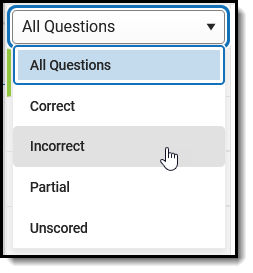 | |
Review and Score the Quiz
How you review and score a quiz depends a lot on how it was set up, but here are some things to consider:
| Most quiz questions are automatically scored, but you can change the score of questions or of the whole quiz if desired, such as rounding the calculated Assignment Score. |
 Assignment Score is calculated based on the relative point values of quiz questions. Assignment Score is calculated based on the relative point values of quiz questions. | |
|
|
|
|
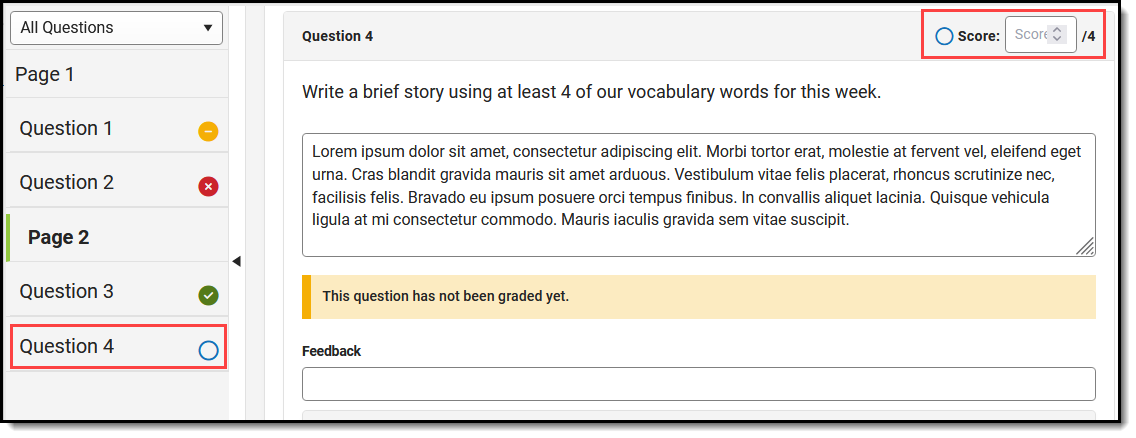 Essay/Short Answer questions cannot be scored automatically and display with a blue circle. Essay/Short Answer questions cannot be scored automatically and display with a blue circle. |
Questions indicated by the blue circle have not yet been scored. Enter a score for the question in the Score field at the top right. | |
|
|
|
|
| Enter Feedback for a question to give students more information. Keep in mind that question-level feedback is only visible if the Quiz Settings are set to display answers After completing the quiz. If answers are hidden, so is the question-level feedback. |
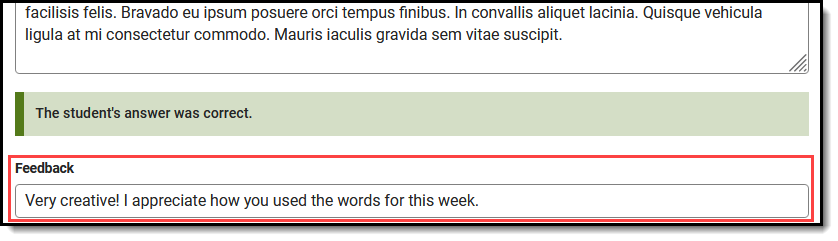 Enter question-level feedback as desired. Enter question-level feedback as desired. | |
|
| ||
 Sometimes a question can be considered correct, even if you didn't plan for it. Sometimes a question can be considered correct, even if you didn't plan for it. |
For questions where students type their answers, you may want to review incorrect answers to see if they could be marked correct. | |
After you've reviewed and adjusted scores as desired, click Save to update the grade book.
- If the assignment was set to release scores at a later date but you're done scoring and want release them now, use the Release Scores option in the Grade Book or Progress Monitor to make scores available to students.
- If waiting to reveal answers and feedback until after the quiz is scored, open the assignment and change the Quiz Settings to display answers After completing the quiz.
Submit a Quiz on Behalf of a Student
If a student uses a printed copy of a quiz instead of taking it online, the teacher can submit their answers on the student's behalf. Classroom must be enabled to submit work for a student.
|
 Use View as Student to submit a quiz for a student. Use View as Student to submit a quiz for a student. |
When you submit work for a student, your name displays in both teacher and student views.
Check out this video for more information.
Previous Versions:
Quizzes (Instruction) [.2211 - .2307]
Quizzes (Instruction) [.2311 - .2415]
Quizzes are only available with the Enhanced Curriculum tool right, which is included as part of the Campus Learning Suite premium offering. Visit the Campus Learning Suite page to learn more.
Teachers can enter or modify quiz scores and feedback for students through Campus Instruction. This video demonstrates how to score quizzes.
Quiz Question Types
There are 8 types of questions for Quizzes in Campus: When you're creating a quiz, questions are Multiple Choice by default. Click Change Question Type to select a different type.
|
 Click Change Question Type to see the list of options. Click Change Question Type to see the list of options. |
Multiple Choice
For Multiple Choice questions, students select the correct answer(s) from a list of options.
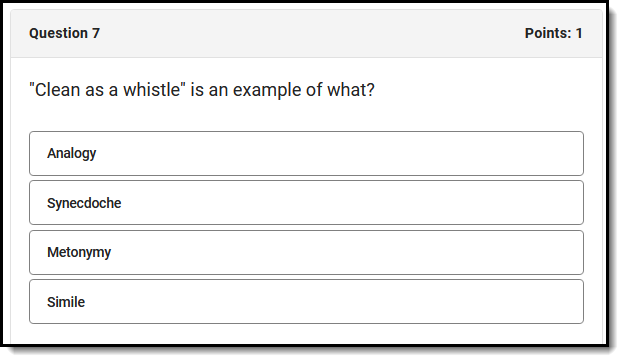 Select the correct answer for a multiple choice question.
 Create a Multiple Choice Question
- Enter the question text in the editor.
- Indicate if the question has Multiple Answers. If marked, more than one answer can be marked as correct.
- If Multiple Answers is marked, indicate if the question should Allow Partial Credit. If marked, students receive partial credit if they select some of the correct answers but not all.
- Mark Randomize Response Order to randomize the order in which answers display.
- Toggle Show Rich Text Formatting to change the possible answer text fields to text editors. As editors, you can format text, create tables, and include images and links.
- Enter Possible Answers, with the radio button marked next to the correct answer. If Multiple Answers is marked, mark the checkboxes next to all correct answers.
- Click Done when finished.
True/False
For True/False questions, students indicate whether the question text is true or false.
Create a True/False Question
| 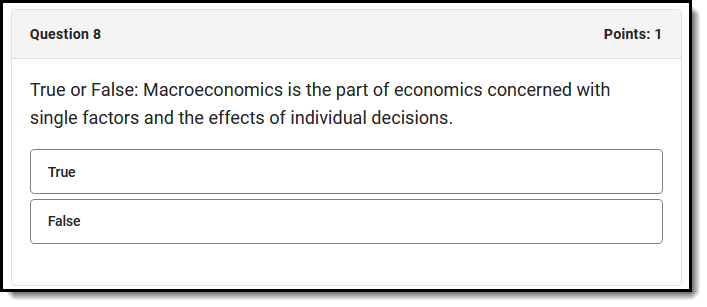 Example of a True/False Question Example of a True/False Question |
Essay/Short Answer
For Essay/Short Answer questions, students type their answers to the prompt.
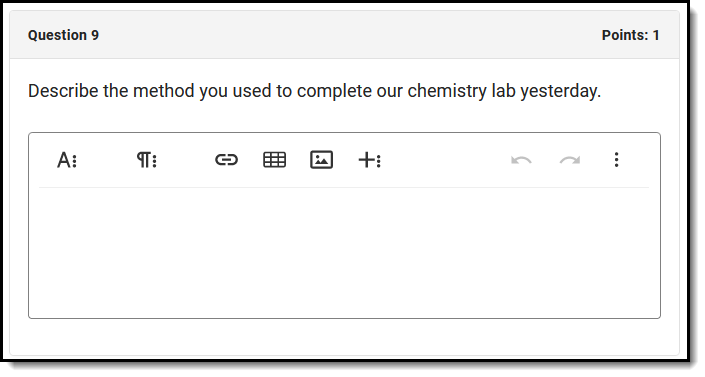 An example of an Essay/Short Answer question with a Rich Text editor.
 Create an Essay/Short Answer Question
- Enter the prompt in the text editor.
- Indicate if the students should have a Plain Text or Rich Text editor when they respond.
- If using a Plain Text editor, students cannot format their responses. If this option is selected, a Word Limit field displays. Enter the maximum number of words for student responses.
- If using a Rich Text editor, students can format their responses in an editor that matches the one you use when writing quiz questions.
- Click Done when finished.
If your quiz includes Essay/Short Answer questions, you may want to change the Release Scores setting to release on a specific date. Because this question type cannot be auto-scored, the auto-calculated score does not reflect these questions until the teacher has scored them. As a result, the student's score would appear lower than it actually is.
Fill in the Blank
For Fill in the Blank questions, students fill in the blanks in the entered text, either by typing an answer or selecting an answer from the dropdown list.
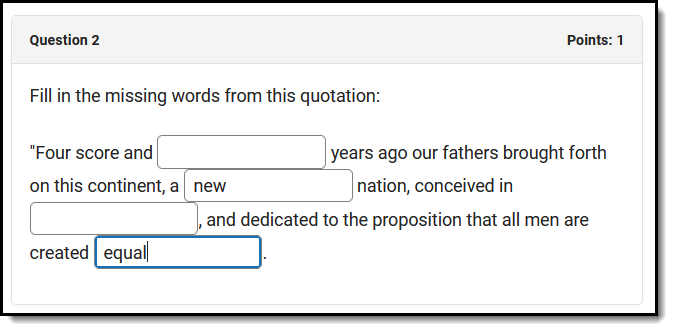 Fill in the Blank question with typed answers Fill in the Blank question with typed answers |
 Fill in the Blank question with answers in dropdown lists. Fill in the Blank question with answers in dropdown lists. |
Create a Fill in the Blank Question
- Enter the question text in the editor. Wherever there should be a blank for students to fill in, click the Add Blank Response button
 . Each blank response corresponds to an answer below, Response 1, Response 2, etc
 - Indicate if the question should Allow Partial Credit. If marked, students receive points for the question based on how many blanks they fill correctly. If not marked, the student must fill all blanks correctly to earn any points for the question.
- Indicate if the Response Type should be Text Entry or Drop Down.
- Enter the correct answer for each blank response field. For example, the first blank response in the question text corresponds to Response 1, the second to Response 2, etc.
- For Text Entry, type the correct answer. Add additional correct answers as applicable, such as "seven" and "7".
- For Drop Down, type the correct answer as well as the distractor options that are also displayed in the dropdown list. Mark the checkbox next to the correct answer. Answer options display in the dropdown list in the order shown.
- If desired, expand Correct Answer(s) and Settings to verify question setup.
- Click Done when finished.
Number Line
For Number Line questions, students place answer options (called Number Line Points) in their correct position on the number line. Students are presented with the question instructions, followed by the number line with options below it. Students click and drag the options to their correct place on the number line.
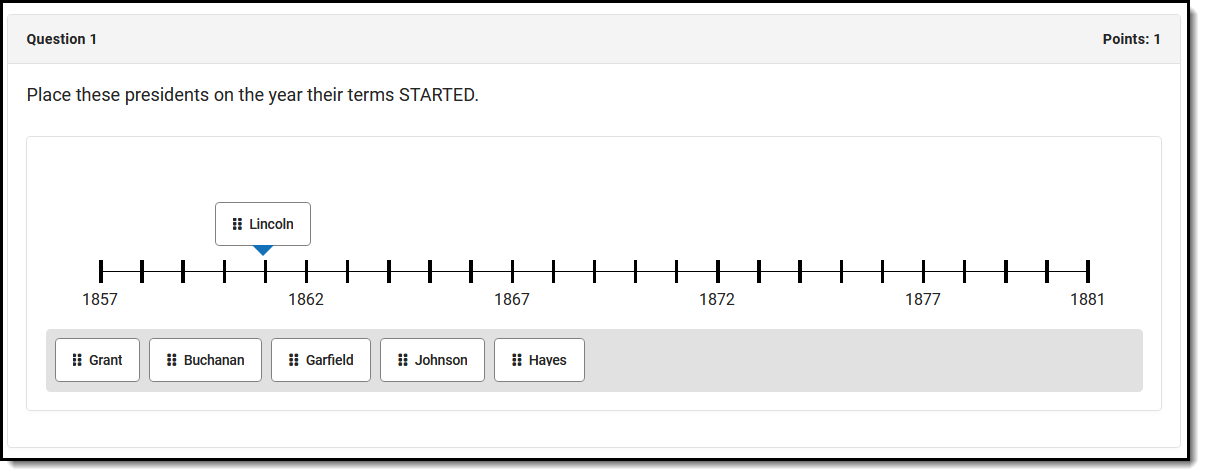 Drag options to the correct place on the Number Line.
Create a Number Line Question
- Enter the question text in the editor.
- Mark Settings as desired, based on the descriptions in the next section. As you determine settings, scroll down to the bottom of the question to see how the settings are applied.
- Enter Number Line Points for each option students must place on the number line. Four points are shown by default; click Add Points to add options.
- In the number line that displays, click and drag each of the points to its correct place on the number line.
- Expand the Correct Answer(s) and Settings section to verify the placement of each option. If Snap to Tick is not enabled, the location of each option is expressed as a decimal rounded to the hundredth place.
- Click Done when finished.
Number Line Settings
The following settings apply to Number Line questions:
- Allow Partial Credit: If marked, students receive points for the question based on how many options they placed correctly. For example, if the question had 10 options, was worth 10 points, and the student placed 7/10 options correctly, they would receive 7 points. If the question was worth 5 points, this student would receive 3.5 points. If not marked, the student must place all options correctly to get any points for the question.
- Minimum Value and Maximum Value: The lowest and highest options on the number line.
- Tick Distance and Ticks Per Label: The Tick Distance is the numerical value represented by each tick. The Ticks Per Label value is how frequently ticks are labeled. For example, if the number line goes from 0 to 100 and the Tick Distance is 5, ticks display at 0, 5, 10, 15, etc. If the Ticks Per Label is 2, ticks 0, 10, 20, 30, etc, are labeled.
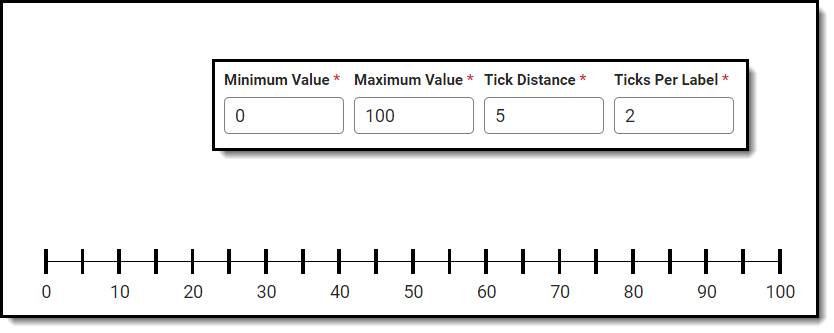
- An example of a number line with the Min Value, Max Value, Tick Distance, and Ticks Per Label fields shown.
- Snap to Tick: If marked, when the student places an answer option on the number line, it automatically moves to the closest tick
- Exact Match: If not marked, a Response Accuracy Threshold field displays. If the student places an option within the entered threshold, the answer is marked as correct. For example, if the correct answer is 40 and Response Accuracy Threshold is 3, placement on the number line from 37 to 43 will be considered correct. If marked, the student must place the option exactly correct to be scored as correct. Snap to Tick should also be marked if Exact Match is.

Matching
For Matching questions, students match stimuli and responses. Students are presented with a list of stimuli with a Response dropdown list and they select the correct Response for each stimulus.
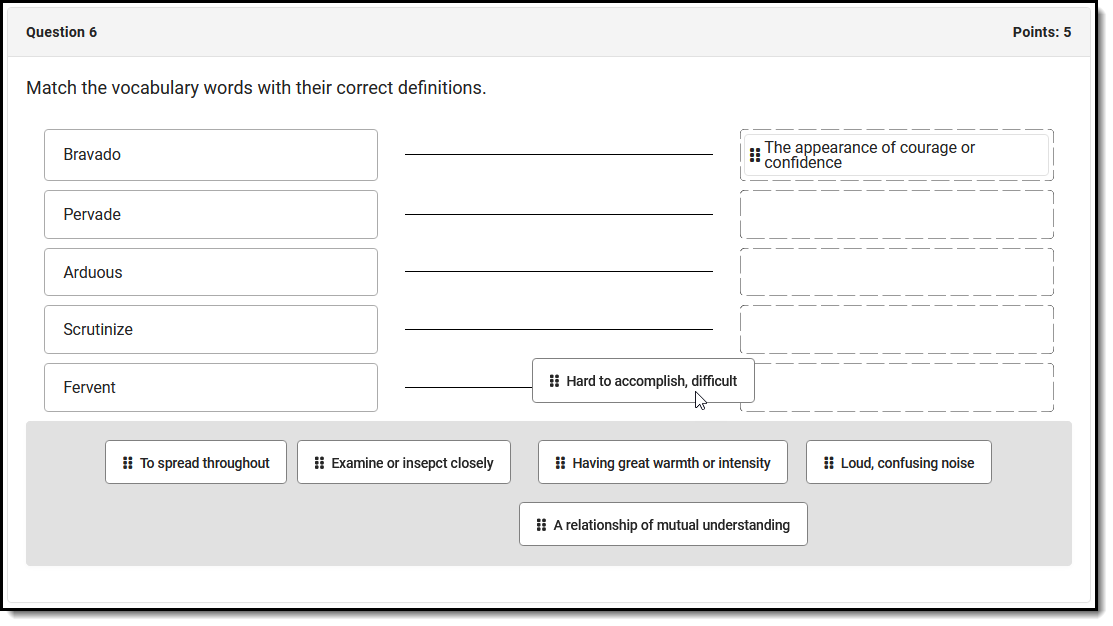 Drag and drop a response to its correct stimulus.
Create a Matching Question
- Enter the question text in the editor.
- Indicate if the question should Allow Partial Credit. If marked, students receive points for the question based on how many matches they got correct. If not marked, the student must get all matches correct to earn any points for the question.
- Indicate if the question allows Non-Unique Answers. If marked, the same response can be selected for multiple stimuli. If not marked, each response can only be selected once.
- Toggle Show Rich Text Formatting to change the possible answer text fields to text editors. As editors, you can format text, create tables, and include images and links.
- Enter Stimuli.
- Enter Response options. You can enter more responses than you have stimuli to create distractor responses. Responses display in the same order that you list them; randomizing responses is recommended.
- For each Stumulus, select the correct response in the dropdown list.
- If desired, expand Correct Answer(s) and Settings to verify question setup.
- Click Done when finished.
Ordering
For Ordering questions, students drag and drop items into the correct order, or use the dropdown list to indicate the order.
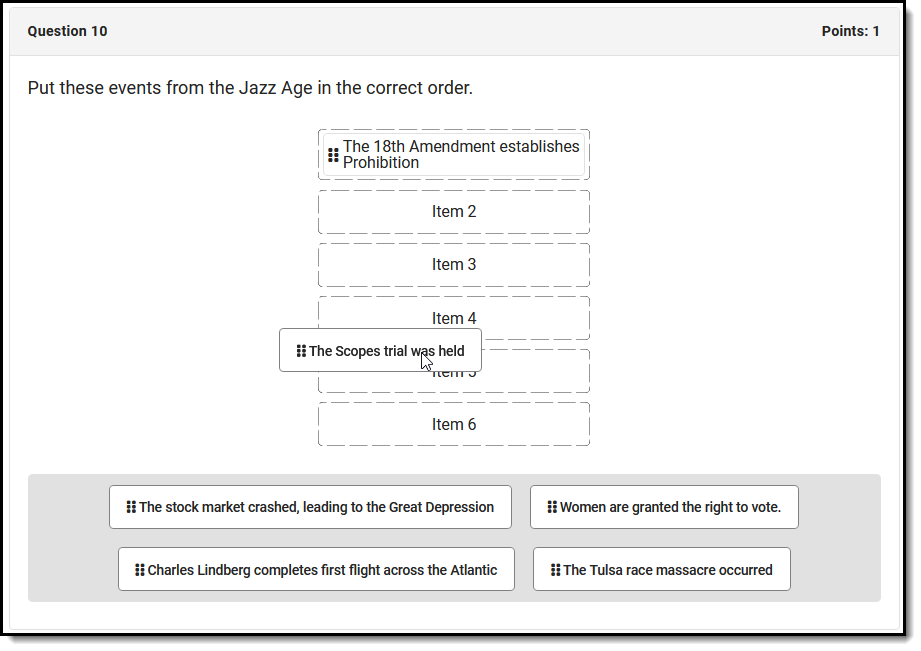 Drag and drop options into the correct order. | Create an Ordering Question
|
 or by selecting an order number in the dropdown list at the right. The order of items is randomized when presented to students.
 Numerical
For numerical questions, students fill in the blank with a numerical answer. Students can only type numbers, letters are not accepted.
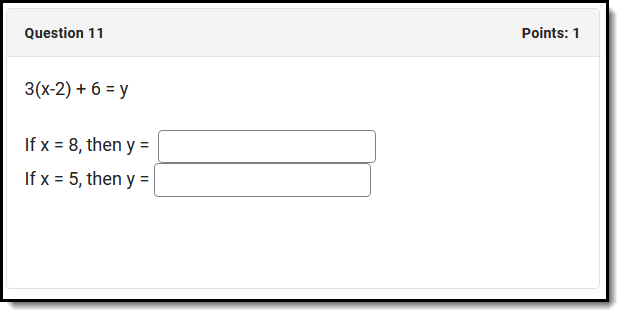 Numerical questions can only be answered using numbers.
 Create a Numerical Question
- Enter the question text in the editor. Wherever there should be a blank for students to fill in, click the Add Blank Response button . Each blank response corresponds to an answer below, Response 1, Response 2, etc.
- Indicate if the question should Allow Partial Credit. If marked, students receive points for the question based on how many blanks they fill correctly. If not marked, the student must fill all blanks correctly to earn any points for the question.
- For each blank response (Response 1, Response 2, etc), indicate if the student's answer must be Exact or fall within a Range.
- For Exact Answer(s), enter the correct answer and add additional correct answers if applicable. The student's answer must match one of the possible answers to be considered correct.
For Range, enter a range of possible answers. The student's answer is considered correct if it falls on or within the range of numbers entered.
- For Exact Answer(s), enter the correct answer and add additional correct answers if applicable. The student's answer must match one of the possible answers to be considered correct.
- If desired, expand Correct Answer(s) and Settings to verify question setup.
- Click Done when finished.
Scoring Submission
The Scoring Submissions tool provides teachers with an easy way to view and score assignments that have student submission enabled.
This tool is available as part of the Campus Learning premium offering.
Location: Tools throughout Instruction such as Grade Book, Planner > My Planner, and Progress Monitor > Score; Grade Book > expand an Assignment > Evaluate Work; Teaching Center > click score icon > click assignment name
Simulating a stack of papers to page through and score, teachers can view and score submissions for assignments that have student submissions enabled. Access submissions from the Teaching Center, the Grade Book, or from the Scoring editor accessed from an assignment.
Assignments with unscored submissions are counted in the Teaching Center. Click the link under the due date to view students' submissions and enter scores and flags. A red dot indicates an assignment with unscored assignments.
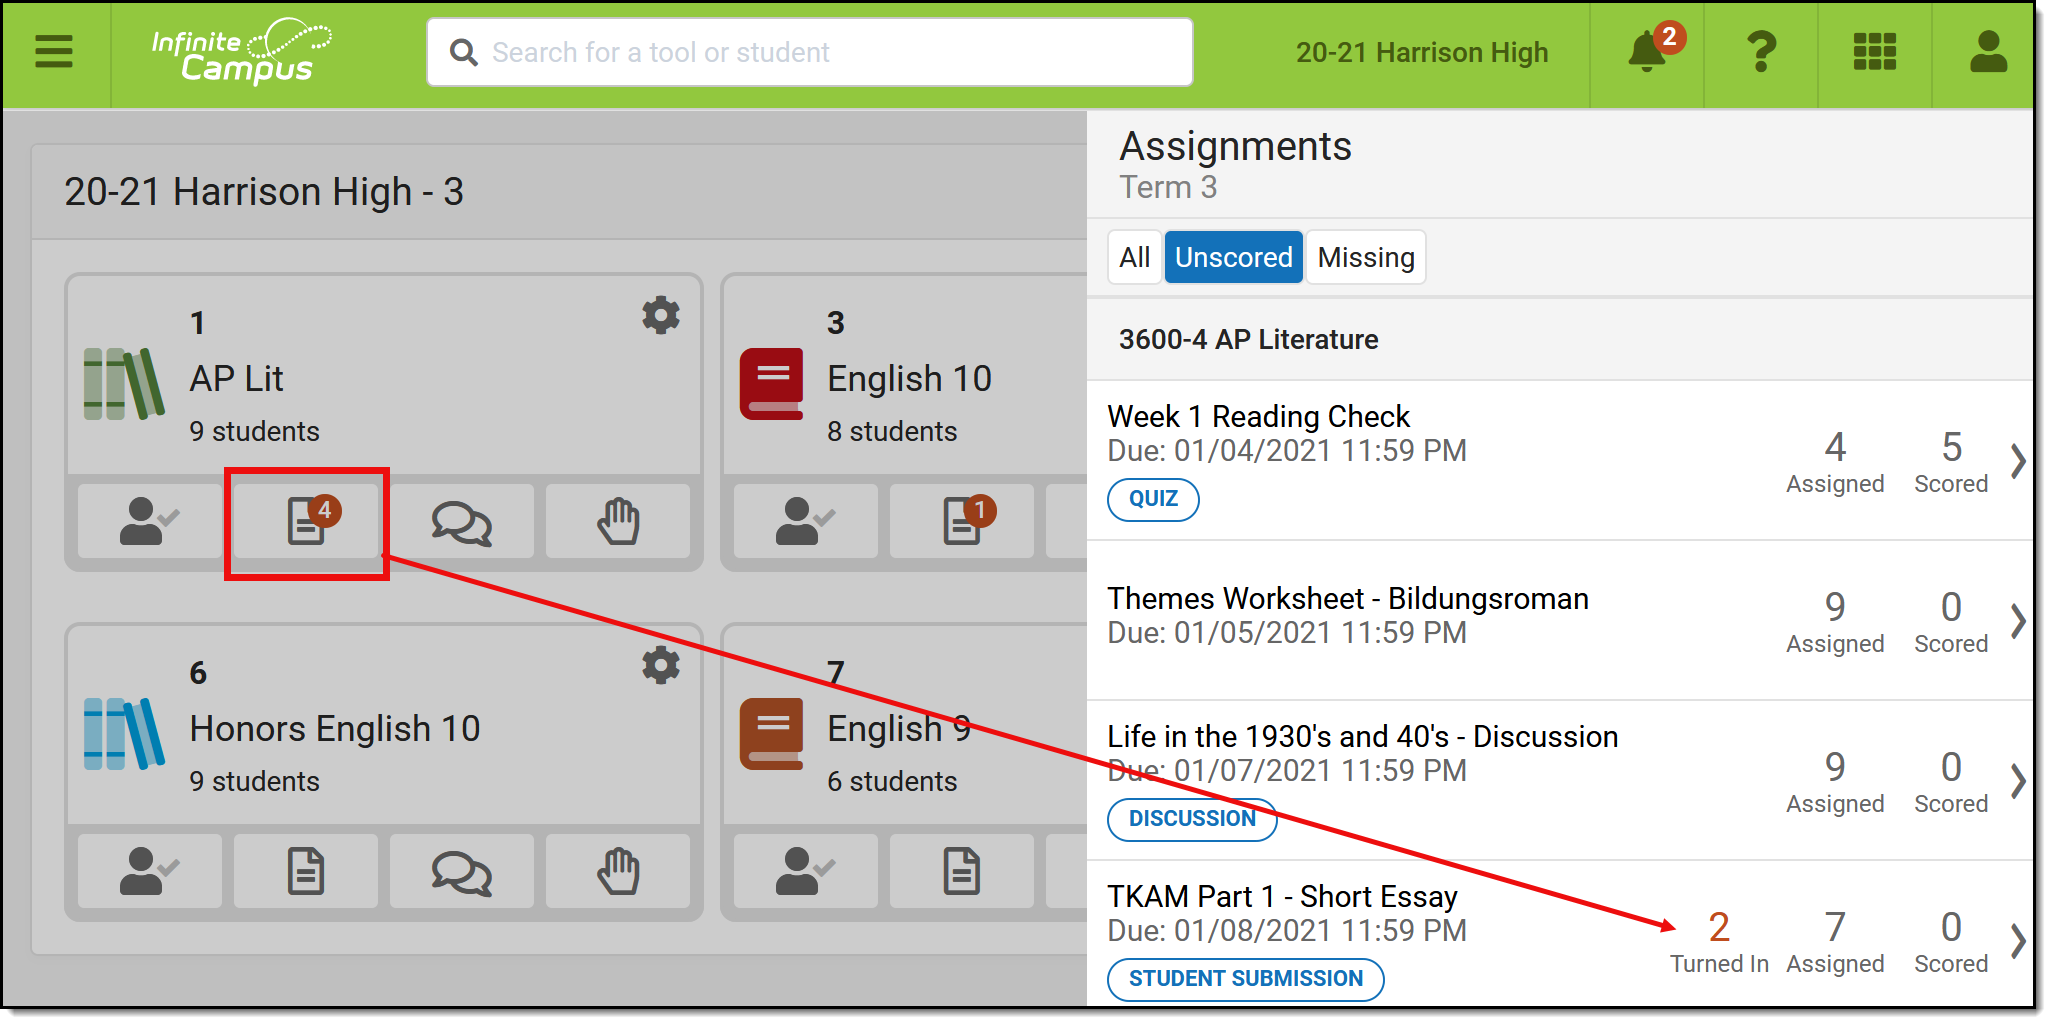 Access unscored assignments and submissions from the Teaching Center.
Teachers can also view submissions by clicking Score from the Assignment editor anywhere assignments can be viewed. 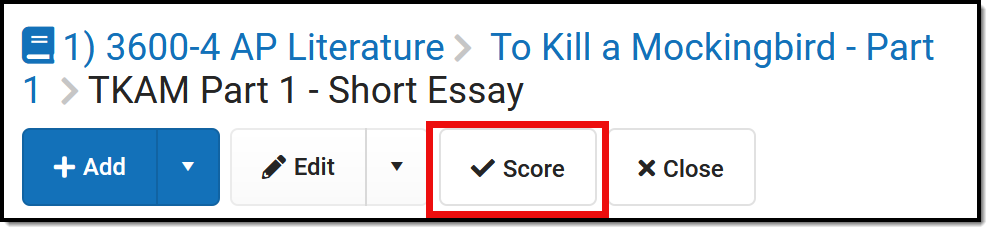 |
From the Grade Book, expand the assignment and click the blue Evaluate Work to view the submission. 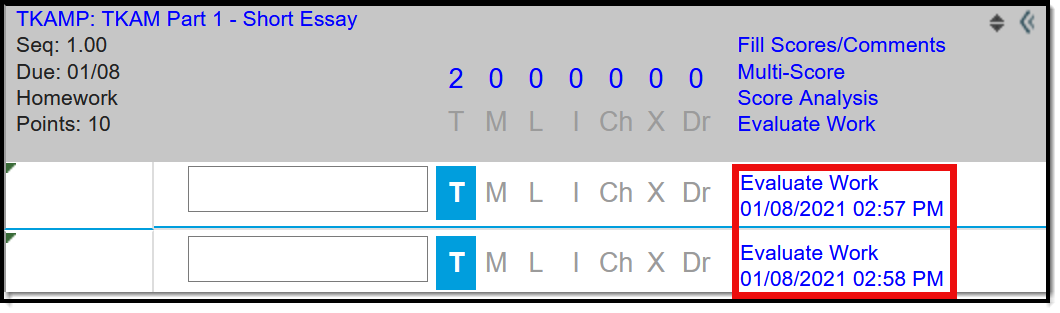 |
|
Assignments must have Student Submissions enabled to use this tool to view submissions. Google Drive files, file attachments, and editor submissions can be viewed in this tool.
|
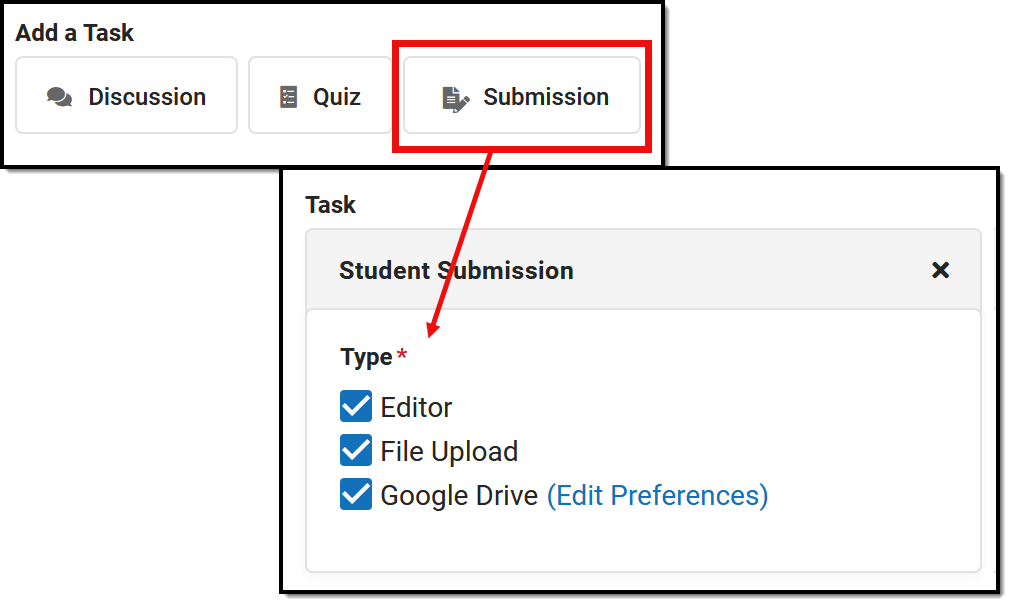
Submissions
Google Drive submissions display inside a basic Google editor. Google Docs, Sheets, Slides, and Drawings all display. File attachments must be downloaded to view and editor submissions display as text.

Google Drive files and text submissions display on screen while file attachments must be downloaded.
From this view, page through student submissions using the  button or by selecting a student from the dropdown list.
In the dropdown list, the status of student submissions is indicates as followed:
 indicates an unscored submission
 indicates a partially scored assignment
 indicates a scored submission
- No dot indicates no submission


Submissions are considered scored if they have a score or any flag other than Turned In. Submissions are flagged as  automatically when students turn them in from Campus Student. Add additional flags by clicking the dropdown next to the score field and enter a Comment. Remove the Turned In flag to allow students to resubmit the assignment.
For Google Drive files, click Turned In to remove the flag and return ownership of the file to the student.
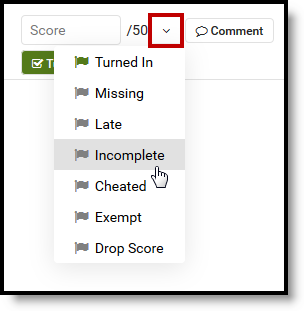
Click the dropdown list to flag the assignment.
Once scores and flags are entered, click Save or the arrow on the Save button to click Save & Back to return to the tool you were on before.
If an assignment has multiple scoring alignments, click  to open the scoring panel and enter scores for each alignment.
To reassign an assignment to just this one student, click Reassign to Student next to the Save button. A reassigned assignment is no longer flagged as Turned In, which allows the student to reattempt the assignment, regardless of whether reattempts are enabled for the whole class.
The student receives a notification in Campus Student that the assignment has been updated.
For assignments submitted via Google Drive: when the teacher reassigns an assignment, the student receives Edit rights to the Google Drive file, but the teacher retains ownership of the file.
To learn more, watch the video below.
Multiple Submissions
If a student has submitted multiple files for a single assignment, a list of submissions displays when the student's name is selected. Click on a submission to view or download it. From a submission, click ![]() to return to the list of submissions.
to return to the list of submissions.
If any submissions were submitted by the teacher, a Submitted By column also displays.
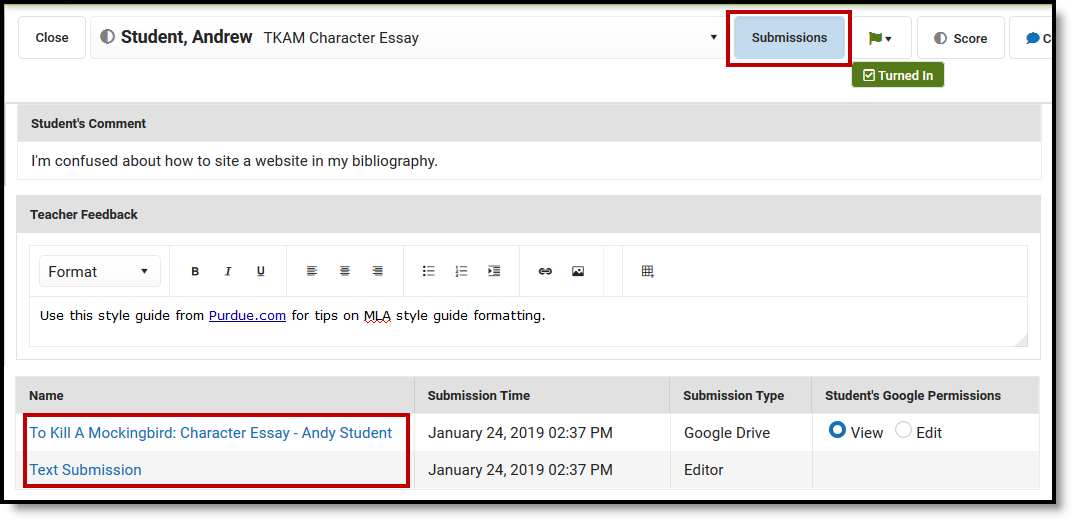
Switch between multiple submissions using the Submissions View.
Google Permissions
For files submitted through Google Drive, teachers have the option of returning edit rights to a student by marking Edit in the Student's Google Permissions column of the ![]() list. This option modifies the student's rights to the Google file only, it does not alter the status of the assignment in Campus.
list. This option modifies the student's rights to the Google file only, it does not alter the status of the assignment in Campus.
This option can be used to allow a student to edit a turned in file prior to grading. Revoke edit rights at any time by switching permissions back to View.
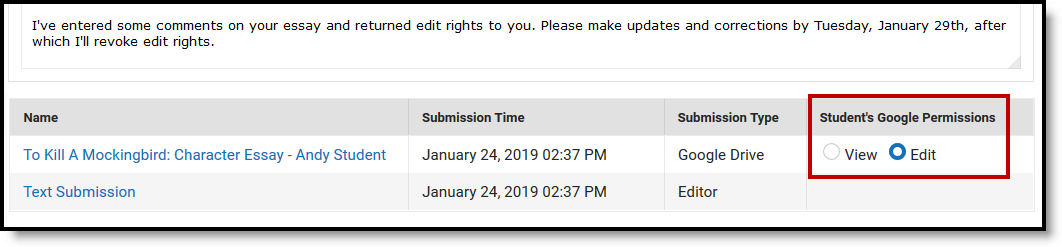
Allow the student to edit their turned in Google file by giving them Edit rights to the file. Revoke rights by switching back to View rights.
Considerations
- This tool is not optimized for use on smaller screens, such as phones and small tablets.
- Currently, only one submission displays per student. View submissions by clicking the timestamp link for the student in the Grade Book or Scoring screen to view multiple submissions for a student.
- Teachers must be logged in to their Google Apps for Education account to view Google Drive files. See the Google Drive Integration article for more information.
Previous Version
Submission Scoring is available as part of the Campus Learning Suite premium offering and requires the Enhanced Curriculum tool right. Visit the Campus Learning Suite page to learn more.
The Submissions Scoring screen allows teachers to view and score assignments that have student submissions enabled. In this video, you will learn how to view and access student submissions.
To learn more about Reassigning Submissions, watch the video below:
Google Drive Setup
From Google Drive, within System Administration, school administrators can configure Google Drive settings and establish Google Drive integration preferences.
Tool Search: Google Drive Configuration
Google Drive integration provides a workflow where teachers can deliver assignments and documents to students and allow students to submit responses back to the teacher. Using Google Drive has a number of advantages over our existing CDR based workflow, such as the ability to use collaboration features and a much higher per user limit on document sizes.
The configuration process requires Campus administrators to extract information from their Google Developer Console and the Google Workspace for Education Domain and input that information into Campus. This article provides you with step-by-step instructions for finding these values. See the Google Drive Integration Troubleshooting article for troubleshooting tips if you're having issues with an existing connection.
Use this tool to configure the integration of google drive files with assignments in Campus. Google Workspace for Education can also be added as a Digital Learning Partner through the Digital Learning Applications Configuration tool.
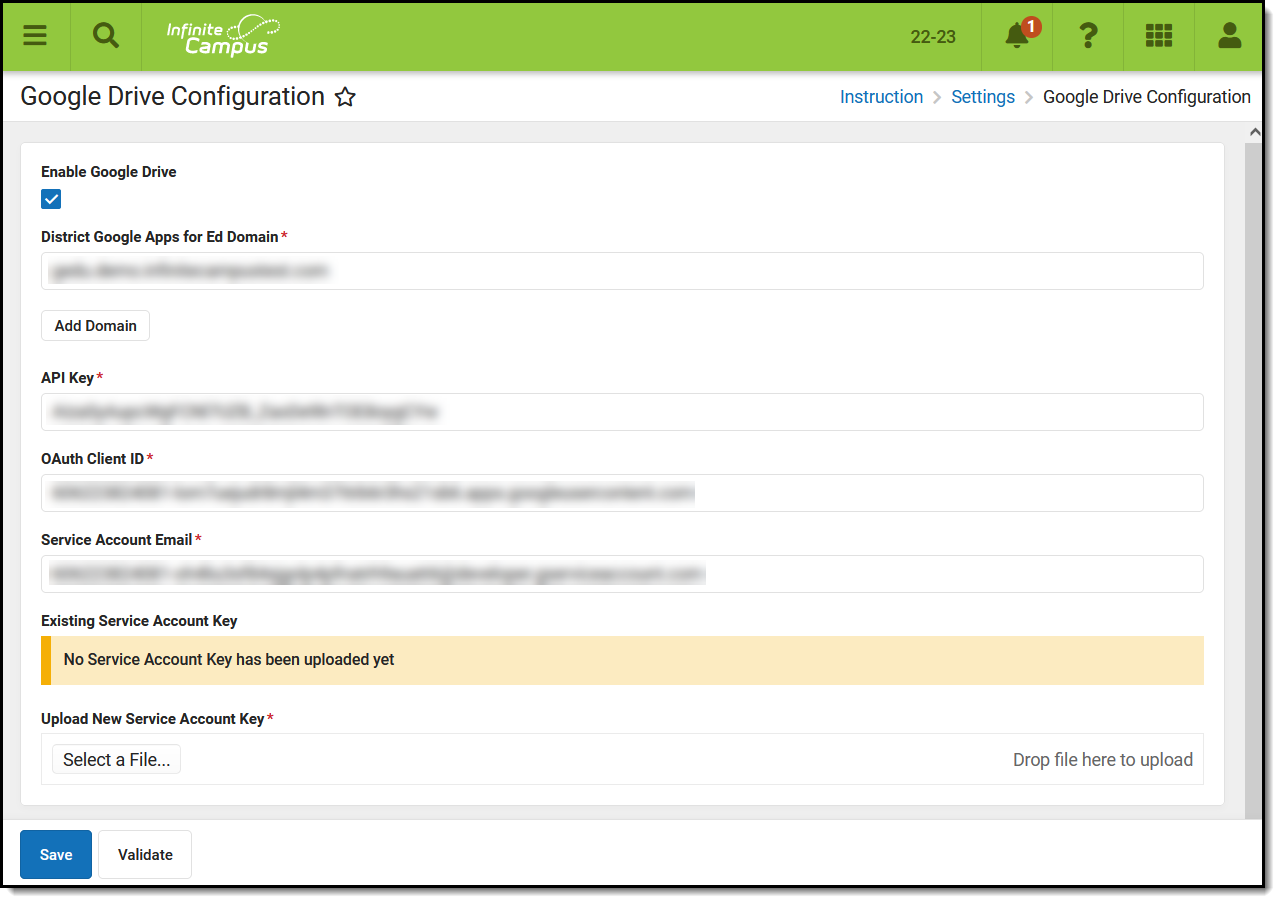
Google Drive Configuration Tab
To complete these configuration steps, the administrator configuring the Google project needs the following access within the Google Workspace project. Access can be granted by your district's Google administrator:
- admin.google.com > Apps > Additional Google Services > Google Cloud Platform must be enabled (it's enabled by default)
- admin.google.com > Apps > Additional Google Services > Google Cloud Platform > Project Creation Settings > Allow users to create projects must be turned on
See the Instruction Tool Rights articles and the Instruction Settings Tool Rights article for more information.
Currently, Campus supports Google Workspace for Education accounts with a single domain or multiple domain setup.The legacy option of separate Google Workspace accounts is not supported.
Complete the following steps to set up both single and multiple domain accounts. Additional information for multiple domain accounts is available at the end of the document.
The Campus Digital Repository (CDR) does not need to be enabled to configure Google Drive Integration.
Prior to beginning the configuration process, it may be helpful to collect the following pieces of information to streamline the configuration process:
- District’s Google Workspace For Ed Domain Name
- Admin user login to Google Workspace For Ed Domain (or team up with a District Admin who has this)
- District’s Infinite Campus URL
- District’s Name
As you configure the Google Dev Console, you'll be instructed to collect the following pieces of information from Google that you'll paste into the Google Drive Configuration tool in Campus:
- District’s Google Workspace For Ed Domain Name
- API Key
- OAuth 2.0 Client ID
- The saved P12 file
- Service Account Email
Setup the Google Dev Console
To enable the Google Drive workflow, a project must be created in the Google Developer console. This project needs to be defined per district, because the project’s OAuth credentials specify authorized JavaScript origins (which vary per district) and because Google enforces limits on how many requests each project is allowed to make in a given day. Keeping it district-specific allows more requests for that district.
A Google user must own the project. This user should be a district administrator for the Google Workspace For Ed account. Some screenshots in this document are taken from a demo Google Workspace For Ed domain.
Step 1. Go to the Google Developers Console
The first step is to go to the Google Developer Console and log in: https://console.developers.google.com/start
Step 2. Create a New Project
Create a new project from the Select a project dropdown list found in the upper left-hand corner of the screen. Give your project a meaningful Project Name, which is displayed in the Google Dev Console. Select an Organization and Location. If there is already an existing project, that project's name displays instead of "Select a project". In that case, click the project name dropdown list and select New Project.
Once you click Create, the page should refresh within a few seconds with your project name selected at the top. If you still see "Select a Project", open the dropdown list, select the project you just created, and click Open.
Step 3. Disable Default APIs
In the sidebar on the left, expand APIs & Services and click Enabled APIs & services. The list of Enabled APIs includes several automatically enabled APIs. These are not used for Google Drive integration so they can be ignored or disabled by selecting the entry and clicking Disable API.
Step 4. Enable Drive and Google Picker
From the Enabled APIs & Services screen, select +Enable APIs and Services.
In the API Library, search for and enable 2 APIs: Google Drive API and Google Picker API.
- Start by searching for the Google Drive API. The API displays below. Select the Google Drive API result and then Enable API.
- Search for Google Picker API. The Google Picker API displays in the search results below. Select the Google Picker API result and then Enable API.
Step 5. Create Credentials
Throughout this process, these instructions prompt you to record certain fields to enter in the Google Drive Configuration tab in Campus.
- Expand the left menu again by clicking the
 menu and click APIs & Services and then Enabled APIs & services.
 - In the sidebar on the left, select Credentials to create an API Key, a OAuth 2 client, and a Service Account.
 menu and click APIs & Services and then Enabled APIs & services.
 API Key
- On the Credentials screen, click Create credentials and then API Key. Click the 3 dots menu button and then Edit API key.
- Under Application restrictions, select Websites.
- Click Add.
- Enter the first part of the district's Infinite Campus URL, starting with https:// up to the top-level domain (such as .com or .edu).
- Click Done and then Save. The entry you created displays.
- Select Show Key to show the API Key.
Record this Key to include in the information entered on the Google Drive Configuration tool in Campus.
Configure Consent Screen
- From the left menu, click Configure consent screen. This screen asks users if they agree to allow data sharing with their district’s Infinite Campus instance.
- For Application type, mark Internal.
- Enter a name in the Application name field, such as "Infinite Campus Google Drive Integration".
- Under Authorized domains, enter your district's Infinite Campus URL without https:// and up to the top-level domain (such as .com or .edu).
- Click Save.
OAuth 2.0 Client ID
- Click Create credentials again and then OAuth client ID. If you have not yet configured the Consent Screen, you will be prompted to do so. See the Configure Consent Screen section above for more information.
- Select an Application Type of Web application.
- You can leave the default Name value or modify it if you prefer.
- Under Authorized Javascript origins, select Add URI. Enter the first part of your Infinite Campus URL, starting with https:// and up to the top-level domain (such as .com or .edu). (Do not include trailing / or /campus path. If running on a non-standard port, the port number must also be included, ex: http://mydistrict.com:8080/).
- Click Create
Your Client ID and Client Secret display. Record the Client ID to enter in the Client ID field on the Google Drive Configuration tool in Campus. This is the OAuth 2.0 Client ID. You do not need to record the Client Secret.
Service Account
- Click Create credentials again and then Service Account key. Enter a Service Account Name and click Create and Continue.
- Click Select a role and choose a Role of Editor. Then click Done.
- Return to the Credentials screen and click the edit pencil icon next to the Service Account you just created.
- Click the Keys tab and then Add Key and Create new key.
- In the pop up that displays, mark P12 and click Create. Do not select JSON.
- Copy this file and save it. This file is uploaded to the Configuration tab. This is called the Service Account Key in Campus. Campus recommends saving this file in a secure location you'll be able to access in the future, in case the file needs to be reuploaded at some point.
- Click the arrow at the top left to return to the Credentials screen.
- Select the Manage Service Accounts link on the right-hand side of the screen to access the Service Accounts screen.
- Copy the Service Account Email to enter into the Google Drive Configuration tool in Campus.
- Under the column OAuth 2 Client ID, a numerical value of about 21 characters displays. Copy this value by hovering over it and clicking Copy to Clipboard. This is the Service Account Client ID and will be used later.
Step 6: Authorize the Service Account Client ID
- Open a new browser tab and navigate to admin.google.com.
- Click Security.
- Scroll down to API controls.
- Select Manage Domain Wide Delegation
- Select Add New and enter the following information:
- In Client Name, enter the Service Account Client ID you copied at the end of step 5.
- In One or More API Scopes, enter: https://www.googleapis.com/auth/drive
- Click Authorize. Verify that the values you entered display correctly.
Step 7: Configure in Campus
Return to the Google Drive Configuration tool in Campus and paste in the values you've collected during the configuration process. Click Save when finished and use the Validate button to verify that the connection is working.
Multiple Domain Accounts
To configure Google Drive Integration for a Google Workspace account with multiple domains, click Use Multiple Domains. Fields for an additional domain display, as well as options to add more domains.
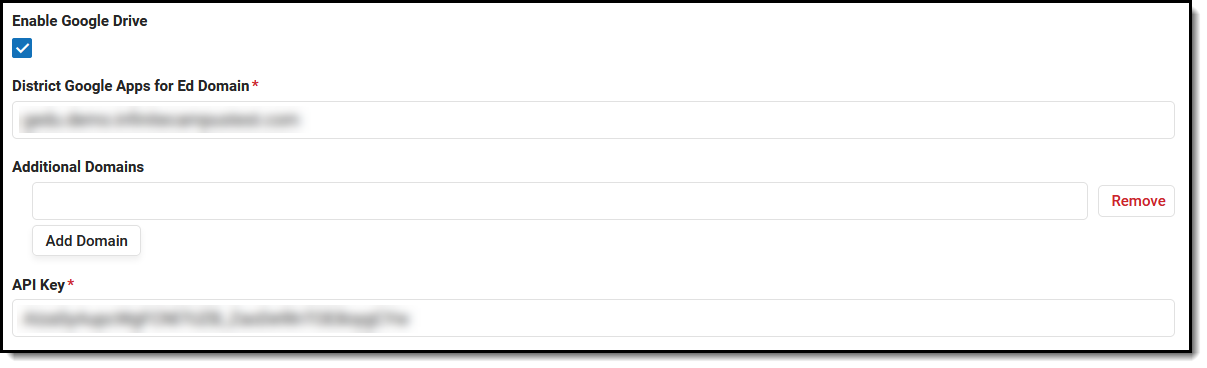
Adding Additional Domains
Enter any additional domains beyond the primary domain. Click Save when finished.
Disable Google Drive Accounts
To disable a configured account, unmark the Enable Google Drive checkbox and save the record.
Validate
Click Validate to log in to a Google Workspace for Education account and verify that the configuration was successful.
Tool Search: Google Drive Preferences
In the Preferences tab, select which schools should have access to the Google Drive options in their assignments.
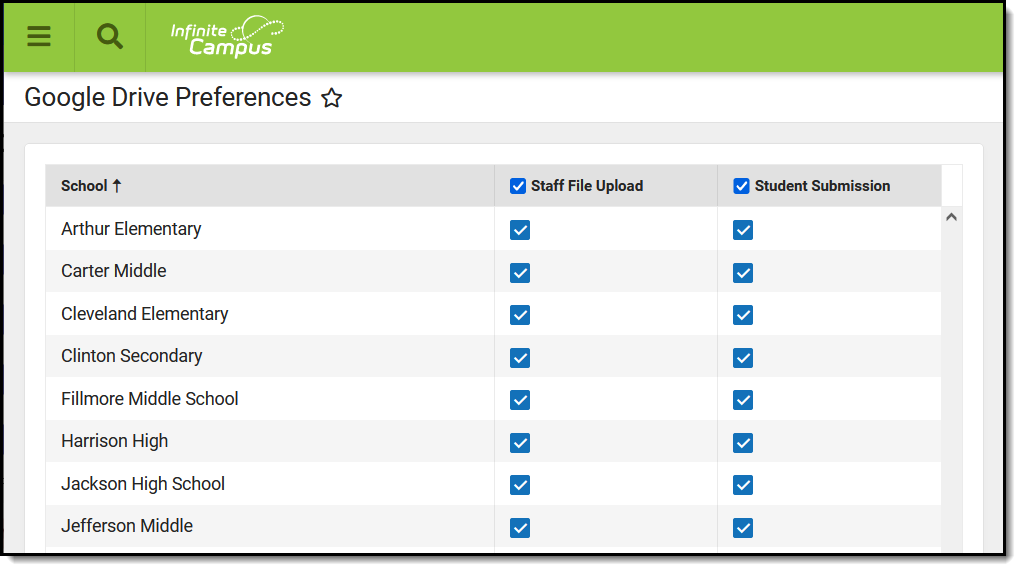
Google Drive Preferences
See the Instruction Settings Tool Rights article for more information.
Allow teachers to upload files from Google Drive to assignments, allow students to submit Google Drive files for assignments through the Portal/Campus Student, or both. Click Save when finished.
Teachers must be given the Google Drive tool right in Campus Instruction to have access to these options.
Save
Save
Using Google Drive Preferences, administrators can select which schools should have access to Google Drive integration options. This video will demonstrate how to establish Google Drive preferences for school districts.
Google Drive Integration
Using Google Drive, teachers can attach files to assignments and resources and receive Google Drive student submissions.
Google Drive integration is available as part of the Campus Learning Suite premium offering and requires the Enhanced Curriculum tool right. Visit the Campus Learning Suite page to learn more.
To use this option, your district must configure Campus to connect to a Google Apps for Education account through the Google Drive tool.
Using Google Drive, teachers can attach files to assignments and resources and receive Google Drive student submissions. This video demonstrates how to manage Google Drive Integration for an assignment.
Digital Repository Preferences
The Digital Repository provides districts with storage space to save uploaded documents. From Preferences, administrators can set digital repository preferences for the entire school district.
Tool Search: Digital Repository Preferences
Digital Repository Preferences allow you to control which tools have document upload functionality, modify the cache, and limit the file size allowed for uploads. They also provide a detailed breakdown of your district's cost (based on total usage) and a useful pie chart to better understand your district's usage per Infinite Campus location.
With the end of June 2025 release (Campus.2527), CDR on-premise hosting will be transitioned to an off-premise cloud-based solution.
To maintain uninterrupted access to CDR, all districts still using the CDR on-premise repository will be automatically migrated to the CDR off-prem repository starting with the end of June release. CDR functionality is not impacted during migration and remains the same after the migration.
Prior to the end of June release, CDR on-premise districts should review and accept the latest terms and conditions by selecting the Change CDR Hosting button

Click here to learn more about our off-premise CDR storage.
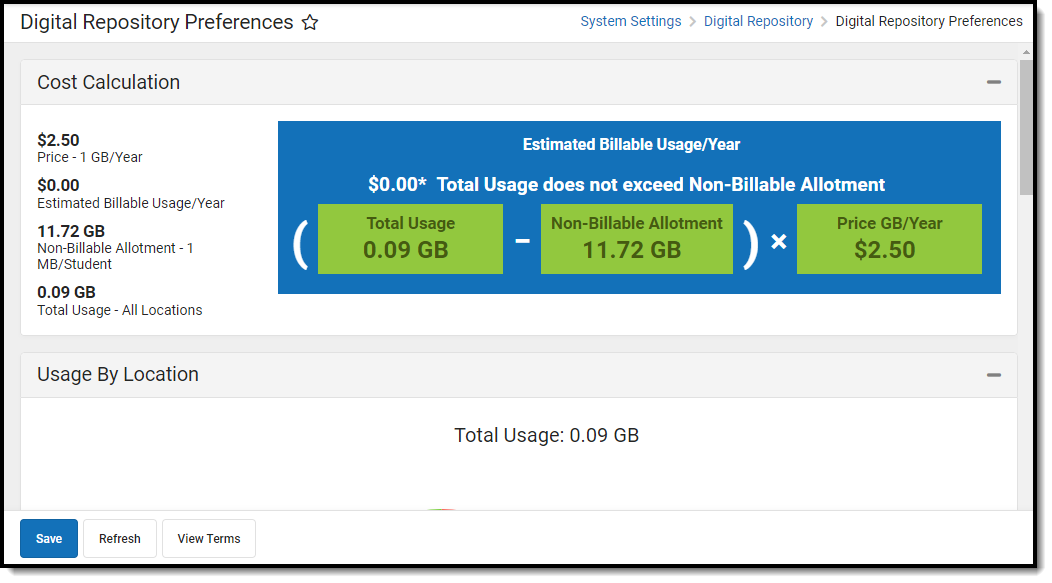
See the Digital Repository Tool Rights article for details on available tool rights.
Enable Campus Digital Repository
To begin using Campus Digital Repository functionality, authorized district personnel can select the Enable CDR button.
The Acceptance of CDR editor will appear, requiring you to click View Terms and read all terms and conditions, mark all three checkboxes indicating you agree to each of the terms listed for each checkbox, and select the I Accept button.
Enabling CDR allows your district 1MB of storage space per student at no cost. The student count used is your state-reported student number. Read the Terms of Service to see additional costs for using space beyond your free amount.
Please allow up to 24 hours for your free storage allocation to be calculated.
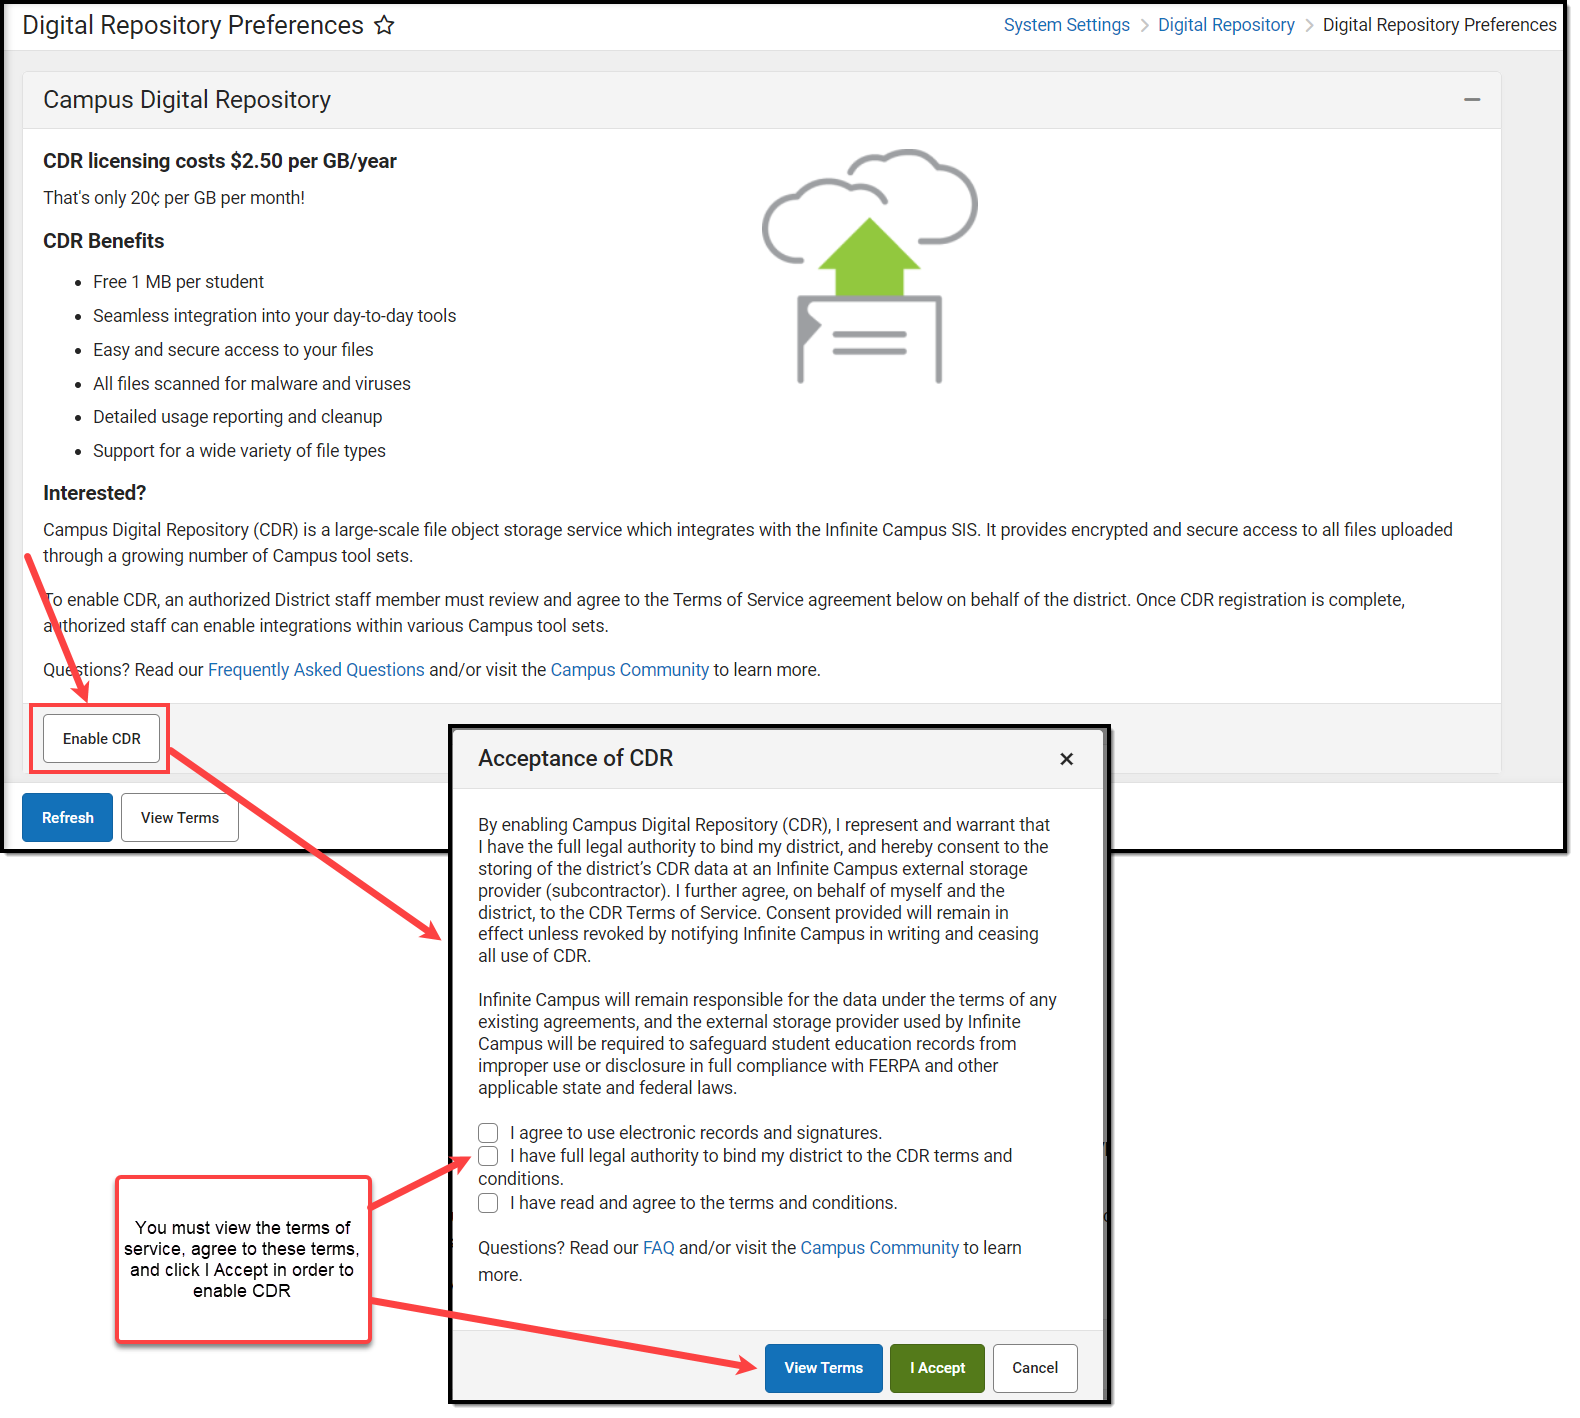
Understand the Cost Calculation
The Cost Calculation section details your district's current estimated cost per gigabyte per year, your estimated billable usage, your non-billable allotment, your total space usage across all of Infinite Campus, and a display of the calculation (using real-time numbers) of how Infinite Campus determines your Estimated Billable Usage for the year.
The non-billable allotment is determined by the district’s count of state-funded students. Annual usage is calculated as the average of monthly values.
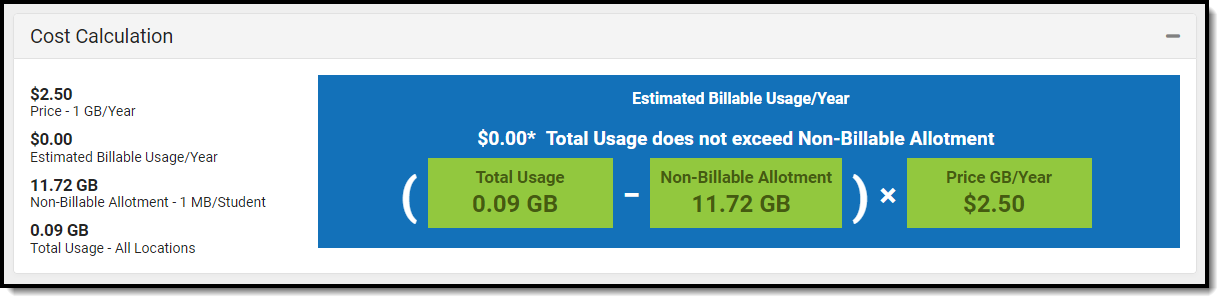
Usage by Location
The Usage By Location pie chart displays how much space is being used by uploaded files per area of Infinite Campus. This chart is useful for understanding where the most data is being used and can serve as guidance on potential cleanup when needing to free up space.

Set File Upload Preferences
The Cache Size is the amount of space available on the district's local repository instance, and the setting is used to support system performance. Five GB is the recommended Cache Size, but options are 1, 5, and 10. Contact Infinite Campus Support if your district's needs exceed the allowed amount.
The Max File Size field allows you to control the maximum size allowed per uploaded file. This field allows for a range between 1 - 100mb.
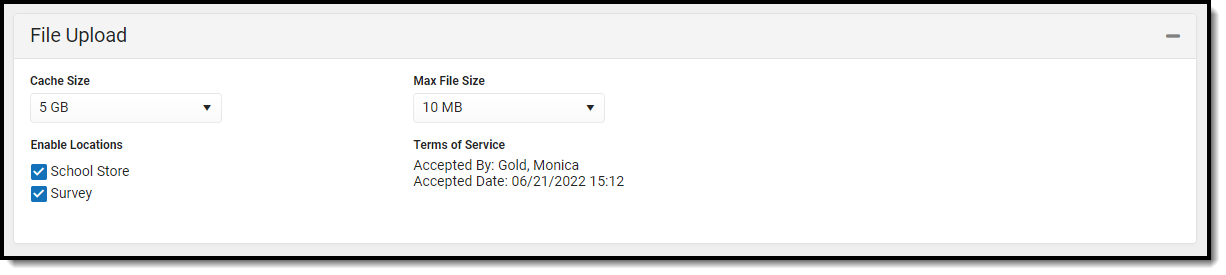
Common File Sizes
The following information can be used as a reference for common file sizes. Files that include images are commonly larger than those that don't.
- 1000 KB = 1 MB
- 1000 MB = 1 GB
File Type |
Size |
|---|---|
2-page Word document |
Less than 20 KB |
20 slide PowerPoint |
Roughly 1 MB |
25 page PDF |
Roughly 2 MB |
1 MP3 |
Roughly 3-6 MB |
Enable Campus Digital Repository Per Module/Tool
Use the table below to better understand how each Digital Repository preference functions within Infinite Campus.
| Module | Toggle and Explanation |
|---|---|
| School Store | Enabling this option allows you to upload images for display of each item within a School Store.
Infinite Campus highly recommends enabling this option when using the School Store. 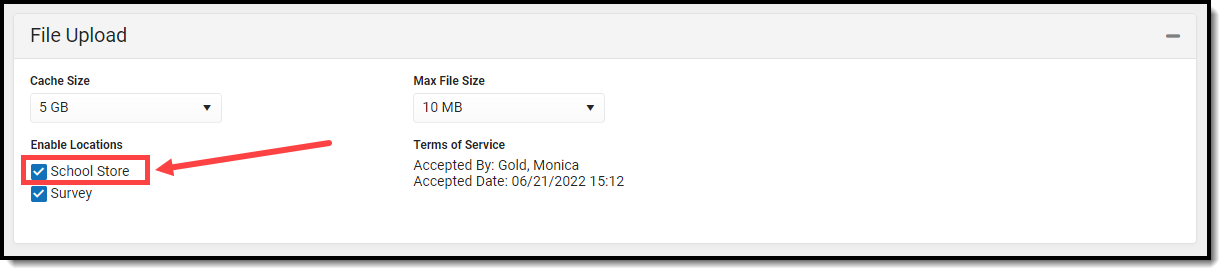 |
| Activity Registration | Enabling this service allows you to enable and disable the document upload feature in the Activity Registration. After the service is turned on, administrators can select the option to allow uploading files when purchasing an activity.
If Campus Digital Repository is disabled (either at the Activity Registration location or the specific post location), activities will become inactive (the step 4 "Active" checkbox will be unchecked) and cannot be re-checked until Campus Digital Repository is re-enabled. Once Campus Digital Repository is re-enabled, you will need to manually check the "Active" checkbox to allow the activity to go live again.  |
| Survey | Enabling this option allows files (such as images, signatures, etc) to be uploaded to surveys via the Survey Designer tool.
NOTE: Survey Designer options that utilize file upload capabilities are part of the Campus Analytics Suite 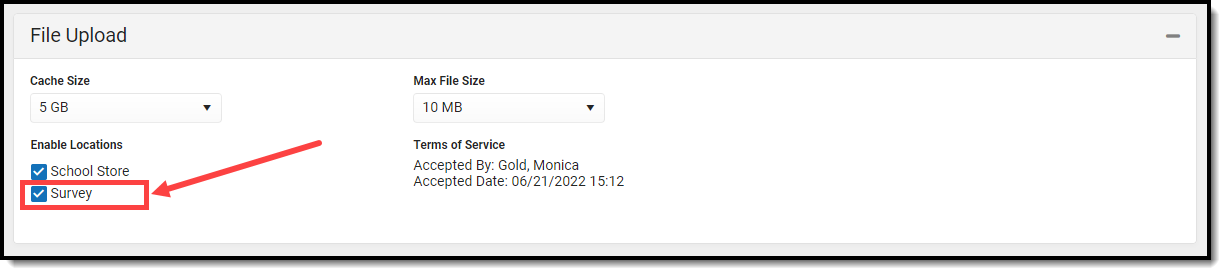 |
| Behavior | Enabling these options adds a Manage Files button to behavior events and incidents, allowing behavior administrators to attach files to them. See this document for more information. This does NOT add a documents button to the top of any Behavior tools.
To enable document attachment functionality, mark the Enable checkbox, mark the checkbox next to each tool that should allow files to be attached, and click Save.
File attachments can be added to student behavior records in the following tools:
|
| Campus Communicator | Enabling Inbox / Email - Inline Images allows users to embed images directly into the message body in Messenger 2.0. Enabling Voice/Text allows Messenger with Voice customers to upload .wav files for use in voice messages.  |
| Person | Enabling these options allows documents to be attached to various person-related tools, including Custom Tabs.
To give users access to the document upload feature, mark the Enable checkbox and then mark the checkbox next to the tool(s) where the Documents button should appear, and click Save.
All documents uploaded via any of the Person tools listed are visible in Person Documents.
To use the Document feature, users must have tool rights to the tool in which the Documents button appears. Read/Write (RW) rights allow users to view the document, edit details (description and file name), and replace a file. Add (A) rights allows the user to upload a new document and Delete (D) allows the user to delete a document.
Clearing the checkbox next to the tool disables the user's ability to upload documents and hides the Documents button. Previously uploaded documents are NOT removed. Removing document attachment functionality only disables the user's ability to add additional documents. |
| Meetings | Enabling this option allows counselors to attach files to meetings.
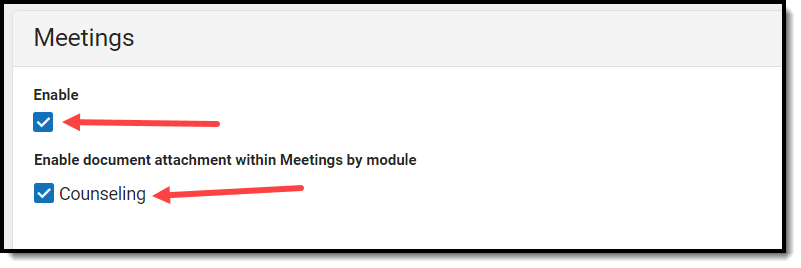 |
| Campus Learning | |
| Discussion | Enabling this option allows moderators to set up discussions that allow participants to attach files to their posts.
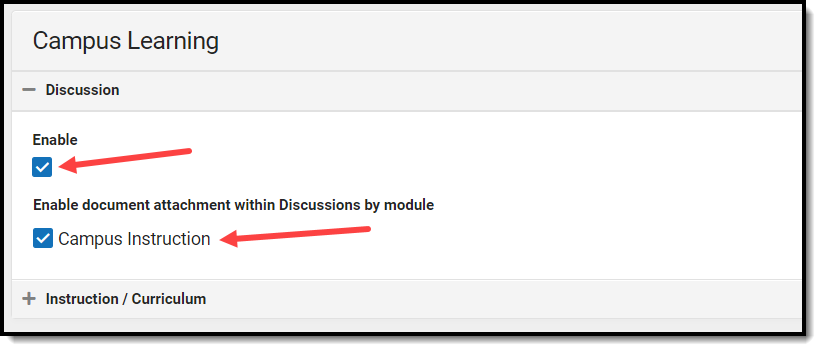 |
| Instruction/Curriculum | When this option is enabled for a school, teachers have the option to allow students to submit assignments via the Campus Student Portal.
If you are a teacher, see the Enabling Submissions article for directions about using the repository to create assignments for submission on the portal, viewing student submissions, and responding to student submissions.
Marking the Staff File Uploads checkbox allows staff to upload files within Instruction/Curriculum tools. 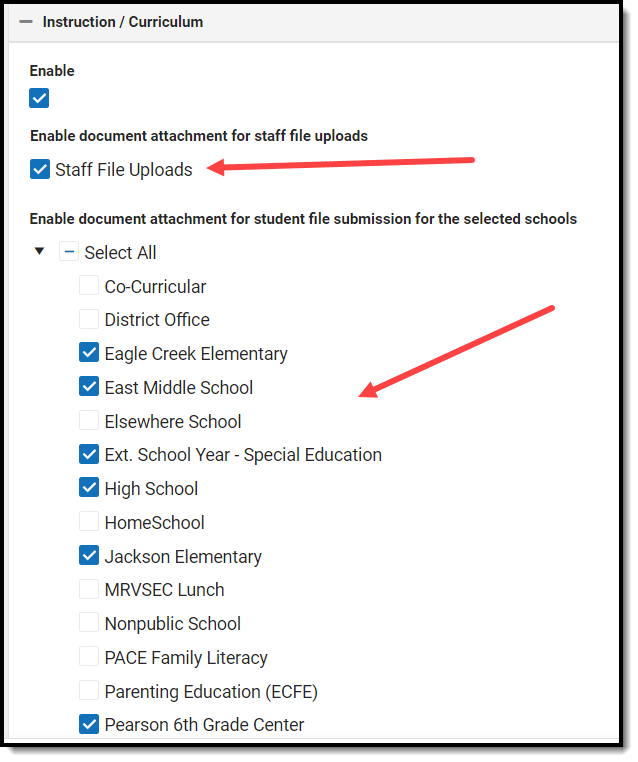 |
| Groups | When this option is enabled for a school, participants in a group can add file attachments and images to posts and replies. 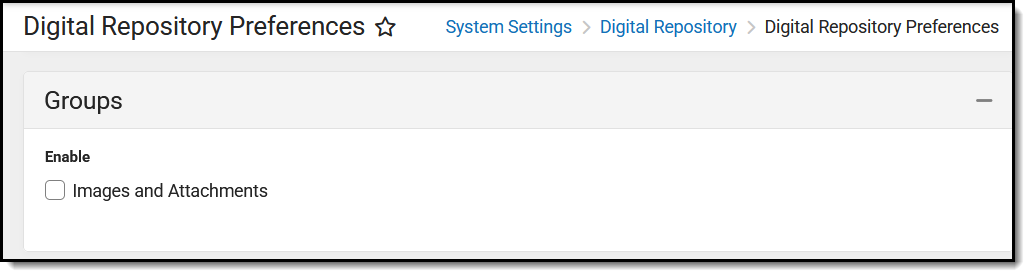 |

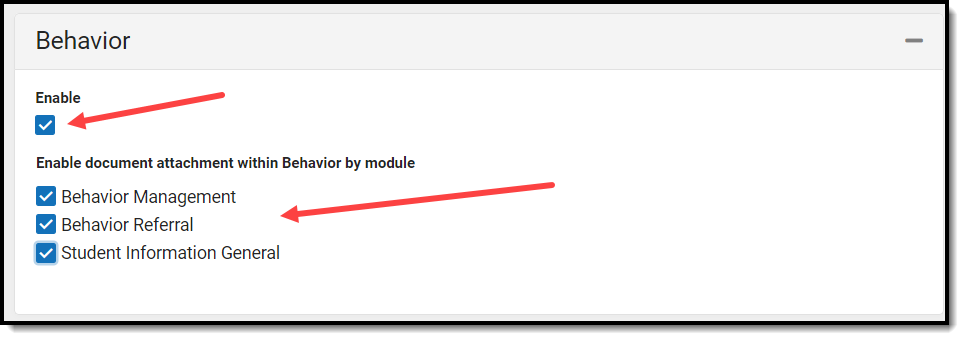
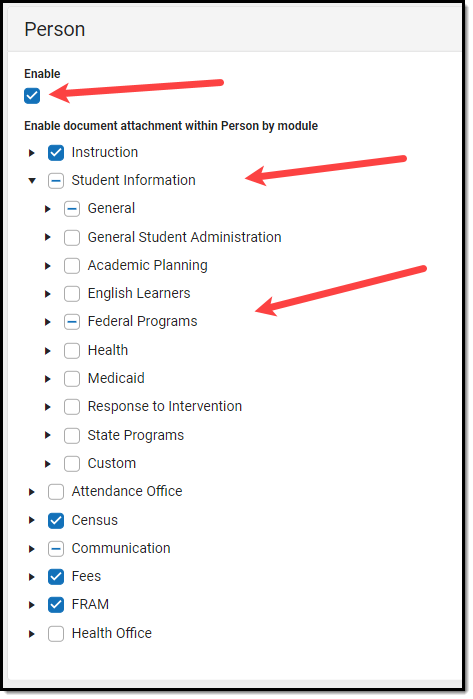
Supported File Types
Digital Repository allows for the upload of all file types except for the extensions listed below.
You cannot upload a document with a file name containing one or more of the following illegal characters: | , [ ] { } ( ) ! ; " * ? < > : / Tab, LF, CR
Periods are allowed except at the end of the file name, creating two or more periods before the extension (i.e., testFile..jpeg)
The following file types cannot be uploaded to the Digital Repository:
Excluded File Types |
|---|
_exe, a6p, ac, acr, action, air, apk, app, applescript, application, awk, bas, bat, bat, bin, cgi, chm, class, cmd, com, cpl, crt, csh, dek, dld, dll, dmg, docm, dotm, drv, ds, ebm, elf, emf, esh, exe, ezs, fky, frs, fxp, gadget, gpe, gpu, hlp, hms, hta, hta, icd, iim, inf, ins, inx, ipa, ipf, isp, isu, jar, java, js, jse, jsp, jsx, kix, ksh, lib, lnk, mam, mcr, mel, mem, mpkg, mpx, mrc, ms, msc, msi, msp, mst, mxe, obs, ocx, pas, pcd, pex, pif, pkg, pl, plsc, pm, potm, ppam, ppsm, pptm, prc, prg, pvd, pwc, pyc, pyo, qpx, rbx, reg, rgs, rox, rpj, scar, scf, scpt, scr, script, sct, seed, sh, shb, shs, sldm, spr, sys, thm, tlb, tms, u3p, udf, url, vb, vbe, vbs, vbscript, vdo, vxd, wcm, widget, wmf, workflow, wpk, ws, wsc, wsf, wsh, xap, xlam, xlm, xlsm, xltm, xqt, xsl, zlq |
The Digital Repository Preferences tool allows districts to manage settings for the Campus Digital Repository, including storage space, maximum file size, and the areas throughout Campus where file upload is enabled.
Existing Campus Digital Repository users can now switch their hosting model from on-premise to off-premise.
Off-premise hosting provides a highly available, reliable, and secure way to store and transmit your files within Campus. See this section for more information.
In the July 2025 release of Campus, access to the Campus Digital Repository will be disabled for districts who are still using the on-premise object repository.
In preparation for this change, a series of notifications will be sent to Campus administrators of districts who need to migrate their CDR accounts off-premise. A Process Inbox message is sent to all users with the SIS Product Security role or who have tool rights to the Digital Repository Preferences tool. The message instructs users to visit the Digital Repository Preferences tool and switch their CDR account to off-premise. An additional message is sent every two weeks until the CDR hosting model for their account is updated.
Switch to CDR Off-Premise
Customers who have already enabled and are using Campus Digital Repository services now have the option to change their hosting from on-premise to off-premise. Off-premise hosting provides numerous benefits, including:
- File replication across multiple geographically distant availability zones.
- 99.99999999999% durability.
- 99.99% availability.
Switching to off-premise hosting does not change or modify the user experience within Campus, and your existing files are seamlessly migrated without any work or intervention required.
To make the switch, click the Change CDR Hosting button, agree to the terms, and get started!
If you do not see the Change CDR Hosting button, your district already uses off-premise CDR hosting.
NOTE: Off-premise hosting is not available for BIE customers.

Manage Learning Interoperability Connections
The Learning Interoperability tool allows district administrators to manage and configure OneRoster and Learning Tool Interoperability (LTI) connections.
Full functionality of tool is available as part of the Campus Learning premium offering. Without Campus Learning, districts can only create connections using Roster Sync. All other types of connections require Campus Learning, including Grade Book Sync and Score Passback.
Tool Search: Digital Learning Applications Configuration
The Digital Learning Applications Configuration tool allows districts to configure OneRoster and LTI connections. Each application the district has connected to displays in a tile, with a ![]() indicating digital learning partners. Connections to partners are supported by Campus. A yellow icon indicates that the partner is at risk of no longer being supported and a red icon indicates that the partner used to be supported but is not anymore.
indicating digital learning partners. Connections to partners are supported by Campus. A yellow icon indicates that the partner is at risk of no longer being supported and a red icon indicates that the partner used to be supported but is not anymore.
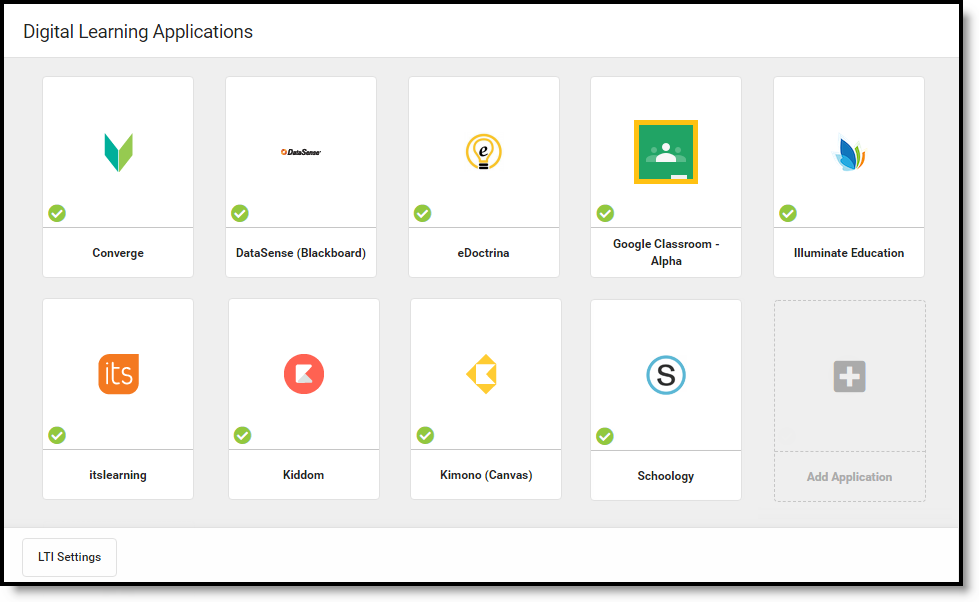
The Digital Learning Applications Configuration tool lists Digital Learning Applications that the district has enabled.
See the Instruction Settings Tool Rights article for more information.
Icon Legend
The following icons indicate the vendor's status in the Infinite Campus Digital Learning Partner Program.
 indicates a member of the partner program.
  indicates a vendor is out of compliance with the Digital Learning Partner Program.

 indicates a vendor is out of compliance with the Digital Learning Partner Program.
Click on a vendor to view any additional information provided by Campus. These icons are for informational purposes and do not affect the connections themselves.
What's the difference between LTI and OneRoster?
OneRoster connections allow vendors to request section and roster data from Campus and send assignment, score, and grade data to Campus. LTI connections allow teachers to integrate learning tools with assignments. Students access these tools through Campus Student and scores are received into the Grade Book where available.
LTI connections are used by teachers who manage assignments and grading in Campus. In comparison, OneRoster connections are helpful for teachers who manage assignments and grading outside of Campus; a OneRoster connection with grade book sync brings assignment and score data from an external program into Campus, where grades can be posted to report cards and students and parents can track progress through Campus Student and Campus Parent.
Most vendors offer either LTI or OneRoster connections, but some support both.
What kinds of connections are available?
Click Add Application and select a vendor to see what functions are available for each vendor. Lozenges on the right indicate which functions are available and which have been enabled.

Plain black lozenges indicate available functions; green with a checkmark means the function is enabled for that vendor.
See the Types of Digital Learning Application Connections article for more information about the types of connections available.
What is a "supported" vendor?
Connections to vendors who are part of the Infinite Campus Digital Learning Partner Program are "supported" vendors. Supported connections allow for access to more data, and Campus provides an increased level of support and troubleshooting.
See the Supported and Unsupported Connections article for more information.
I don't see my vendor.
Does your district use an LMS or other vendor who is not part of the Infinite Campus Digital Learning Partner Program? You can create a connection to the vendor, but be aware that Campus does not support these connections; Campus Support will not be able to help troubleshoot. A vendor would also not display in this tool if they were previously a Digital Learning Partner but were removed from the program.
See Connecting to Non-Partner Vendors for more information.
Have a vendor you think Campus should partner with? Share this form with the vendor.
I don't recognize this vendor.
 Do you see this vendor in your list? If a district had existing OneRoster connections when Campus released this Learning Interoperability tool, Campus matched connections with recognized vendors based on the name entered by the district. If Campus couldn't determine the vendor based on the name entered, those connections were put here in 'Other OneRoster Provisioning Credentials.
Settings & Management
The Settings and Management panel includes identifying information for your district's instance of Campus in the LTI Settings section.
The OneRoster Settings section includes the following options:
- Use Secondary Email addresses for OneRoster 1.1: Since an email address is required for all students and teachers in a OneRoster connection, this option allows districts to use the Secondary Email entered in Demographics for all user accounts.
- Use Local Grades for OneRoster 1.2: If set to No, the CEDS/NCES grade level that a local grade level is mapped to is returned. If set to Yes, the local grade levels are returned. This option applies to all OneRoster 1.2 connections at the district.
- OneRoster Daily Cache Refresh Time: Users also have the option of setting a different time for the daily cache refresh. By default, a time of 10:10pm is entered. If desired, set a custom time to refresh for your OneRoster connections. Off-peak times are recommended. See the OneRoster API article for more information.
- Last Successful OneRoster Cache Refresh: The date and time of the most recent successful refresh of the cache.
Click Refresh OneRoster Cache to trigger a manual refresh. The refresh begins two minutes after clicking Refresh OneRoster Cache. A refresh cannot be triggered if one is in progress. A process alert is sent when the refresh is complete.
See the OneRoster Cache article for more information about how OneRoster data is cached.
Configuring LTI Connections
This tool is available as part of the Campus Learning premium offering.
Location: Digital Learning Applications Configuration > click a specific application > Add LTI Connection
LTI (Learning Tool Interoperability) connections allow districts to establish connections with other learning tool providers and integrate those tools with assignments.
LTI connections differ from OneRoster connections. OneRoster connections allow applications to request section and roster data from Campus and send assignment, score, and grade data to Campus. LTI connections allow teachers to integrate learning tools with assignments. Students access these tools through Campus Student and scores are received into the Grade Book where available.
URL Updates
If your district's URL has been updated as a result of hosting changes, existing LTI connections must be auto-configured. See Updating URLs After a Hosting Platform Change for more information.
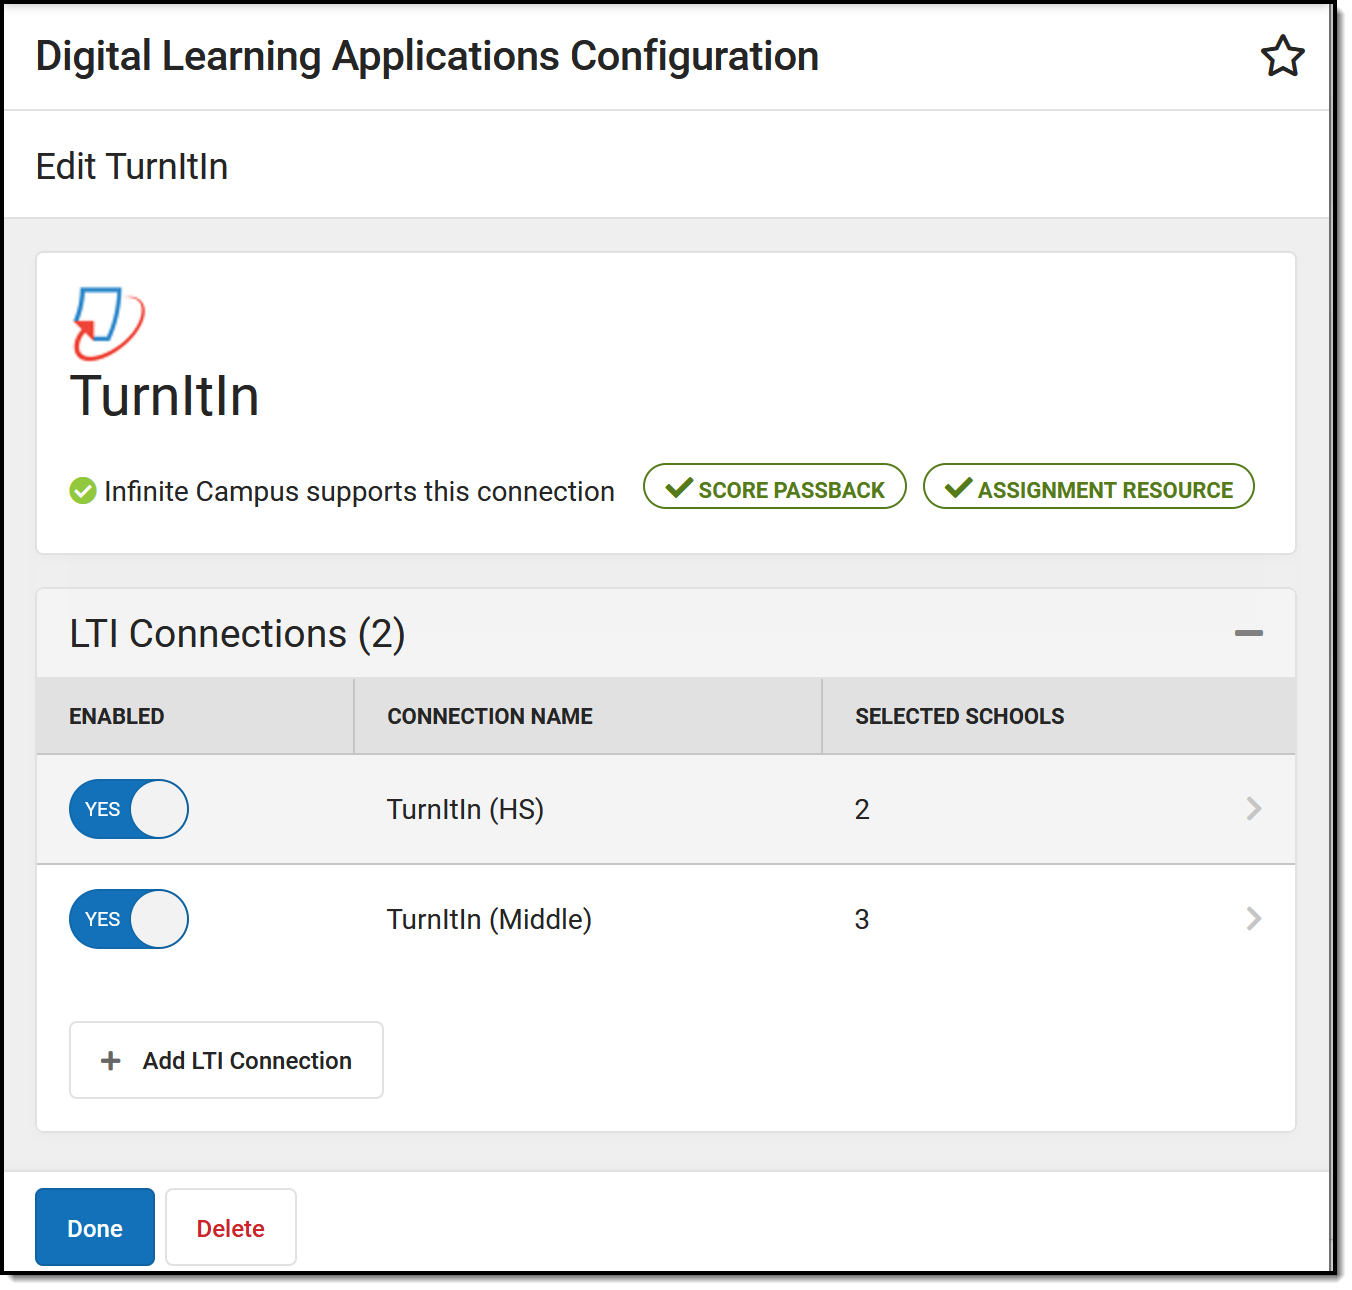 Configure LTI connections to external learning tool applications.
Digital Learning Applications Configuration tool rights grant full access to this tool.
Types of LTI Connections
The lozenges at the right of the screen indicate what types of connections are possible for the partner and which have been enabled by the district.
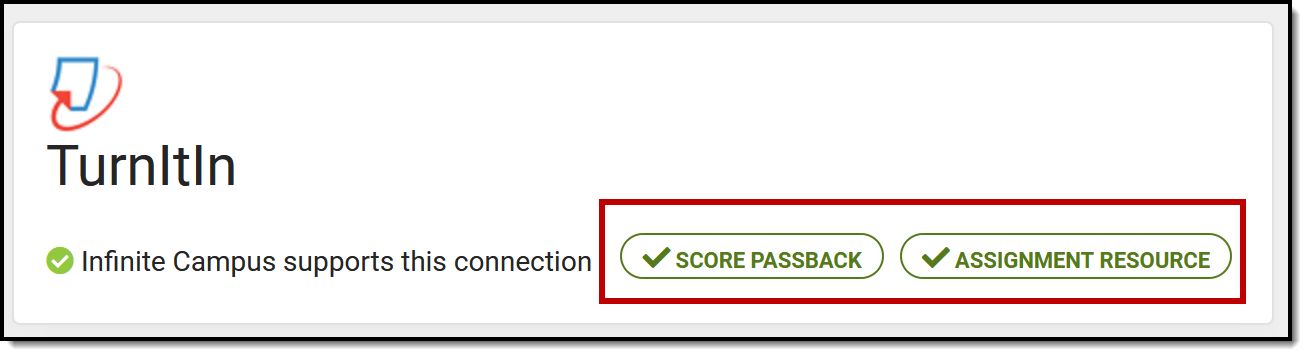 Lozenges indicate available and enabled functions.
Connections with ![]() enabled display in the Learning Tools list for teachers, students, and parents (if configured). Specific pieces of content from the partner program can also be aligned to assignments.
enabled display in the Learning Tools list for teachers, students, and parents (if configured). Specific pieces of content from the partner program can also be aligned to assignments.
Connections with ![]() enabled allow teachers to integrate an assignment in an external application with a Campus assignment, score assignments in the external application, and have those scores display in their Campus grade book. This type of connection requires an extra level of security. See the More Information about Score Passback section at the end of this article.
enabled allow teachers to integrate an assignment in an external application with a Campus assignment, score assignments in the external application, and have those scores display in their Campus grade book. This type of connection requires an extra level of security. See the More Information about Score Passback section at the end of this article.
Connections with  enabled allow teachers to align resources from the application with a Campus assignment, which students can then access through Campus Student.
Connections with  enabled allow teachers to embed an image from the application in the Summary of an assignment, which students can then view in Campus Student.
Lozenges that are black without a checkmark indicate that a type of connection is available for the partner but has not been enabled by the district.
Enabling an LTI Connection
Select the partner to enable or click Add Application to select from the list of Campus-supported partners. Expand the LTI Connections section and click Add LTI Connection.
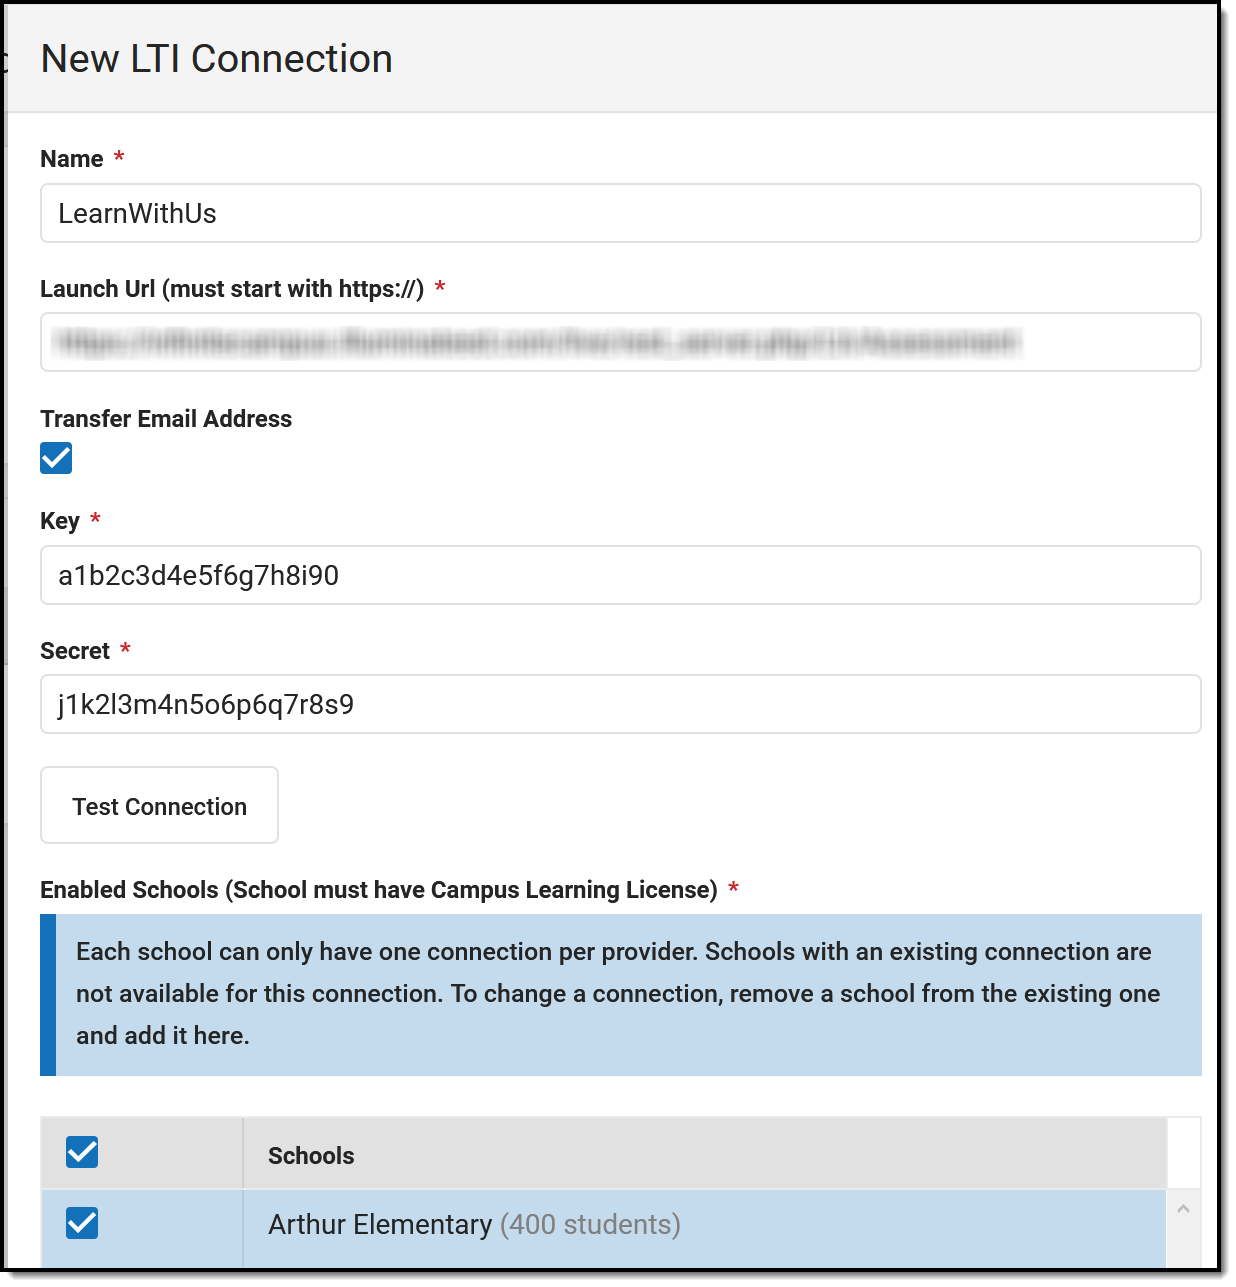 Enter required data for a connection and select schools.
- The Name is specific to the connection, modify if desired. If an application has multiple connections, it may be wise to differentiate the names of the connections.
- The Launch URL and Transfer Email Address settings are populated by default, based on Campus settings. These fields will likely not need to be modified.
- Enter the Key and Secret provided by the partner, which allows Campus users to connect the partner program.
- The
 button attempts to make a connection with the application using the information provided. Note: the user performing the test should have an email address entered on the Demographics tool to perform the test.
 - Modify the Enabled Schools list if desired. All schools are selected by default. Unmark the checkbox next to any schools that shouldn't be included in the connection.
- Under Include in Learning Tools List, mark Campus Parent and/or Campus Student to add the partner to the Learning Tools list in Campus Parent or Campus Student. Only applications marked as Learning Tools can display for parents and students.
- The Advanced Settings area includes multiple configuration sections. Data populates in these sections as applicable for the application. Users should not need to modify these values at this time.
- Click Save when finished and Close to return to the partner.
Give teachers tool rights to External Learning Tools to grant access to LTI tools.
Enabling Multiple Connections for an Application
An application may have multiple connections, such as if the high schools and middle schools in a district are using different connection data. To add additional connections, click Add LTI Connection from the application page. Give each connection a unique name; by default, connection names are iterated numerically.
Each school can only have one connection per provider. When adding an additional connection, and schools selected in existing connections are not listed in the new connection.
Restore Defaults
Click Restore Defaults to restore fields to the default options provided by Campus.
More Information about Score Passback
- Only assignments scored using points can use score passback functionality. Assignments scored using marks or rubrics should not use this option.
- Most applications make the connection between the teacher in Campus and the user of the external application based on the email address entered in Demographics.
- Scores are received from the external application as percentages. The student's numerical score is then calculated using that percentage and the Points Possible entered on the assignment in Campus.
Save
Save
Save
Save
Save
Save
Save
Save
Save
Save
Save
Save
This tool is available as part of the Campus Learning Suite premium offering. Visit the Campus Learning Suite page to learn more.
The Digital Learning Applications Configuration tool allows districts to configure and manage Learning Tool Interoperability (LTI) connections. In this video you will learn how to configure an LTI connection.
Configuring OneRoster Connections
This tool is available as part of the Campus Learning premium offering.
Location: Digital Learning Applications Configuration > click a specific application > Add OneRoster Connection
OneRoster connections allow outside programs to request roster and section data from Campus and, if enabled, send assignment and score data back through the OneRoster API. These connections are helpful for users who manage assignments and grading outside of Campus, but use Campus as the source of truth for report cards and transcripts, and use the Campus Student and Campus Parent Portals to communicate with students and parents.
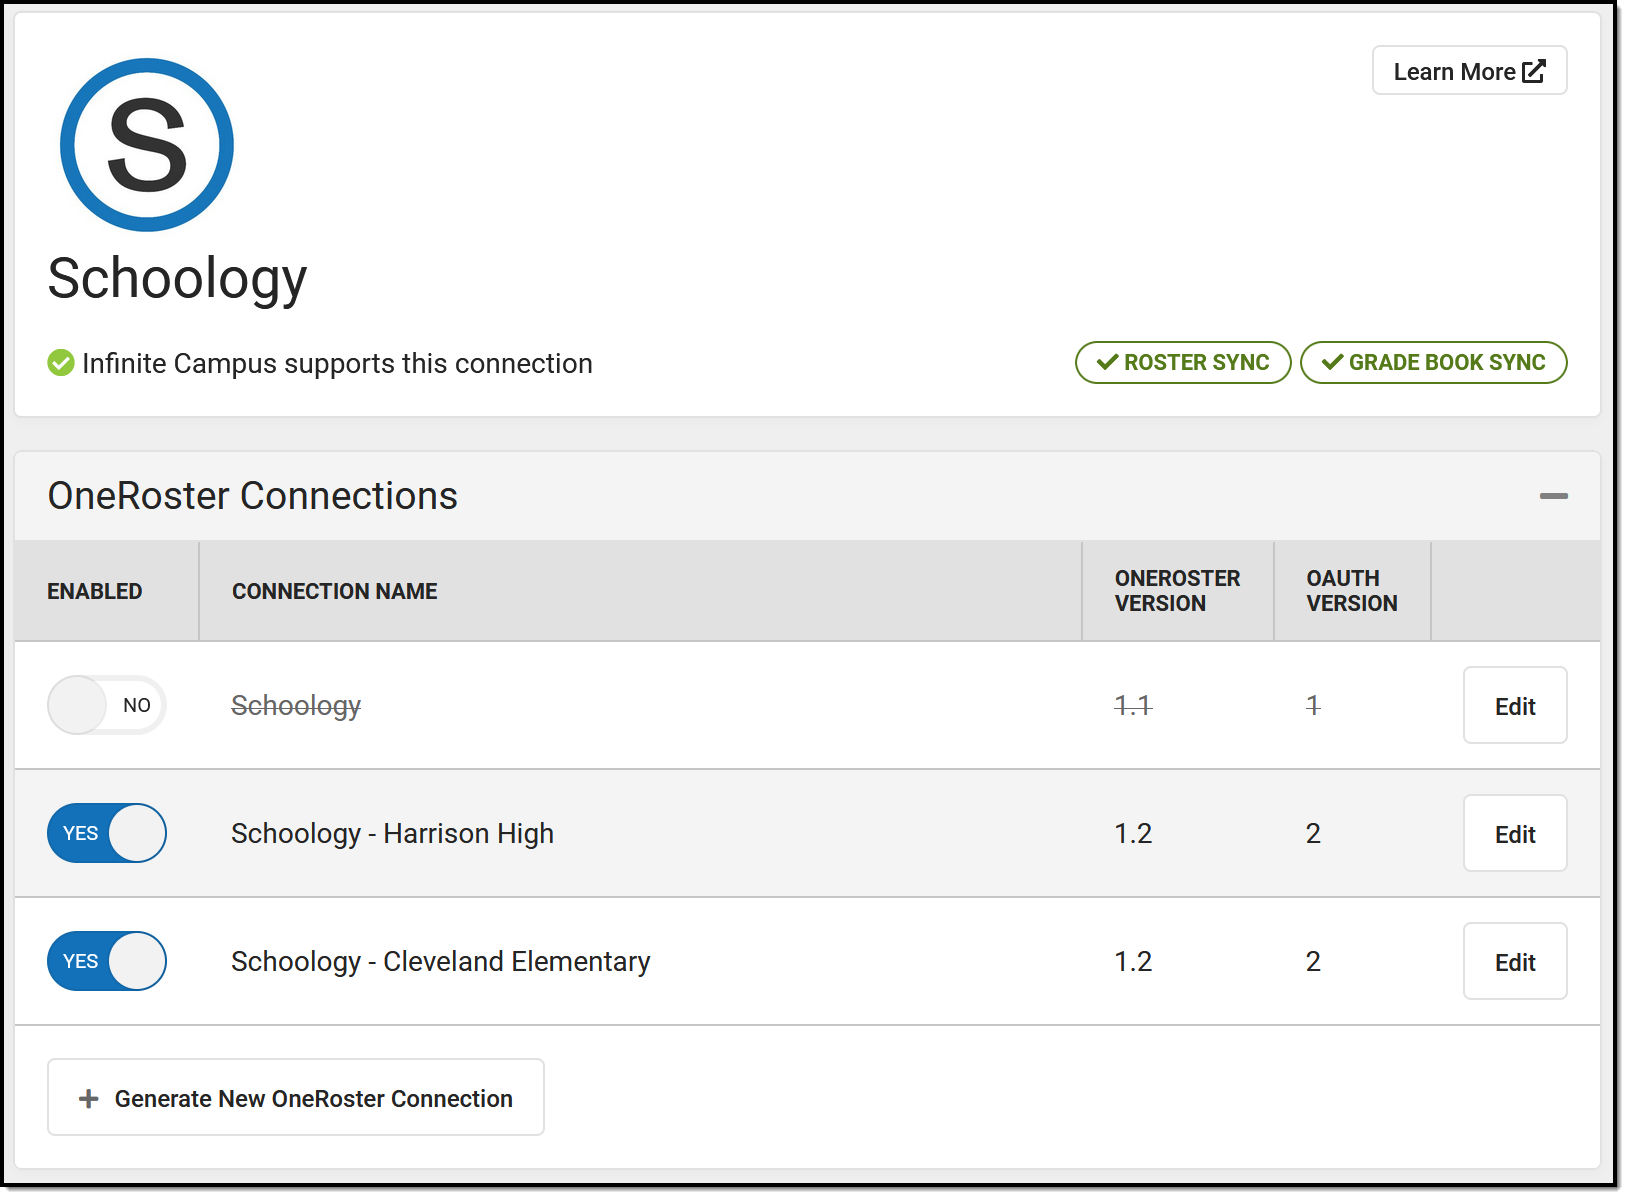 OneRoster connections indicate the version of OneRoster and of OAuth used.
Digital Learning Applications Configuration tool rights grant full access to this tool.
Types of OneRoster Connections
The lozenges at the right of the screen indicate what functions are available for the partner and what functions have been enabled by the district.
Lozenges indicate available and enabled functions.
Vendors with ![]() enabled can request section and roster data from Campus.
enabled can request section and roster data from Campus.
Vendors with ![]() enabled can send assignment and score data to Campus. This type of connection includes roster sync by default.
enabled can send assignment and score data to Campus. This type of connection includes roster sync by default.
Vendors with  enabled can send assessments and assessment scores to Campus. This type of connection includes roster sync by default.
Lozenges that are black without a checkmark indicate that a function that is available for the vendor but has not been enabled by the district.
1.1 Versus 1.2
OneRoster connections can be made through the 1.1 or 1.2 version of the OneRoster specification.
Connections to 1.2 are available on a vendor-by-vendor basis as partners implement this new version of the specification. Campus encourages districts to contact the vendors they use to inquire about 1.2 implementation timelines.
What's new with 1.2?
OneRoster 1.2 includes:
- The option to scope connections by a specific school. As described below, a vendor connection scoped to a single school or set of schools limits the roster and section data available to that vendor to only data for those schools. This option is also available for connections using OneRoster 1.1 and OAuth 2.0. Connections should be scoped to specific schools only as required by a vendor.
- Streamlined reception of assignments and scores, requiring less teacher effort. Because categories and grading tasks are included in the 1.2 version of the specification, teacher are no longer required to categorize and align assignments received through a OneRoster connection.
Enabling a OneRoster Connection to a Partner
To enable a connection, select the application from the Digital Learning Applications Configuration tool or click Add Application to select from the list of Campus-supported partners. To add an additional connection to an application that has existing connections, open the application and click Generate New OneRoster Connection.
In the pop up that displays, select the appropriate option based on the version of the OneRoster specification and the version of OAuth used by your vendor. Verify with your vendor to make sure you're selecting the correct option. Connections using OAuth 1.0 are no longer supported and can no longer be created or enabled. See the OneRoster Migration Instructions article for more information.
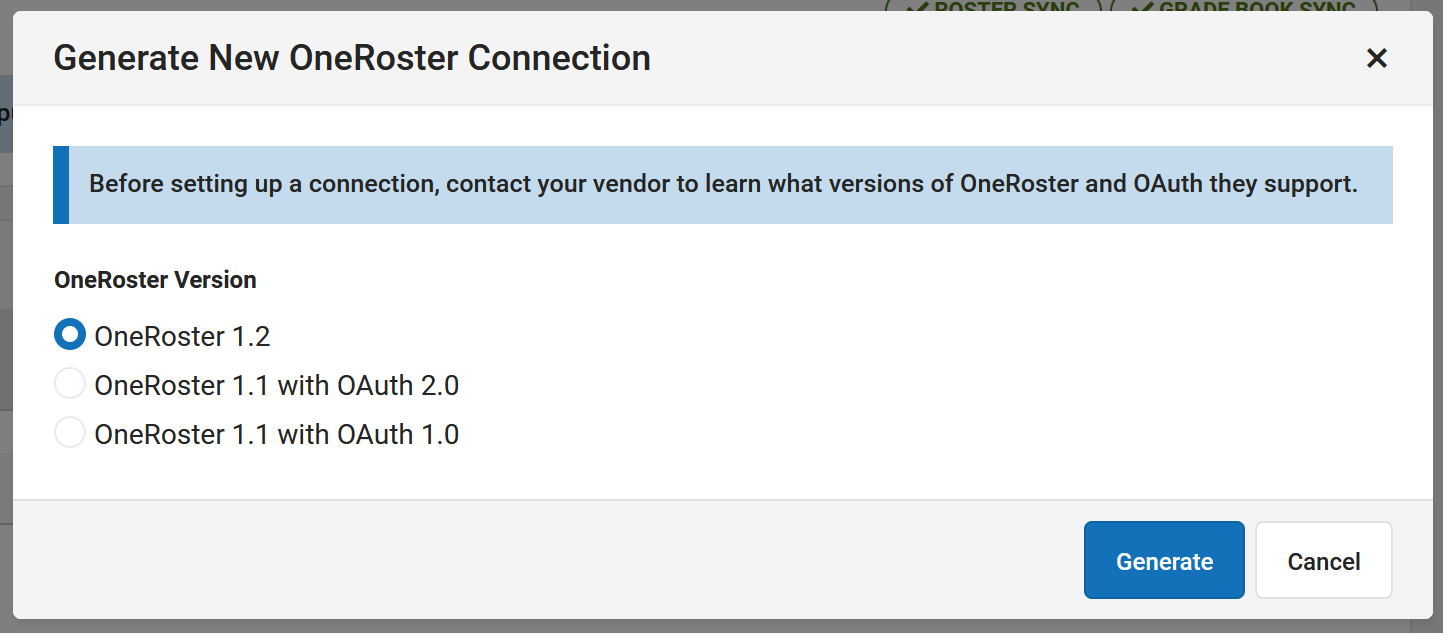 Select the appropriate option based on the versions supported by the vendor.
Once the version is selected, the Edit OneRoster Connection displays. The options on this screen vary based on the versions of OneRoster and OAuth selected.
- If desired, modify the Name of the connection. This option is helpful if your district has multiple schools connected to the same vendor - each school can have their own connection.
- Mark the lozenges for which Data to Share, Assessments, Demographics, and/or Grade Book.
- Assessment data can be received from select vendors (OneRoster 1.2 only). Select this option to allow the vendor to send assessment scores to Campus.
- Demographics data can be shared if using OAuth 2. This data is not shared by default. Enable this option to share this data with the vendor. Consult district guidelines concerning data protection and FERPA before sharing this data.
- Grade Book data is enabled by default. Disable if desired.
- An additional Identity Management option is currently available in a beta release. Vendors with this option enabled can sync email address data for students and teachers. This option is only available in some states and for some vendors.
- Delaware districts should contact Classlink for assistance in setting up this integration. Select the 'Identity Management DE' application for these connections.
- North Carolina districts should ise the 'RapidIdentity' application for Identity Management connections.
- Copy all fields in the Information to Share section and share them with your vendor to allow them to connect to your district's instance of Campus. Fields in this section differ based on which version of OAuth the connection is using. See the OneRoster API for more information that may be useful to send.
- Consult Troubleshooting Documentation as needed. For OneRoster 1.1 connections, a link to the REST Documentation Client is available. For 1.2 connections, links to the Rostering API Documentation and Gradebook API documentation are provided. These provide documentation for the API and allow users to review endpoints and retrieved data for troubleshooting and verification purposes.
| More about OneRoster 1.1 When teacher receive assignments through a 1.1 connection, they must select categories and grading alignments for those assignments so that grades can be reported. The Uncategorized Assignments and Non-Campus Assignment Defaults article provides instructions to teachers for completing this process. |
Additional Information
Below the Information to Share and Troubleshooting Documentation are three sections of additional information and options. View this information when you create the connection, or click the Edit button for a specific connection.
 View additional information about a connection by clicking Edit and expanding the relevant section.
Connection Configuration
The Connections Configuration section includes the following options for further manage data in the OneRoster API:
| 1.1 Connections | 1.2 Connections |
|---|---|
|
|
Enabled Schools
If using OneRoster 1.2 or OneRoster 1.1 with OAuth 2, the connection can be scoped by school. By default, connections are scoped to all schools in the district. If directed by your vendor, mark Use School Scoping and select which school should be included in the connection.
To disable School Scoping, unmark the Use School Scoping checkbox and click Save.
Legacy Configuration
This section includes stores legacy configuration that is no longer used for this connection.
Disable versus Delete
There are three ways to stop a connection:
Disable a connection to stop the flow of data to and from Campus until the connection is re-enabled. |
Remove credentials to remove connections using that Key and Secret. To reconnect, generate new credentials and share them with the vendor. |
Delete a connection to remove all connections to that vendor. To reconnect, click Add Application and start over. |

Connecting to Non-Partner Vendors
Districts have the option of connecting to vendors who are not part of the Infinite Campus Digital Learning Partner Program. Be aware that Campus does not support these connections; Campus Support will not be able to help troubleshoot.
![]() is not available for non-partner vendors. Additionally, lozenges do not display indicating what functions are available.
is not available for non-partner vendors. Additionally, lozenges do not display indicating what functions are available.
- Click Add Application, then scroll to the bottom and click Connect to Other Applications.
- Enter an Application Name. The image displayed in the vendor is the first letter of the entered name.
- Generate credentials and share them with the vendor to connect.
Use caution when sharing student data with vendors that may not meet Campus's data security standards.
Have a vendor you think Campus should partner with? Share this form with the vendor.
Considerations for Using Grade Book Sync
Data received from vendors is the responsibility of the district, not Infinite Campus.
- The OneRoster specification currently does not support standards-based grading when using assignment and score sync. Assignments can only be aligned to one task or standard and scores can only be entered as numerical values, rather than the rubric-style scoring commonly used in a standards-based setup.
- In Campus, In-Progress Grades are calculated every 5 minutes to account for newly-imported assignments and scores.
"Source of Truth"
- For synced assignments, the Digital Learning Partner is the "source of truth." Modifying assignments or scores in your Campus Grade Book after syncing with the partner is not recommended as changes will be overwritten with the next sync. Instead, make changes in the partner program so that the correct data will sync with Campus.
- For term grades, Campus is the "source of truth." Campus recommends that districts using score passback from a vendor system turn off grade calculations in the vendor program. Students and parents should access In-Progress and Posted Grades only from Campus sources.
Grading Best Practices
- When syncing assignments and scores with Campus, the best practice is that all in-progress and posted grade calculations be performed in Campus instead of in the partner system. Campus is the district's system of record for grades, which are used in multiple ways throughout Campus, including report cards, transcripts, and GPA calculations.
Assignment Setup
- In Campus, assignments must have a Points Possible value that is whole number. Currently, assignments received from a partner that have a Points Possible value with a decimal point are rounded down.
- In Campus, assignments cannot be assigned and due at the exact same date and time. If an assignment received via OneRoster has identical Assigned and Due date/times, one minute is subtracted from the Assigned time.
- Assignment Due Dates must fall within the Term Dates of the section in Campus. Even if a student is given an extension to turn in an assignment in the partner program, the due date must still be on or before the end date of the section in Campus.
- Assignment Multipliers (a.k.a. Assignment Factors) - The OneRoster specification does not support syncing multipliers between systems. Campus recommends that teachers adjust total points in the partner system rather than using multipliers for synced assignments. Alternatively, once an assignment has been received into Campus, teachers can update the Multiplier on the Campus assignment to match the one entered in the partner program, and it will not be overwritten.
Score Flags
- If an assignment received via OneRoster is flagged as Missing and does not have a score entered, the Missing Assignment Preferences are applied. If a score is entered for the Missing assignment, the Missing Assignment Preferences are not applied.
- If a teacher enters a score for a OneRoster assignment flagged as Missing, they will be given the option to flag the assignment as Turned In and Late or to remove the Missing flag. See the Scoring Assignments article for more information about logic for missing assignments.
Aligning Assignments to Categories and Grading Tasks
- If the partner is on a OneRoster version of 1.1, teachers must align assignments received from the partner. This can be done individually using the Uncategorized Assignments list or aligned automatically to a single category and task using the Non-Campus Assignment Defaults tool in Grade Book Settings. See the Uncategorized Assignments and Non-Campus Assignment Defaults article for more information.
- If the partner is on a OneRoster version of 1.2, teachers no longer need to align assignments, as long as the partner has implemented the category and grading task syncing capabilities available in 1.2. To sync categories and grading tasks, first set them up in Campus so they can sync to the partner program and use them for grading in the partner program. Assuming the partner has implemented category and task syncing, assignments will be received into campus with the category and grading task auto-aligned.
Considerations for Using Assessments Sync
- Assessment connections are only available with OneRoster 1.2.
- Data received from vendors is the responsibility of the district, not Infinite Campus.
- In the OneRoster API, assessments are returned in the LineItems endpoint and scores are returned in the Results endpoint. Data included in the rostering endpoints is also available for assessment vendors.
- Note: Because rostering endpoints are restricted to students enrolled in the current school year, assessment data can also only be returned for current year students. The OneRoster API cannot be used to import historical assessment data.
- Campus recommends that vendors sync parent assessment data first, followed by child assessments and then scores.
- Assessment data imported via the OneRoster API can be edited in Campus, but those changes will be overwritten if data is resynced.
- Imported assessments and scores are visible in the student's Assessment tool. Imported assessments are also added to the assessment list in Test Setup. Imported assessments are not currently differentiated from Campus-created ones in the UI, although there is a database indicator at the assessment level (Test.addedByVendor).
Refresh OneRoster Cache
See the OneRoster Cache article to learn how and when data is cached and caches are updated.
This tool is available as part of the Campus Learning Suite premium offering. Visit the Campus Learning Suite page to learn more.
The Digital Learning Applications Configuration tool allows districts to configure and manage OneRoster connections. In this video you will learn how to configure a OneRoster connection.
Progress Monitor
Progress Monitor Settings and Filters
Within the Settings area, users can manage how student rubric scores display in the Progress Monitor to help teachers focus on student performance. Additionally, users can change display preferences, turn on highlighting features, and apply standard, student group, and student filters.
This tool is available as part of the Campus Learning premium offering.
Tool Search: Progress Monitor
The Progress Monitor provides another way, in addition to the Grade Book, to view student's grades and scores and manage curriculum. Both standards and grading tasks display in the Progress Monitor, which provides a view of Posted or In-Progress Grades/Proficiency Estimates at a glances and helps teachers to easily manage assignments across all alignments in a section. The Progress Monitor shows all students and alignments in the Term selected at the top of the screen.
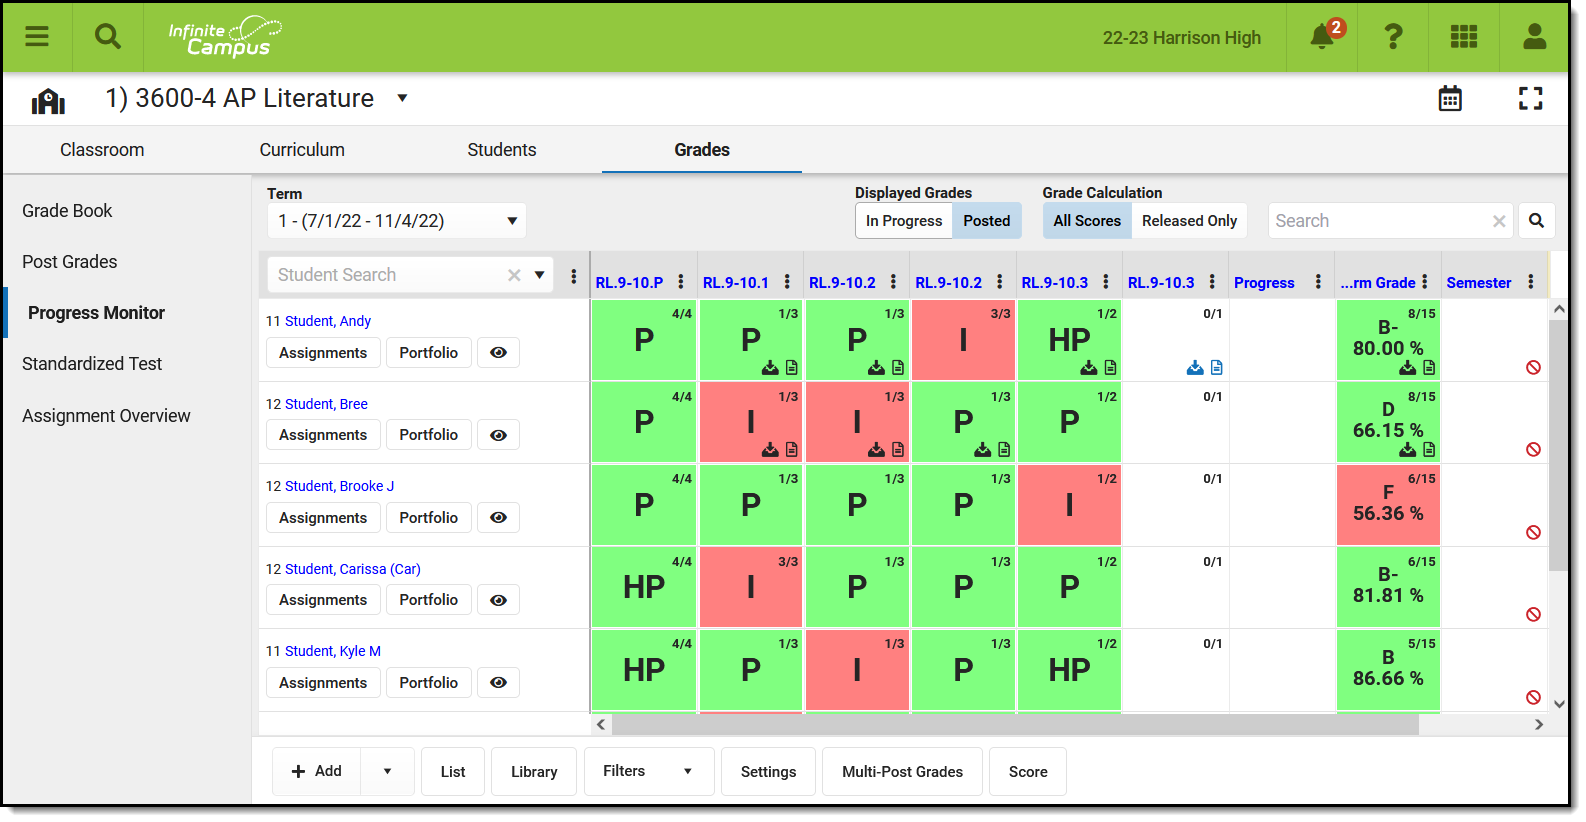 Use the Progress Monitor to view Posted or In-Progress Grades and Proficiency Estimates at a glance.
See the Instruction Tool Rights article for more information.
Understand the Progress Monitor
The Progress Monitor lists students along the left side and grading alignments (grading tasks and standards) across the top.
Student ListBy default, students are sorted alphabetically by last name. Click the three dots menu (
Click a student's name to view contact information, student's schedule, grades, attendance, and the student profile.
Click the |
 |
Column Headers: AlignmentsAlignments are sorted with Standards first (based on the sequence entered in the Standards Bank) followed by grading tasks.
Click a column header to score assignments aligned to that task/standard. Click the three dots menu (
| |
 to
to The Grid
Indicators within each grid square provide information about aligned assignments. Click a grid square to score assignments for that student and scoring alignment.
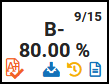
| Indicator | Description |
|---|---|
| Center Score | The Posted or In-Progress Grade/Proficiency Estimate displays at the center of the square. This value calculates based on the Grade Calc Options set for the standard. Toggle between In-Progress and Posted grades using the Displayed Grades buttons at the top.
When the grade shown is the in-progress calculation, click a column header to view posted grades, if available. Use the Grade Calculation toggle to determine whether the grade show is calculated using All Scores or Released Only. See the Release Scores article for more information about managing score release dates. |
| Top Right Number | The number of assignments aligned to the task/standard that have not yet been scored. To include the total number of assignments, enable the Show Total Assignment Count preference in Settings. |
|
Indicates that the student has submitted a file for this assignment. |
|
Indicates that an assignment aligned to the standard is flagged as Missing. |
|
Indicates that there is an unscored assignment aligned to the standard. Unscored assignments have End Dates in the past but not scores entered nor flags selected. |
|
Indicates the student does not have upcoming work assigned. Click the grid square to create an assignment. |
 |
Indicates that the grading window is open for that task/standard and grades can be posted. Post grades using the Multi-Post Grades button at the bottom of the screen or by clicking the column header and then clicking Post on the next view. |


Action Bar
Click a button below to jump to information about that tool:
 |
Add an assignment, or click the arrow on the right of the button to add a Folder or a Resource, or to add an assignment starting with a Discussion, Quiz, or Submission. |
 |
Opens the Curriculum List. |
 |
Opens the Curriculum Library where you can add curriculum to your section that other teachers have shared. |
 |
Opens the Filters menu. |
 |
Opens the Settings menu. |
 |
Opens the Multi-Post Grades tool, where you can post grades for multiple tasks or standards at a time. If the grading window is open, grades can be posted for a single task/standard by clicking the three dots menu ( ) and selecting Post Grades. ) and selecting Post Grades. |
 |
Opens a scoring grid where you can score all assignments in the section. |
Filters
When a filter is applied, a dot displays in the Filter button. Click Filters and then the selected filter to clear it and return to the full view.
 |
Open the Filters menu to access existing quick filters or create filters of your own.
Quick FiltersThe following Quick Filters are available by default, which correspond to the grid indicators described above:
|
User Filters
User Filters display above the Quick Filters. Click + New Filter to open the Filter Options menu.
| One-Time Filters To filter the Progress Monitor without creating a saved filter, select which tasks/standards to include in the filter and indicate if you want to hide tasks/standards without assignments, all standards, and/or all tasks. Click Apply to return to the Progress Monitor. |
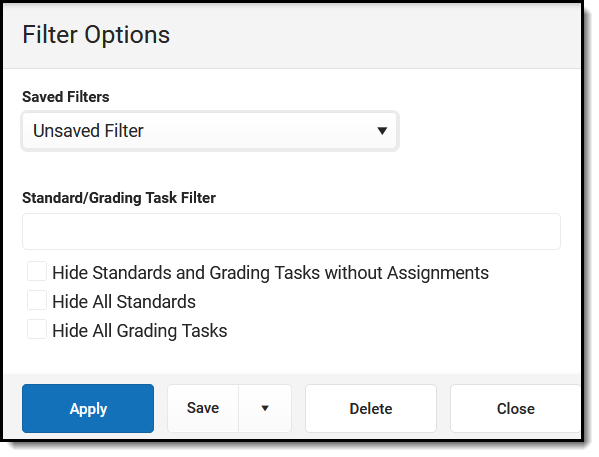 |
| Saved Filters To save a filter, select which tasks/standards to include and any hide options, click Save, and enter a name for the filter. The filter now displays in the filter menu with a  icon. icon. |
To edit a saved filter, click Edit Filter in the Filter menu, select the filter in the Saved Filters dropdown list, make your changes, and click Save.
Filters can be combined with the student filter on the left. For example, set the Missing filter and click the eye icon next to a student's name to view only tasks/standards where that student is missing assignments.
Settings
Access related tools, display preferences, and assignment sort preferences from the Settings menu.
|
Tools
|
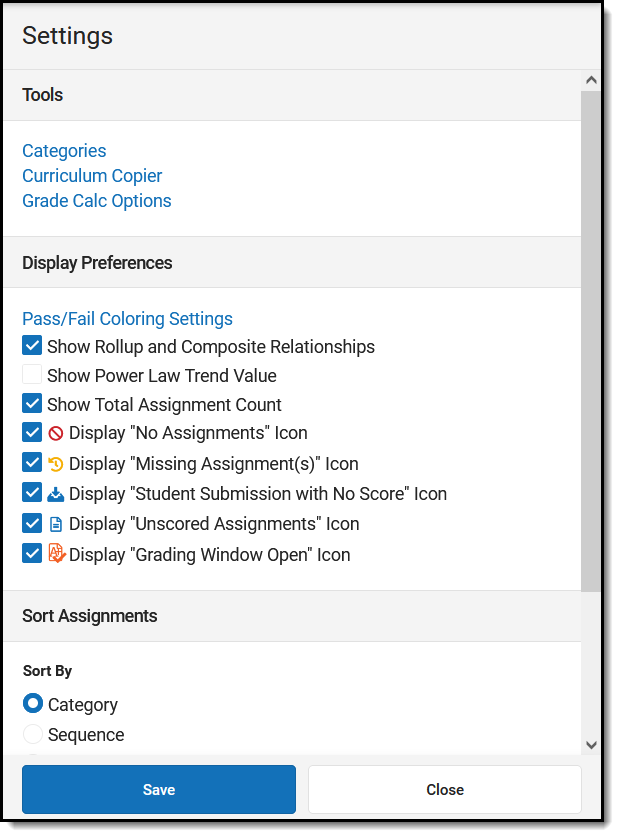
Display Preferences
| Preference | Description |
|---|---|
| Pass/Fail Color Settings | This link opens the Account Settings, where color settings are managed for Instruction as a whole. Passing scores/grades are shown in green and failing score/grades in red. Whether a scores/grade is considered Passing depends on setup of the score group/rubric used.
There is also an option to mute colors. Some users find the muted colors less intrusive, but color-blind users may find these shades more difficult to distinguish. 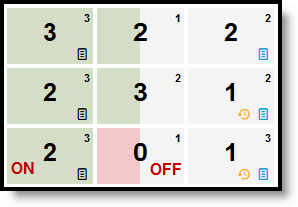 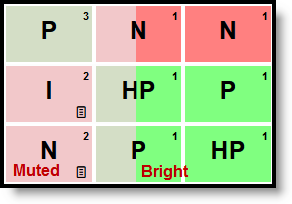 |
| Show Rollup and Composite Relationships | Rollup relationships and composite grading rules calculate the grade of a parent standard/task based on the scores a student has received for child standards/tasks. Rollup relationship is established at the Course level and composite grading is set up in Grade Calc Options. In the Progress Monitor, these relationships display in the column header with child tasks/standards nested under the parent. |
| Show Power Law Trend Value | Power law is a mathematical calculation that determines a student's proficiency on a standard based on the trend shown by the scores that student has earned. This preference only applies if In-Progress grades set to calculate Power Law in the Grade Calc Options and if the appropriate setup has been completed for the Rubric. |
| Icons | Each of the grid icons described above can be hidden if desired:
|
Sort Assignments
Indicate whether assignments should be sorted by Category, Sequence, or Due Date and if they should be sorted in Ascending or Descending order. This setting applies to all views in the Progress Monitor.
Previous Versions
Progress Monitor [.2231 - .2315]
Save
Save
Save
Save
Save
Save
The Progress Monitor is only available with the Enhanced Curriculum tool right, which is included as part of the Campus Learning Suite premium offering. Visit the Campus Learning Suite page to learn more.
Using display preferences, filters, and highlights, the Progress Monitor Settings can be used to review student progress in standards-based classrooms.
Add an Assignment in Progress Monitor
Teachers can create new assignments for a course section from the Progress Monitor within Campus Instruction.
Advanced assignment tools are available as part of the Campus Learning premium offering and require the Enhanced Curriculum Editor tool right, including the Summary, Attach Content, and Add a Task areas of the Assignment editor.
Location: Click Add or List button in tools throughout Instruction, including Grade Book, Planner > My Planner, Assignment Overview, and Progress Monitor
Access assignments in various places throughout Instruction. Regardless of what tool you're in, the editor looks the same.
Available Actions
CreateCreate an assignment or resource anywhere you see an Add button (in the Planner, it's called New)
Click +Add to add an assignment, or click the arrow on the right of the button to add a Folder or a Resource, or to add an assignment starting with a Discussion, Quiz, or Submission.
Categories must exist before assignments can be created. |
ModifyTo modify an assignment, open it by clicking the name or abbreviation and then click the Edit button
Click Edit to modify the item, or click the arrow on the right of the button to move the assignment to a different folder or delete it.
When editing an item that is in multiple sections, you'll have the option of whether changes should be made to all instances or just the current one. |
Access to assignments requries tool rights to a grading tool, such as Grade Book, Planner, or Progress Monitor. Additionally, the Enhanced Curriculum tool right in Additional Access Rights > Instruction Tools grants access to advanced assignment options.
See the Instruction Tool Rights article for more information.
Other Edit Options
Click the arrow next to the edit button to access other options:
| Duplicate | Move | Delete |
| Creates a duplicate of the current item. | Allows you to select a different parent folder in the curriculum structure. | Removes the current item. Be aware that deleting an assignment cannot be undone, even one with submissions or scores. |
Everything moved, help!
Recent improvements included redesigning the assignment editor. But don't worry, it's the same fields, just in different places. Expand below for a comparison of the old assignment editor and the new one:
What are Resources?
| Resources are, essentially, assignments that will not be scored. They allow teachers to share information with parents and students within the context of section curriculum.
When creating an item, toggle Grading on to make it an assignment, or off to make it a resource. Because resources are not scored, they do not display in the Grade Book.
|
|
Resources can be grouped within whatever folder structure you use to manage your curriculum. Consider creating a Course Resources folder to collect section-wide or often used materials, such as a syllabus.
Content, Details, and Reflections
Assignments and resources are made up of three tabs:
- Content: Information such as Dates, Grading, and the content of the assignment. This article describes this tab.
- Details: Metadata used when sharing curriculum to the Curriculum Library. See the Curriculum Details article for more information.
- Reflections: Records of how curriculum was used in your class. See the Reflections article for more information.
Areas of the Editor
Every assignment or resource needs a Title. Let's walk through each of the sections in the assignment editor:
In a hurry? Don't have Campus Learning or the Enhanced Curriculum Editor tool right? See The Basics: Assignments. |
Section Settings
|
Visible to Class indicates if this item is visible on Campus Student and Campus Parent. Click the Preview button at the bottom of the editor to see what the assignment will look like for parents or students.
Start and End Dates default to today. Click the date to type or select another day. To set both dates easily, click the date to open the calendar, then click the Start Date you want and then the End Date, without closing the calendar. Dates are not required if Grading is toggled off. For the most part, dates are informational, but they do control the following:
|
To enter a time, such as for a quiz only available during a class period, click the clock icon. By default, an assignment is available to all students in a section. To change this, click the All Assigned button next to Students. From here, select an existing student group or use the Assigned checkboxes to indicate which students should be assigned. All students not assigned will be marked as Exempt on the assignment. Campus Learning customers can also individualize dates for students. See the Individualized Assignments section for more information. The Release Scores setting determines when an assignment's score will be visible to parents and students. Leave the On Score Save option selected to keep scores visible as soon as they are entered. Or select a date for Release Scores On to schedule when scores will be made available to parents and students. This date must be after the End Date entered for the assignment. See the Release Scores article for more information about this option. | |
Grading
If Grading is toggled on, you're working on an assignment. If Grading is off, it's a resource. Include in Grade Calculation is marked by default - unmark this checkbox if the assignment will be scored but that score should not be included when calculating grades, such as for a practice test. If not marked, the assignment displays with an * in scoring screens like the Grade Book and Progress Monitor.
The Abbreviation for the assignment populates as you enter a title. The Sequence defaults to 1. Modify if desired, up to 7 digits: XXXXX.XX. The abbreviation is used to identify assignments in the Grade Book and the sequence is used to sort.
Grading alignments display in collapsible sections, with basic information in the heading.
Select a Category for the assignment. Categories are groupings of related assignments, such as Homework or Formative. If Default Scoring options are setup for a category, the Scoring Type, Points, and/or Multiplier may auto-populate based on the category selected. These details are still editable. See the Categories article for more information. Standards and Grading Tasks are item to which grades are posted. The Standard/Task of your current context, such as what's selected in the Grade Book, is selected by default. Only alignments available in your current section display.
Select a Scoring Type to indicate how the assignment will be scored. Options are: |
Select applicable grading information for the assignment.
|
If desired, change the Multiplier if using points or marks, which determines how the assignment affects students' grades. For example, a 50 point assignment with a Multiplier of 2 counts as a 100 point assignment.
Add additional scoring alignments by clicking Add Standard/Task. Multiple alignments are most commonly used in standards-based grading, where a single assignment may demonstrate mastery in multiple standards.
The Add Scoring Rubric button displays for Campus Learning users who have the Enhanced Curriculum tool right. Scoring Rubrics allow teachers to communicate expectations for assignments with students and evaluate how well student work met those expectations. See the Create Scoring Rubrics article for more information. | |
Other Sections/Schedules
Adding an assignment to other sections is only available once the assignment has been saved.
To add the assignment to other sections, click Add/Edit and then the Add Sections button:
Add the assignment to other sections you teach.
|
Filter this section list by Term, Period, or Course/Section Groups at the top.
Click Add next to any section to add it to the assignment.
Any sections that already include this assignment are listed at the bottom in Existing Schedules.
Click OK when finished.
| |
Once added to the list, make any needed updates to each instance of the assignment, including the Folder (Campus Learning only), whether it's Visible on Campus Student & Parent, the Start/End Dates, and the Grading setup. By default, these fields match the original assignment.
Click the red X next to a section to remove the assignment from it. Sections cannot be removed if the assignment has already been scored.
Note: Previously, assignments had to have the same grading setup across sections. In the new assignment editor, grading setup can be different in each instance of the assignment, including the task/standard, the category, and the scoring information.
Click the blue scoring link ("100 points" in the example image above) to view and modify Grading information for that instance.
Click Save Changes when finished. The Other Sections/Schedules area now lists other sections that include this assignment. | ||
Advanced Features
If your district has Campus Learning and has given you the Enhanced Curriculum Editor tool right, additional features display for assignments and resources.
Summary & Notes
The Summary is a text field where you can enter any information about the assignment that would be helpful to students, such as instructions, objectives, and lesson materials.
- Format the text as desired, including bold/italics, text colors, or bullets and numbering in the menu.
- You can also add links, tables, images by clicking those icons in the editor.
- Click the equation button to build a math equation using common mathematical operators, characters, and formulas.
- Click the + button to see options for embedding videos, special characters, or any other embeddable content enabled by your district.
Content in the Summary panel displays for students and parents (if the assignment is Visible) just as you see it here in the editor.
Notes are additional text fields, which can be helpful for grouping entered content, slotting text between other attachments and tasks, and adding information that is only visible to other teachers.
| Adding Images To add an image, click the and select a method for attaching an image:
|
|
|
The Summary always displays above any additional content added to the assignment, such as files or notes.
If multiple attachments, notes, or tasks are added below the Summary, they can be rearranged by clicking the dots icon in the top left corner and dragging the segment into the desired order.
The Summary is visible to anyone who can see the assignment. Other attached content and notes can be visible to Student & Teacher or to Teachers Only, which may be a helpful option for content such as an answer key.
Click the Preview button at the bottom of the editor to see how the assignment will appear for students. |
Attach Content
Various options may be available in the Attach Content section, based on your district/schools setup. Options include:
Add a Task
Additional tasks can be aligned to an assignment or resource. Check out the following articles for more information:
'About' Section
The About section on an assignment, resource, or folder houses the metadata used to identify curriculum in the Curriculum Library.
This section includes the following fields:
| |
Individualized Assignments
Individualizing assignments allows teachers to specify which students receive an assignment and each student's Start and End Dates. Assignments can be assigned to select students, as in the case of remedial or advanced work. Start and End Dates can also be individualized to give students the time they need to complete assignments. Quiz timers can also be individualized.
See the Individualized Assignments for more information.
Save
Save
Save
Save
Some advanced assignment features are only available with the Enhanced Curriculum tool right, which is included as part of the Campus Learning Suite premium offering. Visit the Campus Learning Suite page to learn more.
From many places within Campus Instruction, teachers can quickly create new assignments using the assignment editor. The assignment editor is the same in all locations. In this video, a teacher will create a new assignment for one of their course sections.
Scoring Assignments in the Progress Monitor
Teachers can enter scores, flags, and/or comments for each standards-aligned assignment from the Progress Monitor.
Tool Search: Progress Monitor
Assignments are scored in various places around Instruction, including in the Progress Monitor. The context of the Progress Monitor is determined by the Term and Section dropdown lists displayed at the top of the tool.
This article covers scoring in the Progress Monitor. See the general Progress Monitor article for more information about this tool, including an overview and navigation, and the Portfolio.
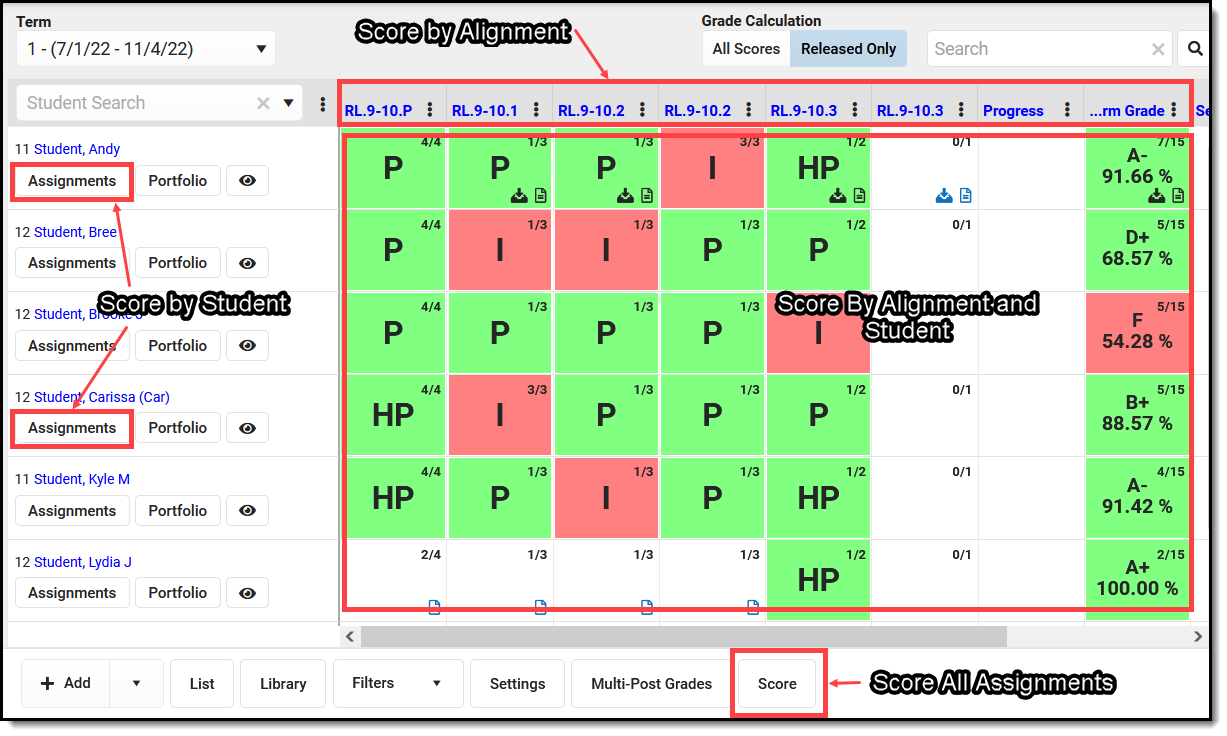 Click in various areas of the Progress Monitor to access different scoring views.
Check out the Progress Monitor article for more information about the other buttons in the action bar at the bottom of the screen.
Available Scoring Views
There are multiple views in the Progress Monitor where you can enter scores, depending on where you click. The following sections describe each area:
- Score Assignments by Student
- Score Assignments by Alignment
- Score Assignments by Alignment and Student
- Score All Assignments
Turn on Pass/Fail Coloring for Grades and/or Pass/Fail Coloring for Scores in the Account Settings to color code passing scores/grades in green and failing scores/grades in red.
Score Assignments by Student
Click the  button to view all assignments for that student in the current Term.
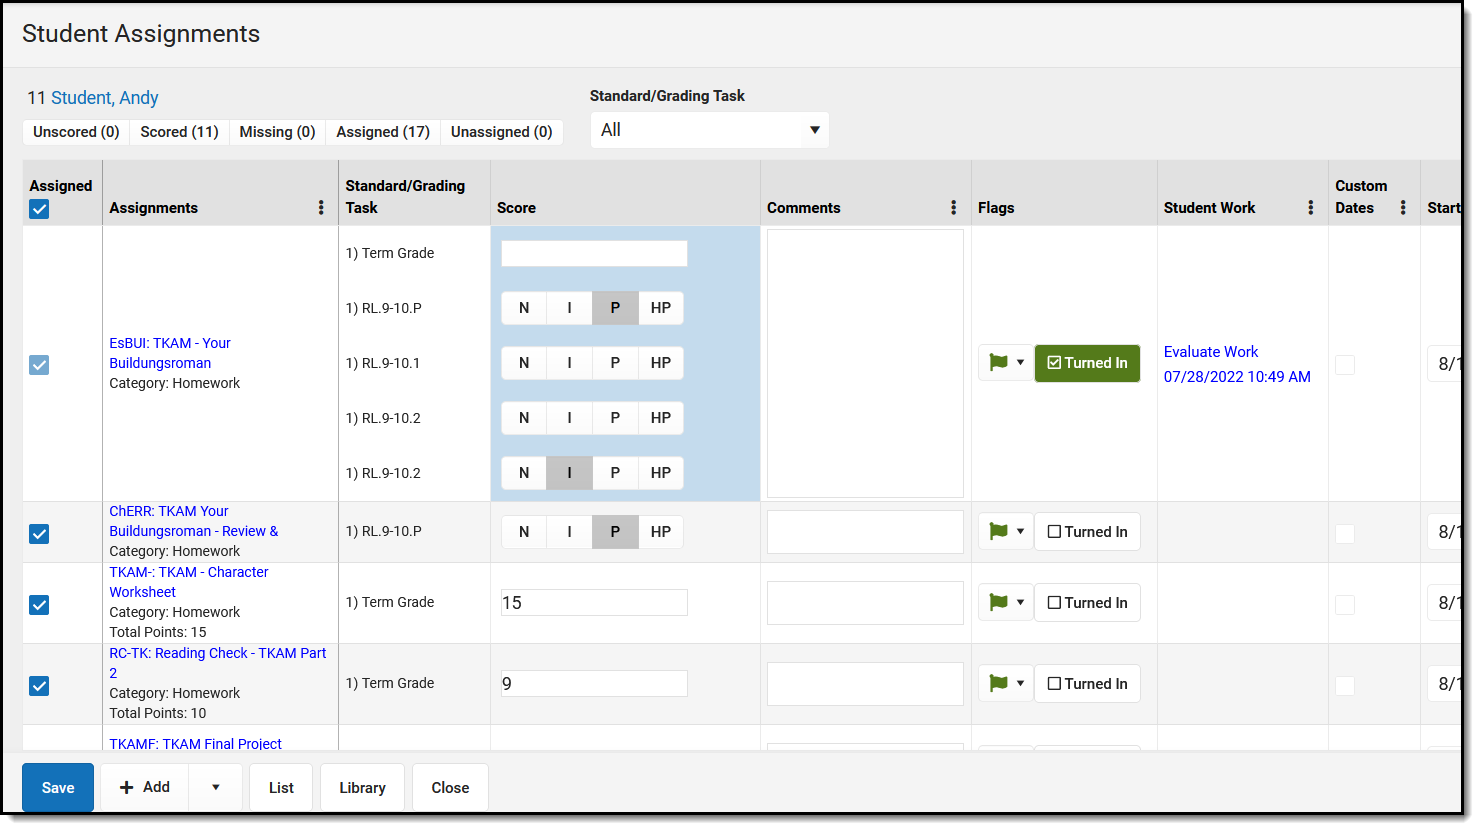
Filter this assignment list using the options along the top, Unscored, Scored, Missing, Assigned, and Unassigned, or by assignments aligned to a specific Standard/Grading Task.
| Column | Description |
|---|---|
| Assigned | Indicates if this student has been assigned this assignment. Unmark this checkbox to unassign this assignment, which individualizes the assignment to not include this student. Note: unassigning an assignment removes any scores for this student. |
| Assignments | The Abbreviation and Name of the assignment, followed by the Category. Click the name of the assignment to view it. Assignments that are not included in grade calculation are prepended by an *. |
| Standard/Grading Task | The standards and/or grading tasks to which the assignment is aligned. |
| Score | Each alignment receives its own score. Alignments scored using Rubrics with fewer than 6 options display as buttons. Otherwise, type the score. |
| Comments | Enter comments for the score or select canned comments, depending on district settings. |
| Flags | Mark Turned In or use the flag dropdown to add a flag to the assignment. Assignments that students have turned in via Campus Student are marked as Turned In by default. See the Score Flags section following for more information about flags. |
| Student Work | Displays links for scoring submissions or using a scoring rubric, depending on assignment setup. Submissions display as a timestamp of when the assignment was turned in. See the Scoring Submissions and Evaluate Student Work using Scoring Rubrics articles for more information. |
| Custom Dates | Indicates that the assignment's dates have been individualized for this student, such as extending a deadline. |
| Start/End Date | The dates on which the assignment was assigned and when it is due. |
Score Assignments by Alignment
Click a column header to score any assignments aligned to that task or standard, for all students. This view mimics the Grade Book.
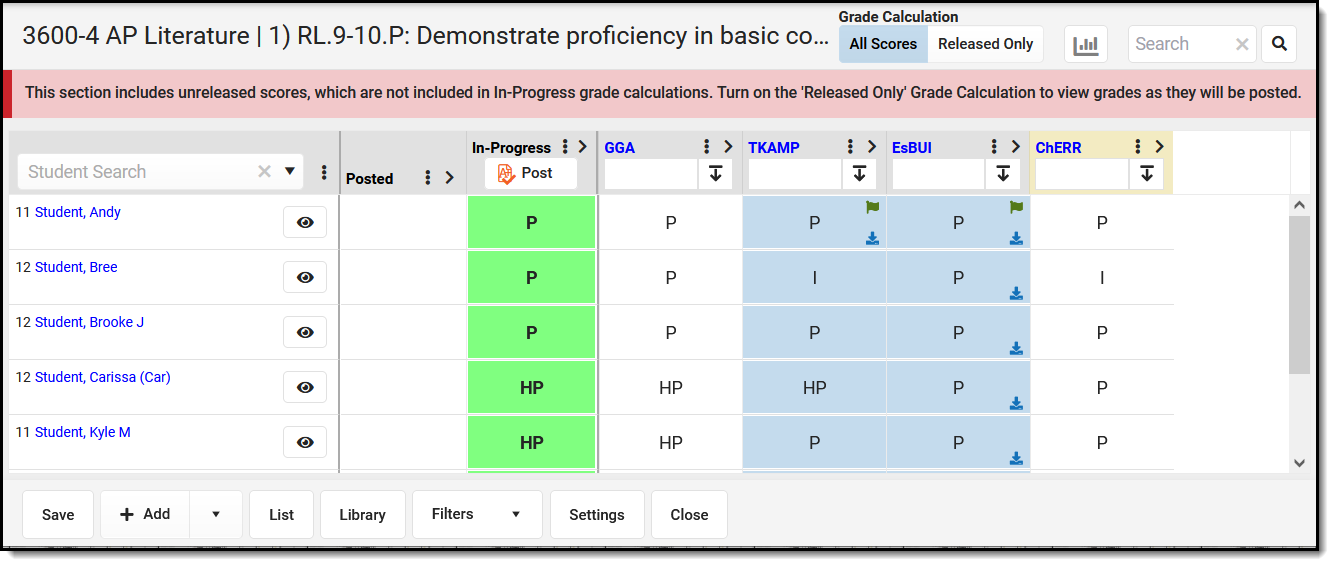 Click a column header to score all assignments aligned to that Task or Standard.
The name of the course and task/standard display above the scoring grid. Use the Grade Calculation toggle to indicate whether the In-Progress grade calculated below should include all scores or only scores that have been released to parents and students. Click the graph icon to view Score Analysis for that task/standard. Use the Search bar to filter the assignments shown.
Student ListClick a student's name to view contact information, student's schedule, grades, attendance, and the student profile. |  |
Posted & In-Progress GradesThe In-Progress grade is calculated based on the Grade Calc Options established via the tool in Settings. Use the Grade Calculation toggle at the top of the screen to indicate if the In-Progress grade shown should include all scores or only released scores. Click the three dots menu ( If the Grading Window is open, In-Progress grades can be posted. Click the  button to copy the In-Progress grade to the Posted column and click Save to post. Only released scores are posted. Toggle the Grade Calculation setting to Released Only to see grades as they will be posted. button to copy the In-Progress grade to the Posted column and click Save to post. Only released scores are posted. Toggle the Grade Calculation setting to Released Only to see grades as they will be posted. |
 ) in the Posted or In-Progress column to sort students by that column.
AssignmentsClick the name of the assignment in the column header to open and view the assignment. Enter scores in the grid. To enter Comments and Flags, expand the assignment using the chevron next to the name. Icons display in the score grid:
|  | ||
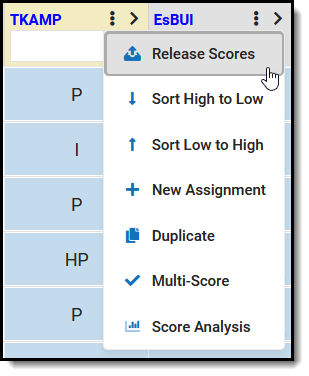 | Click the three dot menu ( ) next to the assignment name to view an additional menu of options: ) next to the assignment name to view an additional menu of options:
| ||
| Fill Options To fill scores, enter a score in the column header, click the Fill icon, and select a fill option:
Expand the assignment access fill options for comments and flag. |  | ||
 indicates a teacher comment. Hover to read the comment.
 indicates a student comment. Hover to read the comment.
 indicates a flag. Hover to view.
 indicates a submission by the student. Hover to view date and time of submission and click to
 Score Assignments by Alignment and Student
To score assignments for a single student and a specific scoring alignment, click a grid square in the Progress Monitor, or click the Assignments button and select a Standard/Grading Task.
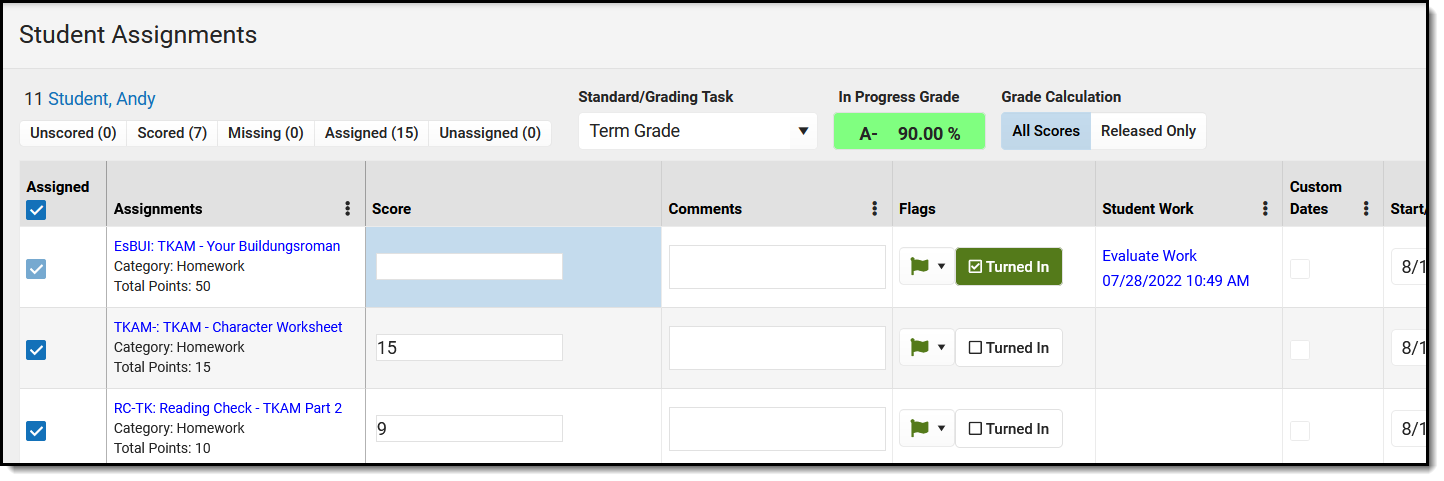 Click a grid square to score all assignments for that student and alignment.
Click the student's name to view contact information, student's schedule, grades, attendance, and the student profile. Filter this assignment list using the options along the top, Unscored, Scored, Missing, Assigned, and Unassigned, or by assignments aligned to a specific Standard/Grading Task.
The current In-Progress Grade displays at the top of the screen. Use the Grade Calculation toggle to determine whether that In-Progress Grade is calculated using all scores or only released scores.
| Column | Description |
|---|---|
| Assigned | Indicates if this student has been assigned this assignment. Unmark this checkbox to unassign this assignment, which individualizes the assignment to not include this student. Note: unassigning an assignment removes any scores for this student. |
| Assignments | The Abbreviation and Name of the assignment, followed by the Category. Click the name of the assignment to view it. Assignments that are not included in grade calculation are prepended by an *. |
| Score | Each alignment receives its own score. Alignments scored using Rubrics with fewer than 6 options display as buttons. Otherwise, type the score. |
| Comments | Enter comments for the score or select canned comments, depending on district settings. |
| Flags | Mark Turned In or use the flag dropdown to add a flag to the assignment. Assignments that students have turned in via Campus Student are marked as Turned In by default. See the Score Flags section following for more information about flags. |
| Student Work | Displays links for scoring submissions or using a scoring rubric, depending on assignment setup. Submissions display as a timestamp of when the assignment was turned in. See the Scoring Submissions and Evaluate Student Work using Scoring Rubrics articles for more information. |
| Custom Dates | Indicates that the assignment's dates have been individualized for this student, such as extending a deadline. |
| Start/End Date | The dates on which the assignment was assigned and when it is due. |
Score All Assignments
Click the button to open a scoring side panel that includes all assignments in the current term.
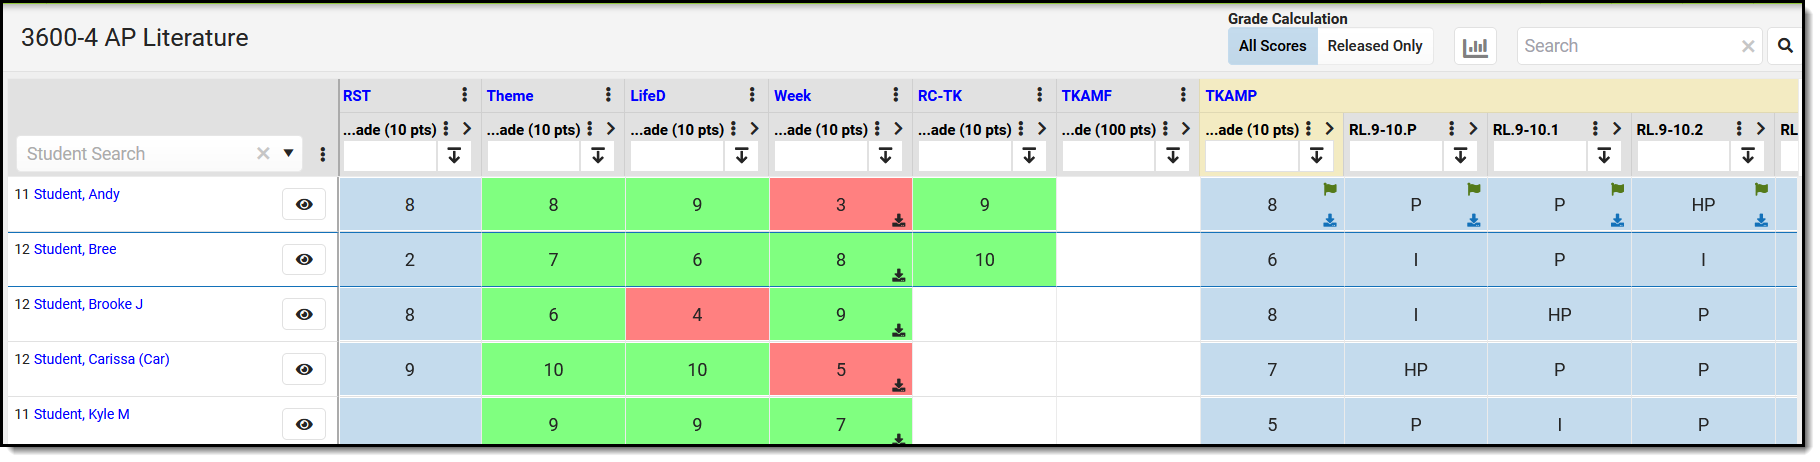 Click the Score button to score all assignments in the section.
Use the Grade Calculation toggle to indicate whether the In-Progress grade calculated below should include all scores or only scores that have been released to parents and students. Click the graph icon to view Score Analysis for that task/standard. Use the Search bar to filter the assignments shown.
Student ListClick a student's name to view contact information, student's schedule, grades, attendance, and the student profile. |  |
AssignmentsClick the name of the assignment in the column header to open and view the assignment. Below each assignment name is the alignment. Enter scores in the grid. To enter Comments and Flags, expand the assignment using the chevron next to the name. Icons display in the score grid:
| | ||
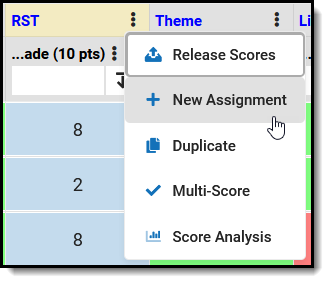 | Click the three dot menu ( ) next to the assignment name to view an additional menu of options: ) next to the assignment name to view an additional menu of options:
| ||
| Fill Options To fill scores, enter a score in the column header, click the Fill icon, and select a fill option:
Expand the assignment access fill options for comments and flag. |  | ||
Appendix A: Score Flags
The following table describes the effect of marking a flag for an assignment:
Abbreviation | Description | Additional Logic |
|---|---|---|
T | Turned In | If you mark an assignment as Turned In and then as Missing, the Turned In flag is removed. Assignments which are enabled for Submission through Campus Student are closed for submission when the Turned In flag is marked. Assignments are flagged as Turned In when a student submits work through Campus Student. To allow students to resubmit an assignment, remove the Turned In flag. |
M | Missing | The logic of the Missing flag is dependent on whether a Missing Assignment Percentage is entered by your district. If the district has not set a calculation, the Missing flag is an indicator only; flagged assignments CAN be scored. If the district has set the flag to auto-calculate and entered a Missing Assignment Percentage, flagged assignments calculate as the entered percentage of Total Points for assignments scored using Points or Marks. Hover over the score field to see the calculated score. In this instance, a score cannot be entered if the Missing flag is selected. Score are not auto-calculated for assignments scored using Rubrics. If you mark an assignment as Missing and then as Turned In, the Missing flag is removed. If the missing flag is set to auto-calculate, when calculating a Proficiency Estimate via Mode of a limited number of assignments, if any of those assignments are marked as Missing, the Proficiency Estimate will not calculate. How do I know what my district has set? Can you enter a score for a missing assignment? If so, no calculation has been set. If you cannot enter a score, hover over the score field to see the calculated score. For example, if a district has set the missing flag as 25%, a 20 point assignment calculates as 5 points. |
L | Late | N/A |
I | Incomplete | When calculating a Proficiency Estimate via Mode of 3 or Mode of 5, if any of the 3 or 5 scores are marked as Incomplete, the Proficiency Estimate will not calculate. |
Ch | Cheated | Score appears stricken-through. Scores with the cheated flag automatically calculate as zero. When calculating a Proficiency Estimate via Mode of 3 or Mode of 5, if any of the 3 or 5 scores are marked as Cheated, the Proficiency Estimate will not calculate. |
X | Exempt | Score appears stricken-through. The grid of scores flagged as Exempt appear in grey. Exempted assignments do not display in student and parent views. When calculating a Proficiency Estimate via Mode of 3 or Mode of 5, if any of the 3 or 5 scores are marked as Exempt, the Proficiency Estimate will not calculate. |
Dr | Dropped | Dropped scores are not included in In Progress grade calculations. The Drop Lowest Score option can be set for categories to automatically mark the lowest score in the category as dropped. |
| - | - | A small gray square displays in the bottom left corner of the score grid if the student was not rostered into the section on the due date of the assignment. |
Typing the flag Abbreviation into the score grid sets that flag, unless the abbreviation is a valid Assignment Mark or Rubric score. If you clear the abbreviation and move to a different cell, a message appears asking if you want to clear any flags on the score. However, replacing the abbreviation with a score does not remove the flag.
Save
The Progress Monitor is only available with the Enhanced Curriculum tool right, which is included as part of the Campus Learning Suite premium offering. Visit the Campus Learning Suite page to learn more.
There are two parts to this video. To switch between the parts, click the More Videos icon![]() in the video player.
in the video player.
From the Progress Monitor, teachers can quickly enter assignment scores, flags, and comments and review student proficiency. In this video, you will learn how teachers can score assignments using the Progress Monitor.
Standards Portfolio
The Standards Portfolio allows teachers to review and track the progress a student is making towards gaining proficiency on standards over time.
This tool is available as part of the Campus Learning premium offering.
Location: Progress Monitor > Portfolio
The Standards Portfolio displays all grades received for standards across the student's school career, tracking student progress towards proficiency on standards over time. Users must have appropriate tool rights to view data from previous calendars.
This tool is available in the Progress Monitor and in Student Information. In the Progress Monitor, the course must have at least one standard aligned for the button to display.
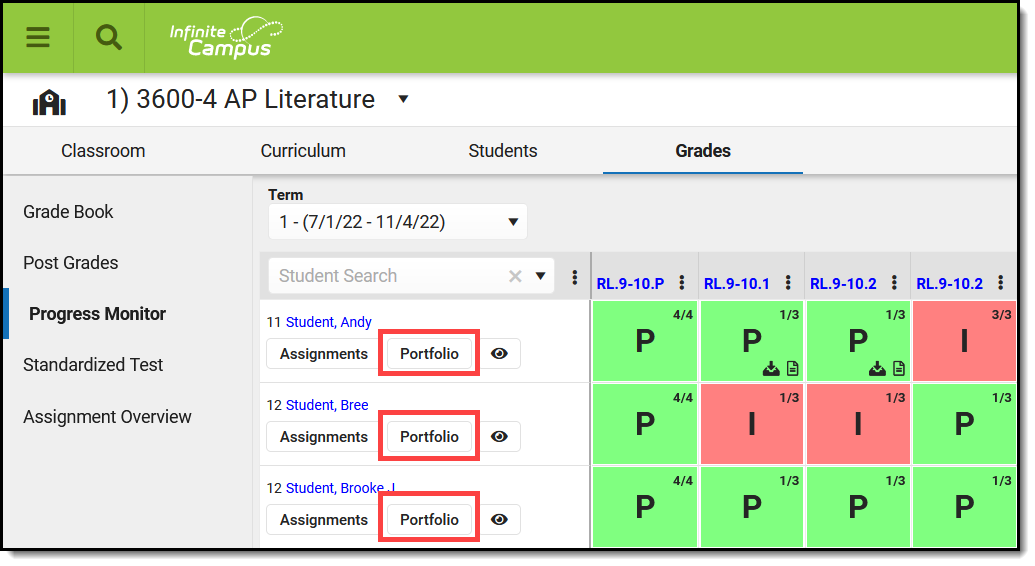 Open the Standards Portfolio from the Progress Monitor.
Click  to view all grades given for standards across a student's school career. Teachers must have the appropriate tool rights to view data for previous calendars. This view allows teachers to track student progress towards proficiency on standards in previous courses, as well as progress on standards aligned to the current section.
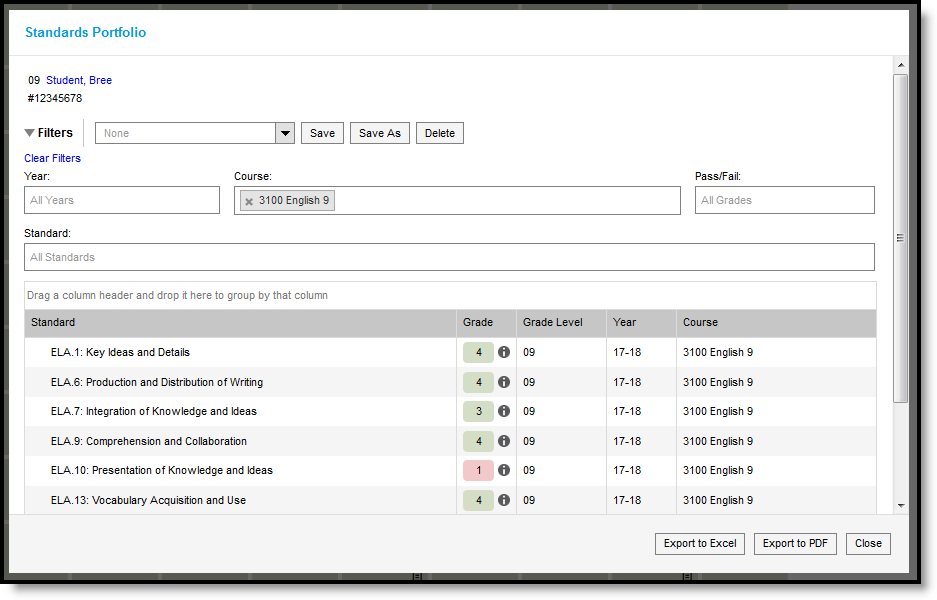
The Portfolio allows teachers to view student progress on standards across years and courses.
Filters
Upon opening the Portfolio, the view is filtered to the current course. Filter data by Year, by Course, by whether the student received a Passing or Failing score, or by Standard. These filters are specific to the student. For example, only courses the student has taken are listed.
Teachers can ![]() a filter to return to it later, or access filters created by others in the Standards tool. For example, this image shows a saved filter that shows instances where the student received a failing grade on English Language Arts standards:
a filter to return to it later, or access filters created by others in the Standards tool. For example, this image shows a saved filter that shows instances where the student received a failing grade on English Language Arts standards:
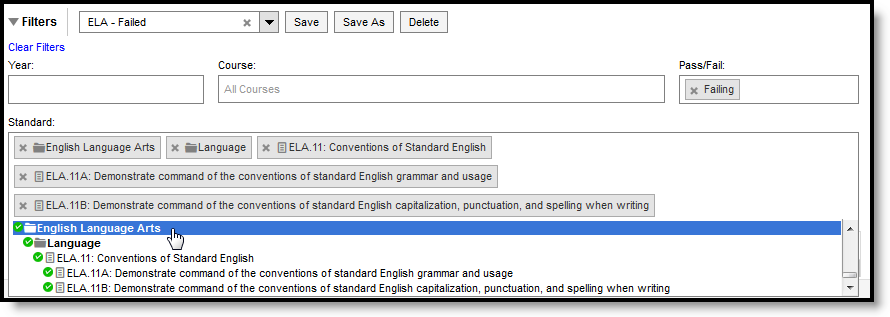
Save useful filters or access those saved by administrators.
Export filter results to an Excel file or a PDF using the options above the standards table.
Standards & Grades
Standards are listed based on the filter options selected. The Grade displayed is the posted grade the student received for the standard in that course, with in info button to view the rubric used. If the student received multiple grades for a standard in that course, the most recent posted grade is shown. The grade level, year, and course are also shown.
Click on a header to sort results or click and drag a header above the table to group results.
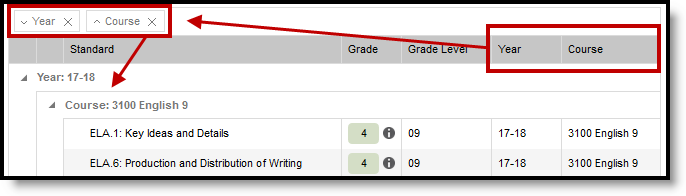
Click and drag column headers to group the standards list.
Assignment Scores & Grades
Click on a standard to view assignment scores that contributed to the grade. In the graph that displays, assignment scores are indicated by ![]() and posted term grades by
and posted term grades by ![]() . Hover over an assignment to the name of the assignment, score, and due date. Hover over a term grade to view the term, course, posted date, and teacher.
. Hover over an assignment to the name of the assignment, score, and due date. Hover over a term grade to view the term, course, posted date, and teacher.
Assignments are listed below the graph. To display, an assignment must have a grading alignment to the standard. Click an assignment name to view read-only details for the assignment. Click the timestamp in the submissions column to view work submitted by the student.
Save
Save
Save
Save
Save
Save
This tool is available as part of the Campus Learning premium offering. Visit the Campus Learning Suite page to learn more.
The Standards Portfolio tool allows teachers to track the progress a student is making towards gaining proficiency on standards. In this video, you will learn how to track student progress using the Standards Portfolio.
The Standards Portfolio tool allows teachers to track the progress a student is making towards gaining proficiency on standards. In this lesson, a teacher would like to review student scores on Reading standards.
Scoring Rubric
Create Scoring Rubrics
Scoring Rubrics allow teachers to communicate criteria and expectations with students and can be used to evaluate student performance.
Scoring Rubrics are available as part of the Campus Learning premium offering and require the Enhanced Curriculum tool right.
Location: Anywhere you view assignments, such as Grade Book > open an assignment > Scoring Rubric
Scoring Rubrics allow teachers to communicate expectations for assignments with students and evaluate how well student work met those expectations.
Scoring rubrics are aligned to assignments and can be added to any new or existing assignments. See the Assignments & Resources article for more information about assignments.
Add and manage the scoring rubric below the Grading section of the assignment.
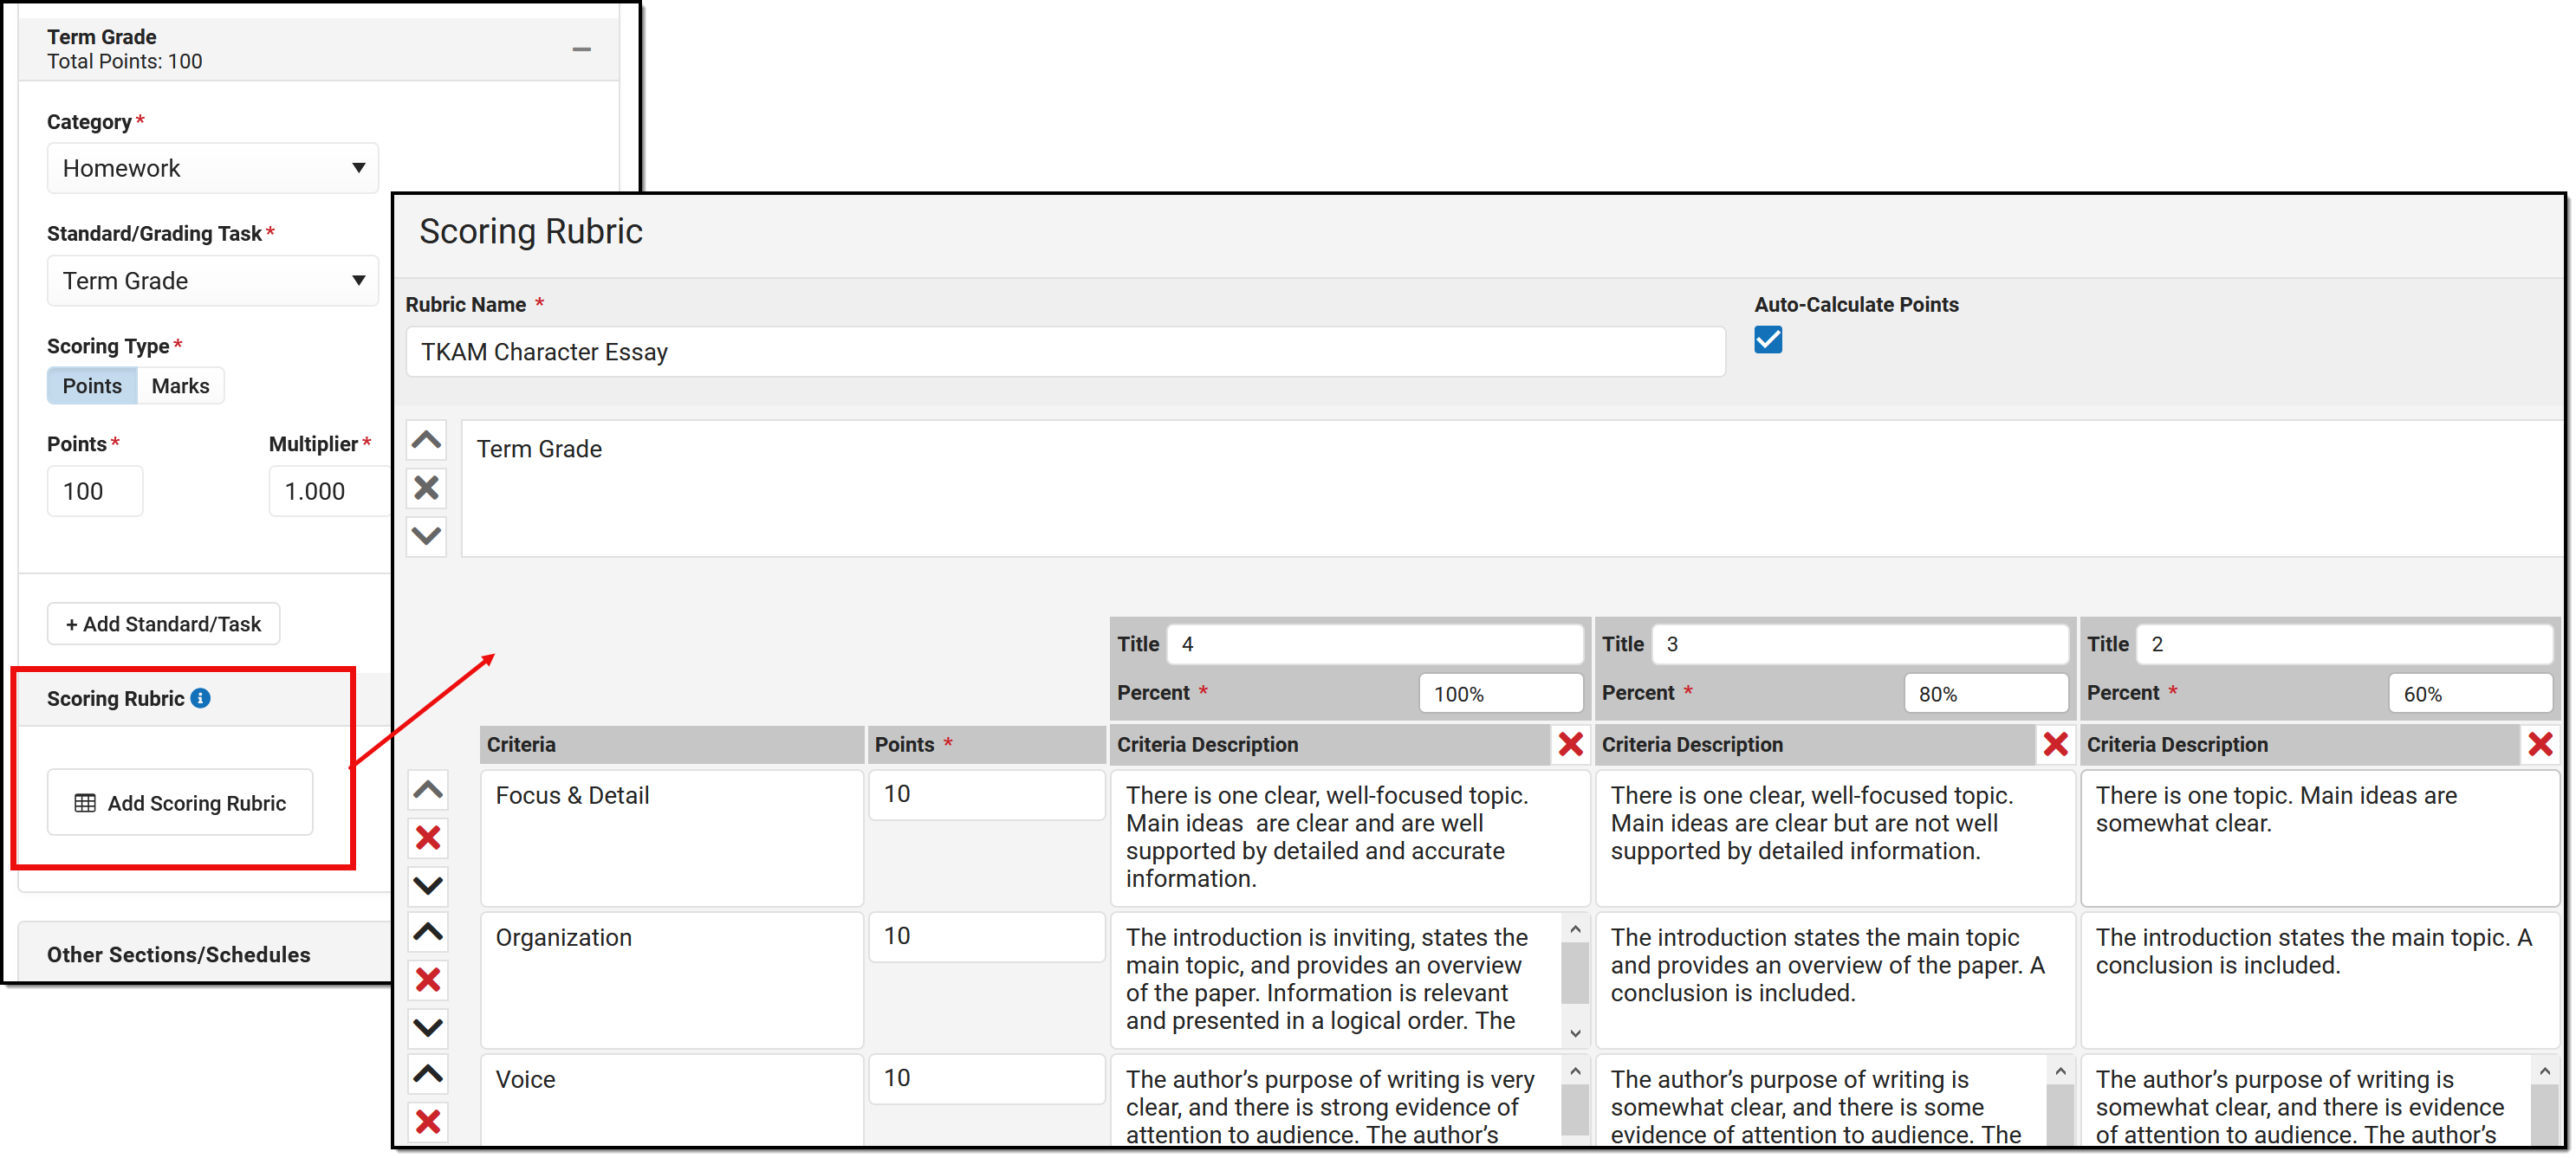 Create scoring rubrics for evaluating student work.
The Enhanced Curriculum tool right in Additional Access Rights > Instruction Tools grants access to this option. See the Instruction Tool Rights article for more information.
Scoring rubrics can be used for assignments aligned to grading tasks or standards and can be scored using points, marks, or rubrics. Options are different based on the scoring type selected.
When creating a new rubric, a separate grid displays for each grading alignment. Add additional criteria rows and columns as desired. Each grid begins with the grading task or standard. Remove or reorder grids or rows using the X and arrows. Click ![]() to change the alignment for a section of the scoring rubric.
to change the alignment for a section of the scoring rubric.
The basic elements of scoring rubrics are:
- Criteria form the rows of a scoring rubric. Often, criteria represent the types of skills demonstrated for the assignment. For example, a scoring rubric used to evaluate an essay may include criteria for argument, style, grammar, and structure.
- Score thresholds form the columns of scoring rubrics. Columns may correspond to specific rubric/mark scores or a certain percentage of points possible. For example, an assignment scored with a rubric with three values, P: Proficient, I: Improving and N: Not Proficient, would have three score columns, one for each score.
- Remaining cells describe the quality of work required to earn a score for that criteria. Cells in a scoring rubric often provide clear, applicable descriptions that help students understand expectations and help teachers score student work consistently. A cell must have text in it to be able to select it when scoring.
Rubrics and Marks
When using rubrics for a scoring rubric, rubric scores populate in each column (defaults to 4 columns, add more as desired). Each column must have a score selected and a scoring rubric cannot have more columns than there are scores possible.
The bottom row of each grid is populated with the description of each score. When scoring, teachers select the score based on the the other grid cells selected; this bottom row select is the score that displays in the grade book.
Points
When using points for a scoring rubric, each criteria is given a point value. The total of all values in the points column must equal the points possible for the assignment, shown in the total at the bottom. An additional Feedback column displays to the right of the grid, which includes the points earned out of possible for that row and any teacher comments.
The Total displays at the bottom right of the grid, which is the score that displays in the grade book for the alignment.
Scoring rubrics using points have the option to Auto-Calculate scores. When this checkbox is marked, a Percent value displays for each column. When a scoring rubric cell is selected when scoring, the percent of points possible for that row is calculated and shown in the feedback column.
If Auto-Calculate is not marked, teachers manually enter the points earned for each row in the Feedback column.
Reusing Scoring Rubrics
To use a scoring rubric on another assignment:
- Within a section, duplicate the assignment and modify the copy. (Duplicate an Assignment)
- Across sections and/or terms, copy the assignment and modify the copy. (Copying Curriculum)
Printing Scoring Rubrics
To print an unscored scoring rubric, open the assignment, click the Edit button, and scroll down to the Scoring Rubric section. A print button displays next to the Edit Scoring Rubric button.
Use the Scored Rubrics report to print scored rubrics for an assignment.
Scoring Rubrics are only available with the Enhanced Curriculum tool right, which is included as part of the Campus Learning Suite premium offering. Visit the Campus Learning Suite page to learn more.
Scoring Rubrics allow teachers to communicate criteria and expectations with students and can be used to evaluate student performance. In this video, learn how to create a new scoring rubric.
Evaluate Student Work using Scoring Rubrics
Teachers can score and evaluate Scoring Rubrics to communicate progress on student work. Assignments can be evaluated from both the Control Center and the Grade Book.
Scoring Rubrics are available as part of the Campus Learning premium offering.
Location: Grade Book > expand an Assignment > Evaluate Work; Teaching Center > score icon
Evaluate student work using a scoring rubric by clicking Evaluate Work in the Grade Book or by clicking Score and the #/# Scored link in the Teaching Center.
If the student has submitted work using Google Drive or the text editor, view the scoring rubric next to the student's submission. Download other types of submissions to view. See the Scoring Submissions article for more information about scoring.
If the assignment does not have submissions enabled, the scoring rubric alone opens.

View the Scoring Rubric next to the student's submission.
The Enhanced Curriculum tool right in Additional Access Rights > Instruction Tools grants access to this option. See the Instruction Tool Rights article for more information.
Resize the view of the scoring rubric using the arrow and collapse icons in the left margin of the scoring rubric. Click and drag the bar highlighted in the image above to resize.
Click a scoring rubric cell to select that score and highlight the cell.
- For assignments scored using points, enter a score for each row or modify the auto-calculated score if desired. The Total in the cell at the bottom right of the scoring rubric populates in the grade book.
- For assignments scored using rubrics or marks, select the rubric score in the bottom row to indicate the score for the assignment that populates in the grade book.
Enter Comments by row. Click Save when finished.
Students and parents can view unscored and scored rubrics for assignments in the Campus Student and Campus Parent apps. Student and parents view a score rubric by opening the assignment and clicking View Scoring Rubric, which generates a PDF of the rubric.
To see what assignments look like from the student's view, edit the assignment, click Preview at the bottom of the editor, and choose Student Preview. The PDF version of scored rubrics that students and parents see matches the rubrics generated in the Scored Rubrics Report.
Save
Save
Save
Save
Scoring Rubrics are available as part of the Campus Learning Suite premium offering and requires the Enhanced Curriculum tool right. Visit the Campus Learning Suite page to learn more.
Teachers can score and evaluate assignments using Scoring Rubrics to communicate progress on student work. In this video, a teacher will use a Scoring Rubric to score a student assignment.
Score Analysis
View Score Analysis
Accessible from the Grade Book or Control Center, the Score Analysis tool allows teachers to view a score distribution graph and student scores on an assignment and visually break down how each student scored.
This tool is available as part of the Campus Learning premium offering and requires the Enhanced Curriculum tool right.
Location: Grade Book > expand an Assignment > Score Analysis; Grade Book > expand Settings menu > Score Analysis; Teaching Center > click score icon > click Assignment Name > Graph icon
The Score Analysis tool is available through the Grade Book and Teaching Center. It allows teachers to view a distribution of student scores on an assignment and visually break down how each student scored.
Access Score Analysis
| Single Assignment | All Assignments in a Section |
|
|
 . Access the scoring editor by clicking Score when viewing an assignment or clicking the assignment icon in the Teaching Center and then a (non-submission) assignment .
The Enhanced Curriculum tool right in Additional Access Rights > Instruction Tools grants access to this option. See the Instruction Tool Rights article for more information.
Single Assignment
Score analysis for a single assignment displays a score distribution graph representing all scores for the assignment. The percentages on this graph indicate the number of students who received that score. For example, the image below shows that about half of the students got a B- or higher on the assignment. Hover over each section of the graph to see the score it represents and how many students received that score.
Below the distribution, the breakdown section lists each student who has received a score, displaying score information and an individual graph.
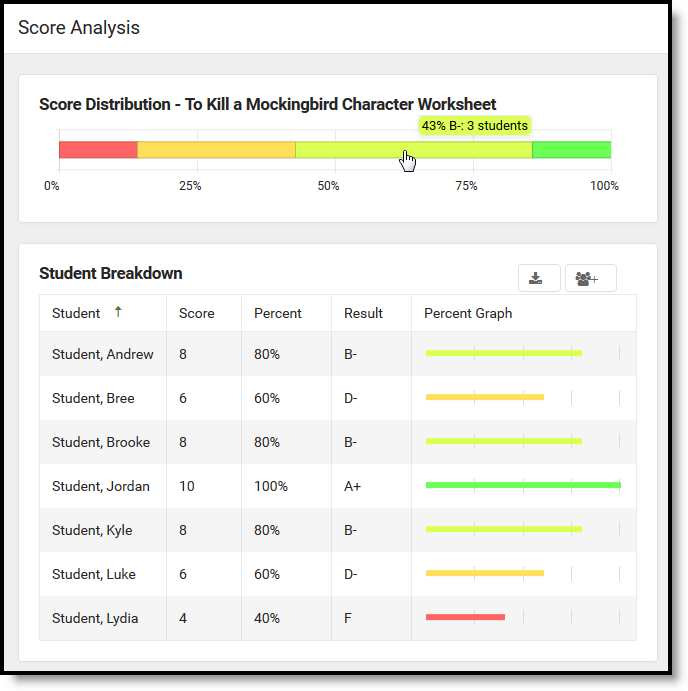
Score Analysis provides a distribution of all scored students and a breakdown showing details for each score.
Filter the student breakdown by clicking sections of the distribution graph. Hold SHIFT or CRTL to select multiple scores to include in the breakdown.
Click  to export the breakdown, with present filters, to Excel. If you have tool rights to Student Groups, click
 ![]() to create a Student Group of the students currently included in the breakdown.
to create a Student Group of the students currently included in the breakdown.
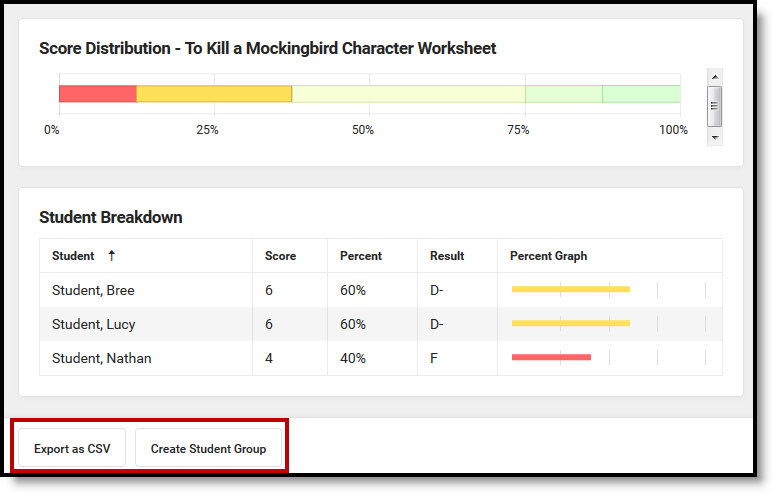
Click one score or use SHIFT and CTRL keys to filter the breakdown.
In this example, I want to create a student group of the students who received 60% or lower on the assignment so I can give them a followup assignment. Hold the CTRL key while clicking the lowest two scores on the distribution and then click Create Student Group and enter a name. The student group is then available to modify in the student group and to select on assignments.
Multiple Assignments
Score analysis from the Settings menu of the Grade Book starts with just distributions of all assignments in section. Assignments display in order by Due Date, starting with the most recent.
Click on one or more sections in the distributions to view a list of students below.
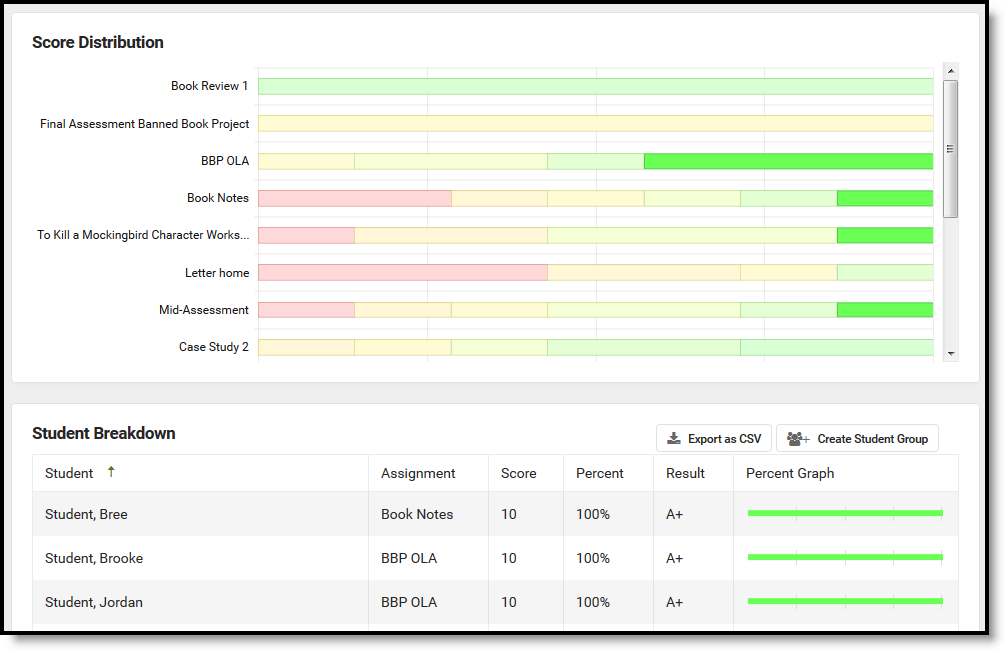
From the Grade Book Settings menu, view the score distributions of multiple assignments.
Quizzes
Assignments with Quizzes have an additional Item Analysis section below the Student Breakdown. This item analysis section shows student performance on each question. The displayed information varies by question type. | |
| The first column shows the question text. The second column indicates how many students got the question correct, incorrect, and partially correct. The third column indicates how many students selected each answer. |  |
| Click any links in the second and third columns to see a list of students who selected that answer and make a Student Group, if you have tool rights to the Student Groups tool. | |
Scoring Rubrics
Additional score information displays for assignments evaluated using Scoring Rubrics. See the articles about creating and scoring for more information about scoring rubrics.
Below the score distribution and student breakdown that display in score analysis, the scoring rubric displays. For each grid square, the number of students who met that criteria is shown, over the total number of students who have been scored.
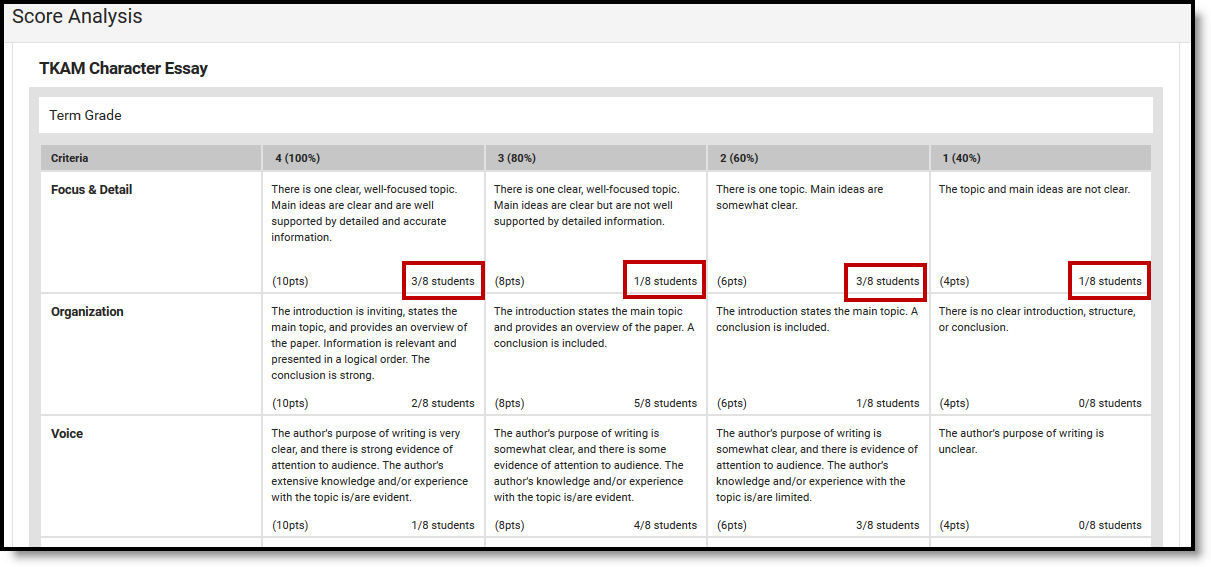
View score analysis for assignments evaluated using scoring rubrics to see the total number of students who met each criteria.
This feature can be helpful in determining where the class is succeeding and struggling. For example, in the image above, half the class got a 60% or lower on the Focus & Detail criteria, so I may want to focus more on topic sentences for our next essay.
Click on a grid square to see a list of students who met that criteria and create a Student Group of those students, if you have tool rights to the Student Groups tool.
Score Analysis is only available with the Enhanced Curriculum tool right, which is included as part of the Campus Learning Suite premium offering. Visit the Campus Learning Suite page to learn more.
The Score Analysis tool enables teachers to view a score distribution graph and student scores on an assignment and visually break down how each student scored. In this video, teachers can learn how to effectively analyze student scores using the Score Analysis tool.
Previous Versions
Score Analysis - Video [.2231 - .2415]
Discussions
Understand Campus Discussions
Teachers can use Discussions to create and manage online classroom discussions. These discussions can be related to course content, group work, and other various classroom activities.
This tool is available as part of the Campus Learning premium offering.
Location: Anywhere you view assignments, such as Grade Book, Planner > My Planner, or Progress Monitor
Two kinds of discussions are available in Instruction, scored discussions that are aligned to an assignment and discussions that are not scored and are aligned to a resource. Discussions are created in conjunction with an assignment or resource.
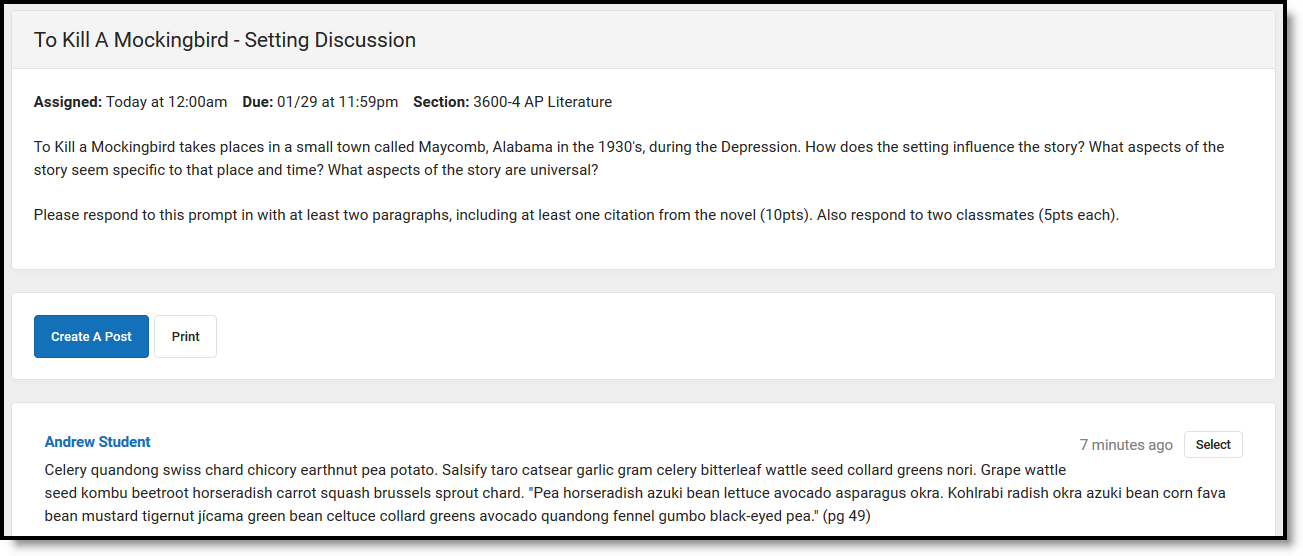 Discussions can be aligned to an assignment and scored or unscored.
The Enhanced Curriculum tool right in Additional Access Rights > Instruction Tools grants access to this option. See the Instruction Tool Rights article for more information.
Creating Discussions
Location: Anywhere you view assignments, such as Grade Book > click Add button > Discussion
Discussions are created in conjunction with an assignment or resource. Discussions aligned to assignments are scored and display in the grade book; discussions aligned to resources are not scored. Use the Grading toggle to change a discussion from assignment (scored) to resource (not scored).
Create an assignment with a discussion by clicking  and then clicking Discussion in the Add a Task section OR clicking the arrow next to
  and picking Discussion. Toggle the Grading section off to make the curriculum item a resource.
Enter details for the assignment or resource as described in the Assignments & Resources article.
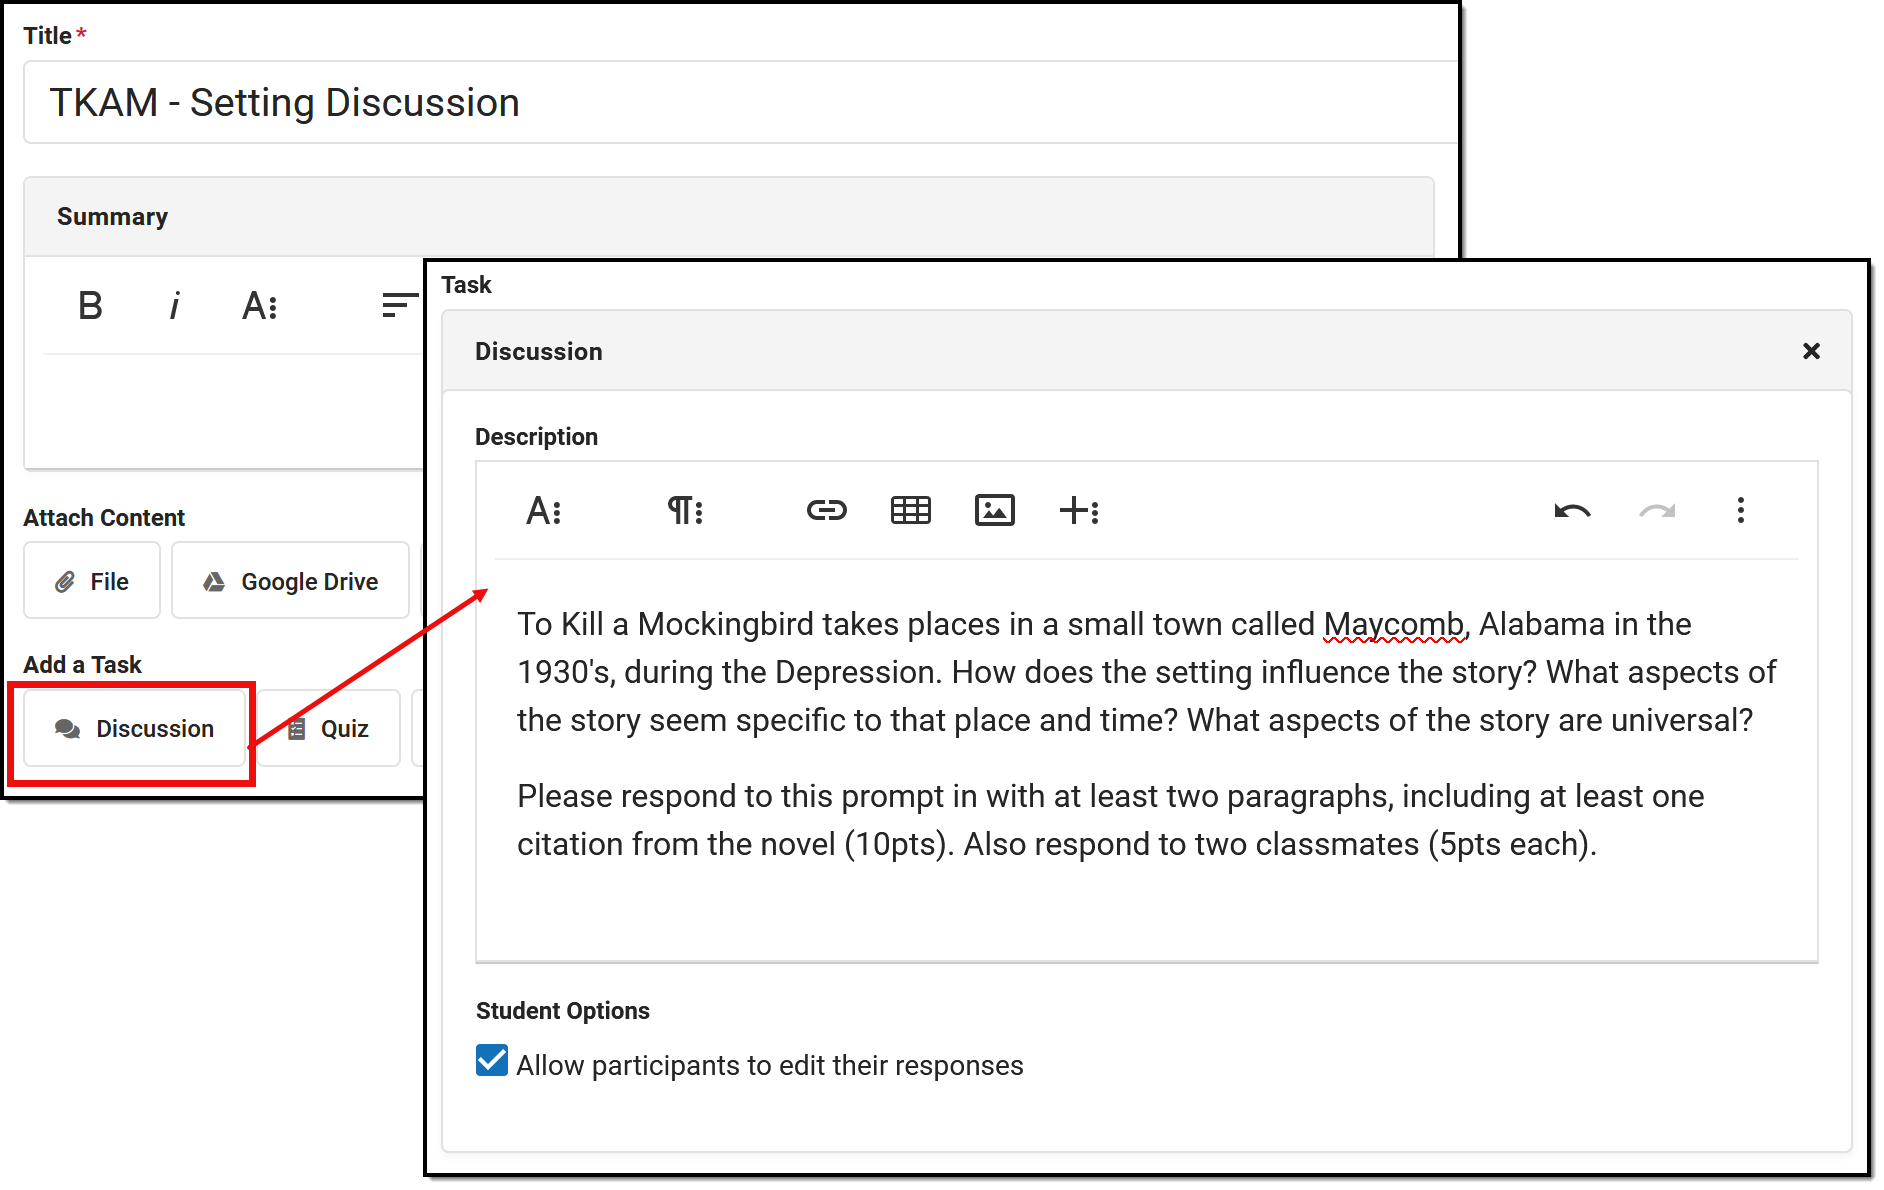 Deliver a discussion through an assignment or resource.
- If an assignment or resource has a discussion enabled, the Title becomes the Name of the discussion and the Description serves as the discussion prompt.
- Discussions are limited to a single section. If multiple sections are selected in the Scheduling Alignment area of the assignment, separate discussions are created for each section.
- Teachers have the option to Allow students to edit their responses. Previous versions of edited posts are not available in the discussions tool. This option can be turned on or off at any time.
- Students respond to discussions using Campus Student.
Viewing Responses
| View responses to a discussion by opening the assignment or resource to which it is attached. To find quizzes, filter the Curriculum list to show only curriculum with Discussions. From this view, the students' responses display below the Summary. You can create a post yourself or print the discussion, or reply to a specific post, score it, or flag it. You can also edit the curriculum, such as section settings and grading information, although the discussion itself cannot be modified once students have responded. |
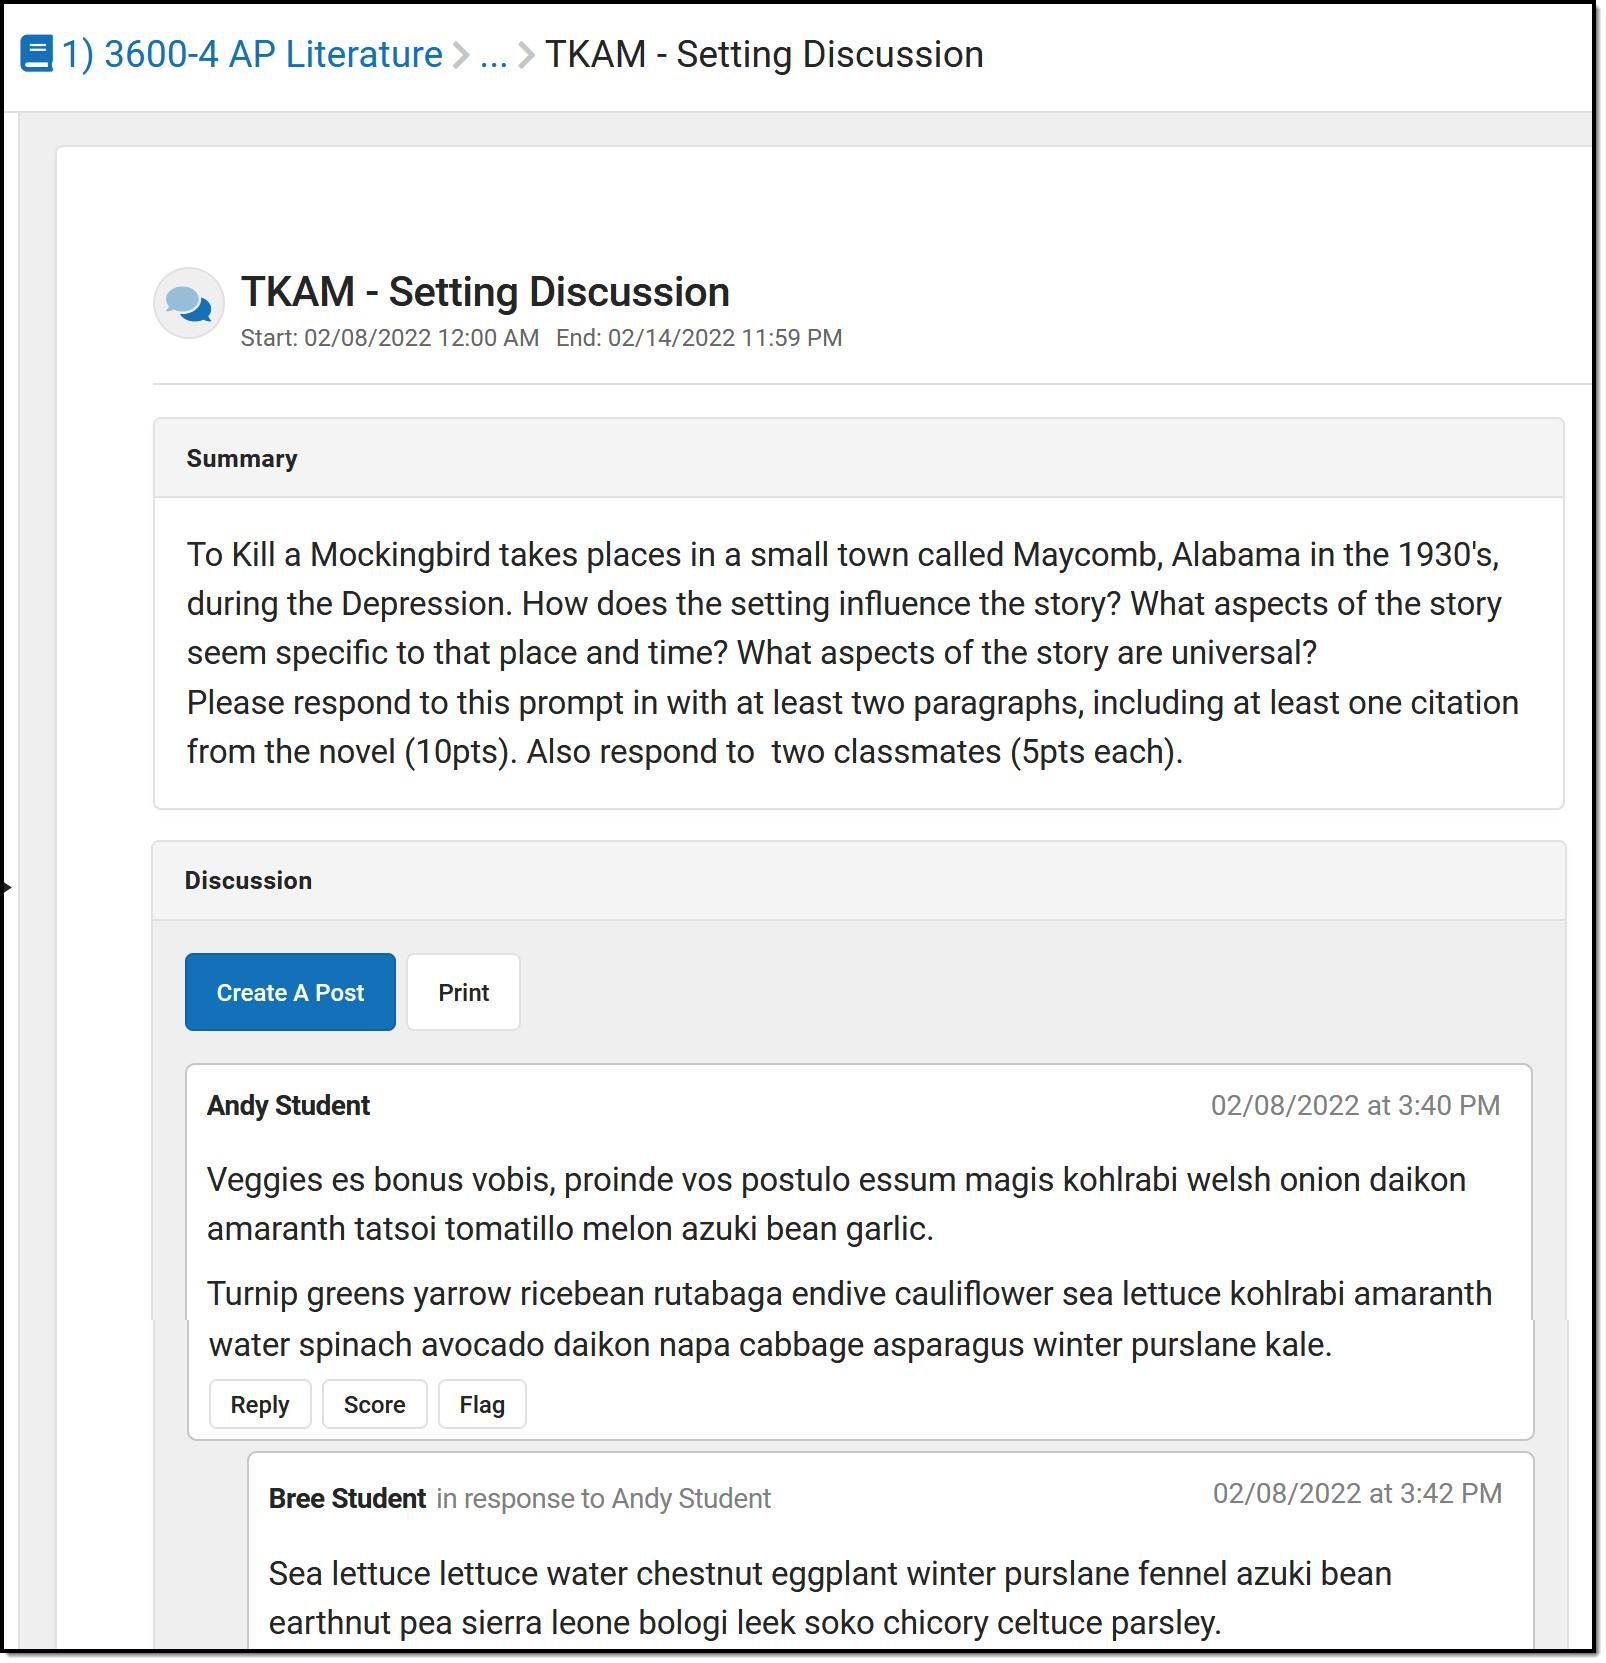 |
When viewing the discussions:
- The Summary of the discussion serves as the initial post.
- Make a new post by clicking Create a Post
- Generate a printable version of the discussion.
- Reply to students.
- Score the posts (for assignments).
- Flag student content and resolve flags. See the Flagged Posts section for more information.
- If a discussion doesn't have student responses yet, it can be Archived to hide it from the teacher's discussion list.
Scoring Discussions
Click the
In the scoring screen, select a student's name in the dropdown list to highlight their posts and simplify scoring. The first student in the class is highlighted by default. Enter scores and flags in the header of the scoring screen, and switch between students to change the highlight. See the Scoring Submissions article for more information about this screen. |
|

Flagged Posts
Inappropriate posts can be flagged by the teacher or by another student. Discussions with a flagged post are indicated by a ![]() . A notification is also sent to teachers when a post has been flagged.
. A notification is also sent to teachers when a post has been flagged.
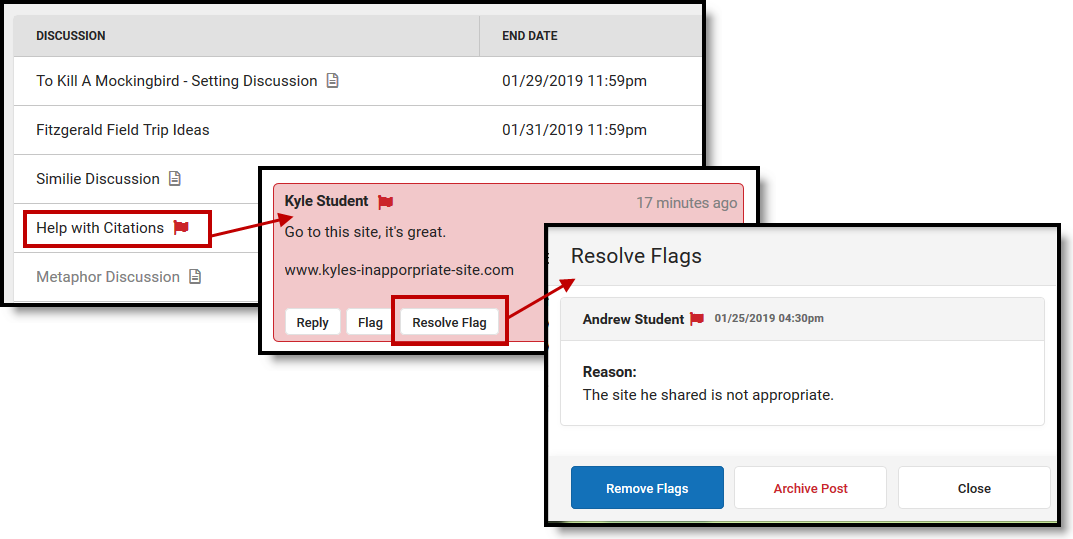
Resolve flags on post by removing the flag or archiving the post.
Flagged posts display highlighted in red. Click ![]() to view the reason the post was flagged and resolve it.
to view the reason the post was flagged and resolve it.
- Remove Flag removes the flag from the post and leaves it in the discussion.
- Archive Post removes the post from the discussion. All replies to that post are also archived.
- Close returns to the discussion without resolving the flag.
Previous Version
Discussions (Instruction) [.2231 - .2327]
Create a Scored Discussion
Teachers can create and manage discussions from the Grade Book within Campus Instruction.
Discussions are only available with the Enhanced Curriculum tool right, which is included as part of the Campus Learning Suite premium offering. Visit the Campus Learning Suite page to learn more.
Teachers can create and manage discussions from the Grade Book within Campus Instruction. This video demonstrates how to create a discussion.
Score and Manage a Discussion
Teachers can view and score discussions to communicate completion and participation in classroom discussions. Discussions can be evaluated from both the Control Center and the Grade Book.
Discussions are only available with the Enhanced Curriculum tool right, which is included as part of the Campus Learning Suite premium offering. Visit the Campus Learning Suite page to learn more.
Teachers can view and score discussions to communicate completion and participation in classroom discussions. This video demonstrates how to score and manage scored discussions.
Previous Version
Score and Manage a Discussion - Video [.2207 - .2447]
