Tool Search: Password and Security Settings
The Password and Security Settings tool allows Campus users to update their account security preferences. This tool functions differently depending on whether or not Password Reset functionality is enabled.
See the sections below for information about the two ways in which this tool functions.
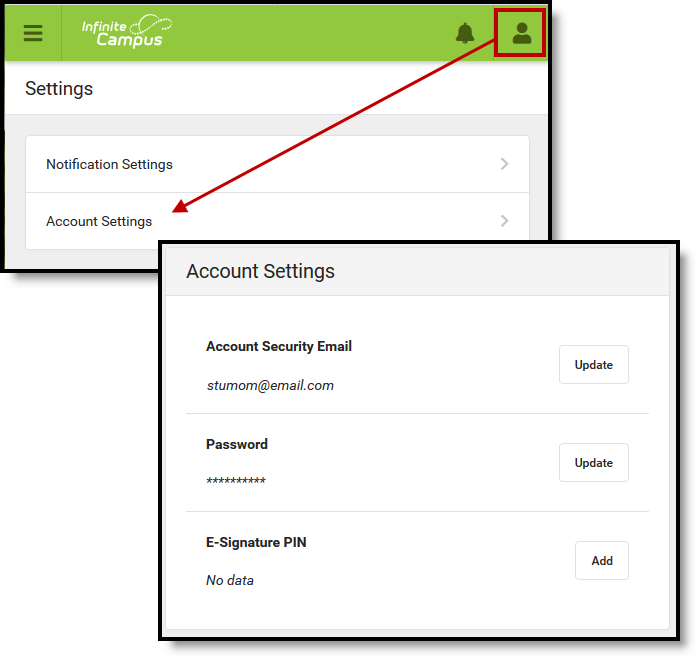
 Image 1: Account Settings
Administrators must ensure ALL non-Portal users are given at least R(ead) tool rights for the Password and Security Settings (also known as Account Settings in Classic Campus) tool.
Add or Update Your Account Security Email
To establish your Account Security Email address for the first time, click the Add button in the Account Security Email Column.
To change your existing Account Security Email address, click the Edit button in the Account Security Email column (Image 2).
This information is based on the assumption that Password Reset functionality is enabled at your district.
If your Account Settings screens looks different than this, please see the Updating Account Settings (Password Reset Not Enabled) section below.
If you forget your Campus username or password, this email address will be used to help you through the recovery process. This recovery process is initiated by the Forgot your Password? and Forgot your Username? buttons on the Campus login screen.
| Add an Account Security Email Address | Update an Existing Account Security Email Address |
|---|---|
|
|


Once Add or Edit is selected, you will be redirected to the Set/Change Email editor. Enter your New Account Security Email and Confirm the New Account Security Email, enter your current password, and click Save.
| Add a New Email Address | Update the Current Email Address |
|---|---|
|
|


Once an email address is added, a message will appear in the editor indicating you must confirm the address.
If the email address you entered is correct and active, you will receive an email containing a unique URL, which you must select to confirm the address (see image below).
Failing to complete the email validation process will not prevent the user from being able to log into Campus.
Users are still highly encouraged to validate their email address to ensure they can successfully access this email in the event they need to retrieve a forgotten username or password.
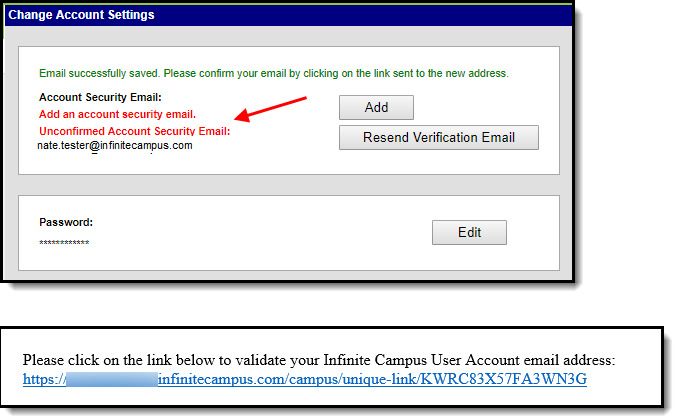
Image 2: Confirming the Account Security Email
Once you have selected the URL in the email, a message will appear indicating the confirmation was received (see image below). Your Account Settings are now properly established in Campus.

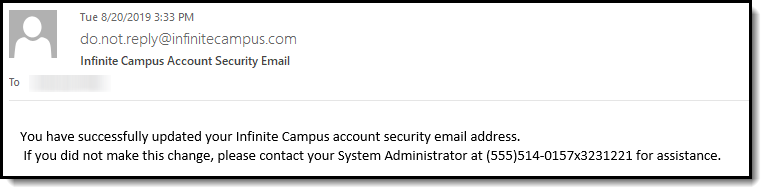
You will also receive an email to this address validating the change (see example below).
Updating Your Account Password
If you would like to change your account password, click the Edit button in the Password column (Image 3).
 Image 3: Changing Your Account Password
Once Edit is selected, you will be redirected to the Change Password editor. Enter your Old Password (existing password), the New Password you wish to create, Verify the New Password, and click Save (Image 4).
The percentage meter on the side will indicate the strength of your new password. Red indicates weak, yellow indicates medium strength and green indicates a strong password. Users will not be allowed to save weak or medium (red or yellow) passwords.
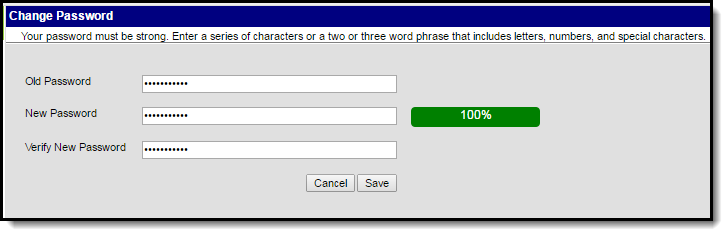
Image 4: Entering and Saving a New Account Password
Your new password is now saved in Campus and the Account Management screen will show "Password successfully saved" (Image 5).
 Image 5: Indication of a Saved Account Password
Enabling Time-Based Multi-Factor Authentication
As an increased layer of protection for your Infinite Campus account, users can enable time-based multi-factor authentication functionality. When enabled, users are provided a unique QR code and Text Code which requires the user authenticate their account using a device and an Authenticator application (such as Google Authenticator, Authy, LastPass, etc).
This feature can only be applied to non-Campus Portal accounts.
BIE Users: This functionality is unavailable at this time.
To enable this feature, click the Options button (Image 6).
 Image 6: Time-Based Multi-Factor Authentication Options
Mark the Enable multi-factor authentication checkbox and click the Save icon. Time-based multi-factor authentication is now enabled on your account (Image 7).
 Image 7: Enabling Multi-Factor Authentication
Once multi-factor authentication is enabled, the first time you log into Infinite Campus you will see a page showing a unique QR Code and Text Code. Using a device (such as cell phone), download an authenticator app (such as Google Authenticator, Authy, LastPass, etc) and use the app the scan the QR Code or enter the Text Code. This will authenticate your device and tie it to your Campus account. In future Infinite Campus logins, the device you just registered will need to be available to authenticate your account prior to being logged into Campus.

If you have enabled Multi-Factor Authentication but are having trouble completing the process or have changed your mind, you can disable it by unchecking the Enable multi-factor authentication checkbox and selecting Save.

NOTE: Once you have successfully logged into your Infinite Campus account at least once using multi-factor authentication, you can no longer access or select this checkbox. You must first log into Infinite Campus and disable multi-factor authentication via the Account Settings tool.
Future attempts to log into your Infinite Campus account will display a screen like the one shown below (Image 8). Open your authenticator app on your registered device and enter the code displayed in the authenticator app into field on the Infinite Campus login screen (Image 8).
Once entered, make sure the Recognize this device in the future checkbox is marked and click Continue. If the code you entered is correct, you will be logged into Infinite Campus.

Image 8: Logging in Using an Authenticator Code
For security reasons, if you lose the phone or device you registered to authenticate your account, you should click the Reset Registration Code button in the Account Settings tool (found by clicking the Options button) and repeat the process of registering a device using your new phone or device (Image 9). This process removes the ability for the lost device to be used to authenticate your account.
 Image 9: Resetting Your Registered Device
Account Settings if SAML SSO is Enabled
If SAML SSO functionality is enabled, users will not be allowed to modify any account settings. All account modifications are performed by your Network Administrator.
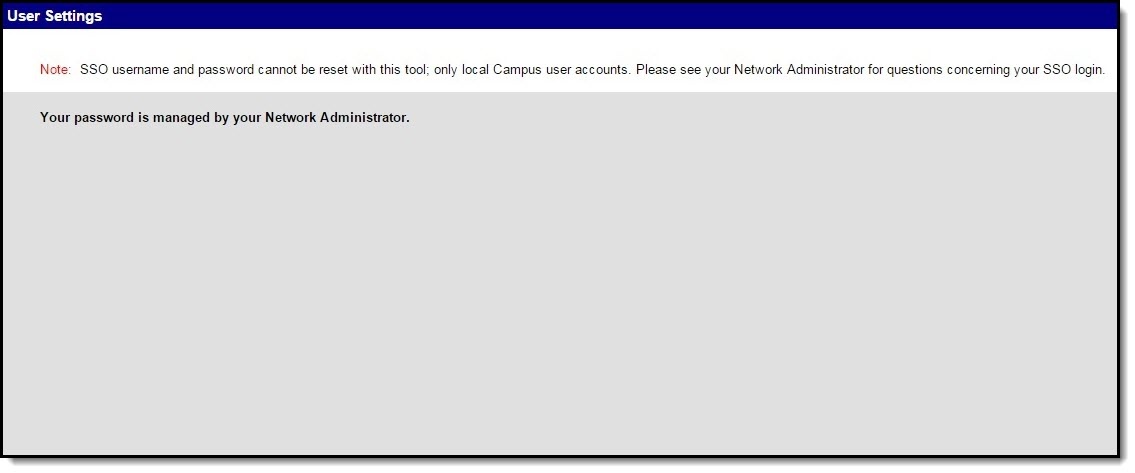
Image 10: Account Settings - SAML SSO Enabled
Account Settings for Student and Parent Portal
For more information about Account Security Email, Password, and E-Signature PIN settings within the Student and Parent Portal, see the following articles:
Troubleshooting Account Security Email Addresses
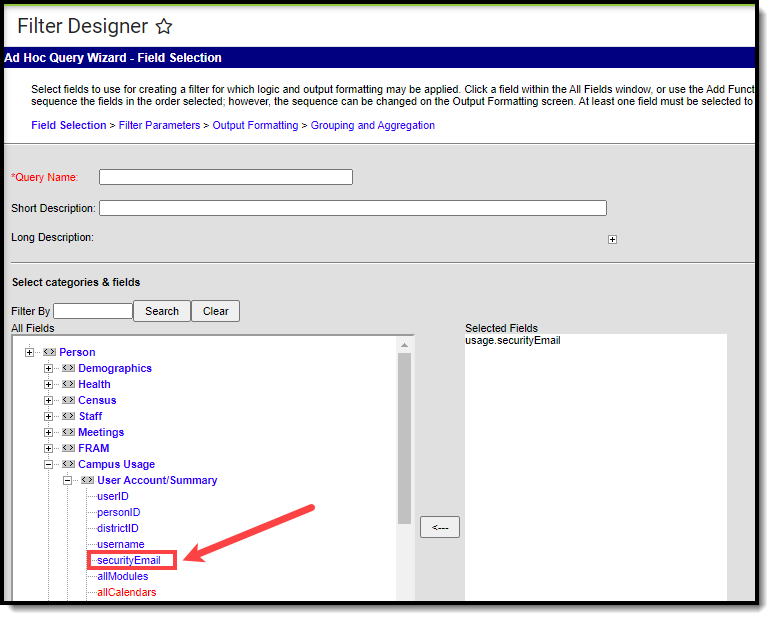
Administrators can view and access Security Email Addresses via the usage.securityEmail field in Ad Hoc Reporting (Census/Staff > Campus Usage > User Account/Summary > securityEmail).
This information can help administrators troubleshoot account issues, particularly for those who have forgotten their Security Email Address and are unable to complete the login process.