Custom Forms are supplemental documents that can then be linked to a person's record in Campus, such as forms associated with Special Education and Health services. This format is used to submit form data to a server, receive a response, and incorporate it back into a form that may be printed. Districts can create their own forms that pull information from the database onto the forms as well as save custom fields to the server. Custom Forms are uploaded at System Administration > Custom Forms. See the Custom Forms documentation for additional information.
Information in this article refers to Adobe 11. Instructions may differ for different version of Adobe.
Only PDFs created using Adobe Acrobat Professional or Adobe DC are supported for Custom Form creation. JavaScript is NOT supported.
Custom Forms
Custom forms provide a way for districts to quickly produce and store single use documents associated with a person. Forms are useful for district customization or for reference in the future.
Requirements
To make a Custom Form, the following is required:
- A document that can be converted into a PDF document (Word, Excel, Powerpoint, etc.)
- A list of Reserved Name Field, listed at the end of this document
- Ability to upload custom forms. See the Tool Rights documentation for additional information.
When the form field is added to the document and named using an ad hoc or reserved field name, the data will be populated from existing information in Campus when the document is attached to a student.
Documents using fillable field names are called Interactive documents. There are also Blank documents, which do not use fillable fields.
Field names cannot exceed 300 characters and ideally would not exceed 50 characters.
Conversion of Original Document to PDF
It is recommended that the majority of editing be done prior to conversion to PDF. Remove extra lines, spaces and tabs, boxes, etc. Edits can be made in the PDF view, but it is more difficult.
There are two (2) ways to convert documents to a PDF file using Adobe Acrobat Pro. Consult the Adobe Acrobat documentation for additional details.
Option 1:
- From the main document, select the File menu and select the Print option.
- Select the Acrobat Distiller printer from the printer dropdown list.
- Click the OK button.
Option 2:
- From the Word document, select the Adobe icon in the toolbar or select the Adobe PDF format option in the header row.
- If the document has been modified since last saved, it will need to be saved again. Once saved, a second Save As box will appear asking for the location to which to save the PDF document. Enter the appropriate file name and select the appropriate folder.
- Select the Convert to Adobe PDF option and select the file location for the new file.
- Click the Save icon. The document will process; the length of time this takes will vary depending on the size of the document. Once finished, the PDF document will appear in the folder where it was saved.
Create Fillable Fields in Adobe Acrobat Professional©
- Review the PDF document to be sure the format is correct.
- Click on the Form Tool in Adobe Acrobat to add the Form fields. If creating a text field, use the text field tool. Refer to the Adobe documentation for proper use.
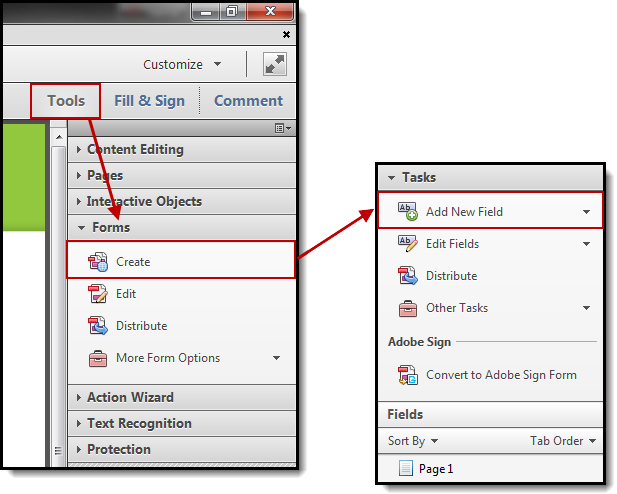
- Click and drag the cursor to create a field in the chosen area.
- In the Field Properties box, name the field using an Ad hoc or Reserved Name field.
- Click on the Options tab and check for other pertinent settings.
- Click OK when finished.
- Check boxes, e.g. Yes/No, will have the same name but different values if you want them to be single select check boxes.
- Radio buttons may be used in cases where a choice does not need to be undone.
- For fields that will have multiple lines of text written in them, check the Multi-line choice and uncheck the scrolling long text field.

An interactive Custom Form created by Acrobat Professional can contain the following form elements:
- Check boxes
- Radio buttons
- Text fields
- Dropdown lists
- Date fields
- Number fields
- Customized look and feel of elements via property windows
Double click the element or right click/properties to customize elements.
The following fonts are supported. Campus recommends using only one of these fonts to ensure that forms display correctly. Any other fonts will be converted to Times Roman.
- Helvetica
- Times New Roman
- Times Roman
- Courier
Add Custom Forms to Campus
Use the Custom Forms tool to make the document available for users. Users must have rights to the Custom Forms tool in System Administration to upload a document. See the Custom Forms documentation for additional information.
Reserved Name List
Student Information Fields | Notes |
|---|---|
stateID | |
studentID | |
studentName | Displays Last Name, First Name Middle Name |
studentFirstLastName | Displays First Name, Middle Name Last Name |
studentFirstName | |
studentLastName | |
studentMiddleName | |
studentDOB | This field will map to a date field. |
grade | |
studentGender | |
studentAge | |
studentHomePhone | |
studentAddress1 | |
studentAddress2 | |
| Guardian Fields | |
guardian1Name | Displays Last Name, First Name, Middle Name |
guardian1FirstLastName | Displays First Name Middle Name Last Name |
guardian1LastName | |
guardian1FirstName | |
guardian1MiddleName | |
guardian1WorkPhone | |
guardian1Relationship | |
guardian1HomePhone | |
guardian1Address1 | |
guardian1Address2 | |
guardian2Name | Displays Last Name, First Name, Middle Name |
guardian2FirstLastName | Displays First Name Middle Name Last Name |
guardian2LastName | |
guardian2FirstName | |
guardian2MiddleName | |
guardian2WorkPhone | |
guardian2Relationship | |
guardian2HomePhone | |
guardian2Address1 | |
guardian2Address2 | |
| School/District Information Fields | |
districtInfo | |
districtName | |
districtAddress1 | |
districtAddress2 | |
districtPhone | |
schoolName | |
schoolAddress1 | |
schoolAddress2 | |
schoolPhone | |
currentDate | This field will map to a date field.
|
user | Displays the user's full name |
username | |
tmName1-tmName12 | tm = Team Member |
tmTitle1-tmTitle12 | tm = Team Member |
caseManager | |
caseManagerTitle | |
caseManagerPhone | |
