To ensure a successful upload process, it is recommended that users complete the import one to two weeks before the Food Service accounts will be utilized and before the first transactions, including deposits, are made. This lead time will give you enough time to contact Campus support if you have any issues.
The Account/PIN Import tool uploads and matches data for the initial import of student and staff Food Service/POS accounts. Users are finished when all four steps are completed.

See the Account/PIN Import Tool Rights article for information about rights needed to use this tool.
Before You Begin
Once the import is completed and Food Service accounts have been created, this tool cannot be used again.
The Before You Begin setup asks questions and provides a series of checks to ensure that your district can use Account/PIN Import without any assistance from Infinite Campus Support. If a legacy food service system used family or household accounts, users cannot proceed to the next step of Account/PIN Import. They will need to contact Campus Support to have their data imported.
The Existing Food Service accounts in the Infinite Campus SIS is a field that assures there are no food service accounts in Campus.
Three preferences, found in Food Service > Setup > General Preferences, must be unchecked before proceeding. When unchecked, their state will appear as "OK to proceed" with a green checkmark. Once the Food Service/Point of Sale data conversion is complete, these preferences can be rechecked.
Select one of the options from Are PINs being imported:
- Yes - PINs will be included in the template file uploaded in step 2.
- No - New PINs will be generated during the final import.
- No - The district will use Student Numbers as PINs and the District will run "Use Student Number as PIN Wizard" when conversion is complete.
Click Next when all requirements are met.
Template Download & File Upload

The Template Download & File Upload step is used to download blank templates or templates that are pre-populated with students or staff that are in Infinite Campus SIS. Once completed, these templates are then uploaded to Infinite Campus to create new Food Service accounts.
Column headers must be spelled the same way as in the template file. If a user wants to keep notes in the upload file, they can do so, but it must be in a column to the right of the PIN column and not contain any headers.
A person who is not staff or a student could be on either file, such as a parent account with a person ID and no current staff/student record.
- Click Download Template(s).
- Select from one of the following templates: Enrolled Campus Students, Employed Campus Staff, Blank Student, or Blank Staff.
When opening these files, select Don't Convert. Do not remove leading zeros that may be included in the student/staff number, person ID, or PIN.

- Complete and save each template. Review the Fields in the Student Template and Fields in the Staff Template tables for more information regarding the columns within the template.
- Click Upload File(s).
- Select the Patron Type. This opens the Import File Upload side panel.
- Click Select files… and choose a completed template.
- Click Save.
- Click Next.
Fields in the Student Template
| Name | Type | Required | Used in Data Match | Description |
| First Name | string (50) | Yes | Yes | The student's first name. |
| Last Name | string (50) | Yes | Yes | The student's last name. |
| Student # | string (15) | No | Yes | The district-wide unique identifier for the student. |
| Birthdate | date | No | Yes | The student's birth date formatted mm/dd/yyyy. |
| Person ID | int (9) | No | Yes | The district-wide unique identifier for each person. The Person ID should match what is in the Infinite Campus SIS. |
| Balance | string (15) | No | No | The beginning balance of the Food Service account. |
| PIN | string (15) | No | No | The district-wide unique identifier account PIN for the Food Service account. If left blank, the conversion will generate a random 4-digit PIN. |
Fields in the Staff Template
| Name | Type | Required | Used in Data Match | Description |
| First Name | string (50) | Yes | Yes | The staff's first name. |
| Last Name | string (50) | Yes | Yes | The staff's last name. |
| Staff # | string (15) | No | Yes | The district-wide unique identifier for the staff. |
| Birthdate | date | No | Yes | The staff's birth date formatted mm/dd/yyyy. |
| Person ID | int (9) | No | Yes | The district-wide unique identifier for each person. The Person ID should match what is in the Infinite Campus SIS. |
| Balance | string (15) | No | No | The beginning balance of the Food Service account. |
| PIN | string (15) | No | No | The district-wide unique identifier account PIN for the Food Service account. If left blank, the conversion will generate a random 4-digit PIN. |
Error Report

The Error Report button on Step 2 checks for all critical errors that would cause a file to be rejected. Discrepancies between the existing information and uploaded templates will appear within the Error Report, with the most recent upload errors displayed on top. Any line number listed in the error will match their row in the .csv file. If there is an error when uploading a file that does not add a line to the Error Report Log, the session has timed out, and the page must be refreshed/reloaded.
| Errors | Descriptions |
| File Level Errors | These errors will report only one error line per upload attempt.
To keep notes in the upload file and have more than seven columns in the file:
|
| Person Level Errors | These errors will report only if there are no file-level-errors and can report multiple error lines per upload attempt.
|
There may be other errors that appear on this log that are not described here. For assistance with any unclear errors, users should contact Support.
Data Matching

The Data Matching step is used to match students and staff within Infinite Campus SIS to the data within the file uploaded in step 2. Each field that was entered will be matched to existing information and a Confidence percentage will be generated in the table. When Begin Data Match has been used, the Student and Staff tabs will only display patrons with less than 100% match or critical errors that must be fixed. To see patrons with a 100% match as well, turn on the Show All Patrons Records Toggle.
First name and last name alone will not provide a match. To form a match, the first name and last name must be combined with another data point (birthdate, Student/Staff #, or Person ID).
The Record # does not correspond to the row number in the .csv file.
- Click Begin Data Match Process in the Patron Matching section.
- Review all data using the View button and/or Print a Report.
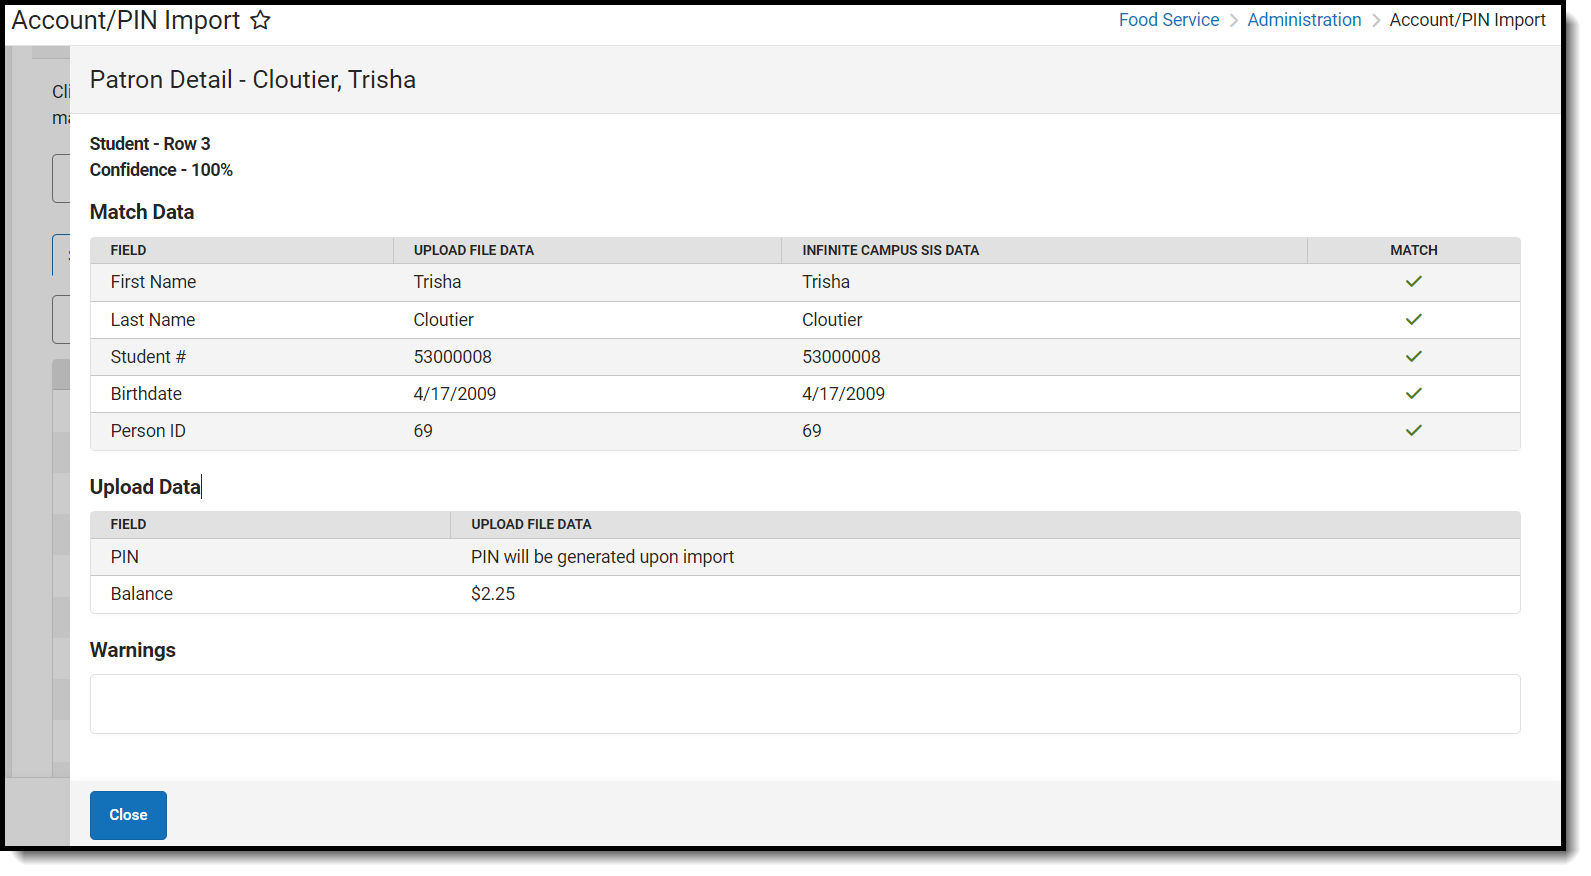 Patron Details after clicking the View button
- Review the match data for anyone less than 100% to ensure it is the correct match. If it is not the correct match, then correct the information on the data file and reupload.
- After uploading and reviewing the data match, click Next.
Printing Student or Staff Report
After using Begin Data Match Process, the data can be reviewed in a .csv file by clicking Print Student Report or Print Staff Report. The reports include the original upload data, matched data, duplicate warnings, confidence %, and error messages. The report button that appears depends on whether the Student or Staff report has been selected.
The reports can be used to make changes, but the headers for rows H-O must be deleted.

Errors in Data Matching

Critical errors, such as No Match and Duplicate, must be corrected or removed from the upload file before moving on to step 4.
| Errors | Descriptions |
| No Match | Appears when a patron cannot match to a PersonID and receives a 0% confidence rating. |
| Duplicate | Appears when duplicate PersonID and/or PIN records between the Staff and Student patron types. |
Information errors, which appear after clicking a patron's View button, show that a data point did not match and lowers the % Confidence. These errors will not stop you from proceeding to the next step.

% Confidence Field
The % Confidence field displays a number based on the data parameters that match an existing student and one being uploaded. Data matching will compare all available data points provided and come up with the Campus person record that most closely matches. The more data points provided that match, the higher the Confidence %.
If there is a 0% match and there is a person in Infinite Campus SIS that should match to the person on the file users should either:
- Add more data to the file to increase the match percent and re-upload the file.
- Remove the person from the data file and, after conversion is complete, add the PIN and balance manually.
If there is no person currently in Campus SIS to match to, add the person in Campus SIS and perform the data matching process again.
If there is a duplicate, remove the duplicate record from the file, correct the data, and re-upload the file.
Tip: Check both the Student and Staff tabs for errors and warnings.
Test and Final Import

A test import must be run before the final import.
- Click Test to run a test of the import process. This can be done multiple times, if desired.
If any of the error messages need to be clarified, contact Support for assistance.

- If the test import is successful, click Import. This cannot be undone or done again.
- Use the Import Report button below to generate the final Patron Import Report.

- Verify that all Accounts and PINs were created.
- After the import is complete:
- If "Use Student Number as PIN" was selected on step 1, run the Use Student Number as PIN Wizard (found in Food Service>Wizards) to generate PINs.
- This tool will only allow limited access to upload file details and reports; the ability to re-import will not be available.

