Tool Search: Data Comparison
The Ed-Fi Data Comparison (Reconciliation) tool compares state Ed-Fi data against data existing within the Campus database. Users can identify errors and gaps in data existing at the state and Campus level and correct this data to improve data quality and ensure proper state reporting and funding.
 Ed-Fi Data Comparison Tool
Read - Access, import and upload files for data comparison.
Write - Provides no function for this tool
Add - Provides no function for this tool
Delete - Provides no function for this tool
For more information about Tool Rights and how they function, see the Tool Rights article.
Prerequisites
- Ed-Fi functionality must be enabled via Enable Ed-Fi System Preference.
- Proper values must be established within the Ed-Fi Config tool. This ensures Campus is communicating with Ed-Fi and successfully sending data to their servers.
- Ed-Fi IDs need to be assigned to users via the Demographics tool.
Reconcile Data Between the State and Campus
The first step in reconciling data between data provided by the state and information within Campus is to create a mapping. This mapping indicates how to align each column of data in the state file with its respective Campus field and data. Once mappings are created, users can continue to reuse them as newer state files come in (with the assumption data locations in the state file continue to match the selected mapping), making for quick and easy comparison of data without the need for tool or data setup.
Create a New Mapping
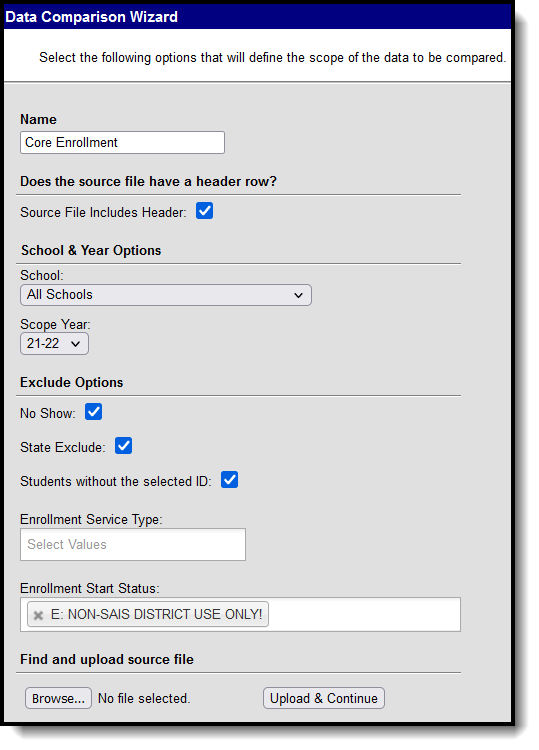
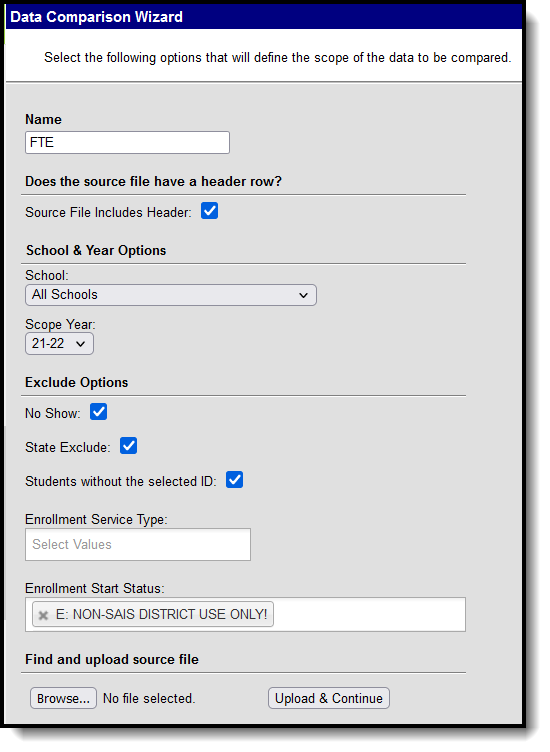
- Click the New icon.
- Give the mapping a Name.
- When the source file from the state contains a header row, mark the Source File Includes Header checkbox.
- Select the School to compare the data to against the source file. All Schools in the districts can also be done at one time.
- Select the Scope Year of the data being compared.
- Review the following Exclude Options to determine which items are NOT included in the comparison:
- No Show excludes enrollment records that are marked as No Show.
- State Exclude excludes enrollment records that are marked as State Exclude.
- Students without the Selected ID excludes students who do not have the appropriate ID assigned.
- Enrollment Service Types excludes the selected service type from data comparison.
- Enrollment Start Status excludes enrollment records with that selected value from data comparison.
- Click Browse. Follow the instructions on your computer screen to locate the correct file.
- Click the Upload & Continue button.
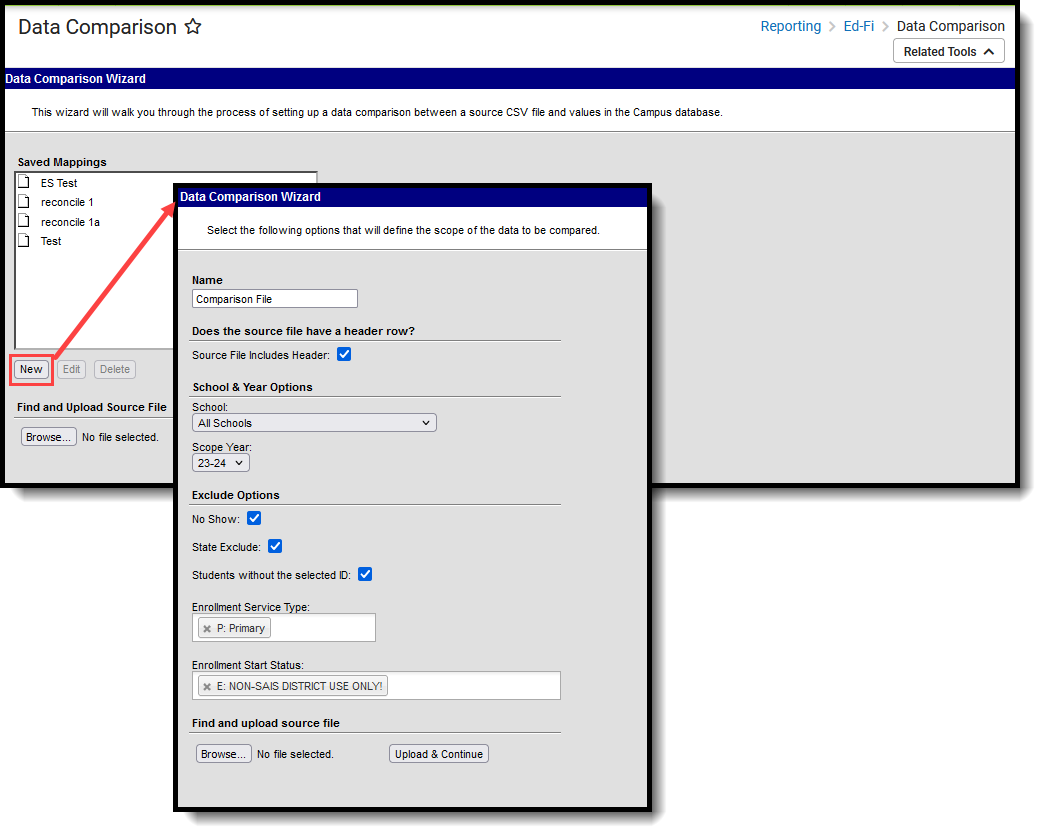 Data Comparison Data Entry and Upload
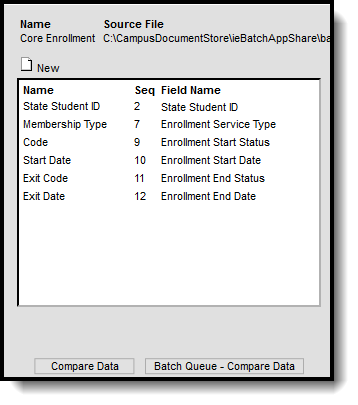
Once the file has been uploaded, each column in the source file needs to be mapped to the corresponding fields in Campus for accurate comparisons.
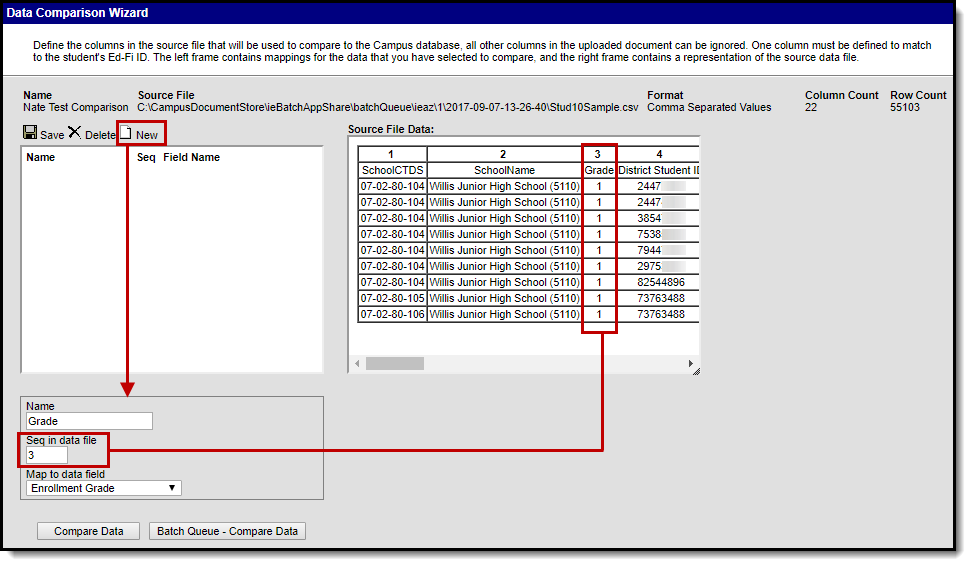
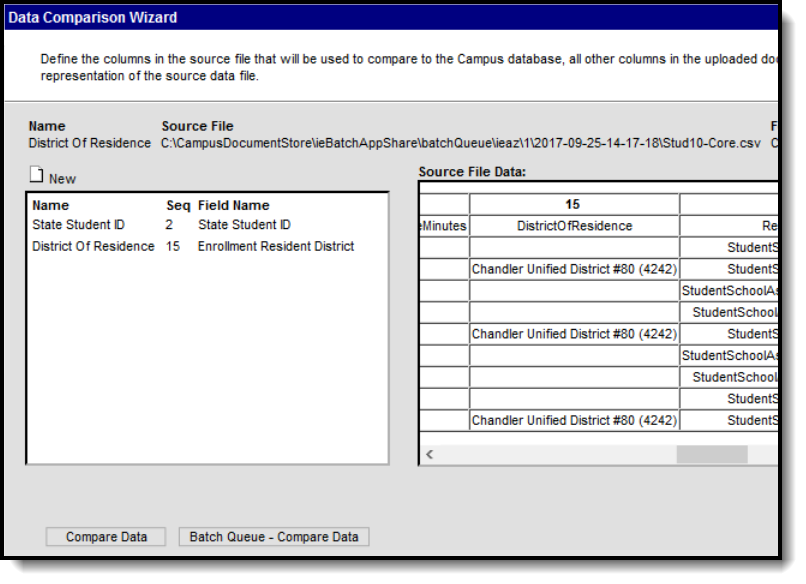
- Click the New icon. The Name, Sequence in data file, and Map to data field fields are displayed below.
- Enter the Name of the data being compared. This value can be any name to assist in the identification of the compared data. It is not tied to any other record. In the image below, the Grade column (3) is being mapped to the Enrollment Grade Field, so the entered name is Grade.
- Enter the Sequence in data file number. This is the column number listed above the column in the Source File Data area, which corresponds to the data that is mapped to a Campus field. In the image below, a Sequence of 3 is entered to compare the Grade column data with the Enrollment Grade field selected. This step ensures the right data is compared between the state data file and Campus. Failure to enter proper sequence numbers results in data comparison errors.
- Select what Campus field to map to the data file column by selecting a value in the Map to data field. When
- Click the Save icon. The mapping displays in the window below.
- Repeat steps 1-4 until all desired data has been mapped.
Arizona Users: There are five additional fields added to the bottom of this list. Separate mappings must be done for each of these fields, and they cannot be combined with any other fields except student identifiers. Adding additional mappings that are not student identifiers results in false results. When doing an enrollment FTE comparison for students with split enrollments, use these additional fields to parse out or differentiate split enrollments.
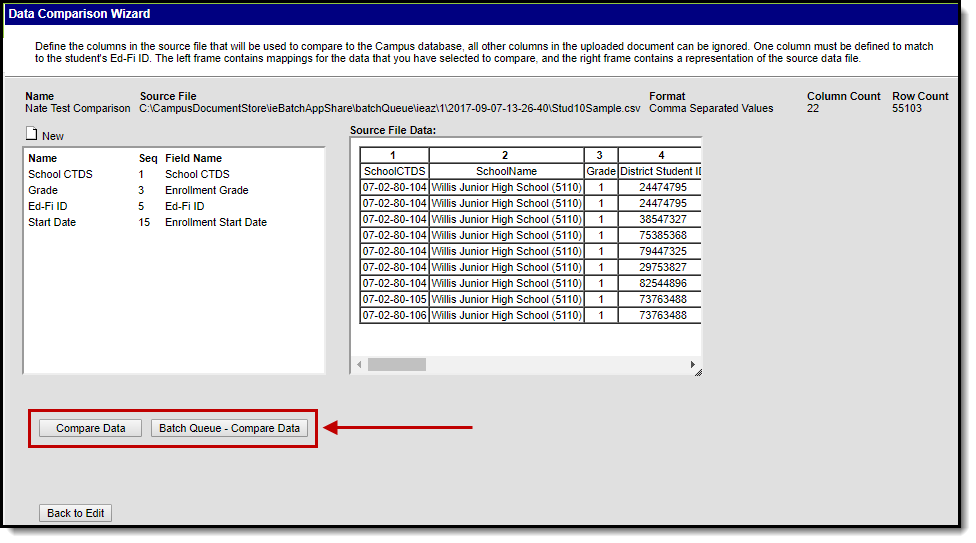
When all mappings created and saved, click the Compare Data button to initiate generation of the comparison file or click the Batch Queue - Compare Data button to send the file to the batch queue where it processes in the background.
When an error occurs in the mappings or additional or modified mappings are made, click the Back to Edit button at the bottom of the screen.
Once the file finishes processing, it downloads to the local hard drive or network as a CSV file. Review the document to understand the differences in data between what is entered in Campus and what exists at the State.
Review Data Using an Existing Mapping
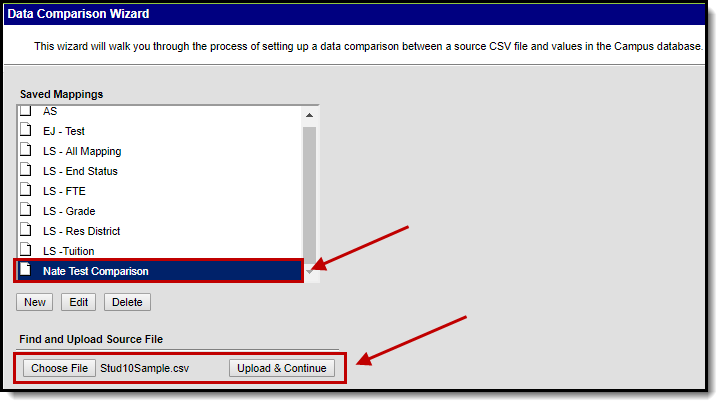
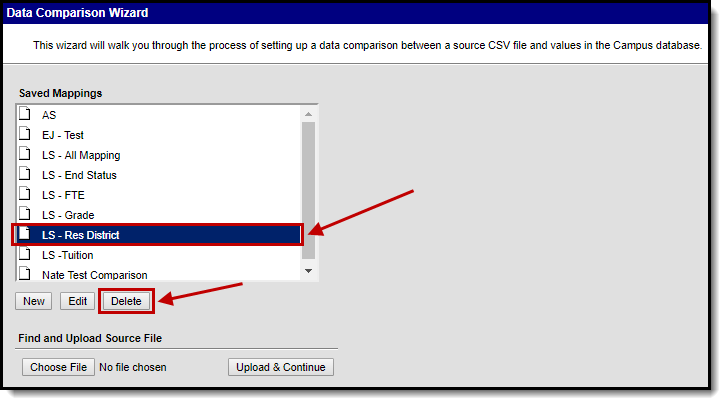
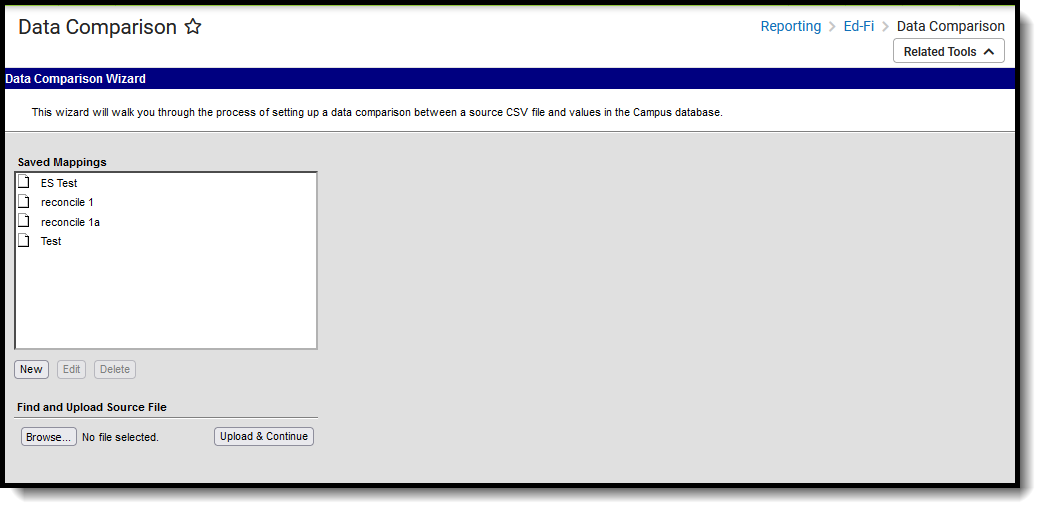
- Select the mapping from the Saved Mappings window.
- Upload the new state file by clicking the Choose File button. Follow the instructions for locating the file, then choose Open.
- Click the Upload & Complete button. The Mapping screen displays.
Review the existing mappings and, when data properly matches between the sequence and field name, click the Compare Data or Batch Queue - Compare Data fields.
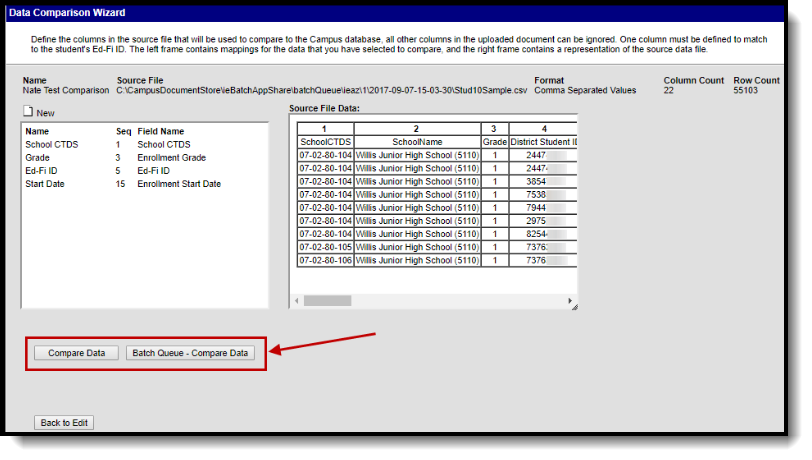 Compare Data
Edit and Delete Mappings
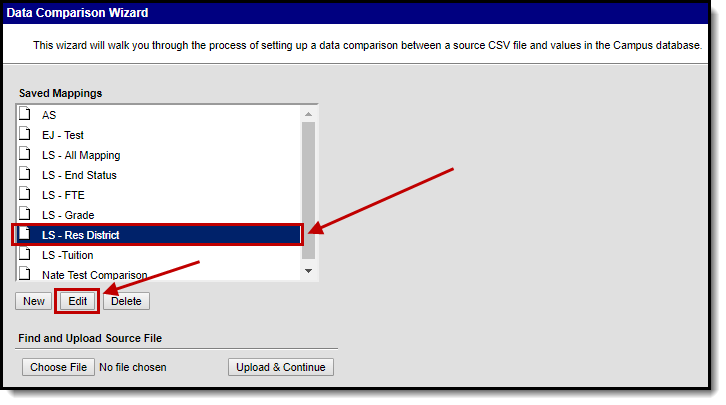
To edit an existing mapping, select the mapping in the Saved Mappings window and click the Edit button.
To delete an existing mapping, select the mapping in the Saved Mappings window and click the Delete button.
For Arizona Districts: Comparing Data Against AzEDS Reports
