Tool Search: Application Processing
The Online Registration Application Processing tool allows district staff to review and process applications entered using Online Registration.
After a parent or guardian submits an Online Registration application, the designated staff person (counselor, front office staff, etc.) can begin processing the application. You can search for applications by status, first name/last name of the person who entered the registration, application number (assigned when the application is submitted), or email address of the person who entered the registration.
Search fields display on the Online Registration Search tool and search results display on the Search Results tool.
 Application Processing Tool
See the OLR Application Processing Tool Rights article for information on available tool rights.
Important Information About this Tool
- Staff can only search for applications associated with the calendar rights assigned to them (when the Disable Calendar Filter for Application Processing checkbox is not marked). For example, a user who has rights to the middle school and not to the high school can only view and approve applications that contain at least one middle school student.
- This means that if an application has a middle school student and a high school student, someone with only calendar rights to the middle school will be able to process that application.
- If there are multiple students on a family application, the school that is first to process the application with a student in their school approves the entire family OLR application.
- When you change the status of an application, the parent/guardian receives an email (assuming an email is assigned to that status in OLR Status).
- Applications submitted by staff are NOT uploaded to Census > Person Documents even if the Upload submitted receipt on the application post option is selected in the OLR System Settings.
- After approving and posting an application for a new family, you must create enrollment records (this can be done via Student Processing).
- Tool rights can impact which options are displayed. For additional information, see the Online Registration Tool Rights documentation.
Search for Applications
 Application Processing Tool
- Use the field descriptions found in the Search Field Descriptions section to complete the fields on the Online Registration Search screen.
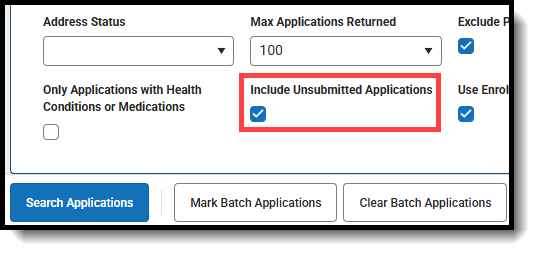
Tip: Select the Include Unsubmitted Applications checkbox to include applications that the parent/guardian may still have in progress. - Click Search Applications.
Result: The Search Results tool displays with a list of applications matching the search results. - Select the application you want to process from the application menu.
Result: The names of the student(s) in the application are displayed at the top section.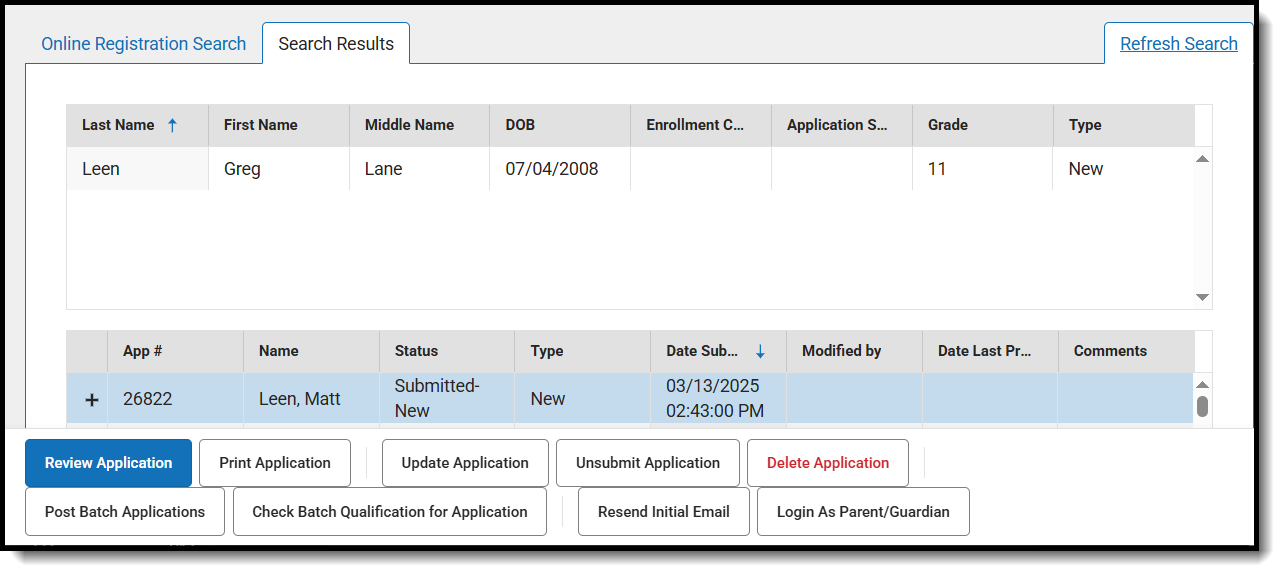

Search Field Descriptions
| Field | Description | ||||||||||||||||||||||||||
|---|---|---|---|---|---|---|---|---|---|---|---|---|---|---|---|---|---|---|---|---|---|---|---|---|---|---|---|
| Application Number | System-assigned number associated with the application. | ||||||||||||||||||||||||||
| Student Number | Locally assigned identification number for the student. This number is created when the enrollment is saved. | ||||||||||||||||||||||||||
| Student First Name Student Last Name |
Legally recognized name of the student. | ||||||||||||||||||||||||||
| First Name Last Name |
Legally recognized name of the parent/guardian who entered the application. | ||||||||||||||||||||||||||
| Email Address | Email address entered when the application was created, usually of the parent/guardian. | ||||||||||||||||||||||||||
| Application Start Application End |
Date fields used as a range to return applications entered between the two dates. | ||||||||||||||||||||||||||
| Configuration Group | The OLR Configuration Group. | ||||||||||||||||||||||||||
| School Required |
Lists the schools for which applications are returned. This is a multi-select field and users may select as many schools as desired. | ||||||||||||||||||||||||||
| Student Grade Level | Select the student grade levels for which to return applications. This is a multi-select field; users may select as many grade levels as desired. | ||||||||||||||||||||||||||
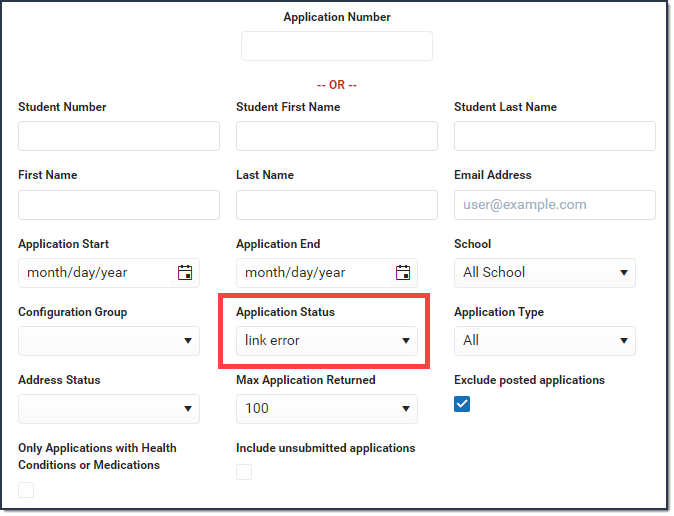
| Application Status | Indicates the status of the application. This includes all core statuses, link errors, post errors and custom statuses. This is a multi-select field; users may select as many application statuses as desired.
| ||||||||||||||||||||||||||
| Application Type Required |
Indicates the assigned type of application - Existing, Existing with new student, Existing with Parent Removed, New.
This is a multi-select field; users may select as many application types as desired. The Existing with Parent Removed Application Type indicates the parent is removed through relationships rather than households. | ||||||||||||||||||||||||||
| Address Status | Indicates whether the address was changed. | ||||||||||||||||||||||||||
| Max Application Returned | This field can be used to reduce the number of returned applications in the search results area. Options include 100, 500, 1000, and all. | ||||||||||||||||||||||||||
| Exclude Posted Applications | When marked, the search results return applications that have not posted. | ||||||||||||||||||||||||||
| Only Applications with Health Conditions or Medications | When marked, only those applications that include health conditions or medications are returned. | ||||||||||||||||||||||||||
| Include Unsubmitted Applications | When marked, the search results return applications that have been started but not completed. This option must be marked to include any unsubmitted applications in the results. | ||||||||||||||||||||||||||
| Use Enrolled School | This option checks for enrollments in the same year as the OLR application year. Only enrollments with a service type that is enabled in the Eligible Enrollment Types OLR Configuration list are checked. Enrollments in Summer School calendars are excluded. These results are in addition to normal search results. This search applies to both New and Existing applications.
This option is only available when the option is marked in the OLR System Settings tool. This option is selected by default when enabled. | ||||||||||||||||||||||||||
| Application Queue | If multiple queues exist for a school in which applications are held, choose the appropriate queue from which to return applications. |
Review an Application
The Review process allows you to approve, hold, or deny an application.
- Search for the application you want to review.
Tip: Make sure the names of the student(s) in the application are displayed at the top section. - Select an application and click Review Application. Users will be taken to the Application Review screen.
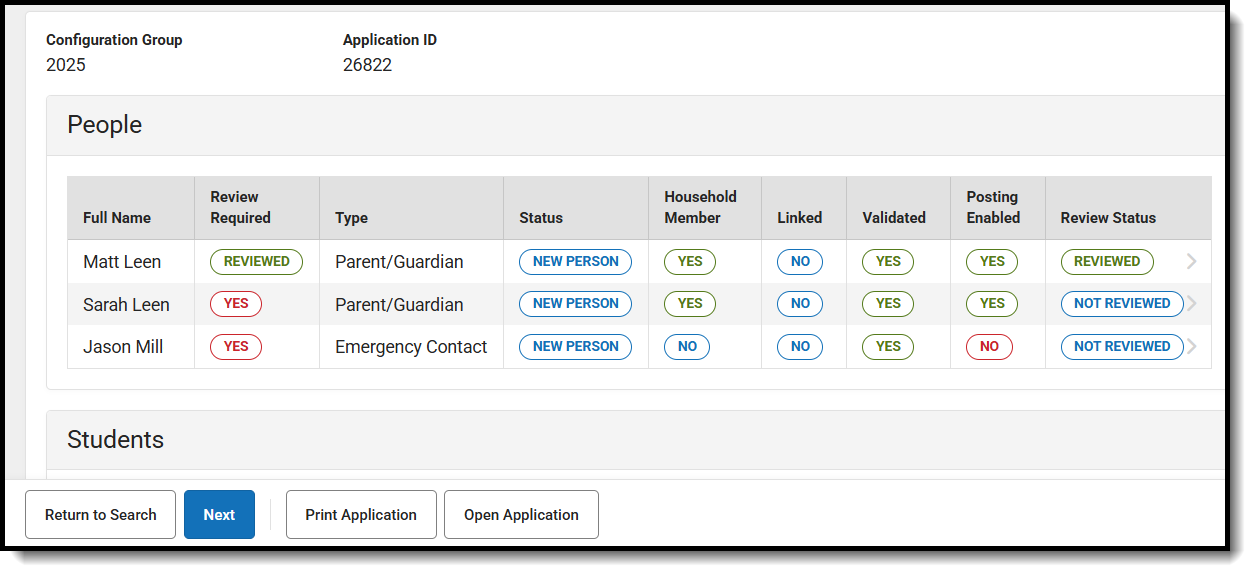
- When all People, Students, and Households have been reviewed, click Next.
See the Guidance for Approving an Application section that follows these instructions for more information about each section.
- Click a person, student, or Review Household to review an entry.
- Eliminate any duplication or data re-entry by linking or unlinking the people, addresses, and households in the application. You can use the following options to correct mistakes on the application.
Option Description Link Person This option allows you to link people in the application to people who already exist in Campus. Link Address This option allows you to link addresses in the application to addresses already in Campus. Link Household This option allows you to link households in the application to households already in Campus.
- Select the appropriate Application Status from the dropdown list: Submitted-Existing, Denied, Approved/Posted - Existing Families, Hold, or Approved/Posted - New Families.
- You may see other statuses created by your district. Check with your System Administrator to ensure you are using the correct statuses.
- Enter any comments related to the processing of this application; e.g., who approved it and when.
- When the Application Status is Approved, click Save and Post, or when the Application Status is Hold or Denied, click Save.

Application Review Field Descriptions
| Field | Descriptions |
| Full Name | Name of an individual in the application. |
| Review Required | Status that states whether a review is required.
A person record will be flagged as review required if any of the follow criteria are met:
A household record will be flagged as review required if any of the following criteria are met:
|
| Type | Shows what type of record this person is. These include Parent/Guardian, Emergency Contact, and Other Household. |
| Status | Shows whether a person exists within Campus and was pulled into the application or if they are newly added from this application. |
| Household Member | Whether or not a person on the application is in the same primary household as the applicant. |
| Linked | Whether or not that person is linked to an existing user in Campus. |
| Validated | Determines whether all required fields for that specific record (i.e., that person or student) are completed. A "Yes" indicates all mandatory questions are answered, while a "No" means missing at least one required question. Individuals will likely not see "No" unless reviewing an unsubmitted application. |
| Posting Enabled | Informs the district that the record will be posted to Campus upon application approval. Districts can disable posting for duplicate records or those they choose not to include when reviewing applications. For example, if a parent lists themselves as both a parent and an emergency contact, the emergency contact record will not want to be posted to avoid duplication. Instead of deleting it for historical reasons, we disable posting of that record. |
| Review Status | Indicates whether or not a person has been reviewed. |
Flagging People As Reviewed
The People section includes individuals who are Parents/Guardians, Emergency Contacts, or Non-enrolled children.

- From the search results, select the application the person is in.
- Select the person from the People section.
- If this is a duplicate person, you can link them via Potential Person Matches or by finding them using the search fields under Person Linking.
- When all linking is finished, click Flag As Reviewed.
- Click Go Back. Their Review Status will now appear as Reviewed under the People list. If this is an error, the status can be changed to Not Reviewed by selecting the person and clicking Remove Reviewed Flag.
Using Disable Posting For
The Disable Posting For button will stop the record in question from posting back to Campus without deleting the record from the application. For example, it can be used when a parent accidentally adds themselves twice in the application, once as a parent/guardian and once as an emergency contact. Disabling the emergency contact record will prevent a duplicate record from being created for the parent.

- From the Search Results, select an application the person is in.
- Select the person you would like to disable posting for.
- Click Disable Post For <insert person's name>.
- Click Go Back. Their Posting Enabled Status will now say No and they will no longer post back to Infinite Campus. If this was done in error, the status can be changed back Yes by selecting Enable Posting For <insert person's name>.
Flagging Students As Reviewed

- From the search results, select the application the student is in.
- Select the student from the Student section.
- If this is a duplicate person, you can link them via Potential Person Matches or by finding them using the search fields under Person Linking.
- When all linking is finished, click Flag As Reviewed.
- Click Go Back. Their Review Status will now appear as Reviewed under the Student list. If this is an error, the status can be changed to Not Reviewed by selecting the Student and clicking Remove Reviewed Flag.
Flagging Households As Reviewed

- From the search results, select the application the student is in.
- Click Review Household within the Household section.
- Use the Link Household, Link Home Address, and Link Mailing Address buttons to link any addresses within the application, or expand one of the manual search linking fields and search for households.
- When all linking is finished, click Flag As Reviewed.
- Click Go Back. A Reviewed label will now appear on the household. If this is an error, the Reviewed label can be removed by clicking Review Household and clicking Remove Reviewed Flag.
Submit an Application on Behalf of the Parent/Guardian
Applications submitted by staff are NOT uploaded to Census > Person Documents even if the Upload submitted receipt on application post option is selected in the OLR System Settings. Applications that are submitted on behalf of the parent/guardian are still editable by parents and can be submitted by parents until the application is approved/posted by district staff.
- Search for the application you want to submit by marking the Include Unsubmitted Applications checkbox on the Online Registration Search tool.
- Select the application you want to submit then click Review Application.
- Click Submit Application on Behalf of Parent/Guardian. An alert will appear to confirm the submission.
See the Guidance for Approving an Application section that follows these instructions for more information about each section. When the button for each section of the application is green and has a checkmark, the application is ready to be approved.
- Click Confirm. You will be taken to the Application Processing screen.

Guidance for Approving an Application
Fields for Review
Fields for Review are questions from the application that are designated by your district for you to review. You can see the Pleat and Question name from the application and the answer the parents provided (if no answer was given, "No saved value" is listed instead). You can designate these fields in the OLR Builder.

Open Application
If you need to review additional information that isn't provided on the review screens, you can use the Open Application button to review the application itself.
Staff users cannot submit applications within Open Application. Please use the 'Submit Application on Behalf of Parent/Guardian' option in Application Processing Review instead.
| Section | Items to Review |
|---|---|
| Household |
The Physical checkbox on the Household Address is informational only and may be used in Ad Hoc reporting. The Online Registration tool does not use or update this field.
|
| Parent/Guardian | The Parent/Guardian section displays the parents/guardians for the registering household. Review the information by clicking on each name listed, including existing parents/guardians. Move through the Demographics, Contact Information, Migrant Worker and Impact Aid editors using the Next and Previous buttons. When finished, click Save. When you are finished reviewing all parents, click Save/Continue. |
| Emergency Contact | Review the information by clicking on each name including existing emergency contacts. Move through the Demographics, Contact Information, and Verification editors using the Next and Previous buttons on the panels. When finished, click Save. When you are finished reviewing all emergency contacts, click Save/Continue. |
| Other Household | This section can be reworded in the Multi-Language Editor to record any younger siblings that are not yet in school. |
| Student | The Student section lists the students who are requesting to be enrolled in the school. Review the information by clicking on each name listed, including existing emergency contacts. Move through the Demographics, Language Information, Previous Schools, Tribal Enrollment, Relationships, Health Services and Release Agreement editors using the Next and Previous buttons.. When you are finished, click Save. When you are finished reviewing all students, click the Save/Continue button. |
Delete an Application
- Search for the application you want to delete.
Tip: Make sure the names of the student(s) in the application display at the top in the Student section. - Click Delete Application. A confirmation window displays.
- Click Delete Application.
Result: Campus deletes the application and a confirmation message displays.
Unsubmit an Application
Approved/Posted applications cannot be unsubmitted.
This option changes the status of the application from Submitted to Not Submitted. This removes the selected application from the list and allows the parent/guardian to make additional changes.
- Search for the application you want to unsubmit.
Tip: Make sure the names of the student(s) in the application display at the top in the Student section. - Click Unsubmit Application. A confirmation window displays.
- Click Unsubmit Application. Campus removes the selected application from the list and allows the parent/guardian to make additional changes.
Update an Application
Applications that have been posted cannot be updated.
This option allows the addition of another student in the same household that was not initially included when the application was submitted. This option also allows any type of census record (parent record, etc.) and adds it to the application. Mark the checkbox to add the student to the application.
- Search for the application you want to update.
Tip: Make sure the names of the student(s) in the application are displayed at the top in the Student section. - Click Update Application. An Update Application message displays.
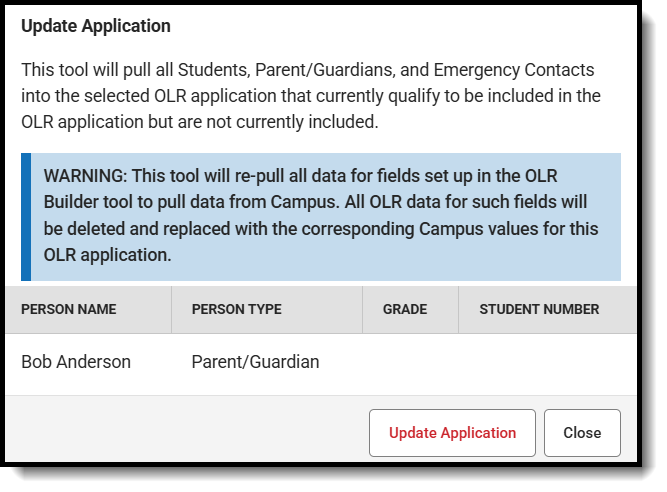
- Click Update Application. The application displays and you can view and print the application or submit the application on behalf of the parent/guardian.

Print an Application
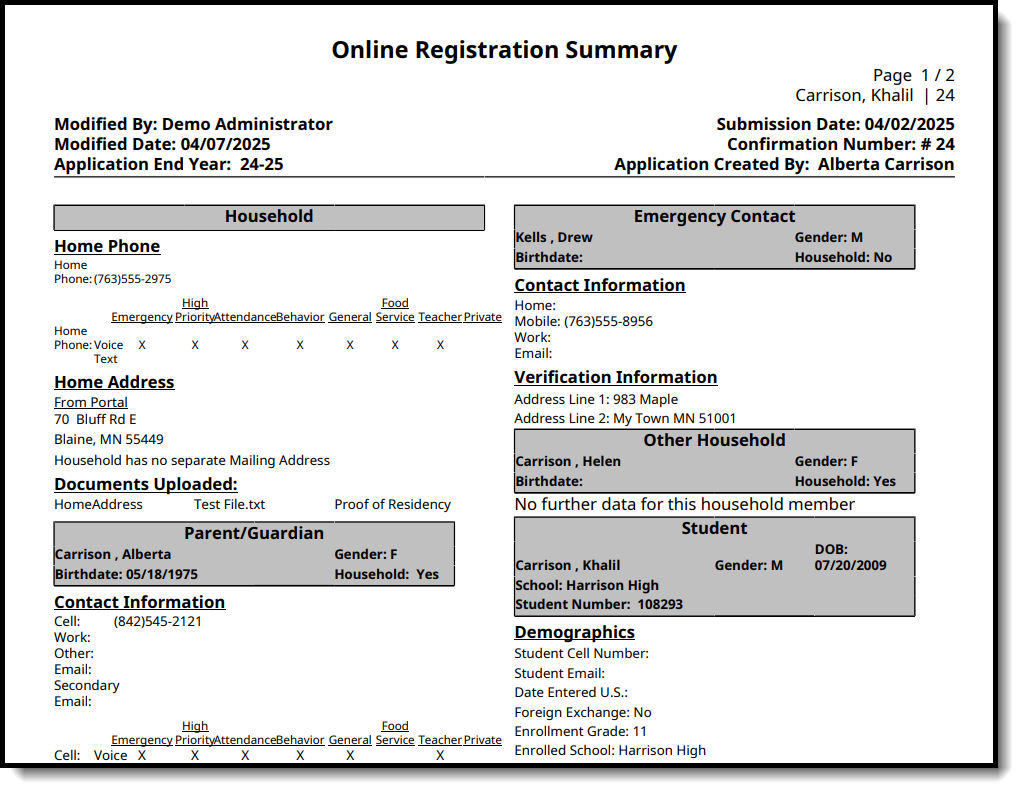
This option displays a PDF of the submitted application.
- Search for the application you want to print.
Tip: Make sure the names of the student(s) in the application display at the top in the Student section. - Click Print Applications. A PDF of the application displays. The following image is an example of the PDF file.

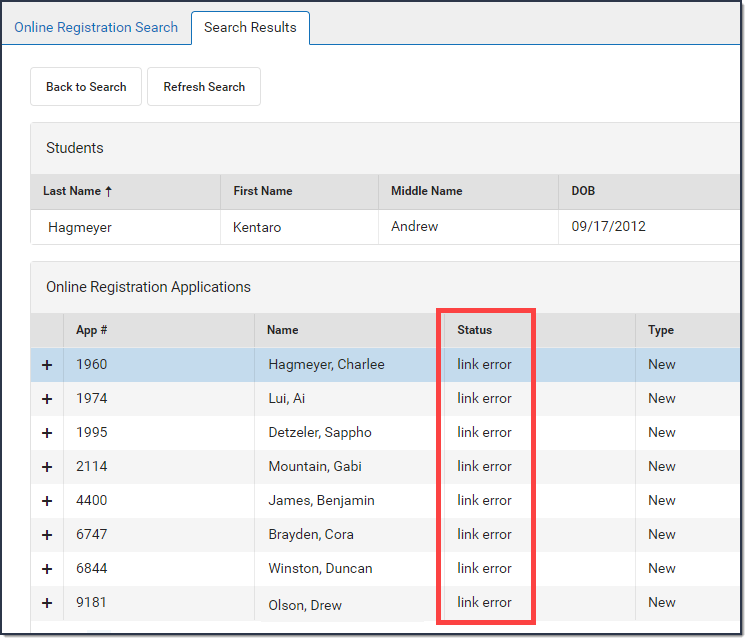
Mark Applications with Link Errors
This option changes the status of applications that have link errors to link error. Link errors typically occur when an application is started and prior to approving and posting the application, one or more of the following ID fields are removed or deleted from Campus.
- Household ID
- Address ID
- Person ID
Applications with the status link error can be found again by selecting link error in the Application Status field.
Complete the following steps to mark applications with link errors.
- Click Mark Applications With Link Errors. The Search Results display and the application status is link error.

Mark Batch Applications
This option changes the status of an application to Batch. Applications with the status of Batch can be posted en masse.
To be selected for batch posting, the application must meet the following criteria.
- The application must be in one of the following statuses:
- Submitted-New
- Submitted-New Student
- Submitted-Existing
- Submitted-Existing with New Students
- No new person records in any section.
- No students moved from the other household members section.
- All people in the application must be linked to existing Campus personIDs.
- No Parent/Guardians or Emergency Contacts added to or removed from the household.
- No changes in Guardian relationships for any students in the OLR application.
- All addresses in the application must be linked to existing Campus addressIDs; i.e., there cannot be any new addresses in the application.
- There cannot be any secondary addresses in the application.
- Either the OLR System Setting to allow batch posting applications with new medical information must be enabled or every student in the application must have the No Medication and No Medical Conditions checkboxes marked.
These same criteria are utilized for the Auto-Post Submitted Applications Eligible for Batch Posting in the OLR System Settings.
Click Mark Batch Applications. The Search Results tool displays and the batch Status for matching applications displays as Batch. 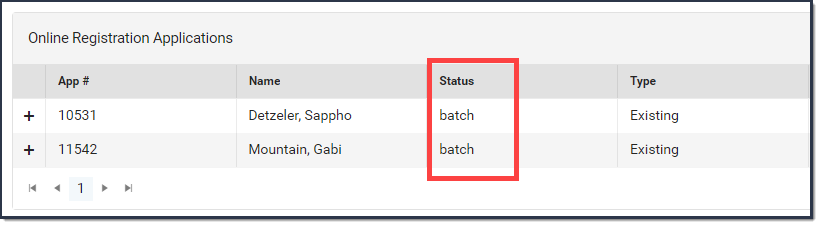
Clear Batch Applications
This option changes applications that are in the Status batch back to their original submitted status, e.g., Submitted-New, Submitted-New Student, Submitted-Existing, or Submitted-Existing with New Students.
Click Clear Batch Applications. The Search Results tool displays and the batch Status for applications previously assigned Batch now display with their original submitted status.
Post Batch Applications
This option posts all applications with the status Batch.
Click Post Batch Applications. A confirmation message displays. The application status is changed to Posted.
Check Batch Qualifications for Application
This feature checks the selected OLR application's qualifications for batch posting. If the application qualifies, a dialog box will appear stating that it qualifies. If it does not qualify, the dialog box will list the reasons why it did not.

Resend the Initial Email
This option sends the initial email the user receives to enter an application. This only works for applications started from the Email Link.
- Search for the application.
Tip: Make sure the names of the student(s) in the application display at the top in the Student section. - Click Resend Initial Email. The email is sent and a confirmation message displays.
Log in as the Parent/Guardian
This option opens up the application and appears as if you were the parent/guardian in the Campus Parent (portal) view of Online Registration.
- Search for the application.
Tip: Make sure the names of the student(s) in the application display at the top in the Student section. - Click Log in As Parent/Guardian.
Application Processing And Data Change Tracker Functionality
When utilizing Data Change Tracker reporting within OLR Application Processing, the system status briefly changes to Failed Post as part of normal systematic processes. This status is reflected in DCT Reports, however, as long as an Approved/Posted status follows, the error can be disregarded.
