Tool Search: Academic and Graduation Programs
Graduation Programs define criteria used to indicate whether students have met requirements for graduation. These programs may include requirements such as types of credits to be earned at each grade level, or specific courses that must be passed. A student can only be assigned to one Graduation Program. Changing a student from one program to another does not impact data such as test results or credits earned or in progress.
See the Academic and Graduation Programs: Graduation Program Fields article for detailed information about fields found in this tool.
See the Academic and Graduation Programs (State Edition) article if you are a State Edition user (currently North Carolina only).
See the Academic and Graduation Programs Tool Rights article to learn about rights needed to use this tool.
Add New Graduation Program
Existing Graduation Programs appear in the Graduation Programs list. Active programs are at the top of the list.

- Verify Graduation is toggled ON in the upper-right corner of the main Academic and Graduation Programs screen.
- Select New in the lower left corner of the screen to display the Add Graduation Program: Program Details editor.
Program Details
Program details must be entered and saved before entering additional program criteria.
 Add Graduation Program - Program Details
- By default, the program is marked Active. This can be unmarked. When saved, active programs are available to assign to students.
- Enter program details as needed for the program being created. Required fields must be populated in order to save. Some fields are read only and cannot be changed.
- Name: descriptive, unique name up to 50 characters
- Credit Group: controls the display of Credit Types available when setting and evaluating Credit and Course Requirements
- Code: enter the code used to identify the program (some states use CIP code, others may use the text field for other program identifiers)
- Available for Selection on Portal: mark to allow program selection on Portal graduation planning tool
- State Reported: mark if program is reported in state extracts
- Allow Planning of Alternates: mark to allow students and counselors to add scheduled alternate courses to the course plan (must indicate minimum number of alt credits if this box is marked)
- Academic Start/End Year: select a year to limit eligible students based on NCLB cohort start/end year, or leave blank to allow all students to participate
- Diploma Type: type of diploma an on-track student will receive
- School: if populated, program is only available to students enrolled at the selected school
- Flag Options: allows choice of a flag to display next to the name of any student actively assigned to the program
- HTML Description: space for entering information about the program that displays in the Portal graduation planning area
- Choose a Save option. Program Details must be save before a user is allowed to enter additional program criteria.
- Save & Stay: save all changes and remain on the Program Details screen
- Save & Close: save the changes and return to the main screen
- Cancel: return to the main screen without saving the changes
- Once saved, the new program appears in the list of Graduation Programs on the main screen.
- Add Credit Requirements, Program Criteria, and/or Course Plan Template information as necessary for the new program. Choose a Save option before moving from one screen to another.
Credit Requirements
Credit requirements need to be set for each credit type and grade level. These are suggested credits to be earned for each credit type at each grade level for students assigned this program. Credit Requirements appear in the Progress tool for individual students assigned to the program as an indicator of whether or not they are on track to meet credit requirements for graduation, regardless of when the student actually earns the credits during their high school years.
 Credit Requirements
- Enter suggested credits to be earned for each credit type at each grade level for students assigned this program.
- If desired, enter a sequence for each Credit Type in the Display Order column, then Refresh Display Order to sort as sequenced.
- Clear All to remove all settings and start over.
- Choose a Save option before moving to the next tab.
Best Practices (Credit Requirements)
Credit requirements are assigned by grade level and are the suggested pacing for the student, not hard requirements. It only matters that all credit requirements are completed by the end of a student's high school career.
- If a Credit Type is not required for a certain grade level, that credit type does not display in other program tools (Course Planner, Graduation Planning, etc.). If a credit type is not required, leave the field blank or enter '0'.
Program Criteria
Program criteria allow for setting course, test, GPA, Academic Program, or Child Program requirements or any combination thereof to evaluate the student on the successful passing of a requirement. For example, a student may meet a requirement by passing specific courses AND passing a test.
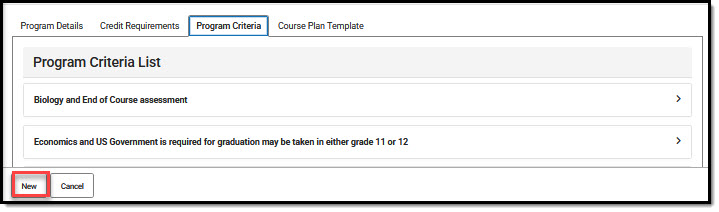
The screenshot below provides an example of an overall requirement that has been set for a Graduation Program.
 Program Criteria
New Program Criteria
- Select the Program Criteria tab. For new programs, the Program Criteria list displays "No Criteria to Display" until criteria are added. As requirements are added, they will display in the list as shown in the screen capture below.
 Program Criteria - New
 - Select New in the lower left corner to display the Program Criteria editor.
- This is what the initial screen looks like when creating a new requirement. After setting the top level requirements, you will use New Requirement to add Course, Test, GPA, Academic Program, and/or Child Program Criteria that will be used to determine whether the overall requirement has been met.
 Program Criteria - New Requirement
 - Enter a descriptive name in the Criteria Description field. This name displays in the Program Criteria List when saved.
- Logical Expression sets the AND/OR parameters for determining whether this requirement has been met. Requirements are numbered as they are added, and those numbers are used in Logical Expression. For example, if two requirements are being set (first, a Course Requirement; second, a Test Requirement), and either one can be used to meet the overall requirement, Logical Expression will be entered as 1 OR 2.
- Display Alert provides a way to display alert messages on a student's Course Plan and Graduation Plan Progress Report when requirement deficiencies exist for the selected credit type.
- Display Order is optional and can be used to sequence the order in which all the overall requirements display in the Program Criteria list if desired.
- Click New Requirement, then choose the requirement type you wish to enter. See the instructions below to learn how to enter each type of New Requirement.
- Once all requirements have been entered, choose a Save option.


New Requirement - Course
Course requirements define specific courses that must be completed and allow requirements to include courses from multiple credit types.
 Course Requirement Editor
Ensure the correct Year, School and Calendar is selected in the Campus toolbar.
- To add course requirements to the program, press the New Requirement button and select Course from the displayed list.
- Enter the Transcript/Course Number(s) for the requirement. Use Preview Course List to verify.
- Enter a State Code for the requirements if desired.
- Enter the Minimum Credits fa student must receive on completion of the course. This is a required field.
- Enter the Minimum GPA the student must achieve for this requirement, or leave blank if not applicable.
- If you wish to determine a credit category where requirement deficiencies exist and display them in student Course Plan and Academic Plan Progress Report, select the Evaluate Credits From option, and then select the desired Credit Type from the Limit Credit Type dropdown.
- Mark the Scheduling Priority checkbox if you wish students with this requirement to receive priority when this course is scheduled.
- Mark the Recommended checkbox if you wish this course to be a suggestion rather than a requirement.
- Select a Suggested Grade level, if needed.
New Requirement - Test
The Test Requirements tool can align specific tests students are required to pass with an Academic Program. The user must have the Test Code or State Code for the test being applied to apply the requirements.
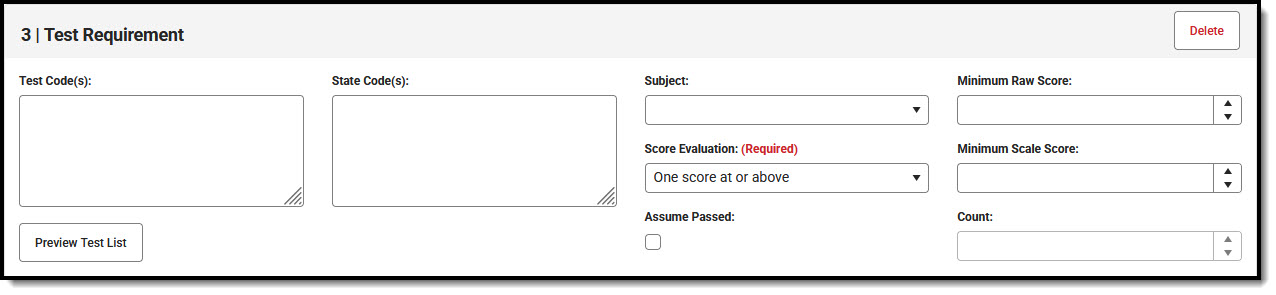 Test Requirement Editor
- To add test requirements to the program, press the New Requirement button and select Test from the displayed list.
- Required fields must be populated. Populate remaining fields according to what is needed for the requirement.
- Enter the Test Codes for the program. Use Preview Test List to verify.
- Enter the State Codes for the program.
- Enter the Subject for the test requirement.
- Select the desired Score Evaluation for the test requirement. This is a required field.
- Enter the Minimum Raw Score for the test requirement, if applicable.
- Enter the Minimum Scale Score for the test requirement, if applicable.
- Mark the Assume Passed option if desired.
- Enter the Count for the test requirement, if applicable
New Requirement - GPA
The GPA (Grade Point Average) Requirements editor indicates the overall GPA and GPA per course credit the student in this program needs to successfully complete the program’s requirements.
 GPA Requirement Editor
Be aware of any state requirements in place for certain programs. For example, in order for a student to receive a diploma, the Unweighted GPA 4.0 scale might have to be used, but for actual successful program completion, the student may need to get a B (3.0) or higher for advanced courses.
Also note that Custom GPAs can be created for use with the Academic Program. If desired, specific courses can be associated with the Custom GPA.
- To add GPA requirements to the program, press the New Requirement button and select GPA from the displayed list.
- Select the desired GPA Calculation from the dropdown list.
- Select the desired GPA Calculation Type from the dropdown list.
- Enter the Minimum Overall GPA value for this program.
- Enter the Minimum GPA per Course Credit value for this program.
New Requirement - Academic Program
Academic Program Requirements list any Academic Programs a student must take in order to meet the requirements of their Graduation Program. Students must also be assigned to the Academic Program(s) and plan enough courses to complete the minimum number of required Academic Programs to satisfy the requirement.
 Academic Program Requirement Editor
- To add GPA requirements to the program, press the New Requirement button and select GPA from the displayed list.
- Select the desired AcademicProgram Options. This is a required field.
- Enter the Minimum Required for the entered description. This is a required field.
New Requirement - Child Criteria
Stand-alone program criteria can be used as Child Requirements for evaluation of one criteria in comparison to another criteria. For example, when mathematics program criteria is created, it can be included as a Child Requirement to the STEAM program criteria grouping. Using a Child requirement, staff, students and parents can quickly identify whether or not the student is successfully completing the requirements of the Program and where to focus more effort. Additionally, Child Criteria can be used as a way to gauge student progress towards Scholarship requirements and other Academic Plans.
 Child Criteria Requirement Editor
When creating program criteria, Child Criteria are created first and attached to the Parent Criteria. To begin creating a Child Criteria select "New Child Criteria."
Once all Child Criteria are created the Parent Criteria can be built. Using the dropdown box, link each child to the parent and create a Logical Expression to define relationships using an AND and OR statement.
Course Plan Template
The Course Plan Template allows counselors/administrators to mass add courses to a student's Course Plan. For example, a graduation program for incoming eighth graders contains all of the core courses high school students must take and pass over the next four years. Instead of adding those courses individually for each student, administrators can create course plans for that specific program. When students are assigned to the program, the Academic Planner automatically adds the courses from the Course Plan Template into each student's Course Plan.
 Course Plan Template Editor for Graduation Programs
Additional courses the student plans for outside of this template can be added by the student on the Portal using the Academic Planner tool. Counselors can use the Course Plan tool in Academic Planning to add any additional courses to a student's plan.
Students who need to alter the plan defined in the course template can make the necessary changes. Students may also enroll in courses at grade levels different from the plan suggestions. If the template indicates that Algebra I be taken in 9th grade, but the student successfully completed that course in 8th grade, the 9th grade math course might instead be Geometry, which is planned for 10th grade.
When planning for the current year, course plan templates apply any course on the template for a student who meets the current year planning requirements (no scheduled courses for the current year, no transcript courses for the current year). If planned courses already exist for students in the current year grade level, the Course Plan Template does not apply course plans to the current year grade level. See the Course Plan article for more information on planning for the current year.
Best Practices
This tool is best used for incoming 9th-grade students who do not have any existing scores posted to a transcript from a previous high school enrollment. When a program is assigned to a student, students are assigned this template, along with the other program requirements (course requirements, test requirements, etc.). Course Plan Template courses are automatically added to the student's Course Plan tab. If the student is assigned both a graduation program and an academic program, the academic program courses also display on the Course Plan tab.
Course Plan Templates only add a planned course into a cell if nothing is previously planned or added to the student's transcript. The Course Plan Template only adds courses to the Course Plan if the box in the Credit Type and Year is blank. It does not append/overwrite if there is a planned course or a course on the transcript in that credit type/year.
This tool can also be used for students who already have scores posted to their transcript. The course plan template does not add courses to an already completed grade level (ended enrollment). If a student transfers from another high school in their junior year, and has transcript records for their freshman and sophomore year, courses on the template for the junior and senior year are added to the transfer student's course plan for Grades 11 and 12. The columns for Grades 09 and 10 contain the transcript information (from the transfer courses).
Things to Know
For courses like Band or Choir, or other courses that can be taken multiple times throughout a student's high school career, make sure these sorts of courses are marked as Repeatable. Another option is to set these courses up as individual courses for each grade level. 9th graders would have a Band: Grade 09 course, 10th graders would have a Band: Grade 10 course, etc. The Course Plan Template will NOT add a course to a student's existing plan, which means a repeatable course would not be added.
If the student has already planned courses for future grade levels in a certain credit area, courses from the plan template are not added for that area. If a student already has transcript scores for a course in the plan, it is not added again.
Courses in which the student is already scheduled are not added to the course plan.
The plan template does not allow locked Courses. This action is only available to a counselor on the student's Course Plan tab.
Using Course Plan Templates is a plan for students' graduation or career tech program. This is not a tool to mass-assign actual courses to student schedules. That process is performed using the Scheduling Board and other Scheduling tools.
Course Plan Template: Warnings/Alerts/Errors
Just like alerts display on a student's Course Plan, alerts display on the Course Plan Template when a Planning Rule is violated during the template's creation. Each time a change is made to the Course Plan, all rules and requirements are reevaluated, and updated alerts and messages are displayed. The plan does not need to be saved to show these alerts. When the alerts have been satisfied, they are automatically removed.
- Counselors can still save course plans when alerts and warnings exist.
- Warnings display when there is a failure in the template that prohibits the student from modifying and saving their course plan.
- Alerts display when:
- A grade does not have enough credits planned.
- A credit type does not have enough credits planned.
Students with an Academic Plan containing an error are not able to save changes made to their course plan from the Portal.
Certain Portal Display Options apply here that can be turned on or off to show these rules.
- When the Enforce All Rules option is marked as part of the Academic Planner option, students can only save their academic plan if it meets ALL established requirements and planning rules.
- When the Enforce All Rules option is NOT marked, students can save their plan without meeting all requirements, but all planning rules must be met. Warning messages from failed requirements and failed planning rules display so users can see the issues while saving the entry.
