Tool Search: Google Drive Configuration
Google Drive integration provides a workflow where teachers can deliver assignments and documents to students and allow students to submit responses back to the teacher. Using Google Drive has a number of advantages over our existing CDR based workflow, such as the ability to use collaboration features and a much higher per user limit on document sizes.
The configuration process requires Campus administrators to extract information from their Google Developer Console and the Google Workspace for Education Domain and input that information into Campus. This article provides you with step-by-step instructions for finding these values. See the Google Drive Integration Troubleshooting article for troubleshooting tips if you're having issues with an existing connection.
Use this tool to configure the integration of google drive files with assignments in Campus. Google Workspace for Education can also be added as a Digital Learning Partner through the Digital Learning Applications Configuration tool.
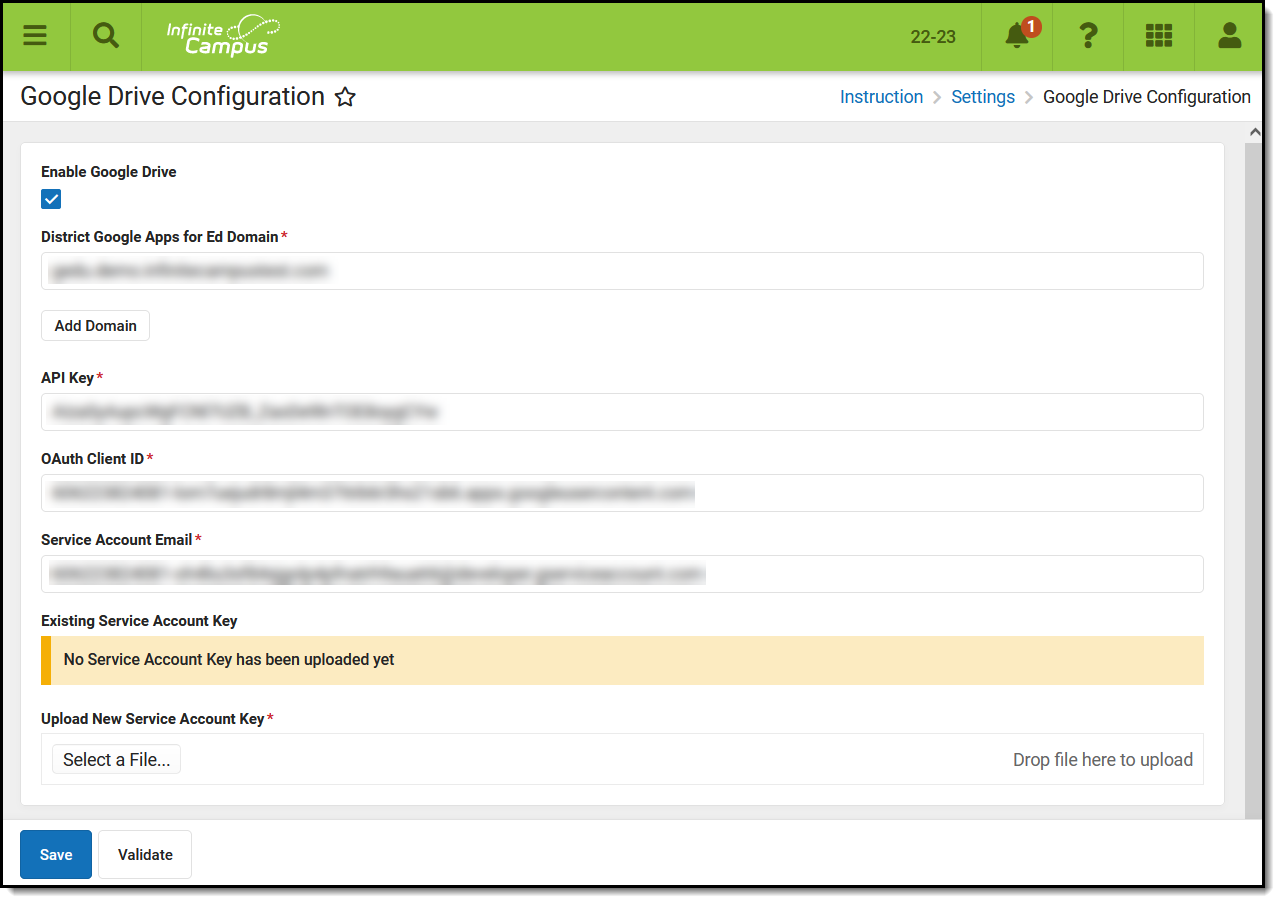
Google Drive Configuration Tab
To complete these configuration steps, the administrator configuring the Google project needs the following access within the Google Workspace project. Access can be granted by your district's Google administrator:
- admin.google.com > Apps > Additional Google Services > Google Cloud Platform must be enabled (it's enabled by default)
- admin.google.com > Apps > Additional Google Services > Google Cloud Platform > Project Creation Settings > Allow users to create projects must be turned on
See the Instruction Tool Rights articles and the Instruction Settings Tool Rights article for more information.
Currently, Campus supports Google Workspace for Education accounts with a single domain or multiple domain setup.The legacy option of separate Google Workspace accounts is not supported.
Complete the following steps to set up both single and multiple domain accounts. Additional information for multiple domain accounts is available at the end of the document.
The Campus Digital Repository (CDR) does not need to be enabled to configure Google Drive Integration.
Prior to beginning the configuration process, it may be helpful to collect the following pieces of information to streamline the configuration process:
- District’s Google Workspace For Ed Domain Name
- Admin user login to Google Workspace For Ed Domain (or team up with a District Admin who has this)
- District’s Infinite Campus URL
- District’s Name
As you configure the Google Dev Console, you'll be instructed to collect the following pieces of information from Google that you'll paste into the Google Drive Configuration tool in Campus:
- District’s Google Workspace For Ed Domain Name
- API Key
- OAuth 2.0 Client ID
- The saved P12 file
- Service Account Email
Setup the Google Dev Console
To enable the Google Drive workflow, a project must be created in the Google Developer console. This project needs to be defined per district, because the project’s OAuth credentials specify authorized JavaScript origins (which vary per district) and because Google enforces limits on how many requests each project is allowed to make in a given day. Keeping it district-specific allows more requests for that district.
A Google user must own the project. This user should be a district administrator for the Google Workspace For Ed account. Some screenshots in this document are taken from a demo Google Workspace For Ed domain.
Step 1. Go to the Google Developers Console
The first step is to go to the Google Developer Console and log in: https://console.developers.google.com/start
Step 2. Create a New Project
Create a new project from the Select a project dropdown list found in the upper left-hand corner of the screen. Give your project a meaningful Project Name, which is displayed in the Google Dev Console. Select an Organization and Location. If there is already an existing project, that project's name displays instead of "Select a project". In that case, click the project name dropdown list and select New Project.
Once you click Create, the page should refresh within a few seconds with your project name selected at the top. If you still see "Select a Project", open the dropdown list, select the project you just created, and click Open.
Step 3. Disable Default APIs
In the sidebar on the left, expand APIs & Services and click Enabled APIs & services. The list of Enabled APIs includes several automatically enabled APIs. These are not used for Google Drive integration so they can be ignored or disabled by selecting the entry and clicking Disable API.
Step 4. Enable Drive and Google Picker
From the Enabled APIs & Services screen, select +Enable APIs and Services.
In the API Library, search for and enable 2 APIs: Google Drive API and Google Picker API.
- Start by searching for the Google Drive API. The API displays below. Select the Google Drive API result and then Enable API.
- Search for Google Picker API. The Google Picker API displays in the search results below. Select the Google Picker API result and then Enable API.
Step 5. Create Credentials
Throughout this process, these instructions prompt you to record certain fields to enter in the Google Drive Configuration tab in Campus.
- Expand the left menu again by clicking the
 menu and click APIs & Services and then Enabled APIs & services.
 - In the sidebar on the left, select Credentials to create an API Key, a OAuth 2 client, and a Service Account.
 menu and click APIs & Services and then Enabled APIs & services.
 API Key
- On the Credentials screen, click Create credentials and then API Key. Click the 3 dots menu button and then Edit API key.
- Under Application restrictions, select Websites.
- Click Add.
- Enter the first part of the district's Infinite Campus URL, starting with https:// up to the top-level domain (such as .com or .edu).
- Click Done and then Save. The entry you created displays.
- Select Show Key to show the API Key.
Record this Key to include in the information entered on the Google Drive Configuration tool in Campus.
Configure Consent Screen
- From the left menu, click Configure consent screen. This screen asks users if they agree to allow data sharing with their district’s Infinite Campus instance.
- For Application type, mark Internal.
- Enter a name in the Application name field, such as "Infinite Campus Google Drive Integration".
- Under Authorized domains, enter your district's Infinite Campus URL without https:// and up to the top-level domain (such as .com or .edu).
- Click Save.
OAuth 2.0 Client ID
- Click Create credentials again and then OAuth client ID. If you have not yet configured the Consent Screen, you will be prompted to do so. See the Configure Consent Screen section above for more information.
- Select an Application Type of Web application.
- You can leave the default Name value or modify it if you prefer.
- Under Authorized Javascript origins, select Add URI. Enter the first part of your Infinite Campus URL, starting with https:// and up to the top-level domain (such as .com or .edu). (Do not include trailing / or /campus path. If running on a non-standard port, the port number must also be included, ex: http://mydistrict.com:8080/).
- Click Create
Your Client ID and Client Secret display. Record the Client ID to enter in the Client ID field on the Google Drive Configuration tool in Campus. This is the OAuth 2.0 Client ID. You do not need to record the Client Secret.
Service Account
- Click Create credentials again and then Service Account key. Enter a Service Account Name and click Create and Continue.
- Click Select a role and choose a Role of Editor. Then click Done.
- Return to the Credentials screen and click the edit pencil icon next to the Service Account you just created.
- Click the Keys tab and then Add Key and Create new key.
- In the pop up that displays, mark P12 and click Create. Do not select JSON.
- Copy this file and save it. This file is uploaded to the Configuration tab. This is called the Service Account Key in Campus. Campus recommends saving this file in a secure location you'll be able to access in the future, in case the file needs to be reuploaded at some point.
- Click the arrow at the top left to return to the Credentials screen.
- Select the Manage Service Accounts link on the right-hand side of the screen to access the Service Accounts screen.
- Copy the Service Account Email to enter into the Google Drive Configuration tool in Campus.
- Under the column OAuth 2 Client ID, a numerical value of about 21 characters displays. Copy this value by hovering over it and clicking Copy to Clipboard. This is the Service Account Client ID and will be used later.
Step 6: Authorize the Service Account Client ID
- Open a new browser tab and navigate to admin.google.com.
- Click Security.
- Scroll down to API controls.
- Select Manage Domain Wide Delegation
- Select Add New and enter the following information:
- In Client Name, enter the Service Account Client ID you copied at the end of step 5.
- In One or More API Scopes, enter: https://www.googleapis.com/auth/drive
- Click Authorize. Verify that the values you entered display correctly.
Step 7: Configure in Campus
Return to the Google Drive Configuration tool in Campus and paste in the values you've collected during the configuration process. Click Save when finished and use the Validate button to verify that the connection is working.
Multiple Domain Accounts
To configure Google Drive Integration for a Google Workspace account with multiple domains, click Use Multiple Domains. Fields for an additional domain display, as well as options to add more domains.
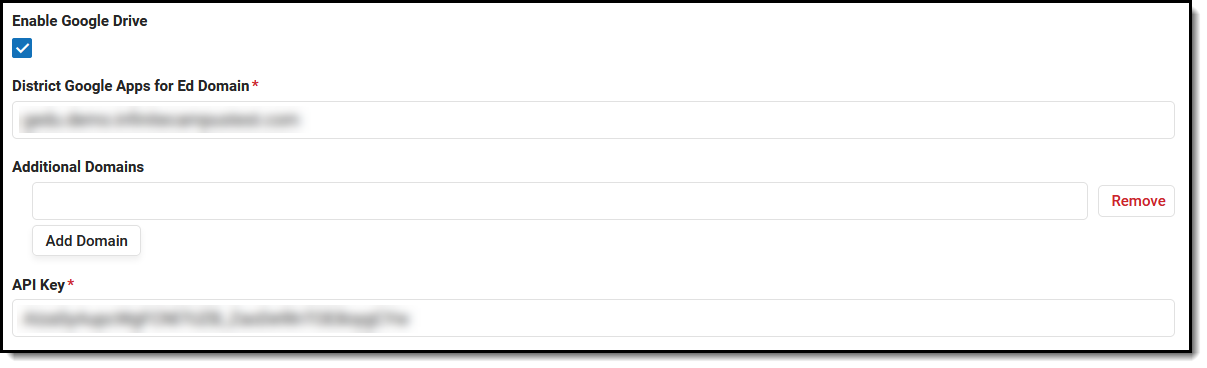
Adding Additional Domains
Enter any additional domains beyond the primary domain. Click Save when finished.
Disable Google Drive Accounts
To disable a configured account, unmark the Enable Google Drive checkbox and save the record.
Validate
Click Validate to log in to a Google Workspace for Education account and verify that the configuration was successful.
