Tool Search: Requests & Rosters
Requests and Rosters is a task-based tool that provides the scheduling team (counselors, administrators, etc.) a way to manage student requests and section rosters in one location, such as:
- Update course sections to modify the student's start and end dates in the section and indicate whether the student is repeating this course and/or receiving credit for this course.
- Create course requests based on a scheduling team, an Ad hoc filter, existing requests, or previous section rosters.
- Remove course requests.
- Copy section rosters from one course to another course.
- Manually build section rosters for specific courses or grade levels or groups of students.
- Copy, add, or remove students from a section.
Course Fees are automatically assigned when the Auto-Post Course Fees system setting is set to Yes. This occurs when updating rosters using Batch Edit Student Rosters, Batch Edit Course Rosters, and Roster Builder.
See the Getting Started article for more information.
 Requests and Rosters
See the Requests and Rosters Tool Rights article for information about rights needed to use this tool.
Over the last few years, new scheduling tools have been made available that streamline the scheduling process. See the What's New in Scheduling article for more information.
Submit feedback for Request and Rosters by clicking the Feedback button in the bottom right hand corner. This takes you to the Campus Community Requests and Rosters forum topic where you can add your suggestions for this new tool.
Requests and Rosters Navigation
View by Students or Courses
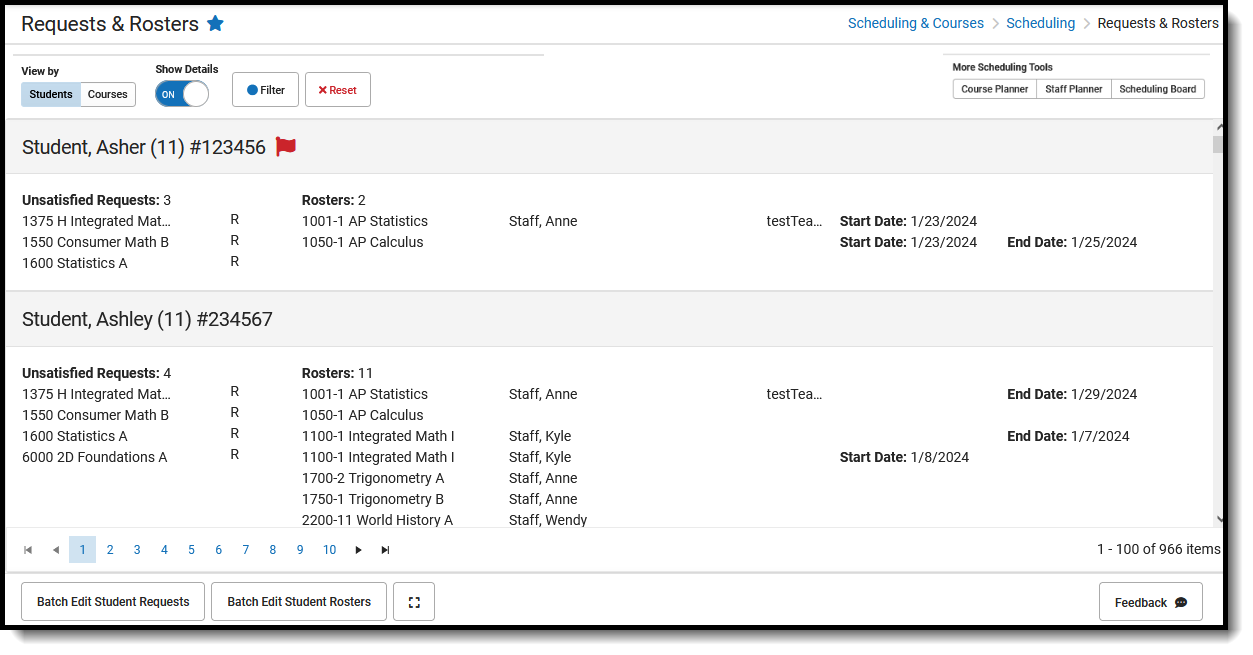
View by Students lists all students enrolled in the selected calendar. The default view for students lists the following information:
- Demographic and Enrollment information, including the student's name, grade level, local student number, and team (when assigned);
- A count of Unsatisfied Requests, e,g. classes the student requests to take but have not been added to their schedule for the selected calendar; and
- A count of the total number of Rosters for the student, e.g., how many course sections the student is scheduled for the selected calendar.
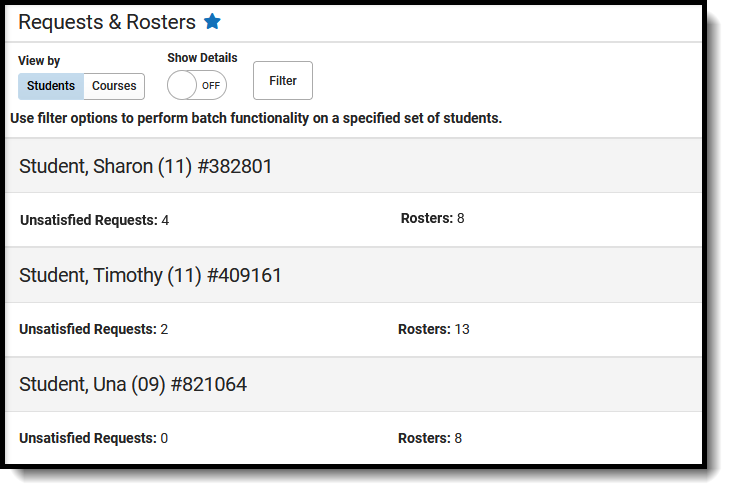 Requests and Rosters - View by Students (Detail OFF)
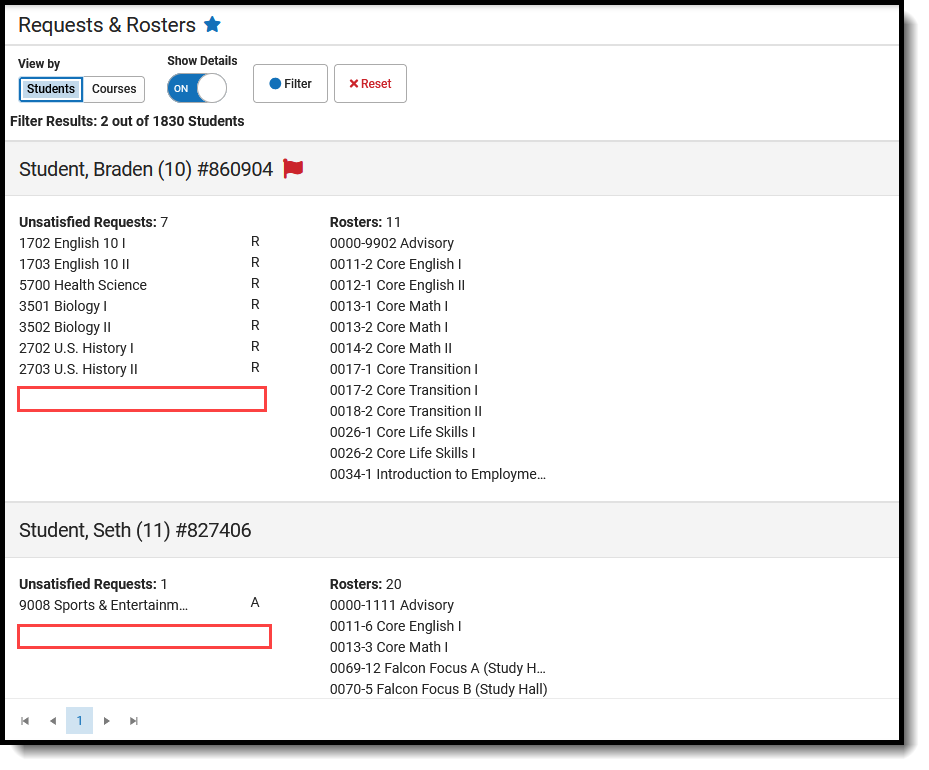
The detail view for students lists the following information:
- Demographic and Enrollment information, including the student's name, grade level, local student number, and team (when assigned);
- A count of Unsatisfied Requests and the course names for those requests, as well as the type of request - R (Required), E (Elected), or A (Alternate) - and whether that course is already their transcripts.
- A count of the total amount of Rosters for the student, the names of the course and section number in which the student has been scheduled, as well as the assigned teacher to those course sections.
- The team, start and end dates if they are outside of the term dates or manually entered.
 Requests and Rosters - View By Students (Detail On)
View by Courses lists all active courses in the selected calendar, each section of the courses that also includes the Teacher assigned to that section, the Max Students count and how many students are currently scheduled into that section (Students in Roster), and the assigned Team (if any). There is no Detail View for Courses.
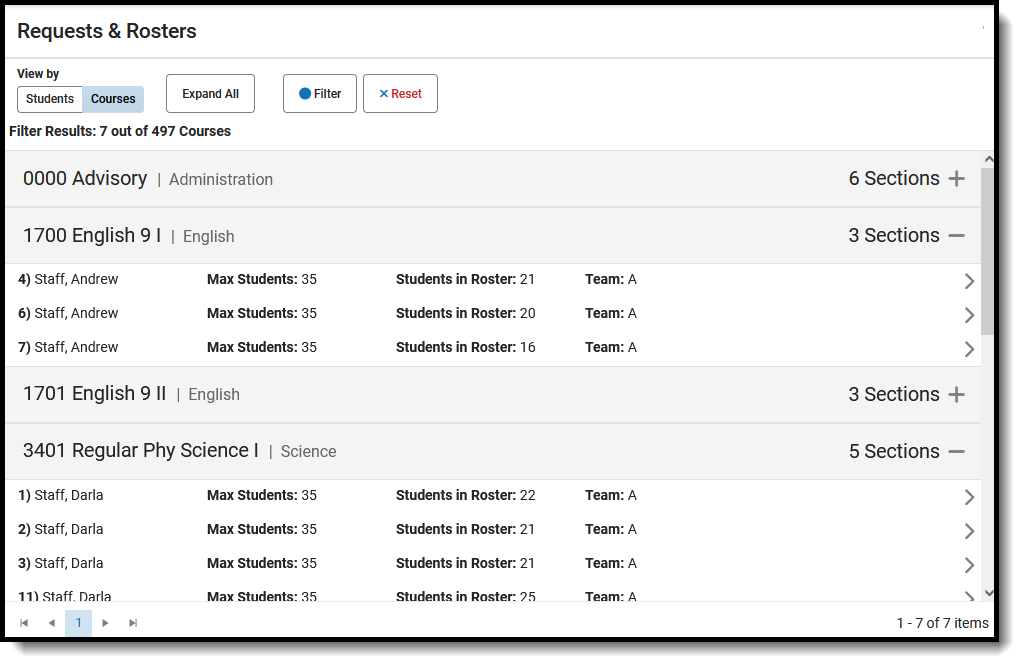 Requests and Rosters - View by Courses
Show Details
When viewing students, move the Show Details setting to ON to show the course names for the Unsatisfied Requests (also shows the type of Request - R (required,) E (Elected, or A (Alternate) and the course names where the student has a roster record, in addition to the total counts. Move the setting to OFF to display the number of Unsatisfied Requests the student has and the total number of roster records the student has.
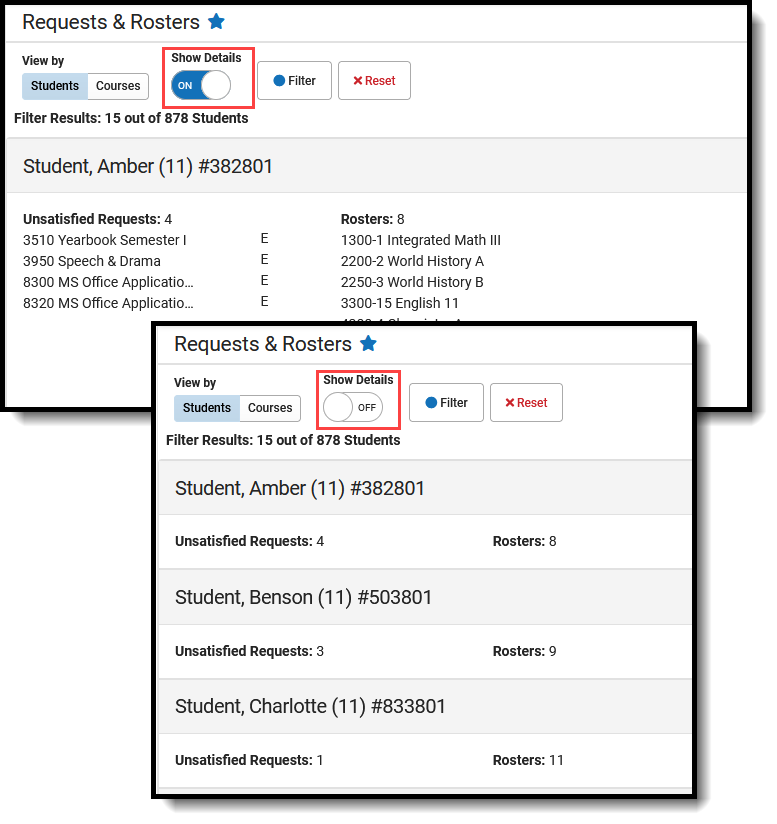 Show Details Option
Filter
ALWAYS filter the Students and Courses list so changes are only made to a selection of students and courses and NOT to the entire population of students and all courses.
Filtering the result set for both Students and Courses is recommended before performing any action that alters the students' placed sections or list of course requests, or the course section rosters.
When the list of students or courses is filtered, the Filter button displays with a blue dot and a Reset button displays. Click that Reset button to remove all filtered settings.
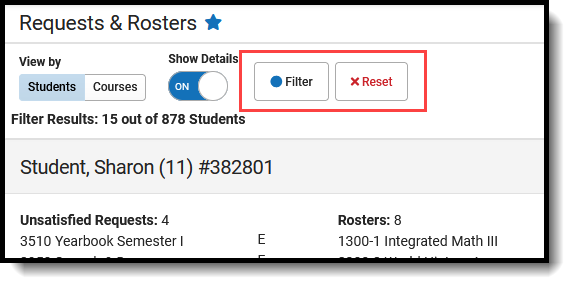 Filter Reset Display
When working with Students, narrow the results by one or more of the following options.
|
|
When working with Courses, narrow the results by one or more of the following options.
|
|
Additional information about filtering is available in the Filter Students List and the Filter Courses List sections.
Expand All, Collapse All
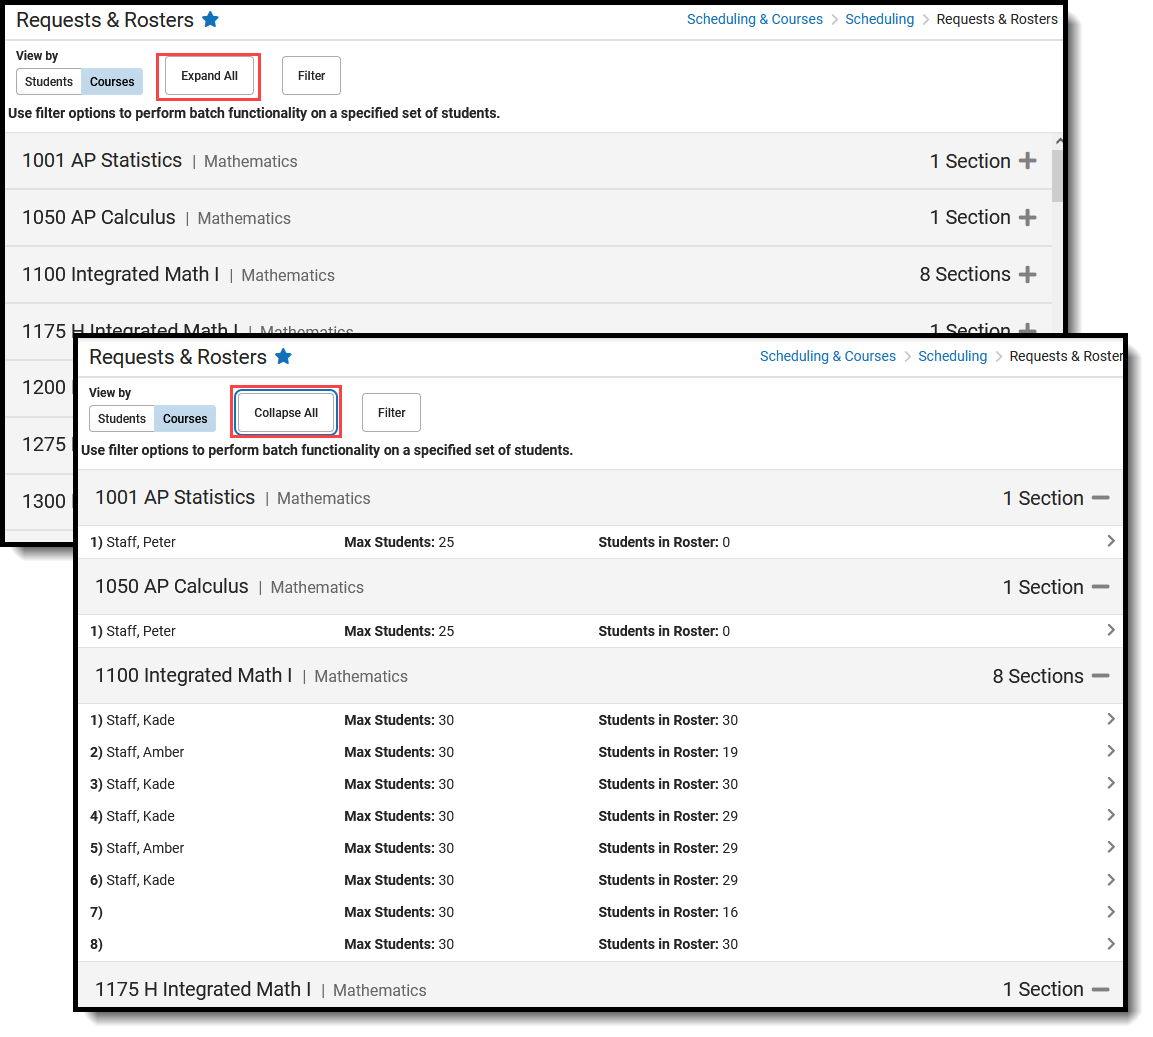
Use the Expand All button to open all courses to show the teachers assigned to the sections, the maximum number of students who can be enrolled in the courses, and how many students are currently scheduled into those sections.
 Expand All, Collapse All
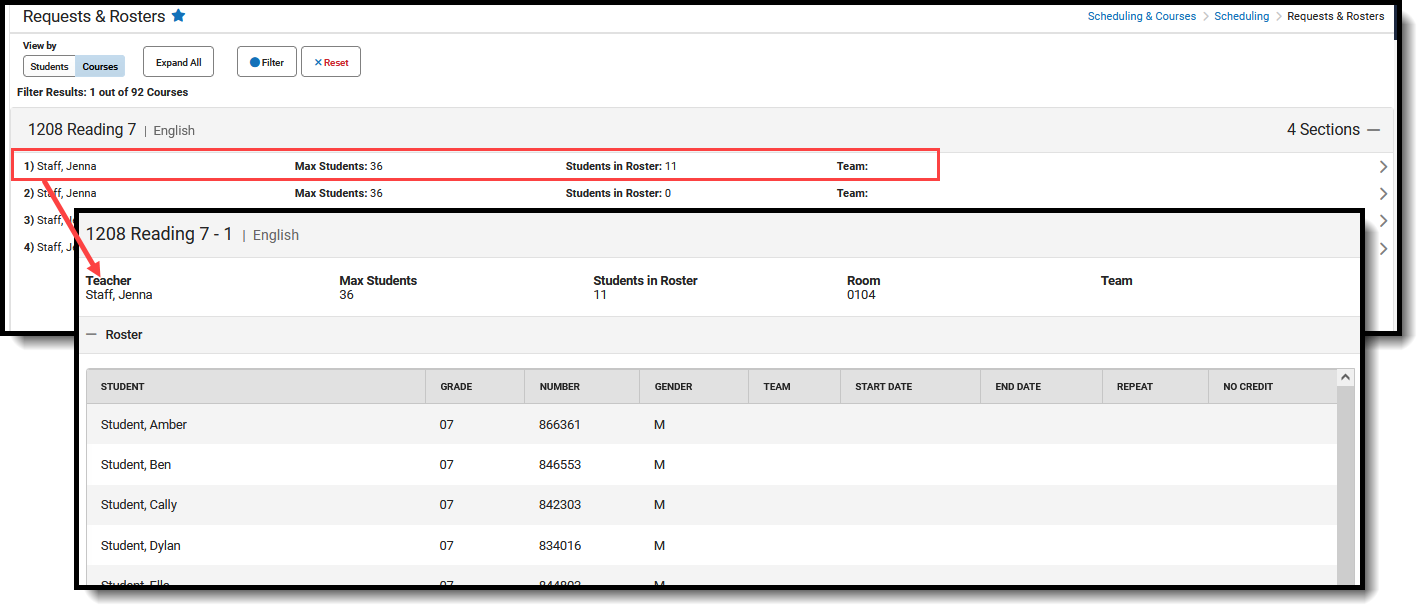
When collapsed, the total count of sections for the course displays on the right, along with a plus ( + ) to expand the course. Click > or anywhere in that section row to open the Section Side Panel to see which students are enrolled in the section and the Room where the section is scheduled.
 Course Section Expand, Collapse, Section Side Panel
The side panel also includes options to manually build the section roster and modify the start and end dates for students scheduled into that section. See the Course Section Side Panel section below for more information.
Student Constraints
Students who have a Strict Student Constraint with other students selected to be in the same course section display with a warning icon. This displays in the Batch Edit Course Roster and the Roster Builder.
When editing the Course Roster, a user without tool rights to Can Overide Strict Student Constraints cannot save the updates to the roster until the constraints are resolved.
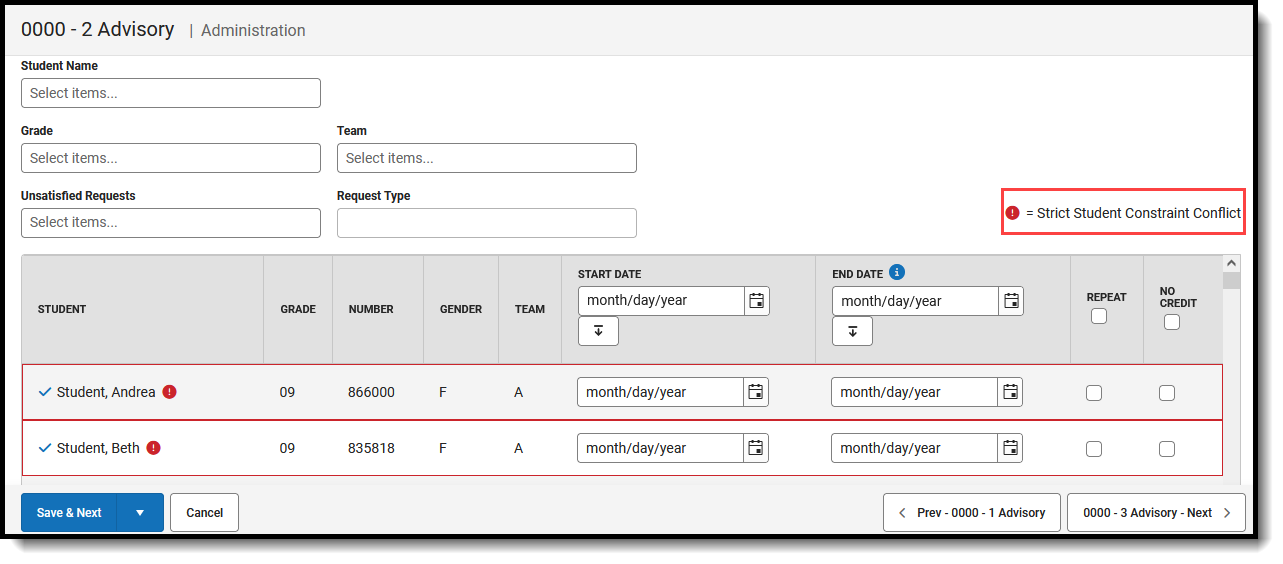 Student Constraints Display
More Scheduling Tools
Access the Scheduling Board, Course Planner or Staff Planner from Requests and Rosters by selecting those options in the upper right corner.
This ONLY displays when navigating to Requests and Rosters from the Scheduling Board. When opening Requests and Rosters from the index, More Scheduling Tools DO NOT display.
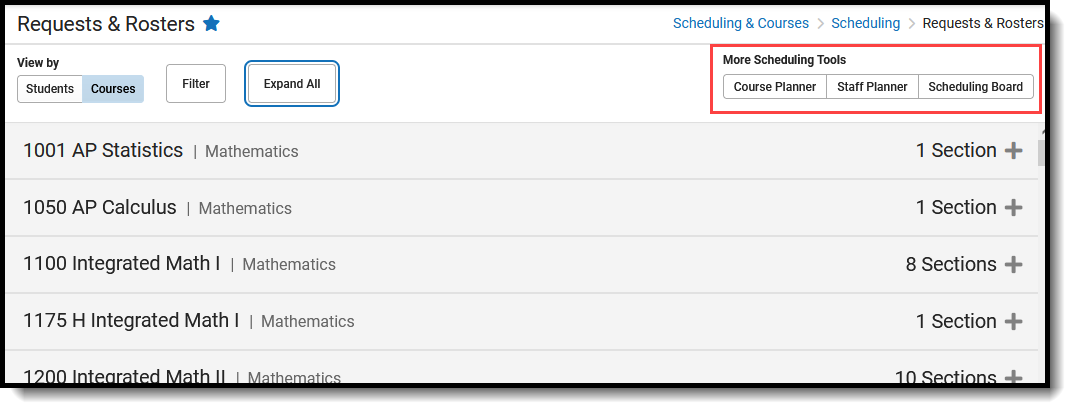 Link to More Scheduling Tools
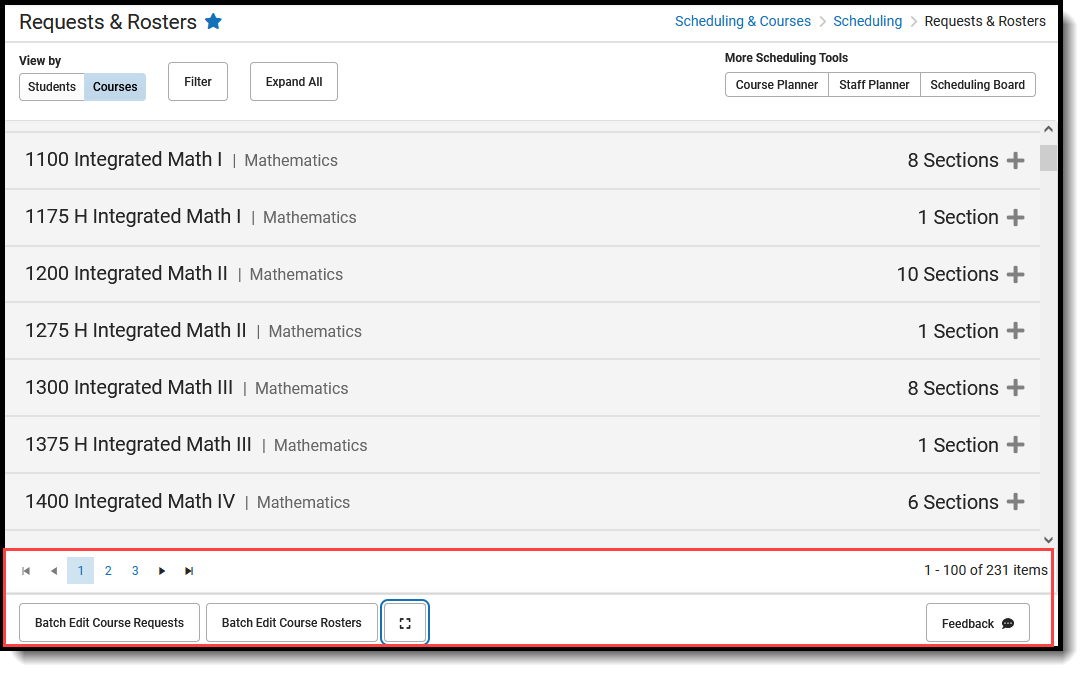
Action Bar
Across the bottom of Requests and Rosters is the Action Bar. Available functions are:
- Page navigation to scroll through the list of courses and list of students. On the right side of the action bar, a count of total items displays.
- Batch Edit options to update Student Requests, Course Requests, Student Rosters, and Course Rosters. Additional Tool Rights are needed to perform these tasks.
- Full Screen viewing to expand the viewing window. Press ESC to exit full screen mode.
- Feedback to submit suggested updates to Requests and Rosters.
 Requests and Rosters Action Bar
Manage Requests and Rosters from the Student View
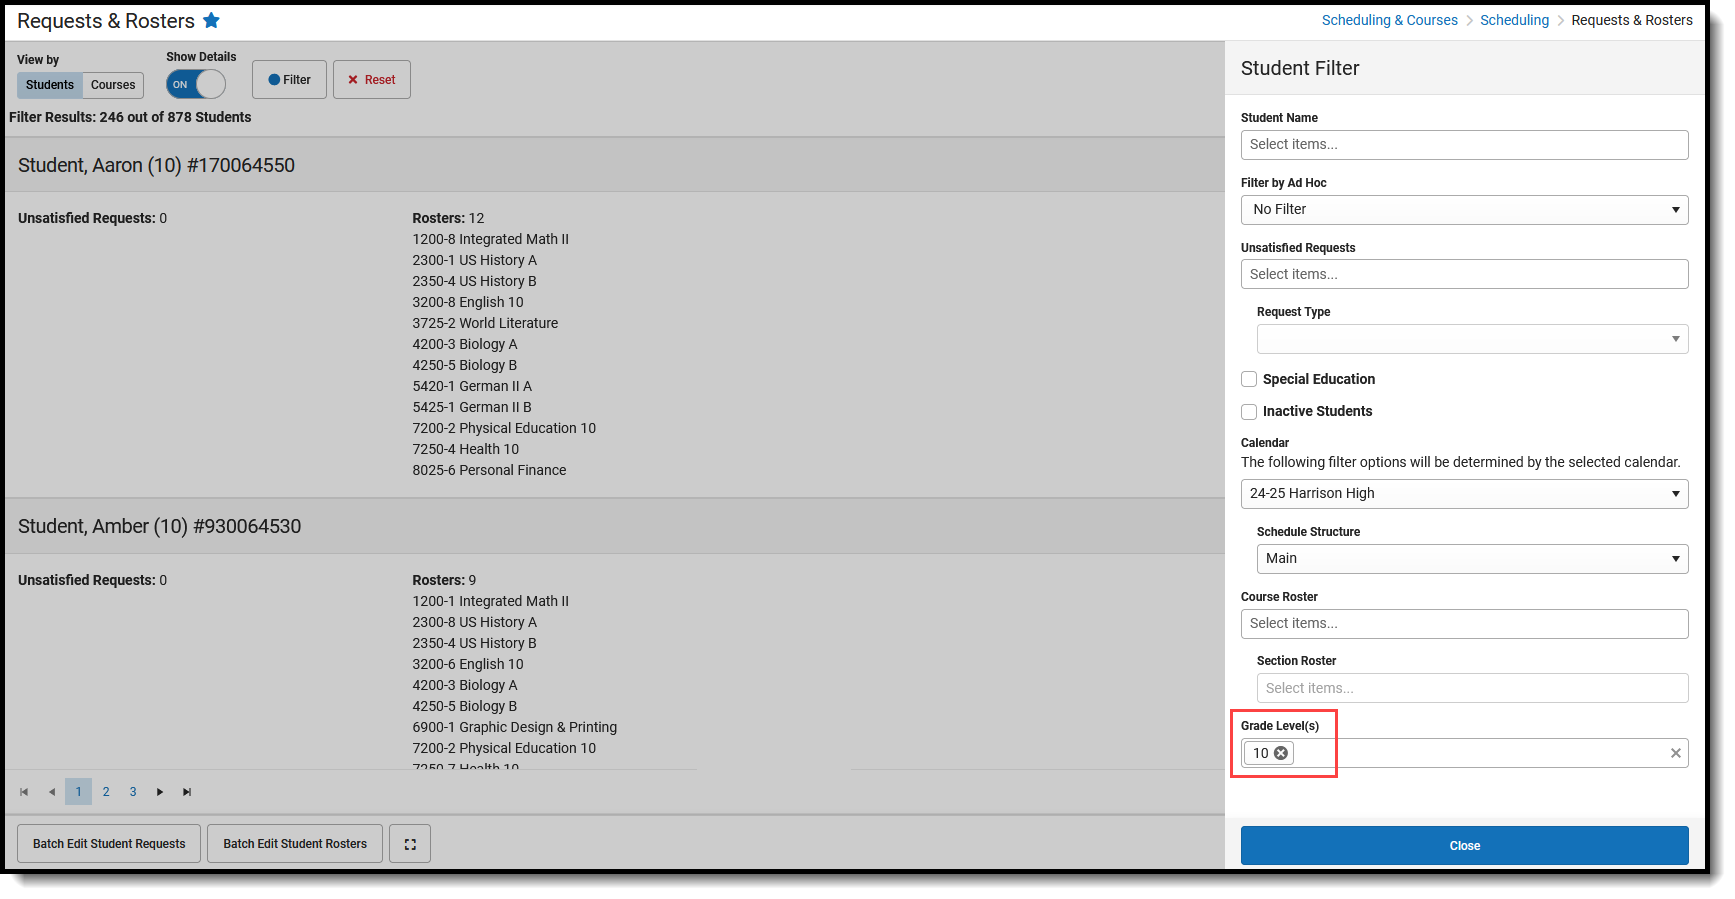
Filter Students List
First, limit the number of students to modify at one time. Any change to student requests and student rosters includes all actively enrolled students in the selected calendar.
- Click Filter. The Student Filter side panel opens.
- Enter data to narrow the full list of students to a manageable set of students using one of the available options. See the Student Filter Descriptions below.
- Click Close when finished. Note that the Filter Results tally changes depending on the chosen filter options.
In the example below, the list of actively enrolled students (1831) is now down to 6 after selecting the next year's calendar and one course from the Course Roster field. Now, student requests can be modified or students already scheduled into the selected course can be managed for those six students.
 Student Filter Results for 6 students
Selected filter options remain until they are reset or the user logs out of Campus. Switching to the Courses view or navigating to the Scheduling Board still keeps the selected filter settings.
Student Filter Descriptions
| Filter Fields | Details |
|---|---|
| Student Name | Select one or more students (listed in alphabetical order by last name). |
| Filter by Ad hoc | Select an existing and saved filter built in Ad hoc Reporting. Only those students included in the filter are returned.
Only one filter can be selected. Use the Search field to easily locate the desired filter. This is helpful when the school/district has numerous filters created and available to staff. |
| Unsatisfied Requests | Select one or more courses where students have requested those courses but were not scheduled into them. |
| Request Type | Choose R, E or A to return the type of request for the selected Unsatisfied Requests courses. When not selected, all requests types for the selected courses return. Only one request type can be selected.
At least one course must be selected in the Unsatisfied Requests field to select the Request Type. |
| Special Education Only |
Mark this checkbox when working with students who have a locked IEP for the selected calendar. |
| Include Inactive Students | Mark this checkbox when working with students who do not have an active enrollment record in the selected calendar. |
| While the above filter options return results based on the calendar selected in the green toolbar, the filter options below return results based on the calendar selected in the Calendar field. | |
| Calendar | Select from which calendar the remaining filter options should be used to manage student courses. This field automatically populates with the same calendar that's selected in the toolbar.
Some examples:
|
| Schedule Structure | For the calendar selected in the previous field, select the appropriate Schedule Structure to edit requests and rosters. The Main Schedule Structure is automatically selected. |
| Course Roster | Select one or more courses to use as the starting point for managing student rosters and requests.
For example, students taking Chemistry next school year also need to take Chemistry Lab. The Chemistry course rosters have already been scheduled, but the Lab course needs to be scheduled now. Select the Chemistry course from the list of available courses. |
| Section Roster | Select one or more course sections from the course above to manage.
Using the same example as above, students in Chemistry Section 1 will also be in Chemistry Lab Section 1. Choose Section 1 from the list of available sections. |
| Include Dropped Students | When marked, students who are not currently enrolled in the selected course/course section are included in the results. This is determined by an End Date on the Section Roster (and on the student's schedule) that is NOT the same end date as the end of the term.
When not marked, only actively enrolled students are included in the results. That means and End Date would NOT be noted next to their name in the Section Roster or on the student's schedule for that course. |
| Grade Level | Select one or more grade levels from the selected Calendar to manage. Only the grade levels in the selected calendar are listed. |
| Team | Select one or more Scheduling Groups to work with just those students and courses assigned to that group.
This is helpful when scheduling middle school students who are all assigned to a team and stay with the same group of students for all of their courses. |
Once the list of students is filtered to a manageable amount, student requests can be modified using Batch Edit Student Requests or Batch Edit Student Rosters.
Batch Edit Student Requests
Batch Edit Student Requests allows the addition or removal of course requests for students. This process can be done prior to, during or after students have entered their course requests.
Some examples for editing student requests:
- Add a Homeroom course for all incoming freshmen.
- Remove requests for a course that is no longer being offered.
- Add a required request for a computing course for all sophomores.
- Remove a request for a student because they haven't met the course's prerequisites.
During the Scheduling Season, students enter course requests through the Portal and work with their counselors to ensure they request the correct courses. Students may plan their courses using the Academic Planning tools, and teachers may also recommend courses for students.
Locate the courses by entering Course Numbers or Course Names. Departments can also be selected. Mark the course to add or remove requests, modify the request Type, then choose Add or Remove.
Duplicate requests are never added for students. When the Fine Arts class is added as an Elected Request Type for ten students included in the filtered list, and two of those students already have an Elected Request for the Fine Arts course, the request is added for the eight students who do not have a request for Studio Art.
When the Request Type differs from the Request Type already assigned to those students, the Request Type is updated to match the newly assigned request type. For the two students who have an Elected Request Type for the Fine Arts course, and the newly added request is for Required Request Type, the Elected Request Type is changed to Required.
When adding or removing student requests, a detailed confirmation message displays that lists which students will have requests added/removed and for which courses. Users can:
- Click Continue to add/remove the student requests.
- Click Copy to Clipboard to copy the student information and the course information for reference at a later time.
- Cancel the update.
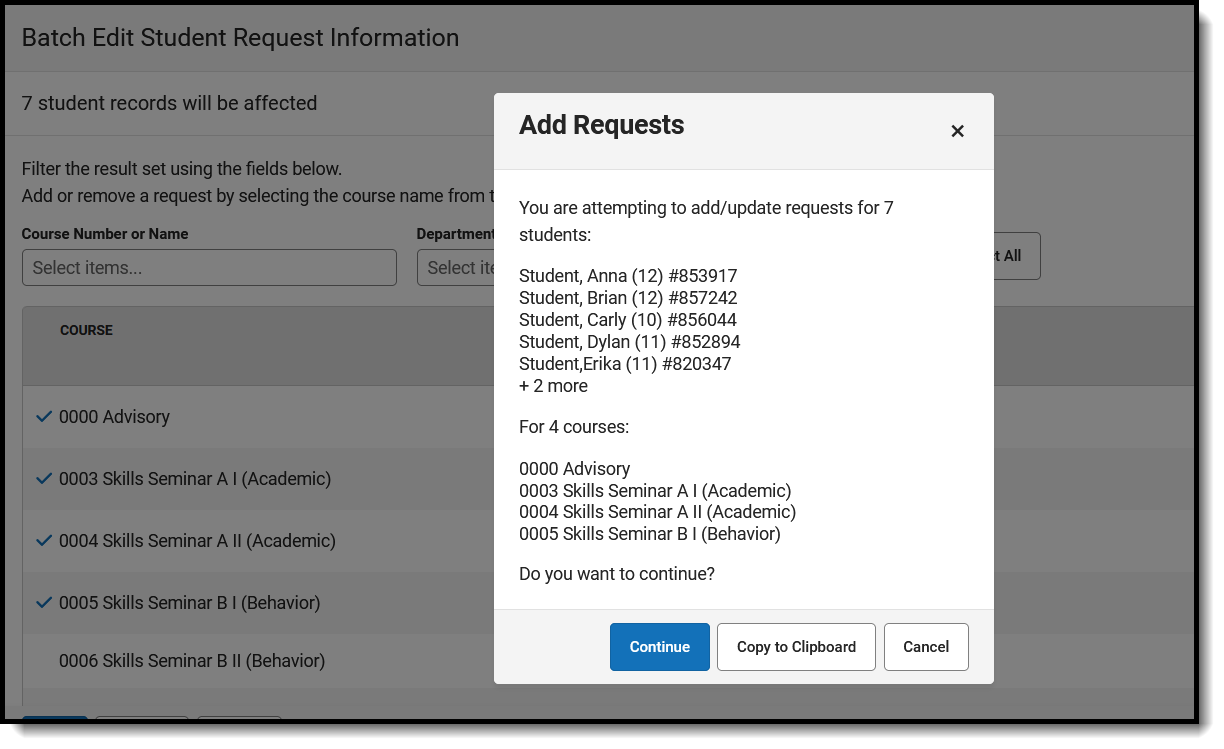 Add Requests Confirmation Message
The following scenarios provide scenarios for how using Batch Edit Student Requests.
Add Requests for Students
Sophomores are required to have a Fine Arts Request as an Elected course. A request for Painting is being added for those students who have not chosen a Fine Arts class already.
First, filter the list of students to those who will be in the 10th grade in the next school year.
 Adding Request for Studio Art
- Click Batch Edit Student Requests. The Batch Edit Student Request panel displays.
- In the Department field, select Fine Arts. All Fine Arts courses display.
- Locate the Studio Art: Painting course and click on the name. This adds a blue checkbox next to the course name and moves it to the top of the list.
- Change the Type to E.
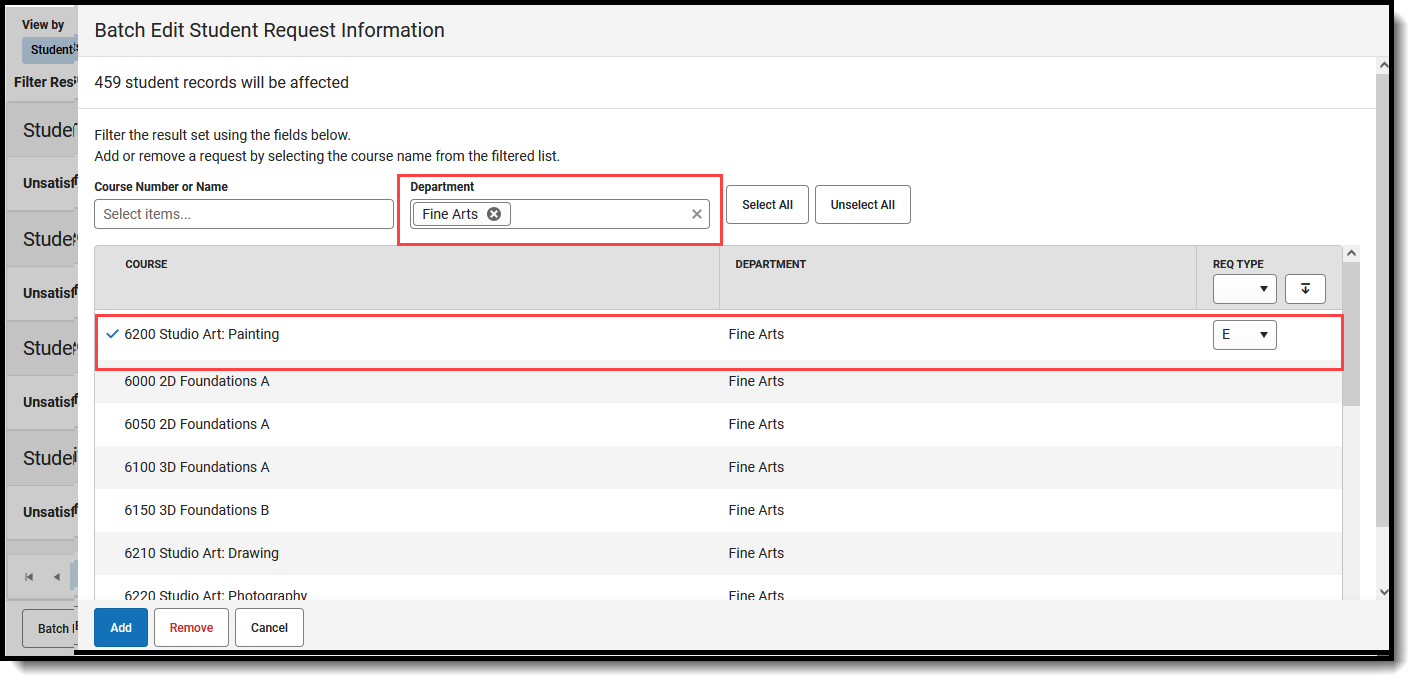 Add Student Request for Painting
 - Click Add. A message displays indicating requests for the selected students are being added/updated.
- Click Continue. A message displays indicating requests have been added for that course.
- Click Close to return to the list of filtered students who now have an Unsatisfied Request for Painting.
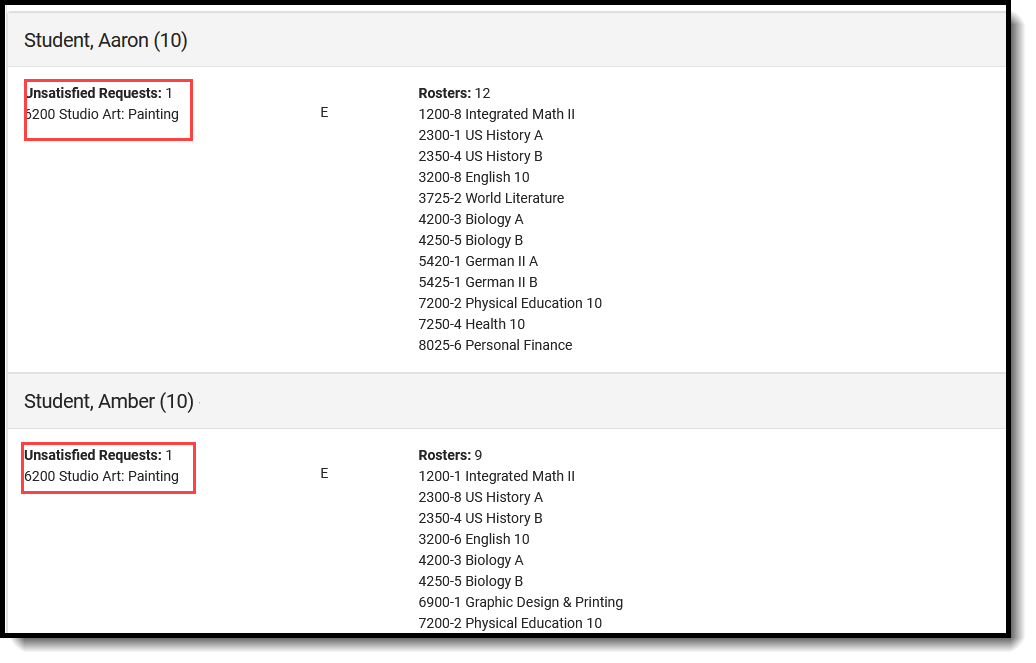 New Request Added for Painting


This process added a course request for a particular course for a particular set of students. For example, when a student in that particular set of students already had a request for the course as an Elected course, a second request is not added for that same course.
This means that the total number of attempted requests noted in the first Add Requests message in Step 5 above may not be the same as the total number of actual requests added in the Student Requests message in Step 6 above.
Remove Requests for Students
Course requests can be removed from student's list of requested courses for a variety of reasons - maybe there aren't enough requests for a course to meet the school's baseline for class enrollment; or perhaps the student changed their mind and want to take another course, or one of their requests has a Transcript indicator by it; or the course could not be added to the school's schedule to meet the needs of the teachers and students;
In this next example, there are not enough course requests for Ceramics to warrant the school scheduling that course, so any student who has already requested that course needs to have it removed.
- Set Requests and Rosters to View by Students and turn Show Details to ON.
- Filter the list of students to a manageable amount. For one student, select that student from the Student Name list. For all students who have a course request for the course that is no longer offered, select that course from the Unsatisfied Requests list. Or use any of the other Student Filter options to return the list of students.
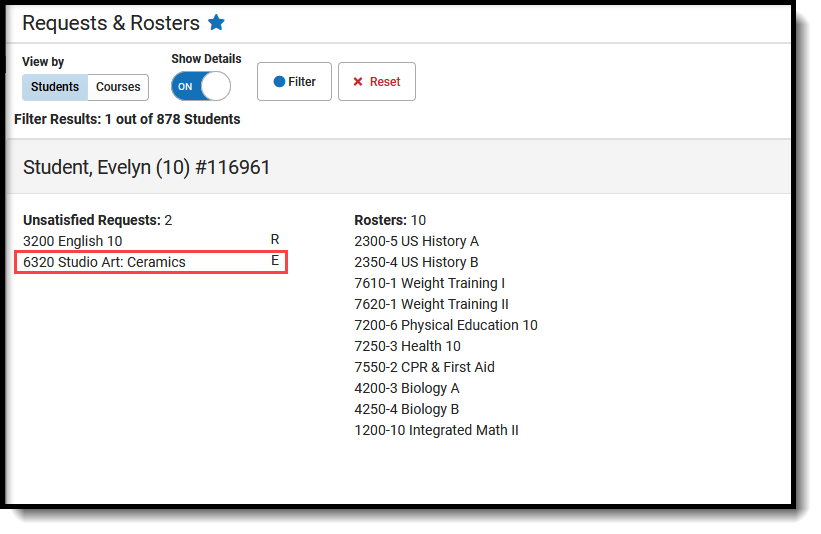 List of Unsatisfied Requests to remove
 - Click Batch Edit Student Requests. The Batch Edit Student Request panel displays.
- Enter either the Course Number or Name to select the Ceramics course.
- Select that course by clicking in the row. A blue checkbox displays next to the course name.
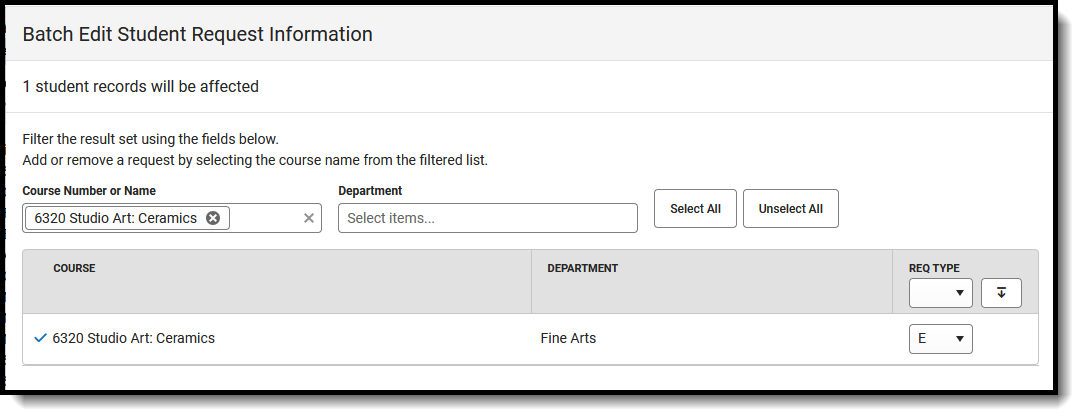 Selected Course to Remove with Matching Request Type
 - Modify the Request Type as needed. To modify the request, the Type must match what was originally requested. Evelyn requested this course as E (Elected), so the selection remains E. When the Type is blank, ALL request types are removed.
- Click Remove. A message displays summarizing what is being removed and that the action cannot be undone.
- Click Continue to complete the action. A message displays indicating the total number of requests that were removed.
- Click Close to acknowledge. This returns the screen to the list of filtered students where Evelyn no longer has a request for Ceramics.
 Request Removed


Batch Edit Student Rosters
Batch Edit Student Rosters allows the addition or removal of students from section rosters. Some examples for using Batch Edit Student Rosters:
- Copying the section roster from last year's 5th grade homeroom to this year's 6th grade homeroom.
- Ensuring the Second Grade STAR Team has the same teacher as the Third Grade STAR Team.
- The Football team can't be scheduled into instructional courses during the last period of the day and all of the players need to be scheduled into a Study Hall instead.
- A few seniors need to take Sociology, but it only meets once during the semester.
In the next examples, imagine the principal, school counselors, and curriculum directors are making final changes to the course schedule as the start of the next school year approaches. The trial has already been marked active, but there are a few teachers and room assignments that still need to be finalized before printing student schedules.
Perhaps a student decided they no longer want to take a certain course next year, or there was a change to the availability of a certain course where some students now need to be removed from that section. Another option is scheduling a Team (Scheduling Group) into specific courses at once.
When adding students to or removing students from section rosters, a detailed confirmation message displays that lists which students will have roster records added/removed and for which courses. Users can:
- Click Continue to add/remove the students to or from the selected sections.
- Click Copy to Clipboard to copy the student information and the section information for reference at a later time.
- Cancel the update.
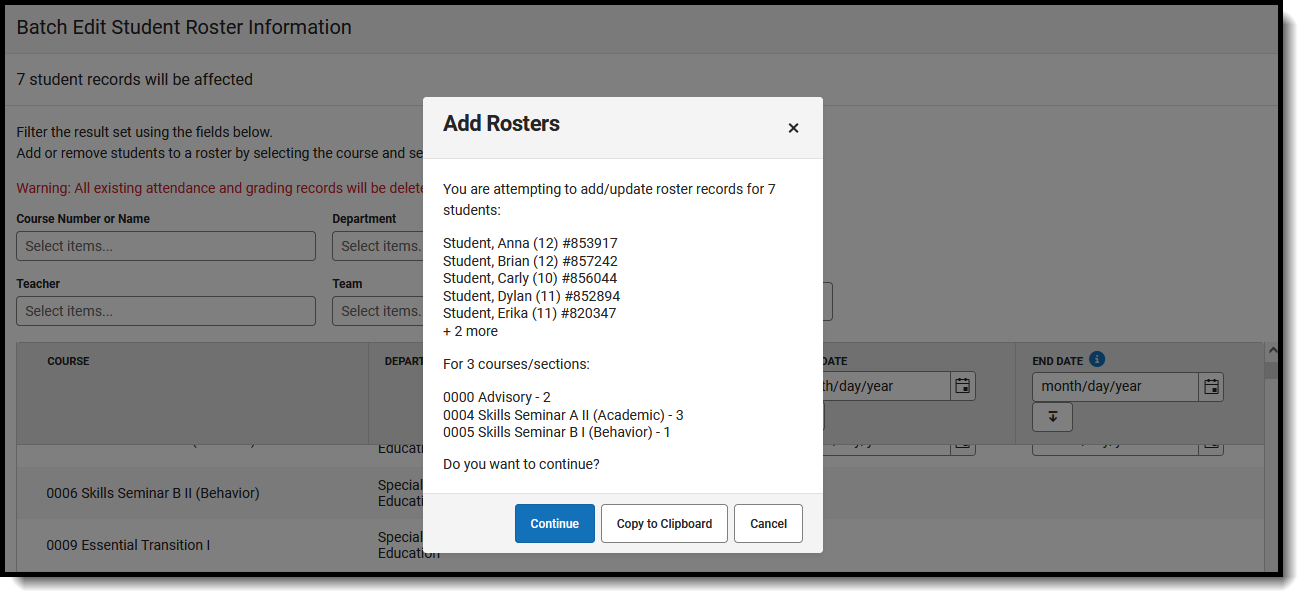 Add Rosters Confirmation Message
The following provides scenarios for using Batch Edit Student Rosters.
Add Students to Section Rosters
A group of students who were in a 6th grade Homeroom section in the previous school year needs to be scheduled into the same 7th grade homeroom section in the next school year. These students are assigned to the Blue Team to have the same homeroom teacher they had in 6th grade.
When doing this, ensure the calendar selected in the toolbar (context editor) is set to the calendar where these students are in 7th grade and the Calendar field in the Side Panel is set to the calendar where these students were in 6th grade.
- Use the Filter option to narrow the list of students to correct group of students. Change the Calendar to be the one in which students were enrolled in 6th grade; select the Grade Level of 06, and select the Team of Blue.
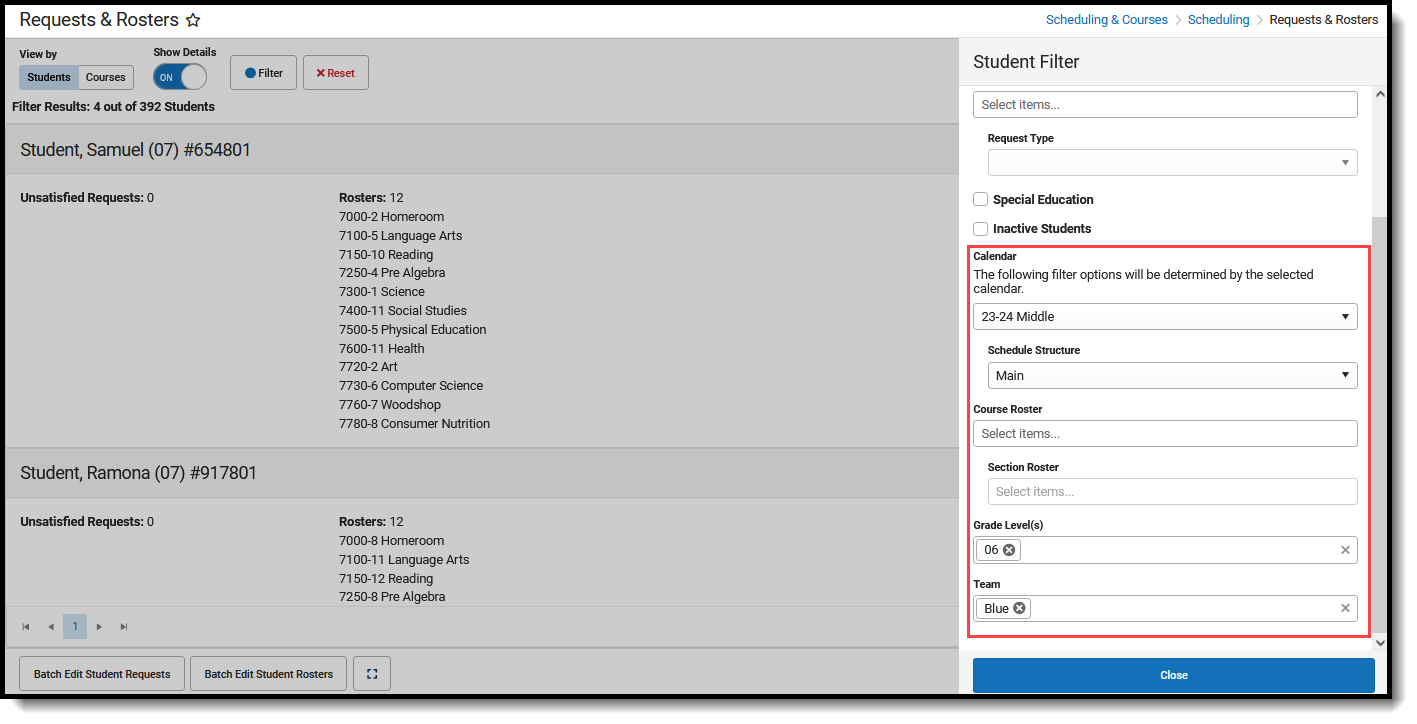 Filtered list of specific students
 - Select Batch Edit Student Rosters. The Batch Edit Student Roster Information side panel opens.
- In the Course Name field, locate and select the 7th Grade Homeroom course.
- Select that course in the results lists so a blue checkbox displays next to it.
- Choose the desired Section Number. When a teacher is assigned to that section, their name displays in the Teacher column.
- Leave the Start Date and End Date fields blank because the students start school on the first day of school.
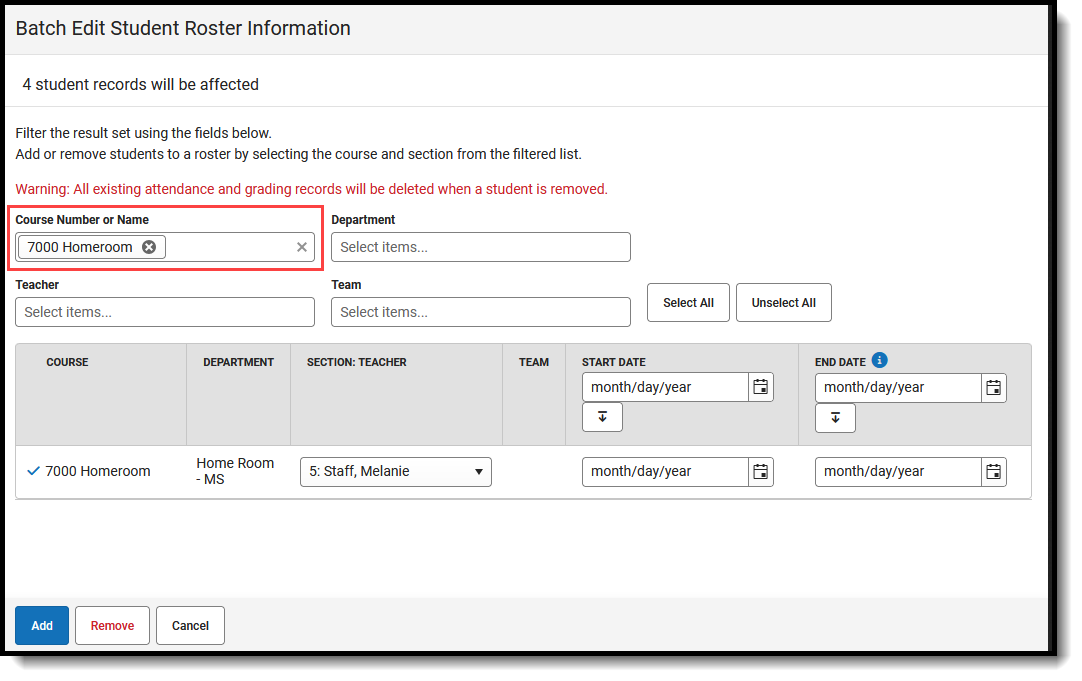 Homeroom Selection
 - Click Add. A message indicating four rosters are being modified displays. Click Continue.
- This Homeroom section has met the maximum student number, as noted by the message that displays. Because tool rights are assigned to overload sections, click Overload. To NOT overload the section, click Skip Overload. This message does not display when the Max Students field is not populated.
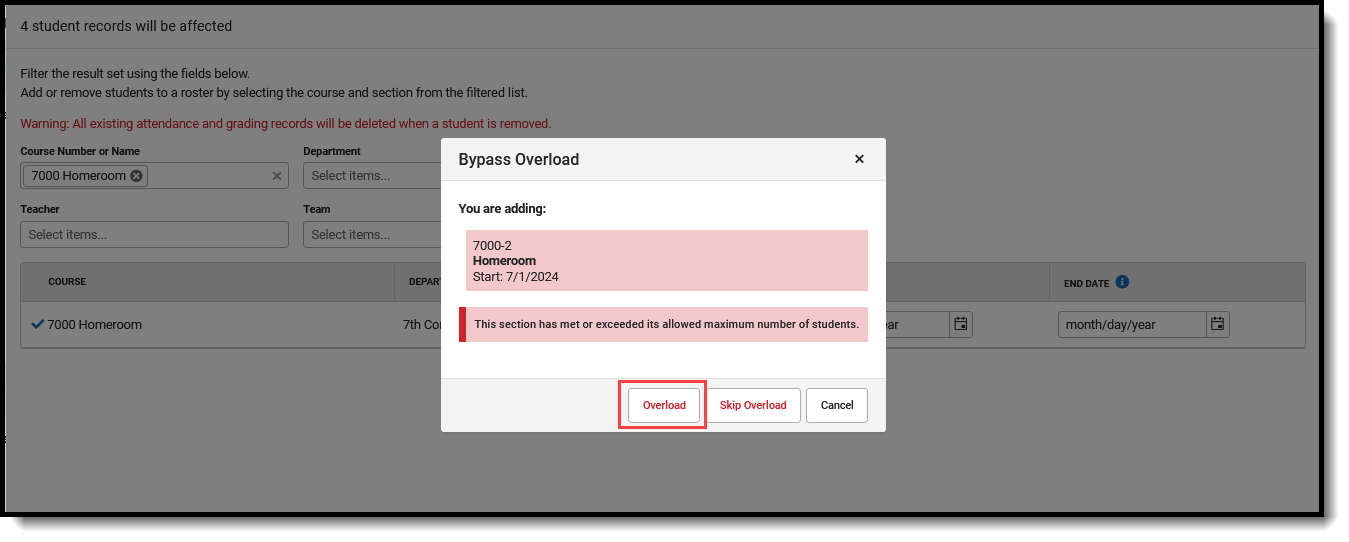 Overload Full Section
 - A message displays indicating how many rosters were updated with this change. Note that in this example, only three rosters were updated, but four students were included. This is because one student was already scheduled for the selected section, and a student cannot be added to the same section multiple times.
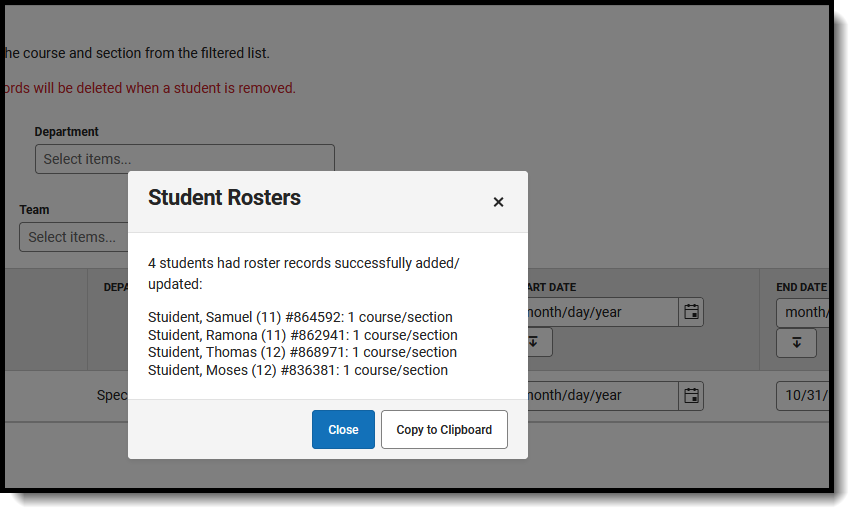 Student Roster Update
 - Click Close and return to the list of students. The four students who were assigned to the same homeroom course are now assigned to the same course.


Add Students to Rosters with a Specific Start Date
A selection of 7th grade students are taking Pickleball during the month of October. When the students were originally added to the Pickleball course, they were added for the entire year. Now, that course will be adjusted to meet just for the month of October.
When working with dates:
- The Start Date cannot overlap the End Date, and vice versa.
- End Dates cannot be the same as the last day of the term.
- The entered dates cannot be before the start date of the section or after the end date of the section.
- A warning message displays when the entered dates are between the term dates of the selected calendar. This warning is informational only; the dates can still be assigned and saved without error.
- Students who are not enrolled in school for the entire date range are not scheduled into the section.
- Filter the list of students to those students who are currently scheduled into the Course Roster of Pickleball and in Grade Level 07. Choose a specific section to update only those students in that section.
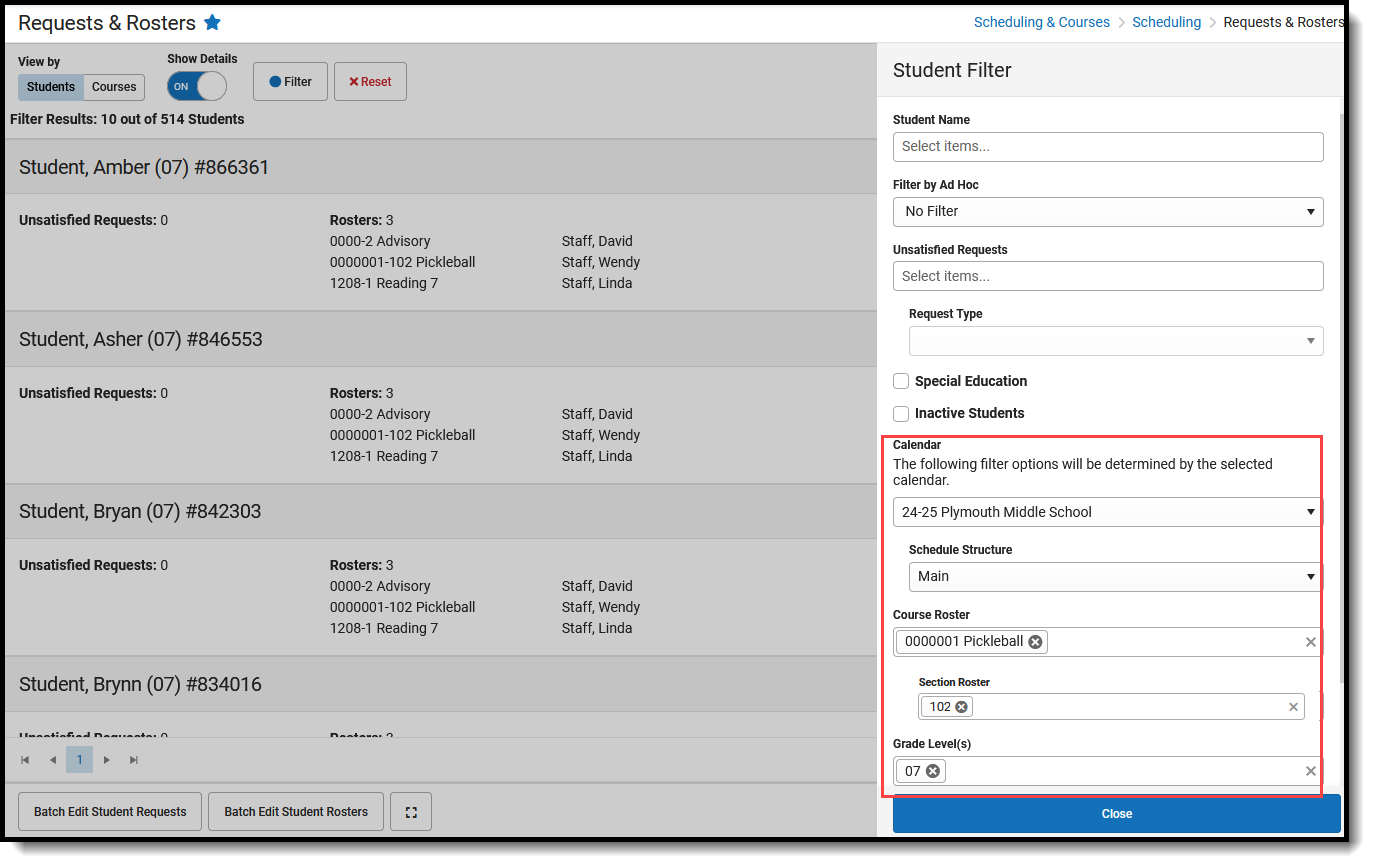 Filter Student List for Selected Course Roster, Section Roster, and Grade Level
 - Click Batch Edit Student Rosters.
- In the Batch Edit Student Roster Information side panel, search for the name of the Course.
- Click next to or on the name of the Course to place a blue checkmark next to it. Only courses with a blue checkmark are updated.
- Select the desired Section Number from the Section: Teacher field. This is a required selection. Once selected, the teacher's name displays in the Teacher column.
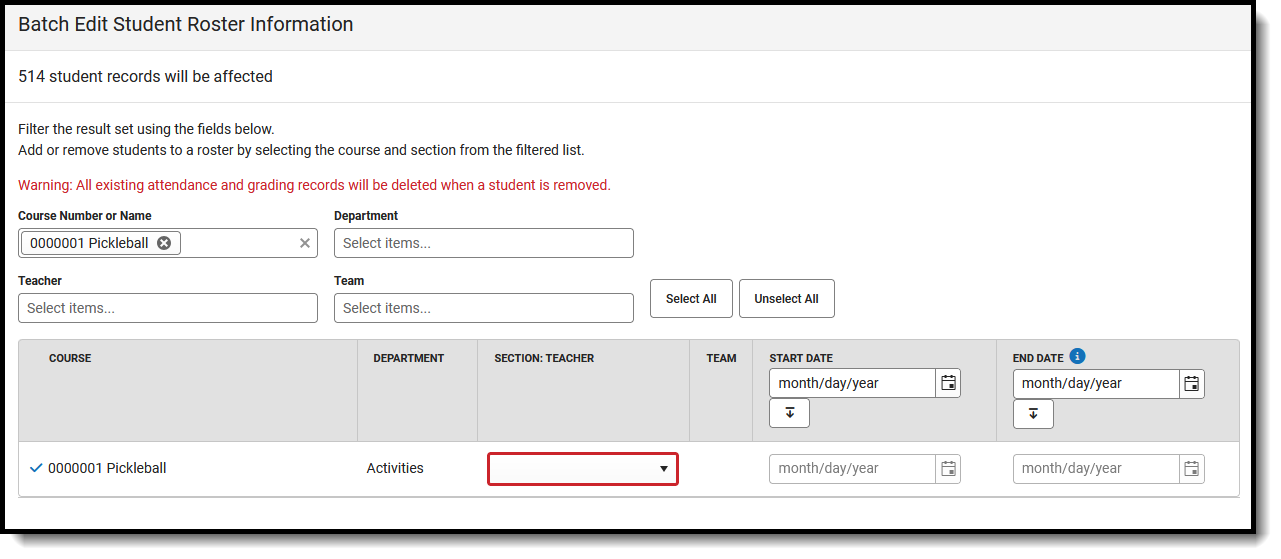 Course Selection for Modifying Section Roster
 - Add a Team from the dropdown list, if available and used in the school.
- In the Start Date field, enter 10/01/2024. In the End Date field, enter 10/31/2024.
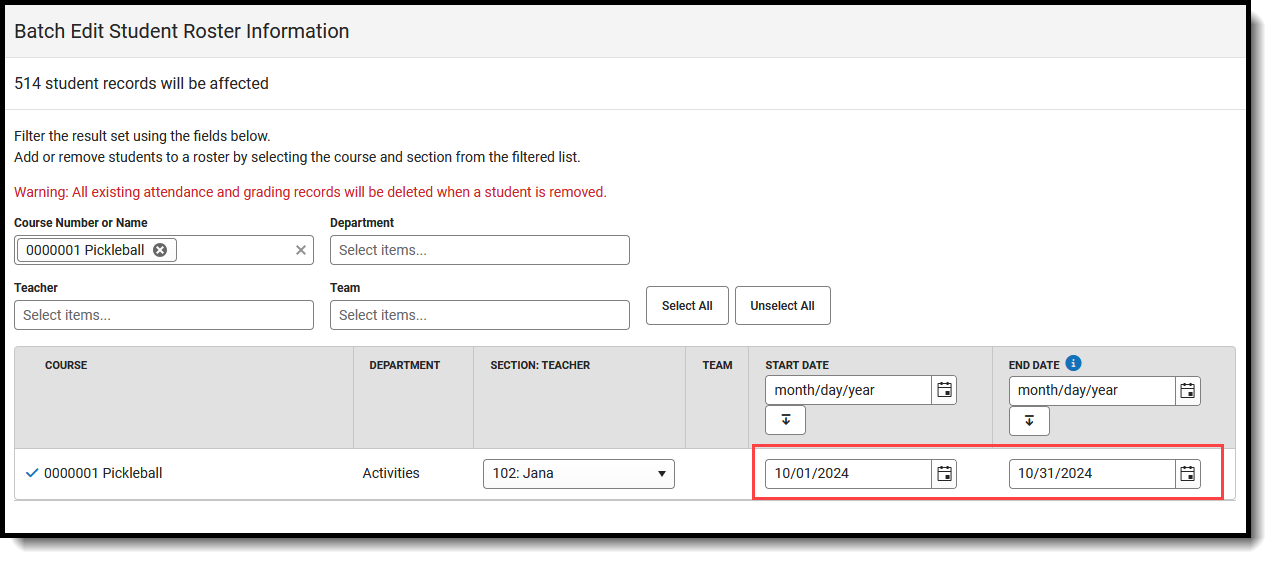 Start and End Date Entered for Section Roster
 - Click Add. A message indicating the number of rosters that will be updated displays. Click Continue to proceed with the roster update.
- A confirmation message displays when the rosters have been updated. Click Close to return to the list of students.


Those students are now scheduled into that section with the entered date range.
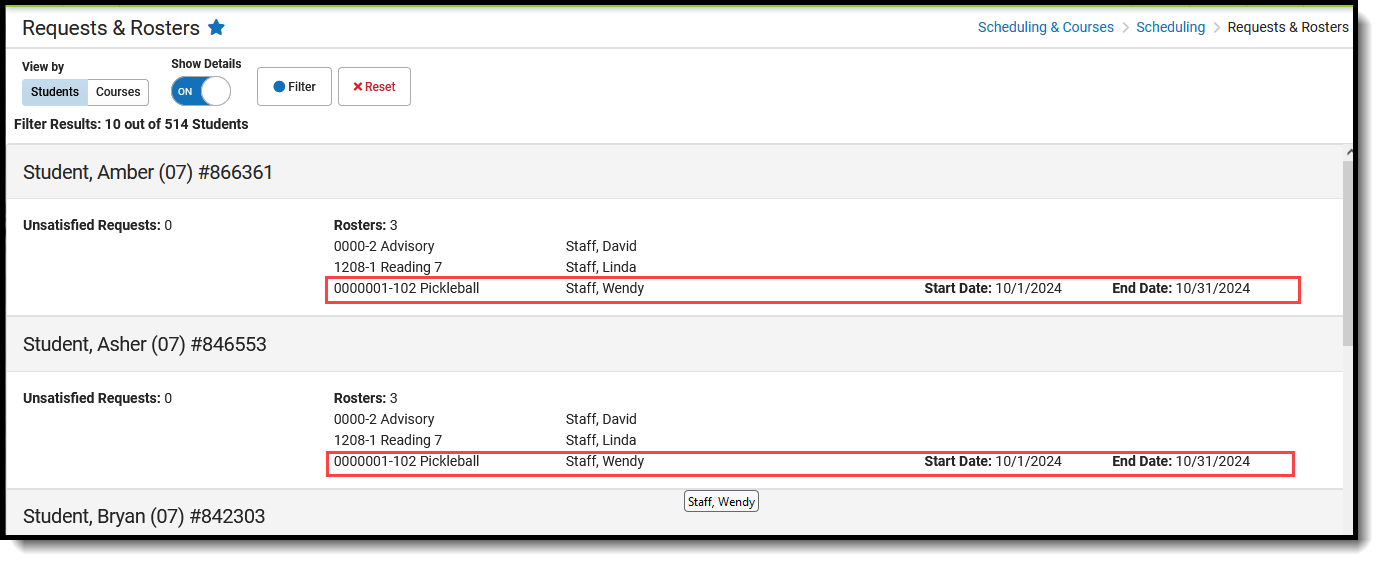 Start and End Dates Added for Course Section
When the start and end dates for multiple courses need to change, select those courses (place a checkbox next to the course name), use the Fill All/Fill Empty option to apply the same dates to all of the selected courses.
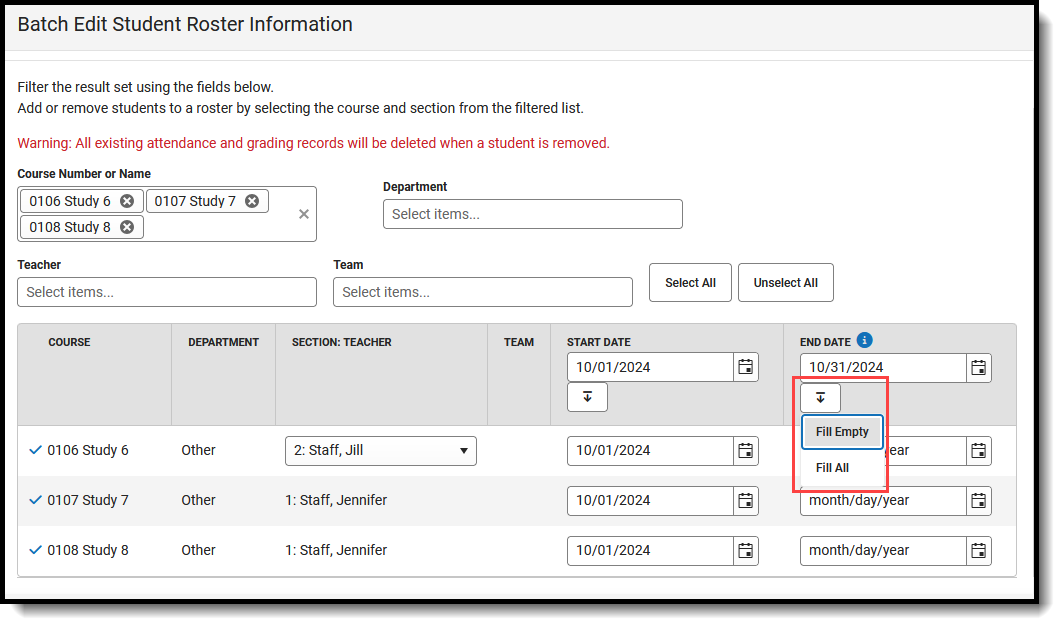 Batch Edit Section Roster - Fill Empty/Fill All Date Fields
The teacher assigned to Section 2 of the 7th Grade Advisory course is out on maternity leave for the start of the next school year. The students currently assigned to that section need to be scheduled into another section of the same course.
- Filter the list of students to those currently scheduled into the Course Roster of Advisory and in Grade Level 07. Choose a specific section to update only those students in a specific section.
 Filter Options for removing students from a section
 - Click Batch Edit Student Rosters.
- In the Batch Edit Student Roster Information side panel, search for the name of the Course.
- Click next to or on the name of the Course to place a blue checkmark next to it. Only those courses with a blue checkmark are updated.
- Select the desired Section Number from the Section: Teacher field. This is a required selection.
- Click Remove. A message displays indicating the total number of records that will be removed from the selected section roster. Note that this action cannot be undone. Click Continue to proceed with the roster removal.
- A confirmation message displays when the rosters have been updated. Click Close to return to the list of students.

Those students who were removed from the Course Section now have Unsatisfied Requests for that Course and need to be rescheduled into that course. Rescheduling can be done using the Add function detailed above.
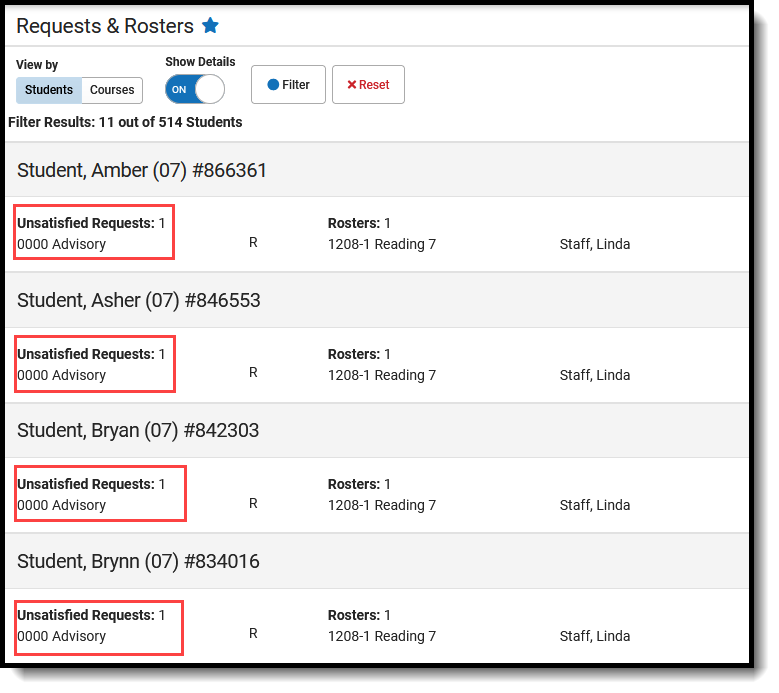 Students Removed now with Unsatisfied Requests
Manage Requests and Rosters from the Courses View
Filter Courses List
First, limit the number of courses that can be modified at one time. Any changes to course requests and rosters include all active courses in the selected calendar.
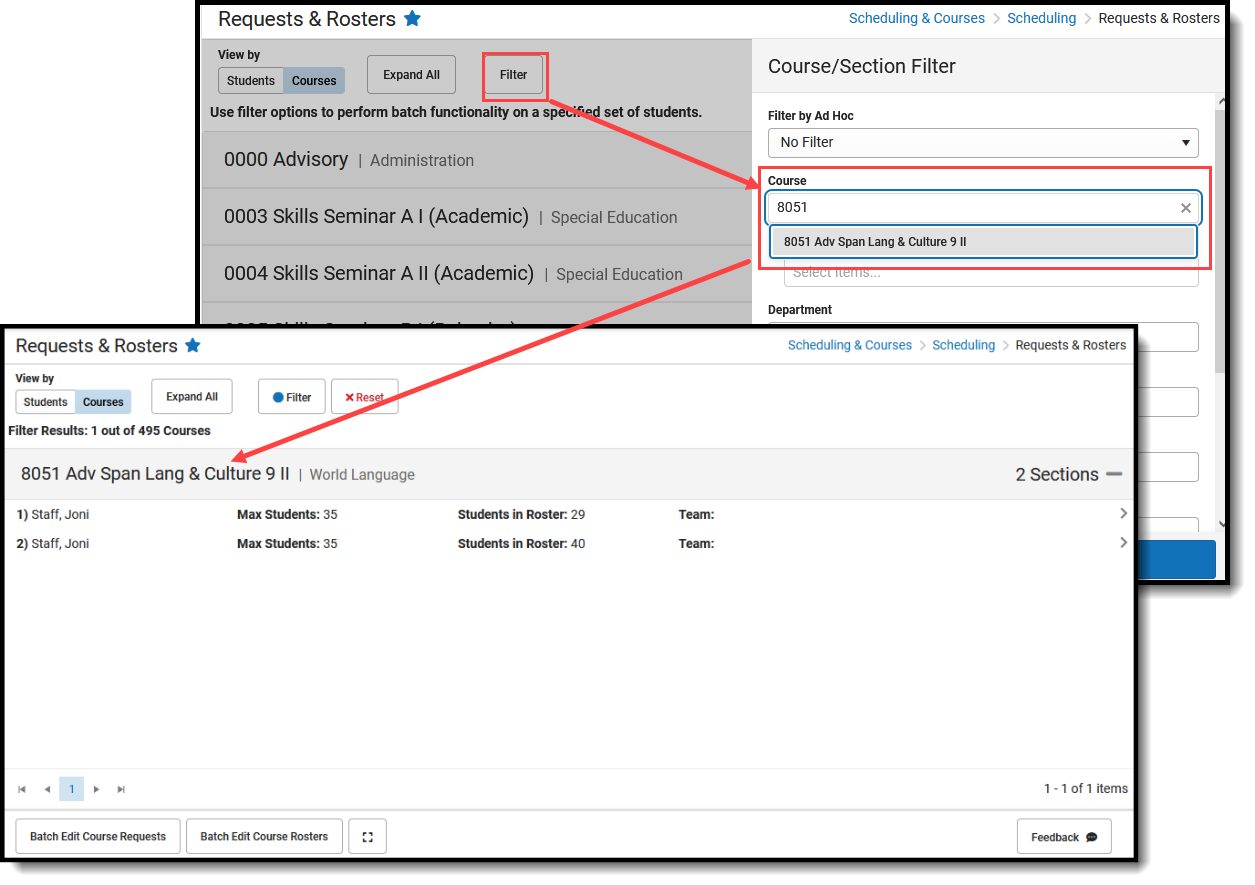
For example, World Language courses that meet only once during the year need to be scheduled first. Select World Language in the Department dropdown, then mark the Singleton checkbox at the bottom of the Filter options. Course requests or rosters are updated for only those courses instead of the complete list of active courses.
- Click Filter. The Course/Section Filter side panel opens.
- Enter data to narrow the full list of courses to a manageable option using one of the available options. See the Course Filter Descriptions below.
- Click Close when finished. Note that the Filter Results tally changes depending on what filter options are chosen, as all well as the Filter button having a blue button indicating filter options are selected and a Reset button displays to remove the filtered list of courses.
In the image below, the entered Filter options return courses in the World Language department that meet one time during the school year. Now, the list of courses to modify the course requests or the course rosters is 3 instead of 92.
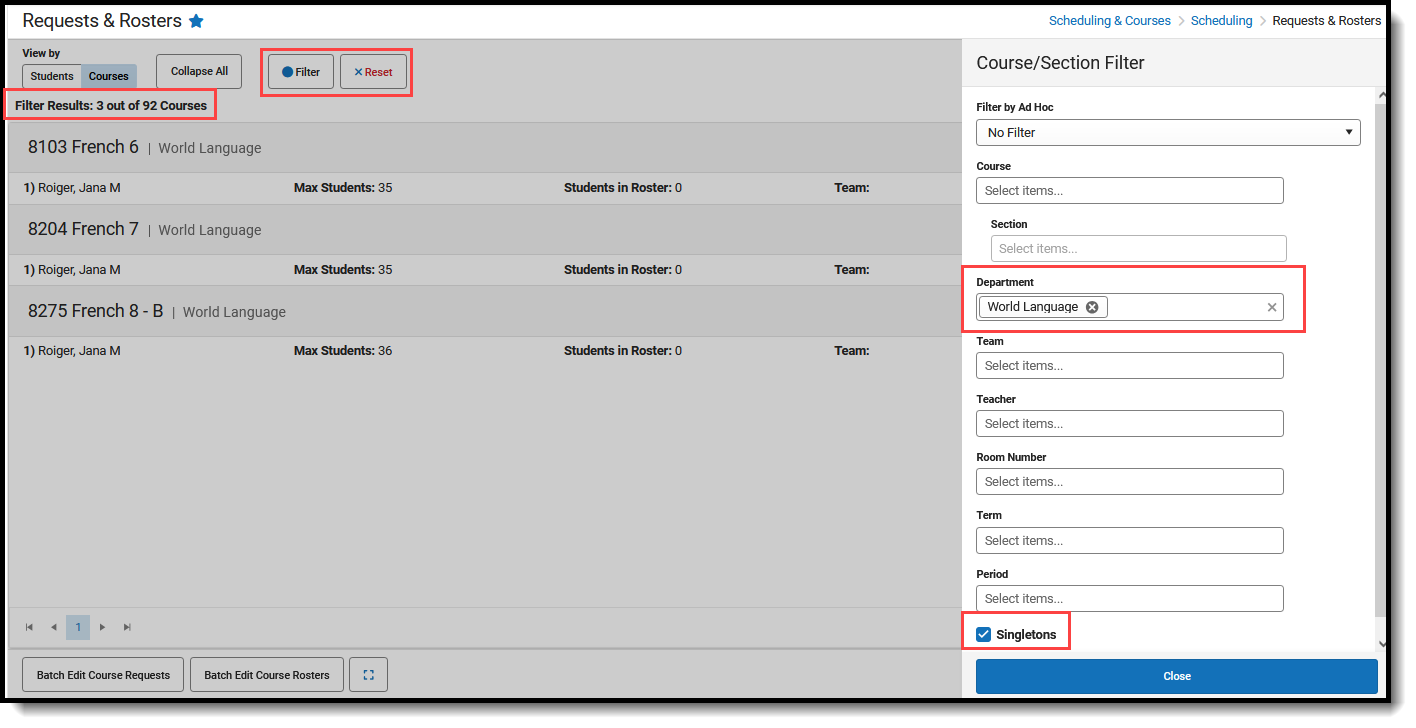 Course Filter Options and Results
Course Filter Descriptions
All of these filter options return results based on the selected calendar in the toolbar/context switcher.
| Filter Fields | Details |
|---|---|
| Filter by Ad hoc | Select an existing and saved filter built in Ad hoc Reporting. Only those courses included in the filter are returned. Only one filter can be selected.
This is a list of filters from any filter-building tool (Filter Designer, Selection Editor, Pass-through SQL Query) with the Course/Section Data Type. Use the Search field to locate the desired filter. This is helpful when the school/district has numerous filters created and available to staff. |
| Course | Select one or more courses from the list of active courses.
When the courses are semester-long and named accordingly - e.g., Math 1A for semester 1 and Math 1B for semester 2 - choose both courses so the rosters and/or requests are the same (for example) for both semesters. |
| Section | Select one or more Sections of the selected Course. A course must be selected in order to select a section. |
| Department | Select one or more Departments to work with a particular set of courses. Manage the requests for all Fine Arts courses or all Technology courses since these courses may be more difficult to schedule. |
| Team | Select one or more Teams that have been assigned to the Courses. Building the rosters for all BLUE Team Courses first because they are just for the 6th grade or just for the Honors students needs to be done first before scheduling the courses for the 3rd grade. |
| Teacher | Select one or more Teachers to schedule their classes. This option is helpful when a teacher may be out for an extended time, and those course sections now need to be taught by another teacher, or perhaps a set of teachers are team-teaching a couple of courses for those students who need additional focus, so their classes need to include the same students. |
| Room Number | Select one or more Rooms to assign to course sections, ensuring all Performance courses meet in the auditorium or all Physical Education courses are scheduled to meet in the Gymnasium. |
| Term | Select one or more Terms of the school year to manage. |
| Period | Select one or more Periods to manage. |
| Singletons | Mark this checkbox to work with courses that are scheduled ONCE during the school year—during one term, one period, and one section. These might be specialized courses for AP or Honors students or courses that are limited in interest or may be available for a subset of students. |
Once the list of courses is filtered to a manageable amount, modifications to the Courses can be done manually for each section or in batch for the courses.
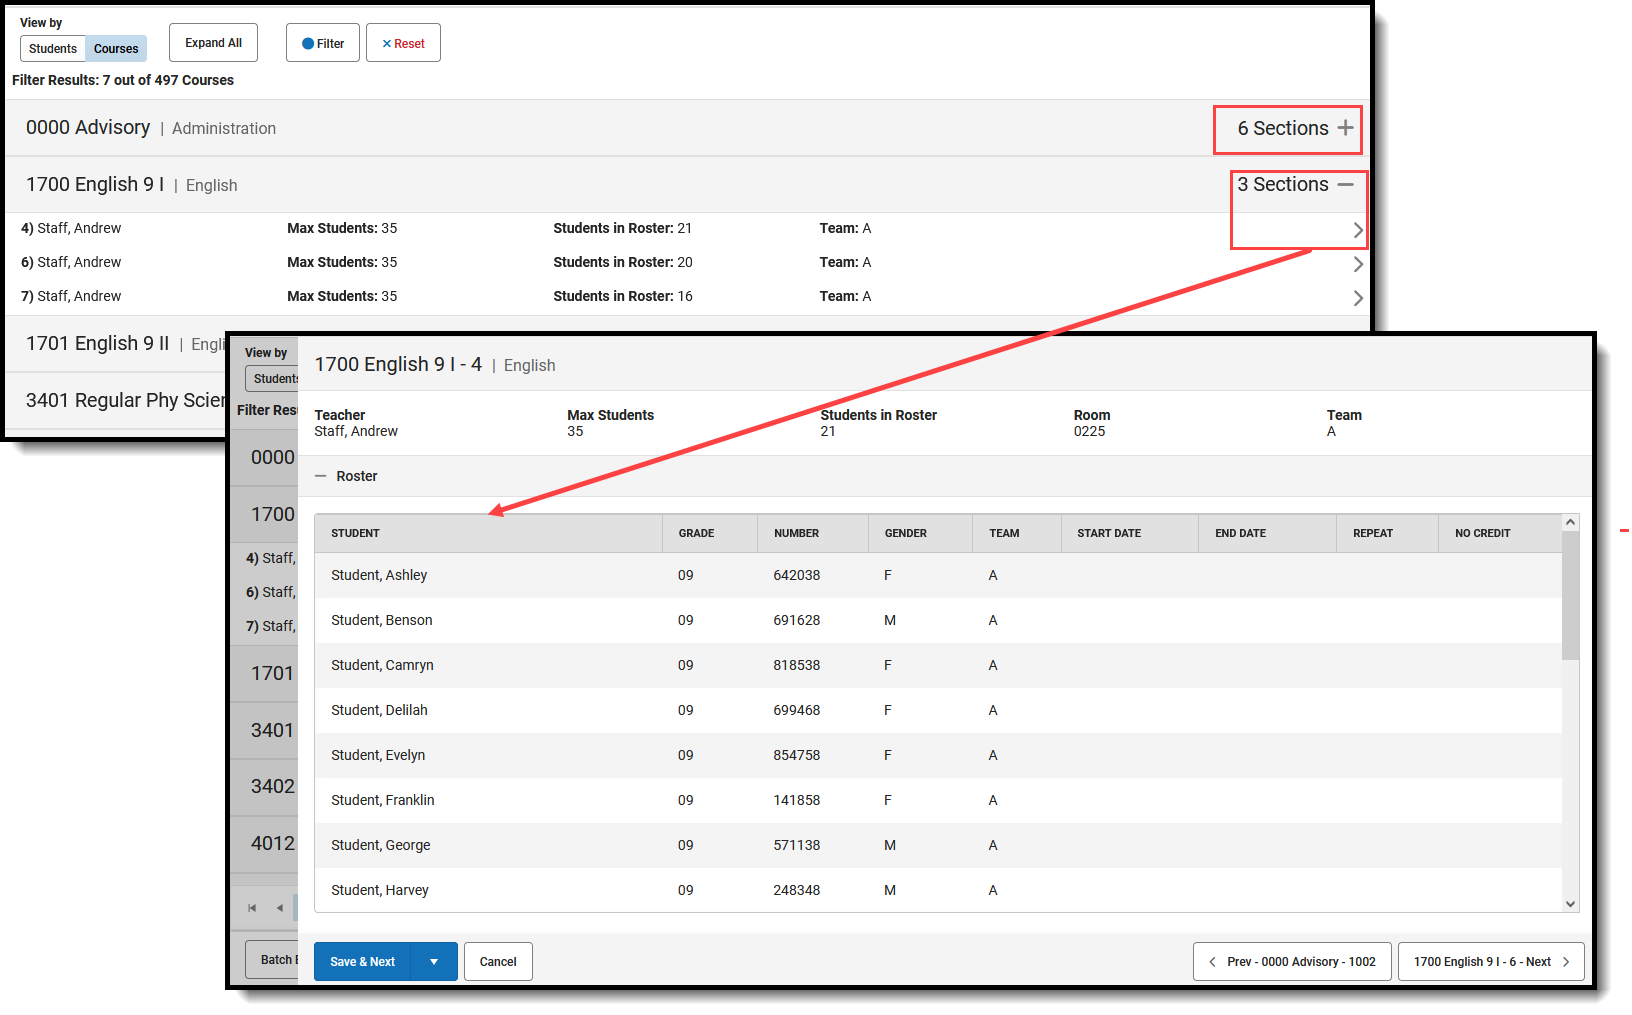
To work with one section, click anywhere in the row for a section to open the Course Section side panel or click the > on the far right side. Here, the Section Roster can be modified using the Roster Builder, including modifying the student's start and end dates.
Course Section Side Panel
The section side panel provides a summary of the section that includes the Teacher name, the number of Max Students, the number of Students in Roster (currently scheduled into the section), in what Room that section meets, and the Team assigned to the Course Section (if any). This information cannot be modified in the Requests and Rosters tool.
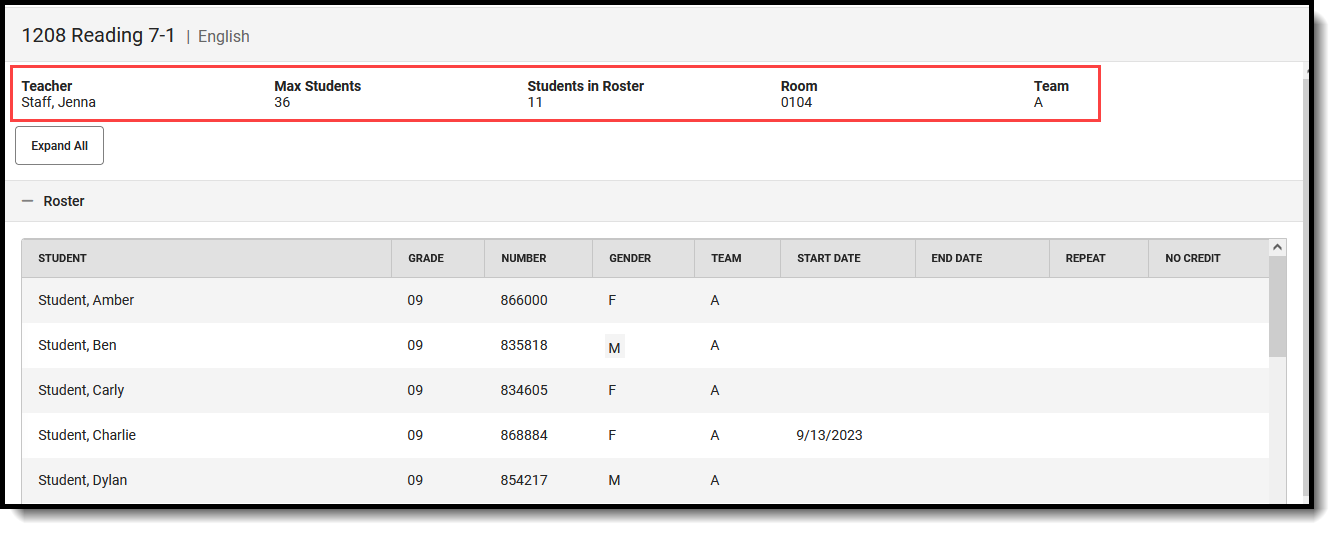 Section Side Panel - Section Identifiers
Use the Expand All/Collapse All button to open or close the Roster and Roster Builder list.
Roster
The Roster lists each student currently scheduled into the section. It includes the Student name, Grade Level, Student Number, and Gender, as well as the Start and End Date of the student being scheduled into that section, and whether the student is repeating the course or receiving No Credit for the course. The Roster cannot be edited from this view.
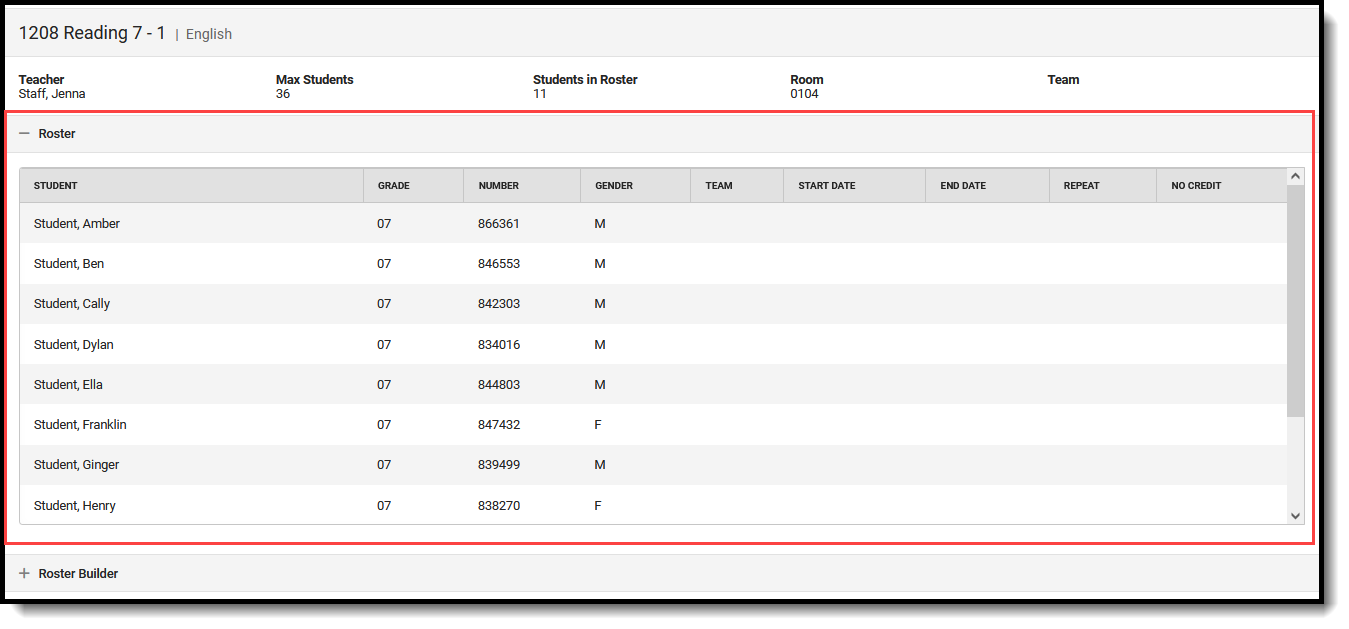 Section Side Panel - Roster List
Roster Builder
Changes can be made when using the Roster Builder. Here, new students can be added to this section by clicking the student's name. Those students already scheduled into the section display with a blue checkbox next to their name are the same students who are displayed in the roster list.
Cross-Site students are NOT INCLUDED in the Roster Builder because they cannot be added, removed, or updated in the Requests & Rosters tool.
Cross-Site students are displayed in the Roster.
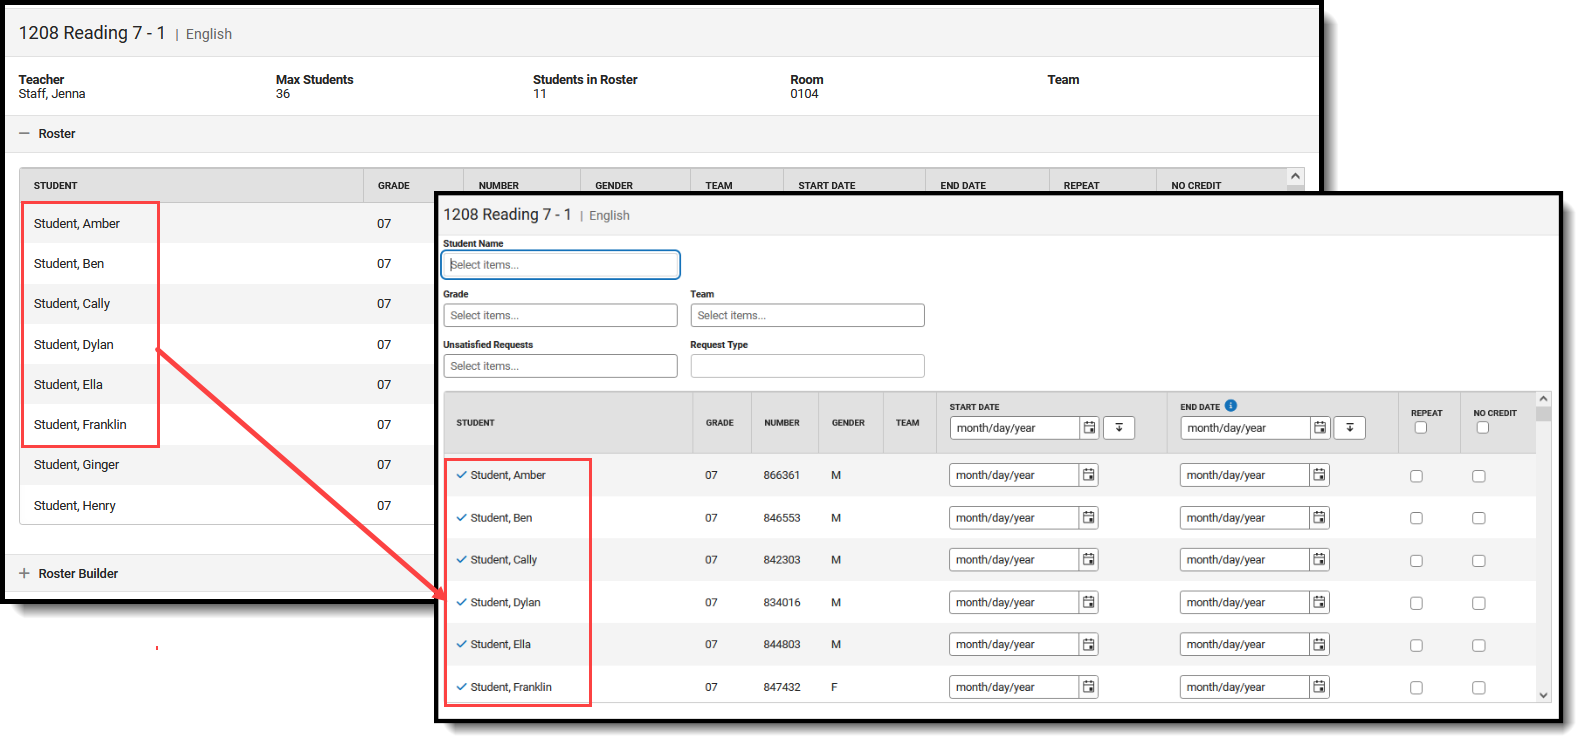
Add or remove students by entering the following in the search fields:
- Student Name
- Grade and/or Team
- Unsatisfied Requests and Request Types
Multiple selections can be added to each search field except Unsatisfied Requests. This option includes selecting the Request Types, which can only be added when ONE course is selected.
The filter result set of students is listed at the end of the roster without a blue checkmark. Selected students are not added to the section until the update is saved (Save & Next, Save & Stay, or Save & Close). A message displays indicating changes are being made and cannot be undone.
 New Student Added at the End of the Roster
To change the Start Dates and End Dates for the students in the section, enter the dates in the appropriate fields for each student. These fields need to be entered only when they differ from the start and end dates of the term (end dates that match the last day of the term cannot be entered). Or use the Fill All and Fill Empty to populate those fields with the same date for all students. Repeat and No Credit can also be marked for all students (by marking the checkbox in the header or for each individual student as needed.
 Roster Builder - Date Entry, Repeat and No Credit Selection
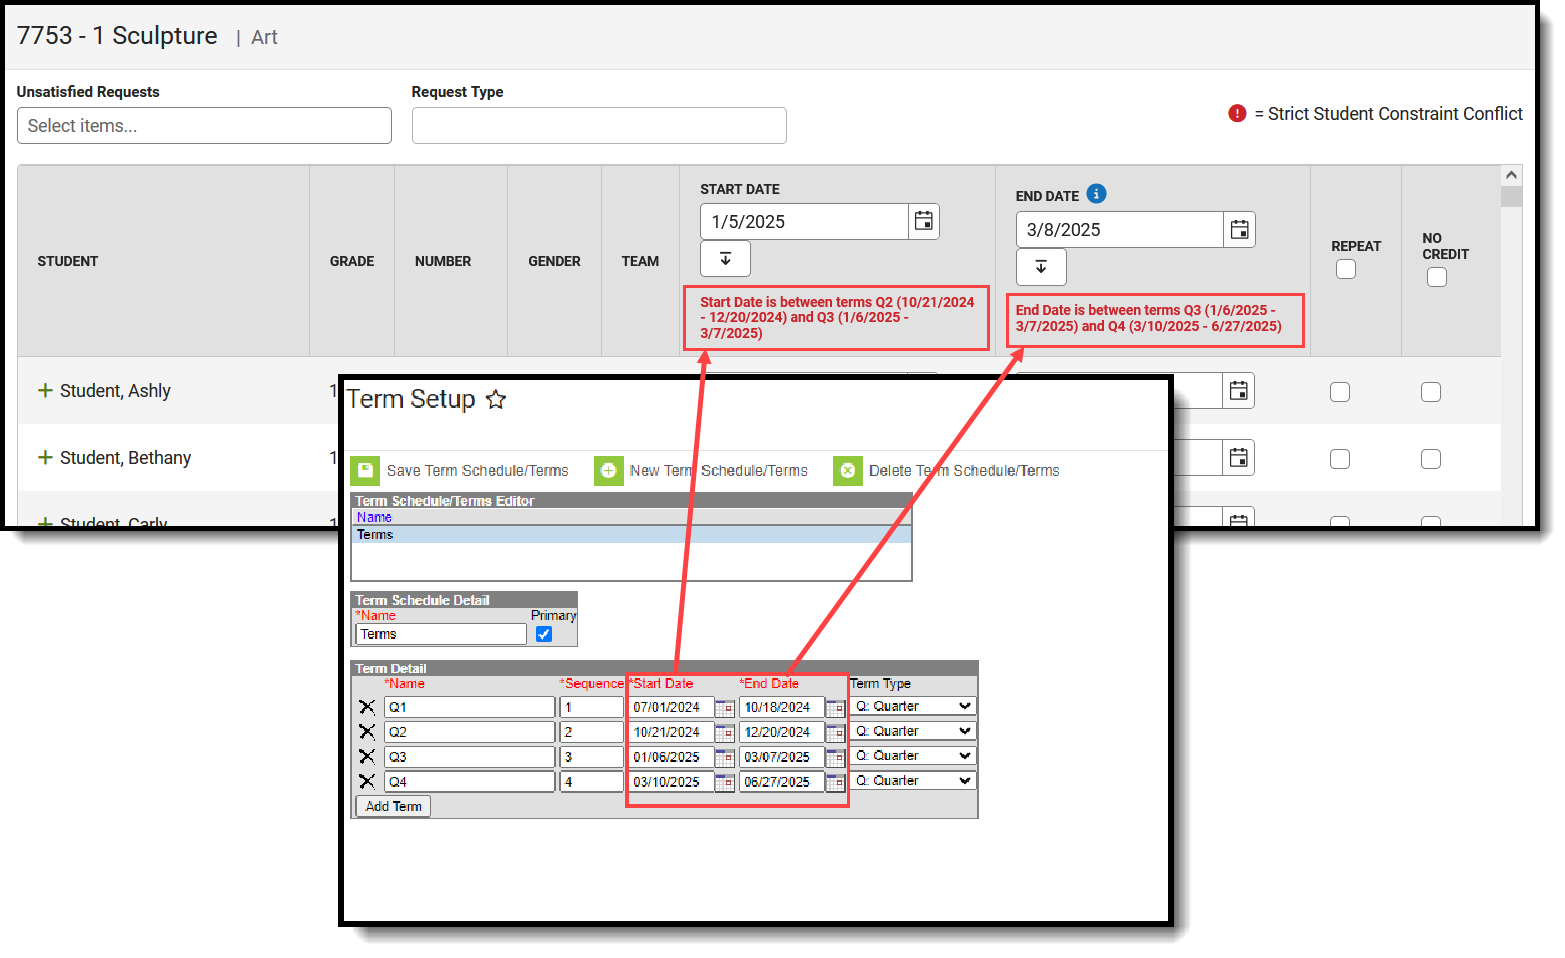
Entering a Start Date or End Date that is between terms displays a warning message in the date headers. This message is informational only; the dates can still be assigned and saved without error.
 Start and End Date Warning for Dates Between Terms
When working with dates:
- The Start Date cannot overlap the End Date, and vice versa.
- The entered dates cannot be prior to the start date of the section or after the end date of the section.
- Students who are not enrolled in the school for the entire length of the date range are not scheduled into the section.
Students can be added or removed, have their start and end dates updated, and have the Repeat and No Credit checkboxes modified from the Roster Builder. Students who are marked for removal have a red X next to their name; students who are added to the roster have a green plus next to their name; students who are already scheduled into that section have a blue checkmark next to their name.
Make the necessary updates and choose Save & Close to return to the filtered courses list. Choose Save & Stay to remain on the section side panel.
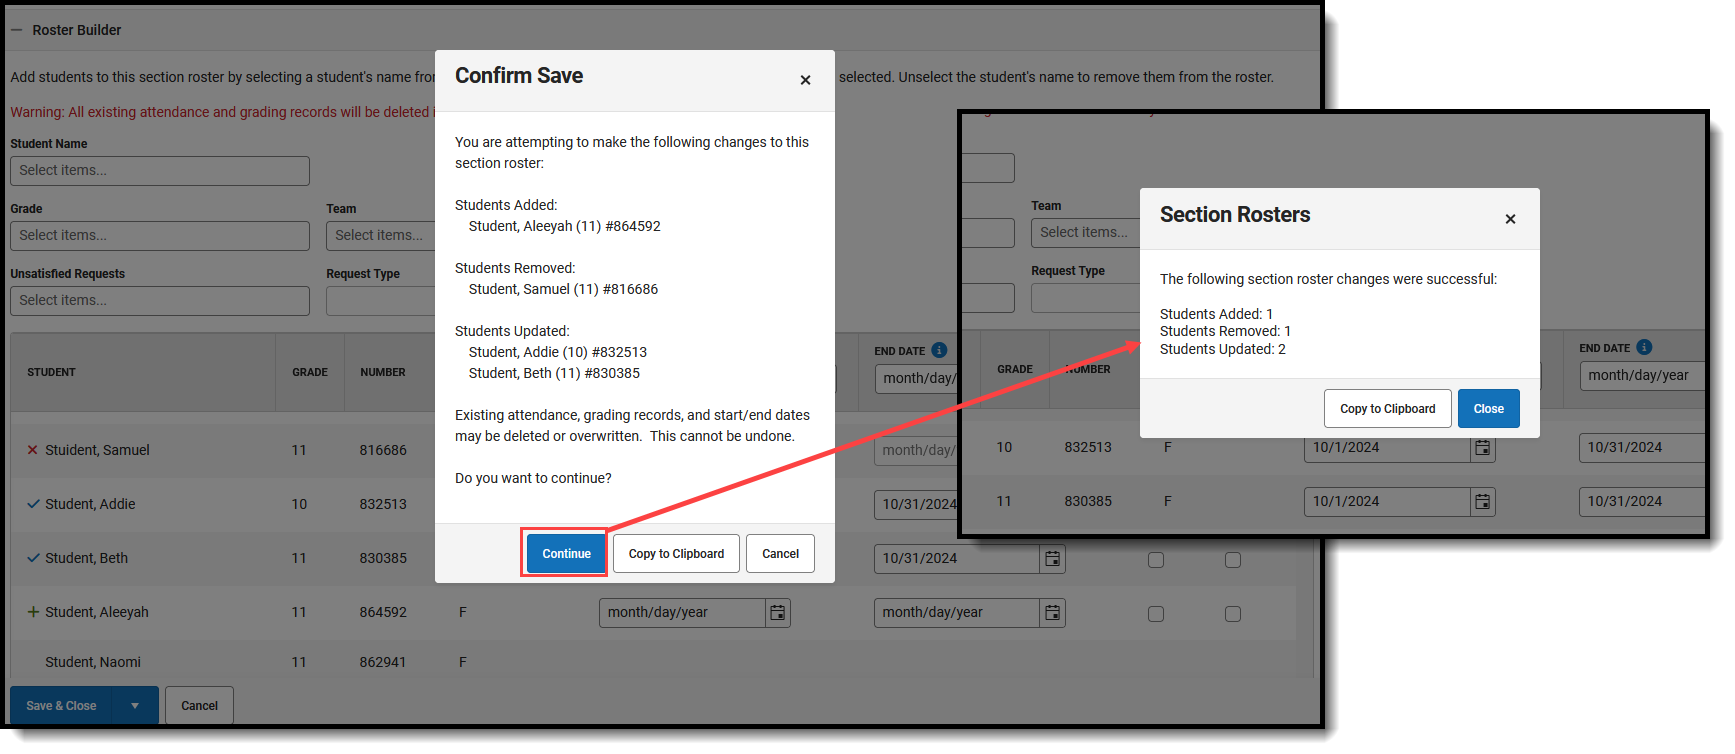
When changes are made to the roster, a confirmation message displays, summarizing what was was changed. Review that message, then choose Continue to save the changes, Copy to Clipboard to review the changes later, or Cancel to not make any changes.
A second confirmation message summarizing the changes displays. Choose Copy to Clipboard to review the updates later or choose Close.
 Roster Builder - Roster Update Confirmation Messages
Overload a Roster
The Max Students field on the Course Information or Section Information editor indicates the total number of students who can be assigned to any given section. However, for certain courses (following your district or school policy), counselors and other scheduling personnel have the ability (requires the Overload Sections tool right) to add more students to that section.
When more students are selected for enrollment in a section that is over the number of Max Students, the conformation modals display additional messaging that need to be processed prior to saving the updates.
In the following example, the Skills Seminar class has a Max Students value of 3, and 3 students are already scheduled into that section. However, there are three more students who need to be added to this section.
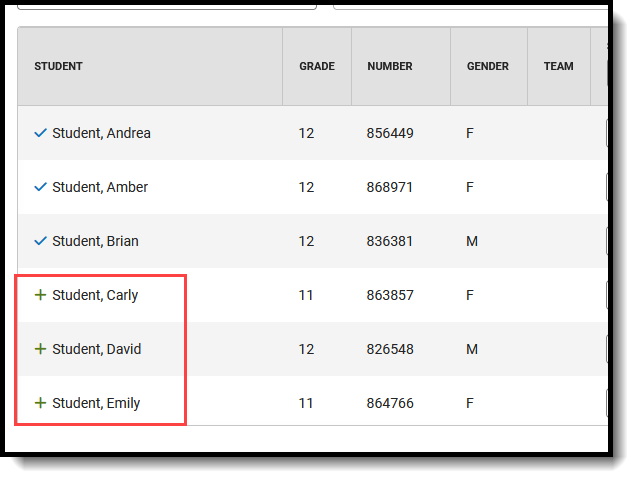
Students Andrea, Amber, and Brian are already scheduled in the section - they have a blue checkmark next to their names. Students Carly, David and Emily need to also be scheduled into the section.
- Select the students to add. Their names are displayed with a green plus sign once selected.
 New Students Selection
 - Make any necessary changes to the Start Date, End Date, Repeat or No Credit default options.
- Choose either of the Save options - Save & Stay or Save & Close. The first Confirm Save message displays, listing the students who are being added (or removed or updated).
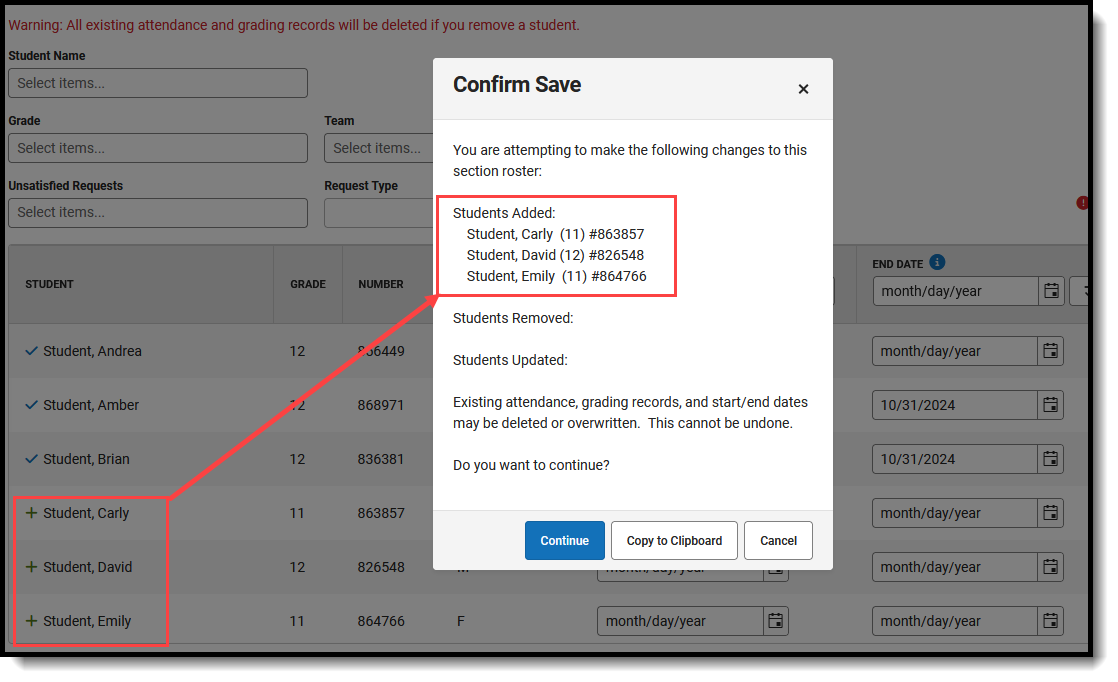 Confirm Save Message - Adding Students
 - Click Continue. Because the section is already full, a Bypass Overload message displays. To continue adding the new students, choose Overload. A Section Rosters confirmation message displays. confirming the updates to the section.
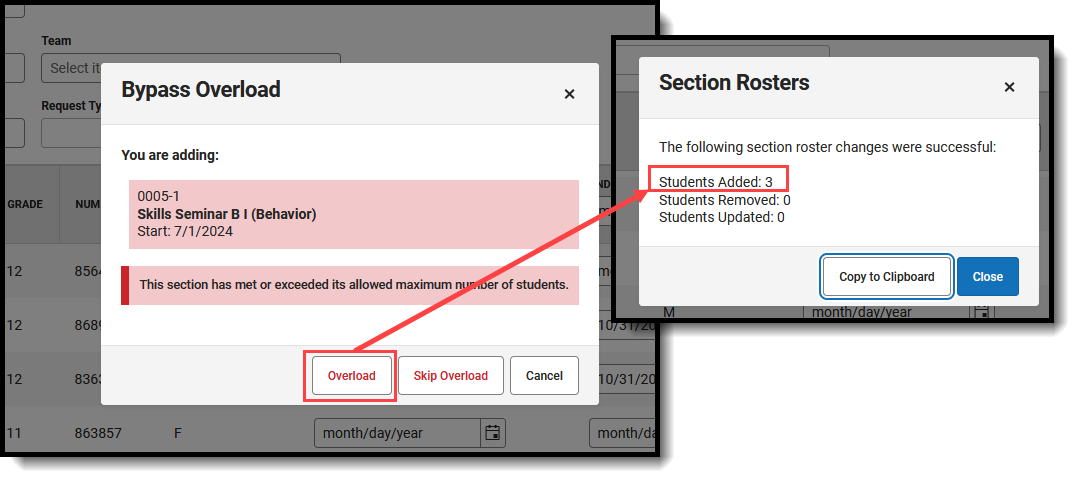 Overload Section Message
 - Or, to cancel the addition of the new students, choose Skip Overload. A message displays indicating the new rosters were not processed.
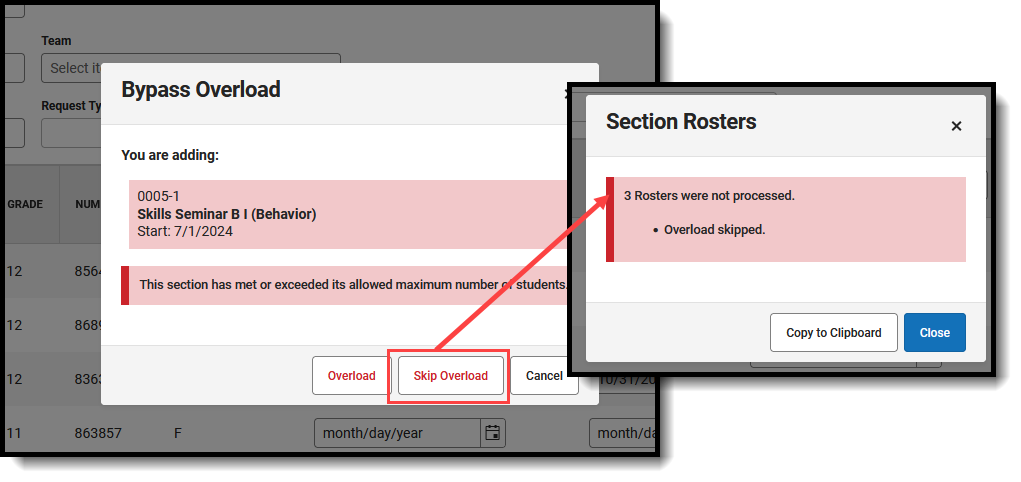 Skip Overload Message
 - Choose Copy to Clipboard to review the list of updates at a later time, or choose Close. The section is now updated.


The Copy to Clipboard option lists the updates made to the section, in this case, the addition of three students. When that option is selected, navigate to another tool - a word document, an email, text pad, etc. - and paste the information.
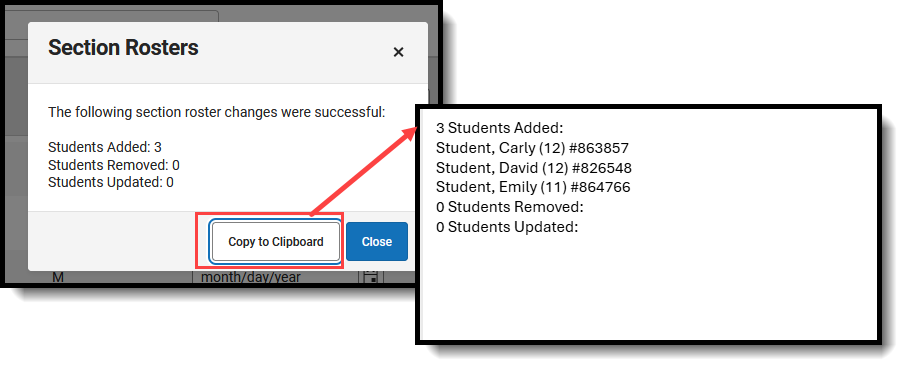 Copy to Clipboard
Batch Edit Course Requests
Use Batch Edit Course Requests to modify the requests that already exist for the selected course(s). This screen contains the same search options as the Roster Builder section, but focuses on the Request Type.
Here are some examples of managing course requests using this option:
- Schedule students into courses where they have unsatisfied requests for those courses.
- Add course requests for all 5th grade students moving from the elementary school to the middle school using teams.
- Remove course requests for students.
- Schedule seniors into their Senior Seminar courses which meets one time during the school year.
The following provides scenarios for using Batch Edit Course Requests.
Add Course Requests for Students who have Unsatisfied Requests
Course requests for Concert Band 1A and 1B are being added for those students who have unsatisfied requests for those courses.
- Filter the Courses to display only Concert Band 1A and Concert Band 1B.
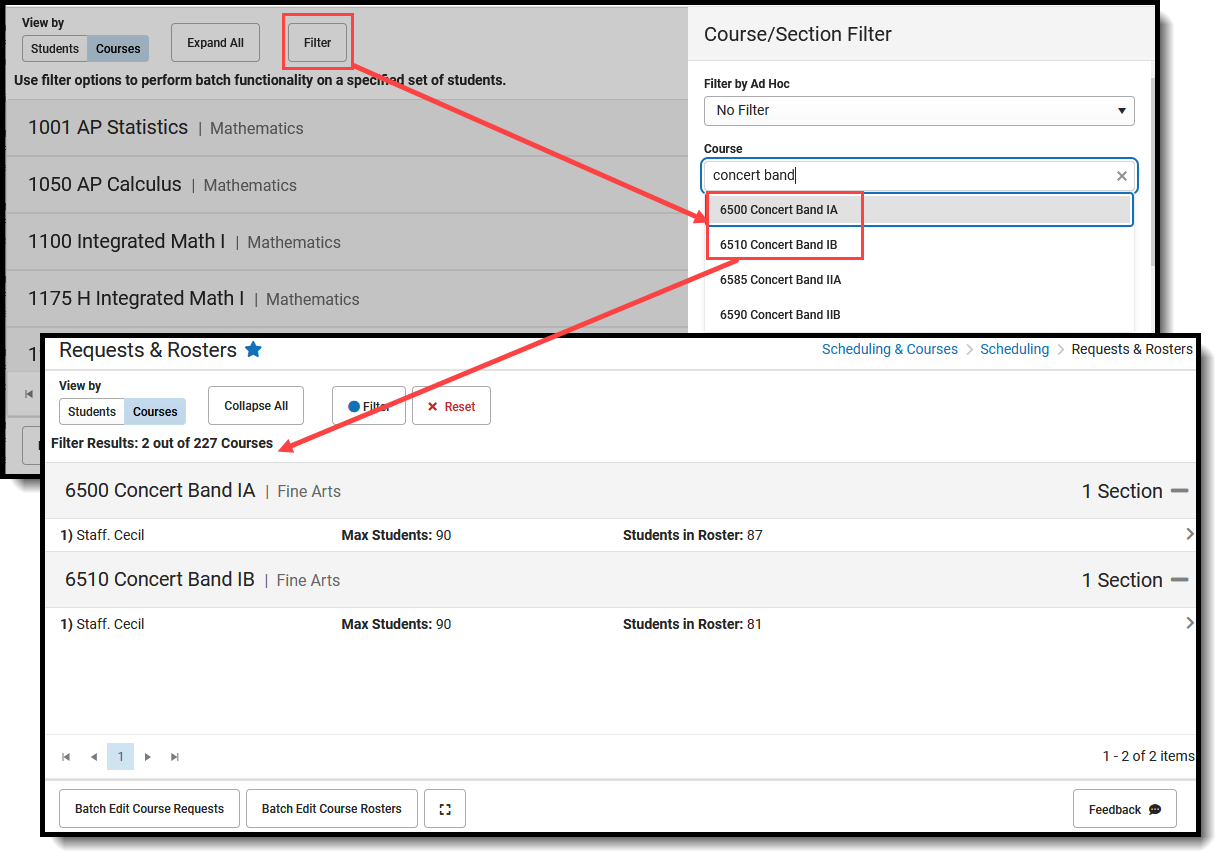 Batch Edit Course Requests - Filtering Courses
 - Click Batch Edit Course Requests. The Batch Edit Course Request Information side panel displays.
- Search for the Concert Band courses in the Unsatisfied Requests field. All students who have a request for the Concert Band courses that have not been added to their schedule are listed.
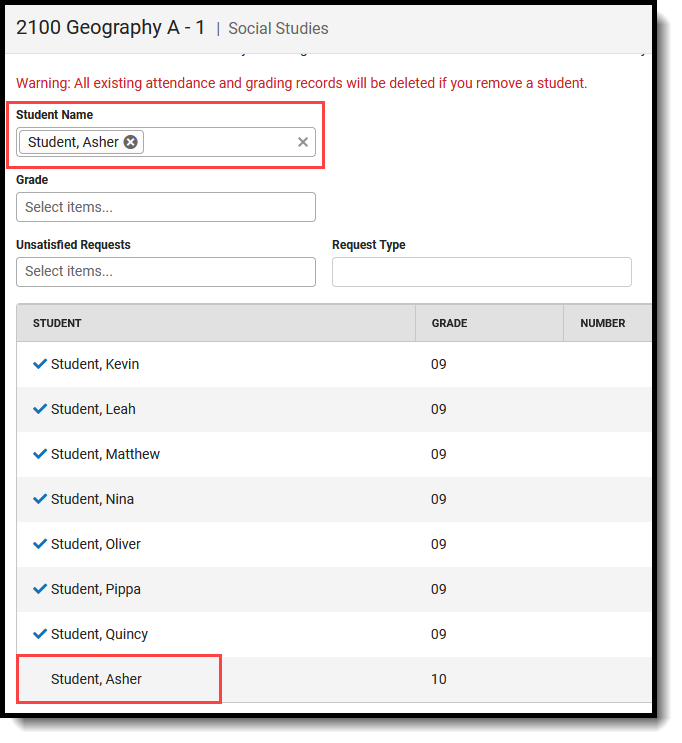
- Click Select All. This adds a blue checkmark next to all students listed and populates the Request Type field with R (Required), the default Request Type. Or, manually choose the students by clicking next to their name. The Request Type field still populates automatically with R, but can be changed to E (Elected) or A (Alternate), if desired. Apply the same Request Type to all selected students by choosing E and using the Fill Empty/Fill All option. Since R is already selected, use Fill All to change it to E.
 Request Type Changed to E
- Example: Asher's counselor knows he wants to be Concert Band, so the request type for him remains as R. For Brynn, she would rather take a Sociology course but she did enjoy Concert Band last year, so the request type for her is changed to an Alternate, meaning she'll be placed in Band if her schedule isn't filled with the Sociology course. And for Callie, her request type is changed to an E because she doesn't need another Fine Arts requirement but the band director has asked her to participate again.
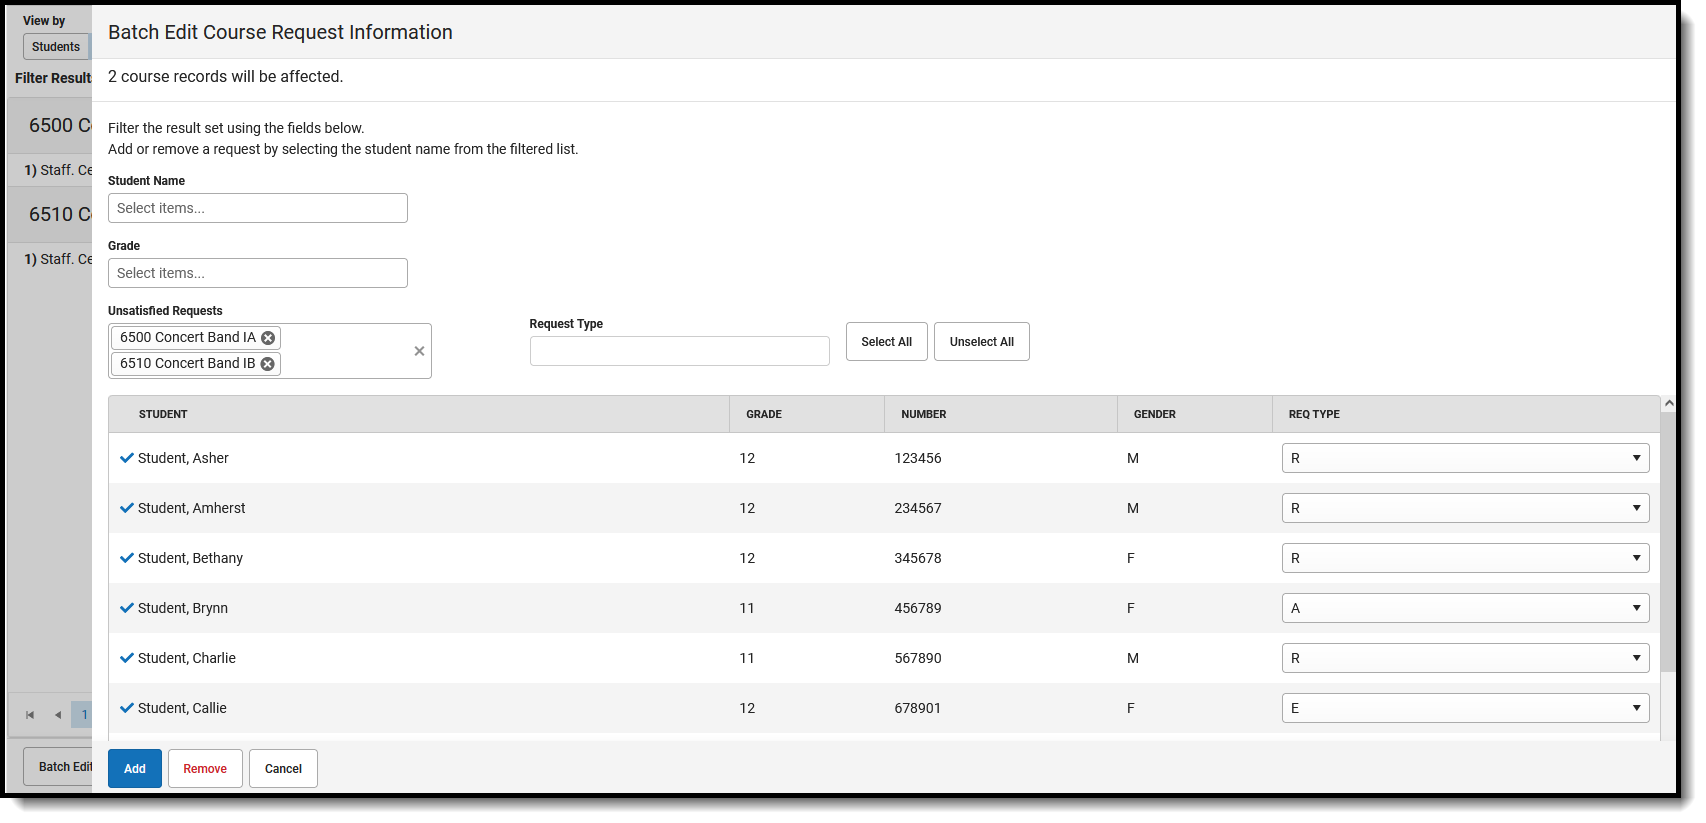 Adding Course Requests to Concert Band
- Example: Asher's counselor knows he wants to be Concert Band, so the request type for him remains as R. For Brynn, she would rather take a Sociology course but she did enjoy Concert Band last year, so the request type for her is changed to an Alternate, meaning she'll be placed in Band if her schedule isn't filled with the Sociology course. And for Callie, her request type is changed to an E because she doesn't need another Fine Arts requirement but the band director has asked her to participate again.
- Click Add. A message displays indicating that the course requests are being added for BOTH Concert Band courses listed for the six students selected.
- Click Continue. A message displays indicating the course request was added to the selected students. This might not be the total number of requests added; when the student has an existing request for the course, another request for the same course is not added. Or, they may have a request for the course with a different Request Type, so a second request is not added.
- Choose Close to return to the filtered course view, or choose Copy to Clipboard to view the added requests later.


To verify requests were added for the students, navigate to their Walk-In Scheduler. The newly added requests are listed under Unscheduled. Or, generate one of the many Scheduling Reports, like the Request Batch Report or the Schedule Conflicts Report.
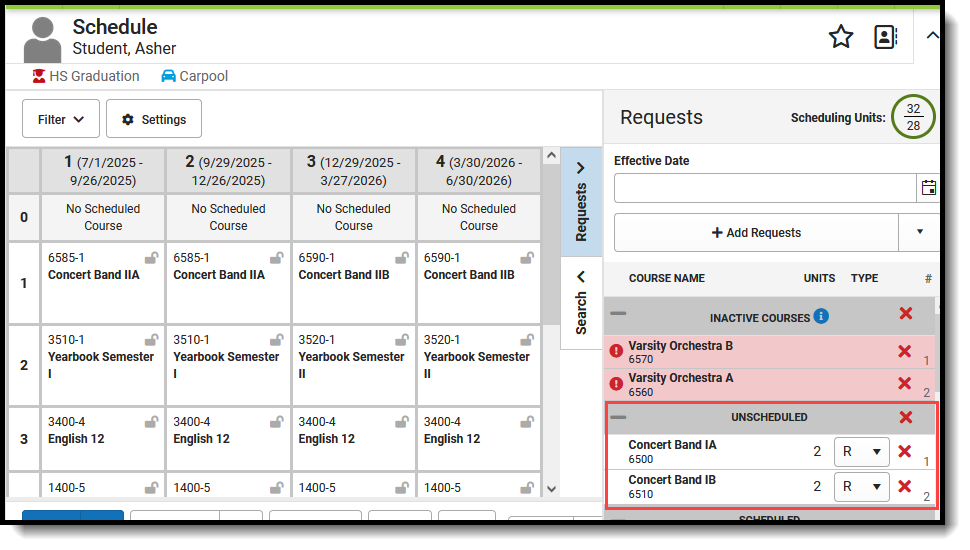 Walk-In Scheduler - Unscheduled Course Requests
Remove Course Requests for Students
Only two students have requested a Recreation and Leisure course, so the decision was made to not offer that course this year. Requests for that course need to be removed. No course sections were created for that course.
- Filter the lost of courses down to just that course.
 Filter Courses to Specific Course
 - Click Batch Edit Course Requests. The Batch Edit Course Request Information side panel opens.
- In the Unsatisfied Requests field, enter the Course Number or Course Name for the Core Recreation and Leisure course. The students who requested that course display.
- Select the students by clicking next to their name, which adds a blue checkmark next to their names.
- In the Request Type field, select R. The Request Type must match the type of request that was originally added for the course. When the Type is blank, requests of any type are removed.
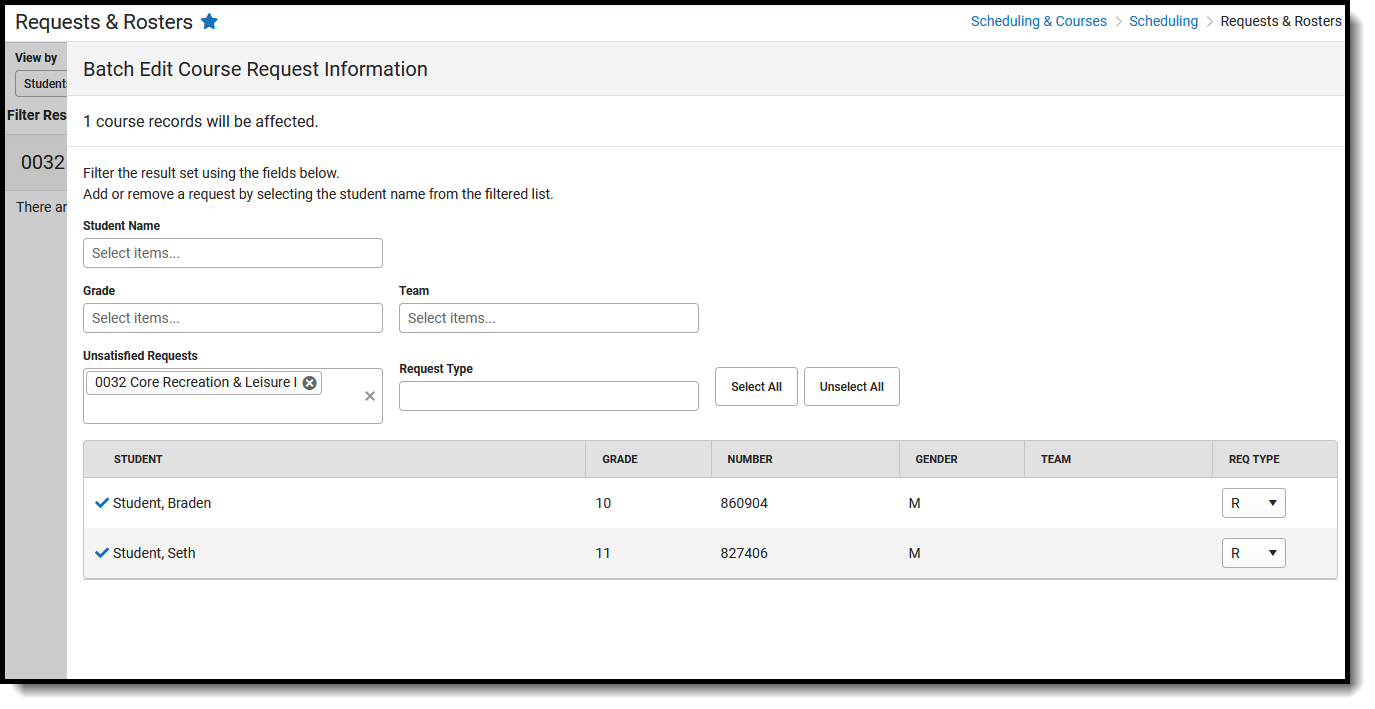 Student Selection for Removing Course Requests
 - Click Remove. A message displays indicating the total number of requests that will be removed. Click Continue to proceed with the removal.
- A message displays indicating the total number of requests that were removed for that course. Click Close to return to the list of courses.


Switch to the Student View and search for those students. That course is no longer listed in their Unsatisfied Requests lists.
 Course Request Removed
Batch Edit Course Rosters
Batch Edit Course Rosters updates - adds or removes - students from the selected course sections. Unlike the Batch Edit Course Requests, this option modifies the students who are scheduled to be in the selected course sections. Because of this, additional tool rights are needed.
Some examples for managing course rosters using this option:
- Add students in a specific Team to the Course.
- Add students in a specific grade level to a grade level specific course.
- Remove specific students from the course.
- Remove unsatisfied requests for a course.
When adding or removing course roster records, a detailed confirmation message displays that lists which course sections are being modified and for which students.
- Click Continue to add/remove the roster records.
- Click Copy to Clipboard to copy the course and student information for reference at a later time.
- Cancel the update.
 Batch Edit Course Rosters Update
The following provides scenarios for using Batch Edit Course Requests.
Add Students to Courses
For the Concert Band courses, those students who had course requests created are now being added to the section rosters.
- Filter the course list to just the Concert Band 1A and 1B courses. Batch Edit Course Rosters - Filtering Courses
- Click Batch Edit Course Rosters option. This displays the Batch Edit Course Roster side panel.
- Search for the Concert Band courses in the Unsatisfied Requests field to return all students who have a request for the Concert Band courses that have not been added to their schedule.
- Click Select All to add all students listed to the section roster. This adds a blue checkmark next to their names. Students can also be selected manually by clicking their name.
- Click Add. A message displays indicating the total number of requests that will be added. Click Continue to proceed with the removal.
- A message displays indicating the total number of rosters that were added for the courses. Click Close to return to the list of courses.
Remove Students from a Course Roster
One of the Advance Spanish courses has a Max Students count of 35, but Section 1 has 29 students scheduled and Section 2 has 40 students scheduled. This change will remove 5 students from Section 2 so the sections are more balanced. This change will remove students on Team F from the section.
The teacher has already suggested which students to move to the other section.
- Filter the course list to Advanced Spanish course.
 Batch Edit Course Rosters - Filtering Courses
 - Click Batch Edit Course Rosters option. This displays the Batch Edit Course Roster side panel.
- In the Team dropdown, select F to list all students assigned to that Scheduling Group/Team. The search results return EVERY student in the school who is assigned to that team, which is why the teacher has offered a list of students from that team to remove.
- Choose the five students who will be removed from the section by clicking next to their name. When their name is marked, the blue checkmark displays next to their name and they are moved to the top of the list of students.
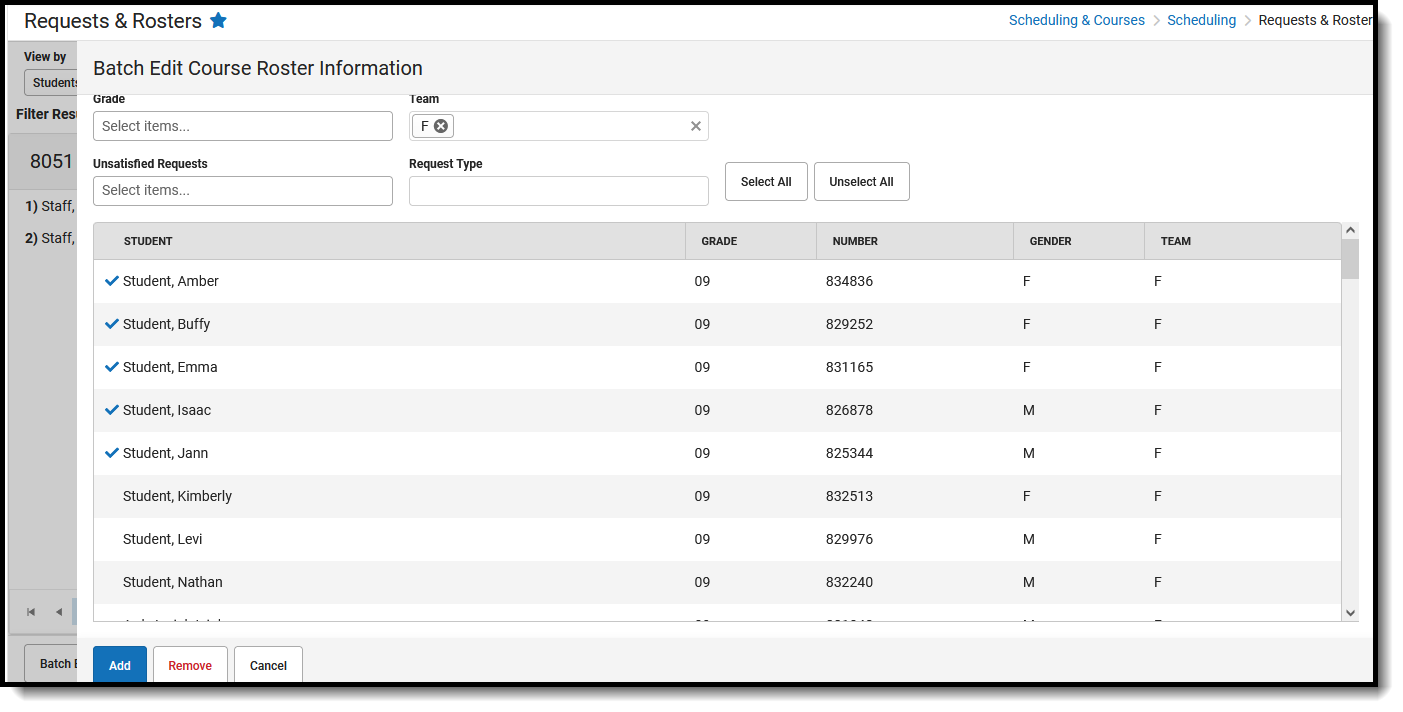 Selected Students to Remove from Roster
 - Click Remove. A message displays indicating the total number of rosters that will be removed. Click Continue to proceed with the removal.
- A message displays indicating the total number of rosters that were removed from the section. Click Close to return to the list of courses.


Those five students can now be added to the other section.
Next Steps
- Use the Scheduling Board to build courses and load schedules
- Review where you are in the Scheduling process on the Scheduling Center.
- Complete student schedules using the Walk-In Scheduler.
- Use the available Scheduling Reports to review and verify requests, plan the course schedule for the next year or see how complete student schedules are.
