Tool Search: Staff Request Processor
The Staff Request Processor tool is used by approved staff members (those that have the Self Service Approver checkbox marked on their District Assignment and appropriate tool rights) to approve or deny changes made by other staff members through the My Data tool.
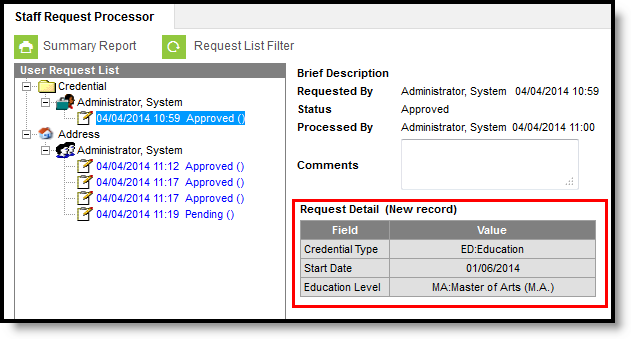
Users with Staff Request Processor rights can select a request from the User Request List, review the entered changes made by the user and approve or deny the request. Original values appear so the processor knows what was changed. The approver can also enter comments related to the request.
The Staff Request Processor displays the Request Detail of each type of request. These values vary depending on the type of request that was made, and if the request is a new record in its entirety (i.e., the staff person requested a Credential change where the school had no record of the credential) or if existing values were modified (i.e., the credential had an incorrect date earned).
 Request Processor - Update Record
- See the Request Processor (Portal and Staff) Tool Rights article for information on rights needed to use this tool.
- A System Preference is available - Require Employment Record for District Assignment - that determines how District Employment records work in conjunction with District Assignment records.
For State Edition users, preferences for State Staff ID are enforced in the Request Processor. If a staff member does not have a state ID and the State Staff ID generation preference is set to Yes at the state level, the staff member does not receive an error, but the administrator is not able to approve the request (they can deny it, however). The approver is directed to the Staff Locator to first assign a State Staff ID.
Request Processor Editor
The Staff Request Processor editor provides a list of all requests that have been entered by all users. A list of open requests that need attention appear in the User Request List, organized by the type of request. Upon selection of a request, additional information about that request appears on the right hand side of the screen.
- All people with rights to the Request Processor see pending requests.
- Approved/Denied requests are only seen by the person who did the approval/denial.
Two approve or deny buttons appear on the editor. Selecting any option processes the request.
For all requests listed, only fields where a value is selected display when viewing the request.
Accept a My Data Request
- Select a Pending request from the User Request List. The information entered in the request appears on the right hand side.
- Enter Comments for the request. Information here may be the processor's initials, reason for denial, etc.
- If appropriate, select the appropriate radio button for a Demographics request.
- Select the Approve button. This changes the information in Census People and the request now displays the updated information.
Deny a My Data Request
- Select a Pending request from the User Request List. The information entered in the request appears on the right hand side.
- Enter Comments for the request. Information here may be the processor's initials, reason for denial, etc.
- If appropriate, select the appropriate radio button for a Demographics request.
- Select the Deny button. The request reads as Denied, and the information is not be changed. The person who made the request also receives a message that it was denied. For a denied request, comments must be entered explaining why the information was denied.
Request Processor - My Demographic Requests
A staff member must select one of the following when requesting My Demographic changes:
- I am adding or correcting my information
- My legal name has changed
Depending on the chosen action, when the change is approved, the logic either overwrites existing demographic data or a new identity is created. When the Request Approver approves the change, one of the following must be selected:
- Overwrite the existing Demographics Data (the requester chose the “I am adding or correcting my information”).
- Create a New Identity (the requester chose “My legal name has changed”).
The selection defaults to what the requester chose when making the original request. Once an action is taken by the approver, the person who requested the change sees that the request was either accepted or denied.
It is advised that those staff members approved as Request Processors define a district policy for any feature within the My Data toolset.
Modifications made here are visible in the Census People toolset.
Request Processor - Employment Requests
A staff person cannot have multiple employment records within the same time period in the same district (unless otherwise determined by localized functionality). Warnings appear when attempting to approve an employment record if the request has start dates that overlap with an existing employment record.
For additional information on district employment logic, see the District Employment Validations information.
Request Processor - Course Requests
The Approve and Deny buttons operate in the following manner when an approver is determining to approve or deny the entered request:
- Approve overwrites the value in the Course Section with a new District Assignment Title.
- Deny does not make any changes to the Course Section.
The School Name for the section for which the request is made is displayed in the request.
Request List Filter
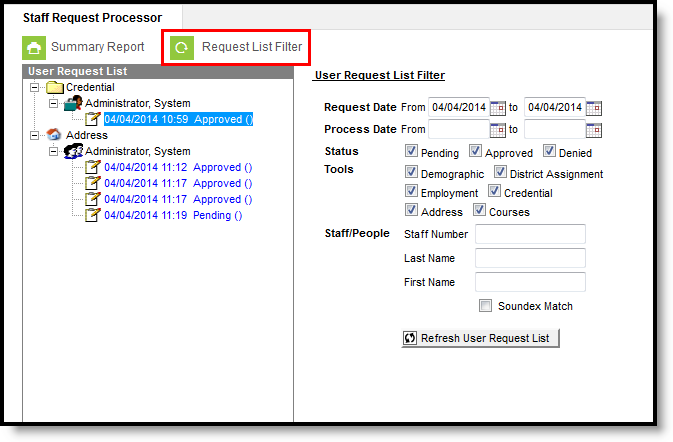
The Request List Filter allows the approver to organize the requests that need to be processed. The User Request List will be updated to account for an entered date range on a request or when a request was processed, the status selected of the requests, and the type (tool) of request.
 Request List Filter
Change the Request List Filter
- Enter a Request Date range in mmddyy format, or use the calendar icon to select a date. This will return only requests entered by a staff member between the entered dates.
- Enter a Process Date range in mmddyy format or use the calendar icon to select a date. This will return only requests that were processed by the approver between the entered dates.
- Check the appropriate Statuses to display: Pending, Approved or Denied.
- Check the appropriate Tools to display: Demographic, District Assignment, Employment, Credential or Address.
- If desired, enter staff members’ last names, first names or staff numbers to further reduce the request list.
- Click the Refresh User Request List button. The Request List will be updated accordingly.
User Request Summary Report
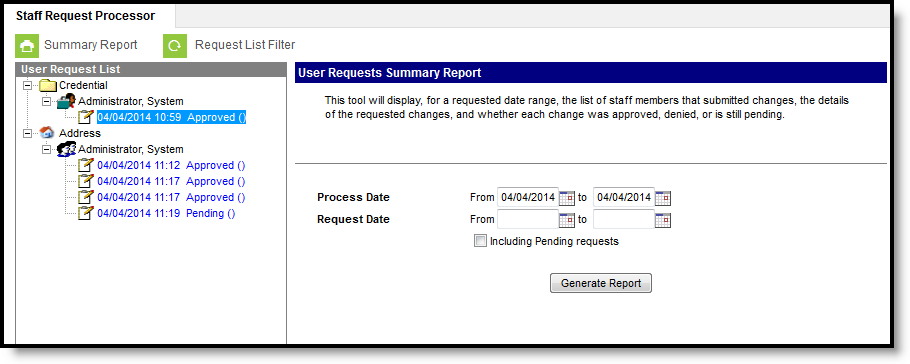
Approvers also have the ability to generate a Summary Report that provides detail on the list of staff members who have submitted changes, the requested changes and whether the change was approved, denied or is still pending.
 Request Processor - Summary Report
The results of the report are not based on any request filter that may have been chosen. It returns all requests matching the entered criteria on the Summary Report editor.
Generate the User Request Summary Report
- Enter a Process Date range in mmddyy format or use the calendar icon to select a date.
- Enter a Request Date range in mmddyy format or use the calendar icon to select a date.
- Determine if Pending Requests should be included in this report. Mark the checkbox accordingly.
- Click the Generate Report button. The requests entered display in PDF format.
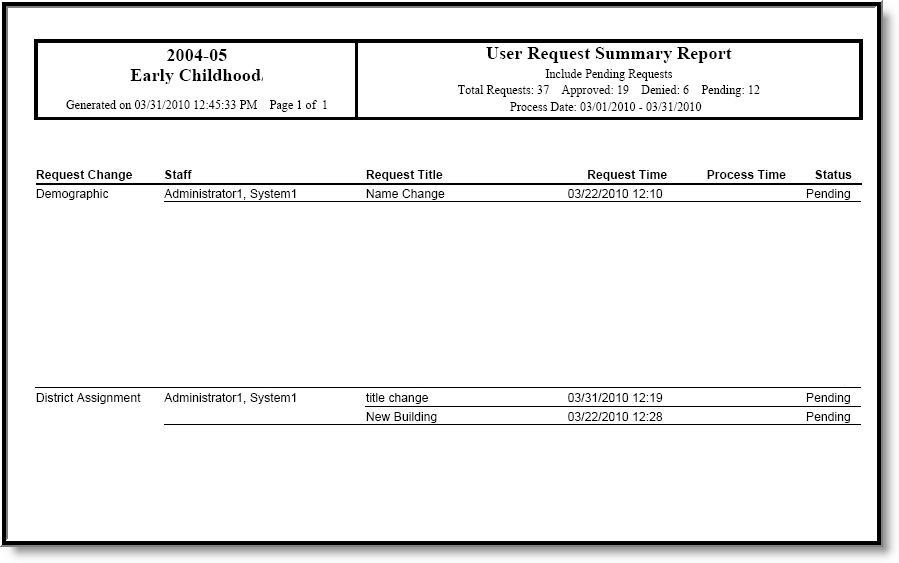 Summary Report Display
