Tool Search: Mailing Labels
The Mailing Labels report generates mailing labels with the dimensions of 1" x 2-5/8", such as Avery 5160. Labels can be printed for:
- Students - prints a label for each student per household, with the student's name and one guardian name per household
- Guardians - prints a label for each person who is marked as a guardian per household
- Teachers - prints a label for each teacher in a household
- Staff - prints a label for each staff member in a household
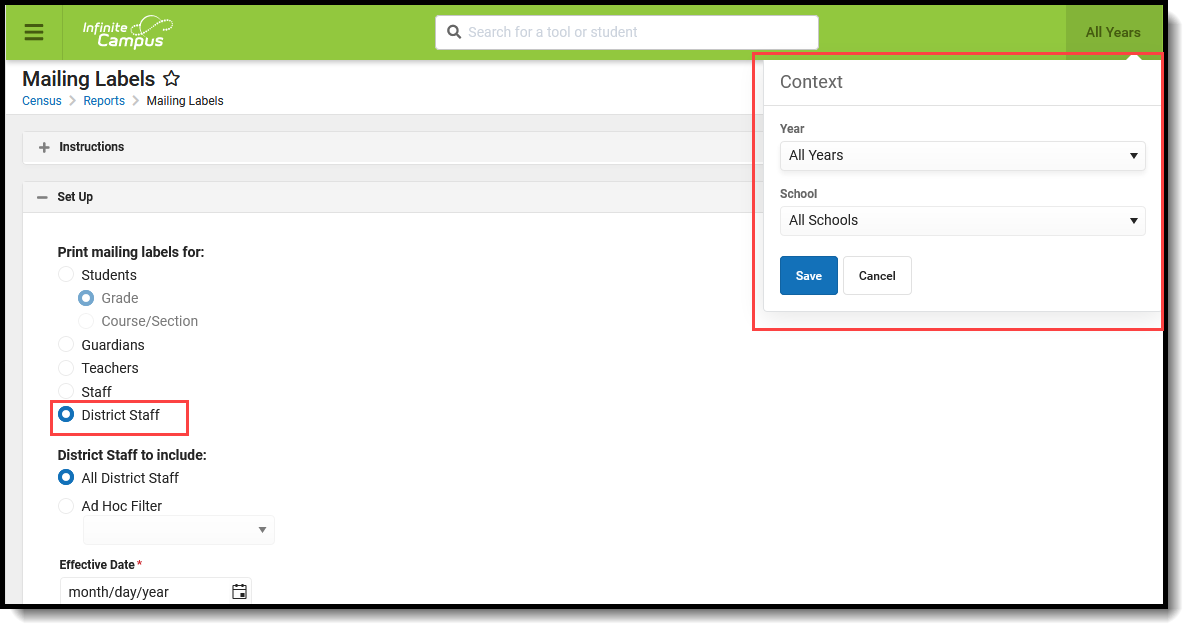
- District Staff - prints a label for each district staff member in a household and only displays when campus toolbar is set to all schools
The Report Editor includes Set Up, Calendar Picker, and Format Options.
Specific Details about generating each type of mailing label follows. Mailing Labels Reports
See the Printing Labels article to review Print Properties prior to printing labels.
See the Census Reports Tool Rights article for information about rights needed to use this tool.
Report Logic
The Mailing Labels report prints address mailing labels for students, student guardians, teachers, staff and district staff.
For ALL mailing label types (students, guardians, etc.), the Mailing checkbox must be marked on the Household Address in order for a label to generate. If an address is not marked for mailing, a label does not generate for that address. If more than one address associated with a household is marked for mailing, more than one label generates.
Ended membership records are ignored when determining if a household requires a label to generate. However, if all membership records are ended but the student is still part of a household with an address that is marked for mailing, a label generates with the student's name for both Student labels and Guardian labels.
Additional logic exists for each of the different label types. Review the following information for specific requirements for each label type.
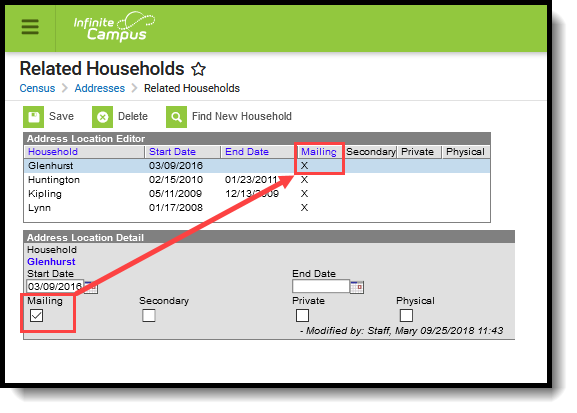 Address Mailing Checkbox
Student Mailing Labels
Student mailing labels print one label per actively enrolled student in a household. Only household addresses marked as mailing addresses are included in the report.
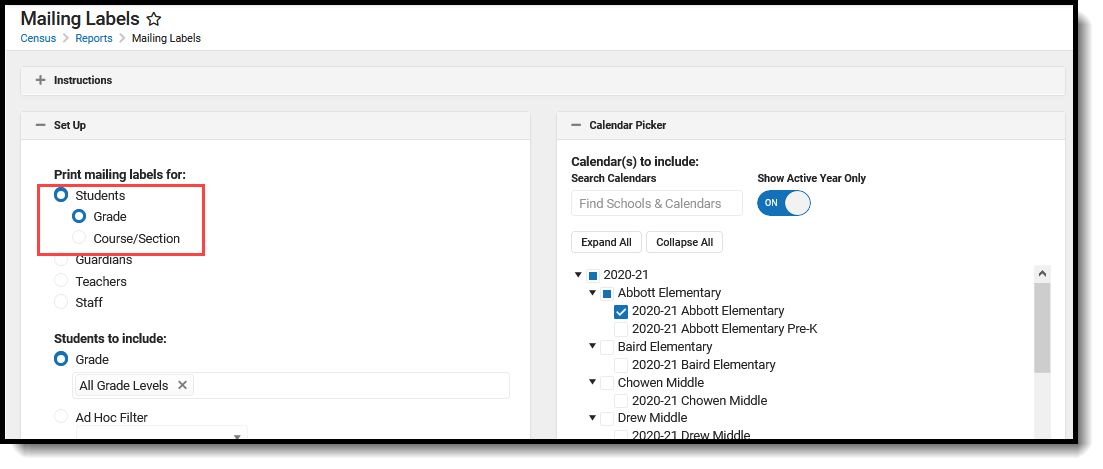
Student labels can be generated by Grade or by Course/Section:
- The Grade option allows the selection of students using the grade level of enrollment based on the entered Effective Date.
- The Course/Section option allows the selection of students using a specific course and teacher in a particular calendar. Only students enrolled in the selected Course Section on the entered Effective Date print.
 Student Mailing Labels by Grade
 Student Mailing Labels by Course/Section
The Effective Date entered on the report is used to return ONLY actively enrolled students in the selected calendar(s) on that date. If a student ended enrollment in the selected calendar(s) prior to the entered date, a label does not generate for that student.
When an Ad hoc Filter is selected, the filter is applied to the school chosen from the Campus toolbar. If All Schools is selected, the filter applies to all schools in the district.
Report Logic for Student Mailing Labels
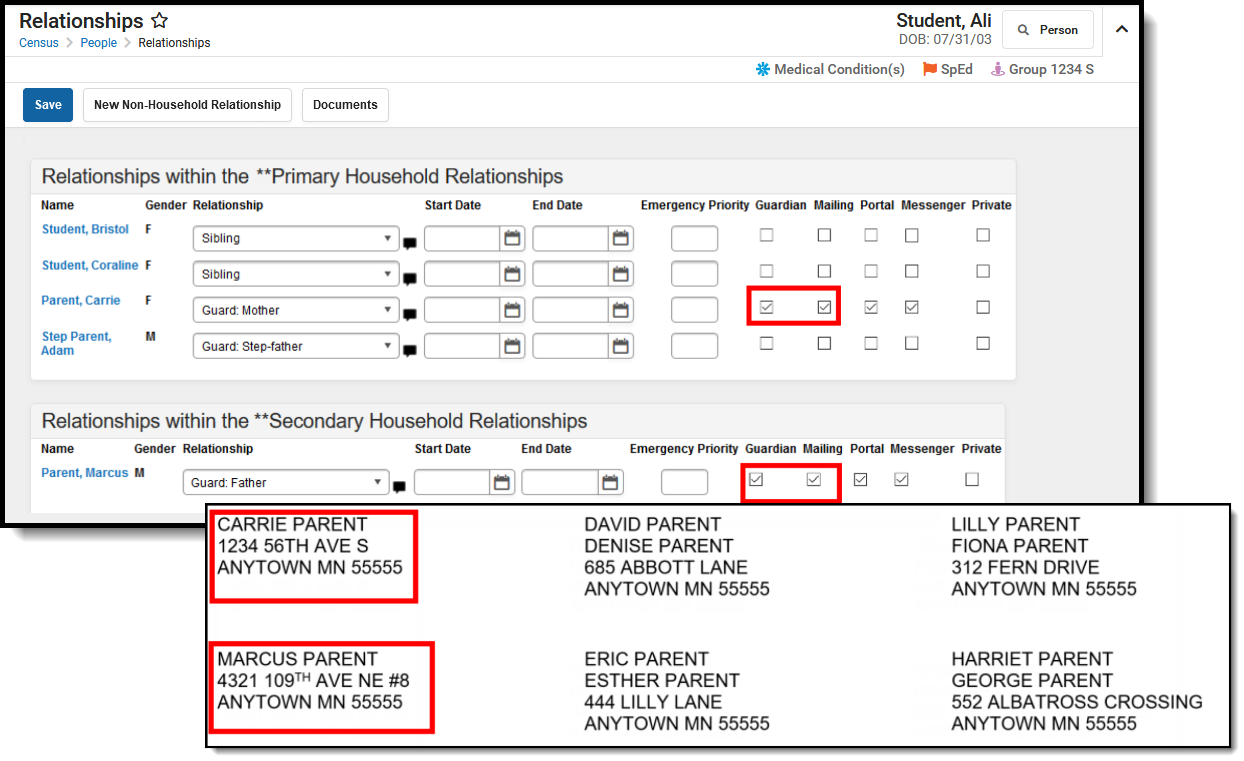
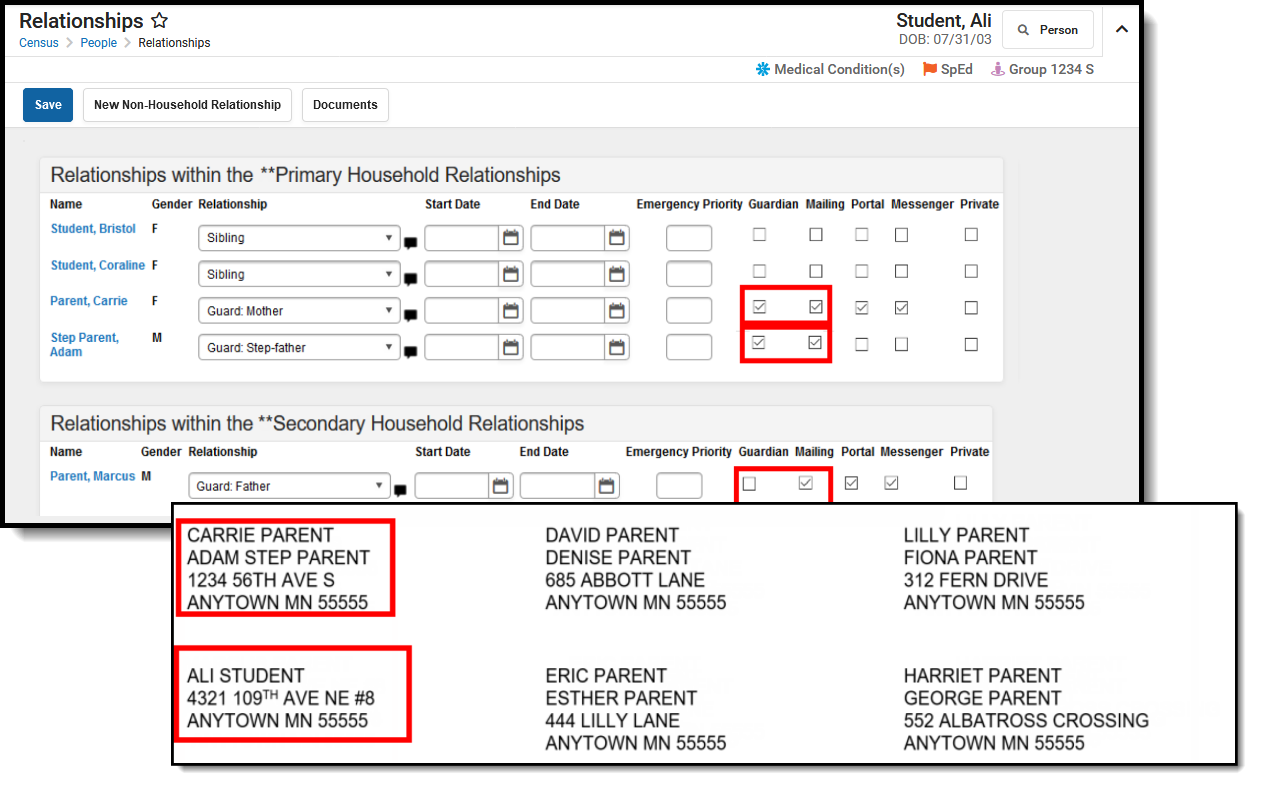
In addition to the Mailing checkbox being marked on the household address, the guardians of the student must have the Mailing checkbox and the Guardian checkbox marked on the Relationships tab. 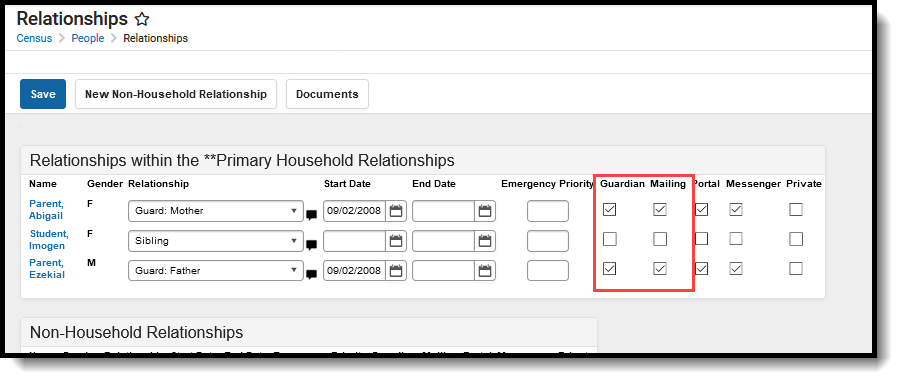 Relationships - Guardian, Mailing checkbox
Household Scenarios for Student Mailing Labels
Scenario 1: Household with Two Guardians
In this example, the student has relationships with two guardians in one household who are both marked as Guardian and Mailing. Only one label with one guardian name and the student's name prints. In this example, the student's mother is listed on the label.
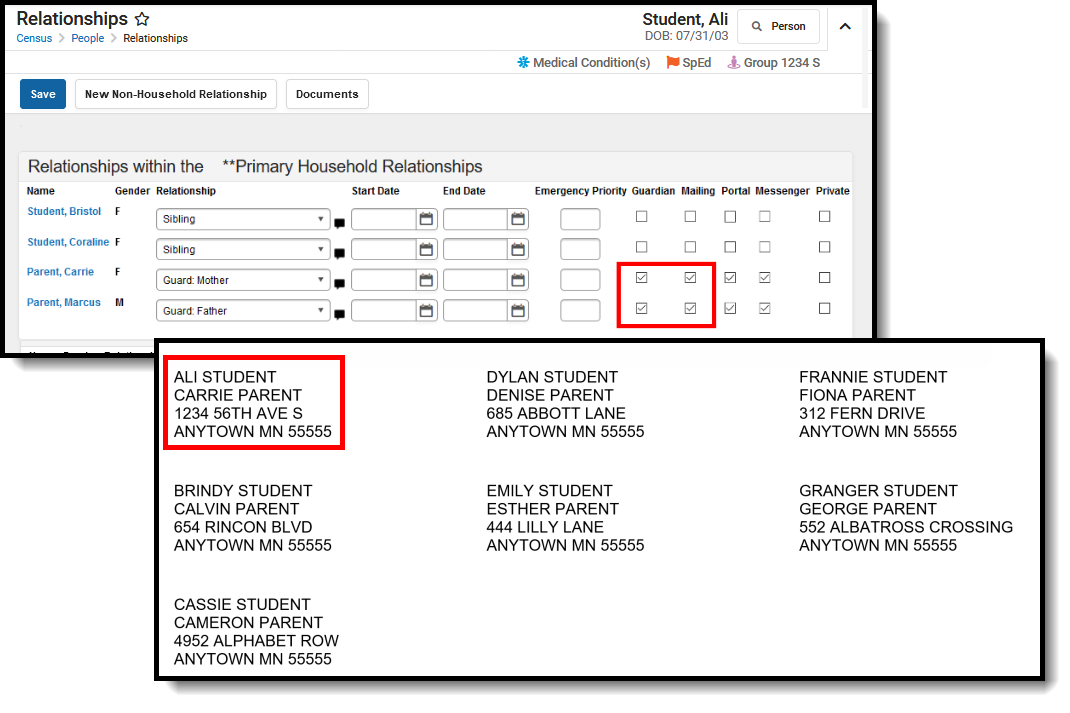 Student Labels - Two Guardians, One household
Scenario 2: Student Lives in Two Households
In this example, the student has relationships with two guardians in two different households. Both guardians are marked as Guardian and Mailing. Two labels print, one for each household. 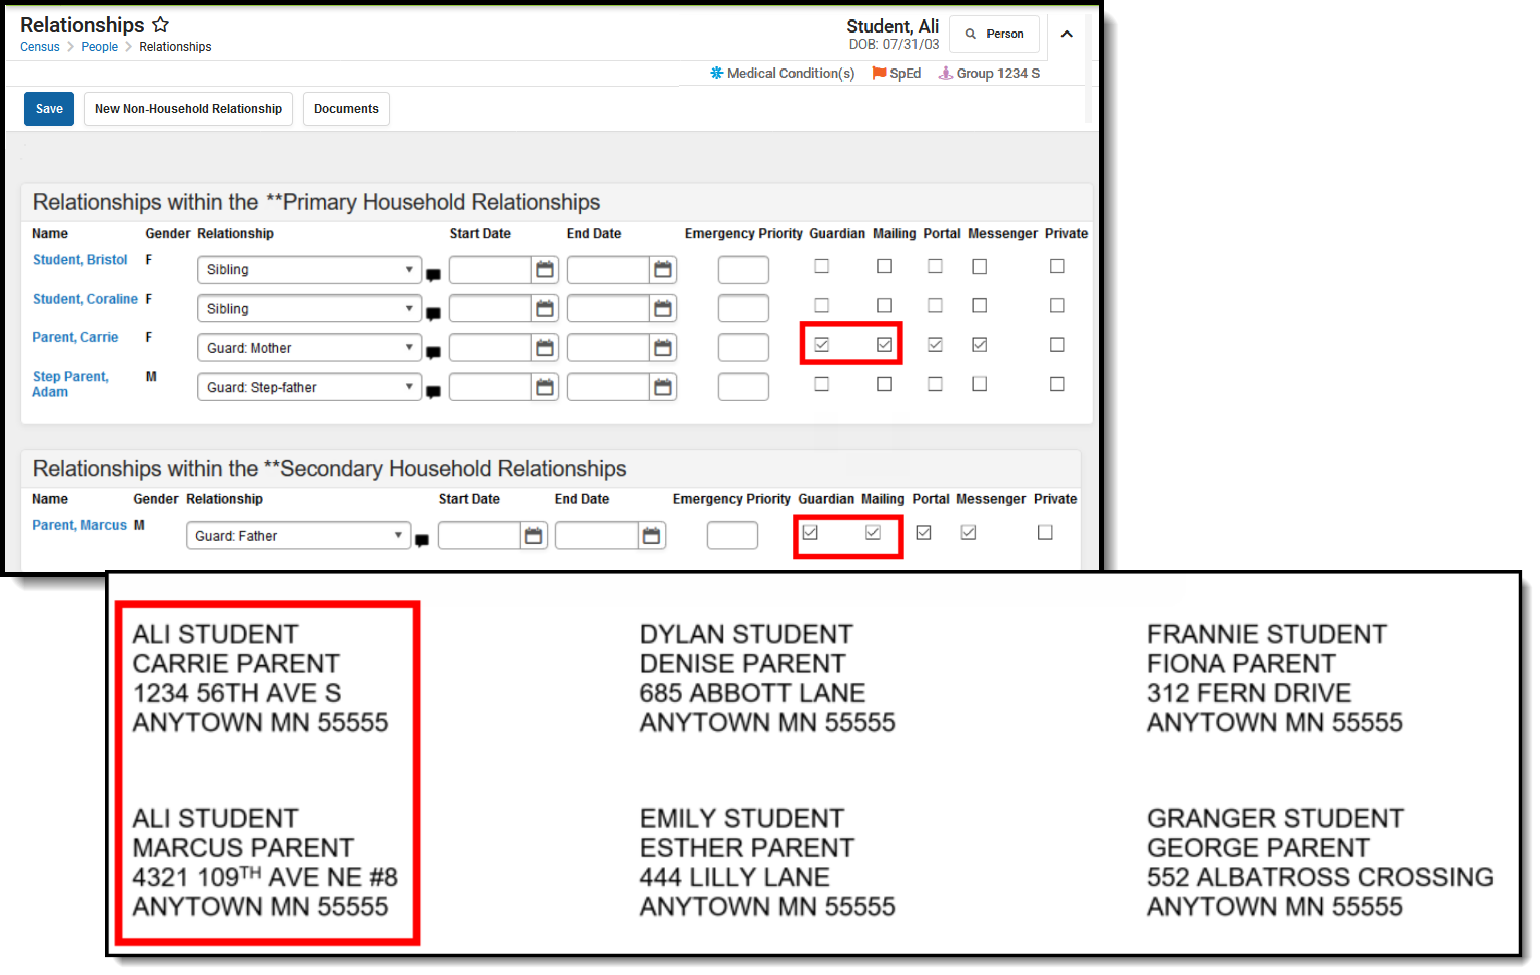 Student Labels - Two Guardians, Two Household
Scenario 3: No Members marked as Guardians
In this example, the student has relationships established, but neither are marked as Guardian. Because the student lives in two households, two labels generate for the student - one label for each address that is marked as mailing, but only the student's name prints on the labels.
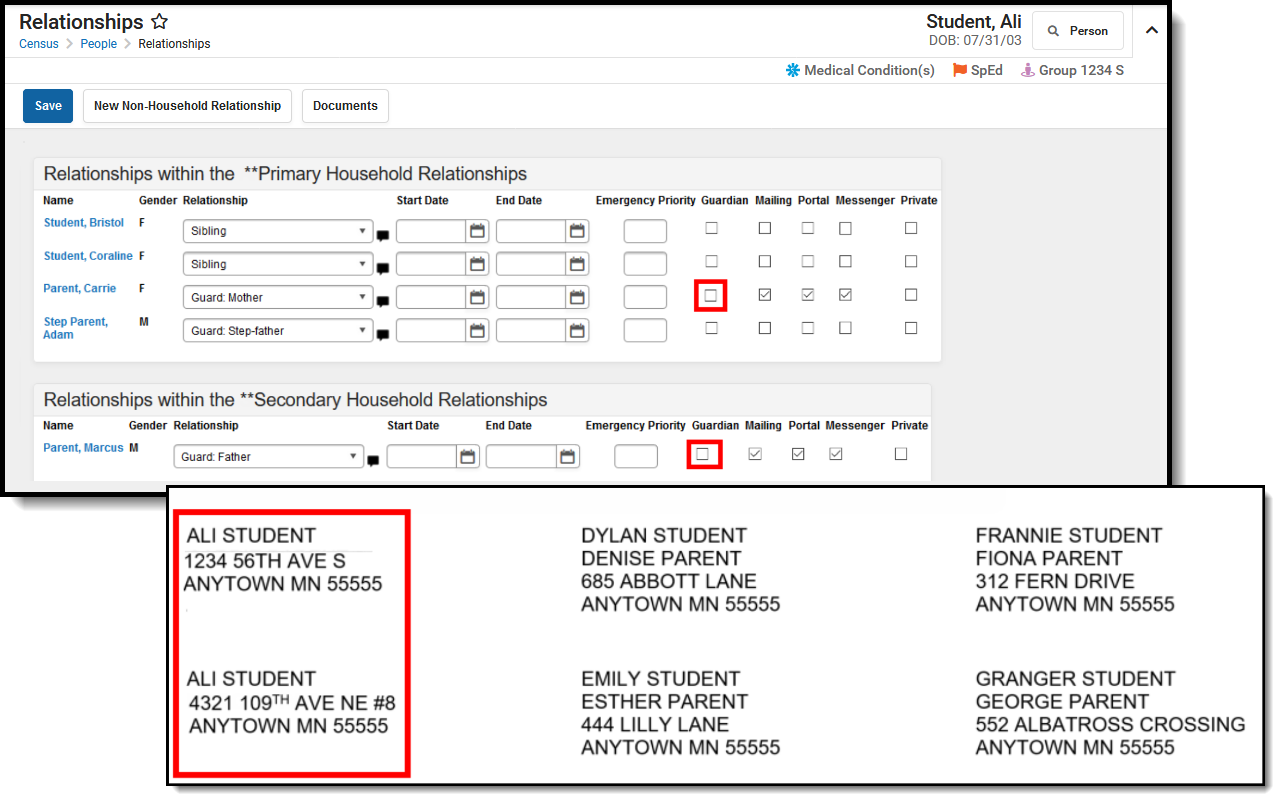 Student Labels - No Guardians, Two Households
Students Mailing Labels Report Editor
The Student Mailing Labels Report can be generated by either a Grade Level and Ad hoc filter or by a Course Section. The available report options vary based on this selection.
Grade Report Type
| Field | Description |
|---|---|
| Set Up | |
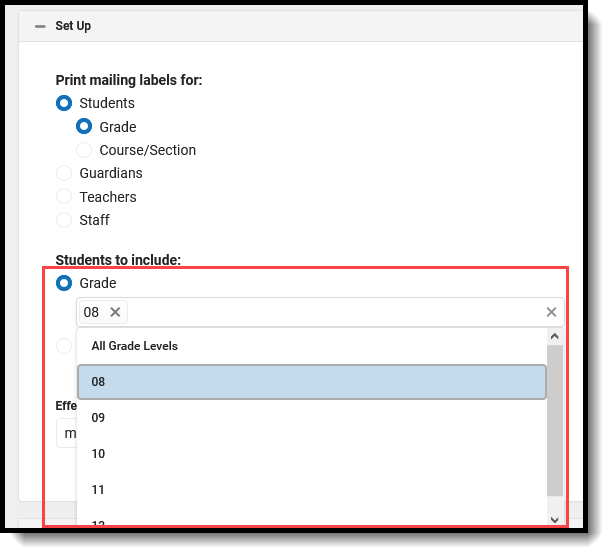
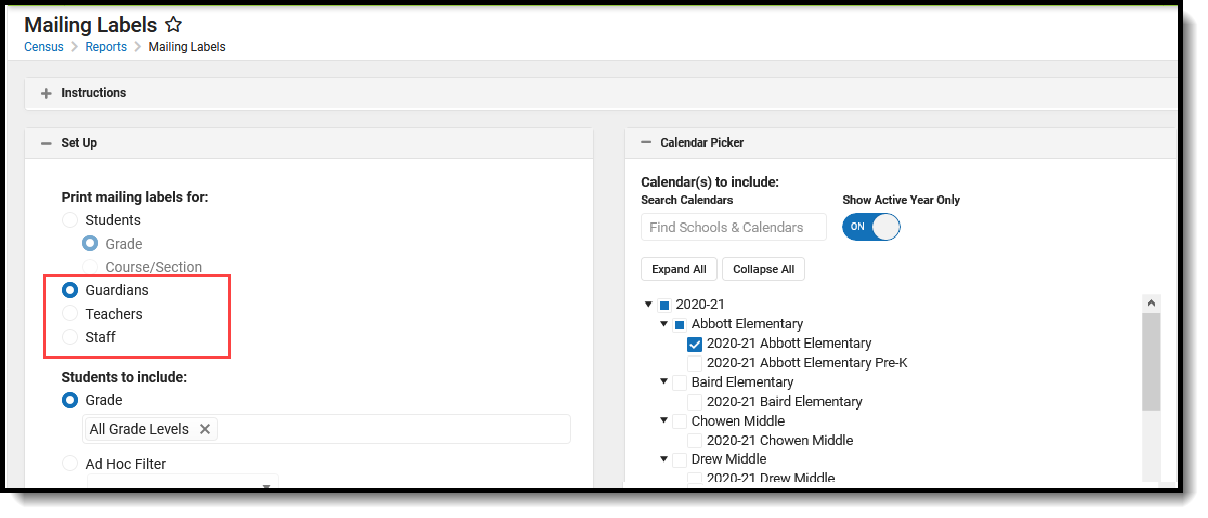
| Print Mailing Labels For | This selection determines which type of mailing label generated. Select the Students radio button and the Grade radio button.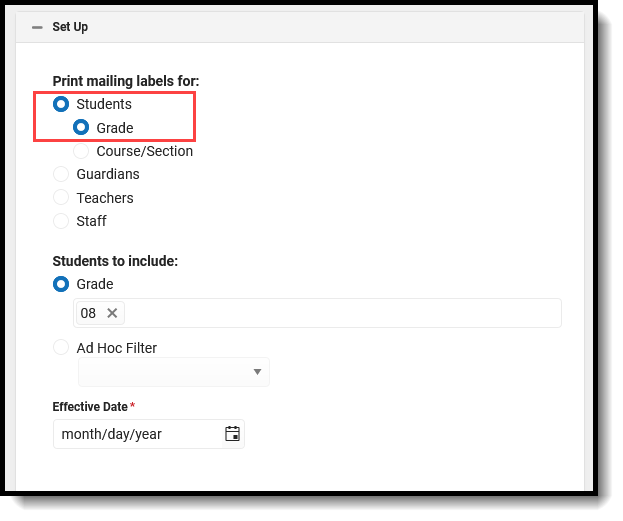 |
| Students to Include | Select students by a Grade level or an Ad hoc Filter. All Grade Levels (default selection) can be selected; or, click in the Grade field to select specific grade levels.
Student and Census Data Type filters are available for selection when generating the Student Labels. |
| Effective Date | The Effective Date is entered in mmddyy format and causes the report to only include enrollment records that are active on the entered date. This means students who ended enrollment BEFORE the entered date do not have a label generate for them. |
| Calendar Picker At least one calendar needs to be selected in order to generate the report. | |
| Search Calendars | Search for a calendar by typing in the name of that calendar. Matching results are filtered as the name is entered in the field. Only those calendars to which the calendar has rights are available for selection. |
| Show Active Year Only | When set to ON, only those calendars for the active school year. When set to OFF, all calendars from all school years are available for selection. |
| Expand All/Collapse All | Use the Expand All/Collapse All to open and close the list of available calendars. |
It is recommended that not all calendars be selected at one time, as this increases the report generation time and could potentially cause server response issues.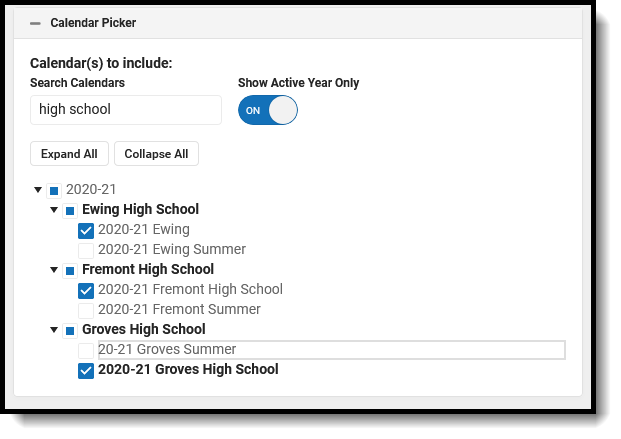 | |
| FormatOptions | |
| Include | The following print options are available for generating Student Mailing Labels for Grades:
A label can be printed with all of these print options selected. Be aware that when the option for Include Guardian's Name is selected AND the option for Include Salutation, both the guardian's name and the student's name are included on the label. Labels print vertically in the selected sort order, not horizontally. |
| Sort Order | The Mailing Labels Report can be sorted by either the Student's Name (alphabetical by last name), the City and Name, or the Zip code. The City and Name sort option first sort by the state associated with the address. Sorting by Zip code can be used for bulk mail rates. |
| Report Format | The report can be generated in PDF or DOCX format. |
Course Section Report Type
| Field | Description |
|---|---|
| Set Up | |
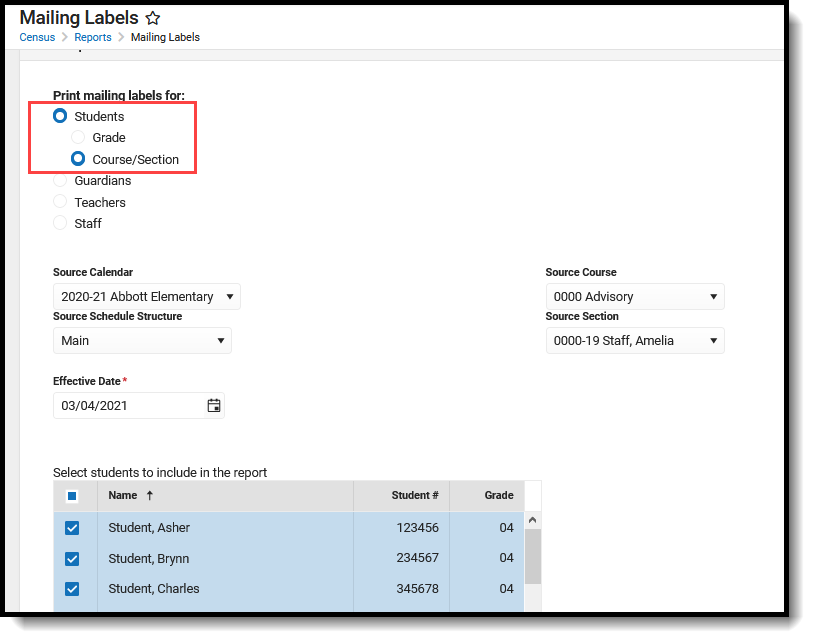
| Print Mailing Labels For | This selection determines which type of mailing label generated. Select the Students radio button and the Course/Section radio button.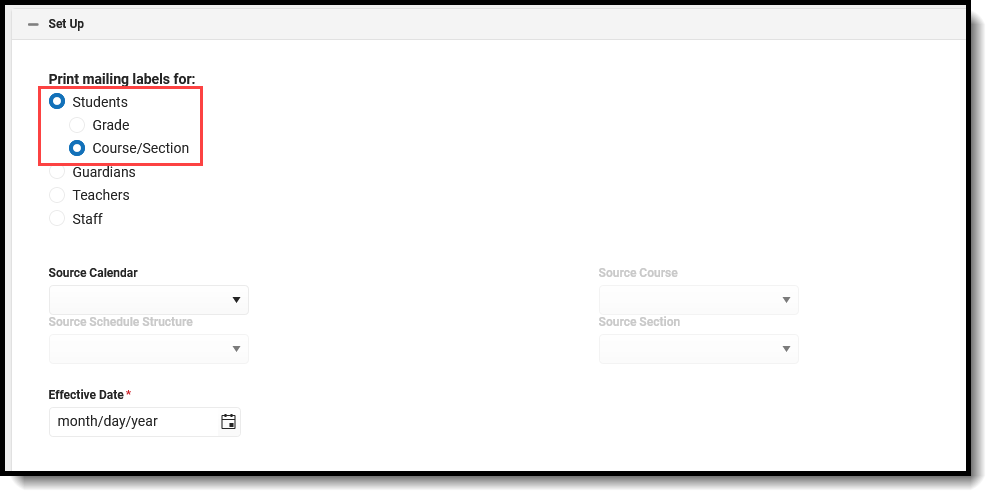 |
| Source Calendar Source Schedule Structure Source Course Source Section | Generating student labels by a course/section requires the selection of one calendar and schedule structure, much like selecting the Calendar and Structure from the Campus toolbar. Only one calendar can be selected, only one course and section can be selected. Select the desired options from the dropdown lists. 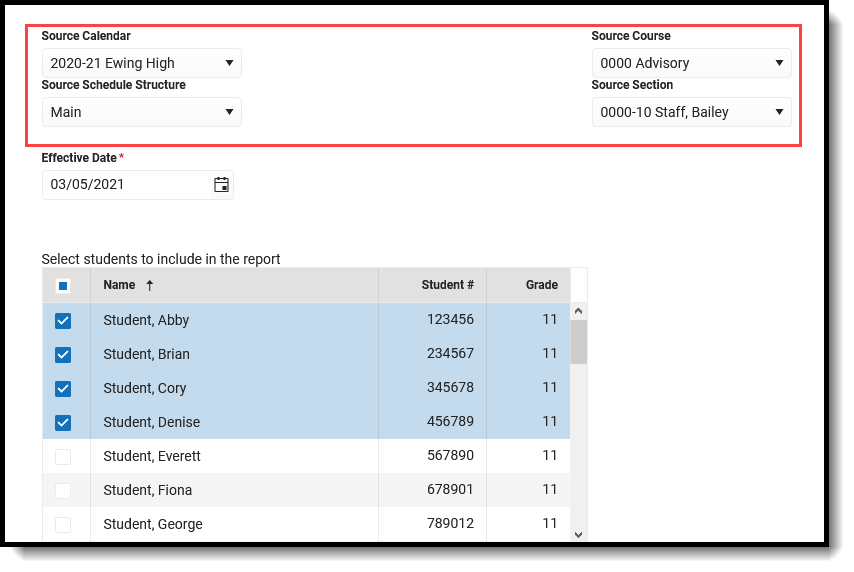 |
| Effective Date | The Effective Date is entered in mmddyy format and causes the report to only include enrollment records that are active on the entered date. This means students who ended enrollment BEFORE the entered date do not have a label generate for them. This field defaults to the current date. |
| Student Selection | Once the Source fields are populated and an Effective Date are entered, a list of students who are or have been scheduled into the selected section based on the entered Effective Date displays. Select which students to include in the report. By default, all active students in the selected course section are marked. Remove the checkbox next to the their name if they should not be included. Inactive students in the selected section display in red and are not automatically selected. |
| FormatOptions | |
| Label Option | When the Mailing Label option is selected, labels for the selected Course and Section and the selected students print on a standard mailing label. When Student/Teacher is selected, the selected student's name and the selection Course/Section Teacher's name print. |
| Include | The following print options are available for generating Student Mailing Labels for Course/Section for the Mailing Label option:
The following print options are available for generating Student Mailing Labels for Course/Section for the Student/Teacher Label option:
A label can be printed with all of these print options selected. Be aware that when the option for Include Guardian's Name is selected AND the option for Include Salutation, both the guardian's name and the student's name are included on the label. Labels print vertically in the selected sort order, not horizontally. |
| Report Format | The report can be generated in PDF or DOCX format. |
Generate Student Mailing Labels
Student labels print as follows. This example was generated using the Grade level option (all of these students are seniors), and does not include the guardian's name, but does include a salutation and private mailing addresses. The starting position was set to Row 1, Column 1.
 Student Label Print
 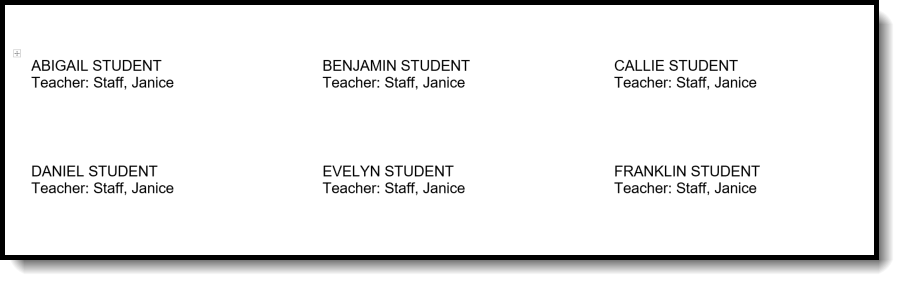 Student Labels - Course/Section Option, Student/Teacher Label
Generate the Student Mailing Label Report Using the Grade Level/Ad hoc Format


- Select the Students radio button, and verify the Grade radio button is selected.
- Select the Calendars to include on the report.
- Select the appropriate Grade Levels to include on the report, or select an available Ad hoc Filter.
- Enter an Effective Date in mmddyy format, or use the calendar icon to select a date.
- Select the desired Format Options.
- Determine how the labels should be sorted by selecting the appropriate radio button, either Name, City and Name or Zip.
- Select the desired Report Format.
- Click the Generate button.
See the Save Options and Apply Options for information on saving these selections as a template.
Generate the Student Mailing Label Report Using the Course/Section Option with the Mailing Label Format
- Select the Students radio button, and verify the Course/Section radio button is selected.
- Select the appropriate Source Calendar, Source Schedule Structure, Source Course, and Source Section from the dropdown list.
- Enter an Effective Date for the report.
- Select the students to include on the labels. All actively enrolled students are selected automatically. If inactive students are in the section, their names appear in red and are not be selected. If a label should generate for inactive students, mark the checkbox next to their name.
- Select the Mailing Label Option.
- Select the other desired Format Options.
- Select the desired Report Format.
- Click the Generate button.
To remove the selected Source Calendar, Schedule Structure, Course and Section values, click the Reset button. These fields return to having no values selected and other option can be chosen, if desired. The Reset option removes the values in each of the Source fields.
See the Save Options and Apply Options for information on saving these selections as a template.
Generate the Student Mailing Label Report Using the Course/Section Option with the Student/Teacher Format
- Select the Students radio button, and verify the Course/Section radio button is selected.
- Select the appropriate Source Calendar, Source Schedule/Structure, Source Course, and Source Section from the dropdown list.
- Enter an Effective Date for the report.
- Select the students to include on the labels. All actively enrolled students are selected automatically. If inactive students are in the section, their names appear in red and are not selected. If a label should generate for inactive students, mark the checkbox next to their name.
- Select the Student/Teacher Label Option.
- Select the other desired Format Options.
- Select the desired Report Format.
- Click the Generate button.
To remove the selected Source Calendar, Schedule Structure, Course and Section values, click the Reset button. These fields return to having no values selected and other option can be chosen, if desired. The Reset option removes the values in each of the Source fields.
See the Save Options and Apply Options for information on saving these selections as a template.
Guardian Mailing Labels
Guardian mailing labels print for each person marked as guardian in the household. The only difference between the Guardian label and the Student label is the ability to print the salutation line with or without the guardian name. The guardian label only prints the name(s) of the guardian.
One label per household prints. If siblings attend the same school, only one label prints for those siblings.
 Guardian Mailing Labels Report Logic for Guardian Mailing Labels

Guardian labels require the household address to be marked as Mailing.
Anyone who is marked as a Guardian and as Mailing on the Relationships tab prints on the label. If the household has three guardians living in it, those three guardians print. Each guardian pints on separate lines. If a student has two guardians in the primary household and another guardian in a secondary household, the two guardians in the primary household print on one label and the guardian in the secondary household prints on a second label. If a student has a non-household relationship that has been marked as Guardian and Mailing, a label will be printed for that person.
The student must be actively enrolled in the selected calendar in order to have a guardian label generate.
If a student does not have any relationship records with another person marked as guardian, the student's name prints on the label. It is assumed that the student is his own guardian. That means each student, with or without guardians, can receive the mailing.
Household Scenarios for Guardian Mailing Labels
Scenario 1: Two Guardians Living in Different Households
In this scenario, the student's guardians reside in separate households, where the student is a member of each household. Two labels print for the student, one for each household.This is the same scenario as the Student Mailing labels for the student living in two households, the only difference being the student's name does not print on the label.
 Guardian Labels - One label for each household with a guardian
Scenario 2: Two Guardians in One Household
In this situation, one label prints for the household with the two guardians in the primary household printing on one label. The guardian in the secondary household is no longer marked as a guardian, so instead of the guardian's name printing, the student's name prints.
 Guardian Labels - Two Guardians in one household, no guardians in second household
Scenario 3: Multiple Guardians in One Household
In this situation, all of the student's guardians live in one household. This household has the mother, the step-father and a grandparent marked as guardians. All of their names print on one label, each on a separate line of the label.
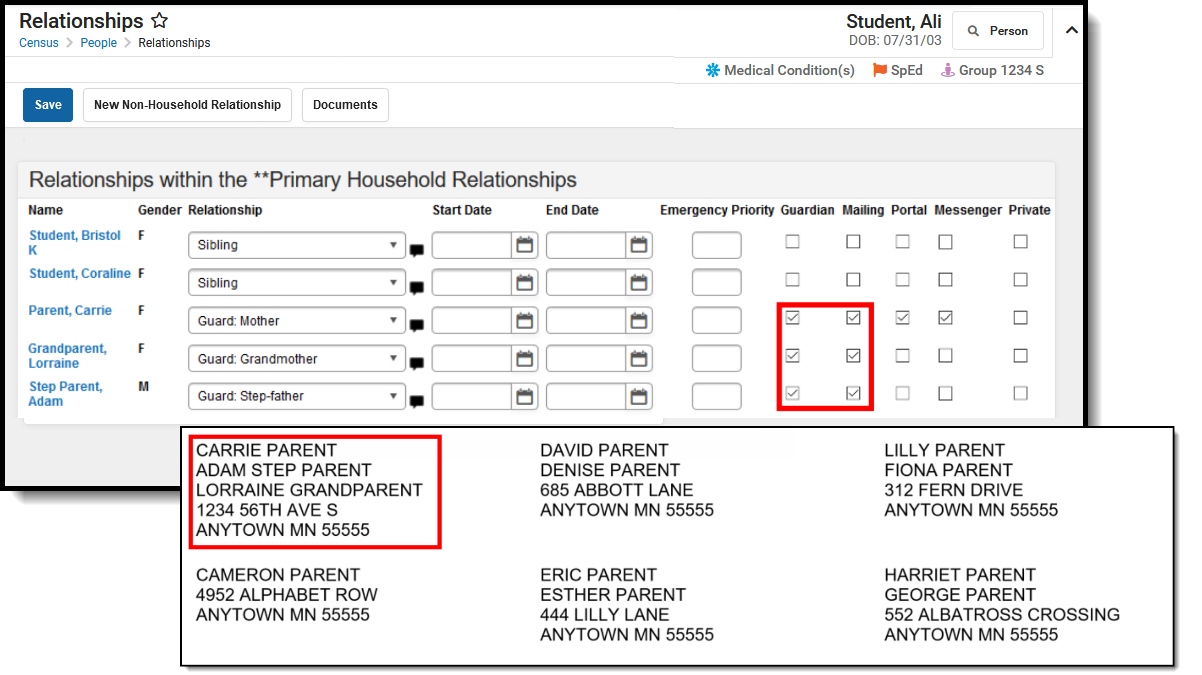 Guardian Labels - Three Guardians, One Household
Guardian Mailing Labels Report Editor
| Field | Description |
|---|---|
| Set Up | |
| Print Mailing Labels For | This selection determines which type of mailing label generated. Select the Guardians radio button.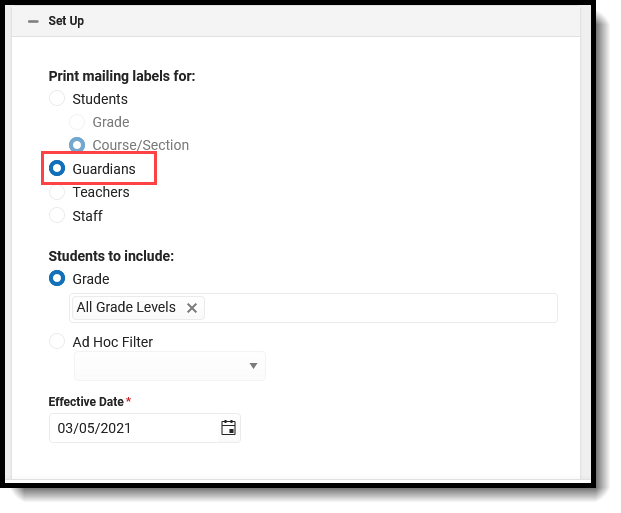 |
| Students to Include | For this option, choose Grade. All Grade Levels (default selection) can be selected; or, click in the Grade field to select specific grade levels. 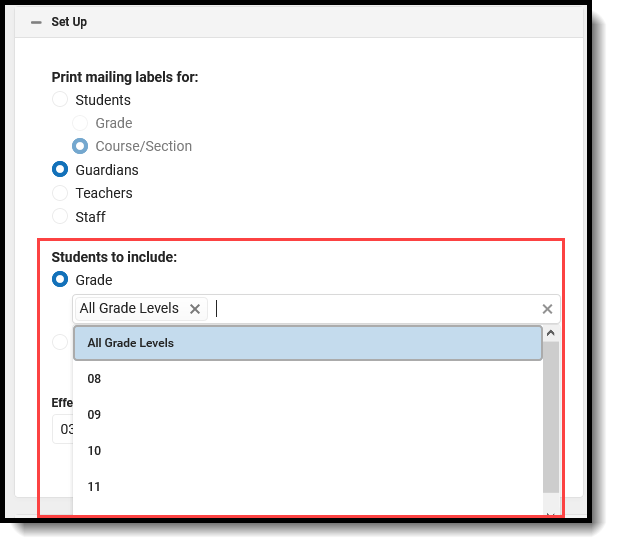
Student and Census Data Type filters are available for selection when generating the Guardian Labels. |
| Effective Date | The Effective Date is entered in mmddyy format and causes the report to only include enrollment records that are active on the entered date. This means students who ended enrollment BEFORE the entered date do not have a label generate for them. This field defaults to the current date. |
| Calendar Picker At least one calendar needs to be selected in order to generate the report. | |
| Search Calendars | Search for a calendar by typing in the name of that calendar. Matching results are filtered as the name is entered in the field. Only those calendars to which the calendar has rights are available for selection. |
| Show Active Year Only | When set to ON, only those calendars for the active school year. When set to OFF, all calendars from all school years are available for selection. |
| Expand All/Collapse All | Use the Expand All/Collapse All to open and close the list of available calendars. |
| It is recommended that not all calendars be selected at one time, as this increases the report generation time and could potentially cause server response issues. | |
| FormatOptions | |
| Include | The following print options are available for Guardian Mailing Labels:
Labels print vertically in the selected sort order, not horizontally. |
| Sort Order | The Mailing Labels Report can be sorted by either the Student's Name (alphabetical by last name), the City and Name, or the Zip code. The City and Name sort option first sort by the state associated with the address. Sorting by Zip code can be used for bulk mail rates. |
| Report Format | The report can be generated in PDF or DOCX format. |
Generate the Guardian Mailing Label Report
- Select the Guardians radio button.
- Select the Calendars to include on the report.
- Select the appropriate Grade Levels to include on the report, or select an available Ad hoc Filter.
- Enter an Enrollment Effective Date in mmddyy format, or use the calendar icon to select a date. This defaults to the current date.
- Select the desired FormatOptions.
- Click the Generate button. The report appears in a new window with the selected options.
See the Save Options and Apply Options for information on saving these selections as a template.
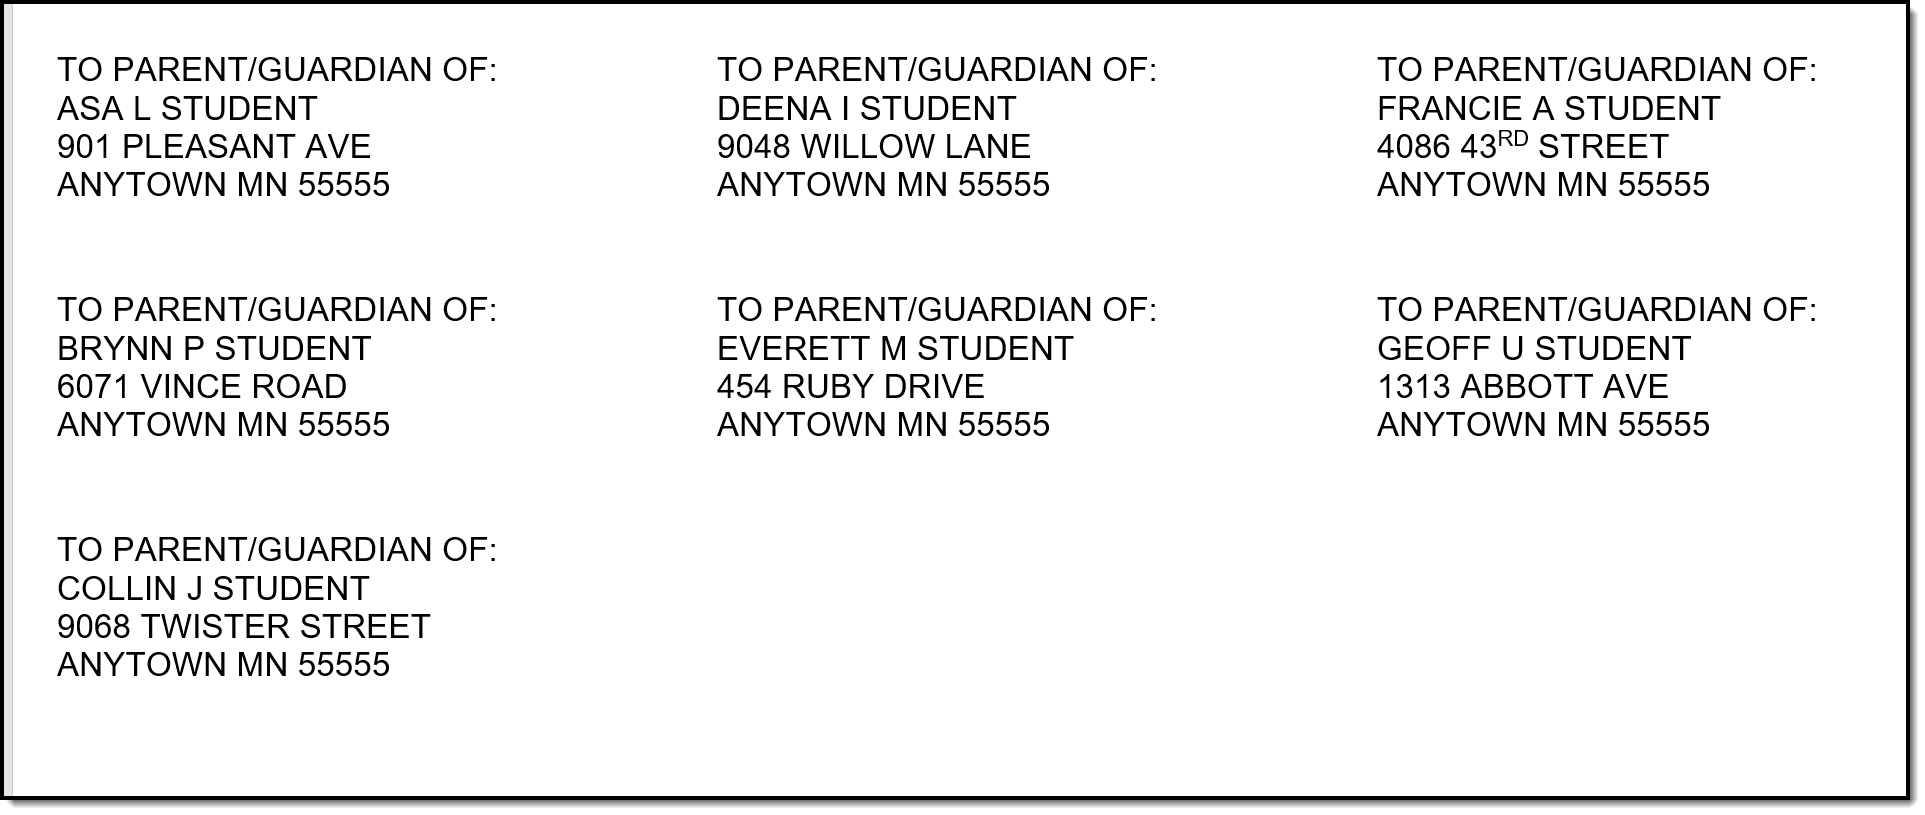
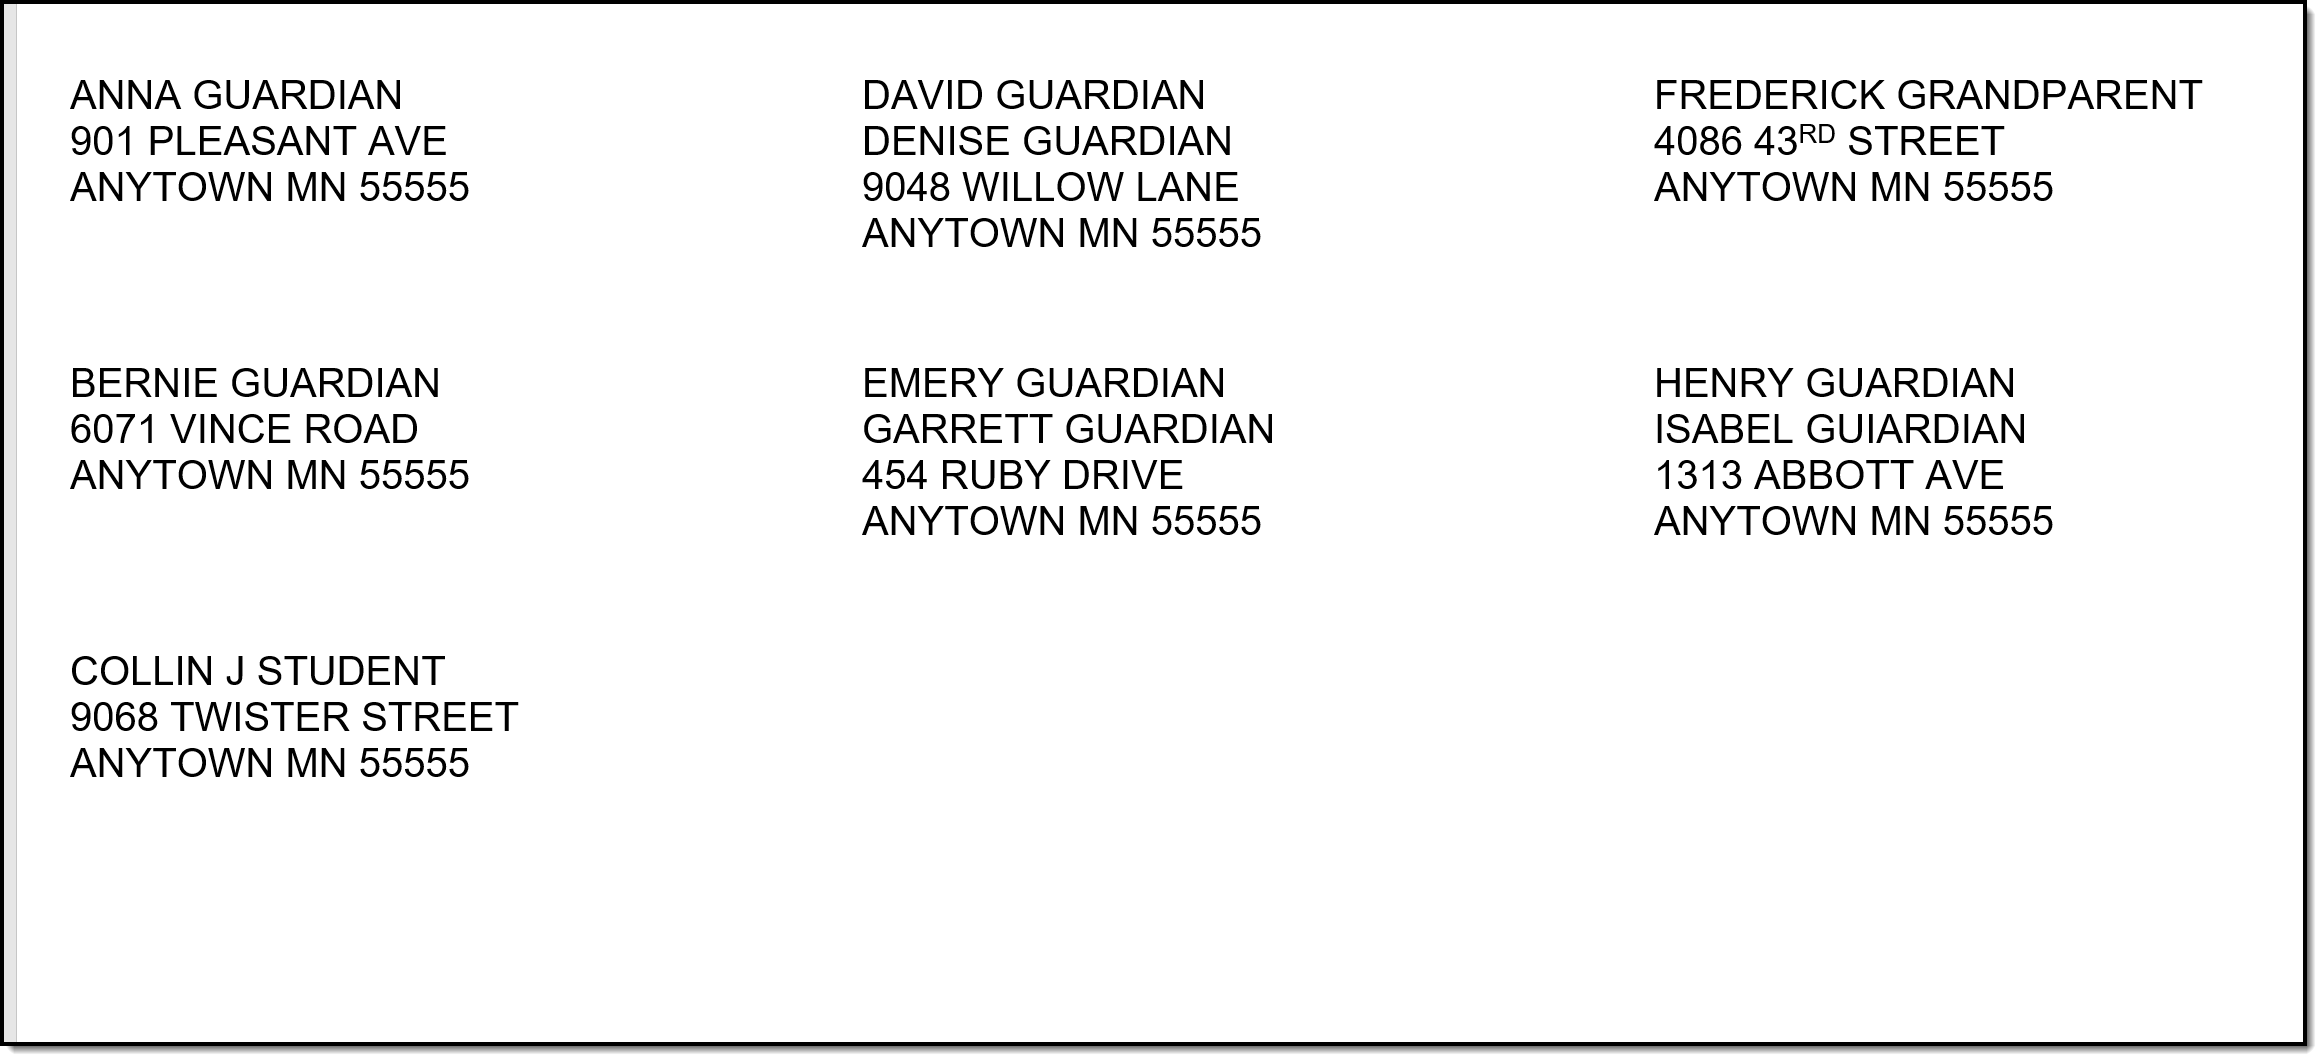
In the example below, notice that both guardians print for a household (David/Denise Guardian, Emery/Garrett Guardian), and a student's grandparent is marked as the guardian (Frederick Grandparent). Also notice that Collin Student is considered his own guardian (perhaps he's an emancipated student).
 Guardian Mailing Labels Print
Teacher Mailing Labels
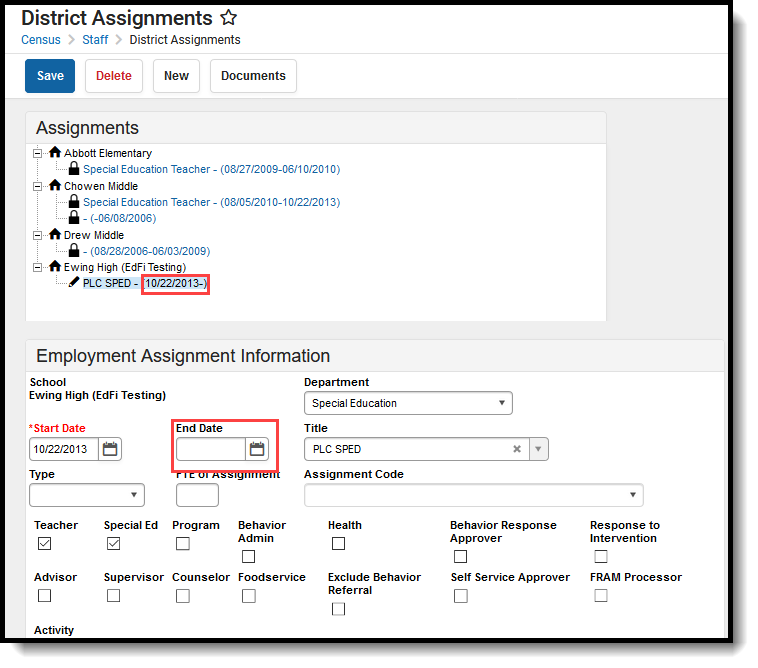
Teacher mailing labels print for all Teachers who have an active District Assignment record in the selected calendar with the Teacher checkbox marked on the active record. Teachers must have a household and at least one address for that household must be marked as Mailing.
 Teacher Mailing Labels
Teacher Mailing Labels Report Logic
The teacher's household address must be marked as mailing.
The teacher's District Assignment must be marked as Teacher.
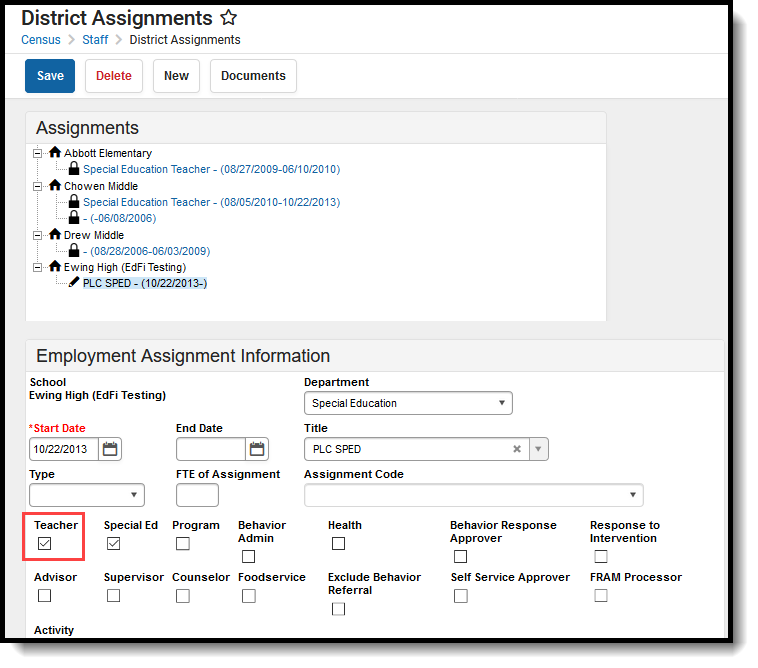 Teacher District Assignment Selection
If your district uses Campus HR, the Teacher Role must be selected on the Work Assignment, and the HR Mailing checkbox must be marked under Contact Info.
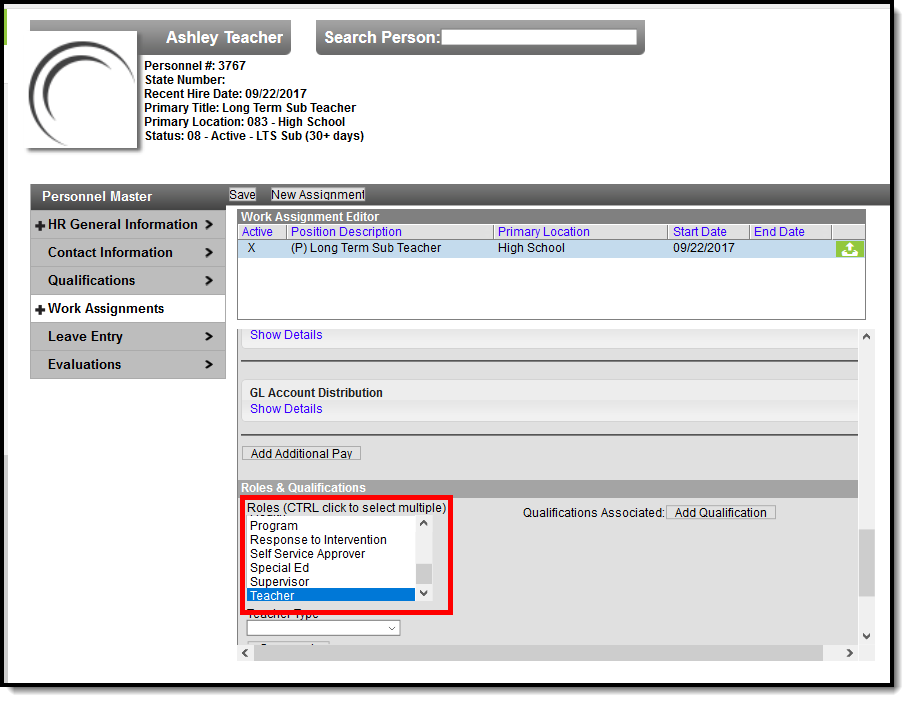 Campus HR Work Assignment Teacher Role | Campus HR Work Assignment Teacher Role |
Teacher Mailing Labels Report Editor
| Field | Description |
|---|---|
| Set Up | |
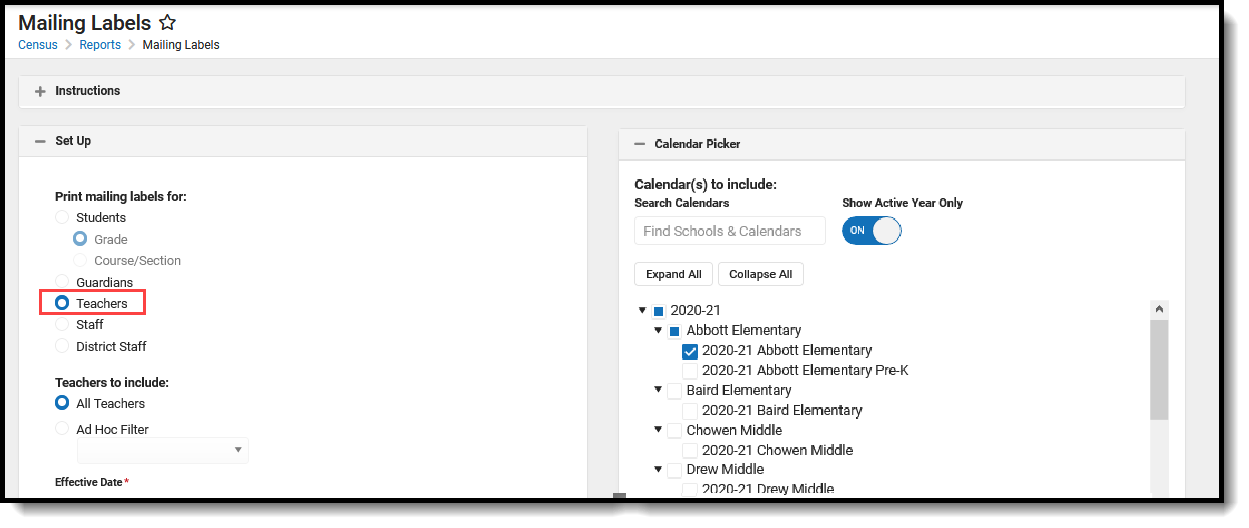
| Print Mailing Labels For | This selection determines which type of mailing label generated. Select the Teachers radio button.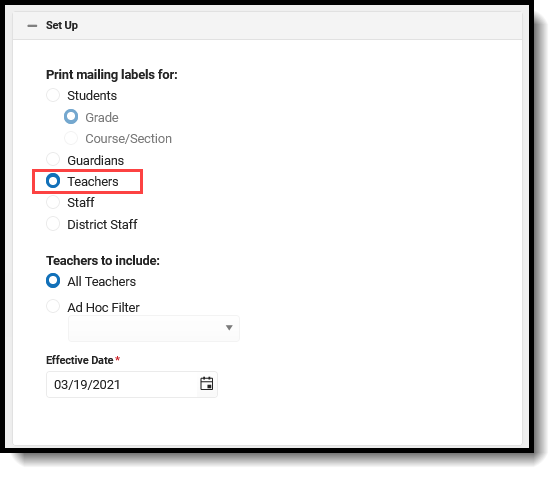 |
| Teachers to Include | All Teachers prints a label for every teacher in the selected calendar, as long as the teacher's district assignment/work assignment, contact information and household address are entered properly (see logic mentioned above). Or, select an Ad hoc Filter. Generating the report this way applies the ad hoc filter to all selected calendars when the School dropdown list in the Campus toolbar is set to All Schools. If All Schools is not selected, the Ad hoc Filter only applies to the selected school in the Campus toolbar. Only Census/Staff Type filters are available for selection when generating the Teacher Labels. |
| Effective Date | The Effective Date is entered in mmddyy format and causes the report to only include teachers who have an active district assignment on that date. This means if a teacher's District Assignment record was ended BEFORE the entered date, a label does not generate. This field defaults to the current date. |
| Calendar Picker At least one calendar needs to be selected in order to generate the report. | |
| Search Calendars | Search for a calendar by typing in the name of that calendar. Matching results are filtered as the name is entered in the field. Only those calendars to which the calendar has rights are available for selection. |
| Show Active Year Only | When set to ON, only those calendars for the active school year. When set to OFF, all calendars from all school years are available for selection. |
| Expand All/Collapse All | Use the Expand All/Collapse All to open and close the list of available calendars. |
| It is recommended that not all calendars be selected at one time, as this increases the report generation time and could potentially cause server response issues. | |
| FormatOptions | |
| Include | The following print options are available for Teachers Mailing Labels:
Labels print vertically in the selected sort order, not horizontally. |
| Sort Order | The Mailing Labels Report can be sorted by either the teacher's name, the City and Name or the Zip code. The City and Name sort option first sort by the state associated with the address. Sorting by Zip code can be used for bulk mail rates. |
| Report Format | The report can be generated in PDF or DOCX format. |
Generate Teachers Mailing Labels
- Select the Teachers radio button.
- Select the Calendars to include on the report.
- Select either All Teachers to include on the report, or select an available Ad hoc Filter.
- Enter an Effective Date in mmddyy format, or use the calendar icon to select a date. This date is automatically populated with the current date.
- Select the desired FormatOptions.
- Determine how the labels should be sorted by selecting the appropriate radio button, either Name, City and Name or Zip.
- Select the desired Report Format.
- Click the Generate button. The report appears in a new window with the selected options.
See the Save Options and Apply Options for information on saving these selections as a template.
 Teacher Mailing Labels Print
Staff Mailing Labels
Staff mailing labels print for those staff who have an active District Assignment record in the selected calendar, or an active Work Assignment in the selected calendar.
 Staff Mailing Labels
Staff Mailing Labels Report Logic
The staff person must be a member of a household that has an address marked as mailing.
Labels print for staff who have an active District Assignment record or Work Assignment record (for Campus HR) in the selected calendar. Logic does not look at any specific district assignment checkbox or any specific role assignment.
 Active Employment Record | 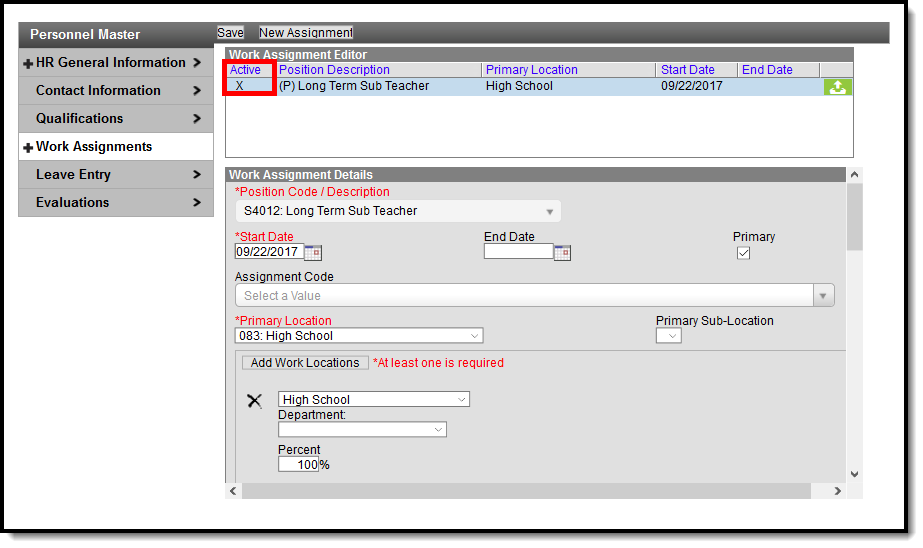 Active Work Assignment |
Staff Mailing Labels Report Editor Details
| Field | Description |
|---|---|
| Set Up | |
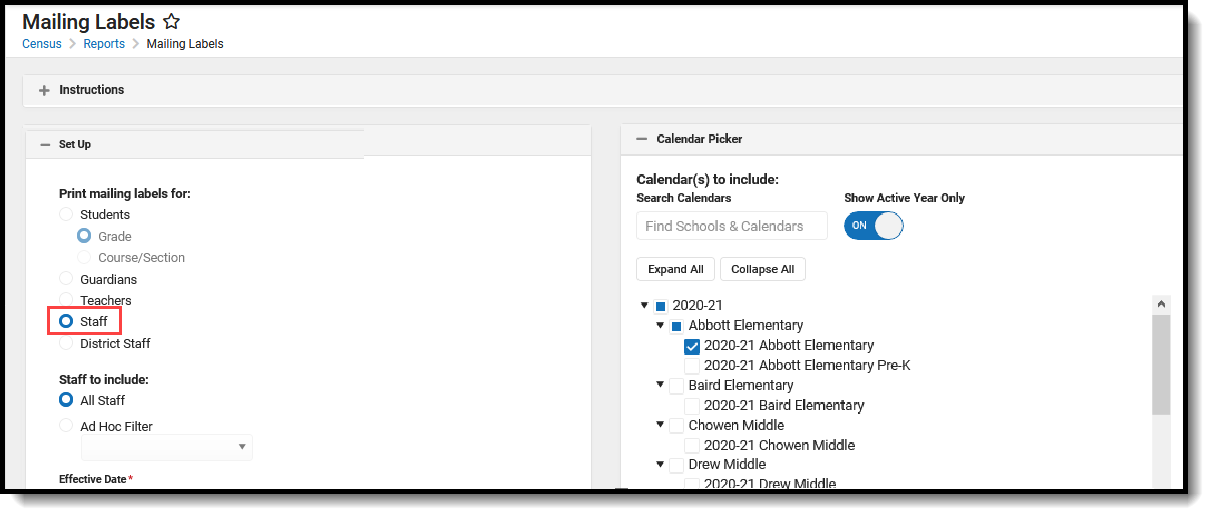
| Print Mailing Labels For | This selection determines which type of mailing label generated. Select the Teachers radio button.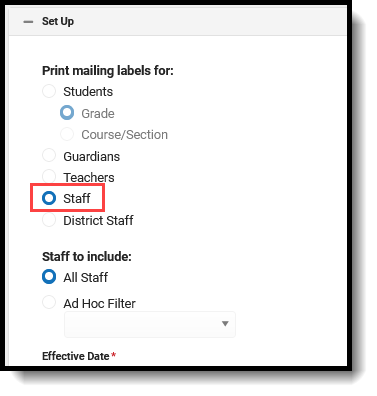 |
| Staffto Include | All Staff prints a label for every staff person in the selected calendar, as long as the district assignment/work assignment, contact information and household address are entered properly (see logic mentioned above). Or, select an Ad hoc Filter. Generating the report this way applies the ad hoc filter to all selected calendars when the School dropdown list in the Campus toolbar is set to All Schools. If All Schools is not selected, the Ad hoc Filter only applies to the selected school in the Campus toolbar. Only Census/Staff Type filters are available for selection when generating the Staff Labels. |
| Effective Date | The Effective Date is entered in mmddyy format and causes the report to pull staff who have an active district assignment record on the entered date. This field defaults to the current date. |
| Calendar Picker At least one calendar needs to be selected in order to generate the report. | |
| Search Calendars | Search for a calendar by typing in the name of that calendar. Matching results are filtered as the name is entered in the field. Only those calendars to which the calendar has rights are available for selection. |
| Show Active Year Only | When set to ON, only those calendars for the active school year. When set to OFF, all calendars from all school years are available for selection. |
| Expand All/Collapse All | Use the Expand All/Collapse All to open and close the list of available calendars. |
| It is recommended that not all calendars be selected at one time, as this increases the report generation time and could potentially cause server response issues. | |
| FormatOptions | |
| Include | The following print options are available for Staff Mailing Labels:
Labels print vertically in the selected sort order, not horizontally. |
| Sort Order | The Mailing Labels Report can be sorted by either the staff person's name, the City and Name or the Zip code. The City and Name sort option first sort by the state associated with the address. Sorting by Zip code can be used for bulk mail rates. |
| Report Format | The report can be generated in PDF or DOCX format. |
Generate Staff Mailing Labels
- Select the Staff radio button.
- Select the Calendars to include on the report.
- Select either All Staff to include on the report, or select an available Ad hoc Filter.
- Enter an Effective Date in mmddyy format, or use the calendar icon to select a date. This date is automatically populated with the current date.
- Select the desired Print Options.
- Determine how the labels should be sorted by selecting the appropriate radio button, either Name, City and Name or Zip.
- Select the desired Report Format.
- Click the Generate button. The report appears in a new window with the selected options.
See the Save Options and Apply Options for information on saving these selections as a template.
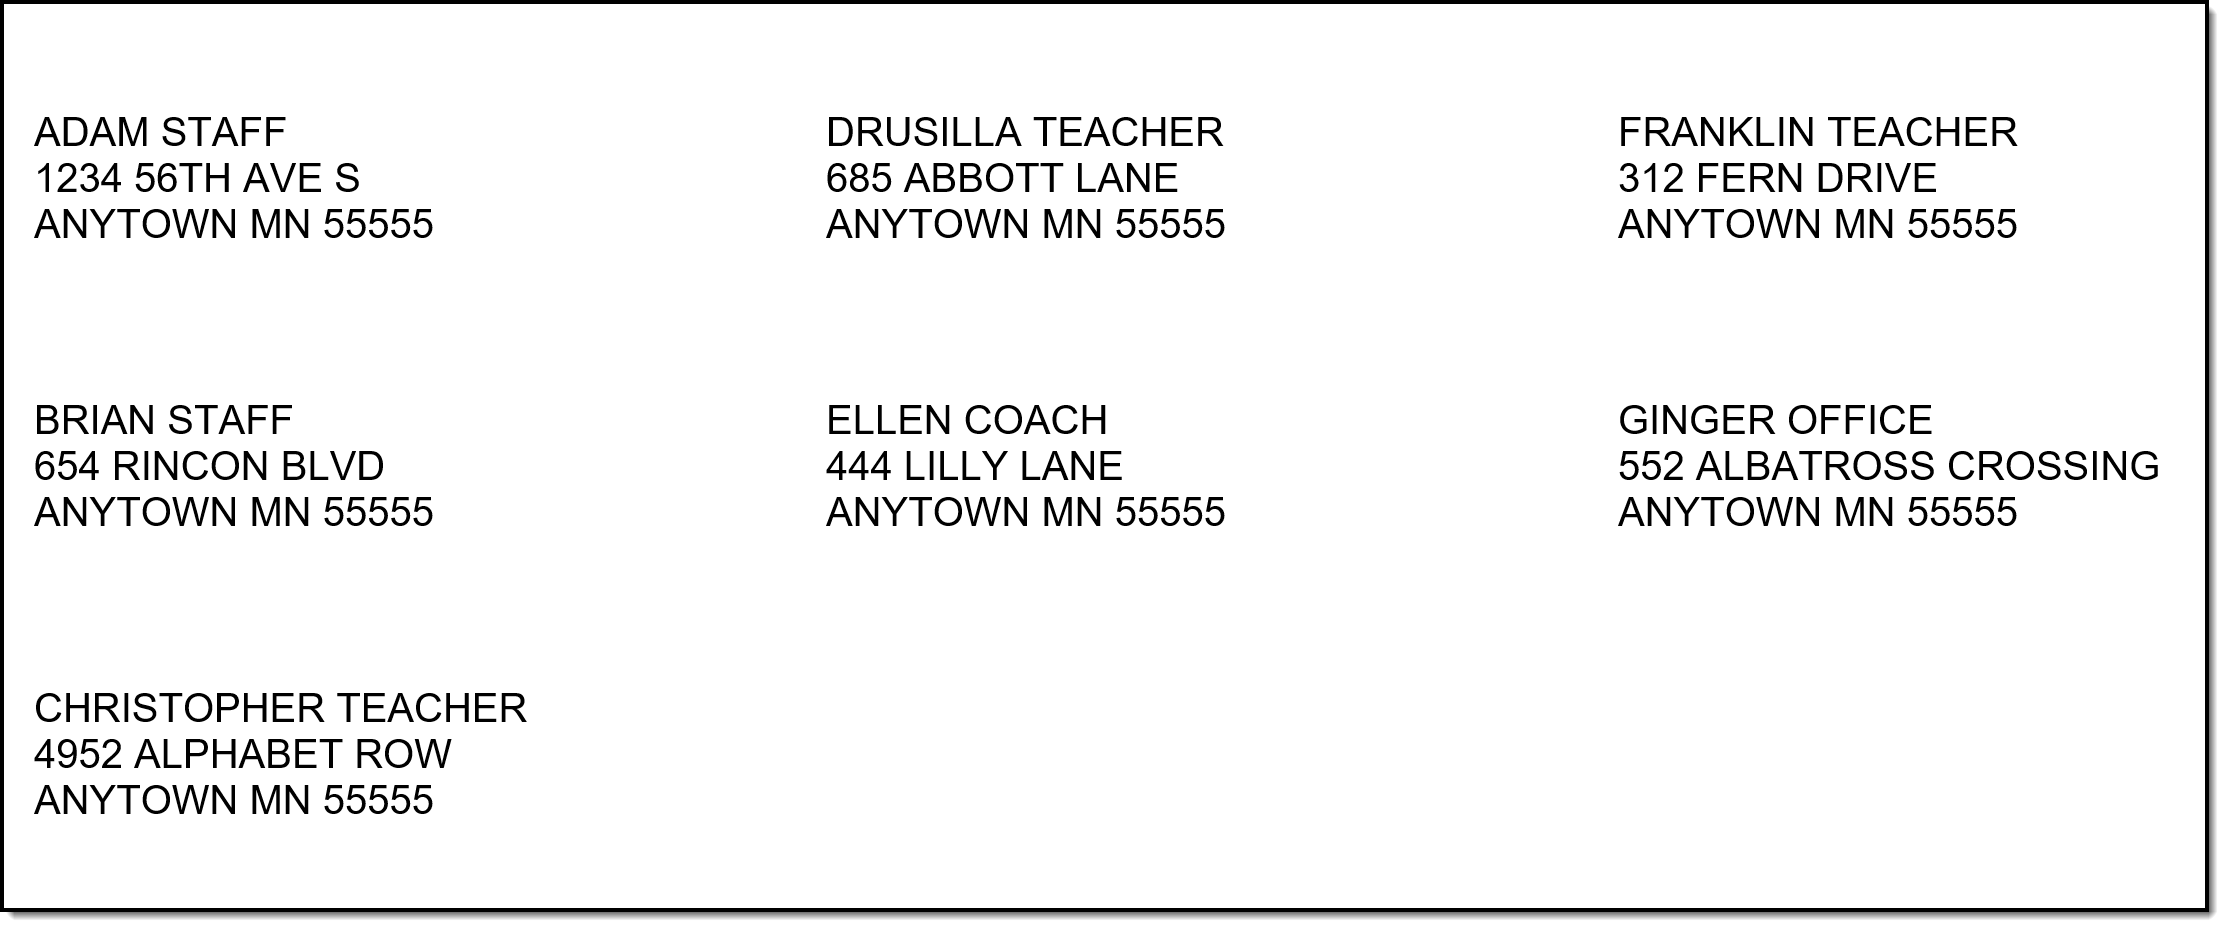 Staff Mailing Labels Print
District Staff Mailing Labels
The District Staff labels option is available when the School and Calendar in the Campus toolbar is set to All Schools and looks for those individuals who only have a District Employment record (no District Assignment record). This option is for district office staff, like a Central Registrar or the Superintendent.
 District Staff Mailing Labels
District Staff Report Logic
District Staff must be in a household that has the Mailing checkbox marked on the Address. The district staff person must have an active District Employment record and no District Assignment record.
The person generating the labels must have calendar rights to All Years/All Schools/All Calendars.
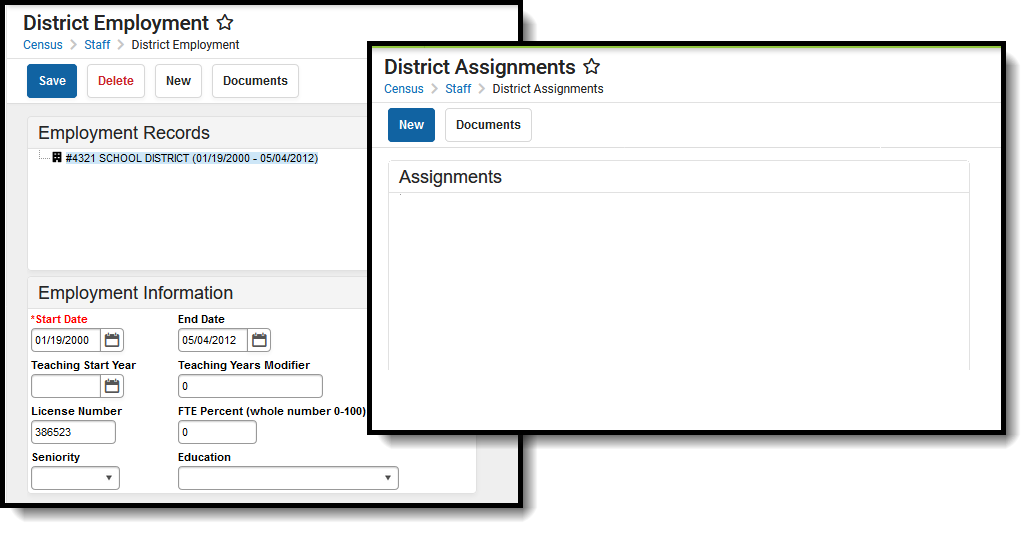 District Employment Record, No District Assignment
District Staff Mailing Labels Report Editor Details
| Field | Description |
|---|---|
| Set Up | |
| Print Mailing Labels For | This selection determines which type of mailing label generated. Select the District Staff radio button.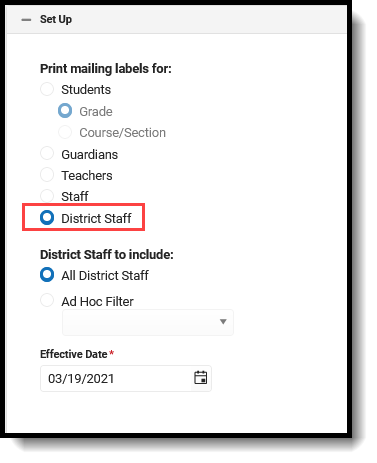 |
| District Staffto Include | All District Staff prints a label for every district staff person in the selected calendar, as long as the district employment, contact information and household address are entered properly (see logic mentioned above). Or, select an Ad hoc Filter. Generating the report this way applies the ad hoc filter to all selected calendars when the School dropdown list in the Campus toolbar is set to All Schools. If All Schools is not selected, the Ad hoc Filter only applies to the selected school in the Campus toolbar. Only Census/Staff Type filters are available for selection when generating the District Staff Labels. |
| Effective Date | The Effective Date is entered in mmddyy format and causes the report to pull employment records that are active on the entered date. This field defaults to the current date. |
| FormatOptions | |
| Include | The following print options are available for District Staff Mailing Labels:
Labels print vertically in the selected sort order, not horizontally. |
| Sort Order | The Mailing Labels Report can be sorted by either the district staff person's name, the City and Name or the Zip code. The City and Name sort option first sort by the state associated with the address. Sorting by Zip code can be used for bulk mail rates. |
| Report Format | The report can be generated in PDF or DOCX format. |
Generate District Staff Mailing Labels
- Set the Campus Toolbar to be All Years and All Schools.
- Select the District Staff radio button.
- Select either All District Staff to include on the report, or select an available Ad hoc Filter.
- Enter an Effective Date in mmddyy format, or use the calendar icon to select a date. This date is automatically populated with the current date.
- Select the desired Print Options.
- Determine how the labels should be sorted by selecting the appropriate radio button, either Name, City and Name or Zip.
- Select the desired Report Format.
- Click the Generate button. The report appears in a new window with the selected options.
See the Save Options and Apply Options for information on saving these selections as a template.
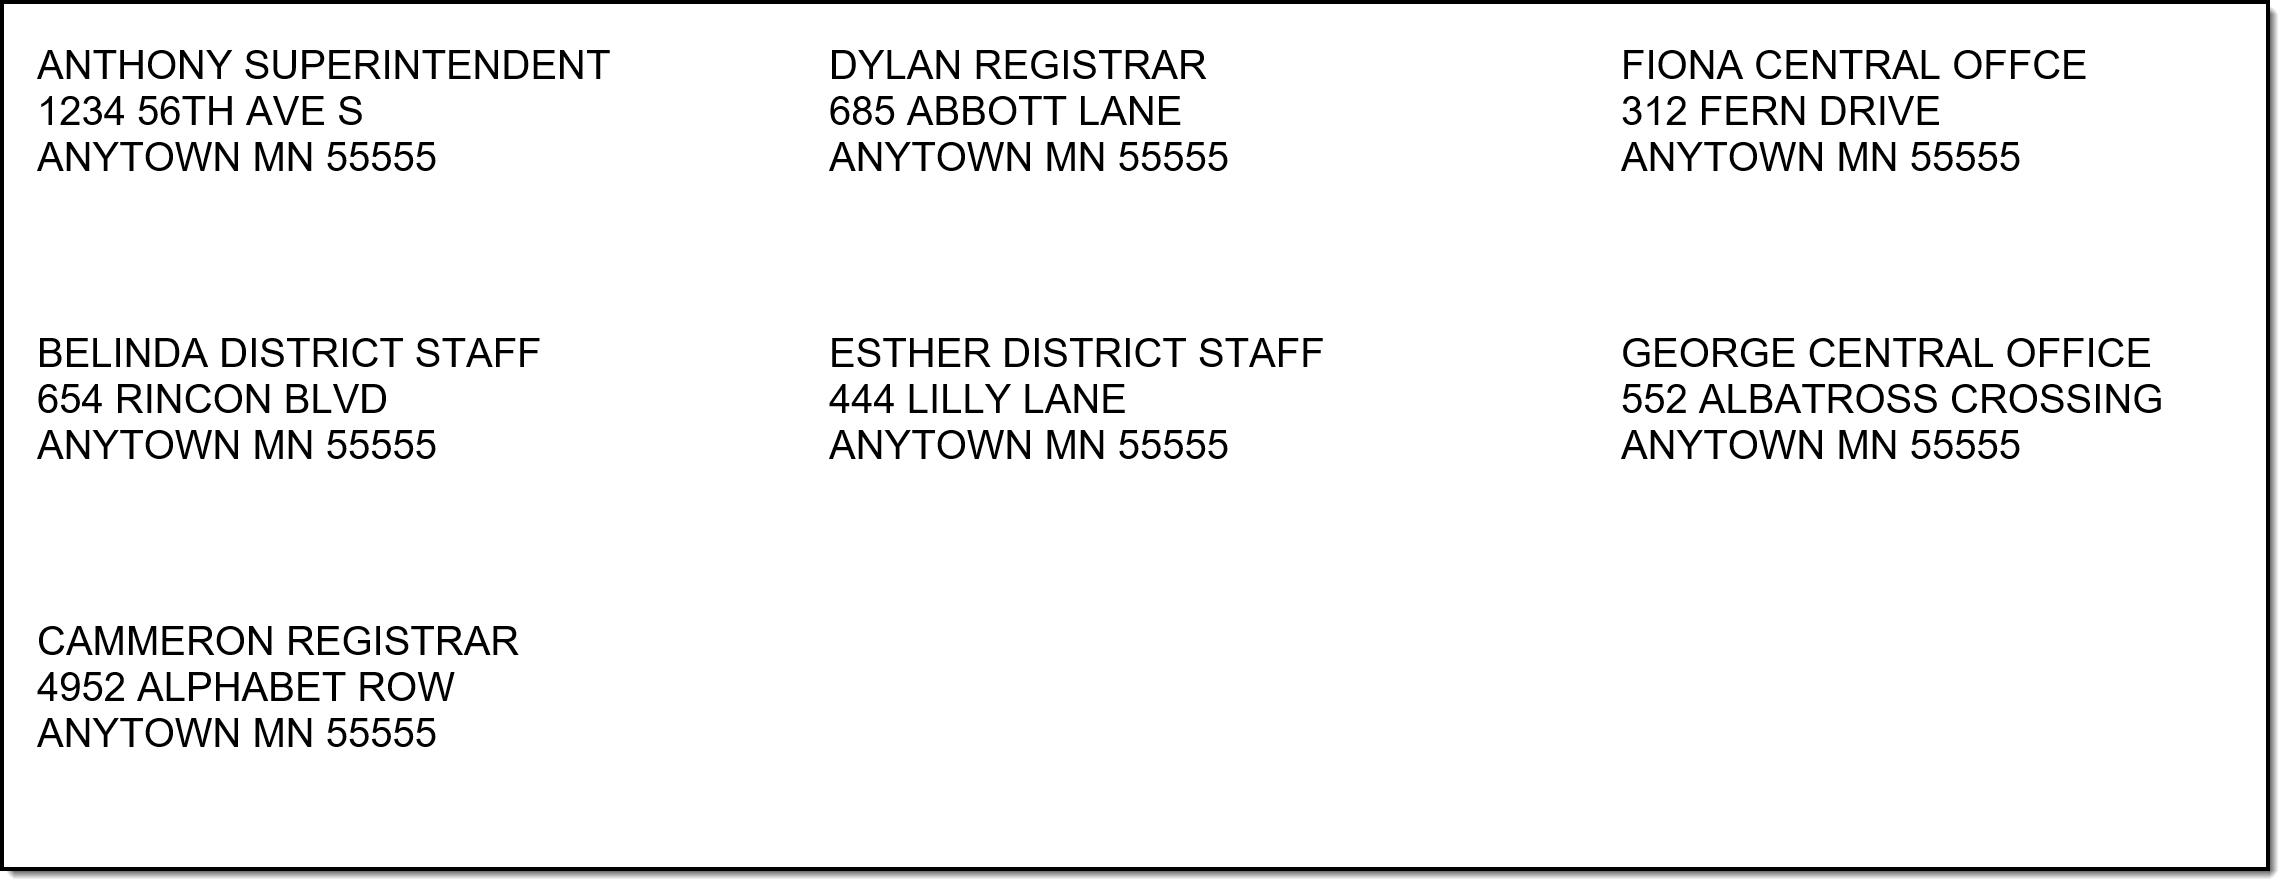 District Staff Mailing Labels Print
Save Options and Apply Options
Options selected for Mailing Label reports can be saved as a template. This is similar to creating Report Preferences used for Report Cards or Transcripts, where selections are saved and can be generated at a later time.
For users who need a particular set of mailing labels, Student by Course/Section for an AP Course, or Guardians using a particular Ad hoc Filter, for example, saving the options as a template saves time when needing to generate the same list of labels again.
There is no limit to the number of templates that can be created, and each one can be saved with a descriptive name.
These reports cannot be shared with other users who also generate the Mailing Labels Report; these templates are only for the user who created them.
 Save Options for Report Generation at a Later Time
Once a name has been entered for a template, it is available in the Apply Options side panel. Here, users can select one of their previously saved templates and generate the report. Or, select the Default Report Options, which displays the original report options without any special settings.
 Apply Options
Templates can be deleted by clicking the red X. Click the Close button on the side panel to return to the report options.
Save a Report Template
- Make the desired selections on the report editor, following the procedures mentioned previously in this article.
- Test the results by generating the report to verify the labels are what is needed.
- Click the Save Options button and enter a Name for the template.
- Click Save when finished. The template is now saved.
All fields that were selected in the report editor are saved on the template, except for the Effective Date.
If specific calendars have been selected for a report prior to choosing a saved template, the calendar selection is cleared and displays the calendars that were selected on the saved template.
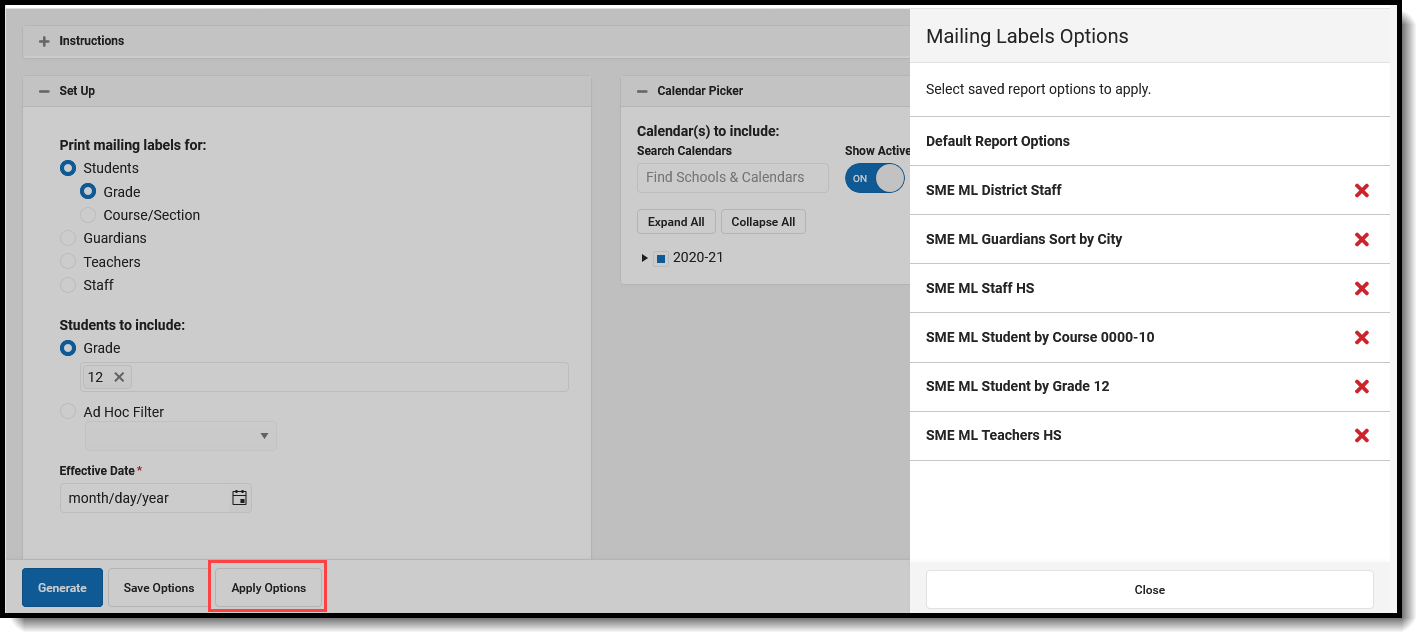
Apply Options
When selecting a saved template for generation, the Effective Date must be entered (the current date is automatically populated) and desired Calendars need to be selected.
- Click the Apply Options button. A Mailing Labels Options side panel displays.
- Select the desired template. The side panel closes and the options stored with that selected template display on the report editor.
- Select the desired Calendars to include in this report.
- Enter the desired Effective Date.
- Click the Generate button to print the labels.
