Users must have Campus Learning and the Enhanced Curriculum tool right to access advanced curriculum options such as folders and resources.
Location: Open an assignment from anywhere in Instruction and click Copy; Grade Book > expand Settings menu > Curriculum/Assignment Copier; Planner > click section name > Copy Curriculum
The Curriculum Copier allows teachers to copy curriculum items, such as assignments, resources, and folders. Curriculum can be copied from one of their sections to another, between different school years, or between different tools like the Curriculum Library and My Curriculum.
This article covers specifically copying curriculum from one year to the next. This option can be especially useful at the beginning of the school year to copy last year's class materials to the new year.
To make copies of individual curriculum items, use the Duplicate option.
 Copy curriculum from one section to another.
You can access the copier all over Instruction:
- Click the Copy button in the top corner of an assignment, resource, or folder.
- Click Copy in the Curriculum List or My Curriculum
- Open the Curriculum Copier from the Grade Book Settings menu or by clicking the name of a section in the Planner.
- Click Copy in the Curriculum Library.
Teachers who do not have Campus Learning and the Enhanced Curriculum tool right do not have access to advanced curriculum features.
The copy process is the same, but you'll only see assignments, not folders and resources with their unique icons. The Curriculum Library and My Curriculum are also not available without a Campus Learning license. |
 Copier without Enhanced Curriculum |
Step 1 - Select Items
The first step of copying curriculum is selecting the source and destination and which items should be copied. These instructions cover copying from a section to another section. For more information about other uses of the Copier, see the Curriculum Copier article.
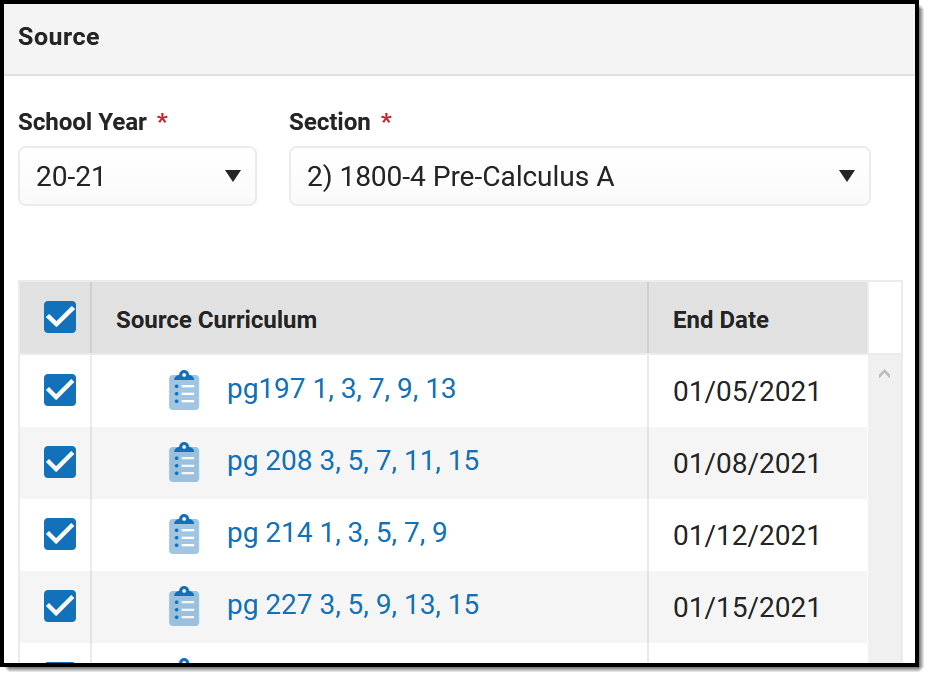
- Select Section in the Copy From and Copy To fields. You can also copy curriculum to or from the My Curriculum tool.
- The Source School Year and Section default to the context where you opened the copier. Select a School Year and Section for the Destination section. The Destination Curriculum list populates with existing curriculum in that section. The Source Curriculum list populates with all curriculum in that section, but items that are already in the destination section display with an uneditable checkmark.
- Mark the checkbox next to curriculum in the source section to copy to the destination. Click the arrow next to folders to view what's inside them.
- To add the selected curriculum to a specific folder in the destination section, click Edit under the destination section and select a Folder.
- Click Next to proceed.
Note: Only curriculum created in Campus can be copied. Curriculum created in another program, such as Canvas or Schoology, won't show up in the Copier and cannot be copied.
Step 2 - Item Dates & Grading
In step 2, modify dates and grading setup as desired.
Click the black arrow next to folders to expand.
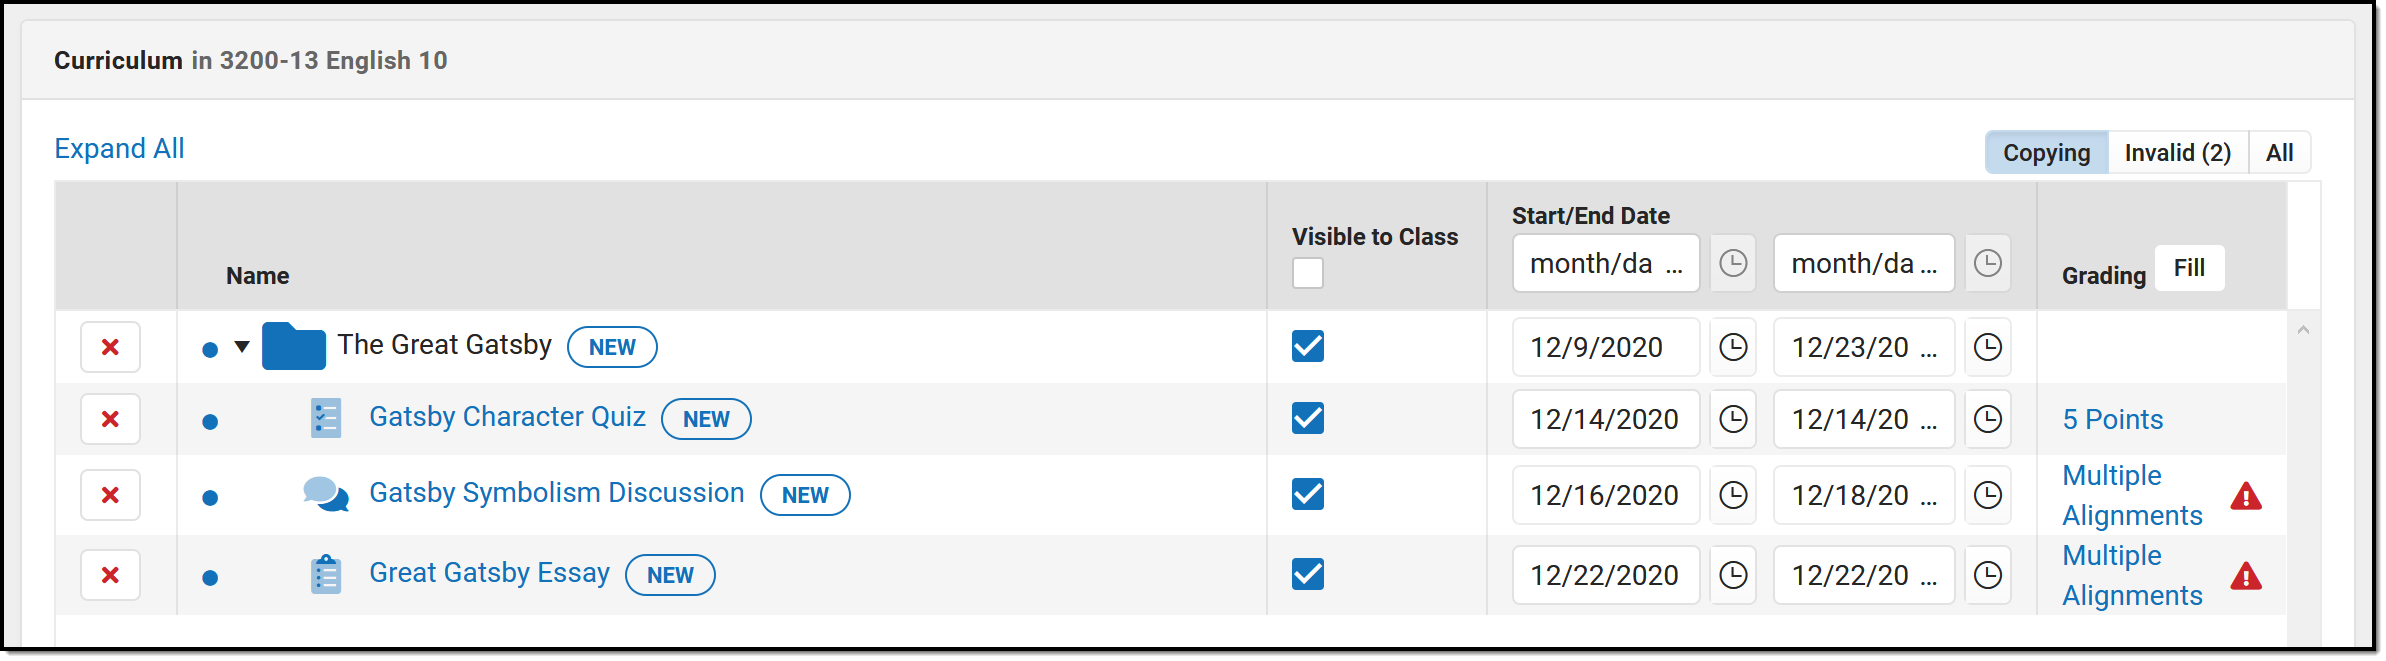 In the second screen, modify visibility, dates, and grading.
Click the red next to an item to remove it from the copy list. Click the name of an item to view a read-only version of it. Indicate if the item should be Visible on Campus Student and Campus Parent using the checkbox.
Fill the visibility status or dates of all items using the fields in the table header.
Dates |
Grading |
Modify Start and End Dates by clicking the date to type or select another day. Click the clock icons to set times for the assignment. If copying an item from a previous year, the dates are calculated by determining what day of the term the item was originally scheduled and setting the date for the copied item to match that day in the destination section. For example, if an assignment has a Date of the 20th day of school in Term 1 and it's copied to Term 2, the Date defaults to the 20th day of Term 2. |
Click the Grading link to view the grading setup for the item. Resources are not scored; click Grading Setup for a resource to change it to an assignment and set up grading. If the grading setup of the source assignment is not valid in the destination section, a red warning icon displays. For example, an assignment may be aligned to a standard that isn't assessed in the destination section. Any invalid alignments will be removed when the copy process if finished; valid alignments will copy.
If the destination section doesn't have any alignments, or any alignments in common with the source section, assignments are copied as resources, with Grading turned off. Toggle grading on and add an alignment to score those items. |
Click Save to finish copying.
When assignments are copied, sequence order is maintained, but sequence numbers are updated to be consecutive, starting at 1. If the destination section already has assignments, copied assignments are sequenced starting with one value higher than the highest existing sequence.
Student Group selections are not copied between sections or calendars.
