Tool Search: Civil Rights Data Collection (CRDC) > Setup
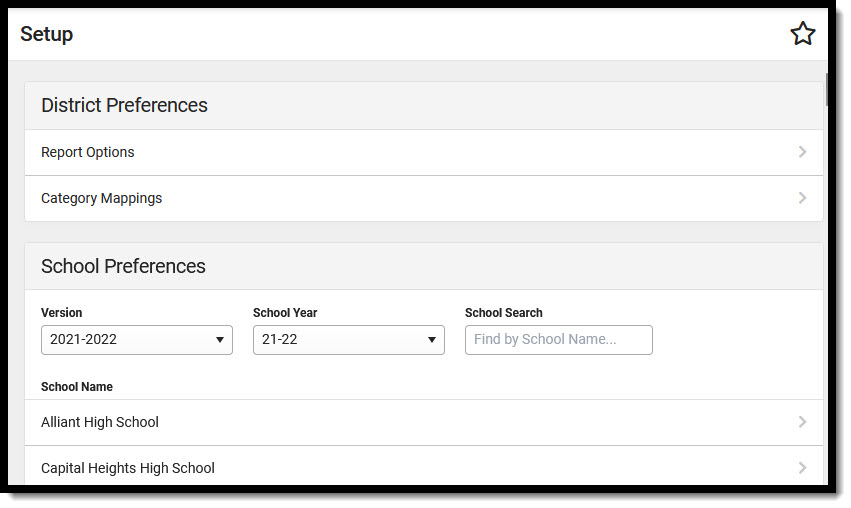
The Civil Rights Data Collection (CRDC) Setup tool allows districts to complete category mappings for each school for grade levels, students in subgroups (IDEA, 504, EL etc.), and courses. Users are able to capture all SIS related data elements required to report for the CRDC. Users are also able to generate reports to match the CRDC data collection templates.
The CRDC tool is available for the 2021-2022 version.
 CRDC Setup Tool
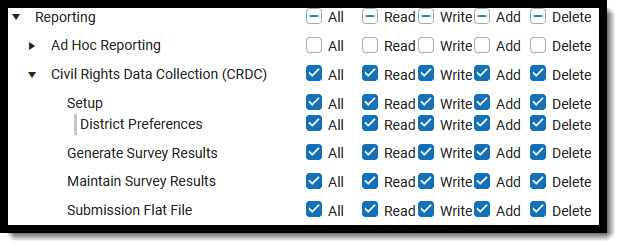
CRDC Setup Tool Rights
In order to use the CRDC Setup tool, users must have rights to the tool within their own district.
 CRDC Tool Rights
Tool | R | W | A | D |
|---|---|---|---|---|
CRDC Setup | User can view Category Mappings. | User can view, copy, and edit Category Mappings. | User can view, copy, edit, and create new Category Mappings. | User can view, copy, edit, and create new Category Mappings. |
| District Preferences | User can view the District Preferences Category Mappings. | User can view, edit & push Categories. | User can view, edit & push Categories. | User can view, edit & push Categories. |
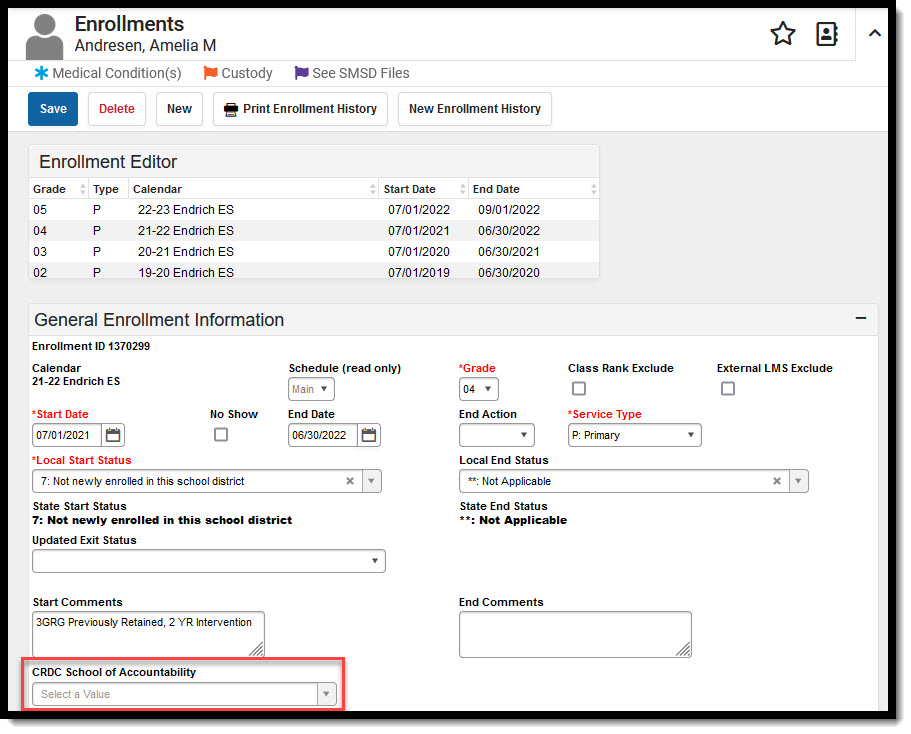
CRDC School of Accountability
In order for students to display in Search Results and report for CRDC, the CRDC School of Accountability field must be set on the student's enrollment in Student Information > General > Enrollments. This field only needs to be used for districts that have students enrolled in a school that is different than the school in which they need to report for CRDC or districts that have students with multiple enrollments with different service types. The School of Accountability field can be unhidden and made visible to users in System Administration > Custom > Attribute/Dictionary > Enrollment > CRDC School of Accountability. The School of Accountability field has its own sub tool right (see below for details).
 CRDC School of Accountability
The School of Accountability field on a student's enrollment determines which school the student will report in CRDC. If a student has an enrollment in the reporting year for the school selected and the School of Accountability is blank or is the same as the reporting school, the student appears in the search results for the reporting school. If a student that has an enrollment in the reporting year for a different school and the School of Accountability is the same as the school selected, the student appears in the search results for the reporting school. If the School of Accountability field is OD: Out of District or is not the same as the reporting school, the student does not appear in the search results. The table below describes different scenarios on how students report regarding the School of Accountability field.
Student Enrollment Scenarios
| School A | School B |
|---|---|
| Student 1: Enrollment in School A and CRDC School of Accountability is blank or is the same as the Selected School. | Student 3: Enrollment in School A and CRDC School of Accountability is blank or is the same as the Selected School. |
| Student 2: Enrollment in School A and CRDC School of Accountability is School B. | Student 4: Enrollment in School A and CRDC School of Accountability is School A. |
| Student 5: Enrollment in School A & B and School of Accountability is blank. | Student 5: Enrollment in School A & B and School of Accountability is blank. |
| Student 6: Enrollment in School A and CRDC School of Accountability is OD: Out of District. |
Student Search Results and Report Logic
| School A | School B | Comments |
|---|---|---|
| Student 1 | Student 2 | |
| Student 4 | Student 3 | |
| Student 5 | Student 5 | The District/School must define a School of Accountability when a student has more than 1 enrollment in different Schools. The student will appear in both schools until a School of Accountability is defined. |
| Student 6 will not appear in any search results or report logic as they do not have a School of Accountability in the District. |
School of Accountability Tool Rights
The School of Accountability field has its own sub tool right. Users must have at least (W) rights in order to enter/edit information in this field.
 CRDC School of Accountability Tool Rights
CRDC Setup
This section provides information on creating category mappings. Mappings can be created for the entire district using the District Preferences option or set for individual schools using the School Preferences option.
The search criteria entered and saved at the district level is not pushed down to individual schools. Only the course and student results based on the search criteria are pushed to individual schools.
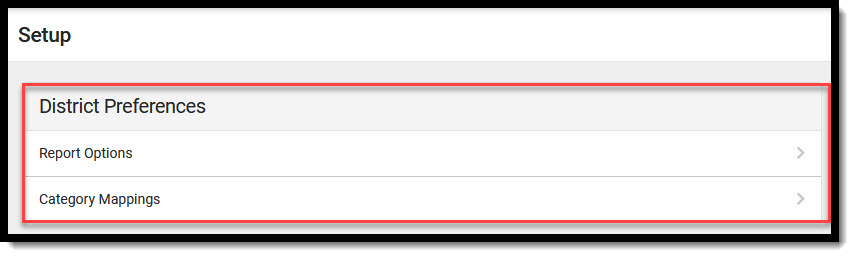
Set District Preferences
The District Preferences section allows users to set the report options and category mappings for the district. These can then be pushed down to schools in the district. Note that pushing preference overwrites any mappings an individual school has made.
 CRDC District Preferences
District Preferences Editor
| Field | Definition |
|---|---|
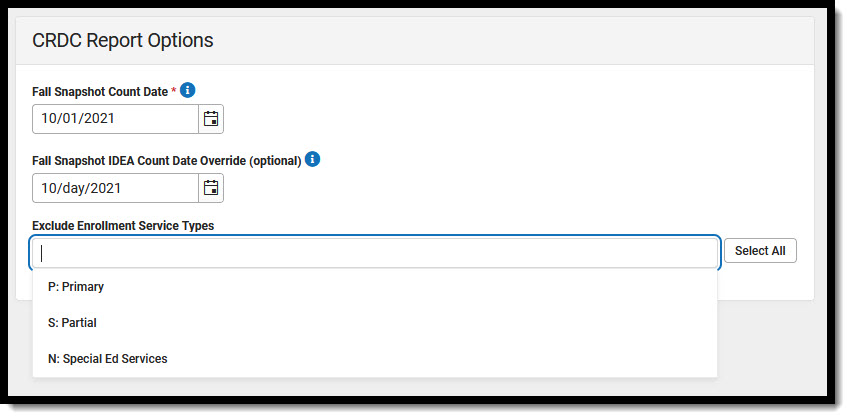
| Report Options | Allows the user to set the Fall Snapshot Count Date, Fall Snapshot IDEA Count Date Override and select enrollment service types that will be excluded from search results for the district. |
| Category Mapping | Allows the user to view, create, and edit category mappings. |
Set District CRDC Report Options
This section describes how to set CRDC reporting options for the district.
 District CRDC Report Options
Report Options Editor
| Field | Definition |
|---|---|
| Fall Snapshot Count Date | The Fall Snapshot Count Date is based on October 1 or the closest school day to October 1. This field is required. |
| Fall Snapshot IDEA Count Date Override | The count of students with disabilities (IDEA) should be based on either the IDEA child count date or October 1 (or the closest school day to October 1). This field is optional. If left blank, the Fall Snapshot Count Date will be used. |
| Exclude Enrollment Service Types | Allows users to select Enrollment Service Types that will be excluded from search results and report results. |
| Select All | Allows users to select all Enrollment Services Types for the Exclude Enrollment Service Types field. |
| Save | Saves the values entered by the user on the CRDC Report Options page. |
| Cancel | Returns the user to the main CRDC Setup page without saving values entered by the user on the CRDC Report Options page. |
To set District Report options:
- Select Report Options.
- Enter the Fall Snapshot Count Date.
- If desired, enter the Fall Snapshot IDEA Count Date Override.
- If desired, enter an Exclude Enrollment Service Type(s).
- Click Save.
District Category Mappings
This section describes how to view, create, and/or edit District Category Mappings.
If schools have been mapped in previous years, these options will be copied when mappings are created in future years. It may not be necessary to Push in this instance. (Date related mappings are not copied).
 District Category Mappings
Category Mappings Editor
| Field | Definition |
|---|---|
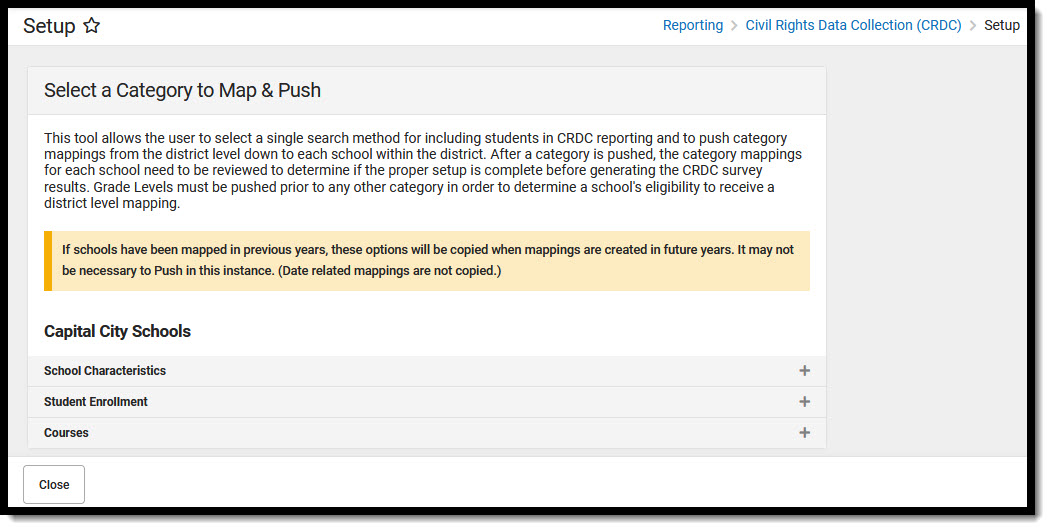
| School Characteristics | Allows the user to select the Grade Levels being mapped for the selected school. A Grade Level Mapping must be created in order to create other mappings. |
| Student Enrollment | Allows the user to select student enrollments being mapped for IDEA Students, 504 Students, EL Students, and EL Students Receiving Services. |
| Courses | Allows the user to create mappings for selected courses for the selected school. Options include Algebra l - Grades 7 & 8, Algebra l - High School, Algebra ll, Geometry - Grade 8, Geometry - High School, Calculus, Advanced Mathematics, Biology, Chemistry, Physics, Computer Science and Data Science. |
| Close | Returns the user to the main CRDC Setup page. |
To select category mappings:
- Select Category Mappings.
- Select the Category Mapping to view, create, or edit.
Proceed to the Select a Category Mappings section for more information on creating/editing Category Mappings.
After the Category Mappings have been created, push the mappings to all schools within the district. When a user presses 'Push' or ' Save & Push', the mappings are pushed to all schools in the district. Pushing Category Mappings overwrites any existing school mappings for all schools within the district. After a category is pushed, users need to review the category mappings for each school to determine if the proper setup is complete.
Set School Preferences
This section describes how to set mapping preferences for a selected school and year.
 Set CRDC School Preferences
Select Preferences Editor
| Field | Definition |
|---|---|
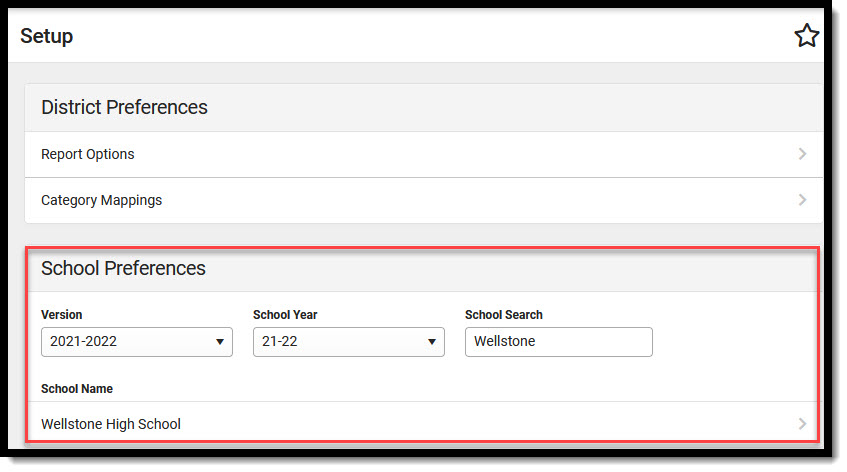
| Version | Allows the user to select the CRDC version for which data will be mapped. |
| School Year | Allows the user to select the school year in which data will be mapped. |
| School Search | Allows the user to search for a school. |
| School Name | Allows the user to select the school in which data will be mapped for the selected School Year. Schools in which the user has tool rights to and have at least one active calendar display. |
To select a version, year and school:
- Select the Version for which data will be mapped.
- Select the School Year in which data is being mapped. The School Search field can be used to find a school, if necessary.
- Select the School Name in which data is being mapped for the selected year.
- Proceed to the Select a Category to Map section.
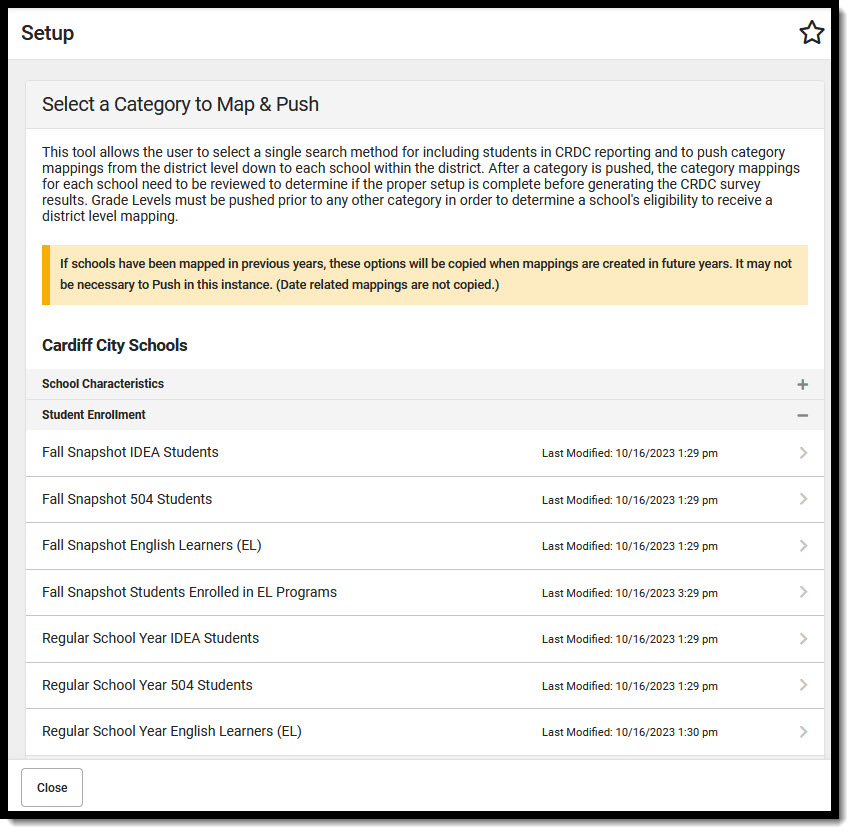
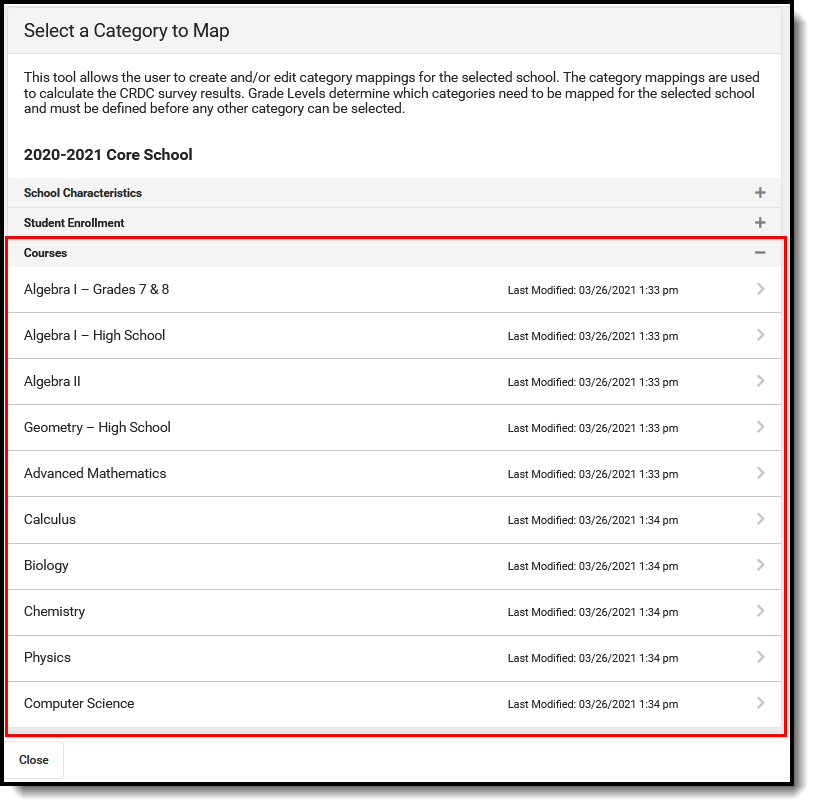
Select a Category to Map
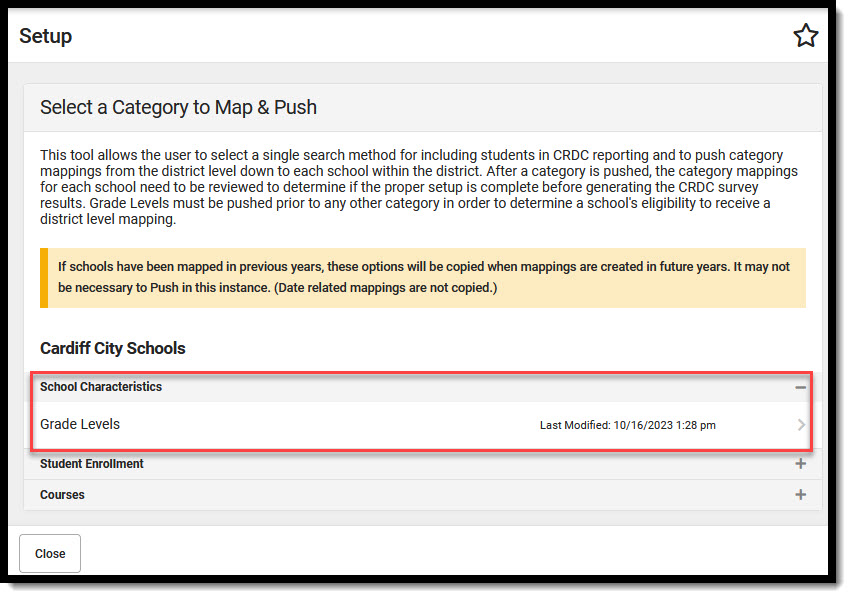
This section describes how to create category mappings. A Grade Level mapping must be created in order to create other mappings. Grade levels determine which category mappings a school needs. Schools only see category mappings for categories that apply to the grade levels at the selected school. If a Grade Level mapping has not been completed, the user will automatically be directed to the Grade Levels mapping screen after selecting a school. See Appendix A to view which grade levels are aligned to each category.
Users may need to use all 'Inactive' locked Plan types in order to get previous school years' locked IEP students to pull into CRDC Searches.
If schools have been mapped in previous years, these options will be copied when mappings are created in future years. It may not be necessary to Push in this instance. (Date related mappings are not copied).
 Select a Category to Map
Select Item to Map Editor
| Field | Definition | |
|---|---|---|
| Note: The following section describes category mappings for individual schools. The process of creating District category mappings is the same, except users are only able to create mappings using a Campus Filter or Ad Hoc Filter. Student details will also not display when creating District mappings. When a user presses 'Push' or ' Save & Push', the mappings are pushed to all schools in the district. A warning message displays after pressing "Push" indicating that running this tool will remove and replace any existing school level mapping for the selected school year and version. Selecting OK will push the district category mappings. After a category is pushed, users need to review the category mappings for each school to determine if the proper setup is complete. A message is sent to the user's Process Inbox when a district mapping is pushed to schools. A message is also sent to the user's Process Inbox if the push fails. | ||
| School Characteristics | Allows the user to select the Grade Levels being mapped for the selected school. Grade levels determine which categories need to be mapped for the selected school. A Grade Level Mapping must be created in order to create other mappings. If grade levels have not been mapped, "UNMAPPED" displays. If grade levels have previously been mapped, then the date and time the mapping was created or last modified displays. See Appendix A to view the grade levels to which each category is aligned. | |
| Student Enrollment | Allows the user to select student enrollments being mapped. If a Student Enrollment mapping has not been created, "UNMAPPED" displays. If Student Enrollment mappings have previously been mapped, then the date and time the mapping was created or last modified displays. | |
| Fall Snapshot IDEA Students | Allows users to create a Fall Snapshot IDEA Students mapping. | |
| Fall Snapshot 504 Students | Allows users to create a Fall Snapshot 504 Students mapping. | |
| Fall Snapshot English Learners (EL) | Allows users to create a Fall Snapshot EL Students mapping. | |
| Fall Snapshot Students Enrolled in EL Programs | Allows users to create a Fall Snapshot EL Students enrolled in EL programs mapping. | |
| Regular School Year IDEA Students | Allows users to create a Regular School Year IDEA Students mapping. | |
| Regular School Year 504 Students | Allows users to create a Regular School Year 504 Students mapping. | |
| Regular School Year English Learners (EL) | Allows users to create a Regular School Year English Learners (EL) Students mapping. | |
| Courses | Allows the user to create mappings for selected courses for the selected school. The courses listed will vary depending on the school selected. If a Course mapping has not been created, "UNMAPPED" displays. If Course mappings have previously been mapped, then the date and time the mapping was created or last modified displays. | |
| Algebra l - Grades 7 & 8 | Allows users to create a mapping for Algebra l courses for grades 7 and 8. | |
| Algebra I - High School | Allows users to create a mapping for High School Algebra l courses. | |
| Algebra ll | Allows users to create a mapping for Algebra ll courses. | |
| Geometry - Grade 8 | Allows users to create a mapping for Geometry courses for grade 8. | |
| Geometry - High School | Allows users to create a mapping for High School Geometry courses. | |
| Advanced Mathematics | Allows users to create a mapping for Advanced Mathematics courses. | |
| Calculus | Allows users to create a mapping for Calculus courses. | |
| Biology | Allows users to create a mapping for Biology courses. | |
| Chemistry | Allows users to create a mapping for Chemistry courses. | |
| Physics | Allows users to create a mapping for Physics courses. | |
| Computer Science | Allows users to create a mapping for Computer Science courses. | |
| Data Science | Allows users to create a mapping for Data Science courses | |
| Close | Returns the user to the main CRDC Setup page. | |
To create School Characteristic Mappings:
- Select School Characteristics.
Select Grade Levels.
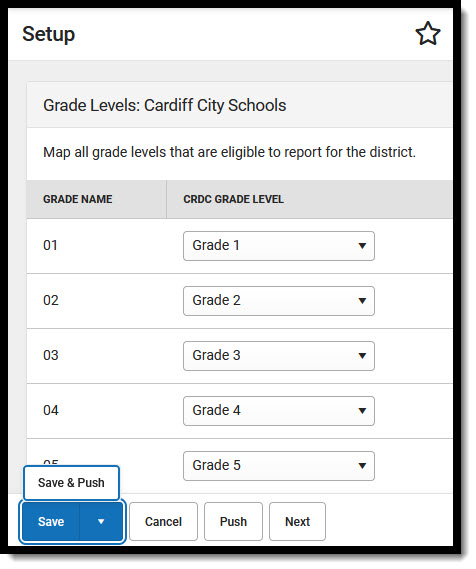
 Category Map & Push - Grade Levels
l
- Select the appropriate CRDC Grade Level for each grade that is being mapped. All grade levels from all calendars in the selected school display. If a grade level should not be mapped, leave the CRDC Grade Level field blank.
Click Save, Save & Push, Push or Next.
 Grade Level Mapping


To create Student Enrollment Mappings:
Select Fall Snapshot IDEA Students or Regular School Year IDEA Students. Select students that will be included in the mapping using a Campus Filter, Quick Search, and/or Ad Hoc Filter. This section describes how to create a mapping for IDEA Students using a Campus Filter. The fields displayed will vary depending on which fields are active for a school. Note that if a mapping was previously saved, the previously selected options will display. The process for creating Fall Snapshot and Regular School Year mappings for IDEA students is the same with the exception of how students are selected using the Search Criteria in the Campus Filter option. IDEA Students Campus Filter Editor Allows users to select IDEA students based on a locked Plan Type. A student with any Enrollment and Plan in the selected Plan Types will report as long as the enrollment and plan overlap the Fall Snapshot Count Date/Fall Snapshot IDEA Count Date Override. A student's Enrollment Start Date & Plan Start Date must be on or before the Fall Snapshot Count Date/Fall Snapshot IDEA Count Date Override. The Fall Snapshot IDEA Count Date Override Date is used if populated. A student's Enrollment End Date & Plan End Date must be blank or on or after the Fall Snapshot Count Date/Fall Snapshot IDEA Count Date Override. The Fall Snapshot IDEA Count Date Override Date is used if populated. The plan must be locked for the student to display. If the plan is unlocked after the student is saved to the mapping, the student will still be included in the mapping. To search for and select students using the Campus Filter option: This section describes how to create a mapping for IDEA Students using Quick Search. IDEA Students Quick Search Editor Allows the user to indicate if students that have an active enrollment as of today are included in the search. Options are Yes or No. To search for and select students using the Quick Search option: This section describes how to create a mapping for Fall Snapshot IDEA Students using an Ad Hoc Filter. The process for creating Fall Snapshot and Regular School Year mappings for IDEA students using an Ad Hoc Filter is the same . IDEA Students Ad Hoc Filter Editor Allows the user to select a previously created Ad Hoc Filter to select students for the mapping. Users only have access to Ad Hoc Filters they own or that belong to a filter user group in which they are a member. Users can reference the CRDC - Ad Hoc Filters for Populating Category Mappings page for examples of Ad Hoc Filters that can be used. To search for and select students using the Ad Hoc Filter option: Select Fall Snapshot 504 Students or Regular School Year 504 Students. Select students that will be included in the mapping using a Campus Filter, Quick Search, and/or Ad Hoc Filter. When searching for and selecting students to be included in a mapping, the different search options can be used in conjunction with each other. When students are added to the Selected Students list using one of the search options, other students can be added to the same list using a different search option. Students removed from the Selected Students list will display in the Search Results when another Search option is chosen. This section describes how to create a mapping for 504 Students using a Campus Filter. The fields displayed will vary depending on which fields are active for a state. If the 504 tab is active, none of the other Campus Filter options will appear on the Campus Filter tab. Note that if a mapping was previously saved, the previously selected options will display. The process for creating Fall Snapshot and Regular School Year mappings for 504 students is the same with the exception of how students are selected using the Search Criteria in the Campus Filter option. 504 Students Campus Filter Editor Allows users to select students who have a section 504 indicator on their enrollment and the enrollment overlaps the Fall Snapshot Count Date. Students that have an enrollment in the selected school and the section 504 field is checked report. A student's Enrollment Start Date must be on or before the Fall Snapshot Count Date and the student's Enrollment End Date must be blank or on or after the the Fall Snapshot Count Date in order to report. To search for and select students using the Campus Filter option: This section describes how to create a mapping for 504 Students using Quick Search. The process for creating Fall Snapshot and Regular School Year mappings for 504 students using the Quick Search method is the same. Allows the user to indicate if students that have an active enrollment as of today are included in the search. Options are Yes or No. To search for and select students using the Quick Search option: This section describes how to create a mapping for Fall Snapshot 504 Students using an Ad Hoc Filter. The process for creating Fall Snapshot and Regular School Year mappings for 504 students using an Ad Hoc Filter is the same. 504 Students Ad Hoc Filter Editor Allows the user to select a previously created Ad Hoc Filter to select students for the mapping. Users only have access to Ad Hoc Filters they own or that belong to a filter user group in which they are a member. Users can reference the CRDC - Ad Hoc Filters for Populating Category Mappings page for examples of Ad Hoc Filters that can be used. To search for and select students using the Ad Hoc Filter option: Select Fall Snapshot English Learners (EL) or Regular School Year English Learners (EL). Select students that will be included in the mapping using a Campus Filter, Quick Search, and/or Ad Hoc Filter. When searching for and selecting students to be included in a mapping, the different search options can be used in conjunction with each other. When students are added to the Selected Students list using one of the search options, other students can be added to the same list using a different search option. Students removed from the Selected Students list will display in the Search Results when another Search option is chosen. This section describes how to create a mapping for English Learners (EL) students using a Campus Filter. The fields displayed will vary depending on which fields are active for a school. Note that if a mapping was previously saved, the previously selected options will display. The process for creating Fall Snapshot and Regular School Year mappings for English Learners (EL) students is the same with the exception of how students are selected using the Search Criteria in the Campus Filter option. See the English Learners (EL) Students Campus Filter Editor table for further details. English Learners (EL) Campus Filter Editor Allows users to select EL students who have an EL Program Status = EL or Exited EL and that have an enrollment that overlaps the Fall Snapshot Count Date. The student's Enrollment Start Date must be on or before the Fall Snapshot Count Date. The student's Enrollment End Date must be blank or on or after the Fall Snapshot Count Date. If the student's EL Program Status = Exited EL, the Program Exit Date must be in the reporting year. The School Year Start and End Dates are used for the reporting year. If the School Year dates are blank, use 7/1/XX - 6/30/XX as the default. Students will not be included in the Search Results if the "Parents Declined" checkbox is checked on the Active EL Record. To search for and select students using the Campus Filter option: This section describes how to create a mapping for English Learners (EL) students using Quick Search. English Learners (EL) Quick Search Editor Allows the user to indicate if students that have an active enrollment as of today are included in the search. Options are Yes or No. To search for and select students using the Quick Search option: This section describes how to create a mapping for English Learners (EL) students using an Ad Hoc Filter. The process for creating Fall Snapshot and Regular School Year mappings for English Learners (EL) students using an Ad Hoc Filter is the same. English Learners (EL) Students Ad Hoc Filter Editor Allows the user to select a previously created Ad Hoc Filter to select students for the mapping. Users only have access to Ad Hoc Filters they own or that belong to a filter user group in which they are a member. Users can reference the CRDC - Ad Hoc Filters for Populating Category Mappings page for examples of Ad Hoc Filters that can be used. To search for and select students using the Ad Hoc Filter option: Select students that will be included in the mapping using a Campus Filter, Batch Add, and/or Ad Hoc Filter. When searching for and selecting students to be included in a mapping, the different search options can be used in conjunction with each other. When students are added to the Selected Students list using one of the search options, other students can be added to the same list using a different search option. Students removed from the Selected Students list will display in the Search Results when another Search option is chosen. This section describes how to create a mapping for Fall Snapshot Students Enrolled in EL Programs using a Campus Filter. The fields displayed will vary depending on which fields are active for a school. Note that if a mapping was previously saved, the previously selected options will display. Fall Snapshot Students Enrolled in EL Programs Campus Filter Editor Allows users to select EL students who have an EL Program Status = EL or Exited EL and that have an enrollment that overlaps the Fall Snapshot Count Date. The student's Enrollment Start Date must be on or before the Fall Snapshot Count Date. The student's Enrollment End Date must be blank or on or after the Fall Snapshot Count Date. If the student's EL Program Status = Exited EL, the Program Exit Date must be in the reporting year. The School Year Start and End Dates are used for the reporting year. If the School Year dates are blank, use 7/1/XX - 6/30/XX as the default. Students will not be included in the Search Results if the "Parents Declined" checkbox is checked on the Active EL Record. To search for and select students using the Campus Filter option: This section describes how to create a mapping for Fall Snapshot Students Enrolled in EL Programs using Quick Search. Fall Snapshot Students Enrolled in EL Programs Quick Search Fall Snapshot Students Enrolled in EL Programs Quick Search Editor Allows the user to indicate if students that have an active enrollment as of today are included in the search. Options are Yes or No. To search for and select students using the Quick Search option: This section describes how to create a mapping for Fall Snapshot EL Students Enrolled in EL Programs using an Ad Hoc Filter. Fall Snapshot Students Enrolled in EL Programs Ad Hoc Filter Editor Allows the user to select a previously created Ad Hoc Filter to select students for the mapping. Users only have access to Ad Hoc Filters they own or that belong to a filter user group in which they are a member. Users can reference the CRDC - Ad Hoc Filters for Populating Category Mappings page for examples of Ad Hoc Filters that can be used. To search for and select students using the Ad Hoc Filter option:
 CRDC Student Enrollment Mappings
To create Fall Snapshot IDEA Students Mappings: To create an IDEA Students mapping using a Campus Filter:
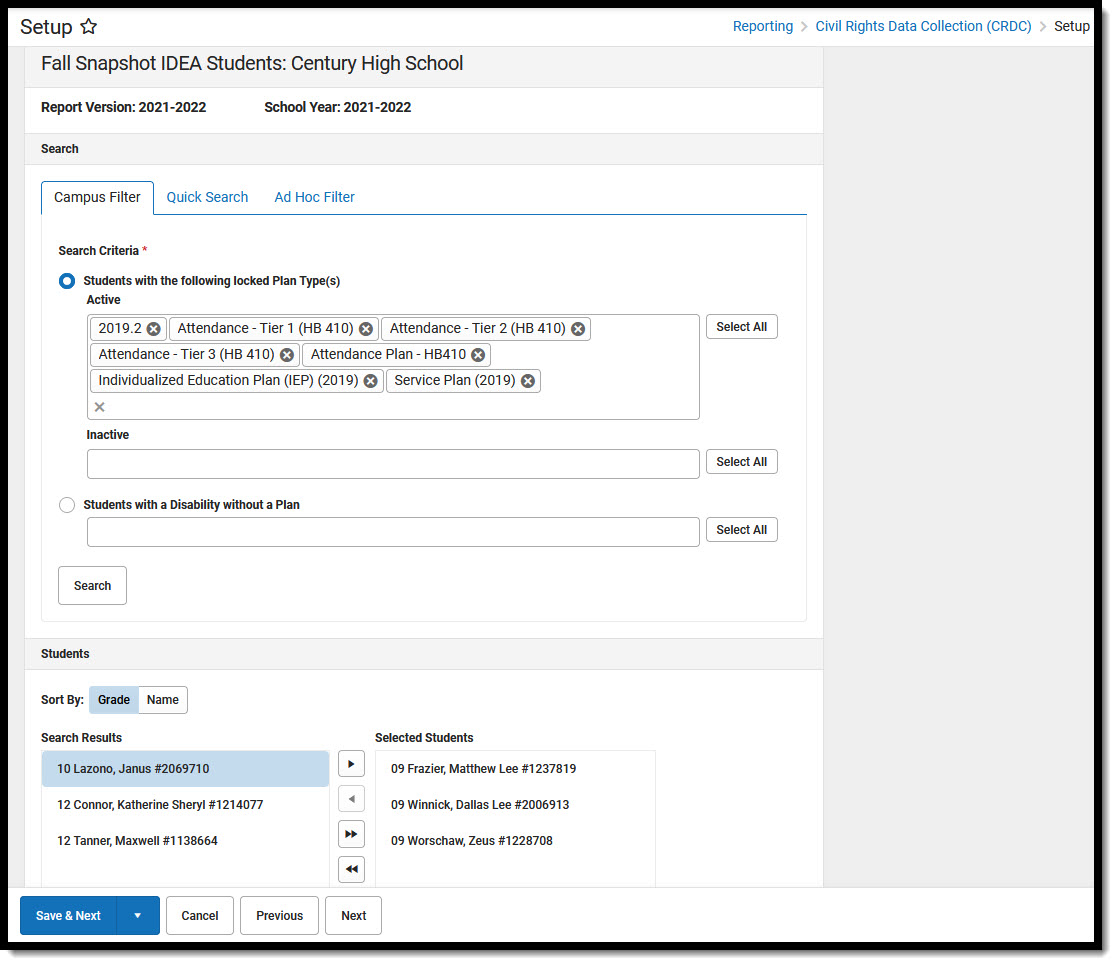 CRDC Idea Fall Snapshot Filter
Field Definition Fall Snapshot - Students with the following locked Plan Type(s) (Active or Inactive) Regular School Year - Students with the following locked Plan Type(s)
(Active or Inactive)Allows users to select IDEA students based on a locked Plan Type. A student with any Enrollment and Plan in the selected Plan Types report as long as the enrollment & plan occur anytime in the regular school year. The student's Enrollment Start Date & Plan Start Date must be on or before 6/30/xx of the reporting year. The student's Enrollment End Date & Plan End Date must be NULL or on or after 7/1/xx of the reporting year. The Plan must be locked for the student to display. If the plan is unlocked after the student is saved to a mapping, the student will remain. Students with a Disability without a plan Allows users to select IDEA students with a Primary Disability and without a Plan. Any student that has an overlapping enrollment with a Primary Disability in the droplist reports. A student does not need a plan to report. A student's Enrollment Start Date must be on or before the Fall Snapshot Count Date/Fall Snapshot IDEA Count Date Override. The Fall Snapshot IDEA Count Date Override Date is used if populated. The student's Enrollment End Date must be blank or on or after the Fall Snapshot Count Date/Fall Snapshot IDEA Count Date Override. The Fall Snapshot IDEA Count Date Override Date is used if populated. Search Searches the database for students that meet the selected criteria. Sort By: Grade / Name Sorts the Selected Students list by grade or by name. Search Results Lists students matching the search criteria. Details regarding a student can be viewed by hovering over the student's name. Students previously added to the Selected Students list are not shown in the Search Results. Selected Students Lists the students selected from the Search Results to be included in the mapping. Save & Next Saves the students in the Selected Students list and advances the user to the next category mapping Save Saves the students in the Selected Students list and returns the user to the Select a Category to Map screen. Previous Advances the user to the previous category mapping. When a user navigates away from a mapping, the system will remember the information previously entered for the mapping. Upon returning to the mapping, the user will be asked if they want to continue from where they previously left off. Next Advances the user to the next category mapping. When a user navigates away from a mapping, the system will remember the information previously entered for the mapping. Upon returning to the mapping, the user will be asked if they want to continue from where they previously left off. Cancel Selected students are not saved and the user is returned to the Select a Category to Map screen. To create an IDEA Students mapping using Quick Search:
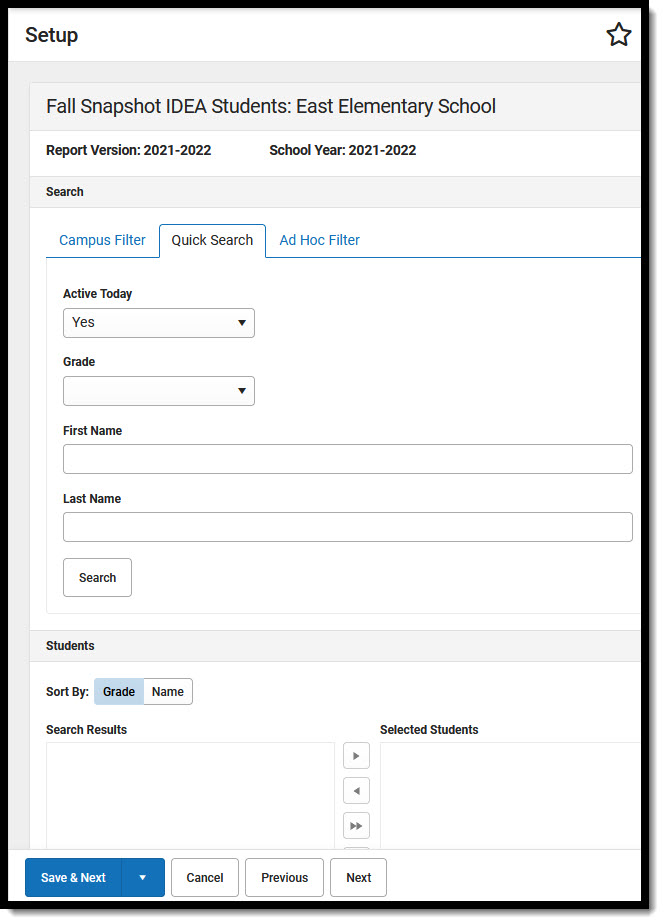 Fall Snapshot - IDEA Students Quick Search
Field Definition Active Today Grade Users can select a grade level to narrow search results. Only grade levels for the selected school are listed. First Name Users can enter a first name to narrow search results. Last Name Users can enter a last name to narrow search results. Search Searches the database for students that meet the selected criteria. Sort By: Grade / Name Sorts the Selected Students list by grade or by name. Search Results Lists students matching the search criteria. Details regarding a student can be viewed by hovering over the student's name.
Students previously added to the Selected Students list are not shown in the Search Results.Selected Students Lists the students selected from the Search Results to be included in the mapping. Save & Next Saves the students in the Selected Students list and advances the user to the next category mapping Save Saves the students in the Selected Students list and returns the user to the Select a Category to Map screen. Previous Advances the user to the previous category mapping. When a user navigates away from a mapping, the system will remember the information previously entered for the mapping. Upon returning to the mapping, the user will be asked if they want to continue from where they previously left off. Next Advances the user to the next category mapping. When a user navigates away from a mapping, the system will remember the information previously entered for the mapping. Upon returning to the mapping, the user will be asked if they want to continue from where they previously left off. Cancel Selected students are not saved and the user is returned to the Select a Category to Map screen. To create an IDEA Students mapping using an Ad Hoc Filter:
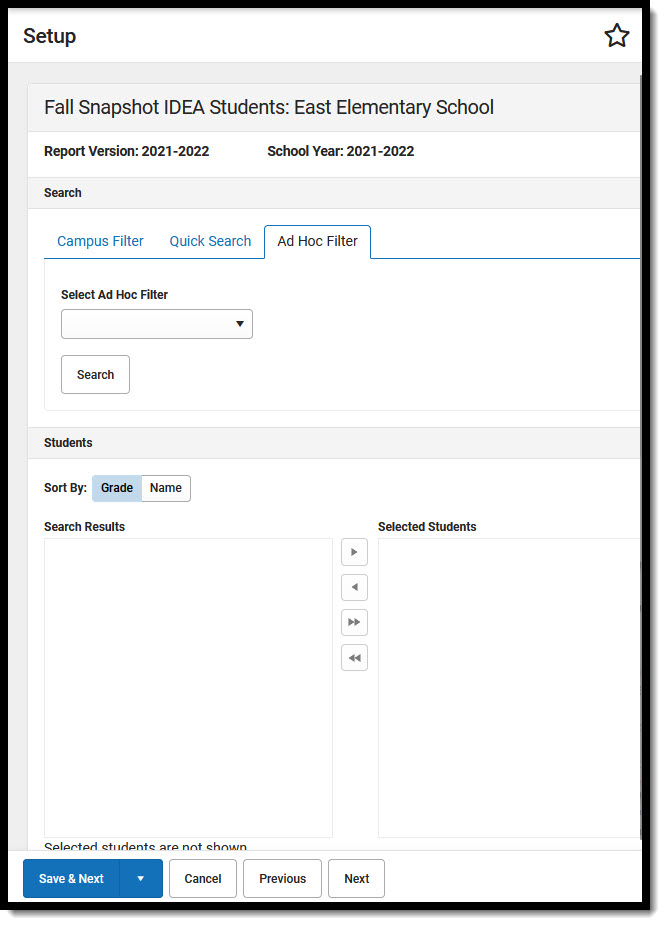 Fall Snapshot - IDEA Students Ad Hoc Filter
Field Definition Select Ad Hoc Filter Search Searches the database for students in the selected Ad Hoc Filter. Search Results Lists students matching the search criteria. Details regarding a student can be viewed by hovering over the student's name.
Students previously added to the Selected Students list are not shown in the Search Results.Sort By: Grade / Name Sorts the Selected Students list by grade or by name. Selected Students Lists the students selected from the Search Results to be included in the mapping. Save & Next Saves the students in the Selected Students list and advances the user to the next category mapping Save Saves the students in the Selected Students list and returns the user to the Select a Category to Map screen. Previous Advances the user to the previous category mapping. When a user navigates away from a mapping, the system will remember the information previously entered for the mapping. Upon returning to the mapping, the user will be asked if they want to continue from where they previously left off. Next Advances the user to the next category mapping. When a user navigates away from a mapping, the system will remember the information previously entered for the mapping. Upon returning to the mapping, the user will be asked if they want to continue from where they previously left off. Cancel Selected students are not saved and the user is returned to the Select a Category to Map screen. To create a 504 Students Mapping:
To create a 504 Students mapping using a Campus Filter:
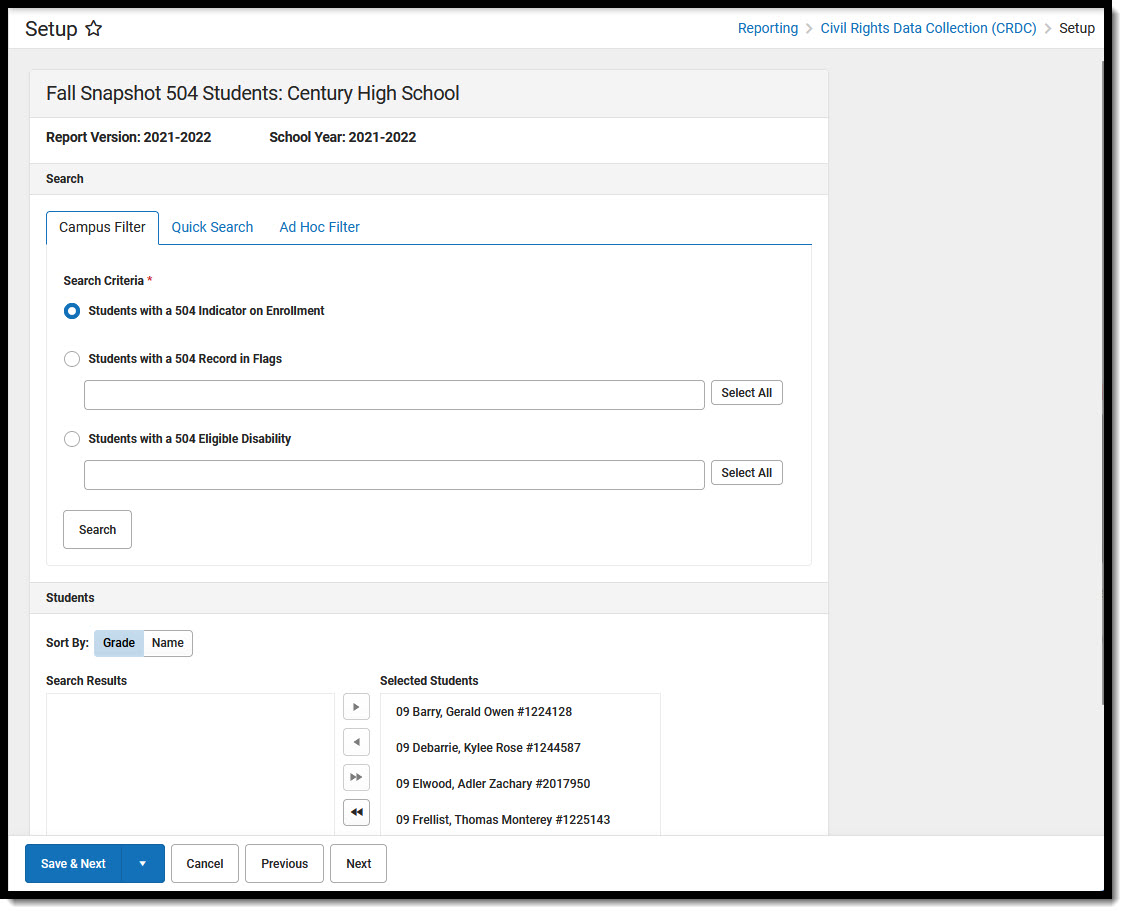 504 Students - Campus Filter
Field Definition Fall Snapshot - Students with a 504 Indicator on Enrollment Regular School Year - Students with a 504 Indicator on Enrollment Allows users to select students who have a section 504 indicator on their enrollment and the enrollment occurs anytime in the regular school year. Students that have an enrollment in the selected school and the section 504 field is checked report. Fall Snapshot - Students with a 504 Record in Flags Allows users to select 504 students with a selected 504 Flag. Students whose Flag Start Date and Enrollment Start Date are on or before the Fall Snapshot Count Date report. A student's Flag and Enrollment End Date must be blank or on or after the Fall Snapshot Count Date in order to report. Regular School Year - Students with a 504 Record in Flags Allows users to select 504 students with a selected 504 Flag and have an enrollment that occurs anytime in the regular school year. The student's Flag Start Date must be on or before 6/30/xx of the reporting school year. The student's Flag End Date must be NULL or after 7/01/xx of the reporting school year. Fall Snapshot -Students with a 504 Eligible Disability Allows users to select 504 students who have a Primary Disability on an IEP or Enrollment with a 504 Status. Students whose Enrollment Start Date and/or Plan Start Date is on or before the Fall Snapshot Count Date report. Student's whose Enrollment End Date and/or Plan End Date is blank or on or after the the Fall Snapshot Count Date report. Regular School Year -Students with a 504 Eligible Disability Allows users to select 504 students who have a Primary Disability on an IEP or Enrollment with a 504 Status. The student's Plan Start Date must be on or before 6/30/xx of the reporting school year. The student's Plan End Date must be NULL or after 7/01/xx of the reporting school year. Search Searches the database for students that meet the selected criteria. Sort By: Grade / Name Sorts the Selected Students list by grade or by name. Search Results Lists students matching the search criteria. Details regarding a student can be viewed by hovering over the student's name.
Students previously added to the Selected Students list are not shown in the Search Results.Selected Students Lists the students selected from the Search Results to be included in the mapping. Save & Next Saves the students in the Selected Students list and advances the user to the next category mapping Save Saves the students in the Selected Students list and returns the user to the Select a Category to Map screen. Previous Advances the user to the previous category mapping. When a user navigates away from a mapping, the system will remember the information previously entered for the mapping. Upon returning to the mapping, the user will be asked if they want to continue from where they previously left off. Next Advances the user to the next category mapping. When a user navigates away from a mapping, the system will remember the information previously entered for the mapping. Upon returning to the mapping, the user will be asked if they want to continue from where they previously left off. Cancel Selected students are not saved and the user is returned to the Select a Category to Map screen. To create a 504 Students mapping using Quick Search:
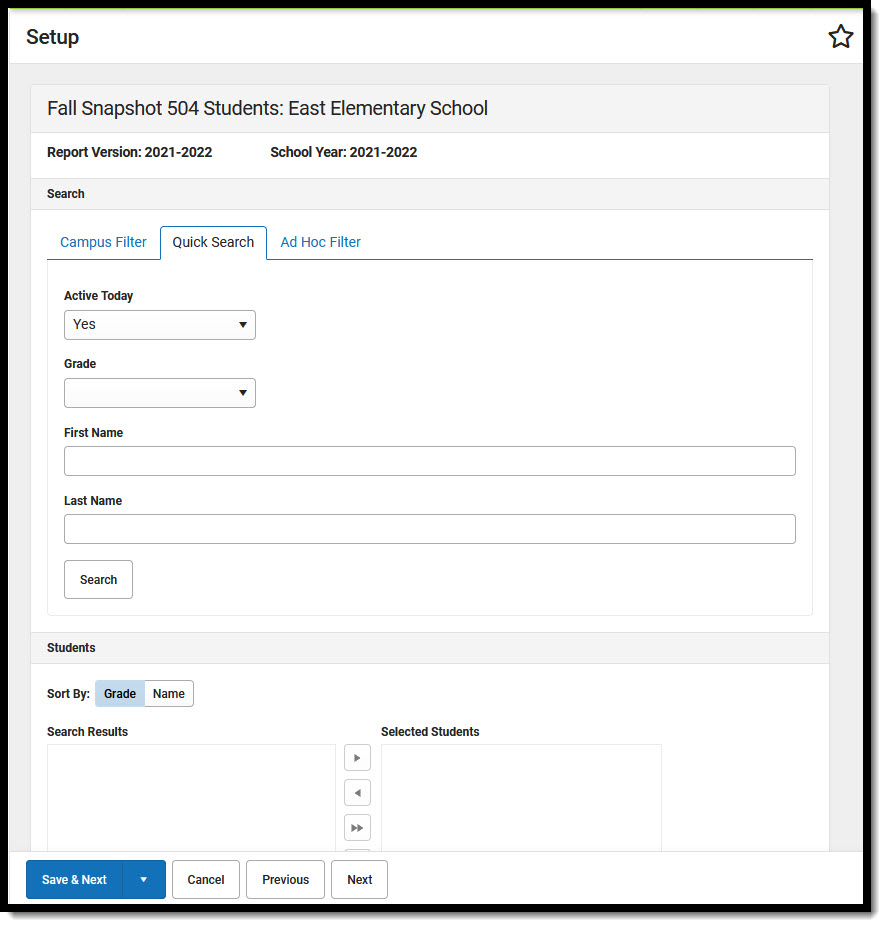 Fall Snapshot 504 Students - Quick Search
504 Students Quick Search Editor
Field Definition Active Today Grade Users can select a grade level to narrow search results. Only grade levels for the selected school are listed. First Name Users can enter a first name to narrow search results. Last Name Users can enter a last name to narrow search results. Search Searches the database for students that meet the selected criteria. Sort By: Grade / Name Sorts the Selected Students list by grade or by name. Search Results Lists students matching the search criteria. Details regarding a student can be viewed by hovering over the student's name.
Students previously added to the Selected Students list are not shown in the Search Results.Selected Students Lists the students selected from the Search Results to be included in the mapping. Save & Next Saves the students in the Selected Students list and advances the user to the next category mapping Save Saves the students in the Selected Students list and returns the user to the Select a Category to Map screen. Previous Advances the user to the previous category mapping. When a user navigates away from a mapping, the system will remember the information previously entered for the mapping. Upon returning to the mapping, the user will be asked if they want to continue from where they previously left off. Next Advances the user to the next category mapping. When a user navigates away from a mapping, the system will remember the information previously entered for the mapping. Upon returning to the mapping, the user will be asked if they want to continue from where they previously left off. Cancel Selected students are not saved and the user is returned to the Select a Category to Map screen. To create a 504 Students mapping using an Ad Hoc Filter:
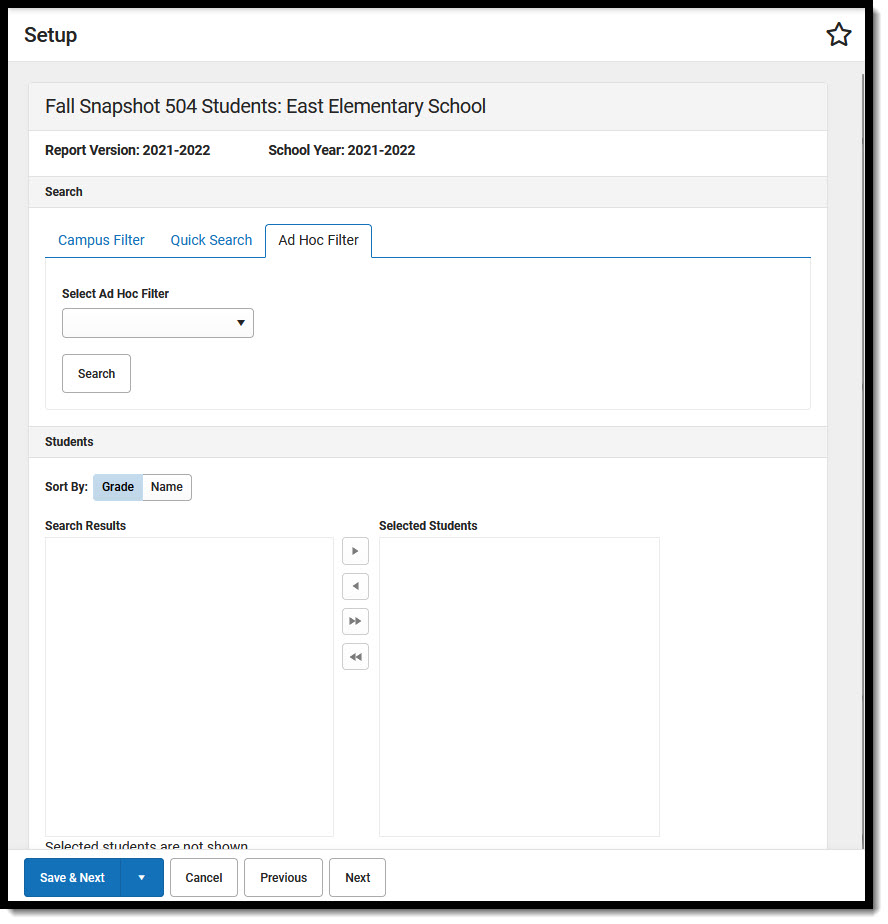 Fall Snapshot 504 Students - Ad Hoc Filter
Field Definition Select Ad Hoc Filter Search Searches the database for students in the selected Ad Hoc Filter. Sort By: Grade / Name Sorts the Selected Students list by grade or by name. Search Results Lists students matching the search criteria. Details regarding a student can be viewed by hovering over the student's name.
Students previously added to the Selected Students list are not shown in the Search Results.Selected Students Lists the students selected from the Search Results to be included in the mapping. Save & Next Saves the students in the Selected Students list and advances the user to the next category mapping Save Saves the students in the Selected Students list and returns the user to the Select a Category to Map screen. Previous Advances the user to the previous category mapping. When a user navigates away from a mapping, the system will remember the information previously entered for the mapping. Upon returning to the mapping, the user will be asked if they want to continue from where they previously left off. Next Advances the user to the next category mapping. When a user navigates away from a mapping, the system will remember the information previously entered for the mapping. Upon returning to the mapping, the user will be asked if they want to continue from where they previously left off. Cancel Selected students are not saved and the user is returned to the Select a Category to Map screen. To map English Learners (EL):
To create an English Learners (EL) mapping using a Campus Filter:
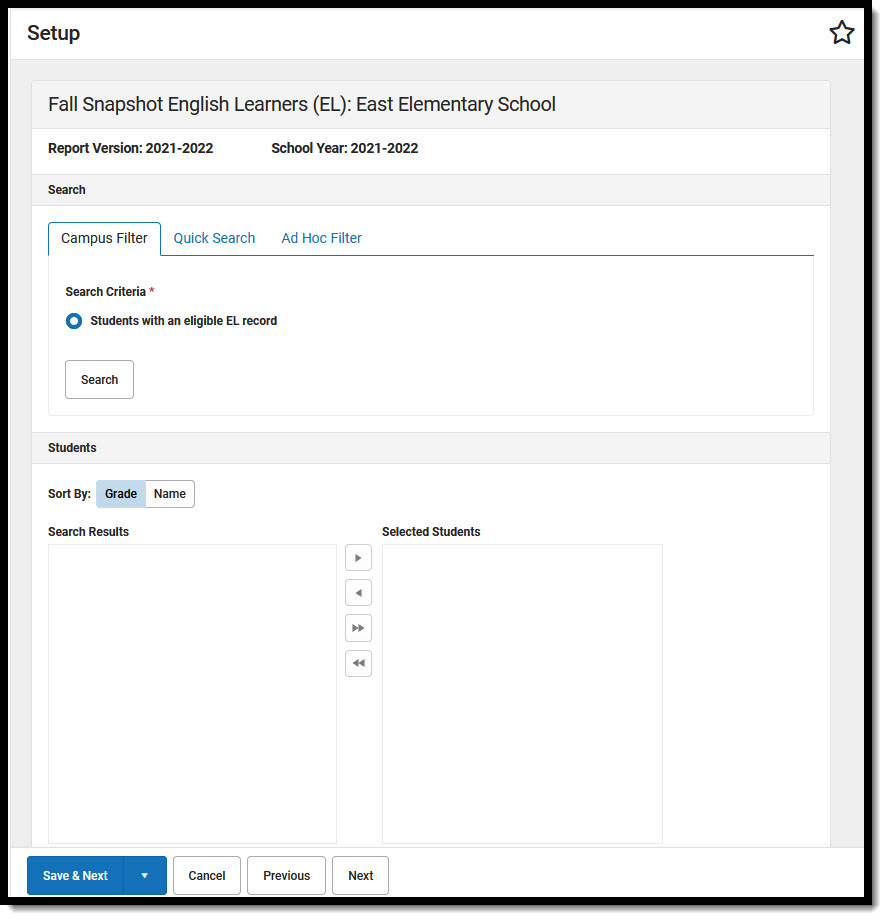 Fall Snapshot English Learners (EL) Campus Filter
Field Definition Fall Snapshot - Students with an eligible EL record Regular School Year - Students with an eligible EL record Allows users to select EL students who have an EL Program Status = EL or Exited EL and that have an enrollment that occurs anytime in the regular school year. The student's Enrollment Start Date must be on or before the last day of the school year and the student's Enrollment End Date must be NULL or on or after the first day of the school year. If the student's EL Program Status = Exited EL, the Program Exit Date must be in the reporting year. The School Year Start and End Dates are used for the reporting year. If the School Year dates are blank, use 7/1/XX - 6/30/XX as the default. Students will not be included in the Search Results if the "Parents Declined" checkbox is checked on the Active EL Record. Search Searches the database for students that meet the selected criteria. Sort By: Grade / Name Sorts the Selected Students list by grade or by name. Search Results Lists students matching the search criteria. Details regarding a student can be viewed by hovering over the student's name.
Students previously added to the Selected Students list are not shown in the Search Results.Selected Students Lists the students selected from the Search Results to be included in the mapping. Save & Next Saves the students in the Selected Students list and advances the user to the next category mapping Save Saves the students in the Selected Students list and returns the user to the Select a Category to Map screen. Previous Advances the user to the previous category mapping. When a user navigates away from a mapping, the system will remember the information previously entered for the mapping. Upon returning to the mapping, the user will be asked if they want to continue from where they previously left off. Next Advances the user to the next category mapping. When a user navigates away from a mapping, the system will remember the information previously entered for the mapping. Upon returning to the mapping, the user will be asked if they want to continue from where they previously left off. Cancel Selected students are not saved and the user is returned to the Select a Category to Map screen. To create an English Learners (EL) mapping using Quick Search:
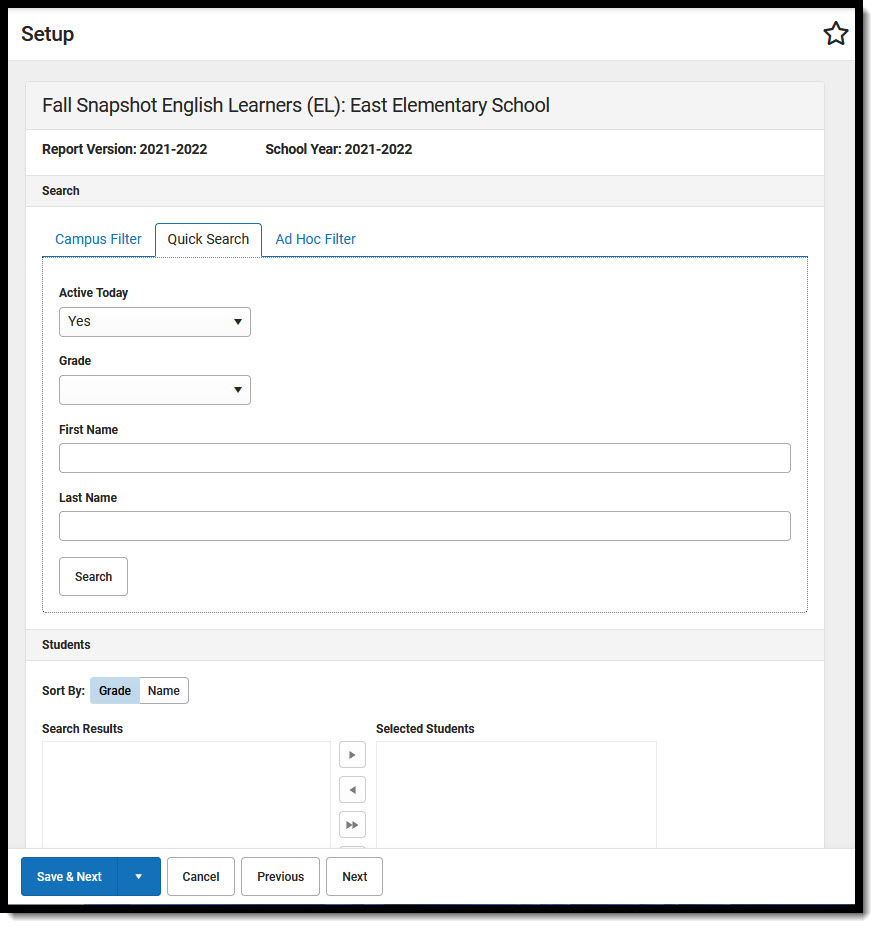 Fall Snapshot English Learners (EL) Quick Search
Field Definition Active Today Grade Users can select a grade level to narrow search results. Only grade levels for the selected school are listed. First Name Users can enter a first name to narrow search results. Last Name Users can enter a last name to narrow search results. Search Searches the database for students that meet the selected criteria. Sort By: Grade / Name Sorts the Selected Students list by grade or by name. Search Results Lists students matching the search criteria. Details regarding a student can be viewed by hovering over the student's name.
Students previously added to the Selected Students list are not shown in the Search Results.Selected Students Lists the students selected from the Search Results to be included in the mapping. Save & Next Saves the students in the Selected Students list and advances the user to the next category mapping Save Saves the students in the Selected Students list and returns the user to the Select a Category to Map screen. Previous Advances the user to the previous category mapping. When a user navigates away from a mapping, the system will remember the information previously entered for the mapping. Upon returning to the mapping, the user will be asked if they want to continue from where they previously left off. Next Advances the user to the next category mapping. When a user navigates away from a mapping, the system will remember the information previously entered for the mapping. Upon returning to the mapping, the user will be asked if they want to continue from where they previously left off. Cancel Selected students are not saved and the user is returned to the Select a Category to Map screen. To create an English Learners (EL) mapping using an Ad Hoc Filter:
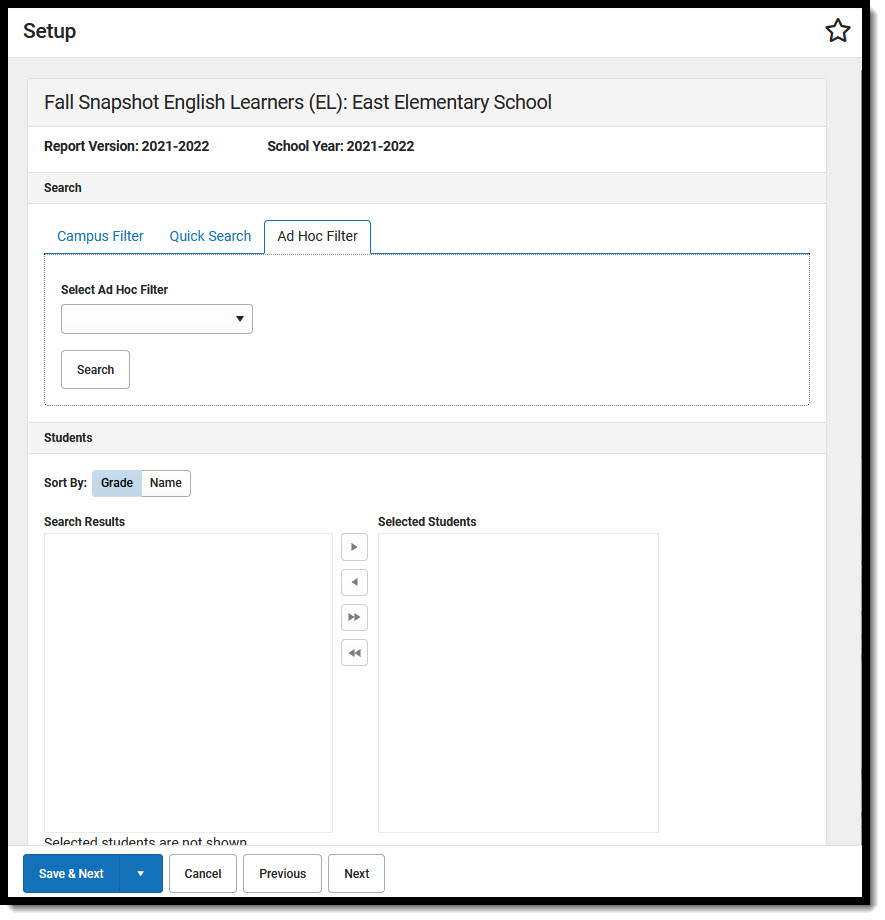 Fall Snapshot English Learners (EL) Ad Hoc Filter
Field Definition Select Ad Hoc Filter Search Searches the database for students in the selected Ad Hoc Filter. Sort By: Grade / Name Sorts the Selected Students list by grade or by name. Search Results Lists students matching the search criteria. Details regarding a student can be viewed by hovering over the student's name.
Students previously added to the Selected Students list are not shown in the Search Results.Selected Students Lists the students selected from the Search Results to be included in the mapping. Save & Next Saves the students in the Selected Students list and advances the user to the next category mapping Save Saves the students in the Selected Students list and returns the user to the Select a Category to Map screen. Previous Advances the user to the previous category mapping. When a user navigates away from a mapping, the system will remember the information previously entered for the mapping. Upon returning to the mapping, the user will be asked if they want to continue from where they previously left off. Next Advances the user to the next category mapping. When a user navigates away from a mapping, the system will remember the information previously entered for the mapping. Upon returning to the mapping, the user will be asked if they want to continue from where they previously left off. Cancel Selected students are not saved and the user is returned to the Select a Category to Map screen. To map Fall Snapshot Students Enrolled in EL Programs:
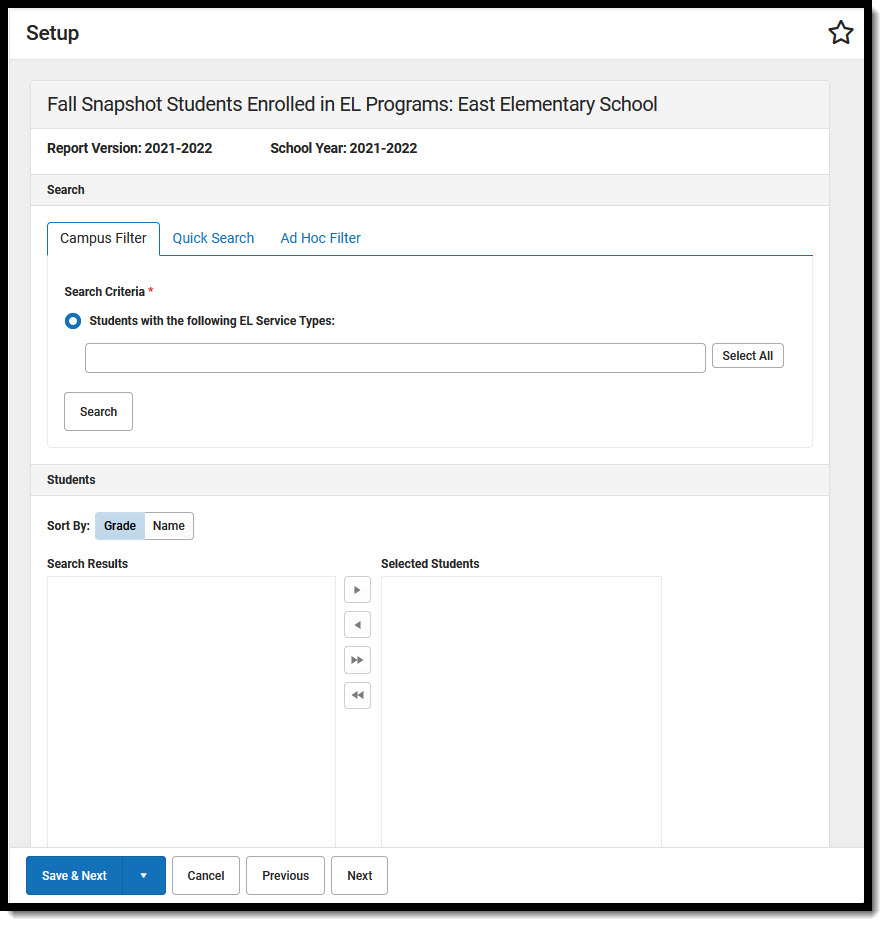
To create a Fall Snapshot Students Enrolled in EL Programs mapping using a Campus Filter:
 Fall Snapshot Students Enrolled in EL Programs - Campus Filter
Field Definition Students with the following EL Service Types Search Searches the database for students that meet the selected criteria. Sort By: Grade / Name Sorts the Selected Students list by grade or by name. Search Results Lists students matching the search criteria. Details regarding a student can be viewed by hovering over the student's name.
Students previously added to the Selected Students list are not shown in the Search Results.Selected Students Lists the students selected from the Search Results to be included in the mapping. Save & Next Saves the students in the Selected Students list and advances the user to the next category mapping Save Saves the students in the Selected Students list and returns the user to the Select a Category to Map screen. Previous Advances the user to the previous category mapping. When a user navigates away from a mapping, the system will remember the information previously entered for the mapping. Upon returning to the mapping, the user will be asked if they want to continue from where they previously left off. Next Advances the user to the next category mapping. When a user navigates away from a mapping, the system will remember the information previously entered for the mapping. Upon returning to the mapping, the user will be asked if they want to continue from where they previously left off. Cancel Selected students are not saved and the user is returned to the Select a Category to Map screen. To create a Fall Snapshot Students Enrolled in EL Programs mapping using Quick Search:
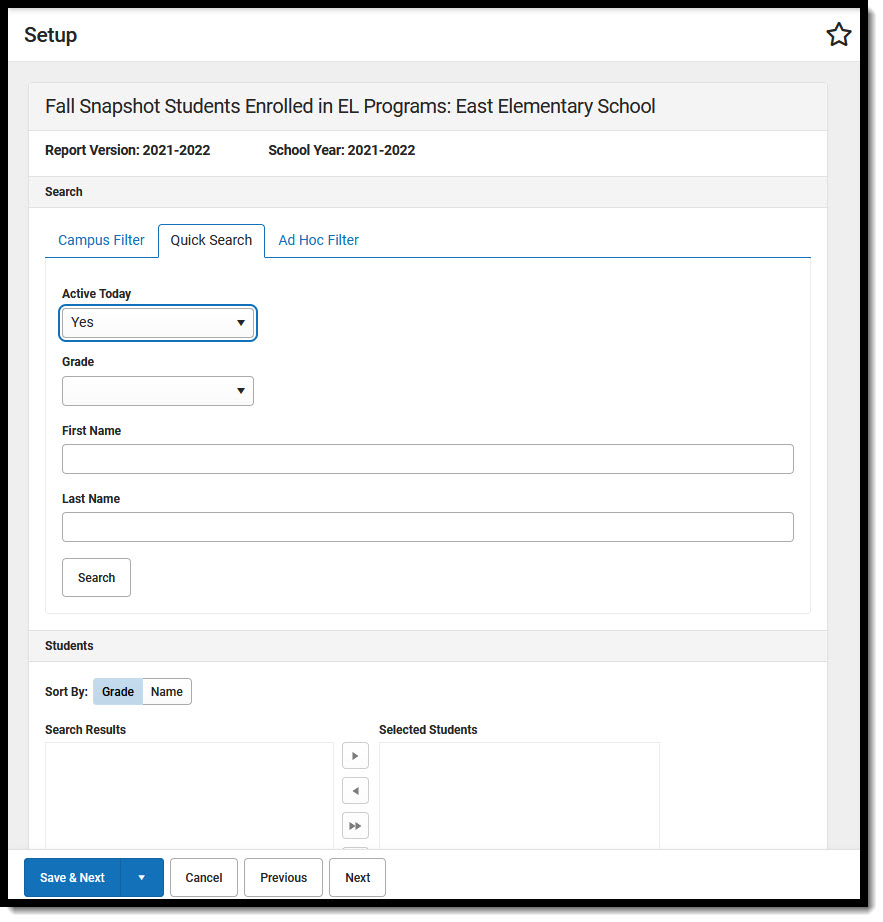 Fall Snapshot Students Enrolled in EL Programs - Quick Search
Field Definition Active Today Grade Users can select a grade level to narrow search results. Only grade levels for the selected school are listed. First Name Users can enter a first name to narrow search results. Last Name Users can enter a last name to narrow search results. Search Searches the database for students that meet the selected criteria. Sort By: Grade / Name Sorts the Selected Students list by grade or by name. Search Results Lists students matching the search criteria. Details regarding a student can be viewed by hovering over the student's name.
Students previously added to the Selected Students list are not shown in the Search Results.Selected Students Lists the students selected from the Search Results to be included in the mapping. Save & Next Saves the students in the Selected Students list and advances the user to the next category mapping Save Saves the students in the Selected Students list and returns the user to the Select a Category to Map screen. Previous Advances the user to the previous category mapping. When a user navigates away from a mapping, the system will remember the information previously entered for the mapping. Upon returning to the mapping, the user will be asked if they want to continue from where they previously left off. Next Advances the user to the next category mapping. When a user navigates away from a mapping, the system will remember the information previously entered for the mapping. Upon returning to the mapping, the user will be asked if they want to continue from where they previously left off. Cancel Selected students are not saved and the user is returned to the Select a Category to Map screen. To create a Fall Snapshot EL Students Enrolled in EL Programs mapping using an Ad Hoc Filter:
 Fall Snapshot Students Enrolled in EL Programs - Ad Hoc Filter
Field Definition Select Ad Hoc Filter Search Searches the database for students in the selected Ad Hoc Filter. Sort By: Grade / Name Sorts the Selected Students list by grade or by name. Search Results Lists students matching the search criteria. Details regarding a student can be viewed by hovering over the student's name.
Students previously added to the Selected Students list are not shown in the Search Results.Selected Students Lists the students selected from the Search Results to be included in the mapping. Save & Next Saves the students in the Selected Students list and advances the user to the next category mapping Save Saves the students in the Selected Students list and returns the user to the Select a Category to Map screen. Previous Advances the user to the previous category mapping. When a user navigates away from a mapping, the system will remember the information previously entered for the mapping. Upon returning to the mapping, the user will be asked if they want to continue from where they previously left off. Next Advances the user to the next category mapping. When a user navigates away from a mapping, the system will remember the information previously entered for the mapping. Upon returning to the mapping, the user will be asked if they want to continue from where they previously left off. Cancel Selected students are not saved and the user is returned to the Select a Category to Map screen.
To create Course Mappings:
The courses displayed depend on the school selected and the grade level mappings. When searching for and selecting courses to be included in a mapping, the different search options can be used in conjunction with each other. When courses are added to the Selected Students list using one of the search options, other courses can be added to the same list using a different search option. Courses removed from the Selected Courses list will display in the Search Results when another Search option is chosen. Only courses marked as Active display in the Search Results. To create a Courses mapping using a Campus Filter: This section describes how to create a Courses mapping using a Campus Filter. Courses Mapping Campus Filter Editor Allows the user to search for courses by course number. Wild cards can be used to search for courses within this field. To search for and select courses using the Campus Filter option: This section describes how to create a Courses mapping using Quick Search. Courses Mapping Quick Search Editor Lists courses matching the search criteria. Courses previously added to the Selected Courses list are not shown in the Search Results. To search for and select courses using the Quick Search option: This section describes how to create a Courses mapping using an Ad Hoc Filter:. Courses Mapping Ad Hoc Filter Editor Allows the user to select an Ad Hoc filter to search for courses. Lists courses matching the search criteria. Courses previously added to the Selected Courses list are not shown in the Search Results. To search for and select courses using the Ad Hoc Filter option: This section describes how to set Course Schedule Options. Course Schedule Options Editor Indicates if the set of courses is on a Full Year, Block Schedule, or Trimester schedule. This field is required. Opens a new screen that allows users to exclude sections from the course count totals. The step is not required for most districts. A section will be counted as a course offering based on the earliest Term selected in the Section Schedule Placement that overlaps with a Course Schedule Count Date. Check the Section Exclude box for any section that should be excluded from the course offering totals. Advanced Schedule Options are not available at the District level. To set the Course Schedule Options: This section describes how to set Passing Score options. Passing Score Options Editor Allows the user to select the grading tasks that are used to define a passing score. Opens a new screen that allows users to group courses together to be considered passing. This step is not required for most districts. A student will be considered passing if they pass one or more of the courses selected in this category. A passing score is defined by either receiving a passing score on a grading task or reaching a minimum number of transcript credits. Only use this tool if a student must pass more than one course in the same school year in order to be considered passing. Group courses together in the Course Requirement box to define course dependencies. Only set the Total # of Credits if it is different than the amount defined under Passing Score Options on the previous page To set the Passing Score Options:
 Course Mappings
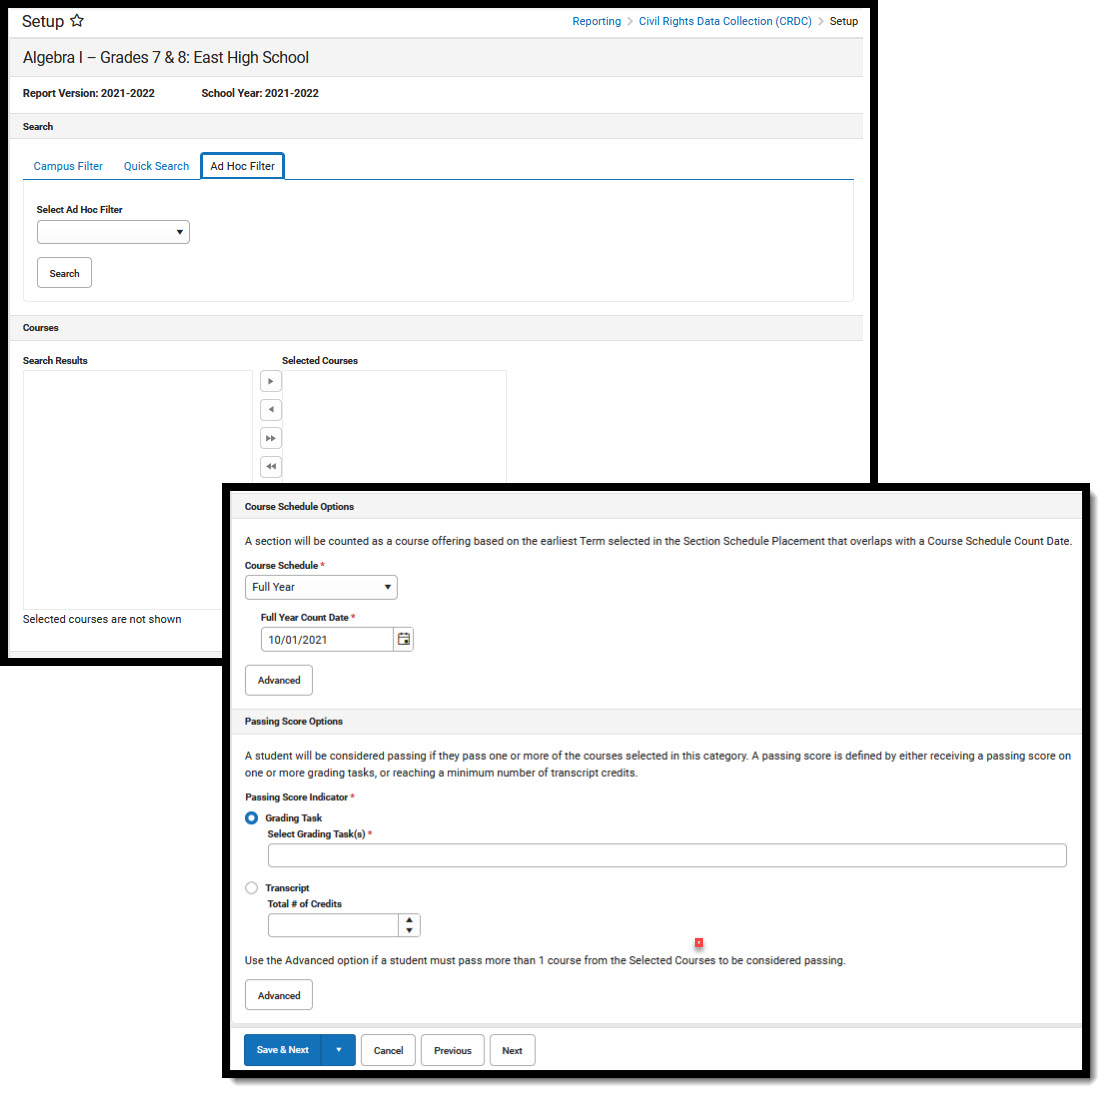 Course Mappings - Campus Filter
Field Definition Course Number State Code Allows the user to search for courses by state code. Wild cards can be used to search for state codes within this field. SCED Subject Area Allows the user to search for courses by SCED Subject Area. Only one value can be selected for this field. SCED Course Identifiers Allows the user to search for courses by SCED Course Identifiers. Multiple values can be selected for this field. Credit Type Allows the user to search for courses by credit type. Only one value can be selected for this field. Search Searches the database for courses that meet the selected criteria. Search Results Lists courses matching the search criteria. Courses previously added to the Selected Courses list are not shown in the Search Results. Selected Courses Lists the courses selected from the Search Results to be included in the mapping. Save & Next Saves the students in the Selected Students list and advances the user to the next category mapping Save Saves the students in the Selected Students list and returns the user to the Select a Category to Map screen. Previous Advances the user to the previous category mapping. When a user navigates away from a mapping, the system will remember the information previously entered for the mapping. Upon returning to the mapping, the user will be asked if they want to continue from where they previously left off. Next Advances the user to the next category mapping. When a user navigates away from a mapping, the system will remember the information previously entered for the mapping. Upon returning to the mapping, the user will be asked if they want to continue from where they previously left off. Cancel Selected students are not saved and the user is returned to the Select a Category to Map screen. To create a Courses mapping using Quick Search:
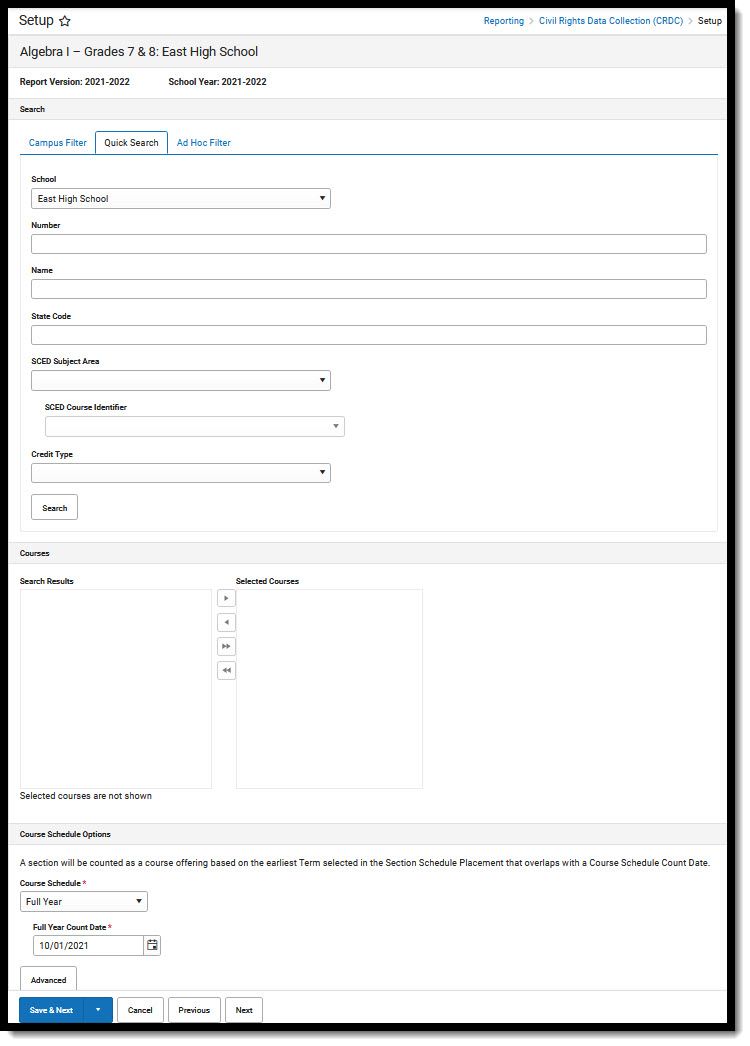 Course Mapping - Quick Search
Field Definition School Allows the user to search for courses within another school in order to report courses and students that were taken at a different school within the district. Number Allows the user to search for courses by course number. Name Allows the user to search for courses by course name. State Code Allows the user to search for courses by state code. SCED Subject Area Allows the user to search for courses by SCED subject area. SCED Course Identifier Allows the user to search for courses by SCED course identifier. Credit Type Allows the user to search for courses by credit type. Search Searches the database for courses that meet the selected criteria. Search Results Selected Courses Lists the course selected from the Search Results to be included in the mapping. Save & Next Saves the students in the Selected Students list and advances the user to the next category mapping Save Saves the students in the Selected Students list and returns the user to the Select a Category to Map screen. Previous Advances the user to the previous category mapping. When a user navigates away from a mapping, the system will remember the information previously entered for the mapping. Upon returning to the mapping, the user will be asked if they want to continue from where they previously left off. Next Advances the user to the next category mapping. When a user navigates away from a mapping, the system will remember the information previously entered for the mapping. Upon returning to the mapping, the user will be asked if they want to continue from where they previously left off. Cancel Selected students are not saved and the user is returned to the Select a Category to Map screen. To create a Courses mapping using an Ad Hoc Filter:
 Course Mapping - Ad Hoc Filter
Field Definition Select Ad Hoc Filter Search Searches the database for courses that meet the selected criteria. Search Results Selected Courses Lists the course selected from the Search Results to be included in the mapping. Save & Next Saves the students in the Selected Students list and advances the user to the next category mapping Save Saves the students in the Selected Students list and returns the user to the Select a Category to Map screen. Previous Advances the user to the previous category mapping. When a user navigates away from a mapping, the system will remember the information previously entered for the mapping. Upon returning to the mapping, the user will be asked if they want to continue from where they previously left off. Next Advances the user to the next category mapping. When a user navigates away from a mapping, the system will remember the information previously entered for the mapping. Upon returning to the mapping, the user will be asked if they want to continue from where they previously left off. Cancel Selected students are not saved and the user is returned to the Select a Category to Map screen. Set Course Schedule Options:
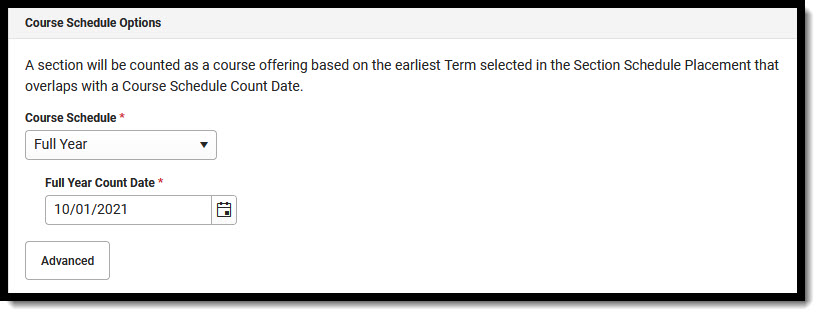 Course Schedule Options
Field Definition Course Schedule Full Year Count Date Displays the Non-Idea Effective Date but can be changed to a different date. When Block or Trimester is selected, additional count dates must be entered. Advanced 
Passing Score Options (For Algebra courses only)
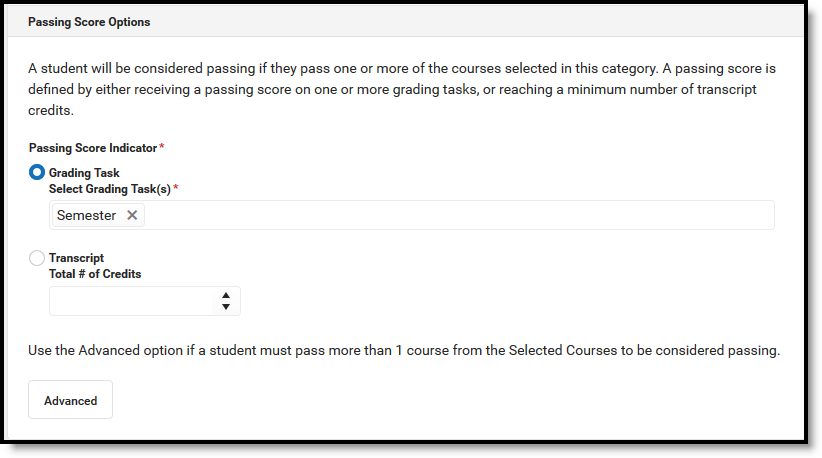 Passing Score Options
Field Definition Passing Score Indicator: Grading Task Passing Score Indicator: Transcript: Allows the user to define the total number of credits the student must receive in order to pass the course category. Advanced 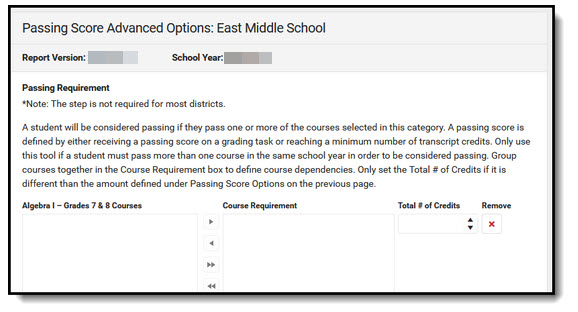
Appendix A - Grade Level/Category Alignment
Category Grade Level School Characteristics Grade Levels All Student Enrollment Fall Snapshot Idea Students All Fall Snapshot 504 Students All Fall Snapshot EL Students All Fall Snapshot Students Enrolled in EL Services All Courses Algebra I - Grades 7 & 8 Grade 7 or 8 Algebra I - High School Grade 9 or Higher Algebra II Courses Grade 9 or Higher Geometry - Grade 8 Grade 8 Geometry - High School Grade 9 or Higher Advanced Mathematics Courses Grade 9 or Higher Calculus Courses Grade 9 or Higher Biology Courses Grade 9 or Higher Chemistry Courses Grade 9 or Higher Physics Courses Grade 9 or Higher Computer Science Grade 9 or Higher Data Science Grade 9 or Higher
