The Scanning toolset is part of the Campus Workflow Suite.
It is recommended to have a webcam with auto-focus at close range if you plan to use it as a scanner. Webcams without this feature may have trouble reading barcodes.
The cursor must be in the entry box before scanning a barcode for the scanner to properly work. If the cursor is not in the box, the scanner cannot copy/paste the number into the box, and the student is not scanned in correctly.
Tool Search: Custom Scanners
System administrators can create custom scanning locations with the Custom Scanners tool, such as a computer lab, study hall, library, etc.
 Custom Scanner Tools
Create New Custom Scanner
Click New to create a new custom scanner location. The Custom Scanner Tab Detail displays.
 Custom Scanner Settings
Custom Scanner Setting Fields
| Field | Description |
|---|---|
Name Required | Enter a Name for the scanner being added. The Name can only contain letters, numbers, and spaces. This field is limited to 27 characters. |
| Enable Sign Outs | Mark the Enable Sign Outs option to allow students the ability to check out from the custom scanning location. Leave this option unmarked if students should be allowed to only sign in at the location. |
| Run as a kiosk | Mark the Run as a Kiosk option if the scanner should function as a Kiosk. Leave the option unmarked to use the device as a scanner only. |
| Run with room selection | To enable room selection for the device, mark the Run with room selection option. This allows the user to specify a specific room when launching the scanner. The selected room is recorded on the student's scans. Leave this option unmarked if room selection is not necessary. When this option is selected, the scanner's first screen requires the user to select a Room.  Scanner with Run with Room Selected Enabled |
| Enable Confirmation Page | Mark the Enable Confirmation Page option to require staff to confirm student sign-in. When a student signs in to the custom scanning location, a screen displays with the student's name and grade. The staff member must press Confirm to continue the sign-in. Leave this option unmarked if a confirmation is not needed. This page can be printed and used as a hall pass if a printer is set up. See Printer Setup for additional information.  Scanner with Confirmation Enabled Scanner with Confirmation EnabledNOTE: This option cannot be used if the scanner is set to Run as a Kiosk. |
| Use Ad Hoc Filter | To allow specific students to use this scanner for sign-in, mark the Use Ad Hoc Filter option. Users then choose the Ad Hoc Filter they'd like to use when launching the scanner. Leave this option unmarked to allow anyone to use the scanner for sign-in. When this option is selected, the scanner's first screen requires the user to select an Ad Hoc Filter.  Scanner with Use Ad Hoc Filter Enabled NOTE: This option cannot be used if the scanner is set to Run as a Kiosk. |
| Display Current Class | Mark the Display Current Class option to display the student's name, grade, personID, and current schedule on the confirmation screen. Leave this option unmarked if the student's schedule should not display. When this option is selected, the student's current and next class information displays upon check-in. 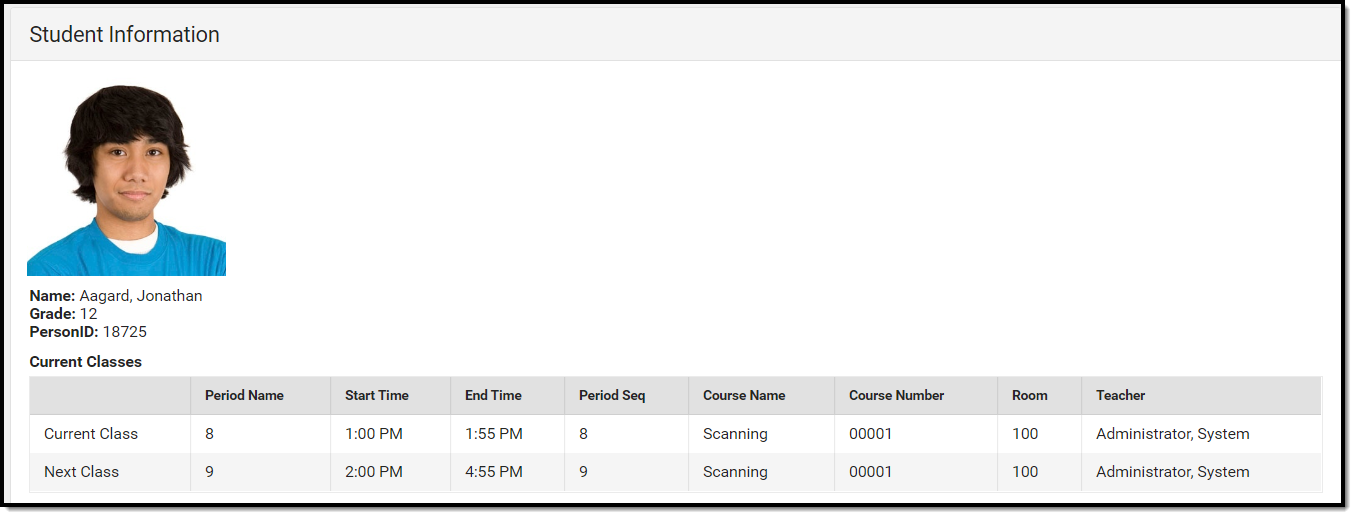 Scanned in Student Current and Next Class Display NOTE: The Enable Confirmation Page option MUST also be enabled for the Current Class information to display. |
| Remove calendar restrictions for scan | To enable scanning for students across multiple schools at the same custom scanner, mark the Remove calendar restrictions for scan option. This option is often used for school events that include students from multiple schools. Leave this option unmarked to limit scanning on this device to the selected school/calendar. NOTE: This option cannot be used if Ad Hoc Filters and Enable Confirmation Page options are enabled. |
| Capacity | Use the Capacity setting to designate the scanner as a Capacity Location. Setting a Capacity for the scanner limits the number of students who can be checked in to this location OR have a hall pass to this location at the same time. NOTE: For a Capacity Location scanner to properly work, be sure to mark the following options: Enable Sign Outs and Remove calendar restrictions for scan. Users MUST ALSO set a Linked School. NOTE: If the location is at capacity when a student scans into the Custom Scanner (without a Hall Pass), they are allowed in. The capacity shows it is overloaded, but the student is still able to scan in. |
| Linked Hall Pass | If desired, select a Linked Hall Pass. This links the selected hall pass type to this location. Linked hall passes count toward the location's capacity and appear on the Capacity Dashboard. NOTE: Hall Pass Types can only be linked to one location at a time. |
| Linked School | Location Capacity Scanners must be linked to a school. Use the Linked School field to select the school to which to link the scanner. This location shows up on the Capacity Dashboard only for the linked school. |
| Save/Cancel | Press Save to save the changes or Cancel to exit without saving the changes. |
NOTE: When creating new scanners or altering existing scanners, users MUST log out and then log back in to insure new scanners and scanner modifications are recognized. See Custom Scanning Tools for additional information.
Edit or Delete Existing Custom Scanners
After a custom scanner has been created, it can be edited or deleted. Click on the custom scanner record in System Administration to change existing data or click Delete to remove the custom scanner.
