Tool Search: Goal Monitoring
The Special Ed Goal Monitoring tool documents the student's progress toward their special education goals and objectives. Once a goal/objective record is created, users can add individual entries to track the student's progress towards the goal/objective or document an intervention change.
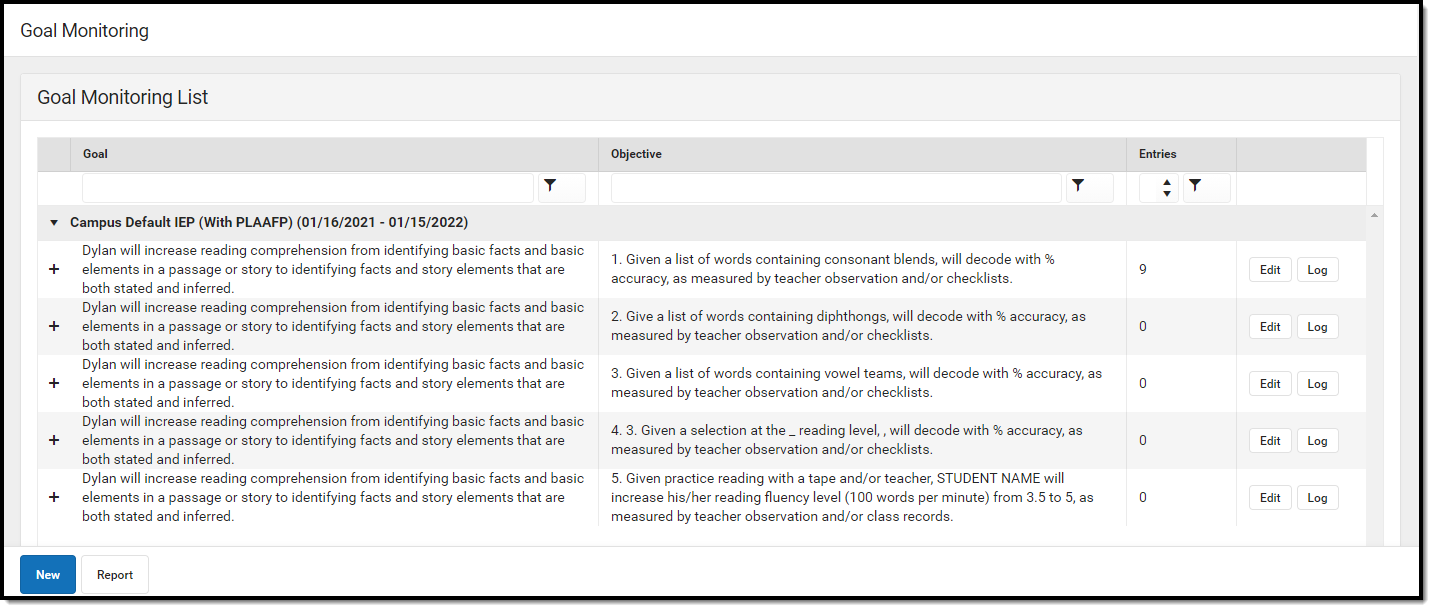 Image 1: Goal Monitoring List
See the Special Ed Goal Monitoring Tool Rights article for information on tool rights.
The table can be searched by entering text into the Goal and/or Objective text boxes or entering a value in the Entries number box. Click the filter icon for additional filtering options. Click the column headers to sort the table.
| Column | Description |
|---|---|
| + / - Icons | Expands or collapses the Type of Data and Data Recorded as information for the Goal/Objective. |
|
Goal |
The Goals that were set up by the user under Goal Monitoring. |
| Objective | The Objectives associated to the goal. |
| Entries | The numerical total of how many individual data entries were made within Goal Monitoring for the combined goals and objectives |
Edit Button |
Allows the user to change the Goal/Objective record if no entries have been associated to it. |
Log Button |
Allows the user to add entries and/or intervention changes. See the Goal Monitoring Log section for additional information. |
Click the New button to create a new Goal Objective record or Report to generate a graph of existing data. See the Goal Monitoring Report Options section for additional information.
Logic
- The goal/objective record can only be deleted if there are no entries associated with the record.
- The Goal Monitoring detail fields can only be edited after selection and saved when no individual entries are associated with this record.
- Only one combination of the specific goal and objective can be created. When a user attempts to create the same goal and objective combination, a warning message displays, "That Goal / Objective combination was already used."
Goal Monitoring Detail
To create a new Goal/Objective record, click New. The Goal Monitoring Detail screen displays.
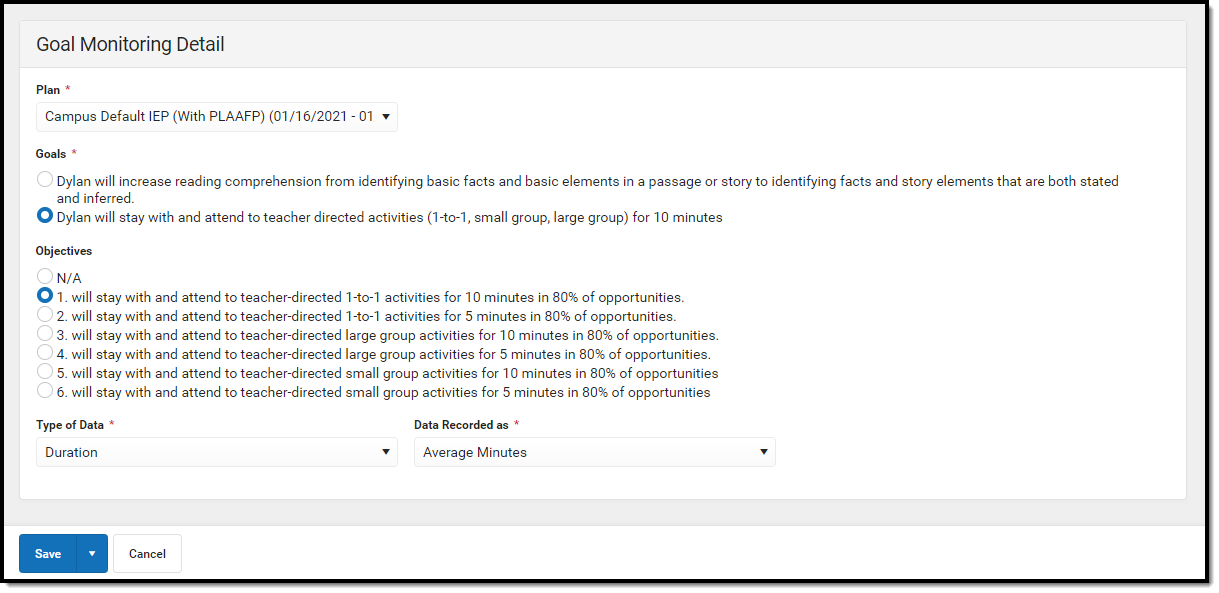 Image 2: Goal Monitoring Detail
Goal Monitoring Log
Once the user creates a Goal Monitoring record, an entry can be created. Click the Log button on the Goal Monitoring List screen. The Goal Monitoring Log screen displays details of the Goal/Objective as well as any existing Data Entries and/or Changes in Intervention entries. Click the Preview button to view a report of the student's progress towards their goals and objectives.
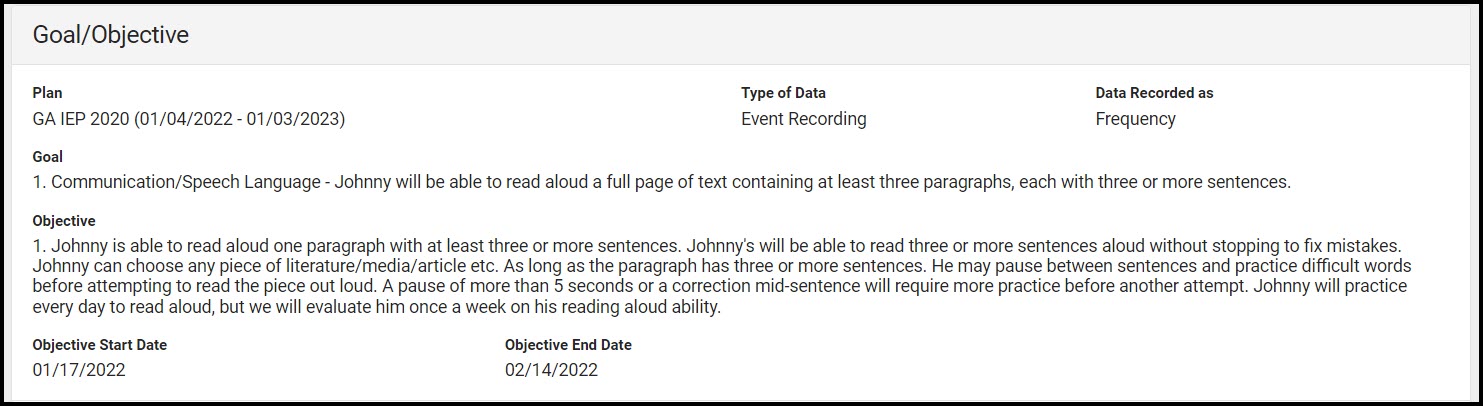 Image 3: Goal Monitoring Log Screen
Note: not all states use Objective Start and End Date fields.
Aim Options
Click Edit to make changes to the Aim options. The aim is the data goal for the student's goal/objective.
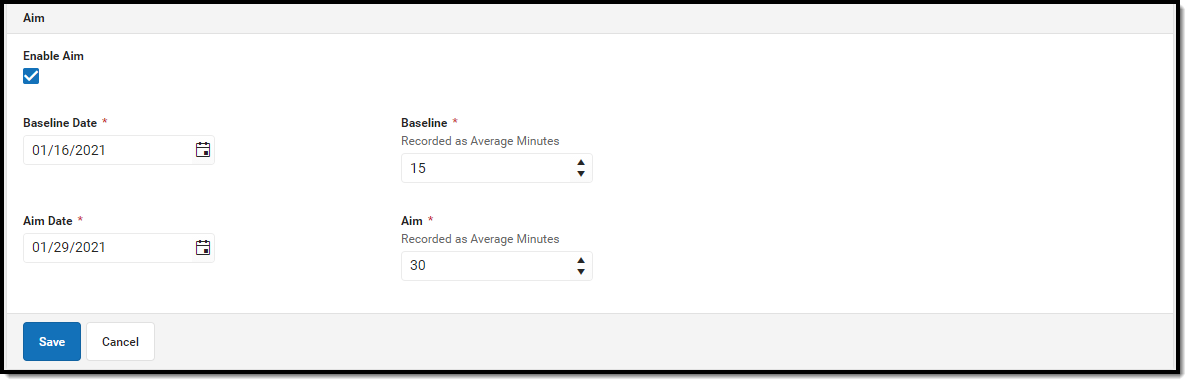 Image 4: Goal Aim Options
Click Save to retain changes.
Data Entry
Click the New button to add a progress record towards the goal/objective. The Data Entry side panel displays.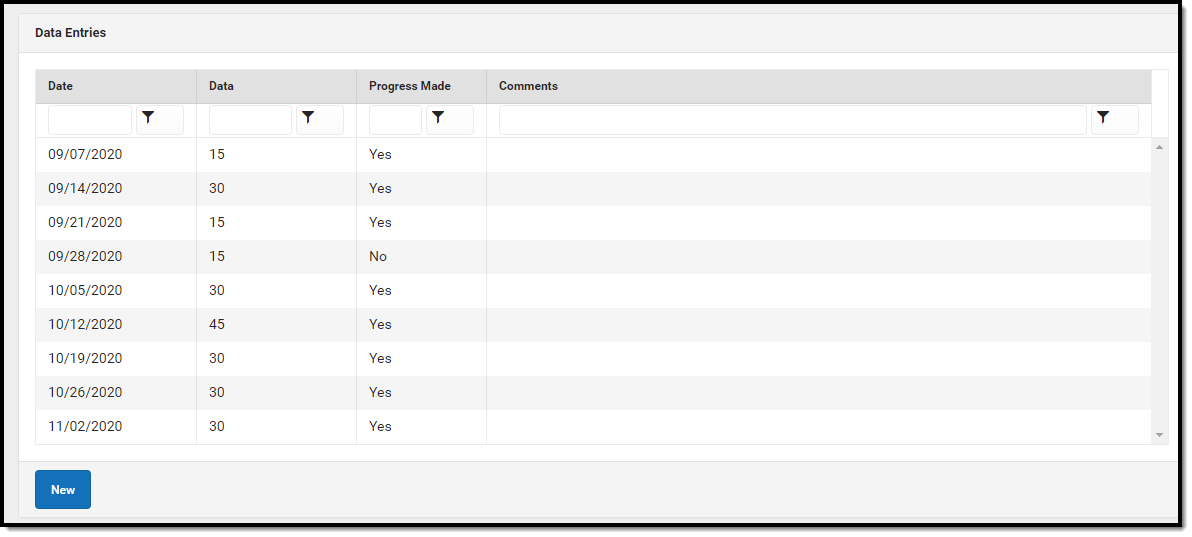 Image 5: Goal Data Entries List
Data Entry Side Panel
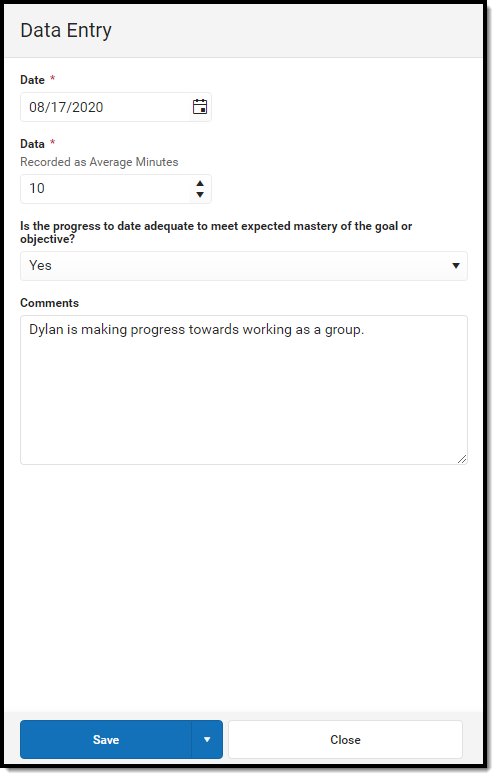 Image 6: Data Entry Side Panel
Click Save to save the entry and navigate back to the Goal Monitoring Log Screen or Save & New to save the entry and begin a new entry.
Change in Intervention
Click the New button to add a record of a change in the way the student will pursue their goal/objective. The Intervention side panel displays.
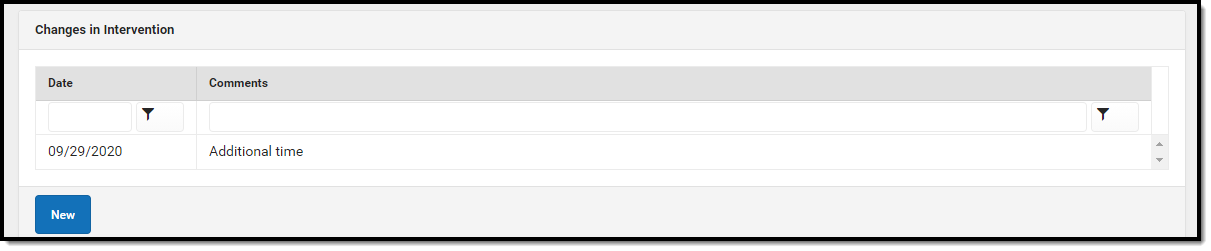 Image 7: Changes in Intervention List
Intervention Side Panel
 Image 8: Intervention Side Panel
Click Save to save the entry and navigate back to the Goal Monitoring Log Screen or Save & New to save the entry and begin a new entry.
Goal Monitoring Report Options
Click the Report button on the Goal Monitoring List Screen. The Goal Monitoring Report Options screen displays.
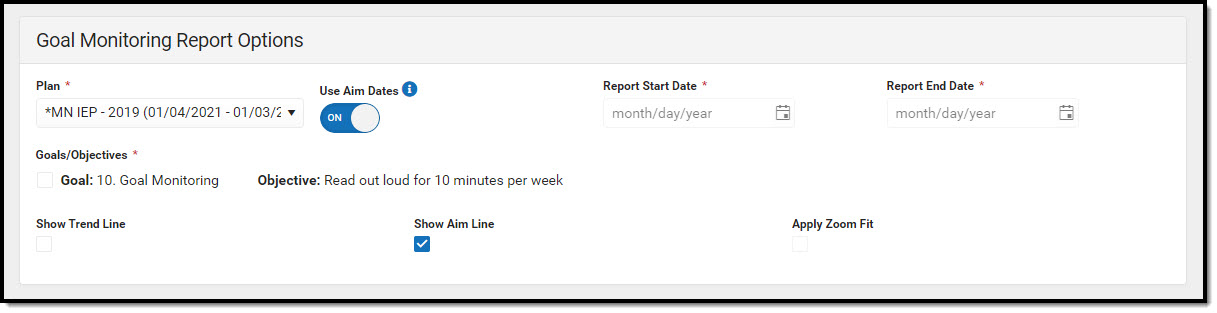 Image 9: Goal Monitoring Report Options
Report Options
| Field | Description |
|---|---|
| Plan
Required |
Any locked Plan with associated goals. The most recent plan displays at the top of the list. |
| Use Aim Dates | When selected, the Aim date range displays on the report graph and the Show Aim Line option is also marked by default. The Apply Zoom Fit checkbox becomes unavailable when this option is marked.
Information icon (i) text reads: "Selecting Aim Dates will show a date range matching the Aim and Baseline information entered for each goal or objective. If no Aim information exists for a goal, the graph will display dates matching the plan."
|
| Report Start Date
Required |
The first day of the report. Users cannot enter a date prior to the plan start date. |
| Report End Date
Required |
The last day of the report. Users cannot enter a date prior to the plan start date. |
| Goal/Objective
Required |
The goals/objectives with data entries that fall within the report date range. At least one record must be selected. |
| Show Trend Line |
When marked, the trend line displays for all selected records. |
| Show Aim Line | When marked, the aim line displays for all selected records. |
| Apply Zoom Fit | When marked, the graph will zoom in to show more graph details. |
Report Layout
Click Generate to run the report. A graph of the data points displays at the top with a breakdown of each data point below. Data entries and intervention changes display as separate line items.
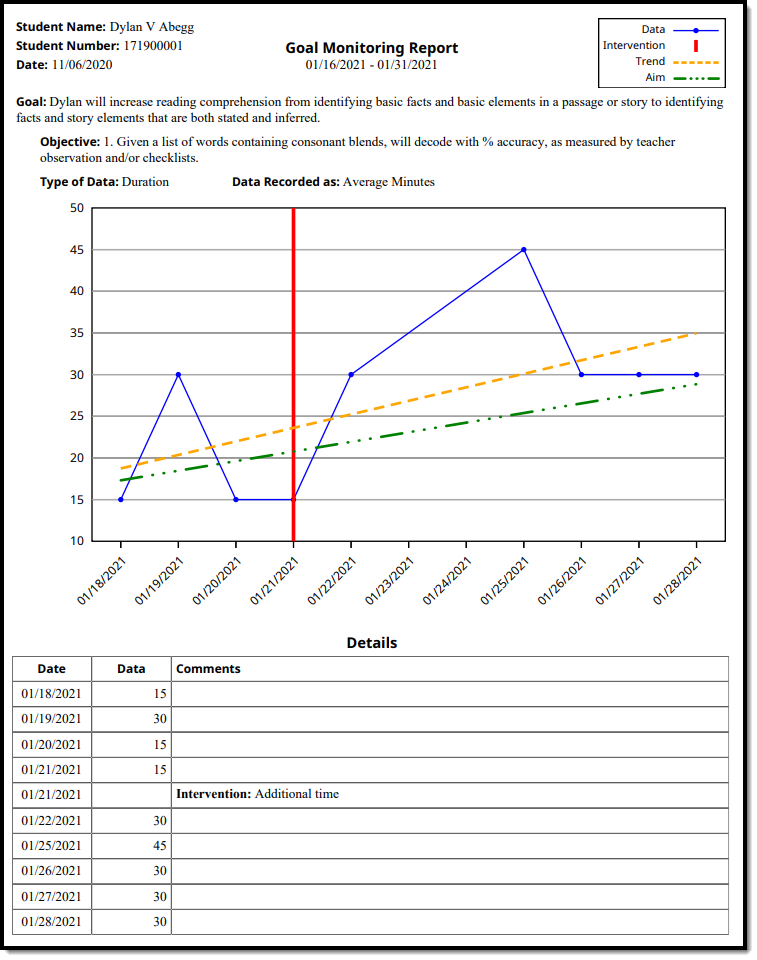 Image 10: Goal Monitoring Report Example
| Field | Description |
|---|---|
| Report Header | |
| Student Name | The name of the student. |
| Student Number | The student's identification number. |
| Date | The date the report was generated. |
| Goal Monitoring Report | The name of the report. |
| mm/dd/yyyy-mm/dd/yyyy | The report date range. |
| Key | The information about the 4 types of lines that may display on the graph, depending on the options selected. |
| Goal/Objective | The selected goal/objective(s). |
| Details | |
| Date | The date of the data point. |
| Data | The type or amount of data. |
| Comments | Any associated comment related to the data point. |
