Tool Search: Zone Setup
This article is designed for advanced technical users only and is relevant to districts using SIF Data Exchange.
This article is part of an ordered SIF Configuration process and applies to both methods of configuration (Horizontal and Vertical).
Before beginning, please consider this setup step in relation to the ordered setup steps of the SIF Configuration process:
A SIF Zone is the area designated for SIF Data Exchange between the Campus SIS and an external SIF application.
SIF Zones
A Zone is an area specifically configured for message communication between Agents. A SIF Zone exists as a specific URL location where the Campus and SIF Agents exchange XML data messages for SIF data exchange or reporting. The data exchanged for these purposes is "scoped" on the Zone by selecting parameters that prevent excessive data transfer.
Please refer to the Zones article for more information and/or field-level definitions of zones.
Set up SIF Zone and Options
A new SIF Zone must be created to allow SIF Data Exchange.
 Setting Up a Zone for SIF Data Exchange
Please refer to the Zones article for detailed information and/or field-level definitions of zones.
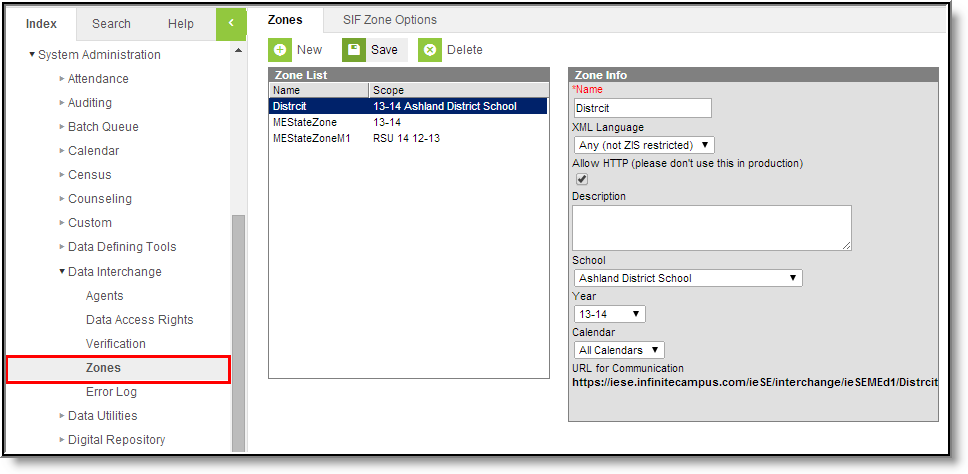
- Navigate to the Zones tool.
- Select the New icon from the action bar. The Zone Info editor will appear.
Enter a Name for the SIF zone.
When the third-party application is a ZIS, the name of the SIF zone in Campus should match that of the external ZIS zone being used for SIF data exchange.
- Choose an XML Language if the SIF implementation requires a specific agent version. Otherwise, leave the default option "Any (not ZIS restricted)."
Select School(s), Year(s) and/or Calendar(s) that should be exchanged in the SIF zone.
Select only the schools/years/calendars that the external SIF agent needs to receive. This filters extraneous data from exchange.
Once a Zone has been established, SIF Zone Options need to be set.
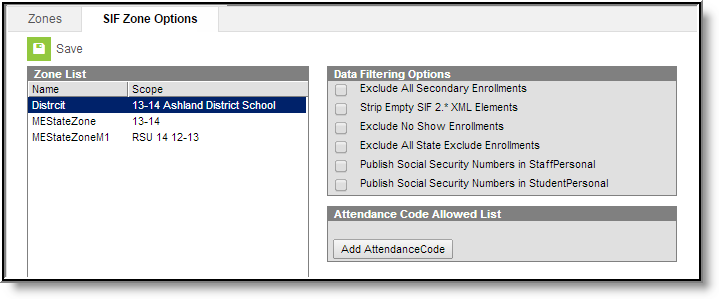
This tab only appears if SIF zones have been established in the Zones tool. Only SIF zones are available for selection in the Zone List and can have Data Filtering Options applied.
 SIF Zone Options
Mark the Exclude All Secondary Enrollments checkbox if the external SIF application only requires primary student enrollment records.
Application Vertical Reporting scenarios only
- Mark the Strip Empty SIF 2.* XML Elements box only if there are requirements in an external ZIS or agent that demand no XML tags for blank data elements.
- Mark the Exclude No Show Enrollments checkbox if No Show enrollment records should be excluded from SIF batch requests and events.
- Mark the Exclude All State Exclude Enrollments checkbox if all State Exclude enrollment records should be excluded from SIF batch requests and events.
- By default, Social Security Numbers are not published in the StudentPersonal or StaffPersonel objects however, users can include this information by marking the following checkboxes:
- StudentPersonal - If marked, Social Security Numbers will populate the <OtherID> XML of the StudentPersonal object in both events and batch requests.
- StaffPersonal - If marked, Social Security Numbers will populate the <OtherID> XML of the StaffPersonal object in both events and batch request
- If specific attendance codes should be included within SIF StudentDailyAttendance object, select the Add Attendance Code button. See the SIF Zone Options article for more information.
- Click the Save icon in the action bar. The zone should appear in the Zone List editor.
Additional Steps for Configuring SIF for Horizontal Reporting:
- Select the newly created zone to re-open the Zone Info editor.
- Copy or make note of the SIF zone's URL for Communication, displayed at the bottom of the editor. It will be used in the future SIF Agent Setup step.
To continue SIF setup, proceed to Setup SIF Agent, or return to the SIF Configuration page.
SIF Zones must be updated when transitioning between the end of one school year and the start of the next, if the Year scope is not set to a value of "All Years."
Excluding Calendars from the SIF Zone
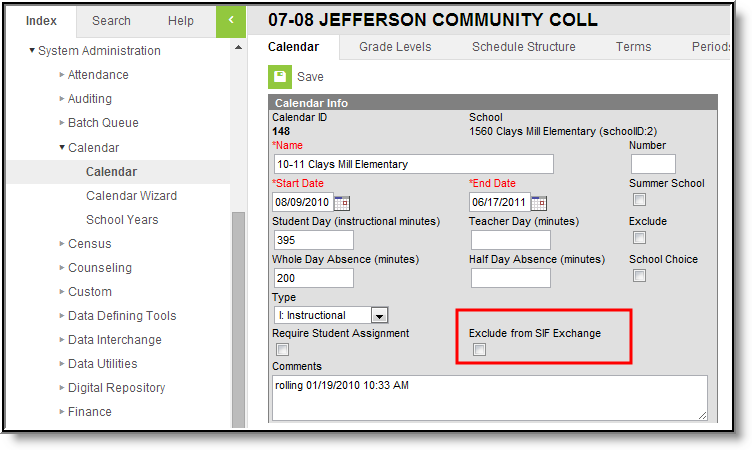
The ability to exclude calendars from a SIF zone ensures calendars that are state excluded (in a VRF environment) or calendars that contain students that should not be included in any third party SIF sync are not sent.
 Excluding a Calendar from SIF Exchange
Mark the Exclude from SIF Exchange checkbox to remove this calendar from the zone's scope. To exclude the entire school, mark the Exclude from SIF Exchange checkbox for all of the calendars within the zone scoped end year for that school. All students in that school will not be sent for any of the applicable objects that are set up for that Zone and Agent configuration.
Rolling the Active SIF Year Forward
For steps on rolling the active SIF scope year forward, see the Rolling the Active SIF Year Forward article.
