Tool Search: Custom Tools Publisher
The Custom Tools Publisher allows State Edition users of Infinite Campus to publish custom tools down to DIS-linked districts.
Note: Custom tools are created via Custom Tool Setup. You must first create a custom tool in order to have something to publish to districts.

Read - Allows users to view existing information and use the View Publish History option.
Write - Allows the user to publish existing custom tabs, add new districts to existing tabs, remove districts from existing tabs and use the View Publish History Option.
Add - N/A
Delete - Allows the user to publish existing custom tabs, add new districts to existing tabs, remove districts from existing tabs, remove custom tabs, and use the View Publish History Option.
For more information about Tool Rights and how they function, see the Tool Rights article.
Prerequisites
- A custom tool must first be created in Custom Tool Setup, and Attributes must be created and saved for it. A tool will not show up in the Custom Tools Publisher until this occurs.
Publish a Tool to Districts
To publish a custom tool down to DIS-linked districts:
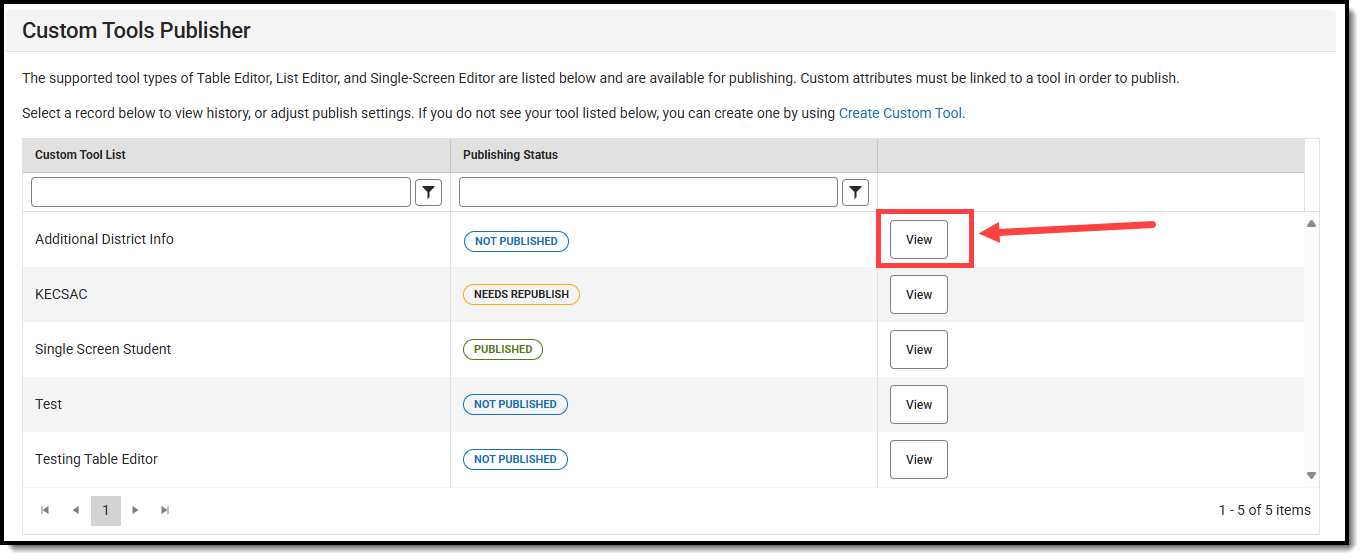
- Navigate to the Publish Custom Tool.
- Click View for the custom tool. The History and Settings menus will appear.

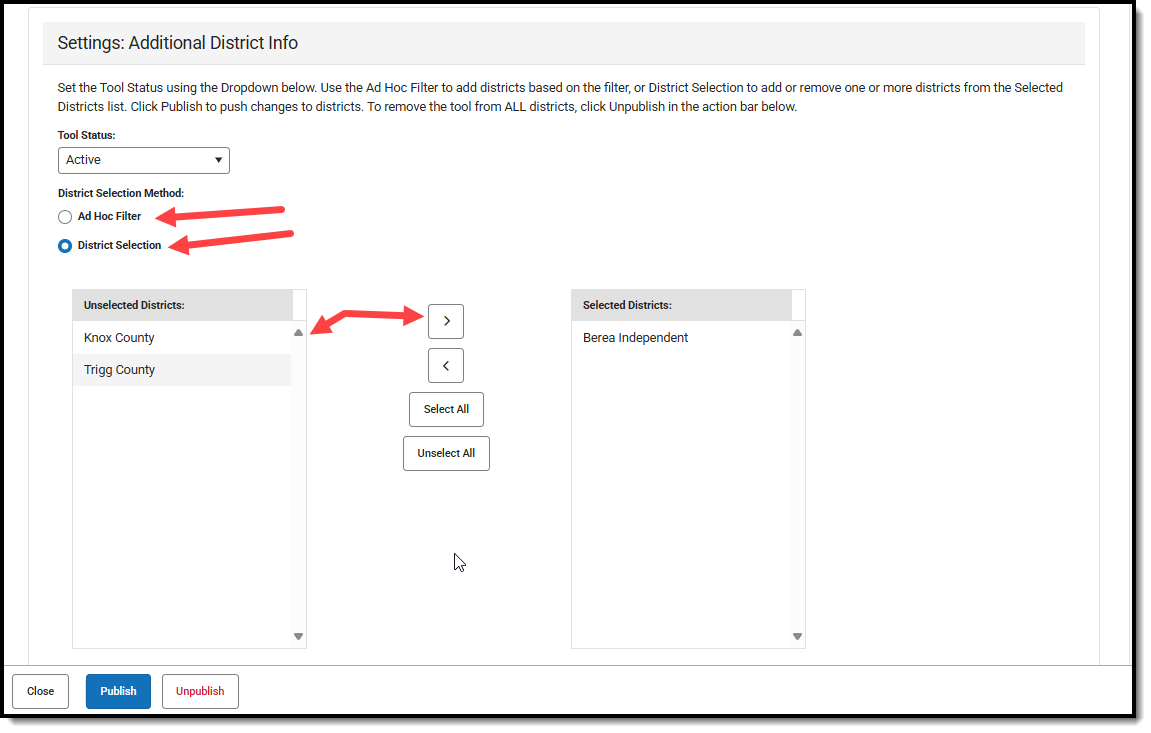
- Scroll down to the Settings menu.
- Select the Tool Status:
- Active - The tool will appear as available to DIS-linked districts once you complete the publish process.
- Inactive/Visible - The tool will still appear for district users, but is not available for use.
- Inactive/Hidden - The tool will not appear or be available for any district users.

- Determine which districts will receive the tool by selecting an Ad Hoc Filter or selecting a district in the Unselected Districts window and clicking the
 button.
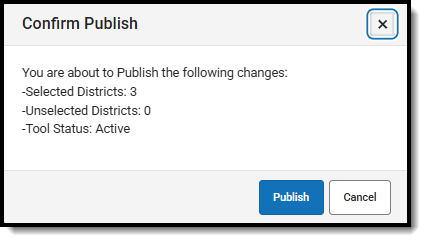
- Click Publish. A Confirm Publish window will appear.

- Click Publish. The tool has now been published to selected districts in the location defined for the custom tool.
Once a tool is published, the Publishing Status will display as 'Published', and the tool will show a checkmark in the Published column of the Custom Tool Setup tool.

Districts can enter data in the custom tool, and once the data is saved, it displays in the custom tool and is visible in State Edition. State Edition users can select but not modify any of the district-entered data. District users cannot modify the name of the custom tool or its associated attributes.
We recommend you inform districts af any published tools or links and explain what data and usage are expected of them.
Unpublish a Custom Tool
Unpublishing completely removes the tool and any entered data. Use this option carefully.
Infinite Campus does not recommend unpublishing a tool; instead, set the Tool Status to Inactive/Visible to remove a district's ability to enter or change new data, or set the Tool Status to Inactive/Hidden to remove the tool from districts entirely, while retaining all records.
- Select View for the custom tool you wish to unpublish.
- Click the Unpublish icon. A warning message displays, explaining what will happen to the existing information.
- If you wish to remove the custom tool and delete all associated data, click the Unpublish button to proceed.
- If the custom tool should not be removed because data is still needed, click the Cancel button.
Remove a District from a Published Tool
- Select View for the custom tool you wish to unpublish.
- Scroll down to the Settings menu
- Select the district from the Selected Districts window and click the
 button. The district will be moved to the Unselected Districts list, meaning they will no longer have access to view or use the custom tool.
 - Click the Publish button again. This will remove the custom tool from the selected district.
Change the Status of a Published Tool
- Select View for the custom tool.
- Select a different Tool Status:
- Inactive/Visible - District users can see the tool but cannot enter or modify data. All records are retained.
- Inactive/Hidden - District users can no longer access or see the tool. All records are retained.
- Click the Publish button. This will make the necessary adjustments to the custom tool for the selected districts.
View the Publish History
The Publish History section lists which districts received the custom tool and its availability status. Depending on the number of districts chosen, the tool's availability at the district level could be delayed. A tool's status will be displayed as Delivered (the custom tool is available to districts) or Pending (the custom tool is in the process of becoming available to districts or was recently unpublished).


 button.

 button. The district will be moved to the Unselected Districts list, meaning they will no longer have access to view or use the custom tool.