Tool Search: Counseling Meetings
Create new meetings in two ways, either by clicking New Meeting or by clicking any free space on the calendar:
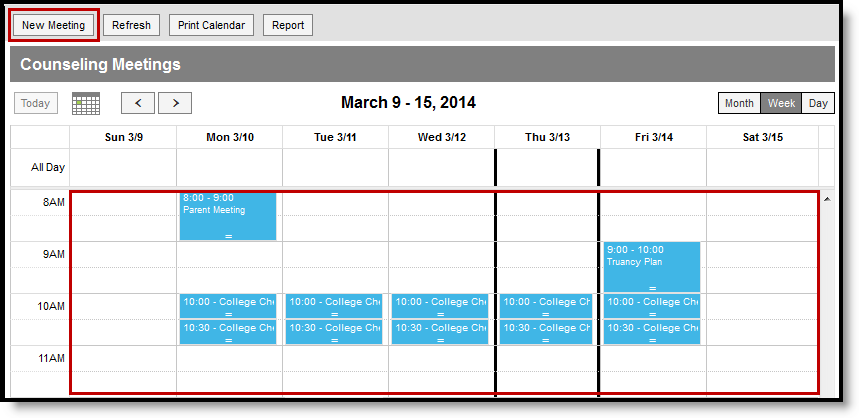 New Meeting
Creating a new meeting opens the Meeting editor, which includes three sections: Details, Participants, and Outcomes.
Other topics in this article include:
- Setting up recurring meetings.
- Saving a participant list as a reusable filter.
- Attaching files to a meeting.
- Saving a Meeting and Sending Notifications.
Meeting Details
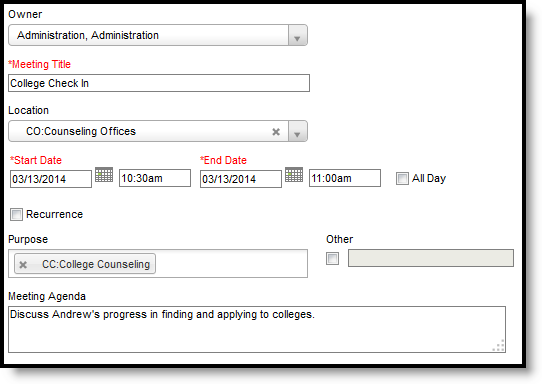
The meeting details section includes core information about the meeting, such as when the meeting is taking place and what the meeting is about.
 Meeting Details
When creating a new meeting, enter meeting information in the fields described below:
Description | Ad hoc Field Name | |
|---|---|---|
Owner | The organizer of the meeting. The default Owner is the current user, but you can change the Owner to any user who is marked as a Counselor on their District Assignment. Start typing in the field to search within counselors. This field only displays for users with administrative tool rights to the Counseling tool and is only editable for users who have Add rights. | meeting.ownerID |
| Meeting Title | The name of the meeting that displays on your calendar and any notifications sent for the meeting. | meeting.title |
| Location | Where the meeting takes place. Start typing in the field to search within available values. Values are established in the Attribute/Dictionary. | meeting.locationCode meeting.locationName |
| Start and End Date and Times | When the meeting takes place. If you click New Meeting, the current day is the default date, with the times autopopulating to the next hour for a half hour. Otherwise, if you click a specific place on the calendar, that date and time autopopulates. Click any field or the calendar icons to update values. Mark the All Day checkbox to remove the time fields and schedule the meeting for the full day. | meeting.startTimestamp meeting.endTimestamp |
| Recurrence | You can set meetings to recur based on a selected time period, such as weekly or monthly. See the Recurring Meeting section following for more information. | N/A |
| Purpose | Why the meeting is taking place. Start typing in the field to search within available values. Select an option(s) from the list established in the Attribute/Dictionary or mark the Other checkbox to enter your own purpose. | meeting.otherPurpose meetingPurpose.purposeCode meetingPurpose.purposeName |
| Meeting Agenda | Use this field to record the agenda for the meeting, such as topics to be covered, questions to be asked, and goals. Keep in mind that participants can see this agenda in the meeting notification. | meeting.agenda |
Create a Recurring Meeting
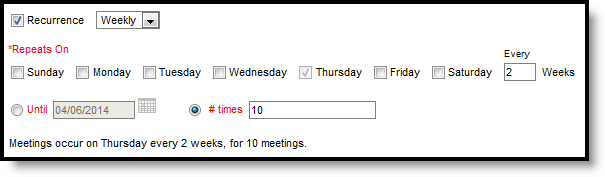
Mark the Recurrence checkbox to establish how often a meeting should repeat.
 Reoccurring Meeting Options
Select Weekly to choose on which day(s) of the week the meeting should be scheduled and how often the meeting repeats (such as every week or every three weeks). Mark all days for a meeting that occurs every day.
Meetings can also be set to recur Monthly or Yearly.
- Note that when scheduling monthly meetings, the meeting repeats on the day of the week you've chosen (for example, the 3rd Monday of a month) rather than the day (for example, the 5th day of the month) unless the meeting is scheduled on the last weekday of the month. For example, a meeting scheduled on the last Monday of the month repeats on the last Monday of each month, regardless of whether that month has 4 or 5 Mondays.
- In comparison, yearly meetings are scheduled on the same date, such as the 8th of December or the 17th of August.
Also indicate for how long the recurring meeting should repeat by entering an Until date or a # of times the meeting should repeat.
All recurring meetings are scheduled after the current meeting. For example, if your scheduling a meeting that occurs every Tuesday and Thursday with the first meeting on a Thursday, a meeting is not scheduled for the Tuesday of that first week.
Add Meeting Participants
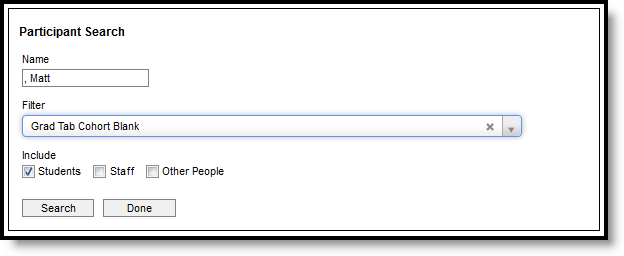
Add participants by clicking Add Participants and then searching for individuals by Name and/or through an established Filter. To remove a filter from search criteria, click the X by the filter name. Indicate if search results should include Students, Staff, and/or Other People.
 Participant Search
Enter your search criteria and click Search to view results. Results display in the search area:
 Search Results
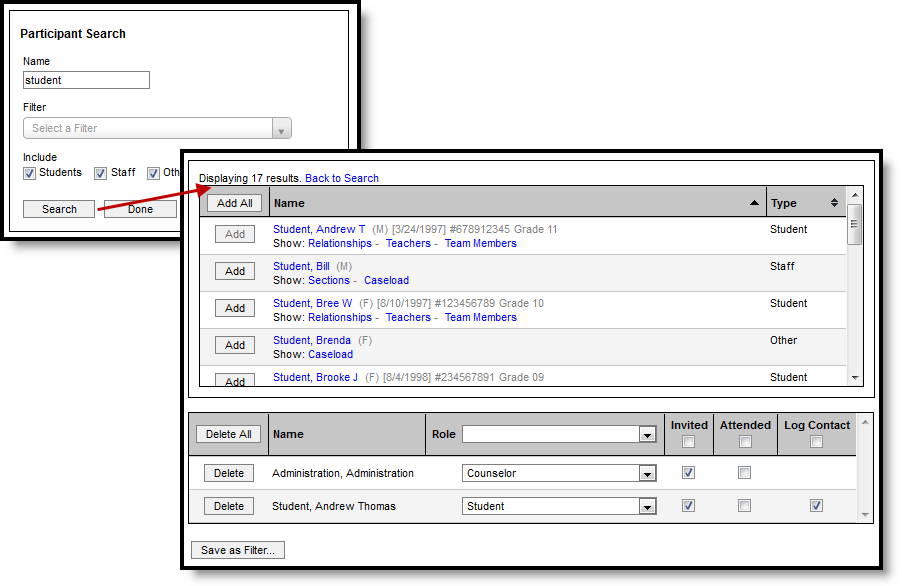
Search results list individuals with additional information based on the person type, limited based on the number of search results allowed. Click a name to view a Person Summary Report with demographic and household information, if you have the appropriate tool rights.
The following options also display:
- Student
- Relationships - Lists all family members of the individual. Use this option to schedule a meeting with a student and their family members.
- Teachers - Lists all teachers of sections in which the student is scheduled. Use this option to schedule a meeting with a student's teachers.
- Team Members - Lists all individuals with memberships in any of the student's teams, with the area of team membership (Special Ed, Counseling, or PLP) listed.
- Staff
- Sections - Lists all sections the staff member teaches. Click the name of the section to view a list of all students scheduled into the section. Click the Add Section button to add all students to the participants list.
- Caseload - Lists all students for whom the individual has a Special Ed, Counseling, or PLP team membership. Role and module are indicated for each student.
- Other
- Caseload - Lists all students for whom the individual has a Special Ed, Counseling, or PLP team membership. Role and module are indicated for each student.
To add individuals to the participant list, click the Add button next to their name. Or click Add All to add all people in the search results. Added participants appear in the participant list below search results.
A meeting must have at least one participant to be scheduled.
Participant List
The participant list includes all of the individuals associated with the meeting.
 Participant List
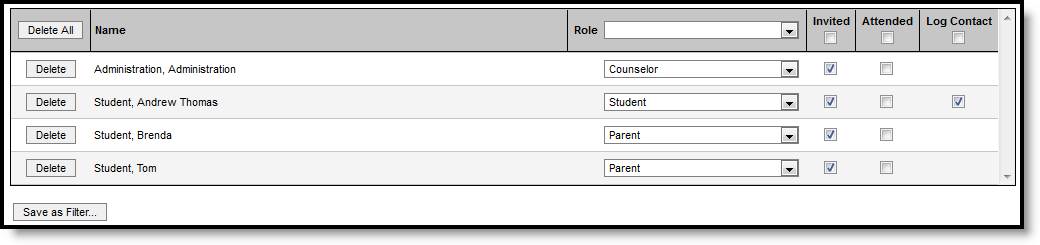
The following fields display for each participant:
Description | Ad hoc Field Name | |
|---|---|---|
Role | The role of the individual in the meeting. Values are established in the Attribute/Dictionary. | meeting.roleName meeting.roleCode |
| Invited | Indicates if the participant is invited to attend the meeting. Unmark this checkbox if the participant should not receive any notifications about this meeting. For example, in a meeting held about a student that the student does not attend, the student would be included as a participant but not marked as invited. | meeting.invited |
| Attended | After the meeting, indicates which participants attended. | meeting.attendance |
| Log Contact | Only displays for students, which checking indicates a record should be made in the student's Counseling Contact Log regarding the meeting. Notification logic is as follows. The Log Contact checkbox defaults to non-marked when adding more than one student at a time. | N/A |
To remove participants from a meeting, use the Delete button.
Contact Log Logic
Entries created by meetings in the contact log are read-only and cannot be edited. The following logic determines how meetings are recorded in the Contact Log.
- When the Attended checkbox is modified, a log entry is created or updated for each student who has Log Contact marked, listing the date/time of the meeting, those who attended and their roles.
- When you select Update and Send Notification, an entry is created for each student in the meeting who has Log Contact marked, listing the date/time of the notification, who sent the message, the type of message and whether it was sent to the student's Process Inbox, their email, or both.
- Contact log entries show read-only information about the meeting, including title, location, date/time, purposes, and outcomes. Only users who are the meeting owner or a meetings administrator can view outcomes.
- In the entry, the title of the meeting links to a printable version of the meeting if the user is a meetings administrator, the owner of the meeting, or invited to the meeting. When the user is only an invitee, only basic information displays.
- When a meeting for which a Contact Log record has been created is deleted, the Contact Log record for the meeting is also deleted. Note: When a Notification of Meeting is created for a deleted meeting, the Notification of Meeting is NOT deleted.
- When a Counseling Meeting is created with more than one student, the Contacted field on the Contact Log record only displays the name of the student who owns the Contact Log record. This ensures the privacy of the other student(s). The other student's name also does not display when printing the Contact Log record.
The Log Contact checkbox defaults to non-marked when adding more than one student at a time.
Save a Participant List as a Filter
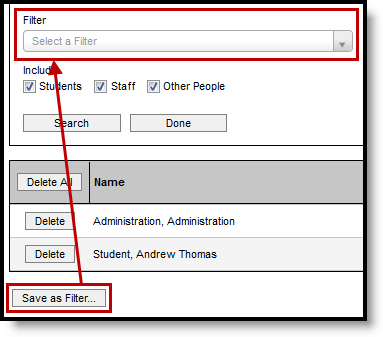
If this is a list of participants you'd like to use again in the future, use the Save as Filter option to save the participant list as a filter that you can search for later. Only invited participants are included in the filter.
 Save Participant List as a Filter
This option is useful if you plan on meeting with the same group regularly.
Click Save as Filter and then enter information about the filter.
 Create New Filter
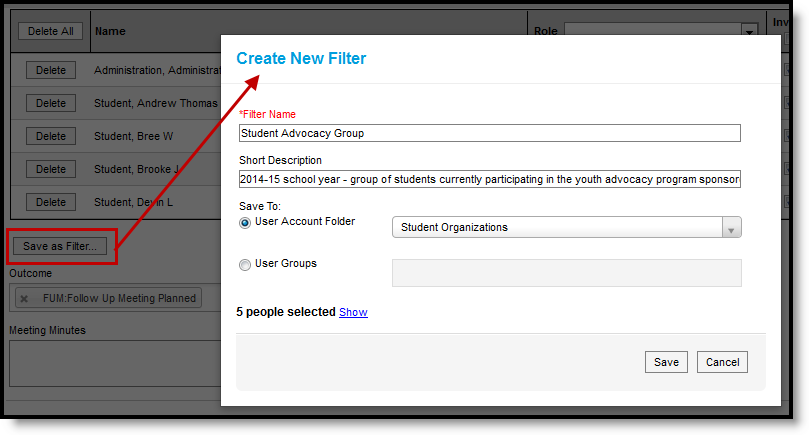
- Enter a Name for the filter. This name displays in the Filter dropdown list in the search options.
- Enter a Description for the filter to provide more information about the individuals in the filter. Descriptions are particularly useful if you're saving this filter to a User Group where other users could access it.
- Indicate where you'd like to Save this filter, to a folder you've created in the Filter Designer or to any user groups you're a member of.
- Click the Show link to review the participants included in the saved filter.
- Click Save to save the filter. Once the filter is saved, it will be available in the filter dropdown list when searching the next time you create or modify a meeting. To modify a saved filter, use the Filter Designer in Ad hoc Reporting.
Attach Files to a Meeting
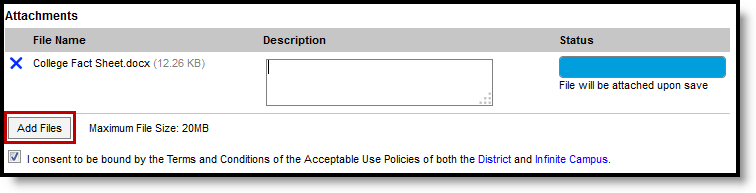
When file attachments are enabled in the Digital Repository for meetings, an option displays at the bottom of the meeting to attach files.
Click Add Files to access your local files to upload to the meeting, or drag and drop files to the Add Files button or the Attachments area.
 Upload Files to a Meeting
Enter a Description if desired. The Terms and Conditions checkbox must be marked to upload files.
Uploaded files are not included in meeting notifications. They can only be viewed by the owner of the meeting and by meetings administrators with Write rights or better.
Add Meeting Outcomes
Once a meeting has been held, record the outcome and minutes in the following fields:
Field | Description | Ad hoc Field Name |
|---|---|---|
Outcome | The outcome decided upon as a result of the meeting. Start typing in the field to search within available values. Select an option(s) from the list established in the Attribute/Dictionary or mark the Other checkbox and enter your own outcome. | meetingOutcome.outcomeCode meetingOutcome.outcomeName |
Meeting Minutes | Notes from the meeting, including discussions, action items, and unresolved questions. Minutes are not included in notifications. | meeting.minutes |
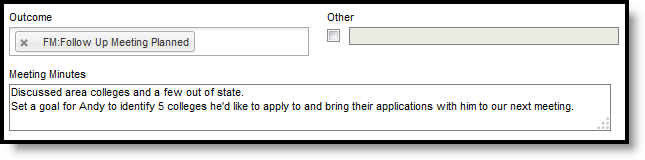 Record Outcomes
Save a Meeting and Send Notifications
To save a meeting, click the Save button at the top of the screen. A save dialog displays giving you the option of sending notifications to invitees.
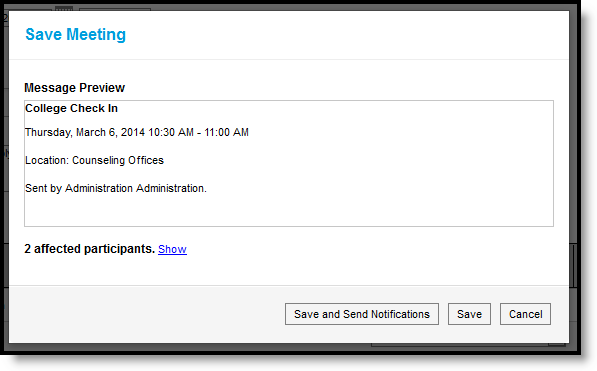 Save Meeting Dialog
Click Save and Send Notifications to save the meeting and notify all invitees of the meeting - a message is sent to their inbox (either through the Process Alerts (formerly Process Inbox) or Campus Parent Portal or Campus Student Portal) and to any email addresses that have the General contact settings enabled. Click Show to view who is receiving a notification.
If any invitees don't have an enabled email address, an additional message displays below the affected participants.
See the Send Counseling Meeting Notifications article for more information.
Otherwise, click Save to save the meeting without notifying participants.
Meeting Information in Ad hoc Query Wizard
Use the Student Data Type in the Filter Designer to build reports that include meeting information, available in the Student > Meetings folder. Fields for the Meeting Purpose (Student > Meetings > Purposes) and Meeting Outcomes (Student > Meetings > Outcomes) are also available.
The Ad hoc Field Names are included in the tables above that define each field.
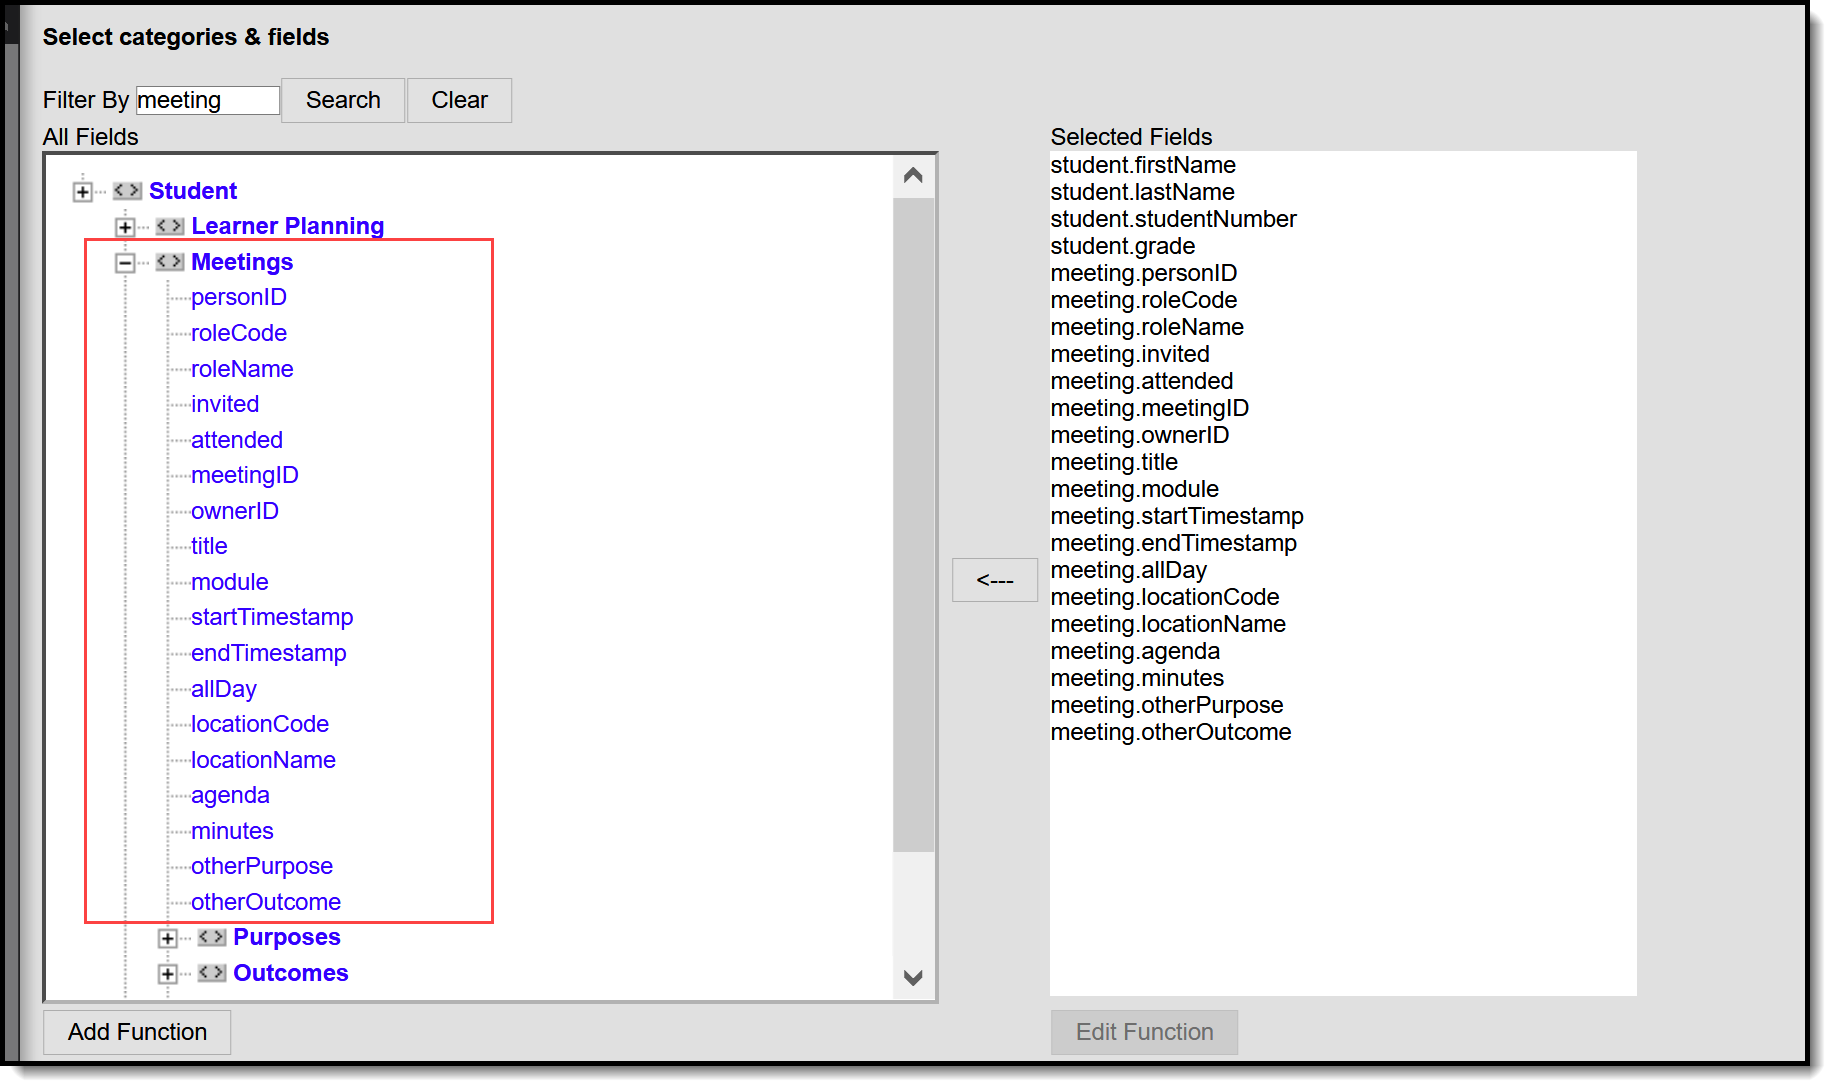 Meetings Fields in Ad hoc Query Wizard
