Tool Search: FRAM Communication
FRAM Communication allows users to modify and print letters and send messages using pre-defined templates, as well as provides formatted templates for districts to customize communications to parents/guardians using the online Meal Benefits Application within the Campus Portal. The FRAM Communication templates are used for paper and online Meal Benefits Applications, Approval/Denial Letter, and portal messages. These templates are formatted after the USDA letter templates.
See the FRAM Setup Tool Rights article for information on available tool rights.
Important Information about this Tool
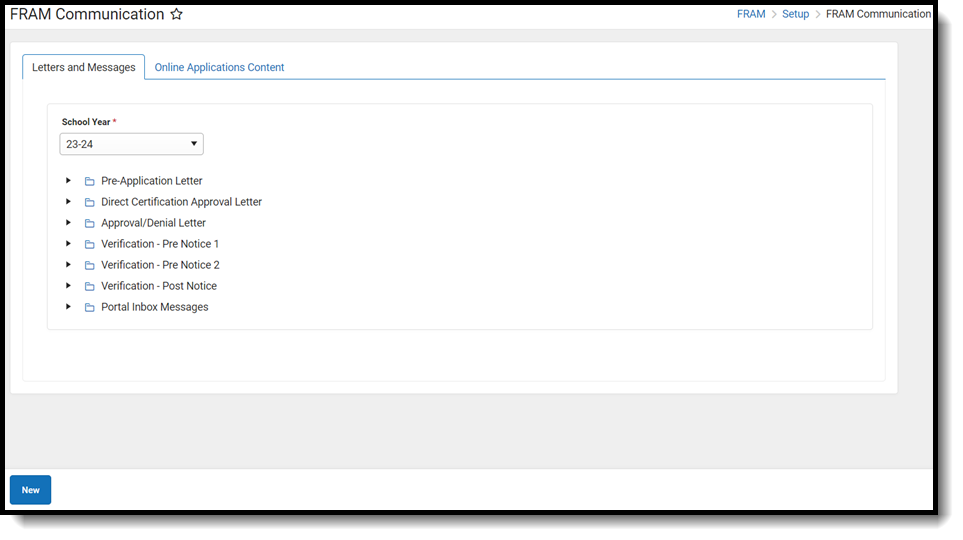
- Letters are created for the school year. Only one letter per language type can be created per year. FRAM letters can be created or copied from previous years to prepare for the upcoming school year.
-
-
You MUST create custom approval/denial letters if:
-
You marked the Use Custom Approval/Denial Letter checkbox on the FRAM Preferences tab,
-
And/or you are using the Online Meal Benefits Application.
-
-
-
Letter Formats
- Each letter type uses a standard font size of 10. This cannot be modified. The font type is defaulted to Arial; this can be changed by the user to Times New Roman, if desired. Letters will print on standard size paper (8.5 x 11) and will fit into standard #10 window envelopes when tri-folded.
- The top margin, commonly used to leave space for district letterhead, can be increased or decreased by selecting the Letterhead Margin option. Side and bottom margins cannot be adjusted.
- For more information about each letter format, see the Generating Letters section.
Letter Languages
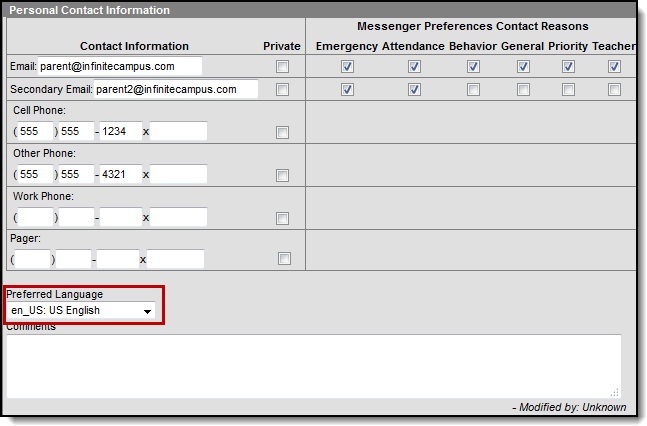
Letters can be created in any supported language as desired. A letter will generate in the designated language for guardians who have that preferred language set in the Preferred Language field on the Demographics tab.
The Preferred Language dropdown list is populated from the Attribute/Dictionary preferred language list (System Settings > Custom Data and Links > Core Attribute/Dictionary > Contact > Preferred Language). This list can be modified to fit district needs.
The following languages are supported in the PDF rendering of a letter:
- Cambodian
- English
- French
- Haitian Creole
- Hmong
- Portuguese
- Samoan
- Somali
- Simplified Chinese
- Spanish
- Tagalog
- Traditional Chinese
Create a Letter
The following provides information on creating, generating, and copying FRAM letters.
When first using this tool, Letters and Messages will not contain any letters. A new letter will need to be created for each letter type.
- Click New. The New Letters And Messages screen will appear.
- Select the School Year from the dropdown list, indicating the year for which this letter will be printed.
- Select the Type of letter to create from the dropdown list.
- Select the Language option from the dropdown list.
- Click Next.
- Select the Font Type of the letter from the dropdown list.
- If printing the letters on district letterhead, mark the Letterhead Margin checkbox. This is not available for portal messages.
- Mark the Use Mailing Address checkbox (for the Pre-Application Letter only) if the letter should be sent to the mailing address designated for the household.
- Make appropriate changes to the letter details:
- Modify all text fields, as desired.
Carefully review the fields you want to modify. For example, be sure to keep the free/reduced portions of the Direct Certification Approval Letter
- Modify all text fields, as desired.
-
Click Save & Next.
The information included in the body of the FRAM Letters must be populated completely by the end user. Sub-reports and Campus Data Fields are not available.
- Verify the USDA text in the Footer.
- Click Save & Next.
- Review the document and click Close. The new letter will appear as a PDF icon below the Letter Type.
Each text box within the letter must be populated. If text is removed and the letter saved, the default text from the template will be repopulated.
Copy Letters
- Select the desired letter to copy by selecting the letter below the letter type.
- Click the Copy icon in the action bar.
- Select the appropriate School Year from the dropdown list.
- Select the desired Language of this new letter from the dropdown list.
- Select the desired Font Type from the dropdown list.
- Mark the Use Mailing Address checkbox (for the Pre-Application Letter only) if the letter should be sent to the mailing address designated for the household.
- Mark the Allow Margin for Letter Head checkbox if the letter should be formatted to print on district letterhead.
(This option is not available for all letter types.) - Make appropriate changes to the letter details:
- Modify all text fields, as desired.
Carefully review the fields you want to modify. For example, be sure to keep the free/reduced portions of the Direct Certification Approval Letter
- Modify all text fields, as desired.
-
Click Save & Next.
The information included in the body of the FRAM Letters must be populated completely by the end user. Sub-reports and Campus Data Fields are not available. FRAM Preference information is not used in the FRAM Letter editor.
- Verify the USDA text in the Footer.
- Click Save & Next.
- Review the document and click Close. The new letter will appear as a PDF icon below the Letter Type.
Delete Letters
To delete a letter:
- Select the desired letter to delete by selecting the letter below the letter type.
- Click Delete in the action bar. A warning message will appear indicating the letter is about to be deleted.
- Click Delete to continue with the deletion process or click Keep to not delete the letter.
Print a Sample Letter
Since this is a template of a letter, modify the page breaks or other formatting before generating the actual letter.
- Select the desired letter from the appropriate letter type.
- Click the step labeled Review.
- Click Print from the action row. The letter will appear in a new tab in PDF format. This sample will resemble how the printed letter will look. From this sample view, users can determine if additional changes need to be made to the body text.
Generate Letters
Once a letter is created in the FRAM Communication, it can be generated from other FRAM tools. The table below lists from where letters can be generated.
|
Letter Type |
Generated From |
Logic |
Notes |
|---|---|---|---|
|
Pre-Application Letter |
This letter will print for all households in the district where at least one student has an active enrollment for the upcoming school year.
|
In order for this letter to print with addresses, the Use Mailing Address option needs to be selected on the created letter. If this is not selected, the letter will print without an address so it can be used in a bulk mailing where the district may send a generic letter to households using mailing labels.
| |
|
Direct Certification Approval Letter |
This letter will be sent to households where Direct Certification files have been imported or manually entered and the district must send the household guardian a letter indicating the students in the household were approved for free benefits from the state agency. |
Guardian and mailing assignments for students will determine how letters are addressed and how students appear on the letter.
Text within brackets, such as [free/reduced], functions as fields that will populate with Infinite Campus data when the letter is generated and should not be modified. | |
| Approval/Denial Letter
|
This letter can be printed from multiple locations:
|
The Approval/Denial Letter can be printed after the paper or online Meal Benefits Application has been processed via the Household Applications Editor or the Online Applications Content. It can also be printed at the end of the day in a batch format to send to households. Another optional method of delivery is to send the letter electronically via a Portal Message. This feature is enabled in FRAM Preferences > Application Preferences > General Application Preferences.
If the letter signer is missing on the application, Campus will use the Head of Household as the name on the letter. |
This letter notifies the application signer whether the application was approved or denied.
|
|
Verification Letters
Pre-Notice 1
Pre-Notice 2
Post Notice |
All three verification letters (Pre-Notice 1, Pre-Notice 2 and Post Notice) will ONLY print from the Verification tool. |
| |
|
Portal Inbox Messages |
Messages (Portal) |
Portal Inbox Messages provide information to the application signer informing them their online Meal Benefits Application has been submitted and processed. An optional message can be sent informing the application signer if their paper application has been processed. |
Portal Inbox Messages templates need to be created if using Online Applications for Meal Benefits or if the optional Portal Inbox Message selections have been marked in FRAM Preferences > Application Preferences for paper Meal Benefits Applications. |
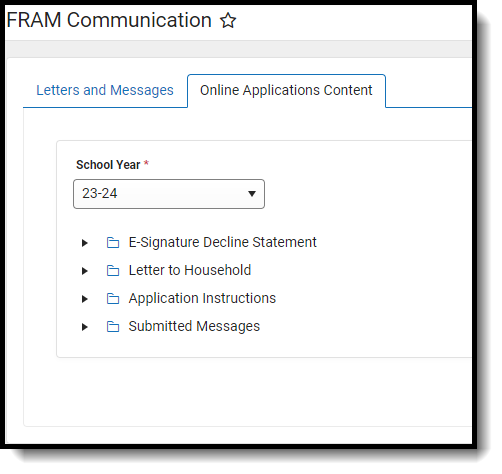
Online Applications Content
The Online Applications Content tab provides formatted templates for districts to customize communications to parents/guardians using the online Meal Benefits Application within the Campus Portal.
Important Information about this Tool
- The Campus Portal provides the parent/guardian the option of selecting one of four languages including English (default), Spanish, Traditional Chinese and Simplified Chinese. There are four portal languages provided in the Portal Language dropdown list when creating a new letter template. If the parent/guardian selects a language other than default English, the Portal is translated to the selected language. If the district chooses to provide the Online Meal Benefits Application in languages other than default English, it is the districts responsibility to have the templates translated.
- To enable Meal Benefits in FRAM Preferences > Application Preferences you must have at least one English (Portal) template created for each letter type.
- Templates can be copied from one year to the next. However, it is recommended that once copied, the templates be updated with current information for the new school year.
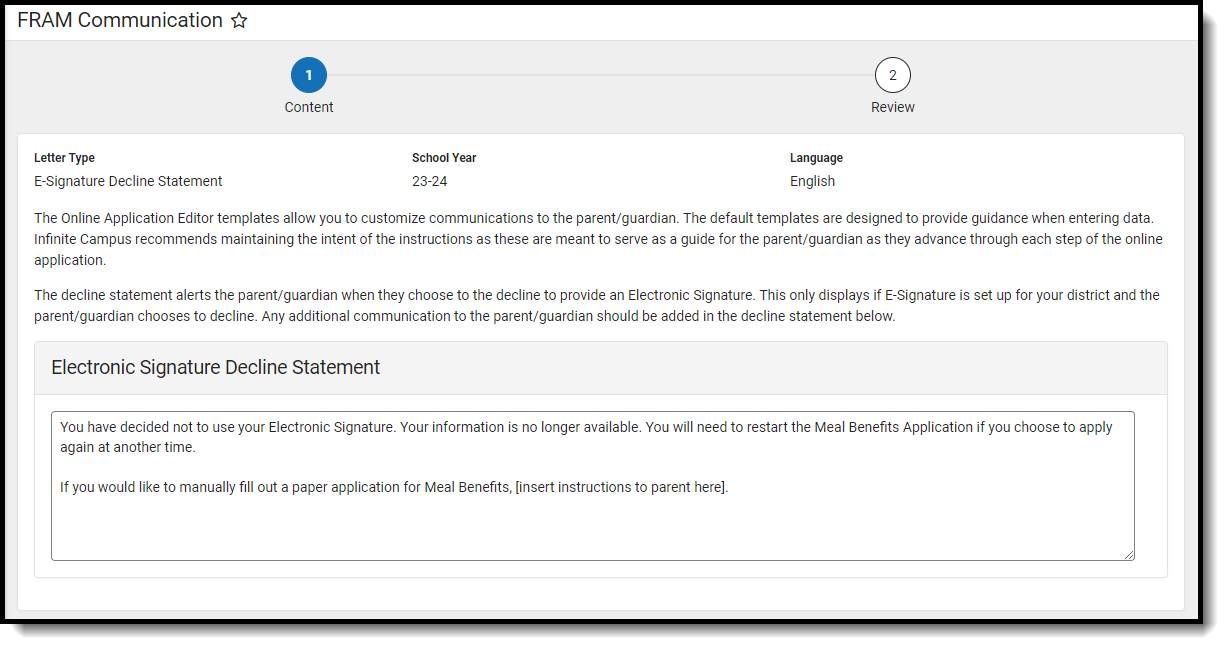
E-Signature Decline Statements
E-Signature Decline Statements provide the parent/guardian information to follow when declining to set up an Electronic Signature or declining to enter a PIN at the end of the application process. Any additional communication the district would like to provide to the parent/guardian should be added to the decline statement templates.
- The first decline statement appears if the parent/guardian declines the Electronic Signature set up at the beginning of the application process.
- The second decline statement appears if the parent/guardian declines to enter their Electronic Signature PIN at the end of the application process.
The E-signature Decline Statements must be saved annually even if E-signature is not activated for your district.
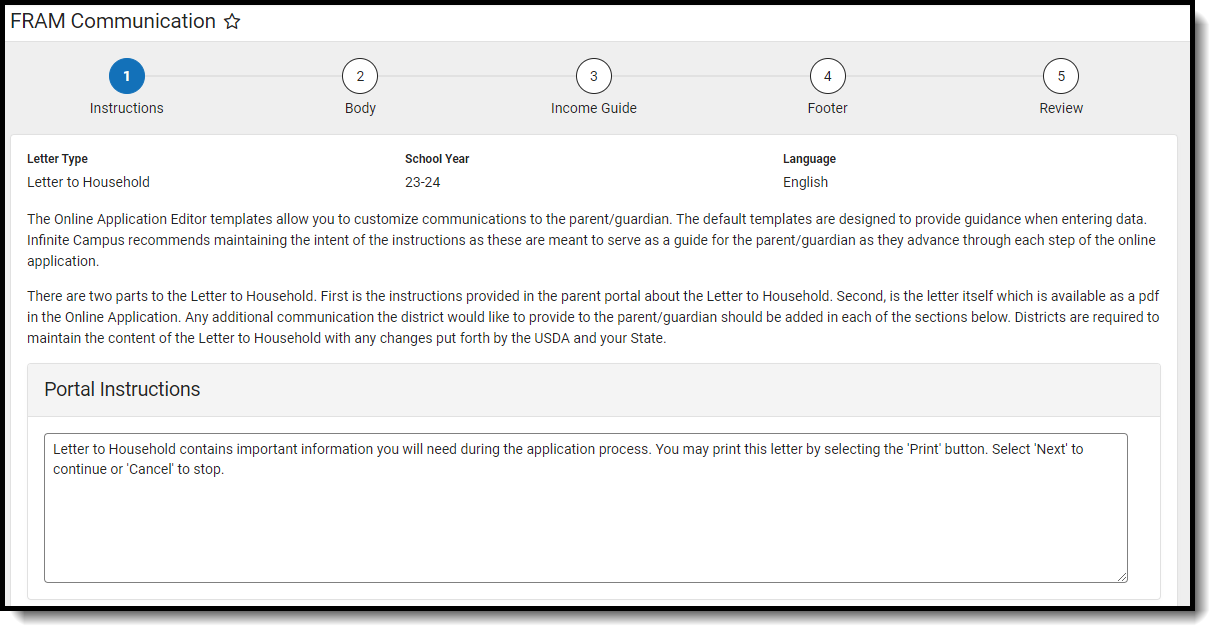
Letter to Household
The Letter to Household is available as a PDF in the Online Meal Benefits Application in the Portal. The USDA and your state require specific information to be provided in the Letter to Household for Meal Benefits Applications.
This template is based on the USDA template Letter to Household. If your State or district requires additional communication to the parent/guardian it should be added in the Letter to Household Content section. Districts are required to maintain the content of the Letter to Household with any changes put forth by the USDA and your state.
The image below indicates where the header instructions to the parent/guardian display in the Online Meal Benefits Application in the Portal. Campus recommends maintaining the intent of the instructions as these are meant to serve as a guide for the parent/guardian as they advance through each step of the online Meal Benefits Application.
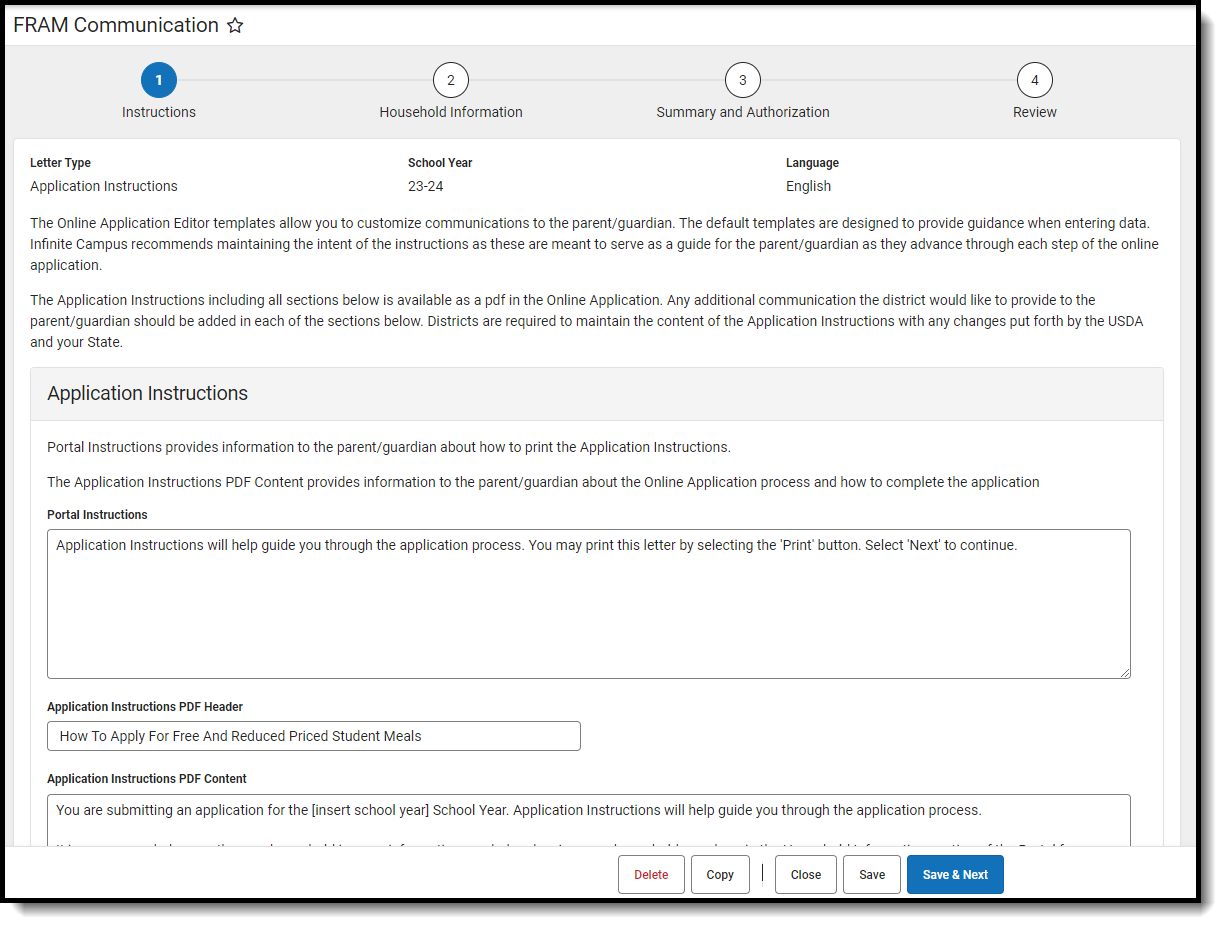
Application Instructions
The Application Instructions template includes multiple sub-templates that are used in the online Meal Benefits Application on the Portal. Districts are required to maintain the Application Instructions content with any changes put forth by the USDA and your State.
| Sub-template | Description/Example |
|---|---|
| Application Instructions | |
| Application Instructions Header |
The Application Instructions Header provides information to the parent/guardian about how to print the Application Instructions. Campus recommends maintaining the intent of the instructions as these are meant to serve as a guide for the parent/guardian as they advance through each step of the online application. |
|
Application Instructions Title Application Instructions Content |
Application Instructions Content explains to the parent/guardian which school year the application is being submitted for as well as other important information necessary for using the Online Meal Benefits Application in the Portal. |
| Signer Confirmation | |
| Signer Confirmation Instructions Header |
The Signer Confirmation Instructions Header provides information to the parent/guardian about the expectations of the application signer. |
| Signer without Self-Service Instructions |
The Signer without Self-Service Instructions provides the parent/guardian with information about what they should do if their primary address is incorrect. |
| Signer without Self-Service Instructions |
If the district has enabled the Allow Change Requests for Household Data preference (System Administration > Portal > Preferences> Self-Service) the parent/guardian will see the Signer with Self-Service Instructions displayed. If this preferences is not enabled, Signer without Self-Service Instructions will be displayed. Campus recommends both instruction sections be completed in case Self-Service preferences are enabled/disabled throughout the school year. |
| Household Members | |
|
Household Members Instructions Header |
Provides information to the parent/guardian about how to identify household members.
|
| Adding Household Members Instructions Header |
The Adding Household Members Instructions Header provides information to the parent/guardian about the type of person being added to the household. A student is a person who will be enrolled in the school district during the school year. A non-student is a person who will not be enrolled in the school district during the school year. A student member has required fields including Last Name, First Name, Gender, Date Of Birth, School and Grade. The School and Grade dropdown list includes an "unknown" option if the parent/guardian is unaware what school/grade the student will be enrolled. |
| Adding Meal Benefits Instructions Header |
The Adding Meal Benefits Instructions Header provides information to the parent/guardian about how to select the name of the person receiving the benefits and entering the benefit case number. The district may include additional information regarding case # formats, etc. |
| Child Members | |
| Child Members Instructions Header |
The Child Members Instruction Header provides information to the parent/guardian about how the Child Members of the household are selected. A child is a person who will be enrolled in the school district during this school year. Non-student members should not be selected. It is not possible to deselect a manually added child. |
| Foster Children Instructions Header |
The Foster Children Instructions Header provides information to the parent/guardian about how Foster Children are selected and how to enter foster income. |
| Migrant, Homeless and Runaway Children Instructions Header |
Provides information to the parent/guardian about how Migrant, Homeless and Runaway Children are selected. |
|
Household Income Instructions Header |
Provides information to the parent/guardian about how the income must be entered for each household member. |
| Summary Review | |
| Summary Review Instructions Header |
provides information to the parent/guardian about reviewing and correcting the entered information. |
| Authorizations | |
| Authorizations Instructions Header |
The Authorizations Instructions Header provides information to the parent/guardian about the options available in this step of the online application process. Authorizations may include all or some of the following depending upon State and/or District requirements: Sharing information with Medicaid/SCHIP, Sharing information with Other Programs, Information about Social Security Number entry, and the Authorization Statement. The header should be modified to reflect what the parent/guardian will be required to complete. |
| Sharing Information with Medicaid/SCHIP Statement |
The 'Sharing Information with Medicaid/SCHIP Statement' will only appear to the parent/guardian if the States requires this data to be collected. To enable 'Display Medicaid opt out' and/or 'Display SCHIP opt out' options to to FRAM > FRAM Preferences > Application Preferences. |
| Social Security Number Statement |
The 'Social Security Number Statement' will only appear to the parent/guardian if it is an income application. |
| Race and Ethnicity Statement |
The Race and Ethnicity statement appears to all parents/guardians. However, responding to this section is optional and does not affect eligibility for free or reduced price meals. The race and ethnicity information is linked to the Household application and not to a specific person. |
| Sharing Information with Other Programs |
The Sharing Information with Other Programs will only appear to the parent/guardian if the State/District requires this data to be collected. This set up needs to be completed before creating the Authorization Instructions Template. |
| Authorization Statement |
The Authorization Statement will always appear to the parent/guardian. It is the last step of the application process before entering the electronic signature. USDA and your State requires specific statements be provided to the parent/guardian. |
| Authorization Declined Statement |
The 'Authorization Declined Statement' message will appear to the parent/guardian if they decline the Authorization Statement. Campus recommends the District add appropriate information to the parent/guardian. |
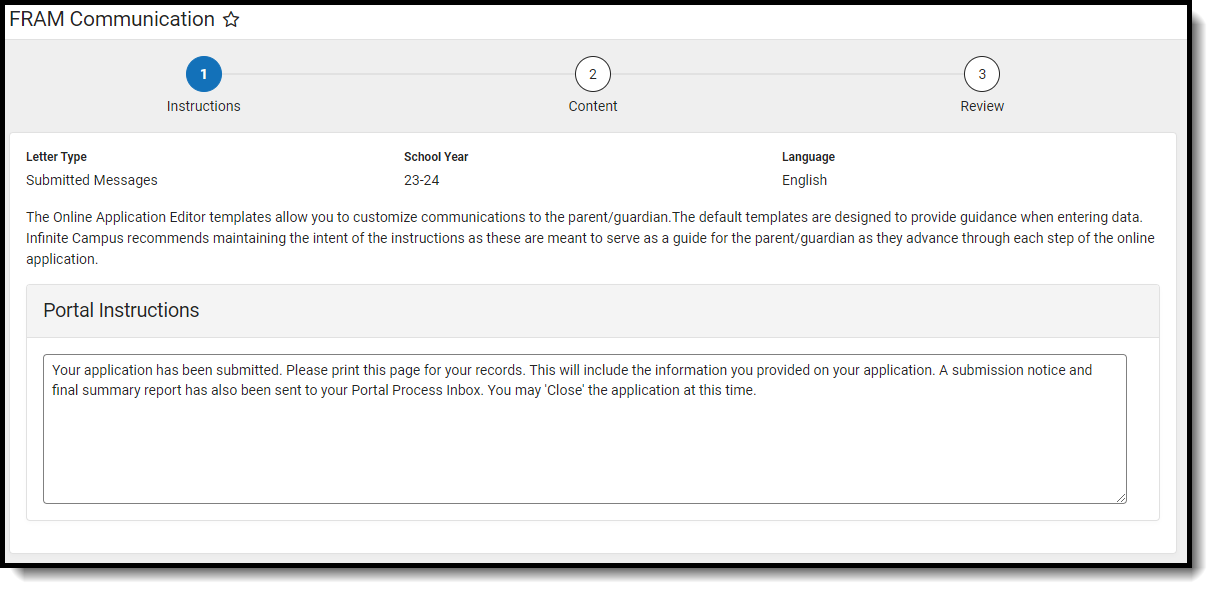
Submitted
The Submitted Response Instructions Header provides information to the parent/guardian about the submitted application, inbox message and how to print the PDF. The Submitted Response Content section provides information to the parent/guardian about the application reference number and any additional information the district would like to provide. This is also available as a PDF in the signer's inbox.