Campus Instruction is designed to provide teachers with all of the tools needed to effectively manage classrooms and instruction. Some of the basic features include: managing daily tasks, defining account settings, viewing the roster, creating seating charts, taking attendance, and sending class messages.
Introduction
Welcome to Campus Instruction!
Campus Instruction provides educators with all the tools they need to effectively manage classroom instruction and their students. The Classroom Instruction application is available to all users who have been given tool rights to it. Additional tools are available as part of the Campus Learning premium offering.
Welcome to Instruction!
Instruction is designed to collect all of the tools teachers need to manage classrooms and instruction effectively. This application is available to all users who have been given tool rights to it. Additional tools are available as part of the Campus Learning premium offering.
All Campus users have two views available: the Classic View and the New Look. Check out this Try New Look video for more information. To turn the New Look on, click the User icon in the top right corner. Account Settings are also available from this user icon. The top right corner of the screen also includes the help icon and notifications.
See the Tool Rights (Instruction) article for more information about the tool rights that govern access to instruction tools.
Classic View
To open Instruction in the classic view of Campus, click the app switcher and select Instruction in the menu that opens.
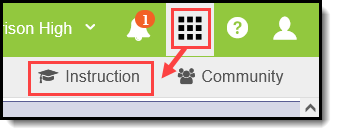
Use the App Switcher to open Instruction
The app switcher in Campus Instruction is located at the top left of the screen. Click Campus Tools to return to the rest of Campus.
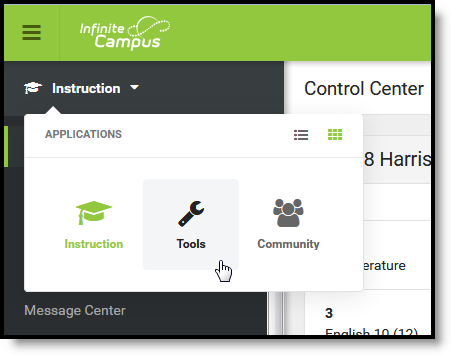
The app switcher is Instruction is in the top left
New Look
To access Instruction in the new look of Campus, expand the navigation on the left side and click Instruction to view lists of all tools, grouped into related categories.
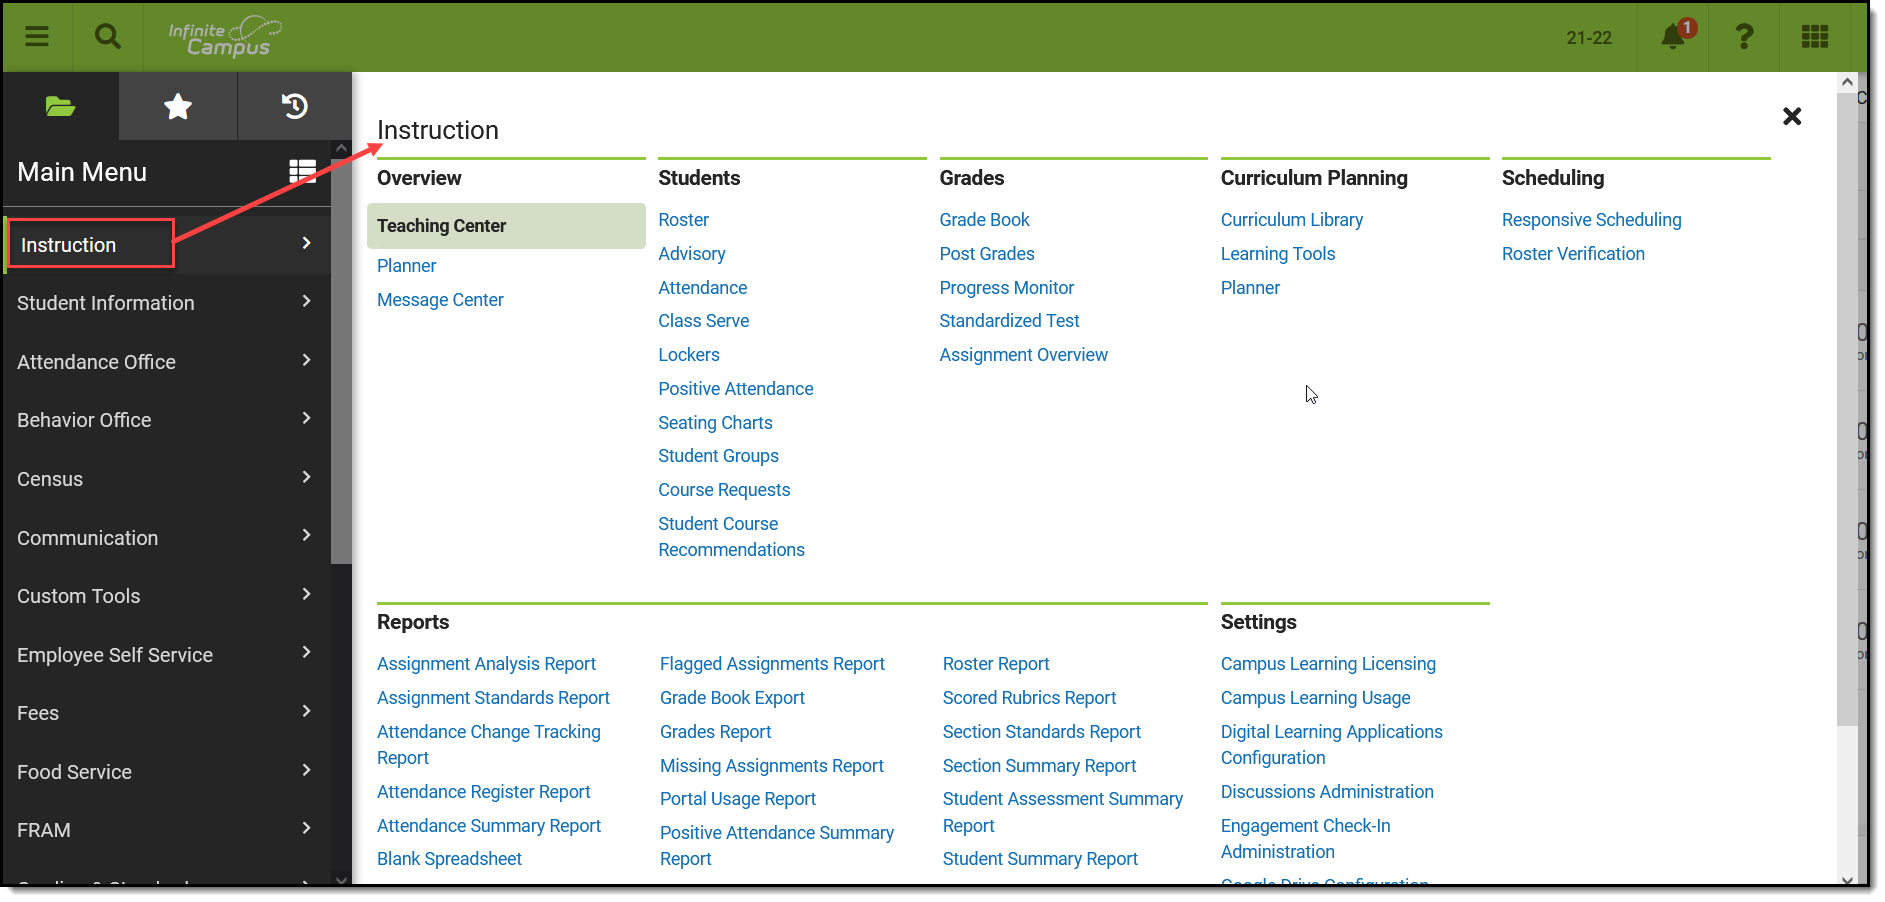
The top right corner of the screen is also where you access the Community and where you log off of Campus. Account Settings are also available from this user icon.
Instruction Tools
Below are links to help content for Instruction tools:
If Classroom is enabled, additional columns display in the navigation for Classroom and Curriculum.
Teaching Center
The Teaching Center
The Teaching Center provides teachers a hub for a variety of common tasks. Current day attendance and assignments to be scored are displayed and sorted by period. This tool has been optimized for use on mobile devices, such as phones and tablets.
Tool Search: Teaching Center
The Teaching Center provides a hub for a variety of common teacher tasks. Current-day attendance and assignments to be scored are sorted by period. Teachers in districts with Campus Learning have access to additional tools.
This tool has been optimized for use on mobile devices, such as phones and tablets.
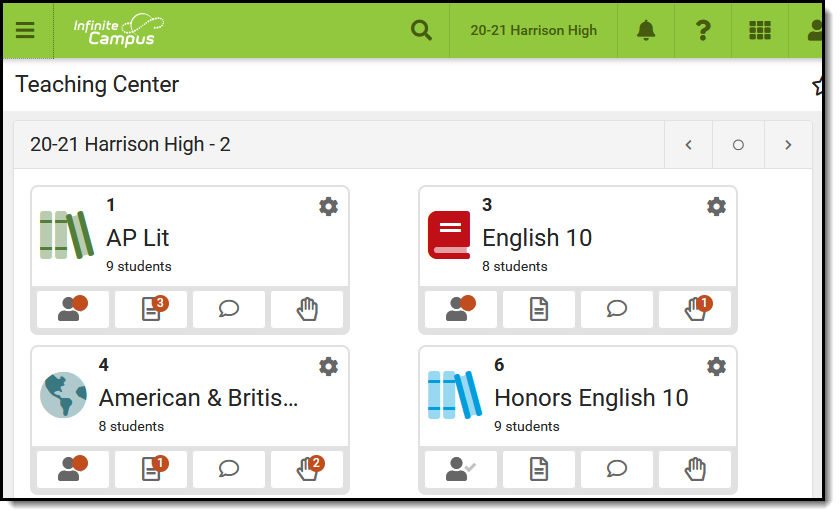 Use the Teaching Center to take attendance and score assignments easily, as well as other common tasks.
Access to this tool is not governed by tool rights. Any users with access to Instruction tools can view Teaching Center.
The calendar name displays at the top of the Teaching Center, followed by a dash and the Term. Navigate between terms using the arrow buttons at the top right. Sections are grouped by period into tiles for each classroom. If one section meets during the period, the Course Number - Section Number and the Course Name display. If multiple sections meet during a period, the number of sections is listed, as shown in the image below.  The default view of periods in the Teaching Center. Customize in the Settings menu (gear icon).
Buttons display for each period that open side panels to take attendance and score assignments. Additional buttons may display for teachers with Campus Learning.
Additional options may display based on tool rights and district setup.
| Discussions If you have tool rights to Discussions, a button displays with a speech bubble icon. Click this button to view the Discussions tool in a side panel. From there, view student responses and reply. Use the discussions tool itself to create discussions, or create scored discussions in the assignment editor. | Questions If your district has enabled Student Questions and you have turned it on in the Settings for a section, a button displays with a hand icon. Click this icon to view questions students have ask and respond. See the Student Questions article for more information about enabling and using this feature. |
Sections that meet in other days of a day rotation are listed at the bottom, if applicable. The Teaching Center does not obey context of the School and Calendar selected so that teachers can view information for everywhere they teach. Assignments with a due date in the current term are displayed.
Classroom Settings
Click the gear icon at the top right of each period to customize that tile.
In the Settings menu, customize the name of the classroom. This name only displays here in the Teaching Center, it does not appear anywhere else in Campus, for you or your students. The Included Sections list includes all sections that meet during this period. Customize the icon that displays for each period by selecting an icon and color. A Preview of what the icon looks like displays. Click Save to apply your changes. | 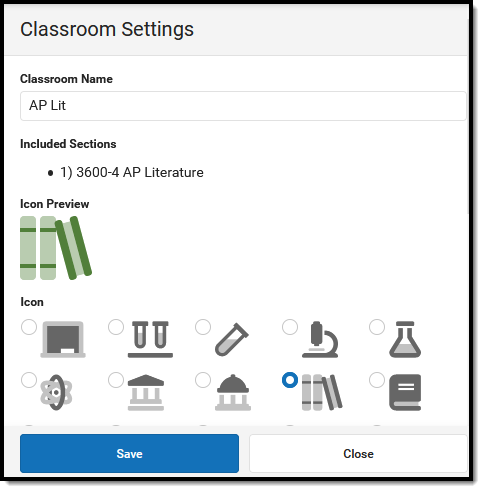 |
Taking Attendance
Attendance that has NOT been taken is indicated by a gray check next to the student icon. Completed attendance is indicated with a green checkmark. Note: the following is a known issue with these attendance indicators. If the period has a Sequence number of 63 or higher, an indicator of whether attendance has been taken does not display.
Click the student icon, the first one in each tile, to enter student attendance.
| Mark the Present, Absent, or Tardy buttons to record student attendance. Click Click Save when finished. If attendance has been recorded by the attendance office, the attendance code displays with any comments, which cannot be edited by the teacher. |
Tip: If a student is in multiple sections in the same period (such as skinnied courses) the student is only listed once in the attendance list.
Blended Learning/Virtual Attendance
Beginning in the fall of 2020, Campus supports Blended Learning scheduling, which allows schools to create groups of students to rotate through in person and virtual instruction. Based on a variety of Virtual Attendance Preferences managed by the school or district, teachers may see a variety of options for recording virtual attendance. Depending on Blended Learning groups, students in a section are divided into Physical and Virtual sections. The options for recording virtual attendance vary based on district setup: Virtual Attendance Scenarios:
| 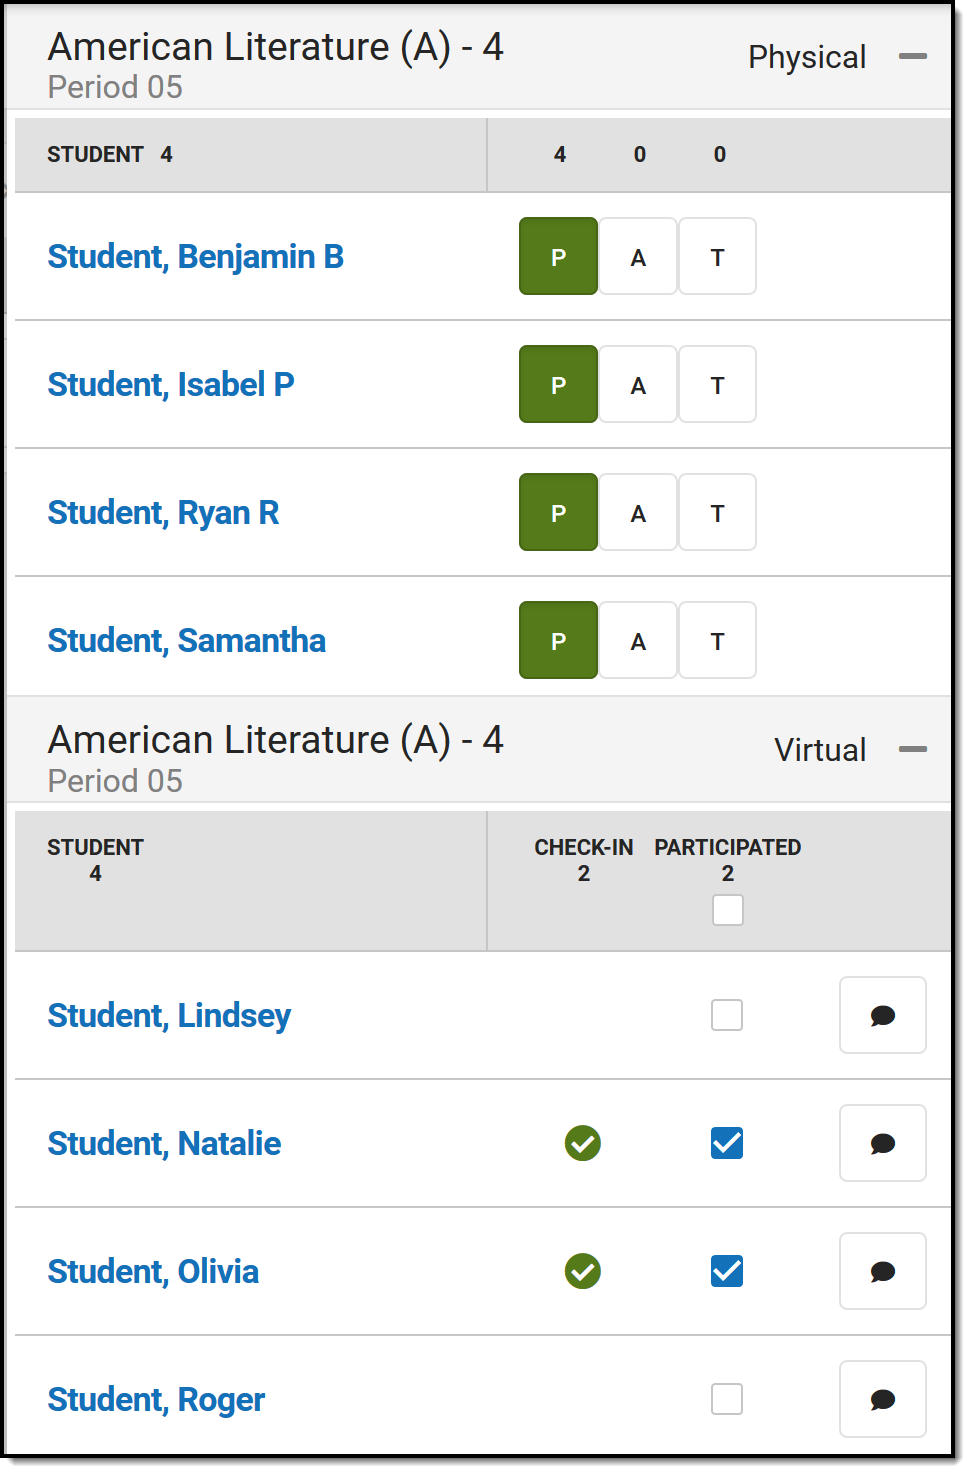 Record Physical and Virtual attendance.
|
Note: Participation information, including Participation Comments, is not visible in in Campus Student and Campus Parent. For Virtual Attendance, students and parents can only see whether the student checked in and if the teacher unmarked the Participated checkbox after the student checked in. Within Campus, participation information is visible in the Classroom Monitor, the Section Attendance tool, and in Ad hoc Reporting. | |
Scoring Assignments
The Assignments icon allows teachers to score assignments due on or before the current day. To display, an assignment's End Date must be within the current Term.
| In the panel that opens, unscored assignments are listed by default. Click All to view all assignments in the section or Missing to view assignments flagged as missing. Three numbers display for an assignment.
When all students have been scored, the assignment is removed from the Unscored list. |
Click on an assignment to score it. The scoring window that displays depends on the size of the device you're using and whether the assignment has submissions enabled. If submissions are enabled, the submission scoring screen displays. For assignments where submissions are not enabled, clicking an assignment to score it opens the full scoring editor used elsewhere in Campus Instruction. On a small device like a phone, a simple scoring editor displays. Using the buttons at the top, view All students (including those with scores), only Unscored, or those flagged as Missing. Click |
|
- Filling Scores: Fill options display at the top of the scoring panel. Anything entered in the Fill Scores area overwrites data entered on the current panel.
- Scoring Individuals: Scores and flags can also be recorded for individual students. Enter numeric scores or select a score from the dropdown for assignments scored using Marks or Rubrics.
- Assignments with multiple alignments display with multiple score fields.
- Scores that include extra credit are shaded blue.
- If students have individualized due dates, a Due Date displays for each student. Otherwise, the Due Date displays at the top.
- Any attendance events on the due date are indicated.
- Flags: Click
 to add flag and comment fields to each student. Click the Turned In button or use the flag dropdown list to select a different flag. Once a flag is selected, click it to remove it. Keyboard shortcuts, such as typing 'M' to flag as missing, cannot be entered in the Teaching Center. The Turned In and Missing flags cannot be marked at the same time. If a score is entered for an assignment flagged as missing, options display for resolving the flag.
Student Information
| Click on a student's name to open the student information panel. Basic information about the student is listed at the top, with sections for additional information. If the student has a health condition, an icon displays with a link to additional information. Click View Profile to view additional student information in the Profile. If your school is using Blended Learning, the students blended learning group also displays. |
| Section | Description | Example Image |
|---|---|---|
| Contact Information | Contact Information is based on the student's Household. The emergency contact priority is shown below the individual's name, if entered. |
|
| Today's Schedule | The student's schedule is listed with Room numbers. The section where the student is currently scheduled is indicated with a border. |
|
| Grades | Grades are only shown for the current section, from which the student's information was accessed. |
|
| Attendance | Attendance is shown for the current month, for this section only. Absences and tardies are totaled in the legend at the bottom. Scroll within the calendar to view other months. |
|
From the Teaching Center, teachers can quickly view current tasks for their assigned course sections. In this video, teachers will learn how to use various Instruction tools from the Teaching Center.
Previous Versions
Teaching Center - Video [.2247 - .2523]
Teaching Center - Video [.2227 - .2243]
Student Questions
The Questions tool allows students to ask teachers questions through Campus Student, which teachers respond to through the Teaching Center.
Location: Teaching Center > click the hand icon
The Questions tool allows students to ask teachers questions through Campus Student, which teachers respond to through the Teaching Center.
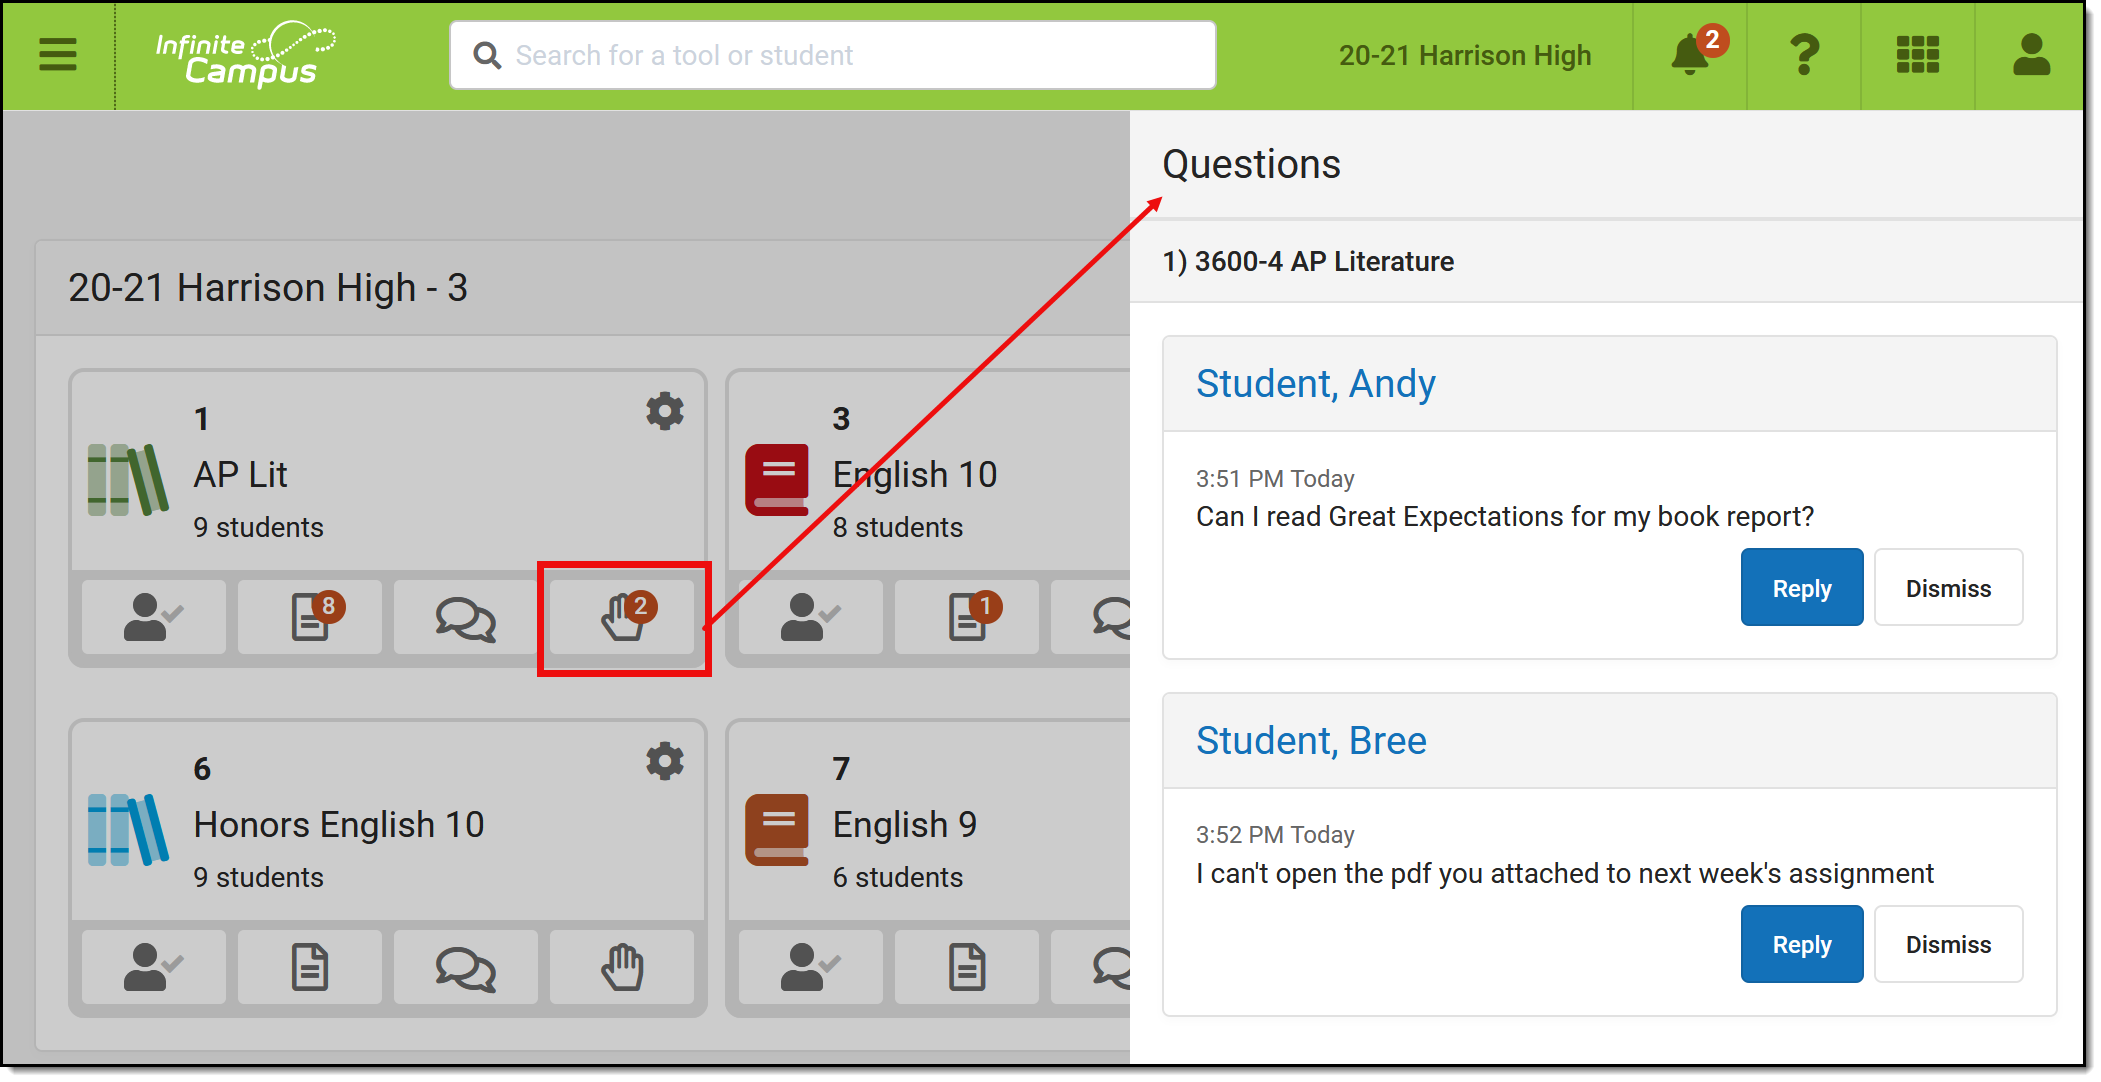 Enable Questions to allow students to ask simple questions through Campus Student.
Enabling Questions
Enabling the Questions tool is a two-step process:
| School Level | Section Level |
Before it is available in the Teaching Center, Questions must be enabled in your schools Portal Display Options: | Once enabled for your school, an Enable Student Questions checkbox is added to your Teaching Center settings, accessed through the gear icon.
|
Ask a Question - Student
Once enabled in the Portal Display Options and at the section-level, a hand icon displays for students in various places around Campus Student, including the Today screen. Once you enable questions for a section, students will receive an informational pop-up the first time they log in. Students click the hand icon to enter a question and click Raise Hand to submit it. They can also click Raise Hand without asking a question, such as to get the teacher's attention in a classroom setting. Once a student submits raises their hand, the hand icon displays as red. | 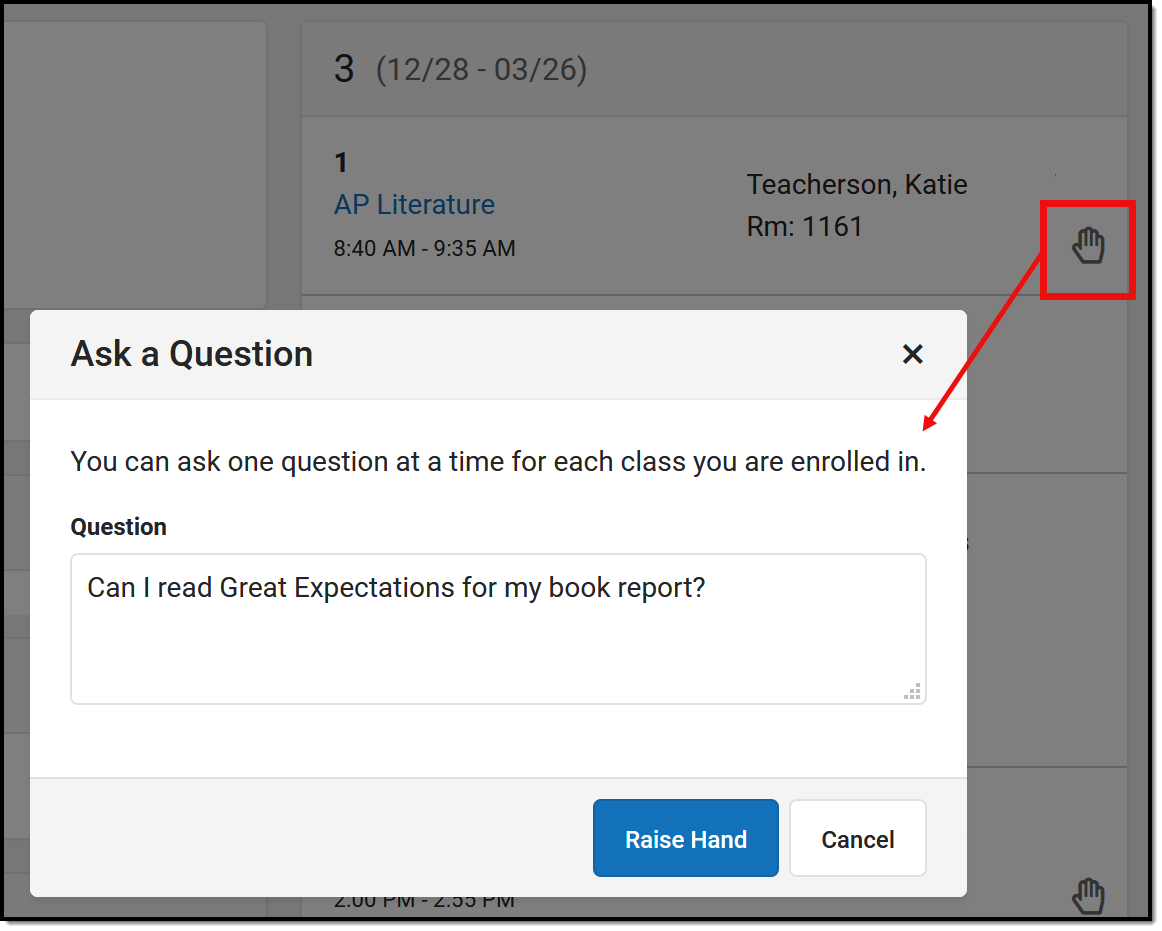 Students click the hand icon to ask a question.
|
View and Respond - Teacher
When a student has asked a question, a red dot with a number displays on the hand icon in the Teaching Center. Click the hand icon to view the question(s):
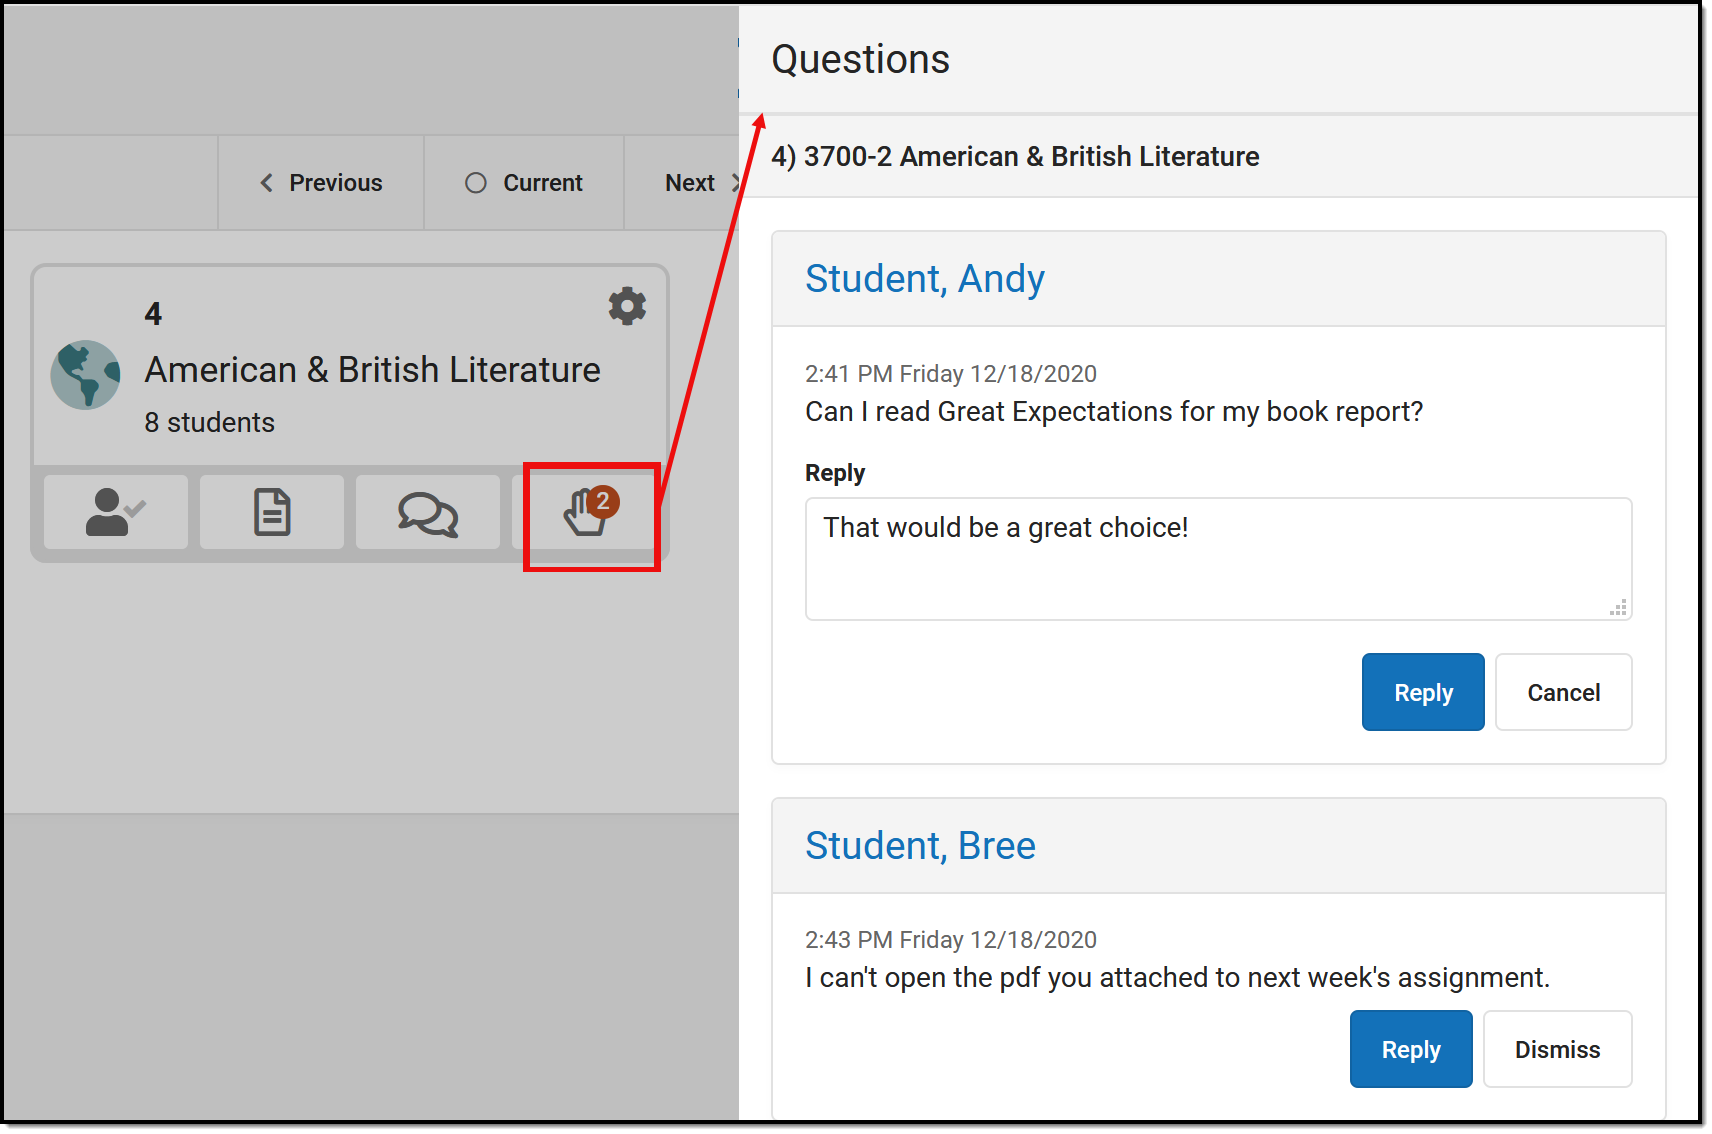 Click the hand icon to view and respond to student questions.
Click Reply to type an answer to the student, or Dismiss if you're responding in some other way. Once you respond to a question, it disappears from your view.
Receive an Answer - Student
When a teacher has responded, the hand icon in the student's view changes to a green speech bubble. Students click this icon to view the teacher's response. At this point, the student has three options:
| 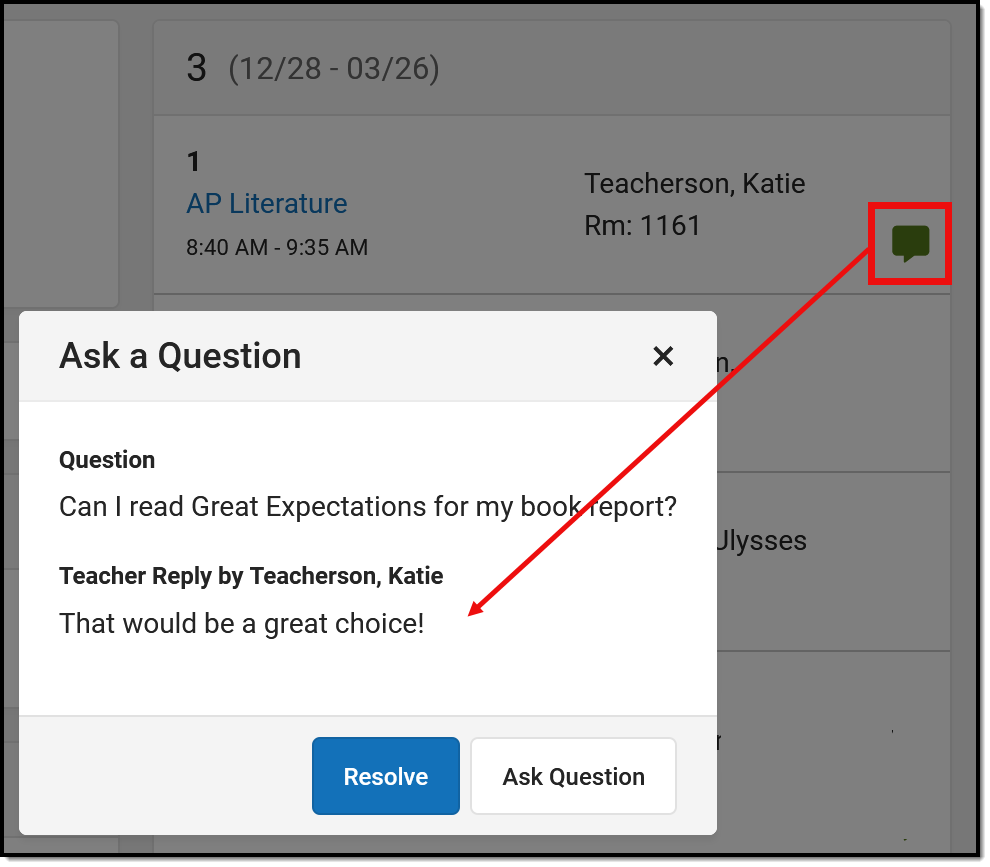 Students click the green speech bubble to view response. |
Once a teacher replies, the student's question disappears from their view. Once a student resolves a question, the question and answer both disappear from their view. Records are kept in the database, but resolved questions are not visible in Instruction or Campus Student.
Using the Student Questions tool, teachers can view and respond to student questions. In this video, you will learn how teachers can use the Student Questions tool.
Engagement Check-In
Teachers can use the Engagement Check-In tool to gauge students well-being and level of engagement in class and with curriculum.
This tool is available as part of the Campus Learning premium offering.
Location: Teaching Center > click the Smiley Face icon
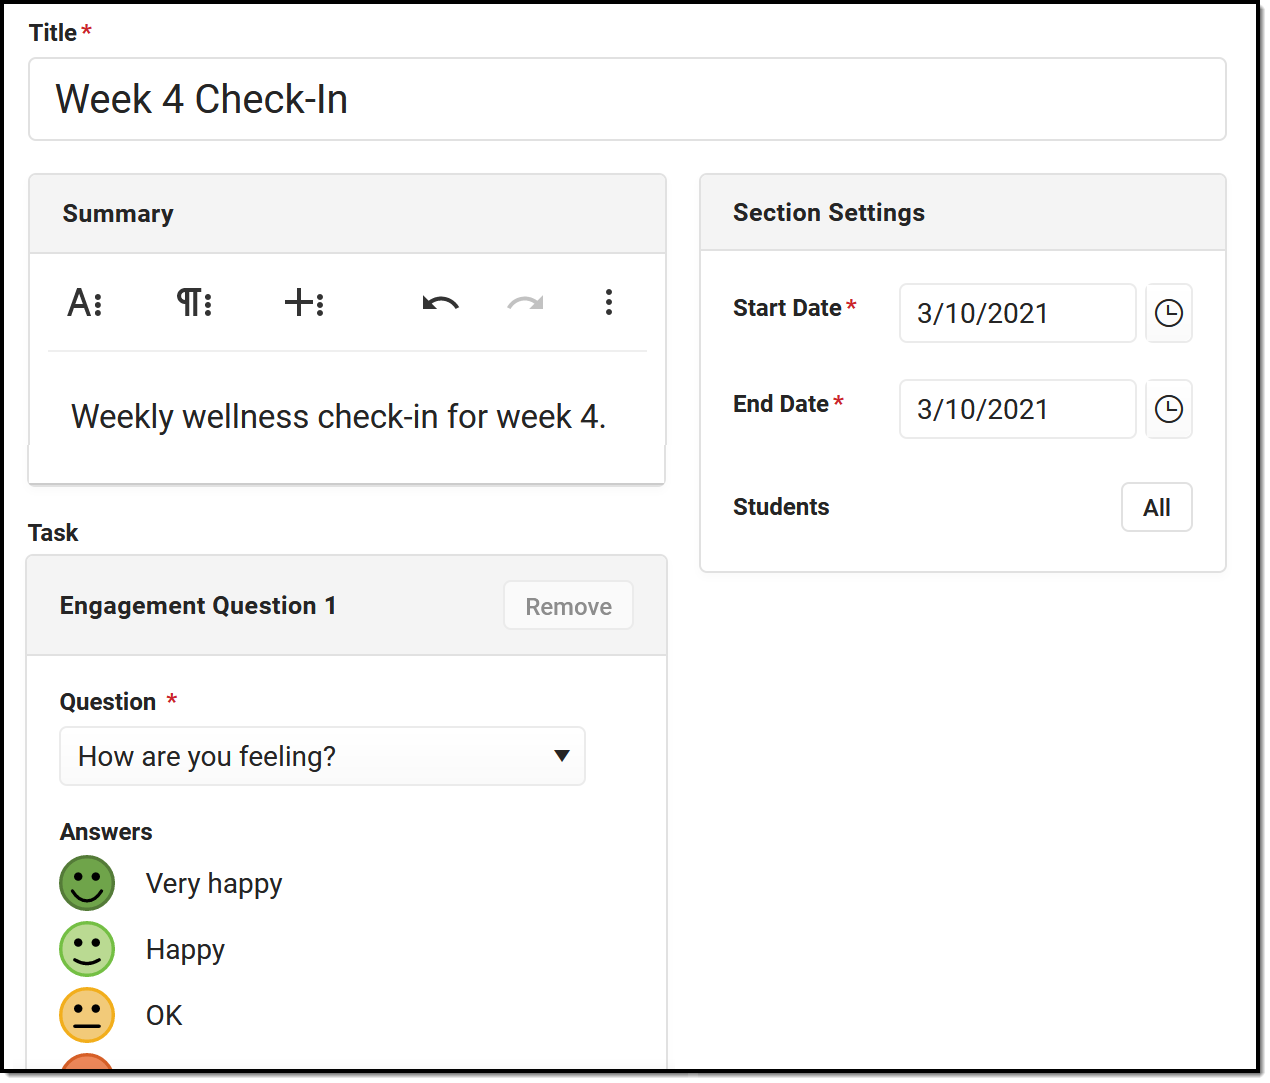
Create an Engagement Check-In to help gauge student well-being and engagement in your class and with curriculum. Questions relate to overall well-being, engagement in class, and feelings about specific assignments and curriculum.
Check-Ins display on the Today screen in Campus Student. Check-Ins are not visible in Campus Parent.
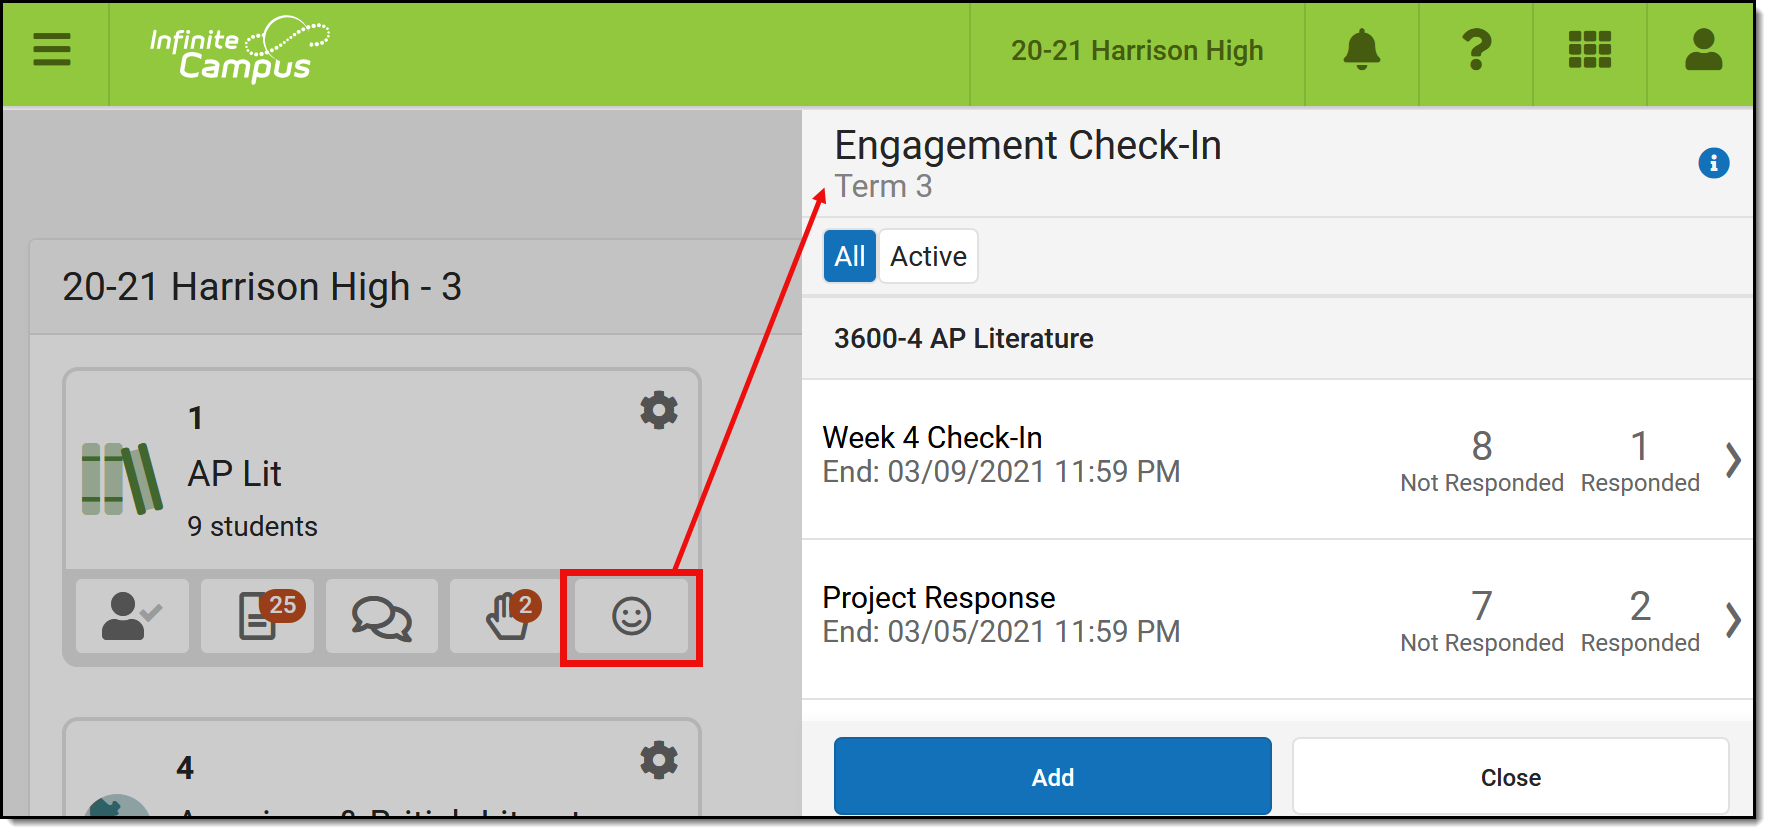 Use an Engagement Check-In to solicit information about student well-being and engagement.
Filter between All and Active Check-Ins using the buttons at the top. A Check-In is Active when today's date falls within the Check-In's date range.
Individualized and Hidden check-ins are indicated with labels.
See the Instruction Tool Rights article for more information.
Create a Check-In
To create a Check-In, click the icon to open the Check-In list and click New.
|
 |
In Campus Student
In Campus Student, students access Check-Ins from the Today screen:
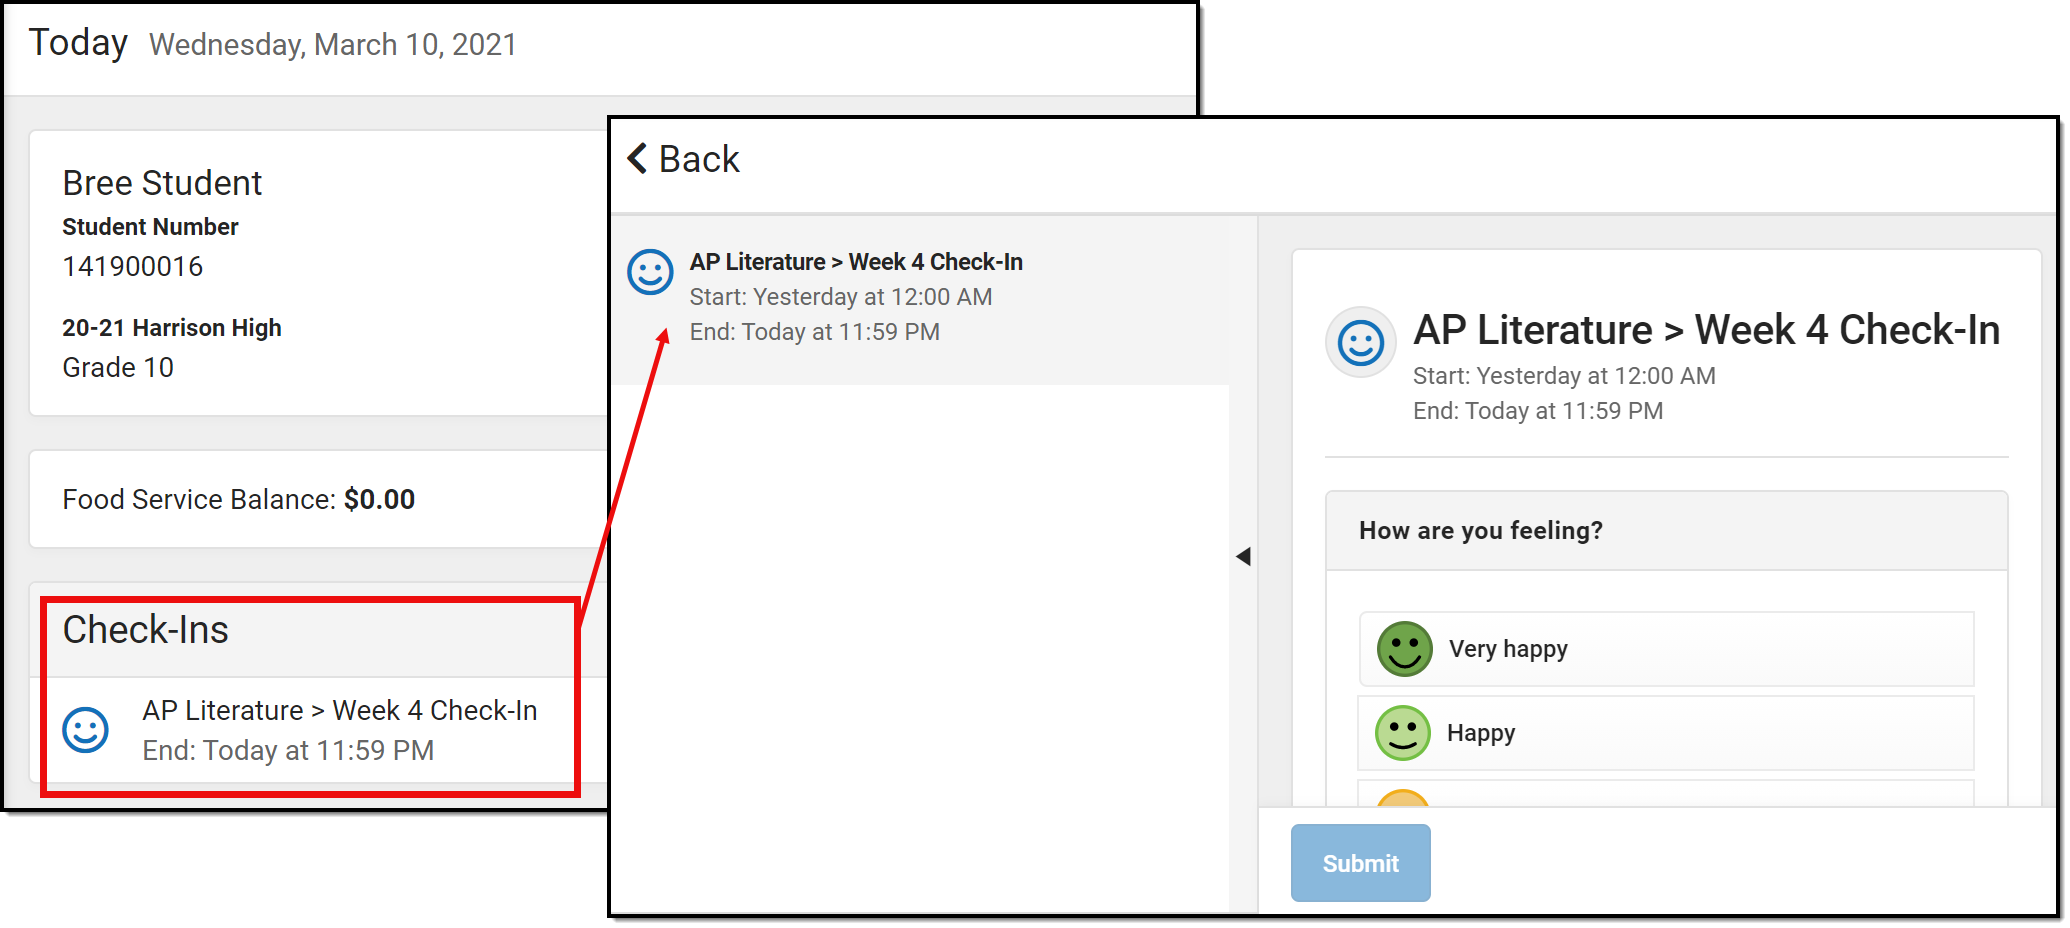 Students access Check-Ins from Campus Student.
View Check-In Results
Open a Check-In and click Edit to make changes. Questions cannot be changed once a student has responded. |
Open an existing Check-In to view results. Three tabs display: Detail, Response Summary, and Student Response.
Detail
The Detail tab shows a read only view of the Check-In.
Response Summary
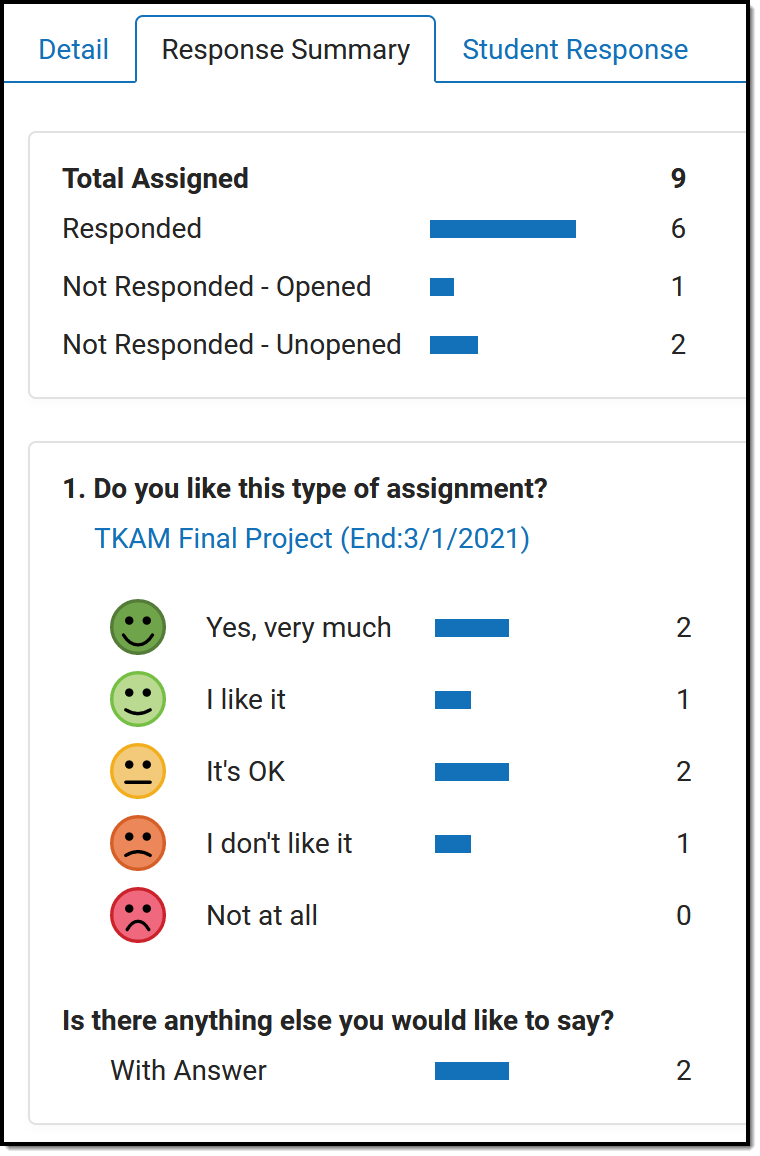
The Response Summary tab summarizes the number of students who have and have not responded and shows a distribution of answers per question.
The Total Assigned section shows the number of students who received the Check-In. The totals of who have responded, who have not responded but have opened the Check-In, and who have not responded or opened the Check-In also display.
For each question, the total number of students who selected each answer is displayed. Hover over a response and then the eye icon that displays to see a tooltip listing the students who selected that response. If the Check-In included a Follow-Up question, the total is the number of students who responded to that question.
Click on any total or response to view a filtered version of the Student Response tab. |
 |
Student Response
The Student Response tab shows responses by student.
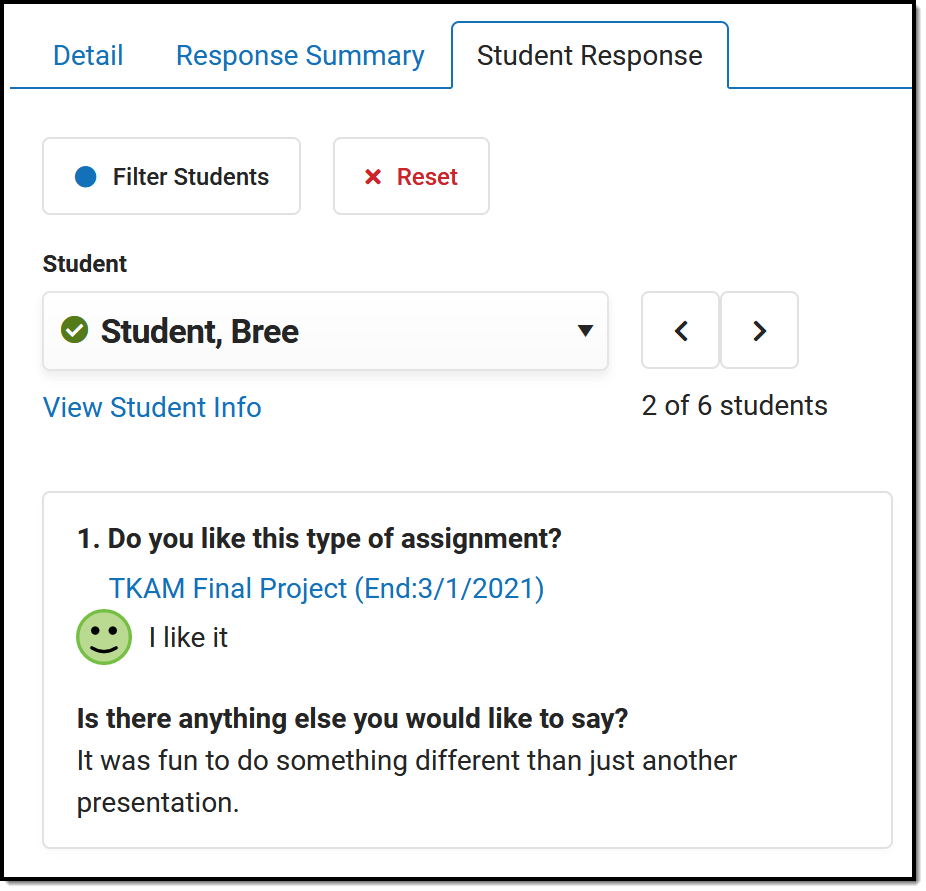 |
Navigate between students using the Student dropdown list or the arrow buttons next to it. The selected student's response displays.
Click View Student Info to view information about the student as shown in the Teaching Center.
Filters Click Filter Students to limit the Student dropdown list to only those who meet the selected criteria. For example, filter the list to only students who had negative responses or those who responded to the Follow-Up question. Click Reset to clear the filter. |
Engagement Check-Ins are included as part of the Campus Learning Suite premium offering. Visit the Campus Learning Suite page to learn more.
Teachers can use the Engagement Check-In tool to gauge students well-being and level of engagement in class. In this video, you will learn how to create an engagement check-in and review student responses.
Section Feed
Teachers can use Section Feed to create and view posts to communicate with students in their course sections.
This tool is available as part of the Campus Learning premium offering.
Location: Teaching Center > Click the speech bubble icon
A Section Feed is the collection of communications for a section. The feed consists of posts and their replies. Teachers can create posts and replies; students' communication options depend on the Section Feed Settings but may include posting, replying, and uploading attachments.
To view a section's feed, click the speech bubbles icon in the Teaching Center. A Section Feed side panel displays.
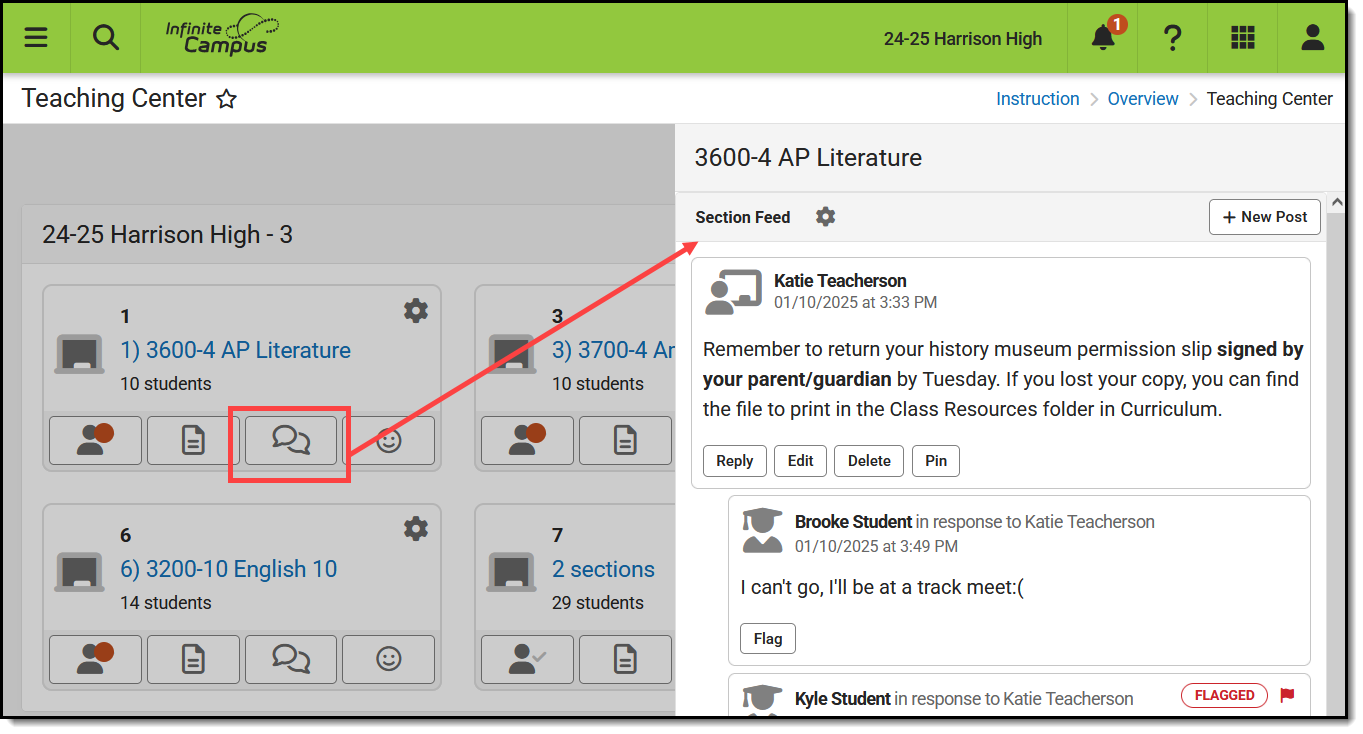 The Section Feed allows a teacher to communicate with students and parents in a class.
 There are no specific tool rights needed for teachers to access Section Feeds. The tool is visible to teachers if it is enabled for any Portal users (parents and/or students). For administrators, the Section Feed Administration tool rights in Instruction > Settings grants full access to that tool.
See the Instruction Tool Rights articles and the Instruction Settings Tool Rights article for more information.Create a Post
- Click the
 button for a section in the Teaching Center.
 - Click New Post.
- Enter the text of your post in the editor that displays. Use the options along the top of the editor to expand WYSIWYG options for formatting the text, including adding images and links.
- To add this post to the feeds of multiple sections, click Add Section. The list of your sections displays, with included sections listed at the bottom. Note: adding sections will add this post to each section's feed, not create a multi-section feed where students in multiple sections can respond to each other.
- Click Post when finished.
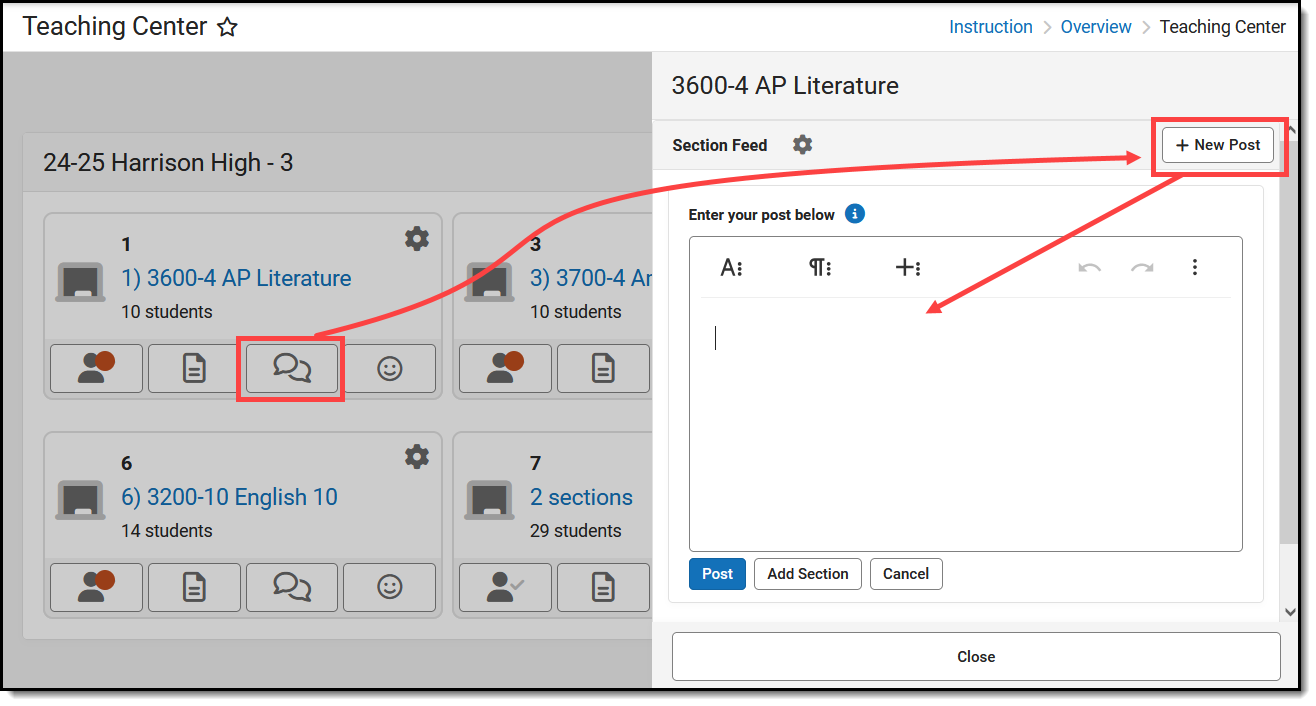 Create a New Post to communicate with students in a section.
View Posts and Replies
When a Feed has new posts or replies, a red dot displays on the speech bubble icon in the Teaching Center. Click the icon to view the Feed. Replies display in the order they were submitted.
From this view, you can Reply to a post, Edit or Delete your own posts, or Pin a post so it always displays at the top of the Feed. Deleted posts and replies are maintained in the database.
Resolve a Flag
 Resolve flags by removing the flag or deleting the post/reply. Resolve flags by removing the flag or deleting the post/reply. |
Inappropriate posts can be flagged by the teacher or by another student. Discussions with a flagged post are indicated by a
To address the flag, click Resolve Flags. A side panel displays that shows who flagged the reply and the Reason it was flagged. From there, you can either Remove Flags to keep the reply or Delete Reply to remove it from the Feed. Deleted posts and replies are maintained in the database. |
Section Feed Settings
Section Feed Settings determine how students can interact with the Section Feed as well as a display setting for your teacher view.
Settings apply to the whole feed. It's not possible to control student permissions on a post-by-post basis, such as allowing replies to one post but not another. However, the permissions can be turned on and off over the course of the term.
Student Posting Permissions
User Feed Display Settings
|
 Click the gear icon in the Feed to view Settings. Click the gear icon in the Feed to view Settings. |
Note: Deleted posts and replies are maintained in the database.
Section Feed In Campus Student/Parent
 |
Once enabled, students and parents view the Section Feed by clicking the name of the course anywhere in Campus Student or Campus Parent. The Section Feed displays in the Classroom tab with the other course information. |
In Campus Student or Parent, click the Course Name to view the Section Feed.
| |
Section Feed is included as part of the Campus Learning Suite premium offering. Visit the Campus Learning Suite page to learn more.
Using Section Feeds, teachers can create and view posts to communicate with students in their course sections. In this video, you will learn how to create, view, and manage posts and replies within the Section Feed.
Classroom
Classroom
Teachers using Classroom can view curriculum at a glance and navigate between tools while staying within the context of their classroom. Compared to the traditional tool-based organization, Classroom provides a section-based experience designed to streamline a teacher's time in Campus.
Location: Classroom
The Classroom is a new way of navigating Instruction that provides commonly-used tools in the context of a specific section. Compared to the traditional tool-based organization, Classroom provides a section-based experience designed to streamline a teacher's time in Campus.
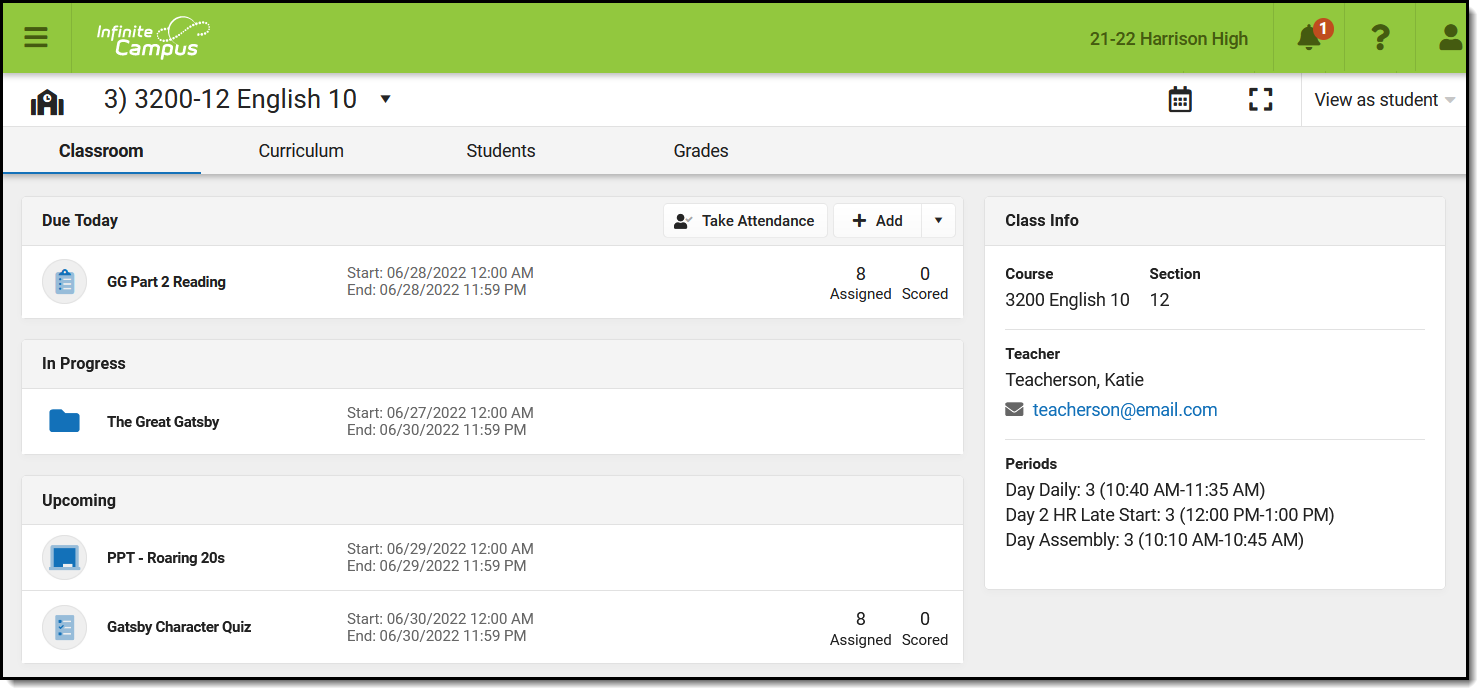 Classroom organizes Instruction tools by section.
Enable ClassroomClassroom is enabled for teachers by default. If desired, turn it off using the toggle in the top corner of the Teaching Center (formerly Control Center). With Classroom enabled, section names in the Teaching Center become links to open Classroom in the context of that section. | 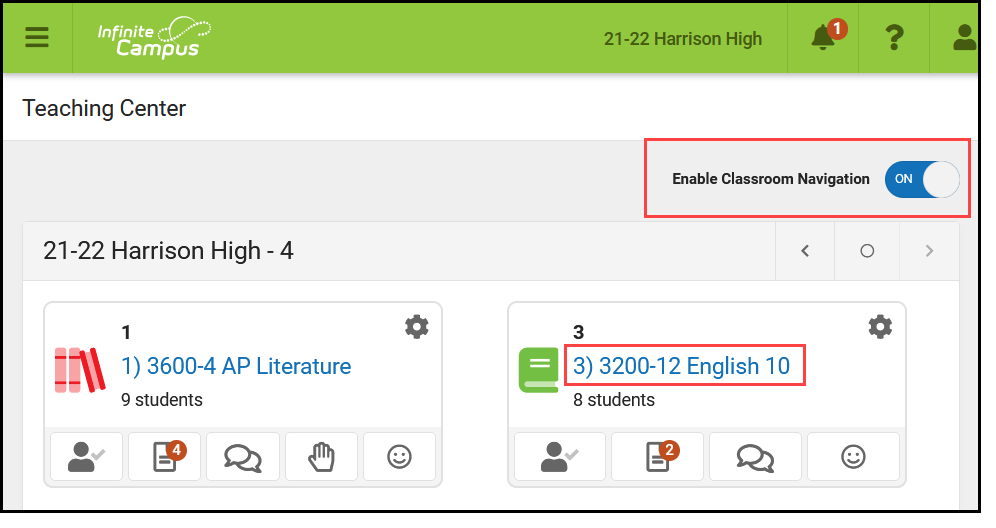 |
Understand Classroom
All of the tools in Classroom are already scoped to the section selected in the dropdown list at the top. Change the section using this dropdown or by clicking the home icon in the top left corner to return to the Teaching Center and select a different section. The color used for icons throughout Classroom matches the color you selected for the section in the Teaching Center.
Click View as Student in the header and select a student to view Classroom, Curriculum, and Grades tabs as they are shown in Campus Student. Individual curriculum items also display as students see them. Navigate between students using the dropdown list or click the X to return to you view of Classroom.
In Classroom, tools are divided into four tabs:
Classroom
The Classroom tab provides an at-a-glance view of the current curriculum for the section. Curriculum is sorted into the following sections:
- Due Today: curriculum whose End Date is today.
- In Progress: curriculum for which today falls within the Start and End Dates.
- Upcoming: curriculum with a Start Date in the next week.
| Each type of curriculum has its own identifying icon. Links below provide more information: | |
 | Folders |
 | Assignments |
 | Resources |
 | Discussions |
 | Quizzes |
 | Submissions |
| Imported Assignments | |
Click on the name of a piece of curriculum to view it. For curriculum that can be scored, numbers display to the right to provide more information:

| Turned In | Assigned | Scored |
| The first number, in red, indicates if there are unscored submissions for the assignment. Click this number to view and score student work. | The assigned number indicates how many student have been given this assignment and have not turned it in or received a score. Click this number to individualize the assignment | The scored number indicates how many students have received a score for this assignment. Click this number to open the scoring editor. |
To the right of the current curriculum, Class Info provides basic information about the section.
Curriculum
The Curriculum tab displays all curriculum for a section, across terms and alignments.
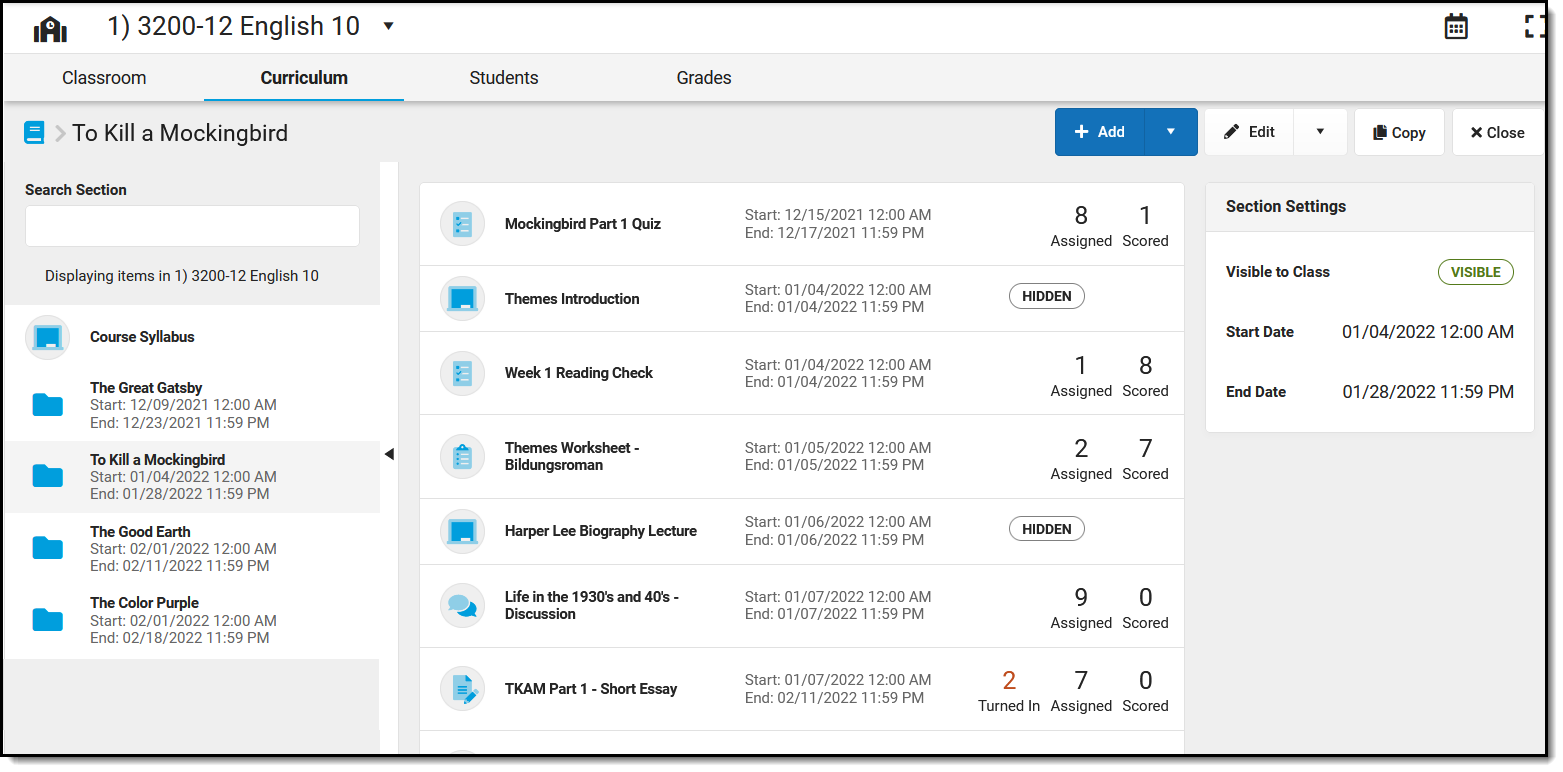
When you open the list, the highest level of your curriculum hierarchy displays. If you don't use folders to organize your content, you'll just see a list of all assignments and resources, ordered by Start Date.
In the example above, I've organized my items into folders for the books my Lit class is reading, with a Course Syllabus resource at the top to keep it visible to students. I then clicked on the "To Kill a Mockingbird" folder to view the assignments, resources, and other items nested within that folder.
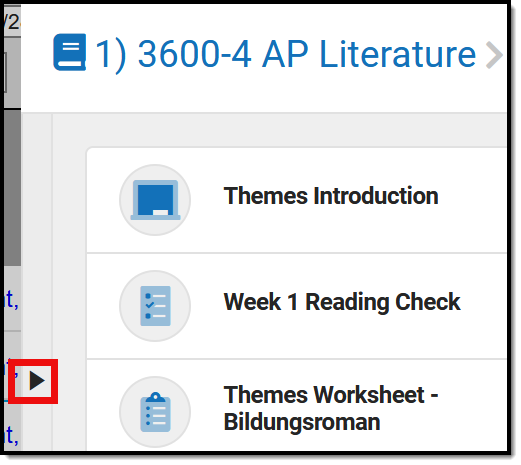 | Within a folder, click the black arrow on the left side of the list to expand or collapse the folder list. In the image above, I've expanded the folder list to display next to my assignments and resources. |
| See the Curriculum List article for more information about this tool, including Filtering the List and using Edit Mode. |
Note: the Curriculum tab looks differently to teachers who don't have the Enhanced Curriculum tool right.
Students
The Students tab collects a variety of tools related to classroom administration in the context of the selected section. See the articles linked below for more information about these tools:
- Roster
- Advisory
- Attendance
- Class Serve
- Lockers
- Positive Attendance
- Seating Charts
- Student Groups
- Course Requests
- Course Recommendations
Grades
The Grades tab collects scoring and grading tools in the context of the selected section. See the articles linked below for more information about these tools:
Teachers using Classroom can view curriculum at a glance and navigate between tools while staying within the context of a specific section. In this video, you will learn how to view and use Classroom.
Previous Versions
Classroom - Video [.2403-.2523]
Account Settings
Managing Account Settings
The Account Settings tool is used to define application preferences and student display options that appear throughout Campus Instruction.
Location: Click the User icon > Instruction Settings
These preferences apply to your entire account.

|
Preference |
Description | ||
|---|---|---|---|
|
Default Application |
The application that loads automatically when you sign in to Campus, either Campus Instruction or Campus Tools. | ||
| Student Display | |||
|
Show Active Students Only |
Mark this preference to prevent dropped students from displaying outside the Roster. If not marked, dropped students display in red text. | ||
|
Show Student Number |
Mark this preference to view students' numbers following student names. | ||
| Show Student Pronouns
|
Mark this preference to display students' pronouns next to their name in the Roster, Seating Chart, Attendance, Positive Attendance, and the student demographics information that displays when you click a student's name.
| ||
|
Show Student Picture |
Mark this preference to view student pictures throughout Campus Instruction. | ||
|
Mark this preference to set the default seating chart as the default view when taking attendance, rather than a roster list. | |||
| Use Canned Comments | Mark this preference to add a Canned Comments link in the Grade Book, which are added via the Report Card Comments column in the Posted Grades section of the Grade Totals, and the Post Grades tool. Canned comments are created in Grading Comments. | ||
| Pass/Fail Coloring |
Used in the Grade Book, Planner, and Progress Monitor. With the release of Campus.1945, these Pass/Fail Coloring settings apply to all of your sections. | ||
| Show Pass/Fail Coloring for Grades | Mark this preference to turn on color coding for students' In Progress Grades and Proficiency Estimates, with passing grades indicated in green and failing grades in red. Grades are considered passing based on the Grading Scales or Rubrics selected in the Grade Calculation Options. | ||
| Show Pass/Fail Coloring for Scores | Mark this preference to turn on color coding for student's scores on individual assignments, with passing grades indicated in green and failing grades in red. Grades are considered passing based on the Grading Scales or Rubrics selected in the Grade Calculation Options, unless there are Assignment Marks aligned to a specific assignment. | ||
| Mute Pass/Fail Coloring |
Mark this preference to use lighter shades to color code student grades and scores. Some users find the muted colors less intrusive, but color-blind users may find these shades more difficult to distinguish.
| ||
Previous Version
Account Settings (Instruction) [.2315 and previous]
The Instruction Settings allows teachers to set display preferences for Campus Instruction. In this video, you will learn how to manage preferences for Campus Instruction.
Previous Versions
Instruction Settings - Video [.2331 - .2415]
Attendance
Taking Attendance
Teachers can submit attendance from the Attendance tool using a roster list or by seating chart. Periods that require attendance submission will display at the top of the tool.
Tool Search: Teacher Attendance
One option for taking attendance is through a student list. The period you're recording attendance for appears selected at the top, as with Period 1 in the example below. The Course and Section display at the top of the attendance list. If you teach multiple sections in a period, each appears in its own section.
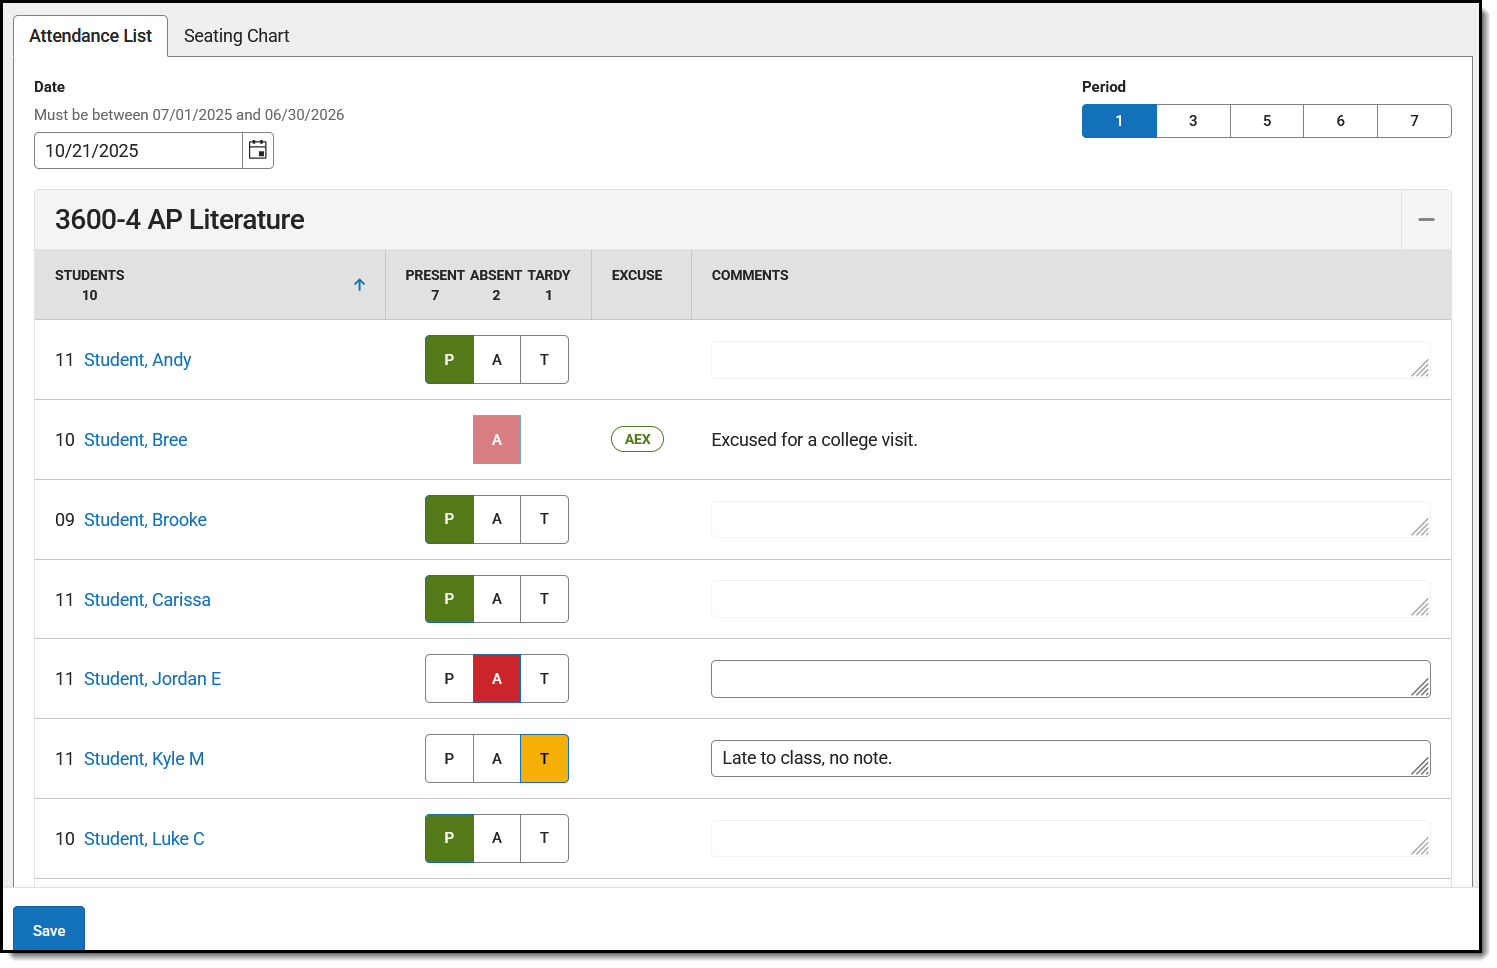 Take attendance from a roster list by marking any students who are absent or tardy and enter any comments.
Once attendance has been saved, a check mark is displayed next to the period. Note: the following is a known issue with the attendance indicators. If the period has a Sequence number of 63 or higher, an indicator of whether attendance has been taken does not display.
See the Instruction Tool Rights article for information on available tool rights.
Students who are new to your section display in green text based on the Days to Flag Roster Additions system preference.
Take Attendance
For each student:
- Use the P, A, and T buttons to indicate which students are Present, Absent or Tardy. The totals of each type calculate at the top of the columns.
- Excuses can only be entered by the attendance office; teachers cannot enter or modify them.
- Include any information you may have about the attendance event in the Comments. Attendance Comments are visible in Campus Student and Campus Parent, whether entered by the attendance office or a teacher.
- Click Save to submit the attendance record to the attendance office.
Click on a student's name to view their demographic and contact info.
If any attendance information has already been entered by the attendance office, that information loads automatically, as with Bree Student in the example above.
| Multiple Users with Access to Take Attendance
If multiple teachers in a section have the attendance tool open at the same time and save attendance, this tool records all changes to attendance. A change in attendance is considered marking a student as Absent or Tardy, reverting to Present after a student has been saved as absent or tardy, and entering or modifying an attendance comment. Example 1: Teachers A and B have Attendance open at the same time. Teacher A marks Student Z absent and clicks Save. Teacher B does not mark any students absent and clicks Save. Result: Student Z's absence is recorded, even though Teacher B saved second. Example 2: Teachers A and B have Attendance open at the same time. Teacher A marks Student Z absent and clicks Save. Teacher B marks Student Y absent and clicks Save. Result: both Student Z and Student Y's absences are recorded. |
Blended Learning - Virtual and Physical Attendance
Beginning in the fall of 2020, Campus supports Blended Learning scheduling, which allows schools to create groups of students to rotate through in person and virtual instruction. Based on a variety of Virtual Attendance Preferences managed by the school or district, teachers may see a variety of options for recording virtual attendance.
Depending on Blended Learning groups, students in a section are divided into Physical and Virtual sections in the Attendance tool. The options for recording virtual attendance vary and are described below.
When Blended Learning is in place, the Attendance screen displays in three sections, depending on setup for the day:
| Summary
At the top of the screen, the Summary section lists counts for all students in the section, as well as students who are attending Physically that day and those attending Virtually. |
 |
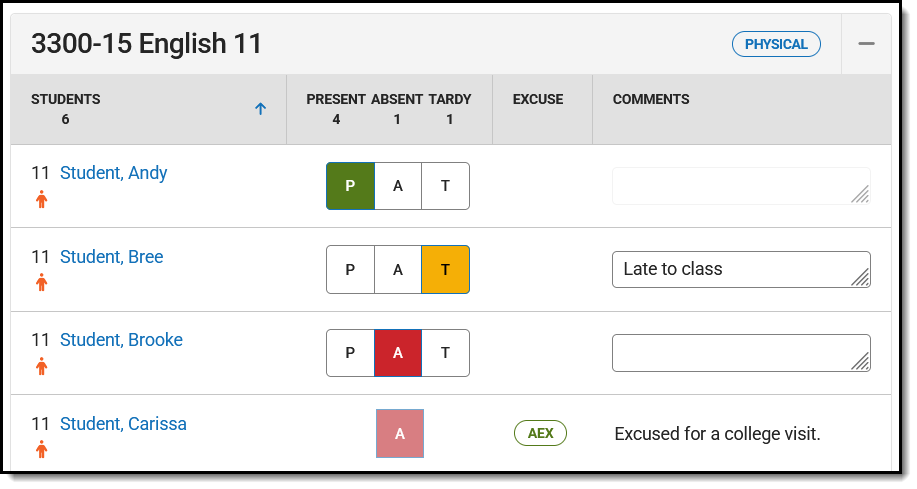
| Physical
Students attending physically display in a list that matches standard attendance described above, with options for Present, Absent, and Tardy, and any attendance and excuses recorded by the Attendance Office displayed. |
 |
| Virtual
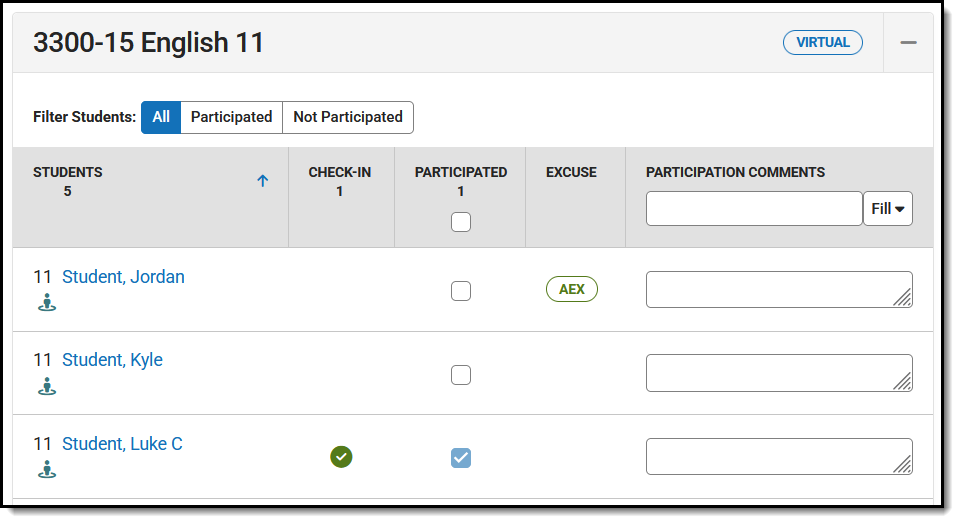
Students attending virtually are listed, with options for recording attendance that vary based on your school's Virtual Attendance Preferences. Students may check in themselves, or a teacher may record them as Participated. Scenarios are described below. |
 |
Teachers may be able to record participation for students on previous days. If so, use the date picker at the top of the screen to navigate between days. Additionally, use the date picker to view future days to see which students will be physically at school and which will be attending virtually.
Virtual Attendance Scenarios
Options are available based on district/school settings.
|
Teacher cannot record virtual attendance at all. In this scenario, attendance is processed through administrative tools and teachers can still record regular attendance. |
Teachers can mark students as Participated.
Teachers can select a Participation Type. |
|
Students record their own participation through attendance Check-Ins in Campus Student. Parents may also have the option of checking in for their students, such as for elementary age students. A green circle with a checkmark displays for students who checked in. |
Students/Parents can check in, but teachers can override by unmarking the Participated checkbox. NOTE: Depending on district setup, unmarking Participated may cause a student to be marked as absent. This checkbox is not just an indication of whether a student spoke up during an online discussion. |
|
Note: Participation information, including Participation Comments, is not visible in in Campus Student and Campus Parent. For Virtual Attendance, students and parents can only see whether the student checked in and if the teacher unmarked the Participated checkbox after the student checked in. Within Campus, participation information is visible in the Classroom Monitor, the Section Attendance tool, and in Ad hoc Reporting. | |
Physical Override
Some districts may allow students to switch from physical attendance to virtual if they want. To record this switch, districts may enable the Physical Override button at the top of the attendance screen. Click this button to view a list of students who are scheduled to attend physically and mark any who have decided to attend virtually.
Once this override is saved, any physical attendance recorded by the teacher for the student that day will be cleared and the student will be marked as Participated, which cannot be removed. To switch a student back to physical, reopen the Physical Override list and unmark the student, which marks them as Present on the attendance screen.
Previous Version
Taking Attendance with the Roster [.2403 - .2539]
Location: Attendance > click Seating Chart
Another option for taking attendance is to use the seating chart you've created for the section. The period you're recording attendance for appears selected at the top, as with Period 1 in the example below. The Course and Section displays at the top of the attendance list. If you teach multiple sections in a period, each appears in its own section.
To use seating charts for attendance, mark the Use Seating Charts for Attendance option in your Account Settings.
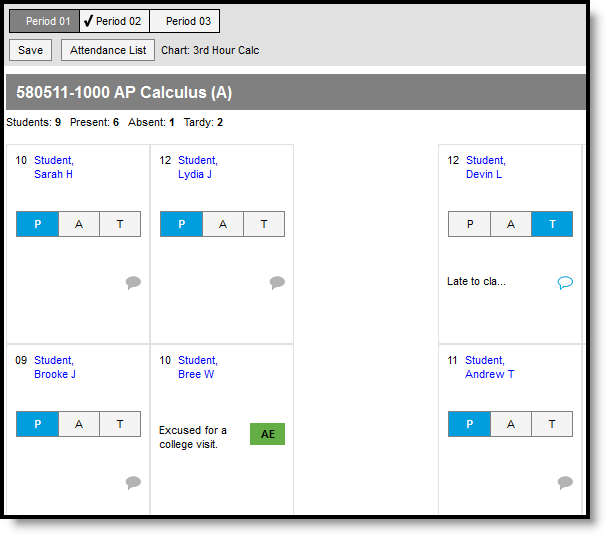
Taking Attendance Using a Seating Chart
Use the P, A, and T buttons to indicate which students are Present, Absent or Tardy. The totals of each type calculate at the top. Excuses can only be entered by the attendance office; teachers cannot enter or modify them. Include any information you may have about the attendance event by clicking the speech bubble icon and entering a Comment. Click Save to submit the attendance record to the attendance office.
Click on a student's name to view the their demographic and contact info.
If any attendance information has already been entered by the attendance office, that information loads automatically, as with Bree Student in the example above.
If a school has implemented Blended Learning, a Virtual tag displays in seating chart attendance for students who are attending school virtually. Use the roster-based attendance tool to record virtual attendance and participation.
Save
From the Attendance tool, teachers can submit student attendance using an attendance list or seating chart. This video demonstrates how to take attendance for a specific period.
Previous Versions
Take Attendance - Video [.2104 - .2539]
Roster
Viewing Your Roster
From Campus Instruction, teachers can use the Roster tool to review student information for all students in a selected course section. The Roster tool is read-only, allowing teachers to view student information, but not modify or add data. A teacher can click on a student's name to view additional Student Details and Contact Information.
Tool Search: Student Roster
The Roster lists all students scheduled into the Section you've selected. If you have Classroom enabled, the roster for the section you've selected displays; otherwise, choose a Section from the dropdown list at the top. This tool is read-only - you can view a variety of student data, but you cannot modify or add any.
 The Roster shows basic data about students in your class.
 You must be an active team member on a student IEP or PLP team for links to those documents to display. To access other documents, you must have at least Read rights to Custom Forms. See the Forms Tool Rights documentation for additional information.
See the Instruction Tool Rights article for information on available tool rights.
The roster is sorted into three sections, Incoming, Active, and Dropped.
| Section | Description |
|---|---|
| Incoming | Incoming students are those who are scheduled to begin enrollment in the section at a later date, based on the Start Date entered on their Schedule. The student's name displays in green text based on the Days to Flag Roster Additions system preference. |
| Active | Active students are those who are actively enrolled in the school and currently scheduled into the section. |
| Dropped | Dropped students are those who are no longer scheduled in the section based on the End Date entered on their Schedule, or who are no longer enrolled in the school. |
A summary of each section appears below the header which calculates the number of students in the section in each gender and grade level.
Roster Columns
The following information is available for each student.
If the Account Settings to display student picture and number are marked, those appear as well.
Data Element | Description |
|---|---|
Name | The student's name, (Last, First, and Middle Initial). |
Gender | Indicates if the student is male or female. |
| Grade | Grade level of the student's current enrollment. |
DOB | Student's date of birth in mm/dd/yyyy format. |
Start Date | Start date of enrollment in the course section, if entered on the student's Schedule. |
End Date | Last date of enrollment in the course section, if entered on the student's Schedule. Only appears for Dropped students. |
Flags | Lists program flags associated with grades, emergency contact information and other flags that may be attached to the student. Blended Learning If your school is using Blended Learning, an icon indicating the student's blended learning group that is active in the selected Term displays with the flags. |
Health | Indicates the student has a health condition. This appears as an EMT symbol. Depends on both a system preference and settings in the health condition. |
IEP | Indicates the student has an active Individual Education Plan. Click the IEP icon to view the document if you are an active member of the student's team and the IEP is locked. With the release of E.1430, IEP flags display prior to the first day of the term, if the plan is active. |
PLP | Indicates the student has an active Personal Learning Plan. Click the PLP icon to view the document if you are an active member of the student's team and the PLP is locked. |
| RTI | Indicates the student has a Response to Intervention Plan. Click the RTI icon to view existing intervention deliveries as well as enter a new delivery. |
| Documents | Indicates the student has a locked document attached. Multiple documents display as a stack of papers. A side panel listing all documents displays when the icon is clicked. Documents are grouped by module, i.e. Counseling, Special Education, etc. Select a School Year from the dropdown to view documents associated with a particular year. Click on an entry to view the file as a PDF. Only locked Custom Forms display in the Roster; uploaded documents cannot be displayed here. In addition to tool rights to the Roster, teachers must have Read tool rights for Student Information > General > Forms > (Module) > Custom Forms OR Student Information > (Module) > General > Documents > Custom Forms to view documents. See the Forms Tool Rights documentation for additional information. |
Hover over any flags to see comments and additional information.
Student Details and Contact Information
Click on a student's name to open a detail window with information about the student and their guardians, including contact information.
Use link to Student Information > General to access tabs that you have rights to, such as the student's Schedule and Grades.
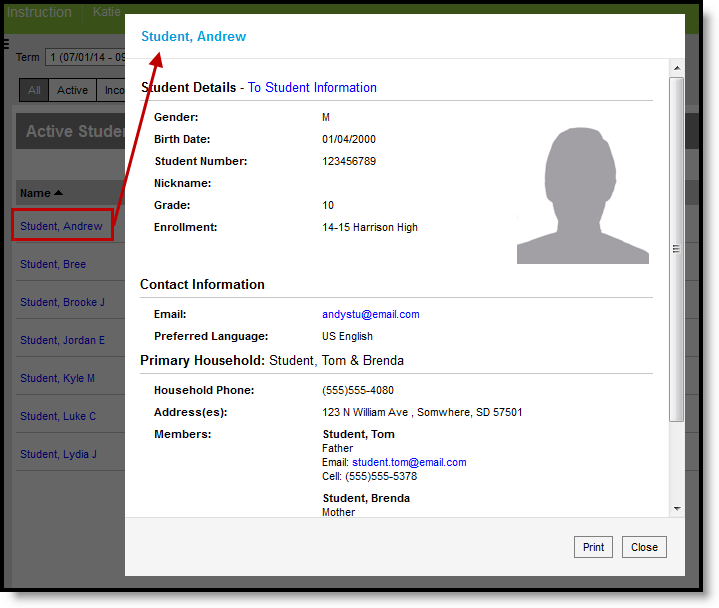
Click the Student Name to view Student and Guardian Details
Click on an email address to open a new email in your preferred email client.
The Roster lists all students scheduled into the section selected. The Roster can be printed for use outside of Campus. This video demonstrates how to print individual student and section specific roster information.
0251e60c-1836-438b-8dfe-110604146bc0
The Roster tool can be used to review student information for all students in a selected course section. In this lesson, a teacher needs to review student information in her US History class.
Generate Roster Reports
From the Rosters tool, teachers can generate and print a Section Rosters report based on selected criteria.
Location: Instruction > Reports > Roster; Instruction > Students > Roster > Print Options
To print a roster for a section, open the Roster and then click Print Options to open the print options window. The printed roster includes students rostered into the section on the Effective Date entered from the selected Section(s). This report is also available with the Campus Instruction Reports.
Much of the data available in this report can be viewed for an individual student by clicking the student's name in the Roster.
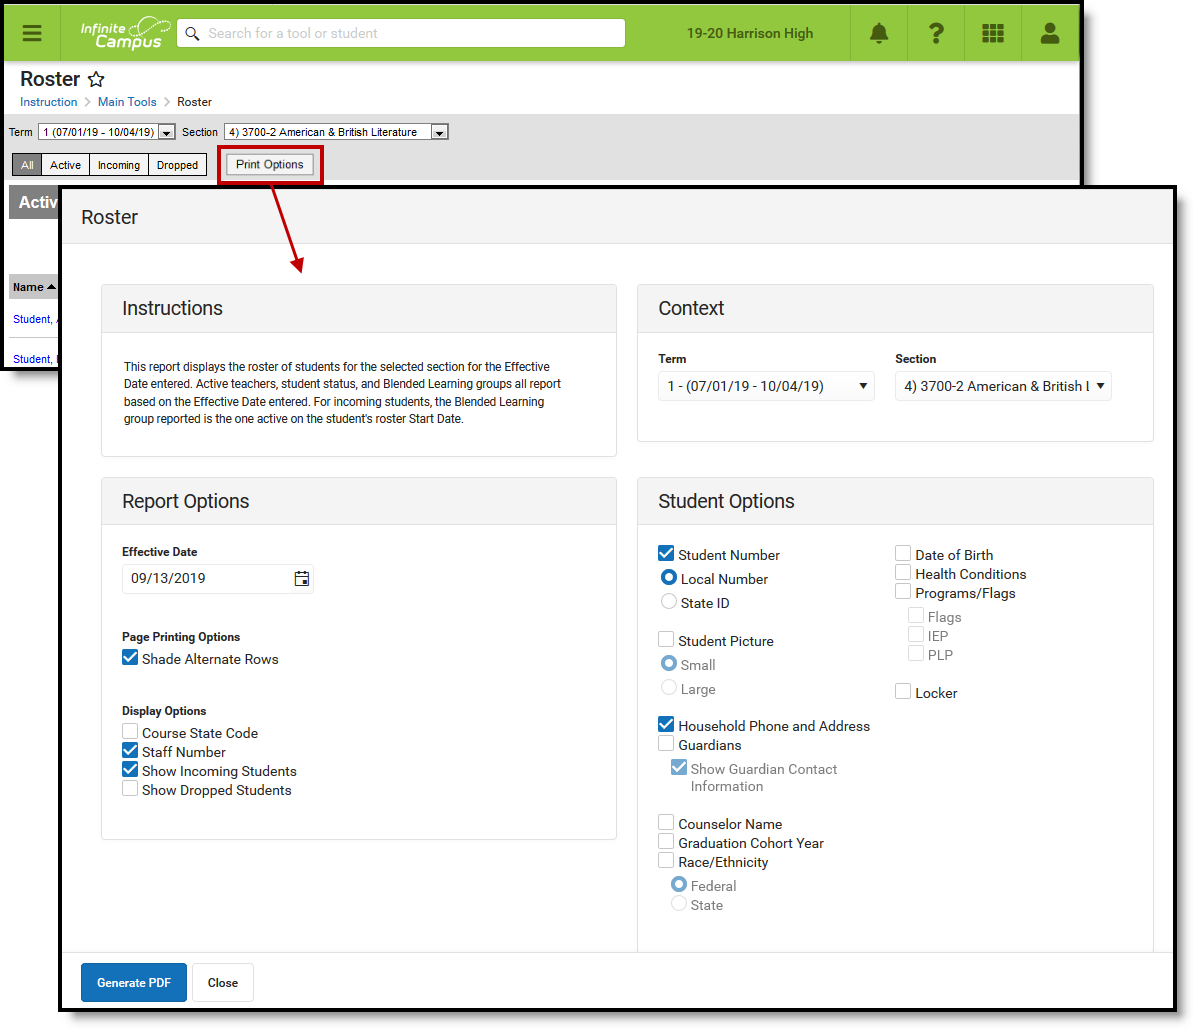 Roster Print Options and the Roster Report allow teachers to determine what data prints for a roster.
Print Options
See the Roster article for more information about where roster data reports from.
Report Options
| Field | On the Report |
|---|---|
| Effective Date | The date for which data in the report is reported. |
| Page Printing Options |
|
| Display Options | Displays the selected data in the report:
|
Student Options
| Field | On the Report | Source |
|---|---|---|
| Student Main Information | ||
| Student Number | Displays the student's number. Student Number Type options are:
|
Demographics |
| Student Picture | Displays the student's picture in the report. Student Picture Size options are:
|
Demographics |
| Race/Ethnicity | Includes the student's race/ethnicity. Race/Ethnicity Type options are:
| Demographics |
| Pronouns | Includes the student's pronouns. | Demographics |
| Preferred Name (Nickname) | Includes the student's Preferred Name (nickname). | Demographics |
| Gender | Includes the student's Gender. | Demographics |
| Date of Birth | Includes the student's date of birth. | Demographics |
| Health Conditions | Includes any recorded health conditions for the student, which displays as an EMT symbol in the roster. | Conditions |
| Additional Information | ||
| Household Phone and Address | Includes the phone number and address of the student's primary household. | Addresses |
| Guardians | Includes the names of the student's guardians. If selected, also shows the Guardian Contact Information. | Relationships |
| Counselor Name | Includes the name of the student's counselor. | Team Member with a Role of Counselor. |
| Graduation Cohort Year | Includes the student's projected year of graduation. | Graduation |
| Blended Learning Group | This option only displays if your school is using Blended Learning. Indicates which group the student belongs to. | Manage Blended Learning Groups |
| Programs/Flags Information | ||
| Programs/Flags | Includes any Programs that display for the student in the roster. Program/Flags Type options are:
|
Programs, Documents (Special Ed), Documents (PLP) |
| Locker Information | ||
| Locker | Includes any lockers assigned to the student. | Lockers (Student), Lockers |
| Locker Options | Includes the Location and Lock Combo of the locker in the report. | Lockers |
| Locker Types | All types of lockers are listed; select types to include them in the report. | Lockers |
Printing Roster Data
- Select the Term and Section you'd like to generate labels for. Select multiple sections if desired.
- Enter an Effective Date for the report to pull roster data as of that date.
- Select Report Options and Student Options as desired to to include data in the report. See options described in the table above.
- Click Generate PDF to view the report in PDF format or click the arrow button next to Generate to select a different format (CSV).
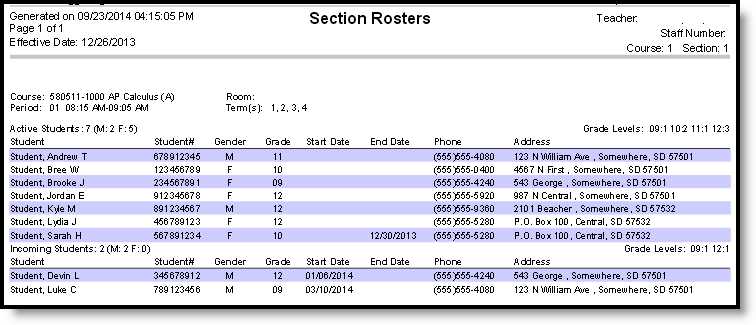 An example of a printed roster.
The Roster lists all students scheduled into the section selected. The Roster can be printed for use outside of Campus. This video demonstrates how to print individual student and section specific roster information.
Record an Intervention Using Your Roster
Response to Intervention (RTI) is an approach to identifying and responding to students special behavior or learning needs. From the Roster tool, RTI service providers can record data for an intervention delivery session and monitor students RTI progress.
Location: Roster > click RTI - # Students
Response to Intervention (RTI) is an approach to identifying and responding to students special behavior or learning needs. RTI plans and intervention events are used to monitor student performance and track whether the intervention is working.
View the Intervention Delivery editor and record an intervention event for students by clicking  at the top, or
  for an individual student.
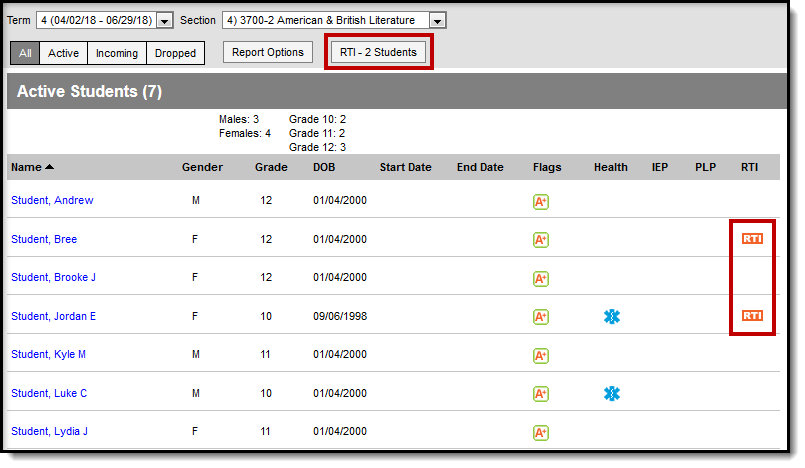
Record an intervention event through the Roster.
In the Intervention Delivery editor, enter details for the event including dates and duration, a score, and comments.
Click  to record additional events as needed.
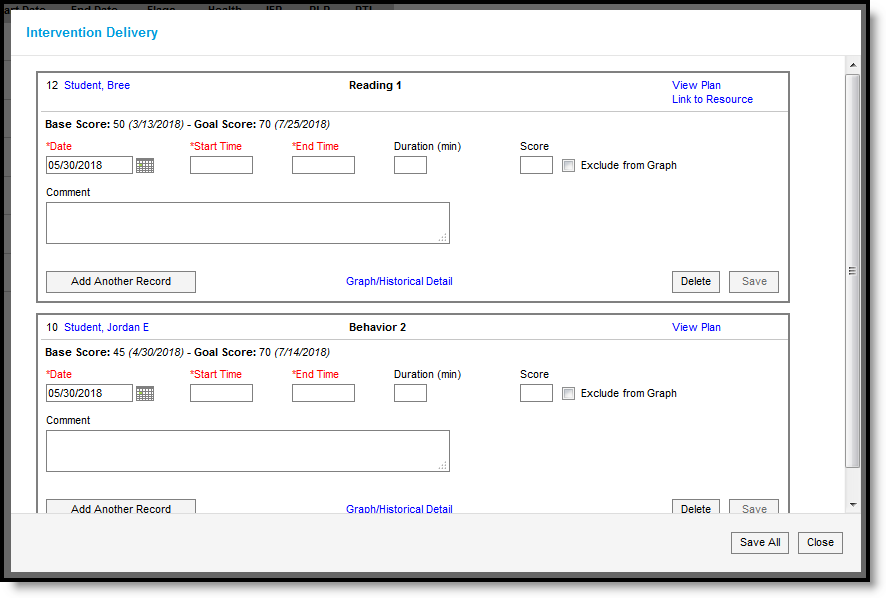
Record intervention events for students with RTI plans.
The following links display on the screen:
- Student Name: opens a summary of student and household information.
- View Plan: opens a read-only version of the student's RTI plan. A teacher must have R(ead) tool rights to Student Information > Response to Intervention > General > Documents > Plan > Document Sections to view this document and the Link to Resource.
- Link to Resource: opens a link in a separate window to provide additional information about the intervention, if applicable. Links are determined by the Intervention selected in the student's RTI plan.
- Graph/Historical Detail: displays a graph of the student's scores for the intervention, with a Trend Line calculated from those scores (using the Least Squares Regression formula) and a Goal Line based on the Base and Goal Scores. Intervention events are listed. Print events with or without the graph using the buttons at the bottom. To exclude a score from the graph, mark Exclude from Graph next to the score. Excluded scores are indicated with a comment.
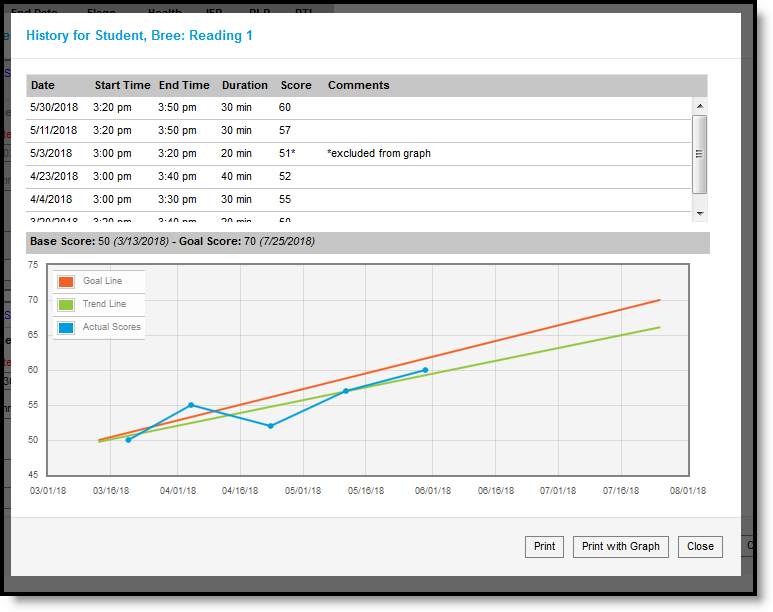
Click the Graph/Historical Detail link to view a list of all intervention events and a graph of scores.
Learn how to record data from an intervention session using the Roster tool in Campus Instruction.
In this simulation, the user will learn how to record data from an intervention session using the Roster tool in Campus Instruction.
Seating Chart
Creating Seating Charts
Teachers may create seating charts to provide a visual representation of where students sit within the classroom. Each section can have multiple seating charts if necessary.
Tool Search: Seating Charts
Seating charts provide a visual representation of where students sit in a classroom. Each section can have multiple seating charts if desired.
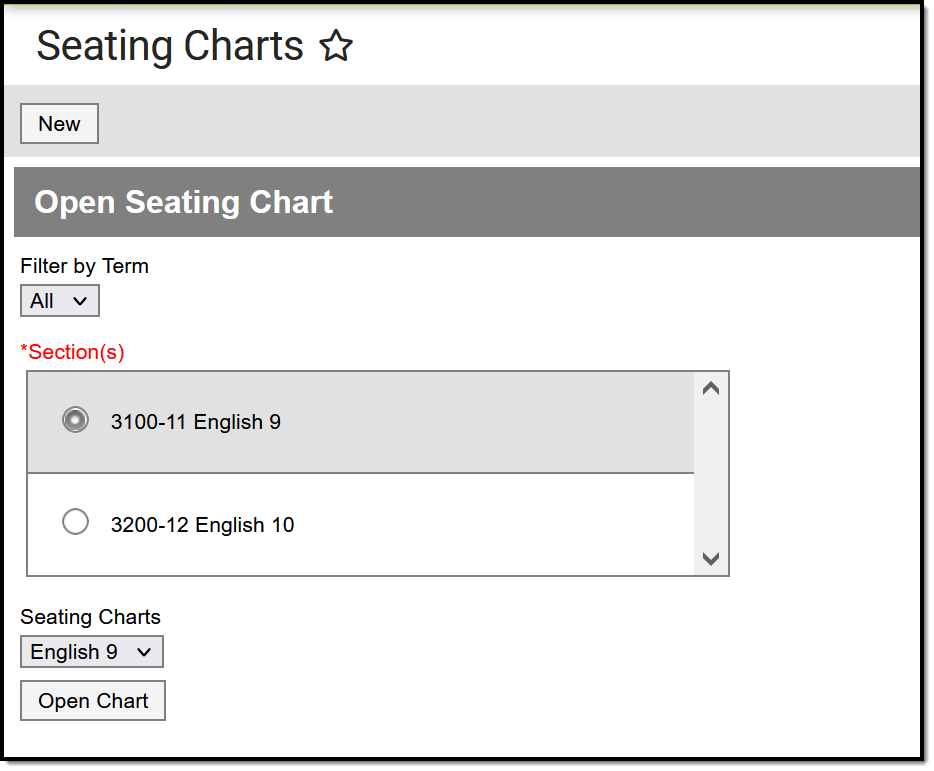
To view a chart, select a section and then a chart from the dropdown list and click Open Chart
See the Instruction Tool Rights article for information on available tool rights.
Using Seating Charts
In addition to being a record of where students sit, use seating charts to take attendance.
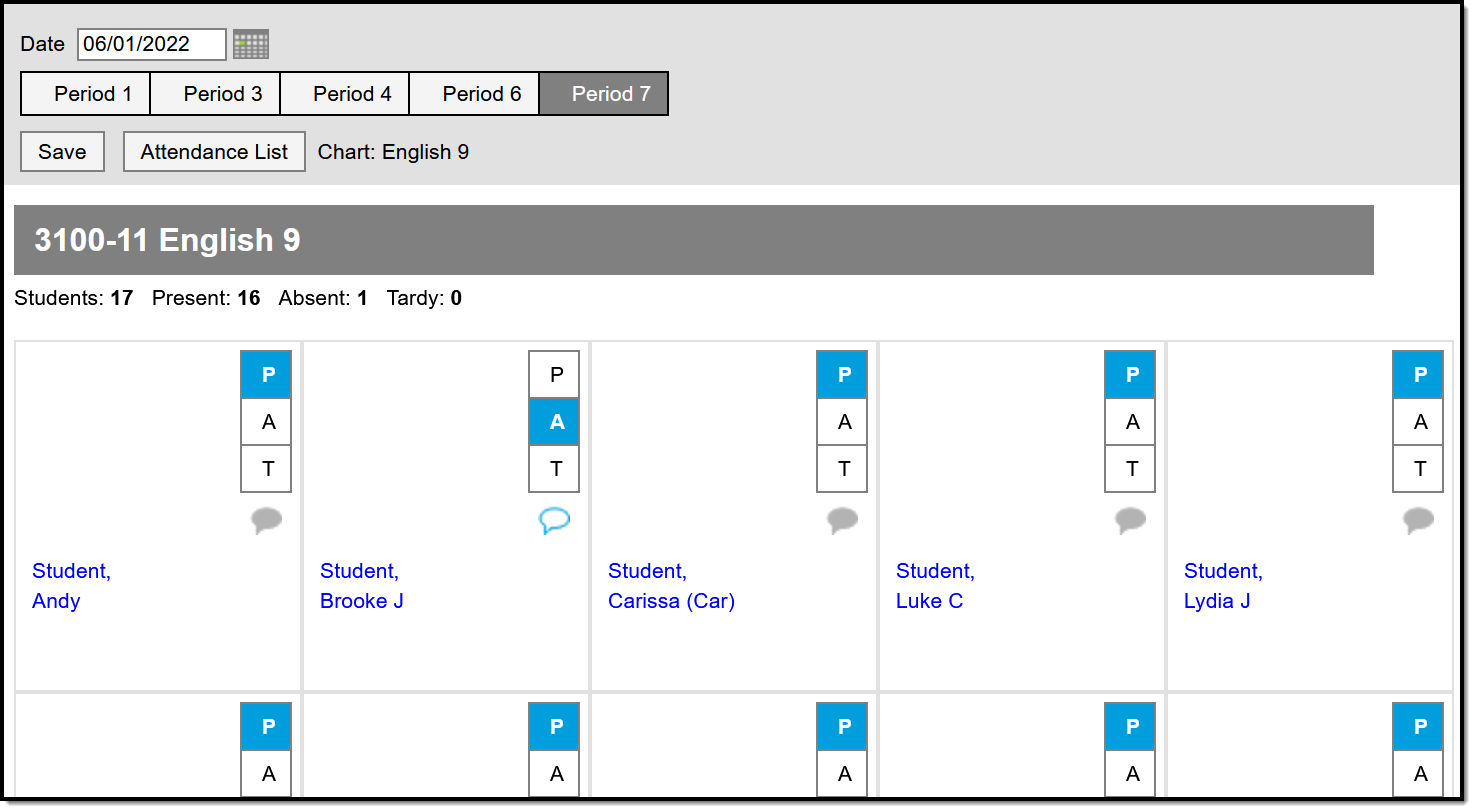
Taking Attendance Using a Seating Chart
Creating Seating Charts
First, establish the parameters of the chart.
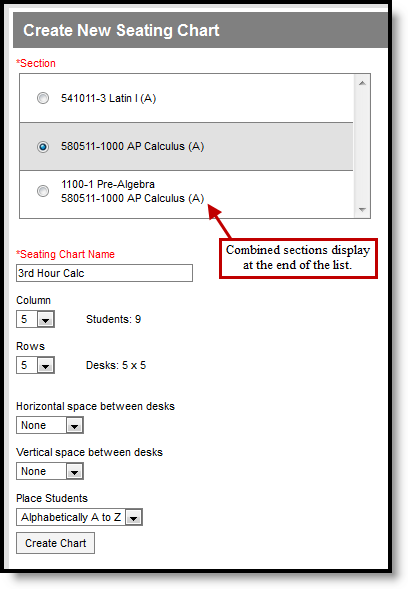
- Click New in the top corner of the seating chart list.
- Select the Section you're creating a chart for.
If you teach multiple sections in the same period, scroll to the bottom of the list to view combined sections.
- Enter a Name for the chart. Names cannot be changed once the seating chart is created.
- Select the number of Columns and Rows to indicate how many desks to include in the chart. The number of students in the section appears below the Name.
- Indicate the default Space Between Desks.
- If you want to automatically fill the chart with students, select the Place option you'd like to use, Alphabetically A to Z, Alphabetically Z to A, or Random. If you would rather fill desks manually, select Do Not Place. Students names display in a list from which you can place them in desks.
- Click Create Chart to create a chart based on the parameters you selected and view the chart.
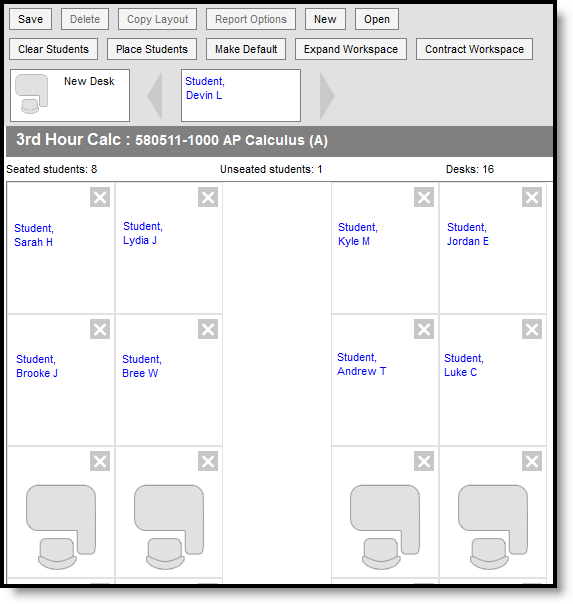
The seating chart fills based on the parameters you selected, but you can click and drag desks into any configuration you'd like. For example, this seating chart represents a class room with two rows of tables, two students at each.
Once you've finished the chart, click Save to add it to your chart list.
Blended Learning
If your school is using Blended Learning, an icon indicating each students blended learning group displays next to their name.
Click and Drag Logic
The following logic applies to manually placing students in the chart.
- Desks can be arranged in any configuration but cannot overlap.
- Click and drag the New Desk icon to add an empty desk to the chart.
- Click and drag unseated students from the list at the top into empty spaces.
- Click the X on a student to move them to the unseated list. Click the X on a desk to remove that desk from the chart.
- Moving a student to a space without a desk also moves the student's desk.
- Moving a student to another desk leaves an empty desk behind.
- Moving a student to a space where there isn't a desk adds another desk to the chart.
- Moving an unseated student (A) to a desk that already has another student (B) moves student B to the unseated list. If students A and B are both seated, they'll trade desks.
Additional Options
The following table describes the additional options at the top of the seating chart.
| Option | Action |
|---|---|
| Delete | Deletes this seating chart. |
| Copy Layout | Copies this desk layout to a new chart. |
| Report Options | Opens the printing options for the chart. |
| Clear Students | Moves all students to the unseated student list. |
| Place Students | Places all unseated students into empty desks based on the option selected, Alphabetically A to Z, Alphabetically Z to A, or Random. |
| Make Default | Makes this desk layout the default organization. You could use this option if you teach in the same room for multiple sections and want to reuse the physical layout of the room. |
| Expand Workspace | Expands the scrollable area of the chart, useful for larger classrooms. |
| Contract Workspace | Contracts the scrollable area of the chart. |
The Seating Charts tool allows teachers to create seating charts for a section. This video demonstrates how to create a seating chart.
In this simulation, the user will learn how to create a new seating chart within Campus Instruction.
Printing Seating Charts
From the Seating Chart tool, teachers can download and print a section's seating chart for use outside of the Campus application.
Location: Seating Charts > click Print Options
To print a seating chart, select the Section and Seating Chart and click Open Chart. From the chart, click Print Options to open the print options window:
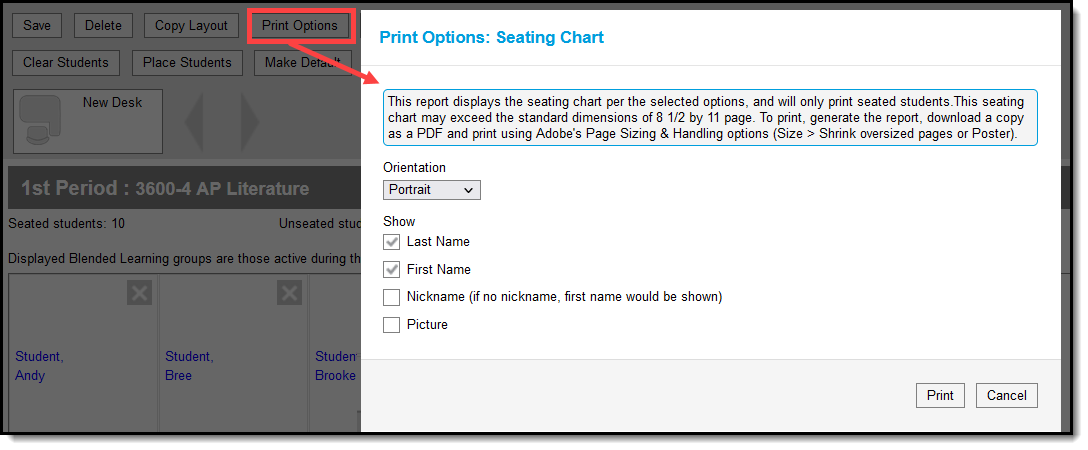 Click Print Option to see options for formatting a printed seating chart.
Indicate the Orientation in which you'd like to print the chart, Portrait or Landscape.
Select Nickname and/or Picture to show that information in the printed chart. Student's first and last name are selected by default. These values are entered on the Demographics tab.
Click Generate Report to view the printable seating chart.
Seated, Unseated students, and total Desks are printed at the top of the report. Student names print in 9 pt font with pictures and in 12 pt font without pictures.
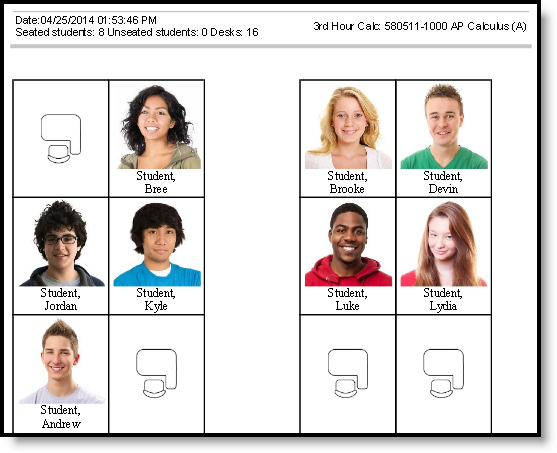
Example of a Printed Chart
If the seating chart is larger than the printable area of the page, anything extra is cut off. Campus recommends first downloading your chart as a PDF and then using Adobe's Page Sizing and Handling options to make sure the whole chart prints correctly.
Save
Advisory
View Student Information from Advisory
The Advisory tool helps teachers identify areas of improvement for students they mentor during classes such as advisory, homeroom, or study hall.
Tool Search: Advisory
The Advisory tool is designed to help teachers target areas of improvement for the students they mentor. The first screen lists students with the number of assignments they have flagged as missing or late and the number of non-passing grades. Click a student to view more details in the student profile or click an assignment or grade total to view more details.
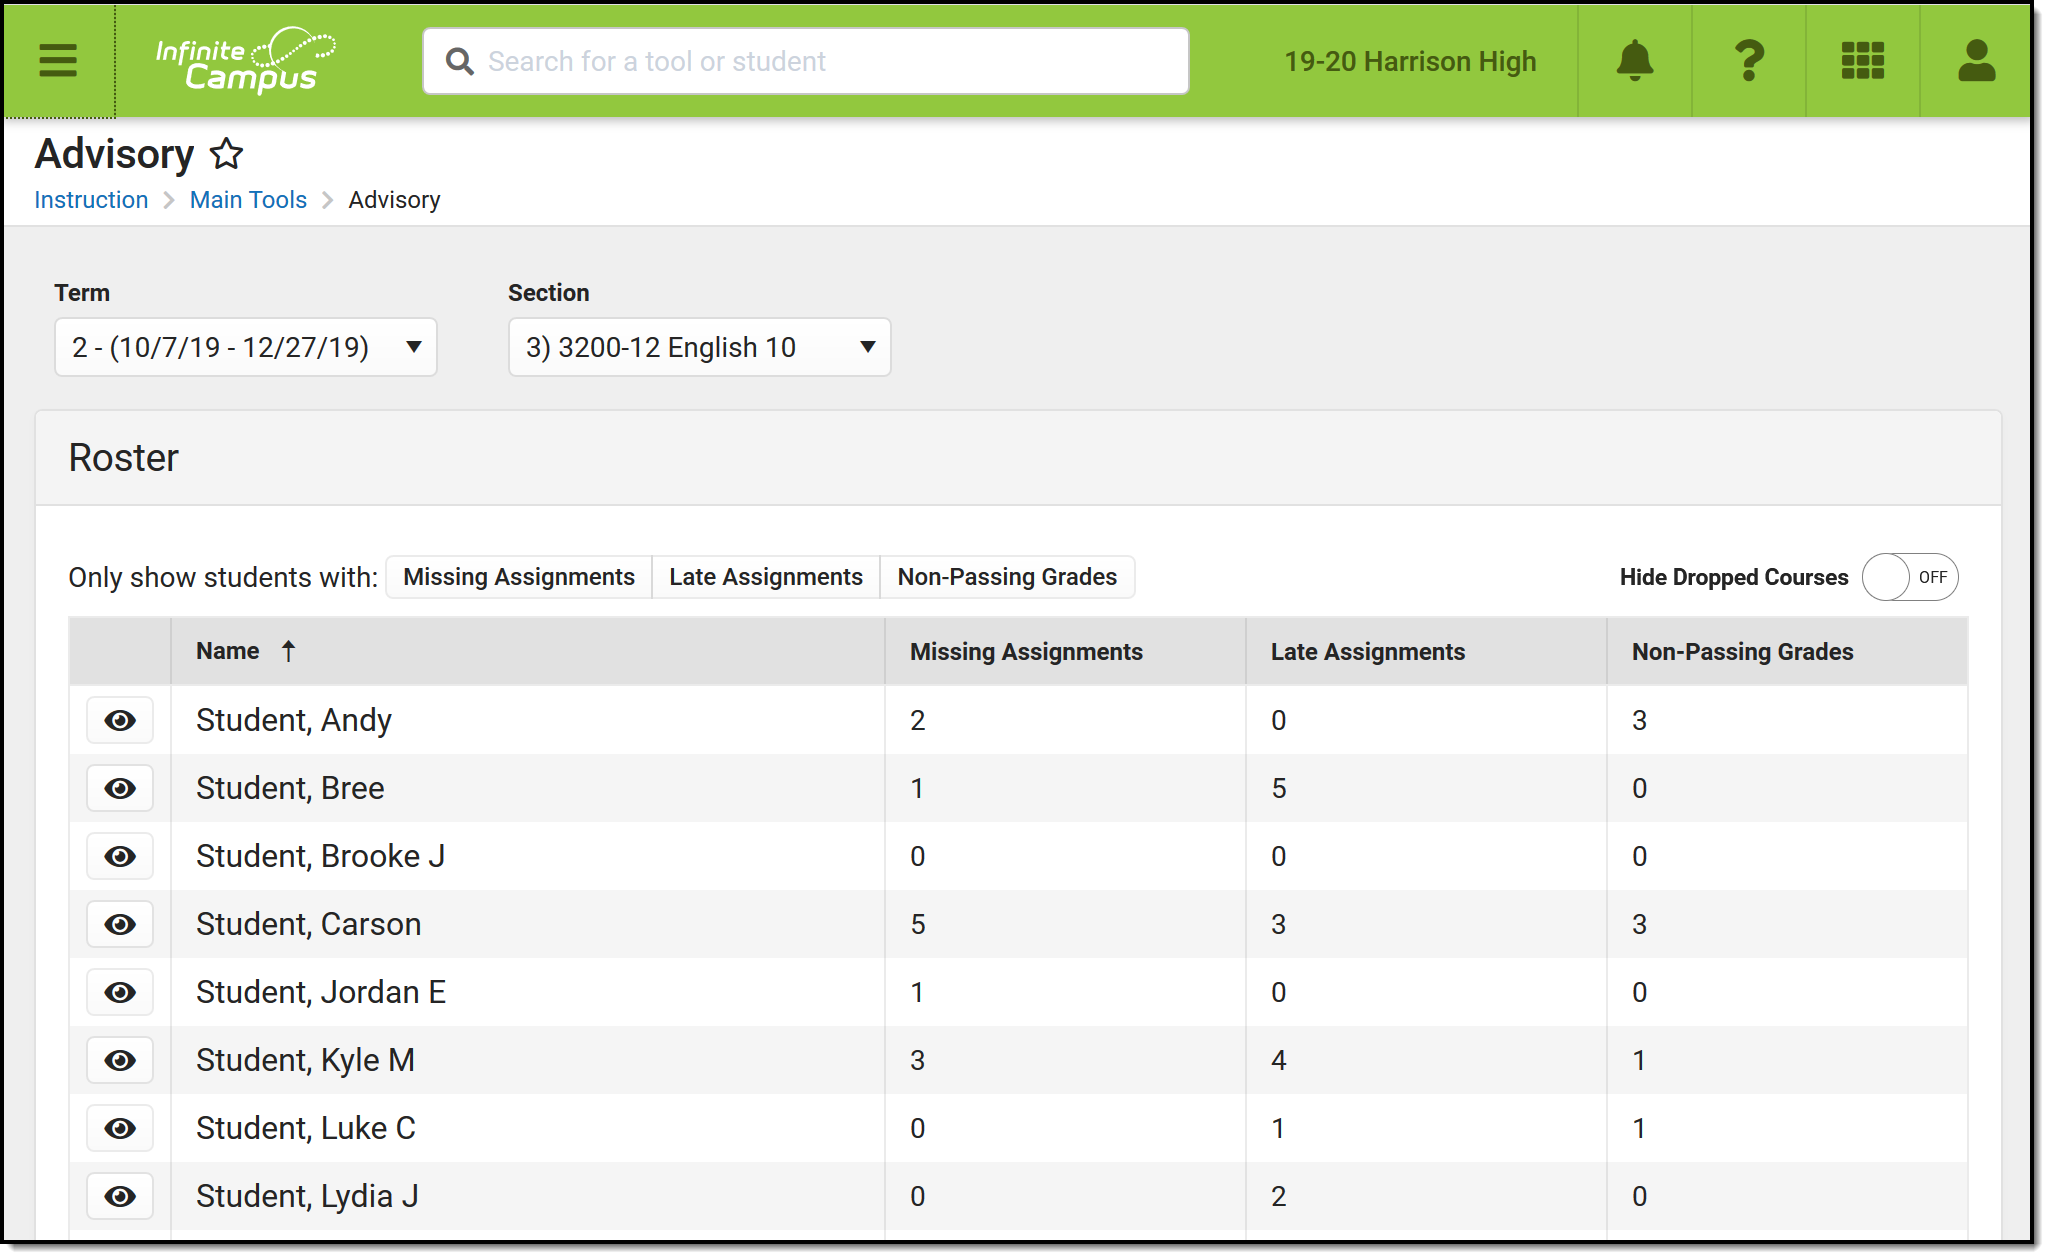 The Advisory tool helps teachers identify student needs.
Access to Advisory is governed by a combination of tool rights and course settings.
See the Enable Advisory section following and the Instruction Tool Rights article for more information.
Enable Advisory
The Advisory tool can be enabled for teachers in two ways. Teachers need the Advisory tool right to access the tool.
By Course/Section
Mark the Advisory checkbox on the Course Master, Course, or Section to enable the tool for all teachers of that course/section.
This checkbox is pushed from the course master to linked courses. If selected for a course, the checkbox is automatically marked for its sections without being pushed. |
By Teacher
In addition to the Advisory tool right, teachers with the Include Non-Advisory Sections subright can view the Advisory tool for all of their sections, regardless of whether the checkbox is marked on the course/section.
|
Section Summary View - The First Screen
The first screen of the Advisory tool displays a list of students in the Section selected at the top. All students in the section are listed, along with counts for the number of missing and late assignments and the number of non-passing grades across all of the students' sections. Click a row to view that student's profile.
Counts are determined as follows:
- Missing: Assignments flagged as missing.
- Late: Assignments flagged as late that do not have scores. Note: assignments marked as late by typing an "L" for the score are not included in this count.
- Non-Passing Grades: Grades for tasks or standards that are not flagged as Passing on the score group or rubric. This column first looks at posted grades and then considers in-progress grades where grades have not been posted. Counts are shown for the term selected.
In districts who have purchased the Campus Analytics suite, an additional column displays with the student's GRAD Score. See the Early Warning article for more information about what this score means and how it is determined.
Filter the students listed using the filter buttons above the table. Sort the table by clicking row headers. Set the Hide Dropped Courses toggle to On to hide any assignments and grades for sections that the student has dropped. Dropped courses are those where the student's Roster End Date in the past.

Filter the student list to only show students with the selected assignments and grades.
Click the ![]() next to a student's name to hide all other students from the view. This feature facilitates counseling 1:1 with a student.
next to a student's name to hide all other students from the view. This feature facilitates counseling 1:1 with a student.
Click the button again to return to the full student list. Applying a filter displays all students who meet that filter, clearing the individual student view.
Assignment and Grade Columns
Click an assignment or grade total to view more details.
Assignment Details
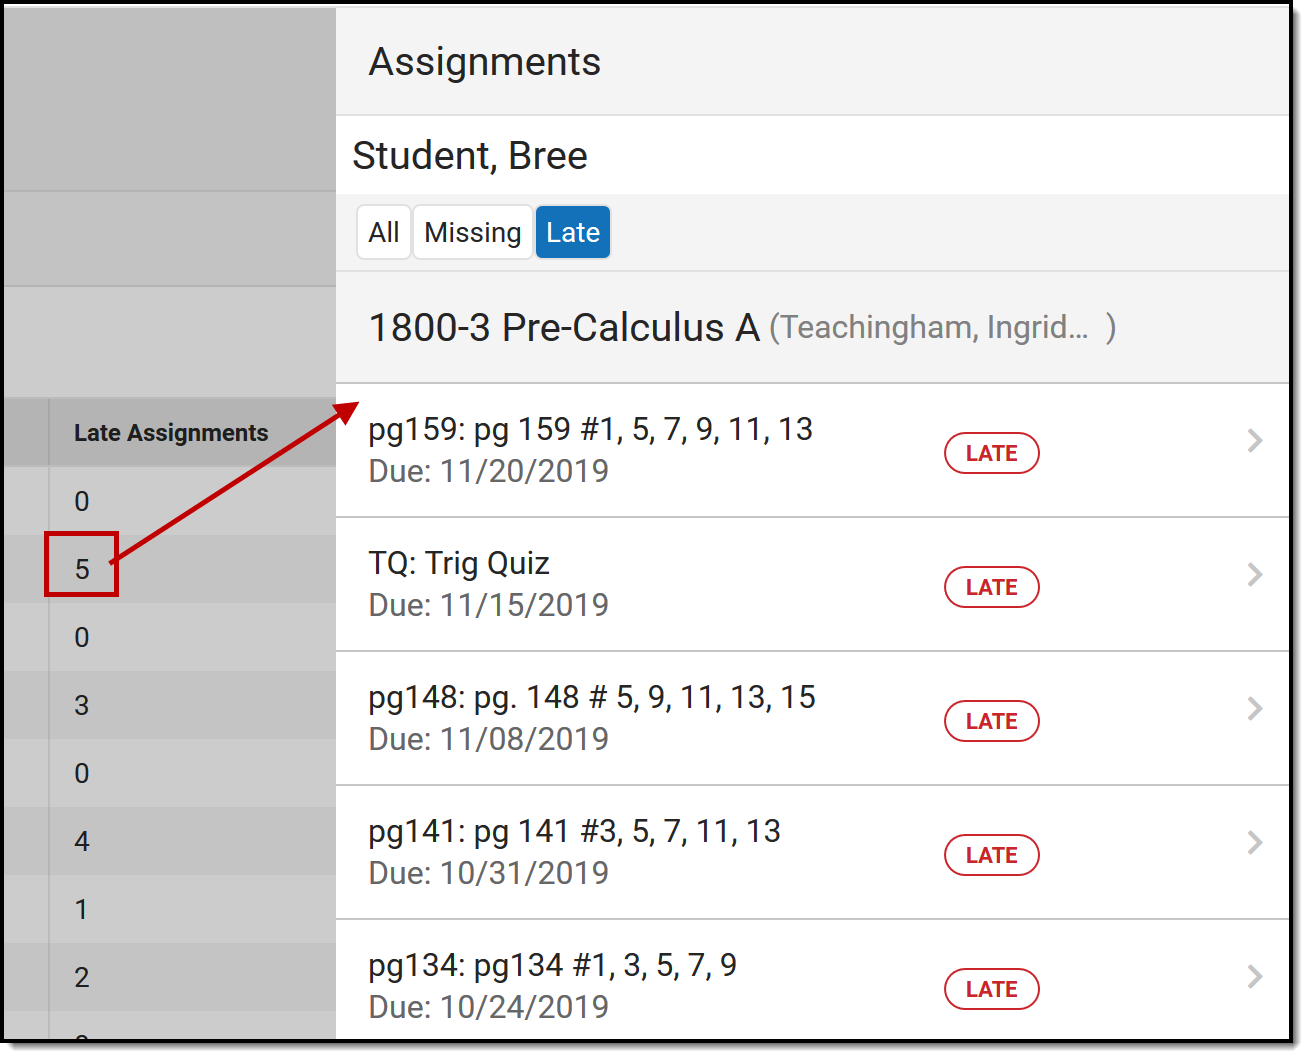
Click the Missing or Late assignments number for a student to view a list of flagged assignments, sorted by course.
Use the filter buttons at the top of the list to view Missing or Late assignments, or All to view both Missing and Late. Click an assignment to view details of the assignment as they display for the student in Campus Student. |
Grade Details
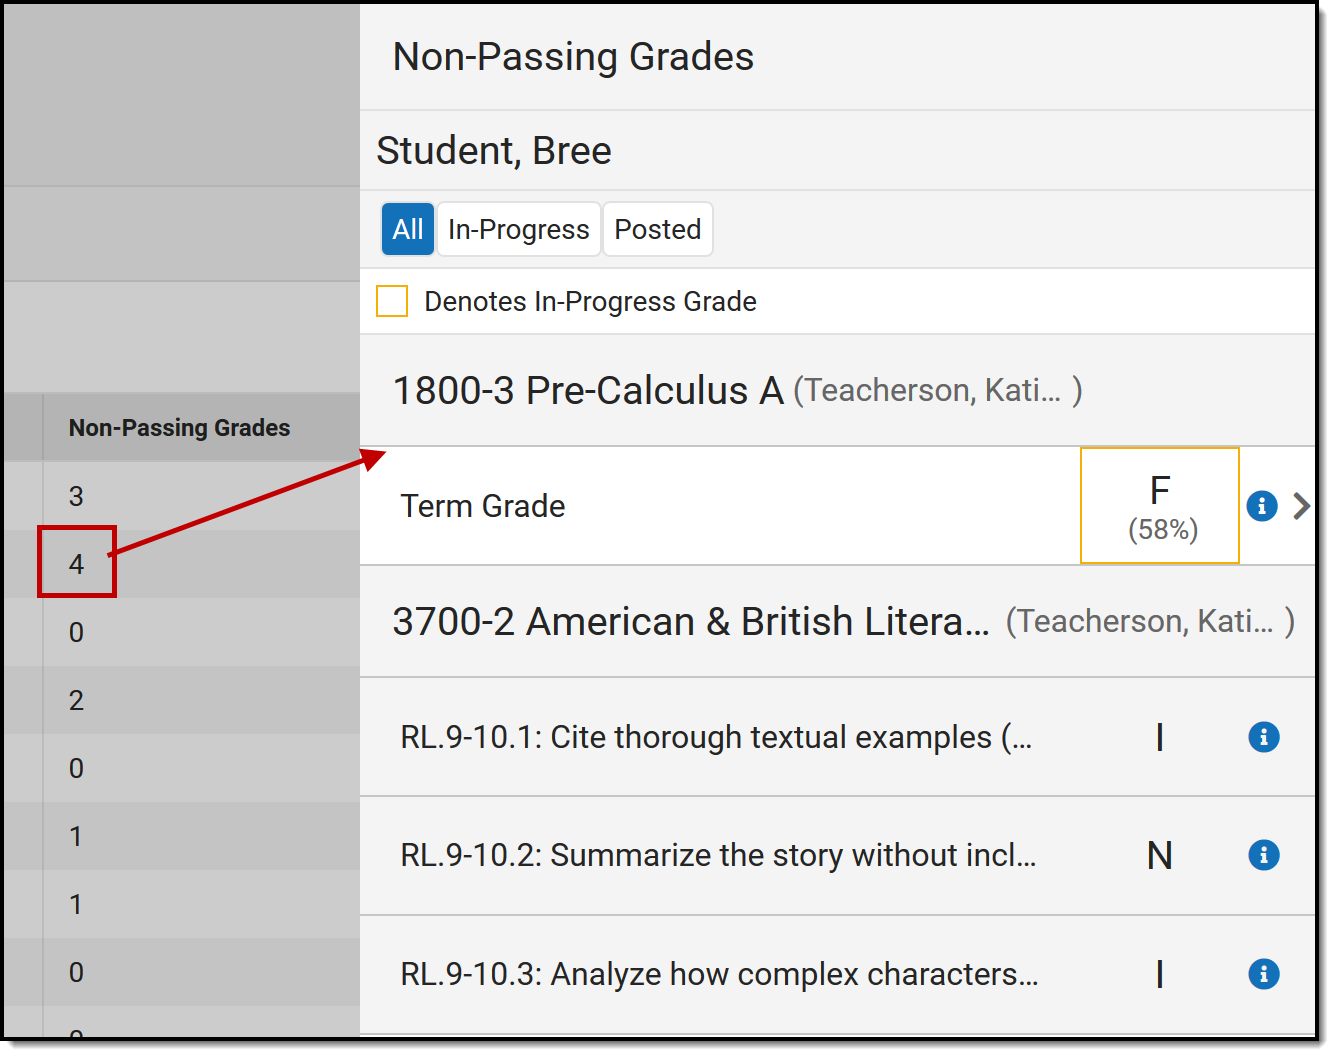
Click the Non-Passing Grades number to view a list of non-passing grades sorted by course.
Click the In-progress grades are indicated by an orange border. Click the row of an in-progress grade to view the assignments that contributed to the grade, sorted by category. Click an assignment to view details of the assignment as they display for the student in Campus Student. |
GRAD Score Details
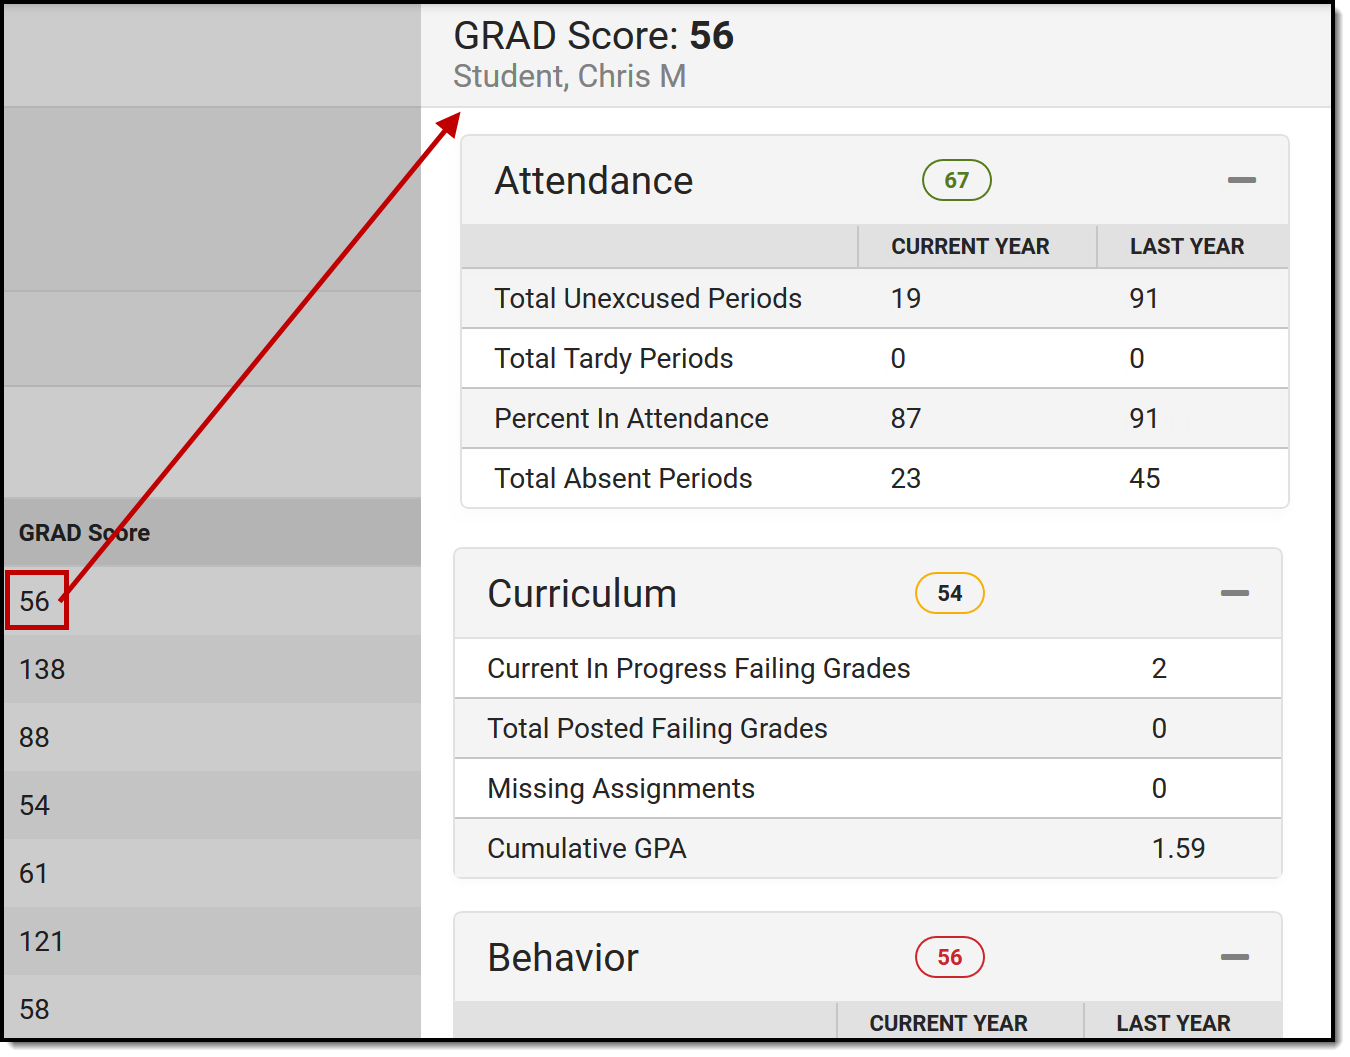
In districts who have purchased the Campus Analytics suite, an additional column displays with the student's GRAD Score. Click the GRAD Score to the categories that contribute to that score.
See the Early Warning article for more information about what this score means, how it is determined, and the categories that display here in the Advisory tool. |
Student Profile
Click a student's name to view more information for that student. Four sections display in the student profile:
Student
The Student section provides basic information about the student, including student number, grade, and date of birth. Click on the student's name to view more information.
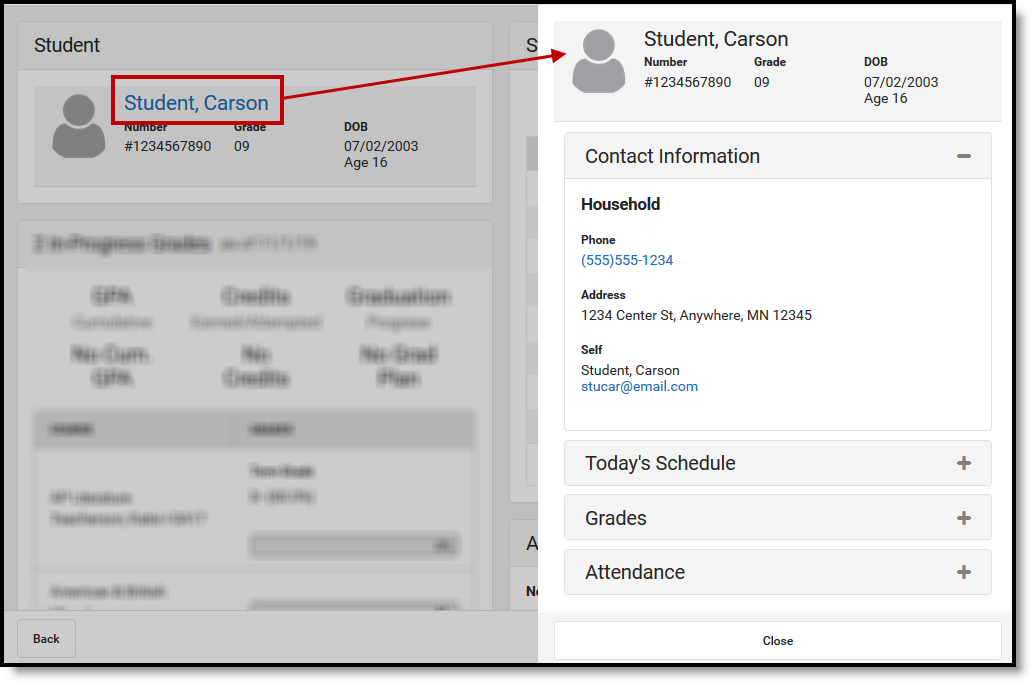
Click a student's name to view more information, including contact information, schedule, grades, and attendance.
Expand a section to view student information:
| Section | Description | Example Image |
|---|---|---|
| Contact Information | Contact Information is based on the student's Household. The emergency contact priority is shown below the individual's name, if entered. |
|
| Today's Schedule | The student's schedule is listed with Room numbers. The section where the student is currently scheduled is indicated with a border. |
|
| Grades | Grades are only shown for the current section, from which the student's information was accessed. |
|
| Attendance | Attendance is shown for the current month, for this section only. Absences and tardies are totaled in the legend at the bottom. Scroll within the calendar to view other months. |
|
Student To Do
The To Do section lists the student's assignments based on the option selected. Use the dropdown list to show all assignment past due, overdue assignments from the last 30 or 7 days, or assignments due in the next 7 days. Use the arrows below the list to page through the list, if available.
Assignments considered past due have a due date prior to today, are not scored, and do not have the Turned In flag marked. This list is not dependent on the Late flag.
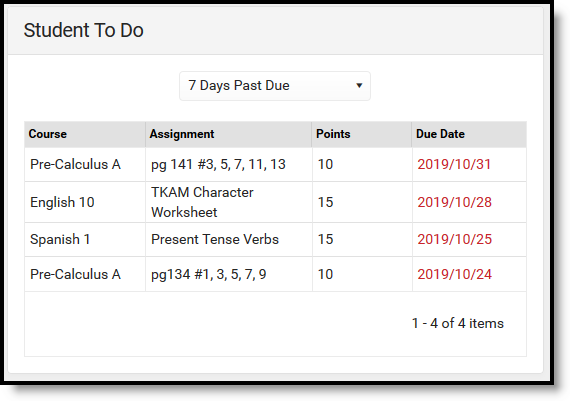
View assignments that are past due or those due in the future.
Assignments from any of the student's sections may be listed, not just assignments in the current section or sections taught by the current teacher.
Click an assignment to view more information.
In-Progress Grades
The In-Progress Grades section displays grades for the student's courses in the current term.
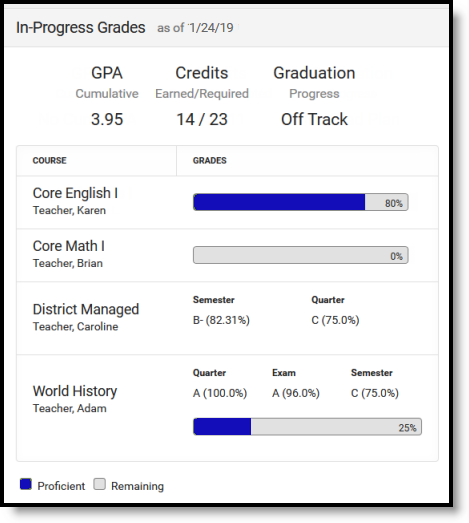
Grades and progress through standards are shown below the summary.
Above the grades, the GPA, Credits, and Graduation Progress are displayed.
- Cumulative GPA values are found on the Grades tab. See the GPA Calculations in Campus for the actual calculation.
- The Credit information indicates if the number of credits the student has earned out of the number required. This data is found on the student's transcript.
- Progress towards graduation reports based on the Progress tab in Academic Planning.
Grades are listed by course. For grading tasks, the student's in-progress grade is shown for each task aligned to the course. For standards, a progress bar indicates the percentage of standards aligned to the course for which the student has a posted grade.
Click on a grade for a grading task to view a list of assignments and scores. Click the progress bar for a standard to view the standards for the course and the student's proficiency for each, whether in-progress or posted.
Attendance
The Attendance section can be filtered to show attendance totals for the year, the last 30 days, or the last 7 days. The total number of full day and period absences and of tardies display above the calendar. Full day absences are calculated using the whole/half day minutes entered on the calendar and do not follow state-specific attendance calculations.
Filter the calendar view by full day absences, period absences, or tardies. When filtered by absences, days are color-coded by excuse.
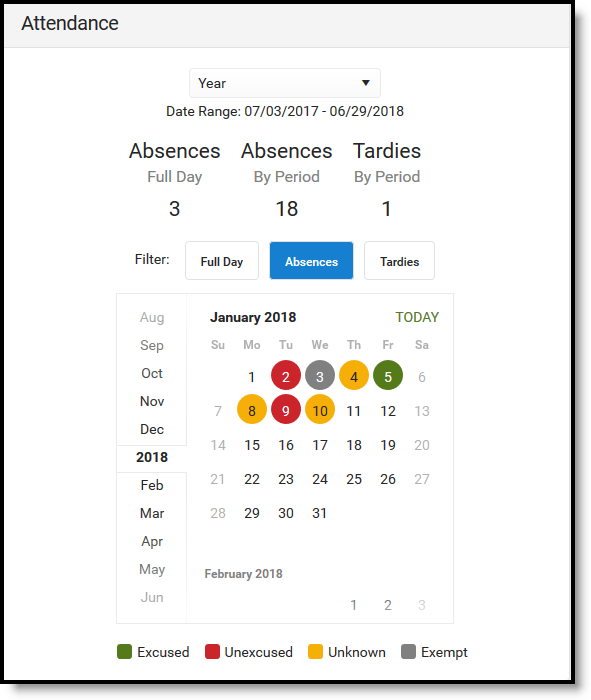
Attendance events display in the calendar and are color-coded.
Click an attendance event to view more information. If attendance letters have been sent to the student, a list of when letters were sent is shown. Letters cannot be viewed or generated from this tool.
The Advisory tool helps teachers identify areas of improvement for students during classes such as advisory, homeroom, or study hall. In this video teachers will learn how to view student information from the Advisory tool.
Message Center
Viewing Messages
The Message Center collects all messages, including process alerts and notices. Notifications are short messages that likely do not require additional actions.
Tool Search: Classroom Messenger
The Classroom Messenger collects all your messages, including process alerts and notices.
- Process Alerts are sent automatically based on processes in Campus, such as records transfer or responses to behavior referrals.
- State, District and School notices are messages sent to all users through User Communication.
- Messages are sent to specific users, such as reminders and updates, through Messenger.
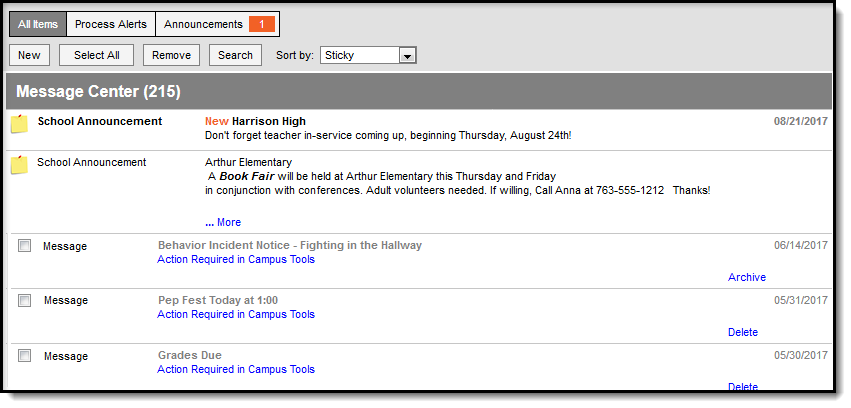 The Message Center in Classroom Messenger includes announcements and messages.
Sort your messages using the Sort by dropdown list. Options are:
- Sticky - sticky messages are at the top, followed by other messages sorted by date.
- Date (newest) - messages sorted with most recent at the top.
- Date (oldest) - messages sorted with earliest at the top.
Filter the messages in your inbox by clicking the All Items, Process Alerts or Notices buttons at the top.
New Messages
New messages have an orange New indicator that disappears when you read the message.
The orange number icon indicates how many messages you have. In the example above, the teacher has 1 new Announcement.
Messages with the yellow post-it icon are designated as "sticky," which means they appear at the top of you inbox and you can't delete them. These messages are given an end date when they're created, at which point they disappear from your inbox.
To view a message, click on the blue link. The message opens in the Campus Tools.
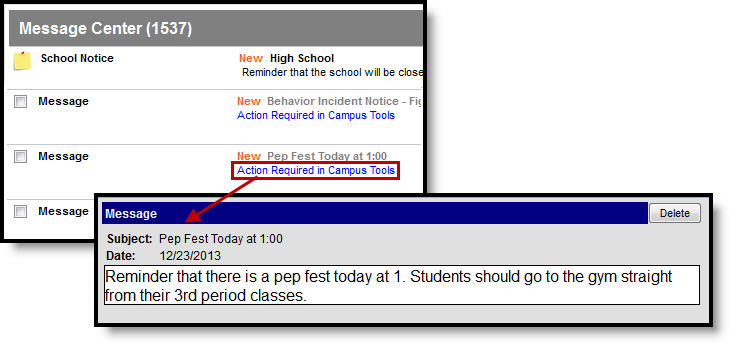 Open a message by clicking the blue link.
Use the app switcher to return to Campus Instruction.
 \
\
Searching for Messages
To search for specific messages by date and type, click Search in the task bar.
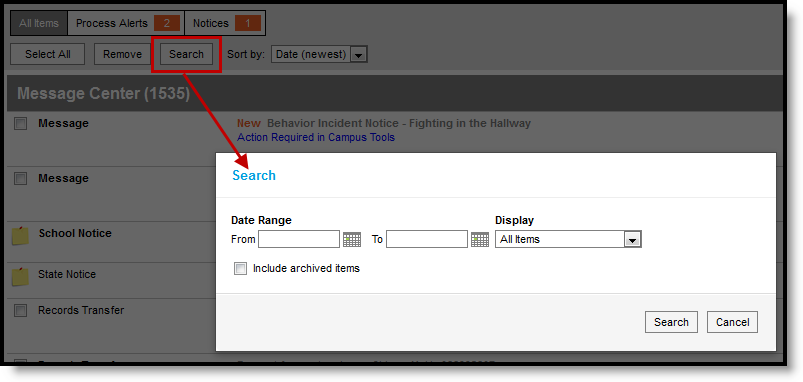 Search for a message by date.
- Enter a Date Range to view messages sent to you within those dates.
- Select which types of messages you wan to Display. Types in this dropdown list are sorted between Process Alerts, Notices and Archived items.
- To Include archived items, mark that checkbox.
- Click Search. Only messages that meet your criteria appear.
Location: Notification Bell
Notifications are short, informational messages. See the Process Alerts article for more information about types of notifications sent to other types of Campus users.
Access notifications by clicking on the bell icon.
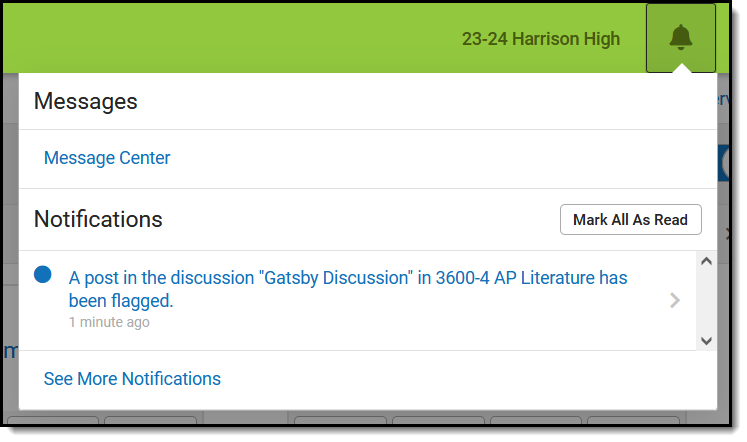 Notifications are listed below a link to the Message Center.
Some notifications are text only, while others are links to additional information. Notifications with additional information are indicated by a > symbol on the right margin of the notification, as shown in the image above. When hovering over a clickable notification, your mouse pointer changes to a hand icon and the notification changes color.
Notifications are shown for 30 days and are deleted at 2:00 AM on the 30th day.
Save
Classroom Messenger displays all process alerts and announcements for teachers. This video demonstrates how to view messages in Classroom Messenger.
Create a Message Template
Within Campus Instruction, teachers can create and use templates to send messages to students and/or guardians. The process for creating and using a template are the same for each type of message.
Location: Classroom Messenger > New
When using the Class Message, Grades Message, or Missing Assignments Message tools, you have the option of selecting an existing template for the message. The template applies to only the first step of sending a message, which includes the Delivery and Message Details. Recipients must be selected each time you send a message and are not part of the template.
The process for creating and using a template are the same for each type of message.
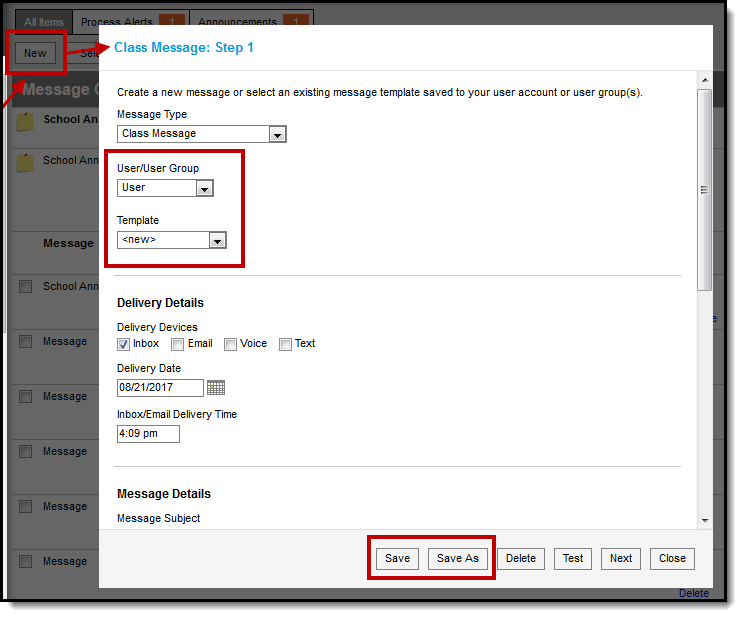
Creating a New Template
The sub-rights for User Group Template for each type of message are required to save a template with a user group selected.
See the Instruction Tool Rights article for more information.
Creating a Template
To create a new template, open a New message from the Classroom Messenger. You have the option of creating a template and saving it without sending it or continuing on to choose recipients and send the message you've created.
- Select a Message Type of Class Message, Grades Message, or Missing Assignments Message.
- Select if you want to save this template to yourself as a User or to a User Group you belong to. The User Group option only displays if you have the User Group Template tool right for the selected Message Type. Templates saved to a User Group are available for all members of that group.
- Leave the Template selected as new.
- Enter the Delivery Details and Message Details of the message. The Delivery and Message Details options available depend on your district's messenger settings. The options that display in both of these sections is dependent on which Delivery Devices you've selected.
Delivery Details
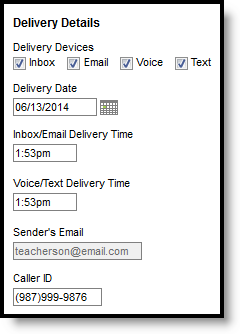
The Delivery Device options determine how the message is delivered to the recipients. Different fields display for each device; all appropriate fields display if you choose more than one device. Note that there are separate Delivery Times for Inbox/Email messages and Voice/Text messages. Inbox/Email messages can be sent at any time, but you may want to limit the delivery of Voice and Text messages to daytime and evening hours.
|
|
Additional Delivery Options
The columns on the right of this table indicate which fields display for which devices, (I)nbox, (E)mail, (V)oice, and (T)ext.
| Option | Description | I | E | V | T |
|---|---|---|---|---|---|
| Delivery Date | The date the message is scheduled to be sent. The default setting is the current date; change the date to send the message on some date in the future. | X | X | X | X |
| Inbox/Email Delivery Time | The time the message is scheduled to be sent on the Delivery Date. The default setting is the current time; change the time to send the message at a future time. | X | X | ||
| Voice/Text Delivery Time | The time the message is scheduled to be sent on the Delivery Date. The default setting is the current time; change the time to send the message at a future time. | X | X | ||
| Sender's Email | The email address that displays in the From field of the email. This email address populates based on the Email Settings set up for the district and is either the default email address selected for the district or your email address entered in Census. This field may be editable, or read only, based on district settings. | X | |||
| Caller ID | The phone number that displays on the recipient's caller ID. This phone number populates based on the Caller ID Preferences set up for the district. | X |
Message Details
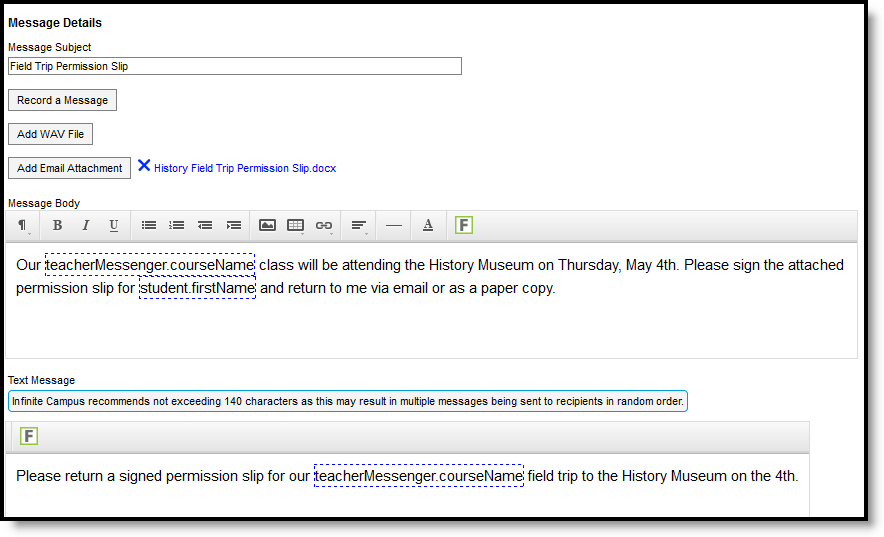
For Grades and Missing Assignments messages, a sample message pre-populates in the Message Body. For a Class messages, none of the message fields pre-populate. Enter your message as desired, including Campus fields that populate based on the recipient. For example, the student.firstName field populates with the student's actual first name in each message based on the recipient.
Message Details
The columns on the right of this table indicate which fields display for which devices, (I)nbox, (E)mail, (V)oice, and (T)ext.
| Message Details | Description | I | E | V | T |
|---|---|---|---|---|---|
| Message Subject | The subject line of the message. | X | X | X | X |
| Record a Message | This link opens up a public voice file recorder where you can record a voice message for this message. Once you've recorded a message, use the Add WAV File option to upload the file to the message. | X | |||
| Add WAV File | Upload an existing WAV file of a voice message. | X | |||
| Add Email Attachment | Allows you to upload a file attachment, based on your district's Digital Repository Preferences. | X | |||
| Message Body | The message sent to the recipient. Default text displays providing an example of the type of Grades Message that you could send, but is entirely editable. Format using the options above the message. The image icon allows you to insert a web link to an image. The link icon, which looks like a chain, allows you to insert a web link. In the example, the fields outlined in blue are Campus fields, which display information based on the recipient. For example, the student.firstName field displays the first name of the student recipient for each message. Use the green F button to access available Campus fields. Message Body supports the use of Chinese characters in email messages only. | X | X | X | |
| Text Message | The message sent to the recipient. Default text displays providing an example of the type of Grades Message that you could send, but is entirely editable. Text messages cannot be formatted. In the example, the fields outlined in blue are Campus fields, which display information based on the recipient. For example, the student.firstName field displays the first name of the student recipient for each message. Use the green F button to access available Campus fields. There is a character limit of 400 characters for text messages. Once the limit of 400, a warning message displays and the message cannot be saved until it is shortened. However, Campus recommends limiting the length of text message to 140 characters, since longer messages will be sent in multiple chunks and may not be delivered in the correct order. | X |
Once you've entered the Details of the message, click Save or Save As to save the template for future use. In the pop up that displays, indicate if you want to save the template to your User account or a User Group you are a member of. Enter a Template Name and click Save.
Using a Message Template to Send a Message
To use an existing template, filter templates by selecting User or a User Group you are a member of and then select a Template from the dropdown list. Delivery and Message Details display based on the template, with the exception of the Delivery Date, which auto-populates as the current date.
Modify any information in the template, including delivery details and message content. At this point, you have three options:
- Proceed with sending the message based on the modified template without saving the modifications.
- Update the template by saving the modifications using the Save button. This option changes the existing template.
- Save the modified version as a new template using the Save As button. This option creates a new template and maintains the original one.
Click Next to proceed to the recipient options and send the message. See the Class Message, Grades Message, and Missing Assignment Message articles for more information about the additional steps.
Classroom Messenger allows teachers to create templates for sending messages. In this video, you will learn how to create a message template in Classroom Messenger.
Send a Class Message
Teachers can send class messages from previously created message templates to communicate class information to students and guardians, such as a reminder about conferences or other general notifications.
Location: Classroom Messenger > New > select Message Type: Class Message
Send a Class Message to students and/or guardians to communicate class information to your sections, such as a reminder about upcoming parent/teacher conferences or other types of general notifications. Class messages can be sent to guardians and students. This option was called Teacher Messenger in the original Instruction module.
Use this tool to create a message to send, or to save a message template for later use.
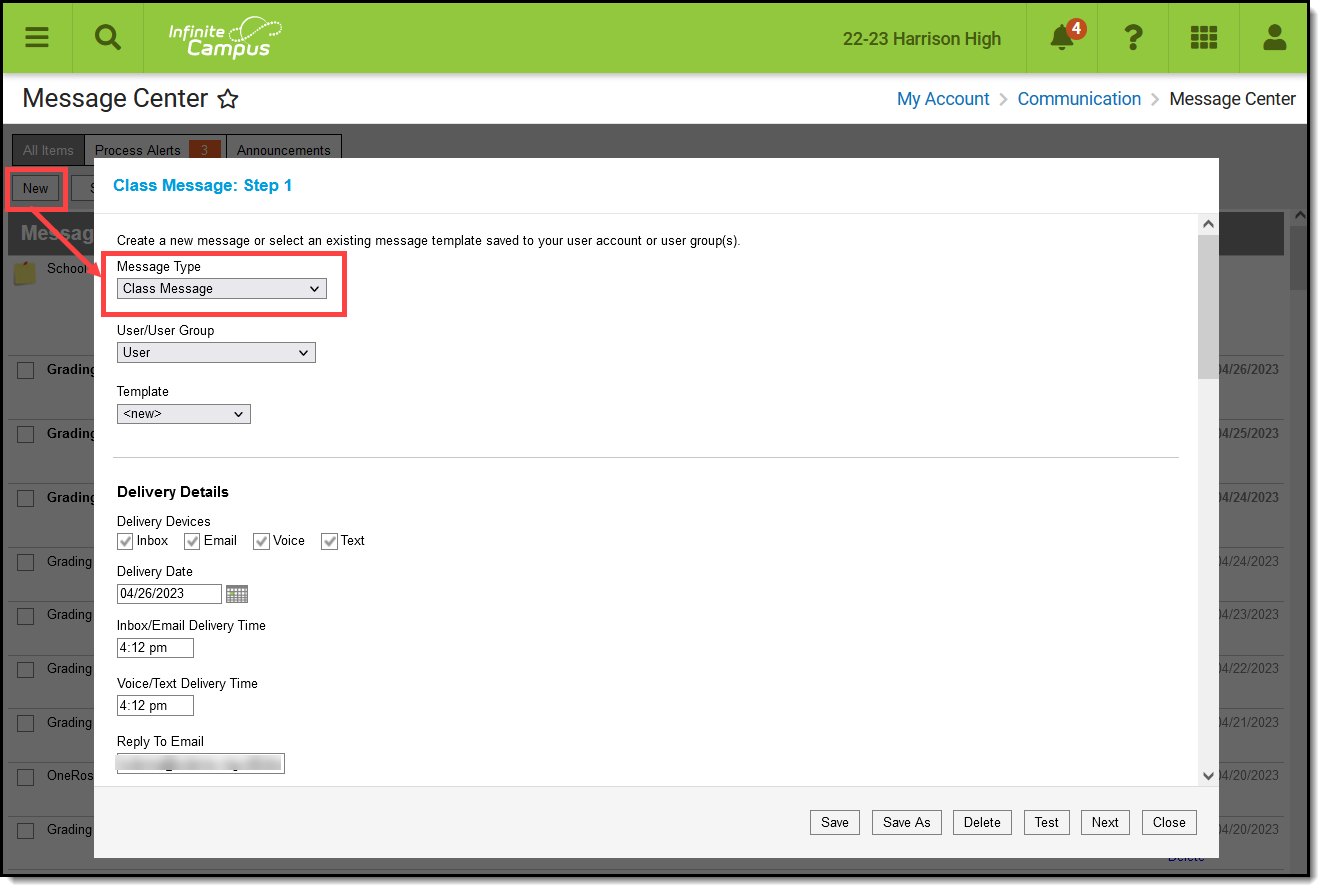
Class Message in the Classroom Messenger
See the Instruction Tool Rights article for more information.
See the table of contents on the right for the steps of how to create a message.
Templates
When you create a message, you have the option of selecting an existing message template or starting from scratch. See the Create a Template for Sending Messages article for more information about templates.
Use the User/User Group and Template fields to select which template you'd like to start with, or choose a Template of new. The User/User Group dropdown list has options for your own account (User) and for each of the User Groups you are a member of. If you have the User Group Template tools right for Class Message, you can save templates to a user group, which would make that template available to all users in the group.
If you select a specific template, fields in the message auto-populate based on that template, but are still editable for this instance of the message. Use the save buttons to save the current template (Save), or to save the message as a new template (Save As).
Step 1 - Delivery and Message Details
The Delivery and Message Details options available depend on your district's messenger settings.
Step-by-Step Instructions
- Select Class Message as the Message Type.
- To start with an existing template, select a Template that is assigned to you as a User or a User Group you belong to in the next two fields.
- Indicate which Delivery Devices to send the message to. Devices are available based on your district's settings. Additional options display based on the device(s) selected.
- Enter a Deliver Date, either the current date or a date in the future.
- Enter Deliver Times for Inbox/Email and Voice/Text messages.
- If sending an Email, review the Reply to Email. This field may be editable based on district settings.
- If sending a Voice message, review the Caller ID number. This field may be editable based on district settings.
- Enter a Subject for the message.
- Attach any additional files needed for the message, either by Recording a Message and Adding it as a WAV File for Voice messages or Adding an Attachment for Emails.
- Modify the default content in the Message Body if desired. Use the options at the top of the text box to format the text, add images or links, and include Campus fields. This text applies to Inbox, Email, and Voice messages.
If copying/pasting from an external source, consider using a program to remove unwanted HTML beforehand. - If sending a text, modify the default content in the Text Message if desired. Campus recommends limiting this text to 140 characters. Messages greater than that length that include variable length Campus fields are sent as multiple messages that may not be delivered in the correct order.
- Use the options along the bottom of the window to move on:
- Click Save or Save As if you're modifying or creating a template. The Delete option also applies to templates. See the Grades Message Template article for more information about these options.
- Click Test to view your message as recipients would see it.
- Click Next to move on to the next step of sending the message, which is determining recipients.
- Click Cancel to exit the message without sending.
Delivery Details
The Delivery Device options determine how the message is delivered to the recipients. Different fields display for each device; all appropriate fields display if you choose more than one device.
Note that there are separate Delivery Times for Inbox/Email messages and Voice/Text messages. Inbox/Email messages can be sent at any time, but you may want to limit the delivery of Voice and Text messages to daytime and evening hours.
|
|
Additional Delivery Options
The columns on the right of this table indicate which fields display for which devices, (I)nbox, (E)mail, (V)oice, and (T)ext.
| Option | Description | I | E | V | T |
|---|---|---|---|---|---|
| Delivery Date | The date the message is scheduled to be sent. The default setting is the current date; change the date to send the message on some date in the future. | X | X | X | X |
| Inbox/Email Delivery Time | The time the message is scheduled to be sent on the Delivery Date. The default setting is the current time; change the time to send the message at a future time. | X | X | ||
| Voice/Text Delivery Time | The time the message is scheduled to be sent on the Delivery Date. The default setting is the current time; change the time to send the message at a future time. | X | X | ||
| Sender's Email | The email address that displays in the From field of the email. This email address populates based on the Email Settings set up for the district and is either the default email address selected for the district or your email address entered in Census. This field may be editable, or read only, based on district settings. | X | |||
| Caller ID | The phone number that displays on the recipient's caller ID. This phone number populates based on the Caller ID Preferences set up for the district. | X |
Message Details
For a Class messages, none of the message fields pre-populate. Enter your message as desired, including Campus fields that populate based on the recipient. For example, the student.firstName field populates with the student's actual first name in each message based on the recipient.

Message Details
The columns on the right of this table indicate which fields display for which devices, (I)nbox, (E)mail, (V)oice, and (T)ext.
| Message Details | Description | I | E | V | T |
|---|---|---|---|---|---|
| Message Subject | The subject line of the message. | X | X | X | X |
| Record a Message | This link opens up a public voice file recorder where you can record a voice message for this message. Once you've recorded a message, use the Add WAV File option to upload the file to the message. | X | |||
| Add WAV File | Upload an existing WAV file of a voice message. | X | |||
| Add Email Attachment | Allows you to upload a file attachment, based on your district's Digital Repository Preferences.
Note that file names that include special characters cannot be uploaded. Special characters include : / \ , [ ] { } ( ) ! ; " * ? < > | CR, LF, '..' or Tab. |
X | |||
| Message Body | The message sent to the recipient. Format using the options above the message. The image icon allows you to insert a web link to an image. The link icon, which looks like a chain, allows you to insert a web link.
In the example, the fields outlined in blue are Campus fields, which display information based on the recipient. For example, the student.firstName field displays the first name of the student recipient for each message. Use the green F button to access available Campus fields.
Message Body supports the use of Chinese characters in email messages only.
If copying/pasting from an external source, consider using a program to remove unwanted HTML beforehand. |
X | X | X | |
| Text Message | The message sent to the recipient. Text messages cannot be formatted.
In the example, the fields outlined in blue are Campus fields, which display information based on the recipient. For example, the student.firstName field displays the first name of the student recipient for each message. Use the green F button to access available Campus fields.
There is a character limit of 400 characters for text messages. Once the limit of 400, a warning message displays and the message cannot be saved until it is shortened.
However, Campus recommends limiting the length of text message to 140 characters, since longer messages will be sent in multiple chunks and may not be delivered in the correct order. |
X |
Step 2 - Recipients
The second step of sending a message is selecting which students and/or messenger contacts to include in the recipient list. Class messages can be sent to multiple sections at a time, either to the entire section or specific individuals.
Students who have end dates on their section rosters before the end of the term will not be included in the message as recipients (nor will their Messenger contacts).
Step-by-Step Instructions
First, indicate if you want to select all recipients from your section(s) or specific recipients.
All Recipients from Sections
- Expand the Term to view a list of of sections in that term or select a Term to include all sections in that term. Alternately, mark Select All to include all sections in all terms.
- From an expanded Term, select which Section(s) you'd like to include.
- Indicate if the recipients should be Student Messenger Contacts, Students, or Both.
- Click Next to review the message prior to sending.
Specific Recipients from Sections
- Select the first Section from which to add recipients. You have the option of adding recipients from one section, switching sections, and adding more recipients from another section.
- Sort the list of possible recipients by Student Messenger Contacts or by Students. Add recipients from either or both lists.
- From the Select Recipients list, click Add to move individuals to the Recipient List. Click Remove to move individuals off the Recipient List. Use the Add All and Remove All buttons below the lists as desire.
- Click Next to review the message prior to sending.
To send a message to All recipients from section(s), choose that option and select the section(s) to include from the list of your sections, divided by term.
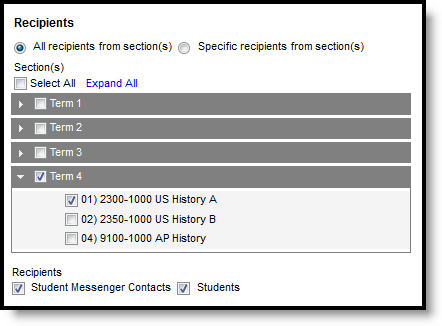
Including Full Sections in the Recipient List
To choose Specific recipients from section(s), mark that option to view a list of recipients by section. Add recipients, sorted by Student Messenger Contacts or Students, from the selected section. Recipients can be added from either or both lists. Select additional sections if desired; the Recipient List can include students and/or contacts from multiple sections.
The Student Messenger Contact options are determined by the Messenger checkbox on the Relationships tab.
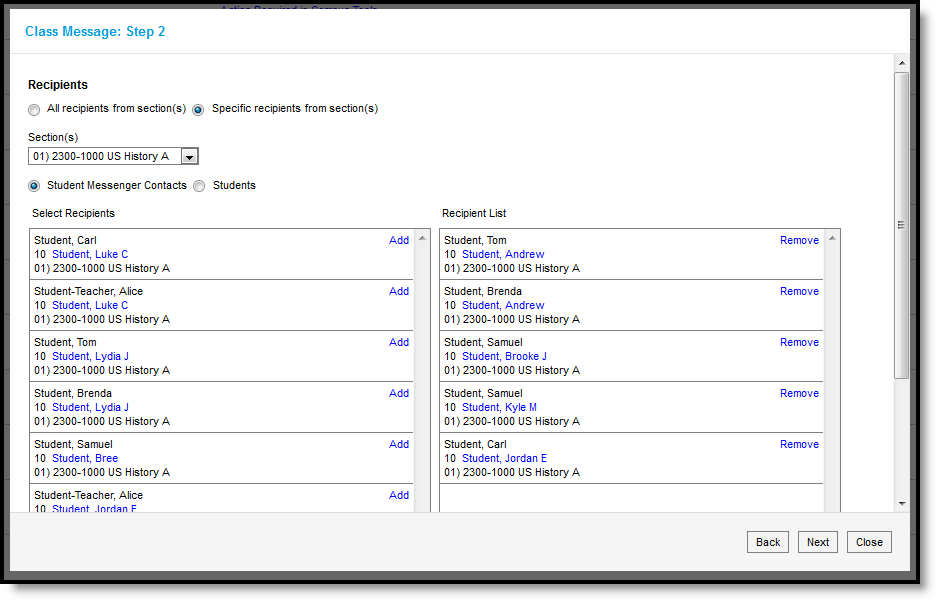
List of Specific Recipients
Blended Learning
If your school is using Blended Learning, an icon displays next to each student's name indicating their blended learning group.
Step 3 - Review and Send Messages
The final step of creating and sending a message is to review recipients and send the message.
Step-by-Step Instructions
- Click Review Recipients to view each planned recipient of the message. Unmark checkboxes for any recipients' devices that shouldn't receive the message and click Save and Close to return. If you don't make any changes to the recipient and device list, just click Close to return.
- Click Send to schedule the message. Any invalid delivery devices, such as an invalid phone number, generate an error. Use the Review Recipients list to remove these invalid devices. Save, Close, and return to Send the message again. The message will be sent at the Delivery Date and Time chosen.
- A total Recipient Count and by-device totals displays.
- To view a printable log of the message, click View Log. If desired, mark the device checkboxes below the recipient counts to include Delivery Details for those devices.
The Delivery Summary displays the options selected in the Delivery Details at the beginning, and the Recipient Counts, as well as a Preview of the Message(s) with any attachments. Recipient Counts indicate the total number of recipients, as well as:
- The number who will not receive the message through any means (No Device),
- The number with a Portal account who could receive the message through the Process Inbox, and
- Those who had email addresses or phone number in Census with the appropriate messenger settings who received the message through those methods (Email and Voice/Text).
The Message Preview displays all messages that will be sent to recipients.
To review specific recipients, click Review Recipients. To remove a recipient prior to sending the message, or to remove a delivery device, unmark the checkbox next to the individual or any of their message devices. For example, in the image below that includes all guardian contacts and students for a section, one parent has two students in the course; unmark one of the duplicate recipients to prevent repeated messages. Click the student's name to view their summary. Click Preview to view the message as that parent would see it, with the appropriate Campus fields populated.
Recipients who do not have any devices listed below their names (such as email addresses and phone numbers) will not receive the message.
If you've made any changes to this screen, click Save and then Close to return to the preview screen. Otherwise, click Close to return.
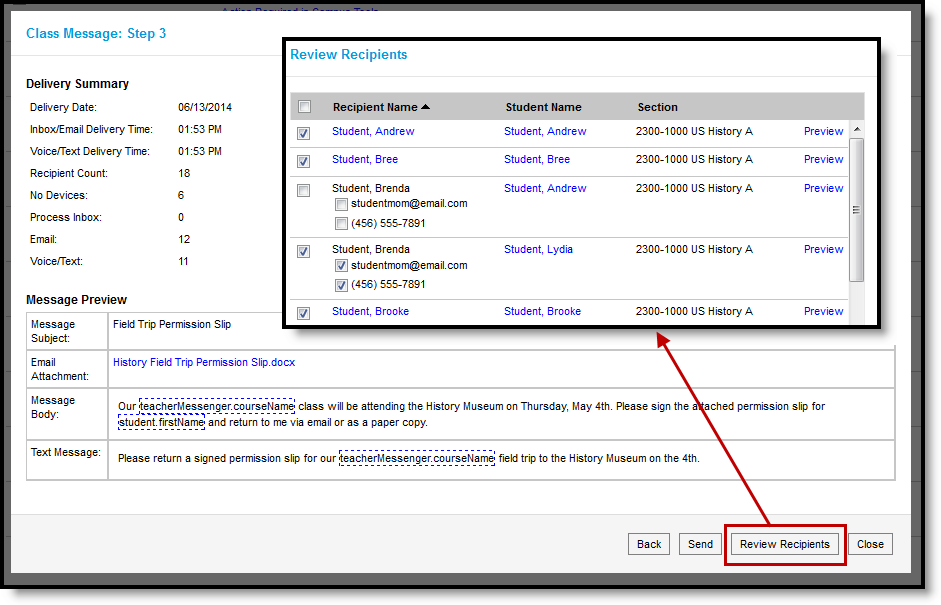
Reviewing Recipients
Click Send to send the messages. If any of the delivery devices is recognized as invalid, an error message displays and messages are not sent. In this case, click Review Recipients again and unmark the checkbox next to the erroneous email address or phone number and click Save and Close. Messages will not be sent to this device. Click Send again to send the message to the remaining devices.
Once messages are successfully sent, a summary screen displays recipient counts. To view a log of messages sent, mark the checkbox next to the delivery devices and click View Log. A printable log generates that includes the following sections:
- Delivery Summary - Includes Date and Time of the message and counts for devices, with both attempted and successful counts where appropriate.
- Filter Criteria - Includes the criteria that determined which students' guardian contacts were sent the message.
- Message Detail - Includes the content of the message(s) and appropriate information about the sender (email address and phone number).
- Delivery Detail - Lists the guardian contacts who were sent the message, their students' names, the Delivery Device(s), the Status of the message, and the Time the message was sent.
Leave all device checkboxes blank to view a general message log of just Delivery Summary, Filter Criteria, and Message Detail.
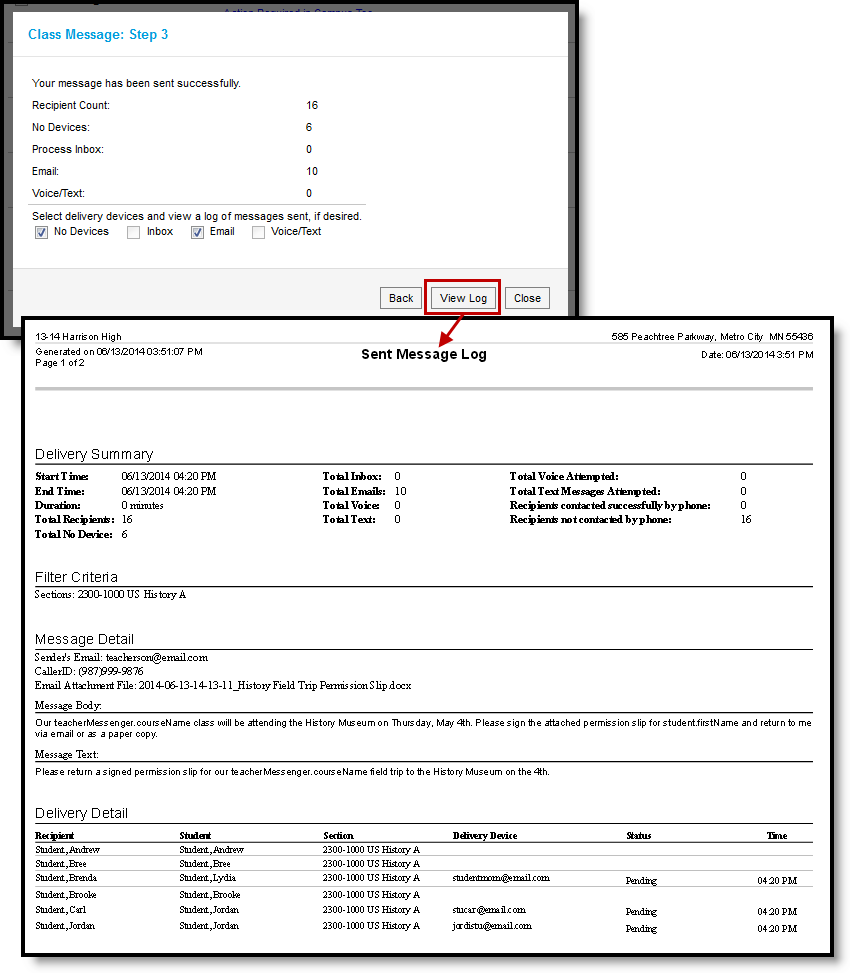
Message Log after a Message is Sent
Classroom Messenger allows teachers to send general class messages to students and guardians. This video demonstrates how to send general class messages in Classroom Messenger.
Send a Grades Message
Teachers can send a grades message from previously created message templates to notify students and/or guardians when a student has received a specific grade either as an In Progress or a Posted Grade. Messages based on templates will auto-populate with default text, including Campus fields that populate based on the recipient.
Location: Classroom Messenger > New > select Message Type: Grades Message
Send a Grades Message to students and guardians to notify them when the student has received a specific grade either as an In Progress or a Posted Grade.
Use this tool to create a message to send, or to save a message template for later use.
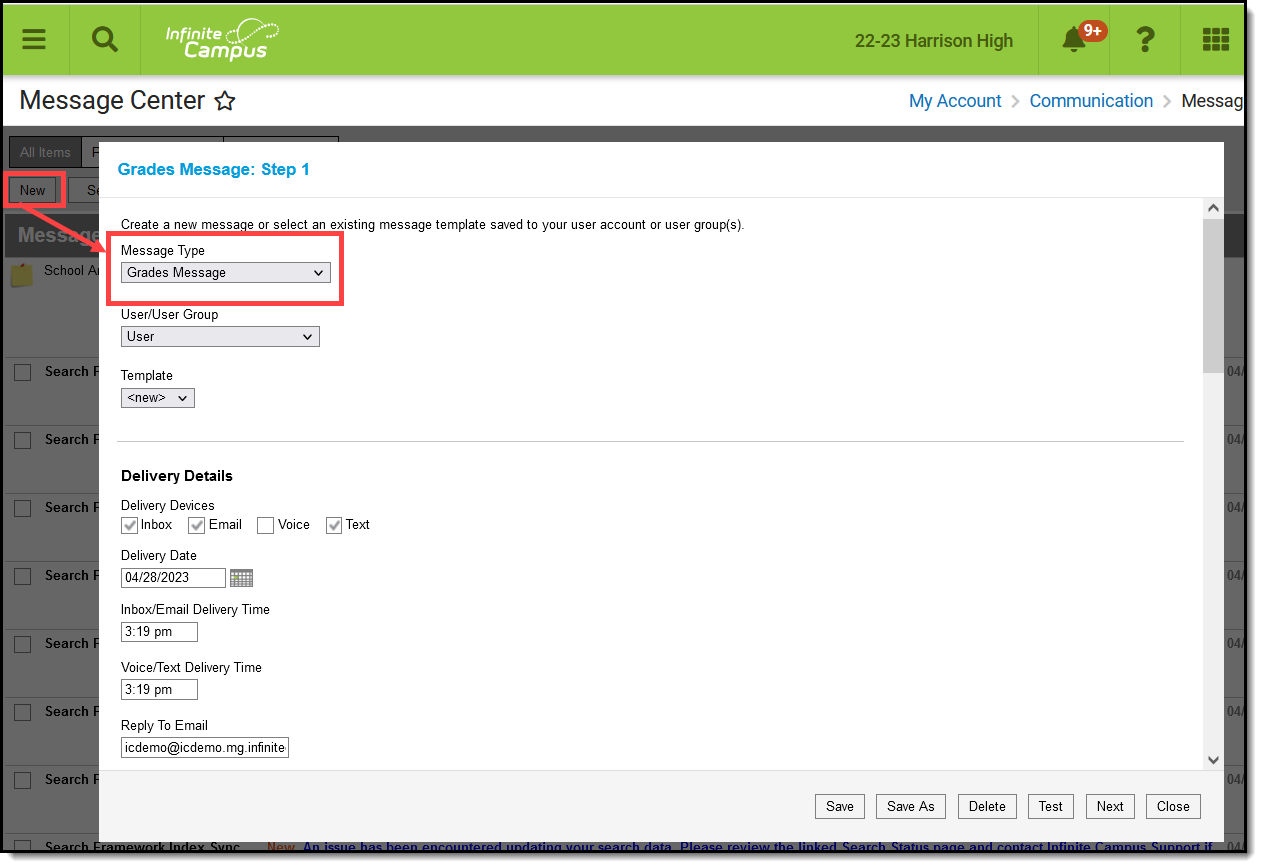 Create a Grades message to notify students and their guardians about specific grades.
 Tool rights to create Grades messages are found in Additional Access Rights > Instruction Messaging.
See the table of contents on the right for the steps of how to create a message.
Templates
When you create a message, you have the option of selecting an existing message template or starting from scratch. See the Create a Template for Sending Messages article for more information about templates.
Use the User/User Group and Template fields to select which template you'd like to start with, or choose a Template of new. The User/User Group dropdown list has options for your own account (User) and for each of the User Groups you are a member of. If you have the correct tools rights, you can save templates to a user group, which would make that template available to all users in the group.
If you select a specific template, fields in the message auto-populate based on that template, but are still editable for this instance of the message.
Step 1 - Delivery and Message Details
The Delivery and Message Details options available depend on your district's messenger settings.
Step-by-Step Instructions
- Select Grades Message as the Message Type.
- To start with an existing template, select a Template that is assigned to you as a User or a User Group you belong to in the next two fields.
- Indicate which Delivery Devices to send the message to. Devices are available based on your district's settings. Additional options display based on the device(s) selected.
- Enter a Deliver Date, either the current date or a date in the future.
- Enter Deliver Times for Inbox/Email and Voice/Text messages.
- If sending an Email, review the Sender's Email. This field may be editable based on district settings.
- If sending a Voice message, review the Caller ID number. This field may be editable based on district settings.
- Enter a Subject for the message.
- Attach any additional files needed for the message, either by Recording a Message and Adding it as a WAV File for Voice messages or Adding an Attachment for Emails.
- Modify the default content in the Message Body if desired. Use the options at the top of the text box to format the text, add images or links, and include Campus fields. This text applies to Inbox, Email, and Voice messages.
- If sending a text, modify the default content in the Text Message if desired. Campus recommends limiting this text to 140 characters. Messages greater than that length that include variable length Campus fields are sent as multiple messages that may not be delivered in the correct order.
- Use the options along the bottom of the window to move on:
- Click Save or Save As if you're modifying or creating a template. The Delete option also applies to templates. See the Grades Message Template article for more information about these options.
- Click Test to view your message as recipients would see it.
- Click Next to move on to the next step of sending the message, which is determining recipients.
- Click Cancel to exit the message without sending.
Delivery Details
|
The Delivery Device options determine how the message is delivered to the recipients. Different fields display for each device; all appropriate fields display if you choose more than one device.
Note that there are separate Delivery Times for Inbox/Email messages and Voice/Text messages. Inbox/Email messages can be sent at any time, but you may want to limit the delivery of Voice and Text messages to daytime and evening hours.
|
|
Additional Delivery Options
The columns on the right of this table indicate which fields display for which devices, (I)nbox, (E)mail, (V)oice, and (T)ext.
| Option | Description | I | E | V | T |
|---|---|---|---|---|---|
| Delivery Date | The date the message is scheduled to be sent. The default setting is the current date; change the date to send the message on some date in the future. | X | X | X | X |
| Inbox/Email Delivery Time | The time the message is scheduled to be sent on the Delivery Date. The default setting is the current time; change the time to send the message at a future time. | X | X |
|
|
| Voice/Text Delivery Time | The time the message is scheduled to be sent on the Delivery Date. The default setting is the current time; change the time to send the message at a future time. |
|
|
X | X |
| Sender's Email | The email address that displays in the From field of the email. This email address populates based on the Email Settings set up for the district and is either the default email address selected for the district or your email address entered in Census. This field may be editable, or read only, based on district settings. |
|
X |
|
|
| Caller ID | The phone number that displays on the recipient's caller ID. This phone number populates based on the Caller ID Preferences set up for the district. |
|
|
X |
|
Delivery Dates in the Future
A Grades message pulls recipient data based on the date that the message is created, not when it is scheduled to be delivered.
For example, if scheduling a message to be sent in the future for posted grades, but the grades have not yet been posted, the message will indicate that there are no recipients because at the time the message is created, no students fit the grade criteria.
Message Details
For a Grades Message, the Subject, Body and Text Message fields auto-populate with a sample of content that you could use, including Campus fields that populate based on the recipient. For example, the student.firstName field will populate with the student's actual first name in each message based on the recipient. Modify this text as desired. .
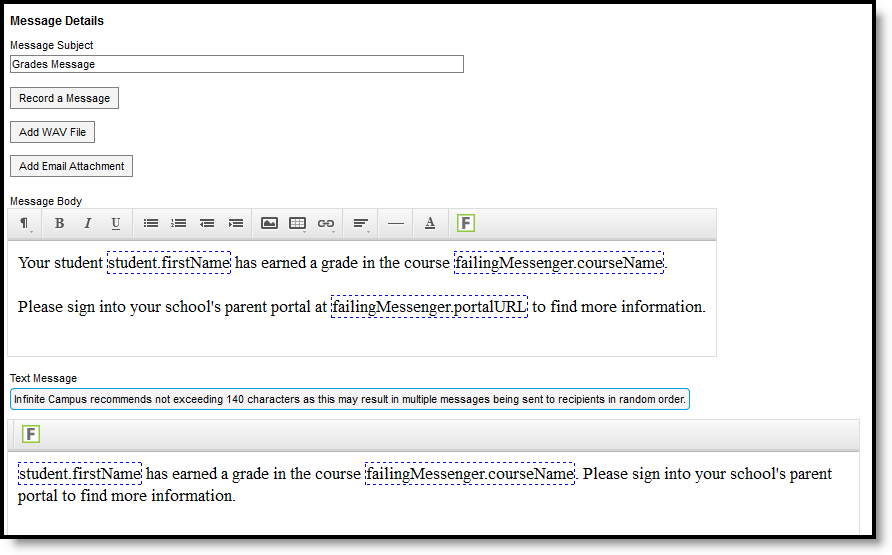
Message Details
The columns on the right of this table indicate which fields display for which devices, (I)nbox, (E)mail, (V)oice, and (T)ext.
| Message Details | Description | I | E | V | T |
|---|---|---|---|---|---|
| Message Subject | The subject line of the message. | X | X | X | X |
| Record a Message | This link opens up a public voice file recorder where you can record a voice message for this message. Once you've recorded a message, use the Add WAV File option to upload the file to the message. | X | |||
| Add WAV File | Upload an existing WAV file of a voice message. | X | |||
| Add Email Attachment | Allows you to upload a file attachment, based on your district's Digital Repository Preferences.
Note that file names that include special characters cannot be uploaded. Special characters include : / \ , [ ] { } ( ) ! ; " * ? < > | CR, LF, '..' or Tab. |
X | |||
| Message Body |
The message sent to the recipient. Default text displays providing an example of the type of Grades Message that you could send, but is entirely editable. Format using the options above the message. The image icon allows you to insert a web link to an image. The link icon, which looks like a chain, allows you to insert a web link.
In the example, the fields outlined in blue are Campus fields, which display information based on the recipient. For example, the student.firstName field displays the first name of the student recipient for each message. Use the green F button to access available Campus fields.
Message Body supports the use of Chinese characters in email messages only. |
X | X | X | |
| Text Message |
The message sent to the recipient. Default text displays providing an example of the type of Grades Message that you could send, but is entirely editable. Text messages cannot be formatted.
In the example, the fields outlined in blue are Campus fields, which display information based on the recipient. For example, the student.firstName field displays the first name of the student recipient for each message. Use the green F button to access available Campus fields.
There is a character limit of 400 characters for text messages. Once the limit of 400, a warning message displays and the message cannot be saved until it is shortened.
However, Campus recommends limiting the length of text message to 140 characters, since longer messages will be sent in multiple chunks and may not be delivered in the correct order. |
X |
Step 2 - Students and Recipient Criteria
The second step of sending a message is selecting which students and guardians could be included in the recipient list and which grades determine that inclusion. Student and guardians of students who meet the recipient criteria are sent the message.
Step-by-Step Instructions
- Select a Section from which to choose students and grades. Options include the current and previous terms for all of your sections.
- Indicate if you want to include All Students as possible recipients or choose from a list of Specific Students in the section. Add students to the List as desired.
- Indicate whether messages should be sent based on In Progress Grades or Posted Grades.
- Select which Grades to include from the list of applicable Score Groups and Rubrics.
- Select which Grading Tasks and Standards to include.
- Indicate if Repeat Messages should be allowed for students who meet multiple criteria.
- Click Next to review the message prior to sending.
Available Sections include your sections in the current term and one term previous. Leave All Students selected to include all active students in the selected Section or mark Specific Students to choose individuals. Move students to and from the Student List using the Add and Remove buttons. Add All and Remove All options are at the bottom of the lists.
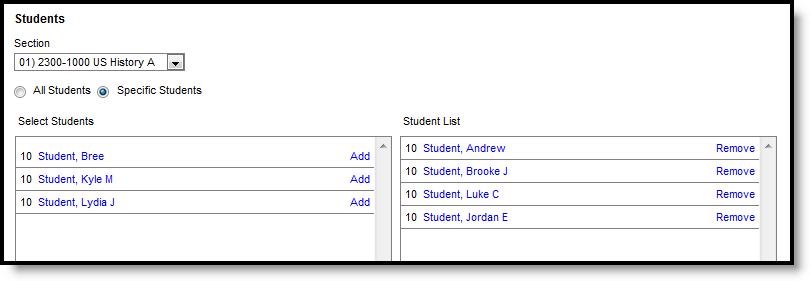
List of Specific Students
Blended Learning
If your school is using Blended Learning, an icon displays next to each student's name indicating their blended learning group.
Once you've selected students as possible recipients, determine the Recipient Criteria for the message: which grades from which tasks and standards cause a message to generate.
|
There are three options to filter which grades meet the criteria:
Below these options is a checkbox to Allow Repeat Messages, which allows multiple messages to be sent to the same recipient for a given Section/Term/Task. If this checkbox is not marked, a messenger contact can only receive one message for a given Section/Term/Task - additional message beyond the first are not sent.
Indicate whether the Recipients for the message should include Messenger Contacts and/or Students. Messenger Contacts are those who have a Relationship to the student marked as Messenger.
|
|
Step 3 - Review and Send Messages
The final step of creating and sending a message is to review recipients and send the message.
Step-by-Step Instructions
- Click Review Recipients to view each planned recipient of the message. Unmark checkboxes for any recipients' devices that shouldn't receive the message and click Save and Close to return. If you don't make any changes to the recipient and device list, just click Close to return.
- Click Send to schedule the message. Any invalid delivery devices, such as an invalid phone number, generate an error. Use the Review Recipients list to remove these invalid devices. Save, Close, and return to Send the message again. The message will be sent at the Delivery Date and Time chosen.
- A total Recipient Count and by-device totals displays.
- To view a printable log of the message, click View Log. If desired, mark the device checkboxes below the recipient counts to include Delivery Details for those devices.
The Delivery Summary displays the options selected in the Delivery Details at the beginning, and the Recipient Counts, as well as a Preview of the Message(s) with any attachments. Recipient Counts indicate the total number of recipients, as well as:
- The number who will not receive the message through any means (No Device),
- The number with a Portal account who could receive the message through the Process Inbox, and
- Those who had email addresses or phone number in Census with the appropriate messenger settings who received the message through those methods (Email and Voice/Text).
The Message Preview displays all messages that will be sent to recipients.
To review specific recipients, click Review Recipients. To remove a recipient prior to sending the message, or to remove a delivery device, unmark the checkbox next to the individual or any of their message devices. Click the student's name to view their summary. Click Preview to view the message as that recipient would see it, with the appropriate Campus fields populated.
Recipients who do not have any devices listed below their names (such as email addresses and phone numbers) will not receive the message.
If you've made any changes to this screen, click Save and then Close to return to the preview screen. Otherwise, click Close to return.
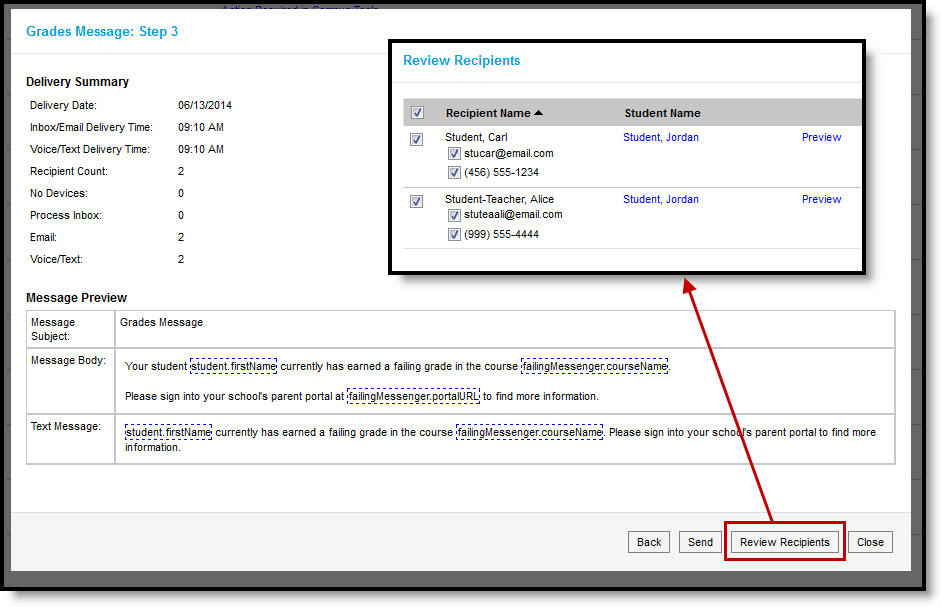
Reviewing Recipients
Click Send to send the messages. If any of the delivery devices is recognized as invalid, an error message displays and messages are not sent. In this case, click Review Recipients again and unmark the checkbox next to the erroneous email address or phone number and click Save and Close. Messages will not be sent to this device. Click Send again to send the message to the remaining devices.
Once messages are successfully sent, a summary screen displays recipient counts. To view a log of messages sent, mark the checkbox next to the delivery devices and click View Log. A printable log generates that includes the following sections:
- Delivery Summary - Includes Date and Time of the message and counts for devices, with both attempted and successful counts where appropriate.
- Filter Criteria - Includes the criteria that determined which students and guardians were sent the message.
- Message Detail - Includes the content of the message(s) and appropriate information about the sender (email address and phone number).
- Delivery Detail - Lists the students and guardians who were sent the message, the Delivery Device(s), the Status of the message, and the Time the message was sent.
Leave all device checkboxes blank to view a general message log of just Delivery Summary, Filter Criteria, and Message Detail.
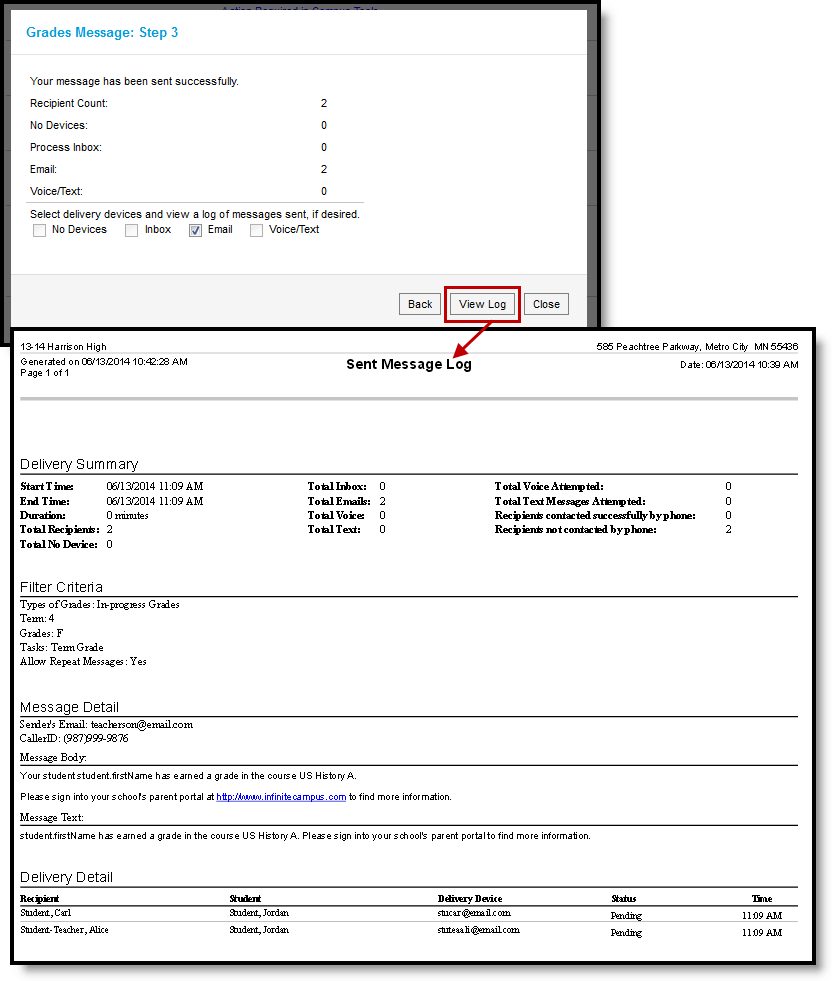
Message Log after a Message is Sent
Previous Version
Send a Grades Message to Guardians [.2211 - .2315]
Teachers can send grades-related messages to students and guardians from Classroom Messenger. This video demonstrates how to send grades-related messages to selected students and guardians in a section.
Send a Missing Assignment Message
Teachers can send missing assignment messages from previously created message templates to notify students and/or guardians when a student is missing assignments. Messages based on templates will auto-populate with default text, including Campus fields that populate based on the recipient.
Location: Classroom Messenger > New > select Message Type: Missing Assignment Message
Send a Missing Assignment Message to students and guardians to notify them when the student is missing assignment(s).
Use this tool to create a message to send, or to save a message template for later use.
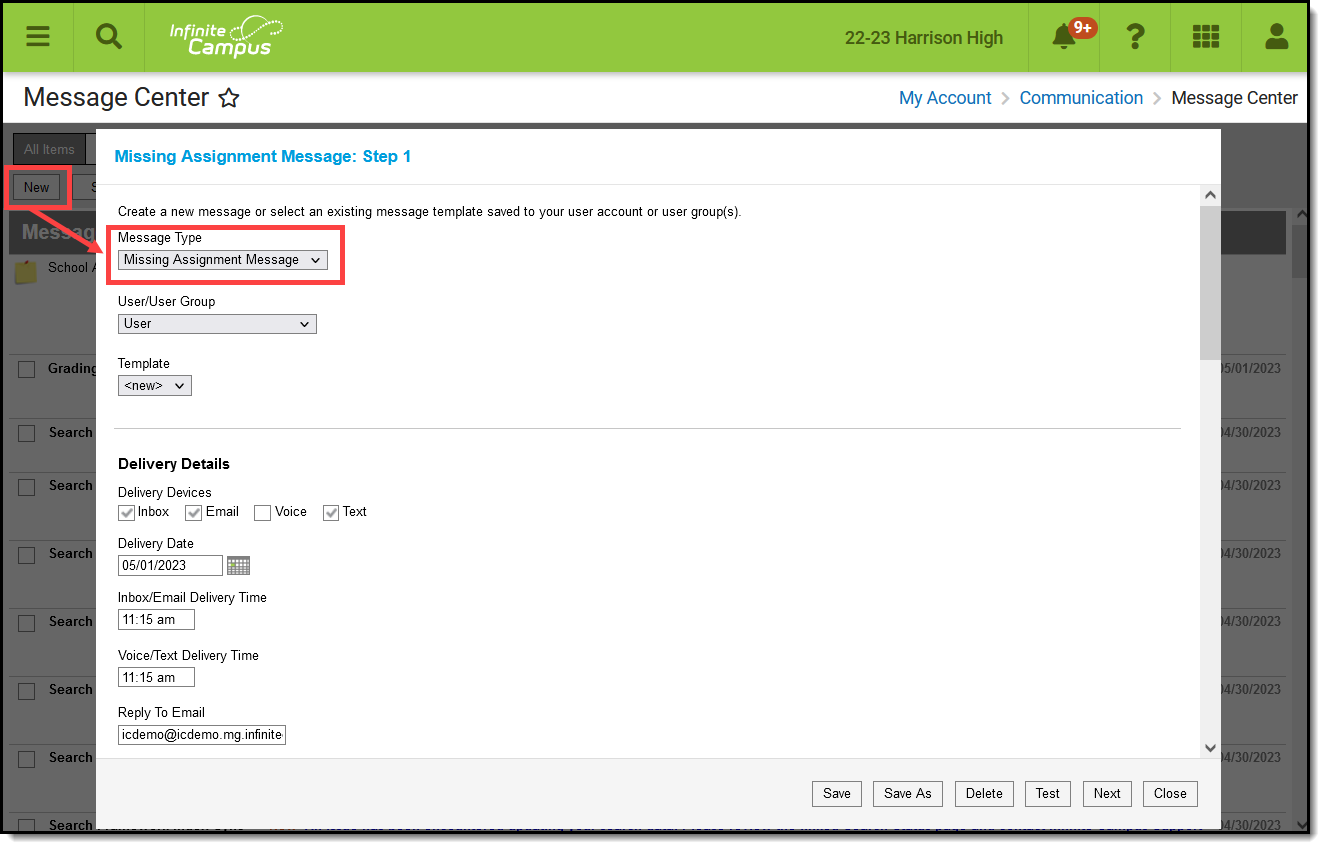 Send a Missing Assignments message to notify students and their guardians of missing assignments.
Missing Assignment Message in the Classroom Messenger
See the Instruction Tool Rights article for more information.
Templates
When you create a message, you have the option of selecting an existing message template or starting from scratch. See the Create a Template for Sending Messages article for more information about templates.
Use the User/User Group and Template fields to select which template you'd like to start with, or choose a Template of new. You have the options of saving this message as a template using the Save buttons, but that step is not necessary to send the message. The User/User Group dropdown list has options for your own account (User) and for each of the User Groups you are a member of. If you have the correct tools rights, you can save templates to a user group, which would make that template available to all users in the group.
If you select a specific template, fields in the message auto-populate based on that template, but are still editable for this instance of the message.
Step 1 - Delivery and Message Details
The Delivery and Message Details options available depend on your district's messenger settings.
Step-by-Step Instructions
- Select Missing Assignment Message as the Message Type.
- To start with an existing template, select a Template that is assigned to you as a User or a User Group you belong to in the next two fields.
- Indicate which Delivery Devices to send the message to. Devices are available based on your district's settings. Additional options display based on the device(s) selected.
- Enter a Deliver Date, either the current date or a date in the future.
- Enter Deliver Times for Inbox/Email and Voice/Text messages.
- If sending an Email, review the Sender's Email. This field may be editable based on district settings.
- If sending a Voice message, review the Caller ID number. This field may be editable based on district settings.
- Enter a Subject for the message.
- Attach any additional files needed for the message, either by Recording a Message and Adding it as a WAV File for Voice messages or Adding an Attachment for Emails.
- Modify the default content in the Message Body if desired. Use the options at the top of the text box to format the text, add images or links, and include Campus fields. This text applies to Inbox, Email, and Voice messages.
- If sending a text, modify the default content in the Text Message if desired. Campus recommends limiting this text to 140 characters. Messages greater than that length that include variable length Campus fields are sent as multiple messages that may not be delivered in the correct order.
- Use the options along the bottom of the window to move on:
- Click Save or Save As if you're modifying or creating a template. The Delete option also applies to templates. See the Grades Message Template article for more information about these options.
- Click Test to view your message as recipients would see it.
- Click Next to move on to the next step of sending the message, which is determining recipients.
- Click Cancel to exit the message without sending.
Delivery Details
The Delivery Device options determine how the message is delivered to the recipients. Different fields display for each device; all appropriate fields display if you choose more than one device. Note that there are separate Delivery Times for Inbox/Email messages and Voice/Text messages. Inbox/Email messages can be sent at any time, but you may want to limit the delivery of Voice and Text messages to daytime and evening hours.
|
|
Additional Delivery Options
The columns on the right of this table indicate which fields display for which devices, (I)nbox, (E)mail, (V)oice, and (T)ext.
| Option | Description | I | E | V | T |
|---|---|---|---|---|---|
| Delivery Date | The date the message is scheduled to be sent. The default setting is the current date; change the date to send the message on some date in the future. | X | X | X | X |
| Inbox/Email Delivery Time | The time the message is scheduled to be sent on the Delivery Date. The default setting is the current time; change the time to send the message at a future time. | X | X | ||
| Voice/Text Delivery Time | The time the message is scheduled to be sent on the Delivery Date. The default setting is the current time; change the time to send the message at a future time. | X | X | ||
| Sender's Email | The email address that displays in the From field of the email. This email address populates based on the Email Settings set up for the district and is either the default email address selected for the district or your email address entered in Census. This field may be editable, or read only, based on district settings. | X | |||
| Caller ID | The phone number that displays on the recipient's caller ID. This phone number populates based on the Caller ID Preferences set up for the district. | X |
Message Details
For a Missing Assignment Message, the Subject, Body and Text Message fields auto-populate with a sample of content that you could use, including Campus fields that populate based on the recipient. For example, the student.firstName field will populate with the student's actual first name in each message based on the recipient. Modify this text as desired.
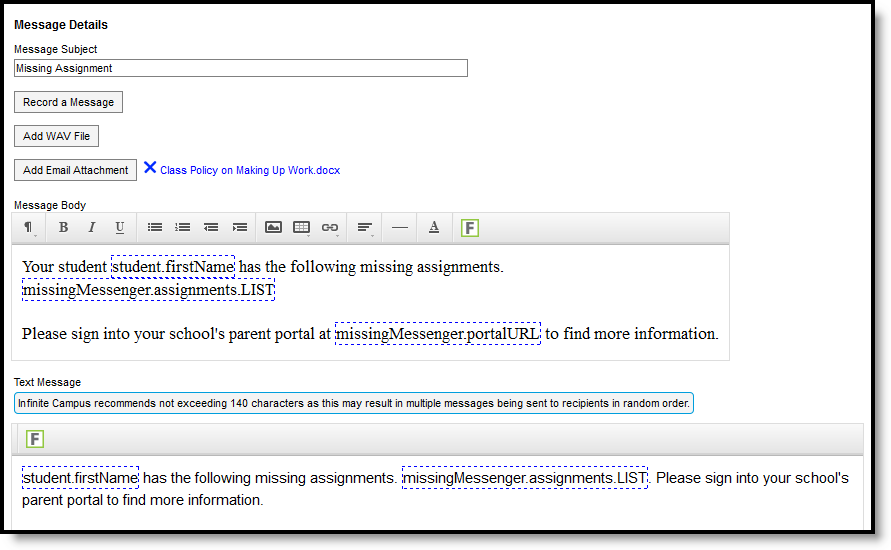
Message Details
The columns on the right of this table indicate which fields display for which devices, (I)nbox, (E)mail, (V)oice, and (T)ext.
| Message Details | Description | I | E | V | T |
|---|---|---|---|---|---|
| Message Subject | The subject line of the message. | X | X | X | X |
| Record a Message | This link opens up a public voice file recorder where you can record a voice message for this message. Once you've recorded a message, use the Add WAV File option to upload the file to the message. | X | |||
| Add WAV File | Upload an existing WAV file of a voice message. | X | |||
| Add Email Attachment | Allows you to upload a file attachment, based on your district's Digital Repository Preferences. Note that file names that include special characters cannot be uploaded. Special characters include : / \ , [ ] { } ( ) ! ; " * ? < > | CR, LF, '..' or Tab. | X | |||
| Message Body | The message sent to the recipient. Default text displays providing an example of the type of Missing Assignment Message that you could send, but is entirely editable. Format using the options above the message. The image icon allows you to insert a web link to an image. The link icon, which looks like a chain, allows you to insert a web link. In the example, the fields outlined in blue are Campus fields, which display information based on the recipient. For example, the student.firstName field displays the first name of the student recipient for each message. Use the green F button to access available Campus fields. Message Body supports the use of Chinese characters in email messages only. | X | X | X | |
| Text Message | The message sent to the recipient. Default text displays providing an example of the type of Missing Assignment Message that you could send, but is entirely editable. Text messages cannot be formatted. In the example, the fields outlined in blue are Campus fields, which display information based on the recipient. For example, the student.firstName field displays the first name of the student recipient for each message. Use the green F button to access available Campus fields. There is a character limit of 400 characters for text messages. Once the limit of 400, a warning message displays and the message cannot be saved until it is shortened. However, Campus recommends limiting the length of text message to 140 characters, since longer messages will be sent in multiple chunks and may not be delivered in the correct order. | X |
Step 2 - Students and Recipient Criteria
The second step of sending a message is selecting which students and guardians could be included in the recipient list and which assignments determine that inclusion. Student and guardians of students who meet the recipient criteria are sent the message.
Step-by-Step Instructions
- Select a Section from which to choose students and grades. Options include the current and previous terms for all of your sections.
- Indicate if you want to include All Students as possible recipients or choose from a list of Specific Students in the section. Add students to the List as desired.
- Select which Assignments should cause messages to send if they are flagged as Missing by selecting the individual assignments or the Categories, Grading Tasks, and Standards to which they belong.
- Indicate if Repeat Messages should be allowed for recipients who have received messages for the same assignment before.
- Click Next to review the message prior to sending.
Available Sections include your sections in the current term and one term previous. Leave All Students selected to include all active students in the selected Section or mark Specific Students to choose individuals. Move students to and from the Student List using the Add and Remove buttons. Add All and Remove All options are at the bottom of the lists.
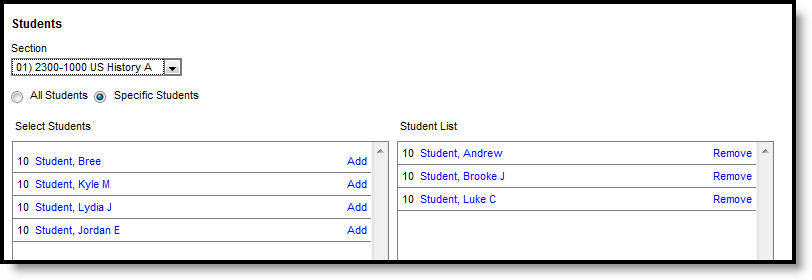
List of Specific Students
Blended Learning
If your school is using Blended Learning, an icon displays next to each student's name indicating their blended learning group.
Once you've selected students as possible recipients, determine the Recipient Criteria for the message.
| First, select the assignments to include in the message. Students who have any of the selected assignments flagged as Missing are included in the recipient list. Each Standard and Grading Task aligned to the section displays. Expand to view categories and individual assignments, or mark the higher levels to include all assignments. Below these options is a checkbox to Allow Repeat Messages, which allows multiple messages to be sent to the same recipient for a given Section/Term/Task. If this checkbox is not marked, a messenger contact can only receive one message for a given Section/Term/Task - additional message beyond the first are not sent. | 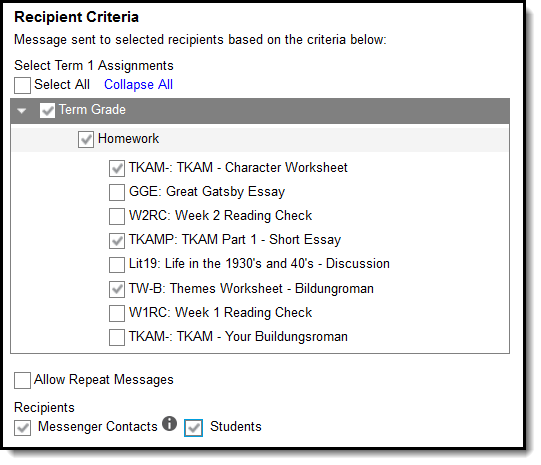 |
| Indicate whether the Recipients for the message should include Messenger Contacts and/or Students. Messenger Contacts are those who have a Relationship to the student marked as Messenger. In this example students who have any of the three marked assignments flagged as Missing are included in the recipient list, as well as their Messenger Contacts. | |
Step 3 - Review and Send Messages
The final step of creating and sending a message is to review recipients and send the message.
Step-by-Step Instructions
- Click Review Recipients to view each planned recipient of the message. Unmark checkboxes for any recipients' devices that shouldn't receive the message and click Save and Close to return. If you don't make any changes to the recipient and device list, just click Close to return.
- Click Send to schedule the message. Any invalid delivery devices, such as an invalid phone number, generate an error. Use the Review Recipients list to remove these invalid devices. Save, Close, and return to Send the message again. The message will be sent at the Delivery Date and Time chosen.
- A total Recipient Count and by-device totals displays.
- To view a printable log of the message, click View Log. If desired, mark the device checkboxes below the recipient counts to include Delivery Details for those devices.
The Delivery Summary displays the options selected in the Delivery Details at the beginning, and the Recipient Counts, as well as a Preview of the Message(s) with any attachments. Recipient Counts indicate the total number of recipients, as well as:
- The number who will not receive the message through any means (No Device),
- The number with a Portal account who could receive the message through the Process Inbox, and
- Those who had email addresses or phone number in Census with the appropriate messenger settings who received the message through those methods (Email and Voice/Text).
The Message Preview displays all messages that will be sent to recipients.
To review specific recipients, click Review Recipients. To remove a recipient prior to sending the message, or to remove a delivery device, unmark the checkbox next to the individual or any of their message devices. Click the student's name to view their summary. Click Preview to view the message as that parent would see it, with the appropriate Campus fields populated.
Recipients who do not have any devices listed below their names (such as email addresses and phone numbers) will not receive the message.
If you've made any changes to this screen, click Save and then Close to return to the preview screen. Otherwise, click Close to return.
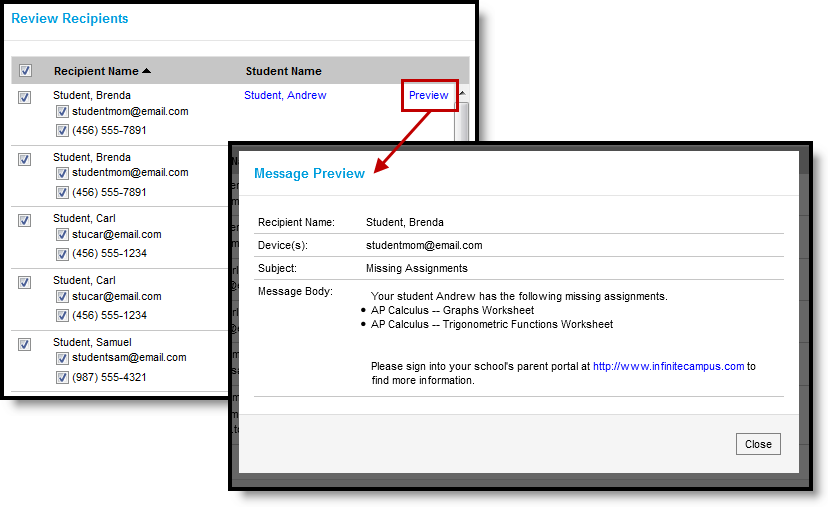
Reviewing Recipients
Click Send to send the messages. If any of the delivery devices is recognized as invalid, an error message displays and messages are not sent. In this case, click Review Recipients again and unmark the checkbox next to the erroneous email address or phone number and click Save and Close. Messages will not be sent to this device. Click Send again to send the message to the remaining devices.
Once messages are successfully sent, a summary screen displays recipient counts. To view a log of messages sent, mark the checkbox next to the delivery devices and click View Log. A printable log generates that includes the following sections:
- Delivery Summary - Includes Date and Time of the message and counts for devices, with both attempted and successful counts where appropriate.
- Filter Criteria - Includes the criteria that determined which students' guardians were sent the message.
- Message Detail - Includes the content of the message(s) and appropriate information about the sender (email address and phone number).
- Delivery Detail - Lists the guardians who were sent the message, their students' names, the Delivery Device(s), the Status of the message, and the Time the message was sent.
Leave all device checkboxes blank to view a general message log of just Delivery Summary, Filter Criteria, and Message Detail.
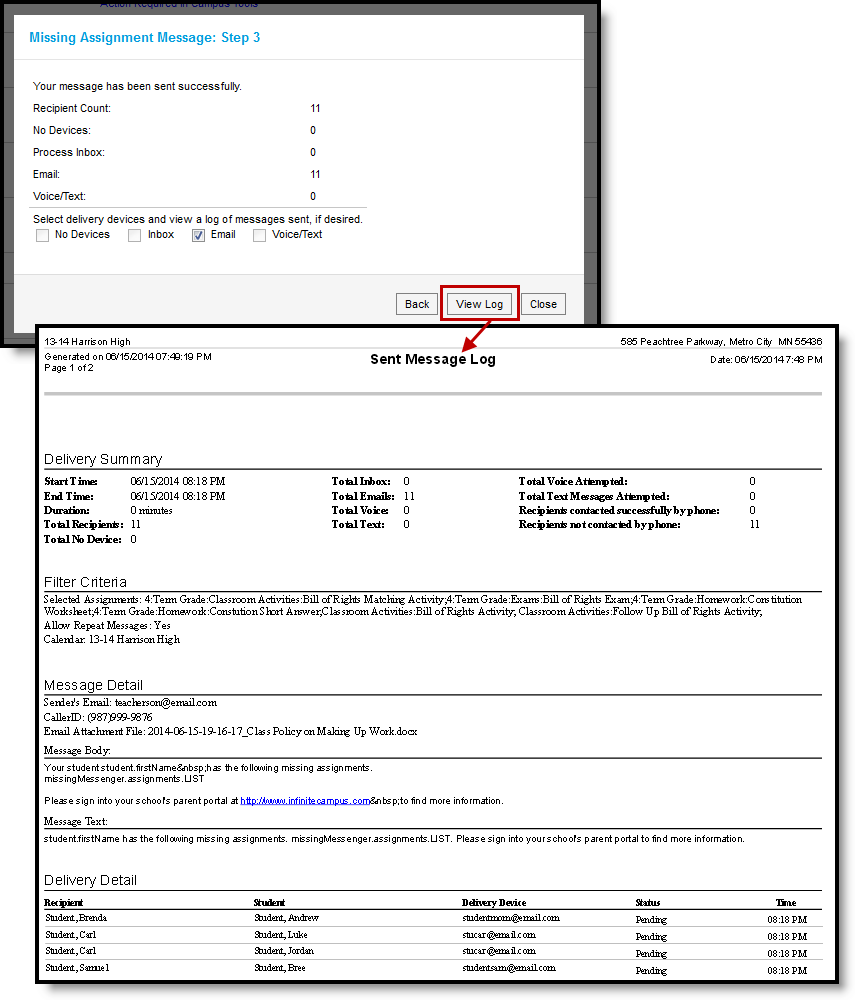
Message Log after a Message is Sent
Previous Version
Send a Missing Assignment Message to Guardians [.2211 - .2315]
Save
Using Classroom Messenger, teachers can send missing assignment messages to students and guardians to notify them when the student is missing assignment(s). This video demonstrates how to send missing assignment messages to selected students and guardians in a section.
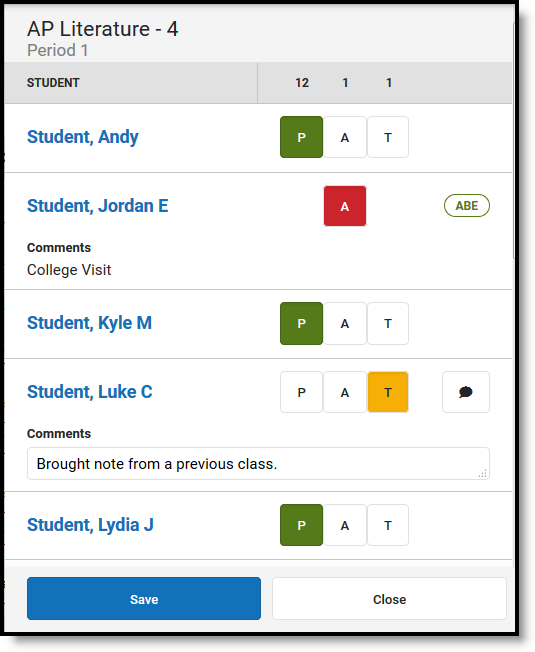
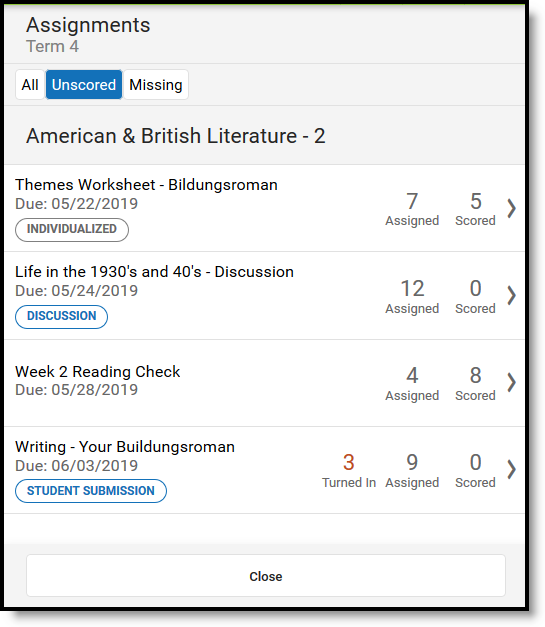
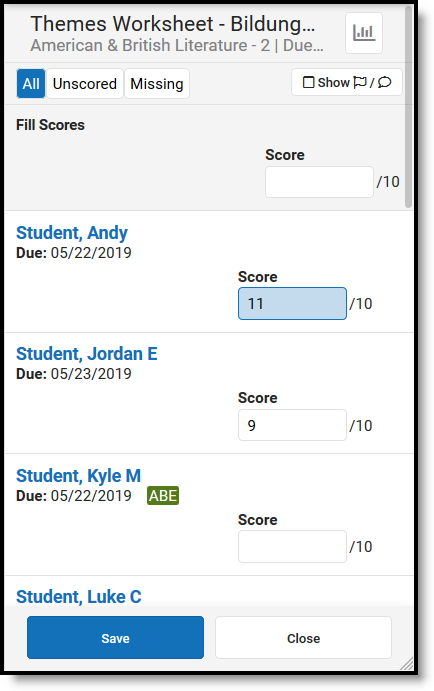
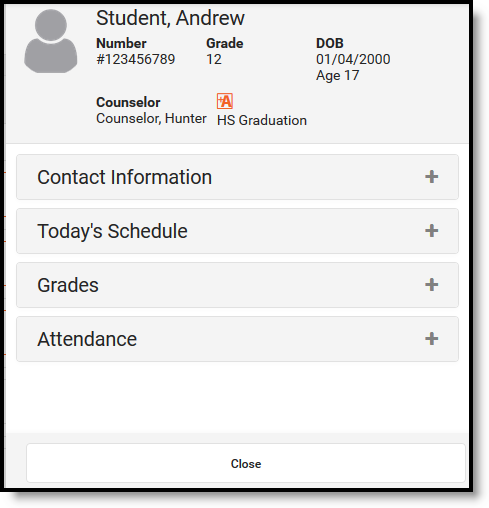
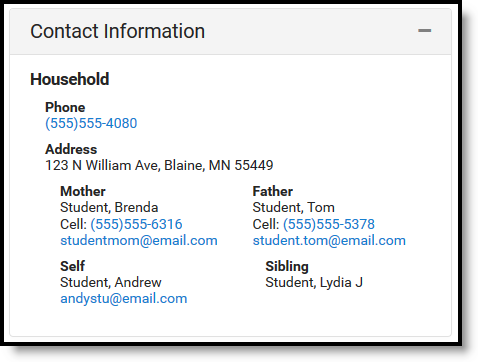
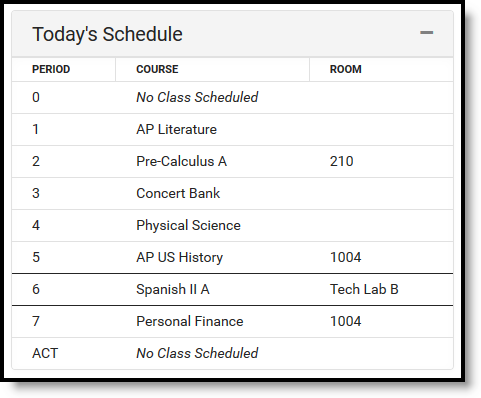
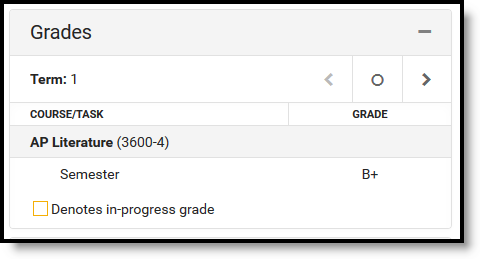
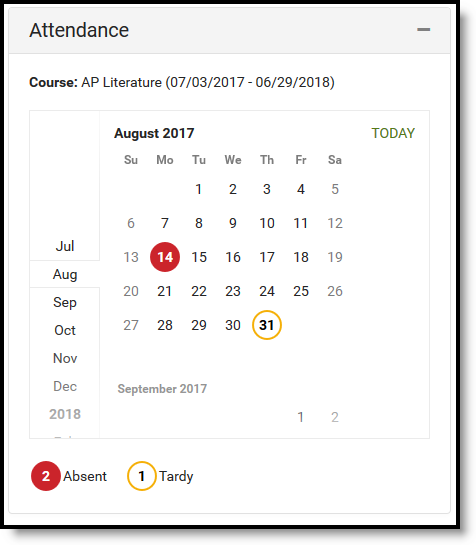
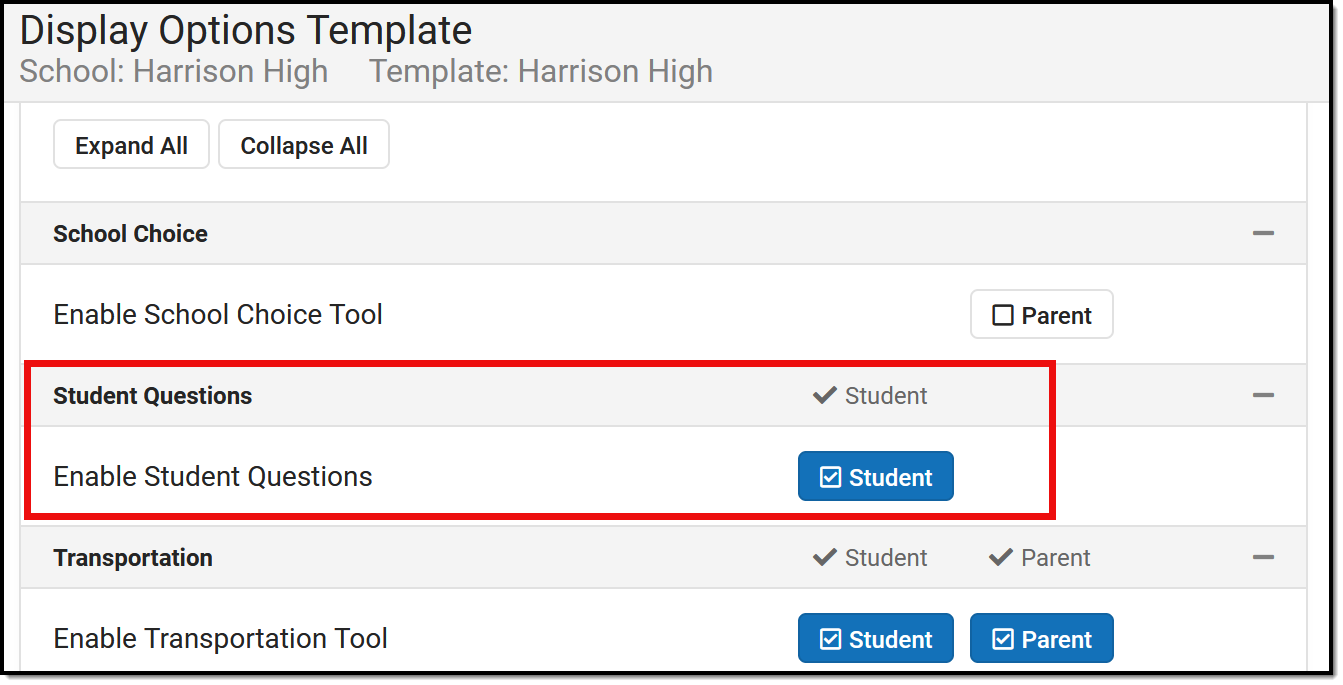
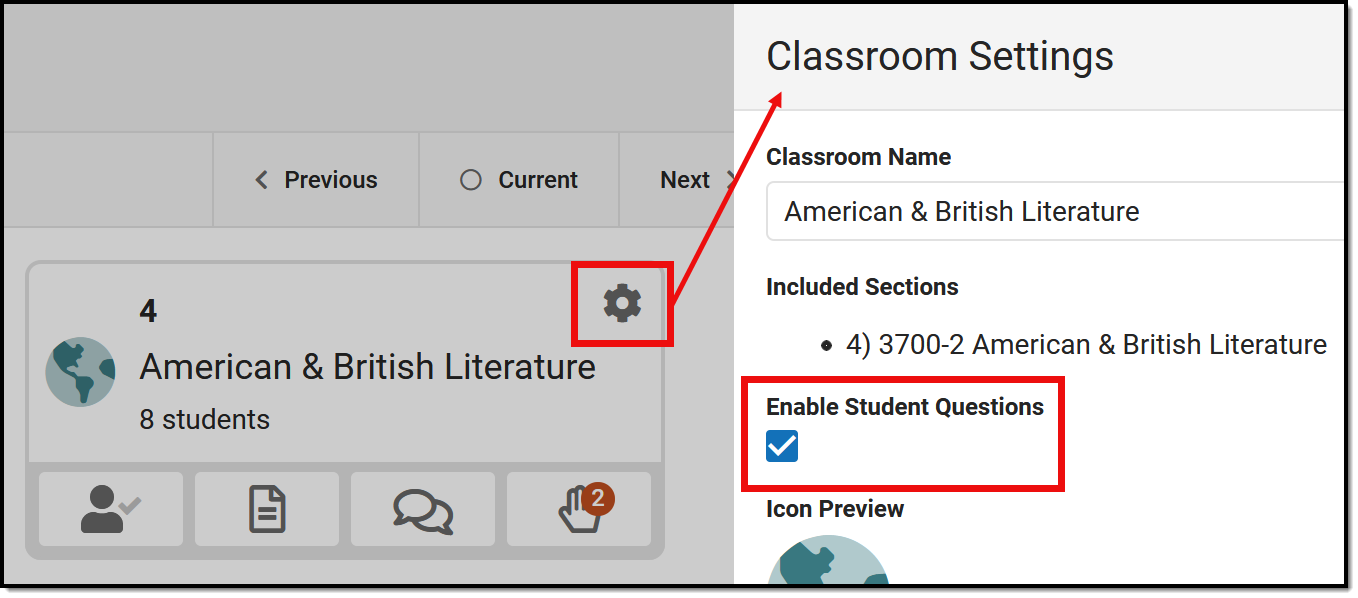
 button for a section in the


