The Assessment Center allows schools to import local / district student test scores and assessment results from external testing agencies into Infinite Campus. The Score Import Wizard tool described below will be deprecated in a future release.
Tool Search: Score Import Wizard
The Score Import Wizard allows districts to import student test scores from external testing agencies into Campus. It also allows districts to import state assessment results. When scores are imported, they are displayed on the student’s Assessment tool. Scores may also be displayed on the student’s transcript. Before using the Score Import Wizard, the appropriate Test Structure needs to be created first.
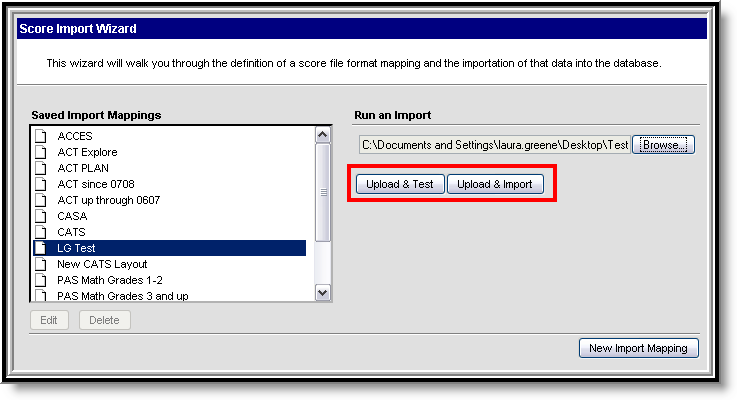
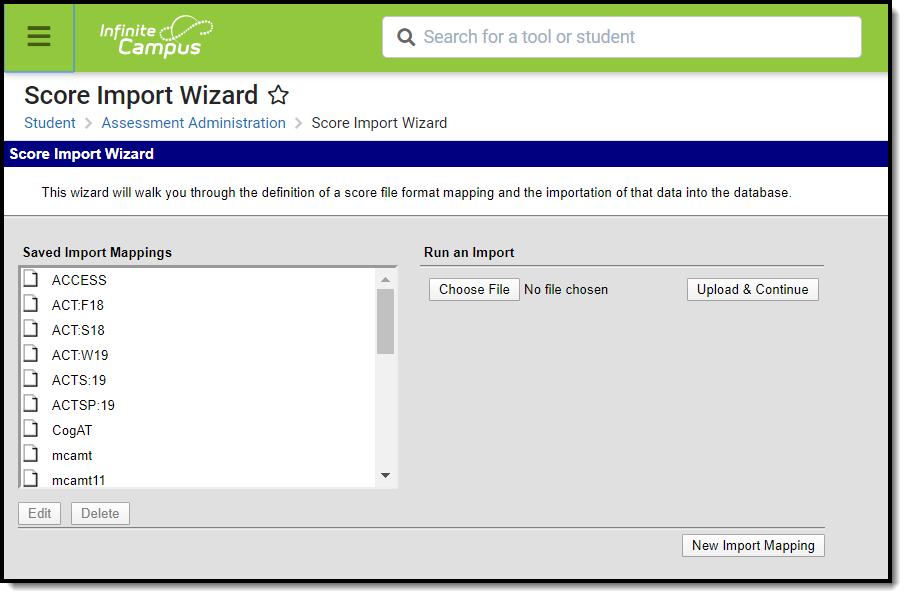 Score Import Wizard
The following import file types are supported:
Format | Definition |
|---|---|
Fixed-Width | This format is usually in the form of a file that has an alotted amount of space for each item. Column widths are static and characters may be padded to meet the formatting restrictions, Data is also left- or right-aligned. The file is often in a TextPad or NotePad document. 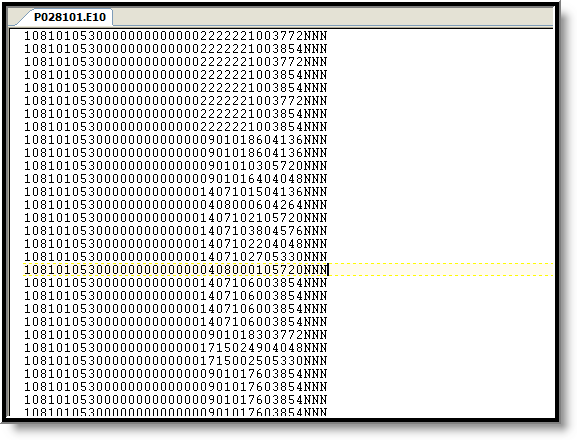 |
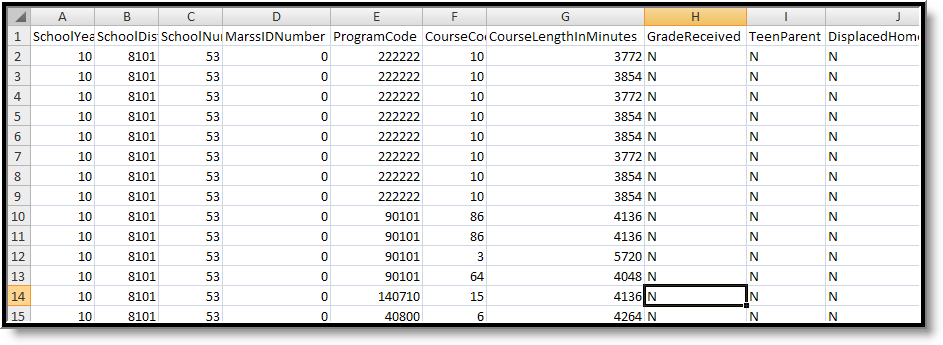
Comma Delimited | This format separates the data by commas. These files can often be opened in spreadsheet form, causing each comma separation to be a new column.
|
TAB Delimited | This format separates the data by using tabs.  |
Before importing any test data through the Score Import Wizard, an assessment structure defining the parameters of the test must have been created through the Tests tool. Refer to the previous sections for more information.
If scores are to be imported into the system, the system administrator must set up the test structure ahead of time, or the scores will not have an assessment format to populate.
Score Import Mapping
This section provides information on mapping imported test scores to the database and fields on a student’s Assessment tool. Before creating a new import mapping, verify the following:
- The test results file exists in one of the accepted file formats (fixed-width, comma-delimited or tab-delimited).
- Parent and child test structures being imported to are already created on the Tests tool and include the options for appropriate score display fields (Scale Score, Raw Score, Percentile, etc). If the option is not selected on the test structure, the option will not be imported.
The test structure can contain more than four total levels, however sub-levels that are nested beyond the third child level cannot be imported through this tool.
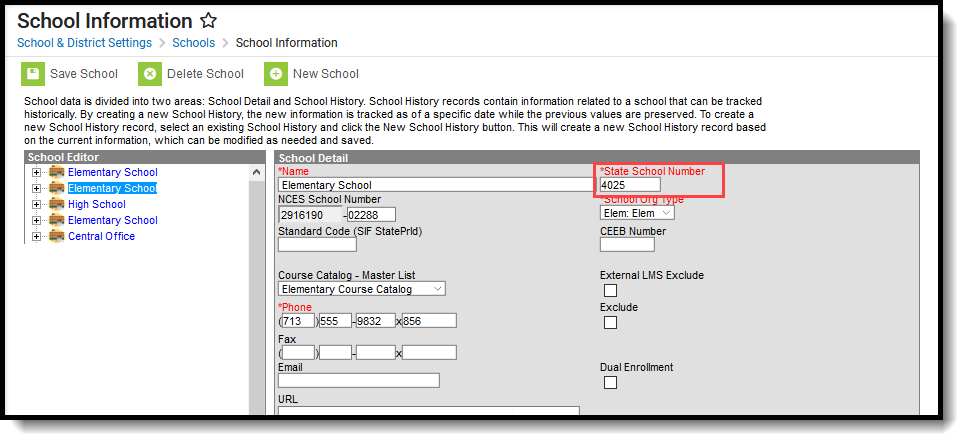
The Scope of the source file depends on the inclusion of a school number. This is the number entered in the State School Number on the School Detail editor. The name varies based on the sate.
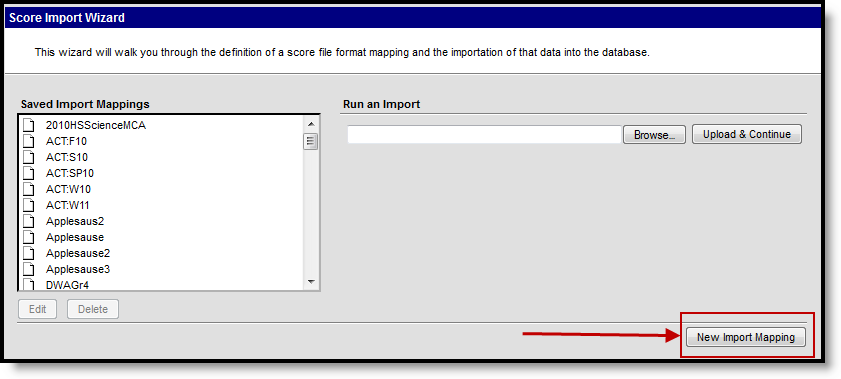
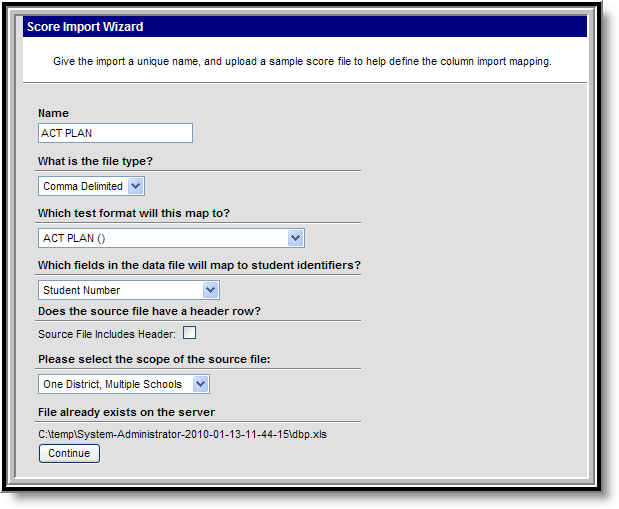
I. Create a New Import
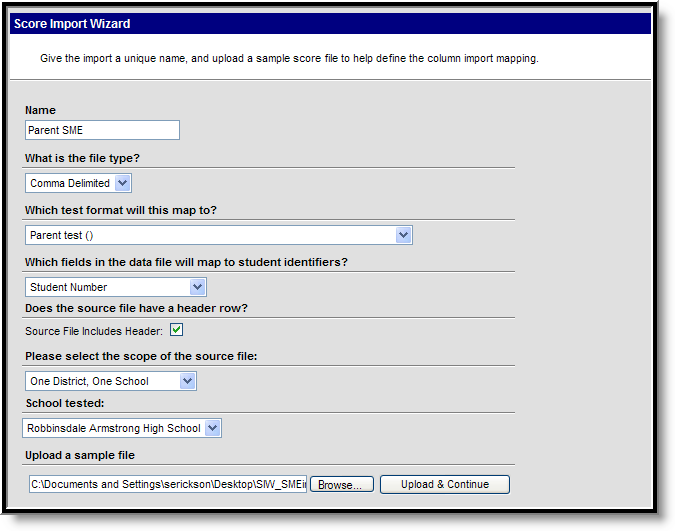
- Click the New Import Mapping button.
- Enter the Name of the import file.
- Select the File Type of the file being imported (fixed-width, comma-delimited, tab-delimited). See definitions of file types above.
- Match the import file to a test structure in the Which test format will this map to? dropdown field. This field will list existing parent test structures from the Tests tool (child test scores can still be imported within the wizard).
- Select the type of identifier to be used in linking test scores to students in the Which fields in the data file will map to student identifiers? dropdown list. Options include identifying test information by state ID, student number, person ID, SSN, OtherID or a combination of first/last name and birthday. The identifier set in this field must exist as a column within the import file.
- If the file contains a header row for identification purposes, flag the Source File Includes Header checkbox. If selected, the wizard will ignore the first row of the file when importing.
- Select the way that contents are organized within the source file from the Please Select the scope of the source file dropdown list:
- One District, One School - If the file contains the assessment results from ONLY one school, select this option. The file would include a school number (located on the School editor, may be called State School Number of Local Number, etc.).
- One District, Multiple Schools - If the file contains the assessment results from more than one school, select this option. The file would include multiple school numbers (located on the School editor, may be called State School Number of Local Number, etc.).
- One District, No School Scope- This option is used when a field that identifies the school is not contained (no school number) in the source file. Test scores for multiple schools within the district may still be mapped.
A school number needs to be identified even if one is not provided in the import file.
- If the One District, One School option was selected from Step 7, also select the applicable schools from the School tested dropdown list.
- Locate the Sample File by selecting the Browse button.
- When found, click the Upload and Continue button.
 New Import Mapping (Step 1)
 New Import Mapping, Steps 2-10
II. Map Import Data Columns to Database Fields
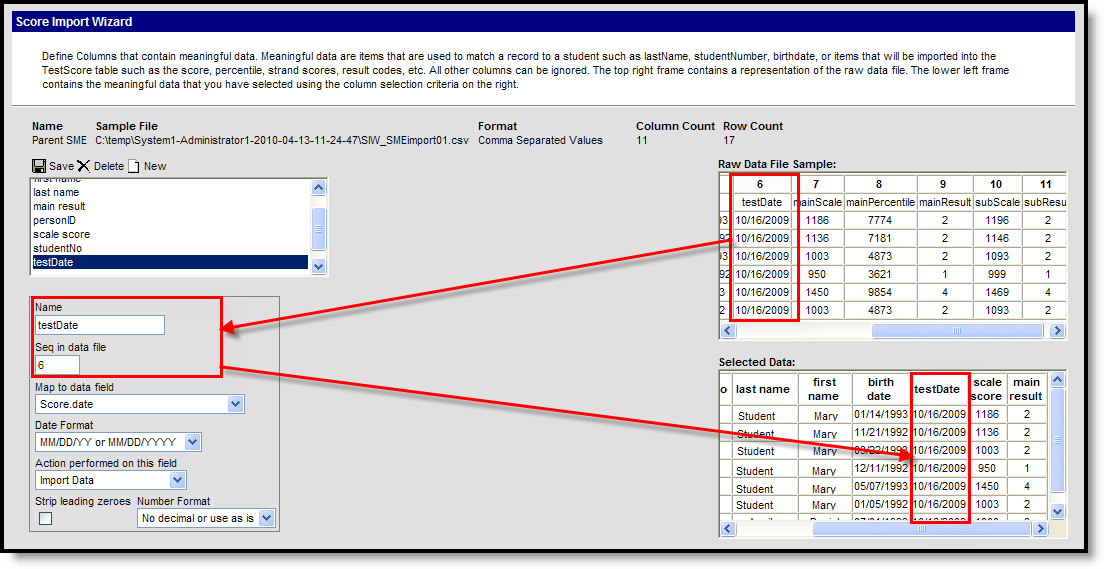
The Raw Data File Sample frame will display columns from the import file. Users will need to map the fields in the raw data file sample (the file that was uploaded) to appropriate fields in the user interface. Meaningful data items should be chosen here - last name, first name, student identifiers, etc., including the score fields.
A bold number will appear at the top of each column, for identification purposes. This number should be entered in the Seq in Data File field when the data from that column is mapped to Campus.
 Score Import Wizard - Column Mapping
Note the maximum field lengths of the fields being added to the import. If a value exceeds that maximum length, an error is returned and the import does not complete.
Refer to the Assessment Schema available on the Community. Field lengths are included in the gray text to the right side of the table.
- Select the New button from the left-hand side of the screen. This will display a place to enter data fields.
- Enter a Name for the field. This name should be based on the Raw Data File Sample on the right. It does not have to be an exact match of the data sample (if the file sample reads "bdate", the name can be "birth date").
- Enter a Sequence in data file number. If the birth date field in the sample is 3, enter a 3 in this field.
- Select from the Map to data field dropdown list the field to which to map the data. This option is used as a matching tool when the file is imported. This list of options is based on entered student data and the test structure chosen on the first screen of this wizard. See the table below for definitions.
- If the field is a date field, select the appropriate Date Format from the dropdown list.
- Select the appropriate Action to perform on this field. Depending on the data field chosen in Step 4, the options here will vary. See the table below for definitions of available options and when to choose which option.
- If the field is numeric (e.g., scores, results, percents), determine if leading zeros should be stripped from the import. If yes, mark the Strip leading zeros checkbox.
- Select the Number Format to use for the field.
- Click the Save button after entering data for each field.
Repeat these steps for each column that needs to be mapped.
When a column from the data file has been mapped to a Campus database field, it will appear in the Selected Data frame.
Map Student Identifiers
The student identifier field is the link that allows importing test scores to student records. Correctly importing/linking the student identifier is vital to the success of the import.
The student identifier specified on the previous wizard screen must be the same identifier that is actually mapped on this import screen.
.png) Map Student Identifiers
Map Student Identifiers
Types of student identifiers are as follows:
- State ID
- Student Number
- Person ID
- Last Name, First Name, Birth Date
- SSN
- Other ID (often used for NASIS ID)
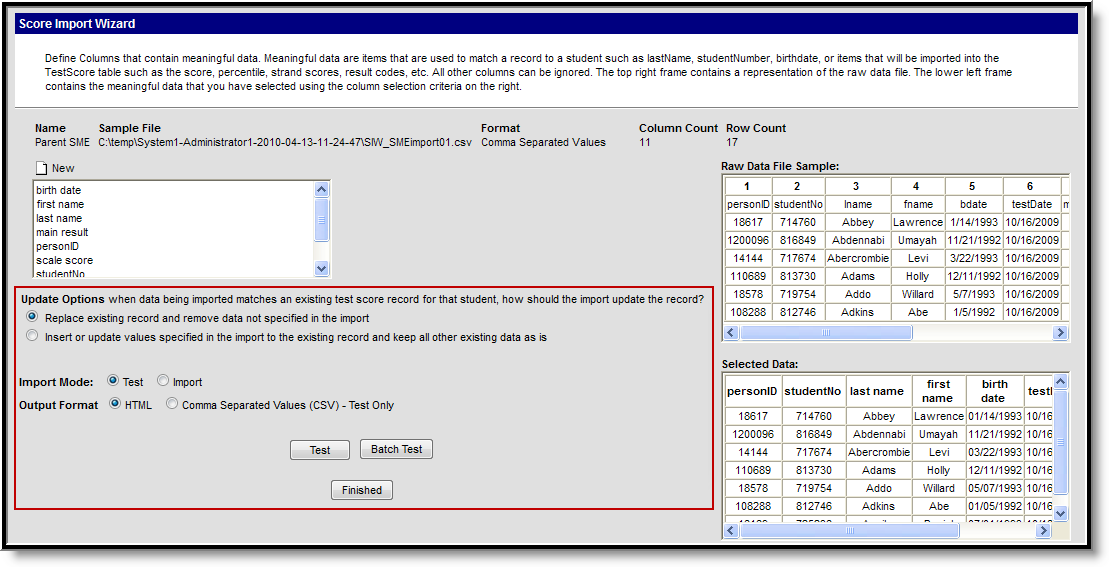
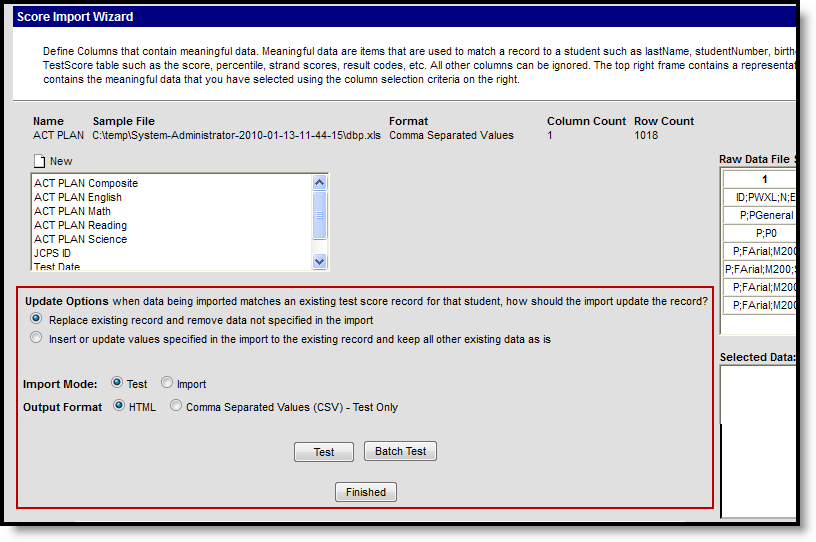
III. Update Options
Import formats are automatically saved for future use. The test file can be uploaded again after additions, corrections, or adjustments are made. When the data from the Raw Data File Sample has been mapped to the selected data fields, the information can now be imported. The data entered can replace existing data or the data can be inserted and update existing information.
 Import Data
- Determine the proper Update Option:
- Replace existing record and remove data not specified in the import - This is the default option which replaces existing records and removes data not specified in the import.
- Insert or update values specified in the import to the existing record and keep all other data as is - This option will insert or update values specified in the import for existing records and keep all other existing data within Campus as is.
- Determine the appropriate option and select an Import Mode:
- TEST the import prior to importing to review any errors or warnings that may occur. This option will not write any data to the database.
- IMPORT the file without reviewing any errors or warnings. This will write data to the database.
- Before modifying or adding data it is important to perform a Batch Test or Batch Import(depending on the Import Mode selected). This process is recommended when testing or importing large files, such as files of over 3000 scores. If a file is larger than 3000 scores, a warning message will appear requesting that the import be run in batch mode. When the process is complete, a message will appear in the user's Process Alerts.
- When the Import Mode of Test is selected, users also have the option of selecting the Output Format of HTML or CSV. This selection is the way in which the test information will generate for review. No Output Format is needed when importing files.
It is recommended that a TEST be run on the import prior to the actual importing of data. This will reduce the amount of cleanup action needed after the assessment data has been imported.
When testing, a report will display listing the potential issues. An import may be run more than once; however, a new record may be added to the student’s Assessment tool each time the import is run.
Users should always verify that assessment info has imported by navigating to the Assessment tool of a student (whose data should have imported).
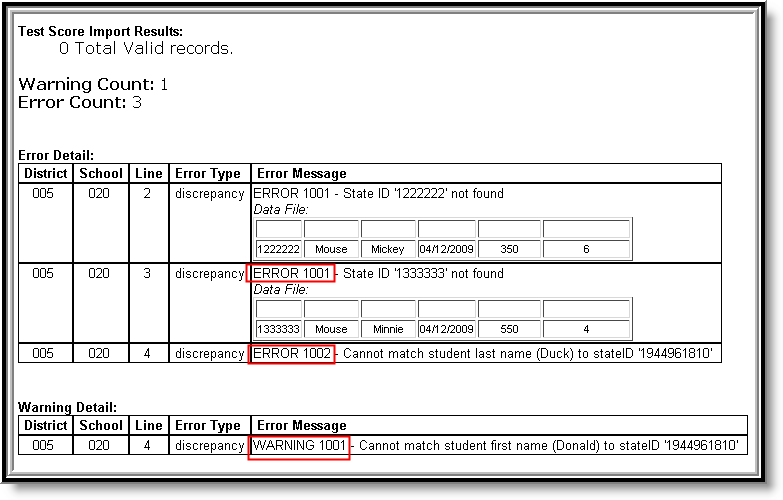
Types of Errors
Most issues will fit into one of the following categories:
- Ambiguity – Multiple student matches found or multiple records in the source file for one student.
- Discrepancy – No match or partial match found.
- Exception – Invalid value or format of data to be imported. Will also occur if there is a student found who does not match the selected school(s) of the import. For these exceptions, error messages will be returned indicating an invalid value for a specific field was found and will instruct the user on the appropriate format.
 Import Errors
Reasons for Import Failures
An import will immediately fail if any of the following are true:
- Import is missing the data file to be imported.
- Import is missing a reference to the school number when import has been set to "One District, Multiple Schools" in the Please select the scope of the source file field.
- Import is missing mapping elements (e.g., the Which fields in the data file will map to student identifiers or Which test format will this map to field). At least one student identifier must be included in an import. A warning message will appear if one is not selected. User is attempting to run an old import without adjusting for current use (missing scope setting).
- User is attempting to map a districtID/schoolName when not applicable to type of import.
- Import encounters unexpected errors (details will be listed in the error details).
- A test (parent or child) will not import unless at least one of the following fields contains a value (is not NULL):
- Scale Score
- Raw Score
- Percentile
- Percent
- Normal Curve Equivalent
- Result
- Invalid
- Academic Achievement Standard
- custom1
- custom2
- custom3
- custom4
- Length of field has been exceeded. This may be in an error message such as String or binary data would be truncated. Review the maximum field lengths for imported fields. See the Assessment Schema for information on the maximum lengths.
Data Matching Errors
Data from the file being imported must exactly match the student to which it will be mapped. Matching is based on the student identifier selected for matching/mapping when the import is created (i.e., if stateID is set as the identifier on which to match/map data, then stateID is the student identifier).
The import will produce an error if any of the following applies to the attempted match:
- Student identifier could not be found.
- First name does not match student identifier.
- Last name does not match student identifier.
- Date of birth does not match student identifier.
The following fields now allow for imported data to not match exactly (case-sensitive issues, not incorrect data):
- Student Number
- State ID
- Person ID
- First Name
- Last Name
- Birth Date
- Social Security Number
- Other ID
IV. Finalize the Import
After the errors have been reviewed by testing the import and the import has been imported, navigate to the student's Assessment tool to verify the data was indeed imported. The test name that was chosen for the import, along with the mapped fields, should appear in Test name order.
Score Import Wizard Field Definitions and Notes
Column Field | Definition | Notes |
|---|---|---|
Name | User-defined name for the column. | This has no impact on the mapping process and is only displayed in the Score Import Wizard for user reference. |
Seq in data file | Bolded column number that identifies the column that will be imported. | From Raw Data File Sample frame. |
Map to data field | The key Campus field to which column data will be imported. | Available fields will vary, depending on the test selected. Mapping fields will include student and test score elements. |
Date Format | The format of the date. This field tells the system how to interpret the date from the source file.
Date fields that are blank or null will still be imported, unless it is a student identifier field. | This field only displays when the Map to Data field has a date element selected. |
Action performed on this field | Manner in which Campus should process the import. The following options will only appear when applicable to the type of data selected in the Map to data field field. | N/A |
Import Data | Standard setting for score fields. This will import the column’s data to the mapped Campus field. | |
Match to student data | This will look for a match of the column’s data. If an exact match is not found, a suggested match will be displayed on the Test report. | |
Match to first _ characters in name | This option will only display when the Map to Data Field field has the student.lastName, student.firstName or student.middleName selected. | |
Calculate value using grading scale | This calculatea the grading scale as defined by the user in the Result Statuses editor of the Test tool specifically created for this test.
| |
Enter date for all students | This option will only display when the Map to Data Field field has a date element selected. When this option is selected, the user can enter the same date for all students in the Score Date field. | |
Number of characters to Match On | The number of characters required for the system to assume a name match, starting from the the first character of the specified name field. | This option allows all student test results to be imported – even when the vendor import file inadvertently cut off part of a student’s name (e.g., name exceeded maximum allowed field length). |
Score Date | The date the test was scored, as entered by the district. The date entered in this field is mass-assigned to all students of the import, in lieu of importing individual dates. | This field will only display when the the Enter Date for all students option is selected from the Action performed on this field field. |
Strip Leading Zeros | If selected, checkbox indicates that upon import, Campus will remove all zeros preceding the column’s value. | EXAMPLE: A column value of 0.45 will import to Campus as .45 and a value of 0003849 will import as 3849. |
Number Format | Format for importing column decimal values. Primary suggested use for this element: to change column values existing as percentages to decimal values. | N/A |
No decimal or use as is | This imports the number as it exists, regardless of whether there is a decimal or not. No rounding will occur. (E.g., 18.9 imports as 18.9) | |
Implied decimal 0.0 | This imports the numeric value as two numbers, rounding to the first decimal place. (E.g., 18.9 imports as 1.9) | |
Implied decimal 0.00 | This imports the numeric value as three numbers, rounding to the second decimal place. (E.g., 18.9 imports as .19) | |
Implied decimal 0.000 | This imports the numeric value as four numbers, rounding to the third decimal place. (E.g., 18.9 imports as .019) | |
Implied decimal 0.0000 | This imports the numeric value as five numbers, rounding to the fourth decimal place. (E.g., 18.9 imports as .0019) |
Calculate Proficiency Levels in Imports
The Score Import Wizard allows proficiency levels to be calculated from import data, according to academic achievement standards that have been aligned with the test.
- Enter the appropriate data in the Name and Seq in data file fields.
- Select the Score.acctProfLevelItemID element from the Map to data field field.
- In the Action performed on this field field, select the Calculate value using grading scale option. The data from the import will be calculated and imported according to existing levels on the Academic Achievement Standards tool that have been mapped to the test.
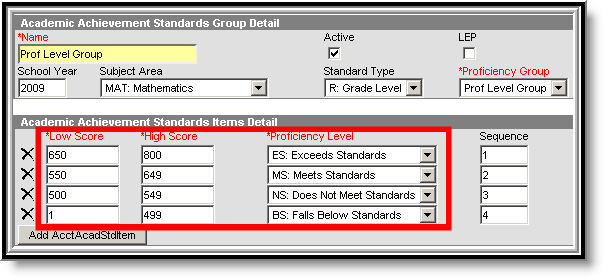 Academic Achievement Standards
Multiple-Tiered Test Structure Imports
For a multiple-tiered test structure (grandparent, child, grandchild, etc.), existing test scores will not be overwritten with the import of a new test. A portion of the test structure can be imported or the entire test structure can be imported.
When importing a portion of the structure, only values for a designated test will be imported.
Fields for each sub-test can be found below the standard fields.
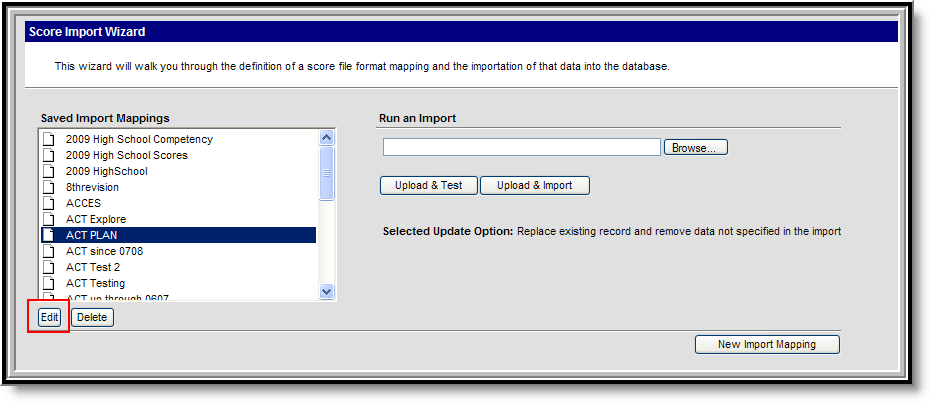
Reuse Saved Import Mappings
Every new import mapping is saved. Saved import mappings appearing in the list of imports on the Score Import Wizard main page may be reused. The user should be careful that an import mapping does not update currently existing scores, if it should not do so. The user may need to modify and re-save the test as a preventative measure.
 Reuse Score Imports
If the import does not have the same number of columns as the first import, it will error out.
Edit and Update Saved Imports
- Select the saved template to reuse in the Saved Import Mappings list and click the Edit button.
- Review the entered information for the chosen file.
- Determine if the file has a source file and header row, and mark the Source File Includes Header checkbox accordingly.
- Select the Scope of the source file from the dropdown list. Options are One District, One School, One District, Multiple Schools and One District, No School Scope.
- If Scope option chosen was One District, One School, select the appropriate school from the School tested dropdown list. This field does not appear with other scope options.
- Locate the file to be import into this template by clicking the Browse button in the Upload Sample file field. Once found, click the Upload & Continue button.
- Test the import by clicking the Upload & Test button.
- Map the column names and data as done previously.
- Determine the appropriate Update Options to perform when the data is imported. The following options are available:
- Replace existing record and remove data not specific in the import.
- Insert or update values specified in the import to the existing record and keep all other existing data as is.
- Choose either the Test or Import buttons, depending on desired testing. It is recommended that a test of the import be done prior to the importing of assessment data, which will reduce the risk of importing errors.
- Click the finished button when complete.
- Verify that the import was successful by checking for expected results on several students’ Assessment tool.
The Score Import Wizard will recognize when an appropriate file already exists for editing or updating a saved import. When such a document exists, after selecting the correct Saved Import Mapping, the file name will appear in the Run an Import section. Clicking Continue will allow the user to bypass the Import Mapping step and move directly to Testing and Importing step.
 Edit Score Import Mappings
 Import Mapping Options
 Import Options
