Tool Search: Office Visits
The Office Visits tool allows a school to track the time and date a student entered the health office, when the student left, and the reason the student was there. From this tool, a district can establish a care pathway by documenting any complaints, medications, treatments, observations, interventions, or discharges related to a student’s health office visit.
All complaints, treatments, observations, interventions, and discharges are predefined by the district to assure that consistent and predictable care is offered for all students. Medication records are created for all medications a student may have administered at school.
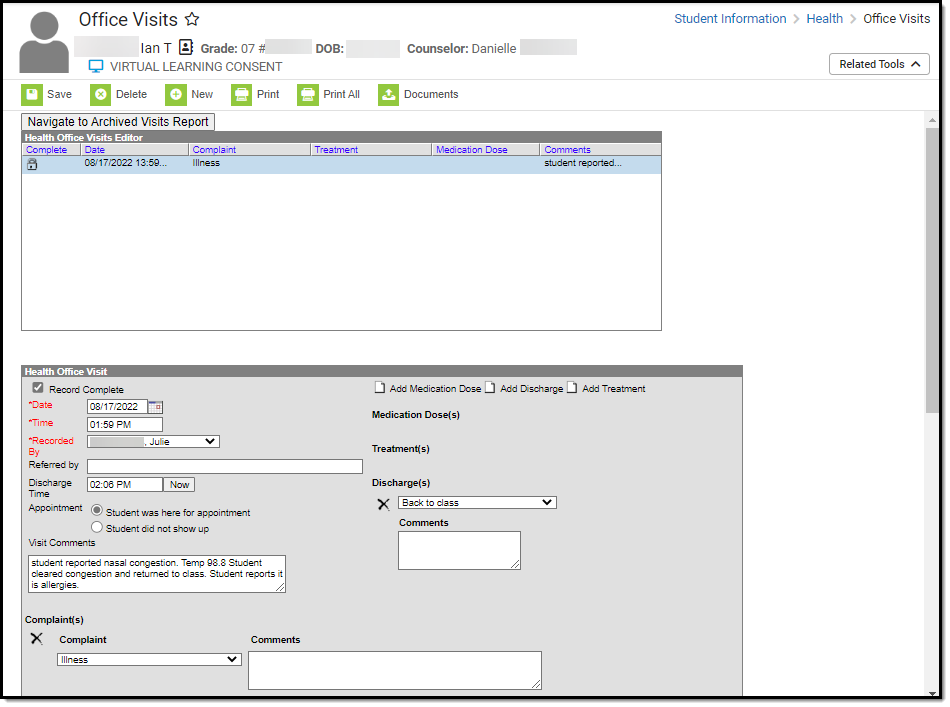 Health Office Visits Tool
See the Office Visits Tool Rights article for information about rights needed to use this tool.
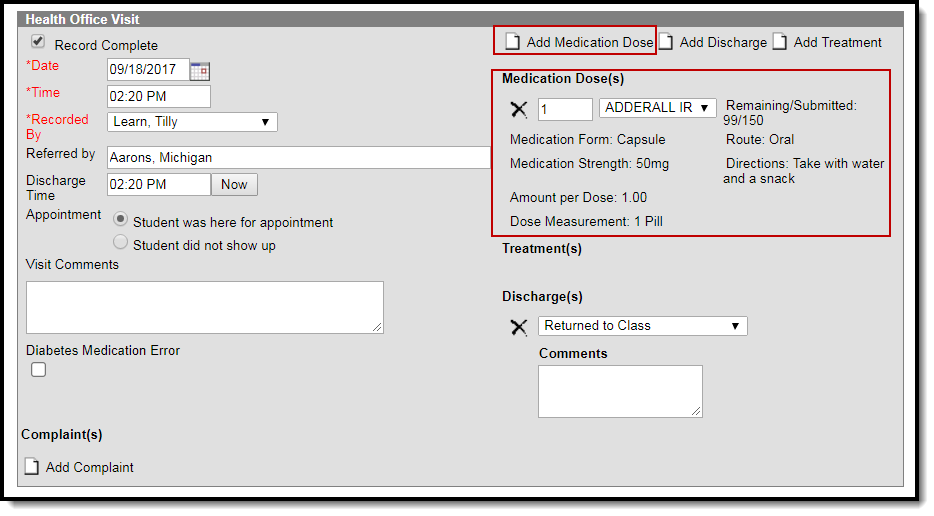
Medication information, including Remaining/Submitted doses, Medication Strength, Medication Form, Route, Directions, Amount per Dose, and Dose Measurement fields will be automatically populated from the Medications tool for scheduled visits or when Add Medication Dose is selected. These items are not editable from the Health Office Visits tab.
The following instructions describe how a health office visit is entered when appointments are not scheduled. See the Health Office Calendar for information on processing scheduled health office visits.
- The Recorded By field is populated based on the Health checkbox on the staff person's District Assignment record. Because of this, a school must be selected in the Campus toolbar.
- When multiple complaints are assigned to one health office visit, observations and interventions are attached to the correct complaint.
- Users who do not have Locked Health Office Visit tool rights are allowed to edit unlocked health office visits and view (but not edit) locked health office visits.
Enter a Health Office Visit
- Select the New button near the top of the tab. A Health Office Visit window will appear near the bottom of the page.
- The Date and Time fields will auto-populate with the current date and time. If this is incorrect, change the time and date accordingly. Time entries of 12 will populate as 12 PM.
- Enter the Recorded By field using the dropdown list and select the appropriate name. This field will default to the current user. Only staff with a Health district assignment will appear on this list. If the staff person has a Health License designation on the District Assignments tool, this title also displays at the end of the person's name (i.e. Smith, Joe: RN).
- In order for an office visit to be considered to have occurred, not just scheduled, a person must be selected in the Recorded by dropdown.
- When entering a new office visit, the Recorded By field displays the user that is currently logged in. When editing an existing office visit, the Recorded By field will display the person who originally entered the visit.
- Staff district assignments must be active to appear in the Recorded By dropdown list. On a saved Health Office Visit, if the staff member's district assignment has ended, the date range of the district assignment will appear next to the staff member's name. For example: Johnson, Mary (01/01/2009 - 01/01/2010).
- The Referred by field can be used to track who sent the student to the Health Office. This field allows the entry of up to 50 characters and can be used in an Ad Hoc filter.
- Enter a Discharge Time by manually entering a time or by clicking the Now button, which populates the current time.
- Select the Appointment option; either Student was here for appointment or Student did not show up.
 No Show Reason Dropdown
When the Student did not show up option is selected, the No Show Reason dropdown will display if it is not hidden. The option to hide/unhide the field, edit the display name and values populated in the dropdown can be accessed in the Attribute/Dictionary at System Administration > Custom > Attribute/Dictionary > HealthVisit > No Show Reason. See the Attribute Dictionary documentation for additional information.
- Enter any Visit Comments.
- Optional: Mark the Diabetes Medication Error checkbox.
The option to hide/unhide the field and edit the display name can be accessed in the Attribute/Dictionary at System Administration > Custom > Attribute/Dictionary > HealthVisit > Diabetes Medication Error. See the Attribute Dictionary documentation for additional information.
- Select an Administered by option from the dropdown if desired.
The option to hide/unhide the field, edit the display name and values populated in the dropdown can be accessed in the Attribute/Dictionary at System Administration > Custom > Attribute/Dictionary > HealthVisit > Administered by. See the Attribute Dictionary documentation for additional information.

Add a Complaint
- Select the Add Complaint button. The add Complaint(s) fields appear on the bottom of the screen.
- Select the appropriate complaint from the Complaint drop-down list.
- Enter any Comments to be associated with the complaint.
Comments attached to a complaint can be written in a word processing document and then copy/pasted into the Comments section.
- Attach Observation(s) and Intervention(s)to the Complaint. This step is optional.
- To attach an observation or intervention, select the Add Observation or Add Intervention button within the Complaint(s) section.
- Select the appropriate observations or interventions to attach.
- Enter any comments related to the observation or intervention.
- If a student’s health office visit has been completed and requires no additional information or modification by health staff, check the Record Complete check box located in the left-hand corner of the Health Office Visits editor. This places a lock icon next to the record under the Complete section of the Health Office Visits Editor.
- Click the Save button.
Complaints are created in the Health Complaint Type tool. Only active complaints are available for selection.
Add Medication Doses
Note: the Medication doses are NOT reduced until the day of the visit, not the day the health office visit record is created.
- Select the Add Medication Dose button near the top of the Health Office Visits editor to attach medication dose(s) to the visit. This will add the Medication Dose(s) field to the right hand side of the window.
- Enter the number of doses in the left field and select the appropriate medication by using the dropdown list.
- Users may add additional medication doses for different medications by clicking Add Medication Dose at the top of the window.
- Select the Save button.
The medication dropdown is populated by the student’s current medication(s). See the Medications tool documentation for additional information.
Dosage Amount Warnings
Users are only allowed to enter medication doses for the quantity available, shown as Remaining Doses on the Medications tool. If a dose amount is entered beyond what is available, a warning message will appear with the number of available doses. The medication dose field will be cleared, requiring the user to enter a new medication dose. Health Office Visits can be saved without entering dose or medication information.
A dose amount must be entered if a medication is selected. If not selected, a warning message appears indicating the dose value is required.
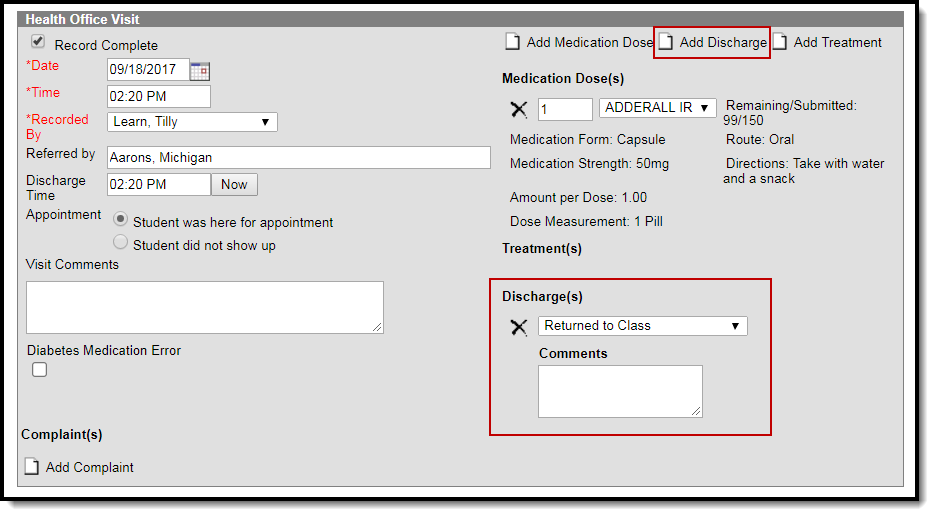
Add a Discharge
Discharge options are created in the Health Discharge Type tool.
- Select the Add Discharge button near the top of the Health Office Visits window to attach a discharge to the visit. This will add Discharge(s) options to the right hand side of the window.
- Select the appropriate Discharge from the dropdown list.
- Enter any additional Comment related to the discharge in the comments field to the right of the dropdown.
- Users may add additional discharges by selecting the Add Discharges button at the top of the window.
- Enter a Discharge Time if appropriate by clicking the Now button or entering the actual time the student left the Health Office. The entered discharge time must be after the time the student arrived at the Health Office. If it is not, a warning message displays indicating such.
- Select the Save button if there is no additional information required.
Discharges are sorted alphabetically in the dropdown list.
 Add Discharge
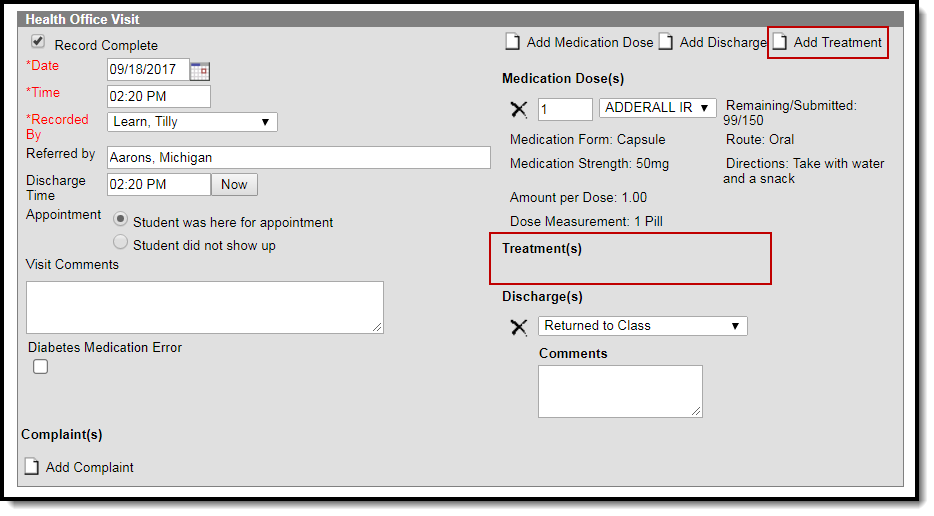
Add a Treatment
Treatments for conditions are created in the Treatment List tool.
- Select the Add Treatment button near the top of the Health Office Visits editor to attach a treatment to the visit. This will add Treatment(s) options to the right hand side of the window.
- Select the appropriate treatment from the drop-down list. Note that the options in the list display as Condition: Treatment
- Users may add additional treatments by selecting the Add Treatments button at the top of the window.
- Select the Save button if there is no additional information required.
 Add Treatment
Multiple treatments can be assigned to a single visit. All treatments are visible (upon saving the record) in the Health Office Visit Editor.
Generate the Individual Health Visits Report
Users can review data in either a PDF or DOCX format from the Health Office Visits tab for individual students by clicking the Print button or the Print All button.
 Student Health Office Visit Report Format Options
Option |
Description |
Example |
|---|---|---|
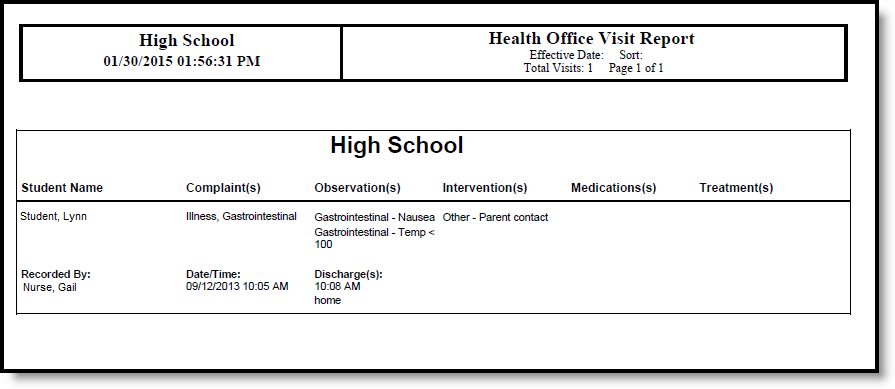
The printed report includes details for a single visit selected on the Health Office Visits Editor. |
| |
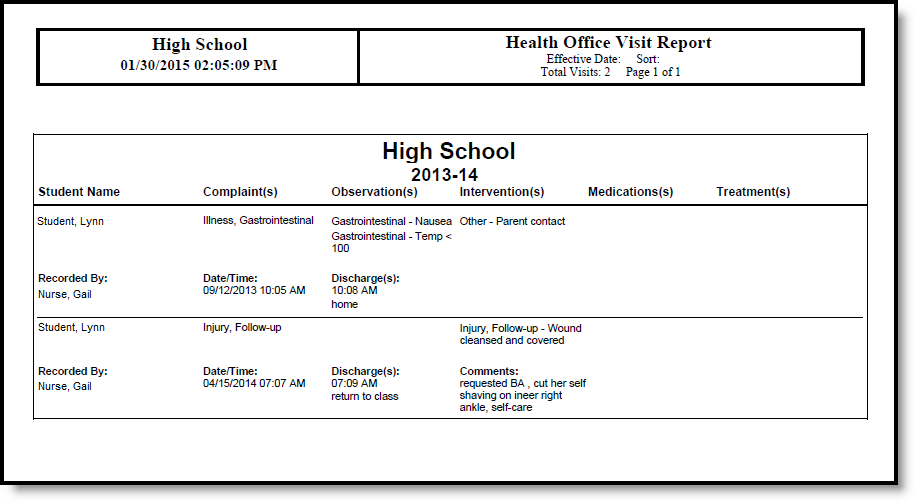
Print All |
The printed report includes a summary of all the student's Health Office Visits for the designated Calendar. |
|
Upload and Manage Health Documents
The Office Visits tool allows you to store, manage, and view all health-related documents associated with the selected person.
To Upload a New Document:
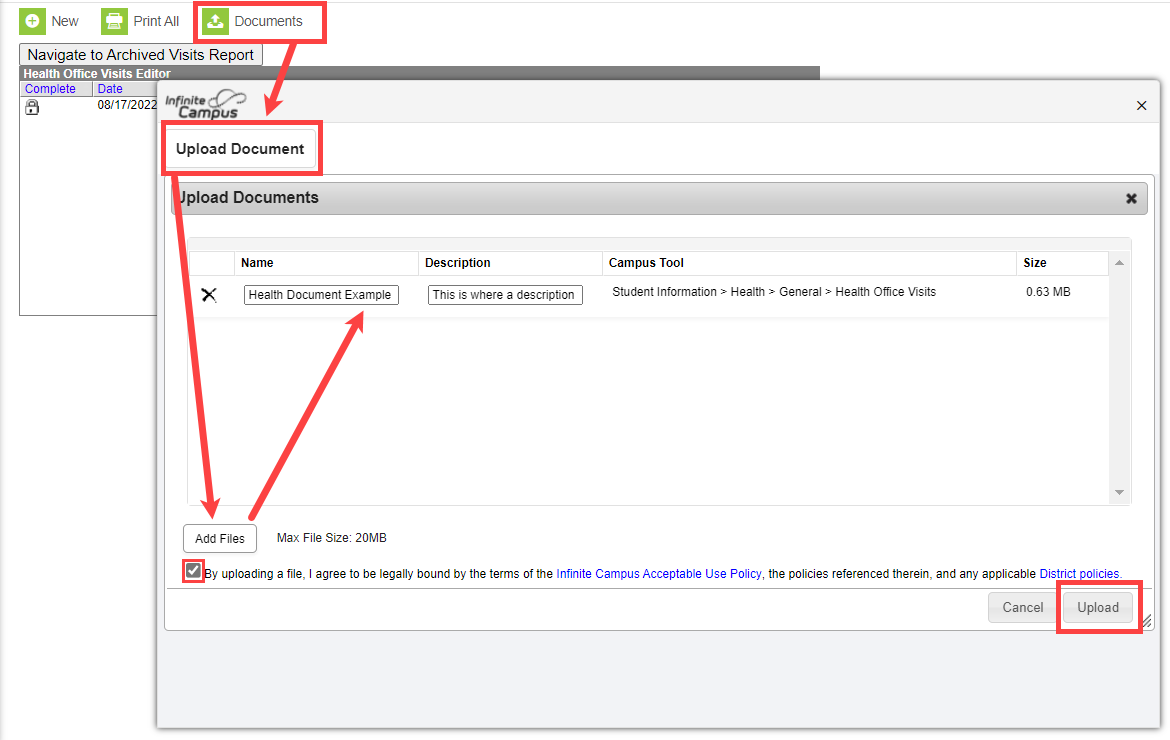
- Click the Documents button. A separate window will appear, containing an Upload Document button and the Documents List.
- To begin uploading a new document, click the Upload Document button and select Add Files.
- Locate the file on your local hard drive or network and click OK.
- The file will appear in the Upload Documents list. From here you can add a Description (optional), see what tool will be associated with the file, and the size of the file.
- Mark the checkbox in the left-hand corner to agree to the terms of the Infinite Campus Acceptable Use Policy (as well as any district-mandated policies).
- Click Upload. The file is now uploaded and attached to the student where it can be accessed at any time.
 Upload Document
Delete or Edit an Existing File
If you need to delete the file, click the next to the file needing deletion.
If you need to edit file details, click the  icon next to the file. The Edit Document editor will appear, allowing you to edit the file name, description, or replace the file.
Archived Health Visits
Users still have the ability to review data in report format from the Health Office Visits tab for individual students. If your district was using Campus before June of 2010, you may have health data that exists in health tables that are no longer used. This report pulls that data. This report will not report data from after June 2010.
This report can also be generated in batch form by generating the Archived Health Visits Report.
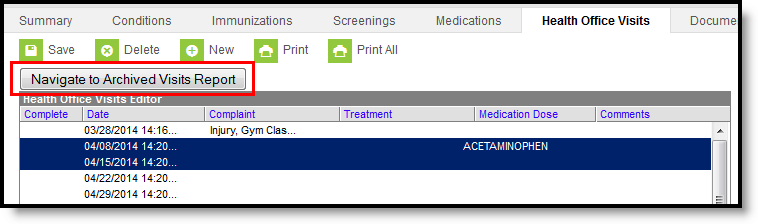 Archived Health Visits Report
 Archived Health Visits Report - Individual Student
Generate the Archived Health Visits Report
- Enter a Start Date for the report in mmddyy format.
- Enter an End Date for the report. These dates are used to find health visits between the entered dates.
- Click the Generate Report button. The report will appear in a new window in PDF format, listing the student's past health visits.
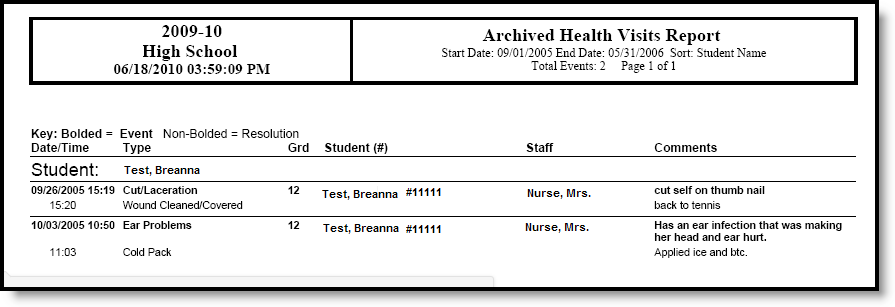 Individual Student Archived Health Visits Report

