Tool Search: Failing Assignment Scheduler
The Failing Assignment Scheduler allows districts to select a time when notifications regarding failing grade assignment messages will be sent to parents, based on the Start Dates and Due Dates of assignments. This eliminates the possibility of sending failing assignment information to those students that may have already received a notice or are no longer in the class.
This feature uses data entered by teachers in the Grade Book to send messages to appropriately marked parents and guardians, so those individuals are aware and can take action to enhance the student's experience with the course.
 Failing Assignments Scheduler
See the Failing Assignment Tool Rights article for information on available tool rights.
Assignments marked as one of the following will not be included:
- Exempt
- Dropped
- Inactive
- Hidden
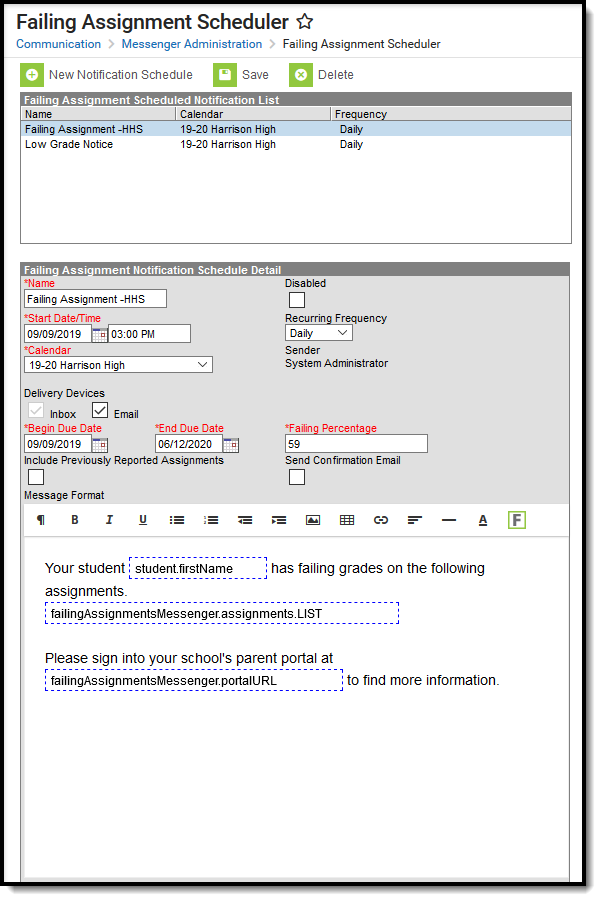
Failing Assignment Scheduler details
The Failing Assignment Scheduler tool is in two sections. The first section, the Failing Assignment Schedule Notification List, displays existing and saved failing assignments. The second section, the Failing Assignment Notification Schedule Detail, notes the specific options included in each notification. Edits can be made by selecting a saved notification and updating the details.
The following table provides a definition of the fields included in the scheduler.
Field | Description |
|---|---|
Name | Displays the name of the message notification that will be sent. This is a required field. |
Disabled | Determines if the message is active. If marked, the message is not active and will not be sent at the designated time. |
Start Date/Time | Determines the date and time the messages will be sent. Dates are entered in mmddyy format or use the calendar icon to select a date. Time is entered in standard HH:MM format. This is a required field. |
Recurring Frequency | Determines the interval at which the messages are sent. Options are:
|
Calendar | Indicates the calendar from which data is pulled in the message and defaults to the calendar selected in the toolbar. This is a required field. |
Sender | Notes which user has created the message. |
Delivery Devices | Indicates how the recipients will receive the message.
|
Caller ID | Lists the phone number that will display (if Phone is selected as a Delivery Device) when the message is sent. This field populates with the number entered on the School tool for the calendar selected. This is a required field. |
Begin Due Date | The first date to include due assignments. The message will list assignments with this due date through the end due date. This is a required field. |
End Due Date | The last date to include due assignments. The message will list assignments with the beginning due date through this date. This is a required field. |
Failing Percentage | Lists the percentage that indicates a failing grade (i.e, 50% is F). The message will be sent to students who received this percentage or lower. This is a required field. |
Include Previously Reported Assignments | Once a message for a specific failing or missing assignment is sent, that assignment won't trigger another message unless "Include Previously Reported Assignments" is marked. |
Send Confirmation Email | When selected, a confirmation email will be sent to the sender of the message indicating the message has been sent. |
Message Format | Lists the text of the message. This message can be built using the WYSIWYG editor and Campus Fields that will personalize the message. This displays the body of the message as written in the Grade Messages tool. Do NOT copy attribute fields from another Messenger tool in Campus. The attribute fields are not the same. |
Use the Failing Assignment Scheduler
- Select the New Notification Schedule icon.
- Enter the Name of the Failing Assignment Scheduler.
- Enter the Start Date and Time of this message.
- Select the Recurring Frequency from the dropdown list.
- Select the Calendar with which this message is associated.
- Select the appropriate Delivery Devices.
- Mark the Include Previously Reported Assignments checkbox if previously reported assignments should be listed on this current announcement.
- Enter the Begin Due Date in mmddyy format, or use the calendar icon to select a date.
- Enter the End Due Date in mmddyy format, or use the calendar icon to select a date.
- Mark the Send Confirmation Email checkbox if a message regarding the receipt of messages should be delivered.
- Enter the percentage that qualifies as a failing grade in the Failing Percentage field.
- Review the Message Format.
- Click the Save icon when complete. The Failing Assignment Message is now scheduled to be delivered to the appropriate individuals.
Disable the Failing Assignment Scheduler
To disable a message, select that message from the list of Failing Assignment Schedules. Mark the Disabled checkbox and click the Save icon. This message will no longer be sent.
