Tool Search: Data Extract Utilities
The Data Extract Utilities tools provide an automated data extract tool for transferring data via a flat file from Infinite Campus servers. The tools can also upload Campus data into third-party software.
The following tools are available within the Data Extract Utilities:
See the Data Extract Utilities Tool Rights article for information on available tool rights for the Data Extract Utilities.
Note: When the Date Extract Utility, Data Extract Zip, and Data Extract History tools were combined into one tool (Campus.2539), the previous tool rights did not automatically translate into the tool rights for the combined tool. Admins will have to re-grant tool rights to the Data Extract Utilities.
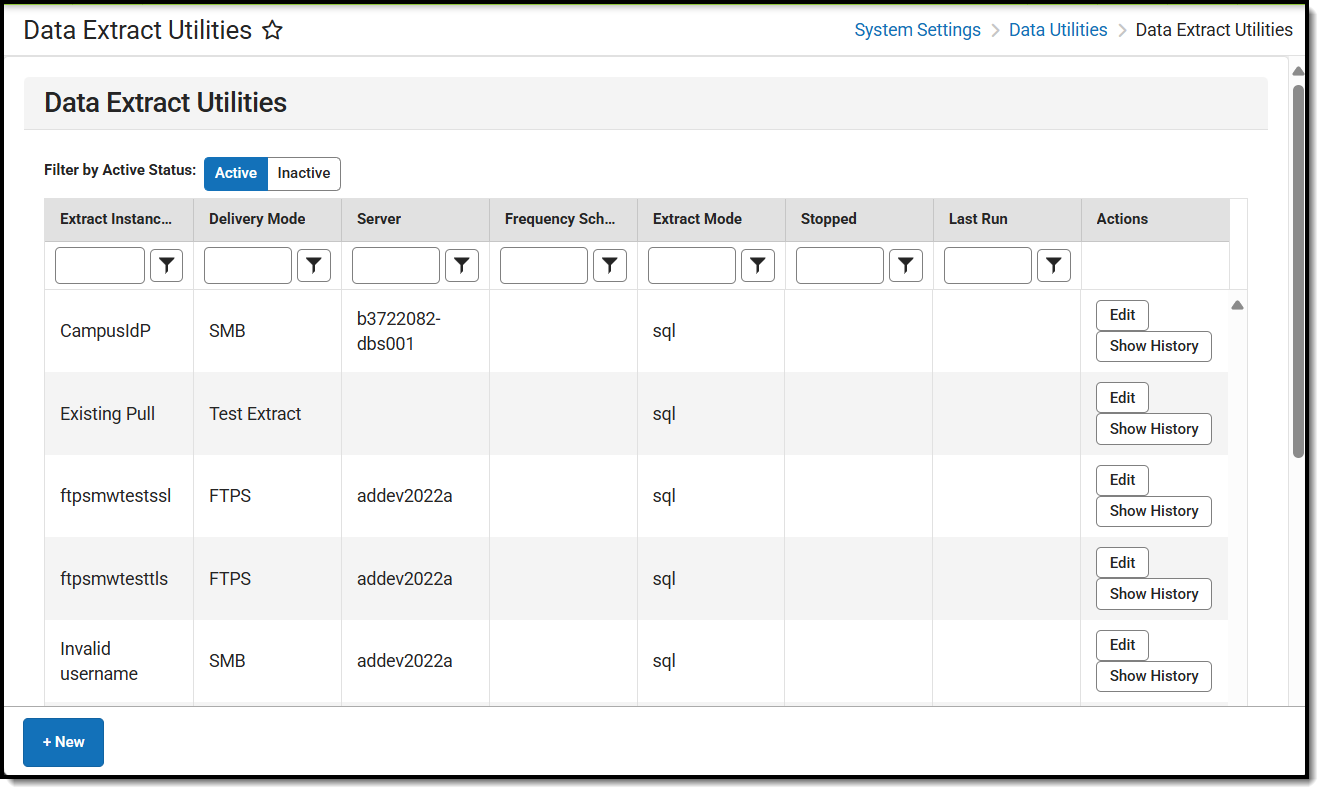
Data Extract Utilities Editor
The following table provides definitions of the data elements available in the Data Extract Utilities Editor.
| Field | Description |
|---|---|
| Extract Instance Name | The name of the Extract. |
| Delivery Mode | The mode in which the extract will be delivered. Options are:
|
| Server | The IP Address of the server connecting to and uploading data from the Data Extract Utility. |
| Frequency Scheduled | Lists the frequency the extract runs. |
| Extract Mode | Displays how the data will be extracted. Options are:
|
| Stopped | Indicates if the extract has been stopped from sending. |
| Last Run | Indicates if the extract was generated successfully the last time the extract was run. |
| Actions | Allows the user to edit an extract or show the history of the extract. |
Data Extract Tool
The Data Extract tool provides an automated data extract tool for transferring data via a flat file from Infinite Campus servers. This tool can also upload Campus data into third-party software.


Data Extract Field Definitions
The following table provides definitions of the data elements available in the Data Extract Editor.
You can remove Social Security Numbers from reporting in the 3 default extracts by setting the parameter @includeSSN bit = 0
Your third-party SFTP server must allow list Campus IPs so traffic can pass. For more information, see this article.
Field |
Description |
|---|---|
Admin/Vendor Provided Data | |
| Delivery Mode | Indicates how the extract will be delivered.
|
| Server | The IP Address of the server connecting to and uploading data from the Data Extract Utility. Your third-party SFTP server must allow list Campus IPs so traffic can pass. For more information, see this article. Limited to 100 characters |
| Path | The location on the destination server where the file will be written. This needs to be an absolute path and include the / upload indicator. |
| Username | The username used to access the destination server. |
| Password | Password used to access the destination server. |
| Port (Default SFTP=22) | Indicates the Port value required to connect to the server.
|
| SFTP Key Exchange | Only applicable if the SFTP Delivery Mode is selected. Indicates you want to use the SFTP Key Exchange for this extract.
If you leave the Password field blank, your extract will authenticate exclusively via passwordless SFTP Key Exchange. If you leave the Password field filled in, your extract can fall back to username/password authentication if your SFTP Key Exchange authentication fails. See the Data Extract Utility SFTP Key Exchange Manager article for more information on this option and process. |
| SFTP Key Exchange Configuration | Only applicable if the SFTP Delivery Mode is selected and the SFTP Key Exchange checkbox is marked. If a key pair has been properly configured and tested within the Data Extract Utility SFTP Key Exchange Manager, select the key to be used for authenticating this extract.
See the Data Extract Utility SFTP Key Exchange Manager article for more information on this option and process. |
| Delivery Configuration | |
| Extract Method | Ad Hoc - This method takes a saved Ad Hoc filter and automatically exports its results to a file (e.g., CSV), then sends the file to a remote server. You can run it on demand or schedule it to run automatically. How It Behaves When Run
Best practice is to save ad hoc queries used for data extracts in a shared user group that includes all users with access to the data extract tool. If an ad hoc is not assigned to a shared group, changes made to the extract by users who do not own the filter can cause scheduled extracts to fail. This also creates risk if the ad hoc owner leaves the district, as the extract may no longer run successfully. SQL - Provides a text area to enter a SQL query. If choosing SQL, enter the text of the query used to generate the file.
Prism - Provides a text area to enter a Prism call. If choosing Prism, choose the Prism call for a PDF report and add the Prism information. This option requires a Firefox browser add-on of Convert Form Methods. |
| User Group to Notify | If an error occurs while using Data Extract Utilities, this group will be notified via a Notifications message. To utilize this functionality, you must have the Error Notification checkbox marked. |
| Error Notification | If marked, any errors that occur will send a notification to the Notifications area of Infinite Campus to all users within the user group selected in the User Group to Notify dropdown list.
|
| Use Data Warehouse | If the district has a Data Warehouse, use that database instead of the live database. |
| File Information | |
| Extract Instance Name | The name of the extract. This name cannot exceed 47 characters. |
| File Extension | Extension of the file.
CSV, HTML, TAB, TXT, and custom file extensions can be added through the Core Attribute Dictionary.
|
| Column Delimiter | Indicates how data in the file will be divided. Options are:
|
| Output File Name | The file name as it will appear in the destination folder. Often, a third-party tool needs/requires this file name. |
| Character Set | Select the character encoding standard used in the file.
|
| File Extract Format | |
| Append Date to Filename | When selected, it includes a date in the file name to prevent overwriting an existing file. Choose the format of the date, either the normal date format of yyyymmdd or the date and time format of yyyymmddhhmmssSS. |
Include Header Rows? |
When selected, a header row will be included as part of the file. |
Include Double Quotes? |
When selected, quotes around each piece of data in the column are included. |
| Data Extract Schedule | |
| Data Extract Schedule | Lists the frequency, date, time, and day of the week the extract runs.
Frequency options include:
If this needs to stop for any reason, mark the Stop Automated Extract checkbox. |


Create a New Extract
The creation of new extracts should be performed only by technical administrators.
- Select the New icon.
- Select Extract and click Submit. The Detail Information section will appear.
- Enter the required fields.
- Choose the other necessary items for adding the extract by populating and marking the appropriate fields, as defined above.
- You should now test your connection to ensure it can successfully reach your server and test your extract to ensure it generates and that data is populated.
- The Test Extract button generates the requested information using SQL or Ad hoc. Data is not written to the database or stored anywhere.
- The Test Connection button checks the connection to the entered server by attempting to write a 1-byte file to the configured location. If it is successful, a success ribbon is displayed; if it is unsuccessful, a pop-up shows the reason the connection failed.
- If both the connection and extract tests are successful, click the Save icon. You can modify the extract to determine when it should be generated.
- If the extract should be run and stored now, click the Run Extract button. Otherwise, the extract will be generated according to the schedule set.
Troubleshooting/Errors
| Error | Explanation |
|---|---|
| Unable to negotiate key exchange
(client: [list of supported algorithms] / server: diffie-hellman-group14-sha1,diffie-hellman-group-exchange-sha1)" |
This error means the SFTP server your Campus site is trying to communicate with does not support the algorithms required by the Data Extract Utility's latest SFTP mode. The issue is that the SFTP server you’re connecting to is only offering up these older key exchange algorithms when your Campus site’s Data Extract Utility client tries to communicate with it:
SHA1 is now considered an insecure key exchange algorithm, so our latest SFTP implementation does not support it.
You will need to contact the third parties/individuals who administer this SFTP server and request that they update their server/SFTP software to support at least one of the more modern and secure key exchange algorithms mentioned in the "client:" part of the error message.
As soon as the SFTP server is updated to support any of the more secure key exchange algorithms, then you'll be able to use the latest SFTP mode for any connection currently receiving this error. Until this update occurs, you'll need to continue using the legacy SFTP mode. |
Data Extract Zip Tool
The Data Extract Zip tool works like the Data Extract tool, allowing users to upload a file to export to a third-party system. Unlike the Data Extract tool, the Zip Tool allows users to upload multiple files to export to a third-party system.
Data Extract Zip Tool Definitions
The following table provides definitions of the data elements available in the Zip Tool Editor.
Field |
Description |
|---|---|
Delivery Mode |
Indicates how the extract is delivered.
|
| Server | A computer that provides client stations with access to files and printers as shared resources to a computer network. Can be an IP address or a server domain name. |
| Path | Indicates the navigation path the user takes to find the server or files. This needs to be an absolute path and include the / upload indicator. |
| Username | Username used to access the destination server. |
| Password | Password used to access the destination server. |
| Port: (Default=22) | Indicates the value required to connect to the server.
|
| SFTP Key Exchange | Only applicable if the SFTP Delivery Mode is selected. Indicates you want to use the SFTP Key Exchange for this extract.
If you leave the Password field blank, your extract will exclusively authenticate through passwordless SFTP Key Exchange. If you leave the Password field filled in, your extract can fail over to authenticating with username/password authentication in the event your SFTP Key Exchange authentication has an issue. See the Data Extract Utility SFTP Key Exchange Manager article for more information on this option and process. |
| SFTP Key Exchange Configuration | Only applicable if the SFTP Delivery Mode is selected and the SFTP Key Exchange checkbox is marked. If a key pair has been properly configured and tested within the Data Extract Utility SFTP Key Exchange Manager, select the key to be used for authenticating this extract.
See the Data Extract Utility SFTP Key Exchange Manager article for more information on this option and process. |
| Delivery Configuration | |
| Student Photo Extract | Creates a zip file of the picture directory. Only files for students with an enrollment record in the selected active school year are included.
When this is marked, the following is not available:
Note: Photos are generated with a [personID].jpg naming convention. This extract can run only between 10 PM and 4 AM, as it can affect system performance during peak hours. This is NOT available in State Edition. |
| Select Extracts To Include | Mark each extract that should be run (queries executed) and then bundled into a single zip file for delivery.
For example, if you have 5 individual data extracts and mark 3 of them, when the zip extract runs, it will run the 3 selected extracts and then put them into a single zip file for delivery.
These options display every instance of the previously created extracts.
This option is not available when the Student Photo Extract is selected. |
| User Group to Notify | This group is notified via a Notifications message when an error occurs while using the Data Extract Utilities. You must have the Error Notification checkbox marked to utilize this functionality. |
| Error Notification | If marked, any errors that occur are sent to the Notifications area of Infinite Campus to all users within the user group selected in the User Group to Notify dropdown list.
|
| File Information | |
| Extract Instance Name | The name of the extract. This cannot exceed 47 characters. |
Output File Name |
File name associated with the extract being generated. Often a third-party tool needs this name. |
| File Extract Format | |
| Append Date to Filename | When selected, includes a date in the file, so as not to overwrite an existing file. Choose the format of the date, either the normal date format of yyyymmdd or date and time format of yyyymmddhhmmssSS. |
| Data Extract Schedule | |
| Data Extract Schedule | Lists the frequency, date, time and day of the week the extract runs.
Frequency options include:
Note: When Student Photo Extract is marked and the Frequency is set to Weekly or Monthly, the Start Time must be between 10:00 p.m. and 4:00 a.m.
When this needs to stop for any reason, mark the Stop Automated Extract checkbox. |


Create Zip Tool Extract
The creation of new extracts should be done by technical administrators only.
- Select New.
- Select the Zip Extract option and click Submit.
- Enter the required fields.
- Choose the other necessary items for adding the extract by populating and marking the appropriate fields, as defined above.
- Click Save when finished. Additional modifications may be made to the extract to determine when the extract should be generated.
At this time, a user can select the available buttons to test the server connection or run the extract.
- The Test Connection button checks the connection to the entered server by attempting to write a 1-byte file to the configured location. If it is successful, a success ribbon is displayed; if it is unsuccessful, a pop-up with the reason the connection failed is displayed.
- The Run Extract button runs the extract, sends and stores the file where needed (in case of an issue with an auto-run extract).
Create a Student Photo Extract Zip Tool
- Select New.
- Select the Zip Extract option and click Submit.
- Enter the required fields.
- Mark the Student Photo Extract checkbox.
- Choose the other necessary items for adding the extract by populating and marking the appropriate fields, as defined above.
- In the Data Extract Schedule, choose the desired Frequency.
- Click Save when finished. Additional modifications may be made to the extract to determine when the extract should be generated.
A user can select the available buttons to test the connection to the server or generate the extract.
- The Test Connection button checks the connection to the entered server by attempting to write a 1-byte file to the configured location. If it is successful, a success ribbon is displayed; if it is unsuccessful, a pop-up shows the reason the connection failed.
- The Run Extract button runs the extract, sends and stores the file where needed (in case of an issue with an auto-run extract).
When the Student Photo Extract zip file has been successfully sent to the destination server, or when an error occurred generating the zip file, it is removed from the app server.
Data Extract History
The Data Extract History tool lists the available extracts that were run and whether they successfully completed or if there was an issue with completion. This is a read-only view and can be used for troubleshooting.
 Show History
 Data Extract History
Create an Extract for an Outside Vendor/System
See the links below for guidance on creating extracts for outside vendors/systems.
